WINDOWS 7/8 instruction guide for your Printrbot printer and computer software
|
|
|
- Lizbeth Burns
- 8 years ago
- Views:
Transcription
1 Software To start printing with your Printrbot Simple 3d printer, you need to download 3 pieces of software and two digital models (STL files). 1. The teensy Serial Driver. This connects the printer to your computer and can be downloaded using your web browser from 2. Repetier Host v1.04. This controls your printer and slices your 3D model in preparation for printing. The URL is You may make a donation to the open source project if you wish. 3. A 3D CAD program to allow you to create your models. There are many possibilities including some free versions. Two such free versions are Sketchup Make downloaded from or TinkerCad that is a web based program located at 4. From download the firstcube.stl and fanshroud.stl files to your computer. These will be your first and second prints respectively. Note that at the time of writing (Sept 2014, the printerbot.com site does have very presentable software set up guides for the above programs. However they refer to old obsolete versions of repetier.com that have a slightly different user interface so do not use them unless they now refer to versions 1.04 or above. Before you start Please unbox your Printrbot and power it up. Verify that the green light on the circuit board underneath the unit is on. DO NOT PLUG IN THE USB CABLE YET. Installing the Serial Driver The serial driver must be installed as an administrator. Download the serial driver file. There may be a small delay depending on the speed of your internet connection or computer. You will see the following dialog box. Follow the on screen instructions after selecting Run. This software will create a virtual serial port for your printer. Page 1 of 23


2 You will see the following dialogue boxes. Click on Install in the dialog box Click on Install Click on Done Page 2 of 23


3 This dialogue may be displayed Select Cancel if displayed. Ensure that the power is connected to the printer. If you are using and ATX power supply and don t know how to connect it to the printer please see appendix B. Plug the USB cable into your printer and then a USB port on your computer. The USB cable will only fit in one way into the Printrbot so do not try to force it into the socket of it does not fit. When the USB cable is connected, the driver will be installed and configured as a COM port. The number of the port (E.g. COM 3, COM 4 etc) will depend on your computer configuration. The following dialogue boxes will be displayed follow any onscreen instructions Page 3 of 23


4 Click on Yes Click on Close There may be a delay during the installation due to the speed of your internet connection or your computer. When the driver is finished installation, you will see the dialogue box. If the installation was not successful, it is most likely that you do not have permissions on your laptop to install. Please contact your IT support service provider. Also see Appendix B for some troubleshooting steps to check the status of the driver installation if required. Page 4 of 23


5 Installing Repetier Host URL Click on Repetier Host Windows 1.04 Click on Run Select your chosen language if different from English and click on OK Click on Next Page 5 of 23


6 Accept the licence agreement and select next If required change the destination folder and click on Next At the time of writing, do not select the Skeinforge Slicer as an error message will be created Click on Next Page 6 of 23


7 Click on Next Click on Next Click on Install. The computer will now install the program. Page 7 of 23


8 When the installation is complete, click on Finish Once installed, run Repetier. For the first starting of Repetier, you will see that a tablet stand is loaded. Please delete the stand from the build platform by clicking the trash can icon on the right side of the screen below the text line Object Group 1. Select the printer Settings tab in the top right hand side of the screen Page 8 of 23


9 Select the Connection tab in the Printer Settings Dialogue box. Set the Port to the com port number of your recently installed Printrbot serial port. Set your Baud Rate to Set Reset on Connect to Disabled YOU MUST CLICK ON APPLY otherwise your settings will NOT be saved. Select the Printer tab of the Printer Settings dialogue box and set the settings as per the values on highlighted in yellow. Click on Apply Page 9 of 23


10 Page 10 of 23


11 WINDOWS 7/8 instruction guide for your Printrbot printer and computer software You may now click on the read Power button icon marked Connect in the top left side of the screen. If successful, the connect button will change from red to green Also if you select the Manual Control tab on the right side of the screen, you will see the words Idle If you see a constant message command waiting, your com port settings are incorrect or there was a problem with the previous steps. The next steps are to confirm the mechanical movement of the printer. However FIRST CONFIRM THAT THE NOZZLE IS NOT touching the bed. You can manually raise the nozzle by turning on the lead screw. If you have not already done so, now would be a good time to cover your bed evenly with the blue painters tape - a small overlap of each tape run is acceptable. Page 11 of 23


12 WINDOWS 7/8 instruction guide for your Printrbot printer and computer software Screen Install the filament into the hot end through the extrude. Pinch the Estruder arm down and insert the filament through the hole at the top and into the extruder and eventually into the hot end. If the Extruder temperature is at 200 C, extrude some filament to confirm extrusion. You may wipe off the excess (take care thetip is hot!). The Printerbot videos on the printrbot site are a good guide. DO NOT ADJUST THE AUTO LEVEL PROBE NUTS these have been set at the factory. Page 12 of 23


13 Setting of the Slicer - CuraEngine Repetier is installed with two slicing engines CuraEngine and Slic3r. CuraEngine is more suited to a new user whereas Slic3r is aimed at the professional user. The author of this document uses CuraEngine so this installation guide focuses on this version. Select the Slicer tab on the main screen. Select CuraEngine as the slicer choice and select Configuration. The CuraEngine settings window will open. Select the Print tab in this window and then the Speed and Quality tab. The settings shown below are a good starting point. With experience and depending on the requirements of your 3D print model, you may change this later to suit. For now, they are good for most normal models. It is good practice to save the settings as you complete each tab. Some of the highlighted settings are already set as default but I have shown them as reference Page 13 of 23

14 Page 14 of 23
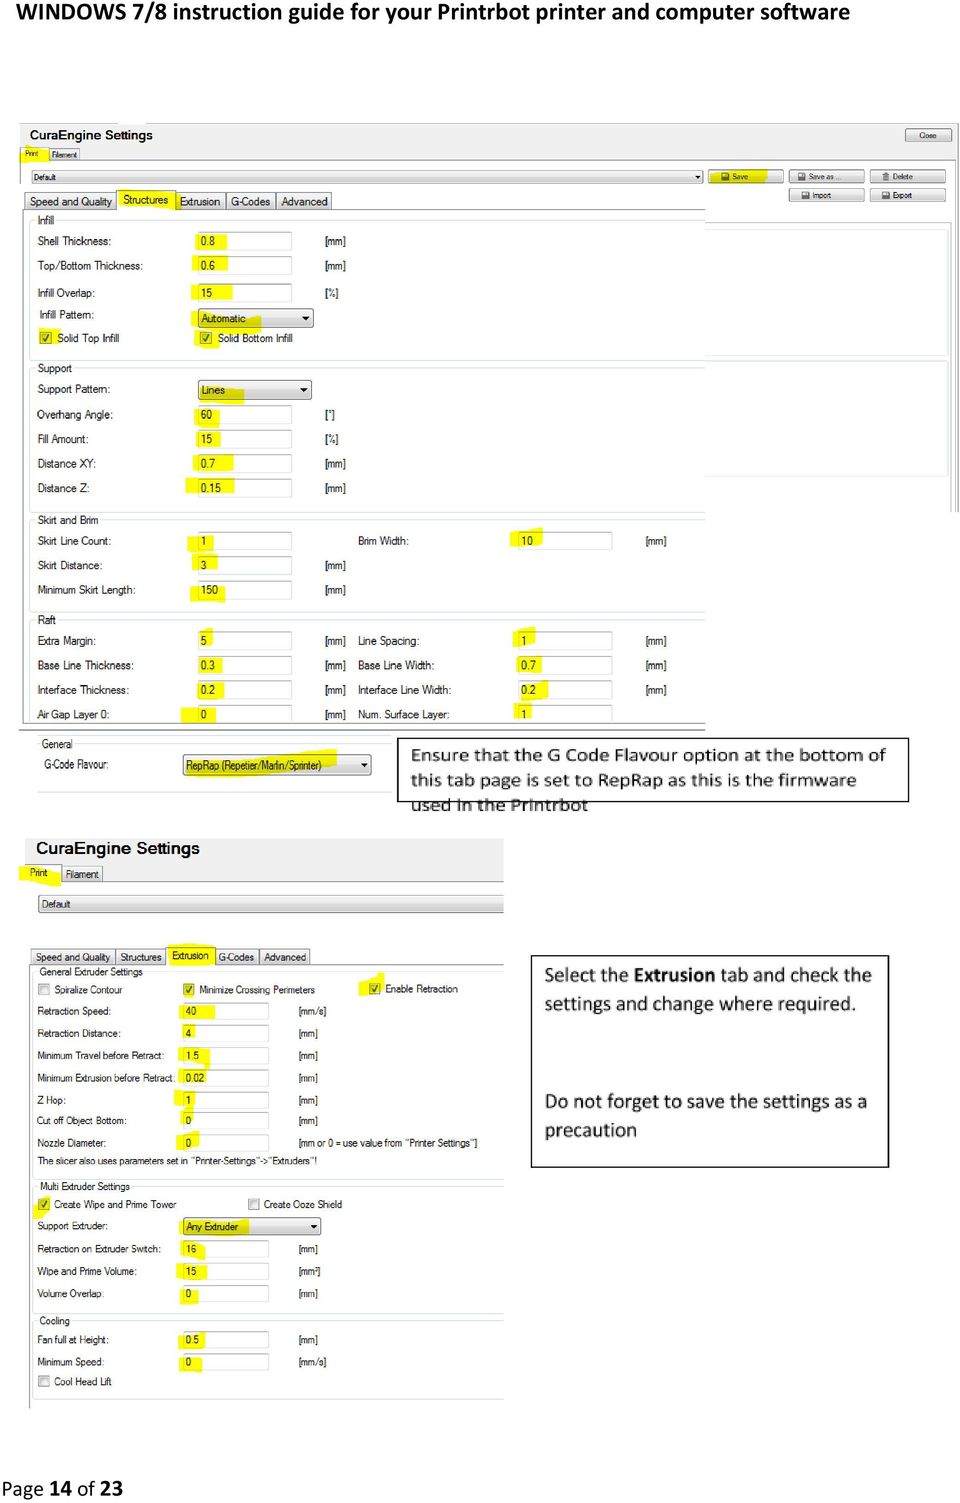

15 The G code settings are very important as the Printrbot ships with an Auto Levelling feature and we need to enable this in our G Code tab. Select the G Code tab and then Start G Code Delete the current code and replace it with the highlighted text shown here Select the End G code option and similarly replace the text with the highlighted text here. The Advanced tab settings are as shown PLEASE CLICK ON SAVE Page 15 of 23


16 Select the Filament tab It is important that the extruder knows the diameter of the filament being used to calculate the amount passed through the nozzle. The nominal value of your filament is 1.75 mm but it is subject to tolerances. It is a good idea if you can check the diameter of your filament when you start with a new batch and measure it over a few points along a length. Calculate the average of these measurements and enter it in the Filament Diameter setting. If you are not able to measure the diameter accurately then set it to The Slicer is now set up so select Save and then Close to return to the main screen On the right side side of the screen you should see something like this You are now ready to print.. Page 16 of 23


17 Your first print Lets print the firstcube.stl. If you have not already done so, download the firstcube model file from the printrbot website and unzip the file to a location on your computer. Load the file into Repetier You can use your mouse to rotate and zoom the viewer. Select the Slicer tab and click on the button Slice with CuraEngine. To change the amount of fill, you can use the slider options on the right hand side of the screen but for now don t adjust the feed rate. Page 17 of 23


18 Select the Preview tab and you will be able to see the sliced model You are now ready to print your model. Ensure that the printer power supply is connected and switched on, the USB cable is connected and that the Connect button is green. You can if desired, press the Toggle Log button to show the G code operation as the print progresses at the bottom of the screen Press the Start Print Button. The printer will probe the bed, heat the nozzle to 200 C (this will take some time) and when the nozzle is at the correct temperature, it will start to print the cube. I would suggest that maybe you do this a couple of times to get used to the process. Alter the amount of infill, more infill will give you a stronger print but will take longer to print and of course use more filament. Your second print The fan shroud will be your next print. As before, download, unzip and load the stl model into Repetier. Repeat the previous process. We suggest a 50% fill. Page 18 of 23
 and when the nozzle is at the correct temperature, it will start to print the cube.")
19 What next? You can download models from: Thinigiverse.com Youimagine.com Grabcad.com Or you can install Sketchup or TinkerCad and design your own. In Sketchup you can install the stl export plugin from the extension warehouse A suggested practical and relevant project is to make a spool holder for your reel of filament. There is a raft of already designed models on Thingiverse ranging from standalone to compact mount on your printer versions. Page 19 of 23


20 Appendix A Troubleshooting check if the teensy serial driver does not install correctly. If the serial driver does not install correctly then the first check to do is to look at the device manager settings to check the driver settings. Select the Control Panel from the computer start menu after pressing the Start button Select the Hardware and Sound icon Select the Device Manager button Page 20 of 23


21 Look for the Ports (Com & LPT) settings If you do not see Teensy USB Serial as an entry then the complete installation procedure failed. Repeat the download and install procedure as previously described. If you see no COM number in brackets then the driver is installed but not configured correctly. Double click on the entry to investigate further. If you do see a COM number in brackets then the driver is installed correctly and the COM number is what you will enter in the Repetier software later in the set up procedure. The Device status message will indicate whether the device driver is not installed, not installed correctly or installed correctly If the driver is installed correctly then click on OK and exit the settings Page 21 of 23

22 If you need to update or re-install the driver click on the Driver tab and the Update Driver (You may decide to Uninstal the driver) Select the Browse option to search the computer for the driver in the directory The correct installed directory location for the driver is C:\windows\system32\drivers however it can be in any location on the computer so long as the program is set up to look in the correct directory. Page 22 of 23

23 Click Next and the computer will search for the driver (usbser.sys). If the computer does not find the driver then it maybe in another directory. You can do a file search for usbsys.sys and repeat the update driver procedure after browsing to the correct directory. Failing this, repeat the whole teensy driver download and installation procedure. Page 23 of 23
Creator Start-up Guide
 www.ff3dp.com Creator Start-up Guide Zhejiang Flashforge 3D Technology Co., Ltd. www.ff3dp.com Contents Precautions:... 1 1. What's in the box?...1 2. Unboxing... 2 3. Initial Hardware Installation...5
Printrbot Getting Started Guide. For models: Simple
 Printrbot Getting Started Guide For models: Simple Contents 4 4 4 5 5 5 6 6 6 6 7 8 Chapter 1: Welcome Overview Support Chapter 2: Your Printrbot has arrived... now what? Printrbot Kits Pre-Assembled Printrbots
FOLGER TECHNOLOGIES, LLC 2020 i3 3D Printer Kit
 FOLGER TECHNOLOGIES, LLC 2020 i3 3D Printer Kit CONFIG GUIDE Rev. A http://www.folgertech.com 2020 Prusa i3 Config Guide Page: 1 / 15 You did it! You built your Folger Tech 2020 i3 Printer and now you
FTDI VCP DRIVER (free) (WIN/MAC/LINUX) http://www.ftdichip.com/drivers/vcp.htm
 (WIN/MAC/LINUX) http://www.ftdichip.com/drivers/vcp.htm") 002 - CONNECTING THE PRINTER Now that you have an idea what 3D printing entails, we can continue and connect the printer to your computer. First make sure you have a computer with a decent amount of RAM
002 - CONNECTING THE PRINTER Now that you have an idea what 3D printing entails, we can continue and connect the printer to your computer. First make sure you have a computer with a decent amount of RAM
Printrbot Getting Started Guide. For models: Printrbot Plus (v2) Printrbot LC (v2) Printrbot jr
 Printrbot LC (v2) Printrbot jr") Printrbot Getting Started Guide For models: Printrbot Plus (v2) Printrbot LC (v2) Printrbot jr Contents 4 Chapter 1: Welcome 4 Overview 4 Support 5 Chapter 2: Your Printrbot has arrived... now what? 5
Printrbot Getting Started Guide For models: Printrbot Plus (v2) Printrbot LC (v2) Printrbot jr Contents 4 Chapter 1: Welcome 4 Overview 4 Support 5 Chapter 2: Your Printrbot has arrived... now what? 5
Network DK2 DESkey Installation Guide
 VenturiOne Getting Started Network DK2 DESkey Installation Guide PD-056-306 DESkey Network Server Manual Applied Cytometry CONTENTS 1 DK2 Network Server Overview... 2 2 DK2 Network Server Installation...
Installing S500 Power Monitor Software and LabVIEW Run-time Engine
 EigenLight S500 Power Monitor Software Manual Software Installation... 1 Installing S500 Power Monitor Software and LabVIEW Run-time Engine... 1 Install Drivers for Windows XP... 4 Install VISA run-time...
PP8X Printer Driver Installation Instruction
 PP8X Printer Driver Installation Instruction Pinnacle Technology Corp. CONTENTS 1 BT Device Installation... 1 2 Printer Driver Installation... 6 3 How to Know the Connecting Port... 10 4 How to Configure
Royal Mail Despatch Manager Online Printer Installation Guide
 Royal Mail Despatch Manager Online Printer Installation Guide Getting you started Thank you for opting to use Royal Mail s Despatch Manager Online (DMO) system. To help get you started successfully please
Config software for D2 systems USER S MANUAL
 DT-CONFIG SOFTWARE Config software for D2 systems USER S MANUAL CONTENTS 1. Introductions ------------------------------------------------------------------- 3 2. System Requirement and Connection ----------------------------------------
Printer Driver Installation Guide
 Fujitsu Dot Matrix Printer DL Series Printer Driver Installation Guide - Windows 7 - Windows Server 2008 R2 Rev.01: April 12, 2010 IMPORTANT NOTE TO USERS For Windows 7 / Windows Server 2008 R2, install
Business Plus Accounting Hardware Setup Guide For Windows XP
 Business Plus Accounting Hardware Setup Guide For Windows XP 1 Contents Chapter 1 - Description of Computer Ports...3 Chapter 2 - Connecting Your Touch Screen...4 Chapter 3 Setting Up Your Printers In
CANON FAX L360 SOFTWARE MANUAL
 CANON FAX L360 SOFTWARE MANUAL Before You Begin the Installation: a Checklist 2 To ensure a smooth and successful installation, take some time before you begin to plan and prepare for the installation
SA-9600 Surface Area Software Manual
 SA-9600 Surface Area Software Manual Version 4.0 Introduction The operation and data Presentation of the SA-9600 Surface Area analyzer is performed using a Microsoft Windows based software package. The
 UX3600/NT/NTL/NTS Quick Start Guide This Quick Start Guide will explain how to connect and communicate with the EAW UX3600, NTL720, NTS250, KFNT, and JFNT powered speakers. Table of Contents 1. Downloading
Printer Support Guide. FedEx Ship Manager Software
 Printer Support Guide FedEx Ship Manager Software Printer FAQs Installing Printer Drivers How do I download and install the Zebra printer drivers? To download and install the current Zebra printer drivers
AUDITVIEW USER INSTRUCTIONS
 The AuditGard AuditView software allows the Manager to view, save, and print the audit records. The AuditGard lock maintains the last 512 lock events in non-volatile memory. Accessing the audit records
Chapter 1 Downloading Images to Your Computer (Windows)
") Software User Guide For the safe use of your camera, be sure to read the Safety Precautions thoroughly before use. Types of software installed on your computer varies depending on the method of installation
Software User Guide For the safe use of your camera, be sure to read the Safety Precautions thoroughly before use. Types of software installed on your computer varies depending on the method of installation
HL2170W Windows Network Connection Repair Instructions
 Difficulty printing from your PC can occur for various reasons. The most common reason a networked Brother machine may stop printing, is because the connection between the computer and the Brother machine
User Manual. Thermo Scientific Orion
 User Manual Thermo Scientific Orion Orion Star Com Software Program 68X637901 Revision A April 2013 Contents Chapter 1... 4 Introduction... 4 Star Com Functions... 5 Chapter 2... 6 Software Installation
Installing a printer in Windows 95.
 Installing a printer in Windows 95. Click on Start - Settings - Printers In the Printers Folder double click on the Add Printer Icon Click on the Next Button to start the installation process of your printer
Centurion C4 Transfer Guide using C4 File Transfer Utility
 Centurion C4 Transfer Guide using C4 File Transfer Utility 1010536 02 23 11 Section 50 1.0 Background: 1.1 A valid configuration is required for the Centurion system. Configuration files are downloaded
PN-L702B LCD MONITOR TOUCH PANEL DRIVER OPERATION MANUAL. Version 2.1
 PN-L702B LCD MONITOR TOUCH PANEL DRIVER OPERATION MANUAL Version 2.1 Contents Setting up the PC...3 Installing the touch panel driver...3 Touch Panel Settings...4 How to configure settings...4 Calibration...5
e-dpp 4.0.2 May 2013 Quick Installation Guide Microsoft Windows 2003 Server, XP, Vista, 7 Access Database
 e-dpp 4.0.2 May 2013 Microsoft Windows 2003 Server, XP, Vista, 7 Access Database ELTECHS Engineering and Consulting Co., Ltd., Japan www.eltechs.co.jp Tel No. +81 (47) 490-1010 Fax No. +81 (47) 490-1011
TE100-P21/TEW-P21G Windows 7 Installation Instruction
 Hardware Installation TE100-P21/TEW-P21G Windows 7 Installation Instruction 1. Go to http://www.trendnet.com/downloads/ to download the Windows 7 Utility. Save the file to your desktop. 2. Right click
Connecting your Omega/BetaPAT PLUS to a PC via a USB
 Connecting your Omega/BetaPAT PLUS to a PC via a USB Install software Windows XP and below Insert the disc into your computers disc drive and run through the setup wizard. Windows Vista & 7 1. Insert the
Select Correct USB Driver
 Select Correct USB Driver Windows often installs updated drivers automatically, and defaults to this latest version. Not all of these drivers are compatible with our software. If you are experiencing communications
Table of Contents. 1. Overview... 3. 1.1 Materials Required. 3 1.2 System Requirements. 3 1.3 User Mode 3. 2. Installation Instructions..
 Table of Contents 1. Overview..... 3 1.1 Materials Required. 3 1.2 System Requirements. 3 1.3 User Mode 3 2. Installation Instructions.. 4 2.1 Installing the On Call Diabetes Management Software. 4 2.2
JVC Monitor Calibration 2 User's Guide
 JVC Monitor Calibration 2 User's Guide Table of Contents 1. What is JVC Monitor Calibration 2? 2. System Requirement 3. Installation (JVC Monitor Calibration 2) 4. Uninstall 5. Installation (EyeOne Display
Ethernet Interface Manual Thermal / Label Printer. Rev. 1.01 Metapace T-1. Metapace T-2 Metapace L-1 Metapace L-2
 Ethernet Interface Manual Thermal / Label Printer Rev. 1.01 Metapace T-1 Metapace T-2 Metapace L-1 Metapace L-2 Table of contents 1. Interface setting Guiding...3 2. Manual Information...4 3. Interface
CLEARONE DOCUMENT 801-000-002 (REVISION 1.0) October, 2008. with Converge Pro Units
 October, 2008. with Converge Pro Units") APPLICATION NOTES Converge Pro Products CLEARONE DOCUMENT 801-000-002 (REVISION 1.0) October, 2008. Troubleshooting USB Connections with Converge Pro Units Description This document explains how to connect
APPLICATION NOTES Converge Pro Products CLEARONE DOCUMENT 801-000-002 (REVISION 1.0) October, 2008. Troubleshooting USB Connections with Converge Pro Units Description This document explains how to connect
GV-Keyboard. User's Manual V2.0
 GV-Keyboard User's Manual V2.0 Before attempting to connect or operate this product, please read these instructions carefully and save this manual for future use. 2007 GeoVision, Inc. All rights reserved.
HP-1000 Powerline USB Adapter
 HP-1000 Powerline USB Adapter User s manual BEFORE INSTALLATION Plan ahead the installation of your powerline network. Note: You will need at least two powerline adapters to create a powerline network.
Network Printing In Windows 95/98/ME
 Network Printing In Windows 95/98/ME If you are using Windows 2000/ XP: To install a printer on your network using D-Link Print Server or DI-series router with built-in print server you do not need to
Transferring Scans from your Dolphin into Destiny
 Transferring Scans from your Dolphin into Destiny Summary: This article is intended to provide Destiny users with an overview of the following tasks 1. Downloading the Dolphin Transfer Utility to their
HP-1000 Powerline Ethernet Adapter
 HP-1000 Powerline Ethernet Adapter User s manual BEFORE INSTALLATION Plan ahead the installation of your powerline network. Note: You will need at least two powerline adapters to create a powerline network.
Metasys System Direct Connection and Dial-Up Connection Application Note
 Metasys System Direct Connection and Dial-Up Connection Application Note Code No. LIT-1201639 Software Release 5.1 Issued August 27, 2013 Supersedes October 4 2010 Refer to the QuickLIT website for the
File Management Utility. T u t o r i a l
 File Management Utility T u t o r i a l Contents System Requirements... 2 Preparing Files for Transfer to GlobalMark... 2 Application Launch... 2 Printer Setup... 2 Communication Status... 4 Communication
BioWin Network Installation
 BioWin Network Installation Introduction This document outlines the procedures for installing the network version of BioWin. There are three parts to the network version installation: 1. The installation
Win 7 - STIMA CLS / CMP Driver Installation Quick Guide
 Win 7 - STIMA CLS / CMP Driver Installation Quick Guide This guide is intended to demonstrate a quick installation and setup of ticket alignment under Windows 7 for the Stima CLS and CMP printers using
Legal Notes. Regarding Trademarks. Model supported by the KX printer driver. 2010 KYOCERA MITA Corporation
 Legal Notes Unauthorized reproduction of all or part of this guide is prohibited. The information in this guide is subject to change for improvement without notice. We cannot be held liable for any problems
EDMS Operation Manual. 1. Install the USB Driver. 1.3 Click next
 EDMS Operation Manual 1. Install the USB Driver 1.1 If this is your first time using the gauge, when you connect the gauge to the PC, a driver installation window may appear or the driver will install
16.4.3 Lab: Data Backup and Recovery in Windows XP
 16.4.3 Lab: Data Backup and Recovery in Windows XP Introduction Print and complete this lab. In this lab, you will back up data. You will also perform a recovery of the data. Recommended Equipment The
Using TViX Network. NFS mode : You must install the TViX NetShare utility in to your PC, but you can play the TP or DVD jukebox without stutter.
 Using TViX Network There are two network mode. One is SAMBA mode another is NFS mode. SAMBA mode : You can play the file via network without special program, but the speed is lower than NFS mode. ( Currently,
USB Driver Installation for Windows XP
 USB Driver Installation for Windows XP USB Serial Converter Driver Installation for Windows XP CAUTION: You must use the drivers on the CD-ROM supplied with your USB Device. DO NOT download drivers from
The FlexiSchools Online Order Management System Installation Guide
 The FlexiSchools Online Order Management System Installation Guide FlexiSchools May 2012 Page 1 of 16 Installation Pack Welcome to the FlexiSchools system. You will have received a disc containing: Sato
Brady IP Printer Installation Instructions
 Brady IP Printer Installation Instructions Ensure the following are available before commencing installation: The IP Printer and accessories (Printer, power cable, Product CD including Windows printer
Networking. General networking. Networking overview. Common home network configurations. Wired network example. Wireless network examples
 Networking General networking Networking overview A network is a collection of devices such as computers, printers, Ethernet hubs, wireless access points, and routers connected together for communication
2014 Simplify3D. Quick Start Guide
 Quick Start Guide Preparation Installing Simplify3D Software 3 The Configuration Assistant 4 The Interface Layout 5 3D Printing Workflow Import Process Settings Preview Print! Import 7 Process Settings
AIM SOFTWARE AND USB DRIVER INSTALLATION PROCEDURE
 AIM SOFTWARE AND USB DRIVER INSTALLATION PROCEDURE CONTENTS AIM software and USB Driver installation Chapter 1 Installing AIM software and AIM USB driver... 2 Chapter 2 Installation under Microsoft Windows
How do I configure the wireless printer using a USB or Ethernet cable and install the printer driver in Windows?
 How do I configure the wireless printer using a USB or Ethernet cable and install the printer driver in Windows? STEP I: Gather the wireless network settings of your wireless access point or wireless router
5.4.8 Optional Lab: Managing System Files with Built-in Utilities in Windows 7
 5.4.8 Optional Lab: Managing System Files with Built-in Utilities in Windows 7 Introduction Print and complete this lab. In this lab, you will use Windows built-in utilities to gather information about
USB DRIVER INSTALLATION GUIDE
 USB DRIVER INSTALLATION GUIDE Use these instructions to install the USB drivers and Microsoft synchronization software for your Pathfinder 6057 printer. You need these utilities for your printer and computer
Before installing the Zebra printer with USB connector, download the drivers from www.zebra.com.
 Download the Zebra Drivers 1 Download the Zebra Drivers Before installing the Zebra printer with USB connector, download the drivers from www.zebra.com. Note: You must first create an account on Zebra.com
Using the Communication Ports on the DG-700 and DG-500 Digital Pressure Gauges
 Using the Communication Ports on the DG-700 and DG-500 Digital Pressure Gauges 1. USB and Serial Communication Ports: Newer DG-700 and DG-500 gauges contain both a USB and a DB-9 Serial Communication Port,
How To: Upload a Custom Tune to Your Predator or Trinity PREP:
 How To: Upload a Custom Tune to Your Predator or Trinity NOTE to Ford Owners: If you have a Predator number U7146/U7142/U7153, you must use the instructions titled U7146/U7142/U7153 Custom tune installation
Shearwater Research Dive Computer Software Manual
 Shearwater Research Dive Computer Software Manual Revision 1.3 Table of Contents 1. Basic overview of components 2. O/S IrDA driver installation 2.1 USB IrDA installation for Windows XP Home/Pro editions
How To Install The Safenet-Inc.Com Software On A Pc Or Mac Or Macintosh (For A Powerpoint) With A Powerline (For Windows) Or Ipad (For Mac) With The Safetime (For Pc
 With A Powerline (For Windows) Or Ipad (For Mac) With The Safetime (For Pc") End-User troubleshooting guide For Sentinel SuperPro/UltraPro and Sentinel Hardware Keys 1 Preface Welcome to Safenet End User Troubleshooting guide! This guide is intended to assist our Distributors,
End-User troubleshooting guide For Sentinel SuperPro/UltraPro and Sentinel Hardware Keys 1 Preface Welcome to Safenet End User Troubleshooting guide! This guide is intended to assist our Distributors,
Maintaining the Content Server
 CHAPTER 7 This chapter includes the following Content Server maintenance procedures: Backing Up the Content Server, page 7-1 Restoring Files, page 7-3 Upgrading the Content Server, page 7-5 Shutting Down
Chapter 2 Installation
 Installation Chapter 2 Installation This chapter will guide you through the installation of the Quartet Serial PCI. There are no jumpers or switches to set for this PCI Plug-n-Play board. 2-1 Hardware
The FlexiSchools Online Order Management System Installation Guide
 The FlexiSchools Online Order Management System Installation Guide Installation Pack Welcome to the FlexiSchools system. You will have received a disc containing: Zebra Drivers FlexiSchools Online Order
AUDITVIEW USER INSTRUCTIONS
 COMBOGARDPRO AUDITVIEW USER INSTRUCTIONS The ComboGard Pro AuditView software allows the Manager to view, save, and print the audit records. The ComboGard Pro lock maintains the last 63 lock events in
MFC8890DW Vista Network Connection Repair Instructions
 Difficulty printing from your PC can occur for various reasons. The most common reason a networked Brother machine may stop printing, is because the connection between the computer and the Brother machine
HASP Troubleshooting Guide
 HASP Troubleshooting Guide Corporate office: Trimble Geospatial Division 10368 Westmoor Drive Westminster, CO 80021 USA www.trimble.com Copyright and trademarks: 2005-2013, Trimble Navigation Limited.
LP 2844 Thermal Printer
 Quick Installation Guide FedEx Ship Manager Software FedEx Ship Manager at fedex.com LP 2844 Thermal Printer Step 1: Confirm Printer Kit Contents Your printer kit contains: 1. Thermal Printer 4. Serial
Banner Document Management Suite (BDMS) Web Access Help
 Web Access Help") May 10 th, 2011 Banner Document Management Suite (BDMS) Web Access Help Division of Information Technology AppXtender Web Access Help: For questions regarding AppXtender Web Access, please contact the
May 10 th, 2011 Banner Document Management Suite (BDMS) Web Access Help Division of Information Technology AppXtender Web Access Help: For questions regarding AppXtender Web Access, please contact the
LPT1 Printer Connector. External Power Supply Connector Power Indicator
 AXIS 1650 Set-up Instructions Page 3 Unpack box Verify that you have all the items listed below: LPT1 Printer Connector Network Indicator Ethernet Connector External Power Supply Connector Power Indicator
How To Connect A300 To A300 Time Clock On A Pc Or Mac Computer
 1 TABLE OF CONTENTS INTRODUCTION CHAPTER 1 ESTABLISHING A CONNECTION TO TIME CLOCK 1.1 INSTALLATION OF SOFTWARE 1.2 CONNECT TIME CLOCK TO PC 2 1.2.A..VIA USB CABLE CONNECTION 2-5 1.2.B... VIA TCP/IP NETWORK
WPA-LON Series WPA-LON-1. Application. Model Chart WPA-LON-2 WPA-LON-3. Adapter Card Software
 WPA-LON Series TAC I/A Series WorkPlace Communication Adapter Installation Instructions Application The WPA-LON Series WorkPlace Communication Adapters are Echelon LONTALK PC adapter cards. A TAC I/A Series
10.3.1.6 Lab - Data Backup and Recovery in Windows XP
 5.0 10.3.1.6 Lab - Data Backup and Recovery in Windows XP Introduction Print and complete this lab. In this lab, you will back up data. You will also perform a recovery of the data. Recommended Equipment
System update procedure for Kurio 7 (For build number above 110)
") System update procedure for Kurio 7 (For build number above 110) IMPORTANT NOTE: Before starting the procedure, please check your current Android build number, that can be found as follows: exit the Kurio
System update procedure for Kurio 7 (For build number above 110) IMPORTANT NOTE: Before starting the procedure, please check your current Android build number, that can be found as follows: exit the Kurio
Virtual Office Remote Installation Guide
 Virtual Office Remote Installation Guide Table of Contents VIRTUAL OFFICE REMOTE INSTALLATION GUIDE... 3 UNIVERSAL PRINTER CONFIGURATION INSTRUCTIONS... 12 CHANGING DEFAULT PRINTERS ON LOCAL SYSTEM...
End-User troubleshooting guide For Sentinel SuperPro/UltraPro and Sentinel Hardware Keys
 End-User troubleshooting guide For Sentinel SuperPro/UltraPro and Sentinel Hardware Keys Preface Welcome to Safenet End User Troubleshooting guide! This guide is intended to assist our Distributors, Customers
Supplemental USB Driver Installation Guide
 Windows 2000/XP/Vista/7 Installation Supplemental USB Driver Installation Guide 1) Do not plug in your Auterra USB OBD Adapter until after the driver is installed. 2) The USB driver is located on the your
Manual. EN Appendix. Blue Solar PWM Pro setup and monitoring software
 Manual EN Appendix Blue Solar PWM Pro setup and monitoring software EN Appendix Contents 1. Region and language settings 2 2. Download the software 2 3. UnRAR the software 2 4. Install the software 3
Installing PowerLink on Windows 7 64-bit
 Instruction Manual Version 1.0, Code No. 20 751 806 1 Introduction... 3 2 Installing Virtual PC... 3 3 Configuring Windows XP Mode... 5 4 Installing Powerlink to Virtual XP... 8 5 Run PowerLink software
Ash Capture Control User Guide
 Ash Capture Control User Guide Revision 1.4 Table of Contents Software Installation... 3 Hardware Installation... 6 System Block Diagram... 7 Using Ash Capture Control... 8 Launching the Application...
SECURITY SYSTEM MANAGEMENT SOFTWARE FOR WINDOWS. Quick Start Instructions
 TM SECURITY SYSTEM MANAGEMENT SOFTWARE FOR WINDOWS Quick Start Instructions Introduction WinLoad for Windows was developed to simplify and speed up the task of programming Paradox control panels. Remote
Colorfly Tablet Upgrade Guide
 Colorfly Tablet Upgrade Guide (PhoenixSuit) 1. Downloading the Firmware and Upgrade Tool 1. Visit the official website http://www.colorful.cn/, choose 产 品 > 数 码 类 > 平 板 电 脑, and click the product to be
Addendum Advanced POS Printer Drivers
 Addendum Advanced POS Printer Drivers Overview With the introduction of version 4.0, The General Store now supports the use of advanced, manufacturer s printer drivers for certain point of sale printers.
Please read and understand this instruction manual thoroughly before using this product.
 Please read and understand this instruction manual thoroughly before using this product. For Mini-Z MR-03VE Series models VE Manager Software Manual Instruction Manual This product is used to connect Mini-Z
OPTAC Fleet Viewer. Instruction Manual
 OPTAC Fleet Viewer Instruction Manual Stoneridge Limited Claverhouse Industrial Park Dundee DD4 9UB Help-line Telephone Number: 0870 887 9256 E-Mail: optac@stoneridge.com Document version 3.0 Part Number:
Installing ABACUS ELECTRICS USB Optical Probes under Windows 7
 Installing ABACUS ELECTRICS USB Optical Probes under Windows 7 AN17a This note assumes that you are installing the drivers on to a clean system, i.e. one on which ABACUS ELECTRICS Optical Probe drivers
Checking the Package Contents. Installing the Printer Software. Connecting. Unpacking the. the Printer. Printer. Attaching
 Installing the Printer Software Checking the Package Contents Connecting the Printer Unpacking the Printer Installing the Ink Cartridges Plugging in the Printer Attaching the Printer Parts 4032216-00 EUL
StrikeRisk v6.0 IEC/EN 62305-2 Risk Management Software Getting Started
 StrikeRisk v6.0 IEC/EN 62305-2 Risk Management Software Getting Started Contents StrikeRisk v6.0 Introduction 1/1 1 Installing StrikeRisk System requirements Installing StrikeRisk Installation troubleshooting
Installation and Setup Guides
 Installation and Setup Guides For Bar Code Label Printers with Freezerworks Unlimited 5.2 Freezerworks Basic version 7 PO Box 174 Mountlake Terrace, WA 98043 www.dwdev.com support@dwdev.com 425-673-1974
Virtual Serial Port over USB For PD & PC Series Printers
 Technology Brief Virtual Serial Port over USB For PD & PC Series Printers Introduction Physical serial ports are becoming less common on new PCs and laptops. Most computers are equipped only with USB or
OPTAC Fleet Viewer. Instruction Manual
 OPTAC Fleet Viewer Instruction Manual Stoneridge Limited Claverhouse Industrial Park Dundee DD4 9UB Help-line Telephone Number: 0870 887 9256 E-Mail: optac@stoneridge.com Document version 4.0 Part Number:
EPSON Stylus. Start Here
 EPSON Stylus C84 EPSON Stylus Start Here C84 CPD-16675R1 4043482-00 XXX 1 Unpack 1 Remove everything from the box. Paper support Printer Manual Power cord Ink cartridges CD-ROM 2 Remove all the blue tape
Running the R4 Software on a USB Port
 Tech Note Running the R4 Software on a USB Port Like a lot of other engine management software programs that have been around for a while, the R4 program is designed to communicate through a 9-pin serial
Centurion PLUS CPC4 Download Guide
 Centurion PLUS CPC4 Download Guide using C4 File Transfer Utility. 1010537 03 01 10 Section 50 1.0 Background: 1.1 The Centurion PLUS Control system consists of a Centurion PLUS Core (CPC4 1) and Color
SAPIP GUI INSTALLATION. Table of Contents
 QUICK START GUIDE SAPIP GUI INSTALLATION Table of Contents 1. Install CSU cable driver for SapIP..2-3 2. Check for pre-requisite for SAPIP GUI install......2 3. Check for pre-requisite for SAPIP GUI install...2-6
How to use SURA in three simple steps:
 How to use SURA in three simple steps: Most of SURA s functionality can be accessed through these three steps. 1) Download SURA to your computer Go to the SU Downloads page to obtain the SURA utility.
Installing the Gerber P2C Plotter USB Driver
 Installing the Gerber P2C Plotter USB Driver 1 You can install a Gerber P2C plotter using a USB connection and communicate with it using compatible design software. The following procedures describe installing
Firmware & Software update procedures Amicroe TouchTAB IV.
 Firmware & Software update procedures Amicroe TouchTAB IV. Important note: The steps & procedures outlined below may be of assistance if you are experiencing difficulties with your Amicroe TouchTAB 9.7
GoodReader User Guide. Version 1.0 GoodReader version 3.16.0
 GoodReader User Guide Version 1.0 GoodReader version 3.16.0 Contents Operating GoodReader 1 Send PDF files to Your ipad 2 Copy Files with itunes 2 Copy Files to a Cloud Service 5 Download Files from the
How To Configure CU*BASE Encryption
 How To Configure CU*BASE Encryption Configuring encryption on an existing CU*BASE installation INTRODUCTION This booklet was created to assist CU*Answers clients with the configuration of encrypted CU*BASE
Driver Installation (USB 2.0) and Software configuration manuals for Sopro Imaging, EagleSoft, and Dentrix Image 4.5
 and Software configuration manuals for Sopro Imaging, EagleSoft, and Dentrix Image 4.5") Driver Installation (USB 2.0) and Software configuration manuals for Sopro Imaging, EagleSoft, and Dentrix Image 4.5 124 Gaither Drive - Suite 140 - Mount Laurel, NJ 08054 USA Tel: 800-289-6367 Fax: 856-222-4726
Driver Installation (USB 2.0) and Software configuration manuals for Sopro Imaging, EagleSoft, and Dentrix Image 4.5 124 Gaither Drive - Suite 140 - Mount Laurel, NJ 08054 USA Tel: 800-289-6367 Fax: 856-222-4726
17 April 2014. Remote Scan
 17 April 2014 Remote Scan 2014 Electronics For Imaging. The information in this publication is covered under Legal Notices for this product. Contents 3 Contents...5 Accessing...5 Mailboxes...5 Connecting
Cura for Type A Machines Quick Start Guide
 Cura for Type A Machines Quick Start Guide 1 Table of Contents About Cura for Type A Machines Downloading Cura for Type A Machines Installing Cura for Type A Machines Mac Windows Linux About the Configuration