Auto Dialer Express Operating Manual
|
|
|
- Dylan Ray
- 8 years ago
- Views:
Transcription
1 1 Auto Dialer Express Operating Manual Section Table of Contents Page * Table of Contents 1 * How To Get Help -&- Liability & Responsibility 2 * Software & Hardware Installation 3 (skip this section if hardware & software are already installed) Auto Dialer Software & Key Installation 4 Dialogic Voice Board & Driver Installation 7 * Telephone Line Requirements 16 Types of Telephone Lines 17 Live Call Transfers 18 * Auto Dialer Operations 19 Overview 20 How To Set Up Your Auto Dialer 22 Phone List 23 Broadcast Messages 28 Dial Schedule 33 Area Code Dictionary 36 Settings 40 Quick Start Guide 42 Remote Starting of Your Auto Dialer 43 * Voice Mail-Automated Attendant Express Version 45 Installation 46 Example of Basic Mailbox Setup 47 Mailbox Types 48 Mailbox Information Tab 50 Notification Information Tab 58 Mailbox Setup Button 59 Voice Mail Buttons 60 Voice Mail Settings 61 Area Code Dictionary Tab 63 Server Tab 69 Remote Access 70 Stop System To Speak Live To Caller 70

2 2 To receive Technical Support and Software Upgrades, you must first REGISTER by going to: How To Get Help Using This Product 1) Read this Operating Manual. 2) Call for Technical Support. An automated attendant will ask you for your name, customer #, telephone #, and reason why you are calling. Your call will be returned as soon as a technician is available if within our normal working hours: Monday-Friday, 8 am to 5 pm Central Time Zone (excluding holidays). 3) a technician: support@tellacom.net 4) Visit our Technical Support Website: to get Software downloads, Upgrades, Manuals, Help, & Information. Liability/Responsibility This product has the capability of being operated in a variety of ways. The Buyer/User assumes all liability and responsibility for only operating this product legally, according to federal, state, and/or local laws. Laws are complex and may change from time to time, and laws vary from country to country and from state to state. A violation of any such laws could result in significant penalties and other sanctions. The Seller and the Manufacturer and its Technicians and Representatives are instructed not to offer any legal advice or interpretation of laws regarding the use of this product; however, if any advice or interpretation of laws is given, it should not be relied upon. Prior to buying or using this product, the Buyer/User should consult with an attorney to determine the extent of permissible activities. This is especially important if the Buyer/User intends to use this product for solicitation purposes (direct marketing, telemarketing, etc.). In addition, the Buyer/User should be aware that he or she may be responsible for maintaining Do Not Call lists. The Seller and Manufacturer strive to provide the highest quality software and hardware; however, there are a number of factors that can cause system malfunctions including, but not limited to, operator error, software corruption, software bugs, telephone line problems, electrical surges, hardware defects, and computer failures. The Manufacturer has provided the Buyer/User with tools to assist in cleaning the Buyer/User s dialing lists of Do Not Call telephone numbers; however, the Manufacturer cannot guarantee 100% integrity or reliability of these tools. The Seller and Manufacturer and its Technicians cannot be responsible if the Buyer/User adds other software or hardware that corrupt the system or for any other malfunctions. The Buyer/User is responsible for making frequent backups of his or her system to protect against any loss of valuable data. The Seller and Manufacturer and its Technicians cannot be responsible for loss of data for any reason whatsoever. The Seller or Manufacturer will not be liable for any lost revenue, lost profits, penalties, fines, legal judgments, or other expenses due to loss of data, hardware or software problems, or for any other reason. By using this product, the Buyer/User accepts 100% of the responsibility and liability regarding its use and will hold the Seller and the Manufacturer and its Technicians and Representatives completely harmless from any fines, penalties, litigation, expenses, or claims for any reason. Revised
 E-mail a technician: support@tellacom.net 4) Visit our Technical Support Website: www.tellacom.net to get Software downloads, Upgrades, Manuals, Help, & Information.")
3 3 Software & Hardware Installation Software Ke

4 4 Software & Key Installation To begin, insert the software CD (label side up) into the CD-Rom drive as shown in Illustration 1. Illustration 1 The installation program should automatically start. If it does not, click Start in your computer s task bar, then click Run. Next, type D:\AUTORUN.EXE and press <ENTER> (If the CD-Rom s drive letter is not D, substitute the appropriate drive letter). A welcome screen is displayed. Click NEXT to continue with the installation procedure. Illustration 2 If you are loading this program for the first time, click NO, then click Next. If you have previously used this program on the same computer, click YES to create a backup copy of all files replaced during the installation. Illustration 3 To enter the Program Manager group name, accept the default by clicking NEXT. Illustration 4

5 5 Select the type of voice board used in the computer: Analog or Digital If using Analog lines, click Next Illustration 5 If using Digital lines, click Next Illustration 6 If using a Digital board, select the type of T1 lines and click Next. The Start Installation screen is displayed. Click NEXT to continue with the installation process. Illustration 7

6 6 During the installation of the software, a screen, much like the one shown to the left, is displayed. This shows the overall progress of the installation. Illustration 8 We have provided a Software Key for your new system. The software will not run without this Software Key (also called a dongle ). Attach the Software Key to your computer s parallel port (printer port). You can then plug your printer into the Software Key. It should not interfere with your printer. If your computer does not have a parallel port, contact your sales person to exchange for a software key designed for a USB port. If you change computers, move the Software Key to the new computer. IMPORTANT: Replacing a lost or stolen Software Key is very expensive. Protect your investment! Verify that the Software Key is attached to the parallel port of your computer, then click OK to complete the installation. Note: If you get a Software Key error, go to and look under the Miscellaneous Information & Help section or contact one of our Technicians for help. Illustration 9 After the software installation is completed, click Finish. Illustration 10 The last step is to register the product at: to be eligible to receive technical support.

7 7 Dialogic Voice Board & Driver Installation Important Notes: Please skip this INSTALLATION section if you received a computer that has already had the software and hardware installed. Please do NOT re-install anything that is already installed, unless Technical Support instructs you to do so. While unpacking the Dialogic board, use caution when handling the board; its high degree of electronic integration makes it susceptible to damage by static discharge. Identify the model of voice board that you have and follow the steps to install the voice board and the drivers. The model name of your board is located on the silver plate on the end of the board where the telephone lines plug in. Label with model name Most users will have Dialogic voice board models for PCI slots in their computers; however, if you have any of the following Dialogic 2 or 4 telephone line ISA slot models, you will need different installation instructions not provided in this section of the manual. Please follow the steps in this section to install and configure the following Dialogic Voice Board-Models: D/4PCI, D/41JCT-LS, D/120JCT-LS, D/240PCI-T1, and other PCI boards. These steps also work for the following Dialogic ISA Voice Board Models: D/160SC-LS, D/240SC-T1, D480SC-2T1 For Dialogic 2 or 4 telephone line ISA slot models: Proline/2V, D/21D, D/41D, D/41ESC, Dialog/4, D/41H, go to or contact technical support for installation instructions of those models.

8 8 Step 1. This illustration shows ISA & PCI slots. ISA slots are the longer of the two types and colored black. PCI slots are shorter and normally colored white, though they can be different colors, such as purple, on some motherboards. Insertion of the voice board will be the same for either type of slot. ISA Slots PCI Slots a) Prepare a static-safe work area prior to handling the voice board. b) Switch off the computer, and disconnect the computer s power cords from electrical outlets. WARNING: To avoid electric shock, confirm the computer s power switch is OFF and unplug all power cords before opening the computer case. c) Remove the computer cover to expose the ISA or PCI bus slots as shown in the picture above. d) Ground yourself to discharge any static electricity by touching the bare metal portion of your computer case, or connect an anti-static wrist strap to a bare metal portion of the computer case and slip it on your wrist. e) Select an empty, ISA or PCI expansion bus slot, and remove the corresponding retaining screw and metal plate, as shown below.

9 9 f) Insert the voice board edge connector into the bus slot and press firmly until the board is securely seated in the slot. Replace and tighten the retaining screw. g) Repeat steps e and f for each voice board you are installing. Note: With multiple board systems, verify the dials on each board are set correctly. The first board is set to 0, second board is set to 1, third board is set to 2, etc. Replace the computer cover when finished, and reconnect the power cords. Step 2. Restart the computer after the boards have been installed. Step 3. If installing a PCI board, Windows will detect new hardware; click cancel, and follow the Instructions on step 4 to keep the Add New Hardware Wizard from displaying each time the computer is started. Step 4. Disable the PCI Bridge Device: Right click "My Computer" on your desktop Click on properties. Click on the hardware tab, click the "Device Manager" button. Right click the "PCI Bridge Device" (it will be marked with a yellow question mark). Click the option to "Disable". This will not affect the way your voice board(s) will work. Step 5. Insert your Dialogic Voice Board Drivers CD into your CD ROM drive, as shown in Illustration 1; follow the steps on the following pages to install Dialogic Driver software. Illustration 1

10 10 The installation program should automatically start. If it does not, click Start in your computer s task bar, then click Run. Next, type D:\SETUP.EXE and press <ENTER> (If your CD-Rom s drive letter is not D, substitute the appropriate drive letter). The opening screen of the Dialogic Installation is displayed. Click Next to proceed. Illustration 2 Fill in the information requested: Your Name and Your Company Name if this is for a business, then click Next to continue with the installation. Illustration 3 To select the type of driver installation, click the TYPICAL option as shown in Illustration 4. Illustration 4

11 11 To select the location on your hard drive where the Dialogic Drivers will be stored, accept the default by clicking the Next button. Illustration 5 To select a folder to store the shortcut to the Dialogic software, accept the defaults by clicking the Next button. Illustration 6 The computer will show a summary of the options selected. To accept the settings, click Next as shown in Illustration 7. Illustration 7

12 12 During the installation process, a screen much like the one shown in Illustration 8, is displayed. Wait for the installation to complete. Illustration 8 When the installation is almost complete, you will be asked a few additional questions. UNCHECK all the options as shown in Illustration 9 by clicking on the check mark boxes next to the options that are checked, then click Next to continue with the installation. Illustration 9 You will be asked if you want to restart your computer. Select Yes, then click Finish, as shown in Illustration 10. Your computer will save its current settings, then reboot after a few moments. Illustration 10 Step 6. After restarting, click on Start> Programs> Dialogic System Software>Dialogic Configuration Manager as shown below: Illustration 11

13 13 This will open the Dialogic Configuration Manager (DCM). The first time you open the DCM you should see a screen much like this one. Click Connect. Illustration 12 After clicking the Connect button, the software will go through a detection process for up to a minute. Illustration 13 Voice boards are listed in the white area in the center of the DCM. (See the troubleshooting section below if you do not see your boards.) Illustration 14

14 14 Step 7. Click the green light on the row of buttons at the top of this window. Your voice board should start within approximately 30 seconds. While the Dialogic board is starting, you will see a progress bar in the upper right corner of your screen. When the board is started, the red light to the left of the board will turn green, as shown in Illustration 16. Illustration 15 Illustration 16 Step 8. After the voice boards have started, set them to start automatically. To do this, click on Service at the top of the Window, then click Startup Mode and select Automatic. This will force the voice board drivers to start automatically each time your computer is started.

15 15 Illustration 17 Step 9. Finally, exit out of the DCM by clicking the X in the upper right corner of the window. Troubleshooting 1. Turn off the Plug and Play (PNP) feature in the BIOS and then go back to the DCM. If you see the board at that point, start from step 7 above to finish setup. 2. If you have a BIOS that has no PNP option, contact your computer motherboard manufacturer for a possible BIOS update or utility. If your motherboard only has ISA slots (black slots on the motherboard) or you cannot get the board to start, contact technical support for assistance. If you need assistance with your computer s hardware, please contact your computer vendor or technician. If you need assistance with our software or voice board, please contact one of our technicians by telephone or by . Important Safeguards Your Computer s Clock: Verify that your computer s clock is set to the correct date and time, including AM or PM. Protection: A surge protector and/or uninterruptible power supply is needed to protect your investment of hardware and software. Your files should be saved onto tape, CD, or DVD periodically.
 or you cannot get the board to start, contact technical support for assistance.")
16 Telephone Line Requirements 16
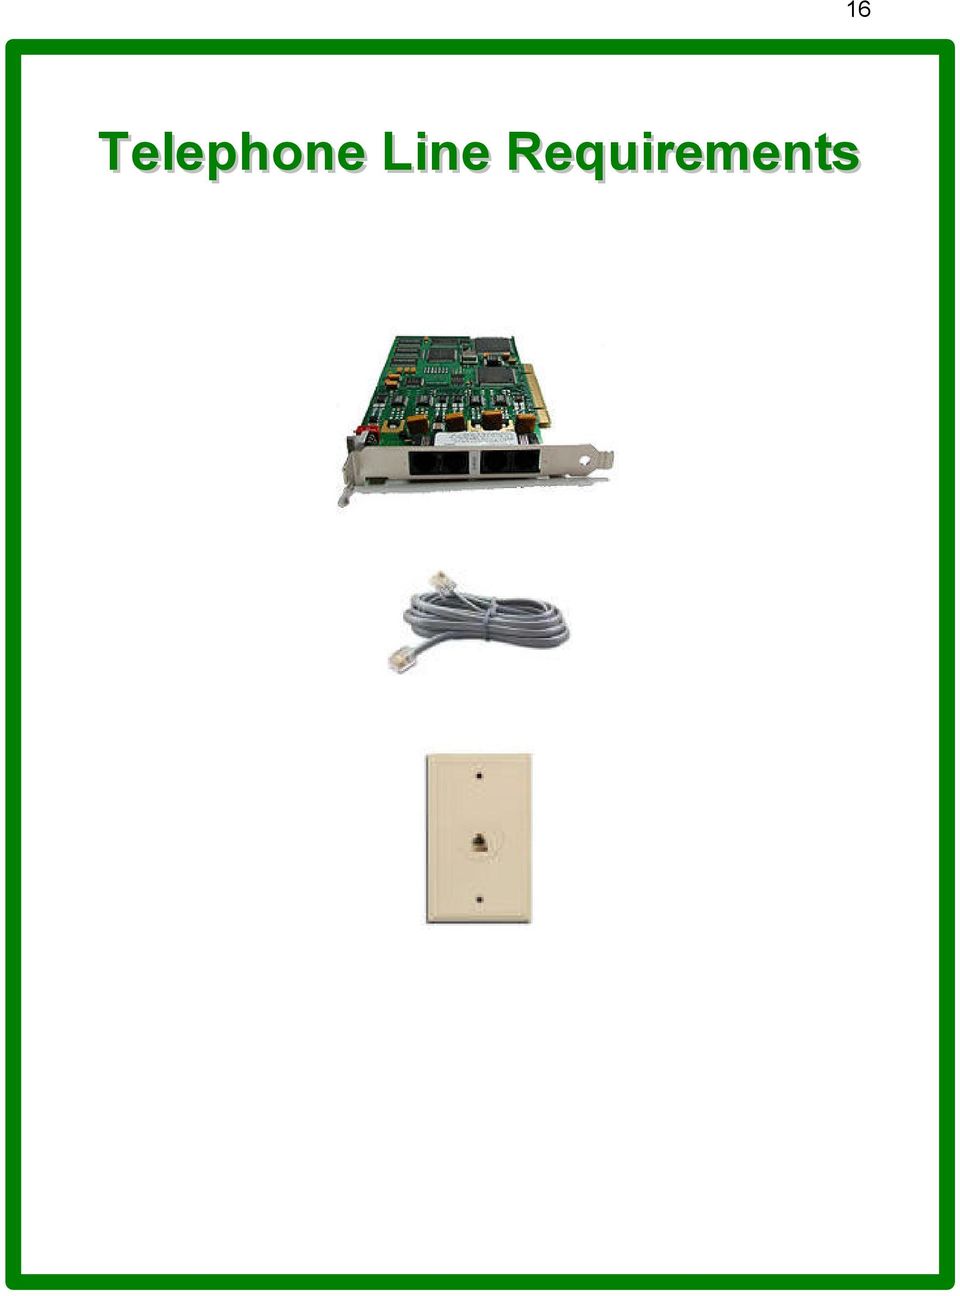
17 17 Types Of Telephone Lines Your local telephone company should install telephone lines with any required features to the location of your computer. Most of our systems can use from 1 to 96 lines. They may be standard analog lines or digital T-1, PRI, or E-1 lines. Most of our systems use either Intel Dialogic or PIKA Technologies voice boards (voice cards). They must be either analog or digital, depending on whether you are using analog or digital telephone lines. Multiple voice boards may be used in the same computer to achieve the total number of telephone lines required for the application. Exceptions: Our Speedy Dialer product requires one analog telephone line. Note: Our Inbound products, such as the Voice Mail-Automated Attendant, will work directly with either analog or PRI lines, but T1 & E1 lines require a channel bank to convert from digital to analog. Analog Lines: Standard analog telephone lines are used with Intel Dialogic 2, 4, 12, and 16 line boards. There are 2 versions of these boards: for ISA slots and for PCI slots. These boards have phone jacks with either 1 line per jack or 2 lines per jack. You may need a Line Coupler/Splitter, depending on how your phone lines are wired from the wall. Contact your sales person if you need any of those devices. Digital Lines: * T-1 and PRI lines are used with Intel Dialogic 24-line and 48-line boards. E-1 lines are used with Dialogic 30-line and 60-line voice boards (used in countries other than the USA and Canada). There are 2 versions of these boards: for ISA slots and for PCI slots. These boards have either 1 or 2 jacks for 1 or 2 T-1, PRI, or E-1 line cables. * T-1, PRI, and E-1 lines are available for long distance only or local only calls. When ordering these lines from a phone company, make certain you understand local vs. long distance pricing. * If you need Live Call Transfer see the section below. * You should also check with your telephone service provider to determine if you will need a CSU Power Module to keep your T-1 or PRI lines turned on if your computer shuts down. * Before ordering T-1, PRI, or E-1 lines from a telephone company, we highly recommend that the Buyer/User contacts our Technical Support at or help@tellacom.net. * If the Buyer/User orders T-1 telephone lines, give the telephone company the following provisioning requirements if you are using a Dialogic voice board: T-1 Provisioning Requirements (not for PRI or E-1): Framing & Coding: D4 SF / AMI E & M Immediate Address Signaling: DTMF Jack Type: RJ48X The above requirements are for T-1 lines only. If you need PRI or E-1 lines, you will need different requirements. Please contact Technical Support to assist you.

18 18 VoIP Telephone Service: Voice Over Internet Protocol services (such as Vonage) using broadband internet connections usually does not work well with auto dialing. This is due to the quality and speed of the service, band width fluctuations, amount of activity on the VoIP service, number of lines, etc. In addition, most VoIP companies have restrictions against the use of auto dialers and fax broadcasting. Exception: VoIP service usually works well when power dialing with our Speedy Dialer. Channel Banks: A channel bank is a device that can convert T-1, PRI, or E-1 digital telephone lines into separate analog lines. It makes all the lines available as separate lines rather than one cable. This is useful if you want to achieve any of the following: * Use an analog Dialogic voice board rather than a digital Dialogic voice board * Use some of the telephone lines for other uses than a Dialogic voice board * Get Call Transfer service which is not available on long distance digital lines * Need inbound lines and you only have T1 or E1 lines. (PRI or analog lines don t require a channel bank for inbound.) Live Call Transfers This feature is available with several of our products. If you do not need the call transfer function (transferring someone to another telephone line to speak to a live person), a standard residential or business telephone line with no special features will suffice. If you are planning to use the call transfer function, you ll need either 3-way calling, call transfer disconnect or Centrex type service from your phone company. Different phone companies have different names for this service. Verizon calls it Centranet and SBC calls it Plexar or call transfer disconnect. See below for the difference between these features. Note: Verizon and some other telephone companies may or may not actually release the line once the connection is made. They sometimes require pathways. Call Transfer Disconnect (or Centrex) Once the call is transferred, the call is disconnected from the original telephone line, freeing it up to receive or place more calls. (This may be used with our products that use Dialogic, PIKA, and Speedy Dialer.) or 3-Way Calling Once the call is transferred, the original phone line remains in use during the conversation and is not available to receive or place more calls until the conversation has ended. (This may be used with our products that use Dialogic & PIKA products, but not with Speedy Dialer.) Call transfer disconnect is usually available with local digital telephone lines, but not normally available with long distance digital telephone lines. If you will be using digital lines and need the call transfer function, please contact one of our Technicians before ordering those lines from your telephone company. If you cannot get the call transfer service you need, our Technicians can explain using call bridging (connecting 2 channels together). Call bridging is available with our systems using certain Dialogic voice boards.

19 19 Auto Dialing Operation Automatically dials lists of telephone numbers to deliver pre-recorded messages, announcements, or reminders to live answers or to answering machines. People called can just listen and/or they can respond by touchtone, voice response, or transfer to speak to a live agent.

20 20 Overview There are a variety of ways Auto Dialing can function: Deliver a message when the telephone is answered. Ask for a voice response after one or more messages or questions. Ask for a touchtone response to one or more questions. Transfer the call (using Centrex or 3-way calling to a live operator immediately or after a message). The system can detect a live person vs. an answering machine. The system is capable of handling up to 96 telephone lines simultaneously. Touchtone key responses may be stored in your computer for retrieval. The time of day to begin and end calling may be set by the operator. The system marks phone numbers that are busy, unanswered, and faxes/disconnected numbers. The system retries telephone numbers that were busy or unanswered as many times as the operator requests. The system allows you to import records of names and telephone numbers, or you may enter the information directly. Listings of Telephone Numbers to Call: Your system allows you to dial from lists created using 2 different methods. The FIRST way is by manually entering the telephone numbers in the system. That is practical only if you have a few phone numbers. The SECOND way is by importing lists of telephone numbers from various databases. Timing of Calls: The time it takes the system to complete its calling depends on 5 primary factors: 1. The length of the message 2. The hours you set to begin and end calling 3. The number of phone lines you devote to the system 4. The number of phone numbers in the list 5. The results of the call For example: Your message is 30 seconds long, calling is set to begin at 5 pm, 1 telephone line is used, and you have 240 phone numbers to call. Because some telephone numbers will be busy, no answer, or answering machines, you could expect to average about 1 call per minute. Therefore, it takes approximately 4 hours, finishing about 9 pm. If you devote 2 lines to the job, the time would be cut in half. Other factors that affect the time positively or negatively are the number of retries needed if busy or unanswered, the number of hang-ups before the

21 21 message is finished, and the number and type of responses from the people who were called. Note: You can choose a variety of hours to begin and end your calling. You should always be mindful not to call too early or too late. If you are using the system for telemarketing, many states allow calling only from 9 am to 9 pm Monday through Saturday and noon to 9 pm on Sunday. Answering Machines: Answering devices often answer the telephone that your Outbound Auto Dialer has called. There are various ways to deal with them, depending on which way you choose to deliver your messages. Our system offers answering machine detection. It listens to see if a live person answers or if an answering machine answers. If it hears a live person, it begins playing the message. If it hears an answering machine, it waits for the greeting to play, and then it delivers your message. Due to the various ways that telephones are answered by humans and due to the wide variety of answering machines and automated attendants, your auto dialer cannot be expected to properly deliver your message to 100% of the recipients. It will however operate successfully most of the time. The system has the ability to deliver the same message to a live person as well as an answering machine or it can deliver one message to a live person and a different message to an answering machine. You can also leave messages on answering machines and disconnect when you reach live people OR leave messages with live people and disconnect when you reach answering machines.
22 22 How to Set Up Your Auto Dialer There are several steps that have to be done before dialing can start. Below is a brief overview of the steps to take. All the settings and options are explained in detail. Before dialing for the first time: Before opening the software: Test the phone lines with a basic telephone by making an outbound call on all the phone lines to be used. If you plan to transfer the phone call(s), test this feature by making a 3-way or transferred call on all the lines to be used. If you have problems with this feature, please contact your local phone company for assistance, not the Auto Dialer technical support. *Note: Some businesses use their in-house phone system to make transferred calls instead of the phone company s lines. If you require assistance making a transferred call through your phone system, contact your phone system s administrator as the Auto Dialer technical support does not support any phone system. Read and review the different settings. Have the list of phone numbers to dial saved on your Auto Dialer computer ready to import. Register and download the Do Not Call lists (if required) for the area codes to be dialed onto the auto dialer computer. Please contact your state regulatory agency for any state lists. The National DNC is on the Internet at: Assistance can not be given by the Auto Dialer technical support team for help trying to register or to retrieve lists from the State or Federal government. Write your voice scripts in preparation for recording. Plug your microphone into the mic. jack on the back of your computer. *Note: If the user requires assistance setting up the Auto Dialer, please perform the above steps before calling technical support for help. After completing the above steps, click the Auto Dialer icon on the desktop.
23 23 Phone List The Phone List tab is the first screen of the Express Auto dialer where the data management of the different lists occurs. Creating a Phone List To create a new phone list, the user needs to first create a name for the list. Click the New button and type in a name to call this new phone list, then click the Save button. The name now appears in the Phone List box on the left side of the screen Importing a phone list The name is now created and phone numbers can be imported into the list. Click the phone list to import the numbers to and click the Import button. This opens a window called Import Data. Click the drop down arrow and select the type of file to be imported. Click the Browse button and find the file to import. Select the file that is going to be imported then click the Open button. This takes you back to the Import Data window and you will see a small sample of the file. Click the Next button.
24 24 If your information is not in separated fields, you will have to select a different String and/or Delimiter character. If the information is in proper fields click Next. After the import is finished, click the OK button. Click your Phone List to view the phone numbers. The last step is to remove duplicate records from the list by clicking the Clear Dupes button and waiting for the process to end. Importing the National DNC List On the Source field / Target field window, follow these steps: Target area: Top part of the screen in blue font. Scroll down to the Telephone option. Click the word ignored. Click the drop down menu and select the field where the phone numbers are located. The numbers can be in different fields from file to file. They may not always be in the same field. When you select the field, it highlights that field in blue as in our example to the left. Use the Source fields at the bottom of the window as a reference. Follow the same steps for any of the fields that you wish to import. The telephone field is the only field that is required to dial. After selecting the fields that you want, click the Finish button to import the file. The first step in this process is to download the list from the appropriate agency. The only standard list is the National DNC List from the federal government. Instructions on importing the National DNC List follow. Every state government compiles their list differently so the operator needs to contact their state for
25 25 information on the file format. The following steps have to be completed before the list is imported: 1. Download the Full, Flat text file from the government s website 2. Unzip the file. 3. Rename the file by adding.txt to the end of the file name. Click the DNC button, click Import a DNC List and select the National DNC List. When using a broadcast that allows the callers to Press 9 (to be added to your DNC), those telephone numbers are saved in your In House DNC. The Import Data window is displayed. Click the browse button to find the file you want to import. Once the file is found, double click the file. This returns you to the Import Data window. A small sample of the file is displayed in the File Preview window at the bottom of the Import Data window as in the example: When the numbers in File Preview window display with the area code separated by a comma, then the phone number, click the Next button. The area code in one field and the telephone number in the other field is displayed as shown to the left.
26 26 Uncheck the Comma selection. This action places the area code and telephone number in the same field. Click the Next button. Now you need to tell the information where to go (from the Source field at the bottom to the Target field at the top). Click the word Telephone in blue font on the Target Field option. After selecting Telephone, place your mouse on the name Field1 and click your mouse. Field1 is highlighted, so click the Finish button to start the import process. Click OK when the list is done. The last step is to the Strip the list which takes out the comma. Click the National DNC button; at the bottom of the window press the Strip button. Then do not touch a key on the keyboard or move the mouse. Please wait for the Stripping process to finish before using the computer. To search the DNC for a specific phone number on the list, click the DNC button, click the National DNC button, then click the folder button at the bottom and enter the phone number with area code. Then click OK.
System Requirements. Hiro H50113
 1 Hiro H50113 System Requirements Hiro H50113 Computer with Pentium 200 MMX or higher processor. Windows 2000, Windows XP Home / Professional, XP Professional x64 Edition, Vista 32 / 64 Families, Windows
Winlead Dialer Software Users Manual Addendum 3 Installing Winlead Dialer Software on the Windows 2000 System
 Winlead Dialer Software Users Manual Addendum 3 Installing Winlead Dialer Software on the Windows 2000 System Copyright 2002 by Winlead Dialer Software 1.0 - Install Guide for Winlead Dialer Software Software
FrontDesk Installation And Configuration
 Chapter 2 FrontDesk Installation And Configuration FrontDesk v4.1.25 FrontDesk Software Install Online Software Activation Installing State Related Databases Setting up a Workstation Internet Transfer
Digital Voice Services Residential User Guide
 Digital Voice Services Residential User Guide 2 P a g e * Feature Access Codes *11 Broadworks Anywhere (pulling call to alternate phone) *62 Access Voicemail *72 Call Forwarding Always Activation *73 Call
Digital Phone @ Home Tutorial
 Digital Phone @ Home Tutorial 2 Table of Contents Quick Start Guide... 4 Making Phone Calls... 5 Voicemail Setup... 6 Setup instructions:... 6 To Check Messages:... 6 Quick Key Reference:... 6 Customer
Stop Dialing By Hand! Dramatically increase your number of telephone calls and save huge amounts of time!
 Stop Dialing By Hand! Dramatically increase your number of telephone calls and save huge amounts of time! Cheetah Call phone lists fast to speak to people live! No dropped or abandoned calls! Power Dialer
UM8000 MAIL USER GUIDE
 UM8000 MAIL USER GUIDE INT-2076 (UNIV) Issue 1.0 INTRODUCTION Welcome to UM8000 Mail User Guide. The UM8000 Mail is a simple yet powerful voice messaging system that can greet your callers and record your
Empowered by Innovation. Setting Up and Using Fax Mail. P/N 1770087 July 2006 Printed in U.S.A.
 Empowered by Innovation Setting Up and Using Fax Mail P/N 1770087 July 2006 Printed in U.S.A. This manual has been developed by NEC Unified Solutions, Inc. It is intended for the use of its customers and
Digital Phone Installation & User Guide
 Digital Phone Installation & User Guide Telephone #1 Voicemail PIN Telephone #2 Voicemail PIN skybeam high speed internet digital phone We would like you to verify that the 911 address we have for you
Centrepoint Technologies. Phone System Solutions for: Smart homes Home businesses Small offices Branch/Remote offices DESKTOP PHONE SYSTEM.
 Centrepoint Technologies DESKTOP PHONE SYSTEM Phone System Solutions for: Smart homes Home businesses Small offices Branch/Remote offices User Guide Table of Contents 1.0 Installing TalkSwitch 1.1 What's
Virtual Receptionist Manual
 Virtual Receptionist Manual This manual is meant to be a guide to help you set up your PhoneFusion One Virtual Receptionist phone number, and some tips and shortcuts for some of your favorite features.
V.I.P. Kit. Video Insight Pilot Kit. (Video Insight Pilot Kit).
.") V.I.P. Kit (Video Insight Pilot Kit). Video Insight Pilot Kit Please follow these instructions and everything should go very smoothly. Before you begin, you will need to establish (or obtain from your
V.I.P. Kit (Video Insight Pilot Kit). Video Insight Pilot Kit Please follow these instructions and everything should go very smoothly. Before you begin, you will need to establish (or obtain from your
Clear Choice Communications. Digital Voice Services User Guide
 Clear Choice Communications Digital Voice Services User Guide 2 P a g e * Feature Access Codes *62 Access Voicemail *72 Call Forwarding Always Activation *73 Call Forwarding Always Deactivation *90 Call
HP LaserJet MFP Analog Fax Accessory 300 Fax Guide
 HP LaserJet MFP Analog Fax Accessory 300 Fax Guide Copyright and License 2008 Copyright Hewlett-Packard Development Company, L.P. Reproduction, adaptation, or translation without prior written permission
Digital Voice Services User Guide
 Digital Voice Services User Guide 2 P a g e * Feature Access Codes *11 Broadworks Anywhere (pulling call to alternate phone) *62 Access Voicemail *72 Call Forwarding Always Activation *73 Call Forwarding
Personal Call Manager User Guide. BCM Business Communications Manager
 Personal Call Manager User Guide BCM Business Communications Manager Document Status: Standard Document Version: 04.01 Document Number: NN40010-104 Date: August 2008 Copyright Nortel Networks 2005 2008
Virtual Phone System User Guide v4.7
 Virtual Phone System User Guide v4.7 169 Saxony Road, Suite 212 Encinitas, CA 92024 Phone & Fax: (800) 477-1477 Welcome! Thank you for choosing FreedomVoice. This User Guide is designed to help you understand
NEXTLEVEL INTERNET. NextLevel Voice User Guide
 NEXTLEVEL INTERNET NextLevel Voice User Guide N E X T L E V E L I N T E R N E T NextLevel Voice User Guide NextLevel Internet P.O. Box 502661 San Diego, CA 92150 Sales 858-836-0703 Support 858-836-0700
ShoreTel Enterprise Contact Center Using Agent Toolbar
 ShoreTel Enterprise Contact Center Using Agent Toolbar USER GUIDES RELEASE 7 Document and Software Copyrights Copyright 1998 2011 ShoreTel, Inc. All rights reserved. Printed in the United States of America.
How To Use Freedomvoice On A Cell Phone Or Landline Phone On A Pc Or Mac Or Ipad Or Ipa Or Ipo Or Ipod Or Ipode Or Ipro Or Ipor Or Ipore Or Ipoe Or Ipob Or
 Virtual Phone System User Guide v5.4 169 Saxony Road, Suite 212 Encinitas, CA 92024 Phone & Fax: (800) 477-1477 Welcome! Thank you for choosing FreedomVoice. This User Guide is designed to help you understand
Personal USB VoIP Gateway User s Guide
 Personal USB VoIP Gateway User s Guide Contents Contents... 2 Welcome... 3 Package Contents...4 Requirements... 5 USB Gateway Installation... 6 Enabling USB GATEWAY... 18 USB GATEWAY States... 20 USB Gateway
Verizon Business National Unified Messaging Service Enhanced Service Guide
 USER GUIDE Voice Verizon Business National Unified Messaging Service Enhanced Service Guide What Is Unified Messaging? Verizon Business National Unified Messaging Service is an interactive voicemail system
User Guide HUAWEI UML397. Welcome to HUAWEI
 User Guide HUAWEI UML397 Welcome to HUAWEI 1 Huawei UML397 4G LTE Wireless Modem User Manual CHAPTER 1 BEFORE USING YOUR UML397 WIRELESS MODEM ABOUT THIS USER MANUAL...4 WHAT S INSIDE THE PRODUCT PACKAGE...4
Ipiphony Phone System. User Manual. 1 P a g e
 Ipiphony Phone System User Manual 1 P a g e About this Guide This guide explains how to use the basic features of your new Aastra phones. Not all features listed are available by default. Contact your
Table of Contents GETTING STARTED... 3. Enter Password Dialog...3 Using Online Help...3 System Configuration Menu...4
 Table of Contents DV2000 Configuration - Service Release 3.0 GETTING STARTED... 3 Enter Password Dialog...3 Using Online Help...3 System Configuration Menu...4 SYSTEM CONFIGURATION OVERVIEW... 5 Using
Polycom SoundPoint 650 Quick Guide
 Polycom SoundPoint 650 Quick Guide ISC Networking & Telecommunications University of Pennsylvania October 2009, v.2 Contents Icons and Indicator Lights Telephone Icons 4 Envelope/Message Waiting Icon.4
AVAYA VOICE OVER INTERNET PROTOCOL (VOIP) TELEPHONE USER MANUAL. Revised by Leeward CC IT October 2012. University of Hawaiʻi Community Colleges
 TELEPHONE USER MANUAL. Revised by Leeward CC IT October 2012. University of Hawaiʻi Community Colleges") AVAYA VOICE OVER INTERNET PROTOCOL (VOIP) TELEPHONE USER MANUAL Revised by Leeward CC IT October 2012 University of Hawaiʻi Community Colleges Hawaiian Telecom Copyright 2012 Table of Contents PLACING
AVAYA VOICE OVER INTERNET PROTOCOL (VOIP) TELEPHONE USER MANUAL Revised by Leeward CC IT October 2012 University of Hawaiʻi Community Colleges Hawaiian Telecom Copyright 2012 Table of Contents PLACING
Voice Mail with E-Forward Online User Guide
 Voice Mail with E-Forward Online User Guide Check voice messages from any phone, your e-mail or online! Discover the ultimate convenience of managing your home and family life using Ponderosa Voice Mail
All Rights Reserved. Copyright 2009
 IMPORTANT NOTICE CONCERNING EMERGENCY 911 SERVICES Your service provider, not the manufacturer of the equipment, is responsible for the provision of phone services through this equipment. Any services
FX-BTCVT Bluetooth Commissioning Converter Commissioning Guide
 FX-BTCVT Bluetooth Commissioning Converter Commissioning Guide FX-BTCVT-1 (Bluetooth Commissioning Converter) Code No. LIT-12011665 Issued December 5, 2014 Refer to the QuickLIT website for the most up-to-date
TelDial. Quick Start. TelDial/VoIP/Skype
 TelDial Quick Start TelDial/VoIP/Skype For TelDial revision 2.00 or higher Document revision last update 8/9/2007 Warrantee Compliance and Liability Information Except as permitted under the United States
Hosting Users Guide 2011
 Hosting Users Guide 2011 eofficemgr technology support for small business Celebrating a decade of providing innovative cloud computing services to small business. Table of Contents Overview... 3 Configure
Voicemail Plus User Guide
 Voicemail Plus User Guide Version: 2.0_US Revised: 25 September 2007 Notices Copyright 2007 Vonage. All rights reserved. No part of this documentation may be reproduced in any form or by any means or used
Using Avaya Flare Experience for Windows
 Using Avaya Flare Experience for Windows Release 9.0 Issue 02.01 September 2013 Contents Chapter 1: About Flare Experience... 5 About Flare Experience... 5 Main window... 6 Button descriptions... 10 Chapter
Vonage Voicemail Plus. User Guide
 Vonage Voicemail Plus User Guide Version:. Revised 08 DEC 006 Vonage documentation is considered proprietary and is made available for business operations and review by employees and regulatory agencies.
To access your mailbox by computer. For assistance, call:
 User Guide 2002 Active Voice, LLC. All rights reserved. First edition 2002. Repartee and TeLANophy are trademarks of Active Voice LLC. To access your mailbox by computer 1. Launch Mailbox Manager. 2. When
Premium Digital Voice Solution. User Guide
 Premium Digital Voice Solution User Guide Table of Contents How to Log into Account Portal & Changing your Password 1 How to Download Toolbar 2 Utilizing Voice Mail 3 Feature Guide & How to Configure
UX Mail Fax Features. Empowered by Innovation. P/N 0913251 Rev 1, September 15, 2008 Printed in U.S.A. V4.21
 Empowered by Innovation UX Mail Fax Features P/N 0913251 Rev 1, September 15, 2008 Printed in U.S.A. V4.21 For additional resources, visit UX5000 on the web at http://www.necux5000.com. This manual has
TELEPHONE BUTTONS & ICONS TOUCHSCREEN OVERVIEW
 This Telephone Guide describes the various features available to you. Telephone Buttons and Icons describe the physical buttons and keys on the phone, the Touchscreen Overview outlines basic functions,
USER GUIDE. Cisco Small Business Pro. SPA 500 Series IP Phones Models 504G, 508G, and 509G. Provided by
 USER GUIDE Cisco Small Business Pro SPA 500 Series IP Phones Models 504G, 508G, and 509G Provided by Understanding Your Phoneʼs Lines and Buttons Use the following graphic and table to identify the parts
FortiVoice. Version 7.00 Start Guide
 FortiVoice Version 7.00 Start Guide FortiVoice Version 7.00 Start Guide Revision 2 18 October 2011 Copyright 2011 Fortinet, Inc. All rights reserved. Contents and terms are subject to change by Fortinet
1 VoIP/PBX Axxess Server
 - 1 1 VoIP/PBX Axxess Server The Axxess Server supports comprehensive Voice Over Internet Protocol network services, which are based on the Open Source Asterisk VoIP software. The Axxess Server VoIP telephony
TR-3 Channel Editor. Software Manual
 TR-3 Channel Editor Software Manual Trilithic Company Profile Trilithic is a privately held manufacturer founded in 1986 as an engineering and assembly company that built and designed customer-directed
TimeValue Software Due Date Tracking and Task Management Software
 User s Guide TM TimeValue Software Due Date Tracking and Task Management Software File In Time Software User s Guide Copyright TimeValue Software, Inc. (a California Corporation) 1992-2010. All rights
iview (v2.0) Administrator Guide Version 1.0
 Administrator Guide Version 1.0") iview (v2.0) Administrator Guide Version 1.0 Updated 5/2/2008 Overview This administrator guide describes the processes and procedures for setting up, configuring, running and administering the iview Operator
iview (v2.0) Administrator Guide Version 1.0 Updated 5/2/2008 Overview This administrator guide describes the processes and procedures for setting up, configuring, running and administering the iview Operator
Getting Started. Getting Started with Time Warner Cable Business Class. Voice Manager. A Guide for Administrators and Users
 Getting Started Getting Started with Time Warner Cable Business Class Voice Manager A Guide for Administrators and Users Table of Contents Table of Contents... 2 How to Use This Guide... 3 Administrators...
Orbitel. Residential Digital Phone Service User s Guide
 Orbitel Residential Digital Phone Service User s Guide All Rights Reserved Copyright 2005 The use, disclosure, modification, transfer, or transmittal of this work for any purpose, in any form, or by any
XPRESSIONS USER GUIDE
 XPRESSIONS USER GUIDE 1 WHAT IS XPRESSIONS? A voicemail system that enables access via the telephone or by PC/MAC. NOTE: Siemens no longer supports the current PhoneMail system. Xpressions is the replacement.
Xpressions Web Assistant
 Xpressions Web Assistant Accessing your voicemail via the web Information Technology Services Outreach and Distance Learning Technologies 1 Copyright 2014 KSU Department of Information Technology Services
IMPORTANT NOTICE CONCERNING EMERGENCY 911 SERVICES
 IMPORTANT NOTICE CONCERNING EMERGENCY 911 SERVICES Your service provider, not the manufacturer of the equipment, is responsible for the provision of phone services through this equipment. Any services
RiOffice Users Manual
 RiOffice Users Manual Rio Networks 9/23/2009 Contents Available Services... 4 Core PBX Features... 4 Voicemail Features... 4 Call Center Features... 4 Call Features... 4 Using Your Phone... 5 Phone Layout...
Faculty & Staff Quick Reference Guide to Smith College Telephone & Voicemail Systems
 Faculty & Staff Quick Reference Guide to Smith College Telephone & Voicemail Systems Table of Contents New Employees...2 Setting up Voicemail...3 - Accessing the Voicemail System - Changing your Password
ShoreTel Contact Center Using ShoreWare Agent Toolbar
 ShoreTel Contact Center Using ShoreWare Agent Toolbar USER GUIDES RELEASE 6 Document and Software Copyrights Copyright 1998 2010 ShoreTel, Inc. All rights reserved. Printed in the United States of America.
Corporate Telephony Toolbar User Guide
 Corporate Telephony Toolbar User Guide 1 Table of Contents 1 Introduction...6 1.1 About Corporate Telephony Toolbar... 6 1.2 About This Guide... 6 1.3 Accessing The Toolbar... 6 1.4 First Time Login...
Features Phone Access... 1. Features Web Access... 3. emta Quick Reference Guide...14. Troubleshooting...15. Quick Reference Guide...
 Phone TABLE OF CONTENTS Features Phone Access... 1 Features Web Access... 3 emta Quick Reference Guide...14 Troubleshooting...15 Quick Reference Guide...16 Features Phone Access Caller ID Feature that
IMPORTANT NOTICE CONCERNING EMERGENCY 911 SERVICES
 IMPORTANT NOTICE CONCERNING EMERGENCY 911 SERVICES Your service provider, not the manufacturer of the equipment, is responsible for the provision of phone services through this equipment. Any services
Fax Getting Started Guide
 Fax Getting Started Guide April 2009 www.lexmark.com Contents IMPORTANT SAFETY INSTRUCTIONS...3 Getting started...4 Finding more information about the printer...4 Navigating menus using the printer control
Electra Elite and InfoSet are registered trademarks of NEC America, Inc.
 reserves the right to change the specifications, functions, or features, at any time, without notice. has prepared this document for the use by its employees and customers. The information contained herein
LifeSize Networker Installation Guide
 LifeSize Networker Installation Guide November 2008 Copyright Notice 2006-2008 LifeSize Communications Inc, and its licensors. All rights reserved. LifeSize Communications has made every effort to ensure
Winlead User Manual. For Winlead Software revision 8.1 or higher Document rev 2.80, last update 08-04-11
 Winlead User Manual For Winlead Software revision 8.1 or higher Document rev 2.80, last update 08-04-11 Copyright 2011 by USAutodialer THE US AUTODIALER COMPANY www.usautodialer.com sales@usautodialer.com
Positron G-320 Business Phone System Setup Guide
 Positron G-320 Business Phone System Setup Guide 5101 Buchan Street, Suite 200 Montreal, Quebec H4P 2R9 Phone: (514)-345-2220 Support: (514)-664-4719 July 2011 Steps Once your Positron G-320 unit hardware
Personalizing Your Individual Phone Line Setup For assistance, please call 1-800-453-2251 ext. 102.
 Personalizing Your Individual Phone Line Setup For assistance, please call 1-800-453-2251 ext. 102. With these instructions, you will: 1. Record your greeting. 2. Configure your 911 setting. 3. Learn how
HP LaserJet MFP Analog Fax Accessory 300 Send Fax Driver Guide
 HP LaserJet MFP Analog Fax Accessory 300 Send Fax Driver Guide Copyright and License 2008 Copyright Hewlett-Packard Development Company, L.P. Reproduction, adaptation, or translation without prior written
AT&T Voice DNA User Guide
 AT&T Voice DNA User Guide Page 1 Table of Contents GET STARTED... 4 Log In... 5 About the User Dashboard... 9 Manage Personal Profile... 15 Manage Messages... 17 View and Use Call Logs... 22 Search the
MiVoice Integration for Salesforce
 MiVoice Integration for Salesforce USER GUIDE MiVoice Integration for Salesforce User Guide, Version 1, April 2014. Part number 58014124 Mitel is a registered trademark of Mitel Networks Corporation. Salesforce
Quick Start Guide. Cisco SPA232D Mobility Enhanced ATA
 Quick Start Guide Cisco SPA232D Mobility Enhanced ATA Package Contents Analog Telephone Adapter Ethernet Cable Phone Cable Power Adapter Quick Start Guide Product CD-ROM Welcome Thank you for choosing
DPH-50U VoIP USB Phone Adapter Quick User Guide
 DPH-50U VoIP USB Phone Adapter Quick User Guide Version 1.0 TABLE OF CONTENTS 1. INTRODUCTION...3 2. PACKAGE CONTENTS...4 3. REQUIREMENTS...5 4. DPH-50U INSTALLATION...6 5. ENABLING DPH-50U...16 6. DPH-50U
VoIP Quick Start Guide
 VoIP Quick Start Guide VoIP is made up of three elements: The Phone The Software (optional) The Web Version of the software (optional) Your new voice mail can be accessed by calling (971-722) 8988. Or,
Digital Telephone User Guide
 Digital Telephone User Guide 1 Proud to provide Conway s Electric, Water, Cable, Internet and Telephone services. Welcome to Conway Corporation Digital Telephone Service We take pride in providing superior
Using Avaya Aura Messaging
 Using Avaya Aura Messaging Release 6.3.2 Issue 1 December 2014 Contents Chapter 1: Getting Started... 4 Messaging overview... 4 Prerequisites... 4 Accessing your mailbox from any phone... 4 Accessing the
<Insert Picture Here> Contact Center Anywhere: Interaction Manager (IM) Overview
 Overview") Contact Center Anywhere: Interaction Manager (IM) Overview What is Interaction Manager? Interaction Manager is the software that each call center agent uses to take and place customer
Contact Center Anywhere: Interaction Manager (IM) Overview What is Interaction Manager? Interaction Manager is the software that each call center agent uses to take and place customer
Business Telephone User Guide
 Business Telephone User Guide 1 Proud to provide Conway s Electric, Water, Cable, Internet and Telephone services. Welcome to Conway Corporation Business Telephone Service We take pride in providing superior
... SphericallTM. Sphericall Desktop User Manual
 ................................... SphericallTM Sphericall Desktop User Manual ................................... Sphericall Desktop User Manual H T T P : / / W W W. S P H E R E C O M. C O M P A R T
VoIP Adapter User Guide
 VoIP Adapter User Guide This guide is meant to help you set up your VIRTUAL PhoneFusion One phone number and PhoneFusion VoIP Adapter. It will also provide you some tips and shortcuts. Note that PhoneFusion
USER GUIDE Cisco Small Business
 USER GUIDE Cisco Small Business Cisco Unified Communications Manager Express for IP Phone Models 30X August 2013 Cisco and the Cisco logo are trademarks or registered trademarks of Cisco and/or its affiliates
Finding What You Need... 4 Setting Up the Wireless Network Feature... 6 Practice Using the Touchscreen Display... 15
 user guide Table of Contents Getting Started Finding What You Need... 4 Setting Up the Wireless Network Feature... 6 Practice Using the Touchscreen Display... 15 Using Your Phone Making Captioned Phone
PIGCHAMP MOBILE. PigCHAMP Knowledge Software. Installation Guide for Mobile Units
 PIGCHAMP MOBILE PigCHAMP Knowledge Software Installation Guide for Mobile Units Table of Contents: Important Note:... 4 Chapter 1: PC Setup... 5 A. Install PigCHAMP Mobile Manager on Windows XP...5 B.
ShoreTel Enterprise Contact Center 8 Using Agent Toolbar
 ShoreTel Enterprise Contact Center 8 Using Agent Toolbar November 2012 Legal Notices Document and Software Copyrights Copyright 1998-2012 by ShoreTel Inc., Sunnyvale, California, USA. All rights reserved.
Coral Message Center (CMC)
") Coral Message Center (CMC) User Guide Version 2.1 for Windows The flexible way to communicate. 2002-2003 Active Voice LLC All rights reserved. First edition 2003. 1 for Yes, 2 for No, PhoneBASIC, Repartee,
Coral Message Center (CMC) User Guide Version 2.1 for Windows The flexible way to communicate. 2002-2003 Active Voice LLC All rights reserved. First edition 2003. 1 for Yes, 2 for No, PhoneBASIC, Repartee,
Quick Start Guide NVR DS-7104NI-SL/W NVR. www.hikvision.com. First Choice For Security Professionals
 Quick Start Guide NVR DS-7104NI-SL/W NVR NOTE: For more detailed information, refer to the User s Manual on the CD-ROM. You must use your PC or MAC to access the files. www.hikvision.com Quick Start 1.
Business Solutions. Page 1
 2012 C Page 1 Contents Getting Started emerge Dashboard Login... 3 Main Profile Screen... 5 Group Services... 5 Auto Attendant Overview... 7 Modifying Auto Attendant Settings... 7 Auto Attendant Modify
SATA+Ultra ATA RAID CONTROLLER RC212. User Manual
 SATA+Ultra ATA RAID CONTROLLER RC212 Contents Feature and benefits Package contents System requirement Magic Switch introduction and jumper setting Hardware installation Important message for user RAID
NGT Hosted Digital Voice. User Guide
 NGT Hosted Digital Voice User Guide December 2009 Getting Started Making Calls Using Your NGT Hosted Digital Voice service Domestic Dial as you normally would. You can also reference your local telephone
Connecting to ANC by VPN (Virtual Private Network)
") Connecting to ANC by VPN (Virtual Private Network) The VPN creates an encrypted connection, a tunnel through the Internet, to the company s secure network servers for employees who need to access network
Connecting to ANC by VPN (Virtual Private Network) The VPN creates an encrypted connection, a tunnel through the Internet, to the company s secure network servers for employees who need to access network
Serial ATA RAID PCI. User's Manual
 Serial ATA RAID PCI User's Manual Chapter 1 Introduction Table of Contents 1-1 Features and Benefits. 1 1-2 System Requirements. 1 Chapter 2 RAID Arrays 2-1 RAID Overview.. 2 2-1.1 RAID 0 (striping)...
Please let us know if you need anything. Our customer service number is 1-866-311-5900. We re always happy to help.
 Dear Valued Customer, We are proud to welcome you to the EvenLink s Crystal Clear Digital Phone service. Our network reliability, customer support and value pricing are a great combination. We appreciate
Telesystem Visual Voicemail Android User Guide
 Telesystem Visual Voicemail Android User Guide Visual Voicemail - Android The Visual Voicemail app allows you to listen/delete/read your messages 1 from your Android device. Before downloading the app
2.4 GHz Dual Handset Cordless Telephone Answering System 2255 with Caller ID/Call Waiting
 USER S MANUAL Part 2 2.4 GHz Dual Handset Cordless Telephone Answering System 2255 with Caller ID/Call Waiting Please also read Part 1 Important Product Information AT&T and the globe symbol are registered
Phone Adapter. with 2 Ports for Voice-over-IP. Installation and Troubleshooting Guide. Model No. PAP2 Ver. 2. Voice
 Phone Adapter with 2 Ports for Voice-over-IP Voice Installation and Troubleshooting Guide Model No. PAP2 Ver. 2 Copyright and Trademarks Specifications are subject to change without notice. Linksys is
TELUS Business ConnectTM. User Guide
 TELUS Business ConnectTM User Guide TELUS Business Connect User Guide Table of Contents Table of Contents 3 Part - Getting Started 4 Introduction 5 Overview 6 Messages 7 Call Log 8 Contacts 9 User Settings
NEXTLEVEL INTERNET. NextLevel Voice Office Manager Guide
 NEXTLEVEL INTERNET NextLevel Voice Office Manager Guide N E X T L E V E L I N T E R N E T NextLevel Voice Office Manager Guide NextLevel Internet P.O. Box 502661 San Diego, CA 92150 Sales 858-836-0703
Hosted Voice Quick Start Guide
 Hosted Voice Quick Start Guide EATEL 225-621-4100 Welcome Welcome to Hosted Voice from EATEL! This guide is intended to get you up and running for the basic features associated with the product. Pages
Contents. Hardware Configuration... 27 Uninstalling Shortcuts Black...29
 Contents Getting Started...1 Check your Computer meets the Minimum Requirements... 1 Ensure your Computer is Running in Normal Sized Fonts... 7 Ensure your Regional Settings are Correct... 9 Reboot your
Welcome to life on. Get started with this easy Self-Installation Guide.
 Welcome to life on Get started with this easy Self-Installation Guide. Welcome to a network that s light years ahead. Welcome to life on FiOS. Congratulations on choosing Verizon FiOS! You re just a few
1. Installing The Monitoring Software
 SD7000 Digital Microphone Monitor Software manual Table of Contents 1. Installing The Monitor Software 1.1 Setting Up Receivers For Monitoring 1.2 Running The Application 1.3 Shutdown 2. The Detail Monitoring
Business Communications Solutions 9910 Irvine Center Drive Irvine, CA 92618 www.bcsconsultants.com [ m ] 949.333.1000 [ f ] 949.333.
![Business Communications Solutions 9910 Irvine Center Drive Irvine, CA 92618 www.bcsconsultants.com [ m ] 949.333.1000 [ f ] 949.333.](/thumbs/28/12943220.jpg "Business Communications Solutions 9910 Irvine Center Drive Irvine, CA 92618 www.bcsconsultants.com [ m ] 949.333.1000 [ f ] 949.333.") VERTICAL VIEWPOINT 2.0 USER GUIDE Business Communications Solutions 9910 Irvine Center Drive Irvine, CA 92618 www.bcsconsultants.com [ m ] 949.333.1000 [ f ] 949.333.1001 TABLE OF CONTENTS Logging on to
VERTICAL VIEWPOINT 2.0 USER GUIDE Business Communications Solutions 9910 Irvine Center Drive Irvine, CA 92618 www.bcsconsultants.com [ m ] 949.333.1000 [ f ] 949.333.1001 TABLE OF CONTENTS Logging on to
CISCO IP PHONE MODEL 7960 & UNITY VOICEMAIL INCLUDES CISCO CALLMANAGER ATTENDANT CONSOLE. Getting Started Manual
 CISCO IP PHONE MODEL 7960 & UNITY VOICEMAIL INCLUDES CISCO CALLMANAGER ATTENDANT CONSOLE Getting Started Manual... 3 Getting Started... 3 Using LCD Icons... 3 Using the IP Phone Configuration Utility...
Linksys Gateway SPA2100-SU Manual
 Linksys Gateway SPA2100-SU Manual Manuel de l'utilisateur Table of Contents Looking for Basic Setup Instructions?... 3 Most Recent Version of this Manual... 3 Advanced Setup Instructions... 4 Wiring Your
Welcome. Digital Phone. Digital Phone. Digital Phone
 Welcome to Welcome to Wi-Power Service Thank you for choosing Wi-Power Internet and Services! This booklet includes important information to better acquaint yourself with Wi- Power Service. Features: Wi-Power