CLK 550 passenger side bumper exhaust cutout.
|
|
|
- Audra Caldwell
- 2 years ago
- Views:
Transcription
 Drill and bit Marker goggles mask painters")
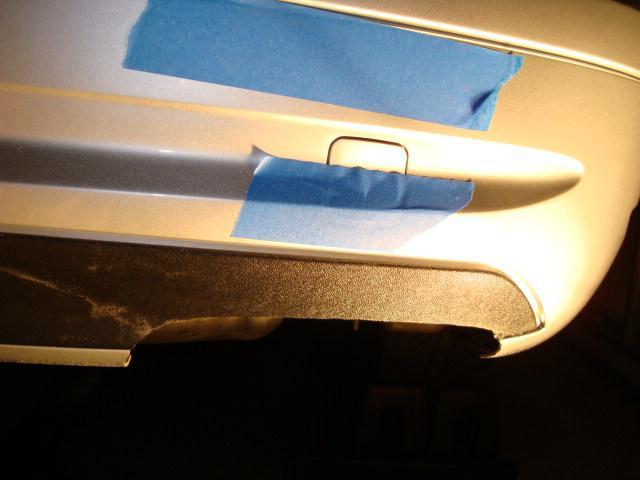
1 CLK 550 passenger side bumper exhaust cutout. These are the tools I used for the bumper cutout. Dremel (grinding wheel plastics cutter guide cutting wheel) Drill and bit Marker goggles mask painters tape duct tape

2 VIS Diffuser covered with painter s tape to protect finish during my handling OE diffuse/bumper with painter s tape over area to be cut out Helps with marking if you make a mistake just remove tape and apply more Helps with avoiding surface splintering of paint and plastic Helps with finishing edges Used diffuser to draw cutout If you are not adding an aftermarket diffuser, you will need to make a template. - The pass side cutout will be a mirror image of the driver side - I ve found the cardboard of coke/soda or beer 12-packs are good for stencils - Make sure your stencil is formed to include part of the bumper underside on either side of the drv side opening. This will help to align the cutout for the pass side by using the underside of the bumper edge as a reference point. - Measure from the top and end of the black insert to validate your cutout marking - Measure 3-4 times before cutting also stand back and eyeball it Another reason for the painters tape is that when using duct tape to hold the diffuser in place for measurements and checking, I didn t have to worry about the duct tape residue on the paint finish. The muffler shop tech who did my interim exhaust pigtail from the drv side muffler to the pass side exit would be handling the diffuser to align the tips. I didn t want him scratching the finish.

3

4 You may need to grind down the black plastic here, across from the tip. Had to grind mine about 1/16 to get an unstressed fit of the diffuser on mine. At this point, with the cutout lines drawn and the area to grind is marked, you could take the car to a body shop and have them cut and finish.

5 Make a test run using the Dremel. There is a tendency for the cutting tool to walk. So practice in an area to be removed to learn to control the tool movement. You should run your cut a minimum of 1/16 below the cut line. Use the grinding wheel to get closer to your cut line. (to within 1/64 if you are not installing a diffuser) Use a flat and a rat tail file to finish the edges to the line if you re not installing a diffuser or if you wish.

6 This plastic brace will be to the right of center. It is a bit hard to cut with the plastic cutting tool (the one that looks like a drill bit). You can locate this before you start cutting and mark the painters tape on the side you will be cutting from. Skip cutting the bumper here. Use the cutting wheel to cut the bumper here last, then remove the bumper piece to expose this brace. Use the Dremel cutting wheel to cut it off.

7 This is how it looks with the grinding wheel finished edges. I did not file it down.
8

9 I used a couple of these as a brace to connect the VIS diffuser to the bottom of the OE bumper. It is not really needed. I m just old school.

10
11

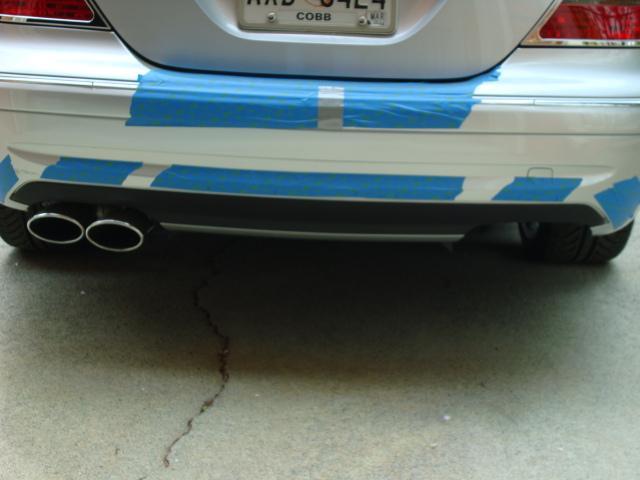
12 I thought I would use the pigtail piping arrangement longer (had planned a year), but it was an abomination. It was a cheap solution and would allow me to stay on the budget I had for the car. After driving for about 1000 miles, I had enough. I changed the budget and accelerated my plans to the full dual config posted.

13 This pic is still with the pigtail piping but the diffuser install came out well. Fatz MB
14 Parts.com CLK500 Fuel system diagram.
15 Exhaust Tips Alignment Fatz 2008 CLK550 June 2013 View From Rear 11 12/16 View From Top Drivers Side 8/16 Tips Diffuser 1 7/16 1 7/16 0 degree lateral rotation 8 14/ / /16 = 2 14/16 (2 14/16) / 2 = 1 7/16 Measurements made from inner walls of diffuser opening 1 Tips View From Top 1 Tips 1 Diffuser
MGB Chrome Bumper Conversion
 MGB Chrome Bumper Conversion Installation Instructions For 1974 1/2-1980 MGB This kit requires cutting, welding, and painting. Professional installation recommended. Note: Every MGB body is slightly different
WARNING! REQUIRED TOOLS & SUPPLIES: HIGH VOLTAGE
 INSTRUCTIONS Product: GEM Electric Motorcars Models: All Subject: Instructions for installing Stereo Accessory Estimated Completion Time:.75 Hours Parts: See Page # 7 REQUIRED TOOLS & SUPPLIES: (1) 3/8
2002 2005 Mini Cooper S Grille Install Instructions
 2002 2005 Mini Cooper S Grille Install Instructions Lower Front Grille BEFORE AFTER Package Contents 1 perforated grille (Stiletto, RAZR, or Monster) 6 Zip Tie Mounting Pads 1 is for the temp. sensor 5
Building Pluto Subwoofers with Large PVC Pipe
 Building Pluto Subwoofers with Large PVC Pipe I decided to make the Pluto subwoofers from 10-12 diameter PVC pipe. It seemed to me that these would be a better visual match to the Plutos themselves. The
THE MINI AERO GRILL INSTALLATION ON MCS STOCK FRONT BUMPER
 THE MINI AERO GRILL INSTALLATION ON MCS STOCK FRONT BUMPER Original instructions (from www.r53w11.com): Some basic rules: Take your time, re-read all you instructions, and make sure you have all your parts
INSTALL/REMOVAL INSTRUCTIONS: WINDOW LIFT MOTOR
 REMOVAL/INSTALL OF WINDOW LIFT MOTOR (742-273) Ford Expedition 1997 2002, Lincoln Navigator 1998 2002, Ford F-150 Super Crew Cab 2001 General Tech Tips: Use painter s tape rather than duct tape to secure
INSTALL/REMOVAL INSTRUCTIONS: WINDOW REGULATOR
 REMOVAL/INSTALL OF WINDOW REGULATOR (748-547) Chrysler 300 2005 10, Dodge Magnum 2005 08, Dodge Charger 2006 09 General Tech Tips: Use painter s tape rather than duct tape to secure window. It will not
Post Mount Light Installation*
 Post Mount Light Installation* *For the general installation of most Post Mount Spotlights, many vehicles may need slight modifications to these instructions. You will need the following tools: High torque
741-760 INSTALL/REMOVAL INSTRUCTIONS: WINDOW REGULATOR
 REMOVAL/INSTALL OF WINDOW REGULATOR (741-760) Chevy Cavalier, Pontiac Sunfire Coupe 1996 2005 General Tech Tips: Use painter s tape rather than duct tape to secure window. It will not damage paint or leave
Firewall Cover Installation Instruction Sheet
 Firewall Cover Installation Instruction Sheet Please Read Carefully Our Firewall cover is designed to fit on the stock strut brace. If you have an aftermarket strut brace than it is you re responsibility
Low Cost Heliostat Assembly Kit for High Schools
 Low Cost Heliostat Assembly Kit for High Schools Phillip Daniel Supervisor: Rockwell International Assistant Professor Alexander Mitsos Department of Mechanical Engineering Massachusetts Institute of Technology
Installation Guide for the TJ LCG PRO Suspension System (Low Center of Gravity) Available 4 or 5
 Available 4 or 5") INSTALLATION GUIDE Installation Guide for the TJ LCG PRO Suspension System (Low Center of Gravity) Available 4 or 5 Take every precaution to make this installation a safe procedure. Make safety the number
INSTALLATION GUIDE Installation Guide for the TJ LCG PRO Suspension System (Low Center of Gravity) Available 4 or 5 Take every precaution to make this installation a safe procedure. Make safety the number
Air Conditioner Duct Construction & Repair
 PROPER ROOF AIR CONDITIONER MOUNTING At Newmar, there are two different models of air conditioners available on all towable and motorized units. The different models are the Dometic Brisk and Penguin models,
Wine Rack & Glass Storage Bench Chris Gardner
 Wine Rack & Glass Storage Bench Chris Gardner Quantity Length Width Material Part 2 48 16 3/4 birch plywood top, bottom 2 14 16 3/4 birch plywood sides 2 14 13 3/4 birch plywood support dividers 2 3 15
Picnic Table Plans. Made out of a single sheet of plywood, it s also portable! By Kevin Ayer. This children's picnic table would
 Picnic Table Plans Made out of a single sheet of plywood, it s also portable! By Kevin Ayer Materials One 4- by 8-foot sheet of 3 4-inch AC plywood Twelve 11 4-inch wood screws Primer and exterior paint
R O A D M A S T E R, I N C.
 R O A D M A S T E R, I N C. MOUNTING BRACKET KIT 12 3 6 9 5 11 ITEM QTY NAME MATERIAL 1...4...1/2" x 1 1/2" BOLT... 350095-00 2...4...1/2" x 1 1/2" CARRIAGE BOLT... 350362-00 3...8...1/2" NUT... 350258-00
Twist Drill Grinding Attachment By Steven Skiprat Jackson June 2009
 Twist Drill Grinding Attachment By Steven Skiprat Jackson June 2009 Part 1. About the tool Part 2. Mounting the tool Part 3. Using the tool Part 1. About the tool This little gadget while not a precision
Hydraulic Steering Install
 Hydraulic Steering Install Disclaimer: The following is a tutorial on how to install hydraulic steering in a center console boat. I am not a mechanic. I am not a photographer. I am a guy who had a steering
COMPLIMENTARY WOODWORKING PLAN
 COMPLIMENTARY WOODWORKING PLAN Adirondack Chair This downloadable plan is copyrighted. Please do not share or redistribute this plan in any way. It has been created for Wilton Tools, a division of WMH
Sprinter Side Window Removal and Installation
 Sprinter Side Window Removal and Installation DaimlerChrysler has been very slow to offer side windows that open on Sprinters. In addition, the secondary market suppliers of windows have not jumped to
Stainless Steel Sink Work Center With Portable Sink, Colander and Cutting Board
 SKU: 463780 / QK09 Owner s Manual Stainless Steel Sink Work Center With Portable Sink, Colander and Cutting Board THANK YOU for selecting American Standard the benchmark of fine quality for over 00 years.
3D Print Link's Hylian Shield
 3D Print Link's Hylian Shield Created by Ruiz Brothers Last updated on 2015-07-14 04:20:12 PM EDT Guide Contents Guide Contents Overview Parts, Tool & Supplies 3D Printing 3D Printed Parts Slicer Settings
Guide for Modified Assembly: Lightning McQueen. By: Collin Patterson, University of Delaware. Materials and Tools:
 Guide for Modified Assembly: Lightning McQueen By: Collin Patterson, University of Delaware Materials and Tools: PVC o 40 inches of 1 in diameter PVC o 25 inches of ¾ in PVC o 4 x 1 in elbows o 2 x ¾ in
BUILDINGA 1/10 SCALE FLATBED TRAILER
 VOLUME 1, ISSUE 1 BUILDINGA 1/10 SCALE FLATBED TRAILER BUILT, DESIGNED & WRITTEN BY NATHAN MYERS MATERIALS: FEATURES: While the design was kept simple to allow anyone to be able to build their own trailer,
Wren Kitchens Installation Tips... 3. Carefully check your kitchen delivery... 4. Measuring out and marking up... 5. Fitting the base cabinets...
 tra 1 Index Wren Kitchens Installation Tips... 3 Carefully check your kitchen delivery... 4 Measuring out and marking up... 5 Fitting the base cabinets... 6 Fitting the corner cabinets... 7 The 972mm or
VW GOLF Mk4 TDI FRONT MOUNTING INTERCOOLER INSTALLATION INSTRUCTIONS
 VW GOLF Mk4 TDI FRONT MOUNTING INTERCOOLER INSTALLATION INSTRUCTIONS Tools required: 10mm/13mm socket and 3/8 drive ratchet with extension Torx T20/25/30 screwdrivers or bits Phillips head screwdriver,
Recommended Procedure For How to Prepare and Paint Carbon Fiber and Composite Parts
 FRP Techniques Recommended Procedure For How to Prepare and Paint Carbon Fiber and Composite Parts Figure 1. A primered composite tailbase with a carbon fiber top wing element. Figure 2. Installing and
FRAME DOOR OPENING, DOOR AND SIDE PANEL OUTER
 NUBIRA/LACETTI FRAME DOOR OPENING, DOOR AND SIDE PANEL OUTER 6 1 SECTION 6 FRAME DOOR OPENING, DOOR AND SIDE PANEL OUTER CONTENTS 1. FRAME DOOR OPENING........................................... 6 2 1.1.GENERAL
INSTALLATION INSTRUCTIONS
 Rear Vision System Aftermarket and Factory 5.0, 8.4 and 6.1 MyGig Touch Screen Display (Factory Display requires Chrysler/Dodge dealer to activate) 2009 Current* Dodge Ram (Kit part number 1009-6503) *NOTE:
INSTALL INSTRUCTIONS KK-C-HVAC-1 HVAC UNIT 2003-2014 CHEVROLET/GMC VANS FOR
 INSTALL INSTRUCTIONS KK-C-HVAC-1 HVAC UNIT 2003-2014 CHEVROLET/GMC VANS FOR (For NEW 2007 ALL WHITE KWIK-KITS ONLY) Warning do not attempt to install A/C units unless you are experienced with servicing
Sebring Timing Belt and Water Pump Replacement
 Sebring Timing Belt and Water Pump Replacement I was motivated to do this work because of a bearing growling sound emanating from the engine. It would grind at low rpms when the engine was cold and then
Models A spe n, Econoline C o l o n i al. and Savoy. Installation Instructions. Contractors Wardrobe
 Installation Instructions Models A spe n, Econoline C o l o n i al and Savoy Contractors Wardrobe DESIGNERS MANUFACTURERS TOLL FREE: (800) CW-DOORS (800) 293-77 www.cwdoor.com 2121 Avenue Hall Valencia,
Things you need to assemble the tube actuator. Left to right. are small piece of masking tape, super glue,pen knife and small
 Things you need to assemble the tube actuator. Left to right are small piece of masking tape, super glue,pen knife and small crosspoint screwdriver. You will also need a few drops of light oil. Begin by
KITCHENS. Tip PAGE 1 FITTING YOUR KITCHEN GUIDE. How to mark out a kitchen. Tools required for installing a kitchen STEP ONE STEP TWO STEP THREE
 FITTING YOUR KITCHEN GUIDE How to mark out a kitchen PAGE 1 Before starting on the installation, measure 870mm from the lowest point of the floor and mark a datum line around the room to indicate where
INSTALLATION INSTRUCTIONS for Bifold Doors (JII103)
") Thank you for selecting JELD-WEN products. Attached are JELD-WEN s recommended installation instructions for premium composite, hollow and solid core molded Bifold Doors. Bifolds are designed for fast
Thank you for selecting JELD-WEN products. Attached are JELD-WEN s recommended installation instructions for premium composite, hollow and solid core molded Bifold Doors. Bifolds are designed for fast
INSTALLATION INSTRUCTIONS. 6111 Air Spring Kit 2011+ Ford F250/F-350 Single Wheel 2WD 2011+ Ford F350 Dually 2WD IMPORTANT NOTES
 INSTALLATION INSTRUCTIONS 6111 Air Spring Kit 2011+ Ford F250/F-350 Single Wheel 2WD 2011+ Ford F350 Dually 2WD Thank you for purchasing a quality Hellwig Product. PLEASE READ THIS INSTRUCTION SHEET COMPLETELY
1998-2002 Suzuki Katana Fender Eliminator
 1998-2002 Suzuki Katana Fender Eliminator The following are instructions and illustrations on the installation of the custom fender elimination. 1 Begin by removing seat, both rear fairings, and tail light
Installation Instructions: (Part # SB76880) XRC Armor Front Fender Kit
 XRC Armor Front Fender Kit") WARNING: Check with Local and State laws before installing this accessory! NOTE: Carefully read entire instructions thoroughly before attempting to install this part. Parts Included: Qty Parts Included:
WARNING: Check with Local and State laws before installing this accessory! NOTE: Carefully read entire instructions thoroughly before attempting to install this part. Parts Included: Qty Parts Included:
Retrofit Instructions Installing a Sport Heated Steering Wheel - Leather, Multifunction BMW X5, E53, 2001 2006
 Retrofit Instructions Installing a Sport Heated Steering Wheel - Leather, Multifunction BMW X5, E53, 2001 2006 Disclaimer: This set of instructions is simply a guide on how I installed my own heated steering
AWE Tuning Air/Air Intercooler Kit for 2000-04 Audi 2.7T
 AWE Tuning Air/Air Intercooler Kit for 2000-04 Audi 2.7T Congratulations on your purchase of the AWE Tuning Intercoolers for your 2.7T Audi. Hundreds of hours of design and operational testing were spent
www.cornholesupplies.com
 www.cornholesupplies.com How To Build Regulation Cornhole Boards Home of the Original Cornhole Bags and Boards Supply List: 1-4' X 8' Piece of Plywood (pre sanded) 4-2" X 4" X 8' Studs (2 by 4s make sure
Beautifully Traditional
 Arcade 800mm Single Sliding Door Quadrant - nickel Arcade 900mm Single Sliding Door Quadrant - nickel ARC48 ARC49 INSTALLATION INSTRUCTIONS A www.arcadebathrooms.com IMPORTANT - Please read before installation
Here is your set of Detailed Plans from Copyright 2004 All Rights Reserved
 Here is your set of Detailed Plans from Copyright 2004 All Rights Reserved Materials for the House Here is the list of materials you will need to construct the basic house then to cover it with roofing
INSTALL/REMOVAL INSTRUCTIONS: WINDOW REGULATOR
 REMOVAL/INSTALL OF WINDOW REGULATOR (741-644) Cadillac Escalade, Chevrolet Suburban, Chevrolet Tahoe, GMC Yukon, Chevrolet Silverado, GMC Sierra 2000 05 General Tech Tips: Use painter s tape rather than
Electric Field Mapping Lab 3. Precautions
 HB 09-25-07 Electric Field Mapping Lab 3 1 Electric Field Mapping Lab 3 Equipment mapping board, U-probe, resistive boards, templates, dc voltmeter (431B), 4 long leads, 16 V dc for wall strip Reading
Gear PEPSI CAN STOVE INSTRUCTIONS
 Gear PEPSI CAN STOVE INSTRUCTIONS [NOTE: Updated Instructions are now available. The new stove is less likely to develop flame leaks and the fuel/air mixture is improved. Instructions for a simmer ring
Repairing a Day/Night Shade made by Specialty Window Coverings. Introduction
 Repairing a Day/Night Shade made by Specialty Window Coverings Introduction Restringing a pleated shade can be exasperating hopefully the changes I made to the manufacturer s instructions will make the
89 to 93 Dashboard Removal. Created for Miata.net Members by Anthony Meeks (SE1686)
") 89 to 93 Dashboard Removal Created for Miata.net Members by Anthony Meeks (SE1686) Intro When I bought my 91 SE, the paint on the top of the dashboard was in terrible shape and I immediately determined
89 to 93 Dashboard Removal Created for Miata.net Members by Anthony Meeks (SE1686) Intro When I bought my 91 SE, the paint on the top of the dashboard was in terrible shape and I immediately determined
Create a Camera Obscura
 Artists in the 17 th and 18 th centuries sometimes used a tool called a camera obscura (Latin for dark room ) to make precise drawings. With a camera obscura, an artist could project an image of a scene
Etching using chemicals
 Etching using chemicals Free tutorial Artsandtechniques.com Arts and Techniques School RJDS inc. Etching using chemicals There are several ways to etch metal, this technique uses a chemical. The etching
C5 Sound Deadening & Insulation Kit Interior Removal & Installation Instructions
 C5 Sound Deadening & Insulation Kit Interior Removal & Installation Instructions Ok, let's start with taking the radio bezel dash area off first. Here is what the OEM radio looks like... First you flip
Router Table Plans. www.bobsplans.com
 www.bobsplans.com Router Table Plans Increase the capabilities of your router with this weekend project. Features a sliding fence with EZ-Mount clamps. These clamps are simple to make and grip tightly
Using the Laser Cutter and AutoCAD Template
 1 Using the Laser Cutter and AutoCAD Template This tutorial outlines the best way to cut and etch using the laser cutter. Your project is important to you, and you want to finish it efficiently. Using
How to build a Pizza Oven in 4 days
 How to build a Pizza Oven in 4 days Preparation day (slab) 1. Foundation 1500 deep x 1300 wide x 75mm deep Required 20 bags cement pre mix. If you already have a concrete base, you save this prep day DAY
FRONT BUMPER INSTALLATION INSTRUCTIONS 2007-2011 DODGE / MERCEDES SPRINTER
 Aluminess Products Inc 9402 Wheatlands Ct. #A Santee, CA 92071 619-449-9930 FRONT BUMPER INSTALLATION INSTRUCTIONS 2007-2011 DODGE / MERCEDES SPRINTER Please read before beginning Stainless steel hardware
Building an Off-Center Fixture for Turning Pendants
 Building an Off-Center Fixture for Turning Pendants Turning a pendant off-center with most available metal pendant chucks means that you will have a significant amount of mass off center, which will limit
Mounting Printed Circut Boards (PCB) Toll Free: 1.866.849.3911 (US & Canada) Fax: 902.567.3336 Email: info@protocasedesigner.com
 Toll Free: 1.866.849.3911 (US & Canada) Fax: 902.567.3336 Email: info@protocasedesigner.com") Toll Free: 1.866.849.3911 (US & Canada) Fax: 902.567.3336 Email: info@protocasedesigner.com Designing enclosures to mount printed circuit boards (PCB) using Protocase Designer (All dimensions are in inches)
Toll Free: 1.866.849.3911 (US & Canada) Fax: 902.567.3336 Email: info@protocasedesigner.com Designing enclosures to mount printed circuit boards (PCB) using Protocase Designer (All dimensions are in inches)
Check for deteriorated, shifting or missing tie-down pads. Replace if needed.
 C C 0 5 C H A S S I S F R A M E Chassis Frame Overview The Blue Bird Vision s chassis frame consists of two main C-channel rails which run the entire length of the bus, and several different kinds of cross
Kiosk Group, Inc. ASSEMBLY INSTRUCTIONS FOR THE STANDALONE. EXQUISITE ipad KIOSK. For ipad 2-3-4-5 Version Tablets.
 Kiosk Group, Inc. ASSEMBLY INSTRUCTIONS FOR THE STANDALONE EXQUISITE ipad KIOSK For ipad 2-3-4-5 Version Tablets ipad 2-3-4-5 Version Tablet Items Required: ipad data/power cable that came with your ipad.
Turning Crow Calls -The Latta Method-
 Turning Crow Calls -The Latta Method- This tutorial will cover how to make a crow call using the molded reeds sets we sell and how to modify them to make a much better end product for you and your customers
TABLE OF CONTENTS. I. TROUBLESHOOTING... 2 - Section 1.01: Common Problems/Solutions... 2
 BAL Accu-Slide System I. Table of Contents TABLE OF CONTENTS I. TROUBLESHOOTING... 2 - Section 1.01: Common Problems/Solutions... 2 II. GETTING STARTED... 5 - Section 2.01: Tools You Will Need... 5 - Section
R O A D M A S T E R, I N C.
 R O A D M A S T E R, I N C. 11 7 6 1 2 10 13 8 ITEM QTY NAME PART # 1...2...1/2 x 5 1/2 BOLT...350108-00 2...4...1/2 x 1 3/4 BOLT...350096-00 3...6...1/2 LOCK WASHER...350309-00 4...6...1/2 HEX NUT...350258-00
GEET Fuel Processor Plans
 GEET Fuel Processor Plans This is a greatly simplified Proof of Concept version of the GEET Fuel Processor that just about anyone can build from parts from a local Hardware store in a weekend for very
R O A D M A S T E R, I N C.
 R O A D M A S T E R, I N C. MOUNTING BRACKET KIT 14 8 7 4 13 5 6 ITEM QTY NAME MATERIAL 1...6...1/2" x 2 1/2" BOLT... 350099-00 2...2...1/2" x 1 1/2" BOLT... 350095-00 3...8...1/2" LOCK WASHER... 350309-00
SPIRAL STAIR KIT INSTALLATION MANUAL
 SPIRAL STAIR KIT INSTALLATION MANUAL Effective January 1, 2014 If you have any questions, please call the location that your Stair Kit was purchased from: Broomall, Pennsylvania 1-800-52-7427 Ontario,
REDI-EXIT COMMERCIAL FIRE DOOR AND EXTERIOR DOOR KITS INSTALLATION GUIDELINES
 REDI-EXIT COMMERCIAL FIRE DOOR AND EXTERIOR DOOR KITS INSTALLATION GUIDELINES Tools Required Tape Measure Hammer Slotted Screw Driver #2 & #3 Philips Screw Driver 3-4 Foot Level 12 Pry Bar Cold Chisel
QWALL 4 ACRYLIC SHOWER WALL INSTALLATION INSTRUCTIONS
 QWALL 4 ACRYLIC SHOWER WALL INSTALLATION INSTRUCTIONS IMPORTANT DreamLine TM reserves the right to alter, modify or redesign products at any time without prior notice. For the latest up-to-date technical
INSTALL/REMOVAL INSTRUCTIONS: WINDOW REGULATOR
 REMOVAL/INSTALL OF WINDOW REGULATOR (741-306) Honda Accord 2003 07 General Tech Tips: Use painter s tape rather than duct tape to secure window. It will not damage paint or leave sticky residue. A plastic
Training Course Catalog
 Saint-Gobain Abrasives Inc. Automotive Aftermarket Training Course Catalog Version 4.1 2/10/14 Presented by: Craig Chaffee, Manager of Training AA Training Course Catalog Automotive Refinishing Training
EH-20 20m antenna. By VE3RGW
 EH-20 20m antenna By VE3RGW Equivalent circuit of EH-20 (prototype 2A) antenna system. Upper cylinder Lower cylinder Ground Counter pose Phasing coil Impedance transformer and tune circuit Tune coil Feed
Bill of Materials: Line Follower: A Zippy Robot That Senses Where to Go PART NO. 2170783
 Line Follower: A Zippy Robot That Senses Where to Go PART NO. 2170783 This kit has the parts you'll need with the exception of a few craft items sold separately to make a line-following cart. It uses a
Milling Tools These are the tools currently available for use with the milling machine
 Jason Ward Page 1 of 5 Milling Tools These are the tools currently available for use with the milling machine T1 Milling Tool The missile-shaped T1 milling tools are the highest precision of T-Tech's milling
R O A D M A S T E R, I N C.
 R O A D M A S T E R, I N C. 6 28 1 2 "ā 1 2 " 4 8 ITEM QTY NAME PART # 1...4...1/2 x 1 1/4 BOLTS... 350094-00 2...4...1/2 LOCK WASHER... 350309-00 3...4...1/2 HEX NUT... 350258-00 4...2...SPACER PLATE...
majestic install ation guide barcelona three sided enclosure 24mm surface mounted wall channels and underframe to base
 majestic install ation guide barcelona three sided enclosure 24mm surface mounted wall channels and underframe to base These Instructions are for a left and right handed unit. The diagrams show a left
How to make an inflatable sphere aka carbon bubble?
 How to make an inflatable sphere aka carbon bubble? The inflatable carbon bubble is a great tool to transform a protest into a highly playful, fun and interactive event and at the same time raise awareness
Air Hockey Training Camp Care and repair of your Air Hockey Playfield
 The playfield is the single most expensive part of your Dynamo Air Hockey table. Proper care will keep your table attractive and functional for your players, and bring them back for more games. CLEAN YOUR
Projector90 Xenon Headlight Installation Guide
 Projector90 Xenon Headlight Installation Guide Written exclusively for Umnitza s Projector90 Product This step-by-step guide is designed to be used in together with other available documentation including
Ford Super Duty Rear Brake Pad & Rotor Replacement. 2004 F250 4x4 XLT Sport Crew Cab
 Page 1 of 31 Ford Super Duty Rear Brake Pad & Rotor Replacement 2004 F250 4x4 XLT Sport Crew Cab Back to 2004 F250 Main Page Click Here for a PDF version of this article *** NOTE *** Some of you may remember
Convertible Top Hydraulic Cylinder Removal Manual for W124 E-Class Convertibles 1993-1995 Models 300CE (1993) and E320 (1994-1995)
 and E320 (1994-1995)") Convertible Top Hydraulic Cylinder Removal Manual for W124 E-Class Convertibles 1993-1995 Models 300CE (1993) and E320 (1994-1995) Written by Samit Ghosh with picture material from vexed of benzworld.org
Convertible Top Hydraulic Cylinder Removal Manual for W124 E-Class Convertibles 1993-1995 Models 300CE (1993) and E320 (1994-1995) Written by Samit Ghosh with picture material from vexed of benzworld.org
BUTTERFLY SHOWER DOOR INSTALLATION INSTRUCTIONS
 BUTTERFLY SHOWER DOOR INSTALLATION INSTRUCTIONS IMPORTANT DreamLine reserves the right to alter, modify or redesign products at any time without prior notice. For the latest up-to-date technical drawings,
presents Easy to make Puppet Stages ideas for your pirate shows in a variety of shapes and sizes to fit every Classroom and Budget
 presents Easy to make Puppet Stages ideas for your pirate shows in a variety of shapes and sizes to fit every Classroom and Budget No stage necessary Putting on an impromptu show? Or taking your show on
http://mbworld.org/forums/c32-amg-c55-amg-w203/449471-famous-ac-clicking-noiseac-footwell-damper-linkage-replacement-diy-details-steps.
 Air Conditioner / HVAC W203 Stepper Motor Repair PART 2 OF 3 forums/c-class-w203/177068-noisy-air-conditioner-stepper-motorreplacement-clicking-hissing.html forums/c32-amg-c55-amg-w203/449471-famous-ac-clicking-noiseac-footwell-damper-linkage-replacement-diy-details-steps.html
Installing the Video Input and TV Tuner Cards in a Compact Computer or a Dual PCI-Slot Tower Computer
 Installing the Video Input and TV Tuner Cards in a Compact Computer or a Dual PCI-Slot Tower Computer This booklet describes how to install the video input and TV tuner cards in a compact Macintosh computer
Back-Up Camera Installation Guide
 Hz Hz In This Guide: Back-up camera installation requires connecting power wiring to the existing reverse lighting circuit and adding a chassis ground, as well as routing a video signal cable to the front
IN00378 (rev A) Corner Entry
 Corner Entry") IN00378 (rev A) Corner Entry Before You Start Check that the tray has been installed correctly and that it is level (Fig. A), tiled down onto and sealed to the manufacturer s guidelines. Please Note: All
IN00378 (rev A) Corner Entry Before You Start Check that the tray has been installed correctly and that it is level (Fig. A), tiled down onto and sealed to the manufacturer s guidelines. Please Note: All
Go-kart for little race-drivers
 Go-kart for little race-drivers Drill and drive. Go-kart What it lacks in speed, it more than makes up for in fun: the go-kart will excite little race-drivers. 1 Introduction It s only a go-kart, but it
IN00419 (rev A) Aqua 6 Glide Quadrant and Off-set Quadrant Enclosure
 Aqua 6 Glide Quadrant and Off-set Quadrant Enclosure") IN00419 (rev A) Aqua 6 Glide Quadrant and Off-set Quadrant Enclosure Instruction suitable for both Quadrant & Off-set Quadrant variations. Instruction suitable for both Right and Left Hand fixing variations
IN00419 (rev A) Aqua 6 Glide Quadrant and Off-set Quadrant Enclosure Instruction suitable for both Quadrant & Off-set Quadrant variations. Instruction suitable for both Right and Left Hand fixing variations
R O A D M A S T E R, I N C.
 R O A D M A S T E R, I N C. 11 10 20 12 4 18 19 1 2 13 16 ITEM QTY NAME MATERIAL 1...2... 1/2" x 3 1/2" BOLT... 350103-00 2...2... 1/2" x 2" BOLT... 350097-00 3...6... 1/2" x 1 1/2" BOLT... 350095-00 4...2...
Total Quantity: IMPORTANT: Plans are to be used with 3 x6 Plexiglass (SKU #298-017).
.") # Materials: Quantity Each: 4x4x8 3 2x4x8 2 2x8x8 1 4x8x3/4 plywood 1 3 x6 corkboard (can be 18 of the 1 x1 pieces) 1 3 x6 plexiglass 1 8 door casing 3 Primer 1 qt. Total Quantity: TIPS FOR SUCCESSFUL
# Materials: Quantity Each: 4x4x8 3 2x4x8 2 2x8x8 1 4x8x3/4 plywood 1 3 x6 corkboard (can be 18 of the 1 x1 pieces) 1 3 x6 plexiglass 1 8 door casing 3 Primer 1 qt. Total Quantity: TIPS FOR SUCCESSFUL
Partnerships Implementing Engineering Education Worcester Polytechnic Institute Worcester Public Schools Supported by: National Science Foundation
 Introduction to Engineering: 1.A.VI Mechanical Engineering Grade Level 1 Sessions Seasonality Instructional Mode(s) Team Size MA Frameworks WPS Benchmarks Key Words Session I: What do mechanical engineers
Dusted! PROCESS SKILLS SCIENCE TOPICS VOCABULARY
 Dusted! Visitors press their fingertips onto a clean Plexiglas sheet. Their fingerprints are then revealed as visitors dust over the print with fingerprint powder. OBJECTIVES: Visitors will learn that
39HQ Airovision Air Handling Units
 39HQ Airovision Air Handling Units Mounting instructions CONTENTS 1 - TRANSPORT AND LIFTING INSTRUCTIONS... 3 1.1 - General... 3 1.2 - Transport and storage... 3 1.3 - Roof edge protection during transport
SEN-003 REVERSE PARKING SENSOR INSTALLATION INSTRUCTIONS DYNAMCO PTY LTD SECURING VEHICLES WORLDWIDE AUSTRALIA WIDE INSTALLER HELPLINE 1800 811 815
 SEN-003 REVERSE PARKING SENSOR INSTALLATION INSTRUCTIONS SEN-003 REVERSE PARKING AID INSTALLATION INSTRUCTIONS It is essential that these instructions are read thoroughly prior to installation. Check limitations,
These instructions will show you how to install an internal door into a non-loadbearing partition wall. The instructions are split into three parts.
 No 8 in the series of 'How to' brochures produced by PlaceMakers, New Zealand How to Frame and Hang a Door These instructions will show you how to install an internal door into a non-loadbearing partition
Customer Service 800.780.8889 or visit us online at smithnoble.com. Wood Shutters. Step by Step Installation. Troubleshooting Tips
 reflect your style TM Customer Service 800.780.8889 or visit us online at smithnoble.com Wood Shutters Step by Step Installation Troubleshooting Tips Easy Care Instructions STEP 1 Your New Shutter Thank
Vision Engravers and Routers PRE-Installation Guide. 2015 Vision Engraving & Routing Systems
 Vision Engravers and Routers PRE-Installation Guide Revised: 8/19/2015 Vision Engravers and Routers PRE-Installation Guide All rights reserved. No parts of this work may be reproduced in any form or by
Inclined Plane: Distance vs. Force
 1a Inclined Plane: Distance vs. Force Look at the inclined plane model you built for Card 2. It s a ramp, so it s easy to slide or roll things up and down it. As you noticed, it is a little more difficult
Installation Manual. Toilet Partitions, Dressing Compartments & Shower Stalls
 Installation Manual Toilet Partitions, Dressing Compartments & Shower Stalls Metpar Corp 95 State Street, Westbury, New York, USA, 11590 Tel: 516-333-2600 Fax: 516-333-2618 Internet: http://www.metpar.com
Figure 2 The fan and shroud also needs to be removed for access to the four a/c compressor bolts and removal of the compressor from the top.
 Here are some pictures to show what s required when replacing the A/C compressor, expansion valve and receiver/drier on a 2001 Volvo V70. Even if you don t replace these A/C parts these pictures can help
POD Visor Instructions
 POD Visor Instructions Please read fully before beginning assembly and mounting the Visor Parts List - Visor Left Part (LV), Visor Right Part (RV) Qty 2, Aluminum Crossbars Hardware - Qty 17, 1/4" X 3/4"