Kiosk Group, Inc. ASSEMBLY INSTRUCTIONS FOR THE STANDALONE. EXQUISITE ipad KIOSK. For ipad Version Tablets.
|
|
|
- Leona Robbins
- 10 years ago
- Views:
Transcription
1 Kiosk Group, Inc. ASSEMBLY INSTRUCTIONS FOR THE STANDALONE EXQUISITE ipad KIOSK For ipad Version Tablets ipad Version Tablet Items Required: ipad data/power cable that came with your ipad. (An after-market connector may not fit.) Warning: When assembling the head enclosure, never use screws other than the security screws supplied with the kiosk. A longer screw can penetrate the head enclosure further than is designed and cause permanent cosmetic damage to the head enclosure. Also, DO NOT OVER TIGHTEN the screws which thread into the head enclosure. A Torx Security Screw Bit is provided with your kiosk for use of tightening the security screws. What is referred to as Finger-tightening is a sufficient amount of torque strength when tightening the security screws.

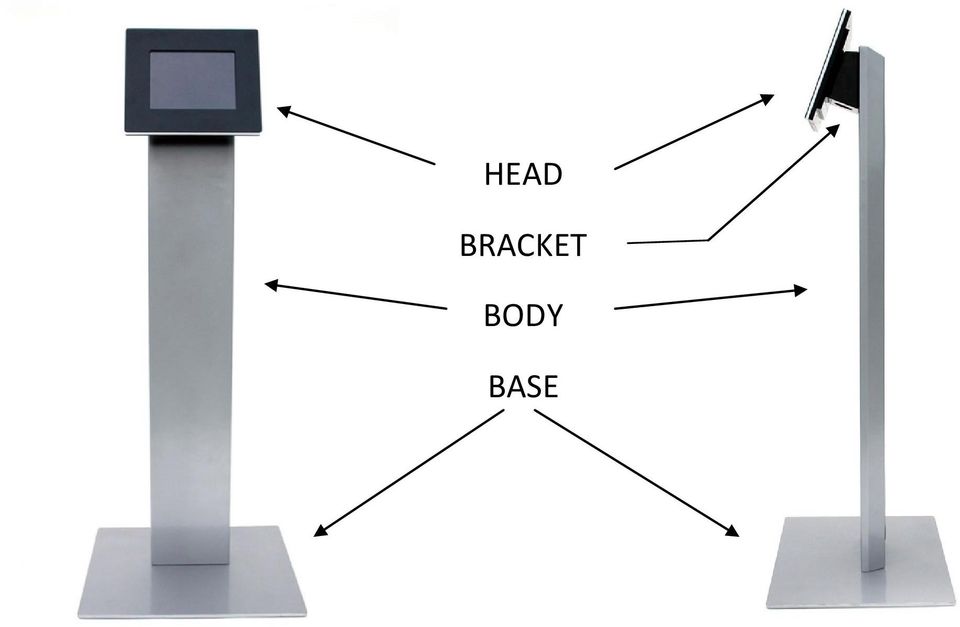
2 HEAD BRACKET BODY BASE
3 # 1 Installing your ipad Tablet into the 2 Piece Head Enclosure Note: Prior to installing your ipad into the enclosure, confirm that your application is running correctly on the ipad. ipad Tablet ipad data/power cable that came with your ipad. (An after-market connector may not fit.) ¼ hex bit driver (supplied) ipad Head Assembly (supplied) Torx security screw bit, small (supplied) Button key (supplied) Part 1A: Disassembling the ipad Head (Front and Rear, 2 Piece Head Enclosure) 1. Lay the head on a soft, clean surface with the rear of the enclosure facing upward, whereby the screws are exposed to view. 2. Using the small security bit and bit driver, remove the 8 security screws in a counter clockwise motion and place them nearby. Part 1B: Inserting the ipad into the Front Assembly 1. Position the front head assembly so that the large notch in the white material is to the right. 2. Make sure that your ipad is completely powered off. If it is on, hold down the power button until a red button appears at the top of the screen and you are prompted to slide to power off. Slide the red button to the right. 3. Unlock the ipad s Screen Rotation Lock. This is located above the volume control buttons. 4. Insert the ipad s data/power cable into the ipad s data port. (If you are using a sound system with the kiosk, plug the audio cable into the headphone jack.)
 1. Lay the head on a soft, clean surface with the rear of the enclosure facing upward, whereby the screws are exposed to view. 2.")
4 5. Place the ipad over the enclosure s front assembly so that the data port is positioned to the right. 6. Make sure that the data cable (and audio cable if used) is not between the ipad and the front assembly, and then press the ipad downward until it is seated all the way down. Note: Since it is a precise fit, you will need to accurately align the ipad over the space before it will fit down inside easily. The ipad enclosure is ready to be assembled. Part 1C: Reassembling the Head Enclosure 1. Pick up the rear assembly and look at the inside. If needed, rotate the assembly so that the end with the large notch is on the right. 2. Thread the USB end of data/power cable (and optional audio cable) through the center hole of the rear assembly. 3. Place the rear assembly on top of the front assembly so that the screw holes are aligned, and then gently pull the cable(s) out the back of the enclosure. Caution: Do not pull tightly on the cable(s) or you may damage the connector. 4. Place the 8 security screws into the screw holes. Realigned the rear assembly over the front assembly and tighten the 8 screws with the security screw bit and driver. 5. Warning: DO NOT OVER-TIGHTEN- Finger-tightening the security screws as an example of torque strength, is sufficient. ALSO, NEVER USE SCREWS OTHER THAN THE SECURITY SCREWS SUPPLIED WITH THE KIOSK. A LONGER SCREW CAN PENETRATE THE HEAD ENCLOSURE FURTHER THAN DESIGNED AND CAUSE PERMANENT COSMETIC DAMAGE TO THE HEAD ENCLOSURE The Head Enclosure is fully assembled. Important: Now is a good time to test that you have power to the ipad tablet. Plug the tablet s power/data cable and power adapter into a wall socket and confirm that your ipad tablet is receiving power.

5 # 2 Testing your ipad 2 Power Button ** See picture at bottom of page ** Part 2A: Testing the ipad Power Button 1. Turn on the ipad by inserting the button key into the power keyhole on the back, and depressing the power button for about 3 seconds. 2. When the startup screen is visible, slide the white button to the right to bring up the home screen. Part 2B: Accessing the Home Screen Even thought the home button is covered up, you can always access the Home Screen by following these simple steps: 1. Insert the button key into the power keyhole and hold the power button down until you see the red slide to power off button. 2. Slide it to the right and you turn off the ipad. 3. After the ipad turns off, press the power button again for about 3 seconds using the button key, and the normal open screen will appear. 4. Slide the slide to unlock button to the right and you will be taken to the home screen. POWER BUTTON ACCESS FOR ipad TABLETS Located on the rear head assembly

6 # 3 Attaching the Bracket to the Head Enclosure Black Steel Bracket (supplied) 4 black socket-head M4 screws (supplied) 3mm L-shaped hex key (supplied) Part 3A: Removing the Bracket from the Packaging 1. Take the steel bracket out of its protective packaging. Part 3B: Aligning the Bracket and Head Enclosure 1. Lay the head enclosure face-down on a soft clean surface. 2. Position the bracket on the back of the head so that the rectangular opening is up. If you will be using the ipad in Landscape mode, position the bracket so that the smaller circular opening is nearest the side of the head enclosure with the 2 volume control channels. This will result in having the ipad positioned so that the Home button is to the left when fully assembled. If you will be using the ipad in Portrait mode, position the bracket so that the smaller circular opening is away from the side of the head enclosure with the power button channel. This will result in having the ipad positioned so that the Home button is at the bottom when fully assembled. 3. Run the ipad's power/data cable (and optional audio cable) up through the bracket and out of the rectangular opening. 4. Align the bracket so that the bracket s 4 screw holes are over the head enclosure s screw holes. Part 3C: Attaching the Bracket to the Head Enclosure 1. Using the 3mm hex key, place each of the 4 screws/washers through the bracket and into the head enclosure. 2. Use the 3mm hex key to tighten each socket-head screw.

7 # 4 Attaching the Kiosk Base to the Body 5mm Hex Key (supplied) Steel Base (supplied) Pedestal Assembly (supplied) 4 5mm socket head bolts (supplied) Note: The following assembling procedure is best achieved with the help of an assistant. Part 4A: Positioning the Body and Base 1. Place the pedestal portion of the kiosk on a protective flat surface, such as a table top. 2. Line up the holes of the flat base with the threaded holes in the body. You ll want the front edge of the body at the centerline of the base so there will be more base exposed in front of the kiosk than behind it. Centerline Part 4B: Attaching the Base to the Body 1. Insert the four flat head bolts through the bottom of the base. 2. Using the 5mm hex key, tighten the 4 bolts.

8 # 5 Attaching the Head and Bracket Assembly to the Kiosk Body ¼ hex bit driver (supplied) 4 socket-head M4 screws (supplied) 3mm L-shaped hex key (supplied) Large Security Bit (supplied) Part 5A: Removing the Back Access Panel *** Please read thoroughly *** 1. Using the key provided within the toolkit, inset the key and turn in a clockwise motion. 2. Remove the back panel by gently lifting the panel slightly upward and outward before pulling it out and away from the kiosk body. This is a safety feature so that it will not simply fall away from the kiosk body. Part 5B: Attaching the Head/Bracket Assembly to the Kiosk Body 1. Align the Head/Bracket assembly with the rectangular opening on the front of the body. 2. Run the ipad cable into the interior of the kiosk body. 3. Using the hex key, place each of the 4 screws through the body and into the bracket assembly. 4. Use the hex key to tighten each socket-head screw.

9 # 6 Installing the Power Cord and Replacing the Access Panel Key (supplied) Cable Ties (supplied) Power cable (supplied) Part 6A: Installing the Power Cable 1. Using the three cable ties, attach the power cord to the interior of the kiosk at the cable tie anchors. Make sure that the female end of the cable is near the top of the kiosk. The male (pronged) end will go through the bottom center of the access panel. (small elongated hole) 2. Plug the ipad s power/data cable and power adapter into the power cord attached to the interior. Additionally, plug the power cord into a wall outlet and confirm that your ipad and kiosk have electrical continuity. ** If you are plugging the power cord into a floor outlet, the power cord can be hidden from view by draping the power cord directly through the aligned center holes of both the kiosk body and base. If you wish to secure your kiosk by bolting it to the flooring material or another substrate, use the aligned, pre-drilled holes to the left and right of the center hole that it used for the power cord. Your kiosk is now ready for use

INSTALL/REMOVAL INSTRUCTIONS: WINDOW REGULATOR
 REMOVAL/INSTALL OF WINDOW REGULATOR (741-306) Honda Accord 2003 07 General Tech Tips: Use painter s tape rather than duct tape to secure window. It will not damage paint or leave sticky residue. A plastic
Processor Cage Fans, Front and Rear Replacement Instructions
 apple Mac Pro Processor Cage Fans, Front and Rear Replacement Instructions First Steps 1 Shut down computer. Note: Follow these instructions carefully. Failure to do so could damage your equipment and
Elo Touch Solutions Wall-mounting Kit for the 5501L IDS Touchmonitors
 Installation Manual Elo Touch Solutions Wall-mounting Kit for the 5501L IDS Touchmonitors SW602206 Rev B Table of Contents Chapter 1: Safety Warning... 3 Chapter 2: Kit Contents... 4 Included in Kit...
SIMPLEX UNICAN LOCKS CHANGING THE CODE / COMBINATION 900 Series 1000 Series L1000 Series LP1000 Series EE1000 Series 2000 Series 2015 Series
 SIMPLEX UNICAN LOCKS CHANGING THE CODE / COMBINATION 900 Series 1000 Series L1000 Series LP1000 Series EE1000 Series 2000 Series 2015 Series 2400/2500 Series 3000 Series 3100 Series Simplex 5000 Series
Front Panel Board Cable Replacement Instructions
 apple Mac Pro Front Panel Board Cable Replacement Instructions First Steps 1 Shut down computer. Note: Follow these instructions carefully. Failure to do so could damage your equipment and void its warranty.
Wall Mount Installation and Use
 Wall Mount Installation and Use 1. Introduction The Wall Mount works the same way for all Touchfire cases - the one or two row magnet strip on the back of the case is magnetically attracted to the Wall
IN00419 (rev A) Aqua 6 Glide Quadrant and Off-set Quadrant Enclosure
 Aqua 6 Glide Quadrant and Off-set Quadrant Enclosure") IN00419 (rev A) Aqua 6 Glide Quadrant and Off-set Quadrant Enclosure Instruction suitable for both Quadrant & Off-set Quadrant variations. Instruction suitable for both Right and Left Hand fixing variations
IN00419 (rev A) Aqua 6 Glide Quadrant and Off-set Quadrant Enclosure Instruction suitable for both Quadrant & Off-set Quadrant variations. Instruction suitable for both Right and Left Hand fixing variations
UPGRADING AND SERVICING GUIDE
 UPGRADING AND SERVICING GUIDE HPTouchSmart 610 PC Computer features may vary by model. Removing and Replacing a CD/DVD Drive...2 Removing the CD/DVD Drive... 2 Installing a New CD/DVD Drive... 5 Removing
Service Guide. Gateway M275
 Service Guide Gateway M275 Contents Replacing Gateway M275 Components.................................... 1 Identifying the convertible tablet PC model...................................... 2 Identifying
GENUINE PARTS INSTALLATION INSTRUCTIONS
 GENUINE PARTS INSTALLATION INSTRUCTIONS 1. DESCRIPTION: Auto-Dimming Mirror Kit with Compass and HomeLink 2. APPLICATION: Titan 3. PART NUMBER: 999L1 WS000 4. KIT CONTENTS: Item Qty Description Service
UPLIFT Height Adjustable Standing Desk (T-Frame) DIRECTIONS FOR ASSEMBLY AND USE - - ALSO - - Watch our assembly video
 DIRECTIONS FOR ASSEMBLY AND USE - - ALSO - - Watch our assembly video") UPLIFT Height Adjustable Standing Desk (T-Frame) DIRECTIONS FOR ASSEMBLY AND USE - - ALSO - - Watch our assembly video http://bit.ly/9ywwh! CAUTION MAKE SURE NO OBSTACLES ARE IN THE DESK S PATH AND ALL
UPLIFT Height Adjustable Standing Desk (T-Frame) DIRECTIONS FOR ASSEMBLY AND USE - - ALSO - - Watch our assembly video http://bit.ly/9ywwh! CAUTION MAKE SURE NO OBSTACLES ARE IN THE DESK S PATH AND ALL
INSTRUCTIONS: LocknCharge Laptop Carts
 INSTRUCTIONS: LocknCharge Laptop Carts www.lockncharge.com Extra Tools required: Hammer, Philips head screwdriver, medium adjustable spanner. (Allen key supplied) (Panel colours for illustration purposes
Written By: Walter Galan
 Installing iphone 4S Display Assembly Written By: Walter Galan TOOLS: Phillips 00 Screwdriver (1) Plastic Opening Tools (1) PARTS: iphone 4S Display Assembly (1) iphone 4 and 4S Screen Protector (1) Small
GAERTNER SCIENTIFIC CORPORATION 3650 Jarvis Ave. Skokie, Illinois 60076 U.S.A. tel: 1 847 673-5006 fax: 1 847 673-5009 email@gaertnerscientific.
 7109-C-244E-R1 Field Installation of HeNe Laser in B, C, and D-Type Auto Gain Ellipsometers GAERTNER SCIENTIFIC CORPORATION 3650 Jarvis Ave. Skokie, Illinois 60076 U.S.A. tel: 1 847 673-5006 fax: 1 847
UNPACKING AND ASSEMBLY
 UNPACKING AND ASSEMBLY Assembly Instructions Step 1. Open the two boxes and remove all the parts. Lay out the parts as shown below and read through the assembly instructions before beginning assembly.
Replacement Instructions. Warning: During this procedure, keep small parts away from children.
 apple ibook G4 Memory Card Replacement Instructions Follow the instructions in this sheet carefully. Failure to follow these instructions could damage your equipment and void its warranty. Note: Written
ATX Mid Tower PC Case. MS800 Series. Ver. 121214
 ATX Mid Tower PC Case MS800 Series MS800 MS800 Plus Ver. 121214 ENGLISH 1 Cautionary Notes 1) Please read this manual thoroughly prior to installation. 2) Before installing, check the components and condition
HermanMiller Aeron Posturefit Installation AE905A AE905B AE905C
 HermanMiller Aeron Posturefit Installation AE905A AE905B AE905C Y How to assemble to your chair Parts Included Posturefit Mechanism For more information about our products and services or to see a list
Trillium 40 Axis Spring Tensioner Wire Replacement Instructions
 Trillium 40 Axis Spring Tensioner Wire Replacement Instructions 1 Overview The objective is to replace the broken axis spring tensioner wire. This requires the following tasks: 1. Remove the seismometer
Installing the Video Input and TV Tuner Cards in a Compact Computer or a Dual PCI-Slot Tower Computer
 Installing the Video Input and TV Tuner Cards in a Compact Computer or a Dual PCI-Slot Tower Computer This booklet describes how to install the video input and TV tuner cards in a compact Macintosh computer
Express5800/120Ed. Rack Mount Kit Installation Procedures PN: 455-01607-001
 Express5800/120Ed Rack Mount Kit Installation Procedures PN: 455-01607-001 Proprietary Notice and Liability Disclaimer The information disclosed in this document, including all designs and related materials,
Original Assembly Guide
 TCT Multipurpose Single Bevel Sliding Compound Mitre Saw Original Assembly Guide Read instructions before assembling this tool. Table of Contents GB Assembly Guide Read instructions before assembling this
EasyNote TJ Series. Disassembly Manual
 EasyNote TJ Series Disassembly Manual CHAPTER3 Replacing notebook components Preventing static electricity discharge Preparing the work space Required tools Preparing the notebook Adding or replacing memory
Depending on which elastic support you have you can secure the V2 power unit to the following seat bracket tubes: EXTERNAL DIAMETER 27.
 ASSEMBLY 1 - EPS V2 POWER UNIT (SOLUTION 5) 1.1 - POSITIONING INSIDE THE SEAT TUBE WITH ELASTIC SUPPORT IN THE SEAT BRACKET TUBE Depending on which elastic support you have you can secure the V2 power
5800 Temperature Sensor Cable Assembly
 5800 Temperature Sensor Cable Assembly Removal and Replacement Instruction Sheet #60-4702-070 Revision D, January 14, 2013 Overview The 5800 has two refrigeration temperature sensors, one attached to the
UB1 AIR CONDITIONING UNIT INSTALLATION INSTRUCTIONS
 UB1 AIR CONDITIONING UNIT INSTALLATION INSTRUCTIONS INSTALLATION INSTRUCTIONS: Carefully read these instructions before installing your new air-conditioner. AUSTRALIAN AUTOMOTIVE AIR AL00500054E 1 Table
Post Mount Light Installation*
 Post Mount Light Installation* *For the general installation of most Post Mount Spotlights, many vehicles may need slight modifications to these instructions. You will need the following tools: High torque
2100 AD 015 0009 Mirror Elevator Ball Nut Replacement Procedure
 2100 AD 015 0009 Mirror Elevator Ball Nut Replacement Procedure Derek Guenther 1/28/2015 Rev. Purpose The purpose of this document is to describe the procedure necessary to replace one of the ball nuts
Small Flat Panel Lift Arm FSA-1004 and KSA-1004
 I N S T A L L A T I O N I N S T R U C T I O N S Small Flat Panel Lift Arm FSA-1004 and KSA-1004 The Lift Arm is an accessory that can be used with a broad range of Small Flat Panel Displays. The allows
6 inch A-Arm Lift Kit WARNING: 16-018/16-019. installation instructions. will fit CLUB CAR DS. included:
 Revised May 205 6-08/6-09 6 inch A-Arm Lift Kit will fit CLUB CAR DS installation instructions included: Rear Lift Blocks Main Suspension Assembly Spindles A-Arms Rear Shock Mounting Plates U-Bolts WARNING:
CALIBRATION FOR LAL20X & LAL24X
 CALIBRATION AND FAULT FINDING FOR LAL20X & LAL24X DUMPY LEVELS MEASURING EXPERTS SINCE 1869 How The LAL20X & LAL24X Works The Automatic level is called Automatic because it requires only a simple basic
OxySense Portable Series Instrument Quick Start Guide
 OxySense Portable Series Instrument Quick Start Guide OxySense, Inc. 13111 North Central Expressway, Suite 440 Dallas, Texas 75243 U.S.A. +1 214 575 7600 Page i Document Revised: March 5, 2014 All Rights
Retrofit Instructions Installing a Sport Heated Steering Wheel - Leather, Multifunction BMW X5, E53, 2001 2006
 Retrofit Instructions Installing a Sport Heated Steering Wheel - Leather, Multifunction BMW X5, E53, 2001 2006 Disclaimer: This set of instructions is simply a guide on how I installed my own heated steering
Congratulations on your purchase of the Great Planes SLOT MACHINE, the first truly easy way to cut hinge slots in your model airplanes.
 INSTRUCTION MANUAL Congratulations on your purchase of the Great Planes SLOT MACHINE, the first truly easy way to cut hinge slots in your model airplanes. The Slot Machine you have purchased is equipped
EXPLORE 4-Leg Teaming Table with Screen Share Assembly Instructions
 EXPLORE 4-Leg Teaming Table with Screen Share Monitor Display Requirements: your flat panel display must confirm to the following requirements. y With the stand removed, the monitor must not exceed 40
FTC 2015-2016 DIY Mountain Build Guide
 FTC 2015-2016 DIY Mountain Build Guide Assembly Instructions Check out the DIY2015-2016 Prints and BoM for individual part details. Release 1.0 9/10/15 Page 1 This guide and Bill of Materials are for constructing
Table of Contents. www.hunterfan.com. What to Expect with. Preparation. Tools Needed. Wiring. Hanging the Fan. Blades. Motor Housing.
 www.hunterfan.com Table of Contents What to Expect with Your Installation 30 inches Hanging the Fan Wiring 8 Maintenance, Operation & Cleaning Light Kit 13??? 14 1 9 Troubleshooting 11 5 Blades Motor Housing
Installation Instructions
 Installation Instructions READ BEFORE INSTALLING UNIT For Low Profile Window Air Conditioner INSTALLATION WARNINGS AND CAUTION Carefully read the installation manual before beginning. Follow each step
Triac Printed Circuit Board Replacement
 Technical Service Bulletin: Triac Printed Circuit Board Replacement TRONIC 5000C Pro Models: WH17, WH27, WH36 Introduction Fig. 1 ELECTRICITY IS EXTREMELY DANGEROUS. TAKE EXTRA PRECAUTIONS AND ENSURE ALL
ipad 2 GSM Headphone Jack & SIM Slot Replacement
 ipad 2 GSM Headphone Jack & SIM Slot Replacement Replace the Headphone jack/sim slot in your ipad 2 GSM. Written By: Walter Galan INTRODUCTION Use this guide to replace a broken headphone jack or SIM card
BODY-12, Door Handle - Removal, Installation, and Adjustment
 Introduction BODY-12, Door Handle - Removal, Installation, and Adjustment There are many different procedures floating around describing how to replace the door handles on a 944 and every one of them will
DMSG_0152_0112_V4 Mamas & Papas (Holdings) Ltd. 2012 Dream Swing - 1 -
 Ltd. 2012 Dream Swing - 1 -") DMSG_0152_0112_V4 Mamas & Papas (Holdings) Ltd. 2012 Dream Swing - 1 - DREAM SWING THESE INSTRUCTIONS ARE IMPORTANT. PLEASE READ CAREFULLY AND RETAIN FOR FUTURE REFERENCE. Read the entire instruction before
DMSG_0152_0112_V4 Mamas & Papas (Holdings) Ltd. 2012 Dream Swing - 1 - DREAM SWING THESE INSTRUCTIONS ARE IMPORTANT. PLEASE READ CAREFULLY AND RETAIN FOR FUTURE REFERENCE. Read the entire instruction before
HP Pavilion All-in-One MS200 series PC. Upgrading and Servicing Guide. Printed in
 HP Pavilion All-in-One MS200 series PC *579907-001* *579907-001* Printed in Upgrading and Servicing Guide Replacing a Wireless Keyboard or Mouse...2 Before You Begin... 2 Replacing the Keyboard or Mouse...
Combination Unit 5'6" Windows a i o P t
 for Andersen 5'6" Double-Hung Venting s Windows a i o P t o rs D o Congratulations You have just purchased one of the many fine Andersen products. For ease of assembly and installation and continued enjoyment
All-Season Sunroom Sliding Glass Door Installation Instructions
 ASRESGD-08 All-Season Sunroom Sliding Glass Door Installation Instructions Panel Frame Door Frame Left Side Foam Insulator IE241 H Bar Assembly Door Frame Top Track Panel Frame Door Frame Right Side Stationary
Thinix ipad Kiosk Hardware and Accessories
 ipad Kiosk Hardware and Accessories ipad Kiosk Overview ipad kiosks are now used in a variety of industry ranging from hospitality to retail, healthcare, and restaurant. Creating secure tablet-based solutions
SERVICE GUIDE. Gateway Notebook
 SERVICE GUIDE Gateway Notebook Contents Replacing Gateway Notebook Components...................................1 Identifying the notebook model......................................... 2 Identifying
P150SC15. Designed for 2015 Ford F150 Super-Cab and Super-Crew vehicles without Sony System. 2015 Stillwater Designs P150SC15-A2-20150813
 P150SC15 Designed for 2015 Ford F150 Super-Cab and Super-Crew vehicles without Sony System Subwoofer Assembly Amplifier Assembly Amplifier Harness 2015 Stillwater Designs P150SC15-A2-20150813 M6 Bolt M6
ECM-D70T / ECM-D70T1.5
 Elliptical Ceiling Dual Mount for 37 to 50 Flat Panels INSTALLATION INSTRUCTIONS CREATING POSITIVE CUSTOMER EXPERIENCES 9531-041-001-01 Contents ECM-D70T / ECM-D70T1.5 Installation Tools... 3 Parts List...
Volkswagen Jetta, Golf, GTI 1999, 2000 Brake System 46 Brakes - Mechanical Components (Page GR-46)
") 46 Brakes - Mechanical Components (Page GR-46) Front brakes Brake pads, removing and installing Brake pads, removing and installing FN 3 brake caliper, servicing FS III brake caliper, servicing Rear wheel
46 Brakes - Mechanical Components (Page GR-46) Front brakes Brake pads, removing and installing Brake pads, removing and installing FN 3 brake caliper, servicing FS III brake caliper, servicing Rear wheel
20000068 WIRELESS REMOTE ASSEMBLY, 24VDC, 1 TRANS,1 REC
 20000068 WIRELESS REMOTE ASSEMBLY, 24VDC, 1 TRANS,1 REC Fitment to MP-25 620 CR 4841, Haslet, TX 76052 Ph 817.439.1108 Fax 817.636.5675 www.machine-technologies.com Kit contents 1 Transmitter 2 button,
MAINTENANCE & TROUBLESHOOTING
 MAINTENANCE & TROUBLESHOOTING This section describes how to: clean the lens replace the projection lamp replace the batteries in the remote use the security lock feature troubleshoot the projector Cleaning
http://waterheatertimer.org/troubleshoot-rheem-tankless-water-heater.html
 http://waterheatertimer.org/troubleshoot-rheem-tankless-water-heater.html TECHNICAL SERVICE DEPARTMENT Removal, Cleaning, & Reinstallation of the Burner Assembly For models 74 & GT199 Required tools -
Replacement Instructions. Warning: During this procedure, keep small parts away from children.
 apple Power Mac G4 / Macintosh Server G4 ATA Hard Drive Replacement Instructions Follow the instructions in this sheet carefully. Failure to follow these instructions could damage your equipment and void
2008 ACCORD - Front Knuckle/Hub/Wheel Bearing Replacement (page 18-13)
") 2008 ACCORD - Front Knuckle/Hub/Wheel Bearing Replacement (page 18-13) Exploded View Special Tools Required Ball joint remover, 28 mm 07MAC-SL0A202 Hub dis/assembly tool 07GAF-SD40100 Bearing driver attachment,
2008 ACCORD - Front Knuckle/Hub/Wheel Bearing Replacement (page 18-13) Exploded View Special Tools Required Ball joint remover, 28 mm 07MAC-SL0A202 Hub dis/assembly tool 07GAF-SD40100 Bearing driver attachment,
Installation. Basic Rack Power Distribution Unit for Blade Servers
 Installation Basic Rack Power Distribution Unit for Blade Servers Contents Preliminary Information...................1 Features............................. 1 Receiving inspection................... 1
Fading Red Tones on Color LaserJet 2600s
 Procedures Fading Red Tones on Color LaserJet 2600s HP Color LaserJets 2600n, 1600, and 2605 share the same basic Canon engine design. One aspect of the design brings the common problem of scanner optic
HP 16/18-Port Cable Management Kit Installation Guide
 HP 16/18-Port Cable Management Kit Installation Guide Abstract This document describes how to attach the HP 16 Port or 18 Port Cable Management Kit to an HP rack. The cable management bracket is designed
Cable Drum Installation
 20 Cable Drum Installation COUNTERBALANCE None Shake the TorqueMaster spring tube gently to extend the winding shafts out about 5" on each side. For single spring applications, there will be no left hand
FRONT BUMPER INSTALLATION INSTRUCTIONS 2007-2011 DODGE / MERCEDES SPRINTER
 Aluminess Products Inc 9402 Wheatlands Ct. #A Santee, CA 92071 619-449-9930 FRONT BUMPER INSTALLATION INSTRUCTIONS 2007-2011 DODGE / MERCEDES SPRINTER Please read before beginning Stainless steel hardware
GEH6290. Mechanism Circuit Breaker. Handle Operating Mechanism Cat. No. Type NEMA 1, 3R, 12, 13 NEMA 4/4X Cat. No. Cat. No. Series Instruction
 GEH6290 g Cable Operator Mechanisms for E150, SE150, SF250, and SG600 Spectra RMS Circuit Breakers Type SCH1/1X, SCH2/2X Flange-Mounted Handle Assemblies, Cable Series SC3L SC10L and Type SC0M1A, SCOM1EF,
Combination Unit (shown from interior) WARNING
 WARNING") for Andersen Double-Hung Venting s Windows a i o P t o rs D o Congratulations You have just purchased one of the many fine Andersen products. For ease of assembly and installation and continued enjoyment
for Andersen Double-Hung Venting s Windows a i o P t o rs D o Congratulations You have just purchased one of the many fine Andersen products. For ease of assembly and installation and continued enjoyment
Installation Instructions 4508 4508S
 SYMPHONY Spread Lavatory Faucet with Speed Connect Drain Congratulations on purchasing your American Standard faucet with Speed Connect drain, a feature found only on American Standard faucets. Speed Connect
INSTALLATION INSTRUCTIONS
 INSTALLATION INSTRUCTIONS PARTS REQUIRED Single QuickStand Parts A (1) QuickStand Unit B (1) Base Plate C (1) Platform D (1) Palm Support E (1) VESA Plate F (6) M8 x 18 mm Flat Head Machine Screws G (4)
POSEIDON 2-29, 2-25 & 2-22 POSEIDON 2-29, 2-25 & 2-22 XT
 POSEION 2-29, 2-25 & 2-22 POSEION 2-29, 2-25 & 2-22 XT Repair Manual Index A. Safety precautions 3 B. Technical data 4 C. Structure 5-6. Service / Repair 7-23 E. Tools 24 F. Function 25-26 G. Electric
INSTALL/REMOVAL INSTRUCTIONS: WINDOW REGULATOR
 REMOVAL/INSTALL OF WINDOW REGULATOR (748-547) Chrysler 300 2005 10, Dodge Magnum 2005 08, Dodge Charger 2006 09 General Tech Tips: Use painter s tape rather than duct tape to secure window. It will not
TABLE OF CONTENTS. I. TROUBLESHOOTING... 2 - Section 1.01: Common Problems/Solutions... 2
 BAL Accu-Slide System I. Table of Contents TABLE OF CONTENTS I. TROUBLESHOOTING... 2 - Section 1.01: Common Problems/Solutions... 2 II. GETTING STARTED... 5 - Section 2.01: Tools You Will Need... 5 - Section
Raritan LCD KVM Console (T1700/T1900)
") Raritan LCD KVM Console (T1700/T1900) Quick Installation and Setup Guide Congratulations on your purchase of Raritan LCD KVM Console, one of the best-known LCD KVM drawers in the current market. The Raritan
Raritan LCD KVM Console (T1700/T1900) Quick Installation and Setup Guide Congratulations on your purchase of Raritan LCD KVM Console, one of the best-known LCD KVM drawers in the current market. The Raritan
INSTALL/REMOVAL INSTRUCTIONS: WINDOW LIFT MOTOR
 REMOVAL/INSTALL OF WINDOW LIFT MOTOR (742-273) Ford Expedition 1997 2002, Lincoln Navigator 1998 2002, Ford F-150 Super Crew Cab 2001 General Tech Tips: Use painter s tape rather than duct tape to secure
VW GOLF Mk4 TDI FRONT MOUNTING INTERCOOLER INSTALLATION INSTRUCTIONS
 VW GOLF Mk4 TDI FRONT MOUNTING INTERCOOLER INSTALLATION INSTRUCTIONS Tools required: 10mm/13mm socket and 3/8 drive ratchet with extension Torx T20/25/30 screwdrivers or bits Phillips head screwdriver,
Guide for Modified Assembly: Lightning McQueen. By: Collin Patterson, University of Delaware. Materials and Tools:
 Guide for Modified Assembly: Lightning McQueen By: Collin Patterson, University of Delaware Materials and Tools: PVC o 40 inches of 1 in diameter PVC o 25 inches of ¾ in PVC o 4 x 1 in elbows o 2 x ¾ in
CP2 Buried Cable Pedestal Initial & Rehab Installation Instructions
 Printing 3 March 2008 CP2 Buried Cable Pedestal Initial & Rehab Installation Instructions This instruction is intended for CP2 cable pedestal installations and replacements. The following tools will be
Replacing Redundant AC Power Supplies in an EX4500 Ethernet Switch Without Disrupting Service
 Replacing Redundant AC Power Supplies in an EX4500 Ethernet Switch Without Disrupting Service This field replacement guide provides instructions for replacing the two AC power supplies in an EX4500 Ethernet
Installation instruction do88 Intercooler for Volvo S40 / V50 / C30
 Installation instruction do88 Intercooler for Volvo S40 / V50 / C30 This instruction shows how to replace the OEM intercooler with our performance intercooler. 2. 3. 1. 4. 5. Part number: ICM-170 6. At
PRODUCT: WASHER / WASHER-DRYER COMBO MODEL: AW 120 / AW 122 / AW 125 AWD 120 / AWD 121 / AWD 129
 PRODUCT: WASHER / WASHER-DRYER COMBO MODEL: The information included in this Splendide Repair Manual may change without notice. Please see our web site www.splendide.com/service/docs.html for updates,
Model No: VS4815 1. SAFETY INSTRUCTIONS VS4800 2. INTRODUCTION & APPLICATIONS VS4815 3. CONTENTS. 2.1 Introduction. 2.
 Instructions for: Petrol Engine Twin Camshaft Setting / Locking Tool Kit - (incorporating Vanos Alignment) - BMW N42 & N46 Engines Model No: VS4800 Associated kit: Camshaft/Carrier Bracket Remover & Installer
OWNER S MANUAL Table Tennis Table Patent Pending
 OWNER S MANUAL Table Tennis Table Patent Pending Be sure to write your model number and serial number here for future reference. You can find these numbers printed on the bottom of the table. MODEL # T8179
Dell P Series Monitor VESA Mounting Bracket Installation Instructions
 Dell P Series Monitor VESA Mounting Bracket Installation Instructions The VESA mounting bracket enables a Wyse cloud client to be mounted to the Dell P Series Monitor and the Dell E24 Monitor. The cloud
INSTALL/REMOVAL INSTRUCTIONS: WINDOW REGULATOR
 REMOVAL/INSTALL OF WINDOW REGULATOR (741-644) Cadillac Escalade, Chevrolet Suburban, Chevrolet Tahoe, GMC Yukon, Chevrolet Silverado, GMC Sierra 2000 05 General Tech Tips: Use painter s tape rather than
Creator Start-up Guide
 www.ff3dp.com Creator Start-up Guide Zhejiang Flashforge 3D Technology Co., Ltd. www.ff3dp.com Contents Precautions:... 1 1. What's in the box?...1 2. Unboxing... 2 3. Initial Hardware Installation...5
50 TO 60 INSTALLATION INSTRUCTIONS v1.0
 50 TO 60 INSTALLATION INSTRUCTIONS v1.0 PLEASE READ Thank you for purchasing The TV Shield. Please read the following, before starting the installation process. UYou will need to unscrew the ten (10) black
Installation Instructions 6028.801
 DAZZLE Installation Instructions 08.80 Spread Lavatory Faucet with Speed Connect Drain* Congratulations on purchasing your American Standard faucet with Speed Connect drain, a feature found only on American
Panel Track Installation Guide
 Panel Track Installation Guide We make it easy! BTG 493361 EN_0510 Before starting Your new Blinds To Go panel track is custom made to your specifications from the finest materials available. To ensure
CONTENTS TOOLS REQUIRED: Ratchet 13mm Socket 10mm Socket Phillips Screwdriver Pliers Panel Removal Tool. Amp Installation
 CONTENTS 1EA. SUBWOOFER ASSEMBLY P/N RUWRANGLER 1EA. 200 WATT AMP/BRACKET ASSEMBLY P/N RM11JKBTL - Bracket P/N RE08BTL200R - Amp 1EA. POWER HARNESS P/N RHWRANGLERPWR 1EA. OVERLAY HARNESS P/N RHWRANGLER
Quick Start Turning on the Tablet PC for the First Time
 User s Manual DL46 Getting Started Congratulations on your purchase of a Tablet PC. The Tablet PC is a fully functional PC with built-in LAN, and wireless connectivity. With your Tablet PC you will be
PORTABLE PA SYSTEM #1 LAST UPDATED: FEBRUARY 2011
 PORTABLE PA SYSTEM # LAST UPDATED: FEBRUARY 20 The portable PA system has been created to offer student groups an easy to use solution for self-operated sound needs. The system has the capability for:
INSTALLATION INSTRUCTIONS
 Rear Vision System Aftermarket and Factory 5.0, 8.4 and 6.1 MyGig Touch Screen Display (Factory Display requires Chrysler/Dodge dealer to activate) 2009 Current* Dodge Ram (Kit part number 1009-6503) *NOTE:
Intel RAID Maintenance Free Backup Unit 4 Quick Installation User's Guide
 Intel RAID Maintenance Free Backup Unit 4 Quick Installation User's Guide Thank you for buying an Intel RAID Maintenance Free Backup Unit 4. The Intel RAID Maintenance Free Backup Unit 4 supports the Intel
MGB Chrome Bumper Conversion
 MGB Chrome Bumper Conversion Installation Instructions For 1974 1/2-1980 MGB This kit requires cutting, welding, and painting. Professional installation recommended. Note: Every MGB body is slightly different
3. SEISCO PARTS & SERVICE REMOVAL AND REPAIR GUIDE
 4 3. SEISCO PARTS & SERVICE REMOVAL AND REPAIR GUIDE A. Changing the Control Board B. Replacing a Heating Element C. Thermistor Replacement D. High Limit Switch Replacement E. Level Detector Replacement
Rack Installation Instructions
 Rack Installation Instructions Guidelines This publication provides information about how to install your server into a standard rack cabinet using the rail kit shipped with your server. If you no longer
Replacing the USB HUB in the D448Pro programming unit
 Replacing the USB HUB in the D448Pro programming unit How-To-Do-It Manual Version 1.00/10.2006 page 1 Introduction This how-do-it manual is designated to guide the user with replacing an original USB HUB
TOYOTA Tundra 2007 - BACK-UP CAMERA SYSTEM Preparation
 Preparation Part Number(s): PT233-34070, PT923-35070-11, PT923-35070-43 NOTE: Part number of this accessory may not be the same as part number shown. Back Up Monitor Kit Contents PT923-35070-11 / PT923-35070-43
CETAC Z-Drive Assembly
 CETAC Z-Drive Assembly Replacement Guide Manual Part Number 610144 Rev 1, 2012 CETAC Technologies, Printed in USA Overview This guide describes the necessary steps to replace the Z-drive assembly on your
Installing Your 960 or 980 Server into a Rackmount Cabinet
 Installing Your 960 or 980 Server into a Rackmount Cabinet 1 2 Contents Installing Your Gateway Server into a Rackmount Cabinet...1 Identifyingpartsintheaccessorykit...2 Rackmounthandlekit... 2 Rackmountrailkit...
Installation Guide. Wyse D Class 4-GB RAM Upgrade Option Kit. Products: D90D7, D90DW. Issue: 121312 PN: 883884-35L Rev. A
 Installation Guide Wyse D Class 4-GB RAM Upgrade Option Kit Products: D90D7, D90DW Issue: 121312 PN: 883884-35L Rev. A Copyright Notices 2012, Wyse Technology Inc. All rights reserved. This manual and
HP ProLiant DL165 G7 Server. Installation Instructions
 HP ProLiant DL165 G7 Server Installation Instructions Identifying server components Front panel components Figure 1 Front Panel Components / 4 3.5 HDD Item 1 Thumbscrews for rack mounting 2 Drive status
LS-1 Series Tungsten Halogen Light Sources Installation and Operation Instructions
 LS-1 Series Tungsten Halogen Light Sources Installation and Operation Instructions Description The LS-1 Series of tungsten halogen light sources are versatile, white-light lamps optimized for use in the
EZ-Steer Assisted Steering System
 EZ-Steer Assisted Steering System Installation Instructions Platform Kit P/N 53059-54 Case IH CVX 1135 CVX 1145 CVX 1155 CVX 1170 CVX 1190 CVX 1195 CVX 135 CVX 145 CVX 155 CVX 175 CVX 195 New Holland TVT