IN00419 (rev A) Aqua 6 Glide Quadrant and Off-set Quadrant Enclosure
|
|
|
- Maximillian Oliver
- 8 years ago
- Views:
Transcription
1 IN00419 (rev A) Aqua 6 Glide Quadrant and Off-set Quadrant Enclosure Instruction suitable for both Quadrant & Off-set Quadrant variations. Instruction suitable for both Right and Left Hand fixing variations on Off-set Quadrants.

2 Before You Start Check that the tray has been installed correctly and that it is level (Fig. A), tiled down onto and sealed to the manufacturer s guidelines. Please Note: All product supplied without tray. Ensure the product is fitted to a non-porous surface ie. tiled. Check that the wall surface is flat. Unpack and check the product is complete and undamaged. Fixings are supplied for solid walls only. Ensure that the correct fixings are used for the wall type if in doubt seek professional advice. Ensure the area is clean, dry and dust free. Read the instructions in full. Have the correct tools available, (as shown below, see Tools Required ). It is recommended to situate the showerhead and door adjacent to each other in order to allow any water spray to be on the side panel or upstanding wall. Safety Handle all glass with care - support on cardboard to avoid risk of breakage. This product is heavy and requires 2 people to carry and install it. When drilling walls check first for hidden pipes and cables. All glass is toughened it cannot be reworked or replaced by ordinary glass. Use safety eyewear when drilling. Use safety eyewear when handling glass. Keep all small parts away from children. Disclaimer Please notify the retailer immediately of any damage or faults. The manufacturer cannot be held responsible for any installation costs that may arise from damaged or faulty product being installed. Please dispose of all packaging with due regard to the environment. Tools Required (not supplied) Fig.A. Spirit Level Screwdriver Tape Measure Pencil Utility Knife Junior Hacksaw Silicone Gun & Sealant Power Drill Suitable Drill Bits 6mm dia. * 3mm dia. HSS * Ensure drill bit used is suitable for wall surface Help Line: Lines open: 8.30am pm Monday to Friday Standard National call charge rate from BT landlines
.")
3 Parts & Fittings Supplied Please notify the retailer immediately of any damage or faults. The manufacturer cannot be held responsible for any installation costs that may arise from a damaged or faulty product being installed. Glass Panel* Keep small parts away from children * Off-set Quadrant Variant: Glass Panel supplied one long, one short D3 D1 D2 D4 D5 D6 D7 Glass Door Allen Keys Supplied 3mm Allen Key

4 D1 *Left and right hand variants supplied D2 Wall Channel Top Cap* Stile Cap Wall Channel Wall Channel Trim Wall Stile Gasket A B C D3 ** Door Blade Seal & Panel Blade Seal are cut to different in lengths Panel Blade Seal** (Shorter) Fixing Clamp Assembly X4 Door Stop Cover Cap X8 Head & Cill Profile Assembly
 Fixing Clamp Assembly X4 Door Stop Cover Cap X8 Head & Cill Profile")
5 D4 D5 ** Door Blade Seal & Panel Blade Seal are cut to different in lengths Magnet Seal Top Adjustable Bearing X4 Door Blade Seal** (Longer) D6 D7 Door Handle Bottom Spring Loaded Bearing X4
 D6 D7 Door Handle Bottom Spring Loaded")
6 Loose Screws & Fittings Supplied Qty A No.8 x 1¾ Pan Head Pozi Screws (actual size) x8 Qty B Wall Plugs (actual size) x8 Qty C No.8 x ⅜ Pan Head Pozi Screws (actual size) x8 1 Slide Stile into position on Cill Assembly Profile as shown* IMPORTANT NOTE: Ensue that this assembly (1-10) is carried out on a flat / level surface. Ensure correct Closing Stile and Cill Assembly orientation. *Closing Stile/ Side Stile location detail :
 is carried out on a flat / level surface.")
7 2 Pre-fitted Cill Assembly screws. i) Tighten pre-fitted Cill Assembly screws to fix Wall & Closing Stiles. IMPORTANT NOTE: Ensure product is assembled on a level surface/ floor and that the frame assembly is straight and level. ii), Alternative Angle i) 3.1 ii) Slide pre-fitted seal into position on Cill Assembly as shown For Off-set Quadrant Installations, please fit large glass panel at this stage. Ensure pre-fitted seal on Cill Profile Assembly is pushed up against Wall Stile.
 Slide pre-fitted seal into position on Cill Assembly as shown For Off-set Quadrant Installations, please fit large")
8 3.2 Please take care when handling glass. Locate Glass Front Panel into Stile. 3 Ensure bushes and protector pads are correctly located. Ensure bushes and protector pads are correctly located. Please Note: Fixing Brackets are supplied assembled. Using Allen key supplied, disassemble part and then re-assemble as shown. DO NOT overtighten. DO NOT fit cover cap at this stage. Screw heads are on OUTSIDE of the enclosure.

9 5 IMPORTANT NOTE: Ensure product is assembled on a level surface/ floor and that the frame assembly is straight and level. Once you have assembled one Front Glass Panel assemble opposite Front Glass Panel as detailed in steps 1-4. Inside, Underside View 6 i) ii) Slide pre-fitted seal into position on Head Assembly as shown Ensure pre-fitted seal on Head Profile Assembly is pushed up against Stile prior to slotting Head Profile Assembly into position. Ensure that the Head Profile Assembly is push right down on top of glass panels.

10 Ensure bushes and protector pads are correctly located. 7 Ensure bushes and protector pads are correctly located. Please Note: Fixing Brackets are supplied assembled. Using Allen key supplied, disassemble part DO NOT fit cover cap at this stage. and then re-assemble as shown. Screw heads are on OUTSIDE of DO NOT overtighten. the enclosure. 8 Pre-fitted Cill Assembly screws. i) Tighten pre-fitted Cill Assembly screws to fix Wall & Closing Stiles. ii) IMPORTANT NOTE: Ensure that Head Assembly is located on top of glass prior to tightening pre-fitted screws.
 Tighten pre-fitted Cill Assembly screws to fix Wall & Closing Stiles.")
11 9, Alternative Angle Please Note: Gasket is supplied oversized, please trim Gasket to suit. IMPORTANT NOTE: Ensure Gasket is down tight against bottom Cill Profile for a watertight seal. * Tip: Push fit Gasket, start at the bottom and work up. 10 IMPORTANT NOTE: Ensure Panel Blade Seal is down tight against bottom Cill Profile. * Tip: To push fit Panel Blade Seal, start at the bottom and work up.

12
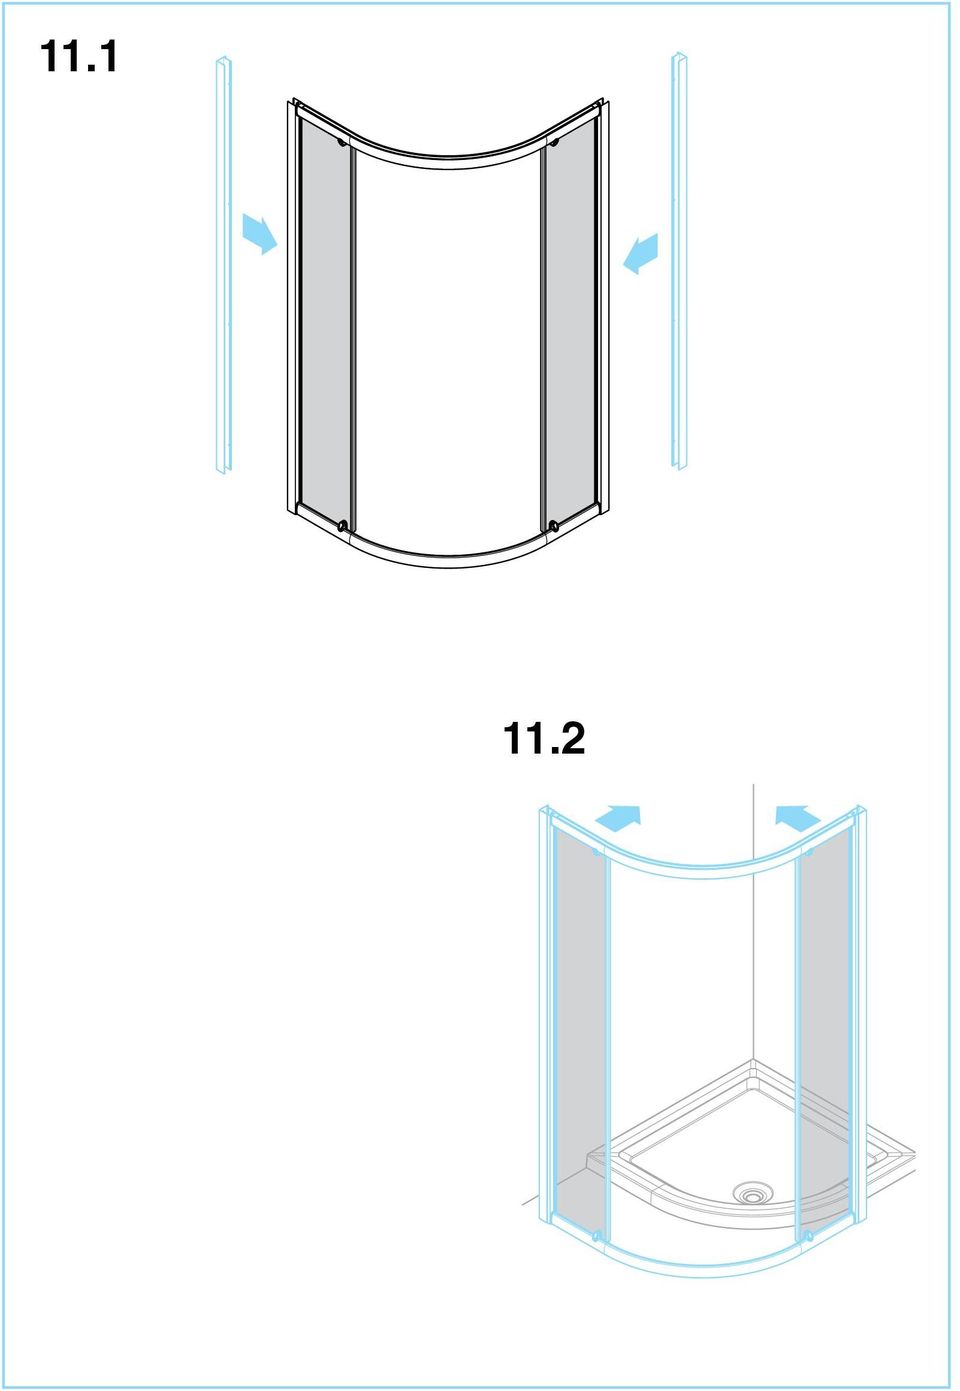
13 11.3 Mark position of Wall Channels Plan View IMPORTANT NOTE Ensure radius of enclosure matches tray. DO NOT push frame fully into Wall Channel, allow a suitable gap to ensure adjustment and fixing.

14 12 Wall plugs supplied are for solid walls only. Ensure correct wall plug for wall type is used. If in doubt seek professional advice. Position Wall Channel on wall as shown, ensure Wall Channel is fixed level Mark position of pre-drilled Wall Channel fixing hole mm dia. holes with drill bit suitable for wall surface B 12.3 Fix through pre-drilled Wall Channel fixing hole A * Tip: When drilling tiles apply masking tape to surface to stop drill bit slipping.

15 13 Plan View IMPORTANT NOTE Ensure radius of enclosure matches tray. DO NOT push frame fully into Wall Channel, allow a suitable gap to ensure adjustment and fixing.

16 14 *3mm dia. holes through pre-drilled holes using HSS drill bit 14.1* 14.2 C Ensure glass is positioned straight and is parallel with tray. * Tip: When inserting screws apply a small amount of oil to the screw thread to allow easier fixing. 15 Top Adjustable Bearing Fixing Preparation Please Note: Top Adjustable Bearings are supplied fully assembled. Disassemble part prior to fixing Please Note: Top adjustable Bearing and Bottom Spring Loaded Bearing variations. Use TOP ADJUSTABLE BEARING only.

17 16 Bottom Spring Loaded Bearing Fixing Prep Please Note: Bottom Spring Loaded Bearings are supplied fully assembled. Disassemble part prior to fixing Please Note: Bottom Spring Loaded Bearing and Top adjustable Bearing variations. Use BOTTOM SPRING LOADED BEARING only. 17 Please Note: Door Handles are supplied assembled. Using Allen key supplied, disassemble part and then re-assemble as shown. Ensure all screw heads are on the enclosure interior. DO NOT overtighten.

18 18 * Ensure Door Blade Seal is fitted with blade facing away from enclosure, (as Shown). Tip: Push fit Door Blade Seal, start at the bottom and work up. 19 * Ensure correct position of Magnet Seals, (as shown). Tip: Push fit Magnet Seal, start at the bottom and work up.
.")
19 20 * Tip: Locate bearing wheels on the top rail first Tip: Push button down and mount bearing wheels from the outside of the enclosure on to the rail, then release button to lock into place. 21.2

20 22 Inside, Underside View * Tip: When door is correctly located, door position can be adjusted up and down using Top Bearing adjustment screws (right). Using the adjustment in the Top Bearings, ensure that the Bottom Bearings are fully engaged into the bottom Cill Rail. Adjustment may also be used to ensure that the Door closes correctly against the Magnet Seals. Ensure free movement of door. Adjust to suit. 23 Push fit Wall Channel Trims

21 24 Push fit Door Stop Cover Caps. 25
22 26 * * Push fit Wall Channel End Cap and Stile End Cap into position. Take care not to let Wall Channel End Caps or Stile End Caps slip down the Wall Channel. For best results, locate Stile Caps at the back edge first in the U feature. 27 Apply Silicone Sealant, (not supplied) vertically between wall channel and wall only.
23 28 Apply Silicone Sealant, (not supplied). 150mm 150mm * Product Care: Use a non-abrasive cleaner. Water marks may be removed with a proprietary limescale remover or household vinegar.
24 Notes: Notes:
IN00378 (rev A) Corner Entry
 Corner Entry") IN00378 (rev A) Corner Entry Before You Start Check that the tray has been installed correctly and that it is level (Fig. A), tiled down onto and sealed to the manufacturer s guidelines. Please Note: All
IN00378 (rev A) Corner Entry Before You Start Check that the tray has been installed correctly and that it is level (Fig. A), tiled down onto and sealed to the manufacturer s guidelines. Please Note: All
6mm Two Door Offset Quadrant
 Installation Guide 6mm Two Door Offset Quadrant 226MBJ 0914RN Offset Quadrant 226MBJ.indd 1 07/08/2015 14:03 Cu w Before you Start Please read this Installation Guide fully. Although these instructions
Important Information
 Single Door Quadrant Instruction Manual ESQ Important Information Toughened glass is completely safe for use in our shower enclosures and bath screens; providing our products are installed according to
Beautifully Traditional
 Arcade 800mm Single Sliding Door Quadrant - nickel Arcade 900mm Single Sliding Door Quadrant - nickel ARC48 ARC49 INSTALLATION INSTRUCTIONS A www.arcadebathrooms.com IMPORTANT - Please read before installation
IMPORTANT INFORMATION
 Curved Quadrant Instruction Manual CQ IMPORTANT INFORMATION Toughened glass is completely safe for use in our shower enclosures and bath screens; providing our products are installed according to our guidelines.
Curved Quadrant Instruction Manual
 Curved Quadrant Instruction Manual Consumer Guarantee - Please make sure the purchaser/end user completes and returns the Guarantee card which is enclosed with this product. Failure to validate the Guarantee
Folding Bath Screen Instruction Manual
 Folding Bath Screen Instruction Manual Consumer Guarantee - Please make sure the purchaser/end user completes and returns the Guarantee card which is enclosed with this product. Failure to validate the
Wetroom Panel (Concealed Fix)
") Wetroom Panel (Concealed Fix) Instruction Manual DXFCPCF Important Information Toughened glass is completely safe for use in our shower enclosures and bath screens; providing our products are installed
Wetroom Panel (Concealed Fix) Instruction Manual DXFCPCF Important Information Toughened glass is completely safe for use in our shower enclosures and bath screens; providing our products are installed
Quadrant Shower Enclosure. Telephone 0844 484 7678. Cleaning. All chrome surfaces should be cleaned using a clean damp cloth.
 Cleaning All chrome surfaces should be cleaned using a clean damp cloth. Quadrant Shower Enclosure No abrasive cleaning agents or materials should be used. General glass cleaner can be used for the screen,
COASTLINE QUADRANT ENCLOSURE. Installation / Maintenance Instructions Rev 05.12 05.14
 COASTLINE QUADRANT ENCLOSURE Installation / Maintenance Instructions Rev 05.12 05.14 IMPORTANT NOTES : Please Read Carefully & retain these instructions for Future Reference. 1. For ease & safety we advise
majestic install ation guide barcelona three sided enclosure 24mm surface mounted wall channels and underframe to base
 majestic install ation guide barcelona three sided enclosure 24mm surface mounted wall channels and underframe to base These Instructions are for a left and right handed unit. The diagrams show a left
IMPORTANT INSTALLATION GUIDE VALENCIA SQUARE CORNER SHOWER READ ALL INSTRUCTIONS CAREFULLY BEFORE STARTING THE INSTALLATION
 INSTALLATION GUIDE VALENCIA SQUARE CORNER SHOWER SEALANT REQUIRED TO COMPLETE THIS INSTALLATION: (Not supplied) Sika Sikasil NG (Arctic White) To seal the WHITE shower door and returns to the shower tray.
All-Season Sunroom Sliding Glass Door Installation Instructions
 ASRESGD-08 All-Season Sunroom Sliding Glass Door Installation Instructions Panel Frame Door Frame Left Side Foam Insulator IE241 H Bar Assembly Door Frame Top Track Panel Frame Door Frame Right Side Stationary
INSTRUCTIONS: LocknCharge Laptop Carts
 INSTRUCTIONS: LocknCharge Laptop Carts www.lockncharge.com Extra Tools required: Hammer, Philips head screwdriver, medium adjustable spanner. (Allen key supplied) (Panel colours for illustration purposes
QWALL 4 ACRYLIC SHOWER WALL INSTALLATION INSTRUCTIONS
 QWALL 4 ACRYLIC SHOWER WALL INSTALLATION INSTRUCTIONS IMPORTANT DreamLine TM reserves the right to alter, modify or redesign products at any time without prior notice. For the latest up-to-date technical
Destiny Shower Enclosure Installation Instructions
 Destiny Shower Enclosure Installation Instructions IMPORTANT Please read carefully the following instructions before installing your shower enclosure. If you have any questions on this shower enclosure
Vinyl Brick Mould Field Installation Instructions All Vinyl and Vinyl Clad Windows
 Vinyl Brick Mould Field Installation Instructions All Vinyl and Vinyl Clad Windows Viewed from the exterior. IMPORTANT: Please read before you begin installation. TABLE OF CONTENTS AND TOOL / MATERIAL
Installation Instructions
 Installation Instructions 1. Position the unit onto bridging packers. These keep the unit away from any water sitting inside the frame. 2. Centralise the unit within the frame and pack the edges with appropriate
BUTTERFLY SHOWER DOOR INSTALLATION INSTRUCTIONS
 BUTTERFLY SHOWER DOOR INSTALLATION INSTRUCTIONS IMPORTANT DreamLine reserves the right to alter, modify or redesign products at any time without prior notice. For the latest up-to-date technical drawings,
Heavy Glass Frameless Shower Door With Return Panel
 202 Anderson Ave., elvue, KS 66407 Phone: 800-669-9867 Fax: 800-393-6699 www.onyxcollection.com Heavy Glass Frameless Shower Door With Return Panel Full Showers with Return ench Seat with Return FRLSDRPL-0116
CHARISMA SHOWER/TUB DOOR INSTALLATION INSTRUCTIONS
 CHARISMA SHOWER/TUB DOOR INSTALLATION INSTRUCTIONS IMPORTANT DreamLine reserves the right to alter, modify or redesign products at any time without prior notice. For the latest up-to-date technical drawings,
Premier & Deluxe 3-Season Room Sliding Glass Door
 DTSSGD-11 Premier & Deluxe 3-Season Room Sliding Glass Door Installation Instructions Screen Door Seal Left Side Track Top Track Assembly Right Side Track Right Side Trim Sliding Glass Door Sliding Screen
ILLUSION FRAMELESS SHOWER ENCLOSURE INSTALLATION INSTRUCTIONS
 PREPARATION Approximate Installation Time: Tools Required for Installation: 60 minutes Hacksaw Electric Drill 3/16 Masonry Bit Pencil/Felt tip pen Safety Glasses Measuring Tape Masking Tape Standard Screw
KITCHENS. Tip PAGE 1 FITTING YOUR KITCHEN GUIDE. How to mark out a kitchen. Tools required for installing a kitchen STEP ONE STEP TWO STEP THREE
 FITTING YOUR KITCHEN GUIDE How to mark out a kitchen PAGE 1 Before starting on the installation, measure 870mm from the lowest point of the floor and mark a datum line around the room to indicate where
Kiosk Group, Inc. ASSEMBLY INSTRUCTIONS FOR THE STANDALONE. EXQUISITE ipad KIOSK. For ipad 2-3-4-5 Version Tablets.
 Kiosk Group, Inc. ASSEMBLY INSTRUCTIONS FOR THE STANDALONE EXQUISITE ipad KIOSK For ipad 2-3-4-5 Version Tablets ipad 2-3-4-5 Version Tablet Items Required: ipad data/power cable that came with your ipad.
Installation Instructions
 Installation Instructions READ BEFORE INSTALLING UNIT For Low Profile Window Air Conditioner INSTALLATION WARNINGS AND CAUTION Carefully read the installation manual before beginning. Follow each step
Retail Reception kiosk
 Retail Reception kiosk put 42" corner post in below 66" to allow post to extend above kiosk for raised box sign Mini cantilever option - 24" overhead support leg Mini cantilever option - 24" overhead 66/48E
DIY CABINET REFACING INSTALLATION GUIDE
 DIY CABINET REFACING INSTALLATION GUIDE CABINET REFACING INSTALLATION Are you ready to reface your outdated cabinets? This guide will show you how to install your new Facelifters Cabinet Refacing Products
WINDOW REPAIR MANUAL & REFERENCE GUIDE
 WINDOW REPAIR MANUAL & REFERENCE GUIDE TABLE OF CONTENTS DOUBLE HUNG & SINGLE HUNG PARTS 4-5 CASEMENT PARTS 6 SCREEN PARTS 7-8 HOW TO REMOVE TILT-IN SASH 9 HOW TO REMOVE A BALANCE 10 HOW TO INSTALL BALANCE
PANELIZED HOME INSTALLATION GUIDELINE
 PANELIZED HOME INSTALLATION GUIDELINE A typical home package will be constructed of Snap-N-Lock Insulated Panels clad with steel skins. 4" panels will be used for the walls, and 6" panels for the roof.
Things you need to assemble the tube actuator. Left to right. are small piece of masking tape, super glue,pen knife and small
 Things you need to assemble the tube actuator. Left to right are small piece of masking tape, super glue,pen knife and small crosspoint screwdriver. You will also need a few drops of light oil. Begin by
1500 Follow Spot Yoke
 = 1500 Follow Spot Yoke Rev 1.1 2004 City Theatrical, Inc. Getting Started with the City Theatrical Follow Spot Yoke Congratulations on the purchase of your City Theatrical Follow Spot Yoke. The City Theatrical
INSTALL/REMOVAL INSTRUCTIONS: WINDOW REGULATOR
 REMOVAL/INSTALL OF WINDOW REGULATOR (741-306) Honda Accord 2003 07 General Tech Tips: Use painter s tape rather than duct tape to secure window. It will not damage paint or leave sticky residue. A plastic
SIMPLEX UNICAN LOCKS CHANGING THE CODE / COMBINATION 900 Series 1000 Series L1000 Series LP1000 Series EE1000 Series 2000 Series 2015 Series
 SIMPLEX UNICAN LOCKS CHANGING THE CODE / COMBINATION 900 Series 1000 Series L1000 Series LP1000 Series EE1000 Series 2000 Series 2015 Series 2400/2500 Series 3000 Series 3100 Series Simplex 5000 Series
TONNEAU INSTALLATION GUIDE
 TONNEAU INSTALLATION GUIDE Warranty, Care & Maintenance Model 4056 Toyota Tacoma Double Cab 5' Short Bed 2005-Current (With Multi-Track System) EASY AS 1-2-3! NORMAL INSTALLATION TIME 30 MINUTES For Warranty
Active and Passive Sash Replacement
 for Andersen Gliding Windows Read all instructions carefully before attempting this procedure. If you have any questions about your ability to complete the procedure, call Andersen at 1-888-888-7020 for
Installation Guide. Bath and Wall Surrounds SERIES 7104 1021861-2-B
 Installation Guide and Wall Surrounds SERIES 7104 1021861-2-B Thank You For Choosing Sterling We appreciate your commitment to Sterling value. Please take a few minutes to review this manual before you
New method, replacement of window and window lift, front door
 SERVICE INFORMATION Number: 831-1646 Year: 1996 Month: Market: FEBRUARI ALL New method, replacement of window and window lift, front door Cars concerned All Saab 900 M94- Background A new method of removing
Window Installation Instructions
 Caution The correct installation methods of windows in full frame or insert applications is critical towards achieving the tested performance of the window and longterm enjoyment and energy savings for
FTC 2015-2016 DIY Mountain Build Guide
 FTC 2015-2016 DIY Mountain Build Guide Assembly Instructions Check out the DIY2015-2016 Prints and BoM for individual part details. Release 1.0 9/10/15 Page 1 This guide and Bill of Materials are for constructing
INSTRUCTIONS. FLHR/C/S (Road King) FRONT END LOWERING KIT 1WARNING -J03242 REV. 10-19-04. General. Removal (Left and Right Forks) Kit Number 54614-05
 FRONT END LOWERING KIT 1WARNING -J03242 REV. 10-19-04. General. Removal (Left and Right Forks) Kit Number 54614-05") INSTRUCTIONS -J04 REV. 0-9-04 General FLHR/C/S (Road King) FRONT END LOWERING KIT This kit is designed for installation on 00 and later FLHR/C/S Model Motorcycles. Road King models use the conventional
INSTRUCTIONS -J04 REV. 0-9-04 General FLHR/C/S (Road King) FRONT END LOWERING KIT This kit is designed for installation on 00 and later FLHR/C/S Model Motorcycles. Road King models use the conventional
Beadboard Wall Bookcase
 Beadboard Wall Bookcase Note: The maximum load for each shelf is 30lbs.This hanging system is meant for drywall/wood stud mounting only. If walls are concrete, brick or plaster, please consult your local
HALE PET DOOR INSTALLATION INSTRUCTIONS HALE STANDARD PANEL MODEL
 HALE PET DOOR INSTALLATION INSTRUCTIONS HALE STANDARD PANEL MODEL Please read these instructions carefully and completely before attempting to install Hale Pet Doors; they will guide you through the steps
Standard Sleep Pod Side Entry Assembly Instructions
 Standard Sleep Pod Side Entry Assembly Instructions www.podtime.co.uk enquiries@podtime.co.uk Working House Ltd How to assemble your pod Pod assembly onsite is a relatively simple exercise for two people
INSTALLATION MANUAL. Contents JAPANESE ENGLISH GERMAN FRENCH ITALIAN SPANISH. To the installing technician: CEILING BRACKET
 Be sure to read this installation manual thoroughly prior to installation. If installation methods or non-standard parts not specified in this installation manual are used, accidents or injury may result.
Elo Touch Solutions Wall-mounting Kit for the 5501L IDS Touchmonitors
 Installation Manual Elo Touch Solutions Wall-mounting Kit for the 5501L IDS Touchmonitors SW602206 Rev B Table of Contents Chapter 1: Safety Warning... 3 Chapter 2: Kit Contents... 4 Included in Kit...
Cable Support System Guide for Andersen Bow, Bay, and Box Projecting Window Units
 for Andersen Bow, Bay, and Box Projecting Window Units Congratulations! You have just purchased one of the many fine Andersen products. Proper assembly, installation and maintenance are essential if the
1 Door Tall Unit ASSEMBLY GUIDE. Page 1 of 9. WARNING: Contains small parts, keep out of reach of children.
 Page 1 of 9 ASSEMBLY GUIDE 1 Door Tall Unit IMPORTANT Before Commencing Assembly: Read all instructions COMPLETELY Ensure all listed parts are present If any parts are missing from Parts List 1, please
Dell E Series Monitor VESA Mounting Bracket Installation Instructions
 Dell E Series Monitor VESA Mounting Bracket Installation Instructions The VESA mounting bracket enables a Wyse cloud client to be mounted to the Dell E Series Monitor. The bracket attaches to the monitor
Installation Instructions
 Installation Instructions One-Piece Deep Wall Sleeve For Use with Packaged Terminal Units Please read these instructions completely before attempting installation. NOTE: Ensure that the unit is only installed
Sash Replacement Guide
 for Andersen 200/400 Series Awning Windows Read all instructions carefully before attempting this procedure. If you have any questions about your ability to complete this procedure, call Andersen at 1-888-888-7020
RELAZZO DECKING THE TERRACE. INSTALLATION GUIDE. Construction Automotive Industry. REHAU R20680 EN 05.2015 www.rehau.com/relazzo
 Construction Automotive Industry RELAZZO DECKING THE TERRACE. INSTALLATION GUIDE REHAU R20680 EN 05.2015 www.rehau.com/relazzo Scan the QR code and learn more: RELAZZO DECKING THE TERRACE. Installation
ECM-D70T / ECM-D70T1.5
 Elliptical Ceiling Dual Mount for 37 to 50 Flat Panels INSTALLATION INSTRUCTIONS CREATING POSITIVE CUSTOMER EXPERIENCES 9531-041-001-01 Contents ECM-D70T / ECM-D70T1.5 Installation Tools... 3 Parts List...
Rebuild Instructions for 70001 and 70010 Transmission
 Rebuild Instructions for 70001 and 70010 Transmission Brinn, Incorporated 1615 Tech Drive Bay City, MI 48706 Telephone 989.686.8920 Fax 989.686.6520 www.brinninc.com Notice Read all instructions before
Integral Kit Instructions
 Integral Kit Instructions For Fisher & Paykel Cabinet widths of 525, 635, 680, 790 mm wide For curved door Models Series B, C, D & G Manual 814980 Updated August 2008 IMPORTANT If your refrigerator has
Models A spe n, Econoline C o l o n i al. and Savoy. Installation Instructions. Contractors Wardrobe
 Installation Instructions Models A spe n, Econoline C o l o n i al and Savoy Contractors Wardrobe DESIGNERS MANUFACTURERS TOLL FREE: (800) CW-DOORS (800) 293-77 www.cwdoor.com 2121 Avenue Hall Valencia,
Sliding Door Hardware Installation Instructions
 Sliding Door Hardware Installation Instructions Installation Instructions Structural Information For standard systems and most custom single door opening systems. General Overview ff All Krown Lab sliding
AZEK Rail Install Guide
 TRIM MOULDING DECK PORCH RAIL PAVERS AZEK Rail Install Guide Installing AZEK Rail with Glass Infill... 2 Installing AZEk Rail Stairs with Glass Infill... 9 Notes...14 Please read all instructions completely
Customer Service 800.780.8889 or visit us online at smithnoble.com. Wood Shutters. Step by Step Installation. Troubleshooting Tips
 reflect your style TM Customer Service 800.780.8889 or visit us online at smithnoble.com Wood Shutters Step by Step Installation Troubleshooting Tips Easy Care Instructions STEP 1 Your New Shutter Thank
INSTALLATION INSTRUCTIONS for Bifold Doors (JII103)
") Thank you for selecting JELD-WEN products. Attached are JELD-WEN s recommended installation instructions for premium composite, hollow and solid core molded Bifold Doors. Bifolds are designed for fast
Thank you for selecting JELD-WEN products. Attached are JELD-WEN s recommended installation instructions for premium composite, hollow and solid core molded Bifold Doors. Bifolds are designed for fast
HORIZONTAL INSTALLATION
 THERMO/SOLAR Žiar s.r.o. MANUAL FOR INSTALLATION PV SUPPORTING FRAMES HORIZONTAL INSTALLATION Technical alternation reserved A1410 1 12/2014 CONTENT ORD.NO. PAGE Mounting information 3 Mounting, flat roof
INSTALLATION INSTRUCTIONS for Premium Pocket Windows (JII022) IMPoRtaNt INFoRMatIoN & glossary. safety & HaNdlINg
 IMPoRtaNt INFoRMatIoN & glossary. safety & HaNdlINg") Thank you for selecting JeLd-weN products. Attached are JeLd-weN s recommended installation instructions for pocket (replacement) double-hung, casement, awning, picture or transom windows, designed to
Thank you for selecting JeLd-weN products. Attached are JeLd-weN s recommended installation instructions for pocket (replacement) double-hung, casement, awning, picture or transom windows, designed to
149mm. Walk-Thru Assembly Gate. MODEL NO: 1161, 1167 Owner s Manual. www.regalo-baby.com
 149mm 210mm Walk-Thru Assembly Gate MODEL NO: 1161, 1167 Owner s Manual READ ALL INSTRUCTIONS BEFORE ASSEMBLY AND USE OF GATE. KEEP INSTRUCTIONS FOR FUTURE USE. www.regalo-baby.com... Regalo International,
HOW TO INSTALL A BEAUTIFUL NEW KITCHEN
 HOW TO INSTALL A BEAUTIFUL NEW KITCHEN Easy to follow step-by-step kitchen cabinet installation TOOL AND MATERIAL LIST Hammer Pry bar Screwdriver Phillips Flathead Level Tape measure Pencil Straight edge
UB1 AIR CONDITIONING UNIT INSTALLATION INSTRUCTIONS
 UB1 AIR CONDITIONING UNIT INSTALLATION INSTRUCTIONS INSTALLATION INSTRUCTIONS: Carefully read these instructions before installing your new air-conditioner. AUSTRALIAN AUTOMOTIVE AIR AL00500054E 1 Table
Sun Windows General Information Sun New Construction Window Installation Instructions
 Sun Windows General Information Section 1 G F H H H A. Apply Weather Resistive Barrier B. Apply Sill Flashing Tape C. Place Waterproof Sill Shims D. Caulk Back of Nail Fin Sides & Top, Set Window, Fasten
Sliding Barn Door Hardware Installation Instructions BALDUR and ODEN
 Sliding Barn Door Hardware Installation Instructions BALDUR and ODEN Installation Instructions Structural Information For standard systems and most custom single door opening systems. General Overview
How To Install Your Frameless Shower Enclosure
 How To Install Your Frameless Shower Enclosure a) Installing Single Frameless Door Side Mounted Wall Hinges b) Installing Frameless Door with In-Line Panel c) Installing Frameless Door Between In-Line
Speed-Mat Rectangle Cutter
 Speed-Mat Rectangle Cutter 1 Honeycomb baseboard. 2 Left hold down. 14 3 Bottom hold down. 4 4 Left / right rule. 8 5 8 5 Left / right rule pointer. 1 6 Top / bottom rule. 7 Top / bottom rule pointer.
SPRITE and BIGFOOT DESKTOP CNC MACHINE KIT ASSEMBLY INSTRUCTIONS
 SPRITE and BIGFOOT DESKTOP CNC MACHINE KIT ASSEMBLY INSTRUCTIONS README FIRST: Thank you for purchasing your MyDIYCNC Desktop CNC Machine Kit. We hope this versatile and innovative machine brings you many
Information Technology Solutions
 Information Technology Solutions Aluminum Sliding Door Assembly Instructions Shield Doors & Windows Bi-fold Door Assembly Instructions For Support Please Call 03 8339 2252 Aluminum Sliding Door Assembly
Bathroom Installation Guide
 Bathroom Installation Guide Step-by-step installation of your cabinets We do a lot of groundwork to make it as simple as possible for you to assemble and install your new bathroom furniture yourself. We
PRODUCT: WASHER / WASHER-DRYER COMBO MODEL: AW 120 / AW 122 / AW 125 AWD 120 / AWD 121 / AWD 129
 PRODUCT: WASHER / WASHER-DRYER COMBO MODEL: The information included in this Splendide Repair Manual may change without notice. Please see our web site www.splendide.com/service/docs.html for updates,
Post Mount Light Installation*
 Post Mount Light Installation* *For the general installation of most Post Mount Spotlights, many vehicles may need slight modifications to these instructions. You will need the following tools: High torque
Close Coupled & Back To Wall WC Saintaryware. Fitting Instructions
 Close Coupled & Back To Wall WC Saintaryware Fitting Instructions Before starting any installation project please consider the following: Prior to drilling into walls, check there are no hidden electrical
VISION SHOWER DOOR & TUB DOOR INSTALLATION INSTRUCTIONS
 VISION SHOWER DOOR & TUB DOOR INSTALLATION INSTRUCTIONS IMPORTANT DreamLine TM reserves the right to alter, modify or redesign products at any time without prior notice. For the latest up-to-date technical
ISSUE 2. Installation Guide
 ISSUE 2 Installation Guide Here at Slide and Fold, we LOVE our Bi-Fold Plus range of folding-sliding doors. We want to ensure that your customers love them too. So we have created a new, detailed installation
AZEK Rail Install Guide
 TRIM MOULDING DECK PORCH RAIL PAVERS AZEK Rail Install Guide Installing AZEK Rail with CableRail by Feeney... 1 Installing CableRail by Feeney for AZEK Rail... 7 Installing AZEK Rail Stairs with CableRail
Assembly Instructions Model 1544 Heart-Of-The-Kitchen Island
 Assembly Instructions Model 1544 Heart-Of-The-Kitchen Island A. These units are Ready-to-Assemble. Catskill uses positive fastening methods such as wood screws and in some places hidden Bastion fasteners.
Dell P Series Monitor VESA Mounting Bracket Installation Instructions
 Dell P Series Monitor VESA Mounting Bracket Installation Instructions The VESA mounting bracket enables a Wyse cloud client to be mounted to the Dell P Series Monitor and the Dell E24 Monitor. The cloud
INSTALL/REMOVAL INSTRUCTIONS: WINDOW REGULATOR
 REMOVAL/INSTALL OF WINDOW REGULATOR (741-644) Cadillac Escalade, Chevrolet Suburban, Chevrolet Tahoe, GMC Yukon, Chevrolet Silverado, GMC Sierra 2000 05 General Tech Tips: Use painter s tape rather than
STEADYfast Stabilizer Installation Notes Fifth Wheel and Travel Trailers 11/23/13
 STEADYfast Stabilizer Installation Notes Fifth Wheel and Travel Trailers 11/23/13 (See Supplemental Instructions for trailers with heavy duty round footplates and/or Power Leveling Systems) PHONE SUPPORT
UNPACKING AND ASSEMBLY
 UNPACKING AND ASSEMBLY Assembly Instructions Step 1. Open the two boxes and remove all the parts. Lay out the parts as shown below and read through the assembly instructions before beginning assembly.
Samuel Shorty Bunk Bed
 Samuel Shorty unk ed - Please keep for future reference / 88/999 0/8 IMPORTANT NOTE: The top surface of the mattress should not come above this line. imensions Width - 8cm epth - 8cm eight - 0cm IMPORTANT
Installation Instructions
 READ BEFORE INSTALLING UNIT For Slider Casement Air Conditioners To avoid risk of personal injury, property damage, or product damage due to the weight of this device and sharp edges that may be exposed:
Technical data sheet PVC Bi-fold doors
 Standard Specifications White internally beaded, Deceuninck 3000 series profile 28mm Low-e toughened sealed units with argon gas Open in doors with white handles and hinges Tracks are fitted to the top
UPLIFT Height Adjustable Standing Desk (T-Frame) DIRECTIONS FOR ASSEMBLY AND USE - - ALSO - - Watch our assembly video
 DIRECTIONS FOR ASSEMBLY AND USE - - ALSO - - Watch our assembly video") UPLIFT Height Adjustable Standing Desk (T-Frame) DIRECTIONS FOR ASSEMBLY AND USE - - ALSO - - Watch our assembly video http://bit.ly/9ywwh! CAUTION MAKE SURE NO OBSTACLES ARE IN THE DESK S PATH AND ALL
UPLIFT Height Adjustable Standing Desk (T-Frame) DIRECTIONS FOR ASSEMBLY AND USE - - ALSO - - Watch our assembly video http://bit.ly/9ywwh! CAUTION MAKE SURE NO OBSTACLES ARE IN THE DESK S PATH AND ALL
INSTALLATION AND OPERATING INSTRUCTIONS For Model GL1 Gate Locks
 Securitron Magnalock Corp. www.securitron.com ASSA ABLOY, the global leader Tel 800.624.5625 techsupport@securitron.com in door opening solutions INSTALLATION AND OPERATING INSTRUCTIONS For Model GL1 Gate
AM/FM ANTENNA KIT (TOUR-PAK MOUNT)
") -J077 REV. 008-0-0 AM/FM ANTENNA KIT (TOUR-PAK MOUNT) GENERAL Kit Number 7-98A Models For model fitment information, see the P&A Retail Catalog or the Parts and Accessories section of www.harley-davidson.com
-J077 REV. 008-0-0 AM/FM ANTENNA KIT (TOUR-PAK MOUNT) GENERAL Kit Number 7-98A Models For model fitment information, see the P&A Retail Catalog or the Parts and Accessories section of www.harley-davidson.com
Reachout Lock Replacement for Andersen 2-Panel and 4-Panel 400 Series Frenchwood Gliding, 200 Series Narroline, and Perma-Shield Gliding Patio Doors
 for Andersen 2-Panel and 4-Panel 400 Series Frenchwood Gliding, 200 Series Narroline, and Perma-Shield Gliding Patio Doors Thank you for choosing Andersen. For questions call 1-888-888-7020. For more information
Hollow or Cinder Block Wall Mount Job Aid
 Summary This Job Aid covers: Hollow or Cinder Block Wall Mount Job Aid Hollow or Cinder Block wall Mount Bracket Installing the Mount Bracket into Cinder Block This Job Aid supports the Technician audience.
MGB Chrome Bumper Conversion
 MGB Chrome Bumper Conversion Installation Instructions For 1974 1/2-1980 MGB This kit requires cutting, welding, and painting. Professional installation recommended. Note: Every MGB body is slightly different
Navico-Northstar 2kW JRC Radar Package, Scanner Cable Removal and Replacement
 Navico-Northstar 2kW JRC Radar Package, Scanner Cable Removal and Replacement This work instruction describes the methods and means for which to remove and reinstall optional scanner cable configurations
http://waterheatertimer.org/troubleshoot-rheem-tankless-water-heater.html
 http://waterheatertimer.org/troubleshoot-rheem-tankless-water-heater.html TECHNICAL SERVICE DEPARTMENT Removal, Cleaning, & Reinstallation of the Burner Assembly For models 74 & GT199 Required tools -
Horizontal Mini Blinds Installation Guide
 Horizontal Mini Blinds Installation Guide We make it easy! BTG 468298 EN_ rev0614 For more safety information: 1-866-662-0666 or.www.healthcanada.gc.ca/blindcords Before starting Your new Blinds To Go
Overview PARTS LIST. B. Lever mounting base C. Flush handle assembly D. Grey/Blue float stop E. Grey float (Full Flush) F. Flush valve washer
 F. Flush valve washer") Overview READ ENTIRE INSTRUCTIONS BEFORE STARTING INSTALLATION PARTS LIST A. Flush valve B. Lever mounting base C. Flush handle assembly D. Grey/Blue float stop E. Grey float (Full Flush) F. Flush valve
Overview READ ENTIRE INSTRUCTIONS BEFORE STARTING INSTALLATION PARTS LIST A. Flush valve B. Lever mounting base C. Flush handle assembly D. Grey/Blue float stop E. Grey float (Full Flush) F. Flush valve
INSTALLATION INSTRUCTIONS
 INSTALLATION INSTRUCTIONS PARTS REQUIRED Single QuickStand Parts A (1) QuickStand Unit B (1) Base Plate C (1) Platform D (1) Palm Support E (1) VESA Plate F (6) M8 x 18 mm Flat Head Machine Screws G (4)
EasyNote TJ Series. Disassembly Manual
 EasyNote TJ Series Disassembly Manual CHAPTER3 Replacing notebook components Preventing static electricity discharge Preparing the work space Required tools Preparing the notebook Adding or replacing memory
450 SERIES SLIDING GLASS DOOR ASSEMBLY AND INSTALLATION INSTRUCTIONS
 450 SERIES SLIDING GLASS DOOR ASSEMBLY AND INSTALLATION INSTRUCTIONS Effective 2/12/11 Revised 7/7/15 TACOMA, WA (253) 922-6030 PORTLAND, OR (503) 682-3270 MARYSVILLE, WA (360) 659-0836 SACRAMENTO, CA
Panel Track Installation Guide
 Panel Track Installation Guide We make it easy! BTG 493361 EN_0510 Before starting Your new Blinds To Go panel track is custom made to your specifications from the finest materials available. To ensure