Air Conditioner Duct Construction & Repair
|
|
|
- Moses Carpenter
- 10 years ago
- Views:
Transcription
1 PROPER ROOF AIR CONDITIONER MOUNTING At Newmar, there are two different models of air conditioners available on all towable and motorized units. The different models are the Dometic Brisk and Penguin models, which are installed on each RV as ordered. Over time, there has been some questions as to how each model is mounted and whether they are interchangeable with the same mounting. It is very important to know that these two mountings are not the same and only after proper modifications can the models be switched from one to the other. Although both models use the same gasket set, they use different plastic roof inserts and the layout of the gaskets are different. See the following diagrams that are labeled A for the Brisk models and B for the Penguin models. The small inner gasket must be cut to fit on the Brisk A/C, but not on the Penguin A/C. Bend the gasket in an L shape for the Brisk, and a Horse-shoe shape for the Penguin. Place both the inner and outer gaskets on the bottom of the A/C before installing the air conditioner. A. BRISK A/C LAYOUT A/C Air Exhaust Vent Return Air Section L shape inner gasket layout Outer Gasket Top View Brisk A/C B. PENGUIN A/C LAYOUT Return Air Section Horse-shoe shaped inner gasket layout Top View Penguin A/C A/C Air Exhaust Vent Outer Gasket Each air conditioner is secured with four lag bolts that run into a backer installed in the roof. There should be foam pads between the roof and the air conditioner that the mounting bolts go through to seal off the roof. The top of each bolt should be covered with silicone. The mounting bolts should be tightened to 60 inch pounds of torque. 1

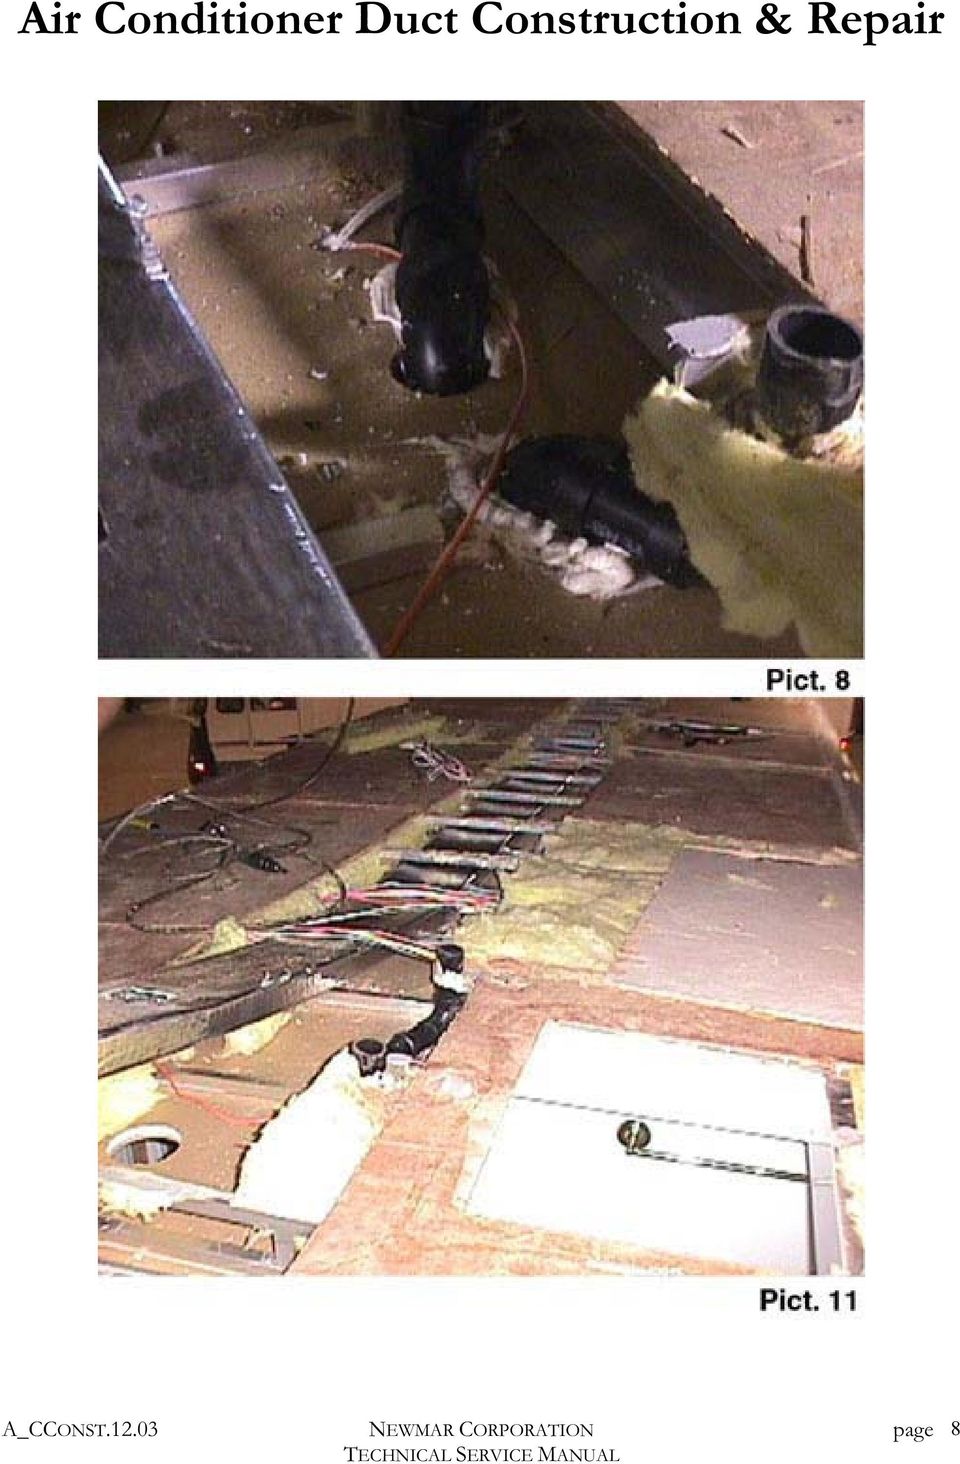
2 Construction Air conditioner ducts are made of foiled 1/4 foam core. They are taped at the edge and inserted in the rafter spaces and usually run the entire length of the unit (See picture 2.) There are two separate ducts side by side. One is for exhaust air and the other one is for return air. Each duct should have inside measurements of 1 3/4 X 8. As the roof section is assembled on the line the ducts are covered with yellow fiberglass insulation and then roof decking (usually 3/8 Luan) then covered with the rubber roof material. (See pictures 4 & 5.) In the case of a fiberglass roof, the yellow fiberglass insulation is covered with foam core before the single fiberglass roof section is laid on top. Problem Air conditioner ducts may collapse or flatten in certain areas. This does not allow enough airflow for the air conditioners to work properly. They will not cool very well, may freeze up frequently, or they may cool well in one area of the coach, but not another. Diagnosis To determine if the ducts are collapsed, open several or all air conditioner vents in the ceiling of the unit. Next, measure for the 1 ¾ and 2 inside clearance. Using a mirror in one vent and a flashlight in another, visually inspect the inside of the duct. Look for open seams at the corners. Also look for a rafter pushing through the top or bottom. Look for loose tape at the air conditioner. Be certain to check to make sure that there is an air tight seal between the ceiling vents and duct with Silicon 999 Sealant. Causes There are several reasons or causes of collapsed ducts. They are as follows: A. Too much insulation on the topside of the ducts. B. Not seamed correctly when folded and taped. C. Tape at the duct seam becomes brittle because of heat from a heat pump. A unit with a collapsed duct system may be caused by any one of the above reasons or a combination of all situations mentioned. There could also be other reasons, which cause the structure of the ducts to weaken and breakdown causing poor airflow. The reasons mentioned are the most prevalent in our shop. 2
 In the case of a fiberglass roof, the yellow fiberglass insulation is covered with foam core before the single fiberglass roof section is laid on top.")
3 Solutions If a duct system is restricted or collapsed in only a small area, braces or supports can be made to insert into the duct. This will hold the duct open and is generally a good, quick fix if the customer is in a hurry and the duct system is not too bad. To make these supports, use a length of 1/2 plywood (usually long enough to reach from one air conditioner vent to another in the same run, 4 to 6 feet.) The plywood should be ripped to 2 to keep the 2 inside opened when installed. One side of the plywood will need cuts approximately every 1/2 to allow it to bend while installing through the ceiling vent. (See Diagram 1.) These side cuts are usually made with saw kerfs only 1/8-3/16 deep. This support should then be covered with a foil tape to help control the warmer temperature associated with a heat pump. Install the support into one vent until it can be reached through the second vent. With the help of another person, stand the support on edge to push the duct up and open. The ends of the support can be siliconed to help hold it in place. If the duct system is broke open or collapsed in several areas the duct system will need to be replaced. This is the most complete and long term solution to this problem. The following steps should be followed to complete this procedure: 1. Remove all roof accessories and trim. 2. Remove roof material and decking to expose yellow fiberglass insulation. 3. Inside the unit, remove all air conditioner ceiling vents that would tie into the duct system. 4. On the roof, fold back the yellow fiberglass insulation to expose the ducts. Note the thickness of this insulation. 5. Cut the centers out of the top of three rafters near the middle. On fifth wheels, cutting near the roof bend works best. Cutting these rafters makes removal of the old ducts and inserting new ones much easier. 6. Remove old collapsed ducts, noting where each run terminated at each end. 7. Prep the new ducts by making sure they are overlapped correctly and taped properly to strengthen the duct. (See diagram 2.) The duct seam should be overlapped so that the side of the duct supports downward pressure or weight. (See diagram 2.) Taping the seam should be done to help hold the seam together as noted above and layered for strength. A good quality foil tape works best and is recommended over gray tapes and clear cellophane tapes. 8. Install one side of the new duct one section at a time, by sliding into the opening of the three cut rafters. The ends of the ducts should be folded and taped for strength. Duct sections should be butted tight together and taped. 9. Install the second run by sliding it against the side of the first run. Watch carefully so the duct doesn t get damaged when pushing it through the rafters. Again tape each joint and fold and tape the ends. 10. Make sure at least every other rafter has a small piece of wood between the rafter and the duct. A 2-3 wide strip of panel or plywood will work to protect the duct from the rafter. 11. Cut pieces of 1 X 1 aluminum angle to replace the sections that were cut out. Overlap each side of the rafter by 2 and rivet or screw these to the rafters. 12. Replace the yellow fiberglass insulation. Thin the insulation that directly covers the ducts. Too much insulation is one of the reasons these ducts collapse. If 3 insulation was used it can be split so that 1 1/2 is above the duct and should not be too tight. 13. Re-assemble the rest of the roof. 3
 The plywood should be ripped to 2 to keep the 2 inside opened when installed.")
4 14. Re-install all ceiling vents by drilling new 4 1/2 holes into the new duct and install vents as normal. 4

5 5

6 6

7 7

8 8
9 9

10 2004 Essex Application Roof Mount, Duotherm air conditioner with water drains. Interior water condensation is caught in the air conditioner drain pan. The water then exits the air conditioner drain pan and gravitationally feeds through a screened cup. The water then flows through a ¾ water line to the rear of the unit, down the inside of the rear cap. The water exits at the bottom of the cap. 10
