Configuring Napco Integration
|
|
|
- Howard Morris
- 10 years ago
- Views:
Transcription
1 Configuring Napco Integration The following instructions will guide you through the CardAccess Napco Integration with TCP/IP communication setup. Note: It is assumed that Napco Panel (including TCP/IP Communication Bit) has already been programmed using Quickloader or the Keypad. (Refer to p.25) 1. Open the System Settings - NAPCO Tab select Use Napco Panels, Enforce Napco Permission Settings. Click on Add Napco Server and type in UNC Name of the Workstation where Napco Integration Server will be running. After Saving and Closing the System Settings window the Napco Integration Server icon should display in the System Tray. 1

2 2. Open the Napco Panel Configuration window. Click New and select Napco panel Type (3200, 9600, 255). Enter the panel s information: a) Panel Name b) Enable checkbox c) Panel Security Code enter Napco panel Master Security Code (hard coded at the panel). If Code contains zero(s), replace them with A (Ex.: A7A62). The Napco panel Download Security Code can be used instead of Master Security Code. (6 digit Download Security Code must be programmed through the Quickloader) d) Group select Napco Panel group (if programmed) e) Workstation select workstation running the Napco Integration server f) Connection Type select Net.Link for TCP/IP communication g) Network Address enter the Napco s panel (NL-Mod s) IP-Address h) Socket Number must be (default) i) PC Security Code enter the same code as programmed at NL-Mod device (through NL-Mod Config utility). This code consists of three numbers. Each number can be between 0 and 255. In our case ( no code). 2
 d) Group select Napco Panel group (if programmed) e) Workstation select workstation running the Napco Integration server f)")
3 3. Open the Napco Area Configuration window. Click Edit and enter the Area information: a) Area name b) Configured checkbox c) Group (if programmed) d) Manual Control Privilege e) Use Relay Control select to use Napco Relay Board f) Use Access Control Panel to monitor Napco Arming through Access Panel g) Panel select Access panel to monitor Napco Arming h) Relay - select Access Relay to monitor Napco Arming i) Select Relay On event for Napco Armed condition and Relay Off for Disarm. 3
 Panel select Access panel to monitor Napco Arming h) Relay - select Access Relay to monitor Napco Arming")
4 4. Open the Napco Zone Configuration window. Click Edit and enter Zone information: a) Zone Name b) Area c) Zone Configured checkbox d) Group 4
 Zone Name b) Area")
5 5. Open the Permissions Configuration window. Click New and enter the Permission information: a) Permission Name b) Group c) For each Napco Panel/Area select Allow Arm/ Allow Disarm checkbox. This Permission when assigned to the Badge will allow it to Arm and/or Disarm those Areas. 5

6 6. Open the Panels Configuration window: a) Select Napco Panel Link select Card Access panel whose reader(s) will be used to Arm and/or Disarm Napco Panel/Area(s). 6
.")
7 7. Open the Readers Configuration window: a) Select Napco Alarm Panel Areas select the Napco Panel Area(s) that will be controlled by this reader. 7

8 8. Open the Personnel window: a) Napco Permissions select Napco Permission from the combo box. Note: In order for an Arm or Disarm command to be sent as a result of an "Arm Request" or "Disarm Request" event, the cardholder must have permission to arm or disarm all of the areas that the reader is monitoring. NL-Mod Setup 8

9 Note: Before attempting to program your NL-Mod it must be powered-up and connected to the Ethernet. a) Click Search button b) The Search Results window opens displaying your NL-Mod device. If you have multiple unsecured (not programmed) devices on the network they will also be on the list. Note: If Search Result window does not display your NL-Mod, you might have to do one or more of the following: 1.Try selecting different network card if there are multiple cards installed in the PC. 2. Another possibility is that NL-Mod already has static IP Address. You will then have to use Find Static IP NL-Mod button on the Search Result window. 3.There might be a Proxy Client or Firewall Client software. This software will need to be temporarily disabled. 4.Reset NL-Mode to factory defaults (Remove power, remove jumper JP2, power-up, upon continuous led flashing (about 1min. later) replace jumper. c) Using the MAC Address as reference, locate your NL-Mod device on the list. Double-click on your NL-Mod 9

10 d) The Temporary account with DHCP configured IP-Address (in our case ) will display. The default PC Security Code is 0.0.0, which represents No Code. 10

11 e) De-select This unit uses DHCP checkbox. You will now be able to enter the Static IP Address (my unit is ). Enter the Subnet Mask and Gateway for the unit. The Port number should be the default value f) Assign PC Security Code for NL-Mod. The PC Security Code is a three 3- digit numbers with value between (My PC Security Code is ) 11
 Assign PC Security Code for NL-Mod.")
12 g) Click on Automation/Access tab to configure the CardAccess parameters. Enter the IP-Address of the Workstation that is running Napco Integration Server. All options (checkboxes) on this tab must be selected for proper communication between NL-Mod and the Workstation. The Port number 5003 (default) must be selected. 12

13 e) Click on File Save As f) Type in the Account Name and click OK 13

14 h) Your NL-Mod Config account has been created and can be Downloaded to the NL-Mod. 14

15 i) Click on Download button, then click Yes j) The Download Confirmation box displayed, Click Yes 15

16 j) Look at the Status bar to confirm successful NL-Mod Download 16

17 Configuring Central Station Reporting (NL-Receiver) 17

18 Configuring PC Preset 18

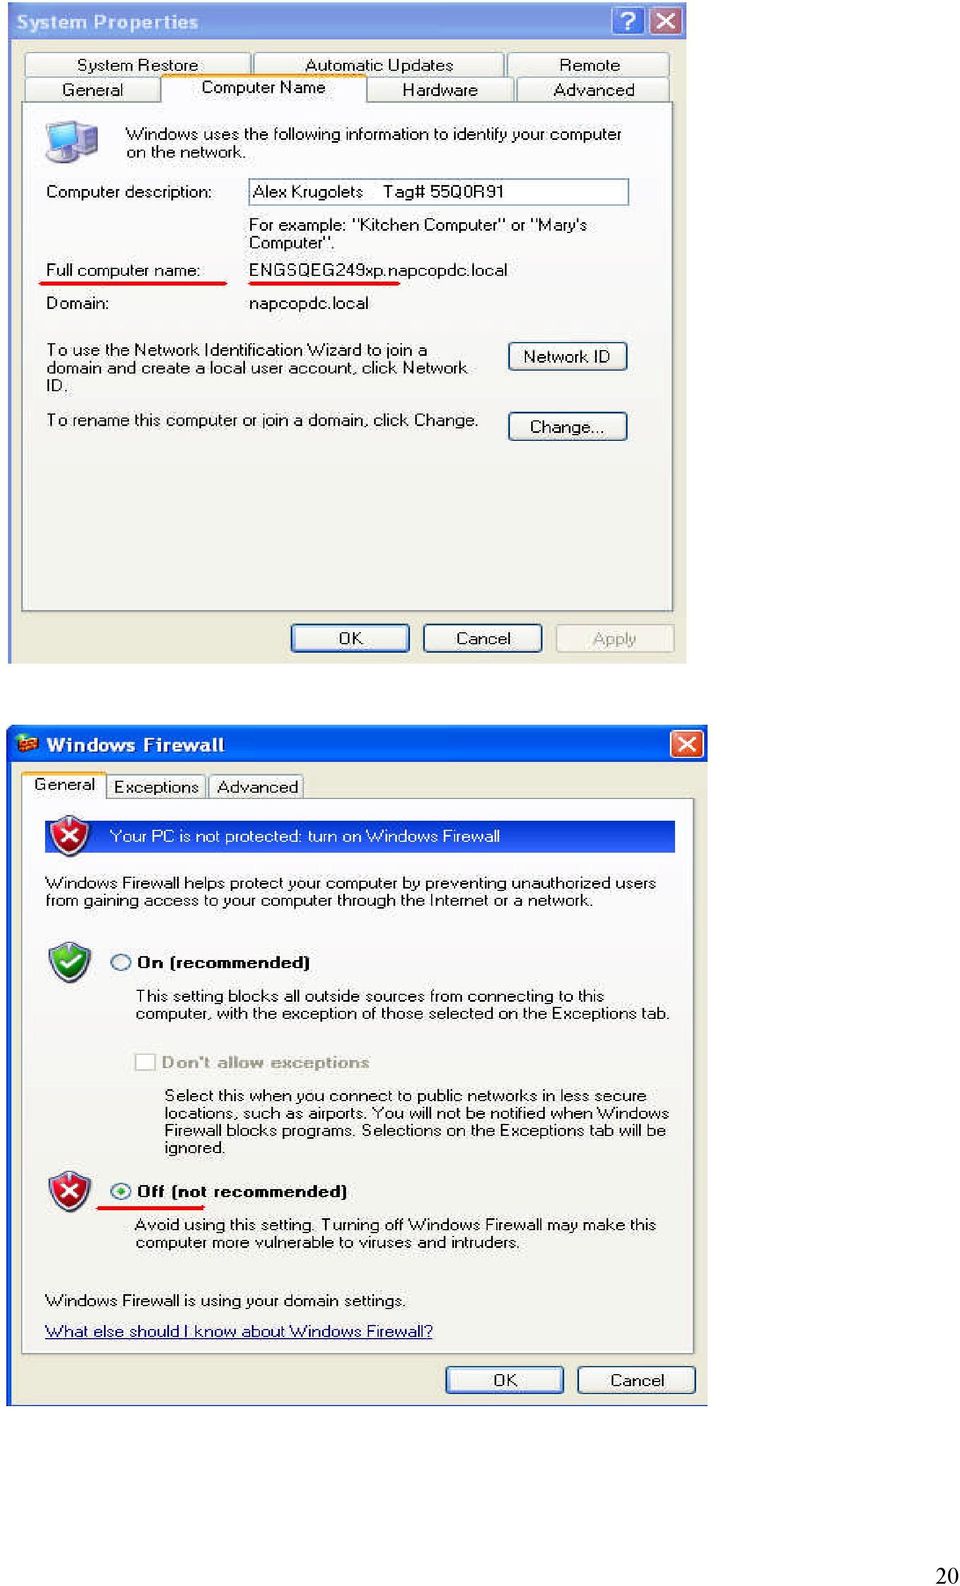
19 Troubleshooting Matrix Perform the following test sequence to verify correct Napco Integration operation. Test Diagnostic Test Symptom Resolution # 1 Napco Integration Server running? No Napco Integration Icon in System Tray - Verify that the correct Workstation Name (p.20) is entered in the System Settings (p.1) - 2 Arm/Disarm Napco panel Area through the Keypad No Arming/Disarming - Possible problem with Napco Panel program. Verify program with the Quickloader. 3 Arm/Disarm Napco panel Area through the Keypad No Area Armed /Area Disarmed Events in CardAccess - - Verify Net Link settings. Open NL-Mod Config - Automation/Access tab. Port=5003, IP Address = address of Workstation running Napco Integration, all 3 Options checkboxes selected (p.12) - Disable Workstation s Firewall (p.20) - Verify that the correct Static IP Address is assigned to the Workstation (p.21) - Verify that the Server Name does not contain an illegal characters ( - etc.) - Verify that the date format is mm/dd/yyyy - Run Ethereal utility to verify data sent from NL- Mod to Napco Integration Port 5003 (p.22-24) - 4 Arm/Disarm Napco Panel through CardAccess Manual Control window 5 Arm Napco Panel with Badge double-swipe 6 Disarm Napco Panel with Badge swipe Can t Arm/Disarm Napco panel - Open Napco Panel Configuration screen. Verify Panel Security Code PC Security Code, Workstation Name, and Network Address (p.2) - Open NL-Mod Config NL-Mod tab. Port=10081, IP Address = address of Napco panel. Verify correct Subnet Mask, Gateway. Make sure This unit uses DHCP check box is not selected. Verify correct PC Security Code (p.14) - Can t Arm Napco panel - Verify that Permission setting allows Area Arming (p.5) - Verify that Reader configured to control Napco Area (p.7) - Verify that your Badge has correct Permission selected (p.8) - Can t Disarm Napco panel - Verify that Permission setting allows Area Disarming (Refer to p.5) - 19

20 20
21 21
22 22
23 23
24 24
25 Enabling TCP/IP Communication at Napco Panels In order for CA3000 (or Quickloader) to communicate through TCP/IP with Napco panels, TCP/IP bit must first be turned ON at the panel. This can be accomplished through Napco Keypad Programming. Follow the procedure below to turn on TCP/IP bit on Gem 3200,9600 and X255 panels. 1. At the Napco panel keypad enter the Master Security Code. (At our test panels this code is hard-coded to be In the real world this code is unique for each panel.) 2. Press MENU button, then BYPASS button twice. (The keypad display should say Activate Program ) 3. Press STAY (Next/Yes) button. (At this point you have entered into the Easy-Menu Programming Mode) 4. Press RESET button. (this activates keypad Address Programming Mode) 5. Enter address 2423 (you will see the content of this memory address, which should be blank (represented by eight dots)) 6. Press 3 (the third dot will change to 3 on the keypad s display) 7. Press ENTER button 8. Press RESET button 25
26 26
Preparing the Windows version of the software for use
 Preparing the Windows version of the software for use System requirements Component Processor RAM Hard disk Drives Interfaces/network TCP/IP internet protocol Screen Installing the Conference Manager software
Crow Limited Warranty. Print Version 017
 Crow Limited Warranty (Crow) warrants this product to be free from defects in materials and workmanship under normal use and service for a period of one year from the last day of the week and year whose
Do not start HiQnet London Architect on the computer until instructed to do so below at Start and Configure HiQnet London Architect.
 This guide will walk you through the process of configuring your PC running HiQnet London Architect to communicate with a network of Soundweb London devices. Before you begin, please ensure that all Soundweb
4-441-095-12 (1) Network Camera
 Network Camera") 4-441-095-12 (1) Network Camera SNC easy IP setup Guide Software Version 1.0 Before operating the unit, please read this manual thoroughly and retain it for future reference. 2012 Sony Corporation Table
4-441-095-12 (1) Network Camera SNC easy IP setup Guide Software Version 1.0 Before operating the unit, please read this manual thoroughly and retain it for future reference. 2012 Sony Corporation Table
Debugging Network Communications. 1 Check the Network Cabling
 Debugging Network Communications Situation: you have a computer and your NetBurner device on a network, but you cannot communicate between the two. This application note provides a set of debugging steps
Easy Setup Guide for the Sony Network Camera
 -878-191-11 (1) Easy Setup Guide for the Sony Network Camera For setup, a computer running the Microsoft Windows Operating System is required. For monitoring camera images, Microsoft Internet Explorer
STATIC IP SET UP GUIDE VERIZON 7500 WIRELESS ROUTER/MODEM
 STATIC IP SET UP GUIDE VERIZON 7500 WIRELESS ROUTER/MODEM Verizon High Speed Internet for Business Verizon High Speed Internet for Business SETTING UP YOUR NEW STATIC IP CONNECTION AND IP ADDRESS(ES) This
MaxSea TimeZero NN3D Radar Connection Checklist
 MaxSea TimeZero NN3D Radar Connection Checklist This TechNote only applies to MaxSea TimeZero Explorer. Description Follow this TechNote if you have any of these symptoms: - The Radar Tab (Radar WorkSpace)
1 PC to WX64 direction connection with crossover cable or hub/switch
 1 PC to WX64 direction connection with crossover cable or hub/switch If a network is not available, or if it is desired to keep the WX64 and PC(s) completely separated from other computers, a simple network
NNAS-D5 Quick Installation Guide
 NNAS-D5 Quick Installation Guide NOTE: By default, LAN0 (eth0) is set to DHCP. If a DHCP server is available or detected, LAN0 will be assigned a DHCP IP address. If a DHCP server is not available, LAN0
Use this guide if you are no longer able to scan to Sharpdesk. Begin with section 1 (easiest) and complete all sections only if necessary.
 and complete all sections only if necessary.") Use this guide if you are no longer able to scan to Sharpdesk Instructions: Begin with section 1 (easiest) and complete all sections only if necessary. 1 Section 1 Complete pages 3-5. Scan to the desired
Use this guide if you are no longer able to scan to Sharpdesk Instructions: Begin with section 1 (easiest) and complete all sections only if necessary. 1 Section 1 Complete pages 3-5. Scan to the desired
1. Hardware Installation
 4 Port 10/100M Internet Broadband Router with USB Printer server Quick Installation Guide #4824904AXZZ0 1. Hardware Installation A. System Requirement Before you getting started, make sure that you meet
To perform Ethernet setup and communication verification, first perform RS232 setup and communication verification:
 PURPOSE Verify that communication is established for the following products programming option (488.2 compliant, SCPI only): DCS - M9C & DCS M130, DLM M9E & DLM-M9G & DLM M130, DHP - M9D, P series, SG,
BASLER ACE QUICK INSTALLATION GUIDE
 BASLER ACE QUICK INSTALLATION GUIDE Rev. 01 Quick installation Guide V1 1 Introduction The installation procedures in this guide assume that you want to get your camera operational and begin capturing
Configuring Routers and Their Settings
 Configuring Routers and Their Settings When installing a router on your home network the routers settings are usually defaulted to automatically protect your home, and simplify setup. This is done because
Lab 8.4.2 Configuring Access Policies and DMZ Settings
 Lab 8.4.2 Configuring Access Policies and DMZ Settings Objectives Log in to a multi-function device and view security settings. Set up Internet access policies based on IP address and application. Set
NetLINE Wireless Broadband Gateway
 NetLINE Setup Guide Farallon s NetLINE connects to your cable/dsl modem, allowing computers on your local wired and wireless networks to share a single broadband connection to the Internet. This Setup
Using a simple crossover RJ45 cable, you can directly connect your Dexter to any computer.
 Dexter is a network device using the Ethernet protocol to connect and communicate with other devices on the network: Computers, routers, DHCP servers. Thus you have to setup your Dexter and your network
Access Control & Burglar Alarm Integration with KT-300
 Purpose Access Control & Burglar Alarm Integration with KT-300 The purpose of this document is to provide Installers and System Administrators instructions on integrating access control to their burglar
Connecting the DG-102S VoIP Gateway to your network
 Contents of Package: DG-102S VoIP Station Gateway Power adapter CD-ROM, including User s Manual Quick Install Guide Requirements: RS-232 Console Cable Two RJ-45 CAT-5 Straight-Through Cables For more information
Enabling Internet Connection Sharing on Windows 2000 15. Enabling ICS On Windows XP As The Host 4 Enabling ICS On Windows XP As The Client 11
 Sharing an Internet Connection with SatDirect Plus Table of Contents Contents Section 1: Section 2: Section 3: Introduction... 1 Physical Setup......2 Enabling Internet Connection Sharing on Windows XP
Quick Installation Guide Network Management Card
 Rev.1.1 www.cyberpowersystems.com Quick Installation Guide Network Management Card Intelligent Network Management Card allows UPS to be managed, monitored, and configured via SNMP Card Configuration Tool
Crystal Matrix Software. Quick Start. Configuration Guide
 Crystal Matrix Software Quick Start Configuration Guide Date: March 10, 2015 Page: 1 Table of Contents Intended Use... 2 Introduction... 3 Basic Steps... 3 Install and Register the Crystal Matrix software...
Ethernet Interface Manual Thermal / Label Printer. Rev. 1.01 Metapace T-1. Metapace T-2 Metapace L-1 Metapace L-2
 Ethernet Interface Manual Thermal / Label Printer Rev. 1.01 Metapace T-1 Metapace T-2 Metapace L-1 Metapace L-2 Table of contents 1. Interface setting Guiding...3 2. Manual Information...4 3. Interface
DRO-210i LOAD BALANCING ROUTER. Review Package Contents
 DRO-210i LOAD BALANCING ROUTER Review Package Contents Make sure that the package contains the following items. DRO-210i Load Balancing Router 2 Straight Ethernet Cables 1 Cross Over Ethernet Cable 1 Power
PC/POLL SYSTEMS Version 7 Polling SPS2000 Cash Register TCP/IP Communications
 PC/POLL SYSTEMS Version 7 Polling SPS2000 Cash Register TCP/IP Communications PC/POLL SYSTEMS supports native TCP/IP polling for the SPS2000 cash register. It is recommended users have the register updated
Section 5: Installing the Print Driver
 Section 5: Installing the Print Driver In This Section Print Driver Installation for USB Connection Using the Ethernet Connection and a Crossover Cable Print Driver: The Epilog print driver is the software
Application & Quick-Start Guide
 Model: CRMWIC Web Intelligent Controller 1 This document will illustrate various ways to connect and use a CRM-WIC as well as programming examples. When connecting CRM-WIC, the installer has several interface
Configuring a customer owned router to function as a switch with Ultra TV
 Configuring a customer owned router to function as a switch with Ultra TV This method will turn the customer router into a wireless switch and allow the Ultra Gateway to perform routing functions and allow
H0/H2/H4 -ECOM100 DHCP & HTML Configuration. H0/H2/H4--ECOM100 DHCP Disabling DHCP and Assigning a Static IP Address Using HTML Configuration
 H0/H2/H4 -ECOM100 DHCP & HTML 6 H0/H2/H4--ECOM100 DHCP Disabling DHCP and Assigning a Static IP Address Using HTML 6-2 H0/H2/H4 -ECOM100 DHCP DHCP Issues The H0/H2/H4--ECOM100 is configured at the factory
Connecting to a Soundweb TM. London Network
 This guide will step you through the process of configuring your laptop and HiQnet TM London Architect TM to communicate with a network of Soundweb London devices. 1 Install London Architect Install the
Configuring the CyberData VoIP 4-Port Zone Controller with Audio Out
 NetVanta Unified Communications Technical Note Configuring the CyberData VoIP 4-Port Zone Controller with Audio Out Introduction The CyberData Voice over Internet Protocol (VoIP) zone controller enables
Quick Note 32. Using Digi RealPort with a Digi TransPort Router. UK Support September 2012
 Quick Note 32 Using Digi RealPort with a Digi TransPort Router UK Support September 2012 1 Contents 1 Introduction... 3 1.1 Outline... 3 1.2 Assumptions... 3 1.3 Version... 3 2 Configuration & scenario...
Deploying Windows Streaming Media Servers NLB Cluster and metasan
 Deploying Windows Streaming Media Servers NLB Cluster and metasan Introduction...................................................... 2 Objectives.......................................................
Self Help Guide IMPORTANT! Configuring Your Router With Your Modem. Please read the following carefully; This Guide refers to the following Products:
 IMPORTANT! This Guide refers to the following Products: Configuring Your Router With Your Modem Please read the following carefully; Synopsis: A standard (Wireless) Router does not come equipped with the
Contents. ST9612 Model WIC Printer. Get the original printer s information. Edited 11/04/15
 Printer - Replacement The following is a guide on how to swap out a WIC printer with another. A scenario where this might happen is when getting a service replacement for faulty hardware from Source Technologies.
Movie Cube. User s Guide to Wireless Function
 Movie Cube User s Guide to Wireless Function Table of Contents 1. WLAN USB Adapter Connection...3 2. Wireless Setup...4 2.1 Infrastructure (AP)...5 2.2 Peer to Peer (Ad Hoc)...7 2.3 Settings for PC...8
TECH BULLETIN NETGEN1 DOOR CONTROLLER WI-FI NETWORK CONFIG
 TECH BULLETIN NETGEN1 DOOR CONTROLLER WI-FI NETWORK CONFIG February 12, 2008 The factory default network configuration for BlueWave Security s Wi-Fi NetGen1 door controllers is a dynamic DHCP IP address,
Application Note Configuring the UGate 3000 for use with ClipMail Pro and ClipExpress
 Application Note Configuring the UGate 3000 for use with Introduction This Application Note guides the ClipMail user through the UGate gateway configuration process by using a simple dial up connection
XEROX DOCUPRINT N4525 NETWORK LASER PRINTER QUICK NETWORK INSTALL GUIDE
 XEROX DOCUPRINT N4525 NETWORK LASER PRINTER QUICK NETWORK INSTALL GUIDE Xerox DocuPrint N4525 Network Laser Printer Quick Network Install Guide 721P56640 September 2000 2000 by Xerox Corporation. All
Network Setup Instructions
 Network Setup Instructions This document provides technical details for setting up the Elite Salon & Spa Management program in a network environment. If you have any questions, please contact our Technical
Configuring MassTransit Server to listen on ports less than 1024 using WaterRoof on Macintosh Workstations
 Configuring MassTransit Server to listen on ports less than 1024 using WaterRoof on Macintosh Workstations Summary This article explains how to configure MassTransit to listen on ports less than 1024 without
If you never used nor intend to use the wired-connection, then please disregard the following info.
 Version date: 21/04/2015 Dear library users, In the library you can connect to the internet in two ways, using wireless or a wired-connection. The wired-connection is faster, allows you to connect to the
EDGE FX Network configuration
 Page 1 of 16 TITLE: Category: EDGE FX Network configuration GERBER EDGE Document Number: 4280 Supplied by: Gerber Service Last Modified: April 14, 2011 Summary: In order to connect an EDGE FX to your PC
EC500 BASIC SOFTWARE SETUP GUIDE. Read This First. www.easyclocking.com. Easy Clocking EC500 Setup Guide - Page 1
 EC500 BASIC SOFTWARE SETUP GUIDE Read This First www.easyclocking.com Easy Clocking EC500 Setup Guide - Page 1 Step 1 - Registering the Software A"er installing the Easy Clocking So"ware, the next step
Network Video Recorder. Operation Manual
 Network Video Recorder Operation Manual Content 1 Product Description... 1 1.1 Product Overview... 1 1.2 Specification... 1 2 Product Structure Introduction... 2 2.1 Back Interface... 2 2.2 Front Panel...
Model:BL-WDR3750 750Mbps Wireless Dual Band 11AC Router
 Quick Installation Guide Model:BL-WDR3750 750Mbps Wireless Dual Band 11AC Router 1.Connecting the device Note: Please use wired network connections only to configure the Router. 1 Connect the WAN port
TECHNICAL BULLETIN. Configuring Wireless Settings in an i-stat 1 Wireless Analyzer
 i-stat TECHNICAL BULLETIN Configuring Wireless Settings in an i-stat 1 Wireless Analyzer Before configuring wireless settings, please enable the wireless functionality by referring to the Technical Bulletin
Configuring the WT-4 for ftp (Ad-hoc Mode)
") En Configuring the WT-4 for ftp (Ad-hoc Mode) Windows XP Introduction This document provides basic instructions on configuring the WT-4 wireless transmitter and a Windows XP Professional SP2 ftp server
En Configuring the WT-4 for ftp (Ad-hoc Mode) Windows XP Introduction This document provides basic instructions on configuring the WT-4 wireless transmitter and a Windows XP Professional SP2 ftp server
Symphony Network Troubleshooting
 Symphony Network Troubleshooting Step 1) Review the Networking 101 presentation on the CD included with the Symphony. A basic understanding of networks is essential to this procedure. Step 2) Identify
Special Note Ethernet Connection Problems and Handling Methods (CS203 / CS468 / CS469)
") Special Note Connection Problems and Handling Methods (CS203 / CS468 / CS469) Sometimes user cannot find the RFID device after installing the CSL Demo App and the RFID reader is connected. If user cannot
Special Note Connection Problems and Handling Methods (CS203 / CS468 / CS469) Sometimes user cannot find the RFID device after installing the CSL Demo App and the RFID reader is connected. If user cannot
How to configure DVR and computer for running Remote Viewer via IP network
 How to configure DVR and computer for running Remote Viewer via IP network Follow these steps to configure a network DVR and a computer with Remote Viewer software to see live pictures via IP network.
IntraVUE Plug Scanner/Recorder Installation and Start-Up
 IntraVUE Plug Scanner/Recorder Installation and Start-Up The IntraVUE Plug is a complete IntraVUE Hardware/Software solution that can plug directly into any network to continually scan and record details
SATO Network Interface Card Configuration Instructions
 SATO Network Interface Card Configuration Instructions Table of Contents 1. Reset of wired/wireless interface card... 3 2. Installing the All-In-One Utility (recommended)... 4 3. Configuring wired/wireless
PIM31 Remote Setup and Operational Procedures
 PIM31 Remote Setup and Operational Procedures 1 Remote Application and TCP/IP Setup PIM31 Remote Control Panel is the software to control the PIM31 unit from any PC using a TCP/IP cable connection. This
Step-by-Step Setup Guide Wireless File Transmitter FTP Mode
 EOS Step-by-Step Setup Guide Wireless File Transmitter FTP Mode Ad Hoc Setup Windows XP 2012 Canon U.S.A., Inc. All Rights Reserved. Reproduction in whole or in part without permission is prohibited. 1
Section 5: Connecting the Laser to Your Computer
 Section 5: Connecting the Laser to Your Computer In This Section Connecting the Laser to your Computer USB Port Ethernet Port Connecting the Laser to Your Computer All Epilog systems are designed to be
CHANGE NETWORK SETTINGS Technicolor TG582n
 CHANGE NETWORK SETTINGS Technicolor TG582n Changing the TG582n Network Settings This document will guide you through the process of changing the gateway address and/or DHCP pool settings of your Technicolor
Guide to Setting up Internet Connection Sharing for Windows
 Guide to Setting up Internet Connection Sharing for Windows Document Date: December 20, 2005 Document Version: Version: 1.0 Disclaimer: Please note that this document is provided on an as is where is basis
Victoria Combo Remote Control
 Victoria Combo Remote Control enables you to control your tester from any where in world. The only requirement is that the Victoria Combo and the PC are connected to TCP/IP networks either physically or
Scan to SMB(PC) Set up Guide
 Set up Guide") Scan to SMB(PC) Set up Guide Regarding Trade Names Windows is a registered trademark of Microsoft Corporation in the U.S.A. and/or other countries. Windows XP and Windows Vista are trademarks of Microsoft
Scan to SMB(PC) Set up Guide Regarding Trade Names Windows is a registered trademark of Microsoft Corporation in the U.S.A. and/or other countries. Windows XP and Windows Vista are trademarks of Microsoft
Prestige 2002 Series. VoIP Analog Telephone Adaptor. Quick Start Guide
 VoIP Analog Telephone Adaptor Quick Start Guide Version 3.60 5/2005 Overview The Prestige allows you to use an analog telephone to make phone calls over the Internet (Voice over IP or VoIP). It uses SIP
Preparing the Computers for TCP/IP Networking
 Configuration Preparing the Computers for TCP/IP Networking Configuring Windows 98, and ME for TCP/IP Networking Verifying TCP/IP Properties Configuring Windows 2000 or XP for IP Networking Install or
Configuring the WT-4 for ftp (Ad-hoc Mode)
") En Configuring the WT-4 for ftp (Ad-hoc Mode) Mac OS X Introduction This document provides basic instructions on configuring the WT-4 wireless transmitter and a Mac OS X (10.5.2) ftp server for transmission
En Configuring the WT-4 for ftp (Ad-hoc Mode) Mac OS X Introduction This document provides basic instructions on configuring the WT-4 wireless transmitter and a Mac OS X (10.5.2) ftp server for transmission
Internet Guide. Prepared for 55 John Street
 Internet Guide Prepared for 55 John Street I. Internet Service How do I connect to the Internet? WiFi (Wireless Connectivity) is available throughout the building. In order to connect, you will need a
NXT Controller Manual IP Assignment in WAN Environments Application Note
 It is difficult to perform NXT controller IP address assignment and auto-configuration when controllers are on different subnets from the local PC (the PC from which the Doors.NET client is run). This
Lab 8.4.2 Configuring Access Policies and DMZ Settings
 Lab 8.4.2 Configuring Access Policies and DMZ Settings Objectives Log in to a multi-function device and view security settings. Set up Internet access policies based on IP address and application. Set
StarMOBILE Network Configuration Guide. A guide to configuring your StarMOBILE system for networking
 StarMOBILE Network Configuration Guide A guide to configuring your StarMOBILE system for networking INTRODUCTION... 3 BEFORE YOU BEGIN... 3 1) CONFIRM YOU HAVE THE LATEST SOFTWARE... 3 2) INSTALL THE STARMOBILE
IDDERO TOUCH PANELS. Video door phone configuration. www.iddero.com 120130-02
 IDDERO TOUCH PANELS Video door phone configuration www.iddero.com 120130-02 TABLE OF CONTENTS 1 INTRODUCTION... 3 2 INSTALLATION... 3 3 INITIAL CONFIGURATION... 4 4 2N HELIOS IP VIDEO DOOR PHONES... 5
The Discovery Series
 The Discovery Series Multi-User License Installation This document provides information needed to install and to operate The Discovery Series multi-user licensing capability. This document is for individuals
Docufide Client Installation Guide for Windows
 Docufide Client Installation Guide for Windows This document describes the installation and operation of the Docufide Client application at the sending school installation site. The intended audience is
Network Installation Guide. WorkForce 600 Series Artisan 700 Series Artisan 800 Series
 Network Installation Guide WorkForce 600 Series Artisan 700 Series Artisan 800 Series Before You Begin Make sure you installed ink cartridges and loaded paper as described on the Start Here poster. Then
Detective. Family. HPGe-Based Portable Nuclide Identifiers. Wireless Remote Operation With SOTI s Pocket Controller Software
 Detective Family HPGe-Based Portable Nuclide Identifiers Wireless Remote Operation With SOTI s Pocket Controller Software This document tells how to set up the Detective-EX/DX, Micro-Detective, Micro-trans-SPEC,
C-more Remote Access, Data Log, FTP File Transfer, and Email Tutorial
 C-more Remote Access, Data Log, FTP File Transfer, and Email Tutorial P a g e 2 Introduction: This script will walk you through the basic process of setting up the remote access, data logging, FTP file
OPERATION MANUAL. MV-410RGB Layout Editor. Version 2.1- higher
 OPERATION MANUAL MV-410RGB Layout Editor Version 2.1- higher Table of Contents 1. Setup... 1 1-1. Overview... 1 1-2. System Requirements... 1 1-3. Operation Flow... 1 1-4. Installing MV-410RGB Layout
PePWave Surf Series PePWave Surf Indoor Series: Surf 200, AP 200, AP 400
 PePWave Surf Series PePWave Surf Indoor Series: Surf 200, AP 200, AP 400 PePWave Surf Outdoor Series: Surf AP 200/400-X, PolePoint 400-X, Surf 400-DX User Manual Document Rev. 1.2 July 07 COPYRIGHT & TRADEMARKS
Internet for Everyone In-Room Instructions January 2011 Version 1.3
 Internet for Everyone In-Room Instructions January 2011 Version 1.3 Everywhere Internet 2006 Page 1 of 17 Connecting your computer to the Everywhere Internet network in your room 1. You need a network
The irnetbox Manager User Guide
 The irnetbox Manager User Guide Chris Dodge RedRat Ltd April 2014 For irnetbox Manager 3.05 1 Contents 1. Introduction...3 2. Initial Network Configuration...3 3. Finding irnetboxes...3 3.1 Device Information
OfficeConnect Internet Firewall 25 Internet Firewall DMZ. QuickStart Guide (3C16770, 3C16771)
") OfficeConnect Internet Firewall 25 Internet Firewall DMZ QuickStart Guide (3C16770, 3C16771) Checking Package Contents Getting Started Thank you for purchasing the OfficeConnect Internet Firewall. The
OfficeConnect Internet Firewall 25 Internet Firewall DMZ QuickStart Guide (3C16770, 3C16771) Checking Package Contents Getting Started Thank you for purchasing the OfficeConnect Internet Firewall. The
While every effort was made to verify the following information, no warranty of accuracy or usability is expressed or implied.
 AG082411 Objective: How to set up a 3G connection using Static and Dynamic IP addressing Equipment: SITRANS RD500 Multitech rcell MTCBAH4EN2 modem PC with Ethernet card Internet explorer 6.0 or higher
Table Of Contents. System Monitoring... 14 System Monitoring Display...14 Monitoring Zones...15 About Areas (partitions)...15 Area Status Display...
...15 Area Status Display...") Quick Start Table Of Contents Getting Started... 2 NEware Editions...2 Installing NEware...3 Installing Languages...3 Connecting to NEware...3 Changing Your IP100 Password...4 User Codes... 5 Master Feature...5
Quick Start Table Of Contents Getting Started... 2 NEware Editions...2 Installing NEware...3 Installing Languages...3 Connecting to NEware...3 Changing Your IP100 Password...4 User Codes... 5 Master Feature...5
Configuration Manual English version
 Configuration Manual English version Frama F-Link Configuration Manual (EN) All rights reserved. Frama Group. The right to make changes in this Installation Guide is reserved. Frama Ltd also reserves the
How to Remotely Access Hikvision Devices User Manual
 HIKVISION EUROPE B.V. How to Remotely Access Hikvision Devices User Manual (Use to remotely access Hikvision DVR s, NVR s and IP Cameras) Name: Remote Access Publisher: HIKVISION EUROPE B.V. Type: Information
Windows Server 2008 R2 Initial Configuration Tasks
 Windows Server 2008 R2 Initial Configuration Tasks I am not responsible for your actions or their outcomes, in any way, while reading and/or implementing this tutorial. I will not provide support for the
Discovery Tool for COMbricks Quick Start Guide
 Discovery Tool for COMbricks Introduction The Discovery Tool for COMbricks makes it easy to: Find all available Head Stations in your entire network (also other IP ranges!) Identify the correct COMbricks
64-Bit Compatibility with Micromeritics Applications
 Tech Tip 7 64-Bit Compatibility with Micromeritics Applications Micromeritics products are designed to operate in most Microsoft Windows environments. However, more current versions of Microsoft Windows,
Basic Mercury Powered NXT Configuration in Doors.NET TM Application Note. 1.0 Adding an NXT-MSC Controller to the NXT Gateway
 Doors.NET installation and controller configuration is a three step process. Each of these steps has its own document, with controller configuration broken into separate documents per hardware type. software
Setup for Windows XP Connect to your Windows XP machine with: FileBrowser, NetPortal & ServerControl
 Connect to your Windows XP machine with: FileBrowser, NetPortal & ServerControl Copyright Stratospherix 2010 Apple, the Apple logo, ipod, ipod touch, and itunes are trademarks of Apple Inc., registered
CS 326e F2002 Lab 1. Basic Network Setup & Ethereal Time: 2 hrs
 CS 326e F2002 Lab 1. Basic Network Setup & Ethereal Time: 2 hrs Tasks: 1 (10 min) Verify that TCP/IP is installed on each of the computers 2 (10 min) Connect the computers together via a switch 3 (10 min)
Self Help Guide. Please read the following carefully; Synopsis: Requirements: A Computer with a working RJ45 LAN Port All Belkin Modem Routers
 IMPORTANT! This Guide refers to the following Products: Establishing A Connection From PC To Router Please read the following carefully; Synopsis: This Self-Help Guide is designed to assist you if you
Configuring NXT Hardware with Mercury Inside into Doors.NET TM Application Note
 1.0 Installing the Mercury SCP Gateway The MSC/SCP gateway must be installed to interface with Mercury hardware. This gateway must be chosen during the installation of the software, or it can be added
DDNS Management System User Manual V1.0
 DDNS Management System User Manual V1.0 1 03/01/2012 Table of Contents 1. Introduction.3 2. Network Configuration 3 2.1. Configuring DDNS locally through DVR Menu..3 2.2. Configuring DDNS through Internet
Operating Instructions
 Operating Instructions (For Setting Up) Digital Imaging Systems Installation Overview Model No. DP-8060 / 8045 / 8035 Table of Contents Setting Your Machine Installation Overview General Installation Overview...
Spam Marshall SpamWall Step-by-Step Installation Guide for Exchange 5.5
 Spam Marshall SpamWall Step-by-Step Installation Guide for Exchange 5.5 What is this document for? This document is a Step-by-Step Guide that can be used to quickly install Spam Marshall SpamWall on Exchange
Clock Link Installation Guide. Detailed brief on installing Clock Link
 Clock Link Installation Guide Detailed brief on installing Clock Link 1 Table of Contents 1. Overview... 3 2. Configuring the Time Clock... 3 Instructions:... 3 2.1 IP Address Setup... 3 2.2 Subnet Mask
LPT1 Printer Connector. External Power Supply Connector Power Indicator
 AXIS 1650 Set-up Instructions Page 3 Unpack box Verify that you have all the items listed below: LPT1 Printer Connector Network Indicator Ethernet Connector External Power Supply Connector Power Indicator
Actiontec GT784WN Router
 Table of Contents General Information...1 Verify Computer Settings...1 Router Installation...3 Configuring Your Router...3 Configuring Your Computer...7 Configuring Your Email...9 General Information Router
Quick Installation Guide of WLAN Broadband Router
 To avoid users without access right through your WLAN Broadband Router, suggest that use security mechanism like WEP, WPA or set ID/password for web configuration login IP address 192.168.1.254. Preparation
RADAR NETWORK SETUP WITH WINDOWS XP/VISTA
 RADAR NETWORK SETUP WITH WINDOWS XP/VISTA These instructions are for setting up a Network between RADAR and a PC. To use RADAR s FTP client a 3 rd party FTP Server is needed such as FileZilla Server. This