Volume Licensing Service Center User Guide MICROSOFT VOLUME LICENSING
|
|
|
- Clementine Leonard
- 9 years ago
- Views:
Transcription
1 Volume Licensing Service Center User Guide MICROSOFT VOLUME LICENSING

2 Contents Overview of the Volume Licensing Service Center... 4 Registering to the Volume Licensing Service Center... 4 Signing New Open License Customer Agreements... 5 Navigating the Volume Licensing Service Center... 6 About Administration Tasks on the VLSC... 9 The My Preferences Page... 9 The My Permissions Page The Request Permissions Page The Add User Page The Manage Users Page The Add Open License Page Viewing License Summary and Relationship Summary Information The License Summary Page The Relationship Summary Page Viewing Licensing ID Enrollment Details The License Details Page Using the Downloads and Keys Page Process step overview Product Key options Accessing Product Keys by Licensing ID in the VLSC Accessing Product Keys by Organization in the VLSC Finding the Part Number in the VLSC Requesting and Viewing Multiple Activation Keys (MAK) Media Kits Using the Subscriptions Page If you have ordered an Office 365 subscription, go to the Relationship Summary page, or Downloads and Keys page to find your keys MSDN Subscriptions Viewing MSDN Subscription Administration Information Using the Subscriber Search Tab Assign a Subscription Assign Multiple Subscriptions Removing a Subscriber

3 Using Shipment Search Viewing the Subscription Summary TechNet Subscriptions About Online Services Subscriptions Management About Microsoft Software Assurance for Volume Licensing Using the Manage Software Assurance Benefits page Creating and Managing OLS License Reservations About License Reservations and Transitions Viewing your Service, License ID, and Reservation details Getting Help Appendix A Signing up for a Windows Live ID Appendix B Glossary Appendix C Revision History

4 Overview of the Volume Licensing Service Center The Volume Licensing Service Center is the single location for Microsoft Volume Licensing customers to view their licensing information. A license agreement with Microsoft dictates how a product is used, how long it can be used, and how a customer intends to deploy the product in a business environment. For example, a license agreement or entitlement might detail a lease agreement for a single software product that may have multiple activations. Moreover, customers can purchase service agreements, such as Software Assurance, which offers benefits in the licensing relationship with Microsoft, such as complimentary product upgrades and a set number of service tickets. When you purchase and download software from Microsoft, you are given the right to use Microsoft intellectual property through the volume licensing agreements and services that you elect to use. Registering to the Volume Licensing Service Center NOTE You need a valid business address and Windows Live ID to register. See Appendix A for instructions on creating a Windows Live ID. To streamline the process for managing multiple agreement numbers, a Windows Live ID and a valid business are required for registration. Following these steps makes the process easier for you to track and manage multiple agreement numbers. When you register with the VLSC, the site requires you to validate your business using an invitation from Microsoft. You should use the same business address that you used when you signed your agreement or order. If you are an Administrator on a parent agreement, then when you sign into the VLSC for the first time, the Administrator Inheritance Option page is displayed. If you select to opt-in, then you automatically become an Administrator on all child agreements associated with the parent agreement. To register to the Volume Licensing Service Center 1. Access the Volume Licensing Service Center (VLSC) at 2. On the Welcome to the Volume Licensing Service Center homepage, click Sign In. 3. Type your Windows Live ID and password. 4. Click Sign In. NOTE If you are a returning user and would like to see an overview of navigating the VLSC, see Navigating the Volume Licensing Service Center 4

5 5. First-time users must type their business address. Type the business into both the Business and confirm your Business fields. Click Submit. If you received an invitation to the VLSC, then type the address to which your invitation was sent. When you click Submit, an is sent to confirm ownership of the Business E- mail address provided. 6. Go to the inbox for the business address you provided. a. Open the from Volume Licensing Service Center with the subject line Thank You for Registering with the Volume Licensing Service Center. b. Click the link in the to confirm your ownership of the business address. NOTE If you do not receive an notification, then check your junk folder in your program. Ensure that you to your Safe Senders list. If you use Microsoft Outlook, turn off automatic filtering by selecting the Home tab. Click the Junk dropdown menu, select Junk Options, and then select No Automatic Filtering. Signing New Open License Customer Agreements When you log in to the VLSC, it verifies if you have any Open License agreements with unsigned terms and conditions. If you have an unsigned Open License agreement, then you are prompted to sign the agreement. To sign an Open License customer agreement 5 1. On the Microsoft Volume Licensing page, a. In the Open License Type field, click the down arrow to open the menu, and then select a choice from the menu. b. In the Country of Usage field, click the down arrow to open the menu, and then select a choice from the menu. c. In the Language field, click the down arrow to open the menu, and then select a choice from the menu. 2. Click Go. The Open License agreement displays. 3. Type your full name, and then click I Accept. If terms and conditions are not accepted, then all Open Licenses are removed from your profile during your session. A single acceptance only is required for all terms and condition types, and for both current and future Open License agreements that are assigned to you.

6 Navigating the Volume Licensing Service Center The VLSC home page is designed for easy access to your licensing management needs. You can Download products and keys Access all your licensing information in one location View your relationship summary and license summary details View all agreements or purchases in your organization Review the status of your enrollments, including upcoming agreement expirations View recent download activity Receive a licensing summary that illustrates all entitlements by product and version As an Administrator, view any pending requests Find help and training resources View news or updates regarding the Volume Licensing Service Center The enabling of menu options and notifications that you can view depends on your user role. On the VLSC homepage, use the main navigation bar to View your open Licenses Download software and access product keys Access Software Assurance Benefits View Subscriptions Perform Administration tasks Get Help with the VLSC 6

7 7
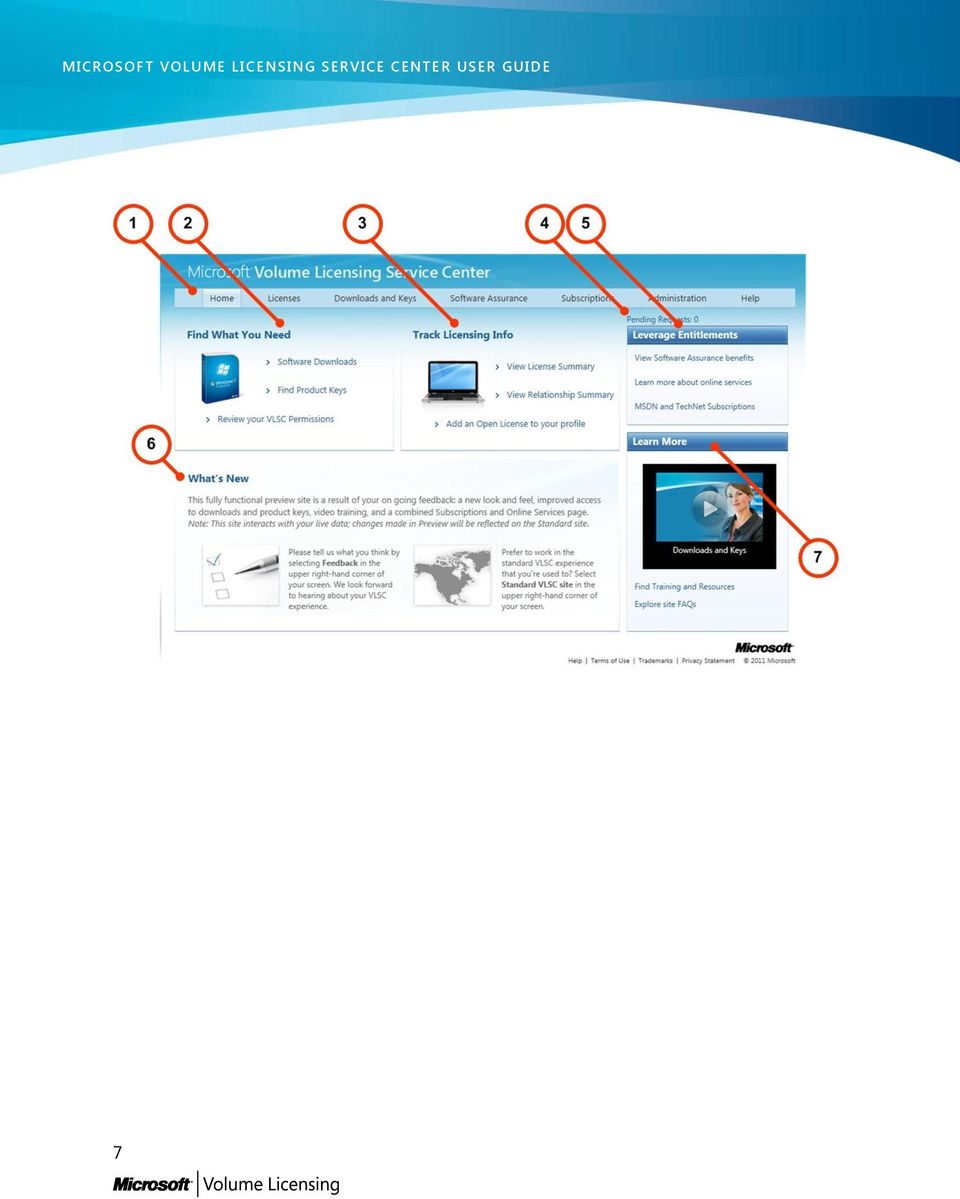
8 Upon sign in, the VLSC home page has several sections to help you perform the following tasks. Number Name Purpose 1. Main navigation bar Use the main navigation bar to access the Licenses, Downloads and Keys, Software Assurance, Subscriptions, Administration, and Help pages. 2. Find What You Need Click the links to Download your software Find Product Keys Review your VLSC permissions 3. Track Licensing Info Click the links to view your license summary, relationship summary information, or add an Open License to your profile. 4. Number of Pending Requests link 5. Leverage Entitlements If you have administrative credentials, this link informs you of the total number of pending requests. Click the link to open the Manage Users page where you can view and edit permissions and address pending requests. Use this section to see the type of entitlements you have depending on your benefits. 6. What s New Learn about VLSC site updates and new features. 7. Learn More View videos on common VLSC tasks, and find other training and resources. 8

9 About Administration Tasks on the VLSC If you are granted the Administrator role, you will have additional functionality and tabs on the Volume License Service Center Administration page. Administration only: Users and Administration: Add User Manage Users Add Open License My Preferences Request Permissions My Permissions Add Open License The My Preferences Page Click Administration, and then select My Preferences from the top navigation bar to manage your notifications and alerts, and view the Administrator FAQ. To select your preference options 1. To receive Notifications and Alerts, click the I want to receive... my permissions are made checkbox. You will receive notifications from the administrator when changes to your permissions are made. In the Administrator FAQ section, you may also opt in or opt out of the Administrator role by selecting Opt In: You will receive the Admin role for all future Enrollments added under the MBSA or Select/Enterprise Agreement(s) that you are named as the Primary Contact or Notices Correspondent and Online Access Contact. Opt Out: You will not receive the Admin role for all future Enrollments added under the MBSA or Select/Enterprise Agreement(s) that you are named as the Primary Contact or Notices Correspondent and Online Access Contact. NOTE Opting out may cause loss of permissions for current and future Volume License agreements. 2. Once you have selected your preferences options, click Save in the upper right of the My Preferences page. 9

10 The My Permissions Page You can view your permissions and remove licenses from your view. NOTE If you are an Administrator, ensure that you click Save to save your permissions changes. Number Name Purpose 1. User Information Displays your name and address. 2. Legend Displays the description for icons and checkboxes used in the Other Roles column. 3. Current Permissions Use this section to view your Volume License permissions. You can view the information hierarchy from the MBSA, the Parent Program, the enrollments listed in the Licensing ID column, and the Organization. The Administrator and Other 10

11 Roles columns allow you to grant Administrator status and modify a user s permissions. 4. MBSA column This column displays the Master Business Service Agreement (MBSA) number under which the Parent Program(s) and entitlements are listed. 5. Parent Program column This column displays the Parent Program type and the number. 6. Licensing ID column This column shows the entitlement and the identification number. 7. Organization column This column shows the organization name. 8.. Administrator column View license details and the type of permissions that you currently are assigned. 9. Other Roles column Use this column to view other VLSC user roles. You can hover over an icon to view its description. To delete permission to a licensing ID, click the red X to delete permission to that licensing ID. NOTE Deleting permission to a license does not delete the user from the VLSC. Their business is always associated with an agreement even if they do not have licensing permissions. For the Software Assurance Manager, Online Services Manager, and Subscription Manager roles, a popup displays which allows you to select individual roles. Click Select All to select all roles. NOTE The ability to select roles singly is currently inactive. If you select one role, then all roles are selected. When you delete a user role, a popup window displays indicating that you will need to request access from the administrator should you need to regain access to the licensing ID. 11

12 The Request Permissions Page You can request changes to your permissions and request access to a new licensing ID. Number Name Purpose 1. Licensing ID Access From the Program drop-down menu, select the type of Volume License program (for example, Campus & School), and then type the Enrollment Number into the associated text field. 2. Volume Licensing Program Reference Use the Volume Licensing Program Reference section to identify the license ID type for each program type. For more information, see Appendix B - Glossary. 12

13 3. Permission Role Requested Select the appropriate checkbox to indicate the role that you want to request for the licensing ID (for example, Product Keys). When you click the Software Assurance Manager, Online Services Manager, and Subscription Manager roles, a popup window displays. You can either click Select All to select all options, or select options singly. NOTE The ability to select roles singly is currently inactive. If you select one role, then all roles are selected. Click OK to save your changes. Repeat as required for each role. 4. Confirm and Send text entry form Add optional comments if needed. There is a maximum character limit of Submit button After you have completed Steps 1 through 3, click Submit to send your request to the Administrator for approval. To address pending requests Where a user requests permissions, that request is ed to the administrator who manages that licensing ID for their approval. For more information, see The My Permissions Page. If you are an Administrator, you can address all pending requests from the Manage Users page. For more information on pending requests, see The Manage Users Page where you can either approve or decline requests. The Add User Page If you are an administrator, you can add a new user and assign permissions using their business . NOTE To add a user and to save permission changes, ensure that you click Add to complete adding a new user. 13

14 Number Name Purpose 1. New User Information Type the user s business address, and the first and last names into the text fields. Your entries and the user s data must match. 2. Legend Displays the description for icons and checkboxes used in the Other Roles column. TIP You can hover over the icons to display a popup of their descriptions. 3. Permissions Assignment You can use this area to request permissions for the new user. 14

15 4. MBSA column This column displays the Master Business Service Agreement (MBSA) number under which the Parent Program(s) and entitlements are listed. 5. Parent Program column This column displays the Parent Program type and the number. 6. Licensing ID column This column shows the entitlement and the identification number. 7. Organization column This column shows the organization name. 8. Administrator column View license details and the type of permissions that you currently are assigned. 9. Other Roles column All licenses that are associated with the Administrator are displayed. For each licensing ID, click the relevant text box to assign the user role and permissions for the new user. For the Software Assurance Manager, Online Services Manager, and Subscription Manager roles, see The Request Permissions Page. For each licensing ID, click the relevant check box to assign user roles and permissions for the new user. There are two options to apply a permissions assignment to an enrollment: If you wish to apply a permissions assignment to all of the licenses listed, then click the checkbox immediately under the role in either the Administrator or the Other Roles columns (for example, Subscriptions Manager). If you wish to apply a permission assignment to a single license listed, then check the checkbox on the same line as the entitlement. NOTE Ensure that you click Add to complete the process. 15

16 The new user will receive an notifying them that they have access to licenses in the VLSC. To Add a New User 1. On the main navigation bar, go to Administration, and then select Add User. 2. In the New User Information box, type the user s address, Last Name, and First Name. 3. In the Permissions Assignment section, select the permissions to assign to the user. 4. Click Add. The new user will receive an notification. Newly assigned permissions may take up to two hours to become effective. 16

17 The Manage Users Page You can use the Manage Users page to view pending requests from users for whom you are an administrator for the license, or to view existing users. Click a user s name or address to view their permissions. Number Name Purpose 1. Pending Requests section If another user requests permissions for a license, it displays in the field under the Pending Requests header. 2. User management section Click the last name, first name, or address to navigate to the Edit User Permissions window to add, edit, or change the current permissions for the selected user. 3. Add New User link Click the Add New User link to navigate to the Add New User page. 17

18 To Edit a User s Permissions A user s roles and permissions are listed for each licensing ID. You can review the legend for a role description. Users whose permissions are updated will receive an notifying them of the Administrator s action. 1. On the main navigation bar, go to Administration and then select Manage Users. 2. Click a user s Last Name, First Name, or Address to edit their permissions. The Edit User Permissions page displays. 3. To change a role, select the check box under the role. 4. Click Add to save your updates. The user for which the permissions have been updated will receive an notifying them of the Administrator s action. To approve or deny a permission request 1. Click Administration, and then select My Permissions from the main navigation bar. 2. On the Manage Users page, the pending user requests are displayed in the Pending Requests section. Click the user s request number to view the request details. 3. The VLSC Permission Request window displays. For the Admin Action, select either Accept or Deny. 4. Add a message to the requestor if required. 5. Click OK. The user receives a notification informing them of their request status. The Add Open License Page When a new Open License order is placed, Microsoft captures the details for both the end customer and reseller. Once the order is processed, both the customer and reseller are automatically granted access to the new Open License agreement. A notification is sent to the Administrator of the agreement, and a welcome e- mail is sent to both the customer and the reseller. The Administrator has the option of denying the reseller access to the agreement. This feature is designed as an alternative for resellers who have been authorized to manage licenses on behalf of Open License customers. You should not use this feature in place of Request Permissions. 18

19 To Access the Add Open License Page There are two methods to access the Add Open License page: On the main navigation bar, click Administration, and then from the drop-down menu, select Add Open License. From the VLSC home page in the Track Licensing Info area, click the Add an Open License to your profile link. Registered VLSC users who are owners or resellers of Open License agreements can request a limited set of permissions for Open License agreements only. These permissions include Viewing Open License agreements Download licensed software Access product keys Viewing a software assurance summary Viewing or managing Microsoft subscriptions NOTE This feature does not grant full Administrator permissions (such as the ability to manage users). To be added as an Administrator for a license, click Administration, and then click Request Permissions 19

20 Number Name Purpose 1. License Number text field To add an Open License, type the license number into the text field. 2. Authorization Number text field Type the Open License Authorization number into the text field. 3. I acknowledge that I am... checkbox. NOTE If you have already registered, the name fields will not display. Click the checkbox, I acknowledge that I am... to indicate that you are The reseller of a record. The owner of the Open License. You have been granted specific permissions by the owner of the Open License. 4. Submit button This button is grayed out until you type numbers into the Open License number and Authorization Number fields. Type the numbers, and then click Submit to complete the request. Repeat to add another Open License to your profile. If the license and authorization numbers are validated, a message indicates the request is already submitted for processing and to check the request again in 24 hours. A notification is sent to the Administrator(s) for that license. If the Administrators take no action, then the access request is automatically approved. An Administrator can deny the access request by clicking a link 20

21 in the notification . Viewing License Summary and Relationship Summary Information On the main navigation bar, you can select Licenses to view License Summary and Relationship Summary information for the agreements that you are authorized to view and manage. In the VLSC, there is a three-level hierarchy of licensing. You can use the Licenses page to view the Master Business Service Agreement (MBSA), Parent agreement, and Licensing ID. a. The MBSA defines the type of agreements that you have for using your software, and discusses how all of your Microsoft licensing agreements are managed. The MBSA governs the parent agreement that details the types of benefits and entitlements that you have elected. Purchases are not made at the MBSA level. b. As a child of the MBSA, the Parent agreement governs the use of one or more agreements for each licensing ID or enrollment at the program level. The Parent agreement details the status of the agreement you have made with Microsoft, such as start and end date, the benefits you elect, such as Software Assurance, and in the case of Open License business agreements, your digitally signed agreement with Microsoft. c. Depending on what it is referred to by the type of licensing program, each licensing ID, entitlement, and enrollment has a child relationship to the parent agreement. The licensing ID is the end item, such as the actual software and the license keys and enrollment that you order under the parent agreement. The License Summary Page The License Summary page provides details of all your licensed Microsoft products across all your Volume Licensing programs. You can view the effective quantity of licenses that you have across all of your inactive and active Microsoft Live IDs that you are authorized to view and modify. You can either view all license IDs, or filter the license IDs by program. 21
22 Number Name Purpose 1. Add Open License link 2. Get a Quote for more licenses link (not visible to all users) Click this link to add an open license. Owners or resellers of Open License agreements can request a limited set of permissions for Open License agreements only. These permissions include Viewing Open License agreements Download licensed software Access product keys Viewing a software assurance summary Viewing or managing Microsoft subscriptions If shown, this link allows users in some countries to get a quote to add more licenses to their agreement. Follow these steps to get a quote: 1. On the License Summary Page, click Filter Licensing IDs included in this summary. 2. Adjust the selected licenses using the 22
23 check marks. 3. Select Create Summary. You will return to the License Summary page. 4. Click Get a Quote for more licenses. 5. Select the agreements requiring a new Product Family. 6. Click Get Quote. 3. Filter License IDs included in this summary link 4. View Relationship Summary link 5. Download all license information link 6. Product Pool column 7. License Product Family column 8. License Version column Click the link to filter a group of license IDs by type, and to create a summary report. For example, to view only the Select Plus license IDs, click the checkboxes for the Select Plus line items in the Parent Program column, and create a summary only for the agreements that you have selected. This page allows you to view a summary of your business relationship with Microsoft. You can view all volume licensing agreements that you have permission to view such as Volume Licensing agreements, Licensing IDs, enrollment details, and Parent Program details. Click the link to download all of the license summary information to your local drive as a CSV file to view in a Microsoft Excel spreadsheet. This column identifies the product type from the three possible pool choices: application, server, and system. This column identifies the name of the product. This column describes the product version. 9. Effective Quantity This column identifies the set number of Volume License entitlements. It indicates the 23
24 column 10. Unresolved Quantity column 11. Active SA Quantity column highest version of a product that may be used. Volume Licensing customers may combine all of their licenses to install an earlier version, or divide their deployment between the older and newer software versions. The Unresolved Quantity indicates that there is an upgrade license for which a base license was not found in Volume Licensing systems. Below are instances where an unresolved quantity might occur: A customer purchased an upgrade license but has not purchased a base license for the fully licensed product or the base license cannot be found. If a customer purchased a computer with OEM software installed from a retail outlet, then the base licenses are unknown to the VLSC since these products shipped with OEM software, such as Microsoft Windows or Office licenses. When a non-vl base license is present, a Volume License can be used to upgrade a non-volume Licensed OEM product, and the unresolved quantity can be added to the Effective Quantity column. The Active SA Quantity column indicates the number of licenses that are covered by Software Assurance complimentary benefits. Customers who purchase SA receive complimentary product upgrades. SA coverage is upgrade insurance, and is renewed every three years, It also includes the following benefits: E-learning benefits to receive product training Technical support tickets for product issues and incidents 24
25 The option to upgrade from a Professional product to an Enterprise product The Relationship Summary Page The Relationship Summary page provides the summary of a customer s business relationship with Microsoft. It details all of the volume licensing agreements that the customer has permission to view such as Volume Licensing agreements, Licensing IDs, enrollment details, and Parent Program details. You can also use this page to view status details for agreement start and end dates, entitlements, Software Assurance benefits, license details related to your business (your organization and business contact information), the agreement status, your organization information, license ID, MBSA, and Parent Program information. 25 Number Name Purpose 1. Filter View Use the Parent Program and Status drop-down menus to select license IDs to view or manage. a. Click the Parent Program down arrow to filter the Orders view to view the parent programs
26 by type (for example, Select). b. To sort your Status search results, click the Status down arrow to select an option from the menu (for example, Active). c. After you have set your filter options, click Go. 2. Download all license information link 3. Licensing ID column Use this link to download all license information on this page to a local drive. Use this column to view the licensing ID enrollment type. You can click the number link to navigate to the Enrollment Details page for a selected enrollment number to view enrollment details and offerings information such as offerings, contacts, licenses, product keys, and order confirmations. 4. Orders column This column shows the total orders you have for an entitlement. An order can have as many enrollments as needed with a minimum of one enrollment. An order may contain one or more products. 5. Organization column Use this column to view the business organization details for an enrollment. 6. City column The city in which the enrollment was signed. 7. Country column The country in which the enrollment was signed. 8. End date column Provides the ending date for the enrollment and its benefits. 9. Status column Provides the state of the agreement: Active, Expired, or Terminated. 10. Parent Program column Provides detail to what type of agreement and the agreement s enrollment details and offerings. Click a number link to access the Enrollment Details page to view parent program details for a selected program number such as Offerings, Contacts, and Performance 26
27 Summary information. 11. MBSA column The Master Business Service Agreement (MBSA) that states the business relationship with Microsoft that is specific to a division of a corporation. Viewing Licensing ID Enrollment Details When you click a License ID number link in the License ID column, you can use the Enrollment Details page to view your Microsoft applications, servers, and systems offerings, contacts, licenses, product keys, and order confirmations associated with the selected license ID. If you have a MSDN or TechNet enrollment, the links to view and manage these enrollment types display in the Relationship Summary area. On the Enrollment Details page, the Order Renewals and the SA Step-ups columns display only for Open License agreements. As Open License is a cash and carry paperless program, you can view an open license agreement by selecting the country of usage and the language, and then clicking Display. 27
28 Number Name Purpose 1. Enrollment Details Displays the agreement hierarchy for the selected license ID, such as Parent Program and MBSA. The Status, Start Date, End Date, and Renewal Dates are provided. If the license ID has MSDN or TechNet agreements, then the links to manage these agreements are visible. 2. Offerings tab (Displays for Enterprise and Select agreements only) The following columns are provided on the Offerings header. Offerings are grouped by License Pool to show the type (Applications, Servers, or Systems). The Level column shows the pricing level. Generally the higher the letter, the more of a discount a customer receives. The letter becomes higher as more products are ordered. The Start Date and End Date columns display start and end dates for the offering. The Status column details the status of the offering (Active, Expired, or Terminated). The Software Assurance Eligible column indicates whether your product may be eligible for Software Assurance benefits, such as upgrades and support. For Open License and Select Plus agreements, the Offerings tab also displays the Units Achieved, Units to Maintain Level, and Units to Next Level columns to indicate the status of your offerings. Units Achieved indicates the total units purchased by all affiliates that roll up under the Lead Affiliate. Units to Maintain Level are the number of units required to remain at the existing price level. Units to Next Level are the number of points required to reach the next price level. 28
29 3. Contacts tab Displays the type, (or title) of the company contact that signed the enrollment. The City and Country columns detail where the enrollment was signed, and the name of the signing contact is provided in the last column. 4. Licenses tab Displays a view similar to the License Summary tab, but is limited only to the selected license ID. 5. Product Keys tab Provides details regarding the keys for the selected license ID. a) The Product column lists the product. b) The Product Key column displays the key for the product. c) The Type column describes what type of licensing key. The choices are Volume Licensing Key, KMS, and MAK. d) In the MAK Activations Used/Available column, you can view the number of used and available Multiple Activation Key (MAK) activations (for example, 235 keys have been used out of a possible 2500 total keys). You can also click the Download all product keys link to download the keys displayed for an entitlement to a local drive. 6. Order Confirmations tab 7. Product Use Rights link 8. Order Renewals tab (Displays for Open License and Select Plus agreements only) This tab allows you to view confirmation details to show the receipt of what software, application, or service that was purchased under the selected enrollment number in the Volume Licensing program. Click the Product Use Rights link to learn more about the terms and conditions of using Microsoft intellectual property. For the Select Plus program, you can filter your line items to view details regarding your three-year renewal options, auto renewal status, renewal term and coverage end date, Software Assurance ending dates, and billing options. Instead of an agreement duration, the Select Plus program has an evergreen 29
30 anniversary agreement that does not expire. On the renewal agreement s third anniversary, you have the option to continue the agreement or change it to a different agreement type. 9. SA Stepups tab (Displays for Open License and Select Plus agreements only) As part of the Software Assurance program, step-ups allow you to pay only for the price difference between product versions instead of having to purchase the entire product. You can view the available version upgrades for your licenses. 30
31 The License Details Page When you click a license on the License Summary page, the License Details page displays the License Details, Contacts, Licenses, Product Keys, and Order Confirmations for the selected Open License. Number Name Purpose 1. License Details tab Displays the agreement hierarchy for the selected Open License ID, such as Parent Program, Status, Start Date, and End Date. If the license ID has MSDN or TechNet agreements, then the links to manage these agreements are visible. 2. Contacts tab Displays the type, (or title) of the company contact that signed the enrollment. The City and Country columns detail where the enrollment was signed, and the name of the signing contact is provided in the last column. 31
32 3. Licenses tab Displays a view similar to the License Summary tab, but is limited only to the selected license ID. 4. Product Keys tab Provides details regarding the keys for the selected license ID. a) The Product column lists the product. b) The Product Key column displays the key for the product. c) The Type column describes what type of licensing key. The choices are Volume Licensing Key, KMS, and MAK. d) In the MAK Activations Used/Available column, you can view the number of used and available Multiple Activation Key (MAK) activations (for example, 235 keys have been used out of a possible 2500 total keys). You can also click the Download all product keys link to download the keys displayed for an entitlement to a local drive. 5. Order Confirmations tab 6. Open License Agreement link 7. Product Use Rights link This tab allows you to view confirmation details to show the receipt of what software, application, or service that was purchased under the selected enrollment number in the Volume Licensing program. If you have Open License agreements, then the products you have purchased are displayed for download where available. Click the Product Use Rights link to learn more about the terms and conditions of using Microsoft intellectual property. 32
33 Using the Downloads and Keys Page In order to access VLSC Downloads, end users must have at least one of the following roles associated with a license ID within their profile. Administrator Download Software Assurance Manager If you have Open License agreements, then the products you have purchased are displayed for download where available. If you have a Select, Select Plus, Enterprise, Campus or School Agreement, then you can view the entire Volume Licensing product catalog. For more product information, see You can use the product search filter to find your products and product keys. In the Filters pane, you can type the product name or use the checkboxes to narrow your search results. You can also control how many products are displayed on the page by using the paging control at the bottom of the page. You can change the filter settings to display more products on a single page and reduce the page count of your search results. The default value of this control is 16. This page allows you to do the following: Download products View a product description View a description for a key Determine which products need keys Locate the correct key for a product Purchase Media Kits Process step overview To download a product and obtain the keys 1. Search for a product by typing a product name into the Product text box, or filter products using the product type check boxes. 2. Select the product from the results and view the description. 3. Determine if the product to be installed requires a product key, and view the type of product key for a product. 4. Download the product. 33
34 Number Name Purpose 1. Filters column Type a product name into the Product text box, or use the sort list to limit your search by product type. The Product text box displays possible suggestions as you type. Select the suggestion to populate the text box. By default, the All Products check box is checked. You can uncheck this box to narrow your search results. If you do not know the name of your product, or if no suggestion appears in the Product text box as you type, then enter the name of the software into the Product search text box, and then click the hand lens (search) icon. NOTE If you have selected a specific product family (for example, Windows Server), and you type a product name into the filter box belonging to a 34
35 different product family and click Enter, then no search results will display. 2. Product column In the search results, select the product. If your search results are more than one page, then use the arrows at the bottom of the page to advance to the next page of search results. TIP To view more search results on the page, click the Items per page control at the lower right of the Product column 3. Description column Click a product Description link to view the version, release date, and product description. 4. Downloads column Click a product Download link to view special instructions, download settings, including the download method, language, and the operating system type. 5. Key column Click a product Key link to view information about product keys, and view the license ID number, the organization, the license key, the type, and the number of activations remaining from an initial number of activations for the Volume Activation. If there are service packs for the products, then these are included below the Product Keys information. You can click the Export all keys link above the Product column to open the product keys list locally in a Microsoft Excel spreadsheet. To search for a software product On the main navigation bar, click Downloads and Keys. 2. In the Filters panel, type a product name into the Product text box (for example, Excel 2010). The Product text box displays possible suggestions as you type. You can select the suggestion to populate the text box. By default, the All Products check box is checked. You can uncheck this box to narrow your search results. 3. (Optional) If you do not know the name of your product, or if no suggestion appears in the Product text box as you type, then a. Type the name of the software into the Product: search text box. b. Click the hand lens (search) icon.
36 4. (Optional) On the Product panel, select the product. If the search results are more than one page, then use the arrows at the bottom of the Product panel to advance to the next page of search results. To view a product description 1. On the Download and Keys page, click either the product name or the Description link for the desired product. 2. The Description drop-down panel opens providing the Version, Release Date, Product Description, and System Requirements for the product selected. 3. Click the product name or Description again to close the drop-down. To download a software product After you have searched for and found your product, click the Download link for that product. 1. In Download Settings, click Download. Select the following options from the drop-down menus. a. For the Download Method, click the down arrow, and then select a menu item from the list. There are two download methods: Download Manager is a software application used to download content. When using the Download Manager, you can pause, stop and resume downloads at a later time. NOTE In the event that your Internet connection is interrupted, or if you are using an older browser and the download fails, Microsoft recommends using the Download Manager. Web Browser is an embedded download feature within your web browser to download content. b. For the Language, click the down arrow, and then select the language from the list. c. For the Operating System Type, click the down arrow, and then select a menu item from the list (if available). NOTE If there is no file available for download, then you can click Order Media to have the physical media shipped. Your options to order physical media may be presented differently depending on the product, your level of access, and regional restrictions. 2. Click Continue. The Product section expands to show the Product, OS, Size, and Format in the lower area of the Product section. 3. In Files, click Download, and then follow the download and installation instructions. To activate an online product 36
37 If you have any Online Service Activation (OSA) keys, you can activate online services by going to the Office 365 Open activation link. From there, you will be able to enter the OSA key(s) and create an account to manage user access and keys. Please note: You will be required to establish a new account using your organization ID on the Office 365 Open activation link. To locate a key for a product If the product that you have installed requires a product key or if you need a product key to activate an online service, you can obtain the product key from the VLSC. If you are having issues with a product key, or require assistance to activate your product, then contact your local Product Activation Call Center. 1. On the Downloads and Keys page, click the Key link for that product. The Product Keys drop-down panel shows the total number of available keys for this product. 2. Click the Display All button to display all of the keys. A popup window displays the available keys by License ID, Organization, Key, Type and Activation. 3. (Optional) You can click the Export all keys: CSV link above the Product panel to open the product keys list locally in a Microsoft Excel spreadsheet. 4. To locate a key by organization, see Accessing Product Keys by Organization in the VLSC. Product Key options If product keys are not available, then you will see one of the following messages in the product keys drop-down panel: No Product Key assigned: The product you have selected requires a product key for product activation. To obtain your product key, please contact your local Product Activation Call Center at the telephone number provided here. 2. Retail Products Only: Product keys for this product are only provided on the retail product media. If you do not have the product media, you can order it by navigating to the download panel for this product. 3. Online Service Activation (OSA) Key: An OSA Key is a type of Product Key. This single-use key is used to activate subscriptions to Microsoft Online Services. OSA Keys are distributed electronically via the VLSC and can be redeemed at the Office 365 Open activation link. 4. No Key Required:
38 This product does not require a product key. Accessing Product Keys by Licensing ID in the VLSC When you need to view a product key for a product that you have purchased in a licensing agreement, you can access the product keys that are associated to your License ID by viewing the License Key information on the Enrollment Summary page. The Product Keys tab allows you to view all product keys associated with each product in the selected agreement. To access product keys by Licensing ID 1. On the VLSC main navigation bar, click Licenses, and then select Relationship Summary. The Relationship Summary page displays. 2. On the Relationship Summary Page, click the hyperlinked Licensing ID for the enrollment. 3. On the Enrollment Details page, select the Product Keys tab. The Product Keys tab shows the product keys that are associated with each product on the selected agreement. 4. If you have an OSA key, you activate this service by going to the Office 365 Open activation link. From there you enter the key(s) to manage user access and keys. Please note: You will be required to establish a new account using your organization ID on the Office 365 Open activation link. Accessing Product Keys by Organization in the VLSC If you have purchased an Enterprise Agreement, then you can track your product keys by the organization, and also sort them in the open Microsoft Excel file in the Organization column.. To access product keys by organization in the VLSC 1. On the VLSC main navigation bar, click Downloads and Keys. 2. On the Downloads and Keys page, locate the Export all Keys: CSV link. 3. Click CSV to download the product keys. 38

39 4. At the prompt, click Open to view the file in Microsoft Excel. 5. Use the Organization column to sort the keys by organization. Finding the Part Number in the VLSC Use the Downloads and Keys page to locate the Part Number in the VLSC. The part number is included in the product download file name as the last nine characters as shown in the following example. Requesting and Viewing Multiple Activation Keys (MAK) VLSC Users must have administrator or Product Key roles in order to view the Product Keys section. You can request permission to view your MAK. For more information, see The Request Permissions Page. For more information on Product Keys and Product Activation, either see Getting Help, or see 39
40 To request and view Multiple Activation Keys (MAK) 1. On the Download and Keys page, locate the desired product, and then view the Key column. 2. Select the Key link to open the Product Keys menu. The Product Keys menu displays, showing the License ID, Organization, Key, Type, and Activations column. 3. To see if the product has a MAK, view the Type column to determine if the product has a MAK. 4. Use the Activations column to view the number of used and available activations. For example, in the Activations column, the value, 27/500, indicates that 27 keys have been used for a MAK that allows 500 activations. Media Kits If you cannot download a product using the Downloads and Keys page, then you may be able to order a Media Kit. Open License customers in USA, Canada, Europe, Middle East, and Africa can order a Media Kit for products purchased under the Open License program. However, Media kits are unavailable for products purchased under Open Value, Select, Select Plus, Enterprise, Campus, or School Volume Licensing programs. The Order Media key is grayed out if the Media Kit is unavailable. Using the Subscriptions Page If you have ordered an Office 365 subscription, go to the Relationship Summary page, or Downloads and Keys page to find your keys. Once you have obtained your Online Service Activation (OSA) Key, you will be directed to the Office 365 Open activation link to activate your Office 365 service At that site enter the key(s) to manage user access and keys. Please note: You will be required to establish a new account using your organization ID on the Office 365 Open activation link If you have a MSDN or TechNet subscription, you can manage your subscriptions depending on the subscription type: Select Subscriptions on the main navigation bar to manage online and TechNet subscriptions Select MSDN Search to manage MSDN subscriptions. 40
41 MSDN Subscriptions An MSDN subscription offers essential information, resources, downloads, and support for developers using Microsoft tools, products, and technologies. You can find more information at Viewing MSDN Subscription Administration Information You can view basic agreement information in the top area of the MSDN subscription management pages. For example, an expired agreement displays the start and end dates. You can also manage the following aspects of MSDN subscriptions: Subscriber Subscriptions Media Shipments Subscription Summary From the MSDN Subscription Administration page you can: Assign subscriptions to a single subscriber or to multiple subscribers simultaneously Track Media Shipments View a summary of subscriptions available and assigned Remove or modify subscriber details Resend an invitation to activate a subscription 41

42 To view MSDN Subscription Administration information 1. From the main navigation, click Subscriptions. 2. From the Subscriptions drop-down menu, click MSDN Search. The MSDN Subscriptions Administration page displays. 3. Type an Agreement Number, Master Agreement Number, Customer Name, or Public Customer Number. The Agreement Number is a required field. 4. (Optional) you can select the Program, Agreement Status, Country, and also search using Last Name, First Name, Address, and Subscriber ID. You can also use the Reference text fields to identify the subscribers. For example, you can type an internal employee number into a Reference field. 5. Click Search. 6. (Optional) From the Agreement/Public Customer Results list, select an Agreement # or Public Customer # link to view the subscriber information for the agreement. 42
43 You can view the agreement information in the Agreement area. For Select Plus agreements, the Customer Number is indicated instead of an End Date since the Select Plus agreement is an evergreen anniversary agreement and has no end date. Using the Subscriber Search Tab You can use the Subscriber Search tab to view details about subscribers. The Subscriber Search tab is collapsed by default. You can search for a subscriber by typing the Subscriber Last Name, Subscriber First Name, Subscriber Address, Subscriber ID, and references into the text fields. You can also select the Country and the Benefit Level from the scrolling menus. To open the Subscriber Search tab 1. From the main navigation, click Subscriber Search. The Subscriptions page displays with the Search area hidden. 2. Click the arrow to open the Search area. To search for a subscriber On the MSDN Subscription Administration page, you can view up to 200 subscribers for an agreement. To view other subscribers not shown, Use the Search area to narrow the search results. 43
44 Export the entire subscriber list to an Excel spreadsheet. Sort your search results within the subscriber list. 1. From the main navigation, click the Subscriptions tab, and then from the MSDN Search drop-down menu, select MSDN Search. The MSDN Subscription Administration page displays. 2. In the Search area of the Subscriber Search page, you can type the subscriber s Last Name, First Name, Address, and Benefits Access Number into the fields. 3. From the Country option box, select the country. 4. From the Subscription Level option box, select an option from the drop-down menu. Use the scroll bar to scroll down the list to a desired option. 5. Click Search. The Results area displays your returned search results. 6. View and edit details by clicking the subscriber s hyperlinked last name. 7. (Optional) To remove a subscriber, select the checkbox by the subscriber(s), and then click Remove Subscribers 8. (Optional) If you would like to view all of your subscribers from an open.csv file in Microsoft Excel, click Export all Subscribers: CSV. You can view returned information from your subscriber search. This area contains information about the selected entitlement. Red checkmarks indicate what entitlement is selected within the subscription. For example, you can view the Benefit Level that is elected for the subscriber, and Media, Download, Support, Newsgroup, and Concierge elections. 44

45 To resend an invitation by , you can select a subscriber by clicking the checkbox next to the subscriber s name, and then click Resend Invitation to resend the benefits subscription . To view subscriber details 1. From the main navigation, click Subscriptions, and then click MSDN Search. The MSDN Subscription Administration page displays. 2. In the Search area, a. Type the Agreement Number or Public Customer Number into the fields. b. (Optional) In the Results area from the Agreement/Public Customer Results list, click the link in either the Agreement # or Public Customer # columns, and then use the subscriber Search page to search for a subscriber. 3. In the Agreement area, you can view the subscriber agreement information. 45
46 To edit subscriber details 1. Select a subscriber from the Results list by clicking the Last Name hyperlink. You can also search subscriber details such as the subscriber s first name, last name, or address. 2. In the Subscriber Details area, you can view the subscriber information. 3. Click Edit. The Edit Subscriber area displays. 4. In the Edit Subscriber area, type the required information into the fields. Required information is indicated by red asterisks (*). 5. Click Save. To add or edit a subscription selection level NOTE A subscription benefit may be put on hold by the administrator if it cannot be used in MSDN. It can be activated any time there is eligibility. 1. In the Subscription Selection area, click a radio button by the selection to select it. This action allows the subscriber to check or uncheck their choice of subscriptions. 2. Click Add. 46
47 3. In the Add Subscription Selection popup window, click Save. 4. If there is already a subscription selected, then select Add, Edit, or Remove to manage the selection. NOTE If you have not yet added a subscription, the Edit button is grayed out. 5. From the Subscription Selection drop-down menu list, select a subscription to edit. 6. Click the Status down arrow to open the drop-down menu. 7. Select the status for the subscription selection. You can select either Active or Hold. 8. Click Save. The updated status displays in the Status column. 47
.")
48 To add or edit subscriber downloads details 1. On the Downloads Details area, click Add to add downloads details. The Add Subscriber Downloads popup displays. 2. From the Add Subscriber Download popup drop-down menu, select a subscription level (for example, Visual Studio Ultimate w/msdn). The Add Subscriber Downloads popup window displays the Subscription Benefits, Coverage Period, and the Available, Assigned, and Remaining benefits. NOTE A negative remaining balance indicates an over-claimed benefit. You must make additional purchases to reconcile this, per the terms of your agreement. 3. To edit or remove downloads details information, select the row, and then click Edit. To add media details to a subscription 1. On the Media Details area, you can view media details that are added to the subscription. If there are no media details assigned to a subscription, then click Add to add media details. 2. From the Add Media Details popup window, select a subscription level that applies to the subscriber (for example, Visual Studio Ultimate w/msdn). The Add Media Subscription popup displays. 3. From the Add Media Subscription popup window drop-down menu, select a subscription level that applies to the subscriber. The benefits for the subscriber are displayed with the Available, Assigned, and Remaining benefits shown. 48

49 4. Select the benefit by clicking the checkbox by the benefit. 5. Click Next. The Media Details area displays your selected media choice. To add Media Subscription Ship To information Use the Add Media Subscription Ship To information area to add media subscription shipping details for a subscriber. You can view the Ship To information entry fields, the Media Subscription Summary, and the Add Media Subscription areas. 49
50 1. Type the necessary subscriber shipping information into the fields. All required fields are denoted by a red asterisk (*). 2. In the Media Subscription Summary area, you can view the Subscription Type, Subscription Level, and all Available, Remaining, and Assigned subscriptions. 3. On the Add Media Subscription area, click the Language drop-down menu to select a language. Your language menu drop-down selection choices are European (NA), Intl (NA), English, and English, French. 4. Type the number of physical media that you wish to ship in the Quantity field. 5. To include a comprehensive media kit, select the Comp Kit Included checkbox. 6. Select Save. The results of your saved Ship To information display. Assign a Subscription You can click the Assign Subscription tab to type information for a new subscriber to MSDN. Select the subscription level for this subscriber. The subscription level should correspond to the license you purchased. Subscriptions are licensed per subscriber, so the component benefits of the subscription must all be assigned to the same person and cannot be shared with others. 50
51 TIP Microsoft recommends you disable Media, and manage all of your benefits digitally by checking Subscriber Downloads. Subscriber Downloads allows you to download software, access e-learning, Windows Azure, and other benefits that may be included. To assign a subscription to an agreement 1. From the main navigation, click the Subscriptions tab. 2. From the drop-down menu, select MSDN Search. The MSDN Subscription Administration page displays. 3. In the Search area, type an agreement number into the Agreement Number field. You can also type a public customer number into the Public Customer Number field. 4. Click Search. 5. Click the Agreement # or Public Customer # hyperlink to view a relevant result or agreement. Click the Assign Subscription tab. 6. Click the Assign Subscription down arrow to open the Subscription Benefits drop-down menu. 7. Select an option from the list (for example, Visual Studio Ultimate with MSDN). 8. Click the checkboxes to select eligible subscription benefits that apply to the subscriber. NOTE Microsoft recommends that you leave all eligible subscription benefits enabled 9. Click Next. The Assign Subscription area displays with the subscriber information text fields available. 10. Type the subscriber s information into the text fields. Required text fields are denoted with a red asterisk (*). NOTE You can use the Reference fields to keep track of additional information (for example, the subscriber s department or division) in your organization. 11. Click Next. The Subscription Selection area displays with your selections listed. 12. Click Finish. A welcome is automatically sent to the new subscriber detailing how to activate the subscription. Activation is required to gain access to Subscriber Downloads and other online subscription benefits. To assign a subscription with media 1. Click the Assign Subscription tab. 2. Click the Assign Subscription down arrow to open the subscription benefits drop-down menu. 3. Select an option from the list (for example, Visual Studio Ultimate with MSDN). 51
52 4. Click the checkboxes to select eligible subscription benefits that apply to the subscriber. 5. To send media to the subscriber, select the Media checkbox. The Ship To, Media Subscription Summary, and Add Media Subscription areas display. 6. Type the required information into the Ship To fields. 7. Review the available media in the Media Subscription Summary. 8. In the Add Media Description area, select the Language and the Quantity. 9. Click the Comp Kit Included checkbox to include a comprehensive media kit. 10. Click Next. You can review your typed information. 11. Click Finish. 12. The Results area indicates the status of your added subscriber. 13. (Optional) You can click the Export All Subscribers: CSV link to export the subscriber list to a Microsoft Excel spreadsheet. Assign Multiple Subscriptions You can assign multiple MSDN subscriptions by pasting an XLS spreadsheet with multiple MSDN subscribers to VLSC. You should enable editing in the Excel file, and then go to the Enter Multiple Subscriptions tab. You can type the information into designated fields for each individual subscriber. If you need additional clarification in filling out the file, refer to the steps on the Instructions tab in the Excel file. Depending on your agreement type, you may need to select a coverage end date. To assign multiple MSDN subscriptions. From the main navigation, click Licenses. Ensure that you are adding subscribers to the correct agreement. Click the Assign Multiple Subscriptions tab. Under the Add Multiple Subscribers heading, follow the instructions provided. Use the instructions detailed within the Excel template. NOTE You can add a maximum 250 subscribers per session. In the Excel spreadsheet, click and drag to copy the rows for the subscribers that you would like to add to VLSC from the Excel spreadsheet. You do not need to highlight the column headers. In Excel, click CTRL, and then click C to copy all highlighted rows of new subscriber data. Click Paste and Submit Subscribers from Excel. The process summary page displays. At the popup prompt, click Allow Access. Click Refresh. 52
53 You can view a report to verify the added subscribers and view any errors that occur. The Assign Multiple Subscriptions status confirms that the multiple subscribers were added successfully. Click Finish. You can view the newly assigned subscribers from the main MSDN Subscriptions Administration page. NOTE Depending on the number of subscribers uploaded, it may take some time for the request to process. It is advised to check back later to confirm completion. To manage errors in adding multiple MSDN subscribers 1. Under the Add Multiple Subscribers heading, you can view subscribers who were not added due to errors. Subscribers who are not added due to errors are listed in the Not Added Due to Errors area. 2. Click the subscriber s hyperlinked first or last name, and then make the necessary correction(s). To fix added MSDN user entry errors The error message displays. Click the last name of the added subscriber to edit entered information. The MSDN Subscription Administration page displays with the Add Multiple Subscribers Error Correction Update Subscriber Information area active. Select the drop-down arrow to select a benefit level (for example, Visual Studio Ultimate w/msdn). 53
54 The Add Multiple Subscribers Error Correction Update Subscriber Information area displays with the subscriber s information entry form active. Type the required information into the fields. Select the drop down arrow to open the menus to enter a Country and Correspondence Language. Click Next. The updated subscriber information displays. Review your changes, and then click Finish. The Added Successfully confirmation message displays. Removing a Subscriber If a subscriber has left the company or changed responsibilities, then it may be necessary to remove them. To remove a subscriber 1. From the main navigation, click the Subscriptions tab. 2. From the drop-down menu, select MSDN Search. 3. On the MSDN Subscriptions Administration page, a. Locate the subscriber you are removing from the list in the Results section or b. Type the subscriber s information into the Search form text fields. 4. Click the arrow on the right hand side to expand the Search section. You can filter by various fields, including subscriber name and , Subscriber ID, subscription level, or country. NOTE In the Results section, you can also export all subscribers to a CSV file. 5. Select the check box next to the subscriber s last name 6. Click Remove Subscriber. 54

55 7. At the confirmation prompt, click OK. The MSDN Subscription Administration page updates with the subscriber no longer listed. Using Shipment Search You can search for shipments by typing the relevant information into the fields. To search for a shipment From the main navigation, click Subscriptions. From the drop-down menu, select MSDN Search. Click the Shipment Search tab. The Shipment List page displays with the Media Details, Ship To, and Shipment Line Items areas displayed. View the read-only Shipments Details page. To view a different shipment, click the Back to Shipments List link. You can find the shipment status by using any of the drop-down filters. Click the Shipment # to go to the Shipment Details page. The Shipment Details page shows media details and shipping information by line item. Viewing the Subscription Summary The Subscription Summary page provides summary information for licenses and media. You can view the results of your subscription. You can filter results to view either Subscriber Downloads 55
 controls.")
56 or Media. Both of these results display by default. The summary provides the total available subscriptions by subscription level and how many have been assigned or are remaining. The Agreement area displays information about the selected agreement. You can sort the subscription summaries using the Subscriber Benefit Level(s) controls. Use the Benefits control to filter for Subscriber Downloads and Media. Use the Subscription Level to filter based on the subscription level (for example, Visual Studio Ultimate w/msdn). For Select Plus subscribers, use the Coverage Period End Date calendar widget to filter based on the coverage period. You can use the View Benefit Summary area to view Benefit Type, Benefit Level, Coverage Period, and Available, Assigned, and Remaining benefits columns. The Remaining Benefits column indicates the remaining quantity of unassigned benefits that are still available for use. NOTE A negative remaining balance indicates an over-claimed benefit TechNet Subscriptions 56
57 TechNet subscriptions can be purchased directly from Microsoft or may be received as a Software Assurance benefit. TechNet benefits available through Software Assurance must be activated and managed separately from all other TechNet subscriptions. Find more information at Number Name Purpose 1. Learn more about Microsoft Online Services link 2. Online Services Agreement List link 3. Click here...to manage your MSDN subscriptions link Click this link to navigate to the Microsoft Online Services homepage. Click the link to navigate to the Online Services Agreement List to view and manage your authorized licensing IDs. Click the link under MSDN and Expression subscriptions to go to the Relationship summary. 57
58 4. Click here...to manage your TechNet subscriptions link Click this link to view the Relationship Summary page and select a license ID to manage the TechNet subscription. 5. View or manage your TechNet subscriptions from Software Assurance link Click the last link under TechNet Subscriptions to go to the Software Assurance Summary to view and manage license IDs that are eligible for software assurance benefits. About Online Services Subscriptions Management The Microsoft Enterprise Agreement gives you the best overall pricing based on the size of your organization along with the full benefits of Microsoft Software Assurance and simplified licensing management through the company-wide option. To learn more about Online Services 1. On the main navigation bar, click Subscriptions. 2. Click the Please click here to learn more about Microsoft Online services link, or navigate to 58
59 About Microsoft Software Assurance for Volume Licensing Click Software Assurance on the main navigation bar to navigate to the Software Assurance Summary page. This page provides a list of your Software Assurance Benefits (SAB). You can click a benefit to view and manage eligible license IDs for the benefit using the Manage Software Assurance Benefits page. Number Name Purpose 1. New customer without current SA Benefits link Click this link to access the Microsoft Volume Licensing, Software Assurance for Volume Licensing page to learn more about SAB. 2. Benefit list Click the link for each benefit to open the Manage Software Assurance Benefits page. 59
60 Using the Manage Software Assurance Benefits page The Manage Software Assurance Benefits page allows you to select a Licensing ID associated with each SA benefit. Number Name Purpose 1. Filter View You can use this menu to select a benefit. Select an option, and then click Go. 2. Licensing ID column You can click the product licensing ID to view the benefit summary for the selected product. 3. Organization column View the organization for the selected software assurance benefit. 4. City column View the city where the selected software assurance benefit was signed. 60
61 To manage Software Assurance Benefits 1. On the main navigation bar, select Software Assurance. The Software Assurance Summary page displays, showing a list of linked Software Assurance Benefits. 2. Click a benefit link to view details on a particular benefit. The Manage Software Assurance Benefits page displays. 3. Select the Licensing ID. The Benefits Summary page opens. You can click the linked benefit to View your activated benefits Activate a benefit View your expired benefits For further details and step instructions for using your software assurance benefits, you can view the Software Assurance Quick Start Guide. This document assists you in accomplishing the following tasks: Step 1: Get to Know Your Benefits Step 2: Establish Software Assurance Managers Step 3: Claim Your Benefits Using VLSC Step 4: See More Ideas and Tips for Getting the Most out of Software Assurance 61
62 Creating and Managing OLS License Reservations NOTE The following information and procedures are intended only for Microsoft Partners and is only applicable to Enterprise Agreements. You can use VLSC to create and manage online services (OLS) license reservations. You will need to change your roles and permissions. In order for a VLSC user to see the reservation page they must have these roles selected: Online Administrator role (OLA): this is the existing Online Administrator role automatically given to the End Customer when an order is placed. Online Service Manager role (OLS) with the Manage Reservation constraint (MRV. An agreement type of E6, EU, or USG. About License Reservations and Transitions A License Reservation is a statement of intent by the customer that they plan to migrate users to making use of online services (OLS) (Microsoft Cloud) products, either through creating new orders, or by transitioning licenses from prior on-premises purchases. A reservation allows customers the ability to use their current Microsoft Cloud product with the commitment that they will complete the purchase at the next anniversary. A Transition is the process of migrating end users from prior on-premises purchases to new online Microsoft Cloud products or services. Transitioning to a cloud product has the advantage over purchasing the product as Net New in that many transition scenarios have no cost To change your roles and permissions NOTE You need to be granted Administrator permissions to perform these tasks. 1. In the main navigation, select Administration. 2. Select Add New User, and then enter the new user details. 3. Select the agreement that you want to add roles. 4. A new constraint or role is added to the OLS role, Manage Reservations which allows you to access VLSC pages that are relevant to Online Services reservations. 62


63 5. From the main navigation, select Licenses, and then click Make Reservations. 6. On the Make a Reservation for a License ID page, select an eligible license. You can hover over a grayed-out ineligible license to see the reason for ineligibility. 7. Select an eligible licensing row, and then click Continue. 8. Select the date from the Calendar icon, and then click Continue. 63

64 9. The requirements for the usage rules dates are You cannot have a past Usage Date. You cannot have a Usage Date beyond 6 months in the future. You cannot have a Usage Date within 30 days prior to the end of the agreement. 10. The Usage Date Rules and corresponding color and behavior are: Grey indicates an ineligible time period. Green indicates that the time frame is within Days of the Anniversary Date. Red indicates that the time frame is within 30 days of the end date. 11. Once you have selected the Usage Date and click Continue, you can view a list of services in the form of product family names (PFAMs). You can select from a list of products to reserve online reservations. Services shown are determined by the agreement and what amendments you have already signed. Not every agreement selected has all services available for use. 64


65 12. To change the usage date, select the Calendar icon to open the date selection widget. 13. From the Action drop-down menu, select New License. 14. Type the number of licenses in the Licenses text box, and then select the Usage Country from the drop-down list. More about usage dates 65
66 If you change the Usage Date after making some step-up line item actions on the reservation (but before submitting the reservation) then the system must evaluate if the change in the Usage Date also changes step-up opportunities. If the new Usage Date is outside of the original step-up opportunities usage date ranges, then a warning message displays. If you select Continue and accept the date, the affected step up items are deleted. 15. On the Online Services page, click Continue. 16. Review the reservation, and then click Submit. 17. At the confirmation popup window, click Submit Reservation. 18. You can also click Reset to restart from the beginning of the procedure. NOTE Ensure all details are correct. You have 72 hours to cancel the reservation once it is submitted. 66


67 19. The Licenses page displays the details of your reservation and indicates if it is complete or if there is an error during submission. 20. On the Online Services page, click the Action drop-down menu, and then make the following selections. 67
68 Number Name Purpose 1. Service description Plan E2 is the service to be reserved. 2. Action menu Click the Action drop-down menu, and then select Step-up License. 3. Step-up Source menu Select Office 365 Plan E1. Selecting a product populates the Available Quantity column. In this example, Office 365 Plan E1 is the service that you will pull the Office 365 resources from to reserve the licenses for Office 365 Plan E2. 4. Available Quantity column The Available Quantity column displays the total number of licenses that are available. The number of licenses you choose cannot be greater than the number available. 5. Licenses textbox Type the number of licenses required. Once this field is populated, the total number of licenses in the Available Quantity column decreases by the number of licenses you reserve. In this example, 6100 licenses were available, and 4100 are reserved. There are 2000 licenses remaining for the source product. 6. Usage Country menu Select the Usage Country where the licenses are reserved. 68

69 21. Once you have selected all of the options, the service section closes, and the results of your selection display. You can manage other plans that you may have listed in your service agreement. You can click Add Entry to add another line item to the same service if needed. 22. Review your line items, and then click Continue. 69
70 23. The Reservation Confirmation page displays the multiple online services chosen for step-up that are included in this reservation. 24. Click Submit Reservation, or Reset to restart the procedure. 70
71 71

72 Viewing your Service, License ID, and Reservation details 1. You can use the Service History link to display the details of your previous reservations. 72
73 2. From the main navigation, click Licenses, and then click Manage Reservations. You can view Manage Reservations by Service, License ID, and Reservation pages. Click the Service button to display all of your reservations. Click a number in the Reservation column to see reservation details. You can click Cancel to cancel a reservation. Clicking a license ID in the Licensing ID column displays the License Details page. Even though the Status is active for services and indicates that your reservation is complete, the service will not be active until it is provisioned in the Microsoft commerce platform. Clicking Close closes the Service section. 73
74 3. Click the License ID to view your reservations by license ID. Click a number in the License ID column to view reservation details. Click a number in the Reservation column to view reservation information for the license ID selected. If you click a reservation number link, the page will open the Reservation view and close the License ID view. You can view reservation information by descending order by the reservation date. 74
75 75
76 Getting Help You can access the Help page to search FAQ, contact technical support, or see an overview of the main navigation bar in the VLSC web site. You can click the Contact Us link on the bottom of the FAQ Overview page to navigate to the VLSC Help page. From the main navigation bar, click Help to view the Frequently Asked Questions Overview page, or click the Contact Us link at the bottom of the page to view contact details for the Support Center nearest you. Number Name Purpose 1. Support Center Contact Info drop-down menu You can select your country from the drop-down list to display the Support Center information. 2. Interactive map You can select the region to limit the number of entries in the Support Center Contact Info drop-down list. 3. Support Center Contact Info box Displays , telephone and fax information, and Support Center hours of operation. 76
77 To locate a local Support center You can use the interactive world map to locate the nearest support center. 1. On the Help Contact Us page map, hover and then click the region (for example, North America). 2. The Support Center choices in the Support Center Contact Info drop-down menu are limited to your selected region. 3. Click the Support Center Contact Info drop-down menu. 4. Select a choice from the menu list. The Support Center Contact Info box displays the phone number, address, and Support Center hours of operation. 77
78 Appendix A Signing up for a Windows Live ID You must sign up for a Windows Live ID to use the VLSC. A Windows Live ID also allows you to access other Microsoft services. To Sign up for a Windows Live ID NOTE Using a group alias or public account is not recommended for use with the Volume Licensing Service Center. 1. From the VLSC home page, click Sign In. 2. Click Sign up now to sign up for a new Windows Live ID. 3. The New to Microsoft? page opens. 4. Type your address in the address field. 5. Type a password in the Password and Retype password fields. The Password strength indicator shows the security of your chosen password. 6. Select a password reset Question from the drop-down list. 7. Type the Secret answer to the question in the field. 8. Type the verification characters in the text box. 9. Click the links to review the Microsoft terms of use and the Microsoft online privacy statement. 10. Click I Accept. The Verify your address page displays. Follow the directions to access your e- mail account and verify the address. 11. In your business account, locate and open the Verify the address for your Windows Live ID message. 12. Click the link provided in the to verify ownership of your Windows Live address. 13. The Your address is confirmed message displays. Click Finish. 78
79 Appendix B Glossary Term Commerce Technology Platform (CTP) Definition Previously called Online Commerce Platform. This is the portal that provisions online services. Enrollments Licensing ID MOC MBSA MSDN Enrollments are referred to as licenses in some licensing programs, and agreements in other programs. An enrollment is the actual end item that orders are placed. Depending on the specific Microsoft Volume Licensing program, a Licensing ID may be an Enrollment (Enterprise or Select programs), an Affiliate (Select Plus program), an Agreement (Open Value program), or a License (Open License program). License IDs have a child relationship to the Parent Program and is the actual application, software, or service that is ordered. Microsoft Online Services Portal. This portal is used exclusively by Microsoft Office 365. The Master Service Business Agreement defines the rules of engagement for all actual agreements. You can use the MBSA to establish other Parent Program child agreements. You can have one or more Parent Program agreements that are governed by the MBSA agreement. Each agreement is specific to a division of a corporation. The MBSA outlines what benefits you get if you have an Enterprise, Select, or Select Plus agreement. The MBSA is program-agnostic; one MBSA can cover all Enterprise and Select agreements. Microsoft Developer Network (MSDN) offers you a subscription package where you have access to licenses to use on nearly all Microsoft software released to the public. In most cases, the software functions exactly like the full product version. However, the MSDN license agreement doesn t allow you to use your software in a business production environment. You can activate as many copies as you need for your development purposes. MSDN subscriptions are on an annual basis, and the license to use the software does not terminate. After one year, you 79
80 are not entitled to product upgrades. Online Commerce Platform Parent Program The portal that provisions online services. This backend service is connected to a third party system, Metracare, to perform billing operations. The Parent Program has a child relationship to the MBSA in the Volume Licensing Agreement structure. The Parent Program defines the actual program(s) that products may be ordered against. The Parent Program shows what offerings Microsoft offers for purchase, and the levels (for example, A, B, and C) of discount that a customer receives based on the number of orders. Generally, the more higher the letter, the higher the rate of discount is on purchased applications, systems and services. Each Parent Program (for example, Enterprise) has its own Parent Program that governs and describes all of the qualifying the entitlements and conditions for agreements. Volume License IDs have different names associated with them per the Licensing ID and Parent Program. Use the table below to locate the name of the Volume Licensing program that corresponds with your Licensing ID or Parent Program. Volume Licensing Program Select, Enterprise, Campus, School Select Plus Open Value, Open Value Subscription Program name for the Licensing ID Enrollment Public Customer Number Agreement Program name for the Parent Program Master agreement Agreement N/A Open License License Authorization Number Performance Summary Performance summary information details progress toward the forecast target for a Select agreement in terms of percentage of 80
81 target achieved as of the most recent order received by Microsoft from the reseller. Planning Services Software Assurance Step-Up Licensing TechNet Benefits Planning Services (aka Packaged Services) provides structured planning services from Microsoft partners to enable efficient deployments, covering Desktop (Office and Windows), SharePoint, Exchange, and Business Value Planning Services. You receive onsite deployment planning help from Microsoft Consulting Services or a qualified Microsoft Partner through a straightforward voucher creation and redemption process. A Microsoft support program which allows a customer to receive complimentary product updates, a complimentary number of service tickets, and E-learning opportunities for products. Typically a SA agreement is renewed every three years. Step-up Licensing enables your organization to upgrade from a lower- to a higher-level software edition such as Office Standard to Office Professional at a low cost. Rather than pay full cost for the higher-level software edition, Step-up Licensing allows you to pay only the pricing difference. To purchase software using your Step-up Licensing benefit, contact your Microsoft Account Manager or reseller. Once purchased, you may download the software through VLSC. Microsoft TechNet is a Microsoft program and resource for technical information, news, and events for IT professionals. TechNet gives your IT and Help Desk staff access to technical information, as well as beta and final versions of products for testing and evaluation. TechNet is a collection of sites for the IT professional community that provide information, documentation, and discussion which is authored both by Microsoft and by the community at large. Through Software Assurance, you get two different TechNet Benefits, a TechNet Plus Direct Subscription, and TechNet Chat and Newsgroup. TIP Learn more about TechNet at: 81
82 VL VLSC Volume Licensing The Volume Licensing Service Center (VLSC) helps you manage your Microsoft Volume Licensing entitlements. 82
83 Appendix C Revision History Version Number Revision Date Organization Global Channel Readiness WW Tools Readiness WW Tools Readiness WW Tools Readiness 83
Volume Licensing Service Center User Guide
 Volume Licensing Service Center User Guide MICROSOFT VOLUME LICENSING FEBRUARY 2015 What s New License Summary has been improved with expanded search capabilities Contents What s New... 1 Overview of the
Getting Started and Administration
 AUGUST 2015 Microsoft Volume Licensing Service Center Getting Started and Administration 2 Microsoft Volume Licensing Service Center: Getting Started and Administration Table of contents Microsoft Volume
License and Relationship Summary
 Microsoft Volume Licensing Service Center License and Relationship Summary 2 Microsoft Volume Licensing Service Center: License and Relationship Summary Information Table of contents TABLE OF CONTENTS...
Managing Visual Studio Standard subscriptions (MSDN Subscriptions)
") February 2016 Microsoft Volume Licensing Service Center Managing Visual Studio Standard subscriptions (MSDN Subscriptions) 2 Managing Visual Studio Standard subscriptions (MSDN Subscriptions) Introduction...
February 2016 Microsoft Volume Licensing Service Center Managing Visual Studio Standard subscriptions (MSDN Subscriptions) 2 Managing Visual Studio Standard subscriptions (MSDN Subscriptions) Introduction...
MyFaxCentral User Administration Guide
 faxing simplified. anytime. anywhere. MyFaxCentral User Administration Guide www.myfax.com MyFaxCentral Common Controls...1 Navigation Controls...1 Customize View...1 MyFaxCentral User Administration...2
Verified Volunteers. System User Guide 10/2014. For assistance while navigating through the system, please contact Client Services at:
 Verified Volunteers System User Guide 10/2014 For assistance while navigating through the system, please contact Client Services at: [email protected] - (855) 326-1860 - Option 1 Welcome to Verified
Understanding Visual Studio Standard subscriptions (MSDN Subscriptions)
") February 2016 Microsoft Volume Licensing Service Center Understanding Visual Studio Standard subscriptions (MSDN Subscriptions) 2 Understanding Visual Studio Standard subscriptions (MSDN Subscriptions)
February 2016 Microsoft Volume Licensing Service Center Understanding Visual Studio Standard subscriptions (MSDN Subscriptions) 2 Understanding Visual Studio Standard subscriptions (MSDN Subscriptions)
The Software Administrator s Guide to Autodesk Subscriptions. How to Set Up, Install, and Manage Your Software and Users
 The Software Administrator s Guide to Autodesk Subscriptions How to Set Up, Install, and Manage Your Software and Users Let s get started. SOFTWARE ADMINISTRATOR S GUIDE OVERVIEW Is this ebook for you?
UF Health SharePoint 2010 Introduction to Content Administration
 UF Health SharePoint 2010 Introduction to Content Administration Email: [email protected] Web Page: http://training.health.ufl.edu Last Updated 2/7/2014 Introduction to SharePoint 2010 2.0 Hours
Table of Contents. Manual for Core Staff - Equipment/Scheduling Core Facilities
 Table of Contents 1. Overview 2. How do I manage my account? 3. Equipment Scheduling Workflow Overview 4. Equipment Scheduling Walk Through a. How do I access the list of calendars available for scheduling?
Getting Started. Getting Started with Time Warner Cable Business Class. Voice Manager. A Guide for Administrators and Users
 Getting Started Getting Started with Time Warner Cable Business Class Voice Manager A Guide for Administrators and Users Table of Contents Table of Contents... 2 How to Use This Guide... 3 Administrators...
My Business Account. User Guide: Getting Started
 My Business Account User Guide: Getting Started Last Updated: 6/2013 Verizon Wireless 2013 1 Logging in 3 Create a Secret Question and Answer (first time logging in only) 5 Terms of Use Page (first time
Abila Grant Management. Document Management
 Abila Grant Management This is a publication of Abila, Inc. Version 2014 2014 Abila, Inc. and its affiliated entities. All rights reserved. Abila, the Abila logos, and the Abila product and service names
Document Services Online Customer Guide
 Document Services Online Customer Guide Logging in... 3 Registering an Account... 3 Navigating DSO... 4 Basic Orders... 5 Getting Started... 5 Attaching Files & Print Options... 7 Advanced Print Options
Using Webmail. Technical Manual: User Guide. Document Updated: 1/07. The Webmail Window. Displaying and Hiding the Full Header.
 Using Webmail Technical Manual: User Guide The Webmail Window To save an attachment: 1. Click once on the attachment name. Or, if there are multiple attachments, click the Save icon to save all attachments
FedEx Billing Online PDF Help Guide Invoiced Customers
 FedEx Billing Online PDF Help Guide Invoiced Customers Table of Contents Introduction... 2 Logging In/Your Account Summary... 3 Viewing... 5 Approving and Notifying... 9 Canceling Approvals... 14 Paying...
Outlook Live Basics. for Students
 Outlook Live Basics for Students 2 Outlook Live for Support Staff Outlook Live for Support Staff 3 Getting Started... 6 Signing into your Outlook Account... 6 Migrating your Account... 8 Address Book...
Migrating From Bobcat Mail To Google Apps (Using Microsoft Outlook and Google Apps Sync)
") Migrating From Bobcat Mail To Google Apps (Using Microsoft Outlook and Google Apps Sync) This document is intended for those users moving from WVWC s Bobcat Mail system to the new Google Apps mail system
Migrating From Bobcat Mail To Google Apps (Using Microsoft Outlook and Google Apps Sync) This document is intended for those users moving from WVWC s Bobcat Mail system to the new Google Apps mail system
Cloud. Hosted Exchange Administration Manual
 Cloud Hosted Exchange Administration Manual Table of Contents Table of Contents... 1 Table of Figures... 4 1 Preface... 6 2 Telesystem Hosted Exchange Administrative Portal... 7 3 Hosted Exchange Service...
MICROSOFT OUTLOOK 2011 READ, SEARCH AND PRINT E-MAILS
 MICROSOFT OUTLOOK 2011 READ, SEARCH AND PRINT E-MAILS Lasted Edited: 2012-07-10 1 Find the Inbox... 3 Check for New Mail... 4 Manually check for new messages... 4 Change new incoming e-mail schedule options...
OWA - Outlook Web App
 OWA - Outlook Web App Olathe Public Schools 0 Page MS Outlook Web App OPS Technology Department Last Revised: May 1, 2011 Table of Contents MS Outlook Web App... 1 How to Access the MS Outlook Web App...
Overview of Autodesk Subscription with Gold Support
 Overview of Autodesk Subscription with Gold Support For Former Platinum Membership Customers Welcome Platinum Members to Autodesk Subscription with Gold Support. This Program Guide will help you become
VALUE LINE INVESTMENT SURVEY ONLINE USER S GUIDE VALUE LINE INVESTMENT SURVEY ONLINE. User s Guide
 VALUE LINE INVESTMENT SURVEY ONLINE User s Guide Welcome to Value Line Investment Survey Online. This user guide will show you everything you need to know to access and utilize the wealth of information
End User Training Guide
 End User Training Guide October 2013 2005-2013 ExpenseWire LLC. All rights reserved. 1 expensewire.com Use of this user documentation is subject to the terms and conditions of the applicable End- User
Microsoft Online Learning Administrator guide v1.0
 Microsoft Online Learning Administrator guide v1.0 This guide provides an overview of the administrative functions of the Microsoft Online Learning Portal for Administrators. IMPORTANT NOTE: Please do
SaaS Email Encryption Enablement for Customers, Domains and Users Quick Start Guide
 SaaS Email Encryption Enablement for Customers, Domains and Users Quick Start Guide Email Encryption Customers who are provisioned for SaaS Email Encryption can easily configure their Content Policies
Novell ZENworks Asset Management 7.5
 Novell ZENworks Asset Management 7.5 w w w. n o v e l l. c o m October 2006 USING THE WEB CONSOLE Table Of Contents Getting Started with ZENworks Asset Management Web Console... 1 How to Get Started...
Wimba Pronto. Version 3.1. Administrator Guide
 Wimba Pronto Version 3.1 Administrator Guide Wimba Pronto 3.1 Administrator Guide Overview 1 Accessing the Wimba Pronto Administration Interface 2 Managing Multiple Institutions 3 General Features 4 Configuring
Webmail Instruction Guide
 Webmail Instruction Guide This document is setup to guide your through the use of the many features of our Webmail system. You may either visit www.safeaccess.com or webmail.safeaccess.com to login with
TrueFiling. Law Firm User Guide 1.0.130. ImageSoft, Inc.
 TrueFiling Law Firm User Guide 1.0.130 ImageSoft, Inc. Copyright 2013 ImageSoft, Inc. All rights reserved. No part of this document may be reproduced, stored in or introduced into a retrieval system, or
Webmail User Guide. The Webmail Window. Logging In to Webmail. Displaying and Hiding the Full Header. Printing an Email. Composing a New Email
 Webmail User Guide Rev: November, 2012 Webmail is supported in the following browsers: Windows Internet Explorer 6, Internet Explorer 7, Firefox 2, and Firefox 3 Mac OSX Safari 2, Safari 3, Firefox 2,
STAAR Assessment Management System User s Guide. STAAR Grades 3 8 and End-of-Course Assessments
 STAAR Assessment Management System User s Guide STAAR Grades 3 8 and End-of-Course Assessments March 2, 2016 Student Assessment Division Texas Education Agency 1701 N. Congress Avenue Austin, TX 78701-1494
Spambrella SaaS Email Encryption Enablement for Customers, Domains and Users Quick Start Guide
 January 24, 2015 Spambrella SaaS Email Encryption Enablement for Customers, Domains and Users Quick Start Guide Spambrella and/or other noted Spambrella related products contained herein are registered
PaymentNet Federal Card Solutions Cardholder FAQs
 PaymentNet Federal Card Solutions It s easy to find the answers to your questions about PaymentNet! June 2014 Frequently Asked Questions First Time Login How do I obtain my login information?... 2 How
FSA ORS Reports & Files Quick Guide 2015 2016
 ORS The Online Reporting System (ORS) provides participation reports for students taking the Florida Standards Assessments (FSA) tests. Logging in to ORS (DAC, CBT, SA) ORS Login 1. On the FSA portal (www.fsassessments.org),
Microsoft Partner Network. Program Administrator Guide to Software and Online Services Benefits
 Microsoft Partner Network Program Administrator Guide to Software and Online Services Benefits Contents Microsoft Partner Network... 1 Program Administrator Guide to Software and Online Services Benefits...
BIGPOND ONLINE STORAGE USER GUIDE Issue 1.1.0-18 August 2005
 BIGPOND ONLINE STORAGE USER GUIDE Issue 1.1.0-18 August 2005 PLEASE NOTE: The contents of this publication, and any associated documentation provided to you, must not be disclosed to any third party without
SAP BusinessObjects Financial Consolidation Web User Guide
 SAP BusinessObjects Financial Consolidation Document Version: 10.0 Support Package 18 2016-02-19 SAP BusinessObjects Financial Consolidation Web User Guide Content 1 General user functions....12 1.1 To
FedEx Billing Online User Guide
 FedEx Billing Online User Guide Introduction FedEx Billing Online allows you to efficiently manage and pay your FedEx invoices online. It s free, easy and secure. FedEx Billing Online helps you streamline
Migrating From WVWC Mail to Google Apps
 Migrating From WVWC Mail to Google Apps This document is intended for those users moving from WVWC s old mail server to the new Google Apps mail system. If you DO NOT have bobcats in your email address,
Microsoft Project Server 2010 Project Manager s Guide for Project Web App
 Microsoft Project Server 2010 Project Manager s Guide for Project Web App Copyright This document is provided as-is. Information and views expressed in this document, including URL and other Internet Web
FedEx Billing Online PDF Help Guide Credit Card Customers
 FedEx Billing Online PDF Help Guide Credit Card Customers Table of Contents Introduction... 2 Logging In/Your Account Summary... 3 Viewing... 4 Disputing... 8 Searching... 9 Downloading... 11 Managing
Email -- Reading and Printing Email
 Email -- Reading and Printing Email Checking for New Email By default, webmail checks for new email automatically. If you want to manually check for new email, click the Check Email button. Or, click the
User s Guide for the Texas Assessment Management System
 User s Guide for the Texas Assessment Management System Version 8.3 Have a question? Contact Pearson s Austin Operations Center. Call 800-627-0225 for technical support Monday Friday, 7:30 am 5:30 pm (CT),
Order Management Tour Guide
 Order Management Tour Guide Table of Contents Welcome to Sysco Market s Order Management Application!... 4 Tips for Getting Started... 4 Buttons... 5 Icons... 6 Ordering... 7 Tips for Ordering... 7 Creating
Optum Patient Portal. 70 Royal Little Drive. Providence, RI 02904. Copyright 2002-2013 Optum. All rights reserved. Updated: 3/7/13
 Optum Patient Portal 70 Royal Little Drive Providence, RI 02904 Copyright 2002-2013 Optum. All rights reserved. Updated: 3/7/13 Table of Contents 1 Patient Portal Activation...1 1.1 Pre-register a Patient...1
How to install and use the File Sharing Outlook Plugin
 How to install and use the File Sharing Outlook Plugin Thank you for purchasing Green House Data File Sharing. This guide will show you how to install and configure the Outlook Plugin on your desktop.
525 South 29 th Street. Harrisburg, PA 17104. Learning Management System User s Guide
 525 South 29 th Street Harrisburg, PA 17104 Learning Management System User s Guide July 2015 1 Table of Contents User Accounts Overview 3 Changing your Email address 3 Changing your Password 3 Changing
WTI Email Marketing Tool
 WTI Email Marketing Tool Procedure Guide September 24, 2010 WTI Email Marketing Tool Table of Contents Table of Contents... 1 Purpose of the Tool... 2 Subscribing to Receive WTI Emails... 2 Figure 1: Training
Chapter 15: Forms. User Guide. 1 P a g e
 User Guide Chapter 15 Forms Engine 1 P a g e Table of Contents Introduction... 3 Form Building Basics... 4 1) About Form Templates... 4 2) About Form Instances... 4 Key Information... 4 Accessing the Form
MANAGER SELF SERVICE USER GUIDE
 MANAGER SELF SERVICE USER GUIDE FEBRUARY 2016 Contents Note: If using this guide electronically the contents are hyperlinked to each section. Introduction... 2 Using This Manual... 2 Signing in to Workday...
Baylor Secure Messaging. For Non-Baylor Users
 Baylor Secure Messaging For Non-Baylor Users TABLE OF CONTENTS SECTION ONE: GETTING STARTED...4 Receiving a Secure Message for the First Time...4 Password Configuration...5 Logging into Baylor Secure Messaging...7
Secure File Transfer Guest User Guide Updated: 5/8/14
 Secure File Transfer Guest User Guide Updated: 5/8/14 TABLE OF CONTENTS INTRODUCTION... 3 ACCESS SECURE FILE TRANSFER TOOL... 3 REGISTRATION... 4 SELF REGISTERING... 4 REGISTER VIA AN INVITATION SENT BY
Quick Start : i-fax User Guide
 Quick Start : i-fax User Guide Introduction Welcome to the i-fax System User Guide! This manual will help new users navigate i-fax System and perform common tasks. This manual is task-oriented. You will
Council of Ontario Universities. COFO Online Reporting System. User Manual
 Council of Ontario Universities COFO Online Reporting System User Manual Updated September 2014 Page 1 Updated September 2014 Page 2 Table of Contents 1. Security... 5 Security Roles Defined in the Application...
Training Manual. Version 6
 Training Manual TABLE OF CONTENTS A. E-MAIL... 4 A.1 INBOX... 8 A.1.1 Create New Message... 8 A.1.1.1 Add Attachments to an E-mail Message... 11 A.1.1.2 Insert Picture into an E-mail Message... 12 A.1.1.3
April 2010. 2007, 2008, 2009, 2010 GXS, Inc. All Rights Reserved.
 April 2010 2007, 2008, 2009, 2010 GXS, Inc. All Rights Reserved. Licenses and Trademarks All product names are copyrights and registered trademarks/tradenames of their respective owners. Information in
Mobile Device Access Simple Application Guide
 Mobile Device Access Simple Application Guide Users can add/manage requests, retrieve passwords, and review password releases/sessions via their mobile device. This manual should be used to help you navigate
TriCore Secure Web Email Gateway User Guide 1
 TriCore Secure Web Email Gateway User Guide This document provides information about TriCore Secure Web Email Gateway. This document is for users who are authorized to send and receive encrypted email
TRUSTWAVE VULNERABILITY MANAGEMENT USER GUIDE
 .trust TRUSTWAVE VULNERABILITY MANAGEMENT USER GUIDE 2007 Table of Contents Introducing Trustwave Vulnerability Management 3 1 Logging In and Accessing Scans 4 1.1 Portal Navigation and Utility Functions...
Site Administrator Guide
 Site Administrator Guide Trademark Notice Blackboard, the Blackboard logos, and the unique trade dress of Blackboard are the trademarks, service marks, trade dress and logos of Blackboard, Inc. All other
Fall 2013. Quick Reference Guide. Organizational and Talent Development. General End Users All SJCD Employees (Level One)
") Organizational and Talent Development Quick Reference Guide General End Users All SJCD Employees (Level One) Fall 2013 San Jacinto College District General End-User Training for All SJCD Employees Page
Organizational and Talent Development Quick Reference Guide General End Users All SJCD Employees (Level One) Fall 2013 San Jacinto College District General End-User Training for All SJCD Employees Page
Administrator's Guide
 Administrator's Guide Copyright SecureAnywhere Mobile Protection Administrator's Guide November, 2012 2012 Webroot Software, Inc. All rights reserved. Webroot is a registered trademark and SecureAnywhere
Corporate Telephony Toolbar User Guide
 Corporate Telephony Toolbar User Guide 1 Table of Contents 1 Introduction...6 1.1 About Corporate Telephony Toolbar... 6 1.2 About This Guide... 6 1.3 Accessing The Toolbar... 6 1.4 First Time Login...
DI SHAREPOINT PORTAL. User Guide
 DI SHAREPOINT PORTAL User Guide -1- TABLE OF CONTENTS PREFACE... 3 SECTION 1: DI PORTAL ACCESS... 4 REQUEST USER ACCESS... 4 To register... 4 SIGNING IN TO THE PORTAL... 8 To sign in to the DI Portal...
The Cancer Institute NSW Grants Management System User Guide
 The Cancer Institute NSW Grants Management User Guide Version 1.1 12 February 2016 Contents 1. Registration 2 2. Login to the Institute s GMS 3 3. Forgot password 3 4. The home page 4 5. Creating a profile
Junk E-mail Settings. Options
 Outlook 2003 includes a new Junk E-mail Filter. It is active, by default, and the protection level is set to low. The most obvious junk e-mail messages are caught and moved to the Junk E-Mail folder. Use
kalmstrom.com Business Solutions
 HelpDesk OSP User Manual Content 1 INTRODUCTION... 3 2 REQUIREMENTS... 4 3 THE SHAREPOINT SITE... 4 4 THE HELPDESK OSP TICKET... 5 5 INSTALLATION OF HELPDESK OSP... 7 5.1 INTRODUCTION... 7 5.2 PROCESS...
How To Set Up A Xerox Econcierge Powered By Xerx Account
 Xerox econcierge Account Setup Guide Xerox econcierge Account Setup Guide The free Xerox econcierge service provides the quickest, easiest way for your customers to order printer supplies for all their
SuccessFactors Learning: Scheduling Management
 SuccessFactors Learning: Scheduling Management Classroom Guide v 6.4 For SuccessFactors Learning v 6.4 Last Modified 08/30/2011 2011 SuccessFactors, Inc. All rights reserved. Execution is the Difference
BCSD WebMail Documentation
 BCSD WebMail Documentation Outlook Web Access is available to all BCSD account holders! Outlook Web Access provides Webbased access to your e-mail, your calendar, your contacts, and the global address
First Data Global Gateway Virtual Terminal User Manual. Version 1.0
 First Data Global Gateway Virtual Terminal User Manual Version 1.0 Table of Contents 1 Introduction 5 1.1 First Data Global Gateway Virtual Terminal Overview 5 1.1.1 Processing Transactions 5 1.1.2 Managing
FedEx Billing Online User Guide
 FedEx Billing Online User Guide Introduction FedEx Billing Online allows you to efficiently manage and pay your FedEx invoices online. It s free, easy and secure. FedEx Billing Online helps you streamline
SMS for REST Professional
 RockendSMS Enhanced Integration SMS for REST Professional RockendSMS has newly designed and developed an upgrade to the way you send SMS through REST Professional V14 and above (RockendSMS Enhanced Integration).
EMAIL QUICK START GUIDE
 IT Services Microsoft Outlook 2010 EMAIL QUICK START GUIDE Contents What is Outlook?...2 Quick Guide to Email...2 Create a new e-mail message...2 Forward or reply to an e-mail message...2 Creating new
TrueFiling. User Guide. Release 1.0.36. www.imagesoftinc.com 25900 W. 11 Mile Rd., Suite 100 Southfield, MI 48034 phone: (855) 959-8868
 959-8868") TrueFiling User Guide Release 1.0.36 www.imagesoftinc.com 25900 W. 11 Mile Rd., Suite 100 Southfield, MI 48034 phone: (855) 959-8868 Copyright 2015 ImageSoft, Inc. All rights reserved If this guide is
TrueFiling User Guide Release 1.0.36 www.imagesoftinc.com 25900 W. 11 Mile Rd., Suite 100 Southfield, MI 48034 phone: (855) 959-8868 Copyright 2015 ImageSoft, Inc. All rights reserved If this guide is
ONLINE MERCHANT PORTAL USER GUIDE
 ONLINE MERCHANT PORTAL USER GUIDE MARCH 2015 Content 1. Introduction... 3 1.1. Payments History... 3 2. Getting Started... 4 2.1. Registration... 4 2.2. Logging into Your Account... 6 3. Home Page... 7
E-Learning Facilitator Manual
 E-Learning Facilitator Manual Created by CCOHS & Vubiz Last updated: 2015-06-25 E-Learning Facilitator Manual 2016-07-22 Page 1 Contents Welcome... 3 Signing In... 3 Learning Management System... 4 Info
Education Solutions Development, Inc. APECS Navigation: Business Systems Getting Started Reference Guide
 Education Solutions Development, Inc. APECS Navigation: Business Systems Getting Started Reference Guide March 2013 Education Solutions Development, Inc. What s Inside The information in this reference
Icebox - Sendio SPAM Filter
 Icebox - Sendio SPAM Filter Sendio Icebox The Navajo Department of Information Technology (DIT) installed and implemented a SPAM filter in 2008 to capture unwanted mail before it gets to your email inbox.
Using Webmail. Document Updated: 11/10. Technical Manual: User Guide. The Webmail Window. Logging In to Webmail. Displaying and Hiding the Full Header
 Using Webmail Technical Manual: User Guide Webmail is supported in the following browsers: Windows Internet Explorer 6, Internet Explorer 7, Firefox 2, and Firefox 3 Mac OSX Safari 2, Safari 3, Firefox
Quantum View sm Manage User Guide
 Quantum View sm Manage User Guide Version 1.0 January 2004 Copyright 2004 United Parcel Service of America. UPS, the UPS brandmark, and the color brown are trademarks of United Parcel Service of America,
Great! You sold some Lexmark devices. Now you need to file for the associated rebates.
 Great! You sold some Lexmark devices. Now you need to file for the associated rebates. How do you do that today? Fill out a spreadsheet, email it to someone at Lexmark and wait How do you know if they
INVESTOR360º CLIENT USER GUIDE
 INVESTOR360º CLIENT USER GUIDE TABLE OF CONTENTS 1. About Investor360 3 1.1 What does Investor360 provide? 3 1.2 Security 3 2. Logging in to Investor360 4 3. Welcome to Investor360 7 4. Navigating in Investor360
AT&T Conferencing Add-in for Microsoft Outlook v10.5
 AT&T Conferencing Add-in for Microsoft Outlook v10.5 July 2014 2014 AT&T Intellectual Property. All rights reserved. AT&T, the AT&T logo and all other AT&T marks contained herein are trademarks of AT&T
The LSUHSC N.O. Email Archive
 The LSUHSC N.O. Email Archive Introduction The LSUHSC N.O. email archive permanently retains a copy of all email items sent and received by LSUHSC N.O. Academic email users. Email items will be accessible
Taulia Supplier Portal User Guide
 Taulia Supplier Portal User Guide Version 2.1 Taulia Inc. Taulia GmbH 201 Mission Street, Ste. 900 Gladbacher Strasse 74 San Francisco, CA 94105 Phone +1 (415) 376 8280 40219 Düsseldorf Germany Fax +1
AT&T Business Messaging Account Management
 AT&T Business Messaging Account Management Admin User Guide December 2015 1 Copyright 2015 AT&T Intellectual Property. All rights reserved. AT&T, the AT&T logo and all other AT&T marks contained herein
Online Bill Payment & Presentment User Guide
 Table of Contents Alerts and Notifications... 4 Add an email Notification...4 Cancel an email Notification...5 Automatic Payments... 6 Add a Standard Automatic Payment Rule...6 Add an Automatic Payment
Online Banking User Guide
 TABLE OF CONTENTS TABLE OF CONTENTS... 1 INTRODUCTION... 4 QUICK REFERENCE... 4 LOG ON... 4 SECURITY PROFILE... 4 ENTITLEMENTS... 4 LOG ON... 5 ENTER YOUR USERNAME... 5 REVIEW SECURE IMAGE AND PHRASE,
GP REPORTS VIEWER USER GUIDE
 GP Reports Viewer Dynamics GP Reporting Made Easy GP REPORTS VIEWER USER GUIDE For Dynamics GP Version 2015 (Build 5) Dynamics GP Version 2013 (Build 14) Dynamics GP Version 2010 (Build 65) Last updated
2010 Outlook Web App Client Overview
 2010 Outlook Web App Client Overview The upgrade to Microsoft Exchange 2010 includes an updated web-based e-mail client, OWA. OWA stands for Outlook Web App and gives you access to your district e-mail
Telephony Toolbar Corporate. User Guide
 Telephony Toolbar Corporate User Guide Release 7.1 March 2011 Table of Contents 1 About This Guide...7 1.1 Open Telephony Toolbar - Corporate... 7 1.2 First Time Login... 8 1.3 Subsequent Use... 11 2 Using
Turnitin Blackboard 9.0 Integration Instructor User Manual
 Turnitin Blackboard 9.0 Integration Instructor User Manual Version: 2.1.3 Updated December 16, 2011 Copyright 1998 2011 iparadigms, LLC. All rights reserved. Turnitin Blackboard Learn Integration Manual:
Using Webmail. Document Updated: 9/08. Technical Manual: User Guide. The Webmail Window. Displaying and Hiding the Full Header.
 Using Webmail Technical Manual: User Guide Webmail is supported in the following browsers: Windows Internet Explorer 6, Internet Explorer 7, Firefox 2, and Firefox 3 Mac OSX Safari 2, Safari 3, Firefox
UCB erequest IIS Requestor - Quick Reference Guide
 UCB erequest - CONTENTS 1 INTRODUCTION... 3 2 HOW TO REGISTER AND LOG-IN... 3 2.1 REGISTER TO RECEIVE AN EXTERNAL REQUESTOR USER ID AND PASSWORD... 3 2.2 LOGIN WITH USER ID AND PASSWORD... 5 3 HOW TO SUBMIT
STEPfwd Quick Start Guide
 CERT/Software Engineering Institute June 2016 http://www.sei.cmu.edu Table of Contents Welcome to STEPfwd! 3 Becoming a Registered User of STEPfwd 4 Learning the Home Page Layout 5 Understanding My View
KPN SMS mail. Send SMS as fast as e-mail!
 KPN SMS mail Send SMS as fast as e-mail! Quick start Start using KPN SMS mail in 5 steps If you want to install and use KPN SMS mail quickly, without reading the user guide, follow the next five steps.
Subscription Guide and Glossary
 AUTODESK SUBSCRIPTION Subscription Guide and Glossary This guide describes the various components of Autodesk Subscription. You can learn how to access your program benefits and manage your subscription