Payco, Inc. Evolution and Employee Portal. Payco Services, Inc.., Home
|
|
|
- Archibald Cross
- 10 years ago
- Views:
Transcription
1 Payco, Inc. Evolution and Employee Portal Payco Services, Inc..,

2 Table of Contents Payco Services, Inc.., 2013 Table of Contents Installing Evolution... 4 Commonly Used Buttons... 5 Employee Information... 6 Setting up a New Employee... 6 Setting up a New Employee Claiming Exempt on his/her W Rehiring a Terminated Employee... 9 Setting Up a Person as an Independent Contractor (1099) Setting up a Direct Deposit Stopping a Direct Deposit Setting up a Scheduled E/D Stopping a Scheduled E/D Blocking Federal and/or State Taxes Starting a Payroll Creating a Second Batch Opening an Existing Batch Adding an Employee into a Batch Voiding A Check Calculating Manual Checks Copy Manual Check to Existing Batch Calculating a Net to Gross Copying a Manual Check into an Existing Payroll Batch Entering a Handwritten Manual Check in Payroll Submitting your Payroll for Processing Running Reports Running a Payroll Register for specific employees and date ranges Employee Portal Employee User Guide Employee Portal Login Screen Employee Portal Dashboard Window Example 4 Initial Employee Portal Window Pay Statement / Paystub Window Example 6 Paystub Window Example 7 Sample Paystub W 2 / 1099 Forms Window Example 8 Select Year Employee Info Window Example 10 Employee Information

3 Example 11 Request Employee Change Window

4 Installing Evolution This software can be installed on multiple computers with Internet access. You will find the following file by going to our website at Security rules require your password to be changed at least every 90 days. User accounts are locked out after 3 invalid attempts. Select Resources Select Downloads Select Evolution Installer (v. xx.xx.x.xx) Note: xx.xx.x.xx represents the current installer version Download and run the installer as normal. Follow all the screen prompts and accept all options After this has been installed you will have an icon on your desktop that looks like this: After three unsuccessful log in attempts, you must call Payco to have your password reset. Double click on the Evolution Icon. This will open a window that looks like this: Enter your Login Id and password as given to you by Payco. You indicate that you want to change your password at any time by putting a checkmark in the Change Password box. The server should always be: evolution.paycoinc.com (Make sure this is all lower case) Change the compression box to reflect the way you connect to the Internet. After three unsuccessful login attempts, you must call your Payroll Specialist to have your password reset. Hit OK and Evolution will open. 4

5 If there is a newer version of Evolution available, it will automatically be downloaded. You will need to enter your password again. Please bear in mind that all data that is changed or added is live data and will reflect the change immediately. After three unsuccessful log in attempts, you must call Payco to have your password reset. Commonly Used Buttons Post Changes button saves any changes you have made locally to your computer Cancel Changes button discards any changes you have made since posting. Commit Changes button saves any changes you have made permanently to our server. Abort Changes button gives you a second opportunity to discard any changes. Create Record button adds a new record to whatever list you are viewing. Delete Current Record button deletes whatever record you are viewing. Refresh button pulls all data from our server on demand. 5

6 Employee Information Setting up a New Employee 1. Click on the EMPLOYEE menu button and select employee. 2. Click the create record button at the top of your screen. This will bring you to the EE Entry tab. 3. Start filling in the blanks with your new employee information. Very Important: If you enter the employee s Social Security Number and the employee s name and address populates automatically, STOP and cancel changes by clicking the cancel changes button. This tells you that the employee is already set up on the database. If you save these changes you may create a duplicate employee record and will receive two W 2 forms at year end. Refer to the instructions Rehiring a Terminated Employee. 4. All mandatory fields are marked with a red asterisk and must have a value with the exception of Ethnicity. Date of Birth is optional, but recommended. **Note: Do not use any punctuation in any fields at all. 5. Be sure to enter a department for your new employee. After entering the employee s gender, press F4 on your keyboard or click on the Assign D/B/D/T button in the Labor Defaults section. For salaried employees, under the words Rate Number, change the Rate Number to 0 and under the words Rate Amount leave the default set at Save changes. Follow the Setting up a New Employee directions in addition to the directions below if your salaried employee is able to earn overtime pay. You must set up a second rate for overtime earnings. 6

7 Setting up a Salaried Employee with Overtime Earnings 1. On the EE Entry tab, enter the salary amount and leave the default settings for Rate Number and Rate Amount. With a salaried employee, the Rate Number should read 0 and the Rate Amount should read Click on the EMPLOYEE menu button and select Pay Rate Info. You will see the primary rate, Rate 0, set to 0.00 (zero). Leave this information as is. 3. Hit the plus sign at the top of your screen to create a new record, Rate 2. In left hand side, fill in the rate amount. The rate amount needs to be the flat pay rate amount not the time and a half rate. If you enter hours under Overtime Hours in the payroll, it will calculate at time and a half automatically. 4. Leave the Rate Number as 2, and make sure NO is selected under the words Primary Rate. Save changes. 7

8 Setting up a New Employee Claiming Exempt on his/her W-4 If the Form W 4 is filled out correctly follow the Setting up a New Employee directions in addition to the steps below for blocking federal withholding tax in Evolution. For security purposes, we do not allow end users to Exempt an employee from taxes on their own. As a workaround, please follow these steps, which result in the same taxability of the employee s wages. 1. Click on the EMPLOYEE menu button and select employee. 2. Enter your employee s information on the EE Entry tab. 3. In the right hand column of the EE Entry tab, make sure to change Federal Dependents to 99 and State Dependents to Change State Marital Status to the highest exemption for your state. 5. Click on the green check mark to post your changes and the green commit button to save. In order for federal withholding tax to be exempt, your employee must fill out his or her Form W 4 correctly. If they write in a number of exemptions on line 5 or write an additional amount on line 6 and claim exempt on line 7 then they have filled the form out incorrectly. The employee will need to fill out a new Form W 4 for your records. To claim exempt, your employee must leave line 5 and line 6 on the W 4 blank and write exempt on line 7. 8

9 Rehiring a Terminated Employee 1. Click on the EMPLOYEE menu button and select employee. 2. When on the Browse tab, click on the red question mark to the left of the EE Code column. 3. When the Filter Records to View box pops up, click on the Clear all button located in the lower lefthand corner of the pop up box. This will allow you to see any terminated employees. 4. Highlight the terminated employee you want to rehire and double click. You will be directed to the EE Entry tab. 5. Erase the termination date, by double clicking on the Current Termination Date and hitting delete on your keyboard. Then under Current Status Code, click the drop down arrow and change the Current Status Code from Terminated to ACTIVE. 6. You will also need to change the current hire date. Please put the date the employee was rehired. In the original hire date, you should leave the original start date of your employee. 9

10 10

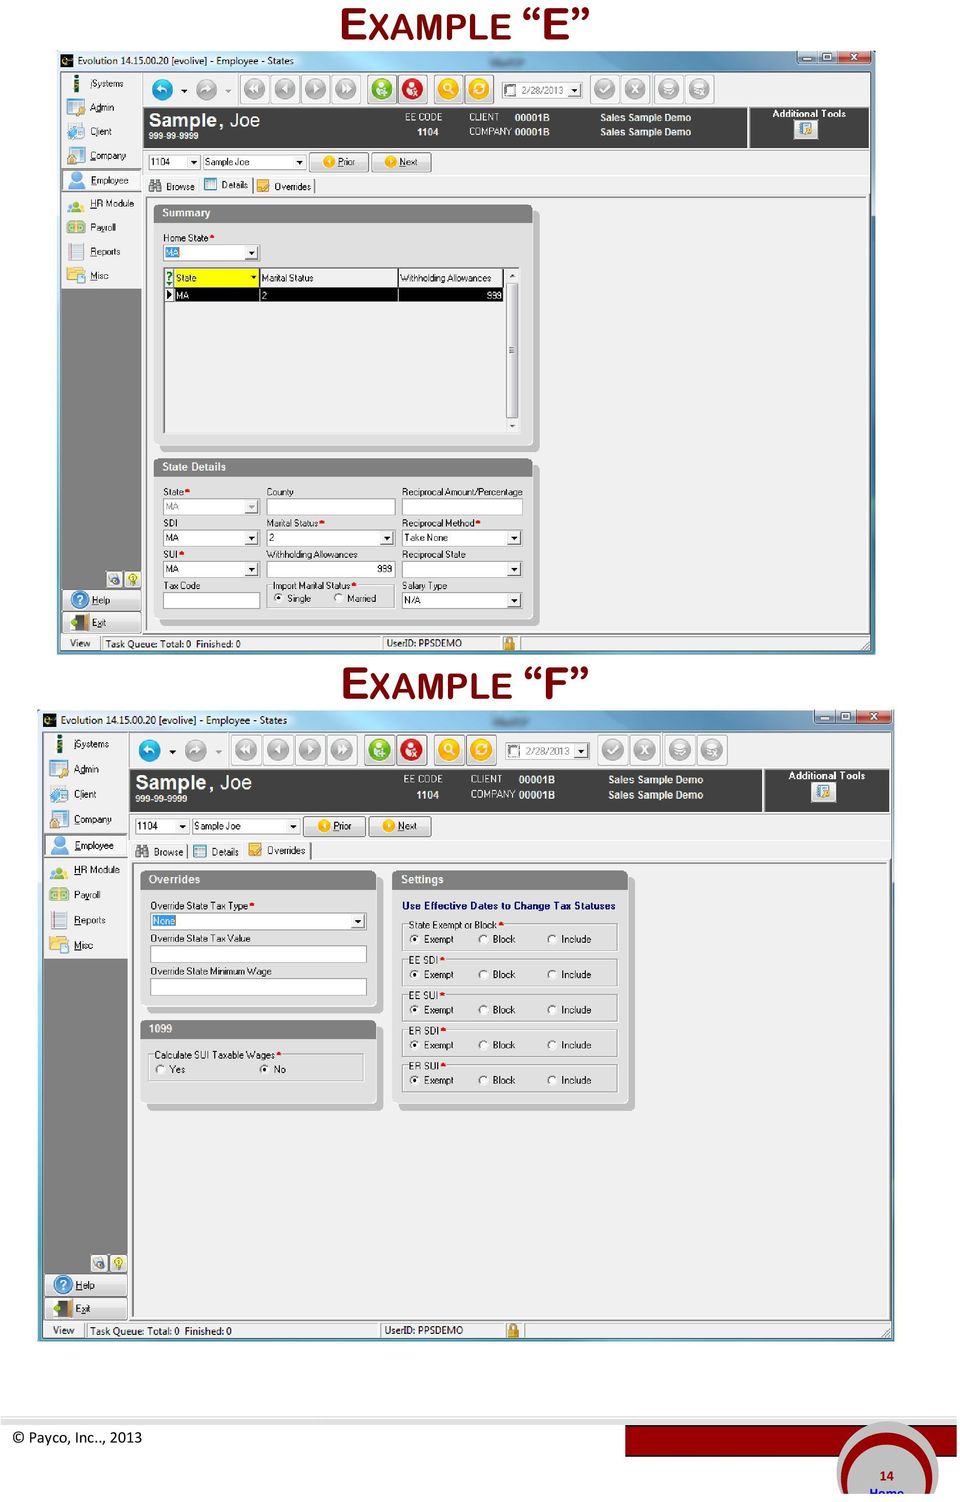
11 Setting Up a Person as an Independent Contractor (1099) This will guide you on how to set up a new 1099 employee on Evolution. Very Important!!!! When setting up a new 1099 employee make sure you DO NOT save until you have entered everything or this will be saved as a W2 employee!!!! Most of our clients like all 1099 employees to be in one department, usually called something like 1099 Employees. If you would like your 1099 employees in their own department, contact your Payroll Specialist to have this department set up. To add a 1099 employee, go to Employee Employee and hit the create record button. Enter the employee s social security or tax ID number. Remember, if any information populates automatically then you must STOP and hit the cancel changes button. This means that the employee is already entered and you will have a duplicate employee. You must find the employee and reactivate and NOT enter it again. If nothing populates then continue with the entry screen remembering NOT to hit the save button until the very end. Fill in the address and any other information you know. Remember to NEVER enter a salary amount on this screen at all for a 1099 recipient. (See example A ) *Remember: DO NOT hit the save button yet. Now move to the W2 tab and select the SSN radio button if this is a social security number or EIN if this is an employer identification number. Choose the 1099 radio button and change the Annual Form Type box to This will exempt all taxes for 1099 purposes. Just remember, choosing the 1099 radio button BEFORE hitting save is what triggers the system to make this employee exempt for all taxes as a 1099 employee. If you hit save and then change this radio button to 1099, the system will NOT trigger as an exempt 1099 employee and you will have to contact your Payroll Speciliaist or your employee will have taxes withheld from their pay check. (See example B ) *Remember: DO NOT hit the save button yet. If you move to the federal tax tab you will see that all taxes are exempt. If they do not show as exempt, you hit save too early in the process, and you will have to contact your Payroll Specialist to fix this. (See example C ) Now choose the Notes tab and enter notes as follows: This is a 1099 employee. Pay under E95 (or the code you are using for this client as a 1099 employee). (See example D ) Now you may hit save. Make sure the green check mark and the commit changes button are grayed out. Navigate to Employee States. (See example E ) Choose the tax overrides tab. Make sure ALL taxes have the exempt radio box selected. (See example F ) If they are not marked as exempt, you hit the save button before you made all your entries. You will need to speak to your Payroll Specialist so they can adjust the settings to properly handle your When paying a 1099 employee, make sure you use the 1099 earnings code only. It is usually a code between E90 and E99. If you are paying the same 1099 amount each pay period, you can schedule the earning in Employee Scheduled E/D s. Navigate to Employee Scheduled E/D s and hit the create record and add E95 (or the code you are using for 1099 for this client). Select Fixed under Calculation Method and enter the amount you want to pay every payroll. Remember to change effective date to a day before today. The Always/Pay deduct box should be changed to Current Payroll. This will allow you to bring this earning code into your batch every payroll automatically. (See example G ) See the Setting Up a Scheduled E/D instructions for more information. 11

12 EXAMPLE A EXAMPLE B 12

13 EXAMPLE C EXAMPLE D 13

14 EXAMPLE E EXAMPLE F 14
15 EXAMPLE G 15

16 Setting up a Direct Deposit 1. Click on the EMPLOYEE menu button and select Scheduled E/Ds. On the Browse tab, select your employee and double click on him or her. 2. On the DIRECT DEPOSITS tab, click the create button at the bottom to add new record (this is NOT the Create Record button at the top of the screen, see example below). Enter the bank s ABA number (the bank routing number should start with 1, 2 or 3), the employee s account number, and the Account Type (Checking or Savings). Select Yes under In Prenote if you want the employee to get a live check for two weeks while we validate the account information. Otherwise, select No. Select Yes under Form on File if the employee has filled out a direct deposit form. Otherwise, select No. If you need a direct deposit form template, contact your Payroll Specialist or visit our forms page at Important: This is a two step process and you must do both Set up the direct deposit Set up the Scheduled E/D Direct Deposit Tab Create New Account Next, go back to the BROWSE SCHEDULED E/Ds tab. 3. Once on the Browse Scheduled E/Ds tab, make sure the employee doesn t already have Direct Deposit set up. If not, hit the create record button at the top of the screen to set up the new E/D. 4. Under E/D Code, click on the drop down arrow and select the appropriate code for Direct Deposit. 16

17 Pick the DD Account Calculation Method Deduct Whole Check? If the employee wants to deposit the entire net check into this account then it should be set up with a calculation method of NONE. Note: Most clients have code DNP set up to be used for Net Direct Deposits. Then be sure to enter the following: Pay Frequency (defaults to Every Pay) Month # (defaults to None) Which Payrolls (defaults to All) Effective Start Date (the start date needs to be the day before your period beginning date) Deduct Whole Check (needs to read YES for full Direct Deposit) EE Direct Deposit Pull in the appropriate account number If the employee wants to Direct Deposit a partial amount, you can enter a calculation method of Fixed, % of gross or % of net. Note: Use a different code than DNP. If one is not available, please contact your Payroll Specialist. If you select Fixed, then enter the fixed dollar amount under the word AMOUNT. If you choose % of gross or % of net, enter the percent the employee has specified to deposit. Note: % of net is assumed unless otherwise specified. Then be sure to enter the following: Pay Frequency (defaults to Every Pay) Month # (defaults to None) Which Payrolls (defaults to All) Effective Start Date (the start date needs to be the day before your period beginning date) Deduct Whole Check (needs to read NO for a partial Direct Deposit) EE Direct Deposit Pull in the appropriate account number 17
 Deduct Whole Check (needs to read YES for full Direct Deposit) EE Direct Deposit Pull in the appropriate account number If the employee wants to Direct Deposit a partial")
18 5. When an employee has more than one Direct Deposit account, you must set each of them up separately. Follow the directions in steps 2 4 to set up the Direct Deposit account and E/D. For the account with the Fixed amount or Percent, enter a Calculation Method of Fixed, % of gross or % of net. Under the words Deduct Whole Check, select NO. Follow the directions in steps 2 4 to set up the Direct Deposit account and E/D. For the account where the remaining balance of the pay is to be deposited, leave the Calculation Method as NONE and under the words Deduct Whole Check select YES. 6. It is very important you tie the Scheduled E/D to the correct account number you entered in steps 1 & 2. Under EE Direct Deposit (lower middle column on the Scheduled E/Ds screen), click the drop down arrow and select the appropriate account number. Note: You will see C next to the checking account number and an S next to a savings account number. 7. Since the Direct Deposit is a new Scheduled E/D, you need to check the payroll register after you preprocess the next payroll to ensure it was set up correctly. If you have already started a payroll, you can still follow the instructions above. After saving your Scheduled E/Ds, you will need to refresh the Scheduled E/Ds by clicking on the PAYROLL menu button. A box will pop up asking you if you would like to refresh Scheduled E/Ds. Since you have already started the payroll, you must click YES to refresh the Scheduled E/Ds in order to see your change take place in the payroll. Then a Refresh check lines box will pop up. On the next screen you will see the individuals name with a check mark, click the selection that reads Refresh All Except Manual. If you make Scheduled E/D changes while a batch is open, and navigate to a menu other than PAYROLL immediately after making the E/D changes, you will not be prompted to apply your changes to the open batch. You can still manually pull in the changes by opening the payroll, and clicking the Refresh ED No Man button in the batch tab. This will pull in ALL scheduled E/Ds again (including ones you may already have deleted from the batch). Note: Be sure to double check the E/Ds on any checks you have already worked with. 18

19 Stopping a Direct Deposit One Off Modification for Current Payroll Only: 1. Click on the PAYROLL menu button and select payroll tab. 2. Highlight the correct check date and click on the BATCH button located at the bottom of your screen. 3. Click on the QUICK ENTRY tab, find the employee s name and double click on the employee. 4. This should bring you to the CHECK LINES tab for that employee s check within the current working batch. Find and click on the line that refers to the desired Direct Deposit. On your keyboard, hold down CTRL key and press DELETE, a box will appear asking Delete this check line? Click on OK, and the line for the Scheduled Direct Deposit E/D will disappear. Save your changes at the top of the screen. Permanently: 1. Click on the EMPLOYEE menu button and select Scheduled E/Ds. 2. Go to the Browse Scheduled E/D s tab and pull down the appropriate employee from the dropdown above (you can use either EE# or employee last name). Find and highlight the appropriate Direct Deposit for the employee, then click on the Details tab. 3. In the middle column of the Details tab, enter an Effective End Date. Many users enter date you select is before your current pay period beginning date. Save your changes. The Direct Deposit will no longer appear in any batches you create going forward. 19

20 Effective End Date If you have already created a payroll batch and want to remove the Direct Deposit, follow the Stopping Direct Deposit permanently instructions. After saving your E/D changes, you will need to refresh the Scheduled E/Ds by clicking on the PAYROLL menu button. A box will appear asking you if you would like to refresh Scheduled E/Ds. Since you have already started the payroll, you must click YES to refresh the Scheduled E/Ds in order to see your change take place in the payroll. Then a Refresh Check Lines box will appear. Since the system automatically selects everyone who had a Scheduled E/D change, you will need to click the button that reads Refresh All Except Manual. If you make Scheduled E/D changes while a batch is open, and navigate to a menu other than PAYROLL immediately after making the E/D changes, you will not be prompted to apply your changes to the open batch. You can still manually pull in the changes by opening the payroll, and clicking the Refresh ED No Man button in the batch tab. This will pull in ALL scheduled E/Ds again (including ones you may already have deleted from the batch,) so be sure to double check the E/Ds on any checks you have already worked with. If the only Scheduled E/D change you made while the batch was open was to end date the Direct Deposit and you do not wish to refresh all the E/Ds in the open batch, you can follow the steps for stopping direct deposit One Off Modification for Current Payroll Only. 20

21 Setting up a Scheduled E/D 21
22 1. Go to the EMPLOYEE menu button and select Scheduled E/Ds. On the Browse tab, double click on the employee. 2. Once on the Browse Scheduled E/Ds tab, make sure the employee doesn t already have the Scheduled E/D set up. If not, hit the create record button at the top of the screen. Very Important: Do NOT change the E/D Code if there is already one set up. To add a new E/D, you MUST follow the instructions and hit the Create Record button. 3. Under E/D code, click on the drop down arrow and select the appropriate code for the Scheduled E/D you are creating. Very Important: Do NOT change the E/D Code if there is already one set up. To add a new E/D, you MUST follow the instructions and hit the Create Record button. Choose a calculation method Pull in an Agency if applicable for your setup Make sure the Start Date is a day in the past (usually yesterday) Enter a flat amount or percentage 4. For flat dollar amounts that will be consistent every payroll, leave the Calculation Method as FIXED and enter the dollar amount under the word Remember, Payright AMOUNT. For Percentages, such as 401k, change the Calculation Method will always set these from Fixed to % of E/D Group Amt, then enter the percentage under the E/Ds up for you: % Percentage. Child Supports Garnishments 5. Then be sure to enter the following: Tax Levys o Pay Frequency (defaults to Every Pay) o Month # (defaults to None) o Which Payrolls (defaults to All) o Effective Start Date (Needs to be a date in the past, usually yesterday s date) o Deduct o Whole Check (will normally be NO for Scheduled E/Ds) o The Agency box is only used when setting up special E/Ds such as 401k when the client has elected that we will be sending the money to the agency directly. If this is the case for your setup, be sure that the appropriate agency appears in the Agency field. 6. Save using the green check mark and commit changes button. 22
23 Stopping a Scheduled E/D Current payroll only: 1. Click on the PAYROLL menu button and select payroll tab. 2. Highlight the correct check date and click on the BATCH button located at the bottom of your screen. 3. Click on the QUICK ENTRY tab, find the line with the employee s name and double click on it. 4. This should bring you to the CHECK LINES tab for that employee s check within the current working batch. Find the line that refers to the Scheduled E/D you wish to stop and highlight anywhere on that line by clicking on it. On your keyboard, hold down CTRL and press DELETE, a box will appear asking Delete this check line? Click on OK, and the red line for the Scheduled E\D will disappear. Save your changes at the top of the screen by clicking the green check mark and commit changes button. 5. Click on Recalculate Check at the bottom, this will bring you to the Preview tab. The preview tab indicates what the check should look like if you were to process payroll without making any more changes. If the check looks correct, you can save your changes at the top of the screen. Permanently: 1. Click on the EMPLOYEE menu button and select Scheduled E/Ds. 23
24 2. Go to the Browse Scheduled E/D s tab and choose the appropriate employee by clicking on either dropdown near the top (one is ordered by EE#, the other by employee last name). Find and highlight the appropriate E/D for the employee, then click on the Details tab. 3. In the middle column of the Details tab, enter an Effective End Date. Be sure the date you select is before your current pay period beginning date. Save your changes. The E/D will no longer appear in any batches you create going forward. Effective End Date If you have already created a payroll batch and want to remove the E/D, follow the Stopping Direct Deposit permanently instructions. After saving your E/D changes, you will need to refresh the Scheduled E/Ds by clicking on the PAYROLL menu button. A box will appear asking you if you would like to refresh Scheduled E/Ds. Since you have already started the payroll, you must click YES to refresh the Scheduled E/Ds in order to see your change take place in the payroll. Then a Refresh Check Lines box will appear. Since the system automatically selects everyone who had a Scheduled E/D change, you will need to click the button that reads Refresh All Except Manual. 24
25 If you make Scheduled E/D changes while a batch is open, and navigate to a menu other than PAYROLL immediately after making the E/D changes, you will not be prompted to apply your changes to the open batch. You can still manually pull in the changes by opening the payroll, and clicking the Refresh ED No Man button in the batch tab. This will pull in ALL scheduled E/Ds again (including ones you may already have deleted from the batch,) so be sure to double check the E/Ds on any checks you have already worked with. If the only Scheduled E/D change you made while the batch was open was to end date the Direct Deposit and you do not wish to refresh all the E/Ds in the open batch, you can follow the steps for stopping direct deposit One Off Modification for Current Payroll Only. 25
26 Blocking Federal and/or State Taxes Current Payroll Only If an employee wants to block Federal or State withholding on the current payroll only, follow the directions below. 1. Click on the PAYROLL menu button and select payroll tab. 2. Highlight the correct check date and click on the BATCH button located at the bottom of your screen. 3. Click on the QUICK ENTRY tab, find the employee s name and double click on it. 4. This should bring you to the CHECK LINES tab for that employee s check within this batch. Move to the MANUAL TAX tab. Fill in the amount next to Federal with 0.00 as shown on line 1 below. To block State withholding, click the ADD STATES button and do the same, filling the amount in with 0.00 as shown on line 6 below. Save your changes at the top of the screen. ***Note: you MUSTclick on an empty field after you modify a manual tax amount BEFORE you save your modifications. 5. Click on Recalculate Check at the bottom, this will bring you to the Preview tab. You may review your changes under the Preview tab and then either save your changes or move back to the Check Lines tab to make further changes. Permanently If an employee wants to block his or her federal withholding permanently refer to the instructions for Setting up a New Employee Claiming Exempt on his or her W 4. 26
27 Starting a Payroll 1. Click on the PAYROLL menu button. This will bring you to the Notes tab. After reviewing all the notes, move to the Payroll tab. 2. Once on the Payroll tab, Click the New Payroll Expert button (lower left hand side of the screen). The system will display a number of prompts. When prompted for payroll check comments you can enter any text that you d like to appear as a memo on every employee s stub (it is okay to leave it blank if desired.) For most of the other prompts, just click NEXT. Pay special attention to the Check Date, Period Beginning and Ending dates, (Adjustments to your Calendar and other adjustments MUST be performed by us.) The Pay Salary prompt allows you to block salaries from being pulled into the batch. The Pay Standard Hours prompt allows you to block standard hours from pulling in. If for any reason you cannot click Next to on any box or have questions about the prompts, call Payco immediately. 3. Once you have clicked next to on all of the prompts, a popup will appear that reads Would you like to auto create checks for this batch? Typically, you will click select YES. Note: Clicking NO will not bring any employees into the payroll batch; you would have to bring each person being paid into the batch manually. This is convenient if you are only paying a few people, but not typically used. 4. Your payroll has been opened and you are now inside the batch. Review your Check date (top center of screen) and your Period Begin and Period End Dates for accuracy. Then click on the CHECKS tab or the Quick Entry button to begin payroll entry. 27
28 Selecting Yes will create a check for each of your Active employees. Selecting No will not create any checks, meaning anyone you want to pay will have to be hand entered. 5. If you need to exit the batch, click Payroll on the bottom left. This will bring you back to the Payroll tab where we clicked New Payroll Expert. To re enter the batch, select the desired check date and click Batch at the bottom, next to New Payroll Expert. 6. Navigate to the Quick Entry tab, and begin entering the hours, tips, commissions, etc. for your employees. Typically you want to set up the quick entry grid with the pay codes you use each payroll, and Scheduled E/Ds should be brought in automatically. To add new Earnings Code columns, right click, highlight E/D > highlight Add > highlight the desired code, and then select Hrs to bring in a column used to enter/show a number of hours, or select Amt to bring in a column used to enter/show an amount of money. 7. When done entering all information for any given employee, use your DOWN ARROW on the keyboard to go down to the next employee line. NOTE: We strongly encourage you to SAVE YOUR WORK with the green check and commit changes button periodically as you enter your data. Getting into this habit will save you from having to re enter everybody s hours in the event of a power or internet connection failure while you are entering payroll. 8. Notice that if you have brought in both the Hours and Amount columns for a given E/D code, you will see gross dollar amounts calculate in real time as you enter your hours. 9. Be sure to save your changes periodically as you enter your data. 10. You can review your totals (including Scheduled E/Ds) at any time by moving to the EARNINGS AND DEDUCTIONS tab, and highlighting the respective code. 11. When finished entering all payroll information into this payroll batch, proceed to the Submitting your Payroll for Processing section. Creating a Second Batch 28
29 If you have multiple pay frequencies with the same check date you will need to create a second batch to pull the second group of employee(s) in. For example under check date 3/15/13 you might have one batch with a pay frequency of bi weekly and a second batch with a pay frequency of monthly. This will allow two different batches of employees to be paid on the same check date without incurring the additional fees of running a second payroll. 1. From inside the opened payroll, move to BATCH tab, click on the NEW BATCH EXPERT button, and adjust your period beginning date, period ending date, and pay frequency. Be sure to save your new batch by clicking on the green check mark and the commit changes button. 2. After saving the second batch, a box will pop up asking you Would you like to auto create checks for this batch? Clicking YES will bring in all your employees with assigned that pay frequency. Clicking on NO will not bring in any of your employees. 3. Now you can navigate to the quick entry tab and enter your pay data. To toggle between batches, navigate back to the batch tab, select the batch you d like to work with, and then move back to the quick entry tab. Opening an Existing Batch 1. Click on the PAYROLL menu button and select Payroll. 2. Click on the PAYROLL tab and find the desired check date. At the bottom of the page, 29
30 click on BATCH. 3. Note that any batches in a status other than W are read only and you cannot make changes. Generally, most batches will either be in W or P status, where W stands for Working while you are still working on a payroll, and P stands for Processed after a payroll has been completely released. You will occasionally see other statuses like C or H while a payroll is processing. 4. Move to the QUICK ENTRY tab and you can continue working on your payroll. This payroll is in Processed status, so you can still open and review it, but you can t make changes. This payroll is in Working status, so you can still open it and make changes. 30
31 Adding an Employee into a Batch There are four occasions during which you would need to manually add an employee into a batch: When you hire an employee after opening a batch in which they need to be paid When paying an inactive or terminated employee When splitting an employee s pay into two checks to make the taxes calculate at a lower rate When an employee is missing from the batch because they were accidentally deleted, or you selected no to the auto create check prompt. To set up a new employee please refer to the directions on Setting up a New Employee before continuing. To rehire a terminated employee please refer to the directions on Rehiring a Terminated Employee before continuing. 1. Click on the PAYROLL menu button and select the payroll tab. Click on the current desired open Payroll, then click on the BATCH button at the bottom of your screen to enter the batch. 2. Move to the QUICK ENTRY tab. 3. Click in the bottom right hand corner grid box, and hit the enter key on your keyboard. 4. Arrow over to the EE Code column, find the employees name and number in the drop down list. Best Practice: Lookup the employee ID number before getting to this point. Then, all you need to do is type the number here, and hit enter! 5. Once you find the employee, hit ENTER on your keyboard. Then hit the DOWN ARROW again and immediately hit the save button. This will sort the employee in the correct order. 6. Then proceed to enter any regular hours, vacation, bonus, etc. 7. Save your changes by clicking on the commit changes button. Voiding A Check 31
32 It is important you void the check in Evolution so payroll records will be correct and up to date. Voiding a check in Evolution must be done after a payroll batch has been started. 1. After starting a payroll, click on the QUICK ENTRY tab and find the employee you need to void a check for. Double click on the employee. You should now be on the CHECK LINES tab. 2. Hit the create new record button at the top of your screen and a Payroll Expert box will pop up asking for you to choose the check type. Change it from Regular to Void by clicking on the drop down arrow and click NEXT. 3. A check finder screen will pop up, Click on Filter. A list of past checks for the employee will appear. Select the appropriate check you would like to Void by looking at the Check Dates and Check Numbers. 32
33 3. Highlight the check you want to Void and click OK. You will then be directed back to the employee s check line where you can see the voided check. 4. Be sure to save your changes by clicking on the commit changes button. 33
34 Calculating Manual Checks Follow the directions below to calculate a manual check. 1. Click on the EMPLOYEE menu button, and select Employee. 2. After highlighting the employee you want to write a manual check for, click on the EE Entry tab. When calculating the manual check, you will need to enter the pay rate or salary amount, so be sure to write it down prior to next step. 3. Then click on the tax calculator button (Near the top right hand side of the EE Entry screen, in the Additional Tools box). 4. We need to build the check to include only the desired E/Ds. If the employee has any scheduled E/Ds, they will appear as check lines. If any are not desired for the manual check, you can remove them by highlighting the row, and then holding down CTRL and pressing DELETE on your keyboard. A popup will appear asking: Delete Record? Click OK or Cancel. ***Note: Direct Deposit E/Ds must always be deleted from manual checks. You can make oneoff tax overrides without effecting future payrolls! 5. Once only desired Scheduled E/Ds remain, you can start keying the employee s earnings. You can add new check lines by highlighting the bottom right hand grid box, and hitting ENTER on your keyboard. To select an earnings code, click on the box in the E/D Code column, and find the desired code on the drop down. Once you select the category of pay (regular, vacation, salary, etc.) you can type in the gross amount of pay. If the person is hourly, you can type in the number of hours and the rate of pay. 34
35 6. Once you have entered the number of hours and rate of pay you will need to click on the CALCULATE CHECK button (bottom of your screen) or hit F5 on your keyboard. 7. After the check has calculated, you will need to save the data so that the manual check can be recorded with the next payroll. Move to the Check Preview tab, and either print the check lines, or take and save a screen shot. To print a copy, Right Click on the check lines, and then click the Print Results (F7) box that appears. 8. Keep this printout! If you are cutting the manual check by hand, note the number of the check that you cut for the employee on print out as well. You will need this info to enter your Manual Check information in the next payroll. 9. You can run a manual check calculation as many times as you want for testing purposes nothing is finalized until the data is entered into a payroll. If you use the results from a calculation for a real manual check, you have your choice of two methods to enter the data into a payroll. If you do not currently have a payroll batch open, turn to the section on Entering a Handwritten Manual Check into Payroll. If you already have a batch open, move to the next section, Copy Manual Check into Existing Payroll Batch. *Remember, calculating a manual check in the EE screen does not save the check. It is very important that you remember to enter the manual check when entering your next payroll so payroll records & employee YTD info will be correct. 35
36 Copy Manual Check to Existing Batch To enter a calculated manual check into batch after you have started a payroll, follow the steps below: 1. After you have calculated check in Manual Check Calculator, you can move to the Payrolls tab. 2. You will be presented with a list of all open payrolls and batches. Highlight the current PAYROLL at the left of your screen (if there are multiple batches open within that payroll, you can select the destination batch for the manual check toward the right of the screen.) 3. Click on Attach to Selected Batch at bottom right of your screen. 4. Enter Manual Check Number in next pop up box and then hit OK. 5. Another pop up window will appear asking if you want the balance of the scheduled EDs for the manual check to be updated. Always hit YES. 36
37 6. You have not successfully attached the manual check to the open batch. You will be able to see the manual check when you re enter the batch. 37
38 Calculating a Net to Gross If you have issued a check to one of your employees and estimated the net pay, or if you wish to hand the employee for a desired net amount (such as a $100 bonus check,) you will need to gross up the check using the Manual Check Calculator: 1. Click on the EMPLOYEE menu button and select employee. 2. Once on the Browse tab, select the employee for whom you need to gross up a check and move to the EE Entry tab. 3. Then click on the tax calculator button (Near the top right hand side of the EE Entry screen, in the Additional Tools box). 4. Click the box to the left of the words Net to Gross. You will see a Check mark appear in the box. You will see a pop up window warning you that the Net to Gross option does not calculate % based E/Ds. This is OK. 5. In the box below the words Net to Gross, enter the net amount of the check you have written to the employee. 6. Make one off tax adjustments you wish (such as blocking Federal and State income tax for a bonus) 7. Then either click on the CALCULATE CHECK button or hit F5 on your keyboard. 38
39 8. The system will calculate the gross amount and the taxes. 9. After the check has calculated, you will need to save the data so that the manual check can be recorded with the next payroll. Move to the Check Preview tab, and either print the check lines, or take and save a screen shot. To print a copy, Right Click on the check lines, and then click the Print Results (F7) box that appears. 39
40 10. Keep this printout! If you are cutting the manual check by hand, note the number of the check that you cut for the employee on print out as well. You will need this info to enter your Manual Check information in the next payroll. 11. You can run a manual check calculation as many times as you want for testing purposes (or to calculate the gross for a regular check you will be paying through payroll if you want the net to come to a rounded number) nothing is finalized until the data is entered into a payroll. If you use the results from a calculation for a real manual check, you have your choice of two methods to enter the data into a payroll. If you do not currently have a payroll batch open, turn to the section on Entering a Handwritten Manual Check into Payroll. If you already have a batch open, move to the next section, Copy Manual Check into Existing Payroll Batch. 40
41 Copying a Manual Check into an Existing Payroll Batch Refer to the instructions on Calculating a Manual Check before entering. It is important that you enter the Manual Check into the payroll so payroll records & employee YTD info will be correct. This must be done after a payroll batch has been created. 1. After calculating the manual check, go to the Payrolls tab. 2. Select the open payroll and batch to which you would like to attach the manual check. 3. Click the Attach to Selected Batch button at the bottom. 4. A box will appear prompting you for the manual check number. Enter the number on the check you will be handing the employee, then hit OK. 41
42 5. Another window will prompt you, Do you want the balance of the scheduled EDs for the manual check to be updated? Click Yes. 6. Your manual check has now been moved into the open payroll. You can confirm this by entering the batch and locating the check. You will know that it is a manual check because it will have an M in the type column of the Quick Entry tab. 7. Double check the check in the batch with the printout you made in the Manual Check Calculator. Entering a Handwritten Manual Check in Payroll Refer to the instructions on Calculating a Manual Check before entering. 42
43 It is important that you enter the Manual Check into the payroll so payroll records & employee YTD info will be correct. This must be done after a payroll batch has been created. 8. After starting a payroll, click on the QUICK ENTRY tab and find the employee you need to record a manual check for. Double click on the employee. You should now be on the CHECK LINES tab. 9. Hit the Create Record button at the top of your screen and a Payroll Expert box will pop up asking for you to choose the check type. Change it from Regular to Manual by clicking on the drop down arrow and click NEXT. 10. A box will appear that says Do you want the balance of the scheduled ED s for the manual check to be updated? Make sure that YES is selected. Then click NEXT. 11. The next box that appears should contain the employee s EE number. Confirm it is the correct employee, then click NEXT. 12. The next box that appears will ask you to enter the Manual Check Number. Enter number of the check that you cut for the employee. Then click NEXT. You will now be entering information from the printout you made when you calculated the manual check. Note: When completing this data entry, you must fill out all fields. A Manual Check is special, and the system will not auto fill the Rate of Pay or Amount fields as it normally does when keying regular payroll information. 43
44 13. Click the drop down arrow under E/D Code and select the appropriate code. Enter the number of Hours, Rate of Pay, and the gross Amount. If you are paying under OVERTIME, make sure to factor in the OT premium (typically hours x 1.5) before entering the result in the Amount field. 14. If paying a salaried employee, commissions, or any category not tied to hours, click the drop down arrow under E/D Code and select the appropriate code. Then just fill in the Amount (no need to record Hours or Rate.) 15. Be sure to save your changes! 16. After all earnings and deductions have been entered, click Recalculate Check. This will calculate the check and bring you to the Preview tab. Make sure the Net Amount at the lower right is equal to the net amount from your printout. If you have any tax discrepancies, use the Manual Tax tab to override tax amounts and ensure the Check Preview tab matches the printout EXACTLY. 17. Once everything balances, save your changes one more time! Submitting your Payroll for Processing Once all payroll batch entry is complete, you need to submit the payroll to Payco for processing! 1. When you are done entering your payroll information to the batch, click on the Earnings and Deductions tab or click Batch Totals to review your payroll totals. Next, click on Complete Payroll or Payroll at the bottom of the screen to exit the batch. 44
45 2. From the Payroll tab, click Pre Process. Click OK to the popup that asks are you sure you want to Pre Process this payroll? Click OK to the next informational popup. Click on the small View button at the very bottom left of your screen (under the word Exit). Click the Finished Successfully! Now, you may continue. button until then screen reads 3. Since the View button opens a new window to monitor your task, Click on the big red X in the upper right corner to close this window and continue. 45
46 Running Reports 1. Click on the REPORTS menu button and select Run Reports. Click on the check mark box next to the words Payroll Register. Once checked, click on the REPORT PARAMETERS tab near the top of your screen. 2. Next, choose the appropriate payroll with the check date you were just working with. It will be flagged with a Status of W for Waiting, as the system knows you have not submitted it yet. Click on the checkbox next to Run Through the Queue to uncheck it. Depending on whether you want to Print or Preview the report, choose from the drop down menu. Click on the button Run Report(s), this will automatically send your report to the printer, or if you chose Preview, then the report will show on your screen. 46
47 3. Review the Payroll Register for accuracy of the payroll information you have entered. Once your review is complete, you are ready to submit the payroll for processing. 4. Click on the PAYROLL menu button and go to the Payroll tab. Click on the button that reads SB Review. Click OK to the popup that says, For Review This will put your payroll on hold until you contact Payco. Click Yes to the next informational popup that says Would you like to your contact at Payco?. 5. Within the that pops up, please submit any instructions to your Payroll Specialist that pertain to this payroll. If no additional assistance is needed from your Payroll Specialist, simply indicate in the that your payroll is all set to process. You have now submitted your payroll. Your reports will be mailed or ed to you, according to your preference. If you discover a mistake, let your Payroll Specialist know immediately. 47
48 Running a Payroll Register for specific employees and date ranges. 1. Click on the REPORTS menu button and select Run Reports. Click on the check mark box next to the words Payroll Register (S109). Once checked, click on the REPORT PARAMETERS tab near the top of your screen. 2. Next, choose the appropriate payroll batch with the check date. Choose the appropriate check date period To and From period ranges. 3. Then click on the EMPLOYEE FILTER tab, choose the employee or employees that you would like on the report. Uncheck the box that says Run Through the Queue and click on the button Run Report. 48
49 Employee Portal Employee User Guide From Click on Services Login at the top of the screen Click on Employee Portal Employee Portal Login Screen Note: it is recommended that Employee Portal be saved as a Favorite your browser for future ease of access. Employee Portal Dashboard Window After successfully logging into Employee Portal, the initial Employee Self Service screen appears. (Example 4) The Dashboard provides functionality for the employee to: View messages setup by the Employee Portal Manager Provides links to Help and Support Access Pay Statements Access W2 and 1099 forms Access Employee Information View Paid Time Off. Services change password Navigation to Employee Portal functionality is accomplished by selecting the link from the Main Menu area of the Dashboard or by selecting the tabs within Employee Portal. 49
50 Example 4 Initial Employee Portal Window Note: the icon,, allows the user to contact the Employee Portal administrator with any questions the employee may have. Pay Statement / Paystub Window Select the Paystubs tab or the Pay Statements link from the Main Menu to access payroll data. (Example 6) By default, the current year payroll data is displayed. Select the Show Year radio button to view pay statements from a previous year. Select the Action icon,, to view the check details. (Example 7) 50
51 Example 6 Paystub Window Example 7 Sample Paystub W-2 / 1099 Forms Window Select the W 2 tab or the W2 / 1099 Forms link from the Main Menu to access annual compensation data. (Example 8) By default, the current year payroll data is displayed. Select the Action icon,, to view the W2 or 1099 details for the selected year. (Example 9) 51
52 Example 8 Select Year Example 9 Sample W2 Form Employee Info Window Select the EE Info tab or the Employee Info. link from the Main Menu to access employee demographic data. (Example 10) By default, the current year payroll data is displayed. Select the Edit icon,, to change employee information. (Example 11) and send an request to the employee s manager for approval. In addition, an employee can view or print the federal and state W 4 forms. When editing is complete, select the send icon, Submit Changes, to the change request to the manager or the cancel icon, Cancel Changes, to cancel the request. Example 10 Employee Information 52
53 53
54 Example 11 Request Employee Change Window Paid Time Off Window Select the Time Off tab or the Paid Time Off link from the Main Menu to view employee time off balance data. (Example 12) Example 12 Paid Time Off Window Services Window 54
55 Select the Services tab or the Services link from the Main Menu to change or reset the employee Employee Portal password. (Example 13) Once the employee password has been changed, select the Save button to save changes or navigate to another tab to cancel the password change. Example 13 Change Password Window Log out Tab Select the Log Out tab to close Employee Portal. 55
PayData A Vermont Company Working for You!
 PayData A Vermont Company Working for You! Introduction Welcome to the Evolution Employee Set Up and Payroll Processing Reference Manual! This manual is one part of an ongoing initiative to provide comprehensive
Web Payroll. User Guide. 2013 Payroll Solutions, Inc & www.payrollmadeeasy.com
 Web Payroll User Guide 2013 Payroll Solutions, Inc & www.payrollmadeeasy.com Overview Introduction This web-based system was designed to give our clients more access and control of their payroll operations
Alliance Payroll Services, Inc Payentry.com. Training manual
 Alliance Payroll Services, Inc Payentry.com Training manual 0 Table of Contents Employee Information Getting Started..1-2 Employee Selection..3 Demographics.4 Department/Positions 5 Labor Allocation..6
DarwiNet Client Level
 DarwiNet Client Level Table Of Contents Welcome to the Help area for your online payroll system.... 1 Getting Started... 3 Welcome to the Help area for your online payroll system.... 3 Logging In... 4
The M3 Payroll Cycle. M3 Training Manual MPI Software
 The M3 Payroll Cycle M3 Training Manual MPI Software Starting The Payroll Cycle You can start the payroll cycle by going to the payroll entry area off of the main menu. Setting the check date The first
PAYROLL ONLINE HOW TO INSTRUCTIONS. CREATED BY: Leslie Feaman Date: 9/1/11
 PAYROLL ONLINE HOW TO INSTRUCTIONS CREATED BY: Leslie Feaman Date: 9/1/11 H o w t o I n s t r u c t i o n s 1 Table of Contents How to Login to Payroll Online... 2-4 How to Add a New Employee... 5-9 How
Sentric, Inc. Web Pay User Guide
 Sentric, Inc. Web Pay User Guide Thank you for choosing Sentric, Inc as your payroll service provider! This User Guide, in combination with Web Pay training by one of our Implementation Specialists, will
NEW JERSEY WORKERS COMPENSATION INSURANCE PLAN
 NEW JERSEY WORKERS COMPENSATION INSURANCE PLAN MANUAL FOR ONLINE APPLICATION FOR DESIGNATION OF AN INSURANCE COMPANY IMPORTANT: This Procedure Guide is designed to ease your navigation through the New
Employer Online Access Documentation
 Employer Online Access Documentation BBCS Payroll Services Online Portal The following has been provided as a brief introduction to the Online Access Portal for BBCS Payroll Customers. It is to help you
Quick Guide: Payroll tips
 Quick Guide: Payroll tips QuickBooks Payroll lets you pay employees with just a few clicks and minimal data entry, usually just the hours employees worked. To make the most of the payroll features: When
for 740 N. Plankinton Ave 12463 Rancho Bernardo Rd Suite 730 PMB #157 Milwaukee, Wisconsin 53203 San Diego, CA 92128 (800) 654-0441 (866) 402-8901
 654-0441 (866) 402-8901") for Integrated Time Systems Advanced Time Concepts 740 N. Plankinton Ave 12463 Rancho Bernardo Rd Suite 730 PMB #157 Milwaukee, Wisconsin 53203 San Diego, CA 92128 www.integratedtime.com www.timesystems.biz
for Integrated Time Systems Advanced Time Concepts 740 N. Plankinton Ave 12463 Rancho Bernardo Rd Suite 730 PMB #157 Milwaukee, Wisconsin 53203 San Diego, CA 92128 www.integratedtime.com www.timesystems.biz
Recruiter s Resource Guide
 Recruiter s Resource Guide First Edition 1.29.2015 Contents Section One Recruiting... 3 Accessing Team Georgia Careers... 4 My Setup Preferences... 5 Creating a Requisition... 6 Approving a Requisition...
Alliance Payroll Services, Inc. Millennium Report Writer
 Alliance Payroll Services, Inc. Millennium Report Writer Introduction to Millennium Table of Contents Table of Contents Symbols Used in this Manual Chapter 1 - Overview of Report Writer Tool Accessing
Cyber Pay ONLINE Product Manual Payroll Administrator User Guide
 -1- Cyber Pay ONLINE Product Manual Payroll Administrator User Guide -2- Table of Contents 1. Overview 3 2. Logging In 4 a. The Log In Screen 4 b. Forgotten Password 5 3. Basic Interface 5 4. Payroll Entry
Council of Ontario Universities. COFO Online Reporting System. User Manual
 Council of Ontario Universities COFO Online Reporting System User Manual Updated September 2014 Page 1 Updated September 2014 Page 2 Table of Contents 1. Security... 5 Security Roles Defined in the Application...
NAVIGATION. Save this page as a favorite for easy access to PeopleSoft.
 Time Entry & epaf NAVIGATION Users of PeopleSoft HR gain access to this system by requesting a PeopleSoft account. To apply for an account, complete the PeopleSoft Account Application available on the
How To Setup & Use Insight Salon & Spa Software Payroll - Australia
 How To Setup & Use Insight Salon & Spa Software Payroll - Australia Introduction The Insight Salon & Spa Software Payroll system is one of the most powerful sections of Insight. It can save you a lot of
Online Bill Payment & Presentment User Guide
 Table of Contents Alerts and Notifications... 4 Add an email Notification...4 Cancel an email Notification...5 Automatic Payments... 6 Add a Standard Automatic Payment Rule...6 Add an Automatic Payment
Dayforce HCM Employee Access Employee Guide
 Dayforce HCM Employee Access Employee Guide Contents Employee Tasks... 2 Dayforce HCM Login... 2 Tool Bar Buttons... 3 Time Entry 4 Time Clock Entry 4 Hours Entry..6 Time In/Out Manually Entered..7 Salaried
Paychex Online Payroll
 Paychex Online Payroll Common Tasks Reference Guide ABOUT THIS GUIDE Use these resources in conjunction with the Paychex Online Payroll Training site, which is available when you log in to www.paychexonline.com.
Evolution. Training Manual. Evolution Training Manual V. 6 AW Page 1 of 117
 Evolution Training Manual Page 1 of 117 TABLE OF CONTENTS Evolution Install pg. 4 Print Key Install pg. 7 Your Username and Password pg. 8 Evolution Password Requirements pg. 8 Payday Contacts pg. 9 Client
SuccessFactors Onboarding Phase 1 Verification Team Reference Guide Last revised 12.8.15
 SuccessFactors Onboarding Phase 1 Verification Team Reference Guide Last revised 12.8.15 Table of Contents Overview... 2 The Onboarding Dashboard... 2 Locating the Hire in the Onboarding System... 5 Completing
Employee Setup: Contact Info
 Employee Setup Employee Setup: Contact Info Purpose You will enter information for each employee on the 7 tabs in Employee Setup. The Contact tab contains the employee contact information. While much of
How To Sync Between Quickbooks And Act
 QSalesData User Guide Note: In addition to this User Guide, we have an extensive Online Video Library that you can access from our website: www.qsalesdata.com/onlinevideos Updated: 11/14/2014 Installing
ACCOUNT RECEIVABLES TABLE OF CONTENTS
 ACCOUNT RECEIVABLES TABLE OF CONTENTS 1. SETUP CUSTOMER...2 2. CUSTOMER LISTING...6 3. CUSTOMER INVOICE...7 4. CUSTOMER INVOICE LISTING...12 5. ENTER CREDITS / REFUNDS...14 6. CUSTOMER CREDITS LISTING...20
ICP Data Entry Module Training document. HHC Data Entry Module Training Document
 HHC Data Entry Module Training Document Contents 1. Introduction... 4 1.1 About this Guide... 4 1.2 Scope... 4 2. Step for testing HHC Data Entry Module.. Error! Bookmark not defined. STEP 1 : ICP HHC
CONFIGURING ASCENTIS HR 3 ASCENTIS HR SECURITY 27 CREATING & MAINTAINING BENEFIT PLANS 41 SETTING UP LEAVE & ATTENDANCE POLICIES 71
 Table of Contents CONFIGURING ASCENTIS HR 3 DATA DEPENDENCIES 4 COMPANY INFORMATION 5 KEY TABLES IN SETUP MANAGER 9 REVIEW QUESTIONS: 25 ASCENTIS HR SECURITY 27 DEFINING ROLES 28 CREATING USERS 33 MAINTAINING
Resource Online User Guide JUNE 2013
 Resource Online User Guide JUNE 2013 CHASE PAYMENTECH SOLUTIONS MAKES NO WARRANTY OF ANY KIND, EITHER EXPRESSED OR IMPLIED, WITH REGARD TO THIS MATERIAL, INCLUDING, BUT NOT LIMITED TO, THE IMPLIED WARRANTIES
DIRECT PAYMENTS (ACH TRANSFER MODULE)
") DIRECT PAYMENTS (ACH TRANSFER MODULE) Direct payments is an add on module to utility billing that allows customers to pay their utility bill by a recur ACH payment. Please note that the term ACH (Automatic
DIRECT PAYMENTS (ACH TRANSFER MODULE) Direct payments is an add on module to utility billing that allows customers to pay their utility bill by a recur ACH payment. Please note that the term ACH (Automatic
for Sage 100 ERP Payroll Overview Document
 for Sage 100 ERP Payroll Document 2012 Sage Software, Inc. All rights reserved. Sage Software, Sage Software logos, and the Sage Software product and service names mentioned herein are registered trademarks
Transitioning from TurningPoint 5 to TurningPoint Cloud - LMS 1
 Transitioning from TurningPoint 5 to TurningPoint Cloud - LMS 1 A Turning Account is a unique identifier that is used to tie together all software accounts and response devices. A Turning Account is required
Netigate User Guide. Setup... 2. Introduction... 5. Questions... 6. Text box... 7. Text area... 9. Radio buttons...10. Radio buttons Weighted...
 Netigate User Guide Setup... 2 Introduction... 5 Questions... 6 Text box... 7 Text area... 9 Radio buttons...10 Radio buttons Weighted...12 Check box...13 Drop-down...15 Matrix...17 Matrix Weighted...18
If you re reading this appendix, you ve probably decided to use Intuit s Basic or
 Running Payroll with an Intuit Payroll Service APPENDIX D If you re reading this appendix, you ve probably decided to use Intuit s Basic or Enhanced Payroll service. (Pages 416 417 of QuickBooks 2015:
Ministry of Education User Guide for the School Facilities Inventory System Application
 Ministry of Education User Guide for the School Facilities Inventory System Application Version 3.0 November 2009 Table of Contents Purpose of this Guide... 1 Overview... 2 Connecting to the SFIS Application...
LCTCB ereporting Website Instructions
 Lancaster County Tax Collection Bureau 1845 William Penn Way Lancaster, PA 17601 Phone (717) 569-4521 www.lctcb.org LCTCB ereporting Website Instructions Revised December 07, 2012 What s New! These instructions
Champion Controller to Red Wing Payroll Migration Instructions
 Champion Controller to Red Wing Payroll Migration Instructions Before you convert your data and run Red Wing Payroll you need to have a good working knowledge of the Red Wing Payroll application. Only
ACHieve Access 4.3 User Guide for Corporate Customers
 ACHieve Access 4.3 User Guide for Corporate Customers January 2015 Citizens Bank 1 February 2015 Table of Contents SECTION 1: OVERVIEW... 4 Chapter 1: Introduction... 5 How to Use This Manual... 5 Overview
Juris User Guide. Version 2.7. 2015 LexisNexis. All rights reserved.
 Juris User Guide Version 2.7 2015 LexisNexis. All rights reserved. Copyright and Trademark LexisNexis, Lexis, and the Knowledge Burst logo are registered trademarks of Reed Elsevier Properties Inc., used
Training Guide. Accounts Payable Training. Mover s Suite users training on the Accounts Payable functionality within Microsoft Dynamics GP
 Training Guide Accounts Payable Training Mover s Suite users training on the Accounts Payable functionality within Microsoft Dynamics GP Version 3.7 (Fall 2008) Accounts Payable Training Copyright Copyright
If you re reading this appendix, you ve probably decided to use Intuit s Basic or
 Running Payroll with an Intuit Payroll Service APPENDIX D If you re reading this appendix, you ve probably decided to use Intuit s Basic or Enhanced Payroll service. (Page 419 of QuickBooks 2016: The Missing
End User Training Guide
 End User Training Guide October 2013 2005-2013 ExpenseWire LLC. All rights reserved. 1 expensewire.com Use of this user documentation is subject to the terms and conditions of the applicable End- User
1) Important browser information New 2) Why is my browser so slow? 3) How can I view more than one screen without the other disappearing?
 Important browser information New 2) Why is my browser so slow? 3) How can I view more than one screen without the other disappearing?") Known/Unresolved issues: Browser Scan to e-mail Creating Help Desk tickets for the scan-to-email issue is no longer necessary. A member of MIS will follow up with each office to determine scan-to-email
Known/Unresolved issues: Browser Scan to e-mail Creating Help Desk tickets for the scan-to-email issue is no longer necessary. A member of MIS will follow up with each office to determine scan-to-email
Electronic Timekeeping Supervisors Manual
 Swarthmore College Electronic Timekeeping Supervisors Manual Modified from: National Times Systems, Inc. (2007). Attendance on Demand User Manual, 1.11.07. Cinnaminson, NJ. 1 Original publication: Attendance
eopf Release E Administrator Training Manual
 eopf Release E Administrator Training Manual i The United States Office Of Personnel Management eopf Administrator Training Manual for eopf v5 eopf Version 4.1, July 2007, March 2008, March 2009; eopf
Sage HRMS Sage 100 ERP Payroll Link User Guide. February 2015
 Sage HRMS Sage 100 ERP Payroll Link User Guide February 2015 This is a publication of Sage Software, Inc. Document version: January 30, 2015 Copyright 2015. Sage Software, Inc. All rights reserved. Sage,
Last Updated on 11/06/2008. www.jobprotech.com
 Last Updated on 11/06/2008 www.jobprotech.com Copyright JobPro Technology, 2008 How to Use this Guide This manual is designed as a reference for JobPro customers. It is not intended to be a replacement
QBClips Payroll Setup Instructions
 BusinessWise Training, Inc. "Power up Your QuickBooks with QBClips 3580 Linden Ave St Paul MN 55110-5132 651-407-7040 651-779-6688, Fax [email protected] www.qbclips.com QBClips Payroll Setup Instructions
Bank Account 1 September 2015
 Chapter 8 Training Notes Bank Account 1 September 2015 BANK ACCOUNTS Bank Accounts, or Bank Records, are typically setup in PrintBoss after the application is installed and provide options to work with
Microsoft OneDrive. How to login to OneDrive:
 Microsoft OneDrive The beauty of OneDrive is that it is accessible from anywhere you have an Internet connection. You can access it from a Mac or Windows computer. You can even access it on your Smartphone
Processing Payroll Pre-Payroll
 Overview The payroll cycle is a process that is completed each time State employees are paid. The payroll cycle consists of the following five basic steps: Process pre-payroll Print payments Process pro
QUICK START GUIDE RESOURCE MANAGERS. Last Updated: 04/27/2012
 QUICK START GUIDE RESOURCE MANAGERS Last Updated: 04/27/2012 Table of Contents Introduction... 3 Getting started... 4 Logging into Eclipse... 4 Setting your user preferences... 5 Online help and the Eclipse
Business Online Banking ACH Reference Guide
 Business Online Banking ACH Reference Guide Creating an ACH Batch Select ACH Payments on the left-hand side of the screen. On the Database List screen, locate the Database to be processed, and place a
CONTRACT MANAGEMENT SYSTEM USER S GUIDE VERSION 2.7 (REVISED JULY 2012)
") CONTRACT MANAGEMENT SYSTEM USER S GUIDE VERSION 2.7 (REVISED JULY 2012) VERSION 2.6 (REVISED APRIL 2012)... I INTRODUCTION... 5 Helpful Hints... 5 Pop-Up Blockers... 5 Users... 6 CPUC Staff Administrator...
CONTRACT MANAGEMENT SYSTEM USER S GUIDE VERSION 2.7 (REVISED JULY 2012) VERSION 2.6 (REVISED APRIL 2012)... I INTRODUCTION... 5 Helpful Hints... 5 Pop-Up Blockers... 5 Users... 6 CPUC Staff Administrator...
Setting up an H.S.A Scheduled E/D with Direct Deposit
 Setting up an H.S.A Scheduled E/D with Direct Deposit If you are setting up a pension, child support, direct deposit, or insurance deduction using the Benefit Tables, please refer to the sections that
Webmail Instruction Guide
 Webmail Instruction Guide This document is setup to guide your through the use of the many features of our Webmail system. You may either visit www.safeaccess.com or webmail.safeaccess.com to login with
To create your payroll, go to Payroll and make sure you are on the Payroll Tab at the top.
 Creating Payroll Prior to creating the payroll, it is important to understand the different parts of payroll and what information resides in each section. Payroll This section is where you verify items
Training Guide. Managing Your Staff in Employee Manager
 Training Guide Managing Your Staff in Employee Manager Managing Your Staff in Employee Manager Copyright 2014 TABLE OF CONTENTS Unit 1: Creating Default Shifts or Positions 4 Adding a Position 4 Establishing
ACCRUAL ACCOUNTING WORKFLOW
 ACCRUAL ACCOUNTING WORKFLOW TABLE OF CONTENTS COMPANY ACCOUNT NUMBERS... 2 POLICY ENTRY... 2 Agency Bill... 2 Direct Bill... 3 Transaction Detail... 3 CLIENT PAYMENTS... 4 Agency Billed Payment... 4 Direct
Business Online. Quick Reference Guide
 Business Online Quick Reference Guide . All rights reserved. This work is confidential and its use is strictly limited. Use is permitted only in accordance with the terms of the agreement under which it
Interim Onboarding New Hire and Rehire
 Interim Onboarding New Hire and Rehire March 2015 State of Minnesota Minnesota Management & Budget SEMA4 HR Services 658 Cedar Street St. Paul MN 55155 5/12/2015 Interim Onboarding New Hire and Rehire
Gateway EDI Client Website Help Document
 Gateway EDI Client Website Help Document Learning your way around a new website can be tricky we know that! This document will serve as a cheat sheet for questions that may arise as you maneuver around
State of Connecticut Core-CT Continuing Education Initiative. Introduction to eprocurement
 State of Connecticut Core-CT Continuing Education Initiative Introduction to eprocurement 1 Handout The handout has the same screen shots as the in-class presentation, but has been designed as a Step by
Banner Document Management Suite (BDMS) Web Access Help
 Web Access Help") May 10 th, 2011 Banner Document Management Suite (BDMS) Web Access Help Division of Information Technology AppXtender Web Access Help: For questions regarding AppXtender Web Access, please contact the
May 10 th, 2011 Banner Document Management Suite (BDMS) Web Access Help Division of Information Technology AppXtender Web Access Help: For questions regarding AppXtender Web Access, please contact the
Getting Started. Powerpay Version 4.1
 Getting Started Powerpay Version 4.1 Contents Opening Powerpay... 5 Before you open Powerpay... 5 Opening Powerpay for the first time... 5 Log on to Powerpay for the first time... 6 Password restrictions
Payroll Processing Tips & Tricks
 Ascentis Macro-Enabled Workbooks Ascentis has a variety of customizable macro-enabled workbooks which can be used to mass import values into either the employee profiles or into Payroll Processing. Master
Creating and Managing Online Surveys LEVEL 2
 Creating and Managing Online Surveys LEVEL 2 Accessing your online survey account 1. If you are logged into UNF s network, go to https://survey. You will automatically be logged in. 2. If you are not logged
Sage Payroll Services
 SAGE ACCPAC Sage Accpac ERP Sage Payroll Services Integration Guide 2006 Sage Accpac International, Inc. All rights reserved. Sage Software, Sage Software logos, and all Sage Accpac product and service
User Manual for Web. Help Desk Authority 9.0
 User Manual for Web Help Desk Authority 9.0 2011ScriptLogic Corporation ALL RIGHTS RESERVED. ScriptLogic, the ScriptLogic logo and Point,Click,Done! are trademarks and registered trademarks of ScriptLogic
HMIS Client Services User Guide
 HMIS Client Services User Guide Washington State HMIS AES Adaptive Enterprise Solutions unlocking the dawn of better results for your organization 2009 AdSystech, Inc. This document is not to be photocopied
EMPLOYEE SELF SERVICE: ACCESSING YOUR INFORMATION
 EMPLOYEE SELF SERVICE: ACCESSING YOUR INFORMATION The implementation of the Human Resources Self-Service system means that you can access your information via the University s PipelineMT portal. The official
ARIBA Contract Management System. User Guide to Accompany Training
 ARIBA Contract Management System User Guide to Accompany Training Technical Training Team 6/29/2010 Table of Contents How to use this Guide... 4 Contract Management Process... 5 ARIBA- Getting Started...
efiling and Reporting for Sage ERP MAS 90 and 200
 Product: Sage ERP MAS 90 and MAS 200 Description This document contains a detailed overview of Sage ERP MAS 90 and 200's Tax efiling and Reporting feature in v4.3 and above. The state and federal payroll
Legal-X Help. Submission Tutorial
 Legal-X Help Submission Tutorial Copyright Information: Legal-X, Allegient, Legal exchange, Bottomline Technologies and the BT logo are the trademarks or service marks of Bottomline Technologies (de),
Click a topic in the Table of Contents to jump to a topic and use Ctrl + Home to return to this page.
 Table of Contents Click a topic in the Table of Contents to jump to a topic and use Ctrl + Home to return to this page. RECRUITING WORKFLOW... 1 CREATE JOB OPENING... 2 TEMPORARY JOB OPENING... 2 POSITION
Decision Support AITS University Administration. Web Intelligence Rich Client 4.1 User Guide
 Decision Support AITS University Administration Web Intelligence Rich Client 4.1 User Guide 2 P age Web Intelligence 4.1 User Guide Web Intelligence 4.1 User Guide Contents Getting Started in Web Intelligence
Document Services Online Customer Guide
 Document Services Online Customer Guide Logging in... 3 Registering an Account... 3 Navigating DSO... 4 Basic Orders... 5 Getting Started... 5 Attaching Files & Print Options... 7 Advanced Print Options
Workers Comp Calculation System Help Manual
 Department of Licensing & Regulatory Affairs Michigan Workers Compensation Agency Workers Comp Calculation System Help Manual Last Updated: November 25, 2014 Overview Department of Licensing & Regulatory
Procedure Guide: Daily Use Cyber Recruiter 6.6 December 2007
 Procedure Guide: Daily Use Cyber Recruiter 6.6 December 2007 Visibility Software Procedure Guide: Daily Use Page 1 of 17 Table of Contents PURPOSE...3 FLOW CHART...4 REQUISITION POSTING PROCEDURE (R)...5
Employee Self Service Ultimate Software
 Employee Self Service Ultimate Software The Human Resources and Payroll Departments welcome you to the Employee Self Service Module (ESS) of the Ultimate Software System. As part of an effort to make AURA
Colorado Medical Assistance Program Web Portal Dental Claims User Guide
 Colorado Medical Assistance Program Web Portal Dental Claims User Guide The Dental Claim Lookup screen (Figure 1) is the main screen from which to manage Dental claims. It consists of different sections
Appointment Scheduler
 EZClaim Appointment Scheduler User Guide Last Update: 11/19/2008 Copyright 2008 EZClaim This page intentionally left blank Contents Contents... iii Getting Started... 5 System Requirements... 5 Installing
Doing payroll with QuickBooks
 LESSON 12 Doing payroll with QuickBooks 12 Lesson objectives, 318 Supporting materials, 318 Instructor preparation, 318 To start this lesson, 318 Overview of payroll tracking, 319 Calculating payroll with
ACCOUNTING CS PAYROLL. WalkThrough. version 2015.x.x
 ACCOUNTING CS PAYROLL WalkThrough version 2015.x.x TL 29048 (05/14/15) Copyright Information Text copyright 2009 2015 by Thomson Reuters. All rights reserved. Video display images copyright 2009 2015 by
Milwaukee Carpenters District Council Health, Vacation, and Millwright Funds. Online Remittance Processing Instructions
 Milwaukee Carpenters District Council Health, Vacation, and Millwright Funds Online Remittance Processing Instructions Milwaukee Carpenters District Council Health, Vacation, and Millwright Funds Online
ACS Version 10.6 - Accounts Payable
 ACS Version 10.6 - Accounts Payable Table Of Contents 1. Accounts Payable... 1 Accounts Payable Overview... 1 Accounts Payable Startup Outline... 2 Procedures Outline... 2 Customizing Program Defaults...
TriCore Secure Web Email Gateway User Guide 1
 TriCore Secure Web Email Gateway User Guide This document provides information about TriCore Secure Web Email Gateway. This document is for users who are authorized to send and receive encrypted email
IRIS Payroll Business
 18/02/2014 IRIS Payroll Business Getting Started Guide 18/02/2014 Dear Customer Thank you for purchasing IRIS Payroll Business and welcome to your Getting Started Guide. This guide is intended as a quick
CITY OF BURLINGTON PUBLIC SCHOOLS MICROSOFT EXCHANGE 2010 OUTLOOK WEB APP USERS GUIDE
 CITY OF BURLINGTON PUBLIC SCHOOLS MICROSOFT EXCHANGE 2010 OUTLOOK WEB APP USERS GUIDE INTRODUCTION You can access your email account from any workstation at your school using Outlook Web Access (OWA),
Health Indicators Advancing Healthy Aging in Your Community. Database Instructions for Managers
 Health Indicators Advancing Healthy Aging in Your Community Database Instructions for Managers Getting to the Database Website You can access the Health Indicators online database in two different ways.
Lawson Employee Self Service User s Manual
 Lawson Employee Self Service User s Manual Table of Contents 1. Lawson Employee Self Service FAQ s page 1 2. Login Page page 6 3. Portal Home Page page 7 4. Benefits (a) Beneficiary page 8 (b) Current
Getting Started with Mamut Online Desktop
 // Mamut Business Software Getting Started with Mamut Online Desktop Getting Started with Mamut Online Desktop Contents Welcome to Mamut Online Desktop... 3 Getting Started... 6 Status... 23 Contact...
Training Guide. Managing Your Reminders and Contact History in Contact Manager
 Training Guide Managing Your Reminders and Contact History in Contact Manager Managing Your Reminders and Contact History in Contact Manager Copyright 2014 TABLE OF CONTENTS Unit 1: Finding an Account
MEETINGONE ONLINE ACCOUNT MANAGEMENT PORTAL HOST / ROOM USER GUIDE
 MEETINGONE ONLINE ACCOUNT MANAGEMENT PORTAL HOST / ROOM USER GUIDE TABLE OF CONTENTS How to Login... 4 Select a Role... 4 Multiple Rooms... 5 Home Tab... 6 Manage Users... 6 Add a New User... 7 Edit an
Finance Reporting. Millennium FAST. User Guide Version 4.0. Memorial University of Newfoundland. September 2013
 Millennium FAST Finance Reporting Memorial University of Newfoundland September 2013 User Guide Version 4.0 FAST Finance User Guide Page i Contents Introducing FAST Finance Reporting 4.0... 2 What is FAST
Hosted PBX. TelePacific Communicator User Guide. Desktop Edition
 Hosted PBX TelePacific Communicator User Guide Desktop Edition 11/19/2014 CONTENTS Login... 2 Home Window... 3 Status Flag... 4 My Room... 6 Contacts Screen... 6 History... 8 Directory... 9 Dialpad...
PeopleSoft Tips TABLE OF CONTENTS GUIDE
 PeopleSoft Tips NOTE: This document is designed to be used online and has a number of embedded links to processes and additional information. We discourage the printing of manuals as they are updated frequently
GP REPORTS VIEWER USER GUIDE
 GP Reports Viewer Dynamics GP Reporting Made Easy GP REPORTS VIEWER USER GUIDE For Dynamics GP Version 2015 (Build 5) Dynamics GP Version 2013 (Build 14) Dynamics GP Version 2010 (Build 65) Last updated
CentreSuite Expense Routing Cardholder USER GUIDE
 CentreSuite Expense Routing Cardholder USER GUIDE CentreSuite Expense Routing Cardholder User Guide Table of Contents 3 First Time Users 6 Quick Links from your Home Screen 7 Statements 9 Creating and