GT3B Hack Kit Install Instructions Written By Austin Hutchison
|
|
|
- Timothy Harvey
- 7 years ago
- Views:
Transcription
1 GT3B Hack Kit Install Instructions Written By Austin Hutchison Step 1: Remove 4 screws located on top of the radio. 1

2 Step 2: There are small plastic latches that also hold the top in place. The easiest way to pull the top cover off is to push these latches open, but it may knar up the plastic alittle. If you don t wish to knar up the plastic you can take a chance and muscle the top cover off, however this may lead to worse damage. To disengage the plastic latches use a small flat head and insert in the places shown on the picture and gently pull up on the cover on the front side its located near the diaganol on the screen pop out, and the back side is located directly across Step 3: With the antenna up pull the top cover off. The rotary knob is attached to the board as well. So it would be smart to gently pry that off the top cover with your fingernails or small flat head screw driver. Other side gently muscle off the cover, the knob will come with it. 2

3 No glue past this line Step 4: Ok now towards the button side of the screen you ll see 4 holes spaced at.1. This is where the 4 pin header goes, Install the short pins into the holes with the long pins pointed to the antenna side of the case then I suggest putting a dab of hot glue on each end of the header, make sure no glue gets on the front side, it s ok if it touches the backside pins, although try to avoid this as well. It s hard to see the glue in the second picture, so the arrows point to where to put the glue. Step 5: Ok now gently lift the board and pull towards the front. This is to pull the power button out of its hole to lift the board up and out. Ok now gently twist the board up towards the st wheel. To expose the bottom side of the header. Now with the bottom side of the hear exposed lets solder it. To solder a header to a circuit board; pre tin your soldering iron tip lightly, position your iron on one side of the pin so it touches both the pin and solder pad. Then let it heat both for.5-1 second. Now with your iron still touching both apply solder to the other side of the pin, until it melts completely around and down through the hole. Now clean your iron tip. Check to make sure this didn t melt your hot glue and make your header un level, if it did then reheat the joint and push the header back down. Now repeat the steps above for the other 3 pins. 3

4 4
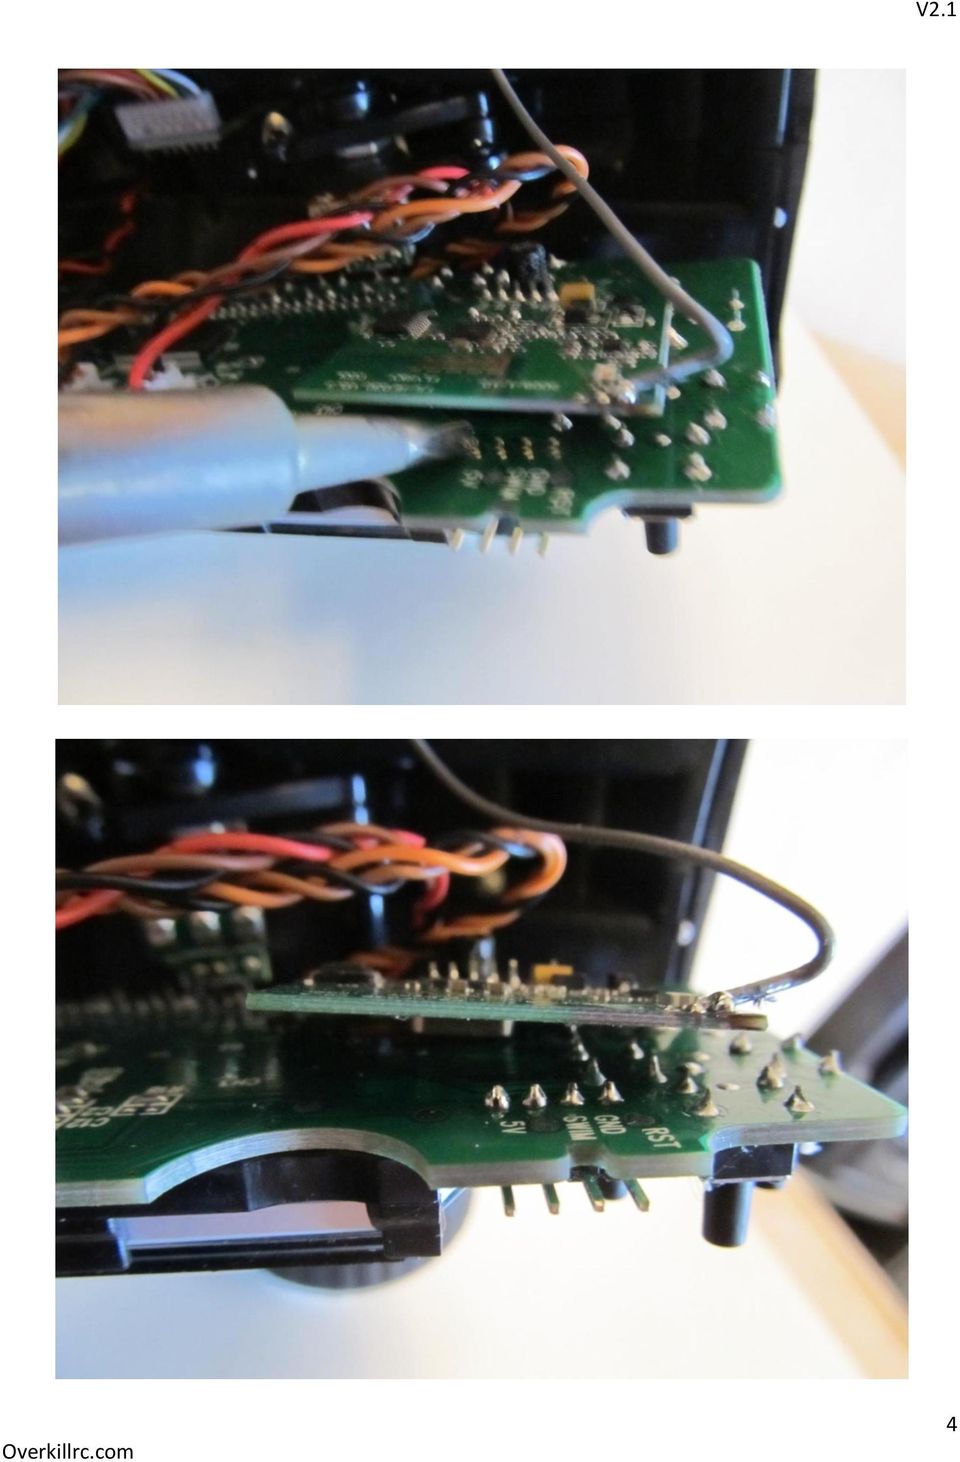
5 Step 6: Ok now flip your board back over and slide the power button back into its hole and push the whole board back down level. Now you ll see there s no way you can plug into the header, that s because you have to cut a slot. Look at the header and at its furthest points take a pair of snips/cutters and cut one step down into the plastic chances are the front side of the cut will bend/flex out to the thinnest point near where the screw goes through, this is ok. Now take a pair of pliers and bend the plastic towards you, you may need to lightly wiggle it back and forth so it breaks off. This new slot will be wre your plug enters the radio to program it. Now it probably doesn t look real neat or very professional. So what I like to do is take a razor knife or hobby knife, and cut all the un even white stretched plastic off into a nice level surface. After you have cut it plug in your cord and make sure it fits, I also like to take my razor and cut a mark in so I know where the plug needs to be, so ones a put the cover back on I don t have to worry about getting it on the wrong pins. 5

6 6
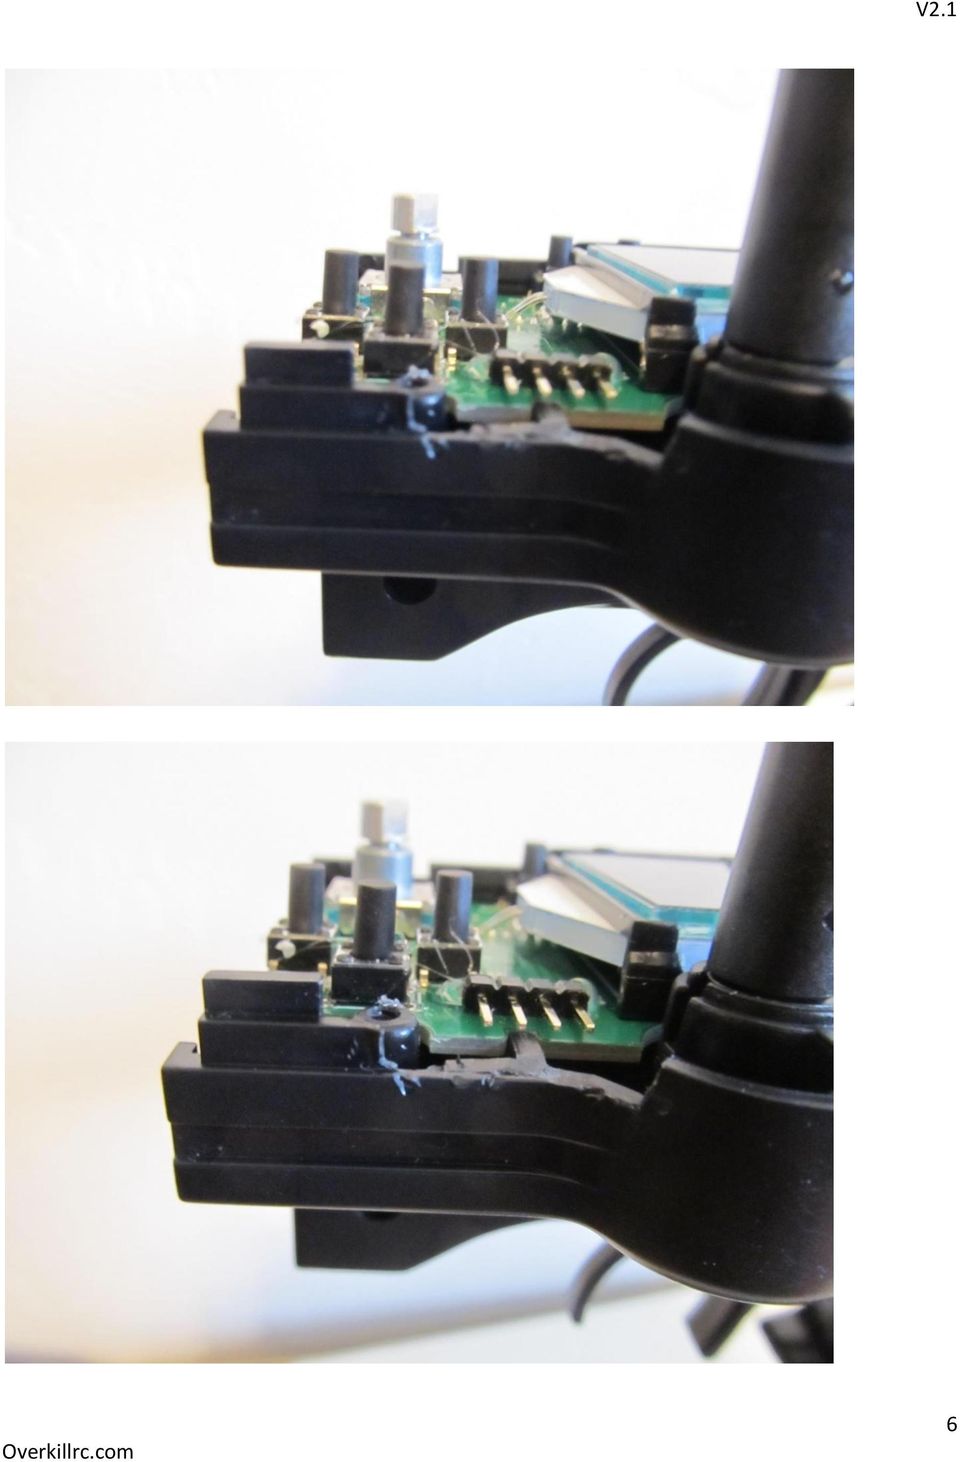
7 Step 7: Put the button covers back on lift antenna up, and pop the top cover back on, so the latches snap back on. Now plug the cord back in, make sure it fits, if it does install the 4 screws and pat yourself on the back because you just finished installing the hack kit to your radio. Now lets program it. 7

8 Step 8: Now you need to download and install the programming software, ST visual programmer. It can be download with/from this link If you are running windows 7 and possibly vista you may need to install this patch as well, which can be found at this link Make sure restart your computer after you install. Once you have rebooted your computer, open up ST Visual Programmer and make sure you have these settings, first time you open it, it should let you choose, however if it doesn t, click on the configure tab, then configure ST visual programmer. 8

9 Step 9: Close out of STVP; now plug your radio into the programmer.. The GREEN wire needs to be on the SB1 side on your programmer, and towards the BND button on the gt3b side it was a black wire on the first batch of kits. Now plug the programmer into the computer with the supplied USB cord. Now open up STVP. o Click File, open, o Select the firmware you want to use. Now click program, Current tab. There should be a status bar on the bottom. It will program then verify. Don t do anything till it says verification complete. 9

10 Step 10: Now unplug your radio, and start setting up your models, have fun. 10

LED Wiring and Connections
 LED Wiring and Connections A Handbook of How-to Manuals 2009 usledsupply. All Rights Reserved. Index These step by step how to manuals will give you the foundation necessary to use your new LED lights.
The Ultimate XBOX 360 Guide to Fix 3 Red Lights (RROD)
") The Ultimate XBOX 360 Guide to Fix 3 Red Lights (RROD) We offer a wide range of repair kits to meet just about everyone's needs. We offer kits ranging from just hardware, to kits that include hardware,
The Ultimate XBOX 360 Guide to Fix 3 Red Lights (RROD) We offer a wide range of repair kits to meet just about everyone's needs. We offer kits ranging from just hardware, to kits that include hardware,
Your Simple Guide to Battery. www.firstalertpro.com. Replacement. Customer Care: 1-800-852-0086. www.firstalertpro.
 Previous Menu Your Simple Guide to Battery www.firstalertpro.com Replacement p e t s ts ep -by Customer Care: 1-800-852-0086 FA/1565 9/00 www.firstalertpro.com Table of Contents: page Introduction...............................
I Click on a link tab to jump to that page. Cover Page
 Publication, Duplication, or Retransmission Of This Document Not Expressly Authorized n Writing By The nstall Doctor s Prohibited. Protected By U.S. Copyright Laws. 1997,1998,1999,2000. Factory Radio Other
Document number RS-PRD-00130 Revision 05 Date 20/10/2009 Page 1/30
 Date 20/10/2009 Page 1/30 1. Purpose This document describes the field replacement of the footscan plate cable for these models: 2m hi-end plate SN 11/5/xxx 2m pro plate SN 7/5/xxx 0.5m 2003 hi-end plate
Building A Computer: A Beginners Guide
 Building A Computer: A Beginners Guide Mr. Marty Brandl The following was written to help an individual setup a Pentium 133 system using an ASUS P/I- P55T2P4 motherboard. The tutorial includes the installation
Cover Page. Factory Radio Other Documents Available For This Vehicle:
 & nstall Publication, Duplication, or Retransmission Of This Document Not Expressly Authorized n Writing By The nstall Doctor s Prohibited. Protected By U.S. Copyright Laws. 1997,1998,,2000. Factory Radio
Time needed: ~3h for lid replacement only. Add 1h for operation harness in lid and ~2h more for installing drive unit and cable harness in trunk.
 DIY for replacing trunk lid and/or retrofitting electrical operation of trunk lid. This document is meant to be a support and give advice on the procedure but I will take no responsibility for any damage
POWERPOLE CONNECTOR GENERAL INSTALLATION TIPS
 POWERPOLE CONNECTOR GENERAL INSTALLATION TIPS Assemble the red and black plastic housings together correctly on the first try, they fit snugly and can be difficult to get apart. See the picture below for
Soldering is easy. here's how to do it. Andie Nordgren (Comics adaptation) Jeff Keyzer. by: Mitch Altman (soldering wisdom) (Layout and editing)
 Jeff Keyzer. by: Mitch Altman (soldering wisdom) (Layout and editing)") Soldering is easy here's how to do it by: Mitch Altman (soldering wisdom) Andie Nordgren (Comics adaptation) Jeff Keyzer (Layout and editing) Download this comic book and share it with your friends! Distribute
Soldering is easy here's how to do it by: Mitch Altman (soldering wisdom) Andie Nordgren (Comics adaptation) Jeff Keyzer (Layout and editing) Download this comic book and share it with your friends! Distribute
2002 2005 Mini Cooper S Grille Install Instructions
 2002 2005 Mini Cooper S Grille Install Instructions Lower Front Grille BEFORE AFTER Package Contents 1 perforated grille (Stiletto, RAZR, or Monster) 6 Zip Tie Mounting Pads 1 is for the temp. sensor 5
apple Service Source PowerBook G4 (DVI) Updated 4 December 2003 2003 Apple Computer, Inc. All rights reserved.
 Updated 4 December 2003 2003 Apple Computer, Inc. All rights reserved.") apple Service Source PowerBook G4 (DVI) Updated 4 December 2003 2003 Apple Computer, Inc. All rights reserved. apple Service Source Upgrades PowerBook G4 (DVI) 2003 Apple Computer, Inc. All rights reserved.
apple Service Source PowerBook G4 (DVI) Updated 4 December 2003 2003 Apple Computer, Inc. All rights reserved. apple Service Source Upgrades PowerBook G4 (DVI) 2003 Apple Computer, Inc. All rights reserved.
I Click on a link tab to jump to that page. Cover Page
 & nstall Publication, Duplication, or Retransmission Of This Document Not Expressly Authorized n Writing By The nstall Doctor s Prohibited. Protected By U.S. Copyright Laws. 1997,1998,1999,2000. Factory
ROTOPOD PERISCOPE LIGHTING KIT (for MCWHLR & Daniel D/Xeno Periscopes)
") ROTOPOD PERISCOPE LIGHTING KIT (for MCWHLR & Daniel D/Xeno Periscopes) 14-APR-2012_rev 1.2 I designed the Periscope Lighting Kit to be as flexible as possible. Every LED is individually controllable. I
ROTOPOD PERISCOPE LIGHTING KIT (for MCWHLR & Daniel D/Xeno Periscopes) 14-APR-2012_rev 1.2 I designed the Periscope Lighting Kit to be as flexible as possible. Every LED is individually controllable. I
Inspiron 13. Service Manual. 7000 Series. Computer Model: Inspiron 13 7348 Regulatory Model: P57G Regulatory Type: P57G001
 Inspiron 13 7000 Series Service Manual Computer Model: Inspiron 13 7348 Regulatory Model: P57G Regulatory Type: P57G001 Notes, Cautions, and Warnings NOTE: A NOTE indicates important information that helps
Replacement Instructions. Warning: During this procedure, keep small parts away from children.
 apple ibook G4 Memory Card Replacement Instructions Follow the instructions in this sheet carefully. Failure to follow these instructions could damage your equipment and void its warranty. Note: Written
Replacing the Gateway M320 Keyboard
 Replacing the Gateway M320 Keyboard This package includes a replacement keyboard for your Gateway M320 notebook and these printed instructions. Tools you need You need a small Phillips and a small flat-blade
Micrio WS1 Replacement Wind Speed Sensor and WC1 Replacement Wind Compass Sensor for Raymarine ST50 and ST60 Wind Instruments. Rev 4.
 Micrio WS1 Replacement Wind Speed Sensor and WC1 Replacement Wind Compass Sensor for Raymarine ST50 and ST60 Wind Instruments. Rev 4.1 The Micrio WS1 Wind Speed Sensor and WC1 Compass Sensor are direct
COBRA 18R2 Wired Reprogramming Instructions
 COBRA 18R2 Wired Reprogramming Instructions The purpose of this document is to perform a wired reprogram of an 18R2 using the COBRA wired reprogrammer. Please note that this process requires only a wired
Elecraft K3 KPA3 Power Connector Replacement Revision A Review, April 16, 2012 Copyright 2012, Elecraft, Inc. All Rights Reserved
 Introduction Elecraft K3 KPA3 Power Connector Replacement Revision A Review, April 16, 2012 Copyright 2012, Elecraft, Inc. All Rights Reserved The connectors furnishing high current to the KPA3 module
Inspiron 15. Service Manual. 3000 Series
 Inspiron 15 3000 Series Service Manual Computer Model: Inspiron 15 3541/Inspiron 15 3542/Inspiron 15 3543 Regulatory Model: P40F Regulatory Type: P40F001/P40F002 Notes, Cautions, and Warnings NOTE: A NOTE
Kurzweil KORE 64. ROM Expansion Board for the PC3 and PC3K
 Kurzweil KORE 64 ROM Expansion Board for the PC3 and PC3K Installation Instructions August 1, 2012 2012 Young Chang Co., Ltd. All rights reserved. Kurzweil is a product line of Young Chang Co., Ltd. Kurzweil,
Service Guide. Gateway M275
 Service Guide Gateway M275 Contents Replacing Gateway M275 Components.................................... 1 Identifying the convertible tablet PC model...................................... 2 Identifying
Wall Mount Installation and Use
 Wall Mount Installation and Use 1. Introduction The Wall Mount works the same way for all Touchfire cases - the one or two row magnet strip on the back of the case is magnetically attracted to the Wall
HP Laser Jet 4200/4240/4250/4300/4350 Swing Plate
 HP Laser Jet 4200/4240/4250/4300/4350 Swing Plate 1 Swing Plate Assembly-RM1-0043 1 Swing Plate Kit-5851-2766 (RM1-0043 plus RM1-1091 gear) CAUTION: Fuser may be hot. Turn off printer, unplug it and allow
I Click on a link tab to jump to that page. Cover Page
 & nstall Publication, Duplication, or Retransmission Of This Document Not Expressly Authorized n Writing By The nstall Doctor s Prohibited. Protected By U.S. Copyright Laws. 1997,1998,1999,2000. Factory
Changing the C6 Front DRL/Turn signal bulb DIY.
 Changing the C6 Front DRL/Turn signal bulb DIY. The Corvette C6 DRL/Turn signal bulb will eventually need to be changed. With the DRL bulbs on most of the time the bulb gets hot and over several hundred
step 1 Unpack the lunchbox And check whether you have got all the components~ If you have questions please contact us at: info@unitunlikely.
 step 1 Unpack the lunchbox And check whether you have got all the components~ If you have questions please contact us at: info@unitunlikely.com This part is called the PCB (printed circuit board). All
EPSON Stylus. Start Here
 EPSON Stylus C84 EPSON Stylus Start Here C84 CPD-16675R1 4043482-00 XXX 1 Unpack 1 Remove everything from the box. Paper support Printer Manual Power cord Ink cartridges CD-ROM 2 Remove all the blue tape
RS232/DB9 An RS232 to TTL Level Converter
 RS232/DB9 An RS232 to TTL Level Converter The RS232/DB9 is designed to convert TTL level signals into RS232 level signals. This cable allows you to connect a TTL level device, such as the serial port on
BODY-12, Door Handle - Removal, Installation, and Adjustment
 Introduction BODY-12, Door Handle - Removal, Installation, and Adjustment There are many different procedures floating around describing how to replace the door handles on a 944 and every one of them will
Memory Modules. Document Part Number: 407947-001. This guide explains how to replace and upgrade memory in the computer. May 2006
 Memory Modules Document Part Number: 407947-001 May 2006 This guide explains how to replace and upgrade memory in the computer. Contents 1 Adding or replacing memory modules Adding or replacing a memory
Instructions for Using the Watch Works Tool Kit to Change a Watch Battery
 Instructions for Using the Watch Works Tool Kit to Change a Watch Battery Click on this link http://www.allamericanwatches.com/site/626101/product/e2306-a to purchase the Watch Battery Replacement Tool
Manual for GlobePharma Mini-Press II Rotary Tablet Press
 1 of 13 Preparing the Rotary Press 1. Make sure the rotary press is unplugged. 2. Open the bottom cabinet of the rotary press and take out the grey tool kit, and the beige box of punches and dies. 3. Take
C5 Sound Deadening & Insulation Kit Interior Removal & Installation Instructions
 C5 Sound Deadening & Insulation Kit Interior Removal & Installation Instructions Ok, let's start with taking the radio bezel dash area off first. Here is what the OEM radio looks like... First you flip
Front Panel Board Cable Replacement Instructions
 apple Mac Pro Front Panel Board Cable Replacement Instructions First Steps 1 Shut down computer. Note: Follow these instructions carefully. Failure to do so could damage your equipment and void its warranty.
Joule Thief 3.0 Kit. June 2012, Rev 1 1 http://www.easternvoltageresearch.com Joule Thief 3.0
 Kit Instruction Manual Eastern Voltage Research, LLC June 2012, Rev 1 1 http://www.easternvoltageresearch.com HIGH BRIGHTNESS LED THIS KIT USES A 1W CREE, HIGH BRIGHTNESS LED. DO NOT STARE AT THIS (OR
Navico-Northstar 2kW JRC Radar Package, Scanner Cable Removal and Replacement
 Navico-Northstar 2kW JRC Radar Package, Scanner Cable Removal and Replacement This work instruction describes the methods and means for which to remove and reinstall optional scanner cable configurations
Please make sure you install GSU and after GKU software befor you plug the Glitch360Shark to your computer!
 GLITCH360SHARK INSTALLATION MANUAL v1.9 FOR XBOX 360 SLIM This Manual will explain you how to install the Glitch360Shark on your xbox 360 SLIM. For more information about the Reset Glitch Hack check our
Nintendo 64 Power Supply Power Cord Replacement Guide Page 1 of 10. Nintendo 64 Power Supply Power Cord Replacement Guide
 Nintendo 64 Power Supply Power Cord Replacement Guide Page 1 of 10 Nintendo 64 Power Supply Power Cord Replacement Guide Thank you for your purchase of a Nintendo 64 power supply replacement power cord
How to connect to a Class II router using a mobile-phone data cable specifically for Solwise & Safecom routers
 USB to router s serial port How to connect to a Class II router using a mobile-phone data cable specifically for Solwise & Safecom routers by Neo at RouterTech.Org Introduction Routers based on the AR7RD/AR7WRD
Removing memory and option cards
 These instructions can help you remove memory or option cards. Use the following illustration to locate the connector for the card you want to remove. Hard disk connector 1 Option card connector Firmware
FRONT BUMPER INSTALLATION INSTRUCTIONS 2007-2011 DODGE / MERCEDES SPRINTER
 Aluminess Products Inc 9402 Wheatlands Ct. #A Santee, CA 92071 619-449-9930 FRONT BUMPER INSTALLATION INSTRUCTIONS 2007-2011 DODGE / MERCEDES SPRINTER Please read before beginning Stainless steel hardware
www.odometergears.com Ford Ranger and Mazda Pickup Odometer Worm Gear Replacement
 www.odometergears.com Ford Ranger and Mazda Pickup Odometer Worm Gear Replacement http://www.therangerstation.com/magazine/fall2008/odometer_worm_gear.htm ****************************************************************************************************
Table of Contents Getting Started... 3 The Motors... 4 The Control Board... 5 Setting up the Computer with Mach3... 6 Starting up the Equipment...
 User Manual Table of Contents Getting Started... 3 The Motors... 4 The Control Board... 5 Setting up the Computer with Mach3... 6 Starting up the Equipment... 12 G-Code Example... 13 2 Getting Started
Phaser 3635MFP Software Upgrade Process
 Overview Phaser 3635MFP Software Upgrade Process The Software Upgrade feature allows the customer to upgrade the machine software as requested by a Xerox Customer Support Center Representative, without
I Click on a link tab to jump to that page
 & nstall Publication, Duplication, or Retransmission Of This Document Not Expressly Authorized n Writing By The nstall Doctor s Prohibited. Protected By U.S. Copyright Laws. 1997,1998,1999,2000. Factory
Written By: Sam Lionheart
 iphone 5s Battery Replacement Replace the battery in your iphone 5s. Written By: Sam Lionheart INTRODUCTION Use this guide to bring life back to your iphone 5s with a new battery. Removing the battery
HP Pavilion All-in-One MS200 series PC. Upgrading and Servicing Guide. Printed in
 HP Pavilion All-in-One MS200 series PC *579907-001* *579907-001* Printed in Upgrading and Servicing Guide Replacing a Wireless Keyboard or Mouse...2 Before You Begin... 2 Replacing the Keyboard or Mouse...
Electronics and Soldering Notes
 Electronics and Soldering Notes The Tools You ll Need While there are literally one hundred tools for soldering, testing, and fixing electronic circuits, you only need a few to make robot. These tools
PORTABLE PA SYSTEM #1 LAST UPDATED: FEBRUARY 2011
 PORTABLE PA SYSTEM # LAST UPDATED: FEBRUARY 20 The portable PA system has been created to offer student groups an easy to use solution for self-operated sound needs. The system has the capability for:
Printrbot Getting Started Guide. For models: Simple
 Printrbot Getting Started Guide For models: Simple Contents 4 4 4 5 5 5 6 6 6 6 7 8 Chapter 1: Welcome Overview Support Chapter 2: Your Printrbot has arrived... now what? Printrbot Kits Pre-Assembled Printrbots
GE Wireless Devices Battery Replacement
 60-506-319.5 Crystal Smoke Detector Two 9V Duracell 9V 1. Twist counter-clockwise until detector become loose from base. 2. Replace batteries observing correct polarity. 3. Replace detector by twisting
No Rainfall Data is Collected
 No Rainfall Data is Collected There are a number of issues that can cause the system to not collect rainfall data, from clogged collectors to hardware failure or improper part replacement. The most common
Retrofit Instructions Installing a Sport Heated Steering Wheel - Leather, Multifunction BMW X5, E53, 2001 2006
 Retrofit Instructions Installing a Sport Heated Steering Wheel - Leather, Multifunction BMW X5, E53, 2001 2006 Disclaimer: This set of instructions is simply a guide on how I installed my own heated steering
Build Your Own Solar Car Teach build learn renewable Energy! Page 1 of 1
 Solar Car Teach build learn renewable Energy! Page 1 of 1 Background Not only is the sun a source of heat and light, it s a source of electricity too! Solar cells, also called photovoltaic cells, are used
Installing the Video Input and TV Tuner Cards in a Compact Computer or a Dual PCI-Slot Tower Computer
 Installing the Video Input and TV Tuner Cards in a Compact Computer or a Dual PCI-Slot Tower Computer This booklet describes how to install the video input and TV tuner cards in a compact Macintosh computer
Replacement Instructions. Warning: During this procedure, keep small parts away from children.
 apple Power Mac G4 / Macintosh Server G4 ATA Hard Drive Replacement Instructions Follow the instructions in this sheet carefully. Failure to follow these instructions could damage your equipment and void
Z-Truck (Vertical Moving) Z-truck Flag. Y-Truck (Horizontal Moving) FIGURE 1: VIEW OF THE Z-TRUCK. Flexshaft Assembly
 Z-truck Flag. Y-Truck (Horizontal Moving) FIGURE 1: VIEW OF THE Z-TRUCK. Flexshaft Assembly") Replacing the Cover Micro-Switch To remove and replace the Cover Micro-Switch you will need the following tools: #2 Phillips screwdriver (magnetic tip preferred) #1 Phillips screwdriver (magnetic tip preferred)
Replacing the Cover Micro-Switch To remove and replace the Cover Micro-Switch you will need the following tools: #2 Phillips screwdriver (magnetic tip preferred) #1 Phillips screwdriver (magnetic tip preferred)
Replacing Faceplate Ribbon Cable on Kenwood KDC-715S (these instructions MAY apply to similar Kenwood motorized faceplate units.)
") Replacing Faceplate Ribbon Cable on Kenwood KDC-715S (these instructions MAY apply to similar Kenwood motorized faceplate units.) Warning: I am not an electronics expert but have done my share of electrical
Replacing Faceplate Ribbon Cable on Kenwood KDC-715S (these instructions MAY apply to similar Kenwood motorized faceplate units.) Warning: I am not an electronics expert but have done my share of electrical
WINDOW REPAIR MANUAL & REFERENCE GUIDE
 WINDOW REPAIR MANUAL & REFERENCE GUIDE TABLE OF CONTENTS DOUBLE HUNG & SINGLE HUNG PARTS 4-5 CASEMENT PARTS 6 SCREEN PARTS 7-8 HOW TO REMOVE TILT-IN SASH 9 HOW TO REMOVE A BALANCE 10 HOW TO INSTALL BALANCE
SELF INSTALLATION GUIDE
 Ultrafast Fibre-optic Broadband SELF INSTALLATION GUIDE Gigaclear install permission July2012 v1.0 Before you begin Please make sure you have the correct length of cable. Bear in mind that you may need
Trouble shooting for fiber Units only
 TROUBLE SHOOTING Electric Lights Jazz FX Jazz/FX Spa Fiber Illuminators Note: For proper trouble shooting have your model number ready. It is located on the outside of your Illuminator on a Fiberstars
You must do Windows updates with Microsoft Internet Explorer.
 Windows Update Walkthrough Begin by going to this Internet address with Internet Explorer: http://windowsupdate.microsoft.com You must do Windows updates with Microsoft Internet Explorer. The first thing
Replacing the Gateway M675 Keyboard
 Replacing the Gateway M675 Keyboard This package includes a replacement keyboard for your Gateway M675 notebook and these printed instructions. Tools you need You need a small Phillips screwdriver and
Dell P Series Monitor VESA Mounting Bracket Installation Instructions
 Dell P Series Monitor VESA Mounting Bracket Installation Instructions The VESA mounting bracket enables a Wyse cloud client to be mounted to the Dell P Series Monitor and the Dell E24 Monitor. The cloud
MAINTENANCE & TROUBLESHOOTING
 MAINTENANCE & TROUBLESHOOTING This section describes how to: clean the lens replace the projection lamp replace the batteries in the remote use the security lock feature troubleshoot the projector Cleaning
Memory Modules User Guide
 Memory Modules User Guide Copyright 2008 Hewlett-Packard Development Company, L.P. The information contained herein is subject to change without notice. The only warranties for HP products and services
INDEX. Trademarks All name and product s trademarks mentioned below are the property of their respective companies.
 USB2.0 EASY IDE ADAPTER INDEX Trademarks ---------------------------------------------------------------------------- Introduction ---------------------------------------------------------------------------
Pad. Quick Start Guide
 Pad Quick Start Guide Copyright 2008 Mimio Congratulations on your mimio Pad purchase! mimio Pad is a 4 GHz wireless pad. To configure mimio Pad for use, install the mimio Studio software and plug the
UPGRADING AND SERVICING GUIDE
 UPGRADING AND SERVICING GUIDE HPTouchSmart 610 PC Computer features may vary by model. Removing and Replacing a CD/DVD Drive...2 Removing the CD/DVD Drive... 2 Installing a New CD/DVD Drive... 5 Removing
http://mbworld.org/forums/c32-amg-c55-amg-w203/449471-famous-ac-clicking-noiseac-footwell-damper-linkage-replacement-diy-details-steps.
 Air Conditioner / HVAC W203 Stepper Motor Repair PART 1 OF 3 forums/c-class-w203/177068-noisy-air-conditioner-stepper-motorreplacement-clicking-hissing.html forums/c32-amg-c55-amg-w203/449471-famous-ac-clicking-noiseac-footwell-damper-linkage-replacement-diy-details-steps.html
Quick Start Guide See Inside for Use and Safety Information
 3 rd Generation Personal 3D Printer Quick Start Guide See Inside for Use and Safety Information The USB Mass Storage Device Contains the User Guide and Quick Start Guide in other Languages Congratulations
MyNetFone Virtual Fax. Virtual Fax Installation
 Table of Contents MyNetFone Virtual Fax MyNetFone Virtual Fax Installation... 1 Changing the SIP endpoint details for the fax driver... 11 Uninstalling Virtual Fax... 13 Virtual Fax Installation Follow
Jabra BIZ 2400 USB USER MANUAL
 Jabra BIZ 2400 USB USER MANUAL 1 2011 GN Netcom A/S. All Rights Reserved. This user guide is published by GN Netcom A/S. The information in this user guide is furnished for informational use only, is subject
Configuring the Siemens TC35 modems for use with the MI2292
 Configuring the Siemens TC35 modems for use with the MI2292 The following instruction describe how to set up GSM communication between an MI2292 Power Quality Analyser Plus and a computer 1. Equipment
Intel NUC Kit DC3217IYE User Guide. Intel NUC Kit DC3217IYE
 Intel NUC Kit DC3217IYE User Guide 1 Before You Begin CAUTIONS The procedures in this user guide assume familiarity with the general terminology associated with personal computers and with the safety practices
Adafruit Pi Box Plus. Created by Phillip Burgess. Last updated on 2014-07-24 08:45:08 PM EDT
 Adafruit Pi Box Plus Created by Phillip Burgess Last updated on 2014-07-24 08:45:08 PM EDT Guide Contents Guide Contents Assembly Instructions Preparation Parts List Assembly Opening the Lid If Using a
Build a Junior Solar Sprint Model Car Kit Materials: 1 PITSCO Ray Catcher Sprint Kit or Solar Made Junior Solar Sprint Kit 1 White Sheet of Plastic
 Build a Junior Solar Sprint Model Car Kit Materials: 1 PITSCO Ray Catcher Sprint Kit or Solar Made Junior Solar Sprint Kit 1 White Sheet of Plastic Coated Paper 2 Balsa Sheets (10-1/2 x4 x3/16 ) 2 Alligator
User Installation Guide
 Careline Alarm User Installation Guide 1.1 IMPORTANT INFORMATION The user s telephone MUST BE connected to the Reach TEL socket - a double adapter on the incoming line must not be used. If the user has
Installing RNS-E SAT NAV for Audi A4
 As one of the major options on the A4 you can get a DVD Satellite Navigation System call the RNS-E. With the help of ebay these sat nav systems are now available to by at a rough cost of 650 plus the cost
Internal Modem Installation with Windows 95
 Internal Modem Installation with Windows 95 You will need these items from your U.S. Robotics modem box: modem phone cord Plus: a screwdriver (not included) Determining Available Resources Your U.S. Robotics
Quick Start Guide. Vonage VWR Device
 Quick Start Guide Vonage VWR Device Before you begin 1. If you purchased your Vonage Device from a retail store, you must first activate your Vonage phone service. (You will need to provide the MAC ID
CorkSport Mazda 3 LED Light Kit 2014+ Mazda 3
 CorkSport Mazda 3 LED Light Kit 2014+ Mazda 3 Thank you for purchasing the CorkSport 2014 Mazda 3 LED Light Kit. CorkSport's LED light kit replaces bulbs for the rear dome light, vanity visor lights, front
Soldering Techniques N I A G A R A C O L L E G E T E C H N O L O G Y D E P T.
 Soldering Techniques N I A G A R A C O L L E G E T E C H N O L O G Y D E P T. Soldering 101 Soldering is the process of joining two metals together to form an electrically and mechanically secure bond
Gripper Kit for the Boe-Bot Robot (#28202)
") 599 Menlo Drive, Suite 100 Rocklin, California 95765, USA Office: (916) 624-8333 Fax: (916) 624-8003 General: info@parallax.com Technical: support@parallax.com Web Site: www.parallax.com Educational: www.stampsinclass.com
599 Menlo Drive, Suite 100 Rocklin, California 95765, USA Office: (916) 624-8333 Fax: (916) 624-8003 General: info@parallax.com Technical: support@parallax.com Web Site: www.parallax.com Educational: www.stampsinclass.com
Replacing the noisy cooling fan in ICOM IC-2KL by Bert Almemo, VE3OBU/SM7BUR
 Replacing the noisy cooling fan in ICOM IC-2KL by Bert Almemo, VE3OBU/SM7BUR The following describes how to replace the cooling fan for a quieter one in the IC-2KL with as little effort as possible. The
Printrbot Getting Started Guide. For models: Printrbot Plus (v2) Printrbot LC (v2) Printrbot jr
 Printrbot LC (v2) Printrbot jr") Printrbot Getting Started Guide For models: Printrbot Plus (v2) Printrbot LC (v2) Printrbot jr Contents 4 Chapter 1: Welcome 4 Overview 4 Support 5 Chapter 2: Your Printrbot has arrived... now what? 5
Printrbot Getting Started Guide For models: Printrbot Plus (v2) Printrbot LC (v2) Printrbot jr Contents 4 Chapter 1: Welcome 4 Overview 4 Support 5 Chapter 2: Your Printrbot has arrived... now what? 5
HP ProLiant DL165 G7 Server. Installation Instructions
 HP ProLiant DL165 G7 Server Installation Instructions Identifying server components Front panel components Figure 1 Front Panel Components / 4 3.5 HDD Item 1 Thumbscrews for rack mounting 2 Drive status
SERVICE GUIDE. Gateway Notebook
 SERVICE GUIDE Gateway Notebook Contents Replacing Gateway Notebook Components...................................1 Identifying the notebook model......................................... 2 Identifying
FOLGER TECHNOLOGIES, LLC 2020 i3 3D Printer Kit
 FOLGER TECHNOLOGIES, LLC 2020 i3 3D Printer Kit CONFIG GUIDE Rev. A http://www.folgertech.com 2020 Prusa i3 Config Guide Page: 1 / 15 You did it! You built your Folger Tech 2020 i3 Printer and now you
FX Circuit Board Replacement Instructions
 FX Circuit Board Replacement Instructions There are three circuit boards inside the FX inverter. Normally, only two of these boards are candidates for replacement; the FET board (large board that includes
Installation Guide. Wyse D Class 4-GB RAM Upgrade Option Kit. Products: D90D7, D90DW. Issue: 121312 PN: 883884-35L Rev. A
 Installation Guide Wyse D Class 4-GB RAM Upgrade Option Kit Products: D90D7, D90DW Issue: 121312 PN: 883884-35L Rev. A Copyright Notices 2012, Wyse Technology Inc. All rights reserved. This manual and
The following pages will help you to solve issues linked to the installation and first use of the Wintech Manager software and Wintech USB computer.
 WINTECH MANAGER FAQ The purpose of this document is not to replace the complete user guide delivered on the Wintech Manager s CD. Most of the common question you may have about the use of the Wintech Manager
EasyNote TJ Series. Disassembly Manual
 EasyNote TJ Series Disassembly Manual CHAPTER3 Replacing notebook components Preventing static electricity discharge Preparing the work space Required tools Preparing the notebook Adding or replacing memory
CETAC Z-Drive Assembly
 CETAC Z-Drive Assembly Replacement Guide Manual Part Number 610144 Rev 1, 2012 CETAC Technologies, Printed in USA Overview This guide describes the necessary steps to replace the Z-drive assembly on your
Installing Your 960 or 980 Server into a Rackmount Cabinet
 Installing Your 960 or 980 Server into a Rackmount Cabinet 1 2 Contents Installing Your Gateway Server into a Rackmount Cabinet...1 Identifyingpartsintheaccessorykit...2 Rackmounthandlekit... 2 Rackmountrailkit...
Repair Section. We need to remove both heat syncs from the motherboard. Heat syncs are shown in the picture below.
 Repair Section We need to remove both heat syncs from the motherboard. Heat syncs are shown in the picture below. We will start by removing the X clamps from the bottom side of the board. X clamps are
Slot.it Audi R8C Snetterton
 Slot.it Audi R8C Snetterton This guide explains in details on how I have converted the Slot.it Audi R8C Slotcar from analog to SCX Digital. The problem to convert this car was that there is not enough
USB Driver Installation for Windows XP
 USB Driver Installation for Windows XP USB Serial Converter Driver Installation for Windows XP CAUTION: You must use the drivers on the CD-ROM supplied with your USB Device. DO NOT download drivers from