Login: Quick Guide for dotcms & Accessibility November 2014 Training:
|
|
|
- Primrose Owens
- 10 years ago
- Views:
Transcription
1

2

3
. i. Note: This text will show on the navigation menu if Show on Menu is checked.")
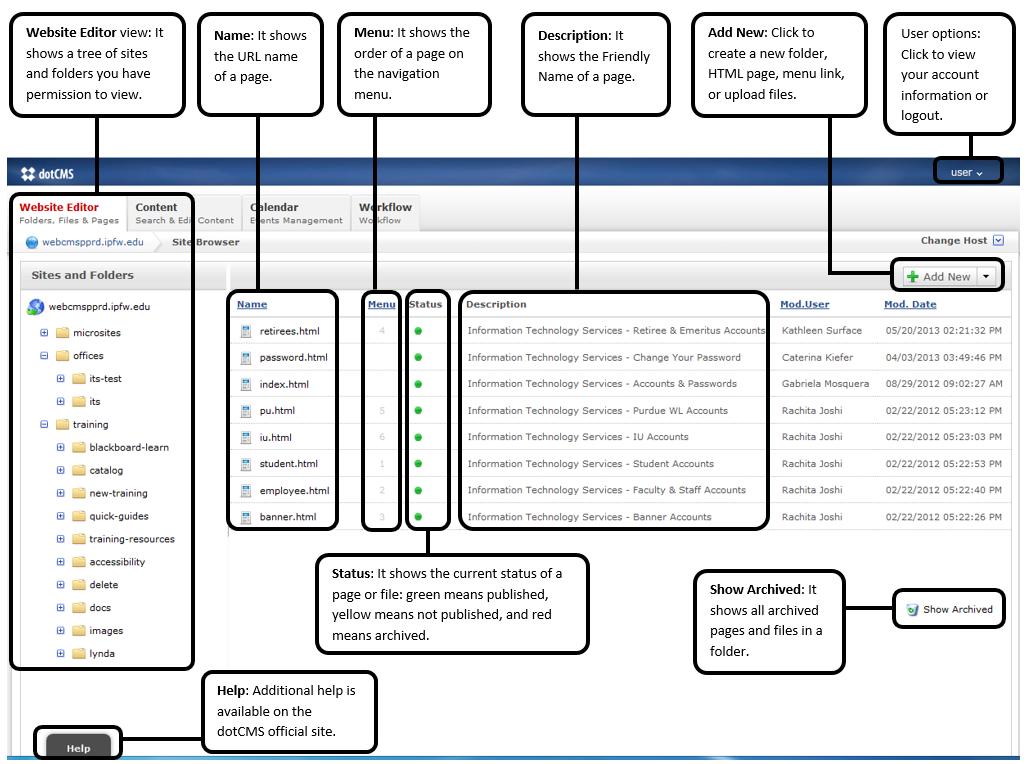
4 dotcms & Accessibility Folders Creating a New Folder Note: All folders showing on menu must have an index page. 1. Right-click the parent folder in which the new folder will reside. 2. Click New > Folder. 3. In the Properties window, fill in the following: a. Title Enter the desired name for the folder (use full names instead of acronyms or abbreviations). i. Note: This text will show on the navigation menu if Show on Menu is checked. b. Name (URL) It will be automatically filled in after selecting the field. i. To change the URL: keep it short, only use lower case, use a hyphen to separate words, and DO NOT use spaces between words. c. Sort Order Enter a numeric value to organize the order of folders showing on the menu (Note: The first item starts at 0). d. Show on Menu Check the box if the folder should be shown on the menu. e. Allowed File Extensions Leave blank to allow any type of files to be uploaded to the folder. i. Or enter *.extension to allow only certain file types (e.g., *.jpg, *.docx, *.xlsx). 4. Click Save. 5. To publish, right-click the folder name and select Publish. Creating a Sub-folder for Images or Documents Note: Image or document folders do not need an index page. 1. Navigate to the desired folder. 2. In the upper right corner, click the Add New drop-down menu and select Folder. 3. In the Properties window, fill in the following fields: a. Title Enter images for an image folder or documents for a documents folder. b. Name (URL) It will be automatically filled in after selecting the field. c. Show on Menu Keep it unchecked. 4. Click Save. 5. To publish, right-click the folder name and select Publish. Menu Links Creating a Menu Link Note: These steps create a link to an internal page, external page, or document. The link will show on the navigation menu. 1. Navigate the desired folder. 2. In the upper right corner, click the Add New drop-down menu and select Menu Link. 3. In the Properties window, fill in the following fields: a. Title Enter the desired name for the link. Use full names instead of acronyms or abbreviation. Help Desk: [email protected] Page 1
. d. Show on Menu Check the box if the folder should be shown on the menu. e.")

5 i. Note: Text will show on menu. b. Type Choose the desired option, e.g., External Link for links referring to a different website. i. If Internal Link is selected, click Browse to locate and select the desired page/document. ii. If External Link is selected, click the first drop-down menu and select the desired option. Then, enter the URL in the field next to the drop-down menu. c. Target Choose the desired option in which the linked page should open. i. Note: New Window is recommended for external links. d. Sort Order Enter a number to sort the position of the link on the menu. e. Show on Menu Check to show the link on the menu. 4. Click Save. 5. To publish, right-click the menu link name and select Publish. Editing a Menu Link 1. Right-click the menu link name and select Edit. 2. Edit the desired field(s). 3. Click Save or Save and Publish. HTML Pages Creating a New HTML Page 1. Navigate to the desired folder. 2. In the upper right hand corner, click the Add New drop-down menu and select HTML Page. 3. On the Basic Properties tab: a. Page/Menu Title Enter the desired title. DO NOT use acronyms. i. Note: Text will be displayed as the page s title. b. Page URL It will be automatically filled in after selected the field. i. If change is needed, use lowercase, keep it short, and unique to each page in a folder. ii. Note: Change it to index.html to make the page into an index page. c. Template Click to choose the desired template. 4. Click the Advanced Properties tab. a. Show on Menu Check if desired. i. It will show the page s title on the navigation menu. b. Menu Sort Order If Show on Menu is checked, enter a numeric value to sort the order of pages showing on the menu. c. Friendly Name Enter the official full department name and the title/description of the page. i. Separate information using spacehyphen-space (e.g., Department of Biology About Us). d. SEO Description Enter a brief description of the page. i. Note: Use full sentences. e. SEO Keywords Enter keywords, separated by commas, which would be used to search for the page. f. Page Metadata Leave it blank. 5. Click Save. Editing Page Properties 1. Locate the desired page. 2. Right-click the page name and select Page Properties. 3. Edit the desired field(s), e.g., Template, Friendly Name. 4. Click Save or Save and Publish. Publishing a Page 1. Locate the desired HTML page. 2. Right-click the page and select Publish. a. Note: All related assets needs to be published before publishing the page. Help Desk: [email protected] Page 2


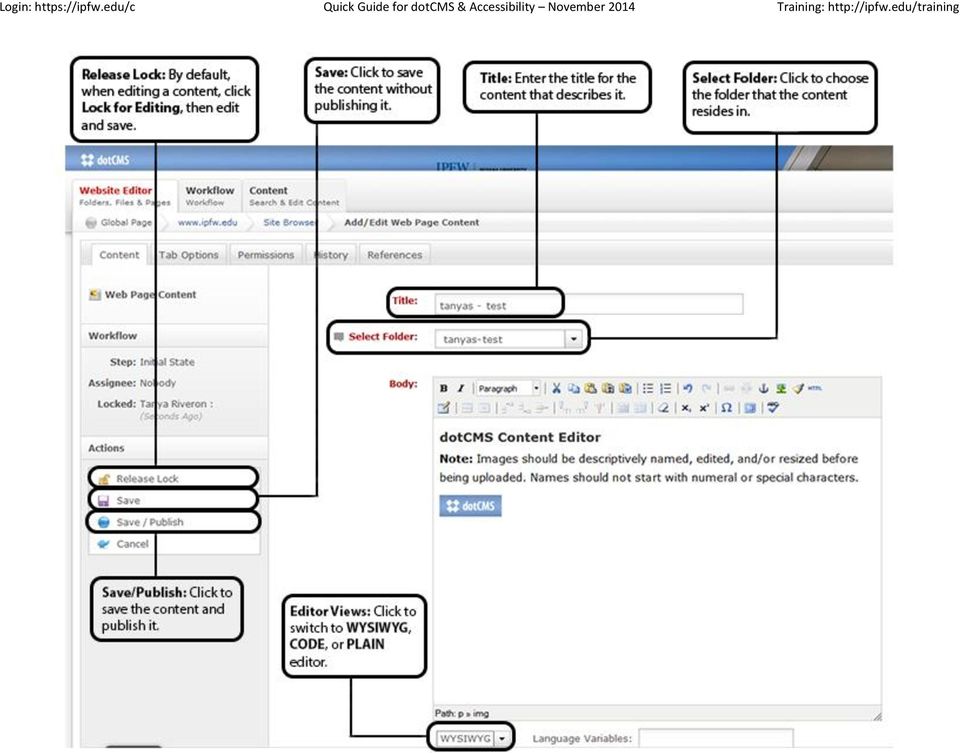
6 Page Contents Adding a New Content Note: A contentlet can be removed from a page and can be reused on other pages. 1. Locate the desired page and double-click it to enter the page Edit mode. 2. In the upper right corner, click Add Content > New Content. 3. In the Title field, enter the department acronyms, the content summary or topic, and your username. a. Example: its quick guide username. 4. Click the Select Folder drop-down menu and choose the folder that the page resides in. 5. In the Body text area, type in the text that will be displayed on the page. a. Use headings, bold, italic, indent, bulleted, and numbered lists to format the text. b. Note: DO NOT edit colors, font family, and font size. c. Note: DO NOT copy and paste straight from a rich text editor (e.g., Microsoft Word) or from the Web. 6. To save the content, choose one of the following: a. Save The content will be saved, but not published. b. Save and Publish It will save and publish the content to the Web. i. Note: The contentlet will be automatically visible as soon as the hosting page is published. Reusing an Existing Content Note: When editing a reused contentlet, the changes made will affect the original as well as all reused contentlets. 1. Locate the desired page and double-click it to enter the page Edit mode. 2. In the upper right corner, click Add Content > Reuse Content. a. The Search window appears. 3. To search the content, fill out one or more of the following fields: a. Title Enter a part of or whole title of the contentlet. b. Select Folder Click to choose the folder that may contain the contentlet. c. Body If desired, insert word(s) that exist in the body of the content. d. Click Search. 4. Locate the desired content in the Matching Results list. 5. Click Select. Editing Existing Content 1. Locate the desired page and double-click it to enter the page Edit mode. 2. Locate the desired content on the page. 3. In the upper left corner of the content, click Edit Content. 4. On the left side, click Lock for Editing. 5. Edit the desired field(s). 6. On the left side, click Save or Save / Publish. 7. Click Cancel to return back to the page Edit mode. Removing Content 1. Locate the desired page and double-click it. 2. Locate the desired contentlet. 3. On the upper right corner of the contentlet, click the X button. 4. Re-publish the page. Tabbed Content Note: Tabbed content can only be added on a tab-enable HTML page. You can add a tab- Help Desk: [email protected] Page 3
 or from the Web. 6.")

7 enable page when creating or edit an existing page s properties. Creating a Tab-enable Page 1. Navigate to the desired folder. 2. In the upper right corner, click the Add New drop-down menu and select HTML page. 3. Fill out the Page/Menu Title and Page URL. 4. Click the Template drop-down list and select a tabbed template, e.g., new.ipfw.edu Silver 2 columns (Left Navigation, Tabbed). 5. Edit the Advanced Properties. 6. Click Save. Adding a New Tab Contentlet Note: You can add up to 5 tabs on a page. 1. Locate the desired tabbed page and doubleclick it. 2. In the upper right corner, click Add Content > New Content. 3. Edit the Title, Select Folder, and Body fields. 4. On upper left corner, click the Tab Options tab. 5. Enter the Tab Title. a. Note: Text will be shown on the page. 6. Enter the Anchor Link. a. Note: This is the tabbed contentlet s anchor name, e.g., charts (the full URL of the tabbed contentlet will then be 7. On the left side, click Save or Save / Publish. a. Click Cancel to return back to the page Edit mode. Changing Tab Order Note: The top most contentlet will be the left most tab. 1. Locate the desired contentlet. 2. Click the upward or downward arrow to change the position of the contentlet. Adding Images to a Contentlet Note: All the images must be uploaded and published into dotcms before adding to a contentlet. 1. Create or edit a contentlet. a. For existing content, click Lock for Editing. 2. In the Body text area, place the cursor at the desired location. 3. From the toolbar, click the Insert/Edit Image icon. a. The Insert/Edit Image window appears. 4. On the right of Image URL field, click the Browse icon. 5. On the left, use the plus (+) button to locate the images folder, example below: 6. Click the images folder and select the desired image. 7. Enter the Image Description and Title. a. If desired, click the Appearance or the Advanced tab to modify additional image options. 8. Click Insert. 9. If desired, repeat step 2 8 to add more images. 10. Click Save or Save / Publish when finished. Upload Files Uploading Images or Documents Note: All Images should be descriptively named, edited, and/or resized before being uploaded (the recommended maximum width of an image is 400px). Names should not start with a numeral or special characters. Note: All PDF and document files should be descriptively named, edited, and accessible before being uploaded. Names should not start with a numeral or special characters. 1. Navigate to the desired images or documents folder. Help Desk: [email protected] Page 4

 to upload. 5. Locate and Open the desired file(s). a. To select multiple files, press and hold the Ctrl key and click the desired files.")
8 2. In the upper right corner, click the Add New drop-down menu and select Multiple Files. 2. On the left side, click Lock for Editing to release the lock. a. On the of the Link URL field, click the Browse icon. a. The Add File window appears. 3. Click Select. 4. Click Select file(s) to upload. 5. Locate and Open the desired file(s). a. To select multiple files, press and hold the Ctrl key and click the desired files. 6. Click Save. 7. Right-click on the new file > select Edit. 8. Click Lock for Editing. 9. In the Title field, enter a descriptive title for the image or file. 10. Click the Metadata tab. 11. In the Description field, enter a description of the image or file. 12. Click Save/Publish. 13. Repeat steps 7-12 for any additional images or files. Replacing Existing Files or Images 1. Locate the desired file/image and doubleclick it. a. Note: By default, the uploaded file is locked for editing. 3. In the File Asset section, click Remove. 4. Click Browse to select and Open the new file. 5. When finished, click Save / Publish. Links Note: All links should clearly identify their target. Linking to an External/Internal Page 1. Create or edit a contentlet. a. For existing content, click Lock for Editing. 2. In the Body text area, highlight the desired link text. 3. From the toolbar, click the Insert/Edit Link icon. 4. For an external link: a. In the Link URL field, enter or paste the web page URL. 5. For an internal link: b. On the left side, use the + button to locate the desired folder. c. Click the folder and select the desired web page. 6. Click the Target drop-down menu and select the desired option. a. For external links, Open in New Window blank) is recommended. 7. Enter the link Title. 8. Click Insert. 9. Click Save or Save / Publish when finished. Linking PDFs or Documents Note: All documents should first be uploaded to the server before linking. 1. Create or edit a contentlet. a. For existing content, click Lock for Editing. 2. In the Body text area, highlight the desired text, example: 3. From the toolbar, click the Insert/Edit Link icon. 4. On the right of Link URL field, click the Browse icon. Help Desk: [email protected] Page 5

9 5. On the left side, use the plus (+) button to locate the desired documents folder. 6. Click the documents folder and select the desired document. 7. Change the Target option if desired. 8. Enter the link Title. 9. Click Insert. 10. Click Save or Save / Publish when finished. Creating an Anchor Link Note: Anchors are used to link to content or to text up or down on the same page. Part 1: Create an Anchor 1. Create or edit a contentlet. a. For existing content, click Lock for Editing. 2. In the Body text area, locate the text to link to and place the cursor to the left of the text. 3. From the toolbar, click the Insert/Edit Anchor icon. a. The Insert/Edit Anchor window appears. 4. Enter the Anchor Name, click Insert. a. Note: it should be one word only and lowercase. Part 2: Link an Anchor to Text 1. In the Body text area, highlight the text that will link to the anchor. 2. From the toolbar, click the Insert/Edit Link icon. 3. Click the Anchors drop-down menu, select the desired anchor. 4. Enter the Title. 5. Click Insert. 6. Click Save or Save / Publish when finished. Creating an Link 1. Create or edit a contentlet. a. For existing content, click Lock for Editing. 2. In the Body text area, highlight the desired text. 3. From the toolbar, click the Insert/Edit Link icon. a. The Insert/Edit Link window appears. 4. In the Link URL field, enter mailto: address, e.g., mailto:[email protected] 5. In the Target field, make sure Open in this window/frame is selected. 6. Enter the Title. 7. Click Insert. 8. Click Save or Save / Publish when finished. Editing Code You can edit code if you need to add or adjust certain aspects that you normally wouldn t be able to with the tools already set. Switching to CODE You can go in and edit the HTML code by switching from WYSIWYG to CODE at the bottom left of the content box. HTML Button The HTML button allows you to view the HTML Source Editor and change the code without exiting the WYSIWYG. Once you click the HTML button, a separate window will pop-up with the Source Editor. Creating Tables Starting a Table 1. Click the Insert/Edit Table button. 2. Add in the rows, columns, and details you want. This can be later adjusted by clicking on the Insert/Edit Table button again or by editing the code. 3. Click Insert and begin filling in the cells. a. The Insert/Edit Link window appears. Help Desk: [email protected] Page 6

10 Editing the Table There are a few different buttons that allow you to edit certain parts of the table you have created. Insert Row Before/After: Allows you to insert a row before/after the one your cursor is currently in. Insert Column Before/After: Allows you to insert a column before/after the one your cursor is currently in. Merge Table Cells: Once you click this button, a window pops up asking for the number of columns and/or cells you want merged based on where your cursor is at. Split Merged Table Cells: Once pressed, if you cursor is where cells have been joined, it will automatically split the cells back up. Deleting Items To delete rows/columns of a table, you can either: Click one of the Delete Row/Column buttons. Or, you can go into the CODE and delete rows, columns, and cells that way. Deleting a Page Note: Deleting a page does not delete its contents, linked items, or images. To delete a page, the page has to be unpublished and archived first. 1. Locate the desired page. 2. Right-click the page and select Unpublish. 3. Right-click the page and select Archive. 4. Click OK to confirm. a. Note: The page disappears but it s not deleted yet. 5. At the lower right corner, click Show Archived. a. All the archived items appear. 6. Right-click the desired archived page and click Delete Page. 7. Click OK to confirm. Deleting an Image/Document/Link Note: All images, documents, and links must be unpublished and archived first. 1. Locate the desired image/document/link. 2. Right-click the desired item and select Unpublish. 3. Right-click the desired item and select Archive. 4. Click OK to confirm. a. The image/document/link disappears but it s not deleted yet. 5. At the lower right corner, click Show Archived. a. All the archived items appear. 6. Right-click the desired item: a. Click Delete File for images and documents. b. Or click Delete Link for links. 7. Click OK to confirm. Help Desk: [email protected] Page 7

USC Aiken CMS Manual. A manual on using the basic functions of the dotcms system. Office of Marketing and Community Relations-USC Aiken
 USC Aiken CMS Manual A manual on using the basic functions of the dotcms system Office of Marketing and Community Relations-USC Aiken Table Of Contents Introduction/How to Use Manual... 2 Logging In...
Content Management System Help. basic tutorial on Evergreen s CMS
 Content Management System Help cms.evergreen.edu Tips, tricks and basic tutorial on Evergreen s CMS Contents Vocabulary Login Opening a page Editing a page Creating a new page Inserting internal and external
Terminal Four (T4) Site Manager
 Site Manager") Terminal Four (T4) Site Manager Contents Terminal Four (T4) Site Manager... 1 Contents... 1 Login... 2 The Toolbar... 3 An example of a University of Exeter page... 5 Add a section... 6 Add content to
Terminal Four (T4) Site Manager Contents Terminal Four (T4) Site Manager... 1 Contents... 1 Login... 2 The Toolbar... 3 An example of a University of Exeter page... 5 Add a section... 6 Add content to
Cascade Server. End User Training Guide. OIT Training and Documentation Services OIT TRAINING AND DOCUMENTATION. oittraining@uta.
 OIT Training and Documentation Services Cascade Server End User Training Guide OIT TRAINING AND DOCUMENTATION [email protected] http://www.uta.edu/oit/cs/training/index.php 2013 CONTENTS 1. Introduction
Cascade Server CMS Quick Start Guide
 Cascade Server CMS Quick Start Guide 1. How to log in 2. How to open page 3. How to edit a page 4. How to create a new page 5. How to publish a page 6. How to change settings to view publish status page
Faculty Web Editing. Wharton County Junior College Employee Training Manual
 2013 Wharton County Junior College Employee Training Manual Faculty Web Editing 13 Faculty Web sites are maintained through Omni Updates Campus Content Management Systems as of January 2013. Please address
Working with the new enudge responsive email styles
 Working with the new enudge responsive email styles This tutorial assumes that you have added one of the mobile responsive colour styles to your email campaign contents. To add an enudge email style to
Managing Contacts in Outlook
 Managing Contacts in Outlook This document provides instructions for creating contacts and distribution lists in Microsoft Outlook 2007. In addition, instructions for using contacts in a Microsoft Word
Google Docs Basics Website: http://etc.usf.edu/te/
 Website: http://etc.usf.edu/te/ Google Docs is a free web-based office suite that allows you to store documents online so you can access them from any computer with an internet connection. With Google
Ingeniux 8 CMS Web Management System ICIT Technology Training and Advancement ([email protected])
") Ingeniux 8 CMS Web Management System ICIT Technology Training and Advancement ([email protected]) Updated on 10/17/2014 Table of Contents About... 4 Who Can Use It... 4 Log into Ingeniux... 4 Using Ingeniux
Ingeniux 8 CMS Web Management System ICIT Technology Training and Advancement ([email protected]) Updated on 10/17/2014 Table of Contents About... 4 Who Can Use It... 4 Log into Ingeniux... 4 Using Ingeniux
Web Ambassador Training on the CMS
 Web Ambassador Training on the CMS Learning Objectives Upon completion of this training, participants will be able to: Describe what is a CMS and how to login Upload files and images Organize content Create
OU Campus Web Content Management
 DRAFT DRAFT DRAFT DRAFT DRAFT DRAFT DRAFT DRAFT DRAFT DRAFT DRAFT DRAFT DRAFT DRAFT DRAFT DRAFT DRAFT OU Campus Web Content Management Table of Contents OU Campus Web Content Management... 1 Introduction
CONTENTM WEBSITE MANAGEMENT SYSTEM. Getting Started Guide
 CONTENTM WEBSITE MANAGEMENT SYSTEM Getting Started Guide Table of Contents CONTENTM WEBSITE MANAGEMENT SYSTEM... 1 GETTING TO KNOW YOUR SITE...5 PAGE STRUCTURE...5 Templates...5 Menus...5 Content Areas...5
EBOX Digital Content Management System (CMS) User Guide For Site Owners & Administrators
 User Guide For Site Owners & Administrators") EBOX Digital Content Management System (CMS) User Guide For Site Owners & Administrators Version 1.0 Last Updated on 15 th October 2011 Table of Contents Introduction... 3 File Manager... 5 Site Log...
EBOX Digital Content Management System (CMS) User Guide For Site Owners & Administrators Version 1.0 Last Updated on 15 th October 2011 Table of Contents Introduction... 3 File Manager... 5 Site Log...
Umbraco Content Management System (CMS) User Guide
 User Guide") Umbraco Content Management System (CMS) User Guide Content & media At the bottom-left of the screen you ll see 2 main sections of the CMS Content and Media. Content is the section that displays by default
Umbraco Content Management System (CMS) User Guide Content & media At the bottom-left of the screen you ll see 2 main sections of the CMS Content and Media. Content is the section that displays by default
UH CMS Basics. Cascade CMS Basics Class. UH CMS Basics Updated: June,2011! Page 1
 UH CMS Basics Cascade CMS Basics Class UH CMS Basics Updated: June,2011! Page 1 Introduction I. What is a CMS?! A CMS or Content Management System is a web based piece of software used to create web content,
Content Management System
 OIT Training and Documentation Services Content Management System End User Training Guide OIT TRAINING AND DOCUMENTATION [email protected] http://www.uta.edu/oit/cs/training/index.php 2009 CONTENTS 1.
Personal Portfolios on Blackboard
 Personal Portfolios on Blackboard This handout has four parts: 1. Creating Personal Portfolios p. 2-11 2. Creating Personal Artifacts p. 12-17 3. Sharing Personal Portfolios p. 18-22 4. Downloading Personal
JOOMLA 2.5 MANUAL WEBSITEDESIGN.CO.ZA
 JOOMLA 2.5 MANUAL WEBSITEDESIGN.CO.ZA All information presented in the document has been acquired from http://docs.joomla.org to assist you with your website 1 JOOMLA 2.5 MANUAL WEBSITEDESIGN.CO.ZA BACK
Joomla Article Advanced Topics: Table Layouts
 Joomla Article Advanced Topics: Table Layouts An HTML Table allows you to arrange data text, images, links, etc., into rows and columns of cells. If you are familiar with spreadsheets, you will understand
ITCS QUICK REFERENCE GUIDE: EXPRESSION WEB SITE
 Create a One-Page Website Using Microsoft Expression Web This tutorial uses Microsoft Expression Web 3 Part 1. Create the Site on your computer Create a folder in My Documents to house the Web files. Save
Cascade. Website Content Management for the Site Manager University of Missouri St. Louis
 Cascade Website Content Management for the Site Manager University of Missouri St. Louis Information Technology Services/Administrative Services January 2015 Contents Purpose & How to Use This Guide...
Joomla! 2.5.x Training Manual
 Joomla! 2.5.x Training Manual Joomla is an online content management system that keeps track of all content on your website including text, images, links, and documents. This manual includes several tutorials
http://ipfw.edu Quick Guide for Accessible PDF July 2013 Training: http://ipfw.edu/training
 Accessible PDF Getting Started Types of Documents best suited for PDF on the Web Document is longer than 5 pages. You need to preserve the formatting or layout of the original document, e.g., for printing.
HOW TO USE THIS GUIDE
 HOW TO USE THIS GUIDE This guide provides step-by-step instructions for each exercise. Anything that you are supposed to type or select is noted with various types and colors. WHEN YOU SEE THIS Click Help
To change title of module, click on settings
 HTML Module: The most widely used module on the websites. This module is very flexible and is used for inserting text, images, tables, hyperlinks, document downloads, and HTML code. Hover the cursor over
WYSIWYG Editor in Detail
 WYSIWYG Editor in Detail 1. Print prints contents of the Content window 2. Find And Replace opens the Find and Replace dialogue box 3. Cut removes selected content to clipboard (requires a selection) 4.
RHYTHMYX USER MANUAL EDITING WEB PAGES
 RHYTHMYX USER MANUAL EDITING WEB PAGES Rhythmyx Content Management Server... 1 Content Explorer Window... 2 Display Options... 3 Editing an Existing Web Page... 4 Creating a Generic Content Item -- a Web
Google Sites: Site Creation and Home Page Design
 Google Sites: Site Creation and Home Page Design This is the second tutorial in the Google Sites series. You should already have your site set up. You should know its URL and your Google Sites Login and
Lions Clubs International e-district House Content Management System (CMS) Training Guide
 Training Guide") Lions Clubs International e-district House Content Management System (CMS) Training Guide All of the material contained in this guide is the exclusive property of Alkon Consulting Group, Inc. (Alkon).
Lions Clubs International e-district House Content Management System (CMS) Training Guide All of the material contained in this guide is the exclusive property of Alkon Consulting Group, Inc. (Alkon).
Module One: Getting Started... 6. Opening Outlook... 6. Setting Up Outlook for the First Time... 7. Understanding the Interface...
 2 CONTENTS Module One: Getting Started... 6 Opening Outlook... 6 Setting Up Outlook for the First Time... 7 Understanding the Interface...12 Using Backstage View...14 Viewing Your Inbox...15 Closing Outlook...17
Using Your New Webmail
 1 Using Your New Webmail Contents Compose a New Message... 3 Add an Attachment... 5 Insert a Hyperlink... 6 Forward an Email... 7 Search Email... 8 Download Email from an existing POP3 Account... 9 Move
Mastering the JangoMail EditLive HTML Editor
 JangoMail Tutorial Mastering the JangoMail EditLive HTML Editor With JangoMail, you have the option to use our built-in WYSIWYG HTML Editors to compose and send your message. Note: Please disable any pop
State of Nevada. Ektron Content Management System (CMS) Basic Training Guide
 Basic Training Guide") State of Nevada Ektron Content Management System (CMS) Basic Training Guide December 8, 2015 Table of Contents Logging In and Navigating to Your Website Folders... 1 Metadata What it is, How it Works...
State of Nevada Ektron Content Management System (CMS) Basic Training Guide December 8, 2015 Table of Contents Logging In and Navigating to Your Website Folders... 1 Metadata What it is, How it Works...
How to Edit an Email. Here are some of the things you can do to customize your email:
 How to Edit an Email Editing a new email created during the Create an Email wizard or editing an existing email in the Edit Email section of the Manage Emails tab is easy, using editing tools you re probably
Adobe Dreamweaver CC 14 Tutorial
 Adobe Dreamweaver CC 14 Tutorial GETTING STARTED This tutorial focuses on the basic steps involved in creating an attractive, functional website. In using this tutorial you will learn to design a site
Using the Cute Rich-Text Editor
 Using the Cute Rich-Text Editor This document is designed to provide users with a basic introduction to using the Cute rich-text editor to format text, create and modify tables, and to place charts and
Kentico Content Management System (CMS
 Kentico Content Management System (CMS Table of Contents I. Introduction... 1 II. Log into a Kentico CMS Desk to Edit GC Website... 1 A. Select a Browser (Internet Explorer or Firefox only)... 1 B. Login
Umbraco v4 Editors Manual
 Umbraco v4 Editors Manual Produced by the Umbraco Community Umbraco // The Friendly CMS Contents 1 Introduction... 3 2 Getting Started with Umbraco... 4 2.1 Logging On... 4 2.2 The Edit Mode Interface...
USER GUIDE. Unit 2: Synergy. Chapter 2: Using Schoolwires Synergy
 USER GUIDE Unit 2: Synergy Chapter 2: Using Schoolwires Synergy Schoolwires Synergy & Assist Version 2.0 TABLE OF CONTENTS Introductions... 1 Audience... 1 Objectives... 1 Before You Begin... 1 Getting
Introduction to Microsoft Access 2013
 Introduction to Microsoft Access 2013 A database is a collection of information that is related. Access allows you to manage your information in one database file. Within Access there are four major objects:
Microsoft PowerPoint 2008
 Microsoft PowerPoint 2008 Starting PowerPoint... 2 Creating Slides in Your Presentation... 3 Beginning with the Title Slide... 3 Inserting a New Slide... 3 Slide Layouts... 3 Adding an Image to a Slide...
Mura CMS. (Content Management System) Content Manager Guide
 Content Manager Guide") Mura CMS (Content Management System) Content Manager Guide Table of Contents Table of Contents 1. LOGGING IN...1 2. SITE MANAGER...2 3. ADDING CONTENT (Pages, Folders, etc.)...6 4. WORKING WITH IMAGES...15
Mura CMS (Content Management System) Content Manager Guide Table of Contents Table of Contents 1. LOGGING IN...1 2. SITE MANAGER...2 3. ADDING CONTENT (Pages, Folders, etc.)...6 4. WORKING WITH IMAGES...15
The Home link will bring you back to the Dashboard after. Workflows alert you to outstanding assets waiting for approval or review.
 Gonzaga University s content management system (CMS) is a software program that allows individuals to create and edit departmental websites. This tutorial demonstrates commonly used CMS functions. For
picocms Client Training - A pico-cms.com
 picocms Client Training - A pico-cms.com Find Our User Manual at http://pico-cms.com/user-manual Login: URL(domain name/login) Layout to training: I. Overview about pico II. Users a. Adding a User b. Edit
Decision Support AITS University Administration. Web Intelligence Rich Client 4.1 User Guide
 Decision Support AITS University Administration Web Intelligence Rich Client 4.1 User Guide 2 P age Web Intelligence 4.1 User Guide Web Intelligence 4.1 User Guide Contents Getting Started in Web Intelligence
Increasing Productivity and Collaboration with Google Docs. Charina Ong Educational Technologist [email protected]
 Increasing Productivity and Collaboration with Google Docs [email protected] Table of Contents About the Workshop... i Workshop Objectives... i Session Prerequisites... i Google Apps... 1 Creating
Creating Personal Web Sites Using SharePoint Designer 2007
 Creating Personal Web Sites Using SharePoint Designer 2007 Faculty Workshop May 12 th & 13 th, 2009 Overview Create Pictures Home Page: INDEX.htm Other Pages Links from Home Page to Other Pages Prepare
Terminal 4 Site Manager User Guide. Need help? Call the ITD Lab, x7471
 Need help? Call the ITD Lab, x7471 1 Contents Introduction... 2 Login to Terminal 4... 2 What is the Difference between a Section and Content... 2 The Interface Explained... 2 Modify Content... 3 Basic
-SoftChalk LessonBuilder-
 -SoftChalk LessonBuilder- SoftChalk is a powerful web lesson editor that lets you easily create engaging, interactive web lessons for your e-learning classroom. It allows you to create and edit content
How to create pop-up menus
 How to create pop-up menus Pop-up menus are menus that are displayed in a browser when a site visitor moves the pointer over or clicks a trigger image. Items in a pop-up menu can have URL links attached
Email Basics. a. Click the arrow to the right of the Options button, and then click Bcc.
 Email Basics Add CC or BCC You can display the Bcc box in all new messages that you compose. In a new message, do one of the following: 1. If Microsoft Word is your e-mail editor a. Click the arrow to
Advanced Presentation Features and Animation
 There are three features that you should remember as you work within PowerPoint 2007: the Microsoft Office Button, the Quick Access Toolbar, and the Ribbon. The function of these features will be more
Introduction to Drupal
 Introduction to Drupal Login 2 Create a Page 2 Title 2 Body 2 Editor 2 Menu Settings 5 Attached Images 5 Authoring Information 6 Revision Information 6 Publishing Options 6 File Attachments 6 URL Path
Cascade Content Management System Training
 Cascade Content Management System Training 2 3 HOW TO LOGIN 1. Visit cms.unomaha.edu 2. Using your NetID and password, login in here. THE DASHBOARD Here is an example of the dashboard: CASCADE CONTENT
Web Portal User Guide. Version 6.0
 Web Portal User Guide Version 6.0 2013 Pitney Bowes Software Inc. All rights reserved. This document may contain confidential and proprietary information belonging to Pitney Bowes Inc. and/or its subsidiaries
Content Management System User Guide
 CWD Clark Web Development Ltd Content Management System User Guide Version 1.0 1 Introduction... 3 What is a content management system?... 3 Browser requirements... 3 Logging in... 3 Page module... 6 List
Microsoft Access 2010 handout
 Microsoft Access 2010 handout Access 2010 is a relational database program you can use to create and manage large quantities of data. You can use Access to manage anything from a home inventory to a giant
Sample Table. Columns. Column 1 Column 2 Column 3 Row 1 Cell 1 Cell 2 Cell 3 Row 2 Cell 4 Cell 5 Cell 6 Row 3 Cell 7 Cell 8 Cell 9.
 Working with Tables in Microsoft Word The purpose of this document is to lead you through the steps of creating, editing and deleting tables and parts of tables. This document follows a tutorial format
Custom Reporting System User Guide
 Citibank Custom Reporting System User Guide April 2012 Version 8.1.1 Transaction Services Citibank Custom Reporting System User Guide Table of Contents Table of Contents User Guide Overview...2 Subscribe
How to Edit Your Website
 How to Edit Your Website A guide to using your Content Management System Overview 2 Accessing the CMS 2 Choosing Your Language 2 Resetting Your Password 3 Sites 4 Favorites 4 Pages 5 Creating Pages 5 Managing
emarketing Manual- Creating a New Email
 emarketing Manual- Creating a New Email Create a new email: You can create a new email by clicking the button labeled Create New Email located at the top of the main page. Once you click this button, a
KEZBER CONTENT MANAGEMENT SYSTEM MANUAL
 KEZBER CONTENT MANAGEMENT SYSTEM MANUAL Page 1 Kezber Table Content Table Content 1. Introduction/Login... 3 2. Editing General Content... 4 to 8 2.1 Navigation General Content Pages... Error! Bookmark
Website Editor User Guide
 CONTENTS Minimum System Requirements... 3 Design Your Website... 3 Choosing your Theme... 4 Choosing your Header Style... 4-5 Website Content Editor... 6 Text Editor Toolbar features... 6 Main Menu Items...
NJCU WEBSITE TRAINING MANUAL
 NJCU WEBSITE TRAINING MANUAL Submit Support Requests to: http://web.njcu.edu/its/websupport/ (Login with your GothicNet Username and Password.) Table of Contents NJCU WEBSITE TRAINING: Content Contributors...
Starting User Guide 11/29/2011
 Table of Content Starting User Guide... 1 Register... 2 Create a new site... 3 Using a Template... 3 From a RSS feed... 5 From Scratch... 5 Edit a site... 6 In a few words... 6 In details... 6 Components
Teacher Training Session 1. Adding a Sub-Site (New Page) Editing a page and page security. Adding content cells. Uploading files and creating folders
 Editing a page and page security. Adding content cells. Uploading files and creating folders") Teacher Training Session 1 Adding a Sub-Site (New Page) Editing a page and page security Adding content cells Uploading files and creating folders Adding Sub Sites Sub Sites are the same as Sub Groups
Teacher Training Session 1 Adding a Sub-Site (New Page) Editing a page and page security Adding content cells Uploading files and creating folders Adding Sub Sites Sub Sites are the same as Sub Groups
WORDPRESS MANUAL WEBSITEDESIGN.CO.ZA
 WORDPRESS MANUAL WEBSITEDESIGN.CO.ZA All information presented in the document has been acquired from http://easywpguide.com/wordpress-manual/ to assist you with your website 1 WORDPRESS MANUAL WEBSITEDESIGN.CO.ZA
Maximizing the Use of Slide Masters to Make Global Changes in PowerPoint
 Maximizing the Use of Slide Masters to Make Global Changes in PowerPoint This document provides instructions for using slide masters in Microsoft PowerPoint. Slide masters allow you to make a change just
Quick Guide to the Cascade Server Content Management System (CMS)
") Quick Guide to the Cascade Server Content Management System (CMS) Waubonsee Community College Cascade Server Content Administration January 2011 page 1 of 11 Table of Contents Requirements...3 Logging
Quick Guide to the Cascade Server Content Management System (CMS) Waubonsee Community College Cascade Server Content Administration January 2011 page 1 of 11 Table of Contents Requirements...3 Logging
Creating Your Personal Website
 Creating Your Personal Website These instructions will show you how to create a personal webpage for CSULB students using Dreamweaver MX 2004. The page will consist of a title, background image, text,
Chapter 15: Forms. User Guide. 1 P a g e
 User Guide Chapter 15 Forms Engine 1 P a g e Table of Contents Introduction... 3 Form Building Basics... 4 1) About Form Templates... 4 2) About Form Instances... 4 Key Information... 4 Accessing the Form
Faculty Web Site with WCM
 Faculty Web Site with WCM WORKSHOP DESCRIPTION... 1 Overview 1 Prerequisites 1 Objectives 1 FACULTY WEB SITE WITH WCM... 2 Introduction 2 Getting Started 3 Understanding the Template 4 The WCM Layout
Access Edit Menu... 2. Edit Existing Page... 3. Auto URL Aliases... 5. Page Content Editor... 7. Create a New Page... 17. Page Content List...
 DRUPAL EDITOR Content Management Instructions TABLE OF CONTENTS Access Edit Menu... 2 Edit Existing Page... 3 Auto URL Aliases... 5 Page Content Editor... 7 Create a New Page... 17 Page Content List...
BUSINESS OBJECTS XI WEB INTELLIGENCE
 BUSINESS OBJECTS XI WEB INTELLIGENCE SKW USER GUIDE (Skilled Knowledge Worker) North Carolina Community College Data Warehouse Last Saved: 3/31/10 9:40 AM Page 1 of 78 Contact Information Helpdesk If you
Go Kiwi Internet Content Management System Version 5.0 (K5) TRAINING MANUAL
 TRAINING MANUAL") Go Kiwi Internet Content Management System Version 5.0 (K5) TRAINING MANUAL K5 CMS The K5 Content Management System (CMS), previously known as Kwik-Az Updating, is a small downloadable program that permits
Go Kiwi Internet Content Management System Version 5.0 (K5) TRAINING MANUAL K5 CMS The K5 Content Management System (CMS), previously known as Kwik-Az Updating, is a small downloadable program that permits
CMS USER GUIDE A MANUAL FOR CASCADE SERVER CONTENT MANAGEMENT SYSTEM (CMS)
") CMS USER GUIDE A MANUAL FOR CASCADE SERVER CONTENT MANAGEMENT SYSTEM (CMS) CMS USER GUIDE A MANUAL FOR CASCADE SERVER CONTENT MANAGEMENT SYSTEM (CMS) BRANDEIS UNIVERSITY LOGIN webedit.brandeis.edu LIVE
CMS USER GUIDE A MANUAL FOR CASCADE SERVER CONTENT MANAGEMENT SYSTEM (CMS) CMS USER GUIDE A MANUAL FOR CASCADE SERVER CONTENT MANAGEMENT SYSTEM (CMS) BRANDEIS UNIVERSITY LOGIN webedit.brandeis.edu LIVE
Microsoft PowerPoint 2010
 Microsoft PowerPoint 2010 Starting PowerPoint... 2 PowerPoint Window Properties... 2 The Ribbon... 3 Default Tabs... 3 Contextual Tabs... 3 Minimizing and Restoring the Ribbon... 4 The Backstage View...
ARCONICS CONTENT MANAGEMENT SYSTEM FOR UL
 ARCONICS CONTENT MANAGEMENT SYSTEM FOR UL MENU OPTION CLASSIFICATION MANAGER Creating a new classification / menu 1. Click Classification manager 2. Click on the plus sign beside WWW to expand the folders
ITP 101 Project 3 - Dreamweaver
 ITP 101 Project 3 - Dreamweaver Project Objectives You will also learn how to make a website outlining your company s products, location, and contact info. Project Details USC provides its students with
Where do I start? DIGICATION E-PORTFOLIO HELP GUIDE. Log in to Digication
 You will be directed to the "Portfolio Settings! page. On this page you will fill out basic DIGICATION E-PORTFOLIO HELP GUIDE Where do I start? Log in to Digication Go to your school!s Digication login
Course Exercises for the Content Management System. Grazyna Whalley, Laurence Cornford June 2014 AP-CMS2.0. University of Sheffield
 Course Exercises for the Content Management System. Grazyna Whalley, Laurence Cornford June 2014 AP-CMS2.0 University of Sheffield PART 1 1.1 Getting Started 1. Log on to the computer with your usual username
Version 7 Editor s Manual
 Version 7 Editor s Manual Contents 1. Introduction... 3 2. Getting started with Umbraco... 2.1 Logging In and Out... 2.2 Umbraco Interface... 2.2.1 Initial View... 2.2.2 Various Screen Sizes... 2.3 Creating,
Help on Icons and Drop-down Options in Document Editor
 Page 1 of 5 Exact Synergy Enterprise Help on Icons and Drop-down Options in Document Editor Introduction The following table provides descriptions on the icons and drop-down options that are available
UHR Training Services Student Manual
 UHR Training Services Student Manual October 2012 1 Logging in to CareWorks Clicking the copyright symbol on the bottom left of the footer takes you to the sign-in screen and then to the control panel.
Web Content Management Training Manualv3
 City & County of San Francisco Powered by Innovation DT City & County of Sa Departme Techno Powered by Innova DEPARTMENT OF TECHNOLOGYDT Web Content Management Training Manualv3 Department of Technology
WYSIWYG Tips and FAQ
 WYSIWYG Tips and FAQ Version 1.0 WYSIWYG: What you see is what you get. This is an abbreviation for the type of editor Acalog uses. You will layout your content in the editor, and when you hit preview,
Introduction to Microsoft Access 2010
 Introduction to Microsoft Access 2010 A database is a collection of information that is related. Access allows you to manage your information in one database file. Within Access there are four major objects:
DRUPAL WEB EDITING TRAINING
 LOGIN AND VIEW CONTENT Work in Firefox DRUPAL WEB EDITING TRAINING the black logo in the upper right corner to log into Drupal The User Work Area will come up: General Information My Recent Edits the content
Web Mail Classic Web Mail
 April 14 Web Mail Classic Web Mail Version 2.2 Table of Contents 1 Technical Requirements... 4 2 Accessing your Web Mail... 4 3 Web Mail Features... 5 3.1 Home... 5 3.1.1 Mailbox Summary... 5 3.1.2 Announcements...
CMS Training Manual. A brief overview of your website s content management system (CMS) with screenshots. CMS Manual
 with screenshots. CMS Manual") Training A brief overview of your website s content management system () with screenshots. 1 Contents Logging In:...3 Dashboard:...4 Page List / Search Filter:...5 Common Icons:...6 Adding a New Page:...7
Training A brief overview of your website s content management system () with screenshots. 1 Contents Logging In:...3 Dashboard:...4 Page List / Search Filter:...5 Common Icons:...6 Adding a New Page:...7
CMS Basic Training. Getting Started
 The (Content Management System), was designed to allow most people in an organization to contribute to or edit their website(s). Utilizing a set of templates and stylesheets, users can add or edit information
Outlook. Getting Started Outlook vs. Outlook Express Setting up a profile Outlook Today screen Navigation Pane
 Outlook Getting Started Outlook vs. Outlook Express Setting up a profile Outlook Today screen Navigation Pane Composing & Sending Email Reading & Sending Mail Messages Set message options Organizing Items
Microsoft PowerPoint 2010 Computer Jeopardy Tutorial
 Microsoft PowerPoint 2010 Computer Jeopardy Tutorial 1. Open up Microsoft PowerPoint 2010. 2. Before you begin, save your file to your H drive. Click File > Save As. Under the header that says Organize
NDSU Technology Learning & Media Center. Introduction to Google Sites
 NDSU Technology Learning & Media Center QBB 150C 231-5130 www.ndsu.edu/its/tlmc Introduction to Google Sites Get Help at the TLMC 1. Get help with class projects on a walk-in basis; student learning assistants
UNPAN Portal Content Management System (CMS) User Guide
 User Guide") UNPAN Portal Content Management System (CMS) User Guide www.unpan.org User Manual Version 1.0 260309 Page 1 of 36 Table of Contents A. UNPAN Sitemap... 3 B. DPADM Sitemap... 4 C. Introduction to UNPAN
UNPAN Portal Content Management System (CMS) User Guide www.unpan.org User Manual Version 1.0 260309 Page 1 of 36 Table of Contents A. UNPAN Sitemap... 3 B. DPADM Sitemap... 4 C. Introduction to UNPAN