Joomla! 2.5.x Training Manual
|
|
|
- Georgina Barnett
- 10 years ago
- Views:
Transcription
1 Joomla! 2.5.x Training Manual Joomla is an online content management system that keeps track of all content on your website including text, images, links, and documents. This manual includes several tutorials to teach you some basic content management skills on Joomla, including updating text, uploading images, building menus, and creating links. Please note that Joomla is an extensive system and this document only covers basic operation. To learn more about Joomla s advanced functionality, please visit the documentation section of 1
2 1.0 Overview For content management, Joomla divides into two basic components: the Article Manager and the Menu Manager. The Article Manager is the place you will make changes to each individual page on your site. Here you can change the text on your pages, upload images, or add links. It is important to remember that all content changes will take place in the Article Manager. The Menu Manager is where you make changes to the navigation menus of the website. All your menus can be edited here. It is important to remember that all navigation changes will take place in the Menu Manager. 2.0 Logging in to Joomla In order to make changes to your website using the Joomla Content Management System, you must access the administrative portion of the website. The administrative section is where all site maintenance and development takes place. In order to access this portion of your site, you need to type a special web address into the address bar of your browser: 2
3 1. Type the address into your web browser ( yoursitesname should be replaced by the name of the website you are editing). 2. Since the administrative portion of the website is where important and irreversible changes take place, you need a user name and password to access it. Enter your user name and password when prompted to do so. Note, only users with Administrative Access can access this section. Once you successfully login to the administrative section of your website, you will see the Administrator Control Panel. From this page, you will access the Article Manager and Menu Manager to make your content changes. 3
4 4

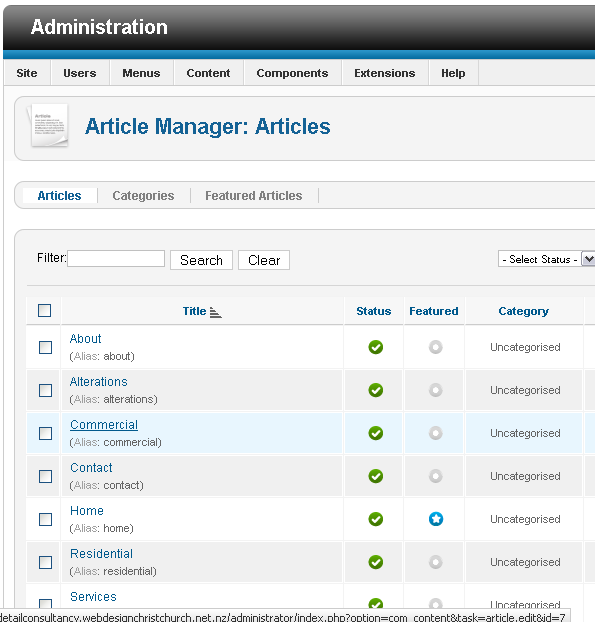
5 Notice that you can access the Article Manager and the Menu Manager from the large icons on this screen. You can also always find the Article and Menu Managers in the top bar under the headings Menus and Content. Article Manager 1. Overview The Article Manager is the place to make changes to the content on each individual web page. Each content page is called an Article, and you will have a separate Article for each page on your site. From here, you can add text, links, images, and whatever else you might want to the content portion of your web site. On the top bar menu, drag your mouse over Content. When the drop down menu appears, click on the Article Manager. 5
6 The Article Manager has two areas to be concerned with, the Article Manager Menu and the List of Articles. In the Article Manager 6
7 Menu, there are several buttons that are essential to understand, and some that are not. 1. New: Creates a brand new article item. 2. Edit: Opens a selected article for content editing (note: Articles can also be edited by clicking directly on their name in the Article List). 3. Publish/Unpublish: Makes the selected article visible (published) or not visible (unpublished) on the front end web site. Featured: Sets an article as a homepage. Not necessary to understand for basic use. 4. Unarchive/Archive: Not necessary to understand for basic use. 5. Check In: Unlocks articles that have a padlock icon next to them which occurs if someone else is editing them or where the article screen hasn t been closed properly. 6. Trash: Deletes a selected article. To delete an article, first select it by checking the box next to the article title in the List of Articles, then click delete on the Article Manager Menu. 7. Options: Not necessary to understand for basic use. 8. Help: Click for on line help regarding the Article Manager. Can t find your article? If the menu is confusing, look at the box Selection and choose Category. This will bring up different levels of headings. Creating a New Article 7
8 8
9 1. On the Article Manager Menu, click the New button. 2. Before you do anything else, you must give your article a title, an alias, and a section. a. In the title box, give your article a good name such as Home Page. b. Your article also needs an alias. We recommend using the same name as your title. c. Set the article s section to Uncategorized. d. Make sure the article is set to Published and the category is set to Uncategorized. e. If the article is going to appear on the main front page of the site, set Front Page to Yes. Otherwise, leave it at No. f. Click the Save button located on the top menu. g. Open the webpage in a browser and click refresh to see the changes reflected on the live site. When you want to go back to where you were, click Close (this looks similar to the Cancel button) Editing an Existing Article In this tutorial the basic functions of the Content Management System (CMS) Editor will be outlined. The CMS Editor is the tool you will use to edit the content of your articles including text, images, and links. 1. In the Article Manager, click on the title of an article that you would like to edit. On the next screen, you should see a large text area box with this tool bar at the top: 9

 otherwise you will end up with hieroglyphics everywhere.")
10 This tool bar contains a number of ways you can manipulate the content of your article. Some of them should look familiar to you, such as the bold, italic, underline and justification buttons at the top left of the tool bar. DO NOT COPY straight from Word. Word and html are like oil and water. Paste your word copy into Notepad or Wordpad (Programs, Accessories, Notepad/Wordpad) otherwise you will end up with hieroglyphics everywhere. Other tools will require an explanation: Format Drop Down Menu - This drop-down menu is for making headings on your article. To make text appear as a main heading, set this box to Heading 1. To make the text appear as a secondary heading, set this box to Heading 2. 10

11 Font Family Drop Down Menu This menu is used to choose the font family. We have already styled your site so you don t need to play with this menu. Change Font Color This button allows you to specify a font color for your text. Insert/Edit Image Button - This button will allow you to insert & edit images. (See 1.5 Images) Add / Remove Hyperlink These buttons are used to add, edit, and remove hyperlinks. Please see the Hyperlinks in an Article section for more information on the use of these buttons. Bullets / Numbering Button These buttons allow you to put bulleted points or numbered lists on your article. Undo / Redo If you make a mistake that you do not like, click the Undo button to return to the previous state, canceling the changes that were made. Click in the field located below the tool bar and type something. Whatever you type in here will appear on your web page. 11
12 Use tables to optimize your page layout For an inner page with photos and text, you can insert a table so the page looks nice and tidy. To put your text and photos under 3 columns, you would use a table like the following one: Insert a new table This button allows to create a new table on your article. Once using it, you will be able to set up your table properties: set up the number of rows and columns. For a table like the one above: 5 Cols and 3 Rows. 12

13 You will get a small table, you need to fill it with your content prior to setting the cells properties. Make sure to leave one empty column or row free between two full cells so their content is not too close. Table cell properties This button allows you to set up one cell properties. Click on one cell and set up the alignment (center, left or right) and the vertical alignment (top, center or bottom). Set up the width to make the content cells identical and the empty cells identical. Use percentage: for the example table, put 30% for the 3 cells in a row that are filled with content and 5% for the 2 empty cells which make the gaps between content. Adjust the % according to the number of columns you want in your table and how you want your table to look. If you want the cell properties to apply to all the cells in a row or in the table, choose Update all cells in row or Update all cells in table on Update button. 13

14 It is also possible to set up some borders and a background color for your table. Do a right click on a cell and choose Table properties. Go to the Advanced tab and click on the Browse icon on for either Border color or Background color. Choose the color you like in the Picker pop up. Once your table is finished, do not forget to click on the Save button at the top of the article to save the changes you have made on your article. 14
15 Hyperlinks in an Article Creating a Hyperlink - In Joomla, inserting hyperlinks into your web content is easy. Follow these steps: Before you start, open your web site in a different tab and find the page you want to link to. Copy the URL address from the browser. 1. Highlight the text that you wish to make into a link by clicking and dragging: 15
16 2. Click on the Add/Edit Hyperlink button on the CMS Tool bar. 3. In the URL field, type the full web address of the page you want to link to: Example: (Note: is REQUIRED for the link to work properly) or find the website article by browsing through Contacts, Content, Menu or Weblinks. If you want to link to a file, click on the button to the right of the URL field and find the file on the server. 4. In the Target drop down, choose behaviour of the link. We recommend links to other websites always open up in a new window. If it is within your own site, it can replace the current window. Or you can set it to be a pop up box. 5. In the Title box, type the title of the web site you are linking to. 6. Press Insert. 16
17 17
18 Uploading and Displaying Images Illustrating your articles with images is a good way to make them more attractive and informative at the same time. In order to place images on the web in your article, there are two steps that must be completed. First, the image must be uploaded to the web. This is followed by actually placing the image in your article. Both of these functions are completed with the CMS Editor in the Article Manager. Note about image file sizes: It is important that you check the file size of the image and make sure it is not too large before uploading. Often times the images taken directly from digital cameras are too large for web display, so be sure to adjust the file size to no more than 100 KB (this is a large pic) using photo editing software. PC s don t really come with a good photo editor. We recommend Irfanview, a free download that allows you to resize images easily. It is not easy to work out in Internet Explorer what size to set your image to. An easy way is to download the browser Firefox. Open up the site in Firefox, right click on the image, select properties and it will tell you the size. Note about image pixel sizes: Your image will always display best by resizing it to the size you want BEFORE uploading it. Taking a large image and resizing it once it is in the browser will often cause it to look grainy or distorted. Always use an image editor before uploading to make sure your image is the right size and quality (this is not outlined in the manual). Uploading Images 1. Ensure that you have your image saved somewhere locally. 2. Log into the Joomla Administrator area and click on Article Manager. Scroll through [or apply a filter to] the list of pages (articles) and select the one that you will be adding an image to. 18
19 Joomla main dashboard. Select Article Manager 19
20 20
21 Find the relevant article that you would like to add the image to. 3. Click within the body of the article editor and position the cursor where you would like to insert the image. Click on the Image button that is underneath the editing screen (shown at the very bottom of the below screenshot) to upload the image to the server. 21
22 22
23 4. A window will open where you are able to select the image from your local computer. Click browse and locate the image. Make sure the upload path is correct in the preview panel and, if it is not, select the folder that the image is to be uploaded into. Click Start Upload. 23
24 A successful upload will yield the following message: 24
25 5. Ensuring that the cursor is still positioned where you would like to place the image, click on the Insert Image button in the editor s toolbar. This button resembles a landscape picture. A window will come up which shows the file structure on the server (shown on next page). 25
26 6. Locate where you have uploaded the file and select it by clicking on the filename that will appear in the middle column. Some properties will populate themselves based on the file information in the upper frame of the window. 26
27 Note that the Alternative Text field is where any image alt tags are entered (for keywording/ search engine optimisation). Dimensions gives you control over how large the image will appear. You can use these fields to make small pixel adjustments to size say changing a picture from 200 pixels to 100 pixels in width. You would not use this field to change an image from 1800 pixels wide to 200 pixels because this will not crop an image to make it smaller in filesize (affecting the space that it takes up on the server and also page loading time) but rather visually reduces the appearance. Having the Proportional box ticked means that if you change the width, then the height will adjust to keep the same height/width ratio. The Alignment option will allow you to position the image. This is especially important when working with tables so that you can place the image at the justification which best suits the table cell layout. Margin allows you to control how much spacing appears at top, right, bottom and left. Uncheck Equal Values to have varying spaces. Often, you will left-align a picture and then allow a 10px Margin at Right so that the text does not run right up against the edge of the image. Borders are seldom used but give you the option to frame an image. 7. Click insert and the image will appear on the page. From the very top right of the Joomla screen, click Save and the adjustments will be reflected on the live site. 1. Overview Search Engine Optimisation Under Article Manager, there are several things you can do to give the search engines clues about the key words you want your site to be found on. This is very important for attracting traffic to your site and appearing on page one for searches. Select the Article page you wish to modify. On the right hand side of the Article Manager when you have selected an article, you will see a heading Metadata Options. Click on this arrow. The Meta description is the paragraph that is normally shown when someone does a search for something. It needs your keywords. Keywords can be a list, with commas of the phrases you want that page to be found on. You should also insert your keywords in Alt Tags. This was mentioned in the section on uploading images. It is not so much for visitors to see, but for robots to help repetition of that keyword throughout the page so the robots know what to index that page on. 27
28 Adding Meta Title (Page Title) Content 1. To add meta title information, firstly find the page you want to change in the menu. 28
29 29
30 Hover over the link Menu in the top left hand corner of the administration area and click on the relevant menu (the menu that the page you want to edit is in). 2. Click on the menu item that you wish to edit. Then expand the box on the right hand side of the page that Page Display Options. 30
31 3. Add the optimised page title into the Browser Page Title Field and make sure that Show Page Heading has No selected. Do not modify the other settings unless you know what you re doing. Simply click save. Menu Manager Overview The Menu Manager is where the navigation for the website is built. The navigation is the system of menus on the top and left hand side of the page that will let the user navigate through all the different Articles. The Menu Manager is grouped by individual menus e.g. top menu, left hand menu, and in each one of these groups there is a list of Menu Items, or the individual links that will appear on the navigation. 31
32 Hover over the link Menu in the top left hand corner of the administration area and click on the relevant menu (the menu that the page you want to edit is in). 2. Click on the menu item that you wish to edit. Then expand the box on the right hand side of the page that says MENU item meta data. 3. Add the meta information that you want to add and click save. 32
33 33
34 1a. Drag your mouse pointer over the Menus label on the top bar navigation as pictured. In the drop down menu, you can see each separate menu grouping on the site. Clicking on one will produce a list of each individual menu item located on the menu. Click on Main Menu. 34
35 35
36 2. Creating a Menu Item Before you can create a menu item, you have to have already created the Article it will link to, in Article Manager. In order to make menus for your website, you have to decide what pages (Articles) the menus should link to. Each one of the links is called a Menu Item. For this tutorial, make sure you are in the Main Menu group of the Menu Manager. 2a. Click the New button at the top right of the Menu Manager. 36
37 2b. Next, you must select what your Menu Item will be linking to. Click the Select button to the right of Menu Item Type and then choose Single Article. This will always be the proper choice to select as long as you are linking to one of your Articles. 37
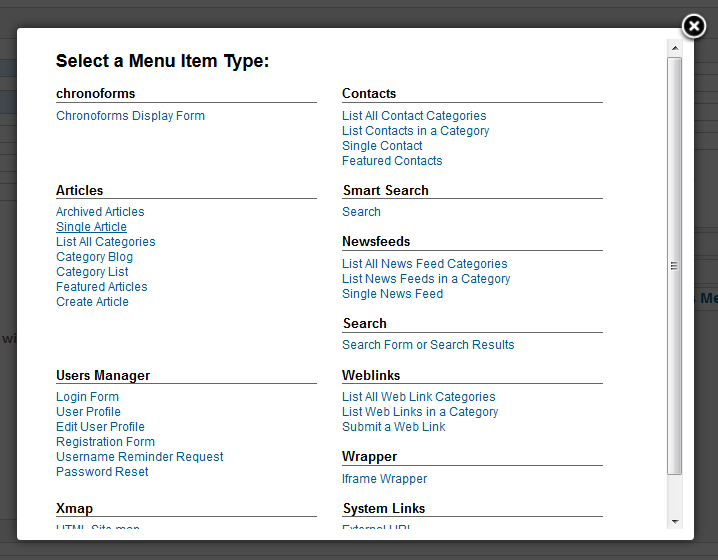
38 38
39 From the right hand side of the screen, you can select the Article to which the menu will point to. Click the Select/Change button and browse through the articles (or apply a search filter in the search field at the top) until you find the appropriate one for the menu. 39
40 2c. Give your Menu Item a name in the Menu Title field and an alias in the Alias field (the alias is the suffix e.g. if you want your page to be called the alias will be /careers. Once this is completed, click Save. If you take a look on your public website, you should see the new menu item on the Main Menu of the site, linking to your content item. 3. Editing an Existing Menu Item It is possible to edit all the attributes of existing Menu Items as well. This is done by simply clicking on the name of the Menu Item 40
41 in the Menu Manager. The same interface appears as explained when creating a new Menu Item There are several options for editing and customizing Menu Items: 3a. Menu Location This drop down menu specifies which Menu the Menu Item will be displayed in. 3b. Parent Item The Parent Item box will specify any sub-menus that exist. It is possible to create a Menu Item as a subheading under another Menu Item. This can create a nice, multi-tiered navigation structure. 3c. Published This specifies whether or not the Menu Item will be visible on the front-end page. The other options in this window are not necessary to be familiar with for basic use. 41
42 V. FTP with FileZilla 1. Overview A tool that is needed for linking your site to content such as PDF and Office documents is called File Transfer Protocol (FTP) 42
43 software. FTP software is very useful for both uploading documents and files to your web server and downloading files from it to your desktop. The FTP program that is recommended is called FileZilla and can be found free for download at Here is what the FileZilla interface looks like: 43
44 44
45 As you can see, the screen is divided into several boxes. The boxes on the left are used to navigate through the files on your desktop. The boxes on the right are used to navigate your site. It is important to understand this distinction, and the rest is quite easy. 2. Using FileZilla to transfer files Before you can begin transferring files back and forth to your website with FileZilla, you must first connect to the site s server. 1. At the top-left corner of the FileZilla box, click on the Site Manager icon. 2. Click New Site from the left hand panel and give your site a name - e.g. mydomain.co.nz. In the 'Host' field, type in the IP address of your hosting server. This will have been issued to you by Alexanders. Select 'Normal' from Logon Type and then enter in your FTP username and password in the relevant fields. This is all you need enter. Click OK to save the information. Click on Site Manager once more and select your site's profile from the left hand panel. Click Connect. 3. Remember that the left boxes are your computer and the right boxes are the web server. On the right, click on the folder that says public_html. Next click on the folder that says images. This is the directory that you will save all media in. 4. To upload a file, you must locate it on your computer (the left box) by navigating through the folders to the one you saved the file in. 5. Double click on the file you want to upload, and it will appear in the right box, right in the images folder you have selected. 3. Note about File Paths To link your website to a certain file that you have uploaded, you must know the location, or path of the file. Then, you can create a link to the file in your content item just as if you were linking to another page or site. For example, let us say that you want to hyper link to a file called abc.pdf, and the file is uploaded into the images folder on the server. 45
46 1. Go to the Article Manager and edit the article that you want to link to the PDF. 2. Create a link just as if you were linking to another web page. 3. Instead of linking to another page, we will link directly to this PDF file: 4. In the URL box, type where yoursite equals yourweb sites address, and abc.pdf equals the name of the file you are linking to. Note: Remember to always include a proper suffix (.pdf,.xls,.mp3, etc.) at the end of your file name when linking to your file. Additional Note: Also, remember to begin your file path with as in 46
47 Manual compiled with love by Alexanders Internet Marketing 47
JOOMLA 2.5 MANUAL WEBSITEDESIGN.CO.ZA
 JOOMLA 2.5 MANUAL WEBSITEDESIGN.CO.ZA All information presented in the document has been acquired from http://docs.joomla.org to assist you with your website 1 JOOMLA 2.5 MANUAL WEBSITEDESIGN.CO.ZA BACK
Ingeniux 8 CMS Web Management System ICIT Technology Training and Advancement ([email protected])
") Ingeniux 8 CMS Web Management System ICIT Technology Training and Advancement ([email protected]) Updated on 10/17/2014 Table of Contents About... 4 Who Can Use It... 4 Log into Ingeniux... 4 Using Ingeniux
Ingeniux 8 CMS Web Management System ICIT Technology Training and Advancement ([email protected]) Updated on 10/17/2014 Table of Contents About... 4 Who Can Use It... 4 Log into Ingeniux... 4 Using Ingeniux
Adobe Dreamweaver CC 14 Tutorial
 Adobe Dreamweaver CC 14 Tutorial GETTING STARTED This tutorial focuses on the basic steps involved in creating an attractive, functional website. In using this tutorial you will learn to design a site
Creating Personal Web Sites Using SharePoint Designer 2007
 Creating Personal Web Sites Using SharePoint Designer 2007 Faculty Workshop May 12 th & 13 th, 2009 Overview Create Pictures Home Page: INDEX.htm Other Pages Links from Home Page to Other Pages Prepare
CMS Training Manual. A brief overview of your website s content management system (CMS) with screenshots. CMS Manual
 with screenshots. CMS Manual") Training A brief overview of your website s content management system () with screenshots. 1 Contents Logging In:...3 Dashboard:...4 Page List / Search Filter:...5 Common Icons:...6 Adding a New Page:...7
Training A brief overview of your website s content management system () with screenshots. 1 Contents Logging In:...3 Dashboard:...4 Page List / Search Filter:...5 Common Icons:...6 Adding a New Page:...7
Joomla Article Advanced Topics: Table Layouts
 Joomla Article Advanced Topics: Table Layouts An HTML Table allows you to arrange data text, images, links, etc., into rows and columns of cells. If you are familiar with spreadsheets, you will understand
WEBSITE CONTENT MANAGEMENT SYSTEM USER MANUAL CMS Version 2.0 CMS Manual Version 1.0 2-25-13
 WEBSITE CONTENT MANAGEMENT SYSTEM USER MANUAL CMS Version 2.0 CMS Manual Version 1.0 2-25-13 CONTENTS Things to Remember... 2 Browser Requirements... 2 Why Some Areas of Your Website May Not Be CMS Enabled...
CONTENTM WEBSITE MANAGEMENT SYSTEM. Getting Started Guide
 CONTENTM WEBSITE MANAGEMENT SYSTEM Getting Started Guide Table of Contents CONTENTM WEBSITE MANAGEMENT SYSTEM... 1 GETTING TO KNOW YOUR SITE...5 PAGE STRUCTURE...5 Templates...5 Menus...5 Content Areas...5
Introduction to Drupal
 Introduction to Drupal Login 2 Create a Page 2 Title 2 Body 2 Editor 2 Menu Settings 5 Attached Images 5 Authoring Information 6 Revision Information 6 Publishing Options 6 File Attachments 6 URL Path
Go Kiwi Internet Content Management System Version 5.0 (K5) TRAINING MANUAL
 TRAINING MANUAL") Go Kiwi Internet Content Management System Version 5.0 (K5) TRAINING MANUAL K5 CMS The K5 Content Management System (CMS), previously known as Kwik-Az Updating, is a small downloadable program that permits
Go Kiwi Internet Content Management System Version 5.0 (K5) TRAINING MANUAL K5 CMS The K5 Content Management System (CMS), previously known as Kwik-Az Updating, is a small downloadable program that permits
Using Adobe Dreamweaver CS4 (10.0)
") Getting Started Before you begin create a folder on your desktop called DreamweaverTraining This is where you will save your pages. Inside of the DreamweaverTraining folder, create another folder called
Getting Started Before you begin create a folder on your desktop called DreamweaverTraining This is where you will save your pages. Inside of the DreamweaverTraining folder, create another folder called
Mura CMS. (Content Management System) Content Manager Guide
 Content Manager Guide") Mura CMS (Content Management System) Content Manager Guide Table of Contents Table of Contents 1. LOGGING IN...1 2. SITE MANAGER...2 3. ADDING CONTENT (Pages, Folders, etc.)...6 4. WORKING WITH IMAGES...15
Mura CMS (Content Management System) Content Manager Guide Table of Contents Table of Contents 1. LOGGING IN...1 2. SITE MANAGER...2 3. ADDING CONTENT (Pages, Folders, etc.)...6 4. WORKING WITH IMAGES...15
Redback Solutions. Visionscape Manual
 Redback Solutions Visionscape Manual Updated 31/05/2013 1 Copyright 2013 Redback Solutions Pty Ltd. All rights reserved. The Visionscape Content Management System (CMS) may not be copied, reproduced or
ITP 101 Project 3 - Dreamweaver
 ITP 101 Project 3 - Dreamweaver Project Objectives You will also learn how to make a website outlining your company s products, location, and contact info. Project Details USC provides its students with
Terminal Four (T4) Site Manager
 Site Manager") Terminal Four (T4) Site Manager Contents Terminal Four (T4) Site Manager... 1 Contents... 1 Login... 2 The Toolbar... 3 An example of a University of Exeter page... 5 Add a section... 6 Add content to
Terminal Four (T4) Site Manager Contents Terminal Four (T4) Site Manager... 1 Contents... 1 Login... 2 The Toolbar... 3 An example of a University of Exeter page... 5 Add a section... 6 Add content to
How to Edit Your Website
 How to Edit Your Website A guide to using your Content Management System Overview 2 Accessing the CMS 2 Choosing Your Language 2 Resetting Your Password 3 Sites 4 Favorites 4 Pages 5 Creating Pages 5 Managing
Quick Reference Guide
 Simplified Web Interface for Teachers Quick Reference Guide Online Development Center Site Profile 5 These fields will be pre-populated with your information { 1 2 3 4 Key 1) Website Title: Enter the name
To change title of module, click on settings
 HTML Module: The most widely used module on the websites. This module is very flexible and is used for inserting text, images, tables, hyperlinks, document downloads, and HTML code. Hover the cursor over
Cascade Server. End User Training Guide. OIT Training and Documentation Services OIT TRAINING AND DOCUMENTATION. oittraining@uta.
 OIT Training and Documentation Services Cascade Server End User Training Guide OIT TRAINING AND DOCUMENTATION [email protected] http://www.uta.edu/oit/cs/training/index.php 2013 CONTENTS 1. Introduction
Course Exercises for the Content Management System. Grazyna Whalley, Laurence Cornford June 2014 AP-CMS2.0. University of Sheffield
 Course Exercises for the Content Management System. Grazyna Whalley, Laurence Cornford June 2014 AP-CMS2.0 University of Sheffield PART 1 1.1 Getting Started 1. Log on to the computer with your usual username
+ Create, and maintain your site
 T4 Basics Version 1.0 + Create, and maintain your site With T4, you are in control of the content of your website. Feel free to be creative, and keep your site up to date. Few of T4 Features Media Library
Where do I start? DIGICATION E-PORTFOLIO HELP GUIDE. Log in to Digication
 You will be directed to the "Portfolio Settings! page. On this page you will fill out basic DIGICATION E-PORTFOLIO HELP GUIDE Where do I start? Log in to Digication Go to your school!s Digication login
DRUPAL WEB EDITING TRAINING
 LOGIN AND VIEW CONTENT Work in Firefox DRUPAL WEB EDITING TRAINING the black logo in the upper right corner to log into Drupal The User Work Area will come up: General Information My Recent Edits the content
Web Ambassador Training on the CMS
 Web Ambassador Training on the CMS Learning Objectives Upon completion of this training, participants will be able to: Describe what is a CMS and how to login Upload files and images Organize content Create
Managing your Joomla! 3 Content Management System (CMS) Website Websites For Small Business
 Website Websites For Small Business") 2015 Managing your Joomla! 3 Content Management System (CMS) Website Websites For Small Business This manual will take you through all the areas that you are likely to use in order to maintain, update
2015 Managing your Joomla! 3 Content Management System (CMS) Website Websites For Small Business This manual will take you through all the areas that you are likely to use in order to maintain, update
OU Campus Web Content Management
 DRAFT DRAFT DRAFT DRAFT DRAFT DRAFT DRAFT DRAFT DRAFT DRAFT DRAFT DRAFT DRAFT DRAFT DRAFT DRAFT DRAFT OU Campus Web Content Management Table of Contents OU Campus Web Content Management... 1 Introduction
Content Management System User Guide
 Content Management System User Guide support@ 07 3102 3155 Logging in: Navigate to your website. Find Login or Admin on your site and enter your details. If there is no Login or Admin area visible select
To familiarise University Web administration staff with the capabilities of the University CMS and also introduce concepts of Web marketing.
 Web Training Course: Web Editing - How to use the Content Management System (CMS). Version 1.0 Draft October 2006 Version 1.1 March 2007 Version 1.2 April 2007 Course Rationale: The University is currently
UW WEB CONTENT MANAGEMENT SYSTEM (CASCADE SERVER)
") UW WEB CONTENT MANAGEMENT SYSTEM (CASCADE SERVER) LEVEL 1 Information Technology Presented By: UW Institutional Marketing and IT Client Support Services University of Wyoming UW CONTENT MANAGEMENT SYSTEM
UW WEB CONTENT MANAGEMENT SYSTEM (CASCADE SERVER) LEVEL 1 Information Technology Presented By: UW Institutional Marketing and IT Client Support Services University of Wyoming UW CONTENT MANAGEMENT SYSTEM
Caldes CM12: Content Management Software Introduction v1.9
 Caldes CM12: Content Management Software Introduction v1.9 Enterprise Version: If you are using Express, please contact us. Background Information This manual assumes that you have some basic knowledge
Introduction to Macromedia Dreamweaver MX
 Introduction to Macromedia Dreamweaver MX Macromedia Dreamweaver MX is a comprehensive tool for developing and maintaining web pages. This document will take you through the basics of starting Dreamweaver
Jadu Content Management Systems Web Publishing Guide. Table of Contents (click on chapter titles to navigate to a specific chapter)
") Jadu Content Management Systems Web Publishing Guide Table of Contents (click on chapter titles to navigate to a specific chapter) Jadu Guidelines, Glossary, Tips, URL to Log In & How to Log Out... 2 Landing
Jadu Content Management Systems Web Publishing Guide Table of Contents (click on chapter titles to navigate to a specific chapter) Jadu Guidelines, Glossary, Tips, URL to Log In & How to Log Out... 2 Landing
RADFORD UNIVERSITY. Radford.edu. Content Administrator s Guide
 RADFORD UNIVERSITY Radford.edu Content Administrator s Guide Contents Getting Started... 2 Accessing Content Administration Tools... 2 Logging In... 2... 2 Getting Around... 2 Logging Out... 3 Adding and
Virtual Exhibit 5.0 requires that you have PastPerfect version 5.0 or higher with the MultiMedia and Virtual Exhibit Upgrades.
 28 VIRTUAL EXHIBIT Virtual Exhibit (VE) is the instant Web exhibit creation tool for PastPerfect Museum Software. Virtual Exhibit converts selected collection records and images from PastPerfect to HTML
Site Maintenance. Table of Contents
 Site Maintenance Table of Contents Adobe Contribute How to Install... 1 Publisher and Editor Roles... 1 Editing a Page in Contribute... 2 Designing a Page... 4 Publishing a Draft... 7 Common Problems...
Content Management System
 OIT Training and Documentation Services Content Management System End User Training Guide OIT TRAINING AND DOCUMENTATION [email protected] http://www.uta.edu/oit/cs/training/index.php 2009 CONTENTS 1.
Sample Table. Columns. Column 1 Column 2 Column 3 Row 1 Cell 1 Cell 2 Cell 3 Row 2 Cell 4 Cell 5 Cell 6 Row 3 Cell 7 Cell 8 Cell 9.
 Working with Tables in Microsoft Word The purpose of this document is to lead you through the steps of creating, editing and deleting tables and parts of tables. This document follows a tutorial format
Terminal 4 Site Manager User Guide. Need help? Call the ITD Lab, x7471
 Need help? Call the ITD Lab, x7471 1 Contents Introduction... 2 Login to Terminal 4... 2 What is the Difference between a Section and Content... 2 The Interface Explained... 2 Modify Content... 3 Basic
Content Management System User Guide
 CWD Clark Web Development Ltd Content Management System User Guide Version 1.0 1 Introduction... 3 What is a content management system?... 3 Browser requirements... 3 Logging in... 3 Page module... 6 List
NJCU WEBSITE TRAINING MANUAL
 NJCU WEBSITE TRAINING MANUAL Submit Support Requests to: http://web.njcu.edu/its/websupport/ (Login with your GothicNet Username and Password.) Table of Contents NJCU WEBSITE TRAINING: Content Contributors...
Umbraco Content Management System (CMS) User Guide
 User Guide") Umbraco Content Management System (CMS) User Guide Content & media At the bottom-left of the screen you ll see 2 main sections of the CMS Content and Media. Content is the section that displays by default
Umbraco Content Management System (CMS) User Guide Content & media At the bottom-left of the screen you ll see 2 main sections of the CMS Content and Media. Content is the section that displays by default
Editing your Website User Guide
 User Guide Adding content to your Website To add or replace content on your website you will need to log in to your Content Management System (Joomla) using your username and password. If you do not already
Sage Accountants Business Cloud EasyEditor Quick Start Guide
 Sage Accountants Business Cloud EasyEditor Quick Start Guide VERSION 1.0 September 2013 Contents Introduction 3 Overview of the interface 4 Working with elements 6 Adding and moving elements 7 Resizing
Vodafone Business Product Management Group. Hosted Services EasySiteWizard Pro 8 User Guide
 Vodafone Business Product Management Group Hosted Services EasySiteWizard Pro 8 User Guide Vodafone Group 2010 Other than as permitted by law, no part of this document may be reproduced, adapted, or distributed,
HOW TO USE THIS GUIDE
 HOW TO USE THIS GUIDE This guide provides step-by-step instructions for each exercise. Anything that you are supposed to type or select is noted with various types and colors. WHEN YOU SEE THIS Click Help
Login: https://ipfw.edu/c Quick Guide for dotcms & Accessibility November 2014 Training: http://ipfw.edu/training
 dotcms & Accessibility Folders Creating a New Folder Note: All folders showing on menu must have an index page. 1. Right-click the parent folder in which the new folder will reside. 2. Click New > Folder.
Working with the Ektron Content Management System
 Working with the Ektron Content Management System Table of Contents Creating Folders Creating Content 3 Entering Text 3 Adding Headings 4 Creating Bullets and numbered lists 4 External Hyperlinks and e
State of Nevada. Ektron Content Management System (CMS) Basic Training Guide
 Basic Training Guide") State of Nevada Ektron Content Management System (CMS) Basic Training Guide December 8, 2015 Table of Contents Logging In and Navigating to Your Website Folders... 1 Metadata What it is, How it Works...
State of Nevada Ektron Content Management System (CMS) Basic Training Guide December 8, 2015 Table of Contents Logging In and Navigating to Your Website Folders... 1 Metadata What it is, How it Works...
darlingharbour.com Content Management System Tenant User Guide
 darlingharbour.com Content Management System Tenant User Guide August 2014 Table of Contents 1 Introduction... 1 2 Getting started... 1 2.1 Requirements...1 2.2 Logging in...1 2.3 Change your Password...2
Lions Clubs International e-district House Content Management System (CMS) Training Guide
 Training Guide") Lions Clubs International e-district House Content Management System (CMS) Training Guide All of the material contained in this guide is the exclusive property of Alkon Consulting Group, Inc. (Alkon).
Lions Clubs International e-district House Content Management System (CMS) Training Guide All of the material contained in this guide is the exclusive property of Alkon Consulting Group, Inc. (Alkon).
If you have any questions or problems along the way, please don't hesitate to call, e-mail, or drop in to see us. We'd be happy to help you.
 If you have any questions or problems along the way, please don't hesitate to call, e-mail, or drop in to see us. We'd be happy to help you. Phone: (807)-274-5373 E-mail: [email protected] Physical
Web Content Management Training Manualv3
 City & County of San Francisco Powered by Innovation DT City & County of Sa Departme Techno Powered by Innova DEPARTMENT OF TECHNOLOGYDT Web Content Management Training Manualv3 Department of Technology
CMS Training. Prepared for the Nature Conservancy. March 2012
 CMS Training Prepared for the Nature Conservancy March 2012 Session Objectives... 3 Structure and General Functionality... 4 Section Objectives... 4 Six Advantages of using CMS... 4 Basic navigation...
Create a GAME PERFORMANCE Portfolio with Microsoft Word
 Create a GAME PERFORMANCE Portfolio with Microsoft Word Planning A good place to start is on paper. Get a sheet of blank paper and just use a pencil to indicate where the content is going to be positioned
Building a Personal Website (Adapted from the Building a Town Website Student Guide 2003 Macromedia, Inc.)
") Building a Personal Website (Adapted from the Building a Town Website Student Guide 2003 Macromedia, Inc.) In this project, you will learn the web publishing skills you need to: Plan a website Define a
Building a Personal Website (Adapted from the Building a Town Website Student Guide 2003 Macromedia, Inc.) In this project, you will learn the web publishing skills you need to: Plan a website Define a
WYSIWYG Editor in Detail
 WYSIWYG Editor in Detail 1. Print prints contents of the Content window 2. Find And Replace opens the Find and Replace dialogue box 3. Cut removes selected content to clipboard (requires a selection) 4.
[D YOUVILLE COLLEGE OUCAMPUS WEB CONTENT MANAGEMENT SYSTEM TRAINING] June 11, 2014
![[D YOUVILLE COLLEGE OUCAMPUS WEB CONTENT MANAGEMENT SYSTEM TRAINING] June 11, 2014](/thumbs/28/12852219.jpg "[D YOUVILLE COLLEGE OUCAMPUS WEB CONTENT MANAGEMENT SYSTEM TRAINING] June 11, 2014") MANAGEMENT SYSTEM TRAINING] June 11, 2014 What is OU Campus? OU Campus is a content management system used by D Youville College on www.dyc.edu. It is an easy-to-learn tool for updating Web pages from
MANAGEMENT SYSTEM TRAINING] June 11, 2014 What is OU Campus? OU Campus is a content management system used by D Youville College on www.dyc.edu. It is an easy-to-learn tool for updating Web pages from
Creating a website using Voice: Beginners Course. Participant course notes
 Creating a website using Voice: Beginners Course Topic Page number Introduction to Voice 2 Logging onto your website and setting passwords 4 Moving around your site 5 Adding and editing text 7 Adding an
Content Management System (CMS) Training Document for LexisNexis Web Visibility Websites. October 6, 2013
 Training Document for LexisNexis Web Visibility Websites. October 6, 2013") Content Management System (CMS) Training Document for LexisNexis Web Visibility Websites October 6, 2013 1 Overview This document provides an overview of the process for editing your website and managing
Content Management System (CMS) Training Document for LexisNexis Web Visibility Websites October 6, 2013 1 Overview This document provides an overview of the process for editing your website and managing
Content Management System Help. basic tutorial on Evergreen s CMS
 Content Management System Help cms.evergreen.edu Tips, tricks and basic tutorial on Evergreen s CMS Contents Vocabulary Login Opening a page Editing a page Creating a new page Inserting internal and external
Creating an Email with Constant Contact. A step-by-step guide
 Creating an Email with Constant Contact A step-by-step guide About this Manual Once your Constant Contact account is established, use this manual as a guide to help you create your email campaign Here
EBOX Digital Content Management System (CMS) User Guide For Site Owners & Administrators
 User Guide For Site Owners & Administrators") EBOX Digital Content Management System (CMS) User Guide For Site Owners & Administrators Version 1.0 Last Updated on 15 th October 2011 Table of Contents Introduction... 3 File Manager... 5 Site Log...
EBOX Digital Content Management System (CMS) User Guide For Site Owners & Administrators Version 1.0 Last Updated on 15 th October 2011 Table of Contents Introduction... 3 File Manager... 5 Site Log...
How to Edit an Email. Here are some of the things you can do to customize your email:
 How to Edit an Email Editing a new email created during the Create an Email wizard or editing an existing email in the Edit Email section of the Manage Emails tab is easy, using editing tools you re probably
Your Blueprint websites Content Management System (CMS).
.") Your Blueprint websites Content Management System (CMS). Your Blueprint website comes with its own content management system (CMS) so that you can make your site your own. It is simple to use and allows
Your Blueprint websites Content Management System (CMS). Your Blueprint website comes with its own content management system (CMS) so that you can make your site your own. It is simple to use and allows
This short guide will teach you how to turn your newly installed Joomla 2.5 site into a basic three page website.
 This short guide will teach you how to turn your newly installed Joomla 2.5 site into a basic three page website. The pages will be Home, About Us & Contact Us. It will also explain how you can tidy up
picocms Client Training - A pico-cms.com
 picocms Client Training - A pico-cms.com Find Our User Manual at http://pico-cms.com/user-manual Login: URL(domain name/login) Layout to training: I. Overview about pico II. Users a. Adding a User b. Edit
How To Write A Cq5 Authoring Manual On An Ubuntu Cq 5.2.2 (Windows) (Windows 5) (Mac) (Apple) (Amd) (Powerbook) (Html) (Web) (Font
 (Windows 5) (Mac) (Apple) (Amd) (Powerbook) (Html) (Web) (Font") Adobe CQ5 Authoring Basics Print Manual SFU s Content Management System SFU IT Services CMS Team ABSTRACT A summary of CQ5 Authoring Basics including: Setup and Login, CQ Interface Tour, Versioning, Uploading
Adobe CQ5 Authoring Basics Print Manual SFU s Content Management System SFU IT Services CMS Team ABSTRACT A summary of CQ5 Authoring Basics including: Setup and Login, CQ Interface Tour, Versioning, Uploading
DESIGN A WEB SITE USING PUBLISHER Before you begin, plan your Web site
 Page 1 of 22 DESIGN A WEB SITE USING PUBLISHER Before you begin, plan your Web site Before you create your Web site, ask yourself these questions: What do I want the site to do? Whom do I want to visit
Personal Portfolios on Blackboard
 Personal Portfolios on Blackboard This handout has four parts: 1. Creating Personal Portfolios p. 2-11 2. Creating Personal Artifacts p. 12-17 3. Sharing Personal Portfolios p. 18-22 4. Downloading Personal
Training Manual Version 1.0
 State of Indiana Content Management System Open Text v.11.2 Training Manual Version 1.0 Developed by Table of Contents 1. Getting Started... 4 1.1 Logging In... 4 1.2 OpenText Menu...5 1.3 Selecting a
Microsoft Expression Web
 Microsoft Expression Web Microsoft Expression Web is the new program from Microsoft to replace Frontpage as a website editing program. While the layout has changed, it still functions much the same as
Support/ User guide HMA Content Management System
 Support/ User guide HMA Content Management System 1 Contents: Access Page 3 Editing Pages Page 4 Adding/Editing Text Page 7 Adding/Editing Images Page 9 Adding/Editing Files Page 11 Adding a Page Page
The Home link will bring you back to the Dashboard after. Workflows alert you to outstanding assets waiting for approval or review.
 Gonzaga University s content management system (CMS) is a software program that allows individuals to create and edit departmental websites. This tutorial demonstrates commonly used CMS functions. For
Creating an Email with Constant Contact. A step-by-step guide
 Creating an Email with Constant Contact A step-by-step guide About this Manual Once your Constant Contact account is established, use this manual as a guide to help you create your email campaign Here
How To Change Your Site On Drupal Cloud On A Pcode On A Microsoft Powerstone On A Macbook Or Ipad (For Free) On A Freebie (For A Free Download) On An Ipad Or Ipa (For
 On A Freebie (For A Free Download) On An Ipad Or Ipa (For") How-to Guide: MIT DLC Drupal Cloud Theme This guide will show you how to take your initial Drupal Cloud site... and turn it into something more like this, using the MIT DLC Drupal Cloud theme. See this
How-to Guide: MIT DLC Drupal Cloud Theme This guide will show you how to take your initial Drupal Cloud site... and turn it into something more like this, using the MIT DLC Drupal Cloud theme. See this
Agile ICT Website Starter Guides
 Agile ICT Website Guide V1.0 1 Agile ICT Website Starter Guides 2 The purpose of this guide is to show you how to edit some of the basics of the website you have purchased through Agile ICT. The website
Web Portal User Guide. Version 6.0
 Web Portal User Guide Version 6.0 2013 Pitney Bowes Software Inc. All rights reserved. This document may contain confidential and proprietary information belonging to Pitney Bowes Inc. and/or its subsidiaries
Creating a Website with Publisher 2013
 Creating a Website with Publisher 2013 University Information Technology Services Training, Outreach, Learning Technologies & Video Production Copyright 2015 KSU Division of University Information Technology
PE Content and Methods Create a Website Portfolio using MS Word
 PE Content and Methods Create a Website Portfolio using MS Word Contents Here s what you will be creating:... 2 Before you start, do this first:... 2 Creating a Home Page... 3 Adding a Background Color
CMC Website Content Management System Note: This document is being updated regularly. Get a new copy often.
 CMC Website Content Management System Note: This document is being updated regularly. Get a new copy often. 1 Support...1 2 Login...2 3 Website Administration Page or Menu...3 4 Editing a Page...4 5 Adding
Content Management System (CMS) Training
 Training") Content Management System (CMS) Training System Requirements Operating System: Mac, PC, Linux and most Internet connected devices Browser: Recent version of Firefox as you cannot use Chrome or Safari Recent
Content Management System (CMS) Training System Requirements Operating System: Mac, PC, Linux and most Internet connected devices Browser: Recent version of Firefox as you cannot use Chrome or Safari Recent
Appspace 5.X Reference Guide (Digital Signage) Updated on February 9, 2015
 Updated on February 9, 2015") Appspace 5.X Reference Guide (Digital Signage) Updated on February 9, 2015 1 TABLE OF CONTENTS 2 What is Appspace For Digital Signage... 4 3 Access Appspace... 4 4 Best Practices and Notes... 4 5 Appspace
Appspace 5.X Reference Guide (Digital Signage) Updated on February 9, 2015 1 TABLE OF CONTENTS 2 What is Appspace For Digital Signage... 4 3 Access Appspace... 4 4 Best Practices and Notes... 4 5 Appspace
How To Manage Your Website On A Webmaster.Com (Webmaster) On A Pc Or Mac Or Macbook Or Macintosh (Web) On Pc Or Ipa (Web).Com (For Mac) On Your Pc Or Pc Or Your
 On A Pc Or Mac Or Macbook Or Macintosh (Web) On Pc Or Ipa (Web).Com (For Mac) On Your Pc Or Pc Or Your") Creative Stream Content Management System (CMS) The Creative Stream CMS is modular and as such installations may vary. Therefore certain sections of this document may not be relevant to your CMS. Contents
Creative Stream Content Management System (CMS) The Creative Stream CMS is modular and as such installations may vary. Therefore certain sections of this document may not be relevant to your CMS. Contents
Website Editor User Guide
 CONTENTS Minimum System Requirements... 3 Design Your Website... 3 Choosing your Theme... 4 Choosing your Header Style... 4-5 Website Content Editor... 6 Text Editor Toolbar features... 6 Main Menu Items...
Chapter 14: Links. Types of Links. 1 Chapter 14: Links
 1 Unlike a word processor, the pages that you create for a website do not really have any order. You can create as many pages as you like, in any order that you like. The way your website is arranged and
Excel 2003 Tutorial I
 This tutorial was adapted from a tutorial by see its complete version at http://www.fgcu.edu/support/office2000/excel/index.html Excel 2003 Tutorial I Spreadsheet Basics Screen Layout Title bar Menu bar
WIX: Building a Website with a Template. Choosing a Template First you will need to choose a template from the Create section of the Wix website.
 WIX: Building a Website with a Template Choosing a Template First you will need to choose a template from the Create section of the Wix website. To choose a template: 1. Go to wix.com. 2. From the top
Texas Woman s University RedDot Webspinner s Manual Revised 7/23/2015. [email protected]
 Texas Woman s University RedDot Webspinner s Manual Revised 7/23/2015 [email protected] 1 Contents CONNECTING TO YOUR SITE... 3 MAIN MENU... 4 REPEATED CONTENT AREAS... 4 OPENING PAGE LAYOUTS AND EXISTING
Schoolwires Staff Website Reference Guide
 CONTENTS Signing In... 2 Changing Your Web Account Password... 3 Adding a New Page... 7 Updating A Web Page... 10 Schoolwires Staff Website Reference Guide Inserting an Email Link... 12 Inserting a Web
Creating Web Pages With Dreamweaver MX 2004
 Creating Web Pages With Dreamweaver MX 2004 1 Introduction Learning Goal: By the end of the session, participants will have an understanding of: What Dreamweaver is, and How it can be used to create basic
(These instructions are only meant to get you started. They do not include advanced features.)
") FrontPage XP/2003 HOW DO I GET STARTED CREATING A WEB PAGE? Previously, the process of creating a page on the World Wide Web was complicated. Hypertext Markup Language (HTML) is a relatively simple computer
FrontPage XP/2003 HOW DO I GET STARTED CREATING A WEB PAGE? Previously, the process of creating a page on the World Wide Web was complicated. Hypertext Markup Language (HTML) is a relatively simple computer
Umbraco v4 Editors Manual
 Umbraco v4 Editors Manual Produced by the Umbraco Community Umbraco // The Friendly CMS Contents 1 Introduction... 3 2 Getting Started with Umbraco... 4 2.1 Logging On... 4 2.2 The Edit Mode Interface...
Google Docs Basics Website: http://etc.usf.edu/te/
 Website: http://etc.usf.edu/te/ Google Docs is a free web-based office suite that allows you to store documents online so you can access them from any computer with an internet connection. With Google
Human Resources Website Drupal User Guide
 Human Resources Website Drupal User Guide Logon http://www.hr.ucsb.edu/user You will be given a unique username and password for editing the website. Basic Tools Quick Start 1. EDIT TAB on content page
Saving work in the CMS... 2. Edit an existing page... 2. Create a new page... 4. Create a side bar section... 4
 CMS Editor How-To Saving work in the CMS... 2 Edit an existing page... 2 Create a new page... 4 Create a side bar section... 4 Upload an image and add to your page... 5 Add an existing image to a Page...
Quick Guide to the Cascade Server Content Management System (CMS)
") Quick Guide to the Cascade Server Content Management System (CMS) Waubonsee Community College Cascade Server Content Administration January 2011 page 1 of 11 Table of Contents Requirements...3 Logging
Quick Guide to the Cascade Server Content Management System (CMS) Waubonsee Community College Cascade Server Content Administration January 2011 page 1 of 11 Table of Contents Requirements...3 Logging
CMS USER GUIDE A MANUAL FOR CASCADE SERVER CONTENT MANAGEMENT SYSTEM (CMS)
") CMS USER GUIDE A MANUAL FOR CASCADE SERVER CONTENT MANAGEMENT SYSTEM (CMS) CMS USER GUIDE A MANUAL FOR CASCADE SERVER CONTENT MANAGEMENT SYSTEM (CMS) BRANDEIS UNIVERSITY LOGIN webedit.brandeis.edu LIVE
CMS USER GUIDE A MANUAL FOR CASCADE SERVER CONTENT MANAGEMENT SYSTEM (CMS) CMS USER GUIDE A MANUAL FOR CASCADE SERVER CONTENT MANAGEMENT SYSTEM (CMS) BRANDEIS UNIVERSITY LOGIN webedit.brandeis.edu LIVE