SYSTEM ADMINISTRATION LAB
|
|
|
- Charlotte Moody
- 8 years ago
- Views:
Transcription
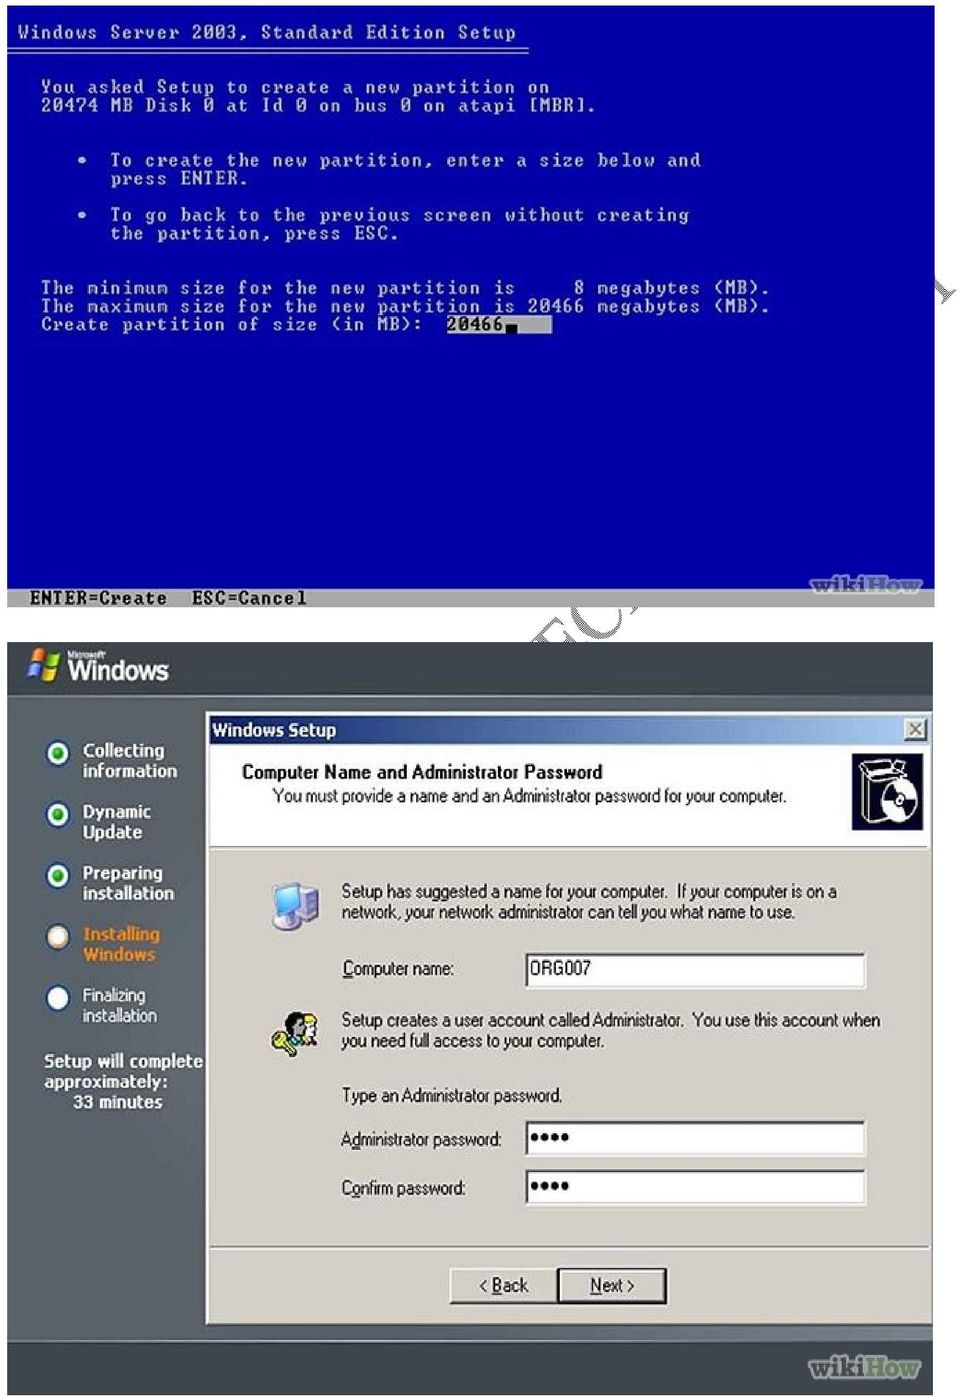
1 SYSTEM ADMINISTRATION LAB Ex.NO:1 Installation of Windows Server 2003 AIM: To write Installation of Windows 2003 Server. PROCEDURE: To install Windows Server 2003: 1 Insert the Windows Server 2003 Setup CD into the CD drive, then restart your server. 2 When you see the prompt Boot from CD, press any key. Your server starts from the CD, and the Window Server 2003, Standard Edition Setup screen opens. 3 Press ENTER. The Welcome to Setup screen opens. 4 Press ENTER. The Licensing Agreement screen opens. 5 To agree to the license agreement conditions, press F8. If an old operating system installation is found and listed on the screen, press ESC to close the message box. The Partition screen opens, which displays existing hard drive partitions. 6 Use the arrow keys to select a partition to install to, then press ENTER. If a message tells you that another operating system was found on this partition, press C. The Choose Format Options screen opens. 7 Use the arrow keys to select a partition format, then press ENTER. We recommend that you select NTFS file system (Quick). You can also choose to leave the current file system intact The Format Confirmation screen opens. 8 To begin formatting, press F. The hard drive is formatted, setup files are copied to the hard drive, then your server restarts. 9 When you see the prompt Boot to CD after your server restarts, do not press any key or the installation process will restart. Wait several seconds until the Regional and Language Options dialog box opens. 10 If you want to change regional settings, click Customize, make your changes, then click OK.

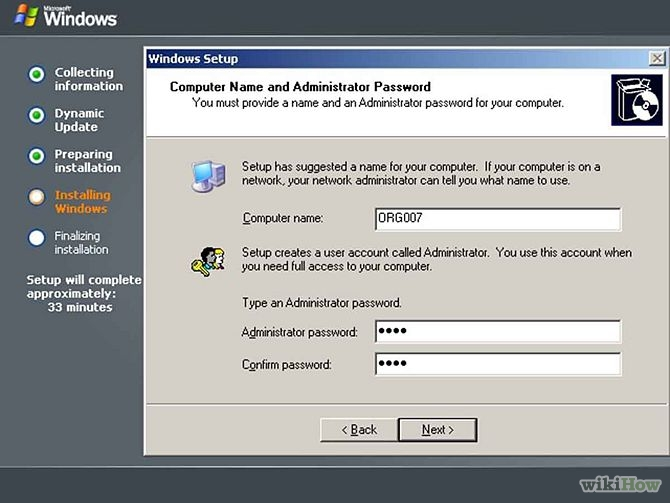
2 11 If you want to change the keyboard layout, click Details, make your changes, then click OK. 12 Click Next. The Personalize Your Software dialog box opens. 13 Type your name and organization name, then click Next. 14 If you are prompted for your Product Key, type your Product Key in the boxes, then click Next. Your Product Key is located on the Microsoft Certificate of Authenticity label found on the back or side of your server. The Licensing Modes dialog box opens. 15 For your licensing mode, select Per Server and specify the number of concurrent connections 16 Click Next. The Computer Name and Administrator Password dialog box opens. 17 Type a unique name for your server in the Computer Name box, type an administrator password in the Administrator password and Confirm password boxes, then click Next. The Date & Time Settings dialog box opens. 18 Select the Date, Time, and Time Zone, then click Next. The Networking Settings dialog box opens. 19 Click Typical Settings or Custom Settings, then click Next. If you do not want special settings, we recommend you select Typical Settings. The Workgroup or Computer Domain dialog box opens. 20 Click Workgroup and type the workgroup name or click Domain and type the domain name, then click Next.After the installation has finished, your server reboots, Windows Server 2003 starts, and the Login dialog box opens. 21 Press CTRL+ALT+DELETE to enter your administrator password.tips & Tricks In order to shut down or restart your server, you must enter an Option and Comment in the Shutdown Event Tracker, then click OK. Result: Thus the experiment to install windows 2003 server done successfully.

3
4

5 EX.NO:2 Installing hardware devices and drivers using device manager AIM: To installing Hardware Device and Drivers using Device manager and Driver query. PROCEDURE: Device Manager is the central location to view, configure, and manage hardware devices. It is critical to understand how the Device Manager works before working on hardware devices. There are multiple ways to open the Device Manager: 1. In the Start menu, right-click Computer Manage, expand Computer Management on the console tree, and then select System Tools Device Manager. 2. Enter the Start menu, right-click Computer Properties, and then click Device Manager on the left pane. 3. Control Panel Device Manager 4. Control Panel Hardware and Sound Device Manager To add a new hardware : Scan for Hardware Changes This initiates a Windows scan for new hardware devices or changes. To change the view select View on the Menu bar. Devices by Type This is the default view, which displays the devices by the type of hardware; devices are under the name of the device type. Devices by Connection This displays devices by the connection each device is connected to. Resources by Type This displays the devices by resource type. There are four resource types: direct memory access (DMA), input/output (IO), interrupt request IRQ, and memory. Resources by Connection This displays the devices by the type of resource it is connected to. There are four resource types: DMA, IO, IRQ, and memory. This allows for tracing resources by the connection.

6 Show Hidden Devices This displays devices that have been removed but drivers have not been uninstalled, as well as non-plug-and- play devices. To view options or actions for each device, either right-click the device or click on the device, and then click Action on the Menu bar. The options for each device are as follows Update Driver Software This initiates the Hardware Update wizard. Disable This disables the selected driver. Enable This enables the selected driver. Uninstall This uninstalls the device and respective driver. Scan for Hardware Changes This initiates a Windows scan for new hardware devices or changes. Properties This initiates the Properties window for the selected device. RESULT: Thus the experiment was successfully executed.

7 Ex.No:3 Configure Active Directory Services, create a user and assign permissions AIM: To Configure Active Directory Services, create a user and assign permissions using Logon Script and Group permissions. PROCEDURE: Important: Before you install Active Directory and DNS on the first domain controller server in a new domain, ensure that the IP address of the server is static, meaning it is not assigned by Dynamic Host Configuration Protocol (DHCP). DNS servers must have static addresses to ensure that they can be located reliably. Creating the Active Directory: 1. Insert the Windows Server 2003 CD-ROM into your computer's CD-ROM or DVD- ROM drive. 2. Click Start, click Run, and then type dcpromo. 3. Click OK to start the Active Directory Installation Wizard, and then click Next. 4. Click Domain controller for a new domain, and then click Next. 5. Click Domain in a new forest, and then click Next. 6. Specify the full DNS name for the new domain. Note that because this procedure is for a laboratory environment and you are not integrating this environment into your existing DNS infrastructure, you can use something generic, such as mycompany.local, for this setting. Click Next. 7. Accept the default domain NetBIOS name (this is "mycompany" if you used the suggestion in step 6). Click Next. 8. Set the database and log file location to the default setting of the c:\winnt\ntds folder, and then click Next. 9. Set the Sysvol folder location to the default setting of the c:\winnt\sysvol folder, and then click Next. 10. Click Install and configure the DNS server on this computer, and then click Next. 11. Click Permissions compatible only with Windows 2000 or Windows Server 2003 servers or operating systems, and then click Next. 12. Because this is a laboratory environment, leave the password for the Directory Services Restore Mode Administrator blank. Note that in a full production environment, this password is set by using a secure password format. Click Next. 13. Review and confirm the options that you selected, and then click Next.
. DNS servers must have static addresses to ensure that they can be located reliably. Creating the Active Directory: 1.")
8 14. The installation of Active Directory proceeds. Note that this operation may take several minutes. 15. When you are prompted, restart the computer. After the computer restarts, confirm that the Domain Name System (DNS) service location records for the new domain controller have been created. To confirm that the DNS service location records have been created, follow these steps: a. Click Start, point to Administrative Tools, and then click DNS to start the DNS Administrator Console. b. Expand the server name, expand Forward Lookup Zones, and then expand the domain. c. Verify that the _msdcs, _sites, _tcp, and _udp folders are present. These folders and the service location records they contain are critical to Active Directory and Windows Server 2003 operations. Adding Users and Computers to the Active Directory Domain : After the new Active Directory domain is established, create a user account in that domain to use as an administrative account. When that user is added to the appropriate security groups, use that account to add computers to the domain. 1. To create a new user, follow these steps: a. Click Start, point to Administrative Tools, and then click Active Directory Users and Computers to start the Active Directory Users and Computers console. b. Click the domain name that you created, and then expand the contents. c. Right-click Users, point to New, and then click User. d. Type the first name, last name, and user logon name of the new user, and then click Next. e. Type a new password, confirm the password, and then click to select one of the following check boxes: Users must change password at next logon (recommended for most users) User cannot change password Password never expires Account is disabled Click Next.

9 f. Review the information that you provided, and if everything is correct, click Finish. After you create the new user, give this user account membership in a group that permits that user to perform administrative tasks. Because this is a laboratory environment that you are in control of, you can give this user account full administrative access by making it a member of the Schema, Enterprise, and Domain administrators groups. To add the account to the Schema, Enterprise, and Domain administrators groups, follow these steps:. On the Active Directory Users and Computers console, right-click the new account that you created, and then click Properties. a. Click the Member Of tab, and then click Add. b. In the Select Groups dialog box, specify a group, and then click OK to add the groups that you want to the list. c. Repeat the selection process for each group in which the user needs account membership. d. Click OK to finish. The final step in this process is to add a member server to the domain. This process also applies to workstations. To add a computer to the domain, follow these steps:. Log on to the computer that you want to add to the domain. a. Right-click My Computer and then click Properties. b. Click the Computer Name tab, and then click Change. c. In the Computer Name Changes dialog box, click Domain under Member Of, and then type the domain name. Click OK. d. When you are prompted, type the user name and password of the account that you previously created, and then click OK. A message that welcomes you to the domain is generated. e. Click OK to return to the Computer Name tab, and then click OK to finish. f. Restart the computer if you are prompted to do so. RESULT: Thus the experiment was successfully executed.

10

11

12 Ex.No:4 Installation of Windows Server using answer files AIM: To Automated installation of Windows Server using answer files. PROCEDURE: This describes how to install Setup Manager and use it to create an answer file. An answer file (the Unattend.txt file) helps automate Windows installations by providing Windows Setup with the information that it needs during an unattended installation. By default, Setup Manager is not installed. To install and run Setup Manager: 1. Insert the Windows Server 2003 CD-ROM into the computer's CD-ROM drive or DVD-ROM drive. Press and hold down the SHIFT key as you insert the CD to prevent it from starting automatically. 2. Start Windows Explorer, and then open the Support\Tools folder on the Windows Server 2003 CD-ROM. 3. In the right pane, double-click the Deploy.cab file to open it. 4. On the Edit menu, click Select All. 5. On the Edit menu, click Copy. 6. Create a new folder on your local hard disk. To do this: a. Click Local Disk (C:), or click the drive in which you want to create the new folder. b. On the File menu, point to New, and then click Folder. c. In the New Folder name box, type the name that you want, and then press ENTER. Right-click the new folder that you created, and then click Paste. Double-click the new folder to open it, and then double-click the Setupmgr.exe file. The Setup Manager wizard starts. Follow the instructions in the wizard to create an answer file. To perform a clean unattended installation from the operating system CD-ROM, perform the following steps: Confirm the computer is connected to the network The unattended answer file must be renamed to Winnt.sif and copied to floppy disk In BIOS, set CD-ROM as the first startup device. Add a [DATA] section to Winnt.sif with the following entries. MSDosInitiated=0 UnattendedInstall=Yes Add a [Unattended] section to Winnt.sif with the following entries. OemPreinstall=No UnattendSwitch=Yes To perform a clean unattended installation with MS-DOS startup disk perform the following steps: Confirm the computer is connected to the network MS-DOS contains device drivers to connect to network or load drivers for CD or DVD drive. In BIOS, set floppy disk as the first startup device. If you are installing from a distribution share, set permission to allow proper access to the distribution share. The answer file is saved on an MS-DOS startup disk or distribution share. RESULT: Thus the experiment was successfully executed.

13 Ex.No:5 Installing Windows 2003 server components using Control panel AIM: To Installing required Windows 2003 server components using Control panel. PROCEDURE: To install Windows Components on a Windows Server 2003 system: 1. Log on to the computer as an administrator. 2. Select Start > Control Panel > Add or Remove Programs from the Toolbar. 3. Select Add/Remove Windows Components from the left pane. 4. Double-click Application Server in the Windows Components Wizard. 5. Select the components to install by selecting the check box after the components are selected, click OK to continue. 6. Double-click Internet Information Services (IIS) and select the following: o Common Files o Internet Information Service Manager o World Wide Web Services 7. Then double-click World Wide Web Services and select World Wide Web Service. 8. Click OK in both dialog boxes to return to the Windows Components Wizard. 9. Double-click Message Queueing and select Common. 10. Click OK to return to the Windows Components Wizard. 12. In the Windows Components Wizard, click OK to continue. 13. Ensure that a check mark is displayed next to the Application Server component. Click Next to continue. 14. The components will start to install. Shortly after installation begins, a message is displayed prompting you to insert the disk labeledwindows Server Insert the disk and click OK. 15. After you insert the Windows Server 2003 CD/DVD, you must specify the location of the i386 folder. Click Browse to locate the folder. 16. The location of the i386 folder on the Windows Server 2003 CD/DVD is based on the setup of the server and where the files are stored. The directory you specified is shown in the Copy files from field. Click Open. 17. Click OK in the Files Needed dialog to continue. 18. After the installation is complete, the Completing the Windows Components Wizard box is displayed. Click Finish to close the Windows Component Wizard. RESULT: Thus the experiment was successfully executed.

14

15

16

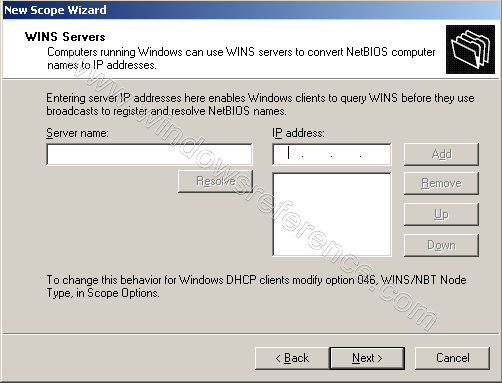
17 Ex No : 6 Install and configure of DHCP server Aim : Procedure: To install and configure DHCP server in 2003 server. Go to Start >All Programs >Administrative Tools >Manage Your Server Here select Add or remove a role Select Server Role as DHCP Server option click on Next Summary selection click on Next Installing DHCP Server in progress Now this will prompt new scope welcome screen click Next A scope is a collection of IP addresses for computers on a subnet that use DHCP. Enter the name and description of your scope click Next Now you need to define the range of addresses that the scope will distribute across the network, the subnet mask for the IP address. Enter the appropriate details and click next. Enter the IP address range that you want to exclude and click on next Select lease duration how long a client can use an IP address assigned to it from this scope. It is recommended to add longer leases for a fixed network and shorter leases for remote connections or laptop computers and click next You are given a choice of whether or not you wish to configure the DHCP options for the scope now or later.you can select Yes,I want to radio button and click next Enter the router, or gateway, IP address click next. The client computers will then know which router to use and click next Enter the DNS and domain name settings can be entered. The DNS server IP address will be distributed by the DHCP server and given to the client click next If you have WINS setup then here is where to enter the IP Address of the WINS server. You can just input the server name into the appropriate box and press Resolve to allow it to find the IP address itself click next

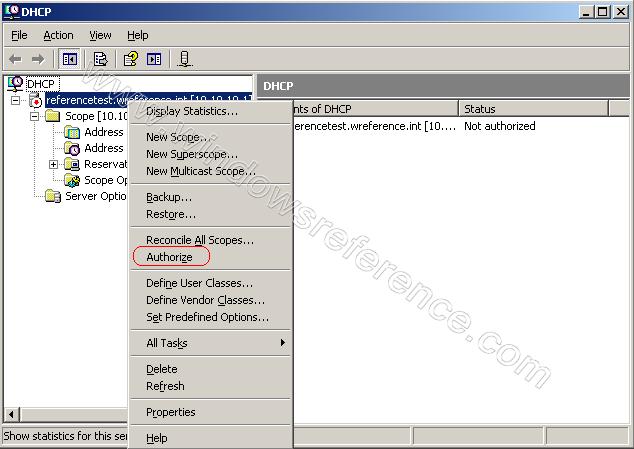
18 Now you need to activate this scope now and click next DHCP Server new scope installation was finished and click finish Now your server is now a DHCP server message and click finish Configuring DHCP: Now you need to go to Start >Administrative Tools >DHCP Right Click on your server click on Authorize your DHCP Server Authorization completed now your DHCP server is up and running DHCP servers permit you to reserve an IP address for a client. RESULT: Thus the experiment for installing and configuring DHCP server executed successfully.

19


20


21
22
23

24
25 EX.NO: 07 AIM: Configuring Disks and Volumes using Disk Manger and Managing disks and volumes from the command prompt To configuring disks and volumes using disk manager and managing disks and volumes from the command prompt. PROCEDURE: Start Disk Management: Type diskmgmt.msc in command prompt and then hit the Enter key. Create a New Partition or Logical Drive: 1. In the Disk Management window, do one of the following: o To create a new partition, right-click unallocated space on the basic disk where you want to create the partition, and then click New Partition. -or- o To create a new logical drive, right-click free space on an extended partition where you want to create the logical drive, and then click New Logical Drive. 2. On the Welcome to the New Partition Wizard page, click Next. 3. On the Select Partition Type page, click the type of partition that you want to create, and then click Next. 4. On the Specify Partition Size page, specify the size in megabytes (MB) of the partition that you want to create, and then click Next. 5. On the Assign Drive Letter or Path page, enter a drive letter or drive path, and then click Next. 6. On the Format Partition page, specify the formatting options that you want, and then click Next. 7. On the Completing the New Partition Wizard page, verify that the options that you selected are correct, and then click Finish. Disk Management creates the new partition or logical drive and displays it in the appropriate basic disk in the Disk Management window. Format a Partition or Logical Drive: 1. In the Disk Management window, right-click the partition or logical drive that you want to format, and then click Format. 2. Specify the formatting options that you want, and then click OK. 3. Click OK when you are prompted to confirm the formatting changes.
26 View the Properties of a Partition or Logical Drive: 1. In the Disk Management window, right-click the partition or logical drive that you want to view the properties of, and then click Properties. 2. Click the appropriate tab to view a property. Delete a Partition or Logical Drive: 1. In the Disk Management window, right-click the partition or logical drive that you want to delete, and then click Delete Partition or Delete Logical Drive. 2. Click yes when you are prompted to confirm the deletion. Result: Thus the configuration of Configuring Disks and Volumes using Disk Manger and Managing disks and volumes from the command prompt was completed successfully.
27 Ex.No:8 Installation and Configuration of Mail Server in windows 2003/2008 server AIM: To Installation and Configuration of Mail Server in windows 2003/2008 server environment. PROCEDURE: Install the Server: You can install the Server by using Add or Remove Windows Components or Manage Your Server Click on Add or remove a role. This will start the Configure Your Server Wizard. Read the text and make sure you have connected all the necessary cables and all the other things it says you should do before continuing. Click Next We now come to the step where we add and remove roles for our server. We will add the Mail Server role. I also suggest that before you click Next, click Read about mail servers Click Mail server (POP3, SMTP) Click Next You will now specify the type of authentication and type the domain name. In this tutorial we will use Windows Authentication, and I will use my domain name, ilopia.com. You should of course use your domain name. Click Next Next step is to confirm the options you have selected. Click Next The installation will start, and will also start the Windows Components Wizard. When you get prompted to insert your Windows Server 2003 CD-ROM into your CD-ROM drive, do so. If you didn't get prompted to do that, you maybe already have it in the drive. You can now see the log, click view the next steps for this role, or click Finish. Do whatever you feel you want to do before continuing. Click Finish You have now successfully installed the mail server. Configure the Server: Click Start, then run, and type p3server.msc This will open up the POP3 Service. This is where you configure and manage the POP3 part of the mail server.
28 Click on <ComputerName> in the left pane Click on Server Properties in the right pane This brings up the Properties for our Mail Server. Create a mailbox The Setup Wizard created a domain to us, so we do not need to create this manually. If you did not use Manage Your Server to install, add the domain manually be clicking the server name in the left pane and then click New domain in the right pane. Remember to set the properties before you add the domain. Click on your domain (ilopia.com in my case) in the left pane. Click Add Mailbox in the right pane. Write bob in Mailbox Name Write bob as password (of course this is not a password you should use in a production environment, it's too short) Click OK A message will pop-up and tell you how to configure the clients. Read this, and notice the difference when using SPA or not. Click OK What we just did was not only creating a mailbox named bob, but we also created a user bob. We will also create a mailbox for an existing user - ariel. To do that we simply perform the same steps, but we uncheck Create associated user for this mailbox. So, we have now two users. Configure the SMTP Server Actually, that's it! It is this simple to configure the POP3 part. But it is not yet working as we want, we have to configure the SMTP part to be able to receive and send s. Yes, I said receive s. A common mistake is to think that the POP3 server receives the s. But that is not true, all the POP3 is doing is 'pop' the s out to the clients. It's the SMTP server that is communicating with other SMTP servers and receives and sends s. Open Computer Management Expand Services and Applications, expand Internet Information Service Right click Default SMTP Virtual Server and click Properties Click the Access tab Click the Authentication button and make sure Anonymous Access and Integrated Windows Authentication is enabled. Click the Relay button and make sure Allow all computers which successfully... is enabled and Only the list below is selected. Configure the client We will use Outlook Express as client. Start Outlook Express (any computer that is connected to the server) Click Tools and then Accounts Click the Add button and select Mail
29 A wizard starts. Use the following table to complete the wizard: Display name address Bob domain> Incoming mail server is a POP3 Incoming mail server Outgoing mail server Account name Password Remember Password SPA <your domain> (ilopia.com) <your domain> (ilopia.com) bob@<your domain> (bob@ilopia.com) bob Checked Unchecked The reason why we got this is written in the error message. 'Unable to relay for < address>'. This means that we didn't get authenticated to the SMTP server. So, let us take a look at the client's settings again. Click Tools, then Accounts. Click the correct account and then the Properties button Click the Servers tab In the Outgoing Mail Server section enable My server requires authentication. Click Apply, click OK, click Close Create a new , and send it RESULT: successfully. Thus the installation and configuration of mail server in windows 2003 server done

30

31
32 EX.NO: 09 Establish RAID (0, 1, and 5) configuration on windows 2003/2008 server AIM: To establish RAID (0, 1, and 5) configuration on windows 2003/2008 server. PROCEDURE: A striped volume (RAID 0) combines areas of free space from multiple hard disks (anywhere from 2 to 32) into 1 logical volume. Data that is written to a striped volume is interleaved to all disks at the same time instead of sequentially. Therefore, disk performance is the fastest on a RAID 0 volume as compared to any other type of disk configuration. Administrators prefer to use striped volumes when input/output (I/O) speed is important. Any file system, including FAT, FAT32, or NTFS, can be used on a striped volume. How to Set Up the Disk Management System 1. Click Start, point to Administrative Tools, and then click Computer Management. 2. Expand the Storage node. 3. Click Disk Management. 4. On the View menu, point to Top, and then click Disk List. In the right pane, a column appears that lists the attributes of each disk in the system. 5. On the View menu, point to Bottom, and then click Graphical View. A color-coded graphical view of the disks on the system is displayed. The Disk Description pane (which is displayed in gray) is positioned on the left side of the volume description, which is displayed in color. The disk description contains information about each disk's disk number, whether it is a basic or dynamic configuration, its size, and its status (online or offline). The volume descriptions are color-coded. They hold information about each volume, such as the drive letter (if assigned), whether the volume is allocated or unallocated, the partition or volume size, and the health status of the volume. To upgrade a basic disk to a dynamic disk: 1. Before you upgrade disks, quit any programs that are running on those disks. 2. Right-click the gray Disk Description pane that is located to the left of the color-coded volume panes, and then click Upgrade to Dynamic Disk. 3. If the second disk in not a dynamic disk, follow steps 1 and 2 to upgrade it to a dynamic disk.
33 How to Convert to RAID Volume: In this scenario, there are two disks on the computer, Disk 0 and Disk 1. Both disks are dynamic disks and have at least 1 gigabyte (GB) of free unallocated space on each disk for a total volume of 2 GB. 1. In the lower-right pane of the Disk Management tool, right-click the free, unallocated volume space on either disk, and then click Create Volume. 2. After the Create Volume Wizard starts, click Next. 3. Under Volume Type, click RAID 5 Volume, and then click Next. 4. In the left pane under Select Two or More Disks, a list is displayed that contains all disks that have enough free, unallocated space to participate in the RAID volume. In the right pane under Selected, the disk that you right-clicked in step 1 is displayed. 5. In the left pane under All Available Dynamic Disks, click the disk, and then click Add. All disks that are displayed in the right pane are labeled Selected. View the bottom of the Select Disk dialog box under the Size label. The For All Selected Disks box displays the maximum size of the RAID volume that you can make. 6. Click Next to advance to the Assign Drive Letter Path page of the wizard. 7. At this time, you may want to assign a drive letter to your striped volume (you can also do this at any other time). To do so, click Assign Drive Letter, and then enter an available drive letter.alternatively, you can click Do not assign drive letter or path. You can also click Mount this volume on an empty folder that supports drive paths. However, this selection is beyond the scope of this article. 8. After you enter a drive letter for your striped volume, click Next. 9. Check your selection in the Summary window, and then click Finish. The RAID volumes are displayed on the two disks on your system. They have the same color code, the same drive letter (if you mapped the drive during the procedure), and they are both the same size. Result: Thus the configuration of RAID (0, 1, and 5) on windows 2003/2008 server was created and completed successfully.
34 Ex No: 10 Configure a router to connect two different networks Aim: Procedure: To configure a router to connect two different networks and transfer files between them. Connect a computer to router and assign IP address. Connect another computer to the same router and assign different class IP address. For example if first computer assigned with IP address means configure another computer with the different class IP as Now go to first computer s network settings and select IP address setting. In that click advanced tab then click add. Add an IP which is in second computer s class of IP. Ex: Likewise add an IP in second computer as first computer s class of IP. Ex: Share a folder in first computer. Access the shared folder from second computer as entering the corresponding IP address in STARTRUN. Type as // Result: Thus the experiment to configure a router to connect two networks done and files accessed successfully.
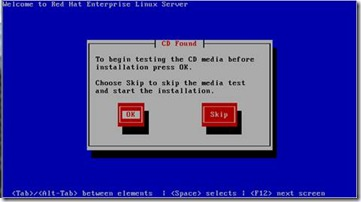
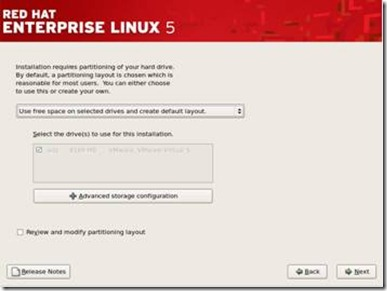
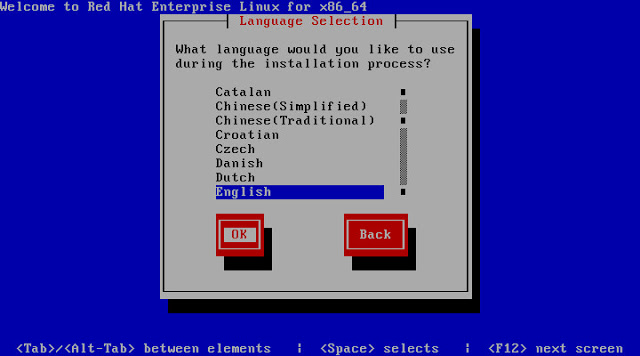
35 EX NO: 11 INSTALLATION OF RED HAT LINUX USING GRAPHICAL MODE AIM: To installing of red hat Linux using graphical mode. PROCEDURE: Red Hat Enterprise Linux is a free open source operating system developed and distributed by Red Hat. To install Red Hat Enterprise Linux, set your CD/DVD drive to boot first, to do this enter into systems bios and set the cd/dvd to boot first then save changes. Insert Red Hat Enterprise Linux in CD/DVD drive and restart the system. After restart Red Hat installer should boot. Select the type of installation. In this we will be using the graphical mode installation. Hit enter key to start the installation. On the welcome screen the installation process will prompt you to check and test installer. Select OK to test your media, otherwise select skip to continue installing Red Hat On the Graphical Interface of red hat installation, click on the next button. We will be asked to select you language, select language and click next, on the next window select keyboard layout and click next. we will be prompted to enter installation number if you have one enter it, if none select skip entering installation number and click ok. After these selections we will see the hard disk partitioning section. Select the Use free space on selected drive and click next. In the network devices window set the hostname to automatically via DHCP and click next. Select region or location on the next window; we can click on the map for your location. Enter the Root password on the next window, Root is the administrator account for Linux operating systems. The succeeding steps will be on the selection of additional packages to be installed on our Enterprise Linux Operating System. After selecting these additional packages, installation of the operating system and these additional packages will begin, wait for the system to finish the installation. After finishing the installation follow the instructions on the screen. We will be asked to configure firewall. Select enabled and select the services we need to pass through the firewall. We can also add TCP and UDP ports. On the SELinux window select the Enforcing option and click forward.
36 On the next window uncheck the enable Kdump option and click forward. Set the date and time in the Date and Time Window. In the software update set up, select yes if you want to connect to the Red Hat website for updates. Select no if you do not want to connect or plan to connect at a later time. Create you preferred username and password in the Create User window then click forward. You can test your sound card in the next window. After that we will be asked to insert additional CD s to install. If we don t have any click the finish button. Your Linux Enterprise operating system is ready to use. You just need to login to the system and start using Linux Enterprise operating system. RESULT: Thus the configuration and installation of red hat Linux using graphical mode was completed successfully.
37
38

39
40 EX NO: 12 INSTALLATION OF RED HAT LINUX USING TEXT MODE AIM: To installing of red hat Linux using graphical mode. PROCEDURE: Make the DVD ROM to boot first by changing the boot devices priority in the bios setup by pressing Del or F2 or F10 key depending upon your manufacture. Now you will get the installation menu, first two menus are for graphical installation, next one is for recovering the system, fourth one is to boot the operating system from HDD and last one is for memory diagnostic. Tab to Edit the menu, at the end type Linux text. DVD will check the hardware information, it will ask you to verify the integrity of the installation media (DVD). Select Skip by using Tab and Enter to continue. Use Tab and press Enter on Welcome Screen. Use up or down arrow to select the language and Tab or Alt-Tab to switch between options, press Enter to OK. Use up or down arrow to select the keyboard and Tab or Alt-Tab to switch between options, press Enter to OK. Select the Time Zone. Enter root password. As this is the new installation, you can select Replace Existing Linux System and then press enter. Confirm the installation. Installing the Red hat Enterprise Linux. Installation finished, Enter to reboot. Login with as root with it s password. No you have successfully installed Red hat Enterprise Linux on the machine through Text mode. Result: Thus the experiment to install Linux in text mode done successfully.

41
42

43
44
45 EX NO : 13 Creating a user in linux server Aim : To creatre a user in linux server and assigning rights. Procedure: Go to Users and groups application to manage users In order to create a new user, click add user Fill in the user info and click ok. As we can see the new user is created If we want more user management options select properties We add the user to a group "linuxers" The user is added. Result: Thus the experiment to create a user in Linux server done successfully.
46
47
48
49 Ex No: 14 (a) Configuration of /etc/inittab Aim: Procedure: To configure /etc/inittab in Linux environment. If you installed using a text login and wish to switch to a graphical login, follow this procedure. If you are not already root, switch users to the root account: su Provide the administrator password when prompted. If you have not already done so, install the X Window System and a graphical desktop environment. For example, to install the GNOME desktop environment, use this command: yum groupinstall "X Window System" Desktop To install the KDE desktop environment, use: yum groupinstall "X Window System" "KDE Desktop" This step may take some time as your Red Hat Enterprise Linux system downloads and installs additional software. You may be asked to provide the installation media depending on your original installation source. Run the following command to edit the /etc/inittab file: vi /etc/inittab Press the I key to enter insert mode. Find the line that includes the text initdefault. Change the numeral 3 to 5. Type :wq and press the Enter key to save the file and exit the vi text editor. Reboot the system using the reboot command. Your system will restart and present a graphical login. Result: Thus the experiment to configure the /etc/inittab done successfully.
50 EX NO: 14 b) CONFIGURING AND TROUBLESHOOTING OF /etc/passwd AIM: To configuring and troubleshooting of /etc/password in Linux environment. PROCEDURE: Understanding fields in /etc/passwd: The /etc/passwd contains one entry per line for each user (or user account) of the system. All fields are separated by a colon (:) symbol. It has 7 fields. 1. Username: It is used when user logs in. It should be between 1 and 32 characters in length. 2. Password: An x character indicates that encrypted password is stored in /etc/shadow file. 3. User ID (UID): Each user must be assigned a user ID (UID). UID 0 (zero) is reserved for root and UIDs 1-99 are reserved for other predefined accounts. Further UID are reserved by system for administrative and system accounts/groups. 4. Group ID (GID): The primary group ID (stored in /etc/group file) 5. User ID Info: The comment field. It allow you to add extra information about the users such as user's full name, phone number etc. This field use by finger command. 6. Home directory: The absolute path to the directory the user will be in when they log in. If this directory does not exists then users directory becomes / 7. Command/shell: The absolute path of a command or shell (/bin/bash). Typically, this is a shell. Please note that it does not have to be a shell. To See User List : /etc/passwd is only used for local users only. To see list of all users, enter: $ cat /etc/passwd To configure/troubleshoot password for a particular user: Type in editor as: passwd username (then press enter), u will be asked for new password then retype the new password, the password will be changed for the particular user. RESULT: Thus the configuration of /etc/passwd completed successfully.
51 /etc/passwd file format
52 EX NO : 16 Linux TCP/IP Network configuration Aim : Algorithm : To configure TCP/IP in Linux environment. Go to System menu in that choose admin and Network option. A pop up window shows you that all the connected network devices. Double click on a device, TCP/IP configuration wizard will be displayed. Change address as you want. Apply the changes and then click Ok. Result: Thus the experiment to configure TCP/IP in Linux environment is done successfully.

53
54 Ex No: 19 File data backup using tar Aim: Procedure: To backup file and data using tar. Right click on the folder which we want to create tar. In that select create archive option. Give the archive name and archive type as.tar from the list of options given in list box. In location field type the path where we want to store the achieved file. The archived file will be created in the desired location with the extension.tar. Result: Thus the experiment to backup file and data in.tar format done successfully.

55
Installation of MicroSoft Active Directory
 Installation of MicroSoft Active Directory Before you start following this article you must be aware this is simply a lab setup and you need to assign relevant ip address, hostnames & domain names which
How To Install And Configure Windows Server 2003 On A Student Computer
 Course: WIN310 Student Lab Setup Guide Microsoft Windows Server 2003 Network Infrastructure (70-291) ISBN: 0-470-06887-6 STUDENT COMPUTER SETUP Hardware Requirements All hardware must be on the Microsoft
Course: WIN310. Student Lab Setup Guide. Summer 2010. Microsoft Windows Server 2003 Network Infrastructure (70-291)
") Course: WIN310 Student Lab Setup Guide Summer 2010 Microsoft Windows Server 2003 Network Infrastructure (70-291) ISBN: 0-470-06887-6 Published by Wiley & Sons 1 STUDENT COMPUTER SETUP Hardware Requirements
Course: WIN310 Student Lab Setup Guide Summer 2010 Microsoft Windows Server 2003 Network Infrastructure (70-291) ISBN: 0-470-06887-6 Published by Wiley & Sons 1 STUDENT COMPUTER SETUP Hardware Requirements
Operating System Installation Guide
 Operating System Installation Guide This guide provides instructions on the following: Installing the Windows Server 2008 operating systems on page 1 Installing the Windows Small Business Server 2011 operating
Appendix B Lab Setup Guide
 JWCL031_appB_467-475.indd Page 467 5/12/08 11:02:46 PM user-s158 Appendix B Lab Setup Guide The Windows Server 2008 Applications Infrastructure Configuration title of the Microsoft Official Academic Course
Windows Domain Network Configuration Guide
 Windows Domain Network Configuration Guide Windows Domain Network Configuration Guide for CCC Pathways Copyright 2008 by CCC Information Services Inc. All rights reserved. No part of this publication may
A+ Guide to Software: Managing, Maintaining, and Troubleshooting, 5e. Chapter 3 Installing Windows
 : Managing, Maintaining, and Troubleshooting, 5e Chapter 3 Installing Windows Objectives How to plan a Windows installation How to install Windows Vista How to install Windows XP How to install Windows
Operating System Installation Guidelines
 Operating System Installation Guidelines The following document guides you step-by-step through the process of installing the operating systems so they are properly configured for boot camp. The document
Installing Operating Systems
 CHAPTER 6 The unattended operating system installation function helps you install the Microsoft Windows and RedHat Linux operating system families. UCS-SCU has integrated device drivers including RAID
WhatsUp Gold v16.1 Installation and Configuration Guide
 WhatsUp Gold v16.1 Installation and Configuration Guide Contents Installing and Configuring Ipswitch WhatsUp Gold v16.1 using WhatsUp Setup Installing WhatsUp Gold using WhatsUp Setup... 1 Security guidelines
TANDBERG MANAGEMENT SUITE 10.0
 TANDBERG MANAGEMENT SUITE 10.0 Installation Manual Getting Started D12786 Rev.16 This document is not to be reproduced in whole or in part without permission in writing from: Contents INTRODUCTION 3 REQUIREMENTS
1. Set Daylight Savings Time... 3. 2. Create Migrator Account... 3. 3. Assign Migrator Account to Administrator group... 4
 1. Set Daylight Savings Time... 3 a. Have client log into Novell/Local Machine with Administrator Account...3 b. Access Adjust Date/Time...3 c. Make sure the time zone is set to Central Time...3 2. Create
Diamond II v2.3 Service Pack 4 Installation Manual
 Diamond II v2.3 Service Pack 4 Installation Manual P/N 460987001B ISS 26APR11 Copyright Disclaimer Trademarks and patents Intended use Software license agreement FCC compliance Certification and compliance
Faculty Details. : Assistant Professor ( OG. ),Assistant Professor (OG) Course Details. : B. Tech. Batch : 2010-2014. : Information Technology
,Assistant Professor (OG) Course Details. : B. Tech. Batch : 2010-2014. : Information Technology") COURSE FILE (COURSE PLAN) Year : 2012-13 Sem: ODD Faculty Details Name of the Faculty : Mullai.P & Yaashuwanth.C Designation : Assistant Professor ( OG. ),Assistant Professor (OG) Department : Information
COURSE FILE (COURSE PLAN) Year : 2012-13 Sem: ODD Faculty Details Name of the Faculty : Mullai.P & Yaashuwanth.C Designation : Assistant Professor ( OG. ),Assistant Professor (OG) Department : Information
Installing the Microsoft Network Driver Interface
 Installing the Microsoft Network Driver Interface Overview This guide explains how to install the PictureTel Live200 Microsoft Network Driver Interface (NDIS) software you have downloaded from PictureTel's
Deploying IBM Lotus Domino on Red Hat Enterprise Linux 5. Version 1.0
 Deploying IBM Lotus Domino on Red Hat Enterprise Linux 5 Version 1.0 November 2008 Deploying IBM Lotus Domino on Red Hat Enterprise Linux 5 1801 Varsity Drive Raleigh NC 27606-2072 USA Phone: +1 919 754
WhatsUp Gold v16.3 Installation and Configuration Guide
 WhatsUp Gold v16.3 Installation and Configuration Guide Contents Installing and Configuring WhatsUp Gold using WhatsUp Setup Installation Overview... 1 Overview... 1 Security considerations... 2 Standard
Installation Instruction STATISTICA Enterprise Server
 Installation Instruction STATISTICA Enterprise Server Notes: ❶ The installation of STATISTICA Enterprise Server entails two parts: a) a server installation, and b) workstation installations on each of
Backup & Disaster Recovery Appliance User Guide
 Built on the Intel Hybrid Cloud Platform Backup & Disaster Recovery Appliance User Guide Order Number: G68664-001 Rev 1.0 June 22, 2012 Contents Registering the BDR Appliance... 4 Step 1: Register the
Installation Instruction STATISTICA Enterprise Small Business
 Installation Instruction STATISTICA Enterprise Small Business Notes: ❶ The installation of STATISTICA Enterprise Small Business entails two parts: a) a server installation, and b) workstation installations
Installing Active Directory
 Installing Active Directory 119 Installing Active Directory Installing Active Directory is an easy and straightforward process as long as you planned adequately and made the necessary decisions beforehand.
Deploying Remote Desktop Connection Broker with High Availability Step-by-Step Guide
 Deploying Remote Desktop Connection Broker with High Availability Step-by-Step Guide Microsoft Corporation Published: May 2010 Abstract This guide describes the steps for configuring Remote Desktop Connection
Installing Windows Rights Management Services with Service Pack 2 Step-by- Step Guide
 Installing Windows Rights Management Services with Service Pack 2 Step-by- Step Guide Microsoft Corporation Published: October 2006 Author: Brian Lich Editor: Carolyn Eller Abstract This step-by-step guide
Deploying Windows Streaming Media Servers NLB Cluster and metasan
 Deploying Windows Streaming Media Servers NLB Cluster and metasan Introduction...................................................... 2 Objectives.......................................................
F-Secure Messaging Security Gateway. Deployment Guide
 F-Secure Messaging Security Gateway Deployment Guide TOC F-Secure Messaging Security Gateway Contents Chapter 1: Deploying F-Secure Messaging Security Gateway...3 1.1 The typical product deployment model...4
WhatsUp Gold v16.2 Installation and Configuration Guide
 WhatsUp Gold v16.2 Installation and Configuration Guide Contents Installing and Configuring Ipswitch WhatsUp Gold v16.2 using WhatsUp Setup Installing WhatsUp Gold using WhatsUp Setup... 1 Security guidelines
WatchGuard Mobile User VPN Guide
 WatchGuard Mobile User VPN Guide Mobile User VPN establishes a secure connection between an unsecured remote host and a protected network over an unsecured network using Internet Protocol Security (IPSec).
Freshservice Discovery Probe User Guide
 Freshservice Discovery Probe User Guide 1. What is Freshservice Discovery Probe? 1.1 What details does Probe fetch? 1.2 How does Probe fetch the information? 2. What are the minimum system requirements
istorage Server: High-Availability iscsi SAN for Windows Server 2008 & Hyper-V Clustering
 istorage Server: High-Availability iscsi SAN for Windows Server 2008 & Hyper-V Clustering Tuesday, Feb 21 st, 2012 KernSafe Technologies, Inc. www.kernsafe.com Copyright KernSafe Technologies 2006-2012.
IsItUp Quick Start Manual
 IsItUp - When you need to know the status of your network Taro Software Inc. Website: www.tarosoft.com Telephone: 703-405-4697 Postal address: 8829 110th Lane, Seminole Fl, 33772 Electronic mail: Contact1@tarosoft.com
Deploying BitDefender Client Security and BitDefender Windows Server Solutions
 Deploying BitDefender Client Security and BitDefender Windows Server Solutions Quick Install Guide Copyright 2010 BitDefender; 1. Installation Overview Thank you for selecting BitDefender Business Solutions
STATISTICA VERSION 12 STATISTICA ENTERPRISE SMALL BUSINESS INSTALLATION INSTRUCTIONS
 STATISTICA VERSION 12 STATISTICA ENTERPRISE SMALL BUSINESS INSTALLATION INSTRUCTIONS Notes 1. The installation of STATISTICA Enterprise Small Business entails two parts: a) a server installation, and b)
Setting Up Your FTP Server
 Requirements:! A computer dedicated to FTP server only! Linksys router! TCP/IP internet connection Steps: Getting Started Configure Static IP on the FTP Server Computer: Setting Up Your FTP Server 1. This
EXPRESSCLUSTER X for Windows Quick Start Guide for Microsoft SQL Server 2014. Version 1
 EXPRESSCLUSTER X for Windows Quick Start Guide for Microsoft SQL Server 2014 Version 1 NEC EXPRESSCLUSTER X 3.x for Windows SQL Server 2014 Quick Start Guide Document Number ECX-MSSQL2014-QSG, Version
UltraBac Documentation. UBDR Gold. Administrator Guide UBDR Gold v8.0
 UltraBac Documentation UBDR Gold Bare Metal Disaster Recovery Administrator Guide UBDR Gold v8.0 UBDR Administrator Guide UBDR Gold v8.0 The software described in this guide is furnished under a license
Secure Perfect RAID Recovery Instructions
 Secure Perfect RAID Recovery Instructions Contents Overview Dell PowerEdge 2500 RAID Level 1 Recovery Instructions Overview NOTE If you possess a previous version of this document, you may notice changes
The Windows Server 2003 Environment. Introduction. Computer Roles. Introduction to Administering Accounts and Resources. Lab 2
 Islamic University of Gaza College of Engineering Computer Department Computer Networks Lab Introduction to Administering Accounts and Resources Prepared By: Eng.Ola M. Abd El-Latif Mar. /2010 0 :D Objectives
Step-by-Step Guide for Creating and Testing Connection Manager Profiles in a Test Lab
 Step-by-Step Guide for Creating and Testing Connection Manager Profiles in a Test Lab Microsoft Corporation Published: May, 2005 Author: Microsoft Corporation Abstract This guide describes how to create
Instructions for Adding a MacOS 10.4.x Server to ASURITE for File Sharing. Installation Section
 Instructions for Adding a MacOS 10.4.x Server to ASURITE for File Sharing Installation Section Purpose: We are setting up a server in ASU s specific environment. Power on the Server Insert the CD Hold
Using iscsi with BackupAssist. User Guide
 User Guide Contents 1. Introduction... 2 Documentation... 2 Terminology... 2 Advantages of iscsi... 2 Supported environments... 2 2. Overview... 3 About iscsi... 3 iscsi best practices with BackupAssist...
Moxa Device Manager 2.0 User s Guide
 First Edition, March 2009 www.moxa.com/product 2009 Moxa Inc. All rights reserved. Reproduction without permission is prohibited. Moxa Device Manager 2.0 User Guide The software described in this manual
Introduction. Versions Used Windows Server 2003
 Training Installing Active Directory Introduction As SonicWALL s products and firmware keeps getting more features that are based on integration with Active Directory, e.g., Active Directory Connector
Migrate to Windows Small Business Server 2011 Standard from Windows Small Business Server 2008
 Migrate to Windows Small Business Server 2011 Standard from Windows Small Business Server 2008 Microsoft Corporation Published: March 2011 Version: 11.03.11 Abstract This guide describes how to migrate
Guest PC. for Mac OS X. User Guide. Version 1.6. Copyright 1996-2005 Lismore Software Systems, Ltd. All rights reserved.
 Guest PC for Mac OS X Version 1.6 User Guide Copyright 1996-2005 Lismore Software Systems, Ltd. All rights reserved. Table of Contents About Guest PC... 1 About your Virtual Computer... 1 Creating a Virtual
STATISTICA VERSION 10 STATISTICA ENTERPRISE SERVER INSTALLATION INSTRUCTIONS
 Notes: STATISTICA VERSION 10 STATISTICA ENTERPRISE SERVER INSTALLATION INSTRUCTIONS 1. The installation of the STATISTICA Enterprise Server entails two parts: a) a server installation, and b) workstation
Installing Windows XP Professional
 CHAPTER 3 Installing Windows XP Professional After completing this chapter, you will be able to: Plan for an installation of Windows XP Professional. Use a CD to perform an attended installation of Windows
User Manual. Onsight Management Suite Version 5.1. Another Innovation by Librestream
 User Manual Onsight Management Suite Version 5.1 Another Innovation by Librestream Doc #: 400075-06 May 2012 Information in this document is subject to change without notice. Reproduction in any manner
STATISTICA VERSION 9 STATISTICA ENTERPRISE INSTALLATION INSTRUCTIONS FOR USE WITH TERMINAL SERVER
 Notes: STATISTICA VERSION 9 STATISTICA ENTERPRISE INSTALLATION INSTRUCTIONS FOR USE WITH TERMINAL SERVER 1. These instructions focus on installation on Windows Terminal Server (WTS), but are applicable
Virtual Appliance for VMware Server. Getting Started Guide. Revision 2.0.2. Warning and Disclaimer
 Virtual Appliance for VMware Server Getting Started Guide Revision 2.0.2 Warning and Disclaimer This document is designed to provide information about the configuration and installation of the CensorNet
Please ring the Service Desk on 8204 1866 or 1300 363 227 if you require assistance or encounter problems.
 BEFORE YOU BEGIN Sites that do not have an Administration File Server are known as Peer to Peer sites. They have only Administration Workstations with one workstation that performs the nightly backup process.
HP ProLiant ML110 Server Network Operating System Installation Guide
 HP ProLiant ML110 Server Network Operating System Installation Guide January 2004 (First Edition) Part Number 344-535-001 Regulatory Model Number HSTNS-3100 2004 Hewlett-Packard Development Company, L.P.
How to. Install Active Directory. Server 2003
 How to Install Active Directory on Server 2003 Table of Content HOW DO I INSTALL ACTIVE DIRECTORY ON MY WINDOWS SERVER 2003 SERVER?... 2 STEP 1: CONFIGURE THE COMPUTER'S SUFFIX... 3 STEP 2: CONFIGURING
Windows 2000 Security Configuration Guide
 Windows 2000 Security Configuration Guide Version 1.0 October 4, 2002 Prepared For: Microsoft Corporation Corporate Headquarters One Microsoft Way Redmond, WA 98052-6399 Prepared By: Science Applications
Getting Started. Symantec Client Security. About Symantec Client Security. How to get started
 Getting Started Symantec Client Security About Security Security provides scalable, cross-platform firewall, intrusion prevention, and antivirus protection for workstations and antivirus protection for
Configuring NXT Hardware with Mercury Inside into Doors.NET TM Application Note
 1.0 Installing the Mercury SCP Gateway The MSC/SCP gateway must be installed to interface with Mercury hardware. This gateway must be chosen during the installation of the software, or it can be added
Microsoft BackOffice Small Business Server 4.5 Installation Instructions for Compaq Prosignia and ProLiant Servers
 Integration Note October 2000 Prepared by OS Integration Engineering Compaq Computer Corporation Contents Introduction...3 Requirements...3 Minimum Requirements...4 Required Information...5 Additional
Trial environment setup. Exchange Server Archiver - 3.0
 Trial environment setup Exchange Server Archiver - 3.0 Introduction This document describes how you can set up a trial environment for using Exchange Server Archiver with Exchange Server 2007. You do not
Chapter 2 Preparing Your Network
 Chapter 2 Preparing Your Network This document describes how to prepare your network to connect to the Internet through a router and how to verify the readiness of your broadband Internet service from
3 Setting up Databases on a Microsoft SQL 7.0 Server
 3 Setting up Databases on a Microsoft SQL 7.0 Server Overview of the Installation Process To set up GoldMine properly, you must follow a sequence of steps to install GoldMine s program files, and the other
Reference and Troubleshooting: FTP, IIS, and Firewall Information
 APPENDIXC Reference and Troubleshooting: FTP, IIS, and Firewall Information Although Cisco VXC Manager automatically installs and configures everything you need for use with respect to FTP, IIS, and the
SharePoint Server for Business Intelligence
 SharePoint Server for Business Intelligence SharePoint Business Intelligence Content Team Summary: Step-by-step, learn how to install and configure SharePoint Server 2010 and SQL Server 2008 to create
Installation and Deployment
 Installation and Deployment Help Documentation This document was auto-created from web content and is subject to change at any time. Copyright (c) 2016 SmarterTools Inc. Installation and Deployment SmarterStats
Lenovo Online Data Backup User Guide Version 1.8.14
 Lenovo Online Data Backup User Guide Version 1.8.14 Contents Chapter 1: Installing Lenovo Online Data Backup...5 Downloading the Lenovo Online Data Backup Client...5 Installing the Lenovo Online Data
Network Scanner Tool R3.1. User s Guide Version 3.0.04
 Network Scanner Tool R3.1 User s Guide Version 3.0.04 Copyright 2000-2004 by Sharp Corporation. All rights reserved. Reproduction, adaptation or translation without prior written permission is prohibited,
In the Active Directory Domain Services Window, click Active Directory Domain Services.
 Installing the Active Directory Domain Services Role Press the Ctrl-Alt-Del on the xxrwdc computer. Log in as the default administrator of the local computer with the username Administrator and cisisthebest!
TB168 (Rev4) - Networking Linux Based Controls
 - Networking Linux Based Controls") TB168 (Rev4) - Networking Linux Based Controls Creating a Network If not already connected, create the network using cables, switches, routers, etc. To successful connect a DHCP network you will require
TB168 (Rev4) - Networking Linux Based Controls Creating a Network If not already connected, create the network using cables, switches, routers, etc. To successful connect a DHCP network you will require
Introduction. This white paper provides technical information on how to approach these steps with Symantec Antivirus Corporate edition.
 Introduction The process of updating virus definitions on workstations protected by Deep Freeze Enterprise involves three fundamental steps: 1. Rebooting the workstations into a Thawed state so the updates
LOCKSS on LINUX. Installation Manual and the OpenBSD Transition 02/17/2011
 LOCKSS on LINUX Installation Manual and the OpenBSD Transition 02/17/2011 1 Table of Contents Overview... 3 LOCKSS Hardware... 5 Installation Checklist... 7 BIOS Settings... 10 Installation... 11 Firewall
LepideAuditor Suite for File Server. Installation and Configuration Guide
 LepideAuditor Suite for File Server Installation and Configuration Guide Table of Contents 1. Introduction... 4 2. Requirements and Prerequisites... 4 2.1 Basic System Requirements... 4 2.2 Supported Servers
LOCKSS on LINUX. CentOS6 Installation Manual 08/22/2013
 LOCKSS on LINUX CentOS6 Installation Manual 08/22/2013 1 Table of Contents Overview... 3 LOCKSS Hardware... 5 Installation Checklist... 6 BIOS Settings... 9 Installation... 10 Firewall Configuration...
StarWind iscsi SAN Software: Using StarWind with VMware ESX Server
 StarWind iscsi SAN Software: Using StarWind with VMware ESX Server www.starwindsoftware.com Copyright 2008-2010. All rights reserved. COPYRIGHT Copyright 2008-2010. All rights reserved. No part of this
Table of Contents. CHAPTER 1 About This Guide... 9. CHAPTER 2 Introduction... 11. CHAPTER 3 Database Backup and Restoration... 15
 Table of Contents CHAPTER 1 About This Guide......................... 9 The Installation Guides....................................... 10 CHAPTER 2 Introduction............................ 11 Required
ADC Windows 7 Professional
 ADC Windows 7 Professional 8-April-2014 Revision: Release Publication Information 2014 Imagine Communications Corp. Proprietary and Confidential. Imagine Communications considers this document and its
Step-by-Step Setup Guide Wireless File Transmitter FTP Mode
 EOS Step-by-Step Setup Guide Wireless File Transmitter FTP Mode Ad Hoc Setup Windows XP 2012 Canon U.S.A., Inc. All Rights Reserved. Reproduction in whole or in part without permission is prohibited. 1
Quadro Configuration Console User's Guide. Table of Contents. Table of Contents
 Epygi Technologies Table of Contents Table of Contents About This User s Guide... 3 Introducing the Quadro Configuration Console... 4 Technical Specification... 6 Requirements... 6 System Requirements...
Introduction to Operating Systems
 Introduction to Operating Systems It is important that you familiarize yourself with Windows and Linux in preparation for this course. The exercises in this book assume a basic knowledge of both of these
QUANTIFY INSTALLATION GUIDE
 QUANTIFY INSTALLATION GUIDE Thank you for putting your trust in Avontus! This guide reviews the process of installing Quantify software. For Quantify system requirement information, please refer to the
NSi Mobile Installation Guide. Version 6.2
 NSi Mobile Installation Guide Version 6.2 Revision History Version Date 1.0 October 2, 2012 2.0 September 18, 2013 2 CONTENTS TABLE OF CONTENTS PREFACE... 5 Purpose of this Document... 5 Version Compatibility...
Moxa Device Manager 2.3 User s Manual
 User s Manual Third Edition, March 2011 www.moxa.com/product 2011 Moxa Inc. All rights reserved. User s Manual The software described in this manual is furnished under a license agreement and may be used
How do I install Active Directory on my Windows Server 2003 server?
 How do I install Active Directory on my Windows Server 2003 server? Here is a quick list of what you must have: An NTFS partition with enough free space An Administrator's username and password The correct
VRC 7900/8900 Avalanche Enabler User s Manual
 VRC 7900/8900 Avalanche Enabler User s Manual WLE-VRC-20030702-02 Revised 7/2/03 ii Copyright 2003 by Wavelink Corporation All rights reserved. Wavelink Corporation 6985 South Union Park Avenue, Suite
Steltronic Focus. Main Desk Internet connection
 Steltronic Focus Main Desk Steltronic S.p.A. Via Artigianale 34, 25082 Botticino Sera Brescia - Italy Tel: +39 030 2190811 fax: +39 030 2190798 Service: + 39 030 2190830 http: www.steltronic.com Service:
Windows 2003 Server Installation Guide
 Windows 2003 Server Installation Guide Revision 2.0 April 14, 2011 Licenses This manual is the exclusive property of Prometric, Inc. This manual is licensed for use with restrictions to authorized centers
How To Use Gfi Mailarchiver On A Pc Or Macbook With Gfi Email From A Windows 7.5 (Windows 7) On A Microsoft Mail Server On A Gfi Server On An Ipod Or Gfi.Org (
 On A Microsoft Mail Server On A Gfi Server On An Ipod Or Gfi.Org (") GFI MailArchiver for Exchange 4 Manual By GFI Software http://www.gfi.com Email: info@gfi.com Information in this document is subject to change without notice. Companies, names, and data used in examples
GFI MailArchiver for Exchange 4 Manual By GFI Software http://www.gfi.com Email: info@gfi.com Information in this document is subject to change without notice. Companies, names, and data used in examples
1. Installation Overview
 Quick Install Guide 1. Installation Overview Thank you for selecting Bitdefender Business Solutions to protect your business. This document enables you to quickly get started with the installation of Bitdefender
How To Set Up A Backupassist For An Raspberry Netbook With A Data Host On A Nsync Server On A Usb 2 (Qnap) On A Netbook (Qnet) On An Usb 2 On A Cdnap (
 On A Netbook (Qnet) On An Usb 2 On A Cdnap (") WHITEPAPER BackupAssist Version 5.1 www.backupassist.com Cortex I.T. Labs 2001-2008 2 Contents Introduction... 3 Hardware Setup Instructions... 3 QNAP TS-409... 3 Netgear ReadyNas NV+... 5 Drobo rev1...
WHITEPAPER BackupAssist Version 5.1 www.backupassist.com Cortex I.T. Labs 2001-2008 2 Contents Introduction... 3 Hardware Setup Instructions... 3 QNAP TS-409... 3 Netgear ReadyNas NV+... 5 Drobo rev1...
Installing the Operating System or Hypervisor
 Installing the Operating System or Hypervisor If you purchased E-Series Server Option 1 (E-Series Server without preinstalled operating system or hypervisor), you must install an operating system or hypervisor.
AD RMS Step-by-Step Guide
 AD RMS Step-by-Step Guide Microsoft Corporation Published: March 2008 Author: Brian Lich Editor: Carolyn Eller Abstract This step-by-step guide provides instructions for setting up a test environment to
Plesk 11 Manual. Fasthosts Customer Support
 Fasthosts Customer Support Plesk 11 Manual This guide covers everything you need to know in order to get started with the Parallels Plesk 11 control panel. Contents Introduction... 3 Before you begin...
Chapter 15: Advanced Networks
 Chapter 15: Advanced Networks IT Essentials: PC Hardware and Software v4.0 1 Determine a Network Topology A site survey is a physical inspection of the building that will help determine a basic logical
Windows 2003 Server Consolidated Lab 1
 Windows 2003 Server Consolidated Lab 1 Nov 20, 2009 Name: In the following lab you are asked to complete several tasks you have previously completed to set up a Windows 2003 Server. Instead of using Server
Team Foundation Server 2012 Installation Guide
 Team Foundation Server 2012 Installation Guide Page 1 of 143 Team Foundation Server 2012 Installation Guide Benjamin Day benday@benday.com v1.0.0 November 15, 2012 Team Foundation Server 2012 Installation
RECOMMENDED HARDWARE CONFIGURATION FOR SCRB RECOMMENDED SOFTWARE REQUIREMENT FOR SCRB
 RECOMMENDED HARDWARE CONFIGURATION FOR SCRB WEB SERVER DATABASE SERVER Xeon Processor Xeon Processor 1 GB RAM 1 GB RAM 80 GB Hard Disk 140 GB Hard Disk LAN Card LAN Card CLIENT Pentium 4 Processor 512
Operating Instructions
 Operating Instructions (For Setting Up) Digital Imaging Systems Installation Overview Model No. DP-8060 / 8045 / 8035 Table of Contents Setting Your Machine Installation Overview General Installation Overview...
3.5 EXTERNAL NETWORK HDD. User s Manual
 3.5 EXTERNAL NETWORK HDD User s Manual Table of Content Before You Use Key Features H/W Installation Illustration of Product LED Definition NETWORK HDD Assembly Setup the Network HDD Home Disk Utility
How To Create An Easybelle History Database On A Microsoft Powerbook 2.5.2 (Windows)
") Introduction EASYLABEL 6 has several new features for saving the history of label formats. This history can include information about when label formats were edited and printed. In order to save this history,
Introduction EASYLABEL 6 has several new features for saving the history of label formats. This history can include information about when label formats were edited and printed. In order to save this history,
Portions of this product were created using LEADTOOLS 1991-2009 LEAD Technologies, Inc. ALL RIGHTS RESERVED.
 Installation Guide Lenel OnGuard 2009 Installation Guide, product version 6.3. This guide is item number DOC-110, revision 1.038, May 2009 Copyright 1992-2009 Lenel Systems International, Inc. Information
Quick Scan Features Setup Guide. Scan to E-mail Setup. See also: System Administration Guide: Contains details about E-mail setup.
 Quick Scan Features Setup Guide XE3024EN0-2 This guide includes instructions for: Scan to E-mail Setup on page 1 Scan to Mailbox Setup on page 6 Network Scanning Setup on page 9 Scan to PC Setup on page
Use 802.1x EAP-TLS or PEAP-MS-CHAP v2 with Microsoft Windows Server 2003 to Make a Secure Network
 How To Use 802.1x EAP-TLS or PEAP-MS-CHAP v2 with Microsoft Windows Server 2003 to Make a Secure Network Introduction This document describes how to create a secure LAN, using two servers and an 802.1xcompatible
Quick Start guide to. Microsoft Business Solutions CRM 1.2. on a Microsoft Windows Small Business Server 2003 Premium Edition.
 Quick Start guide to Microsoft Business Solutions CRM 1.2 on a Microsoft Windows Small Business Server 2003 Premium Edition M Partner Program Welcome! There are many resources available to help you install