User Guide: Virtual Merchant
|
|
|
- Shana Perkins
- 10 years ago
- Views:
Transcription
1 User Guide: Virtual Merchant 1
2 COPYRIGHT Copyright 2010 Elavon, Incorporated. All rights reserved. No part of this publication may be reproduced or distributed without the prior consent of Elavon, Inc., One Concourse Parkway, Suite 300, Atlanta, GA DISCLAIMER Elavon, Inc., provides this publication as is without warranty of any kind, either expressed or implied. This publication could include technical inaccuracies or typographical errors. Changes are periodically made to the information herein; these changes will be incorporated in new editions of the publication. Elavon, Inc., may make improvements and/or changes in the product(s) and/or program(s) described in this publication at any time. TRADEMARKS Virtual Merchant is a registered trademark of Elavon, Inc. All other brand and product names are trademarks or registered trademarks of their respective companies. i
3 TYPOGRAPHICAL CONVENTIONS Throughout this user guide you will see words and phrases that appear in different fonts and formats. The following table describes the typographical conventions used in this user guide. Item Convention Example Common button titles Title capitals, except OK; bold OK and Cancel buttons on a confirmation dialog box. Cross-reference links to topics within this document Figure Captions Text matches the paragraph in which the link occurs; blue, underlined; click the link to go to its target Denoted by a change in font size; bold; follows an image and possibly tables and aligns with preceding figure Chapter 9: Passwords Figure 4. Example Key names, key combinations, and key sequences Menu names; commands on menus and buttons; titles of pages, sections, fields, and boxes where you enter information Notes containing important information All uppercase; bold Bold in procedures; title capitals Denoted by a change in font and possibly color; bold ENTER CTRL, TAB CTRL+ALT+DEL Click Logout. (NOTE) This is an example. Reference document titles Bold italics Batch Management tasks are covered in a separate document, the Batch Management User Guide. Sample Code Fixed-width font (Courier New) Sample Code Typed Commands Fixed-width font (Courier New); bold Type cd \Elavon\pbase in a command window. ii
4 Contents OVERVIEW...1 Why Virtual Merchant?...2 INITIAL LOGIN...4 USER MANAGEMENT...6 Creating a New User...7 New User Confirmation Page...8 Editing Terminal Rights...9 Virtual Merchant Transactions...10 Virtual Merchant Batch...10 User Management...10 Terminal Management...11 Finding and Editing Users...13 Changing Your Password...17 Changing Your PIN...18 MANAGING TERMINAL ACCESS BY IP ADDRESS...19 Adding IP Addresses to the Access List...19 Deleting Login IP Addresses from the access list:...20 Activating and Turning Off IP Address Access for a Terminal:...21 CONFIGURING THE TERMINAL...23 Managing Merchant Information...24 Main...24 Terminal...26 Payment Fields...27 Adding a New Payment Section...28 Editing Section Options...33 Editing a Field...35 Printer Configuration...37 Printer Options...37 Paper Type options...38 Receipt Header Options...39 Receipt Trailer Options...39 Receipt Custom Options...39 Form Configuration...40 Payment Form...40 iii
5 Change the Payment Form Header or Footer Text...41 Change Payment Form Colors...41 Upload a Header Logo or Background Image...41 Receipt Form...42 Receipt Form - Approval Options...42 Receipt Form - Declined Options Form Options Approval Section Options Decline Section...45 Advanced Menu...46 System Setup...46 HTTP Options...46 Processing Options...47 Error Messages...48 Business Rules...49 Edit a Business Rule...51 USING THE VIRTUAL MERCHANT MENU LINKS...53 Merchant Connect...53 Support Section...53 User Feedback...54 View Compatible Carts...56 User Manuals...58 Peripheral Driver...59 Help...62 Logout...62 MAIN MENU...63 Navigation...63 Change Merchant Terminal...65 Virtual Terminal...66 Credit Card Transactions...67 Debit Card Transactions...74 Canadian Debit Transactions...76 Food Stamp Transactions...79 Cash Benefit Transactions...81 Electronic Check Transactions...83 Gift Card Transactions...88 Dynamic Currency Conversion (DCC)...91 Transaction Detail Page...93 Current Batches...95 Settled Batches APPENDIXES Appendix A: Response Codes iv
6 Authorization Response Code Electronic Gift Card (EGC) Response Codes AVS Response Codes CVV2 Response Codes Settlement Response Codes Appendix B: Editing the Payment Form Header and Footer Text Text Editor Tag Wizard Enter Text Here Line Attributes Text Attributes Tag Legend Edit Wizard Appendix C: Merchant User Administration Strategies User Administration Scenarios Example: Small Internet buy-button business Example: Several MO/TO operators Example: Multiple Retail Stores Appendix D: Virtual Merchant Receipt Form Link Definition Appendix E: Virtual Merchant Size Limitations GLOSSARY v
7 Chapter 1 Overview Virtual Merchant is your single-source, online terminal and payment solution. Virtual Merchant can do everything from online payment processing to transaction management. It offers a secure Internet payment gateway solution for traditional Retail, Mail Order/Telephone Order (MO/TO) and Internet (E-Commerce) Merchants. Virtual Merchant accepts Credit Card, Debit Card, Electronic Benefit Transactions (Food Stamp and Cash Benefits), Electronic Check Transactions, and Electronic Gift Certificate Transactions. The terminal sends these transactions encrypted to the Host via the Internet. Transactions are interleaved for superior transaction response times. Virtual Merchant supports card present processing for retail environments, card-not-present processing for MO/TO environments and supports the Electronic Commerce Indicators (ECI) for consumer-initiated transactions on the Internet. You can set up multiple users with unique login information under your Virtual Merchant ID. This feature allows you to grant or restrict levels of access for security and accountability, and permits multiple users to work simultaneously. The Virtual Merchant system is a secure server-based transaction processing system that enables your business to authorize and process transactions in real-time. The information needed to process the transactions is sent over a secure, encrypted Internet connection. At its basic level, the terminal submits your customer s transaction information to the VirtualMerchant server. The Virtual Merchant server connects with the network for payment authorization and, if the sale is authorized, the program prints or returns a receipt for the customer. messages to confirm the order can be sent to customers and the merchant as notification of a new sale. To finalize the sale, you must fulfill the order and login to our server to select the sale for payment processing. Elavon settles the transaction and deposits the funds into your bank 1
8 account. Virtual Merchant automatically archives sales that are finalized so that you can refer to them at a later date. The Virtual Merchant program is easy to integrate with other payment systems. For more information on integration, please call or visit our support site at Merchant.com/support. Why Virtual Merchant? Credit Card Processing Supports processing for all major types of Credit Cards. Debit Card Processing Supports processing for Debit/ATM PIN based transactions. Terminals set up for Internet transactions can be configured to accept PINless Debit. Electronic Benefit Transaction Processing Supports processing for Food Stamp and Cash Benefit Transactions. Electronic Check Processing Supports processing for Electronic Check Transactions for Pointof-Purchase (POP) and Accounts Receivable Conversion (ARC) processing. Electronic Gift Card Processing Allows you to extend more payment choices to your customers while adding value to your business. Gift cards enable you to expand your market, increase revenue, and build customer loyalty, all with electronic efficiency. Dynamic Currency Conversion (DCC) International Visa and MasterCard Credit Card purchases can be converted instantly, at the point of sale, to the cardholder s home currency, at a very competitive exchange rate. This eliminates unpleasant surprises for consumers when their Credit Card bill arrives. Market Segments Supports processing for the Internet, Retail, and MO/TO environments. Superior Transaction Speeds Uses the Internet to deliver superior transaction response times. Multi-Entry Transactions The Multi-Entry Transaction option allows you to key in multiple transactions and submit them together for authorization. Multi-Merchant Processing Supports multiple merchant accounts. Multi-User Capable Supports a hierarchical user structure for increased user security. Enhanced User Rights Allow you to manage each user's access to select features within the application. Access to these features can be granted or denied at an individual user level. HTTPS Authorization Interface An SSL interface to process consumer-initiated transactions is available for payment integration. 2
9 Customizable Payment Forms The online payment and Virtual Terminal Payment forms can be configured to your unique business needs. Auto Settlement The program can be configured to automatically settle unpended transactions. Business Rules This section allows you to set up a list of authorization rules to perform an action on the transaction during the authorization process, such as mark the record for review or send an . This is only available for terminal-based processing. Purchasing Card/Business Card Capable Prompts for customer code and sales tax information to meet Level Two processing requirements. CVV2 Processing Meets current Card Verification Value 2 (CVV2, CVC2, and CID) requirements for Card-Not-Present (CNP) transactions. Address Verification (AVS) Processing Used to comply with Visa and MasterCard direct marketing requirements and to minimize fraudulent Internet and mail order/telephone order transactions. Batch Export Options The program supports a XML, tab- or comma-delimited export process for currently open and previously settled batches. Peripheral Printing Capable The program supports receipt printing to peripheral printers. Receipts do not print complete credit card numbers, rather, it masks some of the card account numbers on consumer receipts. Custom Decline Messages This option allows you to customize "non-approved" authorization responses for consumer initiated transactions. Compatible Carts Section This section provides an alphabetical listing of shopping cart manufactures that have coded to the Virtual Merchant program. User-Defined Fields The program has the ability to support additional user-defined transaction prompts on all payment forms. 3
10 Chapter 2 Initial Login The first time you log in to Virtual Merchant, you use the temporary password the system administrator sent you. You will have to immediately change the password because the temporary password works one time only. To access Virtual Merchant for the first time: 1. Open an Internet browser on a computer that is connected to the Internet. 2. Enter the following URL in the address box: Merchant.com. 3. Select the Client Login link to access the login page. 4. On the Virtual Merchant Login screen, enter your Account ID, User ID and Password and then click the Login button. You should have received login information when you set up your Virtual Merchant account. 4

11 If you are the Merchant Administrator for your account, you control your entire account. A Merchant Administrator can create multiple users who can log in and process transactions simultaneously, create a hierarchy of users with similar or varying degrees of permissions, and access, and can even delegate the ability to manage the hierarchy of users to another user. This helps you better manage efficiency, and creates a system of accountability. If you do not log out and your session is inactive for 15 minutes, Virtual Merchant automatically logs you out, displaying the log on page. If you access your user account from another browser while you are logged in, the first browser will be logged out, because Virtual Merchant only allows one concurrent login per user. If you have problems accessing the Virtual Merchant program, call for assistance. Warning: You must set up your Internet browser to accept pop-ups from Virtual Merchant prior to transaction processing. If pop-ups from Virtual Merchant are blocked, when the receipt printing information bar appears on the webpage and is right-clicked, a duplicate transaction may be created. To prevent this from happening, add the Virtual Merchant site to the allowed sites in the pop-up blocker for your browser before you begin processing. The steps for doing this vary, depending on which browser you use. Please consult the Help for your browser to learn how to add the Virtual Merchant site to the allowed sites. 5

12 Chapter 3 User Management The User section allows you to manage the users for each account. This section provides access to the permissions and terminal associations for users. Use the Find/Edit User option to locate each subordinate or peer user so you can access and edit information about them. To change your password, use the Change Password function. Change PIN allows you to change the length and format of your PIN. The options available on the User menu: Find/Edit Allows the currently logged in user to manage all of their subordinate users and peers. Create New Allows the currently logged in user to add new users to their account. Change Password Allows the currently logged in user to change his own password. Change PIN Allows the currently logged in user to change the length of his terminal PIN(s) and the format of the PIN(s) associated with his account. (The system automatically generates PINs, so users cannot change the actual PIN text. They can only change the PIN s format.) 6
13 Creating a New User Create New User allows you to add new users to the Virtual Merchant account. Enter each new user's information into the Create New User form. To create a new user: 1. Enter a User ID. This field is required and case-sensitive. 2. Enter a Password, and then re-enter the new password into the Confirm Password field for validation. The new Password is temporary, must include both numbers and letters, and contain a minimum of seven (7) characters. This field is required and case-sensitive. 3. The next fields are not required, but you may enter the First Name, Last Name, Location, Phone, and Extension, or simply skip these fields to go to the next required field, . The fields for creating a new user are: User ID Enter a name for this User ID. This is a required field. Password Enter a password for this User ID. This required field is case sensitive. Confirm Password Re-enter the password for this User ID. This required field is case sensitive. First Name Enter the user's first name. Last Name Enter the user's last name. 7

14 Location Enter the user's location. Phone Enter the user s phone number. Extension Enter the user s phone extension. Enter the user s address. This is a required field. Active Select Yes or No from the drop-down menu. Examples of new users who would not be active would be new hires who have not yet started work, or employees out on medical leave. This field is set to Yes by default. Supervisor Select the user s supervisor. This is a required field. When creating a new user, you must select a Supervisor from the drop-down menu. The default Supervisor is the current user s supervisor or the Merchant Administrator, if the user logged in is the Merchant Administrator. See Appendix C, Merchant User Administration Strategies for more information. 4. Click Create User to add the new user, or click Clear to abandon the new user creation. New User Confirmation Page The New User Confirmation page displays the fields that were entered on the Create User page. This page also allows you to set up the new user's rights and terminal associations within the program. 8
15 Editing Terminal Rights The Rights button launches the Update Rights page, where you can specify the permissions and access for the selected user. The user rights that display in the Update Rights window are dependent upon the user rights of the currently logged in user. You cannot grant a right to a subordinate unless your profile has the right to do so. 1. To add rights to the currently selected user, select the checkbox to the left of each field. To remove a right from a user, clear the check box. 2. Once you have selected all the rights for the user, click the Update button. 3. Click Cancel to close this window without changing the user s rights. The rights within each section are defined in the next sections. 9
16 Virtual Merchant Transactions Select the transaction types you want the selected user to be able to access. Virtual Merchant Batch Select the batch management activities you want the selected user to be able to do. Batches - View Allows the user to view the unsettled transactions in the Current Batches section. Batches - Void Delete Allows access to the Void and Delete buttons in Current Batches section. Void applies to both Host and Terminal-based. Delete applies to Terminal-based only. Virtual Merchant does not permit batches to be voided while the auto-settle process is running, or when a manual settlement process is running. Batches - Settle Transactions Allows access to the Settle button in the Current Batches section to settle selected transactions. Batches - Edit Transactions Allows access to the Batches-Edit Transaction option. Batches - Return Transactions Allows access to initiate a return from a Settled Credit Card Transaction in the Settled Batches menu. Batches - View Settled History Allows access to the Settled Batches section. User Management Select the User Management capabilities you want to associate with the selected user. Find/Edit User Allows access to the Find/Edit User section. Create Subordinates Allows access to the Create User section. Edit Terminal Associations Allows access to Terminal Associations section. Edit User Rights Allows access to the Edit Rights section under the Find/Edit User section. IP Limitations Rights Allows the user to enter up to fifty (50) IP addresses that can access an account in Virtual Merchant. If selected, only users logging in from the IP addresses that have been entered can access the account. 10

17 Terminal Management Select the Terminal Management options for the selected user. Edit Terminal Setup Allows access to the Terminal Setup section. Edit Business Rule Allows access to the Business Rule section. Editing Terminal Associations When you add a new user, use the Terminal Associations screen to specify the terminals to which the user s login provides access. 1. To associate a terminal with a new user, click Terminals. 2. On the Terminal Associations screen, select a terminal from the Add New Terminal Association drop-down menu and click Add. The screen updates to show the terminal association. 11

18 3. To associate another terminal with the user, select the terminal from the drop-down menu and click Add again. If the Add New Terminal Association box does not display, then there are no more terminal associations available for the selected user. 4. To remove a terminal association for the currently selected user, click the Delete button in the terminal s row. A dialog box appears, requesting that you confirm this action. 5. Click OK to confirm that you want to remove the terminal association, or Cancel to retain it. Changing the PIN Format Two drop-down menu options allow you to change the PIN Format and PIN Length for the selected user. 1. Change the PIN Length by selecting one of the three options from the drop-down menu. six characters five characters four characters 2. Change the PIN Format by selecting one of the two options from the drop-down menu: numeric alphanumeric 3. Click Change PIN to save the PIN format changes and generate the new PIN. You can access the Edit User screen to modify information for the currently loaded user by selecting the Edit User button at the bottom of the Terminal Associations screen. For more information about editing user information, refer to the Edit User information in the Find/Edit User section of this guide. 12

19 Finding and Editing Users The Find/Edit User function allows you to locate and manage all User IDs for your account(s). The Find/Edit User page allows you to locate users based on four search fields. You can also specify the maximum number of records shown at a time using the Display field. Each field is partial-search capable, meaning you can search fields using only the first letter or first few letters of your search criteria. The search is not casesensitive (so DEBBIE and Debbie and debbie are all the same for search purposes). You can search using a single field or multiple fields to narrow your search. Enter the information in the search field(s) and click Find. If you click Find without defining search criteria, all the current user's peers and subordinates will be displayed. The Find/Edit User function is a user right that can be enabled or disabled for each user. The four search criteria fields are: User ID Searches for all user ids matching the first characters entered in this field. First Name Searches for all first names matching the first characters entered in this field. Last Name Searches for all last names matching the first characters entered in this field. Active Searches for active or inactive users based on the selection. The Display drop-down menu allows you to view users on screen, in increments of 25, 50, 75, 100, 250, 500, 750, or 1,000. This feature allows your browser to work 13

20 more efficiently. Displaying more items per page typically gives you faster results. Search Results Table After you initiate a search, a table displays all users defined by the search. The Search Results table displays the User ID, Company, Account ID, First Name, Last Name, Location, Supervisor, and indicates if the user is active. The headings allow you to find and access users accounts quickly. Click any of the six column headers to change the sort order of the Search Results table. The first click on a header sorts the data in alphabetical order from a to z. Clicking the column header twice reverses the sort order. The column headers are: User ID This column displays the User IDs that match the search criteria. This field is a hyperlink that links to the Edit User page with the selected user s information displayed there. First Name This column displays the first names of the User IDs that match the search criteria. Last Name This column displays the last names of the User IDs that match the search criteria. Location This column displays the locations of the User IDs that match the search criteria. Supervisor This column displays the supervisors of the User IDs that match the search criteria. 14
21 Active This column displays the statuses of the User IDs that match the search criteria. If the User ID is active, the letter Y for yes displays in the column. If the User is inactive, the letter N for no displays in the column. Editing User Information The Edit User page allows you access to basic information for a specific user account. You can modify a single field or multiple fields simultaneously for a user. 1. Load the information for the user by clicking the User ID in the User List table, which displays as the result of performing a user search. For steps on how to find a Virtual Merchant user, see Finding and Editing Users in the previous section. 2. Make the changes to the selected user and click Update to save the changes. The User Fields are: User ID Displays the User ID for the selected user. This value cannot be edited. First Name Enter or change the user's first name. 15
22 Last Name Enter or change the user's last name. Location Enter or change the user's location. Phone Enter or change the user's phone number. Extension Enter or change the user's phone extension. Enter or change the user's address. This field is required. Password Change the selected user's password. The new password must have a minimum of seven (7) characters and at least one letter and one number. This field is required. Supervisor Change the supervisor of the selected user. Active Activate or deactivate the selected User ID. (Note) You can have a maximum of 5,000 active users associated with an account (VID). If you attempt to add a user to an account that already has 5,000 active users, the system will display an error message and you will not be allowed to add the user. You must either deactivate a user or delete a user from the system to lower the total number of active users. Status Lock or unlock a user s ability to login. Rights button - Configure the options that this user can access. Terminals button - Add terminal associations to the currently selected user. Cancel button - Abandon changes. 16

23 Changing Your Password Each user can change his own password. As a security measure, each user's password is set to expire 45 days after the last password change. If a user has not changed his password within the last 45 days, he must enter a new password upon his next successful login. Passwords must be alphanumeric with a minimum of seven (7) characters and must contain at least one letter and one number. New Passwords must be different from the previous thirteen (13) passwords. Three (3) successive failed login attempts automatically lock the account. As a security measure, to change your password, you must have already logged in with your old password. If you cannot remember your current password, or if your account has been locked, call for assistance. To change your password: 1. Select Change Password from the User menu. 2. Enter your password in the Current Password field. 3. Enter the new password in the New Password field. 4. Enter the new password again in the Confirm New Password field for verification. 5. Click Change Password to complete the password change, or click Clear to abandon any changes. 17
24 Changing Your PIN Each user can change his own PIN or PIN format. To change your PIN format: 1. Select Change PIN from the User menu. 2. Change the PIN Length by selecting one of the three options from the drop-down menu. six characters five characters four characters 3. Change the PIN Format by selecting one of the two options from the drop-down menu: numeric alphanumeric 4. Click Change PIN to save the PIN format changes and generate the new PIN. To just change your PIN, simply click Change PIN, and the system will autogenerate the new PIN. 18
25 Chapter 4 Managing Terminal Access by IP Address The Account Settings menu has only one option: IP Address Options. You can restrict access to the selected terminal so that only certain IP addresses can access the terminal. If someone attempts to access the terminal from an IP address that is not in the list, they will not be able to do so. Adding IP Addresses to the Access List 1. Click Account Settings and select IP Address Options. The IP Address Options page appears, showing authorized login IP Addresses that are already associated with this terminal, if they have already been defined. (Note) If the Use Login IP Addresses check box is not selected, the IP addresses will not be used to restrict access to this terminal. Simply adding the IP addresses does not activate this option. 19
26 2. Select (click) the Use Login IP Addresses check box. 3. In the text box, enter the Login IP Address you want to allow to access this terminal. 4. Click the Add Login IP Address button. 5. Repeat steps 3 and 4 until you have added all the IP addresses. 6. Click Update. Deleting Login IP Addresses from the access list: 1. Click Account Settings and select IP Address Options. The IP Address Options page appears, showing authorized login IP Addresses that are already associated with this terminal. 20

27 2. Click the Delete button next to the IP address you want to delete. 3. Click Update. Activating and Turning Off IP Address Access for a Terminal: 1. Click Account Settings and select IP Address Options. The IP Address Options page appears, showing authorized login IP Addresses that are already associated with this terminal. 2. Select or clear the Use IP Addresses check box. 21
28 3. Click Update. If the Use Login IP Addresses check box is selected, Virtual Merchant captures the IP Address of any machine that is attempting to login to the terminal. If the IP address is not in the list, login is not allowed. 22

29 Chapter 5 Configuring the Terminal Terminal Setup configures the environment for the selected Virtual Merchant Terminal ID. This chapter describes how to define the way Virtual Merchant should function based on the options you select. You can modify payment forms fields and colors. You can customize the headers and footers of these forms, as well as the messages. You can also enable or disable more advanced features as necessary for your business needs. The Terminal Setup menu allows you to access to these options: Merchant Main Modify merchant contact information. Terminal Modify the terminal Friendly Name. Payment Fields Create or modify the fields that appear on payment forms. Printer Set up printing options. 23

30 Payment Form Payment Form Add custom headers and footers, define color, and attach images to be displayed on the Virtual Merchant payment form. Receipt Form Define payment receipt form options. Form Setup Approved and Declined options. Advanced System Setup Setup auto-settlement and define HTTP options. Error Messages Define custom error messages to appear in the Virtual Merchant payment form. Business Rules Define custom rules for terminal-based transactions. Managing Merchant Information You can manage your merchant information from the Terminal menu. Main The Merchant Information page allows you to view and edit merchant information for the selected terminal. The remaining information is for internal use only. To view the Main Merchant Information page, click Terminal, select Merchant, and then select Main. To change any field, enter new information for a field and click Update. Once you click the Update button, you cannot automatically revert to the old information; you must reenter the old information again. 24
31 The Merchant Information fields are: Merchant Name Merchant's DBA name. Address 1 Merchant s primary address. Address 2 Additional address information. City City in which the merchant's company is located. State/Province State or province in which the merchant's company is located. Postal Code Zip code for the postal area in which the merchant's company is located. Contact Name Name of the person who is the primary point-of-contact at the merchant's company. Contact Phone 1 Primary phone number for the merchant's company. Contact Phone 2 Secondary phone number for the merchant's company. Contact Primary point-of-contact for the merchant's company. Terminal address for the terminal. SMS Short Message Service address, this is an optional that can send business rule alerts to mobile devices. Merchant s URL (Website) Merchant's Website address. 25
32 Terminal The Merchant Terminal Information page allows you to view the set up information for the terminal. You can also change the Friendly Name for the terminal. To view the Merchant Terminal Information page, click Terminal, select Merchant, and then select Terminal. To change the Friendly Name for the terminal, enter the new friendly name and click Update. 26

33 Payment Fields The Payment Field Setup section provides you with the option to configure how payment fields display both in Virtual Terminal and on the payment form to the customer. The section contains two categories: Sections and Fields. Sections are placeholders for information that can be configured to display on the payment forms. Each section is composed of the individual fields on the payment forms. You can add new sections, add new fields to a section, modify some characteristics of fields in a section, and change the section name that is displayed in Virtual Terminal and on the Payment form. To view the Merchant Payment Fields page, click Terminal, select Merchant, and then select Payment Fields. The Payment Field Setup page appears. In this page, the section name is first (Order Section in the graphic above) and is followed by the fields that appear in the section 27

34 Click the arrows to the left of the fields to move the fields up or down in the list, rearranging the fields on both the Virtual Merchant User Interface, and on the Payment Form. This is the page that allows you to add a new section, add a new field to a section, edit a field s configuration, and change the display name for a section. In the next pages, you ll learn how. Adding a New Payment Section To add a new section to the Payment Form: 1. On the bottom of the Payment Field Setup page, click Add New Section. The New Payment Section configuration page appears. 2. Enter the name of the new section, without spaces, in the Name field. 3. Enter the Display Name for the new section. 4. Select the check boxes to specify where the new section will display. 5. Click Add New Section to save the new section parameters. 6. Once the section information is updated, a message appears, confirming that the new section has been added successfully, and the new section appears at the bottom of the page. 28

35 7. To change the order of the sections, select the up or down arrows in the title bar of the section. 29

36 Adding a New Payment Field to a Section 1. Click Add New Field on the Payment Field Setup screen to add a new field to a section on the Payment form. The Add New Payment Field page opens. 30

37 2. Enter the name of the new field, without spaces, in the Name field of the New Payment Field Configuration form. 3. Enter the name for the field that will show on the Payment Field form in the Display Name field. 4. In the Section drop down list, select the section in which you want the new field to display. 5. In the Field Type drop-down list, select the kind of field (Text, Drop Down, or Checkbox). 6. For text fields that are custom fields or system fields that are optional, you can define a minimum length permitted. If the field is left blank, you can enter a value of any length that is less than or equal to the maximum number of characters defined for the field. If the field contains a numeric text value, the number cannot be zero and cannot contain a decimal point or plus or minus sign. 7. Enter the Maximum Number of Characters accepted by the field. 31

38 8. If you select a drop-down field type, enter the text items that will appear in the dropdown list with a colon(:) between selectable items, as shown below. 9. Select the check boxes to specify whether the field is required, if it can be changed, and where it will display. (Note) If you select or clear any of the following settings on this page, when you click Update, the corresponding setting in the section in which the field is located is automatically updated: Show in Virtual Terminal Show in Payment Form Show in Receipt Show to Customer Show to Merchant 10. Click Update to save the new field parameters. Once the field information is updated, a message appears to confirm that the new field has been added successfully, and the new field displays at the bottom of the section. 11. To change the order in which the fields display in the section, click the up or down Arrows. 32

39 Editing Section Options To edit section options, you must first open the Payment Field Setup window. 1. To view the Merchant Payment Fields page, click Terminal, select Merchant, and then select Payment Fields. The Payment Field Setup page appears. 2. Select the section name in the section header. The Update Payment Section screen displays the current information for the section. 33

40 The section options define how this section appears on the screen, as well as on the Virtual Merchant Payment form, and whether the section will be used on the responses to the merchant and consumer. Name The system name for the section. This field can only be edited when you add a new section. Display Name The name to display on the form. Show in Virtual Terminal Specifies whether the section is visible in Virtual Terminal. Show on Payment Form Specifies whether the section is visible in the Virtual Merchant payment form. Show in Receipt This option will place this section on the transaction receipt. Show in to Customer Includes this section in to the customer. Show in to merchant Includes this section in to the merchant. 3. Click Update Section to save the settings for this Section, click Cancel to abandon any edits that have been made to the section, or click Delete to delete the entire section from your form. If you attempt to delete a section with required system fields, you will receive an error message.. 34

41 Editing a Field System fields may contain information that cannot be edited. If a check box appears dimmed, it is not available for edit. 1. On the Payment Fields Screen, go to the section that contains the field you want to edit and click the field name. The Update Payment Field screen displays. In the graphic below, the Display Name and Section fields on the top of the screen and the Can be changed on Payment Form checkbox are editable. The settings on this screen define how the field is presented on both the Virtual Terminal screens and the Virtual Merchant Payment Form. It also identifies 35
42 whether the field should be used on the responses for approved and declined notifications. Keep in mind that for System Fields, you may not be able to change the settings for a field. Name This displays the system name for the field. This cannot be edited. Display Name This is the name of the field as it appears on the payment forms. Section From this drop-down menu, select the section in which the field appears on the payment form. The drop-down menu contains all available sections. Field Type From this drop-down menu, select the field type. The options available are: Text, Drop Down, and Checkbox. Maximum Number of Characters Define the maximum number of characters for this field. Required Select this check box to designate the field as required on the Payment Form and in the Virtual Terminal. This field cannot be changed for fields the system requires. Show in Virtual Terminal Select this check box to make the field visible in the Virtual Terminal. Can be Changed on Payment Form This option determines whether the field can be edited on the payment form. This option is not valid unless the Show on Payment Form check box is selected. Show on Payment Form Select this check box to make the field visible in the Virtual Merchant payment form. Show in Receipt Select this check box to place this field on the transaction receipt. Show in to Customer Select this box to include this field in the customer to the addresses entered into the payment form. The Address must be a required field in the Payment Field Setup section for the to be sent to the customer. Show in to Merchant Select this box to include this field in the merchant notification to the addresses entered into the Terminal field under the Merchant Information section. Forward on Approval Select this field to forward the information in this field to the URL specified for the merchant if the transaction is approved. 36
 cannot be deleted.")
43 Forward on Decline Select this option to forward the information in this field to the URL specified for the merchant if the transaction is declined. 2. Click Update to save the settings for this field. 3. For user-defined fields, a Delete button is also displayed. System fields (the system-defined fields) cannot be deleted. Only user-defined fields can be deleted. Printer Configuration The Printer Configuration page allows you to configure the receipt printing options for Virtual Merchant. Warning: To print receipts, you must set up your Internet browser to accept pop-ups from Virtual Merchant before you begin transaction processing. Printer Options Printer options define the output generated upon a successful authorization attempt. 37

44 The three printing options to choose from the Printer Type drop-down menu are: No Printer Select this option if you do not wish to print a transaction receipt. Parallel Printer Select this option if you wish to print a receipt to a parallel printer. Serial Printer Select this option if you wish to print to a serial printer connected to a Com port. The No Printer option displays the authorization information on the Virtual Terminal Response screen. The Parallel Printer option launches a separate browser screen with the receipt information and sends the output to the default printer for the Internet browser. You must then select the Print button in the pop-up window, or use the browser s print feature. The Serial Printer option sends a receipt to the printer on a configured serial (COM) port. For the Serial Printer function to work, you must have Windows 2000 or higher, Internet Explorer 6.0 or greater, and have successfully installed the driver from the Support page. Paper Type options Use the Paper Type drop-down menu to select the type of receipt to print. The following Paper Type options are available for parallel and serial printers. When Serial Printer is selected as the Printer Type: Multi-ply is selected for 2 ply impact style printers. Both receipts print at once with one copy per paper ply. Single-ply is selected for 1 ply thermal style printers. Both a customer and a merchant receipt are printed separately. When Parallel Printer is selected as the Printer Type: Multi-ply prints the customer and merchant receipts on 2 separate pages (1 per page, 8 1/2 x11 ). Single-ply prints the customer and merchant receipts side by side on a single sheet of paper (8 1/2 x11 ). 38
45 Receipt Header Options Receipt Header Options configure the structure for the receipt header. You can enable or disable the printing of each header line by adding or removing data from the Header Line field. Header Alignment Sets the alignment for the receipt header. Choose from Left, Right, or Center. Header Line 1 DBA business name. Enable/Disable the printing of this header line by adding/removing data. Header Line 2 Physical Business.Address. Enable/Disable the printing of this header line by adding/removing data. Header Line 3 City, State Zip. Enable.Disable the printing of this header line by adding/removing data. Header Line 4 Business Phone Number. Enable/Disable the printing of this header line by adding/removing data. Header Line 5 Your company motto or other text here. Enable/Disable the printing of this header line by adding/removing data. Receipt Trailer Options Receipt Trailer Options configure the structure for the receipt footer. Enable or disable the printing of each footer line by adding or removing data from the Header Line field. Footer Alignment Sets the alignment for the receipt footer. Choose from Left, Right, or Center. Footer Line 1 Enable/Disable the printing of this footer line by adding/removing data. Footer Line 2 Enable/Disable the printing of this footer line by adding/removing data. Receipt Custom Options Receipt Custom Options configure up to ten (10) additional user-defined fields to appear on either the parallel or serial receipts. To have the value to appear on the receipt, a descriptive label must be entered in the Custom Label field and it must be bound to one of the defined custom fields by selecting a value from the Custom Field drop-down menu. 39
46 Additional Fields 1-10 Allows you to add a custom user-defined field to appear on the receipt. Form Configuration The Payment Form option on the Terminal menu allows you to configure your Payment Form, Receipt Form, and form. Payment Form The Payment Form Setup page allows you to change the basic structure of the HTML payment form. Use these options to modify the Virtual Merchant Payment Form to have the look and feel of your Website, for example. After you select Payment Form from the Terminal menu, and then select Payment Form again, you see the Payment Form. The following three sections appear on the Payment Form page: Payment form Header Footer Section Update header and footer text. Payment form Color Section Update the background, text, header and border table, and hypertext link color. Payment form Images Section Update the Header Logo and background images. 40

47 Change the Payment Form Header or Footer Text To edit the Header or Footer text, click the Editor button to the right of the field (Payment Form Header or Payment Form Footer), and the text editor dialog box will open. For an explanation of how to use the Text Editor, please refer to Appendix B. Change Payment Form Colors In the Payment Form Color section, select values from the drop-down options for the listed items, or, if you know the RGB Value for the exact color you want, you can change the code in the text box provided. All changes to the color options appear simultaneously in the preview screen so you can view your new design before you update it on your Website. Upload a Header Logo or Background Image 1. In the Payment Form Images section, click Browse on the right side of the field to select your.gif, or.jpg image and click Update. 2. Once the Update button has been clicked, you cannot revert to the old information, but you can still click Restore Defaults to change the Payment Form back to the original Virtual Merchant system colors and field values. 41
 authorization attempts, and to enter")
48 Receipt Form The Receipt Form page configures the options to accurately display the transaction authorization results from the Virtual Merchant Payment Form. The Receipt Form page is divided into sections based on authorization response, allowing you to create pages for approved transactions and declined (non-approved) authorization attempts, and to enter a URL for errors. For a more detailed explanation of the Receipt Link Method, see Appendix D. Receipt Form - Approval Options This section of the Receipt Form Information page is used to identify how the authorization response page is handled from the Virtual Merchant Payment Form for approved transactions. The options in this section define the method, URL, and appearance of the response page for declined and approved transactions. Link Method This selection offers four methods to create the receipt link. 42
49 Receipt Form - Declined Options This section within the Receipt Form Information page identifies how the authorization response page is handled from the Virtual Merchant payment form for Declined transactions. The options within this section define the method, URL, and appearance of the response page for "non-approved" transactions. Link Method This selection offers four methods to create the receipt link. Hyperlink This option displays the link back to the Website specified in the URL field as a text link on the Virtual Merchant response page. Form GET This option displays the link back to the Website specified in the URL field as a button on the Virtual Merchant response page. The response data is returned to the site in the form of a GET. Form POST This option displays the link back to the Website specified in the URL field as a button on the Virtual Merchant response page. The response data is returned to the site in the form of a POST. Get Redirect This option re-directs the response from the Virtual Merchant payment form to the URL defined in the URL field in the form of a GET. Button Text This option allows you to specify the text that appears as the link on your Website or response page. This option is only applicable for the Hyperlink, Form GET, and Form POST Link Method options. URL This option allows you to attach a URL address on your receipts to give your customer's easy access back to your Website. You have three protocol options for your URL. HTTP Hyper Text Transfer Protocol HTTPS Hyper Text Transfer Protocol Secure FTP File Transfer Protocol Receipt Header This option allows you to add a customized message that appears at the top of the declined transaction response page. To edit the Header text, select the Editor button on the right side of the form to open the text editor dialog box. Receipt Footer This option allows you to add a customized message to appear at the bottom of the declined transaction response page. To edit the Footer text, select the Editor button on the right side of the form to open the text editor dialog box. For an explanation on use of the Text Editor, please refer to Appendix B. 43

50 Receipt Form Error URL Enter the URL address to be used when an error occurs. To save modifications to the Receipt Form Information page: 1. Click Update. To abandon any current changes, click Cancel. After you click Update, you cannot revert to the old information. 2. Click Restore Defaults to revert all of the fields back to the Virtual Merchant default values. Form The Setup Form page allows you to set up the distribution list for merchant notifications. This can be used for any industry type. It also allows you to identify if the merchant and/or customer should be notified on transaction approvals or declines. You can add custom header and footer messages to approved or declined messages. Options Approval Section Use the Options Approval section to determine who receives notifications for Approved transactions and to modify header and footer formats so custom messages can be presented. 44
51 1. Select the Notify Merchant of Transaction Approval box to generate a merchant confirmation upon approval using the address you have specified in Merchant Information section. If the box is not selected, an approval confirmation will not be sent to the merchant. 2. Select the Notify Customer of Transaction Approval box to generate a customer approval using the address specified by the customer during the transaction. If the box is not selected, an approval will not be sent to the customer. 3. To add a custom message at the top of the approval , click the Editor button on the right side of the form next to the Header field and the text editor dialog box will open. For an explanation on use of the Text Editor, please refer to Appendix B. 4. To add a custom message at the bottom of the approval , click the Editor button on the right side of the form next to the Footer field and the text editor dialog box will open. For an explanation on use of the Text Editor, please refer to Appendix B. Options Decline Section The Options Decline section allows you to determine who receives notifications for Declined transactions. It also allows the header and footer formats to be modified so custom messages can be presented. 1. Select the Notify Merchant of Transaction Decline box to generate a merchant upon a transaction decline using the address you have specified in Merchant Information section. If the box is not selected, a decline confirmation will not be sent to the merchant. 2. Select the Notify Customer of Transaction Decline box to generate a customer decline using the address specified by the customer during the transaction. If the box is not selected, a decline will not be sent to the customer. 3. To add a custom message at the top of the decline , select the Editor button on the right side of the form next to the Header field and the text editor dialog box will open. For an explanation on use of the Text Editor, please refer to Appendix B. 4. To add a custom message at the bottom of the decline , select the Editor button on the right side of the form next to the Footer field and the text editor dialog box will open. For an explanation on use of the Text Editor, please refer to Appendix B. 5. Click Update to save any modifications.once you click Update, you cannot revert to the old information, but you can click Restore Defaults to revert all of the fields back to the Virtual Merchant default values. 45

52 Advanced Menu The advanced menu only has two selections: System Setup and Error Messages. These options are described in more detail in the next sections. System Setup Select Advanced on the Terminal menu, and then select System Settings. The System Setup page enables or disables HTTP access to the Payment Form. HTTP Options Enable HTTP Transaction This option allows you to perform online transactions from a Website outside of the Virtual Terminal. See the Virtual Merchant Developer s Guide for details on Website integration. Use HTTP Referrers Selecting the Use HTTP Referrers option prevents all except the authorized referrers from linking to your site. This assures you that only your Website is sending transactions to your account. Authorized Referrers The Authorized Referrers option allows you to select the sites that you wish to authorize to link to your site. To add a referrer, type the full URL into the window without removing the Example: Once you have entered the desired URL into the window, select the Add Referrer button. You can add as 46
53 many referrers as you like, but you must enter them separately. To remove a referrer, select the URL you wish to remove and click Remove Referrer. Processing Options Auto Pend Sales Automatically pends all sale transactions entered through the Virtual Merchant payment form. All credit and force transactions are automatically pended when entered through the HTTP interface. This option is only for terminals set up as a terminal-based environment. Auto Settlement Time Settles all unpended transactions from the Current Batches queue at a specified time each day. This option only executes once per day and runs on Eastern Standard Time (EST). You can change your Auto Settlement Time after your current Auto Settlement Time has passed. Your current batches will not settle until the newly selected time the following day. You have six Auto Settle Times from which to choose: Midnight 4 A.M. 8 A.M. Noon 4 P.M. 8 P.M. Click Update to update your settlement time. 47

54 Error Messages The Custom Error Messages page allows you to create custom error messages for unauthorized decline responses. If there is no value listed in the Custom Message field, the default message displays when the error is returned on the transaction that was not authorized. If there is a value in the Custom Message field, this message displays on the unauthorized transaction, in place of the default message. 1. From the Terminal menu, select Advanced and then select Error Messages. 2. To customize a specific error, select the Error Name in the Error Message List. 3. To customize a specific error message, enter the desired message into the Custom Message field. The error message cannot exceed 255 characters and displays in 10 point Arial font on the authorization response page. (Note) The text in this field does not support customized HTML code. 4. Click Update to save your changes. 48

55 5. When you have defined a custom message for the selected error, a Use Default button appears. To revert to the original message, click Use Default button. Business Rules The New Rules page lets you create your own processing business rules for terminals that are set up for terminal-based processing. Virtual Merchant system administrators can set system-level rules. Other users cannot edit system rules. Business rules which are run in order, from top to bottom. You can change the order of the rules using the Arrow buttons next to each rule. Once a rule is triggered, no other rules will operate. Actions set up through rules cannot be accessed other than if the rule is triggered. Also, return rules do not affect transaction rules 1. To add a new business rule, on the Terminal menu, select Advanced, and then select Business Rules. 2. To add a new business rule, click Add New Rule on the Processing Rules screen. 3. On the New Rule screen, enter the name of the new business rule in the Rule Name field. 49

56 4. Select the field to use as a comparison value for the rule from the Value drop-down menu. Available selections are: Ship To Postal Code, Bill To Postal Code, Tran Amount, Return Amount, AVS Response, CVV2 Response, and Settlement. 5. Select the comparison Operator from the Operator drop-down menu. Available selections are: Equal To, Not Equal To, Greater Than, Greater Than Equal To, Less Than, Less Than Equal To, and Not in Set. 6. Select the Criteria to use for comparison. Available selections are: Ship To Postal Code, Bill To Postal Code, and Successful. 7. Enter an Or Value as a second value or value set for comparison with the transaction, return amount, AVS response, or CVV2 response. To enter more than one value in the Or Value field, separate each value with a comma. For AVS or CVV2 response comparisons, the is sent when the criteria is not found in the response set. 8. Select an action from the True Action drop-down menu. This is the action that takes place when the criteria comparison is determined to be true. Available selections include Set to Pend and Set to Review. The Or Rule field is populated by existing business rules that have been created. This Or Rule can be selected instead of selecting a True Action. 9. Select an action from the False Action drop-down menu. This is the action that takes place when the criteria comparison is determined to be false. Available selections include Set to Pend and Set to Review. The Or Rule field is populated by existing business rules that have been created. This Or Rule can be selected instead of selecting a False Action. 10. Select an action from the Send drop-down menu to specify an action based on the rule comparison. Available selections include Send Merchant , Send Terminal , and Send SMS Once you have entered the information for the new rule, click Add New Rule to save the rule. A screen message indicates when the rule is added successfully and the rule displays in the Processing Rules table. 50

57 Business rules run in order, from top to bottom. You can change the order of the list using the Arrow buttons next to the rule. You can add no more than 5 rules at a time to a terminal. Edit a Business Rule You can edit an existing business rule if you have the user rights. 1. To edit an existing rule, select the rule name from the Processing Rules table. 2. On the Update Rule screen, enter or adjust the fields as necessary and click Update. 3. To delete the business rule, click Delete. The screen message that the business rule has been updated/deleted successfully appears. 51

58 52
59 Chapter 6 Using the Virtual Merchant Menu Links The four menu links at the top right side of Virtual Merchant are provided to assist and answer questions. Merchant Connect The Merchant Connect link opens the Merchant Connect Home page in a new browser window. Merchant Connect is the online support and reporting tool that provides free access to your monthly statements, recent deposits, chargebacks and retrieval requests, customer support and much more. Support Section The Support Section link gives you access to more links to provide feedback via , view compatible shopping cart information, download the Developer and User Guides, and also download the Peripheral Driver for the devices that are used with Virtual Merchant. 53

60 User Feedback In the User Feedback section, the Submit Feedback link allows you to submit product feedback via to the Virtual Merchant support channel for assistance. The Feedback form consists of five sections: 54
61 Description of Feedback Enter the category for the feedback request. Feedback Used to make any additional comment or ask question related to the Virtual Merchant application. Suggestion Used to make a suggestion for improvement in the Virtual Merchant application. Issue Used to indicate any processing problems encountered within the Virtual Merchant application. System Name Enter Your Company Name here. URL (Web Address) Enter the Virtual Merchant URL related to content of the . Your Address Enter the address for a response. This is a required field. Feedback Message Please be very descriptive when filling out the Feedback Message. By indicating exactly the steps that led to the problem, we can reproduce the issue in an effort to correct it quickly. 55

62 View Compatible Carts In general terms, an Internet shopping cart (sometimes referred to as a virtual shopping cart) is a software program that, when integrated into your Web store, enables customers to choose one or more items from the Web store, specify particular options that might be available and then purchase those items collectively in just a few steps. Not all Internet shopping carts are compatible with Virtual Merchant. This feature shows you the list of the ones that are. The View Compatible Cart List link shows all of the shopping carts that are compatible for use with the Virtual Merchant application. Limit the number of carts shown at a time by selecting from the Display drop-down menu. The available values are 25, 50, 100 or All. The screen refreshes to reflect the new selection. 1. Click Add Cart to submit a request to have an additional shopping cart added to the list. 56
63 2. Enter the appropriate Information and click Add to send the request to the Virtual Merchant support channel for review. Elavon uses the Business Contact information to contact the shopping cart company, and copies the Sales Contact Information in the Compatible Carts List for external contact information. Company Name Enter the Shopping Cart Company name. (Required Field) Product Name Enter the Shopping Cart Product name. (Required Field) Web Site Enter the URL for the Shopping Cart homepage. Business Contact Name Enter the Business Contact's name. (Required Field) Business Contact Phone Enter the Business Contact's phone number. (Required Field) Business Contact Enter the Business Contact's address. (Required Field) Sales Contact Name Enter the Sales Contact's name. Sales Contact Phone Enter the Sales Contact's phone number. Sales Contact Enter the Sales Contact's address. 57

64 User Manuals In the User Manuals section, click the Download Developer Guide and Download User Guide links, to open the respective guides. You will need the Adobe Acrobat Reader to read both of the Virtual Merchant PDF formatted guides. The Developer Guide provides information about integrating Virtual Merchant into a personal site, with examples showing the functions of the Virtual Merchant features. The appendixes translate transaction information into Field Information Codes, Authorization Response Codes, Authorization Source Codes and AVS Response Codes. The User Guide (this document) provides information about the daily use of Virtual Merchant. 58

65 Peripheral Driver Use the Peripheral Driver link to download the Windows-based peripheral driver application so you can use supported peripheral devices to generate receipts, capture PIN information, and check images. Note: Microsoft ActiveX support is required for your browser. 1. Click Open on the File Download window. A status bar shows the status of the download. 2. Once the download has completed, the WinZip (or applicable application) window will open. It contains the DeviceAssistantSetup.exe application. 59

66 3. Double-click the application to launch the Install process. 4. Click the Next button on the Welcome window. 5. Select the check box(es) for the components that you need to install and then click Next. 60

67 6. Click Install to continue the installation. 7. Click Finish to complete the installation. At this point, the installation is completed, but the configuration of the device is not complete. Your system will not work with this device until it is properly configured. To configure the device, if you have completed training, contact Software Technical Support, at If you need training, contact the Merchant Activation Department at
68 Help Click the Help menu to open a separate browser window displaying the help contents for the current section. Select the Help link from the Virtual Merchant screen to select the subject you for which you would like more information. To close the Help window, select the Close Window button at the bottom of the page.. Logout This menu option logs you out of the Virtual Merchant application. Logging out is recommended any time you step away from the computer, to ensure that no unauthorized user can access Virtual Merchant while you are away. In addition, each Virtual Merchant user session is limited to a 15-minute inactivity window. Virtual Merchant automatically logs out a user after 15 minutes of inactivity to prevent unauthorized access. 62
 characters of the Account ID. This is the Virtual Merchant account to which the current user has access.")
69 Chapter 7 Main Menu The Main Menu displays items on the left navigation menu. Your rights, specified by your administrator, determine access to these items. User: Displays the current User Name Account: Displays the first six (6) characters of the Account ID. This is the Virtual Merchant account to which the current user has access. Select Terminal Is used when a User is associated with more than one terminal. The Select Terminal drop-down menu contains a list of associated terminals from which you must select. Once a terminal is selected, the terminal name is displayed below the User ID and Account ID. In addition, the buttons associated with the User ID for the terminal, which are determined by the assigned rights are displayed in the left navigation menu. Navigation To navigate using drop-down menus, mouse-over the menus to reveal the sub-menus and selections and then select the link to activate the screen. Virtual Merchant screens can also be accessed via hyperlinks. To navigate using hyperlinks, select the screen menu and the selections and options under the menu(s) display as hyperlinks on a new page. 63
70 64

71 Change Merchant Terminal If you have rights to access more than one Terminal ID, you will need to select a terminal before you can enter any transactions or make any changes to the Terminal Setup sections. 1. To change from the currently active terminal, click the Select Terminal link in the upper left navigation bar. 2. The Select Terminal drop-down menu option appears with drop-down selections for all the available Terminal IDs associated with your login. 3. Select the desired terminal name from the drop-down menu and click Select Terminal. The selected terminal name appears in the upper section of the left navigation bar. Transaction rights associated with your login appear below the Select Terminal link, as shown in the graphic below. 65

72 Virtual Terminal The Main Virtual Terminal section provides access to all of the transaction entry and management options. From this section, you can enter Credit Card, Debit Card, EBT card, Gift Card, and Electronic Check transactions, depending on your terminal rights. You can also review, print, modify, delete, or settle transactions from the Current Batches section. You can find previous settlement activity in the Settled Batches section. From there you can view, search, filter, or download all previously Settled Batches. If you have access to more than one Terminal ID, you are prompted to select the desired Terminal ID from the drop-down menu. If you only have access to one Terminal ID, it is automatically selected for you. To view the tasks available for the transaction types associated with your login, select the plus sign next to the transaction to expand the menu. In the graphic above, the plus sign next to Credit Card has been clicked to reveal the options for Credit Card transactions. 66

73 Credit Card Transactions The Credit Card Transaction page allows you to either swipe a transaction using a Magnetic Stripe Reader (MSR) or to key-enter the transaction into the Virtual Merchant application. The Swiped Transaction option is only available for Terminal IDs for which the market segment is configured as Retail. When a card is swiped, card numbers are masked in the application window. The user rights your administrator assigned to you determine whether you have access to this section. See the Edit User Rights section for more information. Sale Transaction Obtain a real-time authorization for a Credit Card sale transaction. Return Transaction Enter a refund transaction for a previous sale. Inquiry Transaction Check the balance of a pre-paid Visa or MasterCard gift card. Force Transaction Forces a sale transaction when the approval code was previously obtained, such as through a voice authorization. This transaction type requires the Approval Code be manually entered for processing. The Approval Code is a required field for this transaction type. Auth Only Transaction To pre-approve a transaction that will be forced through at a later time. (This transaction type is often used for rental cars or hotels.) AVS Only Transaction Verifies the address given for the transaction matches that of the cardholder. Recurring Transaction Sets up payment amounts and the billing cycle in which the payments occur. Installment Transactions Used to set up payment amounts, the number of payments, and the billing cycle in which the payments occur. Multientry Transactions Used to enter multiple Credit Card transactions from one screen. For Sale, Return, Inquiry, Force, Auth Only, and AVS Only Credit Card transactions: 67

74 1. Swipe the card through the MSR attached to the computer and the card information is entered into the Virtual Merchant application. The Submit button is automatically initiated when the card is swiped through the reader. The Card Account Number and Expiration Date cannot be edited on this page. 2. You can also manually enter the card number in the Card Account Data field and select the Submit button. 3. Enter information in the fields necessary for the transaction and select the Submit button to send the transaction for authorization. 4. See the Transaction Detail Page for information on authorization responses. The field prompts for each transaction depend on the Payment Form Field Setup for the selected Terminal. See the Payment Form Fields Setup page in the Terminal Setup section for more information on this topic. 68

75 5. To use the billing address for shipping, click Same as Billing in the Shipping Address box. All the billing address information is copied into the fields. After clicking this check box, you can edit the Shipping Address information after copying it This unchecks the check box, and does not update the Billing Address. 6. After entering the appropriate information for the transaction, click Process at the bottom of the page to submit the transaction for processing. 69

76 See the Transaction Detail Page for information on authorization responses. 7. Click Update (on the bottom of the Authorization Response page to save your edits. 8. Click Reprint to print an additional copy of the receipt. 9. If the Terminal is set up to process recurring transactions, click Add to Recurring to load the information from the transaction into the Add to Recurring screen. 10. Specify the remaining information necessary to process recurring payments on the Add to Recurring screen. For more information, refer to the Recurring and Installment Credit Card transactions section of this document. 70

77 For Recurring, and Installment Credit Card transactions: 1. Enter the credit card number in the Account Data field. 2. Enter the Expiration Date using MMYY format. 3. Enter the Amount for the transaction. 4. Select the Billing Cycle frequency from the drop-down menu. Options include: Daily, weekly, Fort-Nightly (which means every two weeks), Bi- Monthly, Monthly, 60 Days, Quarterly, Semester, Semi-Annually, Annually, or Suspended. 5. For Installment Transactions, enter the Number of Payments. 6. Enter the Next Payment Date, or select the red calendar icon next to the field to select the date from the calendar tool. 7. Click the Add. 71

78 For Multi-entry Credit Card transactions: 1. Enter the Credit Card number in the Account Data field. 2. Enter the Expiration Date using MMYY format. 3. Enter the Amount of the transaction. 4. Click Add. 5. Repeat until all transactions have been entered. 6. Click Authorize to submit the transactions. The Multi-entry Response page displays the transaction response information for the submitted transactions. 72
79 73

80 Debit Card Transactions The Debit Card Transaction page allows you to swipe a transaction using a Magnetic Stripe Reader (MSR), and prompts for a Personal Identification Number (PIN) to be entered. Access to this section is determined by your merchant account configuration. See the Edit User Rights section for more information. Purchase Transaction Obtain a real-time authorization for a Debit Card sale transaction. Return Transaction Enter a refund transaction for a previous sale. Inquiry Transaction Obtain the account balance for the Debit Card. Debit transactions are only available if the processing type is set to Host-Based and the market segment is set to Retail in the current terminal profile. A Pin Pad and Printer are required on all debit transactions, except for MO/TO and Internet. For Purchase, Return and Inquiry Debit Card transactions: 1. Swipe the debit card through the MSR. 2. Enter the Amount for the transaction. 3. Enter the necessary fields for the order and click Process to send the transaction for authorization. 4. Enter the PIN using the PIN Pad when prompted, and press ENTER. 74

81 Account Number Displays the Debit Card account number masked to the last four (4) digits. Amount Enter the transaction amount. A decimal is required. Cashback Amount Enter the desired cashback amount. A decimal is required. This is the amount of cash a consumer can receive when using a Debit card. This amount is added to the total purchase amount. Surcharge Amount Displays the surcharge amount for the current profile. This value may be set by the merchant to automatically charge a consumer for processing Debit Cards. Please contact Merchant Customer Service for a list of networks that allow surcharge. User Defined Fields Enter any user-defined information. 75
82 Canadian Debit Transactions Canadian Debit transactions vary from other transaction types. The account type, either checking or savings, is selected on the pin pad screen. Key Exchange is used manually as a troubleshooting tool for Canadian Debit. An automatic Key Exchange is completed with the first debit transaction of the day. For terminals configured for Canadian Debit Transactions, the Key Exchange navigation link appears under the Debit Card link on the left side of the screen. Select this link to initiate a manual Key Exchange. A message indicates the result of the Key Exchange process. 76

83 Voiding a Canadian Debit Transaction Important: Canadian Debit Transactions can only be voided if the batch is open and the card is swiped and the PIN is entered again. The number cannot be entered manually. 1. Initiate a Canadian Debit Transaction Void from the Transaction Detail screen using the details for the initial transaction. To view current transaction activity, click the Current Batches link. 2. To view the batch information, click the Main link under the Current Batches link. New Screen Capture (show the Select All in current view check box ) 3. In the Current Open Batches table, select the card number, in the Card Data column, of the transaction to be voided. This will open the Transaction Detail screen. 4. Click Void to initiate the Debit Card Void process. (Note) Transactions cannot be voided while auto settle or manual settlement processes are running. 77

84 5. On the Debit Card Void screen, swipe the card used in the initial transaction and click Submit. 6. Enter the PIN for the account when prompted by the pin pad and press ENTER. A Debit Card Void Response screen displays the data for the voided transaction. The voided transaction displays in the Current Open Transactions table with Void as the Tran Type value. 78
85 Food Stamp Transactions The Food Stamp Main Authorization screen allows you to enter all Electronic Benefit Transaction (EBT) Food Stamp transaction activity into the application. A Food Stamp transaction involves using an EBT for the purchase of goods or services, or to obtain cash that debits the cardholder s personal EBT account. Food Stamp transactions are only available if the processing type is set to Host- Based and the market segment is set to Retail in the current terminal profile. A pin pad and printer are required on all food stamp transactions. These values will only display if the current user has the appropriate rights to access these transaction types. Purchase Transaction Enter a Food Stamp Purchase transaction. Return Transaction Enter a Food Stamp Return transaction. Inquiry Transaction Obtain the current balance of a Food Stamp card. Force Purchase Enter a Food Stamp Voucher Clear Purchase transaction. Force Return Enter a Food Stamp Voucher Clear Return transaction. 1. Select a Transaction Type. The Enter Card Data screen displays. 2. If the Market Segment is set to Retail, swipe the card through a Magnetic Card reader device to proceed to the transaction entry screen. 79

86 3. Enter the Amount for the transaction. 4. Enter the necessary information in the fields to process the transaction. 5. Click Process to send the transaction for authorization. 6. Enter the PIN number for the account using the PIN pad and press ENTER. The Food Stamp Purchase Response screen displays the results of the authorization attempt. If the program is configured for parallel receipt printing, the program launches a separate browser window with the receipt information. Use the browser s printing options to print the receipt. 80

87 If the program is configured to print to a serial printer, the receipt automatically prints to the serial printer. Cash Benefit Transactions The Cash Benefit Main Authorization screen allows you to enter EBT Cash Benefit transaction activity into the Virtual Merchant application. A cash benefit transaction is the process of using an EBT for the purchase of goods or services, or to obtain cash that debits the cardholder s EBT account. Cash Benefit purchase transactions can either be swiped using a Magnetic Stripe Reader (MSR) or keyentered. Cash Benefit inquiry transactions can only be swiped through the use of a Magnetic Stripe Reader. Cash Benefit Transactions are only available if the processing type is set to Host- Based and the market segment is set to Retail in the current terminal profile. A pin pad and printer are required on all cash benefit transactions. Purchase Transaction Enter a Cash Benefit Purchase transaction. Inquiry Transaction Obtain the current balance of a Cash Benefit card. These values are only displayed if the current user has the appropriate rights to access these transaction types. Account Number Displays the Cash Benefit account number masked to the last four (4) digits. Amount Enter the transaction amount. A decimal is required. Cashback Enter the desired amount of cash back. A decimal is required. This amount will be added to the total purchase amount. 81

88 Surcharge Amount Displays the surcharge amount for the current profile. This value may be set by the merchant to automatically charge a consumer for processing EBT Cash Benefit transactions. Please contact Merchant Customer Service for a list of networks that allow surcharges. User Defined Fields Enter any user-defined information. 1. Enter all of the relevant information required for the cash benefit purchase. 2. Click Process to send the transaction to the server for authorization, or click Clear to clear the form and start again. 3. If you click Process, the total transaction amount appears on the PIN Pad device along with a customer prompt to enter his or her Personal Identification Number (PIN). Once the consumer successfully enters their PIN, the transaction is sent for authorization. The Cash Benefit Purchase response screen displays the results of the authorization attempt. If the program is configured for parallel receipt printing, the program opens a new browser window with the receipt information. Use the browser s printing options to print the receipt. If the program is configured to print to a serial printer, then the receipt will automatically print to the serial printer. User Displays the User Id for the transaction. 82
89 Payment Type Displays the payment type for the transaction. Transaction Type Displays the transaction type. Date/Time Displays the transaction date and time information. Response Displays the response code for the transaction. Message Displays the Authorization Message returned for the authorization attempt. Approval Code Displays the Approval Code returned for the authorization attempt. Reference Number Displays the Reference number returned for the authorization attempt. Food Stamp Balance Displays the remaining Food Stamp balance on the EBT Card. Cash Benefit Balance Displays the remaining Cash Benefit balance on the EBT Card. Record Number This value is only displayed if the profile is configured for Host-Based Processing. Account Data/MICR Data Displays the Food Stamp account number masked to the last four (4) digits. Amount Displays the base transaction amount. Cashback Displays the amount the customer received in cash. Surcharge Displays the surcharge amount added to the transaction. User Defined Displays any user defined fields entered on the transaction. Electronic Check Transactions The Electronic Check Service (ECS) Main Authorization screen allows you to enter Electronic Check activity. An ECS Transaction is the process of electronically imaging a check that debits the account for the purchase of goods and services. Virtual Merchant allows you to image both sides of a check. A Check Imager and Printer are required on all ECS transactions. The values displayed under the Electronic Check menu are based on the configuration for the currently selected terminal profile. There are three possible option categories, and only one of the three option categories will display at a 83

90 time. The transaction only displays if the current user has the appropriate rights to access this transaction type. The sample below shows the choices for the Conversion option category. 1. Conversion: Conversion Only Multientry Conversion Only 2. Guarantee: Guarantee Multientry Guarantee 3. Verification: Verification Multientry Verification Allows you to enter an ECS Purchase for a Conversion Only transaction. Allows you to enter multiple ECS Purchases for Conversion Only transactions. Allows you to enter an ECS Purchase for a Guarantee transaction. Allows you to enter multiple ECS Purchases for Guarantee transactions. Allows you to enter an ECS Purchase for a Verification transaction. Allows you to enter multiple ECS Purchases for Verification transactions. (Note) the options listed above are determined based on the option selected in your merchant account setup. 1. Select a transaction type. The Enter MICR Data screen displays. 2. Swipe the check through check imaging device to proceed. 84

91 You cannot edit the MICR Data field on this screen. The fields labeled in red are required. Field MICR Data Amount User Defined Fields Description The check data, partially masked except for the last four digits, is obtained from the MICR reader. Enter the transaction amount. A decimal is required. Enter any user-defined information. 1. Enter all the information required for the electronic check purchase. 2. Click Process to send the transaction to the server for authorization. The Electronic Check Purchase Response screen displays the results of the authorization attempt. If the program is configured for parallel receipt printing, a window opens with the receipt information and you are prompted to print the receipt. If the program is configured to print to a serial printer, the receipt automatically prints to the serial printer. 85

92 Field User Payment Type Transaction Type Transaction ID Date/Time Response Message Approval Code Reference Number Record Number Tran Reference Number Description The User ID The type of payment The type of transaction. This value displays the unique Virtual Merchant Record ID for this transaction. This value displays the Date and Time at which the transaction took place. The time stamp displayed is based on the time zone that you have indicated in your merchant profile. This field contains the 2-character authorization response code. This field contains the 16-character authorization response message. Displays the Approval Code returned for the authorization attempt. Displays the Reference number returned for the authorization attempt. This value is only displayed if the profile is configured for Host-Based Processing. Displays the parsed checking Transit Routing number. 86

93 Field Account Number Check Number Amount Driver s License State Code Phone Number User Defined Description Displays the parsed checking account number masked to the last four (4) digits. Displays the parsed check serial number. Displays the authorized transaction amount. Displays the check holder s Driver s License number. Displays the state abbreviation. Displays the phone number. Displays any User Defined values that were entered on the transaction. 3. Click Reprint if a reprint of the transaction receipt is necessary, or if the original receipt window was inadvertently closed. 4. Click View Image to see the images captured by the check scanner for the transaction. You can now scan both the front and back sides of a check. 5. Click Upload Image to manually select an image to upload it to our check processing host from the response page. You can perform this action on the transaction detail screen under the current batch section or under the history batch (post settled transactions) section. 6. You can select from two Image Upload Options under the terminal profile: Selective or All. These can only be selected if the processing type is set to Host-Based and the market segment is set to Retail in the current terminal profile. 87

94 7. Click Log File to open the Log File page for the selected entry. The Log File page displays the previous activity on this particular transaction. Gift Card Transactions The Gift Card Main menu screen is where all Gift Card activity is entered into the program. Gift card transaction types are available depending on your terminal rights setup and if the terminal profile is configured to accept Gift Card transactions (EGC). Redemption Enter Gift Card redemption (purchase) transactions. Credit Refund a previous redemption transaction to a Gift Card account. Inquiry Check the current balance of a Gift Card account. Activation Enter Gift Card activation transactions. Reload Increase the current balance of the Gift Card account. Card Return Refund the balance of a Gift Card account. Gift Card Activation You must activate gift cards via the Gift Card Activation screen prior to use. 1. Under Gift Card, select the Activation link. 2. Swipe or enter the card number in the Card Account Data field. 88

95 3. Swipe the card or manually enter the card number and click Submit. 4. Enter the Expiration Date in the format MMYY for the card that was manually entered. 5. Enter the activation Amount. 6. Select the Tender Type for the transaction from the drop menu. 7. Enter any additional information required for gift card activation and click Process. The Gift Card Activation Response screen displays the authorization information for the transaction. 89

96 Gift Card Redemption A Gift Card Redemption transaction is used to make a purchase using the balance on the Gift Card account. You cannot edit the Account Number field or Expiration Date field on this screen if the transaction was swiped through a card reader. 1. Enter the Amount of the transaction. 2. Enter any other necessary data and click Process. The Gift Card Redemption Response screen displays with the authorization information for the transaction. 90

97 Dynamic Currency Conversion (DCC) With Elavon s DCC service, international Visa and MasterCard Credit Card purchases are converted instantly at the point of sale to the cardholder s home currency, at a very competitive exchange rate. This eliminates unpleasant surprises for consumers when their Credit Card bill arrives. The terminal must be set up to process DCC transactions.entering DCC Credit Card transactions in Virtual Merchant is very similar to standard Merchant Credit Card transactions. The exceptions include the Cardholder Amount, Cardholder Currency, Conversion Rate, and Markup (%) fields. 1. Swipe the card through the MSR attached to the computer or manually enter the card number and click Submit. The Order screen for the sale displays the Cardholder Currency and the Conversion Rate to be used in the DCC transaction. 2. Enter the amount of the purchase in US Dollars in the Amount field. For manually entered card numbers you also will need to enter the Expiration Date. 3. Enter any other necessary fields for the order and click Process with DCC to send the transaction for authorization. If you click Process without DCC, the transaction will be processed in US dollars. 4. The Authorization Results screen displays with the transaction information. 91
98 The Orders Section contains the Amount in US dollars, the Cardholder Amount field contains the transaction amount after it is converted using the Conversion Rate. See the Transaction Detail Page for information on authorization responses. 92

99 Transaction Detail Page The Transaction Detail page displays the results of a sucessfully approved transaction. The Transaction Results Section displays all the information obtained during the authorization process. Each subsequent section contains all the values entered for the transaction in the order defined in the Payment Fields section setup under the Terminal Configuration Section. On this page, you can modify billing and shipping fields, or, for authorizationonly transactions, you can adjust the amount of the transaction to an amount that is equal to or lower than the original authorization amount. To do this, change the values and click the Update button at the bottom of the form. Host-based terminal transactions cannot be adjusted unless it is an auth-only transaction. Any terminal-based transaction sale amounts can be adjusted, as long as the adjustment is for equal or less than the original value. If Receipt Printing is enabled for the currently selected terminal, a receipt page is launched in a new window. If Serial Printer is selected as the Printer Type under the Printer options in the terminal profile, a receipt is sent to the serial printer. If Parallel Printer is selected as the Printer Type, a separate window displays the receipt information and you are prompted to print the receipt on the parallel printer. To re-print the current receipt, click the Print button at the bottom of the form. This prints a copy of the original with the word "REPRINT" on the receipt. 93
100 User Displays the User Name of the person who submitted the transaction. Payment Type Displays the form of payment taken for the transaction. Transaction Type Displays the transaction type for the currently selected transaction. Transaction ID Displays the unique Virtual Merchant Record ID for the transaction. Date/Time Displays the Date and Time at which the transaction took place. The time stamp displayed is based on the time zone that was selected in your merchant profile. Response Contains the 2-character authorization response code. Message Contains the 16-character authorization response message. Approval Code Displays the 6-digit approval number received upon successful authorization. AVS Response Code Displays the address verification response for this transaction. CVV2 Response Code Displays the CVV2, CVC2, or CID response for this transaction. Account Balance Displays the account balance. Record Number Displays the transaction record number in the terminal. This value is only displayed if the profile is configured for Host-Based Processing. For more information on the authorization Response Codes, AVS Responses, and, CVV2 Responses, refer to Appendix A. 94

101 Current Batches The Current Batches section displays the current transactions that have not been submitted for settlement. The screens and controls in this section allow you to view, search, sort, and modify batch transaction information. You can also download batch files and generate reports based on batch data. Access to view and modify batch information is dependent on your user rights and the terminal s configuration. Host-based terminals can only void or settle transactions, whereas Terminalbased terminals can delete, pend, unpend, void, unvoid, set to review, release, and settle transactions. In addition, Virtual Merchant does not allow you to void transactions while the auto settle process or the manual settlement process is running. New Screen Cap and new select all checkbox 1. To view current transaction activity, select the Current Batches link. To view the transaction information for the different batch types, select the appropriate link under the Current Batches link. 2. The Main link, under Current Batches, displays the transactions that have not been submitted for settlement, except for Gift Card, Auth Only, Recurring, and Error transaction data, which is accessed through their respective links. 95
 4.")
102 3. For Main, Auth Only, Recurring, and Error batches, you can select or clear all the current open transactions on the current page by clicking the check box in the blue heading row, highlighted with the red rectangle around it in the graphic above. (To select all your current open transactions on all pages, click the Select All button.) 4. Sort the Current Open Transactions table by clicking a column header. To reverse the order of the sort, click the column header once again. The Display control sets the number of transactions displayed per page. The default value is 25 but you can change it to 50, 75, 100, 250, 500, 750, or 1,000 records using the drop-down list. If there are more transactions than are specified by the Display control, Virtual Merchant displays navigation buttons in the title bar above the table. The left side of the title bar displays the number of items currently shown. The navigation buttons allow you to select a specific page, the next or previous page, or go to the first or last page of batch transactions. The Transaction Count and Net Amount values appear at the bottom of the transaction list. If the list has been filtered or a search has been performed, these values reflect the totals of the current filtering or sort criteria. Download Current Batches The Download link allows you to export all of the transaction data shown in the Current Open Transactions table. 1. Once you have the correct information showing in the table for the download, click the Download link. 96
 Sort the download by card type Amount")
103 2. Select from the Sort On drop-down menu on the Download screen to specify the field the data will be sorted by in the download. The fields available to sort on include: User ID Sort the download by User ID Transaction Type Sort the download by the type of transaction Card Desc (Card Type) Sort the download by card type Amount Sort the download by the transaction amount Transaction Date and Time Sort the download by transaction date and time Card Data Sort the download by card account number Invoice Number Sort the download by invoice number Any Custom Fields Sort the download by a custom field. Only custom fields that are indicated as being required in the Payment Fields setup will be available as sort options 3. Use the Specify the download text file type drop-down menu to indicate the type of file for the down load to generate. Comma-Delimited Generates a Microsoft Excel worksheet that can be opened in a new Internet Browser window or saved to a specified directory. Tab-Delimited Generates a Microsoft Excel worksheet that opens in Microsoft Excel. XML Generates an XML document that opens in a new Internet Browser window. 4. Select the Include text qualifier check box to add quotation marks around the downloaded fields. This option is available when Comma- Delimited or Tab-Delimited are selected as the file type. 5. Click Download File. A prompt asks if you want to open or save the file download. 97

104 6. If you click Save, you must specify the Location and File Name in the Save As window. 7. If you click Open on the File Download prompt, the downloaded information displays in a new browser window. 98

105 Generate Reports from Current Batches The Reports link allows you to generate reports using current batch data. Once you have the correct information showing in the table, click the Reports link. Select from the Sort On drop-down menu on the Download screen to specify the field the data will be sort by in the download. The fields available to sort on include: User ID Transaction Type Card Desc (Card Type) Amount (transaction amount) Transaction Date and Time Card Data (card account number) Invoice Number Any Custom Fields Sort the download by a custom field. Only custom fields that are required in the Payment Fields setup are available as sort options. 1. Select a Report Type from the drop down list. The types of reports are: Detail Generates a detailed report of the transaction data. Detail w/subtotals Generates a detailed report with subtotals of the number and transactions and total amount. Summary Generates a summary for the transactions based on the Sort On selection. (Note) If the Sort On selection cannot be used to create a Detail w/subtotals or Summary report, a message notifies you of this. 99

106 2. Select a format from the View As drop-down menu for the report. The available format options include: Browser Displays the report in the Virtual Merchant browser. CSV Formats the report as Comma Separated Values. You are prompted to Open or Save the report in the same manner as a Download File option under the download link. For steps on opening or saving a report, refer to the Download File section of this user guide. 100

107 Search Current Batches You can search Current Batches by selecting the Search link from the title bar on the page. The Search Criteria page allows you to enter the transaction values to search for specific transactions in the unsettled transaction batch. If additional fields are identified as required in the Payment Form Field Setup, then these fields can also be used as search criteria. For example, the custom field AllMart Custom Code was set up as a required field, so it is displayed in the search form and can be used to search for transactions in the batch. Available search criteria include: Date From: (MM/DD/YYYY) Enter, or select using the calendar tool, the starting date for the search range. Date To: (MM/DD/YYYY) Enter, or select using the calendar tool, the ending date for the search range. Account Number Enter the number of the account used in the transaction. Expiration Date (MMYY) Enter the Expiration Date of the Credit Card used in the transaction. Amount Search for a transaction Amount Equal To, Less Than, or Greater than the amount entered. 101
108 Payment Type To search by a specific payment type, select from the drop-down menu. Transaction Type To search by a specific transaction type, select from the drop-down menu. User ID Enter the User ID used to process the transaction. Transaction ID Enter the Transaction ID to search for. First Name Enter the First Name of the account to search for. Last Name Enter the Last Name of the account to search for. Invoice Number Enter the Invoice Number to search for. Customer Code Enter the Customer Code to search for. Any Custom Fields Enter values in any custom fields displayed. Only custom fields that are indicated as being required in the Payment Fields setup will be available as search options. Click Search to initiate the search, or click Reset to clear the values in the Search Criteria window. 102
109 Filter Current Batches You may not want to see every transaction in the current batch. If this is the case, you can filter the batches so that only transactions that meet the selected criteria appear in the list. To filter current batches: 1. In the page s title bar, click Filter. 2. Select one of the options in the Filter drop-down menu to filter the transactions on the Current Open Transactions table. The filtering options are: All Shows all; no filter is applied. Pended Filters the batch list to show only Pended transactions. Unpended Filters the batch list to show only Unpended transactions. Review Filters the batch list to display only transactions that are set for Review. Purchase Filters the batch list to show only Purchase transactions. Sale Filters the batch list to show only Sale transactions. Return Filters the batch list to display only for Return transactions. Force Filters the batch list to show only Force transactions. Force Purchase Filters the batch list to show only Force Purchase transactions only. Force Return Filters the batch list to display only Force Return transactions. Void Filters the batch list to show only Void transactions. Reversal Filters the batch list to display only Reversal transactions. Performing Transaction Tasks The list of tasks can be initiated for transactions from the Current Open Transactions page. The actions that are available depend on the terminal setup, transaction type and user rights. To perform an action on a transaction: 1. Select the checkbox in the first column of row, either by selecting them individually, or by clicking Select All. Select All Selects all currently displayed transactions. After selecting the transactions, you can Settle, Void, Delete or Pend them. Unselect All Unselects all currently displayed selected transactions. 103
110 Pend Pends the currently selected transactions. Pend is available only in terminal profiles that are set up to process as Terminal-Based. Unpend Removes the Pend status for the currently selected transactions. Unpend is available only in terminal profiles that are set up to process as Terminal-Based. Delete Permanently removes selected transactions from your open batch. Once a transaction has been deleted it cannot be recovered. A prompt asks you to confirm your action. Select Cancel to keep the transaction(s) or OK to delete the transaction(s). Delete is available only in terminal profiles that are set up to process as Terminal-Based. Void Voids the currently selected transactions. Unvoid Unvoids the currently selected transactions. Unvoid is available only in terminal profiles that are set up to process as Terminal-Based. Set to Review Changes the status of the currently selected transactions to Set to Review. Set To Review is available only in terminal profiles that are set up to process as Terminal-Based. Release Releases previously reviewed transactions. Release is available only in terminal profiles that are set up to process as Terminal-Based. Settle Selected (terminal-based)/settle All (host-based) Submits all currently selected transactions for settlement. Pend or Set to Review transactions are not included in this process. A confirmation box displays, showing the total number of transactions that are currently being submitted for settlement. 2. Click Submit to settle the transactions or Cancel to return to the Current Open Transactions screen. After you click Submit, Virtual Merchant begins to send the transactions to the network for settlement. This process may take a few minutes to complete. Current Batches Details Page You can display the details for a current batch. 1. Select the link in the Card Data column of a specific transaction from the Current Open Transactions to display the details of the transaction. The first section displays all of the authorization response information obtained when the transaction was submitted for authorization. Each additional section defined in the Payment Form Field setup will be displayed. 104

111 If receipt printing is enabled in the Terminal Configuration section, the Print button is displayed. 2. Click Reprint to print a duplicate receipt. 105
112 Current Batches Auth Only The Auth Only link under Current Batches allows you to view the Authorization Only transactions for Current Batch. You can manually delete these transactions or convert them to actual transactions. (Note) All Auth Only transactions processed in the Retail market segment are deleted after 7 days. All Auth Only transactions processed in the Internet and MO/TO market segments are deleted after 30 days. In a Terminal-Based environment, the Convert to Sale button allows you to convert the Auth Only transaction to a Sale. In Host-Based terminals, you can convert Auth Only transactions to a forced transaction using the Convert to Force button. 1. To view the details and make changes to an Authorization Only transaction, select the link in the Card Data column for a specific transaction. 2. To convert the item to a transaction, select the check box for the row and select the Convert to Force or Convert to Sale button, which are available depending on the processing type setup in the terminal profile. The screen displays Batch Response information for the converted authorization only item Once converted, a transaction displays on the Main Current Batches screen with the Trans Type value of Force. 106
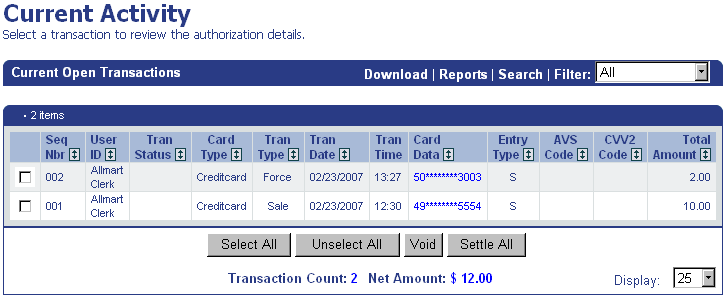
113 107

114 Current Batches Gift Card The Current Gift Card Activity screen allows you to view and settle current Gift Card transactions. 1. To view the details of a specific gift card transaction, click the link for a specific transaction in the Card Data column in the table. 2. The Transaction Detail page allows you to view the response information for the transaction. You can also edit and update some of the transaction detail fields and reprint the response information. 108

115 3. To save changes made to the Transaction Detail form, click the Update button. 4. Click Reprint to print another copy of the receipt or click Cancel to close the Transaction Detail form and return to the Current Gift Card Activity screen. Current Batches Error Messages The Error Batch window displays declined transactions. 1. View and edit the details of the transactions by selecting the link on a specific transaction in the Card Data column in the table. 2. To attempt to re-authorize a transaction from the Error Batch screen, view the transaction details and then click Re-Authorize. 109

116 (Note) All Error transactions are deleted after 45 days. 110


117 Settled Batches The Settled Transaction page allows you to view settlement activity for the previous twelve (12) months. On this page, you can access each individual settlement batch and drill-down to specific transaction details. You can search, sort, filter, or download the contents of each batch. You can also download batch files and generate reports based on batch data. 1. Select the Main link, under the Settled Batches link, to view the settled batch activity for the previous 12 months. The previously settled batches page is sorted in descending order of Batch# by default. You can change the sort order of the page by clicking a column header. The fields that can be used for sorting are: 111
118 Batch# Sorts the settled batches by the 3-digit batch number. Batch Response Sorts the settled batches by the Settlement response number. Settled Date Sorts the settled batches by the date the batches were settled. Net Count Sorts the settled batches by the number of transactions in the batch. Net Amount Sorts the settled batches by the net settlement amount for each batch. Number Purchase/Forces Sorts the settled batches by the number of purchase/force transactions in the batch. Number Returns Sorts the settled batches by the number of Return transactions in the batch. Number Voids Sorts the settled batches by the number of Void transactions in the batch. 2. To view the transactions details, select the Settled Date field for the row. This read-only page allows you to download a report, search, or filter from this page. 3. To locate specific information in the previously settled batches, select the Search link in the title bar above the table. 4. Enter the transaction criteria used to search the complete batch transaction history for the settled batches. The search criteria are listed below. If any custom fields are defined as required in the Payment Form Field setup, these fields will also be displayed on the search page. (Note) You can retrieve only three months of data at a time. An error message displays if you request more than 3 months of data. 112
 Use the default date, or enter or select a date using the calendar tool, for the ending date for the date range of the search.")
119 Date From: (MM/DD/YYYY) Use the default date, or enter or select a date using the calendar tool for the starting date of the search. Date To: (MM/DD/YYYY) Use the default date, or enter or select a date using the calendar tool, for the ending date for the date range of the search. Account Number Enter the number of the Account used in the transaction. Expiration Date Enter the Expiration Date of the Credit Card used in the transaction. Amount Select a transaction amount from the drop-down menu to search for transaction Amount Equal To, Less Than, or Greater than the amount entered. Payment Type Enter the Payment Type for the search. Transaction Type Enter the Transaction Type for the search. User ID Enter the User ID used to process the transaction. Transaction ID Enter the Transaction ID used in the transaction. First Name Enter the First Name of the account for which to search. Last Name Enter the Last Name of the account for which to search. Invoice Number Enter the Invoice Number for which to search. Customer Code Enter the Customer Code for which to search. Any Custom Fields Enter values in any custom fields displayed. Only custom fields that are indicated as being required in the Payment Fields setup are available as search options. 5. Click Search to initiate the settled transaction search, or click Reset to reset the values in the Search Criteria window. 113
120 Settled Batch Detail You can view detailed information for a settled batch in Virtual Merchant. To select an individual batch from the Settled Batch Activity list: 1. Select the date in the Settlement Time column for the batch you would like to view. The individual transactions for the selected batch display on the Batch Detail page. 2. The header section of the Settled Batch Activity list displays the Batch Number, Settlement Response, and Settlement Time. 3. To search the current batch or download the contents of the batch, click the appropriate link on the title bar of the table. 4. You can sort the transactions in the batch by each column in the table. The sorting options are: Seq Nbr Sorts the table by the batch sequence number. User ID Sorts the table by the user who entered the transaction. Tran Status Sorts the table by transaction status Tran Type Sorts the table by transaction type. Tran Date Sorts the table by the transaction authorization date. Tran Time Sorts the table by the transaction authorization time. Card Data Sorts the table by the card or check account number. Entry Type Sorts the table by entry type of the transaction, swiped or keyed. AVS Code Sorts the table by the AVS code. CVV2 Code Sorts the table by the CVV2 code. Total Amount Sorts the table by the amount of the transaction. 114

121 The Transaction Count and Net Amount values appear at the bottom of the transaction list. If the batch has been filtered or a search has been preformed, these values reflect the totals of the current filtering or sort criteria. Selecting one of the options in the Filter drop-down menu will filter the transactions on the Batch Details page based on the option chosen. The filtering options are: All Displays all transactions. Pended Filters the batch list to show Pended transactions only. Unpended Filters the batch list to show Unpended transactions only. Review Filters the batch list to show transactions that are set to Review only. Purchase Filters the batch list to show Purchase transactions only. Sale Filters the batch list to show Sale transactions only. Return Filters the batch list to show Return transactions only. Force Filters the batch list to show Force transactions only. Force Purchase Filters the batch list to show Force Purchase transactions only. Force Return Filters the batch list to show Force Return transactions only. Void Filters the batch list to show Void transactions only. Reversal Filters the batch list to show Reversal transactions only. 115
122 The Display option allows you to change the number of transactions shown per page. The default value is set to 25, but the number can be adjusted to display 25, 50, 75, 100, 250, 500, 750, or 1,000 records. If there are more transactions than the current view can display, page count and navigation buttons display in the title bar above the table. You can select buttons for a specific page, select the next or previous page buttons, or select buttons to advance to the first or last page of batch transactions. Search Settled Batches Selecting the Search option once you have chosen a specific batch allows you to enter specific criteria to locate specific transaction(s) within the selected batch. The search criteria are listed below. If additional fields are identified as required in the Payment Form Field setup, then these fields can also be used as search criteria. 1. Select a batch. 2. Click the Search link in the title bar. (Note) If you drill down into a specific batch that is older than the current date; the default Date From and Date To fields will be defaulted to the settled batch date selected and the previous month s date with a 30-day date range. Date From: (MM/DD/YYYY) Use default, enter, or select the date using the calendar tool, the Beginning Date for the search. Date To: (MM/DD/YYYY) Use default, enter, or select the date using the calendar tool, the End Date for the search. Account Number Enter the number of the Account used in the transaction. Expiration Date Enter the Expiration Date of the Credit Card used in the transaction. Amount Search for a transaction Amount Equal To, Less Than, or Greater than the amount entered. Transaction Type Enter the Transaction Type for the search. Select Refund, Force, or Sale. User ID Enter the User ID used in the transaction. Transaction ID Enter the Transaction ID used in the transaction. First Name Enter the First Name of the account for which to search. Last Name Enter the Last Name of the account for which to search. 116

123 Invoice Number Enter the Invoice Number for which to search. Customer Code Enter the Customer Code for which to search. Any Custom Fields Enter values in any custom fields displayed. Only custom fields that are indicated as being required in the Payment Fields setup will be available as search options. 3. Click the Search button to initiate the settled transaction search, or click Reset to reset the values in the Search Criteria window. Downloading a Batch You can download the contents of a batch. To download the entire contents of the currently selected batch: 1. Click the Download Transactions link in the upper left section of the Batch Details page. This displays the options available for the batch download. (Note) If you drill down into a specific batch that is older than the current date; the default Date From and Date To fields will be defaulted to the settled batch date selected and previous month s date with a 30-day date range. Date From: (MM/DD/YYYY) Use default, enter, or select the date using the calendar tool, the Beginning Date for the search. Date To: (MM/DD/YYYY) Use default, enter, or select the date using the calendar tool, the End Date for the search. Sort On Select the field that you would like the transactions to be sorted on by selecting a value from the drop-down menu. Specify the download text file type Select the desired file type for the batch download. Select Comma-Delimited to receive the file with each field separated by a comma (,), select Tab-Delimited to receive 117

124 the file with each field separated by a tab or select XML to receive the file in an XML format. Include text qualifier (double quote - " ) To include a text qualifier, select the checkbox. 2. Click the Download File button to retrieve the batch download in the selected format. The download file will display in a new browser window. Settled Batches Gift Card The Gift Card link on the Settled Batches page allows you to view the batch information for Settled Gift Card transactions for the previous 12 months. To view batch information for Settled Gift Card transactions: 1. Select the date in the Settled Date column for the batch for which you want to view the details. Settled Transaction Detail Page When you click a transaction link on the Settled Batch Details page, the details for the selected transaction display. The first section displays the authorization response information obtained when the transaction was originally submitted for authorization. Each additional section defined in the Payment Form Field setup will display with each field that has been added to that section. If receipt printing is enabled in the Terminal Configuration section, you ll see the Reprint button. Select the Reprint button to print a duplicate receipt. 118

125 To create a Refund transaction from the original transaction: 1. Click Generate Refund. Virtual Terminal Refund transaction populates with the information entered on the original transaction. The card number appears masked for security purposes. The amount of the Refund transaction cannot be adjusted to an amount greater than the amount of the original Sale transaction. For settled Electronic Checks you can also view the check image (click View Image) or upload the check image (click Upload Image). 119
126 APPENDIXES Appendix A: Response Codes This section describes the responses that can be returned by the Virtual Merchant application. The Authorization Response Codes, AVS Response Codes, and CVV2 Response Codes are values that might be returned during a transaction authorization. Authorization Response Code This is a list of the values that might be returned during an authorization request. Authorization Response Codes Code Message Definition AA APPROVAL Approved AA APPROVAL PARTIAL Approved for a Partial Amount N7 DECLINE CVV2 Do Not Honor N7 DECLINE CVV2 Declined due to CVV2 mismatch \ failure NC PICK UP CARD Pick up card ND AMOUNT ERROR Tran Amount Error ND AMT OVER SVC LMT Amount is more than established service limit ND APPL TYPE ERROR Call for Assistance ND CANNOT CONVERT Check is ok, but cannot be converted. Do Not Honor ND DECLINED Do Not Honor ND DECLINED T4 Do Not Honor. Failed negative check, unpaid items ND DECLINED-HELP 9999 System Error ND DUP CHECK NBR Duplicate Check Number ND EXPIRED CARD Expired Card ND INCORRECT PIN Invalid PIN ND INVALID CARD Invalid Card ND INVALID CAVV Invalid Cardholder Authentication Verification Value 120
127 Authorization Response Codes Code Message Definition ND INVALID TERM ID Invalid Terminal ID ND INVLD R/T NBR Invalid Routing/Transit Number ND INVLD TERM ID 1 Invalid Merchant Number ND INVLD TERM ID 2 Invalid SE Number ND INVLD VOID DATA Invalid Data Submitted for Void Transaction ND MAX MONTHLY VOL The maximum monthly volume has been reached ND MICR ERROR MICR Read Error ND MUST SETTLE MMDD Must settle, open batch is over 7 days old Note: Batch will be Auto Settled after 10 days ND NETWORK ERROR General System Error ND PLEASE RETRY Please Retry/ Reenter Transaction ND RECORD NOT FOUND Record not on the network ND REQ. EXCEEDS BAL. Req. exceeds balance ND SEQ ERR PLS CALL Call for Assistance ND SERV NOT ALLOWED Invalid request ND TOO MANY CHECKS Too Many Checks (Over Limit) NR CALL AUTH. CENTER Refer to Issuer 121
128 Electronic Gift Card (EGC) Response Codes This is a list of the values that might be returned during an EGC authorization request. Authorization Response Codes Code Message Definition AA APPROVAL Approved ND SERV NOT ALLOWED Invalid request ND INVLD TERM ID 1 Invalid Merchant Number ND SEQ ERR PLS CALL Call for Assistance ND APPL TYPE ERROR Call for Assistance 01 DECLINED-HELP 9999 Host Busy 02 INVALID CARD Invalid Card 03 INVALID TERM ID Invalid Terminal ID 04 AMOUNT ERROR Tran Amount Error 05 ALREADY ACTIVE Card already active 06 REQ. EXCEEDS BAL. Request exceeds balance 07 MAX REACHED Cannot load the amount specified 08 NON RELOADABLE The card cannot be reloaded 09 TRAN NOT ALLOWED Transaction type not allowed 10 INVLD TRAN TYPE Transaction type not on server 11 EXPIRED CARD Expired card or bad expiration date 12 CARD NOT ACTIVE The Gift Card is not activated 13 DUPLICATE TRAN Duplicate transaction 14 SEQ ERR PLS CALL Call for Assistance 15 SEQ ERR PLS CALL Sequence does not match previous response 16 INVALID BATCH ID Batch ID is not on the server 17 INVALID TENDER Tender types is not on the server 99 DECLINED-HELP 9999 General System Error 122
129 AVS Response Codes An AVS Response Code will be returned in the Authorization Response Message when AVS information is present in the transaction authorization request. AVS Response Codes Code Definition A B C D E F G I M N O P R S U W X Y Z Address matches - Zip Code does not match. Street address match, Postal code in wrong format. (International issuer) Street address and postal code in wrong formats Street address and postal code match (international issuer) AVS Error Address does compare and five-digit ZIP code does compare (UK only). Service not supported by non-us issuer Address information not verified by international issuer. Street Address and Postal code match (international issuer) No Match on Address (Street) or Zip No Response sent Postal codes match, Street address not verified due to incompatible formats. Retry, System unavailable or Timed out Service not supported by issuer Address information is unavailable 9-digit Zip matches, Address (Street) does not match. Exact AVS Match Address (Street) and 5-digit Zip match. 5-digit Zip matches, Address (Street) does not match. 123
130 CVV2 Response Codes The CVV2 Response Codes are returned in the Authorization Response Message when the CVV2 data is present in the transaction authorization request. CVV2 Response Codes Code Definition M N P S U CVV2 Match CVV2 No match Not Processed Issuer indicates that CVV2 data should be present on the card, but the merchant has indicated that the CVV2 data is not resent on the card Issuer has not certified for CVV2 or Issuer has not provided Visa with the CVV2 encryption Keys. Settlement Response Codes The Settlement Response Code is returned when a settlement is preformed, either manually, or through the Auto Settlement process. Settlement Response Codes Response GBOK BBBMMDDHHMM INVALID TERM ID INVLD CARD 9999 INVLD DATA 9999 PLEASE RETRY 9999 RB INV ACCT 9999 RBOUT OF BALANCE RB INVLD AMT 9999 SERV NOT ALLOWED UNREC CARD 9999 Description GB = good batch, settlement received OK BBB = batch number 001 through 999 MMDD = month and day of settlement HHMM = Time of settlement Terminal ID is not on file with the network Card type, specified by item number, not authorized for settlement Invalid transaction amount System failure - please attempt again Record specified by item number is invalid Item and dollar totals do not match the settlement trailer record totals Invalid transaction amount Merchant not set up for settlement processing Card type, specified by item number, is not recognized 124

131 Appendix B: Editing the Payment Form Header and Footer Text Text Editor To use the Text Editor, click Editor in the Header Footer section on the Payment Form page. The Text Editor allows you to enter the text to display in your Header and Footer field on the payment form. You can either type in the desired text and save it, or use the default Arial font that will appear in a 10-point size. Four buttons on the right side of the text editor help you create your headers and footers. Save Saves the text you have entered into the Text Editor window. Reset Text Removes all unsaved text from the Text Editor window. Clear Text Removes all text from the Text Editor window. If you do not save before clearing the text, the last message you saved appears in your headers and footers. Preview Displays your text as it will appear in the header and footer in the Preview window at the bottom of the tool. Click Preview to retain the text in the Text Editor 125
132 window, but keep the tool open until you Save or Cancel the work. To save your Header and/or Footer text to your site, you must click Save. Cancel Closes the Text Editor, canceling and deleting unsaved work. Help Displays the help page for the Text Editor page. The three buttons in the middle of the Text Editor allow you to customize your headers and footers. The buttons are: Tag Wizard Defines the properties for the selected text. Tag Legend Explains the functions with examples for tags used by the Tag Wizard. Edit Wizard Displays each saved line of text separately for editing or deletion. 126
133 Tag Wizard The tag wizard defines the properties of text in either the header or the footer messages. This wizard utility has three sections: Enter Text Here text box contains the basic text to add to the header of footer. Line Attributes select the buttons to define how the text entered into the previous box appears on the form. Text Attributes Select text attributes to define display properties of the text. Enter Text Here The Enter Text Here field is the section where you enter the text that appears on the Headers and Footers. Line Attributes The Line Attributes field allows you to decide the placement of the text you have entered. There are three selections from which to choose: In-Line Text Places all of the text in one continuous line. 127
134 Line Break Automatically wraps text to the next line. Using the Line Break option with saved text begins the text on a new line. Paragraph Automatically wraps text to the next line. When using the Paragraph option to add new text to existing text, the new text begins where the existing text ends and continues to wrap to the next line. The Paragraph option allows you to select the desired alignment of the text in the previous section. After selecting an alignment, all subsequent text appears in this alignment unless you once again select the paragraph option and change the alignment. The alignment options are : Left (default alignment) Center Right Text Attributes The Text Attributes field allows you to modify the font size, color and format of your text. Font Allows you to choose one of six different fonts. Arial (default) Courier Helvetica Times Times New Roman Verdana Color Allows you to select one of 16 colors to match the look and feel of your own site. The Custom Color RGB window allows you to enter the exact RGB code of your Website s color if the desired color does not appear in the 16-color palette. The basic palette colors are: Aqua Black Blue Fuchsia Gray Green Lime 128
135 Maroon Navy Olive Purple Red Silver Teal White Yellow Size This drop menu allows you to select one of three font sizes: Small (10-point, default) Medium (14-point) Large (18-point) Bold Selecting this option will make your selected text appear in a bold font. Italic Selecting this option will make your selected text appear formatted in italics. Underline Selecting this option will make your selected text appear underlined. 1. Click Insert to insert the modified text into the Text Editor, or click Reset to remove all changes from the Text Wizard tool, keeping the tool open to continue work. Clicking Cancel abandons all text modifications and closes the Text Wizard. 129
136 Tag Legend The Tag Legend explains the Tag Wizard functions with examples of several tags. Edit Wizard The Edit Wizard displays each saved line of text separately for editing or deletion. To edit the text: 1. Click the button to the left of the line you wish to modify and click the Edit button at the bottom of the Edit Wizard tool. The Tag Wizard opens and allows you to modify the selected text. 2. To delete the selected text, click Delete. 3. To close the Edit Wizard without changing or deleting the text, click Cancel. 130
137 Appendix C: Merchant User Administration Strategies User Administration Scenarios In the simplest case, you may be the only employee of your company. In this case, you would log into Virtual Merchant as the Merchant Administrator and use the Virtual Merchant Account ID as your User ID. No further user administration is necessary on your part. Many companies will be more complex than this. Example: Small Internet buy-button business As an example, assume that you own a company that sells things on a Website. You have an accountant who may submit transactions and also will settle the transactions and download settled batches for importing to spreadsheets. You want to set yourself up as the administrator of everything related to Virtual Merchant. The user hierarchy in this case would be as follows: First, login to the Virtual Merchant account as the Merchant Admin and create your own account, giving yourself all rights and associating yourself with the Internet Terminal. Then log in as yourself and create the other users. The Website 131
138 user needs to be associated with the Internet Terminal and have the rights to perform ecommerce transactions. The user for the account has all the Transactions rights, plus the Batches - View, Batches Void/Delete, Batches Settle and the Batches - View Settled History rights. Another important configuration not related to User Management is that the Internet Terminal must be marked with the Enable HTTP Transaction parameter checked on the Advanced System Configuration page of Terminal Setup. Example: Several MO/TO operators Assume, instead that you own a company with several MO/TO operators and an accountant. The MO/TO operators submit all types of transactions, mostly Sales, but occasionally Forces, and Credits (to perform Customer Service functions). The accountant may submit transactions and also will settle the transactions and download settled batches for importing to her spreadsheets. You want to set yourself up as the administrator of everything related to Virtual Merchant. Following is a diagram of the User hierarchy that might be set up for your company: 132
139 First, login to the Virtual Merchant account as the Merchant Admin and create your own account, giving yourself all rights and associating yourself with the MO/TO Terminal. Then log in as yourself and create the other users. Each of the MO/TO operators has the Transactions Sale, Transactions Credit and Transactions Force user rights and nothing else. The user for the account has all the Transactions rights, plus the Batches - View, Batches Void/Delete, Batches Settle and the Batches - View Settled History rights. Later as your accountant learns more about how Virtual Merchant works, you may give them the Edit Terminal Setup right as well. To add a Website, call Merchant Support and add an Internet Terminal to your account. Next, log in as the Merchant Admin and give yourself the Terminal association for the Internet Terminal. Next, logged in as yourself, add a user 133
140 named something like Website for use by the Web developers in integrating the shopping cart with Virtual Merchant (See the Developer s Guide for details on integrating a shopping cart with Virtual Merchant). The resulting user hierarchy follows: The new Website user needs to be associated with the Internet Terminal and have the Transactions Sale user right only. You also would add the Terminal association for the Internet terminal to your accountant s user account so that they can manage batches for both Terminals. Another important configuration is that the Internet Terminal must be marked with the Enable HTTP Transaction parameter checked on the Advanced System Configuration page of Terminal Setup. 134
141 135
142 Example: Multiple Retail Stores George Widget owns a company selling his famous product in two retail stores. He employs a store manager and a couple of retail clerks in each store and encourages friendly competition between the stores. He also employs an IT manager and an accountant. Merchant Support has configured a separate Retail Terminal ID for each of his stores. He expects his store managers to manage the users for each of their stores, but does not want either of them getting into the other s business. Just to make sure, he also wants his IT manager to be able to manage all of the users in his company. George wants only the accountant and himself to perform settlements and manage batches. First, George would login to Virtual Merchant as the Merchant Admin and create users for himself and the IT manager. These users are associated with all terminals and have all user rights. Then he has the IT manager login and create the other users. If the East Side store manager and the West Side store manager were peers, they would be able to manage each other s users. To be sure that they are not peers of each other, the IT manager creates two dummy accounts, one for each store. These accounts have no user rights and are associated with no terminals. These accounts should have impossible passwords. These accounts are marked inactive. They are never intended to be used; they are only there as placeholders in the hierarchy. The IT manager then creates users for the two store managers. Each is associated only with the Terminal for that store. The store managers have the Transactions 136
143 Sale, Transactions Credit and Transactions Force user rights, plus the Create Subordinates, Find/Edit User Information, Edit User Rights and Edit Terminal Associations rights. Later, while instructing the store managers on how to do this new job function, The IT manager walks them through creating the clerks accounts. The clerks have only the Transactions Sale, Transactions Credit and Transactions Force user rights and are associated only with the Terminal for that store. The store managers do not even see the other store s Terminal as an option when assigning Terminal Associations to the clerks. Finally, The IT manager creates a user for the accountant. This user has all the Transactions rights, plus the Batches - View, Batches Void/Delete, Batches Settle and Batches - View Settled History rights. The accountant user is associated with both Terminals. 137
144 Appendix D: Virtual Merchant Receipt Form Link Definition Step 1. The Consumer shops at the Merchant Website and gets the checkout page from the shopping cart. The action on the checkout form instructs the consumer's browser to submit the information to Merchant.com/process.do Step 2. The consumer submits information to Merchant.com/process.do, and Virtual Merchant validates the data. The form that the consumer fills out prior to the final authorization is the "Payment form". The payment form can be customized to: 1) have colors that match the merchant Website, 2) have a top-left logo image to match the merchant Website, 3) have a background image to match the merchant Website, 4) include text in the header and footer to either match the merchant Website or give the merchant more instructions. The action on the payment form also instructs the consumer's browser to submit the information to Merchant.com/process.do. 138
145 Step 3. Depending on the selected Receipt link method and whether the transaction was approved or declined, Virtual Merchant displays a receipt. The receipt can be customized in all the same ways that the payment form can be customized. In the case of the Hyperlink, the Form Get and the Form Post, there is a way for the consumer to optionally return to the Merchant's site. ;Form Get and Form Post will pass information to the merchant's site in addition to directing the consumer there. In the case of Get Redirect, no receipt page is displayed by Virtual Merchant, and the consumer's browser is instructed to automatically redirect to a page on the merchant's Website (usually a receipt page). Information is passed to the merchant's receipt page in this case as well. Step 4. Depending on the selected Receipt link method and possibly on the consumer's action, the consumer returns to the merchant's Website. 139
146 Appendix E: Virtual Merchant Size Limitations Virtual Merchant includes limitations on data fields and number of transactions allowed. Parameter User Defined Payment Fields per Terminal Sections on a Payment Form Business Rules per Terminal ID (Total of Pre-Auth and Post-Auth Rules) Active Standard Users per Merchant Account (VID) Terminal IDs (TIDs) per Merchant Account (VID) Number of Transactions in a Recurring Batch Transactions in an Open Batch Limit 25 fields 10 sections 10 business rules 5,000 users 5,000 terminal ids 20,000 transactions Purged 21 days after Transaction Date. Transactions in an Error Batch 50,
147 Glossary Address Verification The process of verifying customer addresses with the issuing bank to minimize fraudulent transactions. Authorization The process of having Credit Card transactions approved by the issuing bank through communication over the network. Auto-Pend Transaction A transaction option that automatically "Pends" Sale transactions submitted through the Virtual Merchant payment form. Auto-Settle An option that automatically settles all "unpended" transactions in the Unsettled Transaction batch at a specified time each day. Card Verification Value The process of verifying the Card Verification Value with the issuing bank to minimize fraudulent transactions. The CVV2 value is a three to four digit value that is printed in reverse italics on the back side of the card. This additional value is not embossed on the front of the card, and is not contained in the magnetic stripe on back. For Amex, the 4-digit code is called a CID, and appears on the front of the card. Comma-Separated Value A text file format in which all data elements within the file are separated by a comma. This format is also referred to as a comma delimited file. Filter A function that allows you to enter specific parameters to narrow a search for transaction information in a particular file. You can search for a specific card number, within a specific date range, etc. Force Transaction A previously authorized transaction that needs to be entered in the current batch. GBOK Number A successful settlement batch with the network. Merchant Admin The default user account for the Virtual Merchant account; the Merchant Admin User ID is the same as the Virtual Merchant Account ID. This special user cannot be deleted, always has all user rights and all terminal associations. Peer User A user who shares the same supervisor as you. 141
148 Pend Transaction A transaction status option that will not allow the transaction to be submitted for settlement. In order to allow the transaction to be submitted for settlement, the status of the transaction must be changed to Unpended". Refund Transaction A transaction used to refund a previous purchase. Sale Transaction A transaction in which an authorization is obtained and the transaction is entered into the unsettled batch. Scope of user rights Virtual Terminal and Terminal Setup rights apply to your ability to do things in the context of any terminal in your Terminal Associations list. User Management rights apply to your ability to do things to your subordinates and to your peers subordinates. If you have the Edit Terminal Associations right, you may only add terminal associations that are assigned to you. Settlement Process The process of sending a batch of previously authorized transactions for settlement to the network. Subordinate This is anyone who is directly below you in the user hierarchy, or any of their subordinates. Supervisor This is the person directly above you in the user hierarchy. Tab-Delimited Value A text file format in which all data elements within the file are separated by the Tab character. Terminal Association Where your user rights refer to something you can do involving a terminal (make a sale or settle a transaction), your user must be associated with that terminal and you must have selected that terminal context in Virtual Merchant. See the chapter on User Management for details on how to make or edit Terminal Associations in the Virtual Merchant User s Guide. Terminal Friendly Name Terminals are referred to in Virtual Merchant by a Friendly Name configured by Internet Product Support, for instance, Website Terminal. Terminal ID A number used to identify the source of a transaction to the network. This corresponds to a physical credit card terminal in a traditional POS solution, but for Virtual Merchant, this is a virtual ID. You may have more than one terminal for use within your Virtual Merchant account. Each Terminal ID (TID) is associated with certain features as dictated by your Merchant Agreement. Merchant Information in Terminal Setup can be different for each terminal so that, for instance, the address printed on a receipt is correct for that location. See the chapter on Terminal Setup for details on configuring your terminal in the Virtual Merchant User s Guide. Unpend Transaction A transaction status option that allows the transaction to be submitted for settlement. To prohibit the transaction from being submitted for settlement, the status must be set to "Pended". User Account The user you use to sign in to Virtual Merchant; the User ID is case sensitive 142
149 User Rights The tasks that your User Account can do in Virtual Merchant; there are three areas of User Rights: Virtual Terminal, User Management and Terminal Setup. See the section on User Management for details on how to make or edit User Rights in the Virtual Merchant User s Guide. Virtual Merchant Account The Virtual Merchant Account your company has with Elavon 143
Converge. System Administration Guide. Revision Date: November 2015
 Converge System Administration Guide Revision Date: November 2015 Two Concourse Parkway, Suite 800, Atlanta, GA 30328 Elavon, Incorporated 2015. All Rights Reserved Converge System Administration Guide
Resource Online User Guide JUNE 2013
 Resource Online User Guide JUNE 2013 CHASE PAYMENTECH SOLUTIONS MAKES NO WARRANTY OF ANY KIND, EITHER EXPRESSED OR IMPLIED, WITH REGARD TO THIS MATERIAL, INCLUDING, BUT NOT LIMITED TO, THE IMPLIED WARRANTIES
VirtualMerchant. VirtualMerchant Mobile 2.2 User Guide. Revision Date: June 2014
 VirtualMerchant Revision Date: June 2014 Two Concourse Parkway, Suite 800, Atlanta, GA 30328 Elavon, Incorporated 2014. All Rights Reserved Copyright Copyright 2014 Elavon, Incorporated. All rights reserved.
Converge. Getting Started Guide. Revision Date: July 2015
 Converge Getting Started Guide Revision Date: July 2015 Two Concourse Parkway, Suite 800, Atlanta, GA 30328 Elavon, Incorporated 2015. All Rights Reserved Converge Getting Started Guide Copyright Copyright
Virtual Terminal & Online Portal
 Authipay Gateway Virtual Terminal & Online Portal User Guide Version 5 (EMEA) Virtual Terminal & Online Portal User Guide Version 5 (EMEA) CONTENTS 1 Introduction... 5 2 Processing Transactions... 6 2.1
First Data Global Gateway Virtual Terminal User Manual. Version 1.0
 First Data Global Gateway Virtual Terminal User Manual Version 1.0 Table of Contents 1 Introduction 5 1.1 First Data Global Gateway Virtual Terminal Overview 5 1.1.1 Processing Transactions 5 1.1.2 Managing
Merchant User Manual
 PIVOTAL PAYMENTS PAYMENT SERVER Document Version 2.07.0415 Copyright 2007-2008 Pivotal Payments Inc. All Rights Reserved. Visit us at: www.pivotalpayments.com Merchant User Manual Congratulations on the
REDFIN Document Version 2.07.0415-a
 REDFIN NETWORK PAYMENT GATEWAY Document Version 2.07.0415-a Copyright 2001-08 Secured Financial Network, Inc. All Rights Reserved Table of Contents Introduction...4 Overview...5 Ch 1: Beginning to Use
Elavon Payment Gateway- Reporting User Guide
 Elavon Payment Gateway- Reporting User Guide Version: v1.1 Contents 1 About This Guide... 4 1.1 Purpose... 4 1.2 Audience... 4 1.3 Prerequisites... 4 1.4 Related Documents... 4 1.5 Terminology... 4 1.6
Merchant User Manual PAYMENT GATEWAY
 PAYMENT GATEWAY Document Version 1304301 Copyright 2013 epaymentamerica, Inc. All Rights Reserved Table of Contents Introduction... 4 Overview... 5 Ch 1: Beginning to Use EPA Gateway.. 6 Logon as a Merchant...6
Refer to the Integration Guides for the Connect solution and the Web Service API for integration instructions and issues.
 Contents 1 Introduction 4 2 Processing Transactions 5 2.1 Transaction Terminology 5 2.2 Using Your Web Browser as a Virtual Point of Sale Machine 6 2.2.1 Processing Sale transactions 6 2.2.2 Selecting
Skipjack ezpay Secure Online Order Form User Guide
 Skipjack ezpay Secure Online Order Form User Guide About this Document...3 Copyright Notice... 3 Publication History... 3 Documentation Conventions... 4 Assumptions Used in this Guide... 4 Obtaining Additional
PowerPay User Guide. Table of Contents
 Table of Contents Table of Contents... 1 About this Document... 2 Copyright Notice... 3 Publication History... 3 Documentation Conventions... 4 Obtaining Additional Development Information and Documentation...
Virtual Terminal User Manual for Direct Users
 Virtual Terminal User Manual for Direct Users Table of Contents 1 Introduction... 3 2 Logging In & password maintenance... 4 3 Setting up Sub-Users... 7 4 Navigation... 10 5 Virtual Terminal Profile Page...
MySagePay. User Manual. Page 1 of 48
 MySagePay User Manual Page 1 of 48 Contents About this guide... 4 Getting started... 5 Online help... 5 Accessing MySagePay... 5 Supported browsers... 5 The Administrator account... 5 Creating user accounts...
Developer Guide To The. Virtual Merchant
 Developer Guide To The Virtual Merchant March 1, 2010 2 Virtual Merchant Developer s Guide THIS VIRTUAL MERCHANT DEVELOPER S GUIDE WILL FAMILIARIZE YOU WITH ALL THE TRANSACTION TYPES AND PROCEDURES YOU
Version 6.0 USER MANUAL
 X-Charge Version 6.0 USER MANUAL X-Charge Version 6.0 10/10/2005 User Manual 4 Copyright 2005 by CAM Commerce Solutions, Inc. All rights reserved worldwide. This manual, as well as the software described
Bank Account 1 September 2015
 Chapter 8 Training Notes Bank Account 1 September 2015 BANK ACCOUNTS Bank Accounts, or Bank Records, are typically setup in PrintBoss after the application is installed and provide options to work with
Emdeon ecashiering Manual. February 22, 2010
 Emdeon ecashiering Manual February 22, 2010 Purpose... 4 Objectives... 4 Special Symbol... 4 Introduction to Emdeon ecashiering... 5 ecashiering Access... 5 Suggested ecashiering System Roles... 5 ecashiering
Offline Remittance Processing Standalone, Service-Based, Multi-Client, Attorney Options
 Offline Remittance Processing Standalone, Service-Based, Multi-Client, Attorney Options User Manual 911 Central Parkway North, Suite 200 San Antonio, Texas 78232 (210) 403-8670 www.acttax.com Contents
The Wells Fargo Payment Gateway Business Center. User Guide
 The Wells Fargo Payment Gateway Business Center User Guide Contents 1 Introduction 1 About the Wells Fargo Payment Gateway service Business Center 1 About this guide 2 Access the Business Center 2 Log
CaseWare Time. CaseWare Cloud Integration Guide. For Time 2015 and CaseWare Cloud
 CaseWare Time CaseWare Cloud Integration Guide For Time 2015 and CaseWare Cloud Copyright and Trademark Notice Copyright. 2015 CaseWare International Inc. ( CWI ). All Rights Reserved. Use, duplication,
Salesforce Customer Portal Implementation Guide
 Salesforce Customer Portal Implementation Guide Salesforce, Winter 16 @salesforcedocs Last updated: December 10, 2015 Copyright 2000 2015 salesforce.com, inc. All rights reserved. Salesforce is a registered
Merchant Interface Online Help Files
 Merchant Interface Online Help Files REGAL t e c h n o l o g i e s t h e f u t u r e o f p a y m e n t s Table of Contents Merchant Interface Online Help Files... 1 Tools... 2 Virtual Terminal... 7 Submit
Alpha e-pay v2 Merchant User Manual (v1.9)
") Alpha e-pay v2 Merchant User Manual (v1.9) Overview NOTE: Alpha e-pay, Alpha Bank s e-commerce solution, is currently using the DeltaPAY e- commerce platform. Therefore, Alpha e-pay and DeltaPAY are used
Alpha e-pay v2 Merchant User Manual (v1.9) Overview NOTE: Alpha e-pay, Alpha Bank s e-commerce solution, is currently using the DeltaPAY e- commerce platform. Therefore, Alpha e-pay and DeltaPAY are used
Module One: Getting Started... 6. Opening Outlook... 6. Setting Up Outlook for the First Time... 7. Understanding the Interface...
 2 CONTENTS Module One: Getting Started... 6 Opening Outlook... 6 Setting Up Outlook for the First Time... 7 Understanding the Interface...12 Using Backstage View...14 Viewing Your Inbox...15 Closing Outlook...17
Super Resellers // Getting Started Guide. Getting Started Guide. Super Resellers. AKJZNAzsqknsxxkjnsjx Getting Started Guide Page 1
 Getting Started Guide Super Resellers Getting Started Guide Page 1 Getting Started Guide: Super Resellers Version 2.1 (1.6.2012) Copyright 2012 All rights reserved. Distribution of this work or derivative
itransact Gateway Fast Start Guide
 itransact Gateway Fast Start Guide itransact Gateway Fast Start Guide Table of Contents 1. Version and Legal Information... 1 2.... 2 Quick Setup... 2 The Card Setup... 2 Order Form Setup... 3 Simple
EMC Documentum Webtop
 EMC Documentum Webtop Version 6.5 User Guide P/N 300 007 239 A01 EMC Corporation Corporate Headquarters: Hopkinton, MA 01748 9103 1 508 435 1000 www.emc.com Copyright 1994 2008 EMC Corporation. All rights
ORBITAL VIRTUAL TERMINAL USER GUIDE. August 2010 Version 4.2
 ORBITAL VIRTUAL TERMINAL USER GUIDE August 2010 Orbital Gateway on the Web: Orbital Integration Library Orbital Gateway Support: 1-866-645-1314 [email protected] Orbital Virtual Terminal
Getting Started With Parallels Business Automation 4.4
 Parallels Getting Started With Parallels Business Automation 4.4 Reseller's Guide Revision 1.0.18 (c) 1999-2008 ISBN: N/A Parallels 660 SW 39th Street Suite 205 Renton, Washington 98057 USA Phone: +1 (425)
Virtual Terminal User s Guide
 Virtual Terminal User s Guide For Professional Use Only Currently only available in English. A usage Professional Uniquement Disponible en Anglais uniquement pour l instant. Last updated: June 2008 PayPal
End User Training Guide
 End User Training Guide October 2013 2005-2013 ExpenseWire LLC. All rights reserved. 1 expensewire.com Use of this user documentation is subject to the terms and conditions of the applicable End- User
HDAccess Administrators User Manual. Help Desk Authority 9.0
 HDAccess Administrators User Manual Help Desk Authority 9.0 2011ScriptLogic Corporation ALL RIGHTS RESERVED. ScriptLogic, the ScriptLogic logo and Point,Click,Done! are trademarks and registered trademarks
Email Marketing. User Guide. July 2012. Welcome to AT&T Website Solutions SM
 July 2012 Email Marketing User Guide Welcome to AT&T Website Solutions SM We are focused on providing you the very best web hosting service including all the tools necessary to establish and maintain a
My Sage Pay User Manual
 My Sage Pay User Manual Page 1 of 32 Contents 01. About this guide..4 02. Getting started.4 Online help Accessing My Sage Pay Test Servers Live Servers The Administrator account Creating user accounts
TriCore Secure Web Email Gateway User Guide 1
 TriCore Secure Web Email Gateway User Guide This document provides information about TriCore Secure Web Email Gateway. This document is for users who are authorized to send and receive encrypted email
How To Use Senior Systems Cloud Services
 Senior Systems Cloud Services In this guide... Senior Systems Cloud Services 1 Cloud Services User Guide 2 Working In Your Cloud Environment 3 Cloud Profile Management Tool 6 How To Save Files 8 How To
Contents. Contents... i. Chapter 1 Introduction...1. Chapter 2 Using PSiGate...9. Index...25
 Using PSiGate Contents i Contents Contents... i Chapter 1 Introduction...1 How to Apply for an Account...4 Set Up a Merchant Account Profile...6 Chapter 2 Using PSiGate...9 PSiGate from the Customer s
Authorize.Net Mobile Application
 Authorize.Net Mobile Application ios User Guide October 2015 Authorize.Net Developer Support http://developer.authorize.net Authorize.Net LLC 082007 Ver.2.0 Authorize.Net LLC ( Authorize.Net ) has made
Payment Collection Gateway V+POS. User Guide 00-35-3483NSB
 Payment Collection Gateway V+POS User Guide 00-35-3483NSB This manual contains proprietary and confidential information of Bank of America and was prepared by the staff of Bank of America. This user guide
NDA-30141 ISSUE 1 STOCK # 200893. CallCenterWorX-Enterprise IMX MAT Quick Reference Guide MAY, 2000. NEC America, Inc.
 NDA-30141 ISSUE 1 STOCK # 200893 CallCenterWorX-Enterprise IMX MAT Quick Reference Guide MAY, 2000 NEC America, Inc. LIABILITY DISCLAIMER NEC America, Inc. reserves the right to change the specifications,
Manage Address Book. Administrator's Guide
 Manage Address Book Administrator's Guide November 2012 www.lexmark.com Contents 2 Contents Overview...3 Using Manage Address Book...4 Setting up access control from the application...4 Exporting contacts...4
Juris User Guide. Version 2.7. 2015 LexisNexis. All rights reserved.
 Juris User Guide Version 2.7 2015 LexisNexis. All rights reserved. Copyright and Trademark LexisNexis, Lexis, and the Knowledge Burst logo are registered trademarks of Reed Elsevier Properties Inc., used
First Data Merchant Solutions Virtual Terminal & Manager
 First Data Merchant Solutions Virtual Terminal & Manager User Guide Version 2.2 firstdatams.co.uk First Data Merchant Solutions is a trading name of First Data Europe Limited, a private limited company
020112 2008 Blackbaud, Inc. This publication, or any part thereof, may not be reproduced or transmitted in any form or by any means, electronic, or
 Point of Sale Guide 020112 2008 Blackbaud, Inc. This publication, or any part thereof, may not be reproduced or transmitted in any form or by any means, electronic, or mechanical, including photocopying,
ShoreTel Enterprise Contact Center 8 Using Agent Toolbar
 ShoreTel Enterprise Contact Center 8 Using Agent Toolbar November 2012 Legal Notices Document and Software Copyrights Copyright 1998-2012 by ShoreTel Inc., Sunnyvale, California, USA. All rights reserved.
User Guide: VirtualMerchant Mobile
 User Guide: VirtualMerchant Mobile Two Concourse Parkway, Suite 800, Atlanta, GA 30328 Elavon, Incorporated 2013. All Rights Reserved Copyright Copyright 2013 Elavon, Incorporated. All rights reserved.
User s Guide. Version 2.1
 Content Management System User s Guide Version 2.1 Page 1 of 51 OVERVIEW CMS organizes all content in a tree hierarchy similar to folder structure in your computer. The structure is typically predefined
EMAIL CAMPAIGNS...5 LIST BUILDER FORMS...
 Basic User Guide Table of Contents INTRODUCTION...1 CAMPAIGNER FEATURES...1 WHO SHOULD READ THIS GUIDE?...1 GETTING STARTED...2 LOGGING IN TO CAMPAIGNER...2 DASHBOARD...3 Modify Your Dashboard...4 EMAIL
How To Use Microsoft Gpa On Microsoft Powerbook 2.5.2.2 (Windows) On A Microsoft P2.1 (Windows 2.2) On An Uniden Computer (Windows 1.5) On Micro
 On A Microsoft P2.1 (Windows 2.2) On An Uniden Computer (Windows 1.5) On Micro") Microsoft Dynamics GP Analytical Accounting Copyright Copyright 2011 Microsoft. All rights reserved. Limitation of liability This document is provided as-is. Information and views expressed in this document,
Microsoft Dynamics GP Analytical Accounting Copyright Copyright 2011 Microsoft. All rights reserved. Limitation of liability This document is provided as-is. Information and views expressed in this document,
Website Payments Standard Integration Guide
 Website Payments Standard Integration Guide For Professional Use Only Currently only available in English. A usage Professional Uniquement Disponible en Anglais uniquement pour l instant. Last updated:
ADP Workforce Now Security Guide. Version 2.0-1
 ADP Workforce Now Security Guide Version 2.0-1 ADP Trademarks The ADP logo, ADP, and ADP Workforce Now are registered trademarks of ADP, Inc. Third-Party Trademarks Microsoft, Windows, and Windows NT are
Release Information. Copyright. Limit of Liability. Trademarks. Customer Support
 Release Information Document Version Number GeneticistAsst-1.1.6-UG002 Software Version 1.1.6 Document Status Final Copyright 2015. SoftGenetics, LLC, All rights reserved. The information contained herein
Credit & Debit Application
 USER MANUAL ALL TERMINAL PRODUCTS Credit & Debit Application Magic Models: C5, X5, X8, M3, M8 V Series Models: V5, V8, V9, V8 Plus, V9 Plus 1 Dejavoo Systems Instruction Manual V429.12 Instruction Manual
Table of Contents. Revision 2.0-2 -
 Table of Contents Introduction...3 Payment Processing: How it Works...4 Immediate Transaction Processing...5 Delayed Transaction Processing...7 Delayed Transaction Processing: Phase 1 - Authorization...7
Quick Shopping Cart QuickBooks Integration
 Quick Shopping Cart QuickBooks Integration Installing and Configuring QuickBooks This guide walks you through setting up the Intuit QuickBooks Merchant Service (QBMS) payment gateway (where available)
Interworks. Interworks Cloud Platform Installation Guide
 Interworks Interworks Cloud Platform Installation Guide Published: March, 2014 This document contains information proprietary to Interworks and its receipt or possession does not convey any rights to reproduce,
Business Online. Quick Reference Guide
 Business Online Quick Reference Guide . All rights reserved. This work is confidential and its use is strictly limited. Use is permitted only in accordance with the terms of the agreement under which it
Strategic Asset Tracking System User Guide
 Strategic Asset Tracking System User Guide Contents 1 Overview 2 Web Application 2.1 Logging In 2.2 Navigation 2.3 Assets 2.3.1 Favorites 2.3.3 Purchasing 2.3.4 User Fields 2.3.5 History 2.3.6 Import Data
Merchant Integration Guide
 Merchant Integration Guide Card Not Present Transactions Authorize.Net Customer Support [email protected] Authorize.Net LLC 071708 Authorize.Net LLC ( Authorize.Net ) has made efforts to ensure the
Invoicing User s Guide
 Invoicing User s Guide Last updated: September 2010 PayPal Invoicing User s Guide Document Number: 10115.en_US-201009 2010 PayPal, Inc. All rights reserved. PayPal is a registered trademark of PayPal,
Wavelink Avalanche Mobility Center Java Console User Guide. Version 5.3
 Wavelink Avalanche Mobility Center Java Console User Guide Version 5.3 Revised 17/04/2012 ii Copyright 2012 by Wavelink Corporation. All rights reserved. Wavelink Corporation 10808 South River Front Parkway,
PowerSchool Parent Portal Administrator Guide. PowerSchool 7.x Student Information System
 PowerSchool 7.x Student Information System Released March 2012 Document Owner: Documentation Services This edition applies to Release 7.1.3 of the PowerSchool software and to all subsequent releases and
Microsoft Dynamics GP. Electronic Signatures
 Microsoft Dynamics GP Electronic Signatures Copyright Copyright 2011 Microsoft. All rights reserved. Limitation of liability This document is provided as-is. Information and views expressed in this document,
WELCOME TO REVEL SYSTEMS RETAIL SERVICE... 5 STARTING YOUR WORK... 6. Logging In to Your POS... 7. Refreshing the POS Settings...
 Retail Service User Guide. Page 2 of 81 Table of Contents WELCOME TO REVEL SYSTEMS RETAIL SERVICE... 5 STARTING YOUR WORK... 6 Logging In to Your POS... 7 Refreshing the POS Settings... 8 Clocking In and
Authorize.Net Mobile Application
 Authorize.Net Mobile Application Android User Guide October 2015 Authorize.Net Developer Support http://developer.authorize.net Authorize.Net LLC 082007 Ver.2.0 Authorize.Net LLC ( Authorize.Net ) has
NETWORK PRINT MONITOR User Guide
 NETWORK PRINT MONITOR User Guide Legal Notes Unauthorized reproduction of all or part of this guide is prohibited. The information in this guide is subject to change without notice. We cannot be held liable
Your Blueprint websites Content Management System (CMS).
.") Your Blueprint websites Content Management System (CMS). Your Blueprint website comes with its own content management system (CMS) so that you can make your site your own. It is simple to use and allows
Your Blueprint websites Content Management System (CMS). Your Blueprint website comes with its own content management system (CMS) so that you can make your site your own. It is simple to use and allows
Contents Error! Bookmark not defined.
 PayFox User Guide Contents Table of Contents... Error! Bookmark not defined. Product Overview... 3 Peripheral Devices... 3 Product Features and Functionality... 4 Account Activation Programming Enablement...
Virtual Terminal User s Guide
 Virtual Terminal User s Guide For Professional Use Only Currently only available in English. A usage Professional Uniquement Disponible en Anglais uniquement pour l instant. Last updated: June 2009 PayPal
Retail POS User s Guide. Microsoft Dynamics AX for Retail
 Retail POS User s Guide Microsoft Dynamics AX for Retail January 2011 Microsoft Dynamics is a line of integrated, adaptable business management solutions that enables you and your people to make business
Web Mail Classic Web Mail
 April 14 Web Mail Classic Web Mail Version 2.2 Table of Contents 1 Technical Requirements... 4 2 Accessing your Web Mail... 4 3 Web Mail Features... 5 3.1 Home... 5 3.1.1 Mailbox Summary... 5 3.1.2 Announcements...
Live@edu User Guide. Please visit the Helpdesk website for more information: http://www.smu.edu.sg/iits/helpdesk_support/index.asp
 IITS Main Office SINGAPORE MANAGEMENT UNIVERSITY Administration Building, Level 11 81, Victoria Street Singapore 188065 Phone: 65-6828 1930 Email: [email protected] Please visit the Helpdesk website for
NJCU WEBSITE TRAINING MANUAL
 NJCU WEBSITE TRAINING MANUAL Submit Support Requests to: http://web.njcu.edu/its/websupport/ (Login with your GothicNet Username and Password.) Table of Contents NJCU WEBSITE TRAINING: Content Contributors...
FOR WINDOWS FILE SERVERS
 Quest ChangeAuditor FOR WINDOWS FILE SERVERS 5.1 User Guide Copyright Quest Software, Inc. 2010. All rights reserved. This guide contains proprietary information protected by copyright. The software described
History Explorer. View and Export Logged Print Job Information WHITE PAPER
 History Explorer View and Export Logged Print Job Information WHITE PAPER Contents Overview 3 Logging Information to the System Database 4 Logging Print Job Information from BarTender Designer 4 Logging
Legal and Copyright Notice
 Parallels Confixx Legal and Copyright Notice ISBN: N/A Parallels 660 SW 39 th Street Suite 205 Renton, Washington 98057 USA Phone: +1 (425) 282 6400 Fax: +1 (425) 282 6444 Copyright 2008, Parallels GmbH
Lotus Notes Client Version 8.5 Reference Guide
 Lotus Notes Client Version 8.5 Reference Guide rev. 11/19/2009 1 Lotus Notes Client Version 8.5 Reference Guide Accessing the Lotus Notes Client From your desktop, double click the Lotus Notes icon. Logging
Server Installation Guide ZENworks Patch Management 6.4 SP2
 Server Installation Guide ZENworks Patch Management 6.4 SP2 02_016N 6.4SP2 Server Installation Guide - 2 - Notices Version Information ZENworks Patch Management Server Installation Guide - ZENworks Patch
Asset Track Getting Started Guide. An Introduction to Asset Track
 Asset Track Getting Started Guide An Introduction to Asset Track Contents Introducing Asset Track... 3 Overview... 3 A Quick Start... 6 Quick Start Option 1... 6 Getting to Configuration... 7 Changing
Password Memory 6 User s Guide
 C O D E : A E R O T E C H N O L O G I E S Password Memory 6 User s Guide 2007-2015 by code:aero technologies Phone: +1 (321) 285.7447 E-mail: [email protected] Table of Contents Password Memory 6... 1
Virtual Terminal User s Guide
 Virtual Terminal User s Guide For Professional Use Only Currently only available in English. A usage Professional Uniquement Disponible en Anglais uniquement pour l instant. Last updated: August 2009 PayPal
U S E R S G U I D E Last Modified: 12/06/2012 1
 USER S GUIDE Last Modified: 12/06/2012 1 Contents 2 Welcome 3 User Service Activation 4 Introduction 4 Purpose 5 Key Features 6 Activate 8 Using the System 8 Login 9 Credit Sale 10 For Swipe Capable Devices
Getting Started - The Control Panel
 Table of Contents 1. Getting Started - the Control Panel Login Navigation Bar Domain Limits Domain User Account Properties Session Management 2. FTP Management Creating and Editing Users Accessing FTP
AFN-SchoolStoreManagerGuide-032703
 032703 2003 Blackbaud, Inc. This publication, or any part thereof, may not be reproduced or transmitted in any form or by any means, electronic, or mechanical, including photocopying, recording, storage
Online School Payments (OSP) User Guide
 User Guide") Online School Payments (OSP) User Guide November, 2013 OSP User Guide Table of Contents Overview...3 Site Information...3 Login to Portal...4 Activity Setup...6 OSP Activity Setup Form...6 Add Activity...7
Online School Payments (OSP) User Guide November, 2013 OSP User Guide Table of Contents Overview...3 Site Information...3 Login to Portal...4 Activity Setup...6 OSP Activity Setup Form...6 Add Activity...7
formerly Help Desk Authority 9.1.3 HDAccess Administrator Guide
 formerly Help Desk Authority 9.1.3 HDAccess Administrator Guide 2 Contacting Quest Software Email: Mail: Web site: [email protected] Quest Software, Inc. World Headquarters 5 Polaris Way Aliso Viejo, CA 92656
CyberSource Business Center
 CyberSource Business Center CS-5-123110 Copyright 2010 Harris Connect, LLC. all rights reserved. Reproduction in any form without the express written consent of Harris Connect, LLC. is strictly prohibited
Drake Hosted User Guide
 Drake Hosted User Guide Last Revision Date: 11/23/2015 Support.DrakeSoftware.com (828) 524-8020 Drake Hosted User Guide Copyright The Drake Hosted User Guide, Drake Tax Software, and any other related
Webmail Instruction Guide
 Webmail Instruction Guide This document is setup to guide your through the use of the many features of our Webmail system. You may either visit www.safeaccess.com or webmail.safeaccess.com to login with
ADP Workforce Now Portal Administrator Guide. Version 2.0 2.0-1
 ADP Workforce Now Portal Administrator Guide Version 2.0 2.0-1 ADP Trademarks The ADP logo, ADP, and ADP Workforce Now are registered trademarks of ADP, Inc. Third-Party Trademarks Microsoft, Windows,
Custom Reporting System User Guide
 Citibank Custom Reporting System User Guide April 2012 Version 8.1.1 Transaction Services Citibank Custom Reporting System User Guide Table of Contents Table of Contents User Guide Overview...2 Subscribe
Volume PLANETAUTHORIZE PAYMENT GATEWAY. vtiger CRM Payment Module. User Guide
 Volume 2 PLANETAUTHORIZE PAYMENT GATEWAY vtiger CRM Payment Module User Guide S A L E M A N A G E R M E R C H A N T S E R V I C E S User Guide and Installation Procedures Information in this document,
ACHieve Access 4.3 User Guide for Corporate Customers
 ACHieve Access 4.3 User Guide for Corporate Customers January 2015 Citizens Bank 1 February 2015 Table of Contents SECTION 1: OVERVIEW... 4 Chapter 1: Introduction... 5 How to Use This Manual... 5 Overview
Envision Credit Card Processing
 A Guide for Processing Transactions with Envision's Credit Card Module I Table of Contents Part I Credit Card Processing Setup 1 Part II Credit Card Processing 2 1 Entering Tips... 3 2 Processing the Credit
PCLaw 11.0. Administration Guide
 PCLaw 11.0 Administration Guide About this guide This guide provides a list of tasks for installing PCLaw Practice Management Software. If you need additional information, refer to the PCLaw Support Center.
NorthClark Computing, Inc. Bill of Material and Parts Master Maintenance. Administrator s Guide
 ERP Consulting Web Development Custom Programming Solutions Desktop & Web Applications for Manfact NorthClark Computing, Inc. Bill of Material and Parts Master Maintenance Administrator s Guide Web and
Transitioning from TurningPoint 5 to TurningPoint Cloud - LMS 1
 Transitioning from TurningPoint 5 to TurningPoint Cloud - LMS 1 A Turning Account is a unique identifier that is used to tie together all software accounts and response devices. A Turning Account is required
Virtual Terminal User Guide
 Virtual Terminal User Guide For Professional Use Only Currently only available in English. A usage Professional Uniquement Disponible en Anglais uniquement pour l'instant. Last Updated: 2005 PayPal Virtual