Medical Practice Management Software EzMedPro User Manual For
|
|
|
- Hector Ward
- 8 years ago
- Views:
Transcription

1 User Manual For

2 Table of Contents INSTALLATION... 4 Windows Install... 4 EzMedPro Setup... 8 Environment Setup Setup Mode: Network Setup Standalone Mode Environment Setup Change Setup Mode Backup and Restore Database Backup Restore Setup Company CPT and Diagnostic Codes CPT Codes ICD and Diagnostic codes New User ALERTS Management SCHEDULING Appointment Scheduler Setting the Session Length PATIENTS Management Patient Details New Patients Guardian Patient Insurance Emergency Contact Groups Clinical Information Management New Visit Intake Session... 52

3 Patient History Medication Print HCFA Print Intake Print Medical Record Patient Bills Tab Patient Lookup View a Bill Patient Bills Patient Unpaid Bills Create Fee Patient Payments Medical BILLING Bills Per Period Today s Bills Print HCFA Electronic Claims Setup clearing house Setup to Automatic Claim Setup the frequency to check for claim status Generate Claim File Automatic Claim Filing Customer Balances View Customer Bill View Customer Payments View Customer Bill Insurance Claims Insurance Payments Customer Payments... 82


4 INSTALLATION Download EzMedPro from Go to the download Tab and Download EzMedPro for Windows, Linux or Mac OSX. Windows Install 1- The download file is ezmedpro.exe or ezinstall.exe. 2- Double click on the downloaded file: 3- Click Next


5 4- The Readme message will appear. 5- Accept the license


6 6- Choose the folder to Install EzMedPro


7 7- A Screen showing the install in progress will appear 8 -The Install is complete screen will appear with a check box to start EzMedPro.


8 9- The install has created a shortcut in your desktop. 10- The first time you start EzMedPro, A Wizard will guide to create you company, provider, load CPT and ICD codes. EzMedPro Setup When EzMedPro is started for the first time, the wizard screen will appear to help guide to setup EzMedPro.


9 Click Next.


10 Environment Setup EzMedPro can be setup in standalone or on networked mode. In standalone mode, only one machine can use the medical database. The database is integrated with EzMedPro. In Networked mode, the database is installed separately and many EzMedPro instances installed on separate machines can share the same data. Setup Mode:


11 Network Setup To setup Network Mode, you need to download the Network Database. The network Database is only available on Windows platform. After Installing the Network database, RESTART your machine. EzMedPro can be installed on MAC OSX bits, Linux and Windows. To Setup Networked Mode, Chose the Network Setup as shown above. Enter the server name or the IP address of the server where the Database is installed. Enter the Shared Folder is no longer required. Click Next

12 Standalone Mode In Standalone mode, only one machine can access the data. For security reasons, only one EzMedPro instance can access the embedded database. Click Next


13 Environment Setup After you have chosen the Setup Mode, EzMedPro will connect to the database and setup your environment. If your database has not been setup, you will need to provide your company information as well as the first medical provider.

14 Click NEXT and a Window creates a company will show as below.


15 Enter the information Company Name, Address fields; EIN and Group NPI are required information. If you don t have the Group NPI, Enter the main provider s NPI. Click Save.

16 A Trial version of CPT, HCPCS and ICD codes will be added to the database. Click NEXT

17 Click NEXT A Window to create a Provider will show as follows:


18 Click Lookup Button to get the correct Taxonomy code. Click Save

19


20 Change Setup Mode To change the setup mode from Network to Standalone, Backup your database first into a file. Go to Options Server Setup EzMedPro setup section explain how to setup Network or Standalone mode.


21 Backup and Restore Database Backup To backup the database, Start EzMedPro, and Go System Backup and Restore Backup Click Backup

22 Restore To restore the database, Start EzMedPro, and Go System Backup and Restore Restore

23 Setup Company The following Medical Billing Software can be used by any medical practice, family practice, mental health, nursing and chiropractic practice. This medical billing and scheduling software is easy to use and can perform appointment scheduling, case management, patient management, electronic medical record, mental health management, nursing management, HCFA form and scheduling report functions. This medical office software is easy to use and simple to get started. The user can start by selecting the

24 System drop down menu. Then select Setup Company. Click on New Company tab and fill in information. Click New Company Button to create your company.

25 Then select save button. The medical, family, mental health, chiropractor or nursing company name, address, and EIN number should be displayed in the table above. Then click the Close button.

26 CPT and Diagnostic Codes In this management software for healthcare, select the System drop down menu. Then select CPT and Diagnostic Codes. Under the Speciality tab is where you enter your medical Speciality such as mental health, general medicine, pediatrics, etc. and a description of that Speciality. To add Speciality, Click Add Speciality Button.
27

28 CPT Codes To Add CPT Code, Click Add new Code The window below will appear, fill in the information and click save. Enter the description and price in the subsequent boxes. Make sure and highlight the correct Categoryt in the Speciality box and save the data. The number, description and price should be listed in the CPT table

29

30 ICD and Diagnostic codes Click on Diagnostic Codes Tab To add a new code, Click Add new Code Button.

31 Enter the number in the box labeled Diagnostic Code. Fill in the description of that diagnostic code and highlight the correct Speciality. Then press Save

32 New User To add new users to this medical practice software, pull down the Systems Menu and click on User Setup. Then click on Add New User.

33 Fill out the corresponding information and click Save. phone # should be listed in the table. Press Close to exit. The user s first name, last name, s and To edit user information in this patient management software, highlight the user information needing to be edited in the table. Once highlighted, click on Edit User, make the needed changes and then press Save. The changes should be reflected in the existing screen. Then press Close to exit the screen.

34 ALERTS Management
35 Once EzMedPro has started, Alerts will show up if there are unbilled accounts. In order to address these items, please go to the Patient tab; select the appropriate patient and bill. Once billed, click the refresh button to update the Alerts. SCHEDULING Appointment Scheduler To start scheduling in this management software for healthcare, press the Appointment Scheduler button from any screen.

36 Double click on the time slot to and an Appointment Details Screen will show. Use the SEARCH button to select an existing patient. For new patients, enter their details.

37 The user can view appointments in Day View, Week View, Month View, or Group View. Group View allows the user to see all providers in a weekly view format. This allows for easy and clear appointment scheduling.

38 The picture below show two providers on monthly view next to each other: The Today button will automatically bring you back to today s date in this medical scheduling software. The Show Dates button will allow a monthly calendar to appear in the center of the screen. The user can use the Show Dates button to find any particular date by clicking the single arrow (month) or double arrow (year) buttons. Once the month and year are found, the user can then click on the day and the schedule will automatically go to that date and show it in whatever view you have selected.
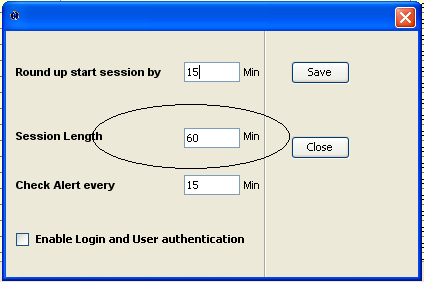
39 To remove the calendar from the screen simply clicks the Hide Dates button. To create an appointment simply double click on the time preferred. A Session Scheduling screen will appear. Populate all required fields and press schedule. This will save the appointment. The appointment will then show up on the schedule in blue. To make this appointment reoccurring go to Reoccurring Appointment tab and select the frequency and either the Number of Times or Repeat Until button. Select the number of times the user wants the appointment to repeat or select a date for the date to repeat until to make this appointment occur until the selected date. If a patient confirms an appointment, double click on the appointment time and press the confirm button. This will change the appointment color to green. Repeat this for the Called, Cancelled, and No show buttons as well. Each button will change the appointment to a different color so that the appointments are color coded therefore the user can recognize what might be happening with a patient s appointment at a glance. The user can also left click on the appointment to accomplish the same functions. Setting the Session Length On the main page of this medical office software, main menu, go to options ---> Global Options Round up start session by will round up the session length by number of minute specified. For example, if the value is set to 15 Minutes, when you double click on the calendar, depending on the position of the mouse, the session can start at 9:00, 9:15, 9:30 or 9:45. You can always overwrite the start any time. Session Length: Is the length of the visit per patient.
40
41 PATIENTS Management Patient Details New Patients To enter a new patient into this mental health/medical practice software, simply click on the Patient tab. The patient information screen will pop up. If this screen is populated, please click the New Patient button in the left hand side of the screen to clear it. Then enter the information to populate the screen. Please note the social security and home telephone numbers must be filled out if you do not have one please enter a factious ( ) one so that you can continue to move down the screen. If the patient is 18 years old or older, the View Guardian button will disappear.

42 Guardian If the patient is a minor please click on the View Guardian button and populated the screen with your data. You can then print out consent to treat that minor by pressing the Print Form button.

43

44 Patient Insurance If using insurance, please click the Insurance Information button. Click on New Insurance and the insurance information screen will pop up. Please select the insurance name and status. Please note the insurance name is populated by preentering the insurance companies information under the Payers tab from the main menu. Please search for the Payers tab heading in this document for more information. Then populate the rest of the screen. If the relation to the insured is self the insured street, city, telephone #, ss# will be automatically populated. Press save to secure data.

45 If a patient s insurance changes, click on the Insurance Information tab and then highlight the listed insurance that needs editing. Then click on View Insurance tab. The insurance information screen will pop up. Pull down the status menu and change from active primary to whatever change has occurred. Then save.

46 Emergency Contact Emergency Contact can be filled out by simply clicking on the Emergency Contact button and populating the screen with the information. Groups Click on the Group button, and we can create a group and assign new patient to it:

47

48 Clinical Information Management Click on Clinical Info Tab. This easy to use medical management software allows the user to locate patients quickly within the system. If a patient has already been selected from the Details tab then the patients name will be listed and ready to enter clinical data. If not please click the Search button and fill out the patients name or id # in the pop up menu. Once the patient s name is display on the screen, highlight it and press Select. The patient data is loaded and displayed on all the tabs.

49 The Session Id screen should then be populated with any prior clinical session entries. If the patient is new, then start by clicking the New Visit Button. To create a new Visit, Click New Visit To view previous visit Select by highlighting it and the press View Visit To View the list of previous visits, press Visit History

50 New Visit Click New Visit button. Please populate any data the needs to be used: Pregnancy or Illness/ Injury Date, First Symptom Date, Authorization #, Medicaid Code, etc. Some of this data will populate the HCFA form or used for Electronic claims.

51 Entering Procedure and Diagnostic Press the Add button to add a Procedure. The Add Button is shown on the above picture. Enter the appropriate date of service. The current date will automatically populate the screen unless changed as well as office for place of service.
52 Select the appropriate CPT and Diagnostic Codes. The amount charged entered in for the CPT code should populate the Charge field. The amount is set per CPT code. Main Many System CPT and Diagnostic Codes. Please make sure everything else is correct. If you wish to enter in dates of service from a certain date to a certain date click the Top box. To save and enter the information press Add to List. The CPT and Diagnostic Code will then be listed in the corresponding box. To add another procedure to the session, to be listed on the same HCFA form repeat the process again starting with the Add button. Once all the sessions are entered for this bill press SAVE button to secure the data. Now the Intial Intake or Clinical Notes can be entered simply by pressing the button at the bottom right hand corner of the screen. Please be aware that if this is the initial session the Intake Session button will appear at the bottom of the screen. If it is the first visit for the patient, Initial Session button will appear otherwise Clinical Notes will appear. Patient and medical record management has never been easier. Intake Session The Intake Session is the first patient session. Patient History Medical History of the patient, you can upload files if the patient provides a soft copy of it. You can copy and paste the information or entered it manually. You can upload scanned files, PDF, Pictures, Xray pictures, and Word Documents.

53 Medication This medical practice software allows the user to see all past and current prescriptions the patient has been on. To view the prescriptions or enter a new one simply click on Medications in the side bar menu and the window below will show on the right panel. A window will pop up stating that no session was selected, do you want to view all the prescriptions for this patient? Click yes and a screen will pop up showing all listed prescriptions.

54 To add new Medication, Press New Medication button

55 To view details regarding a particular prescription, highlight the intended prescription and click View Details. To view a specific session click View History and highlight the session you want to view, then click Medication in the side bar menu.
56 Print HCFA This management software for healthcare allows the user to print a HCFA form by clicking View History and highlighting the intended session. Then click the Print HCFA button. A HCFA form will pop up with populated fields to print. Press Print to print HCFA form or Cancel to discontinue. Print Intake This allows the Intake or Initial Session form to be printed. Print Medical Record This easy to use medical record management software allows the session notes to be printed. Please note that each time you click this button, all the clinical notes completed will be printed.

57 Patient Bills Tab The patients bills tab in this medical billing software allows the user to have an overview an account including Total Charge, Total Adjustments, Total Received, Balance for a patient. It also includes details such as name, type, status, insurance, date, charge, adjustment, insurance payment, copay, payment and what s due on the account.

58 Patient Lookup If a patient has been selected from the Details tab then the patients name will be listed and ready to enter clinical data. If not please click the Patient Lookup button and fill out the patients name, social security # or id # in the pop up menu. Once the patient s name is display on the screen, highlight it and press Select. View a Bill Allows the user to view a particular session by highlighting the intended session and pressing the View a Bill button.

59 Once on the Bill screen, the user can apply adjustments and record received payments. The user is also able to record notes on the account. The user is able to print an invoice for this particular session or a complete statement on the account from this screen. Receiving Payments The Receive Payment button allows the user to post received payments. This payment can be applied to a specific session by checking the show unpaid sessions box. Once the partially paid or unpaid session appear at the bottom of the screen, check the appropriate session to apply the payment to. Enter the amount, the type of payment (cash, check or charge) and whether the payment is a copay, out of pocket payment or insurance payment. If Insurance payment is selected, unpaid or partially paid sessions will appear at the bottom of the screen. Please check the boxes the insurance payment applies to. This can also be done manually for copays and out of pocket payments by checking the box marked Show Unpaid Sessions. Always save data in each screen.
60 Patient Bills Patient Bills shows all the patient including the paid bills Patient Unpaid Bills This screen gives an overview of unpaid bills on the patient s account. Again View a Bill can be used here to open up a specific session to apply a payment or adjustment by highlighting the intended session and clicking the View a Bill button. Create Fee The Create Fee button in this medical billing software allows the user to create a fee, for example a no show charge, on the account. Go to Total Charge in the upper left hand corner and place the amount for charge. Then press save in the side bar menu on the right side of the screen. Patient Payments The Patient Payments tab gives an overview of all payments posted to a patient s account. The user can retrieve a patient s information by using Lookup Patient (see Patient Lookup ). The user can review any posted payment by highlighting the payment and then clicking the View Payment button. The user can again use the Receive Payment button to post a payment and can print a receipt by highlighting the intended payment and clicking the Print Receipt button.

61 PROVIDERS TAB This medical management software allows for multiple providers. The Providers tab allows the user to enter different providers.

62 To edit a providers information please highlight the provider in the Provider List Panel and click Edit Provider, make the changes in the pop up screen and press save. To add a new provider simply click on the Add New Provider.

63 Fill out the above screen. Press save when completed. PAYERS Management This practice management software allows the user easy access to insurance information. The Payers Tab gives the user an overview of all the insurance companies entered into the software. To Add new Insurance, click Add New Insurance button. To Edit an Insurance Company, highlight the insurance you would like to edit and click Edit Button Once clicked, a pop up screen will appear where the user can populate the insurance provider s information. Press Save once completed. This screen also allows for and Editing and Delete option. To Edit or Delete simply highlight the payer and then push the intended button. Remember to always save data once the information is edited.

64

65 REPORTS This management software for healthcare allows the user to generate a weekly, monthly, or daily revenue or calendar report by simply pressing the Report button. The Billing Report gives total copays, payments, adjustments, and session costs for any specified time. Simply apply specific dates in the left hand side bar menu, click on week, month or day and click the Billing Report button. A report will be generated.
 and chose week, month, or day and click Calendar Report.")
66 The Calendar report will generate the total number to appointments by week, month, or day using specified dates that can be adjusted in the left hand side bar menu. Simply chose the specific time frame ( not exceeding 31 days) and chose week, month, or day and click Calendar Report. The scheduling report will show total appointments including total number of confirmed, new, and no show appointments.
67 Medical BILLING Current Bills This practice management software allows for easy billing overview and access.

68 Bills Per Period Bills Per Period button allows the user to see all unpaid bills during a certain time frame. Simply click on the Bills Per Period button and enter the dates for the time frame needed and push Retrieve. A table will follow showing name, type, status, etc. Today s Bills Today s Bills button allows the user to see all unpaid bills for the current day.

69 Print HCFA Click Print HCFA form button: This medical billing software allows the user to print any claim. Simply highlight the desired bill and click the Print HCFA button. If no claim is highlighted, all the claims will be printed.
70 Electronic Claims Setup clearing house Click on Option and then Clearing House.

71 Choose one recommended clearing house from DSOFT SYSTEMS or you can create a new one. Highlight one clearing house and click Edit.

72 DSOFT SYSTEMS will provide you with Practice Number. Enter the number into the field Practice Number Loop 1000A NM108. Setup to Automatic Claim In order to send automatically the file to the insurance companies through DSOFT SYSTEMS partners, check the box Advanced Transmission Settings. The window below will appear to setup the username and password.

73 The username and password will be provided to you by DSOFT SYSTEMS. Enter the User Name and Password and click Save
.")
74 Setup the frequency to check for claim status It is recommended to check for the status of the claims every 4 hours (240 minutes). Enter 240 in the test area of Remittance Time highlight below.

75 Generate Claim File Click on Insurance EFile button. A window to validate the claim file will appear/ You can change the file location and name. Click Save.

76 Confirmation that the file was generated. Automatic Claim Filing Click OK after the file was successfully created. To send the claims automatically through DSOFT SYSTEMS and its partners, Click Yes.

77 Customer Balances This healthcare practice software allows the user to view all accounts and current balances. Those accounts in white have zero balances. The accounts in green are overpaid and the accounts in red owe money.
78 View Customer Bill View Customer Bill button will take the user into a patient s billing account screen by highlighting the intended patient and clicking the button. To return here simply go to the BILLING tab and then to the Customer Balances tab.

79 View Customer Payments View Customer Payments button will take the user into a patient s payment screen by highlighting the intended patient and clicking the button. To return here simply do to the BILLING tab and then to the Customer Balances tab. View Customer Bill This option shows the customer Bill. This affordable and easy to use practice management software is appropriate for medical, family, mental health, chiropractic, and nursing practices. It provides user friendly ways to manage appointments scheduling, electronic medical records, HCFA forms, patient/case management, and

80 scheduling and billing reports. Thank you for choosing Ezmedpro and manage your healthcare practice with excellence. Insurance Claims Click on Insurance EClaim to view all the batch claims that were sent.

81 Insurance Payments The Insurance Payments show the insurance payments.

82 Customer Payments To view the customer payments, Click on Customer Payment Tab. There are 25 rows per page. Click next to see more payment.
Instructions for Importing (migrating) Data
 Data") Instructions for Importing (migrating) Data from CTAS Version 7 to CTAS Version 8 For Windows 8 and 8.1 CTAS Version 8 is designed to work with your Version 7 data if you choose to. These instructions
Instructions for Importing (migrating) Data from CTAS Version 7 to CTAS Version 8 For Windows 8 and 8.1 CTAS Version 8 is designed to work with your Version 7 data if you choose to. These instructions
FrontDesk Installation And Configuration
 Chapter 2 FrontDesk Installation And Configuration FrontDesk v4.1.25 FrontDesk Software Install Online Software Activation Installing State Related Databases Setting up a Workstation Internet Transfer
How to setup Electronic Claims
 How to setup Electronic Claims Copyright DSOFT SYSTEMS Inc. Page 1 Introduction Electronic Claims is the automation of medical claim submission. Instead of printing the HCFA form, simply generate a batch
SERVICE CENTER ONLINE ENTRY
 SERVICE CENTER ONLINE ENTRY TABLE OF CONTENTS Service Center Online Entry... 1 Table of Contents... 2 Service Center Online Entry... 3 Online Entry Tool Instructions... 3 Quick and Easy Instructions For
Appointment Scheduler
 EZClaim Appointment Scheduler User Guide Last Update: 11/19/2008 Copyright 2008 EZClaim This page intentionally left blank Contents Contents... iii Getting Started... 5 System Requirements... 5 Installing
TM Online Storage: StorageSync
 TM Online Storage: StorageSync 1 Part A: Backup Your Profile 1: How to download and install StorageSync? Where to download StorageSync? You may download StorageSync from your e-storage account. Please
Driver Updater Manual
 Driver Updater Manual Keep your drivers up-to-date! Improve your system performance and stability by keeping your drivers updated. Automatically find, update and fix the drivers on your computer and turn
You may have been given a download link on your trial software email. Use this link to download the software.
 BackupVault / Attix5 Server Quickstart Guide This document takes about 5 minutes to read and will show you how to: Download the software Install the Attix5 Professional Backup software Backup your files
Citrix Client Install Instructions
 Citrix Client Install Instructions If you are using Citrix remotely, Information Technology Services recommends updating Citrix client to the newest version available online. You must be an administrator
Provider Electronic Solutions Software User s Guide
 Vermont Title XIX Provider Electronic Solutions Software User s Guide HP ENTERPRISE SERVICES 312 HURRICANE LANE, STE 101 PO BOX 888 WILLISTON VT 05495 Table of Contents 1 Introduction... 2 1.1 Provider
How to Use JCWHosting Reseller Cloud Storage Solution
 How to Use JCWHosting Reseller Cloud Storage Solution Go to https://www.internetspace.co.za and log in with your Cloud Reseller account username and password. How to Use create a cloud account for your
MaineCare Medicaid EHR Incentive Program Meaningful Use Wizard Guide Last Update: February 10, 2014
 Before You Begin: MaineCare Medicaid EHR Incentive Program Meaningful Use Wizard Guide Last Update: February 10, 2014 Be sure your computer is running the Windows operating system (Windows XP or higher).
Payco, Inc. Evolution and Employee Portal. Payco Services, Inc.., 2013. 1 Home
 Payco, Inc. Evolution and Employee Portal Payco Services, Inc.., 2013 1 Table of Contents Payco Services, Inc.., 2013 Table of Contents Installing Evolution... 4 Commonly Used Buttons... 5 Employee Information...
Installing LearningBay Enterprise Part 2
 Installing LearningBay Enterprise Part 2 Support Document Copyright 2012 Axiom. All Rights Reserved. Page 1 Please note that this document is one of three that details the process for installing LearningBay
SOS SO S O n O lin n e lin e Bac Ba kup cku ck p u USER MANUAL
 SOS Online Backup USER MANUAL HOW TO INSTALL THE SOFTWARE 1. Download the software from the website: http://www.sosonlinebackup.com/download_the_software.htm 2. Click Run to install when promoted, or alternatively,
IMAP and SMTP Setup in Email Clients
 IMAP and SMTP Setup in Email Clients Configuring an Email Client for IMAP Configuring an Email Client for the SMTP Server Overview Internet Message Access Protocol (IMAP), or a remote connection through
How to remotely access your Virtual Desktop from outside the college using VMware View Client. How to guide
 How to remotely access your Virtual Desktop from outside the college using VMware View Client How to guide Author: ICT Services Version: 1.0 Date: November 2015 Contents What is the VMware View Client?...
STANDARD OPERATING PROCEDURE FOR USE OF LOG TAG ANALYZERS AS PART OF THE INTER HOSPITAL TRANSFER PROGRAM
 STANDARD OPERATING PROCEDURE FOR USE OF LOG TAG ANALYZERS AS PART OF THE INTER HOSPITAL TRANSFER PROGRAM WITHIN THE PROVINCE OF NEWFOUNDLAND AND LABRADOR USING THE GOLDEN HOUR 24 / 2 SHIPPING CONTAINER
Installation / Backup \ Restore of a Coffalyser.Net server database using SQL management studio
 Installation / Backup \ Restore of a Coffalyser.Net server database using SQL management studio This document contains instructions how you can obtain a free copy of Microsoft SQL 2008 R2 and perform the
You ve Got Mail Groupwise 6.5 for OSX
 You ve Got Mail Groupwise 6.5 for OSX The new Groupwise email version is on all OSX computers. It can be used only when you are in school. To access your Groupwise email from home, you will have to use
RevTrak Software Training Guide
 RevTrak Software Training Guide Introduction: There should be two icons on your desktop: 1. This is the shortcut for the regular RevTrak Software. 2. This is the shortcut for RevTrak Express. If you do
Virtual Heart User Manual Username Password
 Virtual Heart User Manual Username Password These instructions are meant to help you use the Virtual Heart website. Please write down your username and password and store them in a safe place in case you
How To Restore Your Data On A Backup By Mozy (Windows) On A Pc Or Macbook Or Macintosh (Windows 2) On Your Computer Or Mac) On An Pc Or Ipad (Windows 3) On Pc Or Pc Or Micro
 On A Pc Or Macbook Or Macintosh (Windows 2) On Your Computer Or Mac) On An Pc Or Ipad (Windows 3) On Pc Or Pc Or Micro") Online Backup by Mozy Restore Common Questions Document Revision Date: June 29, 2012 Online Backup by Mozy Common Questions 1 How do I restore my data? There are five ways of restoring your data: 1) Performing
Online Backup by Mozy Restore Common Questions Document Revision Date: June 29, 2012 Online Backup by Mozy Common Questions 1 How do I restore my data? There are five ways of restoring your data: 1) Performing
Faculty/Staff instructions for connecting to the Hood College VPN to gain access to your office computer
 Faculty/Staff instructions for connecting to the Hood College VPN to gain access to your office computer Note: These instructions were written for Windows 7 Professional. Some screens may be different
J. Mauel & Associates Property Tax Collection Program User Manual
 J. Mauel & Associates Property Tax Collection Program User Manual Update: 2011 TECHNICAL SUPPORT: (920) 532-0540 J. Mauel & Associates Property Tax Collection Program Table of Contents Welcome 1 Technical
Check current version of Remote Desktop Connection for Mac.. Page 2. Remove Old Version Remote Desktop Connection..Page 8
 CONTENTS SECTION 1 Check current version of Remote Desktop Connection for Mac.. Page 2 SECTION 2 Remove Old Version Remote Desktop Connection..Page 8 SECTION 3 Download and Install Remote Desktop Connection
Accessing vlabs using the VMware Horizon View Client for OSX
 Accessing vlabs using the VMware Horizon View Client for OSX This document will demonstrate how to download, install, and connect to a virtual lab desktop from a personal Mac OSX computer using the VMware
16.4.3 Lab: Data Backup and Recovery in Windows XP
 16.4.3 Lab: Data Backup and Recovery in Windows XP Introduction Print and complete this lab. In this lab, you will back up data. You will also perform a recovery of the data. Recommended Equipment The
Using Microsoft Office 2013: Outlook. Gerry Kruyer
 Using Microsoft Office 2013: Outlook Table of Contents Outlook 2013 Ribbon... 4 Viewing Inbox... 4 Folders... 4 Home Tab... 5 Background Colour and Themes... 5 Inbox... 6 Reading Pane... 6 Turn off/on
Table of Contents. 1. Overview... 3. 1.1 Materials Required. 3 1.2 System Requirements. 3 1.3 User Mode 3. 2. Installation Instructions..
 Table of Contents 1. Overview..... 3 1.1 Materials Required. 3 1.2 System Requirements. 3 1.3 User Mode 3 2. Installation Instructions.. 4 2.1 Installing the On Call Diabetes Management Software. 4 2.2
Hosting Users Guide 2011
 Hosting Users Guide 2011 eofficemgr technology support for small business Celebrating a decade of providing innovative cloud computing services to small business. Table of Contents Overview... 3 Configure
Verizon Cloud Desktop Application Help Guide Version 4.1 72
 Verizon Cloud Desktop Application Help Guide Version 4.1 72 CONTENTS I. Getting started... 4 A. Verizon Cloud... 4 B. Main navigation... 5 C. System requirements... 5 D. Installing the application... 6
DarwiNet Client Level
 DarwiNet Client Level Table Of Contents Welcome to the Help area for your online payroll system.... 1 Getting Started... 3 Welcome to the Help area for your online payroll system.... 3 Logging In... 4
Database Program Instructions
 Database Program Instructions 1) Start your Comparative Rating software by double-clicking the icon on your desktop. 2) Click on the button on the Comparative Rating Software Main Menu. 3) A message Loading
EZClaim 8 ANSI 837 User Guide
 EZClaim 8 ANSI 837 User Guide Last Updated: March 2012 Copyright 2003 EZClaim Medical Billing Software Electronic Claims Using the ANSI 837 Format User Guide NPI Numbers Billing and Rendering NPI numbers
1. Installing The Monitoring Software
 SD7000 Digital Microphone Monitor Software manual Table of Contents 1. Installing The Monitor Software 1.1 Setting Up Receivers For Monitoring 1.2 Running The Application 1.3 Shutdown 2. The Detail Monitoring
Chapter 28. Poi nt of Sale But. FrontDesk v4.1.25. Point of Sale Menus. Voiding Invoices. Redeeming Gift Certificates. Revised on: 06/10/2009
 Chapter 28 Point of Sale FrontDesk v4.1.25 Point of Sale Poi nt of Sale But tons Point of Sale Menus Opening and Closing Register Drawers Making a Sale Voiding Invoices Reprinting Receipts Selling Gift
Windows Accelerated Submission and Processing WINASAP 5010. Montana Medicaid, Healthy Montana Kids (HMK) and Mental Health Services Plan (MHSP)
 and Mental Health Services Plan (MHSP)") Windows Accelerated Submission and Processing WINASAP 5010 Montana Medicaid, Healthy Montana Kids (HMK) and Mental Health Services Plan (MHSP) October 2015 2015 Xerox Corporation. All rights reserved.
Windows Accelerated Submission and Processing WINASAP 5010 Montana Medicaid, Healthy Montana Kids (HMK) and Mental Health Services Plan (MHSP) October 2015 2015 Xerox Corporation. All rights reserved.
Getting credit for completing this lab
 Lab Exercise: Introduction to Microsoft SharePoint The purpose of this lab is to give you an introduction to Microsoft SharePoint, a team collaboration software technology. As the use of SharePoint grows
MSSQL quick start guide
 C u s t o m e r S u p p o r t MSSQL quick start guide This guide will help you: Add a MS SQL database to your account. Find your database. Add additional users. Set your user permissions Upload your database
Disabling Microsoft SharePoint in order to install the OneDrive for Business Client
 Disabling Microsoft SharePoint in order to install the OneDrive for Business Client If you try to setup and sync your OneDrive online documents with the client software and Microsoft SharePoint opens,
At the top of the page there are links and sub-links which allow you to perform tasks or view information in different display options.
 APPOINTMENTS TAB P r a c t i c e M a t e M a n u a l 38 OVERVIEW The Appointments Tab is used to set up appointments, reschedule or edit existing appointment information, check patients in and out, and
DIRECT MESSAGING END USER GUIDE ALABAMA ONE HEALTH RECORD. Unify Data Management Platform 2012/2013 Software Build 5.15
 DIRECT MESSAGING END USER GUIDE ALABAMA ONE HEALTH RECORD Unify Data Management Platform 2012/2013 Software Build 5.15 April 2015 Proprietary and Confidential Property of Truven Health Analytics Inc.
Advanced Event Viewer Manual
 Advanced Event Viewer Manual Document version: 2.2944.01 Download Advanced Event Viewer at: http://www.advancedeventviewer.com Page 1 Introduction Advanced Event Viewer is an award winning application
Integrated Accounting System for Mac OS X and Windows
 Integrated Accounting System for Mac OS X and Windows Program version: 6.2 110111 2011 HansaWorld Ireland Limited, Dublin, Ireland Preface Books by HansaWorld is a powerful accounting system for the Mac
EDI Insight Manual. Training Manual. Presented By
 EDI Insight Manual Training Manual Presented By EDI Insight Manual 2 Step 1 Upload File: Select the file to transmit on the eceno claims transmission screen and click connect. Login to EDI Insight, when
Joining an XP workstation to a domain Version 1.00
 Joining an XP workstation to a domain Version 1.00 All Windows XP Professional workstations need to be joined to a domain to function as part of the domain security environment. Need to Know TM 1. To join
SIGN Surgical Database Training Manual
 Manual In addition to using the Online Surgical Database for single case entry, you can also use the Offline Data Entry Tool (ODET) to enter each case offline and then upload a batch of cases to the online
Getting Started. PMP is designed by chiropractors for chiropractors!
 ONTARIO CHIROPRACTIC ASSOCIATION PATIENT MANAGEMENT PROGRAM PUTTING EXPERIENCE INTO PRACTICE Getting Started Welcome! This booklet is your quick start guide. It houses basic information about PMP, the
10.3.1.6 Lab - Data Backup and Recovery in Windows XP
 5.0 10.3.1.6 Lab - Data Backup and Recovery in Windows XP Introduction Print and complete this lab. In this lab, you will back up data. You will also perform a recovery of the data. Recommended Equipment
1. Open Thunderbird. If the Import Wizard window opens, select Don t import anything and click Next and go to step 3.
 Thunderbird The changes that need to be made in the email programs will be the following: Incoming mail server: newmail.one-eleven.net Outgoing mail server (SMTP): newmail.one-eleven.net You will also
EZClaim Advanced 9 ANSI 837P. Capario Clearinghouse Manual
 EZClaim Advanced 9 ANSI 837P Capario Clearinghouse Manual EZClaim Medical Billing Software December 2013 Capario Client ID# Capario SFTP Password Enrollment Process for EDI Services 1. Enroll with the
Microsoft Outlook 2010
 Microsoft Outlook 2010 Prepared by Computing Services at the Eastman School of Music July 2010 Contents Microsoft Office Interface... 4 File Ribbon Tab... 5 Microsoft Office Quick Access Toolbar... 6 Appearance
Downloading and Installing Core FTP
 What is FTP? To transfer the fi les from your computer to a web server, a special protocol (transfer method) is used: FTP - the File Transfer Protocol. This protocol was designed to be able to handle big
Gladinet Cloud Backup V3.0 User Guide
 Gladinet Cloud Backup V3.0 User Guide Foreword The Gladinet User Guide gives step-by-step instructions for end users. Revision History Gladinet User Guide Date Description Version 8/20/2010 Draft Gladinet
2. PMP New Computer Installation. & Networking Instructions
 ONTARIO CHIROPRACTIC ASSOCIATION PATIENT MANAGEMENT PROGRAM PUTTING EXPERIENCE INTO PRACTICE PMP New Computer Installation & Networking Instructions This document provides installation instructions for
Appointments: Calendar Window
 Appointments Appointments: Calendar Window Purpose The Appointment Calendar window is the automated equivalent of a paper appointment book. You can make appointments, confirm appointments, and view appointments
Configuration Guide. Remote Backups How-To Guide. Overview
 Configuration Guide Remote Backups How-To Guide Overview Remote Backups allow you to back-up your data from 1) a ShareCenter TM to either a Remote ShareCenter or Linux Server and 2) Remote ShareCenter
Installing Lync. Configuring and Signing into Lync
 Microsoft Lync 2013 Contents Installing Lync... 1 Configuring and Signing into Lync... 1 Changing your Picture... 2 Adding and Managing Contacts... 2 Create and Manage Contact Groups... 3 Start an Instant
IMPORTANT Please Read Me First
 IMPORTANT Please Read Me First 3/02/2006 Table of Contents Table of Contents Part 1 Mac Single User Installation 1 Part 2 Windows Single User Installation 2 Part 3 Mac Server Installation 3 Part 4 Windows
(CP) Claim Processing Electronic Select Short Cut Key (F12) Type in Menu Id:
 Claim Processing Electronic Select Short Cut Key (F12) Type in Menu Id:") Manual Section 4 Claim Processing (CP) Claim Processing Electronic Select Short Cut Key (F12) Type in Menu Id: CP and enter The # symbol will generate the next Claim ID Process Type: Proof (This will check
Manual Section 4 Claim Processing (CP) Claim Processing Electronic Select Short Cut Key (F12) Type in Menu Id: CP and enter The # symbol will generate the next Claim ID Process Type: Proof (This will check
Wireless Printing Setup Guide
 Temple University Beasley School of Law Wireless Printing Setup Guide Updated August, 2012 Temple Law Computer Services 8/27/2012 Table of Contents Computer Operating System Page Windows 7 2 Windows Vista
BackupAgent Management Console 4.0.1 User Manual
 BackupAgent Management Console 4.0.1 User Manual May 2011 Version 1.0 Disclaimer This document is compiled with the greatest possible care. However, errors might have been introduced caused by human mistakes
FTP Over SSL (FTPS) Core FTP LE. Installing Core FTP LE"
 Core FTP LE. Installing Core FTP LE") FTP Over SSL (FTPS) Gordon State College has setup FTP Over SSL (also known as FTPS ) to allow students, faculty, and staff to access resources from our Servers from off-campus using an encrypted connection.
FTP Over SSL (FTPS) Gordon State College has setup FTP Over SSL (also known as FTPS ) to allow students, faculty, and staff to access resources from our Servers from off-campus using an encrypted connection.
Xerox EDI Direct Electronic Claims Acquisition Services WINASAP5010 Quick Reference Guide BrickStreet Mutual Insurance
 Xerox EDI Direct Electronic Claims Acquisition Services WINASAP5010 Quick Reference Guide BrickStreet Mutual Insurance This document was developed for the BrickStreet Mutual Insurance provider community.
Installing FileMaker Pro 11 in Windows
 Installing FileMaker Pro 11 in Windows Before you begin the installation process, please exit other open programs and save your work. Installation notes Before you install FileMaker Pro, review the following
Billing Codes. E/M = Evaluation/Management codes are a primary service used by physicians and nurse practitioners in med management.
 Billing Codes Summary: Billing codes are used to describe diagnoses and treatments, determine costs and reimbursements, and relate one disease or drug to another. In PIMSY, billing codes are used to document
Setting Up Dreamweaver for FTP and Site Management
 518 442-3608 Setting Up Dreamweaver for FTP and Site Management This document explains how to set up Dreamweaver CS5.5 so that you can transfer your files to a hosting server. The information is applicable
SeeVogh Video Conferencing
 SeeVogh Video Conferencing SeeVogh runs on Windows, Mac OS X, and Linux. SeeVogh works best when using a network connection connected with a physical cable instead of a wireless network connection. The
Utilities. 2003... ComCash
 Utilities ComCash Utilities All rights reserved. No parts of this work may be reproduced in any form or by any means - graphic, electronic, or mechanical, including photocopying, recording, taping, or
Introduction on Contact Management Software EZY Call Manager 7. Prepare By : Joseph Har 2503 2568 Web Site : www.bashk.org
 Introduction on Contact Management Software EZY Call Manager 7 1 Leads How important it is? Leads are considered as raw details of un-develop business opportunity. Leads can become a great sales opportunities
How to Move an SAP BusinessObjects BI Platform System Database and Audit Database
 How to Move an SAP BusinessObjects BI Platform System Database and Audit Database Technology Used SAP BI Platform 4.1 (this includes SAP BusinessObjects Enterprise 4.1, SAP BusinessObjects Edge 4.1 and
DESKTOP CLIENT CONFIGURATION GUIDE BUSINESS EMAIL
 DESKTOP CLIENT CONFIGURATION GUIDE BUSINESS EMAIL Version 2.0 Updated: March 2011 Contents 1. Mac Email Clients... 3 1.1 Configuring Microsoft Outlook 2011... 3 1.2 Configuring Entourage 2008... 4 1.3.
TOPS v3.2.1 Calendar/Scheduler User Guide. By TOPS Software, LLC Clearwater, Florida
 TOPS v3.2.1 Calendar/Scheduler User Guide By TOPS Software, LLC Clearwater, Florida Document History Version Edition Date Document Software Trademark Copyright First Edition Second Edition 02 2007 09-2007
Mobile Merchant Reference Guide
 COPYRIGHT NOTICE Copyright 2013 Blackstone Merchant Services, Inc. All rights reserved. This document is for internal use only. No part of this publication may be reproduced, transmitted, transcribed,
Installing SQL Express. For CribMaster 9.2 and Later
 Installing SQL Express For CribMaster 9.2 and Later CRIBMASTER USER GUIDE Installing SQL Express Document ID: CM9-031-03012012 Copyright CribMaster. 1996, 1997, 1998, 1999, 2000, 2001, 2002, 2003, 2004,
User Guide. Logout button: will log you out of the session! The tablet tool automatically logs out after 30 minutes of idle time. www.salonbiz.
 User Guide Log In 1. Open Safari on your tablet. 2. Enter the following url US customers http://central.salonbiz.com European customers http://central.spabiz.co.uk 3. Enter your Username and Password.
RSCCD REMOTE PORTAL TABLE OF CONTENTS: Technology Requirements NOTE
 RSCCD REMOTE PORTAL The RSCCD Remote Portal allows employees to access their RSCCD Email (via Outlook Web Access), Department (Public) Folders, Personal (H Drive) Folder, and the District Intranet from
How To Use Standard Pos On A Pc Or Macbook Powerbook 2.5.2.2 (Powerbook 2)
") Integrated Point of Sales System for Mac OS X Program version: 6.3.22 110401 2012 HansaWorld Ireland Limited, Dublin, Ireland Preface Standard POS is a powerful point of sales system for small shops and
Integrated Point of Sales System for Mac OS X Program version: 6.3.22 110401 2012 HansaWorld Ireland Limited, Dublin, Ireland Preface Standard POS is a powerful point of sales system for small shops and
Fingerprint Identity User Manual for the Griaule Biometric Framework 040-0103-01 Rev 1.00
 Fingerprint Identity User Manual for the Griaule Biometric Framework 040-0103-01 Rev 1.00 www.griaulebiometrics.com Brazil Phone: 55-19-3289-2108 USA Phone: (408) 490 3438 Fingerprint Identity Index Getting
Volume AGKSOFT. Wayne Nucleus Back Office Software. Nucleus Guide
 Volume N AGKSOFT Wayne Nucleus Back Office Software Nucleus Guide Configuring Your Back Office PC The Back Office PC requires 2 network cards to connect to the Nucleus & internet at the same time. On some
What is OneDrive for Business at University of Greenwich? Accessing OneDrive from Office 365
 This guide explains how to access and use the OneDrive for Business cloud based storage system and Microsoft Office Online suite of products via a web browser. What is OneDrive for Business at University
SFTP Server User Login Instructions. Open Internet explorer and enter the following url: https://sftp.sae.org
 SFTP Server User Login Instructions Open Internet explorer and enter the following url: https://sftp.sae.org You will be prompted for a user id and password as such. Please enter your account id and password.
Virtual Office Remote Installation Guide
 Virtual Office Remote Installation Guide Table of Contents VIRTUAL OFFICE REMOTE INSTALLATION GUIDE... 3 UNIVERSAL PRINTER CONFIGURATION INSTRUCTIONS... 12 CHANGING DEFAULT PRINTERS ON LOCAL SYSTEM...
Install MS SQL Server 2012 Express Edition
 Install MS SQL Server 2012 Express Edition Sohodox now works with SQL Server Express Edition. Earlier versions of Sohodox created and used a MS Access based database for storing indexing data and other
Outlook 2010 and 2013
 Outlook 2010 and 2013 Email Setup Account Types 2 Exchange account 3 POP account 5 Maintenance Setting up an Email signature 7 Checking Email Storage 8 Archiving Emails 9 Sharing Calendars Giving Access
User Guide Online Backup
 User Guide Online Backup Table of contents Table of contents... 1 Introduction... 2 Adding the Online Backup Service to your Account... 2 Getting Started with the Online Backup Software... 4 Downloading
CDVS-7000 Series Remote Software Users Guide
 CDVS-7000 Series Remote Software Users Guide Crest Electronics, Inc. Version 12.1005 Remote Surveillance Program The remote surveillance program enables users of the Crest 7000 series DVRs to connect remotely
Online Backup and Recovery Manager Setup for Microsoft Windows.
 Online Backup and Recovery Manager Setup for Microsoft Windows. Backup Wizard Default Interface Recovery Wizard Online Backup and Recovery Manager Setup Backup Wizard After installing and launching the
Excel Templates. & Quote/Invoice Maker for ACT! Another efficient and affordable ACT! Add-On by V 1.1. http://www.exponenciel.com
 Excel Templates & Quote/Invoice Maker for ACT! V 1.1 Another efficient and affordable ACT! Add-On by http://www.exponenciel.com Excel Templates for ACT! User s Manual 2 Table of content Relationship between
Apple Mac VPN Service Setting up Remote Desktop
 Apple Mac VPN Service Setting up Remote Desktop After you have successfully connected via the VPN client to the University network you will then need to make the connection to your machine. To do this
Steps for using MagicConnect
 Getting Started Getting Started MagicConnect is a remote access service that allows you safe remote access to a target device from your remote device. What is a remote device? It is a Windows device, iphone/ipad,
EZClaim Advanced 9 ANSI 837P. Gateway EDI Clearinghouse Manual
 EZClaim Advanced 9 ANSI 837P Gateway EDI Clearinghouse Manual EZClaim Medical Billing Software February 2014 Gateway EDI Client ID# Gateway EDI SFTP Password Enrollment Process for EDI Services Client
TSM for Windows Installation Instructions: Download the latest TSM Client Using the following link:
 TSM for Windows Installation Instructions: Download the latest TSM Client Using the following link: ftp://ftp.software.ibm.com/storage/tivoli-storagemanagement/maintenance/client/v6r2/windows/x32/v623/
Using Remote Web Workplace Version 1.01
 Using Remote Web Workplace Version 1.01 Remote web workplace allows you to access your Windows XP desktop through Small Business Server 2003 from a web browser. 1. Connect to the Internet in your remote
User Instruction UBC Department of Botany Backup Service. Prepared by: Botany IT
 User Instruction UBC Department of Botany Backup Service Prepared by: Botany IT June 27, 2014 0 Table of Contents SECTION I: INSTALLATION AND INITIAL SETUP... 2 1. Install client application... 2 1.1 Download
Outlook XP Email Only
 Outlook XP Email Only Table of Contents OUTLOOK XP EMAIL 5 HOW EMAIL WORKS: 5 POP AND SMTP: 5 TO SET UP THE POP AND SMTP ADDRESSES: 6 TO SET THE DELIVERY PROPERTY: 8 STARTING OUTLOOK: 10 THE OUTLOOK BAR:
OSP User Guide. 1 P a g e
 Online School Payments (OSP) User Guide February, 2014 OSP User Guide Table of Contents Overview...3 Site Information...3 Login to Portal...4 Activity Setup...6 OSP Activity Setup Form...6 Add Activity...7
Service Bulletin [2014 02]
![Service Bulletin [2014 02]](/thumbs/27/10792456.jpg "Service Bulletin [2014 02]") How do you know if you have a PanelView Plus or a Panelview Plus 6? The quickest way is to look at the type of memory slot the unit has on the back. If it accepts and SD Card, it s a PanelView Plus 6.
How do you know if you have a PanelView Plus or a Panelview Plus 6? The quickest way is to look at the type of memory slot the unit has on the back. If it accepts and SD Card, it s a PanelView Plus 6.
NextStep FAST Information Coordinators Manual
 NextStep FAST Information Coordinators Manual Disclosure Form: http://its.syr.edu/is/empack-form.cfm ENTSEC@syr.edu - Information Systems security team listserv Table of Contents Overview... 3 Signing