SAS-IPCAM115 MANUAL IP CAMERA
|
|
|
- Gladys Tyler
- 10 years ago
- Views:
Transcription
1 SAS-IPCAM115 MANUAL IP CAMERA
2 Table of contents Introduction: Safety precautions: Packaging content: System requirements: Product description: User instructions: Maintenance: Warranty: Disclaimer: Disposal: Introduction: The plug-and-play IP camera enables people to watch over their properties. It is easy to set up and requires no complex configuration. The free ucare Cam app, available on Google Play and the Apple App Store, facilitates remote viewing on smartphones or other mobile devices anytime, anywhere. If it detects any motion, it will send out an or app notification. Footage can be played back at all times. We recommend that you read this manual before installing/using this product. Keep this manual in a safe place for future reference. Safety precautions: This product should ONLY be opened by an authorized technician when service is required. Disconnect the product from mains and other equipment if a problem should occur. Do not expose the product to water or moisture. Packaging content: 1x IP camera 1x Camera mount 1x AC/DC adapter 1x Quick start guide 1x CD with complete manual System requirements: Device running on ios 5.0 and above Device running on Android 4.0 and above WiFi Router 2

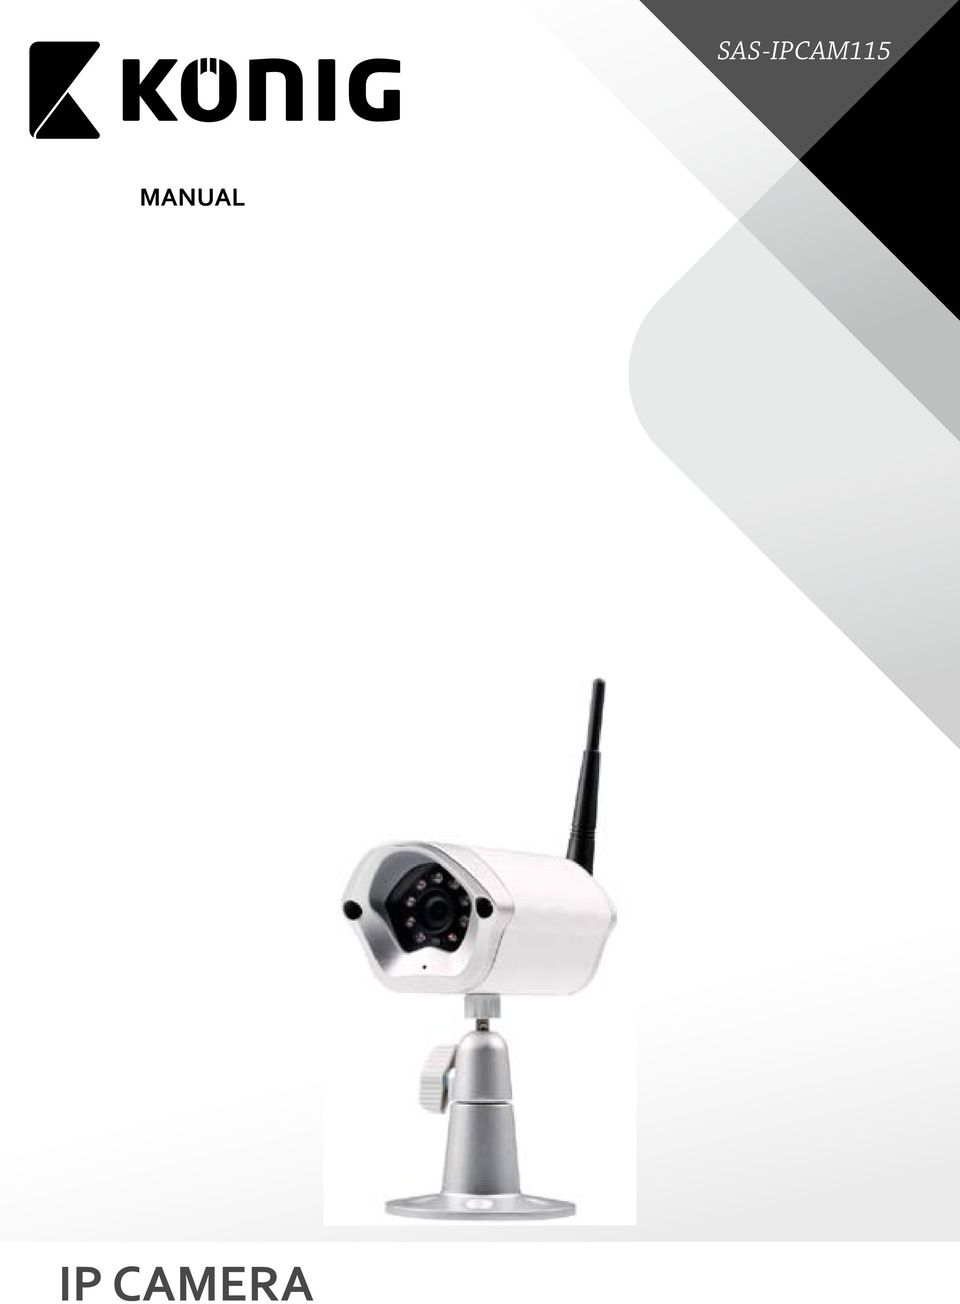
3 Product description: 1. Mount 2. Microphone 3. Antenna 4. IR LED for night vision 5. Camera lens 6. Light intensity sensor 7. WPS/RESET button (behind rubber cover) 8. 12V power cord User instructions: A. Hardware Installation 1. Please find a location to install ucare Cam that is within good WiFi signal reach of your home Router. 2. If you plan to hang the ucare Cam, you can use the included mounting kit found in inside box. 3. If the included power cable does not have sufficient length to reach power outlet, please purchase an extender cable from your local electronics store. 4. Connect the camera power adapter. Warning: Please use the power adapter included with your camera to avoid damage to the camera. When the camera powers up, the status LED will be Green for about 15 seconds before flashing Red. If there is no Red LED flashing, please unplug the power cord, wait 5 seconds, then re-connect the power again. It will take about 60 seconds for the ucare Cam to finish starting up. The status LED should alternate between Red and Green. If the status LED does not flash Red and Green, please press the WPS/REST button at the back of ucare Cam for 10 seconds. 3

4 B. Hardware Installation 1. Download the Smartphone APP ucare Cam from App store(ios) or Play Store (Android). 2. Search for APP name ucare Cam, then download and install it into Smartphone. 3. After the software installation is complete, the icon will appear. Click on this to run the APP. C. ucare Cam APP Overview Default camera password: 0000 Default manager name: admin Default manager password: 0000 There are 4 major function Tabs at the bottom of the APP main screen. Camera List Tab This is the main APP screen. In this Tab, all the cameras which have been added will be listed. WiFi Setting or WiFi Connect Tab Please go to this Tab to configure ucare Cam WiFi settings. There are two methods to install a new ucare Cam and connect it to a WiFi Router. 1. Router Mode 2. WPS (WiFi Protect Setup) Mode (Requires a Router with WPS function using WPA/WPA2 encryption - WEP encryption will not work) Play List Tab Go to this Tab to view all Pictures taken by User via Smartphone. The Pictures will be listed by camera. Setting Tab Configure ucare Cam settings and playback remote microsd Card video. 4

5 User will need to input a management ID and Password to enter this Tab. Default management ID: admin Default Password: 0000 If you forget your password, you can reset the ucare Cam by pressing the WPS/REST button at the back of the camera for 10 seconds. This will restore ucare Cam to factory settings. You will need to set up the WiFi connection again after you reset the camera. D. ios Setup ucare Cam WiFi Method 1: Use WPS (WiFi Protected Setup) Available if your WiFi Router supports WPS and it is set to use WPA or WPA2 security encryption. WEP security encryption is not supported in WPS mode. An easy way to check if your Router supports WPS is to look for a button that says WPS on the Router. It may also be called AOSS or QSS. 1. Press and hold the WPS/REST button for 10 seconds at the back of the camera. It will reset and restart the ucare Cam. After about 60 seconds, the LED color should flash Green and Red. 2. Press WPS button on WiFi Router 3. Press the WPS/REST Button on the back of the ucare Cam for 2 seconds. If ucare Cam has entered the WPS connection mode, the status LED color will turn a fast blinking Green. 4. ucare Cam will try for up to 2 minutes to connect to the WiFi Router using WPS. 5. If the LED color changes to Orange, your ucare Cam has successfully connected to your Router. If the LED does not change to Orange, the setup has failed. Please make sure the ucare Cam is within WiFi distance of your Router, press the WPS/REST button for 10 seconds to reset ucare Cam, and try the setup again. 6. Use Smartphone APP to add ucare Cam into Camera list. See instruction manual ios - Add ucare Cam (already connected to Router) to APP. Method 2: Use Router Mode You will first need to connect to the Router that is available inside ucare Cam, configure the WiFi settings for your home Router, then ucare Cam will restart and connect to your home Router. Write down or have handy, the SSID of your WiFi Router and your WiFi Password. For example, the SSID may be something like TP-Link-XXXXX or NETGEAR. You will need both the SSID and the Password during this process. 5
 Available if your WiFi Router supports WPS and it is set to use WPA or WPA2 security encryption.")
6 1. Make sure the status LED on ucare Cam is blinking Red and Green. If the status LED is not blinking Red and Green, please press and hold the WPS/REST button for 10 seconds to reset ucare Cam. Wait for 1-2 minutes for it to restart and the LED should become Red and Green. 2. Connect your ios device to the router inside ucare Cam. To connect to ucare Cam router, open up Settings, then Wi-Fi and let it search for network. The network will be wificam-p2p. Click on wifi-cam-p2p to connect. 3. Now, open the Smartphone APP ucare Cam and click on the Tab at the bottom of the screen that says WiFi Connect. Click on Router mode, then Next. You will see live video. 4. Enter the WiFi router SSID and password for your home router. Click on Next button and again, on the next screen, the Next button. 5. Please enter a Camera name (2 to 20 characters) and default password You are encouraged to change the default password after setup for security purposes. Then click Finish. 6. After ucare Cam receives this information, it will restart. Please wait for it to start up and connect to your home router. When it successfully connects, the status LED color will turn Orange. It may take up to 10 minutes. If the status LED color does not turn Orange, please check your router and make sure ucare Cam is within the signal area of your WiFi router. Then try setup again, starting from Step3. 7. Your ios device should have disconnected from wifi-camp2p and reconnected to your home Router. Please check that your ios device has connected to your home Router now, via Settings -> Wi-Fi. If it has not, please connect your Smartphone to your home Router WiFi. 8. Open ucare Cam Smartphone App, you can click on the camera name in Camera List view to connect. E. Android Setup ucare Cam WiFi There are two methods to setup ucare Cam to connect to a new WiFi Router. Method 1: Use WPS (WiFi Protected Setup) Available if your WiFi Router supports WPS and it is set to use WPA or WPA2 security encryption. WEP security encryption is not supported for WPS mode. An easy way to check if 6

7 your Router supports WPS is to look for a button that says WPS on the Router. It may also be called AOSS or QSS. 1. Press and hold the WPS/REST button for 10 seconds at the back of the camera. It will reset and restart the ucare Cam. After about 60 seconds, the LED color should flash Green and Red. 2. Press WPS button on WiFi Router. 3. Press the WPS/REST Button on the back of the ucare Cam for 2 seconds. If ucare Cam has entered the WPS connection mode, the status LED color will turn a fast blinking Green. 4. ucare Cam will try for up to 2 minutes to connect to the WiFi Router using WPS. 5. If the LED color changes to Orange, your ucare Cam has successfully connected to your Router. If the LED does not change to Orange, the setup has failed. Please make sure the ucare Cam is within WiFi distance of your Router, press the WPS/REST button for 10 seconds to reset ucare Cam, and try the setup again. 6. Use Smartphone APP to add ucare Cam into Camera list. See instruction manual Android - Add ucare Cam (already connected to Router) to APP. Method 2: Use Router Mode Please have your WiFi password readily available as you will need it in this process. 1. Open the Smartphone APP ucare Cam and click on the Tab at the bottom of the screen that says WiFi Setting. 2. Click on Router mode. 3. Make sure the status LED on ucare Cam is blinking Red and Green. If the status LED is not blinking Red and Green, please press and hold the WPS/REST button for 10 seconds to reset ucare Cam. Wait for 1-2 minutes for it to restart and the LED should become Red and Green. 4. Click Next. Your Smartphone will start to search for ucare Cam. Once it finds it, you will see live video. Click on Next button. 5. Your Smartphone will search for nearby WiFi signals. Once they are found, you will see a list of Routers. 6. Click on your Router name and enter your WiFi password in the pop-up screen. 7

8 7. Please enter a Camera name (2 to 20 characters) and default password You are encouraged to change the default password after setup for security purposes. Then click OK in the top right corner. 8. The camera will restart and the Smartphone App will automatically connect to the camera in Live View. 9. When ucare Cam successfully connects to your Router, the status LED color will turn Orange. It may take up to 10 minutes. If the status LED color does not turn Orange, please check your Router and make sure ucare Cam is within the signal area of your WiFi Router. Then try the setup again. 10. If the setup is successful, the ucare Cam will be automatically added to your Camera List window and you can click on the camera name to view Live Video. F. ios Add ucare Cam (already connected to Router) to APP There are three ways to add a ucare Cam to the Camera List view if the ucare Cam is already connected to the internet. You can: Scan for ucare Cam in local intranet Scan QR code at back of ucare Cam Type in 20 digit code Method 1: Scan for ucare Cam in local intranet 1. Make sure your Smartphone is connected to the same Router as your ucare Cam. Open up the Smartphone APP ucare Cam and click on the + at the top right of the screen. 2. Click on Scan Camera s UID in intranet. 3. You will see a list of UID s that were found on your local intranet. 4. Click on the UID you would like to add. 5. Please enter a Camera name (2 to 20 characters) and the camera password. Default password is Click Done on top right of window. 6. You will see the Camera name now in Camera List view. It should indicate that the Camera is Online. To connect to the Camera, please click on Camera name. If the Camera is not Online, you may need to force Reconnect. To force Reconnect, click on the right arrow and click on Reconnect. Click on Camera name once it shows Online. 8

9 Method 2: Scan QR Code at back of ucare Cam 1. Make sure your Smartphone is connected to the internet. Open up the Smartphone APP ucare Cam and click on the + at the top right of the screen. 2. Click on Scan camera QR code. 3. You will see your Smartphone camera live view. Face your Smartphone camera towards the QR code found on the back of ucare Cam. Please make sure the QR code is clear and fully viewable in the screen. Once the QR code has been detected, the APP will display the UID in the APP window. 4. Please enter a Camera name (2 to 20 characters) and the camera password. Default password is Click Done on upper right of the screen. 5. You will see the Camera name now in Camera List view. It should indicate that the Camera is Online. To connect to the Camera, please click on Camera name. If the Camera is not Online, you may need to force Reconnect. To force Reconnect, click on the right arrow and click on Reconnect. Click on Camera name once it shows Online. Method 3: Type in 20 digit QR code 1. Make sure your Smartphone is connected to the internet. Open up the Smartphone APP ucare Cam and click on the + at the top right of the screen. 2. Click in the UID field to enter typing mode. 3. Type in 20 digit code exactly as printed underneath the QR code in back of ucare Cam. 4. Please enter a Camera name (2 to 20 characters) and the camera password. Default password is Click Done on upper right of the screen. 5. You will see the Camera name now in Camera List view. It should indicate that the Camera is Online. To connect to the Camera, please click on Camera name. If the Camera is not Online, you may need to force Reconnect. To force Reconnect, click on the right arrow and click on Reconnect. Click on Camera name once it shows Online. G. Android Add ucare Cam (already connected to Router) to APP There are three ways to add a ucare Cam to the Camera List view if the ucare Cam is already connected to the internet. You can: Scan for ucare Cam in local intranet Scan QR code at back of ucare Cam Type in 20 digit code 9
 and the camera password. Default password is 0000. Click Done on upper right of the screen. 5. You will see the Camera name now in Camera List view.")
10 Method 1: Scan for ucare Cam in local intranet 1. Make sure your Smartphone is connected to the same Router as your ucare Cam. Open up the Smartphone APP ucare Cam and click on the Click here to import installed WiFiCam at the top of the screen. 2. Click on Search. 3. You will see a list of UID s that were found on your local intranet (Figure XX). 4. Click on the UID you would like to add. 5. Please enter a Camera name (2 to 20 characters) and the camera password. Default password is Click OK on the bottom of the screen. 6. You will see the Camera name now in Camera List view. It should indicate that the Camera is Online. To connect to the Camera, please click on Camera name. If the Camera is not Online, you may need to force Reconnect. To force Reconnect, click and hold on Camera name. A pop-up window will give you options to Reconnect, Edit, and Remove Camera. Click on Reconnect then click on Camera name once it shows Online. Method 2: Scan QR Code at back of ucare Cam 1. Make sure your Smartphone is connected to the internet. Open up the Smartphone APP ucare Cam and click on the Click here to import installed WiFiCam at the top of the screen. 2. Click on QRCode. \You are required to have a QR code reader installed on your Android phone. A popular QR code reader might be QR Droid. 3. You will see your Smartphone camera live view. Face your Smartphone camera towards the QR code found on the back of ucare Cam. Please make sure the QR code is clear and fully viewable in the screen. Once the QR code has been detected, the APP will display the UID in the APP window. 4. Please enter a Camera name (2 to 20 characters) and the camera password. Default password is Click OK on the bottom of the screen. 5. You will see the Camera name now in Camera List view. It should indicate that the Camera is Online. To connect to the Camera, please click on Camera name. If the Camera is not Online, you may need to force Reconnect. To force Reconnect, click and hold on Camera name. A pop-up window will give you options to Reconnect, Edit, and Remove Camera. Click on Reconnect then click on Camera name once it shows Online. Method 3: Type in 20 digit QR code 1. Make sure your Smartphone is connected to the internet. Open up the Smartphone APP ucare Cam the screen. and click on the Click here to import installed WiFiCam at the top of 10

11 2. Click in the UID field to enter typing mode. 3. Type in 20 digit code exactly as printed underneath the QR code in back of ucare Cam. 4. Please enter a Camera name (2 to 20 characters) and the camera password. Default password is Click OK on the bottom of the screen. 5. You will see the Camera name now in Camera List view. It should indicate that the Camera is Online. To connect to the Camera, please click on Camera name. If the Camera is not Online, you may need to force Reconnect. To force Reconnect, click and hold on Camera name. A pop-up window will give you options to Reconnect, Edit, and Remove Camera. Click on Reconnect then click on Camera name once it shows Online. H. Live Video Window & Network Connection Type When you connect to your ucare Cam, you will see the below Live Video screen. At the top of the screen, there will be some information listed to help you understand the performance of your internet connection. Online / P2P: Connection type - there are three types, LAN, P2P, and Relay. Connection type shown is P2P 640x480 is the video resolution. ucare Cam supports VGA 640x480, QVGA 320x240, and QCIF 160x120 FPS is current frames per second OnLine Nm: number of users currently connected to this ucare Cam Frame Ratio 0 / 499: first number is packet loss number, second number is packet receive number. If the first number is too high compared to the second number, it means that your internet connection speed is slow or unsteady. Connection Types There are three types of network connection types possible between ucare Cam and your Smartphone APP. 1) Local Area Network (LAN) Mode Both ucare Cam and your Smartphone are connected to the same WiFi Router. Typical frame rate will be around VGA 640x480 15~20fps. 2) Point to Point (P2P) Mode ucare Cam will establish a point to point network connection directly with the Smartphone. 11

12 Typical scenario will be that the ucare Cam is installed at home or in the office and the Smartphone has a 3G/3.5G/4G internet connection. Typical frame rate will be around VGA 640x480 10~15fps. 3) Relay Mode ucare Cam and Smartphone cannot establish a point to point network connection link. ucare Cam must send Audio/Video data to a Relay Server and the Smartphone will retrieve data from the Relay server. In Relay mode, there will be a limit on the Video download frame rate. Typical scenario will be that the ucare Cam is installed at home or in the office and the Smartphone is using a WiFi connection. Remark: When using 3G/3.5G/4G to connect to ucare Cam, the APP will use P2P mode. If the Smartphone download speed is too slow, the APP will switch to Relay mode. The user can force the APP to reconnect to ucare Cam and it will try P2P mode again. To force reconnect, press and hold the camera name on Camera list. A pop-up menu will appear with the option to Reconnect. Please click Reconnect. I. Using the ucare Cam APP The ucare Cam has a lot of functions possible through the Smartphone APP. Please see below for some of the key functions. Camera List Add Camera that has already setup WiFi Edit Camera Info Camera On-Line 12

13 Take Photo Connection Status Information Playlist User can view, delete, and copy picture files. Camera file folder File list per camera 13

14 File delete Photo view Settings Manage ucare Cam (Default manager name: admin, Default Password: 0000 ) Only one User can manage a camera that is online and connected to Smartphone APP at any one time. Here, User can: Check Camera Info Change WiFi Router Change Alarm Settings Warning & Notify Setting Set Real time video Check SD Card Recording Play SD Card Video Set Password Change Date & Time 14

15 1) Change WiFi Router User can remotely switch the camera to connect to a different WiFi Router. 2) Alert & Notify Setting / Warning & Notify Setting The camera has a number of hardware alarm detection possibilities. User can set the desired trigger and notification. When a new event is generated, the APP will notify the User either through or through a Phone Push Message. 15

16 Set Alerts To setup your to receive motion/sound/etc. alerts, please login to the Settings page with Manager name and password (default: admin / 0000). 1) Click on Alert & Notify Setting or Warning & Notify Setting. 2) Click on snapshot alert 3) You will see a variety of options. You can touch and scroll down the page to see more options. snapshot alert Turn on/off Motion detection enabled Turn motion detection on/off Sensitivity Motion detection sensitivity (High, Medium, Low) Sound detection enabled Turn sound detection on/off SD card remove detection Send alert if SD card is removed SD card out of space alert Send alert if SD card is full Notification subject Note to be added to alert (less than 10 characters) Receiver address to send alert to 16

17 SMTP Mail Settings only either SMTP or Gmail mail settings can be set. Please enter your provider s SMTP server settings. You may need to contact your provider for the server settings. Please enter your address and password. This account will be used as the Sender or From for the alerts. Gmail Mail Settings only either SMTP or Gmail mail settings can be set. For convenience, we have already entered Gmail s SMTP server settings. Please enter your Gmail account and Gmail password. This account will be used as the Sender or From for the alerts. 3) Real time video setting User can adjust the video quality settings based on the status of the network connection. If User does not have adequate video performance, please turn off motion detection and reduce the resolution. 1) Frames: The default is motion image detection 2) Resolution: The default is 640x480 17
 Real time video setting User can adjust the video quality settings based on the status of the network connection.")
18 4) SD Card Recording Setting User can insert a microsd card into the camera to enable the recording function. Trigger Recording: The camera will automatically start recording when a trigger event (motion, sound, and other events) have occurred. The camera will record for 60 seconds. If another trigger event occurs, the camera will record for another 60 seconds; otherwise it will stop recording. Continuous Recording: User can setup ucare Cam to constantly record. A video file will be saved every two minutes. When the microsd card is full, if SDCard Overwrite is checked, the program will remove the oldest video files and continue to record. Otherwise, it will stop recording. HQ means high quality recording. LQ means low quality recording. 5) Play SD Card Video Click on the Video file to play. 18

19 6) Password Setting The two-level password management system allows the user to safely and effectively manage the camera. First layer: Camera password able to view the camera. Default value is 0000 Second layer: Manager s Name and Password able to view and set ucare Cam settings. Default value : admin / ) Date & Time User can only adjust the Time Zone. The Date and Time will be set from the factory and User can not change. APP Info In the APP Info page, User can see options related to the APP, not specific to a camera. To go to APP Info page, please click on on top right hand of screen. Inside APP Info page, User can: Switch the APP user interface skin to a different color template See the Quick Installation Guide See this Detailed Instruction Manual See the APP version number See the memory usage of ucare Cam APP on Smartphone. 19

20 J. Update your ucare Cam firmware 1. Download firmware and un-compress the file. 2. Copy update.bin to microsd Card top folder, for example H:\ 3. Turn off power to ucare Cam and insert microsd card into ucare Cam microsd slot in back of ucare Cam. 4. Turn power on to ucare Cam. 5. ucare Cam will start reading data from microsd card and upgrade the firmware. LED color will blink Red and Green during this process. It will take about 3 minutes to upgrade the firmware. Don t power off the camera or remove the microsd Card during the upgrade process. 6. After firmware upgrade is successful, ucare Cam will automatically reboot and reset all settings. 7. User will now need to reinstall ucare Cam. FAQ: 1) ucare Cam status LED is Orange. Why can t my Smartphone connect to ucare Cam? a. Does the camera status in Camera List view show Online? i. Yes -> Check Smartphone internet connection speed ii. No -> Try to force Reconnect. 1. To force Reconnect on ios, click on the right arrow and click on Reconnect. Click on Camera name once it shows Online. 2. To force Reconnect in Android, click and hold on Camera name. A pop-up window will give you options to Reconnect. Click on Reconnect then click on Camera name once it shows Online. 20

21 2) The live video stream is very slow. ucare cam will automatic adjust video streaming speed according to smartphone s internet connection. It will start sending video from a low frame rate and gradually increase the frame rate. It may take 1-2 minutes for the frame rate to stabilize. If performance is still not satisfactory a. Please ensure motion detection is turned off. Settings -> Alert & Notify Setting -> snapshot alert -> Motion detection enabled is NOT checked. b. Please reduce the video quality. Settings -> Real time video Setting -> Video quality settings 3) What does the LED color stand for? LED Color Power on Green Power on Green Red flashing Red and Green lit alternatively Fast Green lit Green Slow Flashing Orange Red Fast flashing Description IPCam booting (15 seconds) IPCam loading program (15 seconds) Router Mode WPS Mode Searching and Connecting to WiFi Router (ucare Cam will reboot automatically every one hour in this status) Connected to WiFi Router WPS pairing failed 4) My ucare Cam does not connect to the Router It s possible that there are too many WiFi routers nearby using the same channel and interfere with each other. a. Please move the ucare Cam closer to the Router to ensure a good WiFi signal. b. You may consider to change your WiFi channel number, for example Ch1, Ch6, Ch11. c. Please turn off power to ucare Cam, wait 5 seconds, then turn power on to ucare Cam. d. Please wait ~1 minute, then press WPS/REST key in back of ucare Cam. e. Please wait ~1-2 minutes. The status LED should be flashing Red and Green. Please try setup again following instructions. f. If status LED does not flash Red & Green, please contact Customer Support. 5) How to check your WiFi signal and coverage by Android App -- WiFi Analyzer Ans: There is a free android app WiFi Analyzer that can scan and show all WiFi SSID s around. User can change their WiFi channel to avoid interference and get better signal and coverage. result 6) What is the default account name and password? Ans: Default password for IPCam is 0000, default manager account is admin, password is
22 7) Why can t ucare Cam connect with WiFi Router using WPS Mode? a. Make sure Router s WPS function is enabled. b. Please try Router model if WPS mode setup failed. 8) What is the frequency of alert and smartphone notify alert? Ans: Once motion or sound detection is triggered, then ucare Cam will send and phone notify immediately. If the trigger event continually happens, then the and phone notify will send out on a three minute interval. The trigger event ends after 10 seconds if there is no continual motion or sound. The minimum interval for and phone notify will be 11 seconds. 9) What is the estimate recording size of video per hour (video format AVI) VGA 640x480 Continuous HQ (20fps) Continuous LQ (10fps) Frame Rate Priority 4GB / Hour 2GB / Hour Image Quality Priority 8GB / Hour 4GB / Hour 10) In ios, I can not see the ucare Cam Router wifi-cam-p2p. After some time, the ucare Cam Router will no longer broadcast the SSID wifi-cam-p2p. Please reset ucare Cam by pressing the WPS/REST button for ~10 seconds. Then please take note of the LED color. When the LED turns green/red, then you should see the SSID being broadcast again. 22
23 Maintenance: Clean the product only with a dry cloth. Do not use cleaning solvents or abrasives. Warranty: Any changes and/or modifications to the product will void the warranty. We cannot accept any liability for damage caused by incorrect use of this product. Disclaimer: Designs and specifications are subject to change without notice. All logos, brands and product names are trademarks or registered trademarks of their respective holders and are hereby recognized as such. Disposal: This product is designated for separate collection at an appropriate collection point. Do not dispose of this product with household waste. For more information, contact the retailer or the local authority responsible for waste management. This product has been manufactured and supplied in compliance with all relevant regulations and directives, valid for all member states of the European Union. It also complies to all applicable specifications and regulations in the country of sales. Formal documentation is available upon request. This includes, but is not limited to: Declaration of Conformity (and product identity), Material Safety Data Sheet, product test report. Please contact our customer service desk for support: via website: via [email protected] via telephone: +31 (0) (during office hours) NEDIS B.V., De Tweeling 28, 5215 MC s-hertogenbosch, THE NETHERLANDS 23
MANUAL IP Baby and Child Monitor
 KN-BM60 MANUAL IP Baby and Child Monitor Table of contents Introduction 2 Safety precautions 2 Packaging content 2 System requirements 2 Product description 3 User instructions 3 Maintenance 23 Warranty
SEC-IPCAM100B(W) SEC-IPCAM105B(W) MANUAL (p. 2) IP camera 2013-07-30
 SEC-IPCAM105B(W) MANUAL (p. 2) IP camera 2013-07-30") SEC-IPCAM100B(W) SEC-IPCAM105B(W) MANUAL (p. 2) IP camera 2013-07-30 IP camera FULL MANUAL Table of contents: Introduction (p. 2) Safety precautions (p. 2) Packaging content (p. 2) System requirements
SEC-IPCAM100B(W) SEC-IPCAM105B(W) MANUAL (p. 2) IP camera 2013-07-30 IP camera FULL MANUAL Table of contents: Introduction (p. 2) Safety precautions (p. 2) Packaging content (p. 2) System requirements
MANUAL IP Baby Monitor
 KN-BM40 MANUAL IP Baby Monitor Table of contents Introduction 2 Safety precautions 2 Packaging content 2 System requirements 2 Technical specifications 3 Product description 4 User instructions 6 Warranty
SwannEye HD Plug & Play Wi-Fi Security Camera Quick Start Guide Welcome! Lets get started.
 EN SwannEye HD Plug & Play Wi-Fi Security Camera Quick Start Guide Welcome! Lets get started. QHADS453080414E Swann 2014 1 1 Introduction Congratulations on your purchase of this SwannEye HD Plug & Play
EM6230 e-camview HD outdoor IP camera
 EM6230 e-camview HD outdoor IP camera 2 ENGLISH EM6230 e-camview HD outdoor IP camera Table of contents 1.0 Introduction... 3 1.1 Packing contents... 3 1.2 Requirements to access the camera.... 3 1.3 Major
SwannSecure Wi-Fi Monitoring System
 EN SwannSecure Wi-Fi Monitoring System Setup Wizard Quick Start Guide QW470KIT050115E Swann 2015 1 Welcome The Setup Wizard automatically launches the first time you turn on the Wi-Fi Monitor and walks
IP Camera User Manual
 IP Camera User Manual - 1 - Thank you for purchasing the Time2 MIP11 Surveillance Camera this device is a great way monitor any part of your office, home or warehouse making sure all your valuables are
SwannEye HD Security Camera Wi-Fi Connections Quick Setup Guide. Welcome! Lets get started.
 EN SwannEye HD Security Camera Wi-Fi Connections Quick Setup Guide Welcome! Lets get started. 1 1 Introduction 1 2 3 4 Congratulations on your purchase of this SwannEye HD Wi-Fi Security Camera from Swann!
ibaby Monitor Model: M3s User Manual
 ibaby Monitor Model: M3s User Manual Index 1 Introduction...3 1.1 The package contents...3 1.2 Product Features...3 1.3 Product Specifications...4 2 Appearance and Interface...5 2.1 Appearance...5 2.2
FI8910W Quick Installation Guide. Indoor MJPEG Pan/Tilt Wireless IP Camera
 Model: FI8910W Quick Installation Guide (For Windows OS) (For MAC OS please go to page 17) Indoor MJPEG Pan/Tilt Wireless IP Camera Black White Package Contents IP Camera FI8910W with IR-Cut.x 1 DC Power
CHAPTER 2: USING THE CAMERA WITH THE APP
 TABLE OF CONTENTS OVERVIEW... 1 Front of your camera... 1 Back of your camera... 2 ACCESSORIES... 3 CHAPTER 1: Navigating the Mobile Application... 4 Device List: How to Use this Page... 4 My Messages:
Quick Installation Guide
 Quick Installation Guide (For Windows & Mac OS) Outdoor Wireless IP Camera Package Contents V1.1 IP Camera Power Adapter Resource CD Ethernet Cable Mounting Bracket(except FI8919) Wi-Fi Antenna Quick Installation
User s manual for Android Application
 Motorised IP Video surveillance camera for smartphones, tablets and PC / MAC. Protect your home and family remotely! User s manual for Android Application Thanks We thank you for choosing Aquila Vizion.
Instructions for use Important! Please read these instructions carefully.
 PROFESSIONAL SURVEILLANCE & SECURITY SYsteM Wi-Fi NETWORK CAMERA SC201 REMOTE MONITORING & control FROM SMARTPHONES, TABLETS & PCs PAN & TILT MOTION CONTROL Internet router required AUDIO & MOTION SD CARD
Step by Step Guide for Upgrading Your NetCamPro Camera to Cloud Mode Using an Android Device
 Step by Step Guide for Upgrading Your NetCamPro Camera to Cloud Mode Using an Android Device Table of Contents Introduction...2 Backing Out Cloud Mode...2 Indoor Camera Factory Reset...2 Outdoor Camera
Quick Installation Guide
 V48.01 Model: FI8919W Quick Installation Guide Outdoor Pan/Tilt Wireless IP Camera For Windows OS ------- Page 1 For MAC OS ------- Page 15 ShenZhen Foscam Intelligent Technology Co., Ltd Quick Installation
1 Introduction... 3 1.1 The package contents... 3 1.2 Function and Features... 3 1.3 Product Specification... 4 2 Appearance and interface... 5 2.
 ibaby Monitor Model: M2 User Manual 1 1 Index 1 Introduction... 3 1.1 The package contents... 3 1.2 Function and Features... 3 1.3 Product Specification... 4 2 Appearance and interface... 5 2.1 Appearance...
Android /IOS Smart Phone Installation Manual
 Android /IOS Smart Phone Installation Manual Install IP Camera Install Mobile Phone App Technaxx Security Software Register an Account Add Cameras under this account IP Network Camera Installation Procedure
Installation Guide Wireless 4-Port USB Sharing Station. GUWIP204 Part No. M1172-a
 Installation Guide Wireless 4-Port USB Sharing Station 1 GUWIP204 Part No. M1172-a 2011 IOGEAR. All Rights Reserved. PKG-M1172-a IOGEAR, the IOGEAR logo, MiniView, VSE are trademarks or registered trademarks
BlackVue Cloud App Overview...3. Getting Started...6. Basic Menu Screens...15. BlackVue Cloud...24. BlackVue Wi-Fi...40. Internal Memory...
 Table of Contents BlackVue Cloud App Overview...3 Key Functions When Cloud is Connected...4 Key Functions When Wi-Fi Connection is Made...4 Key Features of Internal Memory...4 Supported Devices...5 Getting
Model: VMI-1201 Smart icam Remote HD Wi-Fi DIY Surveillance Camera
 Model: VMI-1201 Smart icam Remote HD Wi-Fi DIY Surveillance Camera User's Manual Please read carefully before using this equipment. Watch the things that matter to you anytime and anywhere Internet Smart
AC750 WiFi Range Extender
 Model EX6100 User Manual April 2014 202-11307-03 350 East Plumeria Drive San Jose, CA 95134 USA Support Thank you for selecting NETGEAR products. After installing your device, locate the serial number
Amcrest 960H DVR Quick Start Guide
 Amcrest 960H DVR Quick Start Guide Welcome Thank you for purchasing our Amcrest 960H DVR! This quick start guide will help you become familiar with our DVR in a very short time. Before installation and
Installation Steps Follow these steps to install the network camera on your local network (LAN):
:") 1. Description The Network Camera supports the network service for a sensor image with progressive scan, which can be monitored on a real-time screen regardless of distances and locations. By using its
1. Description The Network Camera supports the network service for a sensor image with progressive scan, which can be monitored on a real-time screen regardless of distances and locations. By using its
CIPCAM720PTIWL,CIPCAM720OD,CIPCAM720ODWDR,CIPDC AM720OD
 Wireless Network Camera User Manual CIPCAM720PTIWL,CIPCAM720OD,CIPCAM720ODWDR,CIPDC AM720OD V1.0 Default DEFAULT SETTINGS IP Address 192.168.1.58 User/Password admin/123456 Notice 1 Installation Environment
Ultra Dashcam. with Smartphone app control INSTRUCTION MANUAL
 Ultra Dashcam with Smartphone app control EN INSTRUCTION MANUAL 1 Getting to know the Dashcam GPS Receiver Slot 1 Camera Lens Micro HDMI Port 2 Speaker 1 For future application 2 Requires Micro HDMI to
N300 WiFi Range Extender
 Model EX2700 User Manual July 2014 202-11395-01 350 East Plumeria Drive San Jose, CA 95134 USA Support Thank you for selecting NETGEAR products. After installing your device, locate the serial number on
EM6220 e-camview Pan/Tilt IP camera
 EM6220 e-camview Pan/Tilt IP camera EM6220 e-camview Pan/Tilt IP camera Table of contents 2 ENGLISH 1.0 Introduction... 3 1.1 Packaging contents... 3 1.2 Requirements to access the camera.... 3 1.3 Major
User Manual for ios App
 User Manual for ios App Shenzhen Foscam Intelligent Technology Co.,Ltd. Table of Contents Table of Contents...1 1 Overview...2 2 Access the IP Camera...2 3 Install App... 2 4 Introduction to IPCam Management
Wireless IP Camera. Quick Installation Guide
 Wireless IP Camera Quick Installation Guide 1 Packing List IP Camera X1 DC Power Supply X1 CD X1 Certificate of Quality X1 Warranty Card X1 Mounting bracket X1 Mounting screw X1 Key Features 1.720P HD
Nighthawk AC1900 WiF Range Extender
 Nighthawk AC1900 WiF Range Extender Model EX7000 User Manual December 2014 202-11469-01 350 East Plumeria Drive San Jose, CA 95134 USA Nighthawk AC1900 WiF Range Extender Support Thank you for selecting
BlackHawk for MAC Software User Guide
 BlackHawk for MAC Software User Guide Products: BLK-DH2 Series and BLK-HD Series DVRs Please read this manual before using your software, and always follow the instructions for safety and proper use. Save
Fibe Internet Connection Hub Reference Guide
 Fibe Internet Connection Hub Reference Guide FibeInternet_ConnectionHub_ReferenceGuide_Eng_V7 1 Bell Internet Service Agreement Use of the Bell Internet service is subject to the terms and conditions of
ImagineWorldClient Client Management Software. User s Manual. (Revision-2)
") ImagineWorldClient Client Management Software User s Manual (Revision-2) (888) 379-2666 US Toll Free (905) 336-9665 Phone (905) 336-9662 Fax www.videotransmitters.com 1 Contents 1. CMS SOFTWARE FEATURES...4
ImagineWorldClient Client Management Software User s Manual (Revision-2) (888) 379-2666 US Toll Free (905) 336-9665 Phone (905) 336-9662 Fax www.videotransmitters.com 1 Contents 1. CMS SOFTWARE FEATURES...4
How To Set Up Flir Cloud Client For Pc Or Mac Or Mac (For Pc Or Ipad) On A Pc Or Pc Or Mouse (For Mac) On An Iphone Or Ipa) On Pc Or Tv (For Ipa
 On A Pc Or Pc Or Mouse (For Mac) On An Iphone Or Ipa) On Pc Or Tv (For Ipa") Instruction Manual FLIR Cloud Services Client Instruction Manual FLIR Cloud Services Client #LX400018; r. 2.0/14567/14568; en-us iii Table of contents 1 Setting up FLIR Cloud Client for PC or Mac...1
Instruction Manual FLIR Cloud Services Client Instruction Manual FLIR Cloud Services Client #LX400018; r. 2.0/14567/14568; en-us iii Table of contents 1 Setting up FLIR Cloud Client for PC or Mac...1
GETTING TO KNOW YOUR TELSTRA PRE-PAID 3G WI-FI
 GETTING TO KNOW YOUR TELSTRA PRE-PAID 3G WI-FI LET S GET THIS SHOW ON THE ROAD You must be excited about your brand new Telstra Pre-Paid 3G Wi-Fi. This guide will help you get connected as quickly and
Networking. General networking. Networking overview. Common home network configurations. Wired network example. Wireless network examples
 Networking General networking Networking overview A network is a collection of devices such as computers, printers, Ethernet hubs, wireless access points, and routers connected together for communication
EU Environmental Protection
 4CH Digital Wireless Security System Model: 8104JR/8105JR/8107JR EU Environmental Protection Waste electrical products should not be disposed of with household waste. Please recycle where facilities exist.
EM6250HD Easy Pro View HD IP Camera
 EM6250HD Easy Pro View HD IP Camera 2 ENGLISH EM6250HD Easy pro view HD IP camera Table of contents 1.0 Introduction... 4 1.1 Update information... 4 1.2 Packaging contents... 4 1.3 Requirements to access
Linksys WAP300N. User Guide
 User Guide Contents Contents Overview Package contents 1 Back view 1 Bottom view 2 How to expand your home network 3 What is a network? 3 How to expand your home network 3 Where to find more help 3 Operating
N600 WiFi USB Adapter
 Model WNDA3100v3 User Manual December 2014 202-11470-01 350 East Plumeria Drive San Jose, CA 95134 USA Support Thank you for selecting NETGEAR products. After installing your device, locate the serial
1. Central Monitoring System Software
 1. Central Monitoring System Software 1-1. General information CMS program is an application with which users not only watch and control remote DVRs, but also receive video/audio data or alarm signals
This section will focus on basic operation of the interface including pan/tilt, video, audio, etc.
 Catalogue Basic Operation... 2 For Internet Explorer... 2 For Other Non-IE Web Browsers... 5 Camera Settings... 6 System... 6 About... 6 PT Setting... 7 Backup and Restore Setup... 8 NTP Setting... 8 System
1. Central Monitoring System Software
 1. Central Monitoring System Software 1-1. General information CMS program is an application with which users not only watch and control remote DVRs, but also receive video/audio data or alarm signals
Quick Start. Nighthawk X8 AC5300 Tri-Band WiFi Router Model R8500. Package Contents. NETGEAR, Inc. 350 East Plumeria Drive San Jose, CA 95134 USA
 Support Thank you for purchasing this NETGEAR product. You can visit www.netgear.com/support to register your product, get help, access the latest downloads and user manuals, and join our community. We
IP Security Camera for indoor usage TX-23 User Manual
 Technaxx IP Security Camera for indoor usage TX-23 User Manual The Declaration of Conformity for this device is under: www.technaxx.de/ (in bottom bar Konformitätserklärung ) Important Hint regarding the
What is Bitdefender BOX?
 Quick Setup Guide What is Bitdefender BOX? Think about Bitdefender BOX like an antivirus for your network. It s a hardware device that sits next to your Wi-Fi router and protects all Internet connected
COPY EOS 70D (W) Wi-Fi Function Instruction Manual INSTRUCTION MANUAL
 Wi-Fi Function Instruction Manual INSTRUCTION MANUAL") EOS 70D (W) Wi-Fi Function Instruction Manual E INSTRUCTION MANUAL What You Can Do Using the Wireless LAN Functions This camera s wireless LAN functions let you perform a range of tasks wirelessly, from
EOS 70D (W) Wi-Fi Function Instruction Manual E INSTRUCTION MANUAL What You Can Do Using the Wireless LAN Functions This camera s wireless LAN functions let you perform a range of tasks wirelessly, from
125 8880 telstra.com/ppmbb visit a telstra store or partner GETTING TO KNOW YOUR
 FOR MORE INFORMATIoN: 125 8880 telstra.com/ppmbb visit a telstra store or partner GETTING TO KNOW YOUR Telstra PRE-paid 4G wi-fi LET S GET THIS SHOW ON THE ROad WHAT S INSIDE Your Telstra Pre-Paid 4G Wi-Fi
IOS EYE4 APP User Manual
 IOS EYE4 APP User Manual Eye4 App can be downloaded from Google Play (Android) and App Store (IOS). Besides, it can be downloaded from http://www.eye4.so/download/ The below user manual is based on Eye4
1. Smart phone requirements. Hardware / Operating System OS - Android 2.3/4.0/4.1 CPU RAM. Network. Video Codec - H.264 Recommended Smart Phones
 SmartCam for Android SNH-1011N English With SmartCam app, you can monitor what matters to you directly from your smart phone. Download the application from the Play Store and install it on your smart phone.
User Manual V1.0. Remote Software
 User Manual V1.0 Notice: The information in this manual was current when published. The manufacturer reserves the right to revise and improve its products. All specifications are therefore subject to change
TENVIS Technology Co., Ltd. User Manual. For H.264 Cameras. Version 2.0.0
 TENVIS Technology Co., Ltd User Manual For H.264 Cameras Version 2.0.0 Catalogue Basic Operation... 3 Hardware Installation... 3 Search Camera... 3 Get live video... 5 Camera Settings... 8 System... 8
NETGEAR genie Apps. User Manual. 350 East Plumeria Drive San Jose, CA 95134 USA. August 2012 202-10933-04 v1.0
 User Manual 350 East Plumeria Drive San Jose, CA 95134 USA August 2012 202-10933-04 v1.0 Support Thank you for choosing NETGEAR. To register your product, get the latest product updates, get support online,
INSTRUCTION MANUAL Neo Coolcam IP Camera
 INSTRUCTION MANUAL Neo Coolcam IP Camera Revised: June 28, 2013 Thank you for purchasing from SafetyBasement.com! We appreciate your business. We made this simple manual to help you enjoy your new product
EM6225 e-camview Pan/Tilt HD IP camera
 EM6225 e-camview Pan/Tilt HD IP camera 2 ENGLISH EM6225 e-camview Pan/Tilt HD IP camera Table of contents 1.0 Introduction... 3 1.1 Packing contents... 3 1.2 Requirements to access the camera.... 3 1.3
DATA PROJECTOR XJ-A147/XJ-A247/XJ-A257 XJ-M146/XJ-M156 XJ-M246/XJ-M256. XJ-A Series. XJ-M Series. Network Function Guide
 DATA PROJECTOR EN XJ-A Series XJ-A147/XJ-A247/XJ-A257 XJ-M Series XJ-M146/XJ-M156 XJ-M246/XJ-M256 Network Function Guide In this manual, XJ-A Series and XJ-M Series refer only to the specific models listed
Technical Support. Package Contents. CENTRIA WNDR4700/WNDR4720 Installation Guide
 Technical Support After installing your device, locate the serial number on the label of your product and use it to register your product at https://my.netgear.com. You must register your product before
User Guide. Your first steps to smart monitoring
 User Guide Your first steps to smart monitoring 2 3 Important safety and legal Information We have taken all measures to ensure the BabyPing Video Monitor meets the highest safety standards but it must
HRG App for Android Devices. User Guide
 HRG App for Android Devices User Guide Document 800-12218 Rev A 07/2012 Revisions Issue Date Revisions A 07/2012 New document. Contents 3 Contents 1 1 Introduction...............................................
The LimitlessLED Wifi Bridge 4.0 is compatible with RGBW(new), RGB(old), and Dual White(current) LimitlessLED lightbulbs.
, RGB(old), and Dual White(current) LimitlessLED lightbulbs.") www.limitlessled.com Wifi Bridge Receiver 4.0 User Guide The LimitlessLED Wifi Bridge 4.0 is compatible with RGBW(new), RGB(old), and Dual White(current) LimitlessLED lightbulbs. User Guide last updated
www.limitlessled.com Wifi Bridge Receiver 4.0 User Guide The LimitlessLED Wifi Bridge 4.0 is compatible with RGBW(new), RGB(old), and Dual White(current) LimitlessLED lightbulbs. User Guide last updated
Using your ios device, open the App Store, Search for, download and install the WeMo App.
 Setting up WeMo is incredibly simple. All you need is: Your WeMo Switch and WeMo Motion An appliance you'd like to control iphone, ipod Touch or ipad Wi-Fi Router Using your ios device, open the App Store,
Please refer to the guide below to use the latest Android version of the UCam247Live app.
 Please refer to the guide below to use the latest Android version of the UCam247Live app. IMPORTANT: If you already have a camera installed and working on your network using our older app please follow
Functionality Added in M-480 Ver. 1.6
 The functions below have been added in the version 1.6 system software of the M-480. Wireless LAN Function The wireless LAN function has been added. This enables the M-480 to receive remote control from
1. Central Monitoring System Software
 1. Central Monitoring System Software 1-1. General information CMS program is an application with which users not only watch and control remote DVRs, but also receive video/audio data or alarm signals
H.264 Quick Start Guide
 Version 1.0 the world in my eyes R H.264 Quick Start Guide Contents Hardware Connection 2 ios View 2 Android View 5 PC View 8 Last, but not least 11 NOTE: Certain functions, appearance or structure mentioned
A6210 WiFi USB Adapter 802.11ac USB 3.0 Dual Band User Manual
 802.11ac USB 3.0 Dual Band User Manual August 2014 202-11373-01 350 East Plumeria Drive San Jose, CA 95134 USA Support Thank you for selecting NETGEAR products. After installing your device, locate the
Quick Installation Guide
 V46.01 Model: FI8918W Quick Installation Guide Indoor Pan/Tilt Wireless IP Camera Black White For Windows OS ------- Page 1 For MAC OS ------- Page 11 ShenZhen Foscam Intelligent Technology Co., Ltd Quick
Network Installation Guide. WorkForce 610 Series Artisan 710 Series
 Network Installation Guide WorkForce 610 Series Artisan 710 Series Contents Before You Begin.......................................... 3 Choose Your Connection Type................................ 4 Wireless.............................................
Quick Installation Guide
 V2.01 Model: FI9821W Quick Installation Guide Indoor HD Pan/Tilt Wireless IP Camera Black White For Windows OS ------- Page 1 For MAC OS ------- Page 16 ShenZhen Foscam Intelligent Technology Co., Ltd
Everything in your eyes. ismartviewpro. (For iphone) User Manual. Feb 2015 VER 3.0
 User Manual. Feb 2015 VER 3.0") IP Cloud Network Camera Everything in your eyes ismartviewpro (For iphone) User Manual Feb 2015 VER 3.0 1. ismartviewpro Summary ismartviewpro for iphone is our company developed application software based
IP Cloud Network Camera Everything in your eyes ismartviewpro (For iphone) User Manual Feb 2015 VER 3.0 1. ismartviewpro Summary ismartviewpro for iphone is our company developed application software based
Network Installation Guide. Artisan 810 Series
 Network Installation Guide Artisan 810 Series Before You Begin Make sure you installed ink cartridges and loaded paper as described on the Start Here sheet. Then follow the instructions in this guide to
User Manual. PePWave Surf / Surf AP Indoor Series: Surf 200, E200, AP 200, AP 400. PePWave Mesh Connector Indoor Series: MC 200, E200, 400
 User Manual PePWave Surf / Surf AP Indoor Series: Surf 200, E200, AP 200, AP 400 PePWave Mesh Connector Indoor Series: MC 200, E200, 400 PePWave Surf AP Series: Surf AP 200-X, E200-X, 400-X PePWave Surf
EM6250HD Easy Pro View HD IP Camera
 EM6250HD Easy Pro View HD IP Camera 2 ENGLISH EM6250HD Easy pro view HD IP camera Table of contents 1.0 Introduction... 4 1.1 Packaging contents... 4 1.2 Requirements to access the camera.... 4 1.3 Major
IP Wireless / Wired Camera NIGHT VISION & REMOTE PAN/TILT ROTATE. User Manual
 IP Wireless / Wired Camera NIGHT VISION & REMOTE PAN/TILT ROTATE User Manual WELCOME This model IP Camera is an integrated wireless IP Camera solution. It combines a high quality digital Video Camera with
IPCam Client User Manual For X10 IP Camera models XX34A, XX36A, XX39A, XX40A
 IPCam Client User Manual For X10 IP Camera models XX34A, XX36A, XX39A, XX40A Contents 1. INSTALLATION... 3 2. SOFTWARE OPERATION... 5 2.1. Login... 5 2.2. For Multi-windows... 6 2.3. System Settings...
Wireless Pan&Tilt Network Camera. User Manual CIPCAMPTIWL V2.0
 Wireless Pan&Tilt Network Camera User Manual CIPCAMPTIWL V2.0 1 Installation Environment Keep away from the places for high-temperature, heat source and direct sunlight; Keep away from water and when get
MobileLite Wireless G2 5-in-1 Mobile Companion User Manual
 MobileLite Wireless G2 5-in-1 Mobile Companion User Manual Document No. 480-MLWG2-021315.A00 Kingston MobileLite Wireless Page 1 of 21 Table of Contents Introduction... 3 What s Included:... 3 Getting
Diamante WiFi Wireless Communication User Guide. CradlePoint CTR35
 Diamante WiFi Wireless Communication User Guide CradlePoint CTR35 Release: July 2011; March 2011 Patent Pending. Copyright 2011, Stenograph, L.L.C. All Rights Reserved. Printed in U.S.A. Stenograph, L.L.C.
Installation Guide. Mobile Surveillance Distance makes no difference. eagleeyes_quick_v1.5
 Installation Guide Mobile Surveillance Distance makes no difference eagleeyes_quick_v1.5 IMPORTANT SAFEGUARD All lead-free products offered by the company comply with the requirements of the European law
Getting Started. Table of Contents. Quick User Guide - English
 Getting Started This Quick User Guide helps you get started with the IRIScan TM Anywhere Wifi. Please read this guide before operating this scanner and its software. All information is subject to change
10 Magni Tablet User Guide
 10 Magni Tablet User Guide MODEL NUMBER: Wireless Mobile Internet Tablet Powered by SYTAB10ST Top View Front View Bottom View Side View SYTAB10ST Getting to Know Your New Tablet: MINI Micro SD Micro SD
How to setup camera with NAS
 How to setup camera with NAS V.150714 This article describes how to set up a Phylink camera with your NAS driver. Once your camera is authorized to access the NAS, it will be able to record its snapshots
User Manual. NETGEAR, Inc. 350 East Plumeria Drive San Jose, CA 95134, USA. December 2014 202-11380-01
 User Manual December 2014 202-11380-01 NETGEAR, Inc. 350 East Plumeria Drive San Jose, CA 95134, USA Support For product updates and web support, visit http://support.arlo.com. Trademarks NETGEAR, Inc.
PePWave Surf Series PePWave Surf Indoor Series: Surf 200, AP 200, AP 400
 PePWave Surf Series PePWave Surf Indoor Series: Surf 200, AP 200, AP 400 PePWave Surf Outdoor Series: Surf AP 200/400-X, PolePoint 400-X, Surf 400-DX User Manual Document Rev. 1.2 July 07 COPYRIGHT & TRADEMARKS
LOREX CLIENT Remote Software 4.0
 LOREX CLIENT Remote Software 4.0 Instruction Manual English Version 2.0 MODEL: L20WD800 Series www.lorexcctv.com Copyright 2008 LOREX Technology Inc. Table of Contents Table of Contents Software Installation...
IP Camera (L series) User manual 2013-05 V1.1
 User manual 2013-05 V1.1") Dear users, the configuration for this camera is professional, so please read the user manual carefully before using the camera. IP Camera (L series) User manual 2013-05 V1.1 Statement If the user manual
Dear users, the configuration for this camera is professional, so please read the user manual carefully before using the camera. IP Camera (L series) User manual 2013-05 V1.1 Statement If the user manual
Quick Installation Guide
 Quick Installation Guide Cloud Camera, 300Mbps Wi-Fi 7106505077 REV1.0.3 NC200 Configuring the Camera Via Smartphone: 9V=0.6A ETHERNET 1 Connecting the camera Connect the camera to the network your smartphone
Step-by-Step Setup Guide Wireless File Transmitter
 EOS Step-by-Step Setup Guide Wireless File Transmitter Server Mode Infrastructure & Ad Hoc Networks for Apple ios Devices 2012 Canon U.S.A., Inc. All Rights Reserved. Reproduction in whole or in part without
Quick Start Guide NVR DS-7104NI-SL/W NVR. www.hikvision.com. First Choice For Security Professionals
 Quick Start Guide NVR DS-7104NI-SL/W NVR NOTE: For more detailed information, refer to the User s Manual on the CD-ROM. You must use your PC or MAC to access the files. www.hikvision.com Quick Start 1.
How to setup EW-7438RPn with a Windows computer to extend an existing Wi-Fi network
 2 How to setup EW-7438RPn with a Windows computer to extend an existing Wi-Fi network Note: 1. This instruction use pictures from EW-7438RPn firmware v1.13. 2. If you need to restore to the default settings,
Update date: 2015-08-31
 Intelligent network camera APP and PC software User manual Update date: 2015-08-31 This manual applies to Product firmware version:13.0.0.53 Android COT Pro version:v8.3 IOS COT Pro version:v8.2 CMS Client
User's Guide. [Home Network] app. Model No.
![User's Guide. [Home Network] app. Model No.](/thumbs/26/8329814.jpg "User's Guide. [Home Network] app. Model No.") User's Guide [Home Network] app Model No. Table of Contents Table of Contents 1 Welcome to the Panasonic Home Network System!...5 1.1 What is the Panasonic Home Network System?...5 1.2 What can I use it
User's Guide [Home Network] app Model No. Table of Contents Table of Contents 1 Welcome to the Panasonic Home Network System!...5 1.1 What is the Panasonic Home Network System?...5 1.2 What can I use it
Getting Started on the PC and MAC
 Getting Started on the PC and MAC Click on the topic you want to view. Download the Desktop App Download the ios or Android App Desktop App Home Screen Home Screen Drop Down Menu Home Screen: Upcoming
Homeguard Wireless Home Camera Quick Start Guide
 Homeguard Wireless Home Camera Quick Start Guide Congratulations on your purchase of this Homeguard Wireless Home Camera. This leaflet will guide you through setting up your camera for basic use with a
How To Use A Wireless Pan & Tilt Camera On A Pc Or Mac Or Ipad (For Pc) For Free (For Mac) For A Week (For A Week) For $99.99) For Two Weeks (For Ipad)
 For Free (For Mac) For A Week (For A Week) For $99.99) For Two Weeks (For Ipad)") User Manual Wireless Pan & Tilt Camera CIPCAMPTIWL v1.0 Index 1 INTRODUCTION... 4 1.1 THE PACKAGE INCLUDES... 4 1.2 FUNCTION AND FEATURES... 4 1.3 TECHNICAL SPECIFICATIONS... 4 2 APPEARANCE AND INTERFACE...
User Manual Wireless Pan & Tilt Camera CIPCAMPTIWL v1.0 Index 1 INTRODUCTION... 4 1.1 THE PACKAGE INCLUDES... 4 1.2 FUNCTION AND FEATURES... 4 1.3 TECHNICAL SPECIFICATIONS... 4 2 APPEARANCE AND INTERFACE...
AXIS Camera Station Quick Installation Guide
 AXIS Camera Station Quick Installation Guide Copyright Axis Communications AB April 2005 Rev. 3.5 Part Number 23997 1 Table of Contents Regulatory Information.................................. 3 AXIS Camera
USER MANUAL. SMART BABYCAMERA ios IVM-180
 USER MANUAL SMART BABYCAMERA ios IVM-180 NL 1 PRODUCT OVERVIEW The Alecto Smart baby camera is a wireless audio/video baby monitor, suitable for indoor use in conjunction with a tablet or a smart phone.
DIGITUS Plug&View IP cameras
 DIGITUS Plug&View IP cameras Quick Installation Guide (QIG) What's in the box 1 X Plug&View IP camera 1 X power supply with cable 1 X Ethernet cable 1 X Quick Installation Guide 1 X CD with utilities 1
Installation. N300 WiFi Range Extender Model WN3100RP
 Installation N300 WiFi Range Extender Model WN3100RP Getting Started The NETGEAR WiFi Range Extender increases the distance of a WiFi network by boosting the existing WiFi signal and enhancing the overall