COOPER S PULLEY UPGRADE KIT INSTALLATION INSTRUCTIONS PART NUMBER NME5011
|
|
|
- Melina Eaton
- 9 years ago
- Views:
Transcription
1 COOPER S PULLEY UPGRADE KIT INSTALLATION INSTRUCTIONS PART NUMBER NME5011 Below are instructions for the Mini Mania Pulley Upgrade Kit, Part Number NME5011. Please take all necessary precautions for working on and under the vehicle. Mini Mania is not responsible for any damages incurred during the installation of this part. Mini Mania recommends professional installation. Time Required: 3 hours Tools Required: #25 torx standard screwdriver phillips screwdriver 8mm socket if the Madness intake is installed 10mm socket 13mm socket 16mm socket 18mm deep socket or wrench clamp removal tool or small standard screwdriver and small plier belt tensioner tool (or small screwdriver to pin the tension) pulley removal tool with crow's foot puller acetylene torch or head oven floor jack and stands (or lift) NOTE: The models have a slightly different (and simpler) upper engine mount on the passenger side. Photos of the upper engine mount on pages may look different. Before starting, open the rear hatch and disconnect the battery with a 13mm wrench. Leave the hatch open. 1. Jack up the car until the stand will fit under the factory jack point without any extension (to keep the car relatively low). 2. Remove the intake. Start by removing the battery terminal from the side of the airbox - it just clips out. 870 Gold Flat Rd., Nevada City, CA 95959, USA Tel Fax NME5011a_INSTR Page 1 of 25 12/6/05

2 Remove the clamp at the intake boot. Remove the two #25 torx bolts at the base of the intake heat shield (or if it is the stock box, these same two bolts hold the top of the airbox in place). NME5011a_INSTR Page 2 of 25 12/6/05
.")
3 Remove the intake or the panel filter and airbox top (depending on what you have). 3. Remove the ECU and lower airbox half. Remove the ECU cover (it just has two tabs on each side that squeeze together and pull off), then remove each of the two plugs. These are a little tricky - they have tabs on the end of the plug that pull away from the plug which forces the plug up and off. It's easiest to use a small screwdriver very carefully to pull these tabs away from the plug. NME5011a_INSTR Page 3 of 25 12/6/05

4 You can see the tab just under my left hand on the larger of the two plugs. Remove the 10mm bolt that holds the driver side of the airbox down. There is also a small steel bracket holding a wiring loom that is attached with this same 10mm. You will need to move this loom slightly out of the way to remove the airbox. Now remove the clamp on the snorkle to the airbox. You will either use a standard screwdriver if you have replaced the clamp, or the factory removal tool if you still have the stock clamp (you can also remove the stock clamp with a small screwdriver and replace it with the screwdriver and small NME5011a_INSTR Page 4 of 25 12/6/05

5 pliers). Press down on the tab inside the bottom of the airbox that holds the snorkle in place and pull it out of the car. Remove the wiring to the battery terminal from the lower airbox half. You can now remove the lower airbox half by pulling back and then out. NME5011a_INSTR Page 5 of 25 12/6/05

6 Here's what it looks like with the box removed. Note the two small rubber mounting bolts at the bottom rear of the partition. The box is molded on the underside to fit into these mounts, which is why you had to pull toward the front of the car before you pulled up and out. 4. Remove the skid plate. There are two phillips head screws, one on each side (they are like dzus fasteners). NME5011a_INSTR Page 6 of 25 12/6/05

7 Then, remove the three 10mm bolts in front of the lip. Now you can pull the skid plate out by tugging aft then down. 5. Remove the lower motor mount 16mm bolt. NME5011a_INSTR Page 7 of 25 12/6/05

8 6. Using a small block of wood, line up the jack with the power steering fan under the drainplug. Being very careful not to interfere with the power steering fan, jack up until you are resting the jack firmly on the motor. 7. Remove the driver side 16mm motor mount bolt. It helps to wiggle as you are pulling it out, and jacking slightly may help as well. It is a little bit of an art, but once you get the hang of it, it is pretty easy (and it is the same thing threading it back in - you get good at it by just wiggling and jacking the motor at the same time). NME5011a_INSTR Page 8 of 25 12/6/05

9 8. Remove the 10mm clamp bolt holding the wiring loom and radiator hose to the intake manifold. NME5011a_INSTR Page 9 of 25 12/6/05

10 9. Remove the 13mm ground bolt from the passenger side motor mount. Be careful to hold the bottom of the bolt to prevent it from falling out when you pull the nut off. NME5011a_INSTR Page 10 of 25 12/6/05

11 10. I slide the regulator off its bracket to gain more room for the tensioner tool, but you don't really have to. Remove the quick disconnect fittings and use a screwdriver to push the tab on the bracket in slightly and slide it off toward you. NME5011a_INSTR Page 11 of 25 12/6/05

12 11. There are three hoses attached to the vibration damper bracket. These just pop out of their respective holders (MY 02-04). For Model Year , skip to step 13a. NME5011a_INSTR Page 12 of 25 12/6/05
. For Model Year 2005-2006, skip to step 13a.")
13 12. Remove the vibration damper bracket 16mm bolts - the front one is shorter than the rear (for reassembly) (MY 02-04). NME5011a_INSTR Page 13 of 25 12/6/05
.")
14 NME5011a_INSTR Page 14 of 25 12/6/05
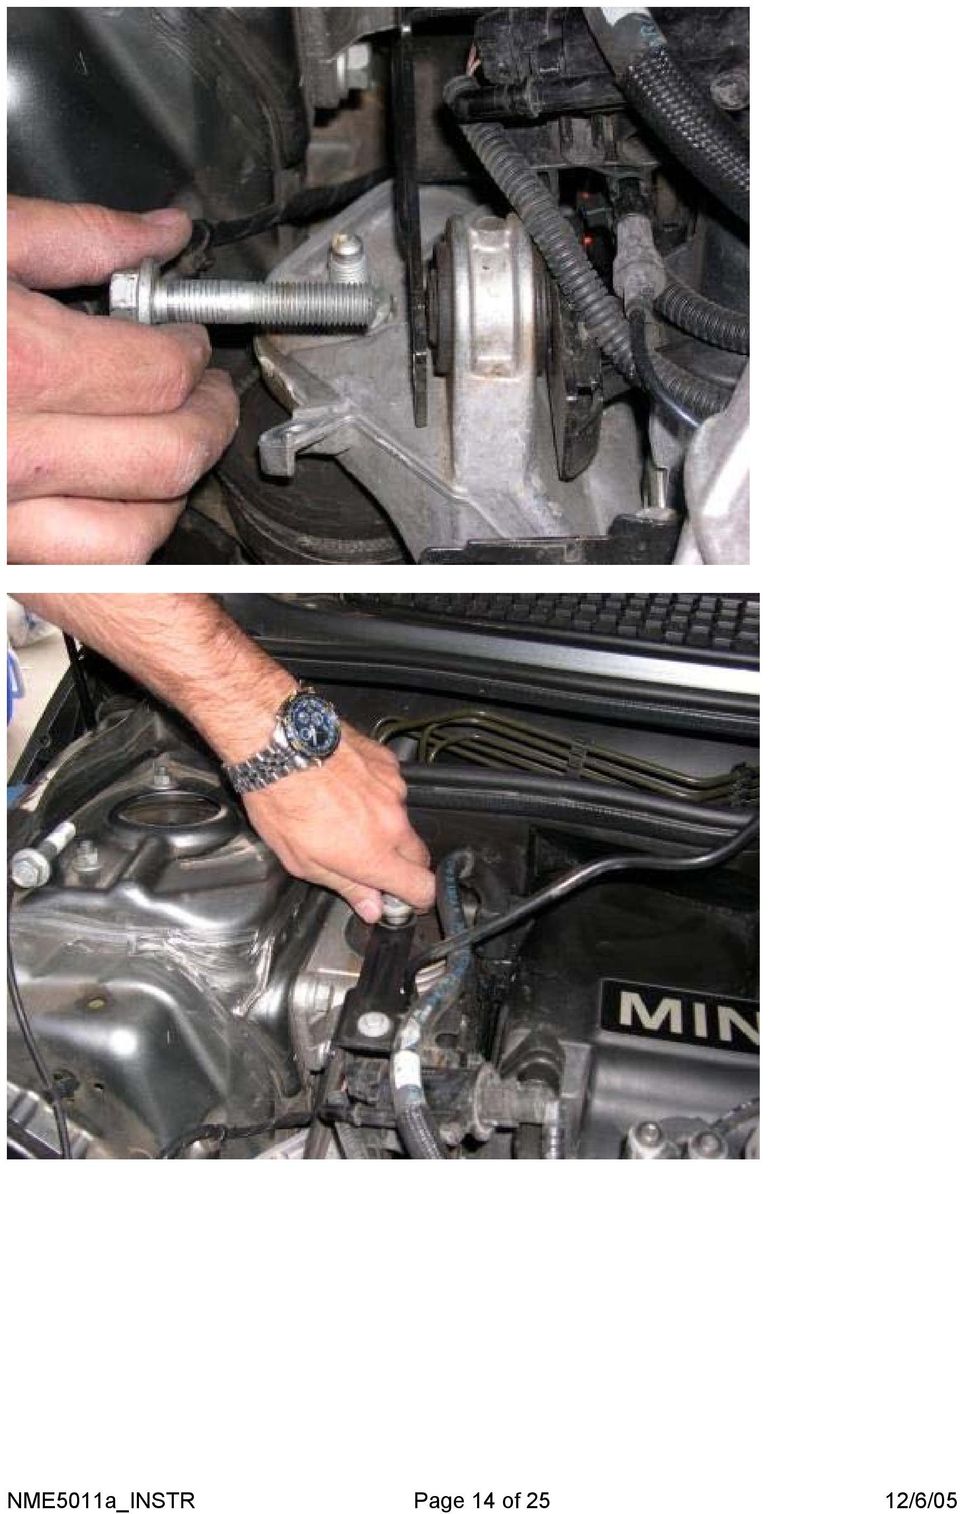
15 Remove the damper bracket (MY 02-04). 13. Using the 18mm wrench or deep socket, remove the passenger side motor mount nut (MY 02-04). NME5011a_INSTR Page 15 of 25 12/6/05
.")
16 13a. For Model Year , remove the ground strap (#1), then the engine mount nut (#2). NME5011a_INSTR Page 16 of 25 12/6/05

17 14. Now, being very careful in several places, slowly jack up the motor. Pay special attention to the coil pack plug, the throttle body, and the power steering fan. Watch all of the hoses and wiring as you go up incrementally. This is the riskiest part of the job, so pay very close attention. Use 2 jacks side-by-side for better control, especially when re-assembling. 15. Using the belt tensioner tool, remove the tension on the belt and pull the serpentine belt off of the idler gear. The pulley tool is just a big lever with a pin on the end that fits into the two holes in the tensioner itself. The lever fulcrum is the forward 16mm tensioner mounting bolt. NME5011a_INSTR Page 17 of 25 12/6/05

18 16. Remove the belt tensioner. There are four bolts, two 10mm and two 16mm. NME5011a_INSTR Page 18 of 25 12/6/05

19 The rear 16mm is the whiter of those two bolts in the fuzzy pic. NME5011a_INSTR Page 19 of 25 12/6/05

20 Note the two holes where the tensioner tool is inserted. Now you have access to the pulley! 17. Install the pulley removal tool. Start by taking the plastic center cap out of the s/c shaft. It helps to get the lip out slightly with the blade of a standard screwdriver, then it will just thread right out like a bolt by hand. NME5011a_INSTR Page 20 of 25 12/6/05

21 Install a 13mm bolt into the center of the shaft. Slide the two halves of the removal tool over the pulley and tighten the allens. Photo below may show a different shaped pulley removal tool. Now install the crow's foot puller onto the removal tool. NME5011a_INSTR Page 21 of 25 12/6/05
22 Using a ratchet on the end of the puller, wind the pulley off. This is a very effective and easy way to get the pulley off. It requires no drilling or cutting, and has worked everytime without a hitch. 18. Once the pulley is removed, you can install the Mini Mania 3-piece pulley. Follow instructions from the pulley to prevent the pulley from moving as you tighten the bolts to spec. Pulley shown may look slightly different than the actual 3-piece pulley. 19. Reinstall the tensioner with the two 16mm and two 10mm bolts. After you have it installed, NME5011a_INSTR Page 22 of 25 12/6/05
23 replace the belt (you will again have to use the tensioner tool to release the tension while you get the belt back on). Here is a rough diagram of the serpentine belt routing: Here is the tensioner being installed: NME5011a_INSTR Page 23 of 25 12/6/05
24 20. Slowly lower the car onto the passenger side motor mount bolt. Once you get the nut started, place a stand with wood under the gearbox and slide the jack more to the center of the motor/gearbox. Now jack it up slightly and use the wiggle jack method to get the other motor mount bolt started. After that, it's just a matter of reinstalling everything. 21. Reinstall the vibration damper bracket (two 16mm bolts - long bolt to the rear of the car) and the associated hoses by snapping them back into place. 22. Reinstall the regulator and quick disconnect hoses. 23. Reintall the 13mm ground strap bolt. 24. Reinstall the 10mm hose/wire loom clamp bolt. 25. Reinstall the airbox. When you are putting in the lower half of the airbox, make sure you lower it into position before sliding it back into the rubber mounts. It helps to take a look at the underside and figure out how the rubber mounts fit into the bottom of the airbox. You can feel the box and rubber mounts to be sure they are attached. You use the tabs on the ECU plugs to reattach them. Make sure they are fully extended, line them up on the associated plug, then slowly close the tab and it will pull the plug onto the ECU. Replace the ECU cover by pressing it into place. Reattach the 10mm forward bolt on the airbox - don't forget to put the bolt through the wiring loom bracket too. Reattach the snorkle by presing it into the lower airbox half and lining up the pin on the snorkle with the female receptacle. Reatach the snorkle hose clamp. Replace the intake with the 8mm and #25 torx bolts. Don't forget to reattach the intake rubber boot and snug the clamp. NME5011a_INSTR Page 24 of 25 12/6/05
25 26. Reattach the 16mm lower motor mount bolt. 27. Put the skid plate back in place with the three 10mm bolts and the two dzus type fasteners (phillips head). 28. Remove the jack stands and lower the car. 29. Reattach the battery terminal. 30. Turn the ingnition key on for 10 seconds to reinitialize, then start the car. Check to see that nothing is askew (I like that word). Listen for belt noises, look at the belt alignment, check for any leaks, etc. NME5011a_INSTR Page 25 of 25 12/6/05
Solstice/Sky Water Pump Replacement
 Solstice/Sky Water Pump Replacement The water pump on the Solstice/Sky is starting to need replacement on some vehicles. This guide will help in replacing the water pump while the engine is still in the
FRONT BUMPER INSTALLATION INSTRUCTIONS 2007-2011 DODGE / MERCEDES SPRINTER
 Aluminess Products Inc 9402 Wheatlands Ct. #A Santee, CA 92071 619-449-9930 FRONT BUMPER INSTALLATION INSTRUCTIONS 2007-2011 DODGE / MERCEDES SPRINTER Please read before beginning Stainless steel hardware
SALEEN SPEEDLAB SERIES VI STANDARD SC UPGRADE KIT
 SALEEN SPEEDLAB SERIES VI STANDARD SC UPGRADE KIT INSTALLATION MANUAL: 2005 MUSTANG 4.6 3V MANUAL P/N: 10-8002-C14338C SUPERCHARGER KIT P/N: 10-1607-B14083* Saleen Performance, Inc. 1225 East Maple Rd.,
Figure 2 The fan and shroud also needs to be removed for access to the four a/c compressor bolts and removal of the compressor from the top.
 Here are some pictures to show what s required when replacing the A/C compressor, expansion valve and receiver/drier on a 2001 Volvo V70. Even if you don t replace these A/C parts these pictures can help
INSTALLATION INSTRUCTIONS FOR 2006-2009 VW MK5
 CI100018 INSTALLATION INSTRUCTIONS FOR 2006-2009 VW MK5 Rabbit, Jetta 2.5L These instructions are applicable to vehicles equipped with either manual or automatic transmissions Thank you for choosing to
INSTALLATION MANUAL INSIDE PASSENGER COMPARTMENT. HFC 134a FOR EUROPEAN SPEC. / GENERAL SPEC. AIR CONDITIONING ENGLISH
 HFC 134a Ozone Friendly Refrigerant FOR EUROPEAN SPEC. / GENERAL SPEC. AIR CONDITIONING ENGLISH AAAMU-60 / INSIDE PASSENGER COMPARTMENT INSTALLATION MANUAL 2000 (EUROPE) B.V.. All Rights Reserved. This
Range Road RR Series Semi-Automatic Firewood Processor. Crated Unit Assembly Manual
 Range Road RR Series Semi-Automatic Firewood Processor Crated Unit Assembly Manual 1 1) Undo 8-18mm x 19mm Nuts and bolts, 2 on each leg of top frame 2) Lift top of Metal crate off and move out of work
Post Mount Light Installation*
 Post Mount Light Installation* *For the general installation of most Post Mount Spotlights, many vehicles may need slight modifications to these instructions. You will need the following tools: High torque
M-9424-463V Intake Manifold INSTALLATION INSTRUCTIONS
 Please visit www.fordracingparts.com for the most current instruction information!!! PLEASE READ ALL OF THE FOLLOWING INSTRUCTIONS CAREFULLY PRIOR TO INSTALLATION. AT ANY TIME YOU DO NOT UNDERSTAND THE
Retrofit Instructions Installing a Sport Heated Steering Wheel - Leather, Multifunction BMW X5, E53, 2001 2006
 Retrofit Instructions Installing a Sport Heated Steering Wheel - Leather, Multifunction BMW X5, E53, 2001 2006 Disclaimer: This set of instructions is simply a guide on how I installed my own heated steering
VW GOLF Mk4 TDI FRONT MOUNTING INTERCOOLER INSTALLATION INSTRUCTIONS
 VW GOLF Mk4 TDI FRONT MOUNTING INTERCOOLER INSTALLATION INSTRUCTIONS Tools required: 10mm/13mm socket and 3/8 drive ratchet with extension Torx T20/25/30 screwdrivers or bits Phillips head screwdriver,
Installation instruction do88 Intercooler for Volvo S40 / V50 / C30
 Installation instruction do88 Intercooler for Volvo S40 / V50 / C30 This instruction shows how to replace the OEM intercooler with our performance intercooler. 2. 3. 1. 4. 5. Part number: ICM-170 6. At
INSTALLATION INSTRUCTIONS
 INSTALLATION INSTRUCTIONS Accessory Application Publications No. All 24393 ACCORD (DX, LX) SYSTEM 2-AND 4-DOOR Issue Date AUG 2002 PARTS LIST Security System Attachment (LX): P/N 08E55-SDA-100A Unit panel
PARTS NEEDED FOR CONVERTING FROM LP TO NG
 1 6 7 8 3 5 4 10 9 2 PARTS NEEDED FOR CONVERTING FROM LP TO NG Number Description 1 30" NG Manifold 2 NG side burner valve 3 NG Regulator 4 Rear I/R NG orifice 4 Rear I/R NG orifice 5 Side burner NG orifice
CAM-03, Camshaft Assembly Oil Seal Replacement
 CAM-03, Camshaft Assembly Oil Seal Replacement Tools Jack stands Floor Jack Metric Socket set Metric Wrench set Porsche Timing Belt Tension tool (P9201) Flywheel Lock (P9206) Balance Shaft Pin Spanner
Service Guide. Gateway M275
 Service Guide Gateway M275 Contents Replacing Gateway M275 Components.................................... 1 Identifying the convertible tablet PC model...................................... 2 Identifying
Installing RNS-E SAT NAV for Audi A4
 As one of the major options on the A4 you can get a DVD Satellite Navigation System call the RNS-E. With the help of ebay these sat nav systems are now available to by at a rough cost of 650 plus the cost
INSTALLATION INSTRUCTIONS
 INSTALLATION INSTRUCTIONS Accessory Application Publications No. ACCORD All 30209 2-AND 4-DOOR SYSTEM (VP, LX, SE) Issue Date AUG 2005 PARTS LIST Security System Attachment: P/N 08E55-SDA-100A Unit panel
CorkSport Mazdaspeed 6 Rear Sway Bar 2006-2007 Mazdaspeed 6
 CorkSport Mazdaspeed 6 Rear Sway Bar 2006-2007 Mazdaspeed 6 Pre-Installation Notes: The CorkSport Rear Sway Bar is a great addition to improving the handling performance to the Mazdaspeed 6. It will minimize
M-9000-ZX3 JRSC Focus Big Boost Upgrade Kit INSTALLATION INSTRUCTIONS
 Please contact the Tech Hot Line for the most current instruction information (586) 468-1356!!! PLEASE READ THE FOLLOWING INSTRUCTIONS CAREFULLY PRIOR TO INSTALLATION!!! INTRODUCTION: These instructions
Wiper Motor Marinco 2.5. Installation Instructions
 Wiper Motor Marinco 2.5 Installation Instructions Wiper Motor Marinco-2.5 The Marinco 2.5 Wiper Motor Offers the Following Features: Fully sealed base and housing which allows installation in outdoor wet
BODY-12, Door Handle - Removal, Installation, and Adjustment
 Introduction BODY-12, Door Handle - Removal, Installation, and Adjustment There are many different procedures floating around describing how to replace the door handles on a 944 and every one of them will
BULB REPLACEMENT BROCHURE
 BULB REPLACEMENT BROCHURE Contents Contents Explanation of Symbols 03 Audi A1 04 06 Audi A4 1.9 TDI with Xenon Headlights (from years of manufacture 2000 to 2005) 07 10 Audi A4 (8K5 / 8K2) with Bi-Xenon
VW Jetta, Golf, New Beetle 1.9L TDi Unichip PnP Installation Instructions
 VW Jetta, Golf, New Beetle 1.9L TDi Unichip PnP Installation Instructions and Warranty Information Tools Required 10mm combination wrench, 13mm Socket (Jetta/Golf only), 3/8-inch or ¼-Inch drive ratchet,
CorkSport Mazda 3 LED Light Kit 2014+ Mazda 3
 CorkSport Mazda 3 LED Light Kit 2014+ Mazda 3 Thank you for purchasing the CorkSport 2014 Mazda 3 LED Light Kit. CorkSport's LED light kit replaces bulbs for the rear dome light, vanity visor lights, front
2002 2005 Mini Cooper S Grille Install Instructions
 2002 2005 Mini Cooper S Grille Install Instructions Lower Front Grille BEFORE AFTER Package Contents 1 perforated grille (Stiletto, RAZR, or Monster) 6 Zip Tie Mounting Pads 1 is for the temp. sensor 5
2003 ACCORD - Automatic Transmission Removal
 2003 ACCORD - Automatic Transmission Removal Special Tools Required Engine support hanger, A and Reds AAR-T-12566 Engine hanger balancer bar VSB02C000019 Front subframe adapter VSB02C000016 These special
INSTALLATION INSTRUCTIONS
 INSTALLATION INSTRUCTIONS Accessory Application Publications No. AII23628 2003 PILOT Issue Date MAY 2002 PARTS LIST Security System Kit (sold separately): P/N 08E51-S84-100 2 Remote controls Attachment
Installation Instructions
 Installation Instructions For Use with PXPV230, PXPV265, PXPD230, and PXPD265 models Attention! - Please read these instructions completely before attempting installation. Always unplug the power supply
A&A CORVETTE PERFORMANCE C6 BOOST & FUEL GAUGE INSTALLATION INSTRUCTIONS
 A&A CORVETTE PERFORMANCE C6 BOOST & FUEL GAUGE INSTALLATION INSTRUCTIONS 1. Check your gauges before you take them out of the packaging to make sure they are at 0 (zero) psi for both boost and fuel pressure.
BUILT-IN DISHWASHER INSTALLATION INSTRUCTIONS
 BUILT-IN DISHWASHER INSTALLATION INSTRUCTIONS PLEASE READ COMPLETE INSTRUCTIONS BEFORE YOU BEGIN LEAVE INSTALLATION INSTRUCTIONS AND USER'S GUIDE WITH OWNER ALL ELECTRIC WIRING AND PLUMBING MUST BE DONE
TITAN Fuel Tanks. INSTALLATION INSTRUCTIONS G e n e r a t i o n V
 TITAN pt. no.: 02 0000 0143 Important: Please read these instructions carefully and completely before starting the installation. TITAN Fuel Tanks INSTALLATION INSTRUCTIONS G e n e r a t i o n V Extended
INSTALLATION INSTRUCTIONS
 INSTALLATION INSTRUCTIONS Accessory TRIM Application 2008 ACCORD 4-DOOR Publications No. AII 35362 Issue Date AUG 2007 PARTS LIST Steering Wheel Trim (Without Navigation) P/N 08Z13-TA0-100 Right steering
Use subject to terms and conditions posted at http://www.burgertuning.com/terms.htm
 Use subject to terms and conditions posted at http://www.burgertuning.com/terms.htm THIS PART IS LEGAL FOR USE ONLY IN COMPETITION RACING VEHICLES AS DEFINED UNDER CALIFORNIA LAW, AND IS NOT LEGAL FOR
How to remove, replace and tighten accessory belts for a second generation (NB, 1999-2005 ) Mazda Miata MX-5
 Mazda Miata MX-5") How to remove, replace and tighten accessory belts for a second generation (NB, 1999-2005 ) Mazda Miata MX-5 If your Miata is squealing loudly either when you engage the air conditioner, turn on the car,
How to remove, replace and tighten accessory belts for a second generation (NB, 1999-2005 ) Mazda Miata MX-5 If your Miata is squealing loudly either when you engage the air conditioner, turn on the car,
MGB Chrome Bumper Conversion
 MGB Chrome Bumper Conversion Installation Instructions For 1974 1/2-1980 MGB This kit requires cutting, welding, and painting. Professional installation recommended. Note: Every MGB body is slightly different
INSTALLATION INSTRUCTIONS. 6111 Air Spring Kit 2011+ Ford F250/F-350 Single Wheel 2WD 2011+ Ford F350 Dually 2WD IMPORTANT NOTES
 INSTALLATION INSTRUCTIONS 6111 Air Spring Kit 2011+ Ford F250/F-350 Single Wheel 2WD 2011+ Ford F350 Dually 2WD Thank you for purchasing a quality Hellwig Product. PLEASE READ THIS INSTRUCTION SHEET COMPLETELY
Installation Guide 2010 BMW S1000RR Full Exhaust System
 Installation Guide 2010 BMW S1000RR Full Exhaust System!! THIS PRODUCT IS DESIGNED FOR USE IN CLOSED COURSE RACING AND IS NOT INTENDED FOR HIGHWAY USE!! Congratulations on the purchase of your new TaylorMade
INSTALL/REMOVAL INSTRUCTIONS: WINDOW LIFT MOTOR
 REMOVAL/INSTALL OF WINDOW LIFT MOTOR (742-273) Ford Expedition 1997 2002, Lincoln Navigator 1998 2002, Ford F-150 Super Crew Cab 2001 General Tech Tips: Use painter s tape rather than duct tape to secure
6 inch A-Arm Lift Kit WARNING: 16-018/16-019. installation instructions. will fit CLUB CAR DS. included:
 Revised May 205 6-08/6-09 6 inch A-Arm Lift Kit will fit CLUB CAR DS installation instructions included: Rear Lift Blocks Main Suspension Assembly Spindles A-Arms Rear Shock Mounting Plates U-Bolts WARNING:
ADDING AN ELECTRIC AUXILIARY FAN TO RADIATOR STACK ON 03 ALPINE COACH
 ADDING AN ELECTRIC AUXILIARY FAN TO RADIATOR STACK ON 03 ALPINE COACH The original design of the 03 Alpine Coaches (and perhaps other years as well) did not include any kind of engine fan engage mechanism
COOLING SYSTEM Section Page
 5 COOLING SYSTEM Section Page 5.1 COOLANT PRE-HEATER... 5-3 5.2 COOLANT PUMP NON-EGR ENGINE... 5-7 5.3 COOLANT PUMP EGR ENGINE... 5-13 5.4 FRONT CONNECTOR HOUSING NON-EGR ENGINE... 5-17 5.5 FRONT CONNECTOR
2011-14 F250 6 RADIUS ARM KIT
 92154000 Thank you for choosing Rough Country for your suspension needs. 2011-14 F250 6 RADIUS ARM KIT Rough Country recommends a certified technician installs this system. In addition to these instructions,
C5 Sound Deadening & Insulation Kit Interior Removal & Installation Instructions
 C5 Sound Deadening & Insulation Kit Interior Removal & Installation Instructions Ok, let's start with taking the radio bezel dash area off first. Here is what the OEM radio looks like... First you flip
430 Power/Electronics Replacement
 Replacing the main board WARNING Before proceeding, turn off the main power switch and unplug the power cord. Caution Make sure you are properly grounded with an ESD strap before continuing. The main printed
REMOVAL AND INSTALLATION
 303-01C-1 REMOVAL AND INSTALLATION Engine Body On Special Tool(s) Adapter For 303-D043 303-D043-02 or equivalent Special Tool(s) 303-01C-1 Turbocharger Lifting Bracket 303-1266 Wrench, Fan Clutch Nut 303-214
INSTALLATION INSTRUCTIONS
 INSTALLATION INSTRUCTIONS Accessory Application 2009 PILOT Publications No. AII 39408 Issue Date MAY 2008 PARTS LIST Steering Wheel Trim (With Cruise and Audio) P/N 08Z13-SZA-130B (Chocolate) P/N 08Z13-SZA-140B
Cable Drum Installation
 20 Cable Drum Installation COUNTERBALANCE None Shake the TorqueMaster spring tube gently to extend the winding shafts out about 5" on each side. For single spring applications, there will be no left hand
CONTENTS TOOLS REQUIRED: Ratchet 13mm Socket 10mm Socket Phillips Screwdriver Pliers Panel Removal Tool. Amp Installation
 CONTENTS 1EA. SUBWOOFER ASSEMBLY P/N RUWRANGLER 1EA. 200 WATT AMP/BRACKET ASSEMBLY P/N RM11JKBTL - Bracket P/N RE08BTL200R - Amp 1EA. POWER HARNESS P/N RHWRANGLERPWR 1EA. OVERLAY HARNESS P/N RHWRANGLER
LIFT-505. BMF Lift Kit. Yamaha Drive Gas or Electric. Installation Instructions
 LIFT-505 BMF Lift Kit Yamaha Drive Gas or Electric Installation Instructions Contents of LIFT-505 Yamaha Drive BMF Lift Kit: a (1 ea.) BMF A-Arm Assembly b (1 ea.) Driver Side Shock Tower c (1 ea.) Passenger
PRODUCT: WASHER / WASHER-DRYER COMBO MODEL: AW 120 / AW 122 / AW 125 AWD 120 / AWD 121 / AWD 129
 PRODUCT: WASHER / WASHER-DRYER COMBO MODEL: The information included in this Splendide Repair Manual may change without notice. Please see our web site www.splendide.com/service/docs.html for updates,
Model 854/856. Operating and Assembly Manual. Palmor Products Inc. 5225 Serum Plant Road Thorntown, IN 46071
 Model 854/856 Operating and Assembly Manual Palmor Products Inc. 55 Serum Plant Road Thorntown, IN 46071 3/31/2015 SAFETY RULES Remember, any power equipment can cause injury if operated improperly or
GTI VR6 Front Wheel Bearing DIY http://www.gtishrine.com
 GTI VR6 Front Wheel Bearing DIY http://www.gtishrine.com This procedure covers replacing the front wheel bearings. Tools and Parts required: Wheel Bearing Puller w/ ABS adapter. Available for rent from
Volkswagen Jetta, Golf, GTI 1999, 2000 Brake System 47 Brakes - Hydraulic Components (Page GR-47)
") 47 Brakes - Hydraulic Components (Page GR-47) FS III front brake calipers, servicing Front brake caliper piston, removing and installing FN 3 front brake calipers, servicing Front caliper piston, removing
47 Brakes - Hydraulic Components (Page GR-47) FS III front brake calipers, servicing Front brake caliper piston, removing and installing FN 3 front brake calipers, servicing Front caliper piston, removing
Time needed: ~3h for lid replacement only. Add 1h for operation harness in lid and ~2h more for installing drive unit and cable harness in trunk.
 DIY for replacing trunk lid and/or retrofitting electrical operation of trunk lid. This document is meant to be a support and give advice on the procedure but I will take no responsibility for any damage
Juice Box Stages 1&2 135&335 Installation Guide 5/10/08
 Tools Required: 8mm socket or nut driver Small flat head screwdriver Electrical tape, masking tape, or shrink tube Pep talk: Although the install looks daunting at first, once you get the learning curve
Equipped with AEM Dryflow Filter No Oil Required! INSTALLATION INSTRUCTIONS PART NUMBER 21-754DS. 2012-2015 BMW 335i 3.0L
 Equipped with AEM Dryflow Filter No Oil Required! INSTALLATION INSTRUCTIONS PART NUMBER 21-754DS 2012-2015 BMW 335i 3.0L 1 ITEM NO. PART NUMBER DESCRIPTION QTY. 1 21-2057DK AIR FILTER 1 2 9-0442 TUBE;
specializing in AIR CONDITIONING, PARTS AND SYSTEMS for your classic vehicle PERFECT FIT IN-DASH HEAT/ COOL/ DEFROST 1967-72 CHEVROLET PICKUP
 specializing in AIR CONDITIONING, PARTS AND SYSTEMS for your classic vehicle PERFECT FIT IN-DASH HEAT/ COOL/ DEFROST 1967-72 CHEVROLET PICKUP CONTROL & OPERATING INSTRUCTIONS The controls on your new Perfect
Installing a new 928 Motorsports All-Aluminum Radiator
 928 Motorsports Supercharger Installation Copyright 2008, 928 Motorsports, LLC All Rights Reserved Installing a new 928 Motorsports All-Aluminum Radiator Copyright 2008 928 Motorsports, LLC. Toll-Free
INSTRUCTION. Industrial Sewing Machines. No. 010012. First published : June 1997 Second edition : March 2001
 INSTRUCTION Industrial Sewing Machines First published : June 1997 Second edition : March 2001 No. 010012 INTRODUCTION Thank you for your purchasing Kansai Special's DLR Series. Read and study this instruction
INSTALL INSTRUCTIONS KK-C-HVAC-1 HVAC UNIT 2003-2014 CHEVROLET/GMC VANS FOR
 INSTALL INSTRUCTIONS KK-C-HVAC-1 HVAC UNIT 2003-2014 CHEVROLET/GMC VANS FOR (For NEW 2007 ALL WHITE KWIK-KITS ONLY) Warning do not attempt to install A/C units unless you are experienced with servicing
Sebring Timing Belt and Water Pump Replacement
 Sebring Timing Belt and Water Pump Replacement I was motivated to do this work because of a bearing growling sound emanating from the engine. It would grind at low rpms when the engine was cold and then
3. Loosen 3 x grub screws in the Dec end cap and unscrew the cap and counterweight shaft. NEQ6 Belt Modification Kit.
 NEQ6 Belt Modification Kit. Thank you for your purchase. Please read these instructions fully before fitting. Your package should contain 2 off 47 & 2 off 12 tooth aluminium pulleys 2 off belts 6mm wide
Cooling system components, removing and installing
 Engine BHW Cooling system components, removing and installing Page 1 / 24 19-1 Cooling system components, removing and installing Warning! When doing any repair work, especially in the engine compartment,
INSTALLATION INSTRUCTIONS. 6108 Air Spring Kit 2011+ Ford F250 Single Wheel 4WD 2011+ Ford F350 Dually 4WD (2011 F350 Single Wheel 4WD use p/n 6113)
") INSTALLATION INSTRUCTIONS 6108 Air Spring Kit 2011+ Ford F250 Single Wheel 4WD 2011+ Ford F350 Dually 4WD (2011 F350 Single Wheel 4WD use p/n 6113) Thank you for purchasing a quality Hellwig Product. PLEASE
INSTALLATION INSTRUCTIONS 6108 Air Spring Kit 2011+ Ford F250 Single Wheel 4WD 2011+ Ford F350 Dually 4WD (2011 F350 Single Wheel 4WD use p/n 6113) Thank you for purchasing a quality Hellwig Product. PLEASE
How To: Retrofit the Morimoto Mini D2S bi-xenon Projectors
 How To: Retrofit the Morimoto Mini D2S bi-xenon Projectors Warning: By reading this document I agree that it is only intended to be used as an educational guide. The Retrofit Source Inc. makes no guarantee
Convertible Top Hydraulic Cylinder Removal Manual for W124 E-Class Convertibles 1993-1995 Models 300CE (1993) and E320 (1994-1995)
 and E320 (1994-1995)") Convertible Top Hydraulic Cylinder Removal Manual for W124 E-Class Convertibles 1993-1995 Models 300CE (1993) and E320 (1994-1995) Written by Samit Ghosh with picture material from vexed of benzworld.org
Convertible Top Hydraulic Cylinder Removal Manual for W124 E-Class Convertibles 1993-1995 Models 300CE (1993) and E320 (1994-1995) Written by Samit Ghosh with picture material from vexed of benzworld.org
Firewall Cover Installation Instruction Sheet
 Firewall Cover Installation Instruction Sheet Please Read Carefully Our Firewall cover is designed to fit on the stock strut brace. If you have an aftermarket strut brace than it is you re responsibility
Front brakes (FN- 3), servicing
, servicing") j a t Front brakes (FN- 3), servicing 46-1 Front brakes, servicing Note: Install complete repair kit. After replacing brake pads and before moving vehicle, depress brake pedal several times firmly to properly
j a t Front brakes (FN- 3), servicing 46-1 Front brakes, servicing Note: Install complete repair kit. After replacing brake pads and before moving vehicle, depress brake pedal several times firmly to properly
PERFECT FIT SERIES IN-DASH HEAT/ COOL/ DEFROST 1967 CHEVROLET IMPALA
 specializing in AIR CONDITIONING, PARTS AND SYSTEMS for your classic vehicle PERFECT FIT SERIES IN-DASH HEAT/ COOL/ DEFROST 1967 CHEVROLET IMPALA CONTROL & OPERATING INSTRUCTIONS The controls on your new
GPS AutoSteer System Installation Manual
 GPS AutoSteer System Installation Manual Supported Vehicles John Deere Sprayers 4720 4630 4730 4830 AutoTrac Ready PN: 602-0227-01-A LEGAL DISCLAIMER Note: Read and follow ALL instructions in this manual
LG G5 Chassis Brace Gen 5 Camaro THE MOST POWERFUL HEADERS ON THE PLANET Brought to you by LG Motorsports 972-429-1963
 LG G5 Chassis Brace Gen 5 Camaro THE MOST POWERFUL HEADERS ON THE PLANET Brought to you by LG Motorsports 972-429-1963 Thank you for purchasing LG Motorsports products for your Gen 5 Camaro. Parts Inventory:
Slide the new steering column shaft through the steering column from the driver compartment.
 Slide the new steering column shaft through the steering column from the driver compartment. Push the column shaft through the steering column until the machined end is out past the column lower bushing.
Walbro 255lph Inline Fuel Pump Install Procedure
 Walbro 255lph Inline Fuel Pump Install Procedure Note: Instructions are based on a single in tank pump with under car OEM VW filter. Total install time for a qualified technician is approximately 2 hrs.
AWE Tuning Air/Air Intercooler Kit for 2000-04 Audi 2.7T
 AWE Tuning Air/Air Intercooler Kit for 2000-04 Audi 2.7T Congratulations on your purchase of the AWE Tuning Intercoolers for your 2.7T Audi. Hundreds of hours of design and operational testing were spent
The Ford Model A Water Pump
 The Ford Model A Water Pump George Washington Chapter, Inc. 3903 Old Lee Highway Fairfax, VA 22030 1 Table of Contents Introduction/Specifications.. 3 1. Water Pump Inspection and Removal. 4 a. Removal..
ALLDATA Online - 2006 Dodge Truck RAM 2500 Truck 2WD L6-5.9L DSL Turbo VI... Service and Repair
 Page 1 of 15 Home Account Contact ALLDATA Log Out Help PAUL REDEHOFT Select Vehicle New TSBs Technician's Reference Component Search: OK 2006 Dodge Truck RAM 2500 Truck 2WD L6-5.9L DSL Turbo VIN C Conversion
R O A D M A S T E R, I N C.
 R O A D M A S T E R, I N C. 11 7 6 1 2 10 13 8 ITEM QTY NAME PART # 1...2...1/2 x 5 1/2 BOLT...350108-00 2...4...1/2 x 1 3/4 BOLT...350096-00 3...6...1/2 LOCK WASHER...350309-00 4...6...1/2 HEX NUT...350258-00
Important: Please read these instructions carefully and completely before starting the installation. TITAN Fuel Tanks
 TITAN pt. no.: 03 0000 0120 Important: Please read these instructions carefully and completely before starting the installation. TITAN Fuel Tanks INSTALLATION INSTRUCTIONS G e n e r a t i o n V Extended
Katana Supercharger Installation Instructions Rev. E Page 1 of 23
 Katana Supercharger Installation Instructions Rev. E Page 1 of 23 READ FITTING INSTRUCTIONS IN FULL BEFORE INSTALLATION This article is sold without warranty expressed or implied. No warranty or representation
TRANS-05, Torque Tube Removal, Rebuilding, and Installation
 TRANS-05, Torque Tube Removal, Rebuilding, and Installation Tools Metric Wrench Set Metric Socket Set Jack Stands (6 minimum) Floor Jack 8mm Cheesehead socket (also referred to as 12 point internal socket
Installation Guide for the TJ LCG PRO Suspension System (Low Center of Gravity) Available 4 or 5
 Available 4 or 5") INSTALLATION GUIDE Installation Guide for the TJ LCG PRO Suspension System (Low Center of Gravity) Available 4 or 5 Take every precaution to make this installation a safe procedure. Make safety the number
INSTALLATION GUIDE Installation Guide for the TJ LCG PRO Suspension System (Low Center of Gravity) Available 4 or 5 Take every precaution to make this installation a safe procedure. Make safety the number
ReadyLift (Part# 66-5075) Strut Extension, Installation Instructions Toyota Tundra New Body Style 2WD & 4WD
 Strut Extension, Installation Instructions Toyota Tundra New Body Style 2WD & 4WD") SAFETY WARNING: recommends this system be installed by a professional technician. In addition to these instructions, professional knowledge of disassembly/ reassembly procedures and post installation checks
SAFETY WARNING: recommends this system be installed by a professional technician. In addition to these instructions, professional knowledge of disassembly/ reassembly procedures and post installation checks
Pulleys and Belt. Install the Major Accessory and Pulley. Install the Motor Pulley NOTE. Align the Motor Pulley and the Tool Pulley NOTE
 Pulleys and Belt Pulley Guard - 505862 Install the Major Accessory and Pulley 1. Place the short end of the mounting base holes, and insert - but don t tighten - the setscrews. If the Major Accessory has
!"#$%&'()*#%+!,-./ 011-2,.%34$5')4564%7"&8*# 9%8:;<%0<17%&=&2$'#)=
*#%+!,-./ 011-2,.%34$5')4564%7&8*# 9%8:;<%0<17%&=&2$'#)=") !"#$%&'()*#%+!,-./ 011-2,.%34$5')4564%7"&8*# 9%8:;
!"#$%&'()*#%+!,-./ 011-2,.%34$5')4564%7"&8*# 9%8:;
2005 MINI Cooper. 2002-05 MANUAL TRANSMISSIONS On-Vehicle Servicing. Cooper S Getrag 285
 2002-05 MANUAL TRANSMISSIONS On-Vehicle Servicing APPLICATION MANUAL TRANSMISSION APPLICATIONS Application Transmission Model Cooper R65 Cooper S Getrag 285 LUBRICATION SERVICE INTERVALS Inspect fluid
MGA Alternator Conversion
 MGA Alternator Conversion Installation Instructions For 1955 to 1962 MGA PART # 130-078 and #130-088 440 Rutherford St. P.O. Box 847 Goleta, CA 93117 1-800-667-7872 FAX 805-692-2525 www.mossmotors.com
INSTALLATION INSTRUCTIONS
 INSTALLATION INSTRUCTIONS Accessory Application Publications No. AII 26327 2004 S2000 Issue Date OCT 2004 PARTS LIST Security System: P/N 08E51-S84-100 Attachment Kit: P/N 08E55-S2A-101 2 Remote controls
This kit may void factory warranty please check with manufacturer.
 Mfg Company TM Thank you for purchasing a Sinister Manufacturing Company EGR delete kit. Precision manufactured using aircraft quality 304 stainless steel and billet aluminum; this EGR kit is designed
INSIDE ENGINE COMPARTMENT TOYOTA AIR CONDITIONING ENGLISH EUROPE,GENERAL,AUSTRALIA
 INSIDE ENGINE COMPARTMENT TOYOTA AIR CONDITIONING ENGLISH EUROPE,GENERAL,AUSTRALIA INTRODUCTION IMPORTANT NOTICE This manual has been designed for technicians who are qualified and educated in the proper
Rear wheel brakes, servicing. Стр. 1 из 45. Note:
 Volkswagen Touareg - Rear wheel brakes, servicing Стр. 1 из 45 46-2 Rear wheel brakes, servicing Rear brakes, FN 44 brake caliper, servicing Note: After replacing brake pads, depress brake pedal firmly
Traditional Sonar and DSI Sonar Installation
 Traditional Sonar and DSI Sonar Installation This document covers the installation of the transducer and display unit installation, which includes connecting the unit to power and installing the unit on
356 CHECKLIST ELECTRICAL: CHASSIS:
 356 CHECKLIST ELECTRICAL: Headlights hi/lo beam Taillights Running lights Turn signals Brake lights License light(s) Fog lights Reverse light Horn Dome lights Dash lights Temp guage Tank level guage Tachometer
Rebuild Instructions for 70001 and 70010 Transmission
 Rebuild Instructions for 70001 and 70010 Transmission Brinn, Incorporated 1615 Tech Drive Bay City, MI 48706 Telephone 989.686.8920 Fax 989.686.6520 www.brinninc.com Notice Read all instructions before
Volkswagen Jetta, Golf, GTI 1999, 2000 Brake System 46 Brakes - Mechanical Components (Page GR-46)
") 46 Brakes - Mechanical Components (Page GR-46) Front brakes Brake pads, removing and installing Brake pads, removing and installing FN 3 brake caliper, servicing FS III brake caliper, servicing Rear wheel
46 Brakes - Mechanical Components (Page GR-46) Front brakes Brake pads, removing and installing Brake pads, removing and installing FN 3 brake caliper, servicing FS III brake caliper, servicing Rear wheel
Mondeo 2.0 TDCI Variable Vane Turbo Cleaning
 Mondeo 2.0 TDCI Variable Vane Turbo Cleaning My Car: '05 Mondeo 2.0 TDCI Euro IV Turbo with Electronic Actuator (The variable vane turbo with the vacuum actuator is much the same process I believe) Guide
FRONT TURN SIGNAL RELOCATION KIT
 -J0 REV. 00-0-0 FRONT TURN SIGNAL RELOCATION KIT GENERAL Kit Number -0 Models This kit fits 00 and later Dyna model motorcycles (except FXDSE), relocating the front turn signal from the handlebars to the
Auto-belay Cable Replacement Process
 Auto-belay Cable Replacement Process Version 2.00 WARNING: The air pressure in the auto-belay system is what causes the cable to be retracted when releasing the cable or climbing the wall with the cable
STEADYfast Stabilizer Installation Notes Fifth Wheel and Travel Trailers 11/23/13
 STEADYfast Stabilizer Installation Notes Fifth Wheel and Travel Trailers 11/23/13 (See Supplemental Instructions for trailers with heavy duty round footplates and/or Power Leveling Systems) PHONE SUPPORT