Mondeo 2.0 TDCI Variable Vane Turbo Cleaning
|
|
|
- Sherilyn Daniels
- 7 years ago
- Views:
Transcription
1 Mondeo 2.0 TDCI Variable Vane Turbo Cleaning My Car: '05 Mondeo 2.0 TDCI Euro IV Turbo with Electronic Actuator (The variable vane turbo with the vacuum actuator is much the same process I believe) Guide about how to clean the vanes inside the turbo using Mr Muscle Oven Cleaner. Sticking vanes are caused by carbon deposits building up on the surface inside the mechanism which prevents the parts moving freely. With the engine off and the actuator arm disconnected so that it can be operated by hand, there should be NO resistance at all when moving the arm. In my case, when the engine was cold the arm was stiff for the first 10mm of travel and then free after that. When warm it was just completely free. My initial symptoms were limp mode, flashing glow plug light and P2263 (Turbo boost performance) code being thrown up under load mainly in 4 th gear when accelerating up a slight incline and reaching about 50mph. Only happened once when engine was cold or cool and after a restart on the same journey it wouldn't happen again. Mine isn't too bad as I gave it a little clean out about 4 weeks ago but symptoms returned so decided to do it again with Mr Muscle Oven Cleaner. Usual Disclaimer: This is just the method that I used I'm not a mechanic so if you're not confident seek help from someone who is. Fairly obvious that Mr Muscle wasn't intended for this purpose but it's very effective and used by many people to cure this problem. Basically if you choose to follow this then I am pleased to have helped you but I'm taking no responsibility if anything should go wrong. Tools Required: 8mm, 10mm, 13mm Spanners 8mm, 10mm, 13mm Sockets Wrench Flat Screwdriver Pliers Mallet Mr Muscle Oven Cleaner Large Towel Lint Free Cloth Tissue Gloves I will break this down as much as possible to cater for everyone but it really is straight forward just a little fiddly in places. I apologise now for any typos or spelling mistakes its currently 1am...

2 Ok so as the turbo is sat in the middle under the metal heat shield just under the windscreen, you can clearly see that its not in the easiest of places to get to but still very doable! Need to remove the plastic engine cover, airbox and associated hoses. Removing the airbox is very straight forward, you simply loosen the jubilee clips on the fat pipe that goes into the turbo and the small breather that goes into the rocker cover. On the back left of the box there is a small pipe that you need to pull off. Unplug the MAF sensor that is sat in the pipe coming off the box, lift the left hand side of the box and wiggle out. Really simple. (Pic 1.1, 1.2 and 1.3) Pic 1.1

3 Pic 1.2 Pic 1.3

4 Now you need to remove the heat shield. This is held on with two 10mm nuts (on top) and two 8mm bolts (one on top and one down the back in line with the top bolt). Wiggle the cover as you pull it out and it will free itself. After you have removed it you will still see a heat shield in place below it but this is fine to be left in place. (Pic 2.1 and 2.2) Pic 2.1 Pic 2.2

5 Time to disconnect the actuator arm and remove the three bolts holding the actuator in place. Using a screwdriver, GENTLY lever the spring clip off of the peg. Mine will look different as I wasn't so gentle previous and it pinged off. Bought a pack of Rolson assorted spring clips and had the perfect size in it. Once removed, unplug the actuator and undo the three 10mm bolts holding the actuator on. (Pic 3.1, 3.2 and 3.3) Pic 3.1 Pic 3.2 Pic 3.3

6 Now the fiddly bit begins. Ultimately the aim is to remove the six red coloured bolts that you can see in the pictures with the fat gold washers. Access to these is restricted by the shape of the turbo and also the oil feed and return pipes. First pipe you need to remove is the oil feed pipe which is the thinner of the two and can be identified if you look underneath the turbo from the gearbox side as it has a section of flexi pipe. The pipe is attached with a Banjo Bolt into the back of the turbo between the red and the silver parts. This is a 13mm bolt and will likely require both use of a 13mm socket and 13mm spanner as it is in a tight spot. When retightening you MUST take great care and DO NOT over tighten as you will twist it. The flexi pipe allows this to be pushed to the side out of the way to enable access to the other bolts. (Pic 4.1 and 4.2) Pic 4.1 Pic 4.2

7 Time to remove the oil return pipe now which is the fatter silver pipe with a bend ever so often and this attaches to the underside of the turbo with two 8mm bolts. There is a gasket to be sure to recover this and take great care as it is very brittle. With the aid of an 8mm spanner, 8mm socket and a lorry load of patience, remove the bolts from underneath but take great care not to drop them. I've lost count of the amount of small things that have disappeared into the black hole down the back of my engine! I found that after slackening them they were easy enough to turn with my fingers but this is very fiddly as space is tight. Take your time, took me about 20mins to get these two bolts out. You can't move this pipe out of the way of the turbo but you can't remove the turbo without unbolting it. You can move it to one side but this doesn't give enough access and its easier to get the bolts out while the turbo is in one piece trust me on that one! (Pic 5.1) Pic 5.1

8 Now you need to unbolt the six red 13mm bolts using a 13mm spanner. They are tight and awkward but very easy once you've cracked them. Again, easiest way is to wind them back a few turns and then use your fingers. They are not that long and the washers have a tendency to want to jump off and down the back of the engine so beware. Once they are out and you have bent back the small section of the heat shield you will be able to separate the two halves. This may require a little persuasion with a mallet. DO NOT smack the hell out of it as you will crack it. Tap it very gently at the same time as pulling it and it will come free. Be careful not to wiggle it too much as you pull it out as you may damage the fins on the impeller. (Pic 6.1 and 6.2) Pic 6.1 Pic 6.2

9 Ok so now you have revealed the variable vane mechanism inside the turbo. You can see if you move the actuator arm that it moves a little lever. This lever sits in the spare little cut out on the ring and turns the ring which moves all of the levers together which have vanes on the back of them that open and close as the ring turns. Simple design but not a lot of clearance on the moving parts. The carbon that you can see is easily cleaned off on this side but it is the other side that you need to get to. There are three Torx screws holding the mechanism in place but its almost a cert that you won't get them out. For this reason we are using Mr Muscle Oven Cleaner. Loosen the jubilee clip on one end of the thick black pipe coming out of the bottom of the turbo and lift the turbo unit out. In Pic 7.1 you can see three little rollers. These will fall off if you're not careful. These are held in place by a peg that is about 10mm long that passes through the middle and into a hole on the turbo housing. I found that the best way to get these out was to hold two in place with two of my fingers and gently tease out the third just a couple of mm. This will hopefully bring the peg out with it. You can then push the roller back leaving the peg exposed which you can then grab with the pliers. Us you pull the peg with the pliers VERY SLOWLY apply a very small amount of sidewards pressure and it will release it from the hole and from the ring. Hard to explain but you will understand when you get the first one out. Just please make sure you hold the ring in place as you do it. (Pic 7.1) Pic 7.1

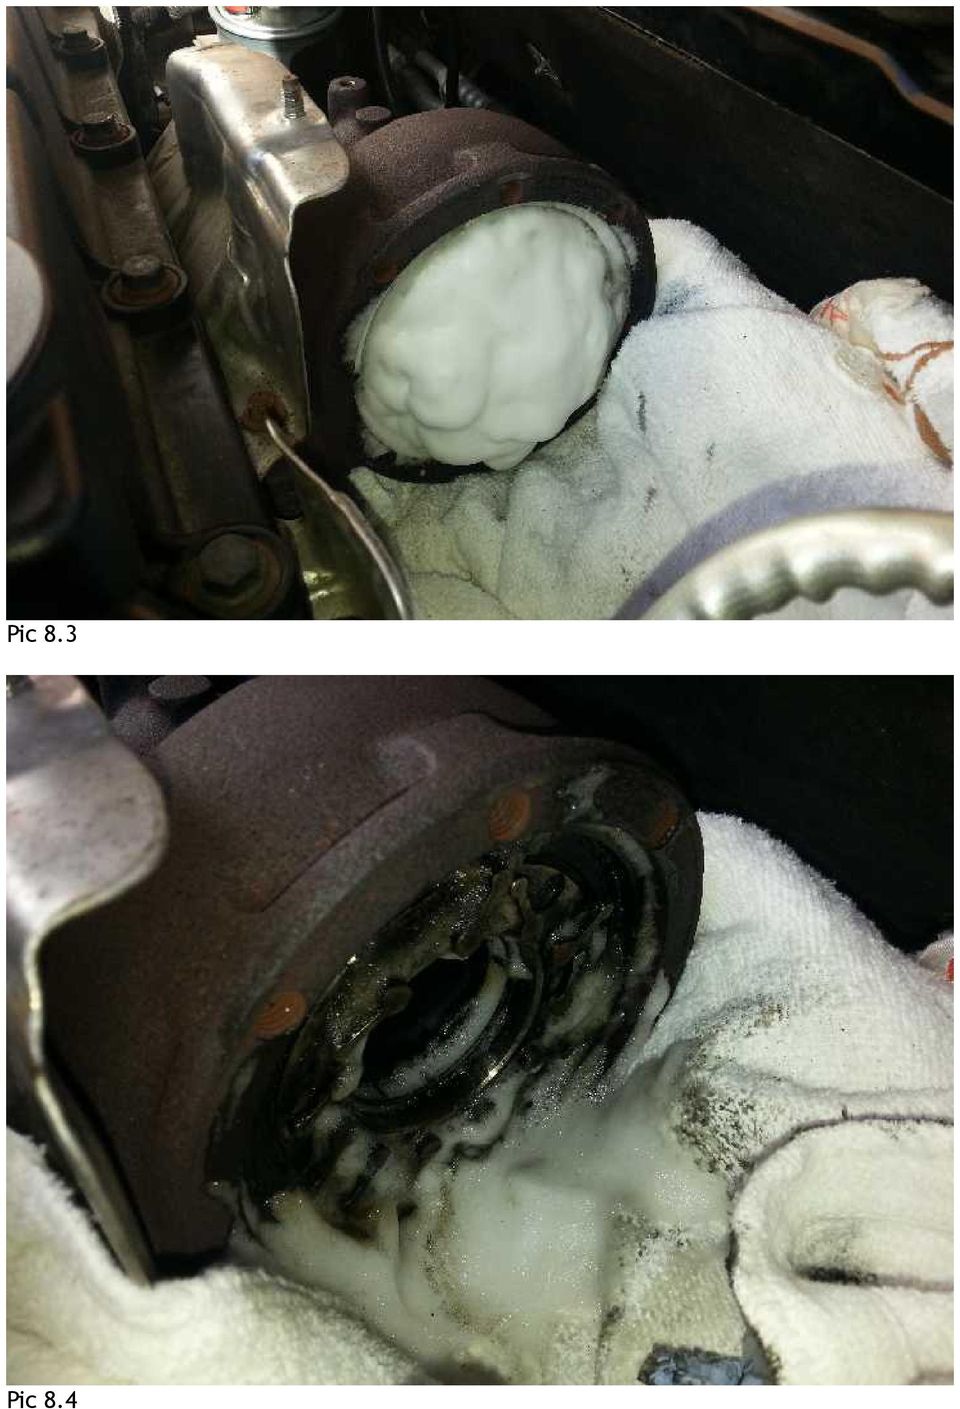
10 Now the ring is off, you need to prepare for lots of foam! Put a bag over the pipes, a big towel under the turbo housing and some tissue into the hole down the middle not too deep as it will become soggy and hard to get out just enough to bung it up. Then crack open the Mr Muscle and start squirting. Spray into the vanes inside working your way out until it looks like below. It foams up very quickly so don't go too mad. Leave for about 30 mins or so and move the levers too to loosen any carbon on the back that it touching the vanes. (Pic 8.1, 8.2, 8.3, 8.4 and 8.5) Pic 8.1 Pic 8.2

11 Pic 8.3 Pic 8.4
12 Pic 8.5

13 Refitting is very much the reversal of removing. I squirted a little more cleaner into the vanes for it to be working whilst I reassembled it all. When replacing the ring, ensure that the slot for the actuator lever is in the right place and use the pliers to help you to slide the rollers back in to place. I found it easier to put the ring on and then put the rollers in. Then reattach the big black pipe and slide the turbo back into the housing taking great care not to damage the fins on the impeller. Put the six red bolts back in place and tighten up. Then tighten the oil return pipe back into place ensuring that you've put the gasket back in, refix the oil feed pipe, and all of the other bits that you've removed. Don't over tighten the bolts that secure the actuator in place as the metal is soft! Now prime the turbo. To do this, disconnect the fuel rail sensor and turn over for 30secs in three 10sec bursts. This allows the oil to pump back up to the turbo before it starts whizzing round. Refix the fuel rail sensor, start up, wait for the black smoke to clear and away you go. Good Luck!

Solstice/Sky Water Pump Replacement
 Solstice/Sky Water Pump Replacement The water pump on the Solstice/Sky is starting to need replacement on some vehicles. This guide will help in replacing the water pump while the engine is still in the
Figure 2 The fan and shroud also needs to be removed for access to the four a/c compressor bolts and removal of the compressor from the top.
 Here are some pictures to show what s required when replacing the A/C compressor, expansion valve and receiver/drier on a 2001 Volvo V70. Even if you don t replace these A/C parts these pictures can help
INSTALLATION INSTRUCTIONS FOR 2006-2009 VW MK5
 CI100018 INSTALLATION INSTRUCTIONS FOR 2006-2009 VW MK5 Rabbit, Jetta 2.5L These instructions are applicable to vehicles equipped with either manual or automatic transmissions Thank you for choosing to
COOPER S PULLEY UPGRADE KIT INSTALLATION INSTRUCTIONS PART NUMBER NME5011
 COOPER S PULLEY UPGRADE KIT INSTALLATION INSTRUCTIONS PART NUMBER NME5011 Below are instructions for the Mini Mania Pulley Upgrade Kit, Part Number NME5011. Please take all necessary precautions for working
M-9424-463V Intake Manifold INSTALLATION INSTRUCTIONS
 Please visit www.fordracingparts.com for the most current instruction information!!! PLEASE READ ALL OF THE FOLLOWING INSTRUCTIONS CAREFULLY PRIOR TO INSTALLATION. AT ANY TIME YOU DO NOT UNDERSTAND THE
Retrofit Instructions Installing a Sport Heated Steering Wheel - Leather, Multifunction BMW X5, E53, 2001 2006
 Retrofit Instructions Installing a Sport Heated Steering Wheel - Leather, Multifunction BMW X5, E53, 2001 2006 Disclaimer: This set of instructions is simply a guide on how I installed my own heated steering
VW GOLF Mk4 TDI FRONT MOUNTING INTERCOOLER INSTALLATION INSTRUCTIONS
 VW GOLF Mk4 TDI FRONT MOUNTING INTERCOOLER INSTALLATION INSTRUCTIONS Tools required: 10mm/13mm socket and 3/8 drive ratchet with extension Torx T20/25/30 screwdrivers or bits Phillips head screwdriver,
BOBBIN WINDER - TYPES & FUNCTION
 BOBBIN WINDER - TYPES & FUNCTION 13.1.006 The bobbin winder is a separate unit screwed on to the machine, adjacent to the balance wheel. Its function is to wind a reserve of cotton evenly onto an empty
Written By: Walter Galan
 ipad 2 GSM LCD Replacement Replace the LCD in your ipad 2 GSM. Written By: Walter Galan INTRODUCTION Use this guide to replace a broken LCD. TOOLS: iopener (1) Phillips #00 Screwdriver (1) Plastic Opening
Time needed: ~3h for lid replacement only. Add 1h for operation harness in lid and ~2h more for installing drive unit and cable harness in trunk.
 DIY for replacing trunk lid and/or retrofitting electrical operation of trunk lid. This document is meant to be a support and give advice on the procedure but I will take no responsibility for any damage
ipad 2 GSM Headphone Jack & SIM Slot Replacement
 ipad 2 GSM Headphone Jack & SIM Slot Replacement Replace the Headphone jack/sim slot in your ipad 2 GSM. Written By: Walter Galan INTRODUCTION Use this guide to replace a broken headphone jack or SIM card
Installation Instructions 4508 4508S
 SYMPHONY Spread Lavatory Faucet with Speed Connect Drain Congratulations on purchasing your American Standard faucet with Speed Connect drain, a feature found only on American Standard faucets. Speed Connect
Written By: Walter Galan
 ipad 2 GSM Rear Camera Replacement Replace the rear camera in your ipad 2 GSM. Written By: Walter Galan INTRODUCTION Use this guide to replace a broken rear camera. TOOLS: ifixit Opening Picks set of 6
Written By: Walter Galan
 ipad 2 GSM Front Panel Replacement Replace the front panel in your ipad 2 GSM. Written By: Walter Galan INTRODUCTION Note: this is a complete guide for replacing a plain front panel. If you have a Front
Step by step guide to installing your own Ku Band satellite dish
 Step by step guide to installing your own Ku Band satellite dish If you don't feel comfortable installing your own system, your local TV Aerial or Handyman can easily follow these helpful guidelines for
2002 2005 Mini Cooper S Grille Install Instructions
 2002 2005 Mini Cooper S Grille Install Instructions Lower Front Grille BEFORE AFTER Package Contents 1 perforated grille (Stiletto, RAZR, or Monster) 6 Zip Tie Mounting Pads 1 is for the temp. sensor 5
FRONT BUMPER INSTALLATION INSTRUCTIONS 2007-2011 DODGE / MERCEDES SPRINTER
 Aluminess Products Inc 9402 Wheatlands Ct. #A Santee, CA 92071 619-449-9930 FRONT BUMPER INSTALLATION INSTRUCTIONS 2007-2011 DODGE / MERCEDES SPRINTER Please read before beginning Stainless steel hardware
This is the civilian transfer case with the cooling loop only found in the driven gear half of the front case.
 INTRODUCTION The Transfer case used in the AMG Hummer is a New Venture Gear, model 242. This case has been in use for the H-1/Hummer since the early 1990 s. There have been modifications to the internal
Model No: VS4815 1. SAFETY INSTRUCTIONS VS4800 2. INTRODUCTION & APPLICATIONS VS4815 3. CONTENTS. 2.1 Introduction. 2.
 Instructions for: Petrol Engine Twin Camshaft Setting / Locking Tool Kit - (incorporating Vanos Alignment) - BMW N42 & N46 Engines Model No: VS4800 Associated kit: Camshaft/Carrier Bracket Remover & Installer
http://waterheatertimer.org/troubleshoot-rheem-tankless-water-heater.html
 http://waterheatertimer.org/troubleshoot-rheem-tankless-water-heater.html TECHNICAL SERVICE DEPARTMENT Removal, Cleaning, & Reinstallation of the Burner Assembly For models 74 & GT199 Required tools -
3. Loosen 3 x grub screws in the Dec end cap and unscrew the cap and counterweight shaft. NEQ6 Belt Modification Kit.
 NEQ6 Belt Modification Kit. Thank you for your purchase. Please read these instructions fully before fitting. Your package should contain 2 off 47 & 2 off 12 tooth aluminium pulleys 2 off belts 6mm wide
www.odometergears.com Ford Ranger and Mazda Pickup Odometer Worm Gear Replacement
 www.odometergears.com Ford Ranger and Mazda Pickup Odometer Worm Gear Replacement http://www.therangerstation.com/magazine/fall2008/odometer_worm_gear.htm ****************************************************************************************************
GENUINE PARTS INSTALLATION INSTRUCTIONS
 GENUINE PARTS INSTALLATION INSTRUCTIONS 1. DESCRIPTION: Auto-Dimming Mirror Kit with Compass and HomeLink 2. APPLICATION: Titan 3. PART NUMBER: 999L1 WS000 4. KIT CONTENTS: Item Qty Description Service
Overview PARTS LIST. B. Lever mounting base C. Flush handle assembly D. Grey/Blue float stop E. Grey float (Full Flush) F. Flush valve washer
 F. Flush valve washer") Overview READ ENTIRE INSTRUCTIONS BEFORE STARTING INSTALLATION PARTS LIST A. Flush valve B. Lever mounting base C. Flush handle assembly D. Grey/Blue float stop E. Grey float (Full Flush) F. Flush valve
Overview READ ENTIRE INSTRUCTIONS BEFORE STARTING INSTALLATION PARTS LIST A. Flush valve B. Lever mounting base C. Flush handle assembly D. Grey/Blue float stop E. Grey float (Full Flush) F. Flush valve
Cooling system components, removing and installing
 Engine BHW Cooling system components, removing and installing Page 1 / 24 19-1 Cooling system components, removing and installing Warning! When doing any repair work, especially in the engine compartment,
Checking Glow Plugs Based on a Terrano II 2.7tdi Year 2000
 Workshop 6 Checking Glow Plugs Based on a Terrano II 2.7tdi Year 2000 Operation: The glow plugs are heated in three stages Pre glow Intermediate glow After glow The duration of each stage will vary with
Convertible Top Hydraulic Cylinder Removal Manual for W124 E-Class Convertibles 1993-1995 Models 300CE (1993) and E320 (1994-1995)
 and E320 (1994-1995)") Convertible Top Hydraulic Cylinder Removal Manual for W124 E-Class Convertibles 1993-1995 Models 300CE (1993) and E320 (1994-1995) Written by Samit Ghosh with picture material from vexed of benzworld.org
Convertible Top Hydraulic Cylinder Removal Manual for W124 E-Class Convertibles 1993-1995 Models 300CE (1993) and E320 (1994-1995) Written by Samit Ghosh with picture material from vexed of benzworld.org
Installation Instructions 6028.801
 DAZZLE Installation Instructions 08.80 Spread Lavatory Faucet with Speed Connect Drain* Congratulations on purchasing your American Standard faucet with Speed Connect drain, a feature found only on American
CorkSport Mazdaspeed 6 Rear Sway Bar 2006-2007 Mazdaspeed 6
 CorkSport Mazdaspeed 6 Rear Sway Bar 2006-2007 Mazdaspeed 6 Pre-Installation Notes: The CorkSport Rear Sway Bar is a great addition to improving the handling performance to the Mazdaspeed 6. It will minimize
Sprinter Fuel Filter Installation
 This document is based on my experience with a 2002 Sprinter, and created because of the lack of manuals for the Sprinter in the US that reflects basic maintenance guidelines. The pros, no doubt, have
Range Road RR Series Semi-Automatic Firewood Processor. Crated Unit Assembly Manual
 Range Road RR Series Semi-Automatic Firewood Processor Crated Unit Assembly Manual 1 1) Undo 8-18mm x 19mm Nuts and bolts, 2 on each leg of top frame 2) Lift top of Metal crate off and move out of work
MGB Chrome Bumper Conversion
 MGB Chrome Bumper Conversion Installation Instructions For 1974 1/2-1980 MGB This kit requires cutting, welding, and painting. Professional installation recommended. Note: Every MGB body is slightly different
Odyssey of the Mind Technology Fair. Simple Electronics
 Simple Electronics 1. Terms volts, amps, ohms, watts, positive, negative, AC, DC 2. Matching voltages a. Series vs. parallel 3. Battery capacity 4. Simple electronic circuit light bulb 5. Chose the right
Softail Oil Change. Tools
 From time to time I see question on the forum regarding doing an oil change on a Harley and more specifically about doing a scavenging oil change on a Softail. Since there didn't seem to be a good thread
FX Circuit Board Replacement Instructions
 FX Circuit Board Replacement Instructions There are three circuit boards inside the FX inverter. Normally, only two of these boards are candidates for replacement; the FET board (large board that includes
Jake's Big Airbox Modification
 1 sur 12 29/11/2012 16:32 Jake's Big Airbox Modification Captain Jake, the Mel Bay of Motorcycle Modification presents: FREE YOUR AIRBOX! What follows is documentation and photographs of the airbox modification
Installing RNS-E SAT NAV for Audi A4
 As one of the major options on the A4 you can get a DVD Satellite Navigation System call the RNS-E. With the help of ebay these sat nav systems are now available to by at a rough cost of 650 plus the cost
Sprinter Fuel Filter Installation
 This document is based on my experience with a 2002 Sprinter, and created because of the lack of manuals for the Sprinter in the US that reflects basic maintenance guidelines. The pros, no doubt, have
Cylinder head gasket, replacement
 "VCC065612 EN 20110604" 1(7) Cylinder head gasket, replacement Special tools: 999 5098 Disconnect battery earth lead Drain coolant Remove heat shield over exhaust manifold. (Only the two bottom bolts on
RULE # 1 is DON T mess with things that you don t know anything about! (Take them to a pro & pay them to fix it)
") OK there seems to be a LOT of problems noted on KatRiders having to do with CARBS, so I thought I d write out sort of a checklist of things to help folks. RULE # 1 is DON T mess with things that you don
OK there seems to be a LOT of problems noted on KatRiders having to do with CARBS, so I thought I d write out sort of a checklist of things to help folks. RULE # 1 is DON T mess with things that you don
Universal Adjustable Fuel Pressure Regulator
 Universal Adjustable Fuel Pressure Regulator Installation Instructions for: Part Numbers 25-302 U.S. Patent # 6,298,828! Due WARNING: to the fact that this installation deals with your fuel system this
Standard Sleep Pod Side Entry Assembly Instructions
 Standard Sleep Pod Side Entry Assembly Instructions www.podtime.co.uk enquiries@podtime.co.uk Working House Ltd How to assemble your pod Pod assembly onsite is a relatively simple exercise for two people
Thread Tensions All Machines
 Below are items related to thread tensions and tension problems as found on Brother embroidery equipment. They are listed in the order that they most often occur. Use this form only as a guide. Following
Navico-Northstar 2kW JRC Radar Package, Scanner Cable Removal and Replacement
 Navico-Northstar 2kW JRC Radar Package, Scanner Cable Removal and Replacement This work instruction describes the methods and means for which to remove and reinstall optional scanner cable configurations
CAM-03, Camshaft Assembly Oil Seal Replacement
 CAM-03, Camshaft Assembly Oil Seal Replacement Tools Jack stands Floor Jack Metric Socket set Metric Wrench set Porsche Timing Belt Tension tool (P9201) Flywheel Lock (P9206) Balance Shaft Pin Spanner
Alfa Romeo 147 Gearbox oil change guide
 Alfa Romeo 147 Gearbox oil change guide Alfa Romeo 147 Gearbox oil change guide This guide will help you to change the gearbox oil on Alfa Romeo 147. Photos used in this guide are from TS version, but
AWE Tuning Air/Air Intercooler Kit for 2000-04 Audi 2.7T
 AWE Tuning Air/Air Intercooler Kit for 2000-04 Audi 2.7T Congratulations on your purchase of the AWE Tuning Intercoolers for your 2.7T Audi. Hundreds of hours of design and operational testing were spent
How To Change Your Oil and Filter-Suzuki GS by BassCliff (a.k.a. BikeCliff)
") How To Change Your Oil and Filter-Suzuki GS by BassCliff (a.k.a. BikeCliff) By popular demand I have undertaken the task of documenting one of my recent oil and filter changes on my GS850GT. I hope you
How To Change Your Oil and Filter-Suzuki GS by BassCliff (a.k.a. BikeCliff) By popular demand I have undertaken the task of documenting one of my recent oil and filter changes on my GS850GT. I hope you
FRONT WINDSHIELD SEAL INSTALLATION
 FRONT WINDSHIELD SEAL INSTALLATION Tech Article From Newsletter 16.1-1st Quarter of 2010 Replacing your Front Windshield Seal ISN T AS HARD AS YOU MAY THINK! Recently, we retooled our front window seal
Repair Section. We need to remove both heat syncs from the motherboard. Heat syncs are shown in the picture below.
 Repair Section We need to remove both heat syncs from the motherboard. Heat syncs are shown in the picture below. We will start by removing the X clamps from the bottom side of the board. X clamps are
GTI VR6 Front Wheel Bearing DIY http://www.gtishrine.com
 GTI VR6 Front Wheel Bearing DIY http://www.gtishrine.com This procedure covers replacing the front wheel bearings. Tools and Parts required: Wheel Bearing Puller w/ ABS adapter. Available for rent from
Triac Printed Circuit Board Replacement
 Technical Service Bulletin: Triac Printed Circuit Board Replacement TRONIC 5000C Pro Models: WH17, WH27, WH36 Introduction Fig. 1 ELECTRICITY IS EXTREMELY DANGEROUS. TAKE EXTRA PRECAUTIONS AND ENSURE ALL
Written By: Walter Galan
 Installing iphone 4S Display Assembly Written By: Walter Galan TOOLS: Phillips 00 Screwdriver (1) Plastic Opening Tools (1) PARTS: iphone 4S Display Assembly (1) iphone 4 and 4S Screen Protector (1) Small
Alfa Romeo 147 On board instruments installation guide
 Alfa Romeo 147 On board instruments installation guide Alfa Romeo 147 On board instruments installation guide This guide is describing how I installed oil temperature and oil pressure gauges to my Alfa
TROUBLESHOOTING DITTING COFFEE GRINDERS
 804 Series 805 Series 903 Series 1203 Series 1403 Series 1800 Series SERVICE TIP #R1 TROUBLESHOOTING DITTING COFFEE GRINDERS Page 1 of 4 DO NOT TAKE THE GRINDER APART BEFORE READING THE FOLLOWING: 1. Grinder
INSTRUCTIONS: LocknCharge Laptop Carts
 INSTRUCTIONS: LocknCharge Laptop Carts www.lockncharge.com Extra Tools required: Hammer, Philips head screwdriver, medium adjustable spanner. (Allen key supplied) (Panel colours for illustration purposes
http://mbworld.org/forums/c32-amg-c55-amg-w203/449471-famous-ac-clicking-noiseac-footwell-damper-linkage-replacement-diy-details-steps.
 Air Conditioner / HVAC W203 Stepper Motor Repair PART 1 OF 3 forums/c-class-w203/177068-noisy-air-conditioner-stepper-motorreplacement-clicking-hissing.html forums/c32-amg-c55-amg-w203/449471-famous-ac-clicking-noiseac-footwell-damper-linkage-replacement-diy-details-steps.html
BODY-12, Door Handle - Removal, Installation, and Adjustment
 Introduction BODY-12, Door Handle - Removal, Installation, and Adjustment There are many different procedures floating around describing how to replace the door handles on a 944 and every one of them will
Equipped with AEM Dryflow Filter No Oil Required! INSTALLATION INSTRUCTIONS PART NUMBER 21-754DS. 2012-2015 BMW 335i 3.0L
 Equipped with AEM Dryflow Filter No Oil Required! INSTALLATION INSTRUCTIONS PART NUMBER 21-754DS 2012-2015 BMW 335i 3.0L 1 ITEM NO. PART NUMBER DESCRIPTION QTY. 1 21-2057DK AIR FILTER 1 2 9-0442 TUBE;
89 to 93 Dashboard Removal. Created for Miata.net Members by Anthony Meeks (SE1686)
") 89 to 93 Dashboard Removal Created for Miata.net Members by Anthony Meeks (SE1686) Intro When I bought my 91 SE, the paint on the top of the dashboard was in terrible shape and I immediately determined
89 to 93 Dashboard Removal Created for Miata.net Members by Anthony Meeks (SE1686) Intro When I bought my 91 SE, the paint on the top of the dashboard was in terrible shape and I immediately determined
Before repairing your toilet, you must determine
 Before repairing your toilet, you must determine which type of toilet you have. Pressurized Toilets If you have a pressurized toilet, it is recommended that you call a licensed plumbing contractor to repair
Honda CX500 & GL500 Forum
 Welcome to Honda CX500 & GL500 Forum Sign in Join Faq Honda CX500 & GL500 Forum Discussion about the CX500, CX650, GL500, GL650, and Turbo variants Links Events Photos Forums CX500 Chopper Project Home
PLUMBING CARE AND REPAIR
 PLUMBING CARE AND REPAIR No special skills are required for any of the repairs described in this section. Plumbing repairs are seldom dangerous unless leaking water is soaking areas where there are electrical
The Ultimate XBOX 360 Guide to Fix 3 Red Lights (RROD)
") The Ultimate XBOX 360 Guide to Fix 3 Red Lights (RROD) We offer a wide range of repair kits to meet just about everyone's needs. We offer kits ranging from just hardware, to kits that include hardware,
The Ultimate XBOX 360 Guide to Fix 3 Red Lights (RROD) We offer a wide range of repair kits to meet just about everyone's needs. We offer kits ranging from just hardware, to kits that include hardware,
Installation guide Nordic mixer taps. Before installing read this guide first
 Installation guide Nordic mixer taps Before installing read this guide first Introduction Installation, maintenance and warranty The Nordic Twintaps are our latest innovation for your kitchen a boiling-water
Dive Rite 200 & 300 Bar Isolator Manifold Service Manual
 Dive Rite 200 & 300 Bar Isolator Manifold Service Manual Principal Photography and Text by Pete Nawrocky Copyright 2003 Lamartek Inc. D/B/A Dive Rite 0 Warning This manual is only to be used as a guide
AstroSystems Digital Setting Circles for Zhumell, GSO, Apertura and Astro-Tech
 AstroSystems Digital Setting Circles for Zhumell, GSO, Apertura and Astro-Tech Components 1 Sky Commander Digital Setting Circle Computer 2 Encoders 10,000 step 1 Sky Commander Digital Setting Circle Manual
Tool And Material Checklist
 HOW - TO CV JOINTS CV JOINTS Tool And Material Checklist Screwdriver Metal Shears Breaker Bar or Torque Wrench Assorted Wrenches Wire Evaporating Spray Solvent Pusher Tool Vise Snap Ring or Duckbill Pliers
Auto Sentry-eXP Maintenance
 Auto Sentry-eXP Maintenance Maintenance Procedures for Auto Sentry exp Bill Dispenser Credit Card Reader Bill Acceptor Bill Dispenser Maintenance Bill Dispenser Problem / Cause Bill Dispenser Error Codes
Installation instruction do88 Intercooler for Volvo S40 / V50 / C30
 Installation instruction do88 Intercooler for Volvo S40 / V50 / C30 This instruction shows how to replace the OEM intercooler with our performance intercooler. 2. 3. 1. 4. 5. Part number: ICM-170 6. At
Cable Drum Installation
 20 Cable Drum Installation COUNTERBALANCE None Shake the TorqueMaster spring tube gently to extend the winding shafts out about 5" on each side. For single spring applications, there will be no left hand
Drive shaft, servicing
 Volkswagen Passat B6 - Drive shaft, servicing Стр. 1 из 41 40-7 Drive shaft, servicing Drive shafts, overview I - Assembly overview: Drive axle with CV joint VL100 40-7, Drive axle with CV joint VL100,
SALEEN SPEEDLAB SERIES VI STANDARD SC UPGRADE KIT
 SALEEN SPEEDLAB SERIES VI STANDARD SC UPGRADE KIT INSTALLATION MANUAL: 2005 MUSTANG 4.6 3V MANUAL P/N: 10-8002-C14338C SUPERCHARGER KIT P/N: 10-1607-B14083* Saleen Performance, Inc. 1225 East Maple Rd.,
2740 Whitten Rd Bldg 103 Memphis, TN 38133 Telephone 901-380-9290 Email Bwilliams@Dieselcare.net
 Fuel Injection Pump Replacement REMOVAL Diesel Care & Performance Inc 1. Disconnect negative battery terminal. 2. Remove throttle linkage. Fuel Injection Pump Bracket 3. Remove injection pump bracket.
http://mbworld.org/forums/c32-amg-c55-amg-w203/449471-famous-ac-clicking-noiseac-footwell-damper-linkage-replacement-diy-details-steps.
 Air Conditioner / HVAC W203 Stepper Motor Repair PART 3 OF 3 forums/c-class-w203/177068-noisy-air-conditioner-stepper-motorreplacement-clicking-hissing.html forums/c32-amg-c55-amg-w203/449471-famous-ac-clicking-noiseac-footwell-damper-linkage-replacement-diy-details-steps.html
REMOVAL AND INSTALLATION
 303-01C-1 REMOVAL AND INSTALLATION Engine Body On Special Tool(s) Adapter For 303-D043 303-D043-02 or equivalent Special Tool(s) 303-01C-1 Turbocharger Lifting Bracket 303-1266 Wrench, Fan Clutch Nut 303-214
Cleaning Instructions for Burner, Pilot Assembly, and Emitter Screen Series: 220000-450000
 Cleaning Instructions for Burner, Pilot Assembly, and Emitter Screen Series: 220000-450000 10 mm open end wrench 12 mm open end wrench 9/16 open end wrench 5/8 open end wrench 11/16 open end wrench 9/16
How To: Retrofit the Morimoto Mini D2S bi-xenon Projectors
 How To: Retrofit the Morimoto Mini D2S bi-xenon Projectors Warning: By reading this document I agree that it is only intended to be used as an educational guide. The Retrofit Source Inc. makes no guarantee
Contents. Front Derailleurs... 2. Part One - Planning... 2 I. Objectives... 2 II. Materials Needed... 2 III. Setting...2 IV. Evaluation...
 Contents... 2 Part One - Planning... 2 I. Objectives... 2 II. Materials Needed... 2 III. Setting...2 IV. Evaluation... 2 Part Two - Activity Instructions... 3 Steps to Adjusting and Replacing... 3 Disassemble...
430 Power/Electronics Replacement
 Replacing the main board WARNING Before proceeding, turn off the main power switch and unplug the power cord. Caution Make sure you are properly grounded with an ESD strap before continuing. The main printed
2005-2007 Ford Focus Front Brake Rotors
 2005-2007 Ford Focus Front Brake Rotors Replacement Replacing the rotors in 2005-2007 Ford Focus models with rear drum brakes. Written By: David Hodson INTRODUCTION The steps in this guide are used to
Triple Threat 3-in-1 Game Table 3 IN 1 GAME TABLE
 NG0M Triple Threat 3-in- Game Table 3 IN GAME TABLE Thank 3 in Y Game Table Thank you for your purchase of our product. We work around the clock and around the globe to ensure that our products maintain
Turbocharger system components, servicing
 21-1 Turbocharger system components, servicing Engine codes: AAZ, 1Z, AHU Observe rules of cleanliness Page 21-10 Turbocharger hoses and lines, connecting Page 21-11 WARNING! Do not re-use any fasteners
PARTS NEEDED FOR CONVERTING FROM LP TO NG
 1 6 7 8 3 5 4 10 9 2 PARTS NEEDED FOR CONVERTING FROM LP TO NG Number Description 1 30" NG Manifold 2 NG side burner valve 3 NG Regulator 4 Rear I/R NG orifice 4 Rear I/R NG orifice 5 Side burner NG orifice
Build Your Own Solar Car Teach build learn renewable Energy! Page 1 of 1
 Solar Car Teach build learn renewable Energy! Page 1 of 1 Background Not only is the sun a source of heat and light, it s a source of electricity too! Solar cells, also called photovoltaic cells, are used
BMW E46 Convertible. Storage Compartment Lid Hydraulic Cylinder Removal
 BMW E46 Convertible Storage Compartment Lid Hydraulic Cylinder Removal Created by taylor192 of E46Fanatics.com Hosted by Top Hydraulics, without any warranties Page.1 Storage compartment lid hydraulic
Ford F-Series Column Shift Repairs
 Ford F-Series Column Shift Repairs I ve had it on my list to tighten up the linkage on my 52 s column shift setup for a long time. I tried to get it apart when I had all the front end sheet metal off,
www.odometergears.com
 BMW E39 (5 Series) September 1999-2003 Headlight Adjuster Repair (version 1) A special thank you to Trent Cole of Lone Star Bavarian in TX for the great write up. Here are his words verbatim. Earlier model
2006 HEADSHOK Service Video #1
 LEFTY SPEED DLR DAMPING CARTRIDGE This document explains how to properly remove, disassemble, inspect, reassemble and reinstall the Lefty Speed DLR2 damping cartridge. It is a document to be used in conjunction
Manual for GlobePharma Mini-Press II Rotary Tablet Press
 1 of 13 Preparing the Rotary Press 1. Make sure the rotary press is unplugged. 2. Open the bottom cabinet of the rotary press and take out the grey tool kit, and the beige box of punches and dies. 3. Take
Installation Instructions
 Installation Instructions READ BEFORE INSTALLING UNIT For Low Profile Window Air Conditioner INSTALLATION WARNINGS AND CAUTION Carefully read the installation manual before beginning. Follow each step
Awning Instructions. Standard Manual 1.5m to 4.5m
 Awning Instructions Standard Manual 1.5m to 4.5m English Standard Manual Instructions Contents Warning 1.5m 3.0m Awnings 4 x Expansion bolts (2 per bracket)** 2 x brackets 1 x Awning 1 x Winder handle
Rebuild Instructions for 70001 and 70010 Transmission
 Rebuild Instructions for 70001 and 70010 Transmission Brinn, Incorporated 1615 Tech Drive Bay City, MI 48706 Telephone 989.686.8920 Fax 989.686.6520 www.brinninc.com Notice Read all instructions before
Your New Frog Bike. Congratulations on purchasing a new bike and thank you for choosing Frog!
 Your New Frog Bike Congratulations on purchasing a new bike and thank you for choosing Frog! We know that you must be raring to go but before you do there s a few little things still to do to get you up
Post Mount Light Installation*
 Post Mount Light Installation* *For the general installation of most Post Mount Spotlights, many vehicles may need slight modifications to these instructions. You will need the following tools: High torque
OWNER S MANUAL Table Tennis Table Patent Pending
 OWNER S MANUAL Table Tennis Table Patent Pending Be sure to write your model number and serial number here for future reference. You can find these numbers printed on the bottom of the table. MODEL # T8179
MAN - MERCEDES - BENZ
 SAYFA: 1 10100 10102 10103 355 353 06 15 355 353 03 15 346 353 08 15 AXLE GEAR AXLE GEAR AXLE (WITH BUSHING TYPE) (WITH BUSHING TYPE) (WITH BUSHING TYPE) 2521 2517-2521-2622 10104 10105 10106 308 350 00
Replacement Instructions. Warning: During this procedure, keep small parts away from children.
 apple Power Mac G4 / Macintosh Server G4 ATA Hard Drive Replacement Instructions Follow the instructions in this sheet carefully. Failure to follow these instructions could damage your equipment and void
Fitting Instructions Garador, Westland & Catnic Garage Door Spring Box Roller Wheels & Wall Bracket & Link Arm
 Fitting Instructions for a Garador, Westland & Catnic Garage Door Spring Box Roller Wheels & Wall Bracket & Link Arm These instructions cover, how to replace a Spring Box Assembly to a Garador, Westland
Front brakes (FN- 3), servicing
, servicing") j a t Front brakes (FN- 3), servicing 46-1 Front brakes, servicing Note: Install complete repair kit. After replacing brake pads and before moving vehicle, depress brake pedal several times firmly to properly
j a t Front brakes (FN- 3), servicing 46-1 Front brakes, servicing Note: Install complete repair kit. After replacing brake pads and before moving vehicle, depress brake pedal several times firmly to properly