Becky! Internet Mail
|
|
|
- Allen Sherman
- 10 years ago
- Views:
Transcription

1 Becky! Internet Mail Rimarts, Inc. 2015

2 p2 Foreward This help file was downloaded from and complements the help file available there. This manual should not be used to the exclusion of the available help file and is primarily designed so new users can browse the many features of Becky! Internet Mail. For optimal productivity, you are encouraged to also download and install the help file that mirrors and expands on this PDF document. This document was developed by david kirk and is an expansion of the documentation published by RimArts, Inc. This document is protected by copyright and is not to be modified in any way. The developer of Becky! is aware of this document and receives all updates. Comments and suggestions - and also corrections - are welcome. Please send to david at [email protected]

3 p3 Table of Contents Becky! Internet Mail 5 Welcome 5 Becky! Basics 7 The Main Window 7 Initial Setup 9 Receiving 11 Sending 12 Reading 13 Replying 14 Using Address Book 16 Managing 18 Managing , Part Two 20 Menu Bars 22 Main Window Menu Bar 23 Main File menu 23 Main Edit menu 26 Main View menu 27 Main Mail menu 29 Main Tool menu 31 Compose Window Menu Bar 33 Compose File menu 33 Compose Edit menu 34 Compose View menu 36 Compose Tool menu 37 Address Book Menu Bar 38 Address Book File menu 38 Address Book Edit menu 39 Address Book View menu 40 Address Book Tool menu 41 Address Book View 42 Settings 43 Mailbox Setup 44 Account 44 Connection 46 Compose 47 Receive - Mailbox 48 Misc. Mailbox 49 General Setup 51 General Setup Menu 51 Tree/List 53 Message View 55 Editor 57 Citation 59 Languages 61 Shortcut Keys 63 Keywords 64 Send 65 Receive - General 66 MIME 68 Advanced Setup 69

4 p4 Folder Mail Settings 71 Folder Properties - General 71 Folder Properties - Compose 73 Search Dialogs 74 Search Messages 74 Find in Text 75 Replace 76 Mail Query 77 Headline Search 79 Advanced Features 80 Thread Mode 80 Command Line Options 82 Profiles 83 Using Memos 85 Reminder Feature 86 Tab Sheets 87 Templates 88 Multi-language Support 92 Spell Check 93 HTML messages 94 Flag, Priority and Color Label 95 Agents 96 Using Plug-ins 98 Sync with Portable Media 99 To Go options 100 What's New 101 Mailing Lists Manager Usage 102 Mailing Lists Manager 103 Mailing Lists Property 104 Filtering Manager 105 Filtering: Rules Menu 106 Filtering: Edit Rules 107 Filtering: Options 109 Keyword Overview 110 Backup and Restore 111 Licensing/Registration 113 User Registration 113 License Agreement 115 COPYRIGHT 116 Appendix 117 Troubleshooting 117 Tips 119 Delivery Status Notification 120 Regular Expressions 121 Cc and Bcc 122 Escape Characters 123 Message Property 124 Information for Visually Impaired Users 125 Font Tutorial 126 Import Tips 127


5 p5 Introduction Becky! Internet Mail is the mail software designed for the Internet . Since its birth in 1996, we kept improving its capabilities by listening to users' feedback. It has now become one of the most successful shareware products, especially in Japan. Becky! has experienced one major overhaul in 2000 and the current version is referred to as Becky! Ver.2. Although we always work hard to develop a stable, fast, and feature rich program, we never forget the most important virtue which is "ease of use." From its simple and clean user interface, you might not imagine its potential. The more you use, the more you will find it by yourself. Thanks to you all who are supporting the development of Becky!. Tomohiro Norimatsu President, RimArts, Inc. Features Mailbox Features: You can create not only multiple mailboxes, but also multiple profiles for each mailbox, which can allow multiple accounts within a mailbox. This feature is also useful if you use different settings, such as LAN and dialup, for the same mailbox. Popular protocols: IMAP and POP for and LDAP and CardDAV for the address book. Portable: Becky! allows you to create a portable version when you need to work from a different PC. Fast! You can manage thousands of at your fingertip. Becky! isn't bloated and uses memory efficiently. HTML: Although Becky! default is plain text, you can also write HTML with Becky!. Becky! uses features in Microsoft Internet Explorer to provide a functional HTML client. Templates: Flexible template capability -- You can prepare standardized formats for business and personal . You can also create HTML templates. Task Manager: With Becky!, you can assign an Agent to a message. That allows you to create tasks regarding the message to help you manage your work. Reminder feature: With Becky!'s unique Reminder capability, you will receive from yourself on scheduled date. You can even schedule sending messages to someone else. You don't have to remember your friends' birthdays -- Becky! does. :-) Filters: Powerful Filtering Manager -- You can sort messages into folders according to the filtering rules. You can define unlimited and/or conditions for one filtering rule. Mailing Lists: Becky!'s Mailing Lists Manager helps you to organize multiple mailing list subscriptions. You don't have to search past messages just to find how to unsubscribe the list. Third-party features: The Plug-In Interface enables third parties to create useful plug-ins to customize Becky! for your particular needs. Did we say Fast? We're talking speed here. Becky! avoids many common GUI features that just slow you down. Welcome to Becky! Internet Mail Becky! focuses on effective Internet communications and, although the learning curve may be longer than for other clients, Becky! delivers. Becky! provides many significant features for your use and we hope you explore and use them.

6 p6 New to Becky!? Please review the basics. Transitioning from another client? You may also want to review our Import Tips. Have problems or questions? Check the topic on Troubleshooting. Becky! is shareware, so please review the licensing/registration process.

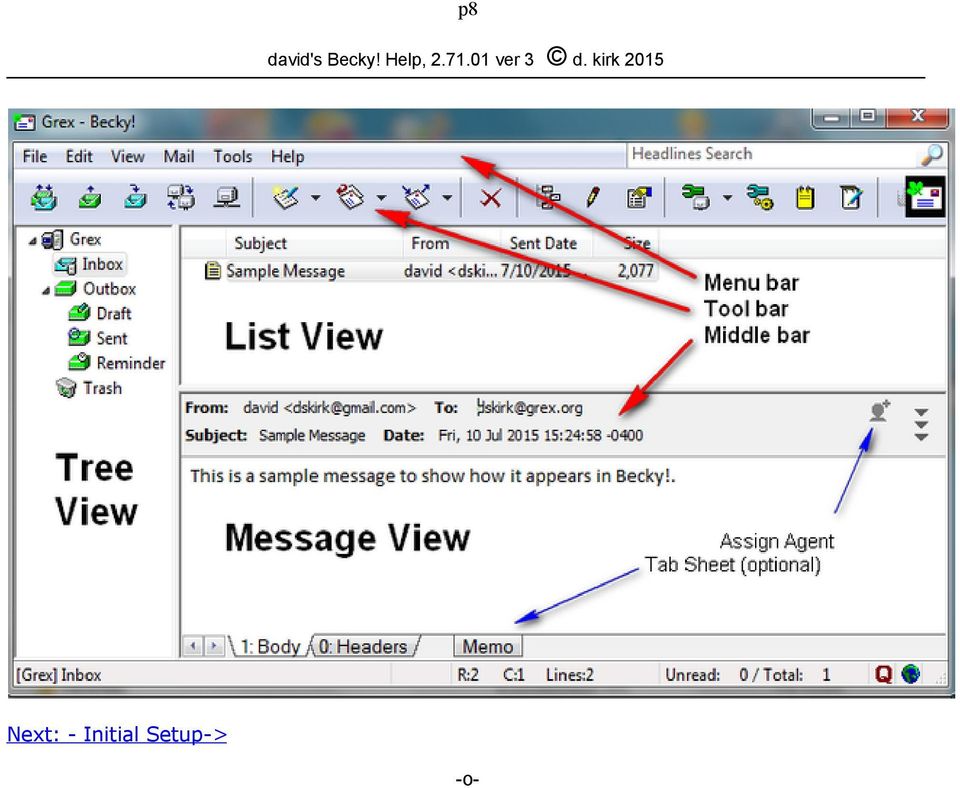
7 p7 Becky! Basics This chapter explains basic use of Becky! and . If you are new to Becky! or only an occasional user, this chapter is for you. If you are already comfortable using Becky! you may not need this chapter, except for a periodic review. However, once you are able to send and receive , you are encouraged to review the chapters on Mailbox Setup, General Setup and Folder Mail Settings for a more thorough knowledge of the full extent of Becky! features. Also, a later review of Advanced Features will ensure that you can use all of the power of Becky!. Take your time. Becky! is there for you. This initial chapter steps you through the basics of 1. The Main Window (an overview of its structure) 2. Initial Setup 3. Receiving 4. Sending 5. Reading 6. Replying to 7. Using the Address Book 8. Managing (Folders, Filters, Priority, Color, Flags and Agents) 9. Managing , Part Two (Optional, beyond the basics) Next: - The Main Window> The Main Window Becky!'s Main Window Panes Becky!'s main window (shown below) consists of three panes. Understanding the terms that reference the three panes will be helpful to you as you learn Becky! At the left, there is a pane that contains mailboxes and folders. This is called Tree View. At the upper right, there is a pane that lists all messages in the selected folder. This is called List View. The entries for each message are referred to as headlines. At the lower right, there is a pane that shows the content of the currently selected message. This is called Message View. There are also three "bars" that you need to be familiar with: the Menu Bar, the Tool Bar and the Middle Bar, as each has its own properties and features. Also shown are the 'Assign Agent icon and the Tab Sheet. Note: If you choose the root mailbox button in the Tree View (the mailbox in sample is named "Grex"), you will see the list of profiles for the current mailbox instead of the message list of the folder.


8 p8 Next: - Initial Setup->
9 p9 Initial Setup When you started Becky! for the first time, you were prompted to confirm the name of the data folder. This is where all your mailbox information and messages will be stored. The default data folder is normally "(Boot Drive):\Becky!\(Your Login Name)\". TIP: Backup this folder periodically to another drive to protect against losing messages in case of a technical problem. Next, you were presented with a dialog box for the configuration of the initial mailbox. The name assigned to the mailbox is known as the "Mailbox Name." You will usually need a mailbox for each of your accounts. The name doesn't affect the functionality so you can name it anything you like, such as the name of your ISP. Then, enter your name and address. They are important because this name and address show up in the From field of your outgoing messages, e.g. Your Name: Tomohiro Norimatsu Address: [email protected] ISP Information Reminder: To complete the setup of your account, you need information from your ISP. This is vital. Your ISP may require use of specific port numbers, specific POP or IMAP or SMTP servers, and may have given you documentation on encryption requirements using terms such as SSL/TLS or STARTTLS and may also specify authentication requirements. Usually, the information from your ISP will let you complete registration of your account. Mailbox Setup: Importing Messages and Address Books: If you are converting from another client, see our Import Tips for guidelines on importing to Becky!. Mailboxes vs Profiles: When you set up a mailbox, you are setting up one "profile" (specific settings for an account) and the accompanying folders to accommodate input and output. In most cases, you will want a unique mailbox for each account. Profiles are a feature of Becky! in that you may have multiple accounts (profiles) in one mailbox, but multiple profiles are designed for use in specific situations. You can learn more about profiles by reading the Profiles page. The situation may surface where you want to use one set of folders for multiple accounts and that is where the Profile feature helps, but you may never need that feature. For practical purposes, when you set up a mailbox, you are setting up a profile and associated folders. Also, for practical purposes, references in this help file to a mailbox are also references to the default profile for that mailbox unless specifically mentioned. For more information, see Using Profiles. TIP! Please review Tools>Mailbox Setup while reviewing the following help information as that is where you enter information for a mailbox. Accounts Tab: You may usually leave Mail Protocol as "POP3". Most ISPs use POP3 unless they specifically mention that they support IMAP4. (If you need IMAP, you may need additional IMAP settings.) Supply POP3 or IMAP Server and SMTP Server name. A POP3 or IMAP Server is used for retrieving , whereas an SMTP Server is used for sending . Both server names should be found in your ISP's startup material. For some ISPs, the same server name is used for both retrieving and sending. Next, you may supply User ID and Password in the Account tab. This is for RECEIPT of .. It is strongly encouraged that you leave Password blank unless you have your computer in a secure place. You will be prompted to enter the password when you are receiving . Did your ISP specify security, e.g., SSL/TLS? If so, you may need to put a tick mark on the IMAPS box (for IMAP retrieval) or on the POP3S box (for POP retrieval) and/or on the SMTPS box (for outgoing mail). Each may offer to change port number and, on that, you should defer to whatever ports your ISP documentation recommended. The OP25B tickbox will set the outbound port number to 587, which is generally preferable. Misc. Tab: The default port numbers usually apply, unless your ISP specified otherwise. Selection (above) of IMAPS, POP3S box and OP25B box may affect the specification of port numbers.

10 p10 If outgoing authentication is required - and it usually is, then put a tick mark in the SMTP Auth box as well as the LOGIN box, plus insert your User ID and Password, just as you did on the Accounts Tab. OK, basics are done. You can check or edit your mail settings from the main menu by selecting Tools>Mailbox Setup to review your account settings. You may also want to select Tools>General Setup to review and manage general settings. If you are experiencing connection difficulties despite having entered all values correctly, you may find help by checking the Socket Options in Tools>General Setup>Advanced. If you connect to the Internet using Becky! via the phone line, click the Connection tab and choose your ISP's dialup entry in the combo box. That way, Becky! will automatically dial up when you are going to send or receive . However, if you connect through other means, you can ignore the Connection tab. Visually Impaired Information: If you are visually impaired and use a screen reader, please see additional setup suggestions. Default Client: To make Becky! your default client, Click Tools>General Setup>Make it "Default" mail program. If that doesn't work, start Microsoft Internet Explorer, click Tools>Internet Options>Programs>Set Programs and then select Becky! as your choice for . Then click 'OK'. This only works if you installed the EXE version of Becky!. The ZIP version does not "install" so there are no settings placed in the registry for this function. This can be done manually, if desired. See Troubleshooting for a potential, unsupported, approach. Backup/Restore Preparation: Now that you're setting up Becky!, this is an excellent time to familiarize yourself with the procedure to adequately backup your messages and other information. We have organized that for you in our Backup and Restore topic. That's it for now! Next: - Receiving >

11 p11 Receiving Click the Receive New Mail button or Collection And Delivery button at the upper left (for POP) or the Remote Mailbox button (primarily for IMAP)! If you receive an error message, you need to review your mailbox settings and/or contact your ISP to confirm appropriate settings for , such as server name, port numbers, etc. Most errors can be resolved by changing settings in either the mailbox Account tab or Misc Tab. A full review is also in the Initial Setup topic. Becky! provides a tool to assist you in resolving a connection issue: the Protocol Log. To activate it, just click Tools>Protocol Logs. Now, when connecting to the server to retrieve messages, Becky! will display all connection messages that may assist you in resolving the connection. To view the log, highlight the Mailbox name in the Tree View. Another possibility for connection issues is to check the Socket Options. The default setup for your mailbox brings new mail into a folder named Inbox. This is fine, but you may wish to have incoming messages pre-sorted, such as by sender. If interested, you may wish to review the topic on managing . If you set up multiple accounts, each will have its own Inbox and related folders. If you want to control which ones are and are not accessed with the Collection And Delivery button, you can set your choices in Mail>Mailboxes for Collection... in the toolbar Mail menu. For other options for receiving see the mailbox Receive tab. Next: -Sending >

12 p12 Sending To compose a new message, click the Compose Mail button on toolbar. A new window will pop up for writing a message. Recipients addresses may be entered to the right of the To, Cc and Bcc buttons. (If the Bcc entry field isn't displayed, see the up/down arrows at right side of screen. Clicking it will display/hide the Bcc field and also controls display of the optional Reply-To and Sender fields.) If the addresses are already in the address book, you can either enter the assigned nick name for each recipient or click one of the To/Cc/Bcc buttons to allow access to the address book to locate the recipients. More information on this is available in the topic, Using Address Book. Adding a Signature People usually add a short description about themselves at the bottom of an message. That is called "Signature", e.g. -- Chevy Corvette <[email protected]> Director, CC management. Becky! creates a default signature for you when a mailbox is defined. You can see this at Tools>Mailbox Setup>Compose. The "--" at beginning is an Internet-compliant designation to recipients. Although you may easily edit this signature, you may want a different signature, or possibly an alternate signature; you can achieve that from the Compose Window. From within the Compose Window, enter your desired new signature text, highlight the text, and choose File>Save As Signature. Save it as "Default" if you want to replace the Becky!-defined signature. That way you will have this signature automatically inserted in your message next time you open the Compose Window. However, if you save the signature with a new name, this gives you the opportunity to manually choose the desired signature for each new you send. If you want NO signature, just click the No Sign button in Tools>Mailbox Setup>Compose menu. Delayed Delivery You have another option for sending . Click Save to Outbox button instead of Send Now. With this command, your messages are not sent immediately. They are stored in the Outbox folder instead. You can store as many outgoing messages as you want in Outbox. When you process Send from Outbox or Send And Receive command, they will be sent at once. This is a very useful feature especially if you are connecting to the Internet via the phone line. TIP! If you want to keep an incomplete message, click the Save to Draft button on toolbar. Open Draft folder and double click the message to reedit it. TIP! Don't forget spelling. Becky! allows you to check spelling prior to sending . See our section on Spell Check in this help file. TIP! If you sent a message and want to send the identical or similar message to someone else, just highlight the message in the Sent folder, right-click and select reedit from the menu. This puts the message back into the Compose Window so you just need to change the recipient id and modify the content as needed. This is a special feature of Becky! and can save innumerable keystrokes. Sending HTML Messages Becky! also allows you to create messages that include graphics and color and special fonts. These are called 'HTML messages' because of the underlying text encoding technique required. For more information, see the HTML Messages section of this help file. Next: - Reading >
 If the email addresses are already in the address book, you can either enter the assigned nick name for each recipient or click one of the To/Cc/Bcc buttons to allow access to the address book to")
13 p13 Reading When you receive , the new messages will be delivered to Inbox. By clicking the Inbox button in the Tree View, you will see the list of messages in the List View. For purposes of Becky! documentation, the line item in List View that refers to a specific message is called a headline. Sorting Messages in a Folder Initially messages are sorted in date-descendent order. However, you can readily change how messages are sorted within a folder by clicking the descriptions on the heading bar, such as "Subject" or "From." You can also sort the messages by other attributes (e.g., flag, priority, color and others) by left-clicking the leftmost area of the heading bar. As you become more familiar with Becky!, these other attributes will become important tools for you. The sorted view can also be switched to the message-tree (thread) mode, which is useful to read messages from mailing lists. To switch to that mode, use View>Thread Mode command. This mode can be set individually for each folder. "Read" vs "Unread" The unread mail has a sealed envelope icon and shown in bold font. If you read it, it will be marked "read". Marking "read" is actually done by one of the following operations. Double clicking the item. Setting focus to the Message View and view the bottom of the message. Pressing space key when the bottom of the message is viewed. Choosing Mark As Read command in the Mail menu. The mail that is marked read is represented by an open envelope icon. If you want to mark it "unread" again, choose Mark As Unread command in the Mail menu. Reading Messages One way to read messages is to just click the headline of the desired message and use the scroll bar at right of screen to scroll through it. That always works. You can also press the space bar instead of using the scroll bar. Also, if you are using Windows 8 and your computer has a touch screen, you can touch the icon in List View to select a message. However, for unread mail, pressing the space bar does it all. Each press displays the next set of text of the message. When you reach the end of a message, the next press of the space bar brings up the next unread message. This is a simple way to read all the unread messages. To skip to the next unread message before finishing reading the current message just press Ctrl and the space bar. Reading a L-O-N-G message? Wish there was a way to scroll through it without continually pressing the space bar or using the scroll bar? Well, Becky! has a solution for just that. This technique applies only to plain text messages ( NOT HTML messages). Just position your cursor within the Message View, and then click Ctrl and the key if at top of message or the Ctrl and key if at bottom of message. Scrolling too fast or too slowly? Just press keys 1 (fastest) thru 9 (slowest) during scroll to change the scroll speed. Press any letter key to stop the scroll. Finally, there is additional information in the Middle Bar, the shaded bar above the message. By clicking Subject, To or Date, you will see additional information and options, depending on the selected topic. Reading HTML Messages Becky! allows you to read messages that include graphics and color and special fonts. These are called 'HTML messages' because of the underlying text encoding technique required. Many HTML messages are sent in both plain text format and in HTML format. By selecting the desired tab in tab sheets, you can pick which you prefer to review. For more information, see the HTML Messages section of this help file. Next: -Replying >

14 p14 Replying Click Reply button to reply to a message. When you finish writing, just send as you do with a new message. When you reply to a message, the message is marked as "replied" by having "Re:" prepended to the subject. The icon changes from an incoming icon to a reply icon in List View. Did you notice the compose window has two panes in the default setup? Those two panes are tools for use in citing messages. Techniques to use the two panes or to remove one are explained below in Quoting. Replying to HTML Messages Becky! also allows you to create replies that include graphics and color and special fonts. These are called 'HTML messages' because of the underlying text encoding technique required. For more information, see the HTML Messages section of this help file. Forwarding If you forward a message, the message is marked "forwarded" by having "Fw:" prepended to the subject. The forwarded mail icon has a little blue arrow. If you redirect a message, the icon doesn't change, except that a blue arrow is added to the icon. TIP: If you have several messages to forward to others, you can press the Ctrl key, highlight in List View all of the messages to be forwarded and then click the Forward button. This brings up the Compose Window and all of the messages to be forwarded as attachments. Forwarding vs. Redirecting Many clients do not allow you to redirect a message as does Becky!, so some explanation may be useful for new Becky! Users. Forwarding is desirable whenever you want to share the contents of a message with others. Redirecting, however, is desirable when you want to share the contents of a message with others when you prefer that a person other than yourself respond to the sender. When redirecting, your id is removed from the message headers. Then, when the person to whom you redirected the message writes a response, the reply goes to the original sender and not to you. Citing Quoting ("citing") text from Original Citing is the act of including part or all of the text from original message in your response. Becky! offers many options on doing this, described below. NOTE: Citing only part of a message is ONLY available for plain text messages or the plain text view of an HTML message. The Compose Window may have one or two panes when replying to support citing. The chosen configuration is dependent on two settings in the Citation Setup page at Tools>General Setup>Citation. Specifically, these are the tick boxes for "Use Template for replying" (turned OFF by default) and "Show Reference View" (turned ON by default). The Reference View setting causes the Compose View to be split horizontally, the original message in the upper pane and a lower pane for your reply. The reply pane is blank when no template is used. The upper pane is called the "Reference View". You can scroll this area with Alt+Cursor key while you are writing a message. Citing with Default Setup - No Templates Set In the above example of a reply, using the default setup, your would include none of the text from the original message, but frequently you may wish to quote/cite part or all of the original message. To quote only a portion of the text from the original message, highlight the text in the Reference View and click the Cite button. If you want to quote entire text, just click Cite button without highlighting text. Now when you send the new message it will contain what you wrote, plus part or all of the original text. Automatically Cite Messages - Templates Set You can cite an entire message without clicking Cite button when you open the replying window by using a template. This approach applies to ALL replies to ALL messages. (However, Power Citing TIP # 2, below, provides a selective citing option with templates.) Information on setting up a basic default template is on the Citation Setup page at Tools>General Setup>Citation. You may also want to read this template overview, as Becky! offers a variety of other template options. Plain Text Message Power Citing TIPs The techniques here are for users who prefer either to have more screen space by turning off the Reference View or who prefer to highlight text to be cited while in Message View prior to clicking Reply. These two options apply only to plain text messages and plain text views of HTML messages.

15 p15 1. Selective citing from Message View with Cite button: With no template set, highlight the portion of the message to be cited and click Reply. Only what was highlighted is shown in the Reference View. Just click Cite button and the pre-selected text will be inserted into your reply message. This option is useful if you often do not cite any of the original message and sometimes want to just cite a portion of it in your response, or if you have difficulty in selecting text in Reference View. 2. Selective citing from Message View without Cite button: With a default template set, such as at the Citation Setup page, you can highlight the desired portion of the message to be cited and then just click Reply. The highlighted text will then be cited immediately into your response message, eliminating the need to use the Cite button. This option mirrors the steps of many other clients and is useful if you tend to always cite at least a part of all messages. This approach eliminates the need for the Reference View. Filtering Filtering Responses When you reply to messages, you may wish that your responses are stored in various folders instead of the default Sent folder. Becky! supports that function and you can review information at the Tools>Filtering Manager page. TIP - Top-Posting vs Bottom-Posting: Know your audience. Many companies and groups prefer your new text to precede the cited text, and others (often technical groups) prefer that your new text follow the cited text. Becky! lets you do this either way. Generally, any technique on this page that uses the Cite button will leave the cursor positioned at the BOTTOM of the cited text; other techniques, such as with templates, leave the cursor positioned at the TOP of the cited text. You can reposition the cursor, of course, to suit your preference. Next: - Using Address Book>

16 p16 Using Address Book Becky!'s Address Book is a powerful tool to manage addresses and to simplify the process of sending a message to multiple recipients. Its primary purpose is as a repository for addresses of your friends and other contacts, plus other information (such as postal addresses, phone numbers and more), yet its real strength is in how easily it lets you access the information. Using the address book, you can quickly select addresses for your outgoing messages. Address Book Structure The Becky! Address Book environment supports multiple address books and multiple address groups. The initial setup provides a default Primary Address Book called "Personal" and one Primary Address Group called "Default." The Default address group is intended to include all addresses, such as your friends and colleagues. Becky! also supports Secondary Address Books. These Secondary Address Books can be useful when wanting to maintain a separate set of addresses that may be temporary, unique to a specific need (such as a project or other company employees), or where you have pre-defined address books in one of two Internet formats (LDAP or CardDAV). If you need your Secondary Address Book to be primary for an account, see this advanced tip. NOTE: Becky! uses ONLY the defined Primary Address Book to locate nicknames/shortcuts entered in Compose View. The structure is this: An address book contains address groups. An address group contains addresses. Importing Address Books If you have an address book you used with a different client, see Import Tips for suggestions on importing that address information into the Becky! address book. Adding Addresses from Incoming Messages. This is the easiest way to update your address book. While highlighting a specific message, just click the Add To Address Book button on Tool Bar (or select Tools>Add to Address Book.) Full Name and are already filled in. The menu offers the option to add to a different address book and group, but for now, just accept the default. Also fill in the Nick Name field. Nick Name is used for entry shortcut, which means that you don't have to type the full address when composing mail; just enter the nick name. Adding Addresses Manually. First, click the Add To Address Book button on Tool Bar. The address book view will be to the default address book of "Personal" and the default address group of "Default". Just click the one-person button on Tool Bar (Add Address). From there, fill in the Full Name, and Nick Name fields at minimum. Remember, it is the nick name that allows quickly entering recipients in Compose View. Creating and Using Address Groups. Additional Address Groups are useful whenever you need to send messages to a group of people on a regular basis, such as for a club or project or committee. Once the desired addresses are added to the address group, you can then just send messages to the group's nick name and that will cause all members of the group to receive the message. To create an address group for a group (such as a hiking club), Click the two-person button on the Tool Bar in Address Book View. A new address group is created. You can change the name "GroupXXXXX" to anything you like, such as "HikingClub". ALSO, enter a Nick Name, such as "hiking", to allow shortcut entry from Compose View. If the intended members are already defined in the Default group, just press the Ctrl key and then highlight each of the members from the List View to be copied to the new group. Then, either drag the cursor to the group or click Edit>Copy, move cursor to group, click Edit>Paste and you're done. This keeps the members' entries in the Default group and also in the new HikingClub group. If the intended member needs to be added manually, just position the cursor on the desired address group and then click the one-person button on Tool Bar and fill in Full Name, and Nick Name. Using the Address Book When Composing

17 p17 If you've defined nicknames for each individual and also for each address group you added, you will not need to access the address book when composing messages. Just enter the desired nickname (s) after To in the Compose Window. However, the address book is very handy when either 1) you are sending to an individual who has no nickname, or 2) you are sending to a number of people who are in the default address group, but who are not predefined in a specific address group (such as for a club or committee). One way to achieve this is to open a Compose Window for a new message and click the button labeled To to open the address book. In lower-left of screen (Recipients List) you will see three tabs (To, Cc, and Bcc). Be sure the one you want is set ("To" is the default). From there, highlight each desired recipient and double-click the mouse. You will see the recipient added in the lower-left window. You could also press the Ctrl key and highlight each desired recipient and then click the Add button. Repeat this as needed for the Cc and for the Bcc. When complete, just close the address book window and you will be returned to the Compose Window. The other way is to click the Address Book button on Tool Bar and perform the same steps as above within the address book. When complete, click the Write Mail button on Tool Bar; this closes the address book and invokes the Compose Window. Information presented here represents the most common uses of the Address Book, but you may wish to review all Address Book features. Next: - Managing >
.")
18 p18 Managing Topics: (Folders, Filters, Priority, Color, Flags and Agents) If you receive only occasionally, you may not need these Becky! features, but if you have lots of or if you need to organize by your own categories and priorities, then these features will become priceless to you. Even if you don't need them now, knowing that they are available will help you in the future. Folders Becky! gives you basic folders for each account. These provides basic functionality, but if you receive a lot of , you may want multiple folders so that you can manage your more easily. For example, you may want separate folders for messages from each friend or for special projects with which you're involved. Becky! lets you create as many such folders as you wish. To create a new folder, highlight the account or a particular folder in the Tree View and choose File>Folder> New Folder command. A new folder will be created under the current folder. For example, if the current folder is "Inbox", the new folder is created under Inbox. You may want to select the mailbox button before you create a new folder so that the new folder becomes the top-level folder similar to Inbox. You will then see the new folder named something such as "FolderXXXX" and it will be in editing mode. Rename it as you wish. "Ashley" Your girlfriend? Good. Open Inbox and find the messages from Ashley. If you find it, highlight it. If you want to choose multiple messages, press Ctrl key and click mail items. After highlighting messages, click the left mouse button and hold down the left button while moving the mouse cursor to the Ashley folder, then release the button. That way the messages from your girlfriend are moved to the Ashley folder. Yes, as you know, it is a simple "Drag and Drop" operation. If you press Ctrl key while you are dragging and dropping, messages will be copied instead of being moved. I know, I know. That's too much trouble for you, since you get tons of messages from your girlfriend everyday, right? :-) There is a useful feature called "Filtering." With this feature, you can sort incoming messages to certain folders automatically. Read on. Filtering/Sorting Filtering (which includes sorting) is a feature that lets you pre-specify how to identify messages (such as those received from a particular address) and how to then direct the message, such as to a specific folder. To do that, you need to configure filtering rules. This can be done by referencing Tools>Filtering Manager or by the drag and drop technique, which is demonstrated below. Actually, it is a simple operation within Becky!. Simply drag one of Ashley's messages to the "Ashley" folder and drop while holding down Alt key. Then you will see a filtering configuration dialog. Select "From" for Header combo box. See? The String field is automatically filled with your girlfriend's address. Then click "OK". That's it. After that, the from Ashley will be automatically sorted to the "Ashley" folder unless she changes her address. By the way, choosing "From" for Header field is good for personal . But if you want to sort messages from mailing lists or mail magazines, you should choose "Reply-To" or some other headers that uniquely identify those lists. Easy, eh? Oh, you've already created some other folders? Great! "Britney" "Claire" "Daisy"... Oh, you have a lot of... nieces...?... No...? Other girlfriends...?... Well, good for you. None of my business... TIP! Do you use IMAP? If so, there are some restrictions on filtering, so check the IMAP issues. TIP! Filtering Manager gives you more advanced features such as auto forwarding/replying, color labeling, etc. based on filtering rules.

19 p19 Flags, Priority and Color Label The above techniques help you organize placement of messages so that you don't have all your messages in one folder. Becky! also has features to let you further manage your mail with flags, priorities and setting different colors. That is described in the Flag, Priority and Color Label section of this help file. Agents All of the above features help you manage the itself. Agents, on the other hand, help you manage what to *do* with the . For example, you receive an from your boss, requesting a report be submitted within the next 2 weeks. You could write a note about that or mark your calendar, but there's a better way; let an agent take the task to remind you of the assignment. Then, whenever you're using Becky! you will know of any outstanding tasks for you. To learn more about setting up agents. see the section on Agents in this help file. Next: - Managing , Part Two >

20 p20 Managing , Part Two This topic isn't necessary for successful use of Becky!; instead, this topic is included for those users who have special concerns or needs that may not be obvious elsewhere in this help file. Changing Subject or Content for POP messages Whenever you receive plain text messages where the subject doesn't relate to the importance of the content, you may wish that the subject was more informative for later retrieval. For example, you may have received a message from your landlord that your rent has been reduced, but the subject might be something such as 'Monthly Report to Renters.' If you prefer the subject be 'Rent Reduction Notice' you can do it. Just highlight the message and then click the Direct Editing button on toolbar. The subject will be highlighted in the Middle Bar and you can overtype or add to the subject and/or content. This can be useful when you're searching later for the message that contained the content in which you were interested. See Mail>Direct Edit Mode for information on doing this for HTML messages. Accessing POP server for messages There may be any number of reasons that you do not want to download certain messages from your server to your PC. Maybe it's spam you receive and you don't want to bother coping with it on your PC, or maybe it's mail that you prefer to download later. This technique works for most ISPs, but you should test it on yours to be sure. Just highlight the desired mailbox name and then click the Remote Mailbox button. New messages will appear in the List View. From here you can process messages, mark for deletion, or mark "Read." Messages that are marked as "Read" will not be downloaded when you later retrieve your POP mail. To download those messages, revisit the server as above and mark the message as "Unread." Reducing disk space for messages Although Becky! has no problem in managing thousands of messages, some users have special needs to reduce the messages stored on their PCs. There are several options: Compaction: This Becky! feature removes some internal Internet headers from your messages. This leaves the messages intact for content, but sans the headers. The headers normally removed are the "Received" headers that show the path taken by the message to reach you. These are normally not needed. The savings are only noticeable for folders with many messages. Initiate compaction with File>Folder>Compaction. This is folder-specific and does not compact all folders at once. This process also offers the option of creating a backup of the folder (which eliminates the assumed objective of reducing disk space, so be sure of your goals if you do this). Export Folders: You may have folders set by year or by project or by some other aspect that allows you to archive the messages periodically. Archiving is an excellent technique to manage large amounts of messages. There are generally two approaches: Archive to UNIX mbox: This approach retains all folder content in one mbox file. This is appropriate where you desire to treat the entire contents as one entity, e.g., all messages for a year or a project. This is done by the File>Export>UNIX mbox command. Archive to eml format: This approach creates a separate file with '.eml' suffix for each message within the folder. This approach is desirable where the user anticipates possible retrieval of some messages based on need or where the messages may need to be accessed by colleagues who use other clients that support the 'eml' message format (e.g., Mozilla Thunderbird or Microsoft Outlook Express). This is best done by first defining a folder to contain the messages and then using the File>Export>eml command. Reintroducing the messages into Becky! is done by just reversing the above procedure. Of course, to reduce disk space, you need to delete the designated folders after archiving. Using Secondary Address Books If you need to use a Secondary Address Book (such as one you defined for CardDAV or LDAP) as the Primary Address Book for an account, you can do that. Once you highlight the account, click Tools>Mailbox Setup>Compose and enter the desired address book in the address field. This will cause the specified address book to be primary for this one account. Do you need to have a Primary Address Book for use with a folder you established for a specific project? Just

21 p21 highlight the folder, right-click, select Properties and then enter the desired address book in the address field. NOTE: To cause Becky! to use that address book, you must have highlighted the folder prior to use.
22 p22 Menu Bars Becky! has separate menu bars for the Main Window, the Compose Window and the Address Book. The names of the entries for each menu bar are the same, but the contents are different to allow specific functions that are specific to each. For example, on the Main Window Edit menu there is a Find option, and on the Compose Window Edit menu there is a Find option. The functions are similar, but one applies to more than one message, whereas the other is explicit to a specific message. Also, under each menu bar is a tool bar of commonly-used buttons (other than the Address Book), and you can add or remove buttons that fit your need. Do this by right-clicking anywhere on a tool bar and selecting customize... or click View>Customize Tool Bar.
23 p23 Main Window Menu Bar Every feature of Becky! can be invoked directly or indirectly here. Developing a familiarity with these menu bars will serve you well as you master Becky! features. The menu entries follow: File menu - The File menu focuses on the overall set of services. Edit menu - The Edit menu focuses on text, whether to find, to copy, to cut, to select. View menu - The View menu focuses on what you see, such as languages and fonts. Mail menu - The Mail menu focuses on messages in your mailbox, such as send, receive, reply Tool menu - The Tool menu focuses on non-specific services, such as address book, filtering and setup Help menu - The Help menu focuses on help in using Becky!, including a FAQ reference. (Headlines Search) - This window allows quick headline searches on messages in current folder. File menu (Main Window) Folder Note: Most options here apply to POP accounts, not IMAP accounts. New Folder C reates a new folder under the currently selected folder or a mailbox. Delete Folder Moves the current folder to Trash box. If you delete folders in Trash box, it will be permanently deleted. Rename Folder Renames the current folder. Reorganize Sorts the messages physically in the descendant order of Sent date. Compaction Removes certain header information from all the messages in the current folder to save disk space. The invoked menu provides two options. Following compaction, there is an option to backup original content. more Get information here. Trash Duplicates Moves duplicate messages (those with same Message-Id and Date), to Trash box. Folder Maintenance Combo C ombination of Reorganize, C ompaction, and Trash Duplicates. Reconstruct Index Reconstructs an index file. If you find the folder looks corrupt and does not show messages properly, use this command so that it will recover the original folder status as much as possible. Separate Attachments Saves all the attachment parts in messages in the current folder to separate data files. That way the overall performance will be improved, while the disk usage will be slightly larger if you have a lot of attachments. If you have Attachments to Separate Data Filesoption checked in Tools>General Setup>Advanced (checked by default), all the incoming messages will be saved with separate attachment files. Combine Attachments C ombine all the attachment parts that are saved as separate files into bodies in the current folder. If you need to use an older version of Becky! than ver 2.05 for some reason, you will need to process this
24 p24 command on each folder that contains attachments, because older versions can not handle those separate data files. Mailbox New Mailbox C reates new mailbox. Assistance on this is available at Initial the Setup page. Delete Mailbox Deletes the current mailbox. All the messages in the mailbox will be deleted. Hide Mailbox Hides the current mailbox. If you have a mailbox you don't want to see but don't want to delete, hide it. Reveal Mailbox Reveals hidden mailboxes. Revealed mailboxes will be added to the end of the tree. System Change Data Folder C hanges the data folder Becky! currently uses. This feature allows multiple users, i.e., several persons can use Becky! on one PC, each with their own mailboxes, messages and address books. You will need to restart Becky! to switch from one data folder to another. Default Mailbox Makes the current mailbox the default. Import Imports messages from text files to the current folder or a new folder. See Import Tips for more information. Export Exports the selected mail items, or an entire folder, to text files. Get more information here. Save As Saves the selected messages as text files. You can choose either RFC822 or plain text format by choosing the file extension. Edit Templates Creates templates or edit existing templates. Empty Trash Deletes all the messages and folders in Trash box. Import Backup Logs Imports messages from Backup Logs for the selected Inbox or Outbox, which are created on a daily basis in case the mailbox becomes damaged. See also Tool>General Setup>Receive Property Views the property of the currently selected item, either a mail account or a folder. Print Prints Selected mail items. Note: This prints plain text messages ONLY. To print HTML messages, place cursor in Message View, right-click and then select Print or Print Preview... Print Preview Views the print preview of the focused message. Print Settings Configures print settings, such as margins. Sync with Portable media Synchronize data with the portable media. This feature allows transferring Becky! and messages to and from another computer, normally when the user needs to be away from primary computer, using portable computer. This does NOT sync IMAP messages.
25 p25 Exit Exits Becky!.
26 p26 Edit menu (Main Window) Cut Cuts the selection. You can cut selected mail items and folders. Copy Copies the selection. You can copy selected mail items and folders. Paste Pastes cut or copied items. Headlines Search Positions cursor within the Headlines Search box. The Headlines Search box visibility is set/reset at View>Headlines Search. Find Searches for specified string in message(s). If the focus is in the List View, it searches entire folder. If the focus is in the Message View, it searches only in the current view. Find Next/Previous Searches for the next/previous candidates. Mail Query Searches messages that contain specified string and lists them in a dialog. You can drag and drop messages to a folder from that list. The "Query Result" virtual folder will show up at the top of the Tree View; it remains there while Query dialog is visible. Reload Query Folder Refresh the query result in the query folder. Add Agent... Assign Agent to the selected message. This allows you to create a follow-up task to respond or otherwise act in regard to the selected message. Mark as Need Reply... Quickly assign Agent with Need Reply task to the selected message. Follow the Topic Quickly assign Agent with Follow the Topic task to the selected message. Bookmark Quickly assign Agent with Bookmark task to the selected message. Toggle Flag Toggle on/off the Flag on the selected messages. Select Read Messages Highlights messages that are marked read. Select Unread Messages Highlights messages that are not marked read. Select Flagged Messages Highlights messages that are flagged. Select All Highlights all the messages in the List View. If the focus is in the Message View, entire text will be highlighted.
27 p27 View menu (Main Window) Tool Bar Toggles show/hide the Tool Bar. Customize Tool Bar Opens a customize dialog for the Tool Bar.To add a button, select a button you want to add in the left list and click Add. To remove a button, select a button you want to remove in the right list and click Remove. You can also change the order of the buttons by Up/Down. Status Bar Toggles show/hide the status bar. What's New Toggles show/hide the What's New dialog, which lists recently arrived messages.this does not apply to IMAP accounts. Headlines Search Toggles the display of a search box in upper right corner of screen. This is a powerful search tool that lets you filter messages within a folder by searching the Subject, To or From columns displayed. Go Back Goes back to the message previously opened. Go Forward Goes to the message, which has been opened next to the current message. Go Previous/Next Mailbox Switch the current mailbox. Go Previous Folder Switch to the folder that was previously open. Choose it again to go back to the current folder. Quick Access Lists the incoming messages that are recently double clicked, or outgoing messages that are recently saved to Draft or Outbox. If incoming messages are marked unread, they are not added to the list by double clicking. They will only be marked read by that operation. This is very useful if you have multiple accounts and want a quick listing to all recently accessed messages, regardless of account. The displayed quick access list shows a check mark if the listed message is in the currently selected account. Also, to the left of each message's subject is an alphabetic or numeric character. To view a selected message, just press that character on the keyboard. (The list is not automatically updated for deleted messages. To remove deleted messages from the list, just select the message and the reference will be removed.) Maximize View Maximizes the Message View pane, or restore to the original size. TIP: This expands Message View to full screen. If you prefer to keep the Tree View visible, an alternative is to click Ctrl, Alt and keys from within the List View. (Note: This TIP only applies to views 1 and 3 ("Long TreeView" and "Wide ListView") from the Tools>Change Layout command.) Change Layout Switches the layout of Tree/List/Message View between six styles. The layout changes each time this command is processed. An additional feature is the option to set List View to display two lines per message. The two-line display is invoked automatically when 1) used with a tablet, 2) Windows 8+, 3) in portrait mode and 4) the Touch Friendly Mode has been set at Tools>General Setup>Advanced. View Related Messages Finds messages that seem to be related to the current message and lists in the message thread form. Thread Mode Toggles the message thread mode of the current folder. Close All Threads Hides all the child messages of every thread. Open All Threads Shows all the child messages of every thread.
28 p28 Thread Tool Connects or disconnects message threads. Language Changes the character set (Language) of the current message, and ONLY the current message. Change Font Changes the font and/or size corresponding to the character set of the current message. This does not affect HTML fonts. This affects ALL messages using this character set. This does NOT affect how recipients view your messages. This is only for your viewing. If your only purpose in doing this is to change the font size, you may prefer to use the Touch Friendly Mode feature, as it can change the size of all plain text fonts viewed, not just for a particular character set. If you want to change the default plain text compose font, do that in the Tools>General Setup>Languages tab. Mail Address Format Selects the format of the mail address that appears in the List View. If you choose "As Is", the original mail header will be displayed. If you check "Use Name from Address Book", the name part of an address will be replaced with the one in the address book (only when the address is found in the address book). Those names will be displayed with * prefix, so it is useful when you want to quickly glance if the message is from someone in your address book. This option only works when the chosen format is either "Name <mail@address>", "mail@address (Name)", or "Name". Note that when you sort messages according to the name, this Name from the address book is not used as a sort key. Customize List Columns Customizes the column headers of the List View. Also, the column headers may be clicked to change column sort order of the displayed messages. View Memo Opens the Memo tab for the selected message. Every message has a Memo area, but it is independent to the message data. So, if you forward or reply to this message, the memo will never be attached to the outgoing message. You can also view memo by choosing the Memo tab in the tab sheets at the bottom of the Message View. View Header Views the header information of the current message. You can also view headers by choosing the Header tab in the tab sheets at the bottom of the Message View, which may be hidden, depending on your settings. More information on Tab sheets is here. View Source Views the "source" of the message. This is raw data and includes the message itself, plus technical headers and HTML codes for HTML messages.
29 p29 Mail menu (Main Window) Send And Receive Sends and receives messages for the current mailbox. Send From Outbox Sends all the messages in Outbox including those in other mailboxes. You can change this behavior in Tools>General Setup>Send Receive New Mail Receives messages for the current mailbox. Collection And Delivery Sends and receives messages for multiple mailboxes. You can choose which mailbox should be checked and which is not by the Mailboxes for Collection menu (below). Further, the collection and delivery process can be automated from the Tools>General Setup>Receive menu. (This does not apply to IMAP accounts.) Mailboxes for Collection This menu lets you specify the mailboxes for Collection and Delivery (above). Although IMAP mailboxes may be checked, they are not eligible for this feature. Remote Mailbox (Connect to IMAP Server) Primarily for IMAP mailboxes, this also works for POP. For POP mailboxes, this command connects to the POP3 server and lists all the messages on the server. The Remote Mailbox looks like a regular folder with the POP server name. You can do most of the operations applicable to regular folders, such as cut, copy, and drag/drop, although some functions, such as replying to a message or using a custom template for forwarding, are not applicable. The following examples are of some general operations accessible for remote POP mailboxes: To Receive (and keep received messages on the POP server): Select messages and drag and drop them holding down the C trl key. If you drop to the root mailbox button, it will be sorted according to the filtering rules. You can also use Edit>Copy and Paste commands instead. To Receive And Delete: Select messages and drag and drop. If you drop to the root mailbox button, it will be sorted according to the filtering rules. You can also use Edit>Cut and Paste commands instead. You may use Tool>Sort Selected Messages instead of dropping to the root mailbox button. To Delete: Select unwanted messages and press Delete key or choose Mail>Delete Mail. Those messages are only marked as "deleted" and will not be actually deleted until the remote mailbox is closed. You can toggle this "deleted" flag by pressing Delete key on the items. Mark Read and Unread: C hoose Mail>Mark As Read/Mark As Unread command. For IMAP accounts, this command first connects to an IMAP server. Receive All Receives all the messages on the server for a POP3 account, including those already downloaded. This can be useful for accounts where you have set the option to leave messages on server at Tools>Mailbox Setup>Account. Delete Downloaded Messages From Server Deletes messages on a POP3 server that were already downloaded. Abort Session Abort the active session. Compose Opens a Compose Window to write a new message. Compose To You can choose the recipients' addresses before opening a Compose Window. Reply Opens a reply window to the selected message.
30 p30 Reply To You can choose the recipients' addresses before opening a Compose Window. With Reply To All, you can reply not only to the originator, but also to all the recipients of the original message. An additional unique Becky! feature is Reply to Selected Addresses that is useful when you want to respond to some recipients, but not all. Reply To Selected Addresses This allows you to select which recipients should receive your response before you write your response. A window will open, displaying the original recipients. Highlight (click) those who should receive your response and then click 'OK'. A Compose Window will then open with only the highlighted addresses displayed. Forward Cites the selected message and forward it to other recipients. If you select multiple messages, it works as "Forward As Attachment". Redirect Forwards the selected message without changing original "From", "To", etc. fields. "Resent-From", "Resent-To", etc. fields are added instead. Forward As Attachment Forwards the selected messages as "message/rfc822" content type attachment. If you want to forward messages intact, this is the best choice. This is also convenient for forwarding multiple messages. Delete Mail Deletes selected messages, causing them to be moved to Trash folder. Direct Edit Mode Enables to edit the current plain text message. You can also change the subject and date. For HTML messages, use View>View Source along with Direct Edit Mode. This feature does NOT apply to IMAP messages. Extract Attached Messages Extracts attached messages (message/rfc822 content type) from a message, and copy them to a folder as individual messages. Mark As Read Marks the selected messages as read. Mark As Unread Marks the selected messages as unread. With this command, forwarded / replied marks are also erased.
31 p31 Tool menu (Main Window) Mailbox Setup Configures settings for each mailbox. Account Connection Compose Receive Misc. General Setup Configures global settings of the program. General Tree/List Message View Editor Citation Language Shortcut Keys Keywords Send Receive MIME Advanced Plug-Ins Setup If plug-ins are installed, this menu entry links to any setup dialog, although many plug-ins have no setup. Mailing Lists Manager Manages subscription information for mailing lists and mail magazines. Add To Mailing Lists Manager Adds a Mailing Lists Manager entry based on the information in the current mail. Usually, you can select "Welcome" messages from mailing lists to retrieve necessary information. Filtering Manager Manages filtering and sorting rules for incoming/outgoing messages. Sort New Messages Sorts newly arrived messages to folders. Sort Selected Messages Sorts selected messages to folders. It is same as dropping messages to the root mailbox button. Address Book Opens the Address Book. Add To Address Book Adds address of the sender, or the recipient if you are in "Sent" folder, of the current message to the address book. Decode EUC-JP C onverts Japanese EUC text to Japanese Shift-JIS code. uudecode Decodes uuencoded text in the message body and saves to a file. BinHex Decodes BinHex text in the message body and saves to a file.
32 p32 Protocol Logs Displays protocol logs for debugging. Whenever you connect to retrieve messages, key server messages are displayed. This can be very useful if you are having difficulty connecting to your ISP server for your messages. To view the log, highlight the Mailbox name in the Tree View. Pause Periodical Check Temporarily disables all periodical mail checking. Dialup Connects to the Internet via the phone line using Windows' dial up network.
33 p33 Compose Window Menu Bar This Menu Bar focuses on features available while composing an message. Spend time learning the available features and your productivity with Becky! will do well. File menu - The File menu focuses on the overall set of services, such as templates & attachments. Edit menu - The Edit menu focuses on text, such as copy, paste, find, replace View menu - The View menu focuses on what you see, such as languages and fonts. Tool menu - The Tool menu focuses on non-specific services, such as address book, filtering and setup File menu (Compose Window) Save To Draft Saves an unfinished message to Draft box. Save To Outbox Saves the message to Outbox so that you can send all the messages in a single session. Send Now Sends the message immediately. Switch Mailbox You can select other mailbox for sending the message. You can also change From address and the signature. Reminder Saves the message as a "reminder", which will be delivered to your mailbox on specified date. Save To Folder and continue... Use this feature when composing and wanting to ensure that your message is preserved until sent. This function is identical to "Save to Draft", allowing saving to an alternate folder. Note: If saving to an IMAP folder and it creates multiple copies, that is a sign that your IMAP server may not be configured properly. Switch to using a local folder. Load Template Applies a template to the message. Edit Template Opens a template to edit. Save As Template Saves the message as a template. Save As Signature Saves the selection as a signature. Attach Files Attaches files to the message. Close Closes the Compose Window.
34 p34 Edit menu (Compose Window) Undo Undo previous changes. Redo Undo previous undo operations. Repeat Repeats the previous editing operation. Cut Cuts the selection and copies to the clipboard. Copy Copies the selection to the clipboard. Paste Pastes text from the clipboard. Paste With Citation Prefixes Pastes text from the clipboard adding citation prefixes at each top of line. Special Copy/Paste Paste from History Pastes text from the clipboard history. Begin Box Selection Begins box region selection. Box Paste Pastes copied box region. Copy To File Saves the selection as a file. Append To File Appends the selection to an existing text file. Paste From File Inserts text from a text file. Paragraph Formatting Left Moves the selection to left. Right Moves the selection to right. Center Moves the selection to center. Indent Indents the selection by one tab level. Unindent indents back the selection by one tab level. Add Strings Adds specified string at each top or end of line in the selection. Sort Sorts the lines in the selection. Format
35 p35 Formats the selection by adding CRLFs from cursor position forward, based on settings Tools>General in Setup>Editorfor Auto Formatting Columnswhen you are editing text. You may also use the Tool Bar icon for this. This is useful when formatting manually. DeFormat Removes all CRLFs in the selection. Convert Converts the selection into various formats. Select All Selects entire text. Find Finds specified string in the text. Replace Replaces found strings with specified strings. Cite Message Cites original message. By highlighting certain portion of the original message in the Reference View, only the selected part will be cited. Does not apply to HTML messages. Cite Without Prefix Does the same thing as Cite Message command without adding citation prefixes at beginning of each line. Auto Formatting Mode Toggles auto-formatting mode. With this mode on, CRLFs are automatically inserted based on settings in Tools>General Setup>Editor for Auto Formatting Columns when you are editing text. This setting is retained after exiting Becky!.You may also use the Tool Bar icon for this. Overwrite Mode Toggles Insert/Overwrite mode.
36 p36 View menu (Compose Window) Tool Bar Toggles show/hide the Tool Bar. Customize Tool Bar Opens a customize dialog for the Tool Bar. To add a button, select a button you want to add in the left list and click Add. To remove a button, select a button you want to remove in the right list and click Remove. You can also change the order of the buttons by Up/Down. Status Bar Toggles show/hide the status bar. Language Changes the character set (Language) of the outgoing message. Change Font Changes the font and/or size corresponding to the character set of the outgoing message. This does not affect HTML fonts. This affects ALL messages using this character set. This does NOT affect how recipients view your messages. This is only for your viewing. If your only purpose in doing this is to change the font size, you may prefer to use the Touch Friendly Mode feature, as it can change the size of all plain text fonts viewed, not just for a particular character set
37 p37 Tool menu (Compose Window) Spelling-Check Checks the English spelling of the current message. Write HTML message Turns Compose Window into HTML editing mode. External Edit Opens an external text editor or HTML editor to edit the current message. External Editors Specifies the editor application to edit text or HTML. You cannot use the editors that do not display the file name on the title bar. The defined editors are set in Editor Setup. Attach vcard Attaches your own vcard to the message. Edit vcard Edits your own vcard. Request "Read Receipt" Adds "Read Receipt" request to the message. This request is processed only when the recipient's mail reader has the capability to handle "Read Receipt" requests, and the recipient agrees to send back the read receipt. Many clients, (including Becky! --see Receive Setup - General) allow the user to automatically respond or to ignore such requests. Therefore, you should not expect that the "Read Receipt" will always return.
38 p38 Address Book Menu Bar The address book retains address information for individuals and groups. You can access the address book by either clicking the address book button or by selecting Tools>Address Book from the main Menu Bar. The address book Menu Bar consists of 1. File menu 2. Edit menu 3. View menu 4. Tool menu Also, the address book view is similar to the main view. File menu (Address Book) Write Mail Sets the mail addresses in the recipients list (lower left) to the actual To, Cc, and Bcc fields of an outgoing message. If the recipients view is empty, the addresses you are highlighting in the List View (upper right) will be set. If you have opened "Address Book" first, it will create a new window to compose a message. New Address Add a new address entry to the highlighted address book or address group via the Address Menu. Delete Addresses Deletes selected addresses. New Address Group Creates a new address group within the highlighted address book or address group. Add Address Book Creates a new address book. You can create an address book as a regular Becky!'s address book or as an LDAP server entry or as a CardDAV server. This menu sets the Address Book Properties. TIP: If you use Gmail, that address book can be accessed as a CardDAV server. Delete Address Group/Book Deletes either an address group or an address book that you are selecting in the Tree View. Property Shows the property of the selected item, such as an address book, an address group, or an address. Reconstruct Index If you find something is wrong in the address data, try this command. Import Imports address data from a text file to the selected address group. You can import from tab/comma delimitated text or from vcard files. See Import Tips for more information. Export Exports address data of the selected address group or the selected addresses to a text file or vcard files. Close Close Address Book
39 p39 Edit menu (Address Book) Cut Cuts the selected addresses. Copy Copies the selected addresses. Paste Pastes the addresses previously cut or copied. Select All Highlights all the addresses in the list. Set Addresses to List Inputs selected addresses to the recipients list. If the focus is in the Tree View and you are selecting an address group, the address group name will be set Name". This group name will be expanded to the read addresses when the message is actually sent. So, be aware that if you set the group name to To or Cc field, all the addresses will be disclosed to all the recipients. Find Address Goes to the finder window of the List View.
40 p40 View menu (Address Book) Tool Bar Toggles show/hide the Address Book Tool Bar. Status Bar Toggles show/hide the Address Book status bar.
41 p41 Tool menu (Address Book) Input Format Choose the preferred format that will be used when the addresses are set.
42 p42 Address Book View Tree View (upper left) Shows address books and address groups. List View (upper right) Shows addresses belonging to the current address group. If you press enter key or triple click on the addresses the selected addresses will be set to the outgoing message. (Same as File>Set To Mail command.) There is an address finder at the top of the window. Key in the string you want to find in the address book and press the enter key (or click Search button). If you are selecting an address group, the first hit item will be highlighted and you can continuously search by pressing the enter key again. If you are selecting an address book or LDAP server, it searches entire address book and lists the found addresses. The title bar columns (Name, address, Note) can be clicked to change column sort order. Recipients List(lower left) By clicking Add button, the addresses you are selecting in the List View are set to the list. Choose To, Cc, or Bcc tab before you add. (You can drag and drop to the other tabs after you enter the information.) Data View (lower right) Shows the detailed information of the focused address.
43 p43 Settings Becky! provides many options for personal settings, whether for the general setup, or for specific mailbox accounts. The Mailbox Setup is the most fundamental and contains the settings for your account. You need one of these for each account (e.g., AOL, Gmail, etc.). The General Setup is vital as this contains your settings for all of the many Becky! features. If you're not familiar with this, you should periodically check it, because as you learn more and more about Becky!, you may find that you wish to adjust various settings. Finally, the Folder Property for each folder offers features of which you may have never envisioned. For example, folder properties can manage specific templates and personalities. This augments the basic settings of the mailbox. Most clients do not provide this feature, so you are encouraged to investigate and experiment with folder properties. Just 'right-click' while highlighting any folder.
44 p44 Mailbox Setup The Mailbox Setup menu is where you set the majority of settings for each mail account. Setting the Default Mailbox Once defined, you can set the default mailbox at File>Default Mailbox Options on Mailbox Page Collection Target Turn on/off whether this mailbox is included in the targets Collection of and Delivery menu setting. Profile Name You can have multiple profiles for one mailbox. A profile is a subset of "Mailbox Setup", and you can switch from one to another for your particular needs. Normally, you will not need to change from the default. Global Profiles You can register "global profile" names and can choose one of them for the name of the profile (except for Default profile). When you switch to the global profile on one mailbox, other mailboxes will automatically switch to the profile that has the same "global profile" name. Options with the Tabs Account Connection Compose Receive Misc. Mailbox Setup - Account Personality Your Name Enter your name. It will be set to "From" field of your outgoing message with your address. Address Enter your address. It will be set to "From" field of your outgoing message. Server Settings Mail Protocol Choose either POP3 or IMAP4. Most ISPs use POP3. If you are not sure, choose POP3. POP/IMAP Server Enter the name of the mail server for incoming mail server. POP3S/IMAPS You can receive messages with SSL/TLS enabled server. This may affect port number selection. SMTP Server Enter the name of the SMTP server for outgoing mail server. SMTPS You can send messages with SSL/TLS enabled server.
45 p45 OP25B If your ISP adopts Outbound Port 25 Blocking, you may not be able to use an external SMTP server to send mail. In that case, turn on this option. It will change SMTP port to 587 and turn on SMTP Authentication. Port 587 is generally the desirable port to use. User ID Enter your user ID of your account. Password By entering your password here, you will not have to enter the password each time you receive . However, that means anyone can receive and read your if your computer is accessible by someone else. In addition, the password is saved in the ini file, which someone could steal from your computer, although it is saved as a scrambled form which you can't read without decoding using a special method. In summary, it is strongly recommended that you do not enter password here unless your computer is located in a secure and private place. Authentication If your mail server requires a special authentication method, choose it in the radio buttons. You can choose between APOP, CRAM-MD5 and NTLM. NTLM is Microsoft specific, and may be used with Exchange Server. POP3/IMAP Specific Settings The next options appear, depending on whether the account is POP3 or IMAP4. POP3 Options: Leave Messages on Server(POP3) Generally, messages from a POP3 server are deleted after they are retrieved. If you want to keep them, check this option. Many providers have a limitation on the total size of messages that you can keep on the server and if your quota is full, the mail server will accept no more messages for you. So, it is not recommended to check this option permanently. If you do select this option, please consider also specifying Delete After X days. IMAP4 Options: Connect on Starting Program This specifies that Becky! should log onto this account immediately upon starting. Otherwise, you must use the Remote Mailbox button or Mail>Connect to IMAP Server command. Connect on Opening Mailbox This specifies that Becky! should log onto this account immediately upon selecting the account. Otherwise, you must use the Remote Mailbox button or Mail>Connect to IMAP Server command.
46 p46 Mailbox Setup - Connection Connection Method Choose whether you want to connect the Internet via LAN or dialup. If dialup, you also have to choose an appropriate dialup entry in the combo box. If you connect to a broadband provider, you will probably need to only check the LAN option on this screen. Most options here focus on dial-up. Force to Reconnect This option enables you to switch dialup connections between mailboxes on Collection and Delivery. Dial up Settings If you choose "Dialup" for the connection method, you can set up each dial up entry. Auto Disconnect Choose whether you want to disconnect the phone line after sending and receiving . Redialing Times Specify the times you want to redial when the line is busy. Redialing Interval Specify the seconds you want Becky! to wait before redialing. Dialup Authentication Choose the authentication method for dialup. If you have set your Windows' dialup network to save the password, "Use ID and password stored in the dialup entry" would be good. SMTP server associated to this dialup. Forces Becky! to use the specified SMTP server when you connect to the Internet using this dialup entry.
47 p47 Mailbox Setup - Compose For many users, no entries are required here, other than to possibly set a personal signature file. However, there are other users who will see the power of these features to be extremely important as they allow a lot of customization to an account. Permanent Fields Supply the header data you want to add to all outgoing messages. Templates Choose the template you want to use for this profile. Address Book Choose an address book or an address group you want to use particularly for this profile. vcard Specify the file name of vcard you want to use for this profile. Signature Create and choose your signature that you want to add to outgoing messages. You can also choose them in the combo box of Compose Window while you are writing a message.
48 p48 Mailbox Setup - Receive Configures some options for mail retrieval. All entries here are optional, depending on your needs. Periodical Mail Check You can configure periodic mail checking for one mailbox. If you want to do Collection And Delivery periodically, you should look at Tools>General Setup>Receive. For IMAP accounts, when you do not configure periodic checking, Becky! will automatically poll "Noop" command to IMAP server and check messages in Inbox every minute. (If you specify either Check Every or Check At this polling will not be invoked.) Check Every Specify the interval of mail checking. Check At Specify the time you want to check mail. Check Only When Dialup is Active If you have set Becky! to use dialup, it doesn't check mail when you are not online. IMAP Settings Use IMAP IDLE for Mail Check "IDLE" command (RFC2177) will be used to check for new mail. With this setting, the server takes ownership of the responsibility of making new mail available as soon as it arrives. This reduces demand on the server and gives you better service. The IMAP server must support the IDLE command for this to work. Using this feature is not required, but is desirable if supported by the server. Use IMAP COMPRESS The "COMPRESS" command (RFC 4978) will be used to compress the traffic (i.e., reduce bandwidth). The DEFLATE algorithm (RFC 1951) is used. Compression might improve the performance, or might not, depending on the network environment, the server configuration and/or the average size of the messages Ignore UIDVALIDITY If you experience frequent index reconstruction when you open an IMAP folder, try this option Normally, this should not be needed. (The term, UID, is an abbreviation for "unique identifier", required for each IMAP message.) Deleted offline not go to Trash This option causes messages deleted when offline to be permanently deleted when the account goes online. Size Limit Tells Becky! to download messages partially if the size of the message exceeds specified K bytes. For POP3, you can download skipped messages using Remote Mailbox later. For IMAP, you can simply double click the item to download an entire message. Receive from multiple POP3 servers of other profiles. If you have set multiple profiles within a mailbox, using different POP3 servers, this option defines the behavior of receiving mail for the current mailbox. If checked, the mail server of this profile is always checked even if this profile is not active, except when the active profile does not have this option checked. If not checked, the mail server of this profile is checked only when this profile is active and any other profiles' mail servers will not be checked. Show unread count on the "Welcome" screen of Windows. If this is checked, the count of unread messages of this mailbox will be added to the "Unread messages" on the "Welcome" screen of Windows XP (or later). When you quit Becky! leaving unread messages that are in the folded folder tree, those messages may not be counted as unread messages when you restart the program. This is not a bug but a technical limitation.
49 p49 Mailbox Setup - Misc. Port Numbers You don't have to change these values usually. Sometimes you will need to change to a specific value, such as when you use proxy servers to receive . Your ISP should advise you. SMTP Authentication If your SMTP server supports "SMTP AUTH" capability, use this option. SSL/TLS Settings Incoming/Outgoing You can specify the particular version of SSL/TLS protocol for Incoming server and Outgoing (O/G) server (SMTP) respectively. It is, however, recommended to leave it "Default" unless you have some compatibility problem with the server. See also the Initial Setup information. Skip verifying certificate. You can choose not to verify the SSL/TLS server certificate so that you can connect to a private SSL/TLS server without error. That is not recommended for security, though. Use Client Certificate. If you have problems connecting to an SSL server from a PC with client certificate, turn it off. C lick [...] button beside this option and you can specify the certificate you want to use. POP before SMTP Many ISPs that provide SMTP servers use this mechanism so that only the users who have a POP account on their server can use the SMTP server. Turn this on if this applies to you. Sometimes this mechanism works several seconds after the POP3 authentication. In that case, specify the wait time in milliseconds. Alternate server Specify a POP server for POP before SMTP if you need to use a different server. You can use a different User ID and password as well. (You can leave them blank if you want to use your default User ID and password) Use ESMTP You should not turn this option off. Without ESMTP, you will not be able to use some features such as SMTP Authentication and Delivery Status Notification. If your SMTP server is old and it doesn't support ESMTP, uncheck this. IMAP Settings IMAP Folder If in doubt, leave this field blank. Usually, messages for IMAP accounts are stored in the user's home directory. Some IMAP servers show unwanted regular files such as mailbox files. In that case, you can create a separate folder to store IMAP messages under your home directory. Different IMAP accounts may function differently with this variable. For example, if you have a Gmail account, set this value to [Gmail] to remove unnecessary duplicate file folders. Update unread states on every connection Sends "STAT" command to all the folders to retrieve accurate information of the number of unread messages when you log on to the IMAP server. However, it takes a long time if you have many folders or your Internet connection is not fast enough. In that case, it is not recommended to check this option. Place Trashbox on the server You can place your trash box on the IMAP server instead of your local hard disk. It makes deleting operation faster when you delete messages on the IMAP server. (See also Auto retrieve names, below.) Place Draftbox on the server You can place your Draft box on the IMAP server. If you save messages to Draft when you are offline, they are temporarily kept on the local hard disk and will be transferred to the remote folder when you log on to the IMAP account. (See also Auto retrieve names, below.) Place Sentbox on the server You can place your Sent box on the IMAP server.
50 p50 It could be useful if you always want to refer to your sent messages from different computers. However,this does have an impact on network traffic, in that the message is sent twice; once to your recipient and once to your IMAP Sent box. (See also Auto retrieve names, below.) Place "Tasks" on the server Place "Tasks" folder on the server. This functionality is made possible by creating a dedicated IMAP folder on the server. If you access this IMAP account by any other client than Becky!, you will see a folder named "com_rimarts_tasks_..." with pseudo- items. Note: Gmail will "see" the tasks as mail items, so they may appear in other mail folders, such as the Archive and All Mail folders. If this is confusing to you, then using this feature with a Gmail account may not prove fruitful. Show extended name space as folders Some IMAP servers show FTP directories or newsgroups as regular IMAP folders. If you want to see those folders, check this option. Auto retrieve names Retrieves the names of Trashbox, Draftbox and Sentbox from the server if available. This is achieved by use of the "SPECIAL-USE" IMAP capability (RFC6154) or the XLIST command (for Gmail accounts). This option is NOT normally needed and is primarily for those mail servers that have predefined folders for trash, draft and sent mail (such as Gmail).
51 p51 General Setup The General Setup menu is where you can define all your settings for overall functionality that are not dependent on any specific mail accounts. Knowing these features will help you in using Becky! to its maximum. Tabs on the General Setup menu follow: General Tree/List Message View Editor Citation Languages Shortcut Keys Keywords Send Receive MIME Advanced General Setup - General On Startup Run "Collection and Delivery" Process Collection and Delivery upon starting Becky! Run "Send and Receive" Process Send and Receive upon starting Becky! Minimize Start Becky! with minimized window. On Exit Empty Trash box Empty all the trash boxes on exit (applies only to POP3 accounts). Warn unsent messages in Outbox If unsent messages are found in Outboxes, notify the user. Sort messages to folders Sort newly arrived messages to folders according to the filtering rules. It doesn't work for IMAP mailbox; for IMAP, use Tools>Sort New Messages. Warning Warn opening these types of attachments Warns when you are opening an attachment file that has one of the defined file extensions.
52 p52 Do not allow executing these types Disallow executing files that have specified file extensions. Warn outgoing attachments, too. Warns when your outgoing messages have attachment files with above file extensions. Confirm Posting to Mailing Lists C onfirm when you are sending messages to the mailing lists that are registered in "Mailing Lists Manager". This will prevent you from sending personal messages to mailing lists by mistake. Confirm Trashing mail items C onfirms when you are deleting mail items. Deleted mail items are moved to Trash box. Warn drag and drop to Outbox Warns when you drag and drop messages to Outbox. Warn reediting a message if "From" is not me Warns when you are about to reedit a message from Draft, Outbox, or Sent and the originator of the message is not you. Warn External Link Warns when you click a URL in an message. Light Security Startup Password Sets up the password you want to use to start Becky! This password security only prevents people from opening your mailbox by mistake. Do not depend on this. Need when restoring from minimized window Makes password entry mandatory when restoring the program from minimized window. Misc. Show only on tasktray when minimized Hides minimized window in the taskbar when minimized. This lets you access Becky! through the icon in the task tray. Show network error on the status bar instead of a dialog box. C auses network error messages to display only on the status bar instead of bringing up a dialog box. This is useful if you don't want to be interrupted in your work when network errors occur during periodic mail checking. Delete History for search, etc. Pressing this button deletes search history. Make it "Default" mail program. Pressing this button establishes Becky! as your default mail program. This feature is for Becky! installed from the EXE version, not from the ZIP version. If trouble persists see Troubleshootingsection. the
53 p53 General Setup - Tree/List Tree View Bring up the current mailbox on top When you switch the mailbox, current mailbox always bring up on top and other mailboxes are collapsed. Show unread number. The number of unread messages in the folder will be displayed right next to the folder name. Collapse tree items that were expanded while D&D. With drag & drop operation, you can expand the tree item by hovering the mouse cursor over the [+] icon, and with this option, those tree items will be automatically collapsed after drag and drop is finished. Behavior On Switching Folder C onfigures which item to be selected in the folder when it was opened. Behavior On Switching Mailboxes C onfigures which folder to be selected when the mailbox is switched. "Tasks" Folder Always Visible "Tasks" folder doesn't disappear even when there is no task. Delete "Done" tasks after [ ] days Tasks which are marked "Done" will be deleted automatically after specified days. Add task name to Subject Inserts task name such as "{Need Reply}" to the subject line of the message. Show "Green" tasks' count. Includes the count of non-urgent (i.e., green) tasks in the task summary for an account. List View Message Orders C onfigures whether to remember the message order in the List View. You can change the message order by clicking list item headers. If "From" is me, show "--> To" instead If the messages are sent from you, shows "To" field in the place of "From" field in the List View, Prohibit deleting important items (Priority 1 or 2) This option prevents you from accidentally deleting mail items with high priority (red or yellow). Since senders can set those priorities, sometimes unimportant messages, such as spam mail, have the highest priorities. In that case, right-click the priority icon (colored ball) at the left of the mail item and change the priority before you trash them. Prohibit deleting flagged items. This option prevents you from accidentally deleting mail items that you have flagged. Prohibit deleting tasked items outside "Tasks". This option prevents you from accidentally deleting messages with tasks. This option has no effect in "Tasks" folder. Double click to view a message. A message will not be viewed until you double click or press a space key on the list item. Disallow dropping to Outbox. Disable drag & drop (or paste) to Outbox from any folders except Draft.
54 p54 Unread Browsing Keep current item in the middle When you are browsing unread messages by space key, a selected message is kept positioned at the middle of the list. This allows you can see above and below the focused item. Pause at a last unread message in each folder When you are browsing unread messages by space key, unread messages are marked and the selection is moved to the next message. However if you want to stay in the folder after the last unread message is marked read in that folder, turn this option on. Spacing between tree items This changes line spacing for the Tree View. Spacing between list items This changes line spacing for the List View. Size% This changes the font size for the Tree View and also the List View. If you prefer to set the font sizes for Tree View and List View separately, you may prefer to use the Touch Friendly Modefeature, as it can change the sizes of each separately.
55 p55 General Setup - Message View Action for URL/ Single Click/Double Click C hoose whether you prefer single clicking or double clicking to open URL/ addresses. If you choose Single C lick, you will see underline on URL/ addresses as on web browsers. URL C hoose the default action for URL. "Use DDE" is maintained only for older web browsers. Usually you should not check this option. C hoose the default action for addresses. Mark read immediately when opened. Usually, unread messages are marked read when you read it to the end or double click the item. With this option checked, unread messages are marked read immediately after you select the message. Wrap long lines to fit the window. Sometimes, you may receive messages that contain long lines without carriage return. This option makes them wrap to fit the window width. Operate 4way button by the cursor key. Assigns the cursor key to the 4way button. Always wheel scroll when focused. When the Message View has a focus, mouse wheel always scrolls the Message View despite the mouse cursor position. Treat uuencode in body as an attachment. There are some mail agents that send attachment files in uuencoded format, which has been widely used in UNIX community, in the text body. This option causes Becky! to recognize them as attachments despite MIME format. Treat BinHex in body as an attachment. There are some mail agents that send attachment files in BinHex format, which is widely used in Macintosh community, in text body. This option causes Becky! to recognize them as attachments despite MIME format. Always show Tab Sheets. By default,. you can see Tab Sheets when you move the mouse cursor over the bottom of the Message View. Tab Sheets are usually hidden except when there are other sheets than text and header. This option causes Becky! to always show Tab Sheets. Large button view for attachments. By default, attachment files are displayed with small buttons at the bottom of the Message View. This option makes them display with large buttons. This option doesn't affect the Compose Window (always small buttons for the outgoing attachments). "Save & Open" attachments by default Assigns double click action to the attachment to "Save & Open" command instead of "Open". Note: You can always override this; just right-click on an attachment and a menu with options will pop up. Extract Attachments from ms-tnef Show attachment files that are included MS Outlook's "winmail.dat" attachment. If "winmail.dat" contains no attachments, nothing will appear. (Winmail.dat is the packaging envelope ms-tnef.) for Spacing Between Lines Specify sizes of line spacing in dots. Scroll Mode Smooth/Skip C hoose whether you prefer scrolling or paging when you are browsing messages with the space key. by Half Page
56 p56 Turn this option on if you want to scroll by half page instead of full page by pressing a space key. Color C hoose colors for Message View using the drop-down menu. HTML View See more information regarding HTML Messages. Convert to Plain Text All the tags within the HTML messages will be removed and only the plain text will be viewed. (text/html) as attachment file When HTML message is viewed as plain text, the HTML part shows up as (text/html) button in the attachment file area. Clicking it will open message in IE component in the Message View. This option will disable that feature and treat it as an HTML attachment file; clicking it will open message in your browser. View with IE component Enables Becky! to use Microsoft Internet Explorer component to view HTML messages. Use cache if offline If you have configured the current mailbox to use dialup, it sets HTML viewer to offline mode when you are not online. That way, you won't see dialup-connecting dialog each time you open an HTML message. Disallow Scripts Forbid the IE component from processing scripts in HTML messages. Scripts can be dangerous because most viruses can be processed automatically by scripts. View HTML part first Many HTML messages are in multipart/alternative format, which means there are several formats with the same content and a mail agent can choose which is to be displayed. This option causes Becky! to show HTML part prior to text part. TIP: HTML messages are sometimes the source of viruses. If you prefer to first confirm to yourself that the message is legitimate prior to viewing the HTML element, UNtick this box. Then, when viewing the message, there will be a tab at bottom of screen labeled "2: t/html" that you can click to view the full HTML message. Do not download pictures If an HTML message contains links to pictures or other graphics, those images will not be displayed unless they are in local cache. Pictures and graphics that are embedded within the HTML will still be viewed. TIP: If using this feature to reduce exposure to spammers, be advised that use of "Print" or "Print Preview" invokes your browser and the files will then be downloaded. Reply/Forward as HTML When the original HTML message is viewed in IE component, the original HTML format will be kept in Reply/Forward messages. View HTML source The source code of HTML will be viewed.
57 p57 General Setup - Editor Max Columns Specify the wrapping point of long lines. Use "0" to fit to the window. Note that wrapping point is only for viewing convenience and no CRLFs are inserted. Generally, this should be set to allow you to view more columns than the setting for Auto Formatting Columns so that you see the text as it may be formatted. Does NOT apply to HTML messages. Auto Formatting Columns Unlike Max Columns, this value specifies the column for inserting CRLFs in "Auto Formatting" mode or with " Format" command. Formatting (aligning each line to the length specified here) does NOT occur unless you 1. toggle Auto Formatting (Edit>Auto Formatting Mode or Tool Bar icon) or 2. highlight the desired text and use the Format command (Edit>Paragraph Formatting>Format or the Tool Bar icon). Does NOT apply to HTML messages. TIP: When no formatting is set, text wraps to the Max Columns setting. Recipients will generally see your message wrapping at their screen size. However, if recipients have difficulty reading your messages you may wish to format messages to a fixed length; there is no universal agreement on which is best. If you are posting to newsgroups, formatting the message (generally at a line length of 72) is preferred. Tab Size Specify the tab column. Editing Options Auto Indent Automatically indents when you press return key. Soft Tabs Inserts space codes (20h) instead of a tab code (09h) when you press tab key. Permit Caret After End Of Line Makes caret to preserve the column position even if the end of line is located before the caret. However, the caret is actually positioned at the end of line, so if you do any editing operation, the caret goes to the end of line immediately. Free Caret Unlike "Permit Caret After EOL", the caret preserve its position and you can enter at the position where the caret is. Spelling Checker American/British C hoose the dictionaries you want to use for spelling-check. Check Before Sending Message Automatically check the spelling of outgoing messages before they are sent. Display Changed Mark Displays the marks that show which lines are changed. Tab and CRLF Displays Tab and CRLF codes. Underline Displays an underline at the caret line. Use inline HTML editor Enables Becky! to use HTML editor component included in IE (Internet Explorer). Initial Font Size This specifies a font size other than the IE default for HTML. For more information, see Font the Tutorial.
58 p58 Use auto complete for To, Cc, and Bcc fields. You can use "Auto complete" feature when you are typing in To, C c, and Bcc fields in the composing window. Mail addresses or nicknames will be automatically completed as you type. Auto Backup Interval Specify the backup interval for composing messages. You can keep a backup in case Becky! crashes while composing messages. Backup messages are restored to Draft box. If you specify 0, no backups are made. (If you are running Becky! on floppy disk, frequent backups may affect performance.) Open IME Automatically Enables Becky! to turn on Input Method Editor when you are composing a message. It will be turned on when you focus on the editor window and "Subject" field, and turned off otherwise. (IME is usually used for East Asian languages.) Always focus to the editor when composing Normally, the Compose window opens with the cursor positioned in To the box if that field is empty. C hecking this option causes the cursor to be positioned in the message window, regardless of empty fields. (External Editors...) Enables Becky! to invoke other editors in C ompose Window. The menu allows specification of an external editor for plain text messages and one for HTML messages. If the two tick boxes (MDI and Start Automatically) are unticked, the defined editor can be manually invoked from the Tools>External Edit command in the C ompose Window. If MDI (Multi-Document Interface) is ticked, the editor is opened transparently whenever the C ompose Window is opened. If Start Automatically is ticked, the editor is opened in a separate window whenever the C ompose Window is opened. This feature may not work with all editors, so you are encouraged to test with whatever editor you prefer.
59 p59 General Setup - Citation This menu is where you can specify how you want your replied or forwarded messages to appear to the recipient. This includes the citation prefix that differentiates your content from sender's content and optional use of generic templates for replying and forwarding. For more template options, or to have a better understanding of how templates are used by Becky!, see the Templates page. Citation Prefix (For Replying) Specify the characters you want to insert before each line of cited message. With Name You can add name of originator of cited message before the citation prefix. Following 3 types are supported. Here is example for Tomohiro Norimatsu <[email protected]> Part of carty> Name Tomohiro> Initial TN> Other Prefixes Specify characters that you want Becky! to recognize as citations. You can specify multiple strings separated by ',' (comma). '>' is always specified implicitly. Add reply sequence number to Subject Adds sequence number to the subject of replying message. It will show up as "Re[2]: subject". It has limited usefulness and some people don't like it. This option is maintained only for the compatibility with Becky! Ver.1. Use template for replying If you want to cite original message automatically when you are replying, check this option. Actual template is in the text box below the option. You can edit it, but you should not remove "%M" (cited message) and %0 (default signature) macro symbols. If desired, you can use these additional template symbols. (See example reply below.) NOTE: If you prefer to use specific templates for different mailboxes or use specific templates on an as-needed basis, Becky! gives you that flexibility by allowing you to set up custom templates. Please consider that quoting an entire message may make your message large and messy. It is a good idea that you cut unwanted parts from the citation. Show Reference View Shows the original message in the above pane of the split view of the replying window. If you use template for replying, you may not need the reference window because the original message is cited in the editor window. In that case, turn it off. Use special template for forwarding Check this option if you want to MODIFY this template when you are forwarding a message. (Works only with Forward command, not with Redirect or Forward As Attachment commands from Mail Menu.) If desired, you can use these additional template symbols. NOTE: If you prefer to use specific templates for different mailboxes or use specific templates on an as-needed basis, Becky! gives you that flexibility by allowing you to set up custom templates. Custom or modified templates are NOT FUNCTIONAL if using Remote Mailbox for POP mailboxes. Example of Use of Template This is the default sample template for message replying. On %d <== %d inserts date %f wrote <== %f inserts sender's name %M <== %M inserts full content of sender's message %0 <==%0 inserts your signature Here is how a reply message would appear.
60 p60 On Sat, 23 Oct :13: Mazda wrote > Hi, > How are you -- Celica Toyota
61 p61 General Setup - Languages Language Settings Language Choose the character set you want to configure. You can add new character sets, which you cannot find in the list. However, invalid character set name can cause problems on the recipients' side. So be careful if you are going to add one. Use for Composing Make the selected character set the default for composing messages. Becky! usually determines an appropriate character set from the OS's language, so you don't really need to check this option. Implicit Charset for Incoming Messages Use as a default character set if an incoming message doesn't declare any character set. Becky! usually determines an appropriate character set from the OS's language, so you don't really have to check this option. Font Choose the font and size for the selected character set. The font is for plain text messages viewable by you, not by recipient. For more information and other options, see the Font Tutorial. UNICODE font Check this option only when you can't get the specified font displayed properly. Generally, you don't need this checked. Character Set Specify a character set name for the selected language. It is used for composing messages as well as viewing incoming messages in proper font. You can specify multiple character set names, separated by comma, in case different character set names are used for the same character set. e.g. BIG5,CN-BIG5 Encoding Choose the encoding method for specified character set. Although it is recommended that you choose "Base64" or "Quoted-Printable" for 8bit character sets, sometimes you may need to choose "8bit" because some systems don't recognize those encoding formats. You should choose "7bit" for US-ASCII and ISO-2022-* character sets. ANSI code page used by editor Although you can specify ANSI code page for text editing here, you don't really have to do that. Simply set it to 0 and Becky! will determine appropriate code page from the font. Note This is just a short description for the character set. MIME Encoding Do not use MIME encoding in header. You should not check this. However, if you are using Becky! in a closed intranet environment and your in-house system is not MIME compliant, this option could be used. Replying Foreign Language Mail Configure which language you prefer to use when you are replying to mail written in a foreign language. Default Uses your default language. Cited message might not be displayed correctly. Use original charset Uses the language that is used in the original message. If you use English, this would be the best choice because 7bit ASCII is supported in most languages' charset. UTF-8 Uses UTF-8 charset (Unicode) in which you can mix your own language and other languages. Forwarding Foreign Language Mail
62 p62 Configure which language you prefer to use when you are forwarding mail written in a foreign language. Default Uses your default language when you are forwarding as attachments. Subject field might not be displayed correctly. For regular "Forward" or "Redirect", an original charset will be used. Use original charset Use the language that is used in the original message. UTF-8 Use UTF-8 charset (Unicode) in which you can mix your own language and other languages. This option does not affect "Redirect". Always use UTF-8 (Unicode) for outgoing messages Use UTF-8 for new,/reply,/forward messages regardless of the above settings.
63 p63 General Setup - Shortcut Keys Shortcut Keys can significantly improve your productivity by allowing you to specify key combinations to quickly invoke various functions within Becky! This is especially useful for persons who prefer to use the keyboard instead of the mouse. Many shortcut combinations are already defined for you, so a review of the shortcuts can be useful even if you do not intend to set any yourself. (Command lists) Choose a function group in the above combo box; then highlight a function whose key assignment you want to change. Key Assignment Shows shortcut keys assigned to the chosen function. You may highlight and delete shortcut keys, if desired. Key combination to Add Type desired key strokes in the text box. Use the buttons to insert TAB, Enter or ESC codes. Note that it is not guaranteed that you can always use the key combination you enter here. Some key combinations are reserved by OS and Becky! doesn't check the availability. If you can't use the key combination you set, try another combination. Two Stroke Keys Register the first stroke of two stroke keys. "Two stroke keys" is the sequence of two Ctrl+Alphabet keys. For example, when you type Ctrl+K, Becky! will wait until the next key is typed, because K, O, and Q are specified as default here. Show Menu After... You can see a menu of two stroke commands after the first stroke is typed. Specify the delay time in milliseconds.
64 p64 General Setup - Keywords Keywords and Comment Blocks are added features of Becky!. Although the following information conveys how to use the features, you are first encouraged to read this Keyword Overview. Group You can configure up to 16 Keyword Groups. Each group has independent color and boldness scheme and you can see those keywords in different color and boldness. Comment Short description of the selected Keyword Group. MIME type You can choose a specific MIME type to activate the Keywords. For example, HTML Keywords have meanings only in text/html content. Character Set Specify the character set you want to be activated by the Keywords. You can specify multiple character sets separating by comma. "*" means all the character sets. For example, Chinese Traditional Keywords make sense only in BIG5 character sets. Keyword Type a Keyword you want to add to the list. Color Choose whether you want to see all Keywords in the group in a defined color. Bold Choose whether you want to see all Keywords in the group in bold font. Case Sensitive Check this if those Keywords are case sensitive. Comment Block You can see text enclosed with defined strings in different colors. This is called a "Comment Block". Begin/End with Specify the beginning and ending strings of the Comment Block. Both must begin with a non-alphabetical character. If a CRLF is encountered prior to appearance of the End With character(s), the CRLF will serve as the delimiter. Keywords in Block You can choose whether you want to see Keywords within the Comment Block in their defined colors or boldness. For example, in HTML, text enclosed with "<!-- and "-->" are comments and HTML tags inside should not be emphasized. In that case, clear both "Colored" and "Bold".
65 p65 General Setup - Send Send from Outbox Choose how outgoing messages are sent when Send from Outbox command is processed. Send Now Choose the behavior of Send Now command. Send large messages with "message/partial" MIME type. Sends a large message divided into small multiple messages with "message/partial" MIME type. Always confirm recipients before posting When you are sending , a dialog pops up for you to confirm recipients. Without this option, the dialog shows up only when you leave To or Subject fields empty. The associated tickbox is there for those who prefer to have a tickbox on the confirmation dialog screen in addition to the "Okay" button. Send after "Send and Receive" "Send and Receive" is done in the order of "Send"->"Receive". Sometimes, auto forwarding/replying messages are generated in Outbox as the result of a receiving operation. If you want to send those messages in the same session, check this. Prohibit group mailing If you do not want to use the group mailing feature of the address book, turn it on. Group mailing is the feature that allows you to send messages to all the members in an address group by choosing an address group and clicking "Add" button in the address book. Omit Date field Removes Date field from outgoing mail so that the SMTP server can add the date. However, since some SMTP servers don't put Date field, it is not recommended to check this option. Date field should be added by user agents such as Becky!. Omit Message-Id field Removes Message-Id field from outgoing mail so that the SMTP server can add the message-id. However, since some SMTP servers don't put Message-Id field, it is not recommended to check this option. Message-Id field should be added by user agents such as Becky!. Reedit a message that caused an SMTP error. If a message caused an error during SMTP session, it will be open for reediting. This lets you identify which message was the culprit. 8bit file name conversion Although it is not recommended to send attachment files with 8bit file name, you can choose how 8bit file names are handled in outgoing messages. SMTP Host Name Specify the host name that is used during the SMTP session. If it is left blank, [IP address] will be used instead. This field can usually be left blank.
66 p66 General Setup - Receive Mail checking, pop up message, and some other settings only work with POP3 accounts, not IMAP. Periodical "Collection and Delivery" Configure it if you want to automatically run Collection and Delivery command at one or more of these times. Check Every Specify the interval of mail checking. Check At Specify the time you want to check mail. Check Only When Dialup is Active If you have set Becky! to use dialup, it doesn't check mail when you are not online. Backup Logs You can backup incoming and outgoing messages so that you can restore them by the File>Import Backup Logs command. It is a good idea to specify a limited number of days to keep backups because they may eat up your disk space. If you have sufficient disk space, you may specify 0 to keep backups forever. You can also choose the "Mirror" option so that those logs will be created to the specified folder other than to Becky!'s data folder. Those logs will not be deleted automatically. This feature does NOT apply to IMAP accounts. Get more information at the Backup and Restore topic. Sound On Arrival You can specify the sound file (.wav) you want to hear when new messages are arrived. Specify "MailBeep" to use Windows' default mail arrival sound. Notify arrival of new mail with a message box when Becky! is not active. When you receive new mail and Becky! is running background, a message box will come up to get your attention. With POP3 mailbox, the message box appears after the mail check session. With IMAP mailbox, the message box appears when RECENT response is returned for NOOP command that is issued every minute. That means the user needs to stay online to get the message box notification. Use Toast instead of the message box. (Windows 8 or later.) This allows use of the Windows Toast option. Not applicable for OS versions prior to Windows 8. Notify "No New Messages" with a dialog box. Brings up a dialog box to let you know there are no new messages. Do not send on periodical check. Usually, the process of mail checking is sending from Outbox and then receiving new messages. If you do not want to send automatically, check this option. Notify when already received messages are found on the server. Even if you did not check the "Leave Messages on Server" option in "Mailbox Setup", sometimes messages are left on the server due to incomplete session or server problems. With this option, you will be notified when those messages are found on the server during the POP3 session, and you can choose to delete them. However, if you have set up filters to leave some messages on the server, you will see this warning for those messages, too. In that case, it is better to uncheck this option. This warning will not pop up when the main window is in background or minimized. Also when "Show network error on the status bar instead of a dialog box." option is checked, this warning will not give you a choice to delete messages on the server. How to respond to a request for "read receipt" Requests for "Read Receipts" might be for business or legal reasons to "prove" that you read the message, or possibly just from a friend who is distrustful of Internet mail delivery. Regardless, Becky! gives you the options to determine how to handle such requests. This is an unreliable process at best, considering the many clients involved and the different interpretations of Internet protocol.
67 p67 This process is based on how to respond to messages that have a "Disposition-Notification-To" or "X-Confirm-Reading-To" header. Note that if the messages' "To", "Cc", or "Original Recipient" fields do not contain your address, this "read receipt" request will be ignored. Some servers might refuse to send the response because of an empty Envelope-From. It is not a bug. It is defined in RFC > The envelope sender address (i.e., SMTP MAIL FROM) of the MDN MUST be > null (<>), specifying that no Delivery Status Notification messages > or other messages indicating successful or unsuccessful delivery are > to be sent in response to an MDN. Some mail clients violate it, but there is a reason that RFC prohibit it (MUST is a very strong term in RFC), so Becky! is implemented accordingly.
68 p68 General Setup - MIME (Multipurpose Internet Mail Extensions) Associates the Windows file types with MIME content types. MIME types are normally identified by their suffix (e.g., a file with the ".jpg" suffix is a graphic image), whereas one ending with ".txt" would be a text file. For most users, no MIME setup changes are required. MIME Type/SubType Shows the MIME type and subtype of the item currently selected in the list. Add New Type Create a new MIME type and subtype. File Type Specify the file extensions corresponding to the current MIME type. It must begin with "." (dot). You can specify multiple file types such as ".jpg.exe". Action Define the action for the attachment file with the specified MIME type. Open Opens the document according to the OS's setting. For example, ".html" file is opened by a web browser. Save As Saves the attachment to the selected location. It is recommended that you choose this for "application/octet-stream" MIME type, because this MIME type is often used for attachment files with unknown file types such as ".exe", ".com", or ".pif", which might contain computer viruses. Open With Opens with specified application program.
69 p69 General Setup - Advanced Size of Each Mail Storage File Becky! saves messages to multiple files, which means if one file reaches the size defined here, a new file will be created. This can reduce the performance overhead of saving all the messages into one file and minimizes the risk of losing data in case of file corruption. If you specify zero, Becky! will save one message as one file. In terms of data loss, it is the safest. However, it may unnecessarily consume your disk space because of the cluster gap, especially on FAT16 file systems. The value from 64 to 640 is recommended. However, FAT16 is an old architecture and no change is required for most users. Save Attachments to Separate Data Files. If this option is on, attachment parts in messages will be saved as separate data files, which improves overall performance and decreases the risk of virus-scanning software deleting messages that contains viruses along with other innocent messages. Those separated attachment files are saved "as is" (not decoded) and this process is totally transparent to the user. There are two commands in "File>Folder" menu; "Separate Attachments" and "Combine Attachments". Max IMAP Mail Item Cache Specify the number of mail items you want to save on the local hard disk as IMAP mail item cache. Clear on Disconnecting If this option is checked, all IMAP cache files will be deleted when IMAP session is terminated. Keep for nnn days This option is effective only if the 'Clear on Disconnecting' option is unchecked. Socket Options These options are for troubleshooting. If you have any difficulty with the network connection, try the following options. The first three are generally not a concern anymore, but if the connection is timing out or indicating no mail when mail is present, try setting the Set Timeout option to 120. This causes a delay on the server which may allow sufficient time to acknowledge the mail request. When troubleshooting, always tun on Protocol Logs at Tools>Protocol Logs. Larger Receiving Buffer Larger Sending Buffer Send Without Delay Set Timeout Effective After Restarting Program Create composing window on an independent thread. Creates Compose Window on a different thread from the main thread. It makes the Compose Window more stable, especially when receiving in background, but it consumes more system resources. If you are using Windows95/98, this option is not recommended. No dropdown menu on toolbar. Some tool buttons have dropdown menus, with which you can choose more options for one command. However, if your PC's screen is not wide enough, you may want to check this option. That can create a space for another tool button. Touch Friendly Mode. (Bigger UI Components.) This option provides TWO functions. The FIRST function allows changing font sizes individually for Tree View, List View and Message View, and also changing icon sizes on toolbar. The change to Message View is ONLY for plain text messages. The SECOND function provides a drop-down menu of toolbar options that can be invoked by touch or mouse. This menu is at upper-right main menu Becky! icon. The touch friendly aspect is compatible with Windows 8 and later Windows versions. After setting this option, close and restart Becky! for the changes to take effect. This also may have an effect on layout, described at View>Change Layout. (Plug-ins) This button displays all installed plug-ins and you may activate or deactivate them here. These are contributed functions to Becky! and many work very well, but we cannot take ownership of any of them. However, we do
70 p70 have plug-in information available here. For any setup options for plug-ins, see Tools>Plug-Ins Setup.
71 p71 Folder Mail Settings The Folder Mail Settings menu is where you can define multiple settings for each account. This is a powerful and unique feature of Becky!, in that you can define multiple templates and personalities. You can access these settings by right-clicking any mail folder. The tabs are General Compose Folder Properties - General Folder Property You can open the property of any folder by selecting the Property... command in the right-click menu on the Tree View or File menu. Each folder replicates many of the features of your Mailbox Setup and may contribute to a better management experience for you. One tab is for General Folder Properties and the other is for Folder Properties Compose Folder Properties- General Folder Name Name of the folder Templates Choose the template you want to apply when you are processing compose/reply/forward from this folder. These templates override the ones you have specified in Tools>Mailbox Setup>Compose Address Book Choose an address book or an address group you want to open when you are in this folder. This will cause that address book to be Primary Address Book whenever you have highlighted this folder and are composing a message. Related Functions Mailing List Choose a mailing list associated to this folder from the ones registered in Mailing Lists Manager. If you associate a mailing list to a folder, you can process some ML commands, such as "Post", from the right-click menu. Folder Options Remove [...]/(...) from the top of the subject line on replying. Some mailing list server adds a sequential number to the head of the subject, such as [aaa-ml: 1234]. You can remove when you are replying to the message. Hide [...]/(...) from the top of the subject lines in the List View. You can hide those sequential numbers in the List View. Ignore unread messages. If you check this option, this folder will be ignored while you are browsing unread messages by a space key. Also unread number besides the folder name appears in gray. This folder is for "sent" messages Makes this folder act similarly to the "Sent" box. It is useful if you want to keep sent messages to the folders other than Sent box, yet have the folder retain "Sent box-type" functionality. For example, double clicking a message in the folder causes the message to be brought up in the Compose Window and not in the View window. Also, messages cannot be marked '"Read" in the folder. You may still need to set up appropriate rules in the Filtering Manager to cause messages to be sorted to this folder. Using right-click on a message in this folder
72 p72 brings up the same menu as the "Sent" folder. Allow IE component to render HTML messages in this folder. Allows use of IE component to render HTML messages in this folder regardless of the setting in Tools>General Setup>Message View. Pictures, too Allows displaying of external pictures in HTML messages in this folder regardless of the "Do not download pictures" option in Tools>General Setup>Message View. Apply Settings to Sub Folders Copies all the properties of this folder to sub folders. It also makes the current property as initial value when you create sub folders of this folder. (Agent button) You can select an Agent, if desired. (Folder button) You can choose the folder button color.
73 p73 Folder Properties - Compose Folder Property You can open the property of any folder by "Property" command in the right-click menu on the Tree View or "File" menu. Each folder replicates many of the features of your Mailbox Setup and may contribute to a better management experience for you. One tab is for Folder Properties- General and one is for Compose Folder Properties. Folder Properties - Compose Permanent Fields Setting permanent fields for a recipient are rarely needed, but depend on your requirements. Compose To Specified mail address will be set to To field when you compose/forward messages selecting this folder. Also Use for Replying Forces Becky! to use the specified mail address as a replying address for messages in this folder. It can be useful if the list servers that don't set Reply-To and you have to modify the replying address if you want to follow up. Cc, Bcc, Reply-To, Sender Specified mail addresses will be used for each header fields. These settings override the ones in Tools>Mailbox Setup>Compose. If you want to override the mailbox settings with null string, enter "" (two double quotes). Personality The following settings will overrides the ones in Mailbox Setup and empower you to customize specific folders. Sender's Name Specify the name you want to set to "From" field of outgoing messages. If you want to override the mailbox settings with null string, enter "" (two double quotes). Sender's Specify the address you want to set to "From" field of outgoing messages. Organization Specify the organization name you want to set to Organization header of outgoing messages. If you want to override the mailbox settings with null string, enter "" (two double quotes). Signature Select the default signature. If you want to create a new signature, go to Tools>Mailbox Setup> Compose. Move replied messages to this folder instead of "Sent" box. With this option checked, you can save your sent messages to this folder when you reply to the messages in this folder. This allows your personal correspondence can be kept in one folder without the need to set up a rule in the Filtering Manager for this purpose.
74 p74 Search Dialogs Finding text within messages is a strong feature of Becky!. Whereas other clients may use one search function for everything, Becky! provides separate tools for maximum facility, whether one folder, one message or multiple folders. The tools are these: Search Messages - A strong search tool for a folder. This is the most frequently used option. Searches selected messages or an entire folder. Find in Text - This feature is for messages in Compose mode or Message View. Replace - This feature is for messages in Compose mode. Mail Query - This feature shows its strength for searching multiple folders. Headlines Search - This feature focuses on headlines (i.e., Subject, To and From) in current folder. Search Messages Accessible from "Find" button or Edit>Find from toolbar. Search particular messages or a folder of messages for those that contain the specified string. The cursor must be on the List View and not on the text of any message to invoke this search. If the cursor is on the text of a message in Message View then the Find in Text function is invoked. If your interest is to search within a message, then the Find in Text function is more appropriate. If your goal is to search ALL folders, then check out Mail Query. Find For Specify the string to find. '\' is treated as an escape character. Target Choose the part you want to search in . Search by Word Matches a string that is enclosed with white spaces or delimiting characters. Search Top of Lines Matches a string at the top of the line. Case Sensitive Distinguishes upper and lower case. Use Regular Expressions Specifies that the find string is a regular expression. Search Entirely in the Folder If NOT checked, only one message, previously highlighted in List View, is searched; otherwise, all messages in folder are searched. This box is normally checked for POP accounts. This feature may not work for IMAP accounts, depending on server implementation. In that case, use Mail Query to search all folder messages. Character Set This is available (and mandatory) only for IMAP folders. If you want to search Japanese text in Japanese ISO-2022-JP messages, specify ISO-2022-JP here. However, it depends on the server's implementation whether the specified character set is supported.
75 p75 Find in Text Search specifies text string within the current message in the Message View window (where the cursor is within the body of the text) or from the Compose Window. This feature is accessible from "Find" button or Edit>Find from main toolbar, or from the Compose Window via Edit>Find. Find Specify the string to find. '\' is treated as an escape character. From Top Of Text Searches from the top of the text instead of the current caret position. Mark Found Lines Mark the line in which the string is found. Search by Word Matches a string that is enclosed with white spaces or delimiting characters. Search Top of Lines Matches a string at the top of the line. Case Sensitive Distinguishes upper and lower case. Use Regular Expressions Specifies that the find string is a regular expression. Mark All Process the searching operation at once and mark all the lines in which the string is found.
76 p76 Replace (Compose Window) Replace the found string with the specified string. This feature is accessible from Edit>Replace from the Compose Window. Find Specify the string to find. '\' is treated as an escape character. Replace Specify the string you want to replace with the found string. From Top Of Text Searches from the top of the text instead of the current caret position. Mark Replaced Lines Mark the line in which the string is replaced. Search by Word Matches a string that is enclosed with white spaces or delimiting characters. Search Top of Lines Matches a string at the top of the line. Case Sensitive Distinguishes upper and lower case. Use Regular Expressions Specifies that the find string is a regular expression. Replace All Process replace operation at once and replace all the found words.
77 p77 Mail Query Mail Query is in the Main Window Edit Menu Searches specified string in multiple folders and lists the results. This feature is preferred whenever you want to search all folders. If this is not your intent, see other search dialogs. Query Criteria Find For Specify the string you want to find. If you choose "All Words" or "Any Words", you can specify multiple words separated by a space. Choose "Not Included(-)" if you want to locate entries that do NOT contain the search string. Target Choose the part you want to search in . Search Sub Folders Searches sub folders as well as the current folder. You cannot choose this for IMAP folders. Search from All Mailboxes Searches within all the folders in all the mailboxes as well as the current folder. Search by Word Matches a string that is enclosed with white spaces or delimiting characters. Match Start of Lines Matches a string at the top of the line. Case Sensitive Distinguishes upper and lower case. Use Regular Expressions Specifies that the find string is a regular expression. Unread, Flagged, Attachments, With Memo Selecting any of these will cause only messages with the selected attributes to be listed. Priority You can narrow down the target of search by specifying priority. Date You can narrow down the target of search by specifying date. Character Set This is available only for IMAP folders. If you want to search Japanese text in Japanese ISO-2022-JP messages, specify ISO-2022-JP here. However, it depends on the server's implementation whether the specified character set is supported. Query Management Notify: This allows setting a notification when query is done in background and other window is active. Query Start Query. Find in Result Query within the result of the previous query. You can go back to the original result by clicking the little [<] button at the left of "Find in Result" button.
78 p78 Go Result This takes you to the "Query Result" folder in the Tree View, with which you can browse the contents of the result and do the most of the things that you can do on the regular folders. If you first highlight a specific message in Summary Window, this takes you to the specific message. Save Query... Save the current Query criteria as a virtual folder in the Tree View. You can also create this Query Folder by dragging & dropping the "Query Result" folder in the Tree View. If you delete messages in the Query Folder, original messages will be deleted, too, but deleting the Query Folder itself doesn't affect messages inside. The result of "Find in Result" cannot be saved. (Summary window) Lists the messages that meet the query condition. Double click to view the selected message. Double click a second time to highlight the found string in the text.
79 p79 Headline Search The search applies to the Subject, To and From columns for the current folder. This window is at upper right of Main Window Menu Bar. Whether this window is visible or not is set at View>Headline Search. As you enter each character, the List View changes to reflect only those headlines that contain the characters entered. Just click on the window and the words "Headline Search" will disappear and you can then enter text. For example, if you wanted to only view headlines for messages from a person named Sarah, when you enter the first letter, s, the List View will immediately show only headlines where that letter appears somewhere in the columns. When you then enter the next letter, a, the List View is reduced to show only messages that contain sa. This reduction continues until all letters are entered. If you make a mistake, just backspace over the error and continue.
80 p80 Advanced Features Becky! provides many useful features for your everyday management. Additionally, Becky! provides many advanced features that separate it from the other clients. These advanced features are listed below: Thread Mode Command Line Options Using Profiles Using Reminder Tab Sheets Using Memos Using Templates Multilanguage Support Spelling Checker HTML messages Flag, Priority and Color Label Using Agents Using Plug-ins Sync with Portable Media What's New Mailing Lists Manager Filtering Manager Backup and Restore Thread Mode By using Thread Mode command, you can switch the order of mail items from the recent-first order to the thread order, in which older messages are located upper and each reply message follows the original message. Thread Mode applies to the List View. This is useful when you read the messages from mailing lists or where you are having an ongoing conversation. For example, If you have these messages in your Inbox (newer is upper)... Re: Topic C Re: Topic B Re: Topic C Topic C Re: Topic A Topic B Topic A It will be like this in the thread order. Topic A Re: Topic A Topic B
81 p81 Re: Topic B Topic C Re: Topic C Re: Topic C In the thread mode, you can connect messages with simple drag and drop operation. If you drop the message to its parent, it will be disconnected from the thread.
82 p82 Command Line Options Becky! supports the following command line options. Opens the Compose Window for the address. It supports the RFC2368 scheme. /F folder Makes the <folder> as the current data directory. It is useful if you want to share the same computer with other people. /D Opens the address book immediately.

83 p83 Profiles Becky! Ver.2 introduced the concept of "Profile", which allows you to have multiple account settings for one mailbox. This is primarily to support multiple settings for one account, such as a profile for dialup and one for LAN access, but can be used as desired. This page explains use of profile and global profile. Setting Up Multiple Profiles When you create a mailbox, you automatically create a primary profile for one account. To create an additional profile, highlight the desired mailbox, click Tools>Mailbox>Setup, and then click the New button. You are now viewing the new profile. Notice that some data fields are empty and some are not. The data fields that are blank will use the values defined in the primary profile unless you insert new values. This is useful in situations where the new profile will be used for the same account with only minor differences. In all the tabs (Account, Connection, Compose, Receive, Misc.) insert all content that will NOT use the default profile content. The default name for the new profile will be something such as "PRF00001". Just overtype that if you want a unique identifier, such as the ISP name if the profile is for an account, or "Dialup" if the profile is just to provide the setting for occasional dial-up for the account. Selecting a Profile When you use only one profile, you implicitly select a profile when you select a mailbox. However, when a mailbox has more than one profile, you need to identify the desired profile you wish to use (EXCEPTION: the Receive Mail icon applies to all profiles within a mailbox.) To see the profiles in a mailbox, highlight the mailbox name and the profiles are displayed in the List View, as shown below. In the above example for two mail accounts, if you desired to use the AOL profile to compose a message or to edit the profile itself, you could select the AOL profile in one of two ways: Double-click the AOL profile in the List View or use the combo box in Tree View to select the AOL profile. Once selected, you may then proceed with whatever action desired, just as you would with a mailbox that had only one profile. Note: See Example 2, below, for considerations for this setup. Using Multiple Profiles Example 1 - Different Connections for One Account For example, assume you have a laptop PC and use it both at office (LAN connection) and at home (dialup connection). Open Tools>Mailbox Setup dialog and click the New button. Since the default profile has already been created. most of the important data elements have already been entered, such as address and server information. You only need to change or add information that makes this profile unique. Assuming the default profile was for the office (LAN) connection, this new profile only needs to specify the information for dialup. Click Connect tab and set the dialup connection information. You may also want to rename the profile from PRF00001 to 'Dialup' or 'Home' or whatever you wish. That's it. Click 'OK' and close the dialog. Example 2 - One Mailbox with multiple Accounts You can share one mailbox with multiple accounts by setting up multiple profiles that have different account settings. The important thing is that you have to check the Receive from multiple POP3 servers of other profiles option in Receive tab when using this approach. With this option ticked, you will receive messages from the other profiles' mail servers as well as the current profile's server by one operation. The other profiles also need to have this option ticked.
84 p84 This approach has limited use. Mail retrieval works as anticipated (retrieving new messages for all profiles), but a reply or forward of a received message will be done from the active profile, not necessarily the profile to which the message was sent. If your intent is to collect messages in one folder, you may prefer the alternative below. An Alternative - Inter-mailbox Filtering Becky! also supports inter-mailbox filtering, which means you can sort messages to folders belonging to other mailboxes. Therefore, you may find it simpler to set up multiple mailboxes instead of having multiple profiles for one mailbox. An Additional Alternative - Intra-mailbox Filtering If your mail account has multiple identifiers, commonly called "aliases", another possibility to keep them all separate would be to set up a different folder for each alias, set up filters to sort the aliases into the specific folders and then to set folder properties, (with or without templates) to use the specific aliases for all outgoing mail when composed from their folders. Global Profiles Whereas a profile is a specific set of data to define an account, a global profile is just a profile NAME shared across multiple mailbox profiles and defined as a global profile; there need be no similarity in the data defined within the profile itself. Whenever multiple profiles share the same global profile name, changing the default profile on one mailbox automatically causes all other mailboxes that have like global profiles to be changed as well. Global profiles at set at Tools>Mailbox Setup. This feature might be useful if you have multiple mailboxes where each has a dialup and LAN profile; when you want to change one to dialup, this would let you change all such profiles to dialup. Another option might be where you have set up a profile in each of several mailboxes to use an alternate SMTP server. By changing the profile on one mailbox to use the profile for the alternate server, all mailboxes with like-named profiles would also be changed.
85 p85 Using Memos The memo feature is a useful Becky! feature. Do you sometimes receive a message and want to write notes about the message's content, yet not modify the message itself? That's the purpose of the memo. Becky! allows you to create/modify a memo for every message in your mail folders. The memos are kept on your PC, regardless of whether the mail account is POP or IMAP. Whenever the message is deleted, Becky! will also delete the associated memo. The easiest way to access the memo feature is via the tab sheets, that are normally viewable at the bottom of the Message View area. You can also access a memo for the message being viewed by clicking View>View Memo. Using Quick Memo. There is a quick memo for each account. Use it any way you wish. To edit the quick memo, click the Pencil button on Tool bar or click Mail>Direct Edit Mode.
86 p86 Reminder Feature Becky! has a "reminder" feature that allows you to send messages to yourself and receive on pre-specified dates. Those messages are not actually sent; they are copied from "Reminder" folder to "Inbox" according to the schedule. You may want to use this feature to remind yourself of important but forgettable events, such as a dentist's appointment, or your mom's birthday. ;-) Its usage is simple. Write a message and choose "Reminder" in File menu of the Compose Window. You will see a dialog to set up the schedule. You may also send this reminder message to others instead of yourself by choosing Save To Outbox for Action.
87 p87 Tab sheets At the bottom of every message in Message View is a tab sheet, normally hidden. This tab sheet includes tabs for Plain Text, HTML text, Headers, and Memo. If you want this to always be visible, you can set this option at Tools>General Setup>Message View and tick the box for Always Show Tab Sheets. Your other option is just to move your mouse to the bottom of the screen in Message View and the Tab Sheets bar will appear. The benefit is that this lets you easily view messages in plain text mode, HTML mode, see headers and also view any memo you created for the message.
88 p88 Templates Templates allow you to create messages and responses automatically formatted the way that you want them -- for a mailing list assigned to its own folder, for example. Think of a template as the outline for a form letter -- complete with your choice of header lines, boilerplate text, and information copied from the original message. This is also an option for those Becky! users who prefer to use HTML, as they can create HTML templates for categories 2 thru 4 below. Template Hierarchy Templates can be of four types and are worth your understanding them - and NONE are required. Once you understand the hierarchy, you may wish to Create a Template. There are restrictions if accessing a POP mailbox via Remote Mailbox. 1. Simple generic templates for ALL MAILBOXES. If all you want are simple cite templates for Reply and Forward for all mailboxes, see Tools>General Setup>Citation. This is by far the easiest approach as these are pre-written templates already there to use as-is or to modify or to ignore. This is explained in the Citation Setup menu. These are the default templates and will always apply unless one of the following options is being used. 2. Templates for SPECIFIC MAILBOXES for ALL messages in a mailbox. This feature allows you to create explicit templates for Compose, Reply and/or Forward for any or all mailboxes. This gives you flexibility in how you want your messages to appear for each mailbox. Use Tools>Mailbox Setup>Compose to establish the templates for their assigned role. Use of these templates always overrides the generic templates. 3. Templates for SPECIFIC FOLDERS for ALL messages from a specific folder. This feature allows you to create explicit templates for Compose, Reply and/or Forward for any or all folders. This gives you flexibility in how you want your message to appear for each folder's purpose, such as a project folder or a customer folder. Right-click on a folder and select Property... to establish the templates for their assigned role. Use of these templates always overrides the generic or specific mailbox templates 4. Templates for OCCASIONAL use for messages. These are templates for occasional use, such as one that has an extended signature with marketing information. These templates override all other templates, as they are manually loaded (see below). USING Templates Invoking a template automatically If you have set up templates in categories 1 thru 3 above, the templates are used with no further action on your part. Using an Occasional template If you are using an occasional template, use the Load Template button from Tool Bar or click File>Load Template while in the Compose Window. Otherwise, hold down the Shift key when you select the Compose, Reply, or Forward command. CREATING/Editing a template The process starts almost the same way as writing a regular message. Choose File>Edit Template to create a new template or to edit an existing template for categories 2, 3 or 4, above. This operation can be done either on the main window or the Compose Window. Select the desired mailbox (for a Compose template) or [For Forwarding] or [For Replying] and click 'OK'. This brings up the Compose Window. Then, type your stock message in the Compose Window. Start by adding Subject:, Cc:, and any other header lines that you wish to always appear in messages to a mailing list, or business correspondence mail, for example. To add flexibility when creating a template for forwarding or replying, you can set the template to refer back to the original message with the following "macro symbols" or placeholders that Becky! automatically fills in when it loads the template. The following symbols are readily available in the Compose Window via a right-click menu. Just click the desired symbol and it will be inserted into the template. When your template is complete, save it with File>Save As Template command. Template Symbols
89 p89 %f The data portion of the From: line from the original message, the one that you are replying to or forwarding. %t The data portion of the To: line from the original message. %d The data portion of the Date: line from the original message. %D{fmt} The data from %d converted to local time and formatted to the standard date format that you have specified with the Windows' control panel. You can also supply "fmt" to format date/time string as you wish to appear. (See the right mouse button menu for details) %R{fmt} The date and time when the original message arrived at your mail server. %W{fmt} The date and time when the original message was retrieved. %T{fmt} Current date and time. %i The data portion of the Message-Id: line from the original message %I The data portion of the Message-Id: line from the original message without enclosing "<>" %s The data portion of the Subject: line from the original message. %S The data portion of the Subject: line from the original message, but "Re:", "Fw:", and "[...]" at the beginning of the line is omitted. %n The name portion of the From: line from the original message. %e The name of the From address in the Address Book. If the address is not found in the Address Book, it works as %n. %v{attr} vcard attribute from the address book for the From address. %v{attr1/attr2} Same as above. If attr1 does not exist, attr2 will be used instead. Known vcard attributes used by Becky! are: FN NOTE N ADR URL TEL;HOME TEL;WORK Display Name address Note First name Sur name Last name Address Web site Home phone Work phone
90 p90 TEL; CELL TEL; FAX Cell phone FAX e.g. %v{tel;work/tel;cell} Work phone number will be inserted. If work phone does not exist, cell number will be inserted instead. %a The mail address portion of the From: line from the original message. %h{header} The data portion of the specified header line -- %h{x-mailer}, for example. If you enter a certain string enclosed with "" inside {}, it will be displayed only when the specified header contains data, e.g., %h{"cc:"cc} --> CC: mail@address (only when Cc field is not empty). %F{filename} Inserted text file that is referred by "filename". %B{filename} An attachment file referred by "filename". %m The original message verbatim. %M The original message marked with the citation prefix string. %A Your address. %N Your name. %0 Default signature for all accounts. This allows creation of templates without regard to which account uses the template. The default signature for each account will be used accordingly. %1 to %20 Signature No.1 to 20. (This macro remains for the compatibility with Ver.1. It is recommended that you use %G {} macro instead.) %G{sign} Signature referred by "sign". %% %itself Example of a Template Here is a simple example: Hi %n, On %d %f wrote: %M %1 Saving the above template and specifying it as the account's Reply Template produces a response similar to the following for a message from Tomohiro Norimatsu to Johnny B. Good. Hi Tomohiro Norimatsu, On Wed, 20 Oct :56:24 Tomohiro Norimatsu <[email protected]>wrote:
91 p91 >Hi, >What's up? -- Johnny B. Good > Blah-Blah technology Inc.
92 p92 Multi-language Support Do you have a mail friend in Czech Republic as well as in United States and have to use non-english font sometimes? Don't worry. You can use different fonts for different character sets. Do you have to write in Chinese in English Windows? You can use double byte characters, such as Japanese, Chinese, and Korean, to read and write in English Windows as if you are using those localized version of Windows as long as proper code pages, fonts, and input method editor are installed. To install code pages and fonts to your English Windows, we strongly recommend you to get "Multi-language Support for Internet Explorer, which Microsoft distributes on their web site. ( We just need fonts and some system files they provide. (We regret that we cannot support how to get and install it to your system.) The preferred operating system for multilingual users is Windows 2000/XP Pro or later. Those newer OS fully support multilingual environment and you don't have to install any additional components. To use Becky!'s Multi-language support, you will need some work on your settings on Becky!. Here is an explanation about it using the example of Chinese BIG5. Open Tools>General Setup>Language Choose "BIG5" in the "Language" combo box. Click Font>Change button to choose the font, which properly displays BIG5 characters on your system. The following settings are optional. Change the "Note" as you wish. Change the "Encoding" if you would like to use Base64 or Quoted-Printable instead of 8bit. Code page for BIG5 should be 950. If it's 0, Becky! automatically determine the code page from the font. Therefore, you don't really have to worry about it. You can configure other character sets in the same manner. Generally, it is recommended that you specify European font for ISO-8859-* so that you can read accent characters, such as Umlaut, properly. However, some mailers send even Chinese, Korean,etc., messages with ISO charset. (Well, I confess, the very old version of Becky! was one of them.) Therefore, sometimes it's better to set up your local language font for your ISO-8859-* configuration. If you have installed IE's Multi-language support and want to use the font that comes with it, you may have to check "UNICODE font" option. To switch the current character set to another for each message, click the earth button at the bottom right of the window and choose desirable charset in the menu.
93 p93 Spell Check The Becky! spell checker can be set to run automatically by configuring the options in Tools>General Setup>Editor dialog. When set, the spell checker is invoked immediately prior to sending the message. You can also invoke the spelling checker while composing a message by clicking the Spell Check button on Tool Bar. All URLs, addresses, capital words, and quoted text will be skipped while checking. Although there is no user interface to maintain the user dictionary, it is a plain text file stored in your data directory so that you can edit it using a regular text editor. Open the "BkIgn.TLX" file with a text editor such as Notepad or Dana, edit, and save. Please enter only one word per line. Be careful not to remove the first line in the text. It looks like this: #LID
94 p94 HTML messages Becky! can display and compose messages in HTML format. NOTE: To PRINT an HTML message, position cursor within body in Message View, right-click and select Print or Print Preview... Do NOT use the normal File>Print command as that will print the HTML source code, not what you normally want. Access to HTML messages is made possible by the ActiveX component of Microsoft Internet Explorer. HTML Restrictions in Becky! Becky! was designed as a superb communications tool, primarily for managing plain text messages, but to also allow HTML where the sender desires expanded formatting, such as bold, underline and a choice of fonts. However, some features of Becky! are not available when using HTML messages. Those restrictions are: - Inability to set HTML as the default format for composing messages - Inability for selective citing when replying to an HTML message (although this can be accomplished if there is also a plain text version) - Inability to use cut-and-paste techniques to place graphics into a message (although this function can be accomplished from the Compose tool bar) - Inability to benefit from the Keywords and Comment Blocks feature of Becky! - Inability, as mentioned above, to use the standard File>Print feature. Viewing HTML Messages To view HTML messages, make sure View with IE component option in Tools>General Setup> Message View is ticked. It is strongly recommended to tick "Disallow Scripts", too. If you are concerned about the possibility of viruses being embedded in HTML messages, see the TIP in the Tools>General Setup>Message View>HTML View. The font size of HTML messages can be changed while viewing by pressing Ctrl key and using mouse wheel. Composing HTML Messages You can create HTML messages in the Compose Window. In the Compose Window, select Tools>Write HTML Message or click the HTML button on the toolbar. The creation of HTML messages cannot be set as your default. When responding to or forwarding an HTML message, the compose window will be in HTML format by default. If you prefer to respond or forward in plain text, be sure to use the plain text version of the message when available. (You can select plain text or HTML modes from Tab Sheets.) If you prefer to use HTML messages all the time or for certain accounts or other situations, Becky! offers the option of using templates. By creating HTML templates, you can automate or control your use of HTML messages. Font Choices for HTML Messages Selecting fonts for HTML messages can be confusing so this help file has a Font Tutorial to assist you. Note: Many people dislike receiving HTML messages, especially on mailing lists. HTML messages are thought to be offending sometimes, and that can cause worthless flames. Also, HTML messages are generally over twice as big as plain text messages and are a common avenue for spammers to send viruses.
95 p95 Flag, Priority, and Color Label There are three ways to classify messages in a folder: Flag, Priority, and Color Label. These attributes are stored in your local Becky! folder on your computer, whether you are using a POP account or an IMAP account. (NOTE: Since Flag and the sender's Priority are supported by the IMAP protocol, that information is also stored on the IMAP server.) Flag Flag is a simple marking feature that has only on and off attributes. You can toggle on/off by double clicking the leftmost of the message item in the List View. (or in the right-click menu) The advantage of Flag is its easiness. For example, you can quickly mark the messages that you want to reply to at a later time. Then, later on, process Edit>Select Flagged Messages and click Reply button to open reply windows for those messages. You can also add flags on retrieved messages right away using Filtering Manager. However, Flag's simplicity can be a disadvantage. It is not useful for complex classifications as Color Label does. Priority Priority is basically set by the sender by adding X-Priority header that represents 5 priority levels. Becky! supports modifying the priority on received messages. Right-click the leftmost of the message item and choose desired priority level. The advantage of the priority is that the sender can set the priority level, that means the sender and the recipients can share the information about the importance of the messages. It is especially useful if you are running a mailing list for a small group. However, this feature is both a blessing and a curse, because spammers love to add the highest priority on their junk mail. You might automatically think the messages with the red ball are spams. Color Label Color label can be set by right-clicking the icon of the messages in the List View. You can choose a color in the basic palette, and even more by choosing "Others" so you can use virtually unlimited colors to classify messages. Obviously, the advantage of Color Label is this versatility. You can use variety of colors to sort a pile of messages. You can also set Color Label by Filtering Manager. For example, you can make messages colored if they are from the particular people or contain particular keywords. The disadvantage of Color Label is that they don't have any priority information. So, it is difficult to classify messages according to their importance. Sorting in Folder A strong feature of Becky! is that you can sort your mail folder by all of this. Just left-click in leftmost header bar to left of the "Subject" title and you can sort messages by flag, priority or color or other categories.
96 p96 Agents (from Edit menu) Becky! has a unique Agents feature. Agents are functions within Becky! that manage tasks for you, such as reminding you to respond to a message by a certain date. This feature gives you significant control over managing your time and focusing on the important messages more easily. This is a significant feature in Becky! to manage your . Messages with assigned tasks are readily visible based on a small icon with color attached to the subject line of the message. This color represents "Urgency" of the task. It is GREEN when it is not urgent, YELLOW as the deadline is closer, RED when the deadline has come. Tasks Available You can add a virtual agent to a message that you want to process later. This is done by assigning one of several possible tasks to the message. The available tasks are: Need Reply You have to reply to this message before the specified deadline. When replying message is created, its status becomes "Done". Watch for Reply This is mainly specified from the Compose Window. When you receive a replying message, it will be thrown into Tasks folder. The task will become "Done". Follow the Topic This is similar to "Watch for Reply", but it collects all the reply messages, such as "reply to reply", "reply to reply to reply", and so on until the deadline comes. When the deadline comes, it is marked "Done" and no more messages will be collected. Need Action If you will need some actions for the message other than replying, choose this option and add a comment. You can manually set it to "Done" when it's done, or there are a few predefined "Done" conditions you can choose. Bookmark If you haven't decided the action to the message but you want to mark it anyway, choose this. The bookmark can also be added from Edit menu bypassing this "Add Tasks" dialog. Assigning a Task to an Agent There are several ways to assign a task to an agent for a message; Option 1: With a message highlighted in List View, right-click leftmost of line and select one of the three most common tasks: Need Reply, Follow the Topic..., Bookmark. Option 2: With a message highlighted in List View, click the button at right side of Middle Bar above the displayed message. This invokes the Agent menu where you can select the desired task from the drop-down menu, set a deadline date and add a note if desired. From this menu you can also create additional tasks, such that the message may have several tasks that you want done regarding this message. Option 3: With a message highlighted in List View, select from the Edit menu, such as Edit>Add Agent (same as Option 2), or other Edit commands such as Mark as Need Reply, Follow the Topic, or Bookmark (same as Option 1). Examples Example 1: If you want to reply to a message, but it doesn't have to be now, click the button at the right top corner of the Message View in the Middle Bar or click Edit>Add Agent from Menu Bar. Next, choose "Need Reply" as "Task" and specify "Deadline" as your need. If you don't have to worry about it until, let's say, next week, you can also specify "Starts warning" date to the beginning of the next week. Example 2:
97 p97 With a message highlighted, select Edit>Mark as Need Reply. This opens a window to specify the number of days for which a reply is needed. Once clicked, the standard Agent menu appears and can be edited as in Example 1, above. Summary Once a task is assigned, there will appear a Tasks folder right above the Inbox in the Tree View. (TIP: If you use an IMAP account, you can place the Tasks folder on the server. See information here.) In Tasks folder, the messages are sorted in their Urgency order. This defaults to urgent tasks only, but includes non-urgent tasks if "Show Green Tasks' count" is ticked in Tools>General Setup>Tree/List. This feature has no intention to pop up and shout "Hey, you've got a task.", which only interrupts your work. It only shows color at the right of the Tasks folder. And you can browse the Tasks folder to decide what to do next. As a further reminder, regardless of how you created the task, the Middle Bar when viewing message will show information about the task and includes buttons to edit, delete or 'go to tasks' (which allows you to easily review and change all tasks, not just this one).
98 p98 Using Plug-Ins A 'Plug-in' is a feature developed externally from RimArts and made available to Becky! users. Becky! was developed to allow such enhancements because this empowers many talented contributors to add additional features to Becky! Although plug-ins are never required, you may find some that are perfect to your needs. For example, some plug-ins allow changing the buttons on the toolbars, while other plug-ins allow changing fonts in the look-and-feel of Becky!. It would be impossible to list all of the categories in which plug-ins have provided optional enhancements to Becky! If you are interested, please review our main website at and follow the forums. Some plug-ins are self-installing and some are stand-alone DLL files that require some work on your part. Some have documentation and some do not. All of them can be removed at any time. Although RimArts cannot be responsible for these contributions, here is some basic information on installing plug-ins. 1. If the plug-in self-installs, it may be assuming that you installed Becky! via the EXE download option. If you chose to install the ZIP version of Becky!, then the self-install may not work properly and you may need to contact the author of the plug-in. 2. If the plug-in is a DLL file, the preferred technique is to copy it to the PlugIns subdirectory within the data directory (e.g., C:\Becky!\(your name)\plugins). If that directory does not exist, just create it. Then, copy the DLL to that directory - but ONLY when Becky! is shut down. 3. On restarting Becky!, you will see a prompt menu the first time to alert you to the fact that a new plug-in is there. 4. Once Becky! has started, you can select the Tools>Plug-Ins Setup to set options of the plug-in. To deactivate, just click Tools>General Setup>Advanced and then click the Plug-ins button to untick the desired plug-in. 5. Plug-ins can be in either your data directory (e.g., C:\Becky!\(your name) Plugins)\) or your program directory (e.g., C:\Becky!\Program Files (X86)\RimArts\B2\PlugIns\). Although they work properly in either place, you should consider moving any in the program directory's PlugIn directory to the data directory's PlugIn directory to simplify any future need to restore Becky!. More information is at the Backup and Restore topic.
99 p99 Sync with a portable media The Sync with Portable Media command enables you to create a portable version of Becky!, complete with your mailboxes and address books and program settings. After using this portable version on another Windows PC, this command lets you then synchronize all changes back to your primary PC. If you tend to use multiple PCs as part of your life, this feature can be very useful. Also, because it is portable, it leaves no footprint on other PCs, such as registry settings. Extracting Becky! data to a portable device is easy. Here are the steps: 1. C onnect your portable storage device (such as a USB memory stick or laptop PC ) to your primary PC (via LAN, USB, etc.) 2. Run File>Sync with Portable Media. 3. If first time, specify a "Sync Name", which will be used as the sub folder name on your portable device. Becky! will display a prompt to confirm your selection. 4. The "To Go" option dialog will be displayed if first time to this device/folder. C hoose appropriate options and click 'OK'. The "To Go" data will then be created or updated on your portable device. C reating new "To Go" data takes time because all the folder data have to be copied. For subsequent times, this process should be much shorter because only the differences will be copied. TIP: Because this version of Becky! is not installed in the traditional way, some Windows services such as "mail to" or "send to" do not invoke Becky! on the "To Go" PC. This "To Go" data folder can also be used as Becky!'s regular data folder when the "To Go" PCalready has Becky! installed. Click File>System>Change Data Folder on your PC and specify the location of the data folder when Becky! restarts. This feature can also be useful if you need to access the "To Go" data on your primary PC but are not yet ready to synchronize changes back to your primary PC. Synchronizing Becky! data with primary PC is just as easy. All the mail data you have processed on the road will be synchronized with your primary PC. Here are the steps: 1. Connect your portable storage device (such as a USB memory stick or laptop PC) to your primary PC (via LAN, USB, etc.) 2. Run File>Sync with Portable Media. 3. Becky! retains location of prior sync so you can normally just click "Sync As Usual". The synchronization process will then begin. Note 1- You can send and receive messages on both "To Go" PC and the primary PC before synchronizing them, but the order of the messages in the folder may not be as desired after synchronization. 2- Avoid synchronizing with the portable device with an unstable connection, such as a wireless LAN in a bad reception area. That may cause I/O errors. 3- You have to be responsible for available space on your portable device. Mail data can be unexpectedly huge, especially with attachments. Some smaller devices, such as USB memory, may not be able to accommodate all of the data. 4- Avoid editing address book, using direct edit mode, and changing folder names in "To Go" data. Those operations will cause data duplication or loss of edit data upon synchronization. 5- When synchronizing "To Go" data with the primary PC data, only added data will be synchronized. Deleted data will not be synchronized. On the other hand, deleted data on the primary PC may affect the "To Go" data when taking out. 6- Avoid creating multiple "To Go" data and synchronizing with them. It will not cause serious problems, but data duplication may happen. Also the order of messages in the folder may become disorganized.
100 p100 "To Go" options - Sync with Portable Media menu... Choose the following options for creating "To Go" data. Mailboxes To Go Select mailboxes you want to take out. Leave Messages on Server If checked, the messages retrieved on the road will not be deleted from POP3 servers. This option, however, does not affect the filtering rules that delete messages from servers. Address books To Go Select address books you want to take out. Within? days Specify the days to limit the mail data to take out. To take all mail data, uncheck this option. Unread messages only Only unread messages will be taken out. Unanswered messages only Only unanswered messages will be taken out. Copy Plug-ins Take out plug-ins alongside B2 program. Folders not to go Choose the folders you do not want to go. Messages in those folders will be ignored, not only when taking out but also when taking in. However, "Ignore Unread" marked folders will not be ignored when taking in, regardless. Overwrite Choose files you want to overwrite when the data are already in "To Go" folder. You should usually check General Setup option because it contains many PC-specific configurations, such as window positions, and you will probably modify them when you use it on other computers. When you choose Mail option, be sure to specify Within days. Otherwise all data will be overwritten every time and that can be time intensive. Support AutoRun Supports AutoRun feature that is available on Windows XP SP2 and later versions. If "To Go" data are not in a root directory or if Windows is older than XP/SP2, it does nothing. Do not use Task Tray Checking this option ensures that the portable use of Becky! does not create Registry entries for tray use.
101 p101 What's New (in View Menu) Shows the list of messages recently arrived. This does NOT work with IMAP accounts. It is useful especially if you have set Filtering Manager to sort incoming messages to folders automatically. (News Ticker) Shows the News Ticker, which scrolls the headline of the selected message. If you click it, the selected message is shown in the main window. News Ticker If you find the News Ticker annoying, uncheck this option. Browse Continuously Automatically browses the recently arrived messages one by one. "To read" only If this option is checked, messages that are sorted to the folder of "Ignore Unread" attribute and messages that are marked read by the filtering manager will not be listed. This doesn't affect messages already in the list. Scroll Speed Adjust the scroll speed as you wish. Check New Mail Allows checking for new mail from within the What's New menu. Deselect Deselects the message whose headline is scrolling. If the News Ticker is unchecked, this does nothing. Clear Clears the list. The list always keeps about 500 messages, and older messages are deleted automatically. If you want to completely empty the list, click this button.
102 p102 Mailing Lists Manager Usage If you have subscribed to several mailing lists, you may find it annoying that each mailing list has a different command system and you have to seek for that information among thousands of messages every time when you want to unsubscribe, get archive, or so. Tools>Mailing Lists Manager is helpful in that situation. Generally, you will receive a "Welcome" mail right after you subscribe a mailing list. This mail has all necessary information about the list. View this message and choose Add To Mailing Lists Manager in Tool menu. That will bring up the Mailing List's Property menu. First, fill the Name of the List field. Then choose appropriate addresses for Posting, Command, and Administrator from the drop down list, which stores all the addresses in the Welcome mail. Of course, you have to determine which address is which by yourself. But, you can generally assume that a mail address that begins with "majordomo@" or "xxxx-ctl@" is the control mail address, and "xxxx-admin@" would be an administrator's address. Then click Description Text button. That way the entire text of "Welcome" mail will be copied to the text file for future reference. You may also need to refer to this text to configure Templates for Commands. For example, to unsubscribe from the list, some need "unsubscribe" string in the subject field, some need "bye" in the messages body, and some need special address. You want to read "Welcome" message to find out the proper procedures. Some mailing lists, such as magazines, provide web-based user interface so that you don't have to send an command. In that case, you don't really need Templates for Commands. All you need is the URL of the web site, and it would have been already filled. For the last procedure, associate a folder to the mailing list. Click Choose button to specify Related Folder. The folder selection dialog will bring up. You can create a new folder if you wish. Click 'OK' and you will see a filtering setup dialog. Don't cancel it. This is very important. You need to set up a filtering rule to get the list's messages sorted to the folder. Unlike personal , you shouldn't choose "From" for "Header". Because many people post to mailing lists, each message will have a different "From". One recommended field is "Reply-To". Some mailing lists have special headers such as "X-ML-Name", which are also useful for filtering. When all the setting up is complete, click 'OK' to close the dialog. Now you can launch Mailing Lists Manager to manage your mailing list subscriptions. Another benefit of using Mailing Lists Manager is that Becky! will always notify you when you are about to post to mailing lists if you have checked Confirm Posting to Mailing Lists option in Tools>General Setup>General. You must avoid wrong posting to mailing lists because hundreds or even thousands of members will receive your message.
103 p103 Mailing Lists Manager You can manage your subscription information of mailing lists with Tools>Mailing List Manager. (List) Shows the list of the registered mailing lists. If you want to add a new mailing list entry, click the Add button and enter necessary information. Actually, there is a better way to register a new mailing list entry. You will receive a "Welcome" message when you subscribe to a new mailing list. Generally, that message contains enough information to register to the Mailing Lists Manager. So, select that "Welcome" message and choose Tools>Add To Mailing Lists Manager command. All the necessary information, such as addresses, is automatically retrieved from the message, and all you have to do is to choose them from the combo box for the appropriate fields. The following commands, except Add, can be processed when you select a particular mailing list entry in the list. Subscribe Opens a Compose Window to send a "subscribe" command to the mailing list. Unsubscribe Opens a Compose Window to send an "unsubscribe" command to the mailing list. Command Opens a Compose Window to send a particular command to the mailing list. Post Opens a Compose Window to post to the mailing list. To Admin Opens a Compose Window to send a message to the administrator of the mailing list. Web Site Opens a WWW browser to see a web site about the mailing list. Description Opens a system default text editor to see a description about the mailing list. Add Adds a new mailing list entry. Property Opens a property of the mailing list. Copy Duplicate the mailing list entry. Delete Delete the mailing list entry. Close Close Mailing Lists Manager.
104 p104 Mailing List's Property Name of the list The name of the mailing list. Posting An address to post to the mailing list. Command An address to send a command to the mailing list. Administrator An address of the administrator of the mailing list. Templates for Commands Edit templates for subscribe, unsubscribe and some other list commands. Web Sites URL of the web site related to the mailing list. There are some mailing lists and mail magazines where you can subscribe and unsubscribe from web sites. Description Text Usually, copy and paste entire "Welcome" message and save. Related Folder Choose a folder you want to associate with the mailing list. If you want to sort messages to this folder automatically, set up a filtering rule.
 for messages based your own requirements.")
105 p105 Filtering Manager Overview The Filtering Manager (Tools>Filtering Manager) is a tool to let you manage messages by 1) sorting incoming and outgoing mail into different folders, and 2) filtering actions to be performed (such as causing a sound to be generated) for messages based your own requirements. For example, if you want your Aunt Emma to always receive forwarded copies of you receive from your cousin Eddie (filtering) and you want Eddie's message stored in a specific folder (sorting), the Filtering Manager lets you define this requirement once and then forget it. The filtering manager has two components: Rules and Options. Rule Definition: The basic tool is the rule. A "Rule" is defined as a set of one or more Conditions and one or more associated Actions. Rules are executed in order of appearance, top-down. This example of a Rule Tree shows two rules; one for sorting to Test1 folder and another is for sorting to Test2 folder. The first rule has two conditions combined with OR logical operator that is represented by parallel tree items. The second rule has two conditions combined with AND logical operator that is represented by parent and child tree items. This demonstrates that Becky! enables you to configure complicated filtering rules. Creating a Rule (overview of steps) Start at the RULES tab. This is the default menu for Filtering Manager. It is here that you specify whether the rule is for inbound or outbound messages and also here that you can manage existing rules. For example, this is where you can reorder sequence of rules, add or edit conditions or even copy or delete a rule. Some of these functions can also be performed on the Edit Rules menu, but this is the primary rules management menu. Once you click the Inbound or Outbound tab (bottom of screen), click the New Rule button. The opens the Edit Rules menu, from where you can specify Actions and Conditions. Depending on your needs, you may also need to set Options for your rule.
106 p106 Filtering: Rules Menu This menu is invoked from Tools>Filtering Manager and is the Rules tab. You can define and manage rules for incoming or outgoing messages. Choose either Incoming or Outgoing tab (at bottom left of menu). Rules List (also known as the Rule Tree) Registered filtering rules are shown as tree items, with the rule as the root and conditions below and to the right as branches. New Rule Opens Edit Rules setup menu to add a new rule with associated conditions and actions. Edit Rule Opens Edit Rules setup menu to edit a selected rule to add, remove or change conditions and actions. Add Condition If a rule is highlighted, this lets you add an additional condition as an OR condition. If a condition is highlighted, this lets you add a condition as an AND condition to the existing condition or as an OR condition. See Edit Rules for more information on Add Condition. Edit Condition Allows you to edit a selected condition, but not the associated action(s). Copy Duplicates a selected rule. Delete Delete a selected rule or a condition. Open Tree Opens the entire tree items in the rule tree so that you can browse every Action and Condition connection. You can also do this by clicking the "+" to left of a rule. Collapse Tree Closes all of the tree items in the rule tree. You can also do this by clicking the "-" to left of a rule. Rule Up Moves a selected rule up. Click x10 button to move by 10. Click Rule Up while pressing Shift key, the rule will be moved to the top. Rule Down Moves a selected rule down. Click x10 button to move by 10. Click Rule Down while pressing Shift key, the rule will be moved to the bottom.
107 p107 Filtering: Edit Rules The Edit Rules menu allows adding, changing and deleting conditions and actions for a rule. Conditions are specified on the left side and actions on the right side. Add Condition Defines a condition that triggers a specified action. The String and Header fields are the operative components of a condition. The Header defines where the search is to be done and the String defines the characters of the search. Using Address Groups You have a choice of "(Select Address Group...)" in String combo box. If you choose this, you can match addresses based on the addresses in the selected address group including sub groups. It only works with structured headers such as "From", "To", etc. It may not work as expected with "Subject", "[body]", etc. NOTE: With address group matching, the following search options will be IGNORED. Condition Options: These options define the condition to be met with String and Header. Present or Not Present Case Sensitive Distinguishes upper and lower case. Match Start Of Lines Matches only the text that begins with the specified string. For example, "foo" matches "foo@bar" but doesn't match "barfoo@barr". Search by Word Matches only when the text is delimited with spaces or non-alphabetical characters. Regular Expression Specifies that the search string is a regular expression. Conditions: (Add) (Replace) (Edit) (Delete) These buttons allow you to add more conditions and/or replace, edit or delete the highlighted condition. Note: You must always have at least one condition. ADDing a condition with no condition highlighted causes the new condition to be an OR condition. Adding a condition when a condition IS highlighted causes a prompt of whether the new condition is to be an AND or an OR. This will be graphically displayed, as the new condition will be under the highlighted condition and indented if AND is specified. Actions Defines one or more actions if a message matches the condition(s). First, choose either "Sorting" or "Filtering" in the combo box. Then choose an action in the next combo box. When set, **Set** will appear in the combo box. Multiple actions can be defined if you set that option in the Filtering Manager> Options tab. Sorting Sorting is an action that can be processed when either a message is sent, retrieved or the Tools>Sort New Messages command is processed. (For IMAP accounts, sorting of incoming messages is not automatic; use of Tools>Sort New Messages command or the Sort to Folder button is required since messages are generally already present.) Occasion There are three options: Default, Auto, and Manual. Default means the sort depends on the settings in the Options tab. Auto overrides the default so sorting is automatic for this rule. Manual overrides the default so sorting is processed only when Tools>Sort New Messages command is executed. Filtering Filtering causes an action to be performed, based on settings. (For IMAP accounts, filtering is limited to outbound messages since inbound messages are generally already present.)
108 p108 Each filtering option has its own menu with explanation. However, two options need additional information. Auto Forward Place forwarded message in Draft folder. Specify "?" as template and leave "MailTo" blank. Redirect message to a different account. Leave template field blank and fill "MailTo" with desired address. Message placed in Outbox. Forward message automatically. Use a template for forwarding. Fill in the "MailTo" with desired address. Message placed in Outbox. Sample Template for Forwarding: I'm forwarding this to your attention:l From: %f To: %t Date: %d Subject: %s %m NOTE: Auto Forward places outgoing messages in either Draft folder or Outbox; it does NOT send messages. This allows the option of further editing prior to sending, if desired. The Redirect function places the sender's id (not yours) in the FROM field. Leave/Delete/KILL on server Killed messages are still saved in backup logs and the records are saved in YYYYMMDD.KILL log files. This KILL log will be maintained on the same schedule as the receive backup logs. (Reset) Resets this one action, i.e., removes it. Rule Enabled Unticking this box disables this rule.
109 p109 Filtering: Options This menu is invoked from Tools>Filtering Manager and is the Options tab.this menu allows changing the default settings for Actions. Changes defined here become the new default. Some sort options can be overridden when defining a rule. See Actions for more information on overriding. Sorting of Incoming Messages Do not sort to folders on receiving. Tells Becky! not to process sorting when messages are retrieved. However, Color Label always works regardless of this option. Sort only read messages by "Sort New Messages" command. Sorts only the messages that are marked read. Treat all sorting as "Copy to Folder". If you check this option, all the messages that match the rule are copied and sorted. Sorting of Sent Messages Do not sort to folders on sending. Tells Becky! not to process sorting when messages are sent. Treat all sorting as "Copy to Folder". If you check this option, all the messages that match the rule are copied and sorted. Enable to assign multiple actions for one rule. In the Filtering Manager, you can usually assign only one action to one rule to keep the operation simple. You can assign multiple actions to one rule if you check this option. Treat all the text parts (not only text/plain) as [body] With this option set, Becky! will search the content of the HTML message as well as in the regular text message.
110 p110 Keyword Overview Keywords and Comment Blocks are special features of Becky! and may not be readily understood. These features only affect how plain text appears to you, the user. Specifically, you will not see them when composing or viewing messages in HTML format, nor will any recipient of your messages see them. Becky! includes some examples, but they are only examples and may not relate to your use of Becky!. Keywords Keywords are any words that you would like to see in color and/or bold. All words specified in a group will appear in that one color and bold setting. If you have some words that you would like to appear in one color/bold combination and others in a different color/bold combination, then you need to use a separate group for each. Keywords are independent from Comment Blocks, although Comment Block settings can alter whether Keyword color or bold settings are used when Keywords appear within the Comment Block. Comment Blocks These allow you to specify that text within predictable delimiters be displayed in a specific color you define. This can be useful if you receive messages where some of the content has known prefixes or known before/after delimiters. For most people, there are few such situations. When a message is being composed or viewed in plain text and the defined Begin character is present, text following that character(s) will appear in the specified color until appearance of the End With character(s) or a CRLF. The color specified for the delimiters determines the color of the text within the delimiters. However, Keywords from any Keyword Groups that appear within the delimiters will appear in their own colors if the Comment Block has that option checked. (Although Comment Blocks are packaged into Keyword Groups, that is only for convenience when specifying structures where Keywords and delimiters are regularly used, such as HTML. Otherwise, neither is dependent on the other.) Note: Using the same delimiters in different Comment Blocks may cause undesired results. Example with Comment Blocks Text within a message that represents a reply from another person will normally be prefixed by one or more carets (e.g., >,>>,>>>,...). If you would like each response within a message thread to show in a different color, you can do that by setting the values in Comment Blocks. In this example, the End character will normally be a CRLF, but you still must define an End With character for syntactical purposes. The characters used for Begin should normally be used for the End WITH. If you use this example, be sure to define all anticipated combinations (e.g., >, >>, > >, >>>, > > >, etc.) as separate Comment Blocks. This example has no need for Keywords. Example with Keywords The group named 'rfc822' is an example of using Keywords without Comment Blocks. This group shows only words that commonly appear in header records. By setting a color for the group, you will find when you select View>View Headers that all Keywords will appear in that color, simplifying your reading of the headers. Example with Keywords and Comment Blocks The group named 'HTML tags' is an example of mixing Keywords and Comment Blocks. HTML tags are always delimited by '<' and '>', so this allows you to specify that the Keywords and related variables should always be displayed in color. To use this feature when using View> View Source you would need to change the MIME type to '*'. Consideration Since the Keywords and Comment Blocks are always active, there may be instances where the displayed text seems unusual. For example, if you specified a color for the 'HTML tags' group, words from that group will appear in that color in normal text because some of the words have meaning beyond HTML (e.g., form, frame, body, center). If you specify use of the Keywords and/or Comment Blocks you may occasionally see unanticipated color in a plain text message.
111 p111 Backup and Restore Restoring everything from a crash or or other problem is rarely anticipated and Becky! is designed to use a simple restore process, but some preparation is needed to ensure your data is safe from a crash or other problem. Similarly, there may be times when your mailbox becomes corrupted and you want to restore messages from a prior day or days. You can define to Becky! how you want that managed. Both subjects are covered here: - Backing up and Restoring Becky! data and - Backing up and Restoring messages. Backup Becky! data Overview: Becky! uses two directories: one for the program and its components and one for your data. Backup focuses on the data directory, as that is where all information important to you is stored. Specifically, your Becky! messages, address book, registration and mailbox information are all stored in the data directory, plus any plug-ins that you stored there. This directory is normally at (Boot Drive):\Becky!\(Your Login Name)\. Options set in Tools>General Setup are stored in the registry. With the plug-in to store Windows registry entries (one was supplied with this help file along with setup instructions), you also have all the registry information about your Becky! setup stored within the data directory (a file ending with ".reg"). Preparation: Becky! allows plug-ins to be installed in a subdirectory named PlugIns, in either the data directory or the program directory or both. Any plug-ins that are in the program directory will NOT be backed up as part of the data directory backup. If in doubt, check your program directory (e.g., C:\Program Files (x86)\rimarts\b2\plugins\). (Some plugins auto-install there, but can be moved to the data directory if desired.) To ensure all information is in your data directory (e.g., C:\Becky!\(your name)\), do the following: 1. Move any plug-ins in your program directory's PlugIns directory to the PlugIns directory in your data directory (e.g., C:\Becky!\(your name)\plugins\). 2. If not done already, install the registry backup plug-in that you downloaded with this help file. Separate instructions are with the plug-in. Backup: For your protection, back up the data directory on a scheduled basis, such as to a CD or a USB stick. Then, should you encounter a disk crash or other severe outage, you will have all the information for a successful install. If available to you, consider using one of the many Internet backup services; some offer free storage for up to several gigabytes of data with daily backup. That type of backup ensures that your backup copy is never more than a day old. Restore Becky! data If your computer crashed or if you are moving Becky! to a different computer, you now have all the information available for a quick and simple install. Here are suggested steps. (If you are just reinstalling the data directory, skip steps 2 through 5.) 1. First, copy your backed up data directory to wherever you want it to be, normally (Boot Drive):\Becky!\(Your Login Name)\. When possible, this should be the same directory name you used on prior installation to minimize any conflicts when restoring the registry in step 3. If there is a pre-existing data directory, delete it firstto avoid confusion. 2. Now, double-click the backed-up REG file (your registry backup) to reset General the Setup settings you have for Becky! 3. Third, reinstall Becky!, either the EXE or the ZIP version. 4. Now start Becky! Becky! may prompt for the data directory you defined in step 1. C lick "Browse" to be sure; what Becky! shows is a guess. Becky! may also prompt to activate any identified plug-ins that are in the data directory. These are normally inactive plug-ins (or you bypassed step 2). Just click the 'cancel' option now if in doubt. 5. Finally, click Tools>General Setup to ensure that options are set as desired, such as confirming activated plug-ins. Once done, Becky! is ready for use again. Does this make for a "perfect" reinstallation? Possibly not; there may still be a few tweaks, especially if you reinstalled to a different version of Windows. Still, this does allow access to all accounts and saved messages with most or all of your settings intact. Backup Messages One of Becky!'s many features is the ability to restore messages when the mailbox becomes damaged. When that happens you can restore the affected messages, depending on how many days of messages you specified to be backed up. This feature is NOT for IMAP. This feature is implemented at the Tools>General>Receive menu where you can set your desired options. Restore Messages
112 p112 To restore the messages, highlight the appropriate Inbox or Outbox and then click File>Import Backup Logs. From the next screen, you will see a backup file for each day, depending on the number of days you specified to be backed up. Highlight the desired log and click the Open button. All messages for the specified day will be restored.
113 p113 Licensing/Registration The following section contains some important information, such as how to purchase the license for this product. Please read so that you can understand the license and registration process. User Registration License Agreement Copyright Notice User Registration Becky! is shareware: distribution and trial are free of charge. If you want to continue to use this software, you must purchase a license. Trial period is up to 30 days. Please also review the license agreement. If you register... - You will not see the shareware notification dialog on startup. - You will be qualified to upgrade Becky! without any additional fee when new version is released. Please check before the registration - You MUST have an address. Without an address, you will not be able to receive a registration pass code. - You MUST have one of the payment methods, which are supported by Kagi. The following description is cited from the Kagi web site: Kagi accepts all major credit cards*: Visa, MasterCard, American Express, Optima, Discover (Novus), Diner's Club, Carte Blanche, JCB, and Eurocard. You can use a debit card as a credit card, as long as the debit card has a credit card logo (from the list above) printed on it. When paying by credit card, you can choose to pay in the following currencies: United States Dollars (USD), Australia Dollars (AUD), Canada Dollars (CAD), Euros (EUR), British Pounds (GBP), and Japanese Yen (JPY). You may also pay by check, cash, money order or purchase order. If you send a check in USD drawn on a bank outside the United States, the order must be for $100 or more. We accept money orders issued in the United States, Canada, and Japan. If payment must be mailed to Kagi, first complete your order online and print the Payment Form. Include this form with your mailed payment. For us to process your order quickly and correctly, please do NOT send Kagi cash, check, or money order payments by post without first completing the order online and printing and enclosing the Payment Form. You may also pay by wire transfer. Select wire transfer as your payment method on the online order page, and follow the directions. - Please make sure Becky! works fine on your machine. Becky! is designed to work with most of Windows PCs. However, sometimes it might not work well for some reasons; the problem of your hardware driver, mail server's implementation of your Internet provider, some conflict with your system environment, etc. Please make sure Becky! works fine on your machine and with your internet provider before you send money. Of course, we will do the best to fix the problem if you report to us. However, your registration is not refundable in any case. Price
114 p US$ for one lifetime license. Volume discount Volume discount will be applied according to the number of licenses. Price Table number unit price(us$) The price for 20 licenses is 20$ * 20 = $400, for 40 licenses is 15$ * 40 = $600. How to buy You can purchase a license at Kagi online store. Go and follow the instruction. It's easy! Note that we don't sell our product as physical merchandise such as CD-ROM. When the payment is done, you will receive a from Kagi that includes a registration pass code. Since you already have a software itself, that's all you need for continuing to use Becky!. - You will receive a confirmation of the payment and a registration pass code via . Generally, It takes less than a week to receive it. Long weekend, server troubles, etc., may cause a several days delay. If you do not receive a reply in two weeks, please contact me. ([email protected] ) - Run Becky! and click " I have purchased a license/licenses and obtained a pass code... " button on the startup dialog. You can also register from "User Registration" in the "Help" menu. - Fill out the information: your name, registration pass code and address, and click "OK". For more details about Kagi, please visit And if you have any problem through the registration procedure, feel free to contact me. ([email protected] ) KAGI IS A PAYMENT PROCESSING SERVICE. THEY DO NOT PROVIDE ANY TECHNICAL SUPPORT FOR OUR PRODUCT. ANY QUESTION REGARDING OUR PRODUCT SHOULD GO TO [email protected] - Kagi is the secure and convenient shareware payment processing service.
115 p115 License Agreement You must have read the following license agreement when you started Becky! for the first time. You are not allowed to use Becky! if you don't agree with these terms. -=-=-=-=-=-=-=-=-=-=-=-=-=-=-=-=-=-=-=-=-=-=-=-=-=-=-=-=-=-=-=-=-=-=-=-= Becky! Internet Mail License Agreement RimArts, Inc. -=-=-=-=-=-=-=-=-=-=-=-=-=-=-=-=-=-=-=-=-=-=-=-=-=-=-=-=-=-=-=-=-=-=-=-= Please read the following agreement before using this software. If you do not agree to the terms of this agreement, do not use the software and destroy all the copies of it. LICENSE AGREEMENT - About the unregistered software The unregistered software may be freely tried out for a trial period of up to 30 days. To continue to use it after this period, the user must purchase a license. The unregistered software may be freely copied and distributed so long as no modification is made in the archive package. - The license for the registered software One license is defined as follows: - Per User One license is granted to one 'user'. If a user has multiple mail addresses or multiple personal computers, the user is permitted to install and use multiple copies of this software for his/her own use. - Per Install One license is granted to single personal computer nonsimultaneously used by multiple people. - Per Family One license is granted to one family that shares a household and income. However, if a member of the family want to use it outside of the house, such as at school or at work, he/she needs a separate license. Users can choose one of the above licensing policies. Purchase of a license does not imply the purchase of the copyright of this program. A registered user can get a copy of the latest release of the program free of charge, although the new version has to be obtained by the user from an Internet site or some other source. However, RimArts are not obligated in any way to update the program. Purchased licenses are not refundable. - Registration pass code A registered user will obtain a pass code. The pass code is used to make the shareware notice message box invisible, but the pass code itself does not represent a License. A License is granted only when a user has received a registration notice from RimArts, Inc., or from a shareware payment-processing service with which RimArts, Inc. has contracted. Only registered users may use the pass code for the licensed copies of the software. USE OF THE PASSCODE WITHOUT A LICENSE IS A SERIOUS VIOLATION OF THE COPYRIGHT. LIMITED WARRANTY THIS PROGRAM AND ACCOMPANYING WRITTEN MATERIALS ARE PROVIDED "AS IS" WITHOUT WARRANTIES OF ANY KIND, EITHER EXPRESS OR IMPLIED, INCLUDING, BUT NOT LIMITED TO THE IMPLIED WARRANTIES OF MERCHANTABILITY OR FITNESS FOR A PARTICULAR PURPOSE. NEITHER THE AUTHOR NOR ANYONE ELSE WHO HAS BEEN INVOLVED IN THE CREATION, PRODUCTION OR DELIVERY OF THIS PRODUCT SHALL BE LIABLE FOR ANY DIRECT, INDIRECT, CONSEQUENTIAL OR INCIDENTAL DAMAGES ARISING OUT OF THE USE OR INABILITY TO USE SUCH PRODUCT EVEN IF THE AUTHOR HAS BEEN ADVISED OF THE POSSIBILITY OF SUCH DAMAGES. COPYRIGHT Becky! Internet Mail is owned and licensed exclusively by RimArts, Inc. Copyright (C) RimArts, Inc. All rights reserved. Reverse-engineering or modifying this software is strictly prohibited.
116 p116 COPYRIGHT Becky! Internet Mail is owned and licensed exclusively by RimArts, Inc. Copyright RimArts, Inc. All rights reserved. Reverse-engineering or modifying this software is strictly prohibited. The Sentry Spelling-Checker Engine Copyright Wintertree Software Inc. RSA Data Security, Inc., MD5 message-digest algorithm Copyright , RSA Data Security, Inc. Created All rights reserved. This Help File expansion to official documentation Copyright david kirk, Reverse-engineering or modifying this help file is strictly prohibited.
117 p117 Appendix These pages are supplementary to the overall information provided here. Topics are: FAQ TIPs Delivery Status Notification Regular Expressions Cc and Bcc Escape Characters Message Property Information for Visually Impaired Using IMAP vcard Information Font Tutorial Import Tips Troubleshooting This page is for Troubleshooting problems and defining solutions. These topics reflect customer questions. See also the page on Tips. I want to transfer Becky! to my new computer. How do I do that? This is a simple process and will transfer your messages, address book, registration information and more. Just review the Backup and Restore topic. When I restore my data from backup, Becky! doesn't seem to recognize it. I can only see empty "Inbox", "Outbox", and "Trash". What should I do? Becky! is looking at a wrong folder. You need to specify the correct folder. To do that, choose File>System>Change Data Folder in the menu. Becky! will quit automatically. Then restart Becky!. You will be prompted to specify the name of the data folder (e.g., C:\Becky!\(your name)\). For complete information on this, see the Backup and Restore topic. How can I Set Becky! to sound an alarm when mail is received on specific subjects, from specific individuals or for specific accounts? Use the Filtering Manager and set a rule for desired issue and specify a sound file. This tip applies only to POP accounts. How can I turn off showing the annoying control characters such as CRLF and Tabs in the editor? You have an option for turning them off in the 'Editor' property in the General Setup. I am getting various errors in retrieving . Can Becky! help me solve this? Becky! cannot solve this, but it can help with diagnosing the issue. Click Tools>Protocol Logs to turn on logging of retrieval. This will cause a listing of of all messages from the server to be displayed. To view the log, highlight the Mailbox name in the Tree View. The auto formatting is fine. But when I paste text, it isn't formatted automatically. How can I do it?
118 p118 You need to select the text you would like to wrap and use the Format Button. It is available on the Tool Bar (6th button from the right). I have several accounts and want them to share the same folders. Can Becky! do that? Yes, one option is the use of Profiles, placing all accounts within one mailbox as explained in this example. The other option is to use the Filtering Manager to sort the messages to the same folders. I have an alias account and need to send and receive from it, including use of a separate signature file. Can Becky! do that? Yes, see the topic on Intra-mailbox Filtering. I want to change Subject on a received HTML message, but Direct Edit doesn't seem to work. Any ideas? Yes, click View>View Source and then Mail>Direct Edit Mode and then edit the subject line. I'd like to read the unread messages without using mouse. Use space key. :-) I'd like to read HTML messages in a larger (smaller) font. Click Ctrl key and use mouse wheel. :-) The mail view is too narrow, I'd like to read mail in a larger window. You can maximize and restore the view window by pressing Ctrl+Enter key or click Maximize View tool button. I cannot set Becky! as default client. Help! First, review the information in the Initial Setup page. If that doesn't work, you may need to edit the Registry manually. Becky! assumes no responsibility for this and offers this information only from other users. This is a Windows issue, not a Becky! issue. If you're not familiar with the Registry,seek help. The information presented here may not work with your version of Windows. The Windows Registry key for default is: "HKEY_CLASSES_ROOT\mailto\shell\open\command" (without quotes) where the value of the key is "your program location" "%1" (WITH the quotes) For example, if you have Becky! installed at C:\Beckymail\B2.exe, then the key value would be "c:\beckymail\b2.exe" "%1" Again, this information may not be appropriate for your PC. If the above key is not located, you may need professional help. Normally, there is no problem in registering Becky!, so this should be a last resort.
119 p119 TIPs Here are some quick TIPs that might be useful when you are using Becky!. See also the page on Troubleshooting. Drag & Drop If you drop to root mailbox button, dropped messages are sorted according to the filtering rules. Text editor supports OLE drag & drop. You can drop text directly from other applications. Middle bar On the Middle Bar, the gray area between the message list and the Message View pane, you can click From, To, Subject, and Date labels to get quick information on headers. Further, by clicking on a displayed header, a menu opens to allow headline search or query. Right-click the 4way button at right of bar to change the behavior of the button. Message Color, Priority and Flag To change color, right-click the icon to left of subject in List View. To change priority or to flag message, right-click to left of same icon to left of subject in List View. View Source You can also edit the source directly by entering Direct Edit mode. Folders Ctrl+Right-Click allows you to change icon color. Maximizing Message View Ctrl+Alt and cursor keys allows you to maximize and minimize certain panes. Thread Mode Use cursor keys. Left: go to the parent message. Ctrl+Left: go to the root message. Right: go to the child message. Ctrl+Right: go to the next sibling message. Compose Window Ctrl+Up/Down allows you to increase or decrease entry fields of recipient area, such as Bcc or Reply-To. Splash Screen B2.bmp in the installed directory will be used for the splash screen. Create your own splash image and save it as B2.bmp. (Do not save it as B2default.bmp, because it will be overwritten on program update.) You can also create a sequence of 30*30 bitmap animation and name it "b2anim.bmp". It will be used on the upper right animation of the main window.
120 p120 Delivery Status Notification (DSN) This is a mechanism defined in RFC1891. If you request DSN, the recipient's server will respond with a notification message as soon as your messages arrive. Both sender's and recipient's SMTP server need to support this mechanism for it to work. You can request DSN in Becky!'s Header dialog in the Compose Window,but the recipient's server may ignore the request. Relying on such delivery notification is problematic.
121 p121 Regular Expressions The search functions and Filtering Manager of Becky! support Regular Expressions (regex). The majority of Becky! users may never use regular expressions, but this powerful feature is available for the few who do. Regex is good for situations where you have a complex search or where you want to combine multiple searches into one. For more information on Regular Expressions, see or just type 'regular expressions' into an Internet search engine. Some basic examples are provided here. Supported Expressions: ^ Matches the top of a line. $ Matches the end of a line. X Y Matches X or Y (X,Y is a regular expression) [A-Z] Matches a character between A and Z. (A, Z is a certain character) [^A-Z] Matches a character which is not included between A and Z. [ABC] Matches a character one of the characters "ABC". (A,B,C is a certain character) [^ABC] Matches a character not one of the characters "ABC".. Matches any one character. X* Matches zero or more repeat of X. (X is a regular expression) X+ Matches one or more repeat of X. X? X may or may not be present /X Escape character. X is treated as a literal and not as a regex operator. A regular expression component between () is evaluated separately. Examples: These examples are not intended to teach regex and are only provided to demonstrate some of the capabilities of regex. Searching for John or Joan: john joan Searching for [email protected] or [email protected]: (john joan)@domain\.org OR (jo[h a]n)@domain\.org Searching for Mary or Marie or Maria or Mariah: mar[iy](ah? e)? Note: This also would find mari or marya or marye Searching for hotmail.com or gmail.com or outlook.com: ((hot g)mail outlook)\.com (A special thanks to Manuel López for contributing foundation material for these examples.)
122 p122 Cc and Bcc "Cc" is an abbreviation of "Carbon Copy". If you want someone, other than the direct recipients, to see your message, set those people's addresses to the Cc field. "Bcc" is an abbreviation of "Blind Carbon Copy". It works exactly as Cc, but the addresses in Bcc field are not disclosed to recipients. The terms are carryovers from the days of typewriters and carbon paper, when one needed to insert a carbon paper and an extra typing paper so that the typewriter keystrokes would imprint not just the original, but also the copy.
123 p123 Escape Characters Escape Characters are text that represents what are generally non-printable characters, such as a line feed or a form feed or a carriage return. Searching for such a character requires use of Escape Characters. To gain more information, type 'escape characters' or 'escape sequences' into your favorite Internet search engine. This is a powerful feature for the few who use it and possibly irrelevant for the majority who do not. Becky! strives to address all needs. Although there may be many escape characters that function within Becky!, the ones below are officially supported. Note: The escape character has a special meaning when used with regular expressions. \t Tab \n Line feed \b Bell \f Form feed \e Escape \r Carriage return \0 Null \xxx Control code represented by XX (0x01 to 0x1f) \\ '\' itself
124 p124 Message Property Message Property is accessed by doing a right-click while highlighting a message subject. General It shows general information about the selected message. "MIME Structure" shows "Content-Type" header of each MIME part of the message. An ordinary message consists of only one MIME part with "text/plain" Content-Type. Addresses It shows mail addresses that the message contains. You can reply/compose to any of the addresses there. You can also add them to the address book.
125 p125 Information for the Visually Impaired If you're visually impaired, here are some suggestions to make your experience with Becky! a more positive one. These suggestions came from our users and we hope you find them useful. These suggestions came from Becky! users who use the Window-Eyes Screen Reader. We hope you find them useful. Our goal is to make Becky! a useful tool to all of our users. Basic Setup Suggestions: 1. Select Tools>General Setup>Message View. 2. Then UNtick the box for Operate four way button by the cursor key. 3. Select Tools>General Setup>Editor 4. Press ALT-Y to move to the Line Pointer check box and UNcheck it. Display CC and BCC fields in tab order: This suggestion is to minimize the many fields to negotiate while composing Click Compose Mail from the Tool Bar. 2. Press Ctrl key + Up or Down arrow to establish the fields you usually use, such as CCor BCC. Once you complete this task, Becky! will remember the fields you normally use. 3. Click File>Close. This will preserve this setting as a default until you need to change it.
126 p126 Font Tutorial Fonts can be confusing. This brief information is intended to explain how Becky! decides what font to use for a message. HTML Messages Composing HTML Messages: Becky! determines the font to use based on this hierarchy from first to last: 1. The font and/or size in a specified HTML template, (if a template is used) 2. The font and/or size as manually selected in the Compose View 3. The font that is set in Internet Explorer with Initial Font Size specified in General Setup>Editor. 4. The font and size set in Internet Explorer (typically Times New Roman, 12 pt size) (Note: Font in items 3 and 4 is NOT sent as part of message. Font size in item 4 is also NOT sent.) Reading HTML Messages: Becky! determines the font to use based on this hierarchy from first to last: 1. The font and/or size encoded in the incoming message 2. The font and/or size as set in Internet Explorer (typically Times New Roman, 12 pt size) For example, when composing an HTML message with no specified template, Becky! uses the font defined in IE, but that is only for your viewing and is not part of the message as sent. If the font size has been specified in template or Compose View or Tools>General Setup>Editor, then that size becomes part of the sent message. Specifically, unless font information is manually specified or in a predefined template, no font information is transmitted with the message and the font and size used to display message on recipient's computer will depend on settings on the recipient's computer. Also, templates are used by hierarchy and you may want to review the information on templates. When sending HTML messages, please consider avoiding special fonts and sizes. The default in Becky! when composing HTML messages is to omit sending font and font size to allow the recipient to make that decision. Many people do not appreciate a fancy font and an overly large or small font size can annoy, reducing the impact of your intended communication. Plain Text Messages Internet protocol does not include font specifications for plain text messages. Such messages are displayed based on the user's defined preferences for the character set of the message. Plain text messages normally include a character set specification and Becky! uses the font and font size that is defined in your PCfor that character set to display the message to you. If you receive a message in an undesired or unreadable font, you can change the default for that message's character set with the View>Change Font menu. You can also specify desired fonts and sizes for character sets in Tools>General Setup>Languages, including your default plain text compose character set and its associated font and size. The font and font size are ONLY for displaying messages to you. On a larger scale, should you wish to change the font size (not the font itself) for all plain text messages, you may prefer to use the Touch Friendly Mode feature, as it can change the size of all plain text fonts viewed, not just for a particular character set
127 p127 Import Tips This page is for the individual who has been using a different client and is transferring to Becky!. (Naturally, we think that is a brilliant decision.) Information on setting up the account itself is covered in the Initial Setup page, but often the difficult part is importing messages and the address book to the new client. Fortunately, Becky! complies with general Internet formats for this purpose. This page doesn't give step-by-step instructions, but reflects general directions that may help you. Importing messages and address books are tasks that may vary from one person to another. Importing Messages When you click the File>Import... command from main menu, you will see that Becky! supports the UNIX mbox format (for mailboxes) and the eml format (for individual messages). The third option is beyond the scope of this help file. By using the mbox and eml formats, Becky! can import messages from many/most other clients, although there may be some tweaking, depending on your situation. When importing messages, always remember that if the importation has problems, you can always delete and start over. Prior to starting, be sure to empty trash on the other client and review locations of attachments, as they may be stored separately from the message. Here are our tips for importing messages, based on our experience. These are just our notes, intended to assist you, but we can give no specific help on other clients and their functions may vary over time. Thunderbird Considerations: Several clients need Thunderbird's import feature prior to being imported into Becky!. In Thunderbird, each mailbox consists of two files, one with no suffix and one with the ".msf" suffix. For example, if you keep a mailbox for messages to/from Jacques, you will see two files: Jacques and Jacques.msf. To import, highlight both for the import. If you see one without the other, that is NOT a mailbox (a common situation with Eudora). You can highlight multiple paired files and import at the same time. Becky! Considerations: Becky! uses a file-oriented import process. That is, if you are importing messages that you want to be in a folder, you need to first create the desired folder and then import the mailbox files. Import Considerations: Thunderbird: Easy, as Thunderbird supports the UNIX mbox format. Use File>Import>UNIX mbox directly to the mail files. Postbox: Same as Thunderbird Pocomail: Same as Thunderbird The Bat!: This client can export messages to mbox format. Then, just use File>Import>UNIX mbox directly to the exported files. Eudora: Install Thunderbird and use it to import the messages. Then, use File>Import>UNIX mbox directly to the imported files. Outlook Express: Same as Eudora. Courier or Calypso: Use the freeware product, Courex, to create Thunderbird-compatible files. Use File>Import>UNIX mbox to directly import the files. Pegasus: This client can create mbox mail files. Older mail files can be moved to the newer files. Use File>Import>UNIX mbox to directly import the files. Windows Live Mail: This client uses eml files (one for each message). Create desired folders and use File>Import>Eml to import the messages. Cleanup Considerations: After finishing the import, review that all messages were imported and that you can locate all attachments. The complexity of switching clients is not unique to Becky!. These issues apply to any similar conversion. When converting to a different client, you may find that attributes such as read, unread and others are not transferred and that all messages appear as unread. For some folders, you may wish to highlight all messages and click Mail>Mark as Read. Importing Address Books To import an address book, Becky! uses the File>Import>Text File... command from the Address Book menu. This should be a tab-delimited or comma-delimited text file created from your old client. The suffix for such files is often ".csv" and will be a text file that can be readily edited with any text editor, such as Notepad. Editing a csv file can also be done by several spreadsheet programs. The steps to importing the csv file are here:
128 p128 First, browse the csv file with a text editor. This will show you if the first record is a list if names of the fields. Make a written note of the fields you want to import and the sequence of all the fields. Next, the File>Import>Text File... menu that is displayed shows all available address book fields in a column on the left. Put a tick mark by the fields you want to import and use the Up and Down buttons to arrange the fields to match the sequence of fields that you determined in step one. Be sure to specify whether the file is tab-delimited or comma-delimited. Also tick the box for Field Names at 1st Line if true. Import Considerations: There is no consistent format for address books and you may find that your best import is when specifying the fewest fields, such as first name, last name, address. It is not uncommon to repeat this process several times until satisfied. Sometimes it helps to use a text editor prior to importing to remove fields that are problematic.
129 p129 Index - A - Accessing POP server 20 Account 44 address book 38, 16, 99, 40,, 71, 39, 124, 38, 42 Address Book Property Address Book View 42 Address Property Advanced Setup 69 Agent 26, 96 aliases 83 Archiving 20 attachments 14, 99, 55, 61, 77, 51, 23, 69 Auto complete - B - Backup 111 Backup and Restore 111 Backup Messages 111 Bottom-Posting 14 - C - CardDAV 16,, 38, 20 Cc and Bcc 122 Changing Subject 20 Citation 14, 59 Cite 14, 88, 59 Collection And Delivery 51, 29, 44 color 95, 119, 96 Color Label 95, 18 column sort order 27, 42 Command Line Options 82 Comment Block 64 Compaction 23, 20 Compose 12, 47 COMPRESS 49 Connection 46 COPYRIGHT D - Default Client: 9 Default Mailbox 23, 44 Delivery Status Notification 120 direct edit mode 99, 29
130 p130 - E - Editor 57 Escape Characters 123 Export Folders 20 External Editors 37, 57 - F - Features Filtering 18 Filtering Manager 105 Filtering: Edit Rules 107 Filtering: Options 109 Filtering: Rules Menu 106 Find in Text 75 Flag 95 Folder Properties 71 Font Tutorial 126 Formatting 34, 57 Forward 14, 61, 59, 29, G - General Setup Menu 51 Global Profiles 83, 44 Gmail 49,, 38, 20 - H - Headers 87 Headline 119, 27, 101, 79, 23 Headline Search 79 HTML 5, 14, 94, 88, 27, 105, 71, 23, 37, 57, 126, 87 - I - IMAP 95, 18,, 9, 49, 44, 74, 77, 51, 29, 23, 66, 107, 48, 101, 69 IMAP COMPRESS 49 IMAP IDLE 49 Import Backup Logs 23 Import Tips 127 Importing Address Books 127 Importing Messages 127 Information for Visually Impaired Users 125 Initial Setup 9 - K - Keyword Overview 110 Keywords 64
131 p131 - L - Languages 61 LDAP 16, 20 License Agreement 115 List View 5, 13, 27, 69, 53, 7 - M - macro 88, 59 Mail Query 77 Mailbox 9 Mailbox Name 9 mailing list 71 Mailing Lists Manager 103 Mailing Lists Manager Usage 102 Mailing Lists Property 104 Main Edit menu Main File menu Main Mail menu 29 Main Tool menu Main View menu Managing , Part Two 20 Memo 27, 77, 87, 85 menu bar 5, 33, 23 Menu Bars 22 Message Property 124 Message View 14, 13, 119, 55, 27, 74, 71, 75, 69, 74, 87, 7, 85, 125 middle bar 5, 13, 119, 96 MIME 68 Misc. Mailbox 49 Multi-language Support 92 Multiple Users 92 - N - newsgroups 57 - P - Plug-Ins 31, 69, 98 POP3 117, 100,, 83, 9, 49, 44, 51, 29, 66 Primary Address Book 16, 71, 20 Print 23 PRINT an HTML message 94 Priority 95, 18 Profiles 83, 9, 44 Protocol Log 11, 69 - Q - Quick Memo 85 Quoting 14
132 p132 - R - Read Receipt 66, 37 Reading 13 Receive Setup 66, 48 Receiving 11 Redirect 14, 61, 59, 29, 107 Reducing disk space 20 reedit 12 Reference View 14 Regular Expressions 121 Reminder Feature 86 Remote Mailbox 11, 88, 59, 29, 48, 20 Replace 76 Replying 14 Restore 111 Restore Messages 111 Rule Definition S - Screen Reader 9, 125 Search 74 Search Dialogs 74 Search Messages 74 Secondary Address Book 16, 20 Selecting a Profile 83 Send 65 Sending 12 Setting Up Multiple Profiles 83 Shortcut Keys 63 Signature 12 Socket Options 69 sorting 18 Spell Check 93 Sync with Portable Media 99 - T - Tab Sheets 27, 87 Template 5, 14, 88, 80, 33, 47, 59, 71, 23, 33, 71, 43 The Main Window 7 Thread Mode 80 Tips 117, 119 To Go options 100 Toast 66 tool bar 5, 117, 16, 27, 40, 36 Top-Posting 14 touch 13, 69 Touch Friendly Mode 27, 36, 69, 53, 126 Tree View 5, 13, 69, 53, 7 Tree/List 53 Troubleshooting U - UIDVALIDITY 48
133 p133 User Registration 113 Using Address Book 16 - V - vcard, 47, 37, 38, viruses 94, 55, 69, 68 visually impaired 9, W - Welcome 5 What's New 101 Windows 8 13, 66, 69
134 RimArts, Inc 2015 w w w.rimarts.co.jp/
Module One: Getting Started... 6. Opening Outlook... 6. Setting Up Outlook for the First Time... 7. Understanding the Interface...
 2 CONTENTS Module One: Getting Started... 6 Opening Outlook... 6 Setting Up Outlook for the First Time... 7 Understanding the Interface...12 Using Backstage View...14 Viewing Your Inbox...15 Closing Outlook...17
Using Outlook WebAccess
 Using Outlook WebAccess Outlook Toolbars - Terminology Update all folders New Move/Copy Reply Forward Check for New Messages Help Show/Hide Folders Delete Reply to All Show/Hide Reading Pain Search Address
Outlook Email. User Guide IS TRAINING CENTER. 833 Chestnut St, Suite 600. Philadelphia, PA 19107 215-503-7500
 Outlook Email User Guide IS TRAINING CENTER 833 Chestnut St, Suite 600 Philadelphia, PA 19107 215-503-7500 This page intentionally left blank. TABLE OF CONTENTS Getting Started... 3 Opening Outlook...
Webmail Instruction Guide
 Webmail Instruction Guide This document is setup to guide your through the use of the many features of our Webmail system. You may either visit www.safeaccess.com or webmail.safeaccess.com to login with
Microsoft Outlook 2013 Part 1: Introduction to Outlook
 CALIFORNIA STATE UNIVERSITY, LOS ANGELES INFORMATION TECHNOLOGY SERVICES Microsoft Outlook 2013 Part 1: Introduction to Outlook Fall 2014, Version 1.0 Table of Contents Introduction...3 Starting Outlook...3
Microsoft Outlook. KNOW HOW: Outlook. Using. Guide for using E-mail, Contacts, Personal Distribution Lists, Signatures and Archives
 Trust Library Services http://www.mtwlibrary.nhs.uk http://mtwweb/cgt/library/default.htm http://mtwlibrary.blogspot.com KNOW HOW: Outlook Using Microsoft Outlook Guide for using E-mail, Contacts, Personal
Lotus Notes Client Version 8.5 Reference Guide
 Lotus Notes Client Version 8.5 Reference Guide rev. 11/19/2009 1 Lotus Notes Client Version 8.5 Reference Guide Accessing the Lotus Notes Client From your desktop, double click the Lotus Notes icon. Logging
Microsoft Outlook 2010 Part 1: Introduction to Outlook
 CALIFORNIA STATE UNIVERSITY, LOS ANGELES INFORMATION TECHNOLOGY SERVICES Microsoft Outlook 2010 Part 1: Introduction to Outlook Spring 2015, Version 1.4 Table of Contents Introduction...3 Starting Outlook...3
Microsoft Outlook 2010 Part 1: Introduction to Outlook
 CALIFORNIA STATE UNIVERSITY, LOS ANGELES INFORMATION TECHNOLOGY SERVICES Microsoft Outlook 2010 Part 1: Introduction to Outlook Spring 2012, Version 1.0 Table of Contents Introduction...3 Starting the
Outlook Web Access (OWA) User Guide
 User Guide") Outlook Web Access (OWA) User Guide September 2010 TABLE OF CONTENTS TABLE OF CONTENTS... 2 1.0 INTRODUCTION... 4 1.1 OUTLOOK WEB ACCESS SECURITY CONSIDERATIONS... 4 2.0 GETTING STARTED... 5 2.1 LOGGING
Outlook Web Access (OWA) User Guide September 2010 TABLE OF CONTENTS TABLE OF CONTENTS... 2 1.0 INTRODUCTION... 4 1.1 OUTLOOK WEB ACCESS SECURITY CONSIDERATIONS... 4 2.0 GETTING STARTED... 5 2.1 LOGGING
Outlook. Getting Started Outlook vs. Outlook Express Setting up a profile Outlook Today screen Navigation Pane
 Outlook Getting Started Outlook vs. Outlook Express Setting up a profile Outlook Today screen Navigation Pane Composing & Sending Email Reading & Sending Mail Messages Set message options Organizing Items
Getting Started Guide
 Getting Started Guide Mulberry IMAP Internet Mail Client Versions 3.0 & 3.1 Cyrusoft International, Inc. Suite 780 The Design Center 5001 Baum Blvd. Pittsburgh PA 15213 USA Tel: +1 412 605 0499 Fax: +1
Outlook 2010 Essentials
 Outlook 2010 Essentials Training Manual SD35 Langley Page 1 TABLE OF CONTENTS Module One: Opening and Logging in to Outlook...1 Opening Outlook... 1 Understanding the Interface... 2 Using Backstage View...
Introduction to IMAP Email with Outlook 2003
 Introduction to IMAP Email with Outlook 2003 Version 4 August 2006 Massachusetts Institute of Technology Outlook 2003 Eudora Feature Comparison Eudora Outlook Page Mailboxes Mailbox Folders p. 4, 5, 10,
Core Essentials. Outlook 2010. Module 1. Diocese of St. Petersburg Office of Training [email protected]
 Core Essentials Outlook 2010 Module 1 Diocese of St. Petersburg Office of Training [email protected] TABLE OF CONTENTS Topic One: Getting Started... 1 Workshop Objectives... 2 Topic Two: Opening and Closing
Introduction. POP and IMAP Servers. MAC1028 June 2007
 MAC1028 June 2007 Getting Started with Thunderbird 2.0 For Macintosh OS X Author: John A. Montgomery Adapted to OS X by: Peter Lee Revised by Mitchell Ochi and Deanna Pasternak Introduction...1 POP and
Using Webmail. Document Updated: 11/10. Technical Manual: User Guide. The Webmail Window. Logging In to Webmail. Displaying and Hiding the Full Header
 Using Webmail Technical Manual: User Guide Webmail is supported in the following browsers: Windows Internet Explorer 6, Internet Explorer 7, Firefox 2, and Firefox 3 Mac OSX Safari 2, Safari 3, Firefox
Vodafone Email Plus. User Guide for Windows Mobile
 Vodafone Email Plus User Guide for Windows Mobile 1 Table of Contents 1 INTRODUCTION... 4 2 INSTALLING VODAFONE EMAIL PLUS... 4 2.1 SETUP BY USING THE VODAFONE EMAIL PLUS ICON...5 2.2 SETUP BY DOWNLOADING
MICROSOFT OUTLOOK 2010
 MICROSOFT OUTLOOK 2010 George W. Rumsey Computer Resource Center 1525 East 53rd, Suite 906 Chicago, IL 60615 (773) 955-4455 www.computer-resource.com [email protected] What Is Outlook?... 1 Folders... 2
Grapevine Mail User Guide
 Grapevine Mail User Guide Table of Contents Accessing Grapevine Mail...2 How to access the Mail portal... 2 How to login... 2 Grapevine Mail user guide... 5 Copying your contacts to the new Grapevine Mail
Configuring, Customizing, and Troubleshooting Outlook Express
 3 Configuring, Customizing, and Troubleshooting Outlook Express............................................... Terms you ll need to understand: Outlook Express Newsgroups Address book Email Preview pane
Using Webmail. Technical Manual: User Guide. Document Updated: 1/07. The Webmail Window. Displaying and Hiding the Full Header.
 Using Webmail Technical Manual: User Guide The Webmail Window To save an attachment: 1. Click once on the attachment name. Or, if there are multiple attachments, click the Save icon to save all attachments
Email -- Reading and Printing Email
 Email -- Reading and Printing Email Checking for New Email By default, webmail checks for new email automatically. If you want to manually check for new email, click the Check Email button. Or, click the
Microsoft Outlook 2003 Basic Guide
 Microsoft Outlook 2003 Basic Guide Table of Contents Introduction... 2 Getting Help... 2 Exploring Outlook... 3 Drop-Down Menus... 3 Navigation Pane... 4 Folder Pane... 7 Reading Pane... 7 Toolbars...
Outlook Web App McKinney ISD 5/27/2011
 Outlook Web App McKinney ISD 5/27/2011 Outlook Web App Tutorial Outlook Web Access allows you to gain access to your messages, calendars, contacts, tasks and public folders from any computer with internet
RSCCD REMOTE PORTAL TABLE OF CONTENTS: Technology Requirements NOTE
 RSCCD REMOTE PORTAL The RSCCD Remote Portal allows employees to access their RSCCD Email (via Outlook Web Access), Department (Public) Folders, Personal (H Drive) Folder, and the District Intranet from
Email at Bradford - Outlook
 This document provides guidance for staff using Office 365 with Microsoft Outlook 2010 for email at the University of Bradford. The University of Bradford retains copyright for this material, which may
Catholic Archdiocese of Atlanta Outlook 2003 Training
 Catholic Archdiocese of Atlanta Outlook 2003 Training Information Technology Department of the Archdiocese of Atlanta Table of Contents BARRACUDA SPAM FILTER... 3 WHAT IS THE SPAM FILTER MS OUTLOOK PLUG-IN?...
Email. Help Documentation. This document was auto-created from web content and is subject to change at any time. Copyright (c) 2013 SmarterTools Inc.
 2013 SmarterTools Inc.") Help Documentation This document was auto-created from web content and is subject to change at any time. Copyright (c) 2013 SmarterTools Inc. Email Email Overview SmarterMail users can send and receive
Help Documentation This document was auto-created from web content and is subject to change at any time. Copyright (c) 2013 SmarterTools Inc. Email Email Overview SmarterMail users can send and receive
Outlook Web Access (OWA) 2010 Email Cheat Sheet
 2010 Email Cheat Sheet") June 9, 2014 Outlook Web Access (OWA) 2010 Email Cheat Sheet Outlook Web Access 2010 allows you to gain access to your messages, calendars, contacts, tasks and public folders from any computer with internet
June 9, 2014 Outlook Web Access (OWA) 2010 Email Cheat Sheet Outlook Web Access 2010 allows you to gain access to your messages, calendars, contacts, tasks and public folders from any computer with internet
Bare Bones Guide to Using Outlook 2010 for Email
 Bare Bones Guide to Using Outlook 2010 for Email July 10, 2013 Alternative Format Statement This publication is available in alternative media upon request. Statement of Non-Discrimination The Pennsylvania
Web Mail Guide... Error! Bookmark not defined. 1 Introduction to Web Mail... 4. 2 Your Web Mail Home Page... 5. 3 Using the Inbox...
 Powered by Table of Contents Web Mail Guide... Error! Bookmark not defined. 1 Introduction to Web Mail... 4 1.1 Requirements... 4 1.2 Recommendations for using Web Mail... 4 1.3 Accessing your Web Mail...
Introduction to Outlook Express 6 with IMAP
 Introduction to Outlook Express 6 with IMAP Version 3 May 2006 Massachusetts Institute of Technology Getting Started This Quick Start class assumes that: 1. Outlook Express is configured for use at MIT.
Outlook XP Email Only
 Outlook XP Email Only Table of Contents OUTLOOK XP EMAIL 5 HOW EMAIL WORKS: 5 POP AND SMTP: 5 TO SET UP THE POP AND SMTP ADDRESSES: 6 TO SET THE DELIVERY PROPERTY: 8 STARTING OUTLOOK: 10 THE OUTLOOK BAR:
BCSD WebMail Documentation
 BCSD WebMail Documentation Outlook Web Access is available to all BCSD account holders! Outlook Web Access provides Webbased access to your e-mail, your calendar, your contacts, and the global address
Using Webmail. Document Updated: 9/08. Technical Manual: User Guide. The Webmail Window. Displaying and Hiding the Full Header.
 Using Webmail Technical Manual: User Guide Webmail is supported in the following browsers: Windows Internet Explorer 6, Internet Explorer 7, Firefox 2, and Firefox 3 Mac OSX Safari 2, Safari 3, Firefox
If you encounter difficulty or need further assistance the Archdiocesan help desk can be reached at (410) 547-5305, option 1. Email Access Methods:
 547-5305, option 1. Email Access Methods:") ArchMail (www.archbalt.org/archmail) is a centrally hosted email system for the employees of the Archdiocese. To simplify employee access multiple methods for accessing email have been established. This
ArchMail (www.archbalt.org/archmail) is a centrally hosted email system for the employees of the Archdiocese. To simplify employee access multiple methods for accessing email have been established. This
The online email environment
 The online email environment These are the options for the selected application. Navigation Pane is comprised of a folders list and oneclick access to your Inbox, Calendar, Contacts, and Tasks folders
EMAIL QUICK START GUIDE
 IT Services Microsoft Outlook 2010 EMAIL QUICK START GUIDE Contents What is Outlook?...2 Quick Guide to Email...2 Create a new e-mail message...2 Forward or reply to an e-mail message...2 Creating new
Training Manual. Version 6
 Training Manual TABLE OF CONTENTS A. E-MAIL... 4 A.1 INBOX... 8 A.1.1 Create New Message... 8 A.1.1.1 Add Attachments to an E-mail Message... 11 A.1.1.2 Insert Picture into an E-mail Message... 12 A.1.1.3
Using Outlook 2010 for Email
 Using Outlook 2010 for Email Workbook Edition 1 June 2013 Document Reference: 3774 Contents Using Outlook 2010 for Email 1. Introduction Microsoft Outlook... 1 Outlook Basics... 1 2. The Ribbon Mail, Contacts
CITY OF BURLINGTON PUBLIC SCHOOLS MICROSOFT EXCHANGE 2010 OUTLOOK WEB APP USERS GUIDE
 CITY OF BURLINGTON PUBLIC SCHOOLS MICROSOFT EXCHANGE 2010 OUTLOOK WEB APP USERS GUIDE INTRODUCTION You can access your email account from any workstation at your school using Outlook Web Access (OWA),
Charter Email. Email Addresses Create / Manage
 Charter Email Email Addresses Create / Manage You can create and manage your email addresses from your My Account. If you have not already done so as the primary account holder, you will need to create
Getting Started Guide
 Getting Started Guide Mulberry Internet Email/Calendar Client Version 4.0 Cyrus Daboo Pittsburgh PA USA mailto:[email protected] http://www.mulberrymail.com/ Information in this document is subject
Chapter 3 ADDRESS BOOK, CONTACTS, AND DISTRIBUTION LISTS
 Chapter 3 ADDRESS BOOK, CONTACTS, AND DISTRIBUTION LISTS 03Archer.indd 71 8/4/05 9:13:59 AM Address Book 3.1 What Is the Address Book The Address Book in Outlook is actually a collection of address books
Microsoft Outlook 2013 -And- Outlook Web App (OWA) Using Office 365
 Using Office 365") 1 C H A P T E R Microsoft Outlook 2013 -And- Outlook Web App (OWA) Using Office 365 1 MICROSOFT OUTLOOK 2013 AND OUTLOOK WEB ACCESS (OWA) Table of Contents Chapter 1: Signing Into the Microsoft Email System...
1 C H A P T E R Microsoft Outlook 2013 -And- Outlook Web App (OWA) Using Office 365 1 MICROSOFT OUTLOOK 2013 AND OUTLOOK WEB ACCESS (OWA) Table of Contents Chapter 1: Signing Into the Microsoft Email System...
Produced by: Flinders University Centre for Educational ICT
 Produced by: Flinders University Centre for Educational ICT Introduction to Outlook 2010 Contents Microsoft Online Services Sign-in to Outlook/Exchange... 2 Key Features... 3 Outlook Screen... 4 To-Do
ABOUT THIS COURSE... 3 ABOUT THIS MANUAL... 4 LESSON 1: PERSONALIZING YOUR EMAIL... 5
 Table of Contents ABOUT THIS COURSE... 3 ABOUT THIS MANUAL... 4 LESSON 1: PERSONALIZING YOUR EMAIL... 5 TOPIC 1A: APPLY STATIONERY AND THEMES... 6 Apply Stationery and Themes... 6 TOPIC 1B: CREATE A CUSTOM
CONTENTS. Introduction... 3. Outlook at a glance... 3. Configure Outlook 2010 on-campus... 3. Creating Folders... 4. Sorting Emails...
 OFFICE OF INFORMATION TECHNOLOGY Academic Technology Unit Microsoft Outlook 2010 Basics Workbook CONTENTS Introduction... 3 Outlook at a glance... 3 Configure Outlook 2010 on-campus... 3 Creating Folders...
email-lead Grabber Business 2010 User Guide
 email-lead Grabber Business 2010 User Guide Copyright and Trademark Information in this documentation is subject to change without notice. The software described in this manual is furnished under a license
Amazon WorkMail. User Guide Version 1.0
 Amazon WorkMail User Guide Amazon WorkMail: User Guide Copyright 2016 Amazon Web Services, Inc. and/or its affiliates. All rights reserved. Amazon's trademarks and trade dress may not be used in connection
Microsoft Outlook 2010. Reference Guide for Lotus Notes Users
 Microsoft Outlook 2010 Reference Guide for Lotus Notes Users ContentsWelcome to Office Outlook 2010... 2 Mail... 3 Viewing Messages... 4 Working with Messages... 7 Responding to Messages... 11 Organizing
What browsers can I use to view my mail?
 How to use webmail. This tutorial is our how-to guide for using Webmail. It does not cover every aspect of Webmail; What browsers can I use to view my mail? Webmail supports the following browsers: Microsoft
How to Manage Email. Guidance for staff
 How to Manage Email Guidance for staff 1 Executive Summary Aimed at Note Purpose Benefits staff Necessary skills to All staff who use email This guidance does NOT cover basic IT literacy skills. Staff
Microsoft Office 365 Outlook Web App (OWA)
") CALIFORNIA STATE UNIVERSITY, LOS ANGELES INFORMATION TECHNOLOGY SERVICES Microsoft Office 365 Outlook Web App (OWA) Winter 2015, Version 2.0 Table of Contents Introduction...3 Logging In...3 Navigation
CALIFORNIA STATE UNIVERSITY, LOS ANGELES INFORMATION TECHNOLOGY SERVICES Microsoft Office 365 Outlook Web App (OWA) Winter 2015, Version 2.0 Table of Contents Introduction...3 Logging In...3 Navigation
Microsoft Outlook 2010 The Essentials
 2010 The Essentials Training User Guide Sue Pejic Training Coordinator Information Technology Services Email : [email protected] Mobile : 0419 891 113 Table of Contents What is Outlook?... 4 The Ribbon...
Webmail User Guide. The Webmail Window. Logging In to Webmail. Displaying and Hiding the Full Header. Printing an Email. Composing a New Email
 Webmail User Guide Rev: November, 2012 Webmail is supported in the following browsers: Windows Internet Explorer 6, Internet Explorer 7, Firefox 2, and Firefox 3 Mac OSX Safari 2, Safari 3, Firefox 2,
Changes to Skillnet Group Emails. Outlook and Outlook Express Users
 Changes to Skillnet Group Emails Skillnet Group emails are moving from the current provider to our own exchange mail server. This will mean that you will have a much improved web-mail system and almost
Stores copies of items you sent to others, by default. Stores items created offline that you want to send the next time you are online
 Outlook Folders: All new messages are stored in Inbox unless rules are created. Stores copies of items you sent to others, by default Stores temporarily deleted items until you permanently delete or retrieve
Focus On echalk Email. Introduction. In This Guide. Contents:
 Focus On echalk Email Introduction Email can be very useful in a school setting. For instance, instead of writing out a memo and delivering it to everyone s mailbox in the main office, you can simply send
isecuremail User Guide for iphone
 isecuremail User Guide for iphone Page 1 CONTENTS Chapter 1: Welcome... 4 Chapter 2: Getting Started... 5 Compatability... 5 Preliminary Steps... 5 Setting up a POP3 / IMAP4/ Exchange Email Account...
Outlook Web Access Tipsheets
 You can use a Web browser to access your Outlook mailbox from any computer with an Internet connection. You can use Outlook Web Access with Microsoft Internet Explorer, Mozilla Firefox and many other browsers.
IBM Sterling Gentran:Director Connection. User Guide
 IBM Sterling Gentran:Director Connection User Guide Version 6.2 4108-540-USER04-0002 Copyright This edition applies to the 6.2 Version of IBM Sterling Gentran:Director Connection and to all subsequent
Life after Microsoft Outlook
 Welcome to Gmail What's different, at a glance... Now that you've switched from Microsoft Outlook to Google Apps, here are some tips on beginning to use Gmail as your new mail program. In Microsoft Outlook,
Outlook Web Access Tutorial
 1 Outlook Web Access Tutorial Outlook Web Access 2010 allows you to gain access to your messages, calendars, contacts, tasks and public folders from any computer with internet access. How to access your
Outlook Express. a ZOOMERS guide
 Outlook Express a ZOOMERS guide Introduction...2 Main Window... 4 Reading email...9 Sending email...14 Contacts list... 17 Housekeeping...20 Configuration... 21 Written by Chorlton Workshop for hsbp Introduction
Microsoft Office 365 Outlook Web App (OWA)
") CALIFORNIA STATE UNIVERSITY, LOS ANGELES INFORMATION TECHNOLOGY SERVICES Microsoft Office 365 Outlook Web App (OWA) Spring 2013, Version 1.0 Table of Contents Introduction...3 Signing In...3 Navigation
CALIFORNIA STATE UNIVERSITY, LOS ANGELES INFORMATION TECHNOLOGY SERVICES Microsoft Office 365 Outlook Web App (OWA) Spring 2013, Version 1.0 Table of Contents Introduction...3 Signing In...3 Navigation
MICROSOFT OUTLOOK 2010 READ, ORGANIZE, SEND AND RESPONSE E-MAILS
 MICROSOFT OUTLOOK 2010 READ, ORGANIZE, SEND AND RESPONSE E-MAILS Last Edited: 2012-07-09 1 Read Emails... 4 Find the inbox... 4 Change new incoming e-mail notification options... 5 Read email... 6 Change
MailEnable Connector for Microsoft Outlook
 MailEnable Connector for Microsoft Outlook Version 2.23 This guide describes the installation and functionality of the MailEnable Connector for Microsoft Outlook. Features The MailEnable Connector for
Outlook 2010. Mail, Calendar, Contacts, Notes & Tasks. User Guide
 User Guide Outlook 2010 Mail, Calendar, Contacts, Notes & Tasks IT Training (818) 677-1700 [email protected] www.csun.edu/it/training CSUN IT Training YouTube Channel http://www.youtube.com/user/csuninfotech
Life after Microsoft Outlook Google Apps
 Welcome Welcome to Gmail! Now that you ve switched from Microsoft Outlook to, here are some tips on beginning to use Gmail. Google Apps What s Different? Here are some of the differences you ll notice
THUNDERBIRD SETUP (STEP-BY-STEP)
") Jim McKnight www.jimopi.net Thunderbird_Setup.lwp revised 12-11-2013 (Note1: Not all sections have been updated for the latest version of Thunderbird available at the time I verified that Section. Each
Jim McKnight www.jimopi.net Thunderbird_Setup.lwp revised 12-11-2013 (Note1: Not all sections have been updated for the latest version of Thunderbird available at the time I verified that Section. Each
What's different, at a glance...
 Welcome to DCU Apps Email Now that you've switched from Mozilla Thunderbird to DCU Apps, here are some tips on beginning to use DCU Apps Email as your new mail program. What's different, at a glance...
Webmail 6.0 User guide
 Webmail 6.0 User guide Table of Contents Overview...4 What is WebMail 6.0?...4 Login to WebMail 6.0...4 The WebMail 6.0 Main Screen...5 Main Menu...6 Secondary Menu...6 Feature Details...6 Home...7 1)
LETTERS, LABELS & EMAIL
 22 LETTERS, LABELS & EMAIL Now that we have explored the Contacts and Contact Lists sections of the program, you have seen how to enter your contacts and group contacts on lists. You are ready to generate
Don't have Outlook? Download and configure the Microsoft Office Suite (which includes Outlook)!
!") UVa Exchange Service Outlook 2013 Quickstart Guide Don't have Outlook? Download and configure the Microsoft Office Suite (which includes Outlook)! In this Quickstart Guide, you will learn to: Send and
UVa Exchange Service Outlook 2013 Quickstart Guide Don't have Outlook? Download and configure the Microsoft Office Suite (which includes Outlook)! In this Quickstart Guide, you will learn to: Send and
WHAT S NEW IN OUTLOOK 2010 & HOW TO CUSTOMIZE IT
 WHAT S NEW IN OUTLOOK 2010 & HOW TO CUSTOMIZE IT THE RIBBON... 2 CONTEXTUAL TABS... 4 THE FILE TAB... 4 DIALOG BOXES... 5 MINIMIZING THE RIBBON... 5 CUSTOMIZING THE RIBBON... 6 CUSTOMIZING THE QUICK ACCESS
MailEnable Web Mail End User Manual V 2.x
 MailEnable Web Mail End User Manual V 2.x MailEnable Messaging Services for Microsoft Windows NT/2000/2003 MailEnable Pty. Ltd. 486 Neerim Road Murrumbeena VIC 3163 Australia t: +61 3 9569 0772 f: +61
WINDOWS LIVE MAIL FEATURES
 WINDOWS LIVE MAIL Windows Live Mail brings a free, full-featured email program to Windows XP, Windows Vista and Windows 7 users. It combines in one package the best that both Outlook Express and Windows
Switching to Gmail from Microsoft Outlook
 Welcome to Gmail What's different, at a glance... Now that you've switched from Microsoft Outlook to Google Apps, here are some tips on beginning to use Gmail as your new mail program. In Microsoft Outlook,
OWA - Outlook Web App
 OWA - Outlook Web App Olathe Public Schools 0 Page MS Outlook Web App OPS Technology Department Last Revised: May 1, 2011 Table of Contents MS Outlook Web App... 1 How to Access the MS Outlook Web App...
A Presentation of TeachUcomp Incorporated. Copyright TeachUcomp, Inc. 2013. Mastering Outlook Made Easy for Lawyers CPE Edition v.2.
 A Presentation of TeachUcomp Incorporated. Copyright TeachUcomp, Inc. 2013 Mastering Outlook Made Easy for Lawyers CPE Edition v.2.0 TeachUcomp, Inc. it s all about you Copyright: Copyright 2013 by TeachUcomp,
Outlook Web Access E-mail
 Outlook Web Access E-mail A. Accessing the mailbox via the Internet 1. Open your browser Firebox or Internet Explorer 2. In the URL address location box, key mail.asbury.edu for students and mail2.asbury.edu
700 Fox Glen Barrington, Illinois 60010 ph: [847] 842-9570 fx: [847] 842-0190 www.excaltech.com [email protected]. Webmail System User Guide
![700 Fox Glen Barrington, Illinois 60010 ph: [847] 842-9570 fx: [847] 842-0190 www.excaltech.com support@excaltech.com. Webmail System User Guide](/thumbs/28/12481810.jpg "700 Fox Glen Barrington, Illinois 60010 ph: [847] 842-9570 fx: [847] 842-0190 www.excaltech.com support@excaltech.com. Webmail System User Guide") 700 Fox Glen Barrington, Illinois 60010 ph: [847] 842-9570 fx: [847] 842-0190 www.excaltech.com [email protected] Webmail System User Guide Last Updated November 14, 2013 -2- Table of Contents Welcome
700 Fox Glen Barrington, Illinois 60010 ph: [847] 842-9570 fx: [847] 842-0190 www.excaltech.com [email protected] Webmail System User Guide Last Updated November 14, 2013 -2- Table of Contents Welcome
MS OUTLOOK 2007 E-MAIL
 MS OUTLOOK 2007 E-MAIL CREATE, SEND, READ, AND RESPOND TO E-MAIL MESSAGES An e-mail address consists of a user ID and a host name, separated by the @ symbol (userid@host name). You can SEND AND RECEIVE
- Training. Getting Started with Outlook 2003. Information Technology Services - Training The University of Texas at Austin
 - Training Getting Started with Outlook 2003 Information Technology Services - Training The University of Texas at Austin http://www.utexas.edu/its/training 2007 Information Technology Services The University
User Guide for the VersaMail Application
 User Guide for the VersaMail Application Copyright and Trademark 2004 palmone, Inc. All rights reserved. palmone, HotSync, the HotSync logo, Palm, Palm OS, the Palm logo, and VersaMail are among the trademarks
MCCG PowerChart. Message Center Complete Manual. Hold the Ctrl key down & then left click on a link below to navigate to it:
 Hold the Ctrl key down & then left click on a link below to navigate to it: Table of Contents Overview of the Message Center Message Center Basics Working with the Message Journal Working with Documents
Webmail with. Sun Convergence
 Webmail with 09 08 1 TABLE OF CONTENTS TABLE OF CONTENTS 1 2 1.1 Getting started 2 1.2 Reading E-mail 4 Sorting 4 Searching 4 Opening a message 5 Writing a message 6 1.3 Sending E-mail 6 Message with an
Outlook 2010 Desk Reference Guide
 Outlook 2010 Desk Reference Guide Version 1.0 Developed by OR/WA IRM Please remember to print back-to-back. July 12, 2011 Microsoft Outlook 2010 This document has been developed by OR/WA IRM staff to provide
OWA User Guide. Table of Contents
 OWA User Guide Table of Contents 1. Basic Functionality of Outlook Web Access... 2 How to Login to Outlook Web Access (OWA)... 2 Change Password... 3 Mail... 3 Composing Mail... 5 Attachments - Web Ready
Outlook Web Access. PRECEDED by v\
 Outlook Web Access Logging in to OWA (Outlook Web Access) from Home 1. Login page http://mail.vernonct.org/exchange 2. To avoid these steps each time you login, you can add the login page to your favorites.
www.novell.com/documentation Client User Guide GroupWise 2014 April 2014
 www.novell.com/documentation Client User Guide GroupWise 2014 April 2014 Legal Notices Novell, Inc., makes no representations or warranties with respect to the contents or use of this documentation, and
Web Mail Classic Web Mail
 April 14 Web Mail Classic Web Mail Version 2.2 Table of Contents 1 Technical Requirements... 4 2 Accessing your Web Mail... 4 3 Web Mail Features... 5 3.1 Home... 5 3.1.1 Mailbox Summary... 5 3.1.2 Announcements...
Microsoft Outlook 2010
 Microsoft Outlook 2010 Prepared by Computing Services at the Eastman School of Music July 2010 Contents Microsoft Office Interface... 4 File Ribbon Tab... 5 Microsoft Office Quick Access Toolbar... 6 Appearance
Outlook Tweaks and Tips
 Outlook Tweaks and Tips Outlook Tweaks and Tips...1 The Basics...2 Using Run...2 Opening and Using the Registry Editor...2 The Registry Editor...3 Backup the Vista Registry...5 Outlook Settings...6 Change
GroupWise to MS Outlook 2007
 GroupWise to MS Outlook 2007 "GroupWise to MS Outlook 2007" The following is a list of GroupWise features with the equivalent names and brief instructions for performing similar actions in Microsoft Outlook.
Using Your New Webmail
 Using Your New Webmail Table of Contents Composing a New Message... 2 Adding Attachments to a Message... 4 Inserting a Hyperlink... 6 Searching For Messages... 8 Downloading Email from a POP3 Account...
Outlook 2007 - Exchange
 Information Technology MS Office Outlook 2007 Users Guide Outlook 2007 - Exchange Mail, Calendar, Contacts, Notes & Tasks Folders IT Training & Development 677-1700 [email protected] TABLE OF CONTENTS
STAFF MAIL. User Guide. Please see the next page for an important note
 STAFF MAIL User Guide Please see the next page for an important note Important note: This user guide was written to support the use of the original Staffmail system. A newly rewritten version is in preparation