Quick Guide for Camtasia Basics August 2013 Training:
|
|
|
- Charity Payne
- 7 years ago
- Views:
Transcription
1


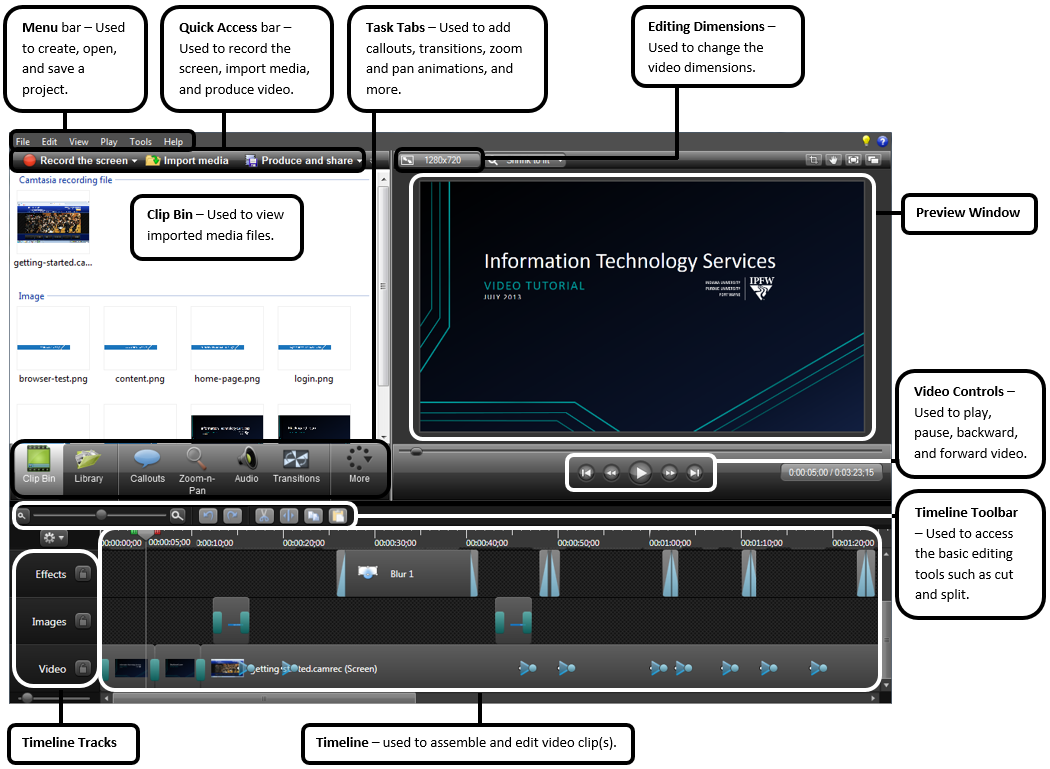
2 Camtasia Basics Getting Started What is Camtasia? Camtasia is software that will allow you to record your actions on a computer screen. It also comes with video editing tools. Videos created with Camtasia can be saved into multiple formats and uploaded to the IPFW MediaVault, Blackboard Learn, or YouTube. Supported Media Formats Video Formats Camtasia recording files- *.camrec DV-AVI files - *.avi MPEG-4 movie files - *.mp4 or *.mov MPEG-2 movie files - *.mpg or *.mpeg Windows Media Video files - *.wmv Adobe Flash files - *.swf Supported Audio Formats MP3 files -.*mp3 PCM files - *.wav Windows Media Audio files- *.wma Supported Image Formats Windows Bitmap files - *.bmp JPEG files - *.jpg or *.jpeg GIF files - *.gif PNG files - *.png Recording There are 3 types of screen recording areas in Camtasia: The entire screen This is the default record setting and it will record the entire computer screen. o Note: By default, it will only record the primary screen even if multiple screens are available. However, you can change the screen dimensions to record multiple screens. Custom dimensions Select one of the preset dimensions, based on widescreen or standard aspect ratios. A region It will record a specific area on the screen, a window, or an application. Recording Computer Screen 1. Start Camtasia. 2. In the Quick Access bar, click Record the Screen. a. Note: The Recorder window appears at the bottom right corner of the screen. 3. In the Select area section, choose the desired recording dimensions (Note: by default, Full screen is selected). a. To choose a specific dimension, click the Custom drop-down menu and select the desired dimension. b. To change the custom dimensions, enter the desired dimensions in the width and height fields. i. Or, click and drag the record frame handles to manually resize the frame, example below: c. To change the custom recording area position, move the cursor to the center of the recording area, click and drag the move icon to the desired location, example below: 4. In the Recorded inputs section, click the audio drop-down menu and select the desired audio option: Help Desk: helpdesk@ipfw.edu Page 1


3 a. Microphone will only record the audio from your microphone. b. Do not record microphone will not record any sound. c. Record system audio will only record the audio from your system, such as windows startup sound. 5. To start recording, click the red rec button. a. Camtasia will start the recording count down. 6. To pause recording, click Pause in the recorder window. a. Or press F9 on the keyboard. 7. To resume recording, click Resume in the recorder window. a. Or press F9 again on the keyboard. 8. To stop recording, click Stop in the recorder window. a. Or press F10 on the keyboard. 9. Once the recording process stops, a Preview window will appear, click: a. Save and Edit Save the recording and go to the video editing mode. b. Produce Save the recording and start rendering the video. c. Delete Delete the recording. i. Note: This is will you back to the recording mode. Camtasia Projects Creating a New Camtasia Project 1. From the Menu bar, click File > New Project. Saving a Camtasia Project 1. In the Menu bar, click File. 2. Click Save project or Save project as a. The Save As dialog window appears. 3. Navigate to the desired location where the project will be saved. 4. In the File name field, enter the desired project name. 5. Click Save. Opening a Camtasia Project 1. In the Menu bar, click File > Open project a. The Open dialog window appears. 2. Locate and select the desired project. 3. Click Open. Importing Media Files Note: Please refer to the Supported Media Formats section for the lists of supported video, audio, and image formats. 1. In the Quick Access bar, click Import media. a. The Open dialog window appears. 2. Locate and select the desired media file, click Open. a. Note: To import multiple files, press Ctrl and click the desired files. 3. The imported media file(s) will appear in the Clip Bin. Deleting a Media File 1. In the Clip Bin, right-click the desired media file > click Remove from Clip Bin. Timeline Editor Adding Timeline Tracks Note: Timeline tracks represent the sequence of all clips and effects in a video. Think of them as layers in Photoshop or Illustrator. 1. In the Timeline Tracks section, click the Insert Track (+) button. Renaming a Timeline Track 1. In the Timeline Tracks section, right-click the desired track name > click Rename track. 2. Enter a new name. 3. Press Enter. Removing a Timeline Track 1. In the Timeline Tracks section, right-click the desired track name > click Remove track. Zooming Out/In on the Timeline Note: It s easier to work with clips and effects when zoomed in on the Timeline. 1. In the Timeline Toolbar, click the magnifying glass icons to zoom out or zoom in on the Timeline (Note: The left button is Zoom out and the right is Zoom in). Help Desk: helpdesk@ipfw.edu Page 2
 to the desired time position.")

4 Adding Media Files to the Timeline Note: If the media file is the first clip to add to the Timeline, an Editing Dimensions window will appear. 1. In the Timeline section, click and drag the Playhead indicator (the vertical straight line) to the desired time position. Removing a Media Clip in the Timeline Note: Removing the media clip does not delete the media file. 1. In the Timeline section, right-click the desired clip > click Delete. Changing the Editing Dimensions Note: You may only change the editing dimensions while there is at least one clip in the Timeline. 1. In the Preview window, click Editing Dimensions button. 1. In the Task Tabs, click Transitions. a. The Transitions panel appears. 2. Locate the desired transition. 3. Click and drag the transition to the beginning or the end of the clip in the Timeline, example: a. Note: Make sure you don t click the green or the red part of the indicator. 2. In the Task Tabs, make sure Clip Bin is clicked. 3. In the Clip Bin area, right-click the desired media file > click Add to Timeline at Playhead. a. Alternatively, click and drag the media file to the desired location in the Timeline. b. Note: The selected media will be added after the Playhead indicator. c. Note: If the Editing Dimensions window appears, click the Dimensions dropdown list and select the desired option > click OK. Moving a Media File in the Timeline 1. In the Timeline section, click and drag the desired clip to the new location. a. Note: You can also move media files to a different track. a. The Editing Dimensions window appears. 2. Click the Dimensions drop-down list and select a new dimension. a. Alternatively, in the Width and Height fields, enter the desired values to manually change the dimensions. 3. Click OK. Adding Transitions to Clips Note: A clip can have up to 2 transition effects. Changing the Transition Duration 1. In the Timeline, locate the desired transition within a clip. 2. Move the cursor over the transition edge until the horizontal resize cursor appears. a. Note: To prevent changing the clip duration: i. If the transition is at the beginning, place the cursor on the right edge of the transition. ii. If the transition is at the end, place the cursor on the left edge of the transition. 3. Click and drag the transition edge to change the duration, example below: Help Desk: helpdesk@ipfw.edu Page 3


5 Deleting a Transition 1. In the Timeline, locate the desired transition within a clip. 2. Right-click the transition > click Delete. Adding Callouts to Clips Note: Callouts are graphics that appear on top of a video to draw viewer s attention to important objects or processes in a video. 1. In the Timeline, move the Playhead indicator to the desired position. 2. In the Task Tabs, click Callouts. b. Note: If fill color option is available, click the Fill drop-down menu and select the desired color. 5. To change the effect: a. In the Shape section, click the Effects drop-down menu and select the desired Resizing/Moving a Callout Shape Note: You won t be able to see the callout shape if the Playhead indicator is at the beginning or the end of the 1. In the Timeline, move the Playhead indicator to the middle part of the desired Moving a Callout to a Different Frame 1. In the Timeline, locate and click the desired 2. Click and drag the callout to the new position. Changing Callout Duration 1. In the Timeline, locate and click the desired 2. Move the cursor over the callout edge until the horizontal resize cursor appears. 3. Click and drag the callout edge to change the callout duration, example below: a. The Callouts panel appears. 3. Click + Add callout. a. The callout will be inserted after the Playhead indicator. Changing Callout Shape/Color/Effects 1. Make sure the Callouts panel is open. 2. In the Timeline, locate and click the desired callout. 3. To change the shape: a. In the Shape section, click the Up or Down arrows to navigate b. Click the desired callout shape. a. The callout shape will appear in the Preview window. 2. To resize the shape: a. In the Preview window, click and drag the callout frame handles to change the width and height. Deleting a Callout Effect 1. In the Timeline, locate the desired callout effect. 2. Right-click the callout > click Delete. Adding Zoom-n-Pan Effects to Clips 1. In the Timeline, click and drag the Playhead indicator to the desired position. 2. In the Task Tabs, click Zoom-n-Pan. 4. To change the color: a. In the Shape section, click the Border drop-down menu and select the desired color. 3. To move the shape: a. In the Preview window, click and drag the callout shape to a new position. a. The Zoom-n-Pan panel appears. Help Desk: helpdesk@ipfw.edu Page 4


6 3. Click and drag the zoom frame handlers to resize the frame. 3. Click and drag the Zoom-n-Pan effect edge to change the duration, example: 1. In the Quick Access bar, click Produce and share. a. The Production Wizard window appears. 2. Click the drop-down list and select the desired video format, example: a. Note: You can also move the frame. b. Note: You can preview the result in the Preview Window. c. Note: The Zoom-n-Pan effect icon will appear inside the clip in the Timeline. Moving a Zoom-n-Pan Effect 1. In the Timeline, locate the desired Zoom-n- Pan effect icon within a clip. 2. Click and drag the icon to the new position within the clip. Changing Zoom-n-Pan Duration 1. In the Timeline, locate the desired Zoom-n- Pan effect icon within a clip. 2. Move the mouse over the icon until the horizontal resize cursor appears. Deleting a Zoom-n-Pan Effect 1. In the Timeline, locate the desired Zoom-n- Pan effect icon within a clip. 2. Right-click the Zoom-n-Pan effect icon > click Delete. Editing a Zoom-n-Pan Effect Note: Editing a Zoom-n-Pan effect is not recommended. The best solution is to delete then recreate a Zoom-n-Pan effect. Preview Window Note: Users can preview the final video in the Preview Window. Playing Video 1. In the Timeline, click and drag the Playhead indicator to the desired position. 2. In the Preview window, click the Play button. a. To pause, click the Pause button. Video Production Note: This is the final step to produce a video. You can t edit anything once Camtasia finishes the rendering process. If editing is needed, you must re-render the video. a. Note: For HD quality, MP4 format is recommended. 3. Click Next >. 4. In the Production Name field, enter the desired name. 5. If desired, click the folder icon at the right to change the default save folder. 6. If desired, edit any remaining option(s). 7. Click Finish. a. The rendering process will begin. It s recommended to not use the system heavily during the rendering process. Help Desk: helpdesk@ipfw.edu Page 5
PODCASTING ON WINDOWS PCs USING CAMTASIA
 PODCASTING ON WINDOWS PCs USING CAMTASIA INTRODUCTION Camtasia 3 is one of the most powerful applications currently on the market for creating podcast content on Windows PCs. Originally designed as a screen
Camtasia Recording Settings
 Camtasia Recording Settings To Capture Video Step 1: Resolution and Recording Area In the select area section, you can choose either to record the full screen or a custom screen size. Select the dropdown
Camtasia Studio. Creating Screen Videos
 Camtasia Studio Creating Screen Videos WORKSHOP DESCRIPTION... 1 Overview 1 Prerequisites 1 Objectives 1 INTRODUCTION... 1 WHY USE CAMTASIA STUDIO?... 2 WHERE CAN I GET CAMTASIA STUDIO?... 2 HOW TO USE
Done. Click Done to close the Capture Preview window.
 The Capture Preview window allows you to preview, edit, and customize a screen capture before it is saved to a file, inserted into your document, attached to an e-mail, or sent to a variety of other Output
Windows Live Movie Maker
 Windows Live Movie Maker What is Windows Live Movie Maker? Windows Live Movie Maker is available on all computers that have Windows 7. Teachers and students use Windows Live Movie Maker to turn videos
CAMTASIA - Screen Recorder
 CAMTASIA - Screen Recorder Upon opening the program, you should see a Welcome screen that allows you to open a Recent Project, view Tutorials under the Free Training section, or begin working with a new
USING WINDOWS MOVIE MAKER TO CREATE THE MOMENT BEHIND THE PHOTO STORY PART 1
 PART 1 Windows Movie Maker lets you assemble a range of video, pictures, and sound elements to create a story. It is an application that comes with most PC computers. This tip sheet was created using Windows
Sharing Files and Whiteboards
 Your user role in a meeting determines your level of file sharing. The type of files you can share include documents, presentations, and videos. About Sharing Files, page 1 Changing Views in a File or
Working with Windows Movie Maker
 518 442-3608 Working with Windows Movie Maker Windows Movie Maker allows you to make movies and slide shows that can be saved to your computer, put on a CD, uploaded to a Web service (such as YouTube)
Windows Movie Maker 2012
 Windows Movie Maker 2012 Open Windows Movie Maker A shortcut for Movie Maker should be on the desktop, but if it is not, you can search for the program by touching the right edge of the screen and swiping
Flash MX Image Animation
 Flash MX Image Animation Introduction (Preparing the Stage) Movie Property Definitions: Go to the Properties panel at the bottom of the window to choose the frame rate, width, height, and background color
Camtasia: Importing, cutting, and captioning your Video Express movie Camtasia Studio: Windows
 Camtasia: Importing, cutting, and captioning your Video Express movie Camtasia Studio: Windows Activity 1: Adding your Video Express output into Camtasia Studio Step 1: the footage you shot in the Video
Figure 3.5: Exporting SWF Files
 Li kewhatyou see? Buyt hebookat t hefocalbookst or e Fl ash + Af t eref f ect s Chr i sjackson ISBN 9780240810317 Flash Video (FLV) contains only rasterized images, not vector art. FLV files can be output
ADOBE CONNECT 8 USER GUIDE. Colorado Department of Labor & Employment
 ADOBE CONNECT 8 USER GUIDE Colorado Department of Labor & Employment Enter a Meeting Room Getting Started - Enter a Meeting Room DO ONE OF THE FOLLOWING: 1. From the Home Page in Adobe Connect Central,
Snagit 12. Snagit 12 Help. Version 12.4.1. August 2015 2015 TechSmith Corporation
 12 Version 12.4.1 August 2015 2015 TechSmith Corporation All rights reserved This manual, as well as the software described in it, is furnished under license and may be used or copied only in accordance
Creating Hyperlinks & Buttons InDesign CS6
 Creating Hyperlinks & Buttons Adobe DPS, InDesign CS6 1 Creating Hyperlinks & Buttons InDesign CS6 Hyperlinks panel overview You can create hyperlinks so that when you export to Adobe PDF or SWF in InDesign,
Movie Maker 2 Beginning
 Movie Maker 2 Beginning Quick Overview...3 Preparing a Folder...3 Collecting Resources...3 Pictures...4 Screen Resolution...4 Starting Windows Movie Maker...4 Which Version?...4 Windows Movie Maker 2 Window...4
The main imovie window is divided into six major parts.
 The main imovie window is divided into six major parts. 1. Project Drag clips to the project area to create a timeline 2. Preview Window Displays a preview of your video 3. Toolbar Contains a variety of
Instructions for Creating a Poster for Arts and Humanities Research Day Using PowerPoint
 Instructions for Creating a Poster for Arts and Humanities Research Day Using PowerPoint While it is, of course, possible to create a Research Day poster using a graphics editing programme such as Adobe
Creating a Poster in PowerPoint 2010. A. Set Up Your Poster
 View the Best Practices in Poster Design located at http://www.emich.edu/training/poster before you begin creating a poster. Then in PowerPoint: (A) set up the poster size and orientation, (B) add and
Premiere Pro CC Workflow Setting up your project
 Premiere Pro CC Workflow Setting up your project In This Section 1. Project Settings 2. Sequence Settings for AVCHD cameras 3. Sequence Settings for P2 cameras 4. Sequence Settings Slideshows 4. Sequence
User Guide. March 2015. Moovly.com. Discover all Moovly Features and learn how to create videos like a Pro!
 User Guide March 2015 Discover all Moovly Features and learn how to create videos like a Pro! Moovly.com 1. Getting Started... 4 1.1. Technical requirements... 4 1.2. Moovly Editor Overview... 4 1.3. Making
GUIDE. Give PowerPoint a Voice: Developing. Narrated Presentations on a Windows PC. Donna Carnduff. dcarnduf@utk.edu.
 GUIDE Give PowerPoint a Voice: Developing Narrated Presentations on a Windows PC Donna Carnduff dcarnduf@utk.edu Revised 6/10/2015 To register for workshops, visit http://oit.utk.edu/training Configure
Overview of the Adobe Flash Professional CS6 workspace
 Overview of the Adobe Flash Professional CS6 workspace In this guide, you learn how to do the following: Identify the elements of the Adobe Flash Professional CS6 workspace Customize the layout of the
Getting Started Guide
 Getting Started Guide 2012 TechSmith Corporation. All rights reserved. 1 About this Guide Whether you re using Snagit on Windows or Mac, this guide will help you get started! Content that only applies
Adobe Illustrator CS5 Part 1: Introduction to Illustrator
 CALIFORNIA STATE UNIVERSITY, LOS ANGELES INFORMATION TECHNOLOGY SERVICES Adobe Illustrator CS5 Part 1: Introduction to Illustrator Summer 2011, Version 1.0 Table of Contents Introduction...2 Downloading
Tutorial for Tracker and Supporting Software By David Chandler
 Tutorial for Tracker and Supporting Software By David Chandler I use a number of free, open source programs to do video analysis. 1. Avidemux, to exerpt the video clip, read the video properties, and save
Microsoft Picture Manager. Picture Manager
 Picture Manager Picture Manager allows you to easily edit and organize the pictures on your computer. Picture Manager is an application that was included with Microsoft Office suite for Windows 2003 and
Web Ambassador Training on the CMS
 Web Ambassador Training on the CMS Learning Objectives Upon completion of this training, participants will be able to: Describe what is a CMS and how to login Upload files and images Organize content Create
Using MindManager 14
 Using MindManager 14 Susi Peacock, Graeme Ferris, Susie Beasley, Matt Sanders and Lindesay Irvine Version 4 September 2014 2011 Queen Margaret University 1. Navigating MindManager 14... 3 Tool Bars and
Camtasia Studio Project Collaboration. Version 7.0
 Camtasia Studio Project Collaboration Version 7.0 Table of Contents Camtasia Studio 7 & Project Collaboration... 3 Tips for Managing Collaborative Video Projects... 4 Create a Video Script... 7 Script
Working with Windows Live Movie Maker
 518 442-3608 Working with Windows Live Movie Maker Windows Live Movie Maker is the latest in a long series of Windows Movie Maker video editing programs. This version first became available with Windows
Using the Cute Rich-Text Editor
 Using the Cute Rich-Text Editor This document is designed to provide users with a basic introduction to using the Cute rich-text editor to format text, create and modify tables, and to place charts and
Within minutes you can transform your high-resolution digital image in to a DVquality movie that pans, zooms and rotates the once-still image.
 Slick Motion gives you a simple and easy way to make your still images come alive. Within minutes you can transform your high-resolution digital image in to a DVquality movie that pans, zooms and rotates
Sharing a Screen, Documents or Whiteboard in Cisco Unified MeetingPlace
 Sharing a Screen, Documents or Whiteboard in Cisco Unified MeetingPlace Release: 7.0 Revision Date: December 9, 2009 1:29 pm This section describes how to use the features in the Cisco Unified MeetingPlace
Adobe InDesign Creative Cloud
 Adobe InDesign Creative Cloud Beginning Layout and Design November, 2013 1 General guidelines InDesign creates links to media rather than copies so -Keep all text and graphics in one folder -Save the InDesign
Introduction to Final Cut Pro 7 - Editing Basics
 Workshop Objectives Become familiar with the Final Cut Pro workspace, basic editing, capturing footage, using tools, exporting to tape, or QuickTime. Learn effective workflow and file management strategies.
Lesson 7 - Creating Animation II
 Lesson 7 - Creating Animation II A. Motion-Tweened Animation With motion tweening, you can easily create motion effects for the objects in your Flash movies. Kites flying, balls bouncing, rocks rolling
Camtasia Studio. Help File Document. Release 8.0. June 2012. 2012 TechSmith Corporation. All rights reserve
 Create Engaging Screencasts Camtasia Studio Help File Document Release 8.0 June 2012 2012 TechSmith Corporation. All rights reserve Table of Contents Table of Contents 1 Recorder 1 Record PowerPoint 1
Using Acrobat Comment and Markup tools
 Using Acrobat Comment and Markup tools In Adobe Acrobat 9 and Adobe Reader, a comment is a note, highlight, stamp, or any other markup you add to your PDF document by using the comment and markup tools.
Creating Fill-able Forms using Acrobat 8.0: Part 1
 Creating Fill-able Forms using Acrobat 8.0: Part 1 The first step in creating a fill-able form in Adobe Acrobat is to generate the form with all its formatting in a program such as Microsoft Word. Then
MULTIMEDIA INSTALLING THE MULTIMEDIA UPGRADE
 26 MULTIMEDIA With the PastPerfect MultiMedia Upgrade, you will be able to attach digital images and link multimedia files to your catalog records. This is an optional feature and may be purchased for
WIX: Building a Website with a Template. Choosing a Template First you will need to choose a template from the Create section of the Wix website.
 WIX: Building a Website with a Template Choosing a Template First you will need to choose a template from the Create section of the Wix website. To choose a template: 1. Go to wix.com. 2. From the top
6. If you want to enter specific formats, click the Format Tab to auto format the information that is entered into the field.
 Adobe Acrobat Professional X Part 3 - Creating Fillable Forms Preparing the Form Create the form in Word, including underlines, images and any other text you would like showing on the form. Convert the
SMART Ink 1.5. Windows operating systems. Scan the following QR code to view the SMART Ink Help on your smart phone or other mobile device.
 SMART Ink 1.5 Windows operating systems User s guide Scan the following QR code to view the SMART Ink Help on your smart phone or other mobile device. Trademark notice SMART Ink, SMART Notebook, SMART
Anime Studio Debut vs. Pro
 vs. Animation Length 2 minutes (3000 frames) Unlimited Motion Tracking 3 Points Unlimited Audio Tracks 2 Tracks Unlimited Video Tracks 1 Track Unlimited Physics No Yes Poser scene import No Yes 3D layer
Sample Table. Columns. Column 1 Column 2 Column 3 Row 1 Cell 1 Cell 2 Cell 3 Row 2 Cell 4 Cell 5 Cell 6 Row 3 Cell 7 Cell 8 Cell 9.
 Working with Tables in Microsoft Word The purpose of this document is to lead you through the steps of creating, editing and deleting tables and parts of tables. This document follows a tutorial format
4. ADDING GRAPHICS AND MEDIA
 53 54 From E-Learning Uncovered: Lectora X 2010 Alcorn, Ward & Partners, Inc. ADDING IMAGES ADDING IMAGES Images can help explain a concept, set a mood, or simply provide visual interest. Lectora accepts
SMART Board Training Outline Trainer: Basel Badran
 Sharjah Higher Colleges of Technology SMART Board Training Outline Trainer: Basel Badran What is a SMART Board? o Concept & Technology SMART Board Components: o Smart Tools Start Center Recorder Keyboard
How to build text and objects in the Titler
 How to build text and objects in the Titler You can use the Titler in Adobe Premiere Pro to create text and geometric objects. There are three methods for creating text, each capable of producing either
Blackboard Collaborate Classroom in Desire2Learn. Presenters
 Blackboard Collaborate Classroom in Desire2Learn Presenters Copyright 2014 Information Technology Services Kennesaw State University This document may be downloaded, printed, or copied, for educational
Introduction to Word 2007
 Introduction to Word 2007 You will notice some obvious changes immediately after starting Word 2007. For starters, the top bar has a completely new look, consisting of new features, buttons and naming
Basic video editing using imovie
 Apple Computer released imovie in October 1999. In April 2000 Apple made imovie available for free download on their Web site. With imovie 2 in July 2000 imovie is no longer free unless you purchase a
Faculty Web Site with WCM
 Faculty Web Site with WCM WORKSHOP DESCRIPTION... 1 Overview 1 Prerequisites 1 Objectives 1 FACULTY WEB SITE WITH WCM... 2 Introduction 2 Getting Started 3 Understanding the Template 4 The WCM Layout
Getting Started Guide
 MadCap Software Getting Started Guide Capture 7 Copyright 2015 MadCap Software. All rights reserved. Information in this document is subject to change without notice. The software described in this document
Microsoft Access 2010 handout
 Microsoft Access 2010 handout Access 2010 is a relational database program you can use to create and manage large quantities of data. You can use Access to manage anything from a home inventory to a giant
GETTING STARTED TABLE OF CONTENTS
 imovie 11 Tutorial GETTING STARTED imovie 11 is consumer-level digital video editing software for Macintosh. You can use imovie 11 to edit the footage you film with digital video cameras and HD video cameras.
Inside Blackboard Collaborate for Moderators
 Inside Blackboard Collaborate for Moderators Entering a Blackboard Collaborate Web Conference 1. The first time you click on the name of the web conference you wish to enter, you will need to download
SMART Board Tips & Tricks (version 9.0) Getting Started. SMART Tools vs. SMART Notebook software
 Getting Started. SMART Tools vs. SMART Notebook software") SMART Board Tips & Tricks (version 9.0) Getting Started SMART Tools vs. SMART Notebook software Click the SMART Board icon (in the system tray at the bottom right of your screen) to access the SMART Board
SMART Board Tips & Tricks (version 9.0) Getting Started SMART Tools vs. SMART Notebook software Click the SMART Board icon (in the system tray at the bottom right of your screen) to access the SMART Board
Any Video Converter User Manual 1. Any Video Converter. User Manual
 Any Video Converter User Manual 1 Any Video Converter User Manual Any Video Converter User Manual 2 1. Welcome to Any Video Converter...3 1.1 Main Window of Any Video Converter...3 1.2 Setting Program
Using Adobe Dreamweaver CS4 (10.0)
") Getting Started Before you begin create a folder on your desktop called DreamweaverTraining This is where you will save your pages. Inside of the DreamweaverTraining folder, create another folder called
Getting Started Before you begin create a folder on your desktop called DreamweaverTraining This is where you will save your pages. Inside of the DreamweaverTraining folder, create another folder called
I. Create a New Project
 Judith Herb College of Education imovie 09 Tutorial Students in the Judith Herb College of Education are required to complete video projects in many classes as well as their student teaching. These videos
After creating your powerpoint, use Camtasia to enhance the presentation.
 Page 1 of 5 Camtasia Powerpoint Recordings After creating your powerpoint, use Camtasia to enhance the presentation. With Camtasia installed, a special Record menu appears in the upper left hand corner
Working With Animation: Introduction to Flash
 Working With Animation: Introduction to Flash With Adobe Flash, you can create artwork and animations that add motion and visual interest to your Web pages. Flash movies can be interactive users can click
Sharing Presentations, Documents, and Whiteboards
 Chapter 19 19 Sharing Presentations, Documents, and Whiteboards Your user role in an event determines your level of sharing. Whichever role you take, the following table describes the basic tasks associated
Smart Board Notebook Software A guide for new Smart Board users
 Smart Board Notebook Software A guide for new Smart Board users This guide will address the following tasks in Notebook: 1. Adding shapes, text, and pictures. 2. Searching the Gallery. 3. Arranging objects
SoftChalk. Level 1. University Information Technology Services. Training, SoftChalk Level Outreach, 1 Learning Technologies and Video Production
 SoftChalk Level 1 University Information Technology Services Training, SoftChalk Level Outreach, 1 Learning Technologies and Video Production Page 1 of 49 Copyright 2013 KSU Department of University Information
Communicate: In Print
 Communicate: In Print A simple guide Work areas Communicate: In Print has two different modes in which to edit your documents: Create and Adjust modes. These are easily interchangeable and the toolbars
Making Visio Diagrams Come Alive with Data
 Making Visio Diagrams Come Alive with Data An Information Commons Workshop Making Visio Diagrams Come Alive with Data Page Workshop Why Add Data to A Diagram? Here are comparisons of a flow chart with
PowerPoint 2007 Basics Website: http://etc.usf.edu/te/
 Website: http://etc.usf.edu/te/ PowerPoint is the presentation program included in the Microsoft Office suite. With PowerPoint, you can create engaging presentations that can be presented in person, online,
Working with the new enudge responsive email styles
 Working with the new enudge responsive email styles This tutorial assumes that you have added one of the mobile responsive colour styles to your email campaign contents. To add an enudge email style to
Using PowerPoint s Advanced Features. What Are Advanced Features? Basic Skills:
 Using PowerPoint s Advanced Features September, 2003 Suzanne Czurylo czurylo@umich.edu For questions about using PowerPoint, please contact Software Support at umbssofthelp@umich.edu What Are Advanced
Arles Image Explorer Arles Image Web Page Creator. User Manual
 Arles Image Explorer Arles Image Web Page Creator User Manual I Arles Image Web Page Creator Help Table of Contents Part I About 1 Part II Getting Started Creating a Image Web Page Gallery 1 Part III Order
Adobe Dreamweaver CC 14 Tutorial
 Adobe Dreamweaver CC 14 Tutorial GETTING STARTED This tutorial focuses on the basic steps involved in creating an attractive, functional website. In using this tutorial you will learn to design a site
Introduction to Adobe Connect Video Conferencing System
 Introduction to Adobe Connect Video Conferencing System Adobe Connect is the Australian National University's web conferencing solution for staff and students. It has been integrated with the University's
Layout Tutorial. Getting Started
 Getting Started Layout Tutorial This tutorial will explain how create a layout template, send views to a layout page, then save the document in PDF format. In this tutorial you will learn about: Creating
Advanced Presentation Features and Animation
 There are three features that you should remember as you work within PowerPoint 2007: the Microsoft Office Button, the Quick Access Toolbar, and the Ribbon. The function of these features will be more
Cut a video into multiple short clips
 Step-by-Step Guide Cut a video into multiple short clips Separating the highlights and key messages from hours of raw footage requires a tool that makes for easy clipping and painless export to multiple
ECHO360 PERSONAL CAPTURE
 ECHO360 PERSONAL CAPTURE Echo360 - Personal Capture allows a User an easy way to capture, edit, publish, and view lectures from their personal computers. Users and/or Instructors can use Echo360 to capture
Why Use OneNote? Creating a New Notebook
 Why Use OneNote? OneNote is the ultimate virtual notebook that enables users to create notes in various formats, shares those notes, sync those notes with the cloud and collaborate with others. You can
224 INDEX. Index. Symbols
 224 INDEX Index Symbols! prefix 135, 176, 178 % prefix 135 + prefixes 122, 134 =# prefix 127, 129, 135 2 Pass encoding 214 4:3 aspect ratio 191 16:9 aspect ratio WIDE menus and 90 widescreen mode 19 working
GRC 119 Assignment 7 Create a Flash Animation Banner Ad
 GRC 119 Assignment 7 Create a Flash Animation Banner Ad 1. Brainstorm your Ad Concept and identify the 5 components 2. Storyboard your ad concept 3. Develop the visual components 4. Develop banner ad web
SMART Board Menu. Full Reference Guide
 SMART Board Full Reference Guide Start-Up After entering Windows, click on the desktop icon SMART Board Tools. The SMART Board icon will appear in the system tray on the bottom right of the screen. Turn
Windows Movie Maker 2 Video Task Guide
 Windows Movie Maker 2 Video Task Guide This guide will instruct you how to get video footage from a DV camcorder to your computer. It will also give basic instructions for trimming footage and adding transitions.
Avaya Flare Experience for Windows Quick Reference
 Avaya Flare Experience for Windows Quick Reference Making voice calls Making a voice call using the dialpad 1. Click the Call button under the center spotlight or press the CONTROL + D keys on your keyboard
Sage Accountants Business Cloud EasyEditor Quick Start Guide
 Sage Accountants Business Cloud EasyEditor Quick Start Guide VERSION 1.0 September 2013 Contents Introduction 3 Overview of the interface 4 Working with elements 6 Adding and moving elements 7 Resizing
Florence School District #1
 Florence School District #1 Module 2: SMART Board Basics and Beyond 1 SMART Board Software and Beyond In SMART Notebook software, you can create or open SMART Notebook software (.notebook) files. After
Copyright 2002-2003 Kinoma Inc. All rights reserved.
 Kinoma Producer 2 Version 2.0 Copyright 2002-2003 Kinoma Inc. All rights reserved. Before using this software, please read the End User License Agreement that is supplied together with this software. http://www.kinoma.com
Text Basics. Introduction
 Text Basics Introduction PowerPoint includes all the features you need to produce professionallooking presentations. When you create a PowerPoint presentation, it is made up of a series of slides. The
GRC 119 Assignment 6 Create a Flash Animation Banner Ad
 GRC 119 Assignment 6 Create a Flash Animation Banner Ad 1. Brainstorm your Ad Concept and identify the 5 components 2. Storyboard your ad concept 3. Develop the visual components 4. Develop banner ad web
How to create pop-up menus
 How to create pop-up menus Pop-up menus are menus that are displayed in a browser when a site visitor moves the pointer over or clicks a trigger image. Items in a pop-up menu can have URL links attached
A Beginner s Guide to PowerPoint 2010
 A Beginner s Guide to PowerPoint 2010 I. The Opening Screen You will see the default opening screen is actually composed of three parts: 1. The Slides/Outline tabs on the left which displays thumbnails
Ortelia Space Builder User Manual
 Ortelia Space Builder User Manual http://ortelia.com 1 Table of Contents Introducing Ortelia Space Builder... 2 System Requirements... 3 1. Operating system:... 3 2. Hardware:... 3 Minimum Graphics card
Making a Poster Using PowerPoint 2007
 Making a Poster Using PowerPoint 2007 1. Start PowerPoint: A Blank presentation appears as a Content Layout, a blank one one without anything not even a title. 2. Choose the size of your poster: Click
Desktop Messenger 4.9 USER GUIDE 2011-03-29
 Desktop Messenger 4.9 USER GUIDE 2011-03-29 TABLE OF CONTENTS 1. Introduction 4 2. Requirements 4 3. Install and register 4 4. Contacts 5 4.1. Add new contact 5 4.2. Add new group 5 4.3. Auto-complete
[Not for Circulation]
![[Not for Circulation]](/thumbs/39/20045725.jpg "[Not for Circulation]") Using SMART Notebook SMART Notebook is software meant to supplement use with the SMART Board. The software helps users create interactive presentations, and offers a variety of ways to enhance presenting
Using SMART Notebook SMART Notebook is software meant to supplement use with the SMART Board. The software helps users create interactive presentations, and offers a variety of ways to enhance presenting
Working With Microsoft PowerPoint
 LIBRARY AND LEARNING SERVICES WORKING WITH MICROSOFT POWERPOINT www2.eit.ac.nz/library/ls_computer.html Working With Microsoft PowerPoint Powerpoint Basics Inserting a Graph Inserting a Sound Saving your
PowerPoint 2007: Basics Learning Guide
 PowerPoint 2007: Basics Learning Guide What s a PowerPoint Slide? PowerPoint presentations are composed of slides, just like conventional presentations. Like a 35mm film-based slide, each PowerPoint slide
Reviewer s Guide. Morpheus Photo Animation Suite. Screenshots. Tutorial. Included in the Reviewer s Guide:
 Morpheus Photo Animation Suite Reviewer s Guide The all-in-one animation suite includes Morpheus Photo Morpher, Morpheus Photo Warper, Morpheus Photo Mixer, as well as all 15 sample morphs, warps, and
OPERATION MANUAL. MV-410RGB Layout Editor. Version 2.1- higher
 OPERATION MANUAL MV-410RGB Layout Editor Version 2.1- higher Table of Contents 1. Setup... 1 1-1. Overview... 1 1-2. System Requirements... 1 1-3. Operation Flow... 1 1-4. Installing MV-410RGB Layout