Movavi Screen Capture Studio. User guide 2014
|
|
|
- Primrose Richards
- 9 years ago
- Views:
Transcription

1 Movavi Screen Capture Studio User guide 2014
2 Table of Contents Overview...4 Supported Formats...5 Hardware Acceleration...6 System Requirements...7 Activating Software...8 Trial Limitations...9 Getting an Activation Key...10 Online Activation...11 Offline Activation...13 Capturing Screen Activity...17 Quick Start Guide...18 User Interface...20 Before Capture...22 During Capture...23 After Capturing...24 Program Preferences...25 General Preferences...26 Video Preferences...27 Audio Preferences...28 Hot Keys...29 Preparing to Capture...30 Choose Capture Mode...31 Defining the Capture Area...32 Selecting an Audio Source...33 Mouse Cursor Effects...34 Recording Video...35 Saving and Converting Video...36 Saving Previously Captured Files...38 Saving Screenshots...39 Video Editor...40 User Interface...41 Quick Start Guide...43 Program Preferences...49 Fast Track HD Acceleration...52 Setting Up Your Video Project...54 Adding Media...57 Capturing Video...60 Capturing Audio...62 Managing Your Media Collection...64 Using the Timeline...66 Using the Toolbar...70 Volume Levels...72 Opacity Levels...74 Playback Speed...76 Editing Video...77 Cutting and Splitting Video...78 Rotating Video...80 Cropping Video...81 Adding Effects...83 Applying the Deinterlace Effect...86
3 Using the Picture in Picture Effect...88 Using the Chroma Key Effect...91 Creating Split Screen Videos...95 Adding Fades...98 Adding Text Titles Creating Slideshows Automatic Slideshow Creator Saving Video Screenshots Saving Your Movie Saving Video Saving Audio Saving 3D Movies Saving for Mobile Devices Burning Video to DVD Uploading Videos to the Web Share Online Adding Media Files Uploading Videos to YouTube Uploading Videos to Facebook Uploading Videos to Vimeo Uploading Videos to Amazon S Uploading videos to FTP Accounts Contacting Support...123
4 Overview Movavi Screen Capture Studio is a program bundle that includes Movavi Screen Capture, Movavi Video Editor, and the free Share Online add-on. Such a combination opens limitless possibilities for making video tutorials, game walkthroughs, highlights of sports broadcasts, and much more. Using Movavi Screen Capture Studio, you can capture anything that's happening on your screen and seamlessly transfer the captured videos to the Video Editor, which you can use to cut out unnecessary footage, add effects and captions, and export your video in a wide variety of formats. For quick tutorials on using Movavi Screen Capture Studio, see the following pages: Capturing screen activity with Movavi Screen Capture Studio Editing videos with Movavi Video Editor
5 Supported Formats Please see our full list of supported formats and devices here.
6 Hardware Acceleration To enhance your experience, Movavi Screen Capture Studio is powered by a number of hardware and software acceleration technologies. You can enable hardware acceleration via program preferences in the Movavi Video Editor and Movavi Screen Capture separately. NVIDIA GPU Acceleration If your computer is equipped with an NVIDIA graphics card, you can use it to accelerate media file processing up to 5x by shifting a part of the workload to the graphics processing unit, freeing up your computer's CPU for other tasks. This technology supports the newest NVIDIA graphics cards, including GeForce, GeForce Mobile, Quadro, and Quadro Mobile. You can find the full list of supported GPUs on our webpage. Supported Formats: Input Video Formats: AVI, MP4, FLV, MKV, MOV, MPEG2-TS with H.264 codec, MPEG (MPEG2 PS, MPEG2 TS) with MPEG1/MPEG2 codec, WMV with VC-1 codec. Output Video Formats: 3GP, 3GP2, AVI, FLV, M2TS, MKV, MP4 with H.264 codec. Intel Media Acceleration Movavi Screen Capture Studio also supports hardware acceleration provided by Intel multi-core processors, which allows for faster encoding/decoding, as well as simultaneous conversion of a large number of files by employing the full power of each core. Performance grows up to 400% for H.264 and MPEG-2 codecs and up to 8 files can be processed simultaneously. Supported Formats Input Video Formats: AVI, MP4, FLV, MKV, MOV, MPEG2-TS with H.264 codec; MPEG (MPEG2 PS, MPEG2 TS) with MPEG1/MPEG2 codec; WMV with VC-1 codec. Output Video Formats: 3GP, 3GP2, AVI, FLV, M2TS, MKV, MP4 with H.264 codec; M2TS, MPEG with MPEG2 codec. To enable Intel or NVIDIA acceleration in Movavi Video Editor: 1. Open the Edit menu and select Preferences. 2. In the Preferences window, select the acceleration method that you prefer. For Intel acceleration, you can choose hardware or software acceleration methods for each of the supported codecs. 3. Click OK to accept the changes. To enable Intel or NVIDIA acceleration in Movavi Screen Capture: 1. Open the Capture menu and select Options. 2. In the Acceleration section, select the acceleration method that you prefer. For Intel acceleration, you can choose hardware or software acceleration methods for each of the supported codecs. If your processor or graphics card model is listed as supported, yet the acceleration options are still unavailable, please update the device's driver
7 Minimum System Requirements: System Requirements Microsoft Windows 2000/XP/Vista/7/8 with up-to-date patches/service packs installed, Intel or AMD or compatible processors, 1GHz, Minimum graphics display resolution of 1024x768, 32-bit color, 256MB RAM for Windows XP, 512MB for Vista, 1GB for Windows 7 and Windows 8, Minimum 250MB free hard disk space for installation, 2GB for ongoing operations, Latest version of QuickTime Player for Windows for MOV file processing, VHS capture device is required for capturing analog video, Administrator permissions are required for installation. Recommended System Requirements for HD Video Processing: Microsoft XP/Vista/7/8 with up-to-date patches/service packs installed, Intel or AMD or compatible processors, 2.8GHz, Display resolution of 1280x1024, 32-bit color, 1GB RAM for Windows 2000 and XP, 2GB for Vista, Windows 7 and Windows 8, 5GB free hard disk space for ongoing operations; DVD and Blu-ray Disc copying, editing and authoring may require large amount of free disk space, up to several 10's of GB, Latest version of QuickTime Player for Windows for MOV file processing, VHS capture device is required for capturing analog video, Administrator permissions are required for installation, Sound card. Note: Movavi Screen Capture Studio may run on slower computers; however, stable performance of the application in such cases is not guaranteed.
8 Activating Software When you first install a copy of Movavi Screen Capture Studio, it will be running in Trial Mode, where a number of limitations apply. To be able to use the program to its fullest, you will need to activate it using an activation key that you can purchase from our official website or any of our partners. Please see the following sections on some of the frequently asked questions about activation: How do I get an activation key? How do I activate the program? I have a stable Internet connection. Can I activate the program if I don't have Internet access? If you have any other questions or you find that activation is not working correctly, please don't hesitate to contact our support team.
9 Trial Limitations Unactivated copies of Movavi Screen Capture Studio are subject to the following trial limitations and will only function for 7 days after being installed. Module Video Editor Screen Capture Share Online Watermark trial watermark trial watermark Other Saves only ⅓ of audio length for video and audio files Capture time is limited to 2 minutes No restrictions To remove these limitations, buy a license and activate Movavi Screen Capture Studio using the key you receive after purchase. Please see the Activating Software section for more information on activating Movavi Screen Capture Studio.
10 Getting an Activation Key 1. To purchase an activation key, click the Buy Now button in the Movavi Screen Capture Studio launcher or just use the button below. 2. Choose a personal or business license and click the corresponding Buy Now button. If you intend to use Movavi Screen Capture Studio commercially, that is, to obtain profit of any kind or in a government organization, you need to select a business license. 3. Fill in your billing information and enter a valid address. This will be used to deliver your activation key, so make sure you have entered it correctly and that you have access to it. 4. After you've completed your payment and your request has been processed, you will receive a confirmation with your activation key, which you can use to activate Movavi Screen Capture Studio. If you haven't received your activation key: Check the Spam folder of your mailbox Contact support
11 Online Activation This section explains how to activate Movavi Screen Capture Studio using the quick online activation method if your computer is connected to the Internet. If your computer does not have a stable Internet connection, or you are having trouble with online activation, please see the Offline Activation section. Step 1: Open the Activation Wizard 1.1. Launch Movavi Screen Capture Studio In the bottom right-hand corner of the Movavi Screen Capture Studio launcher, click the Activate button. The Activation Wizard will open Click Next to continue to the next step. Step 2: Enter Your Activation Key 2.1. Enter or paste your activation key into the box of the Activation Wizard Select Internet Activation Click Next to verify your activation key.

12 You should see a successful activation message. Click Finish to close the Activation Wizard and restart the program. If online activation fails, try the following: Check that the activation key is entered correctly and is intended for the program you are activating. Make sure you have administrator rights on your computer. Try disabling your computer's firewall and antivirus software. Try Manual (Offline) Activation. If you have any questions or problems while activating your Movavi software, please don't hesitate to contact our technical support team.
13 Offline Activation This topic explains how to activate Movavi Screen Capture Studio if you do not have a stable Internet connection or if the online activation method did not work. Step 1: Open the Activation Wizard 1.1. Launch Movavi Screen Capture Studio In the Help menu, select Activate Software. The Activation Wizard will open Click Next to continue to the next step. Step 2: Enter Your Activation Key 2.1. Enter or paste your activation key into the box of the Activation Wizard Select Offline Activation Click Next to proceed to the next step.
14 Step 3: Send an with Your Activation Key The next page of the Activation Wizard contains the activation key you entered and some other information that is necessary for successful activation. To complete this step, you will need to send this information to our activation server via . You will receive an automatic response containing a registration key, which you will need to enter into to Activation Wizard's window First, you will need to copy or save the information for later, when you send us the . Click Copy to copy the information to clipboard or click Save to save it as a text file When you have Internet access, use your preferred mail client to compose an . Fill out the fields as follows:

15 To: Subject: Activation of Movavi Screen Capture Studio In the Body field, paste the information you copied from the Activation Wizard. Then, send the to You should receive a reply within an hour. To ensure a quick reply from our activation server, please do not alter the message subject or body Step 4: Enter Your Registration Key 4.1. When you have received your registration key, return to the Activation Wizard and enter it into the corresponding box Enter your registration name into the corresponding box Click Next to submit the information. If you have entered all the information correctly, you should see a successful activation message. Click Finish to complete the activation process and restart the program.
16 If you are having trouble activating Movavi Screen Capture Studio, feel free to contact our support team.
17 Capturing Screen Activity The Screen Capture program can help you record what's happening on your screen: Capture full screen videos or any part of the screen, work with multiple monitors. Record video lessons and tutorials Easily capture games: show off your awesome walkthrough or raid! Capture online videos, webinars, and sports broadcasts Take snapshots while capturing video Save your video in a wide range of formats
18 Quick Start Guide 1. Open the Movavi Screen Capture Studio 5 application. 2. Choose a capture mode In the upper right-hand corner of the Movavi Screen Capture Studio window, click the screen icon to open a list of capture modes. Each mode is optimized for a certain scenario in terms of quality and frame rate: Screencast ideal for capturing educational videos and tutorials, but it will be just as effective for most video capturing needs. You can leave this mode selected if you're not sure which to choose. Online Video for capturing sports broadcasts, YouTube videos, and any other kind of online video streams. Game a high-speed capture mode for recording games 3. Set a capture area The red rectangle on your screen represents the part of your screen that will be captured. You can set the size of that area in three ways: Using the mouse, click and drag the corners of the red rectangle, If you need to capture a single program window, click the Select button and mouse over the window that you would like to capture. When you see a blue flashing outline around this window, click the left mouse button. The capture area will now be the exact width and height as that window. In the Capture Area section of the Movavi Screen Capture Studio window, select a size from the list or enter a custom size into the width and height boxes. To move the capture area, click the red position icon of the screen. in the middle of the capture area and drag it to the necessary part 4. Select audio source If you want to record audio with your screen activity, make sure that the Audio option is checked. Then, select the preferred channel (such as the microphone or line input) and set the audio volume using the slider beneath the Recording source list. If you want to record sounds as you would hear them through your speakers, select the Stereo Mix or Speakers option. 5. Set mouse visibility and effects By default, the mouse cursor is hidden when you capture screen activity. However, you can choose to display the cursor or even emphasize its actions using effects. Open the Effects menu and select Show cursor if you want the mouse cursor to be displayed. You can also select an effect to highlight the cursor, its clicks or both. 6. Start recording Click the rec REC button to begin recording. You will see a countdown window before the recording starts so that you will have time to prepare.
19 While recording, you can click the Pause button to temporarily pause capture, and then resume capture from the same place. When you're done, click the Stop button. You will see a player window, where you can preview your video before saving it. 7. Save your video When you are done capturing your video, you can either continue working on it in the Editor, or save it as a video file right away. To edit the video: Click the Edit button to add the captured video to Movavi Video Editor. You will then be able to add it to the Timeline and edit it just like any other video. See these pages for more information on using Movavi Video Editor: Editing videos in Movavi Video Editor Saving videos in Movavi Video Editor To Save the recording as a video file: In the Convert to list, select a format you would like to save the recording in. Then, click Convert if you want to save the video as a file or click Share if you want to upload the video online as well. If you want to continue capturing videos after saving them, click the Repeat button in the bottom left-hand corner of the player.

20 User Interface When you launch the Screen Capture module, you will see it appear on your desktop as a small options window and a larger transparent rectangle, like so: The transparent rectangle represents the capture area, namely, the area of your screen that you would like to be shown in your video. Its position and size properties are displayed at the top of the rectangle. The window beneath the capture area is your capture control panel which you can use to set up and control the capturing process. This control panel will change depending on the stage of recording you are on, and has three states: before recording, during recording, and after recording. Click on each panel to find out about its functions: I. Before Capture II. During Capture III. After Capture

21

22 Before Capture For detailed instructions on setting up the program before capturing, please see the Preparing to Capture section. Menu The Menu contains many useful commands and options, such as taking a screenshot or setting various mouse effects. Custom Capture Area Selection The Select button enables a smart capture area selection mode, where you can specify the capture area by either selecting an automatically recognized window or frame, or clicking and dragging to draw the capture area on the screen. Size Selection The size selection box contains a list of common capture sizes which you can choose from, including capturing the entire monitor. Custom Capture Area Properties If you need to capture a custom area of definite size, you can enter its width and height into the corresponding fields. Audio Channel Selection Select the preferred audio channel from the drop-down list. If you want to record your video without sounds, simply uncheck the Audio option. Audio Channel Volume Drag the slider to set the recording volume. You will be able to change the volume during capture. Record Button When you are done with the set-up, click the REC button to begin recording. Capture Mode Depending on what you want to capture, select the most suitable capture mode: Screencast, Online Video, or Game. To learn more about the difference between these, see the Choose Capture Mode section.
23 During Capture Capture Duration Here you can see the total duration of the video. Capture Volume Use the slider to change the audio volume. Cancel Capture The Cancel button terminates capturing without saving the video. Pause Capture The Pause button pauses capturing so that you can resume capturing the video from where you left off. Stop Capture The Stop button stops the capturing process and you can proceed to saving the video.
24 After Capturing Player Use the Player to reivew your video before saving. Delete Recording The Delete button permanently deletes the video along with any temporary capture files. Convert Video If you want to save your recorded video in a format other than the default MP4 with H.264 video codec, you can check the Convert to checkbox and select a format or device from the list below. Save/Convert Video Clicking the Save button will save your video in MP4 format with the default H.264 codec. If you check the Convert to checkbox, the Save button will change to Convert. Share Video Online Click the Share button to open the Share Online module and upload your captured video to the web. Edit Video Click the Edit button to open the recording in the Video Editor.
25 Program Preferences To open the program settings for Movavi Screen Capture, open the Capture menu and select Preferences. You will see the following window: The preferences are organized into four categories: General, Video, Audio, and Hot Keys. Click the tabs on the left to navigate between them. You can also quickly access audio settings via the Audio > Options menu.
26 General Preferences The General tab allows you to change the interface language and set the folder where you want the captured files to be stored by default. Directory for captured files: As you record your screen activity, Movavi Screen Capture stores the recording files in the *.mrec format. These files can be opened at any time using Movavi Screen Capture for saving in a different format. For your convenience, you can change the folder these files are stored in to another location (for example, if you prefer the files to be stored on a different drive), or leave the default Videos\Movavi Library folder. This directory will only be default for temporary *.mrec files; you will still be prompted to specify a location for captured videos when you save or convert them using the post-capture dialog. Acceleration: Movavi Screen Capture Studio supports the latest hardware and software acceleration methods. If your computer is equipped with an NVIDIA graphics card or an Intel processor, just check the corresponding box to enable the acceleration method. The options will be unavailable if your hardware does not support NVIDIA or Intel acceleration. For more information, please see the Hardware Acceleration section. Send anonymous usage stats to Movavi checking this box will allow Movavi Screen Capture to send usage statistics to our development team, enabling us to fix any bugs you may encounter much faster, as well as add new features that you might be missing. The data sent by contains no personal information, will not be disclosed to third parties and will be used for software improvement purposes only. You can find more information about usage statistics on our Movavi Improvement Program page.
27 The Video tab contains the following settings: Video Preferences Here, you can manually specify capture settings for each capture mode. Select a capture mode from the list to edit its parameters. To change the capture codec for the selected mode, click the Settings button and select the necessary codec from the list. You can also convert your videos into a more convenient format when saving or using the Convert Video module. Maximum capture frame rate: like in regular video, the frame rate will define how many frames will be captured each second. A lower frame rate will result in smaller output size, however, the video may not turn out as smooth. The recommended frame rate is frames per second. Output frame size: defines the dimensions of the captured video. Full size means that it will be captured "as-is", while other frame sizes will result in some scaling to fit the captured area into the specified frame. For example, if you are capturing a 1280x720 screen with a frame size of 480x320, the captured image will need to be scaled down. Likewise, if the area you are capturing is smaller than the output frame size, the video will need to be scaled up, which results in larger file size with no gain in quality. Setting custom video preferences allows you to save time if you intend to always capture videos in one format, but some options like a higher frame rate and larger frame size will require more resources. We recommend that you keep the default settings and convert your videos to the necessary format and frame size when saving.

28 Audio Preferences The Audio tab allows you to change the default recording device and preferred audio quality, including the sample rate, number of channels, and bits per second.
 To set modifier keys (Shift, Ctrl, or Alt), check the corresponding checkboxes. 3. Select an alphanumeric key from the list.")
29 Hot Keys The Hot Keys tab allows you to set your own custom shortcuts for such actions as starting or pausing the capturing process. To change one of the shortcuts: 1. Find the command you want to set a hotkey for. 2. (Optional) To set modifier keys (Shift, Ctrl, or Alt), check the corresponding checkboxes. 3. Select an alphanumeric key from the list. For example, if you check the box next to Alt and select F10 in the Start/Stop capture section, you will be able to start or stop capture using the Alt+F10 combination. In case you forget a shortcut, you can always look it up here in the keyboard shortcut settings.

30 Preparing to Capture When you launch the Screen Capture module, you will see it appear on your desktop as a small options window and a larger transparent rectangle, like so: Use the control window to set up your capture area and audio source before recording. Click the links below to find out more about each step: 1. Choose a capture mode 2. Define the capture area 3. Select an audio source 4. Set mouse cursor effects Once you have everything set up, click the red REC button to begin recording. You will be given a 5-second countdown before the recording starts.

31 Choose Capture Mode The Screen Capture module has three capture modes: Screencast, Online Video, and Game. The three capture modes are set up to offer you the best capturing experience depending on the type of media you want to capture. Capture Screencast The Capture Screencast mode uses Movavi Optimized Capture Codec that has high capture quality with an average frame rate. You can use this mode to capture any kind of video from educational videos to technical procedures. Capture Online Video Use this capture mode for capturing online video from various video hosting sites, sports streams, and IP-TV broadcasts. As online videos are rarely broadcast in HD quality, this mode has average capture quality and speed, which allows to record videos that take up less disc space. Capture Game The game capture mode captures your games at high frame rates so that your viewers don't miss out on any action. Please be aware that video encoding takes up a part of your computer's resources, so if your computer is not performing as good as usual while capturing games with high hardware requirements, try lowering the game's graphics settings.

32 Defining the Capture Area Before you begin capturing, the first thing you will need to do is define which part of your screen you want to appear in the video. You can do this in one of the following ways: Selecting an area using the smart selection tool: 1. Click the Select button. The screen will dim slightly. 2. Specify a capture area: If you want to capture a window or a window frame, hover your mouse pointer over that frame. Automatically recognized windows will be outlined with a blue border. Click the necessary window once it is highlighted with a border. The capture area will be set automatically to fit the entire window. If you want to draw a custom size capture area, place your mouse pointer where you want the corner of your capture area to be located (it doesn't matter which one), then click and drag the mouse to where you want its opposite corner to be. Manually selecting a capture area: 1. Define the dimensions of the capture area: Click the drop-down box to open a list of sizes and select one of the Fullscreen, Standard, or Widescreen options that best suits your needs. If you need a capture area size that is not on the list, you can enter its width and height manually into the boxes or click and drag at the red rectangle's borders to change its size. 2. Click the red position icon ( position. ) in the center of the rectangle and drag it to move the capture area into the necessary

33 Selecting an Audio Source If you want to record audio along with your screen activity: 1. Make sure that the Audio option is checked. 2. Select the necessary audio device from the drop-down box. The list will display all your connected devices, including USB-microphones, Built-in Input, as well as any virtual or aggregate devices. If you want to capture your system's sound, including alerts, music and other sounds you can hear through your speakers, select the Speakers or Stereo Mix option. Troubleshooting: If you don't see Stereo Mix in the list of recording devices, you will need to enable it on your system: 1. In your system tray, find the volume icon. Right-click the volume icon and choose Recording devices. A sound settings window will open with the list of available recording devices. 2. Right-click on a blank space in the window and make sure both Show Disabled Devices and Show Disconnected Devices options are checked. 3. You should now see Stereo Mix in the list of recording devices. Right-click Stereo Mix and select Enable. Click OK to close the window and restart the Screen Capture module. If after step 2 Stereo Mix still does not show up in the list of devices, please update your audio drivers and check that your hardware supports Stereo Mix. If you need to record microphone or CD input along with sound from your speakers: 1. In your system tray, find the volume icon. Right-click the volume icon and choose Playback devices. A sound settings window will open with the list of playback devices. 2. Right-click on Speakers and select Properties. In the Speaker properties window, switch to the Levels tab. You will see a list of sound sources that can be included into Speakers output. 3. Enabled sources are marked with a sound icon next to them, while disabled devices are marked as muted: the mute icon next to a device to enable it. 4. Click OK to save changes and restart the Screen Capture module.. Click

34 Mouse Cursor Effects The Screen Capture module offers various options for displaying onscreen actions. You can choose to display or hide the mouse cursor as well as draw attention to mouse clicks using a spotlight or sound effect. To toggle mouse cursor effects: 1. Open the Effects menu 2. Click one of the options to enable it. You can select as many effects as you like. To disable an effect, click on it once again.

35 Recording Video To begin recording screen activity, click the REC button in the main Screen Capture window. You will be given a 5-second countdown before recording begins. Then, the borders of the selected capture area will flash red and the control panel will change to the following: There are three ways to control the capturing process: 1. Using the control panel: The Duration counter displays the length of your video. Click the Pause button to temporarily pause capturing so that you can continue recording into the same file. The Duration timer will pause and the capture area outline will turn white. Click the Resume button (located in the same place as the Pause button) to continue capturing. Press Stop if you are done capturing and are ready to save your video. Press Cancel to terminate recording and delete the temporary files. 2. Using the tray icon: If you right-click the Movavi Screen Capture tray icon Stop Recording to control the recording process., you will see a context menu appear. Use Start Recording and 3. Using the keyboard shortcuts: Depending on the hot key combinations you have set in the hot key preferences, use those keys to start, stop, or pause capture. The default key for starting and stopping capture is F10, and F9 for pausing and resuming capture.

36 Saving and Converting Video When you click the Stop button during recording, the control window will change to the following: You can now use the player to review your video. The Delete button discards the video and permanently deletes the temporary captured file. The Edit button opens the recording in the Video Editor. The Share button opens the Share Online module that you can use to upload the video to the web. The Convert button saves your video in the selected format. To convert and save your video: 1. In the drop-down list, select a format or device preset that best suits your needs. If you don't see the one you need, you can click More formats and choose from an extended list, or set up a custom preset. 2. To set up custom conversion settings, click the Settings button to the right of the format list. You will see a settings window, where you can set up the video's frame size, audio codec, and more.

37 3. Click the Convert button on the right, or click the Share button to upload it to the web after conversion. The program will then begin processing your files.
38 Saving Previously Captured Files When you record videos using Movavi Screen Capture, they are first stored as files with the *.mrec extension. These files are located in the directory you've specified in General Preferences, or in the default User\My Videos\Movavi Library folder. You can later open these captured files in Movavi Screen Capture and save them in the format of your choice. To open the temporary files: 1. In the menu bar, open the Capture menu and select Open Captured File 2. Select the *.mrec file you want and click Open. You can now save or convert the video just like after any other capture.
39 Saving Screenshots You can use the Screen Capture module to save snapshots of any area of your screen, including videos playing in various media players. 1. Set up the capture area to include the part of your screen you want to take a snapshot of. For more information, see the Defining the Capture Area section. 2. Open the Capture menu 3. Select Take a Snapshot. 4. You will then be prompted to specify a location and name for the new image. You can save images in BMP, GIF, JPEG, or PNG format. You can also use a hotkey to take a snapshot. Just press whichever key you have set up as the snapshot key in Hot Key preferences. If you haven't changed the hot keys, the default snapshot hot key is F8.
40 Video Editor The Video Editor module is an effective and easy-to-use video editing tool that you can use to create anything from fiveminute slideshows to elaborate home movie projects, music videos and more. Here are some of the main features: Advanced video editing in a simple interface easily rotate, crop, and join videos, add music and voiceovers! Cut and split videos without even pausing playback! Capturing video and audio record clips and voiceovers straight from a webcam or microphone, capture video from TVtuners and DV-cameras, revive old VHS videos. An expanding library of effects, transitions and titles to make your video extra spectacular A large number of export options: Movavi Video Editor saves video and audio in all popular formats, records videos to DVD, converts for playback on mobile devices, and even uploads videos to the Web! Hardware and software acceleration for a smooth and painless video editing experience Convenient Storyboard mode to help you create wonderful slideshows in under five minutes!

41 User Interface These are the main areas of the Video Editor user interface. Click on a number to see more information about each area or button. Menu bar The Menu bar contains common menus such as File and Edit, which you can use to manage files and settings. Most functions of Movavi Video Editor can also be accessed from the Menu. Playback area Use the player to preview your video. When you apply various effects, you will also be able to compare the image before and after applying the effect. Toolbar The toolbar contains a number of useful video editing tools such as undo and redo, the Split button, volume controls, etc. You can also access most of these tools from the Edit menu. To find out about each button on the toolbar, please see the Toolbar section. Timeline The Timeline is the primary working area, where you can cut video and audio files, rearrange media clips, fades, and subtitle balloons, set volume and transparency levels for each clip, and much more. For help on the various timeline controls, please see the Using the Timeline section. Tab contents Whenever you click on any of the buttons underneath this pane (buttons 6-10) a corresponding pane will open, containing various related control options. For example, if you click on the Import button, you will see various options for adding media files to your project. Import button Clicking the Import button opens the Import tab. The Import tab is also the tab you will see by default when you open Movavi Video Editor. The Import tab contains various options for adding media content to your video. You can also import files via the File menu. To find out more about importing files to the project, please see the Adding Media section of this manual.
42 Media button As you add media files to your project, they will appear on the Media tab, from which you can simply drag files onto the Timeline to add them to your video. You can find more information on the Media tab in the section titled Managing Your Media Collection. Effects button When you click the Effects button, the list of all available effects will open in the Effects tab. For more information on using effects, please see the Adding Effects section. Fades button The Fades button opens the Fades tab, where you can pick and apply fades that can help you make smooth transitions between parts of your video. For more information on how to use fades, please see the Adding Fades section. Titles button The Titles button opens the Titles tab, where you can select a type of titles you like to add captions or subtitles to your video. For more information on using titles, please see the Adding Text Titles seciton. Save Movie button When you finish your project, you can click the Save Movie button and select a convenient option for exporting your project as a video file, DVD, 3D movie, and more. These options are also available in the File menu. For more information, please see the Saving Your Movie section.

43 Quick Start Guide Even if you have never edited video before, we believe that you can create amazing movies in just a few simple steps! Just follow the instructions below and watch your idea come to life! Step 1: Import media files In the Import tab of the editor, click Add Media Files. An Explorer dialog box will open. Select the files you want to add and click Open. The Editor will switch to the Media tab, where you will be able to see your files. If you want to add a DVD or 3D videos, just click the corresponding button in the Import tab. You can always come back to this step if you want to add more files. Step 2: Place the files on the Timeline In the Media tab, click and drag an image or video's thumbnail and drag it onto the video track (marked by a video film icon ) of the Timeline panel at the bottom of the screen. To add audio files to your movie, drag audio or video files onto the sound track of your project (marked by a note icon ). They will appear as blue balloons on the audio track. If you want to only use the audio of any video file by simply adding it to the sound track.

44 You can rearrange the video, audio, and image tracks on the timeline by simply holding the left mouse button and dragging the clips around. Keep an eye on the time scale at the top of the Timeline to get an idea of your movie's length. Step 3: Cut, split, crop, and rotate videos What's the most important part in a Video Editor? Probably editing videos, and it can do just that! In just a few clicks, you can cut out unwanted fragments or crop a video. Here's how: Splitting videos: 1. On the Timeline, place the red seek marker where you want to split the video. 2. Click the Split button on the toolbar:. The video will now be split into two parts at the designated time. Cutting out fragments: 1. Place the seek marker at the beginning of the unwanted fragment and use the Split button to split the clip into two parts. 2. Now, place the seek marker at the end of the fragment and click the Split button again. 3. You now have the unwanted fragment as a separate video clip on the Timeline. To remove it, just press the Del key on your keyboard and move the remaining clips together. Cropping videos: 1. On the Timeline, select the clip you want to crop. 2. In the preview area, click the Crop button. You will now see a dotted rectangle appear in the preview area. You can also find Crop in the Effects library. 3. Drag the corners of the dotted rectangle to outline the area you want to keep inside the frame. 4. Click anywhere on the Timeline to apply the Crop effect. Rotating videos: 1. On the Timeline, select the clip you want to rotate. 2. In the preview area, click the Rotate Step 4: Add effects button to rotate the video counterclockwise.

45 Now that you've arranged your clips on the Timeline and cut out the unwanted bits, it's time to spice things up with some creative effects! To do that, click the Effects button to switch to the Effects tab where you will see our extensive filter library. Click on a thumbnail to preview an effect. To see animated effects in action, click the Play button in the player to the left. To apply an effect, simply drag an effect's thumbnail onto the video or image clip you want to apply it to. The clip will then be marked with a star icon meaning that it has one or more applied effects: Step 5: Add fades If you place the red pointer at the beginning of the timeline and click Play, you will see that the video clips simply switch from one to another with nothing in between. If you want to add some transitions between videos, click the Fades button to open the transition library. You can preview each fade by clicking on its thumbnail. Once you've picked out a fade you like, simply drag its thumbnail onto the video track between two clips or at the beginning or end of your movie.

46 You will now see a small rectangle where you've placed the fade. You can drag this rectangle to another place on the Timeline if you want to relocate the fade. To remove a fade, right-click on it and select Delete from the context menu or press the Del key on your keyboard. Step 6: Add titles If you want to add some captions, subtitles, or credits to your video, click on the Titles button to open the list of various title styles you can use. You can click on a title's thumbnail to preview it. When you pick a style you like, click the Add button at the bottom of the pane. A green balloon will be added onto the Titles track ( inside the Titles tab. ), and the Title Settings panel will open Enter your text into the box and set a font, size, and style that you like. If you really want to customize the titles, click the Brush, Animation, or Shadow tabs at the top of the Title Settings panel and feel free to change things around!

47 When you're done with the title style, all that's left is to set the time during which you want the titles to appear. Click and drag the green titles balloon to place it at the appropriate place on the Timeline. To change the titles' duration, place your mouse pointer over the left or right edge until you see the resizing pointer ( ), and then click and drag the edge of the balloon to prolong or shorten the titles' duration. Step 7: Save your movie You're almost done! Now would be a good time to preview your entire movie to make sure that everything looks great. Deselect any clips by clicking on a blank space, place the red slider at the beginning of the Timeline and click Play the preview area. If you find that some things still need work, you can always come back to any step of this guide and read on the other sections to find out more advanced editing techniques. in If you're satisfied with the video, go ahead and click the Save Movie button! You will see several different options for saving, but if you just want to save your movie to view in a player, you can select Save as Video File. This will open a window where you can select a format and preset you would like to save the video in.
48 For most cases, you can select General Video from the Output Format list, and MPEG-4 Video from the Preset list. Then, click Save and specify a name and location for you new video file. Movavi Video Editor will now begin processing the video.

49 Program Preferences To open the Movavi Video Editor settings, open the Edit menu and select Preferences. The Preferences window will open. All Movavi Video Editor preferences are divided into three tabs: General, Advanced, and Others, which you can switch between at the top of the Preferences window. I. General Preferences: Interface Language: Click the drop-down menu and select from a list of languages. Please be aware that you will need to restart the application for the change to take effect. Background Rendering: Enabling this option will allow the Editor to display a smaller copy of your video project in the preview area. This will help reduce playback lag when previewing large projects. If you have a high-performance system and do not have any problems with previewing your video files, you can disable this feature by clearing this checkbox to see higher-quality previews of your project. To further enhance your video making experience, Movavi Video Editor is powered by a number of hardware and software acceleration technologies. Acceleration: Movavi Video Editor supports the latest hardware and software acceleration methods. If your computer is equipped with an NVIDIA graphics card or an Intel processor, just check the corresponding box to enable the acceleration method. The options will be unavailable if your hardware does not support NVIDIA or Intel acceleration. For more information, please see the Hardware Acceleration section. Temporary folder: As you work on your project, Movavi Video Editor will create some backup files, background renders and other small files in order to provide stable and smooth functionality. By default, these files will be stored in your user's \Appdata\Roaming \Movavi\MovieEditor\ folder, but you can change its location if, for example, you are running low on disc space. II. Advanced Preferences:
50 If you switch to the Advanced tab, you will see the following settings: Adding multiple files: When you add many files at once to the Timeline, Video Editor can automatically place transitions between each image or video clip. If you enable the Prompt me to add transitions between files option, whenever you simultaneously add several video clips, you will see a small dialog box where you can select which transition to use between files. If you add multiple image files, you will see the Automatic Slideshow dialog box, which we cover in detail in the Automatic Slideshow Creator section. Fast Track HD: Enabling this option will allow the Editor to create a smaller copy of each large HD video that you import into your project to use during editing and previews, which can significantly boost your computer's performance, as it would not need to handle many large files at once. When you save the video, the smaller copy will be replaced with the original, retaining all changes that you have made. You can change the location for saving the temporary files if you want. To find out more, see the Fast Track HD Acceleration section. III. Other Preferences: If you switch to the Others tab, you will see the following settings:

51 Check for new versions when you start Movavi software make sure to enable this option so that you don't miss important updates to Movavi Video Editor! You are entitled to free updates within your version! Send anonymous usage stats to Movavi you can help us bring you better software by agreeing to send anonymous data to Movavi. We guarantee that we do not collect any personal information. Your data will only be used within Movavi for improvement purposes and will not be disclosed to third parties. You can find out more about our Privacy Policy and Movavi Improvement Program on our website. Player background color if want to clearly see the borders of your video (which may be harder against a black background if you are working with dark videos), you can select any other color from the drop-down box. You can always bring back the black background by selecting Default from the color drop-down.

52 Fast Track HD Acceleration While not everybody may have the latest and fastest hardware, we believe that everyone should be able to make great videos, including HD video! That is why we've included Fast Track HD technology, which can significantly improve your experience when editing large files. What this technology does is create an exact copy of the original video file, but with smaller resolution, quality, and size. This copy will be used in place of the original video file during preview and editing, since it can be processed significantly faster, so that there will be no delays during preview and editing. Once you have finished editing your video and begin exporting it, the small temporary file will be precisely replaced with your original, large file, retaining all the effects and other modifications you have added to the project. This way, you can work on a smaller file within Movavi Video Editor for faster processing, but export the edited video file in its original size. Therefore, if you are not sure that your computer's resources will allow you to work with large video files smoothly, you can switch this option on in Movavi Video Editor. To enable this option, follow these steps: 1. Open the Edit menu and select Preferences. The Preferences window will open. 2. In the Preferences window, move to the Advanced tab. There, find the Fast Track HD option. 3. Select the Enable Fast Track HD option and check the path for saving temporary files. If you are working on several projects at once, this may take some disc space, so if you do not have enough space, you can set a different folder. 4. Click OK to save the changes. Managing Fast Track HD Files: If you switch to the Media tab, you will see the files you have added to your project. As you add large HD files, you will see a progress bar beneath each video. This progress bar reflects the processing of each video. You can still edit the files even before the processing is complete, but performance will be smoother once it is finished. If you want to disable Fast Track HD for a specific file, you can right-click its thumbnail in the Media tab and select Disable Fast Track HD from the context menu. You can always turn it on later by selecting Enable Fast Track HD from the same menu. To delete a temporary file, select Delete Fast Track HD file.

53

54 Setting Up Your Video Project The video editing process is organized within a project, which contains all the information about edits, applied effects, time positions, etc. When you launch Movavi Video Editor, the program opens with a blank project which you can immediately start working on. To create a new project, open the File menu and select New Project. Saving and Opening Projects If you want to save your work on a project, open the File menu and select Save Project. Then, specify a location and file name in the Save dialog box. Please note that the file can only be opened with Movavi Video Editor: if you want to save it for viewing in a media player, you will need to convert and export your project. You can learn more about exporting videos in the Saving Your Movie section. To open a project you've previously worked on, open the File menu and then either select it from the list of recent projects at the bottom of the menu or click Open Project and browse for your project file. Moving files used in a project: When you add media files to a project, Movavi Video Editor remembers their location on the disc, but does not store the actual files in the *.mep project file in order to conserve disc space. Therefore, if you move files used in a project, you will need to relocate these files if you want to keep working on the project. When you open a project which is missing some files, you will see the following message:
 Configuring Project Settings: If you don't have specific requirements for the size and format of your video project, you can just go ahead and start working on it, and all the settings")
55 To relocate your files, click Search to open the browse dialog box. Then, simply find the files in the Explorer and click Open. Once you've done this, you can keep working on your project as usual. (Optional) Configuring Project Settings: If you don't have specific requirements for the size and format of your video project, you can just go ahead and start working on it, and all the settings will be set automatically based on the files you add. However, you can still manually set up the video project's parameters. To do that, open the File menu and select Project Settings. You will see the following dialog box: By default, Movavi Video Editor determines the project's parameter from the first clip that you add to the Timeline. For example, if the first clip you add has the aspect ratio of 16:9, then the project will also assume these dimensions. If you want to manually define the project's settings: 1. In the Project Settings dialog box, select Use this format for projects. 2. Open the drop-down list below and select from the available presets. 3. (Optional) If you cannot find a suitable preset in the list, you can set up your own parameters by choosing the Custom option at the bottom of the drop-down list. This will activate the fields in the Current Settings section, and you will be able to alter the following values: For the Video Stream: Width - the horizontal measurement of the video, in pixels, Height - the vertical measurement of the video, in pixels, Aspect ratio - the ratio between the width and the height of the image. For the Audio Stream:
56 Sample rate - measured in Hertz, the number of discrete audio samples taken by a digital audio recorder to make an audio stream; defines the audio channel's quality Channels - the quantity of audio channels: Mono for one channel, Stereo for two channels. Click OK when you're done setting up your project.

57 Adding Media The first step to creating a great video project is to pick out interesting videos and images that you'd like to share, as well as some cool background music to accompany them. Follow the instructions below depending on the kind of media you want to use in your movie project. Use the buttons in the Import tab to add media to your project. Adding Video, Audio and Image files To add video clips, images, and audio files of any format to your project, click the Add Media Files button in the Import tab. Then, locate them on your hard drive and click Open. Adding DVDs If you want to add an entire DVD to your media collection, click the Add DVD button in the Import tab to browse for DVDs. Select your DVD drive and click Open. The files will take a few seconds to process. Adding 3D Video Movavi Video Editor also supports stereo 3D video clips. To add them to your project, click the Add 3D button in the Import tab and browse your computer for 3D video files. The 3D Video Settings dialog box will open:

58 There, select which format your 3D files are in: Side-by-side 3D - the two stereo images are aligned right next to each other - one in the left half and one in the right half, separated with a vertical line. Over-under 3D - the two stereo images are aligned one on top of another - one in the upper half and the other in the bottom half, separated with a horizontal line. Still confused? Use the sample cat images in the dialog box as reference and choose the one which resembles your videos the most. Please note that if you want to add several 3D videos with different formats (for example, three over-under files and two side-by-side files), it is best that you add them separately, so that the Editor can process them correctly. After you've added your 3D files, you can view and edit them just like any other file, both in 2D and 3D mode. For saving 3D video files, please see the Saving 3D Movies section. Capturing Video and Audio In addition to importing ready-made media files, Movavi Video Editor can also help you capture video and record audio. All you need for recording is a webcam or microphone connected to your computer. For detailed instructions on recording video and audio from the Editor, please see the following sections: Capturing Video Capturing Audio

59 Want more media? Do you have a really good idea which is missing key footage? Maybe you could use some stock videos and backgrounds for that film or presentation you're making? Fear not, you can find the missing pieces at videblocks.com a subscription-based stock media service where you can find all sorts of royalty-free video files, all for one price! Click the Get More Content button to learn more and subscribe for unlimited stock media downloads! After you've added the files, you can find them on the Media tab, where you can manage your media collection.
 and opened for further editing in Movavi Video Editor")
60 Capturing Video Using the Movavi Video Editor Capture Video module you can capture live video from your DV, HD, HDV cameras as well as TV-tuners connected to your computer. The captured video will be automatically saved on your computer in your Movavi library folder (C:\\Users\YourUserName\My Videos\Movavi Library) and opened for further editing in Movavi Video Editor main window. After connecting your DV, HD, or HDV camera to the computer, the video will be displayed in the Preview area of the Capture Video module. Here you can manage video playback during capture from your DV camera using the control buttons located under the preview area. Please note that if you capture video from a webcam or a TV-tuner, the control buttons will be inactive. You can also capture video from VHS cassettes. In that case, your video recorder has to be connected to the computer through a video capture board. After your video has been captured into a video file, the file will be displayed in the Captured Video Files area. After you click the Done button, these files will be added to the main window of Movavi Video Editor where you can preview and edit them. Note: You cannot open and preview the output file in the preview area of the Capture Video module. These files can be viewed in the Preview area of Movavi Video Editor main window only. Follow these steps to capture video using the Capture Video module available in Movavi Video Editor: 1. Connect a device to your computer (for example, connect webcam using an USB cable or connect a DV camera using a FireWire cable). 2. Launch Movavi Video Editor. 3. In the Import tab, click the Capture Video button or go to File > Import Media > Capture Video from the Menu bar. This will open the Capture Video window:
61 4. If several devices are connected to your computer, select the necessary one in the Video Capture Device drop-down menu. If there is only one device connected, it will be displayed by default. 5. If several sources of video are available, select the necessary one in the Video Capture Source drop-down menu. For example, if you capture video from the TV-tuner, here you can choose the necessary TV channel. 6. If several audio devices are connected to your computer, select the one that you intend to capture audio with in the Audio Capture Device drop-down menu. If there is only one device connected, it will be displayed by default. 7. If several sources of audio are available, select the necessary one in the Audio Capture Source drop-down menu. 8. Specify the folder to save captured video in the Output Folder field. 9. Specify a file name for a captured video in the Filename field. 10. Select the Preview checkbox to view your video during capture. 11. Click Start Capture. 12. When you are ready to finish the capturing process, click Stop Capture. 13. Click the Done button to automatically add captured video files to the Movavi Video Editor main window for further editing.

62 Capturing Audio With Movavi Video Editor, you can record your voice, music or any other sounds using the Capture Audio module and then add the result to your video. 1. Connect audio recording devices to your computer. You can record audio from several sources: microphone, CD-player, telephone line and so on. 2. Launch Movavi Video Editor. 3. In the File menu, select Import Media > Record Audio, or click the Capture Audio button in the Import tab. This will open the Capture Audio module inside the Import tab: Tip: if you want to cancel recording, just click the Import button to return to the Import tab. 4. From the Recording Device drop-down list, select the device you will use for audio recording. If there is only one audio recording device on your computer (for example, a standard sound card), it will be selected automatically. 5. From the Recording Source drop-down list, select a recording source you will use: microphone, CD-player, etc. 6. Specify the volume level for the recorded audio. 7. Click Start recording. The indicator will appear next to the Start recording button. When you want to stop recording audio, click Stop Recording.
63 After you have recorded the audio clip, it will be added as a blue balloon onto the audio track of the Timeline panel. Now you can freely edit your recording.

64 Managing Your Media Collection Now that you've added some media files to your project, you can find them in the Media tab, which you can open by clicking the Media button. How to filter media types: When you add a lot of video files, it gets harder to find just one in the whole list. To make that easier for you, we've added file type filters. Use the following buttons in the upper right-hand corner of the Media tab to filter your files: - show all media files at once - show only video files, including regular videos, 3D videos, and DVD movies - show only image files - show only audio files How to change thumbnail size: You can set your preferred thumbnail size by clicking on the thumbnail button on the upper panel of the Media tab. Just click on the thumbnail size button ( and choose thumbnail size from the list. How to add more media files from the Media tab: You don't have to come back to the Import tab every time you need to add another file. Use the following buttons in the upper left-hand part of the Media tab to add more files: )
65 - add more media files, including videos, images, and audio files - add more 3D video files - add the contents of a DVD - get more content from a stock media database

66 Using the Timeline The bottom part of the Video Editor interface is occupied by the Timeline. Here, you can get a visual representation of your project, specify the order in which your clips will appear in the output video, and more. It has two modes: Timeline mode, which is the default mode for working with video projects, and Storyboard mode, which is especially useful for making slideshows. At the top of the Timeline you can find the Timeline toolbar, which gives you quick access to useful tools. You can find out about each button on the toolbar in the following section: Using the Toolbar. Timeline Mode: The Timeline of Movavi Video Editor consists of tracks for various media types: Titles track for text titles, captions, and credits, which will appear as green balloons on the Timeline. Video track for video clips and transitions. Audio track for audio clips, including voiceovers and background music. Adding and Deleting Tracks When you create a new project, it starts out with four default tracks: one titles track, one video track, and two audio tracks, but you can easily add more tracks of each kind or delete tracks if you don't need them. To add a new track, click the plus icon on the toolbar, and select which kind of track you would like to add. You can also rearrange tracks by holding down your mouse button on the grey control area to the left of a track and dragging it up or down. To delete a track, right-click on its grey control area and select Delete from the context menu. You can also use this menu to add tracks.

67 Temporarily Disabling Tracks If you want to temporarily disable a track without deleting it, you can click the eye button in the grey control area of a track to disable it. When you need to re-enable the track, click the eye icon once again. Please note that disabled tracks will remain hidden when you save your movie. Adding files to the Timeline After you've added some media files to your project, it's time to start placing them onto the Timeline. 1. Click the Media button to open the Media tab. 2. Click and drag files onto the corresponding tracks of the Timeline: Place videos and images onto the video track Place audio files and recordings onto the audio track. You can also place video files onto an audio track to extract its soundtrack. 3. Click and drag clips on the Timeline to rearrange them.

68 Storyboard mode The Timeline of Movavi Video Editor also has a Storyboard mode which you can use to create video slideshows or simple video montages. To switch to Storyboard mode, click the Storyboard button on the toolbar:. Adding empty clips: If you want to add some blank space between your video and image clips, you can add an 'empty clip' of any length from within Storyboard mode. 1. Place the time slider where you want the beginning of the empty clip to be. If you place the slider in the middle of another clip, that clip will be split into two parts. 2. Right-click on an empty space on your Storyboard and select Add Empty Clip from the context menu. 3. To change the clip's duration, click the Duration button in the toolbar ( ). A dialog box will appear, where you can set a custom duration for the clip, down to the millisecond. Click OK to accept the change. Now, if you switch to Timeline mode, you will see an empty space between clips with the exact length you've specified. Removing empty spaces: Empty clips work the same way if you create spaces in Timeline mode and want to quickly remove them. Let's say you have an empty space three seconds long, like so:

69 If you want to remove it, you can either select all the clips after the space and move them up to the clip before it, or you can quickly remove this space in Storyboard mode! 1. In Timeline mode, note the approximate time where you have an empty space. 2. Click the Storyboard button to switch to Storyboard mode. You'll see an empty clip in that place. 3. Select the empty clip in the Storyboard and press the Del button on your keyboard. 4. Click the button to switch back to Timeline mode you'll see that the empty space is gone and the clips are nicely aligned one after another. When you move clips around in Timeline mode, this method can be useful for checking that you haven't left any unwanted spaces between clips.

70 Using the Toolbar Adds video, audio or title tracks to the Timeline. Splits the clip into two parts at the selected position. Opens Movavi Split Movie for advanced splitting of the selected clip. Cancels the last operation. Repeats the last undone operation. Opens a dialog box to set the selected clip's volume. Opens a dialog box to change playback speed for the selected clip. Changes the duration for image clips. Switches the view to Storyboard mode. Switches the view to Timeline mode. more precise video editing. Allows you to "zoom in" or "zoom out" your video a greater zoom factor allows for
71 Sets the zoom to fit all the clips on the screen. Expands the Timeline to take up the entire window. Click the button which appears in its place to go back to the standard Timeline view and bring back the options pane and the preview area.

72 Volume Levels Depending on your aim, there are four ways to change the volume in Movavi Video Editor: Playback Volume: If you only want to change the volume when previewing your project in Movavi Video Editor without affecting the end result, you can use the volume control in the preview area of the Editor. Click the volume icon underneath the preview to show the volume slider and then drag the slider to set the volume. Drag the slider all the way down if you want to completely mute playback. For an entire track: If you want to set a volume level for an entire track, you can do this from the track control area on the left. Click the volume button on a track to display the volume scale and then drag the slider to set the volume. This will change the track's volume relative to the other tracks in your project. For a single clip: To specify a volume level for a single clip, select that clip on the timeline and then click the Clip Volume button on the toolbar (located to the right of the Redo button). The Clip Property - Volume dialog will appear. Drag the volume percent slider to the necessary position and click Apply. Please note that the clip volume percentage is set relative to the track's percentage: for example, if you set the track's volume to 50% and then change a clip's volume to 50%, the overall volume of the clip will be 25% of the original. Custom volume curves: If you need more flexible volume levels, you can set not only volume levels for each clip, but also set smooth volume transitions and fade-outs using curves. Follow the steps to create a volume curve: 1. On the track you want to set an opacity curve for, right-click inside the grey control area and select Select Curve > Volume from the context menu. 2. In the upper left-hand corner of each video or audio track, you should see a small green dot. Move your mouse pointer over to that dot until it turns into a resize pointer: green line will appear on the track.. Then, click and hold your mouse button, and drag the dot down. A 3. The position of the line on a track reflects the volume level: for example, if you place the line right in the middle of a track, the volume will be at 50%. With that in mind, drag the first segment of the line (the one before the dot you've just added) to the volume level which you would like at the very beginning of the track (at 00:00:00).
73 4. Right-click anywhere on the green line and select Add Point from the context menu. There will now be a small dot on the line, which you can drag in any direction. The points of the curve represent the curve's peaks. 5. Click and drag the point you've just made to a position where the effect should change. For example, if you want the sound to drop on the second minute of your video clip, move the added point down to the necessary position on the Timeline. When you move the cursor over a point or some fragment on the effect curve, Movavi Video Editor displays a tooltip with the time and level of effect for the given point so that you can easily configure the sound curve you need. 6. Repeat steps 4 and 5 to add as many points as you need. After you have set all the points on the curve, you can smoothen out the curve using the Linear Fade, Fast Fade, Slow Fade, Smooth Fade or Sharp Fade effects. To apply one of the effects, right-click a curve fragment between two points and select the necessary effect from the context menu.
74 Opacity Levels Depending on your aim, there are three ways to change a video or image clip's opacity: 1. For an entire track: If you take a look at the grey control areas to the left of a video or titles track, you will see an opacity icon:. To change a track's opacity, click on the corresponding opacity icon and then drag the slider to set the opacity level. Click anywhere on the track to hide the slider. 2. For a single clip: Right-click on the clip you want to change and select Opacity from the context menu. You will see a Clip Property - Opacity dialog with a percentage scale. Drag the slider to set the necessary level and click Apply. Please note that the clip's opacity level is dependent on the track's level: if you set a track's opacity at 50%, a clip on that track with 100% opacity will be halftransparent. 3. Custom opacity curves: Similarly to volume curves, you can create smooth opacity transitions and fade-outs using curves that reflect opacity levels. Follow the instructions to set a custom opacity curve: 1. On the track you want to set an opacity curve for, right-click inside the grey control area and choose Select Curve > Opacity from the context menu. 2. Move your mouse pointer over to the upper border of a video track until it turns into a resize pointer: hold your mouse button, and drag your mouse down. A red line will appear on the track.. Then, click and
75 3. The position of the line on a track reflects the opacity level: for example, if you place the line right in the middle of a track, the image will be 50% transparent. With that in mind, drag the line to the opacity level which you would like at the very beginning of the track (at 00:00:00). 4. Right-click anywhere on the red line and select Add Point from the context menu. There will now be a small dot on the line, which you can drag in any direction. The points of the curve represent the curve's peaks. 5. Click and drag the point you've just made to a position where the effect should change. For example, if you want a fadeout on the second minute of your video clip, move the added point down to the necessary position on the Timeline. When you move the cursor over a point or some fragment on the effect curve, Movavi Video Editor will display a tooltip with the time and level of effect for the given point so that you can easily configure the sound curve you need. 6. Repeat steps 4 and 5 to add as many points as you need. After you have set all the points on the curve, you can smoothen out the curve using the Linear Fade, Fast Fade, Slow Fade, Smooth Fade or Sharp Fade effects. To apply one of the effects, right-click a curve fragment between two points and select the necessary effect from the context menu.
76 Playback Speed To change a clip's playback speed: 1. On the Timeline, select one or multiple clips that you want to slow down or speed up and click the Speed button the toolbar. 2. A dialog box will open. Move the percentage slider to set the playback speed. 3. Click OK to accept the changes. The clip's length on the Timeline will change to reflect its new playback speed. Hint: Slowing down clips works best with videos filmed at 60 frames per second and above. on
77 Editing Video Movavi Video Editor offers an extensive set of tools for various video editing tasks, such as: Cutting video and audio, removing fragments, splitting videos into multiple parts Rotating videos and images Cropping videos and images An extensive effect library Lots of creative fades and transitions Customizable text titles A flexible Timeline or Storyboard workspace and much more!

78 Cutting and Splitting Video Cutting scenes and removing unwanted video fragments is a frequent problem both for beginners and professionals. Whether you're cutting out TV advertisements or making your own movie, Movavi Video Editor can help you with it. 1. Trimming videos There are two ways to trim a video from the beginning or the end: A. In the Timeline, hover your mouse cursor over the edge of the clip which has unwanted footage. Then, click and drag this edge towards the center of the track to hide the frames you want to remove. B. Select the clip you want to trim. Then, in the player, find the triangle markers ( progress bar, and drag one of the markers toward the center of the track. ) at the beginning and the end of the You can always edit the boundary later or completely remove the trimming by dragging the edge or the triangle marker back to its original position. 2. Splitting videos in the middle Maybe you want to split a clip down the middle to insert another scene or transition between the two parts? 1. Place the red seek marker where you want to split the clip. Use the Zoom slider in the toolbar to better see the scenes' borders. 2. If you need to specify an exact moment in the clip, click the time stamp beneath the player progress bar and type the new position for the seek marker inside the box: 3. Click the Split button in the Timeline toolbar:. The clip will be split into two parts at the designated time. 3. Cutting out parts There are two ways to cut out a video fragment:
79 A. Using the Cut Out option: 1. Select the clip on the Timeline. Place the seek marker at the beginning of the fragment you wish to cut out. 2. Open the Edit menu and select Set Left Marker. 3. Move the seek marker to the end of the fragment you wish to cut out. 4. In the Edit menu, select Set Right Marker. You should now see only the clip fragment that you need to delete. 5. Open the Edit menu and select Cut Out. The fragment is now gone and you have two separate parts of the original clip. B. Using the Split button: 1. Select the clip on the Timeline. Place the seek marker on the beginning of the fragment you wish to cut out. 2. Click the Split button on the Toolbar. The clip will be cut into two parts. 3. Select the second clip and move the seek marker to the end of the fragment you wish to cut out 4. Click the Split button again. You now have the unwanted fragment separated from the rest of the clip 6. Select that fragment and press the Del key on your keyboard. The unwanted scene will now be gone! 4. Do it all at once with the Split Movie module! If you're, say, picking out scenes from an hour-long movie, and have a lot of cutting work ahead, fear not! You can use the Split Movie module to quickly cut a video into many parts and then insert them back into the Editor. Split Movie has a similar Timeline, so you can easily start using it without having to learn a new interface. To open the Split Movie module, select a clip on the Timeline and click the Multi Split button on the toolbar: For detailed instructions, please see the following chapter: Splitting with the Split Movie Module..

80 Rotating Video If you need to change the orientation of a video or image, you can use the Rotate effect. This operation may be required if your video was recorded with the incorrect orientation or if you need to level the horizon. To rotate your video, click below the Preview area. The video will be rotated by 90. You can click the button again to rotate the video counterclockwise by another 90 degrees. You can also access the Rotate function from the Effects tab: 1. Open the Effects tab and find the Rotate effects under Transform. 2. Select one of the effects: the minus (-) sign denotes a counterclockwise rotation, while effects with the plus (+) sign will rotate your video clockwise. 3. (Optional) If you want to rotate your video to a precise angle: 3.1 Open the Effect Settings by clicking on the button. 3.2 Drag the Rotation Angle slider to define the angle of rotation. 3.3 Set the checkboxes to the required parameters: Fit to Frame - when this option is selected, the video will be shrunk to such a size that would allow the entire video to fit inside the defined frame borders without overlapping. Bilinear Interpolation - this option is useful when you rotate the video to oblique angles, as some videos may become slightly distorted as a result of rotation, most evidently at the video's edges. Enabling this option will fix the distortions using bilinear interpolation. 4. To apply the effect, drag its icon onto the clip in the Timeline, or click Apply in bottom part of the Effects tab. Note: All effects applied to the video can be accessed by right-clicking the icon at the end of a video clip in the Timeline panel. The Properties window will open, allowing you to review, reorder, or remove applied effects. Clicking on an effect in the Properties window will open the Effect Settings panel for the selected effect, where you can set the effect's parameters.
 or need to change the focus of your video composition.")
81 Cropping Video Movavi Video Editor contains a special tool which allows you to crop a video picture. Cropping can be helpful if you want to get rid of unwanted video elements (for example, black side bars) or need to change the focus of your video composition. To apply the crop effect to your video: 1. Click below the Preview Area. As a result, the cropping area will appear on the picture. 2. Now you can resize the cropping area by pulling at one of its corners, and drag the cropping area to the required position within the Preview Area: Note: All effects applied to the video can be accessed by clicking the panel. icon at the end of a video clip in the Timeline
82 This will open the Properties window, where you can reorder or remove applied effects.
83 Adding Effects Movavi Video Editor offers a wide variety of filters and visual effects included to improve the quality of your video and make it look unique and lively. Step 1: Browse Effects Click the Effects button to open the effect library and browse effects. You will see a long list of effects. You can browse the list of all effects or click through categories on the left to find more specific effects. Clicking on an effect's thumbnail will display a preview in the player. At the top of the player, you will find three buttons that toggle preview modes. The buttons Before and After show the image before and after applying the effect, while Both displays a split screen with the original image on the left, and the edited image on the right. Hint: If you're looking for a particular effect, use the search field at the bottom to find it. Step 2: Apply Effects There are two ways to apply an effect: 1. Click and drag the necessary effect onto the clip you want to apply it to. 2. In the Timeline, select a video or image clip to apply the effect to. Then, select an effect and click the Apply button at the bottom of the Effects tab. After you apply the effect, a star icon applied. Step 3: (Optional) Customize the Effect will appear at the end of the clip, denoting that one or more effects are To customize an applied effect, click the Settings button at the bottom of the Effects tab. An effect settings panel will appear. Use the controls in the effect settings panel to customize the effect. You will be able to see your changes in the preview area on the left. Click Apply when you are done fine-tuning the effect to save the changes.

84 Hint: Click the question mark icon in the effect settings panel to find out more about the selected effect. Viewing Previously Applied Effects: 1. Find the star icon at the end of the clip in the Timeline panel. 2. Right-click this icon to open the Effect Properties window, where you can view, reorder, or remove applied effects using the Up, Down, and Delete buttons. Copying and Pasting Effects: You may find this feature handy if you've applied an effect with custom settings (such as Color Balance) and you want to apply the same effect to other clips in the Timeline. 1. Find the clip with an effect you would like to copy and click the star Properties window. 2. Select the necessary effect and click Copy. icon at the end of the clip. This will open the Effect

85 3. Right-click the clip you would like to apply the effect to and select Paste Effect from the context menu. We also have tutorials on using some effects: Deinterlacing videos Creating split screen videos Using the Picture in Picture effect Replacing video backgrounds with the Chroma Key effect
: Why")
86 When shooting fast moving objects, along with blurriness, you can get a distortion called interlacing. You can easily distinguish an interlaced video from a blurry one by horizontal stripes that are present across the entire frame (clearly visible interlaced areas are marked with yellow arrows): Why does interlacing happen? When recording, many digital camcorders divide each frame into a set of even and odd horizontal rows: first the even rows are recorded, and then the odd rows. So, each frame you see consists of two connected pictures. This mixing is called interlacing. Thanks to interlacing, your camera can compress video without using digital compression methods. But if you record a fast moving object, it can appear at one place in the "even" picture, and at another in the "odd" one. As a result, you get a "striped" picture. The Deinterlace filter transforms the mixed frames into normal video frames and removes interlaced horizontal rows. Applying the Deinterlace filter is generally very simple: 1. Open your file with Movavi Video Editor: click the Import button and then select Add Media Files and select your file. 2. Drag your video from the Media tab and drop it onto the Timeline panel. 3. Click the Effects button, then select the Adjust category from the left-hand column. 4. Drag the Deinterlace-Copy Rows or Deinterlace-Interpolate filter and drop it onto the clip in the Timeline panel. Copy Even Rows - copies even lines into odd lines. This allows to noticeably improve the quality of video. Interpolate - calculates odd lines using the neighboring even lines. This option provides high processing speed and good quality after processing. As a result, interlace artifacts are removed from the video. The video should become much sharper and without distortions. Result:
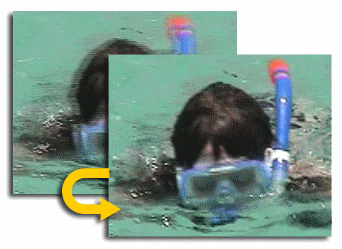
87

88 Using the Picture in Picture Effect in Movavi Video Editor: The Picture in Picture effect is widely used for sports broadcasts, videoblogs, tutorials, and even applying animated logos to videos. Similarly to the Split Screen effect, it allows you to easily enhance watching simultaneous events by including different camera angles and footage from various locations. 1. To start with, you will need to add two or more videos to the Editor. You can just drag the files onto the Editor from Windows Explorer, or use the Import tab for various importing options. 2. Create an additional video track to place your overlay video onto. To do that, click the select Video Track. button on the Toolbar and 3. Add the videos onto the video tracks in the Timeline. The main video which will be displayed on the whole screen should go on the lower video track, while the upper video track should contain the video to be shown in the small area. 4. Select the upper video clip and click the Effects button. Then, click the Picture in Picture category on the left and select the Picture in Picture effect.

89 5. In the Preview area, you will see a small rectangle with the selected video track. You can pull at its corners to change its size and drag it with the mouse to the necessary position.
90 If you can see the outlines of the rectangle but not the image itself, make sure that you are applying the effect to the upper video track! 6. Click Apply at the bottom of the Effects tab. You now have a nice picture in picture video! 7. If you're done with your video, click the Save Movie button and choose one of the export options.

91 Even if you are hearing this term for the first time, you have definitely seen it in your favorite movies and news programs. The Chroma Key effect allows film editors to create astonishing scenes in surreal landscapes without building an expensive set or actually sending actors into space! The secret? Two video clips and a good video editor is all you need to make a blockbuster of your own! The Chroma Key effect is really simple. When applied to a video clip with a solid background, it makes a specified color transparent, so that you can replace those areas with any other video or image, be it a fantasy landscape, an explosion, or a news studio. You can even make your very own invisibility cloak by replacing the foreground colors. Before you start: Find or make a video clip with a monochromatic background. It is important that the background color does not match any of the subject's colors. The colors used for the background are usually bright green, blue, or magenta, but you will be able to work with any other colors in Movavi Video Editor. Choose what video or image you will replace the background with. Making Videos with the Chroma Key Effect: 1. Add two video files to the program one with a solid backdrop and the one you'd like to replace the background with. 2. Make sure you're in Timeline mode you can switch to it using the 3. Add a second video track: click the button on the Toolbar. icon on the Toolbar and select Video Track.
 to select it. 6.2 Click the Effects button to view the list of available effects.")
92 4. Place the clip with the solid background onto the upper video track. 5. Place the background image or clip onto the lower video track. 6. Apply the Chroma Key effect to the first video to remove its background: 6.1 Click the upper video clip (the one with a solid background) to select it. 6.2 Click the Effects button to view the list of available effects. 6.3 In the left pane of the Effects tab, click the Chroma Key category to see the relevant effects. You will see three Chroma Key effects: green, blue, and pink. Click the one that best matches your background. Don't worry if it doesn't match the color 100% we'll adjust it in the next step. 6.4 Click the Settings button in the lower part of the Effects tab to open the Effect Settings panel.

93 6.5 Check the Picker checkbox and click on the clip's background in the Preview area to copy its color. Uncheck the Picker checkbox to see the background removed. 6.6 Click Apply to apply the Chroma Key effect to the video clip. You should now see the second video track instead of the background. Tip: If the background is not completely removed, or parts of the subject have distorted colors, you might want to either slightly adjust the color using the color palette, or scroll down the Effect Settings panel and drag the Hue Tolerance slider until you are satisfied with the result. You can always change these settings later: just click the icon at the end of the video clip to open the Effect Settings panel for the applied effect. 7. Once you're done editing your movie, you'll need to save it to show off to your friends and family! Click the Save Movie button and select a format that best suits your needs: you can save your movie as a 2D or 3D video file, convert for watching on a mobile device, burn it to DVD, or upload to a video hosting service.

94

95 The Split Screen effect has been in wide use in movies and TV since as far back as the 1940-s, used frequently to shoot twins using just one actor, display simultaneous actions, and add drama to sports broadcasts. It is often used in conjunction with the Picture in Picture effect. The possibilities are limitless! Take a minute to try various size and position options to bring out the best parts in your video footage: Making split screen videos with Movavi Video Editor: 1. Add two or more videos to the editor. You can find ready-made effects for splitting the screen into up to four parts, however, you can easily work with any number of video files. 2. Before placing your videos onto the Timeline, you will need to have separate video track for each video that you want to be simultaneously displayed on screen. To create a new track, click the button in the Toolbar, and select Video Track. Repeat this step for each additional video if you want to use more than two. 3. Drag the clips from the Media tab onto separate video tracks. 4. Click the Effects button to view the list of available effects. For your convenience, the effects are organized into categories: you can find the Split Screen effects in the Picture in Picture category, or simply type "Split" into the search field.

96 You can use these effects to plan out the screen's layout. Here are the possible ways you can split your screen using just the pre-made effects. In half vertically for splitting the screen into two parts aligned vertically on top of each other, choose the effects with the 2V tag. In half horizontally for splitting the screen into two parts aligned side-by-side, choose the effects with the 2H tag. In thirds vertically if you pick the effects with the 3H tag, you'll be able to split your screen into three stripes. Into four quarters this group of effects, marked with the number 4, will help you split your screen into four parts. For the purposes of this tutorial, we will be making a two-part split screen using the 2H Left and 2H Right effects, but you can use any combination of the above effects to produce the movie you want. 5. To adjust the appearance of the split screen: 5.1 Select one of the video clips and click the 2H Left effect. 5.2 A dotted rectangle labeled "Location" will appear in the Preview area. You can resize it by dragging at its corners, or drag it to the desired position within the frame. 5.3 If you want to modify which part of the video will appear in the defined area, click the button to bring out the effect settings panel and then click the button. Now you can move the Crop rectangle in the Preview area to specify which part of the video you want to show. Click the Crop button again to return to positioning your video. 5.4 Click Apply to save your changes. 6. Repeat the above step with the 2H Right effect and the second video. It should now look similar to this picture:

97 You're almost done! 7. Since all of your videos will be played simultaneously, you will also hear all of their soundtracks mixed together if you play your split screen video. You can manage your video's sound in the following ways: Mute all but one video track: click the icon to the right of the video track you want to mute and drag the volume slider down to zero; repeat this for other video tracks, if necessary. Add a separate soundtrack: mute all the video tracks as described above and import an audio track into the program; then, simply drag this audio clip onto the audio track. 8. When you're done, just click the Save Movie button and select one of the exporting options. Congratulations on creating an awesome split screen video!
, or in between scenes to join them with a smooth transition.")
98 Movavi Video Editor offers a multitude of ways of fades and transitions. In addition to applying effects to your video, you can also add various types of fades. A fade can be added either to the beginning and the end of the video to enhance it with visual effects (e.g., a fade out), or in between scenes to join them with a smooth transition. These effects can also be applied to slideshows. To see the list of fades available in Movavi Video Editor, click the Fades button: Previewing a fade: Choose a fade you like from the list of fades. Holding your mouse over a fade will demonstrate the fade effect in the thumbnail. For a larger preview, click the fade to display the effect in the Preview Area Click Play under the Preview area if you want to see the fade animation again. Applying a fade effect: 1. Select two neighboring clips on the Timeline which you want to join with a fade. 2. Select a fade you like from the list of fades in the Fades tab. 3. To add the Fade to the Timeline: Click at the bottom of the Fades tab, or Drag the Fade's icon from the Fades pane to the video track Storyboard mode. in the Timeline Panel, or between two clips in Modifying a fade effect: Once you have chosen a fade, clicking it will activate the Settings button on the bottom of the Fades tab. Click this button to open the Fade Settings panel. Here, you can change the fade's duration as well as some additional parameters. If you have made some changes and would like to reset the fade, click To Defaults.

99 You can preview the changes by clicking the Play button ( ) in the preview area. From here, you can either click Apply to add the fade, or drag its icon onto to the Timeline. Tip: Besides applying transitions to video clips and images, you can apply the CrossFade effect to audio tracks to make them smoothly blend one into another. Removing a fade: Select a fade effect in the Timeline panel and click the Delete key on your keyboard, or While in the Fades tab, select a fade on the timeline and click at the bottom of the Fades tab. Right-click a fade effect in the Timeline panel and select Cut from the context menu. If you have already placed a fade, but would like to change its location, just select it and drag it to anywhere else in the Timeline. Did you know? You don't have to delete and re-insert a fade if you just want to use another one! Just right-click a fade in the Timeline, and choose Replace from the context menu. Then, you'll see a dialog box, where you can choose a different fade, and even edit its duration.

100 Adding Text Titles Using Movavi Video Editor, you can add text titles to be displayed on your video during playback. It can be anything from a name or link to opening and closing credits for your video. To add text titles to the video clip, do the following: 1. Click the Titles button to open the Titles tab, and select a type of titles. You can filter the list to show only Animated or only Simple titles by clicking a corresponding category on the left. For animated titles, clicking the title's icon will display its animation in the Preview Area. 2. After you have selected a type of titles, an editable rectangle text field will appear in the Preview Area. Double-click inside the rectangle and enter any text you like into the editable text field. If necessary, you can resize the text area by pulling at its corners or move it to the necessary position within the frame by dragging it with your mouse. 3. To customize your titles, click the button located at the bottom of the Titles tab. 4. In the Settings panel that you have just opened, select the font, size, color and other available settings: For your convenience, the settings are organized into tabs:
101 Text - contains the text field, font settings, and an editable Duration field, Brush - allows you to change the color and outline of your titles, Animation - affects the title's animation and its speed, Shadow - here you can enable a shadow effect and set its color, offset, and opacity. As you edit the titles, you can always click the Play button to preview the changes. If you would like to revert the changes you have made under Settings, click To Defaults to restore the default settings. 5. Click Add to apply the titles or drag the Title's icon onto the titles track in the Timeline. You can also move the Titles icon to the video track to create opening or closing titles against a black background. 6. Now you can set the time during which the titles you have added will be displayed on your video: To place the titles onto the desired position within your project, simply drag the balloon with your mouse. To set the time limits for the titles you have added, just click the titles balloon and pull at its borders to define the beginning and end of its appearance in your video. Movavi Video Editor allows you to add more than one text title to be displayed in your video clip. Just drag and drop as many Titles as you need to the Titles track.

102 Creating Slideshows Movavi Video Editor allows you to create beautiful slideshows from your pictures or append images with fades to the beginning and/or to the end of your movie to make it more dramatic. Here are a few simple steps on how to do it: 1. Launch Movavi Video Editor. 2. In the Import tab, click Add Media Files and add the image files want to add to the slideshow. Or select File > Add Media > Open Media File. 3. Storyboard mode is more suitable for creating slideshows. You can find the Storyboard mode switch ( Timeline toolbar. ) on the 4. Drag and drop image files one by one from the Media tab to the Storyboard panel. 5. Go to the Fades tab and select the transitions that you like. 6. Drag and drop the Fades onto the Storyboard between pictures. 7. To change the duration of slides, do any of the following: Right-click on a slide on the Storyboard and select Duration from the context menu, or Select a slide and click the button on the Toolbar. The Duration dialog box will open, where you can enter the new duration, up to the millisecond. Click Ok to apply the changes and close the dialog box. You can also switch to Timeline mode to edit the duration of each slide and transition by dragging at the clip's borders in the video track. Note: You can select all image files in the Media tab and drag them to the Storyboard. In that case you will be offered the automatic way of creating a slideshow. The Storyboard will look like this picture: To preview your slideshow, click under the Preview Area.
103 Automatic Slideshow Creator Movavi Video Editor allows you to automatically create a slideshow in two easy steps. You just need to select the images which will be added to your slideshow, then choose a transition and its duration, and that's all! There is no need to manually drag and drop images and fades to the Timeline. This method is suitable if you need to create a beautiful slideshow quickly. 1. Launch Movavi Video Editor. 2. In the Import tab, click Add Media Files and add image files you want to add to the slideshow. Or select File > Add Media > Open Media File from the menu. 3. Right-click anywhere on the Media tab and choose Select all in the context menu or simply select all the images with your mouse. All images displayed in the Media tab should be highlighted. 4. In the Edit menu of the Menu bar, select Create Slideshow, or drag all the files that you have selected onto the Storyboard. You will be prompted with the following window: 5. In the Choose transition drop-down menu, select a transition you like: This transition will be applied between all images on the slideshow. Note: If you select the Random transition checkbox, different transitions will be added randomly between images. 6. Specify the duration of the transition in the respective field.
104 7. Specify the duration of each slide in the respective field. 8. Click OK. Now you can preview the result in the Preview area using the control buttons. Note: you can always change individual transitions later by dragging their icons from the Fades tab onto the Storyboard.
105 Saving Video Screenshots Not all video players support saving screenshots from videos, while taking a screenshot in the usual way often results in a black screen instead of the frame you wanted to save. Follow the instructions to save video screenshots using Movavi Video Editor: 1. Select a video clip in your Media collection or in the Timeline and move the seek slider to the frame you want to save. 2. Open the Edit menu and select Save Current Frame as an Image 3. Specify a location to save the image to and click Save. The image will be saved in the given folder and also placed in your Media collection.
106 Saving Your Movie Movavi Video Editor offers a variety of options for exporting and sharing your video: Saving as a video file Saving the audio as a separate file Saving 3D videos Exporting for mobile devices Burning videos to DVD Uploading videos to social networks and the Web Tip: Please note that the Save Project option only saves your work on the project in *.mep format which can only opened by Movavi Video Editor. To save your video for viewing in a player, etc, please see one of the above options.
107 Saving Video 1. In the File menu, select the Save Movie option, or click the Save Movie button. 2. Select the Save as Video File option. The following window will open: 3. In the Output Format drop-down menu, select the required file format to export your file in. You can also choose to save your project's audio in a separate file by choosing from one of the audio formats at the bottom of the list. The Preset menu will contain the list of presets corresponding to the option selected in the Output Format menu. 4. In the Preset drop-down menu select the option which best suits your needs. Note: You can modify preset settings by clicking the Settings button. It will open the following window containing such advanced settings as video codec, audio format, and many more.
108 5. Click Save. You will then be asked to select the destination path on your computer for saving the file. Clicking Save in the directory selection window will start the exporting process.

109 Saving Audio 1. In the File menu, open the Save Movie menu, or click the Save Movie button. 2. Select the Save as Audio File option. The Save Project as Audio File window will open. 3. Select a suitable format in the Output Format list and then choose one of the presets for the selected format. The presets allow you to define the audio quality or select a format from a category such as Lossless Audio. 4. If necessary, you can further adjust the selected preset by clicking the Settings button underneath the Preset list. Click OK to save the changes and close the window. 5. When you're done, click Save. You will be prompted to specify a folder to save your audio file to. Select the necessary folder and click Save to start the processing of your audio file.

110 Saving 3D Movies Note: Only 3D video files can be exported to any of the available 3D formats. 1. In the File menu, select the Export Project option, or click the Export button. 2. Select the Save Project as 3D File option. The following window will open: 3. In the 3D Settings drop-down menu, select one of the available 3D effects. Stereo 3D - presents each eye with slightly different images which create a stereoscopic effect when combined. Anaglyph 3D - encodes separate channels with contrasting colors such as red and cyan. Seen through special colorcoded glasses, the two channels are mixed in the brain to produce a single three-dimensional image. 4. In the Output Format drop-down menu, select the file format in which you want to export your file. The Preset menu will contain the list of presets corresponding to the option you chose in the Output Format menu. 5. In the Preset drop-down menu, select the format preset which best suits your needs. Note: You can modify preset settings by clicking the Settings button. 6. Click Save. You will then be asked to select the destination path on your computer for saving the file. Clicking Save in the directory selection window will start the exporting process.
111 Saving for Mobile Devices 1. In the File menu, select the Save Movie option, or click the Save Movie button. This will open a submenu with saving options. 2. Select the Save for Mobile Device option. The following window will open: 3. The Device menu lists a number of device manufacturers, series, and general device types. Select an option which you want to export your video to. Note: You can also find special Xbox 360 presets in this menu. 4. The Preset menu contains a list of particular devices and format presets. Just find your device model, and the best settings for your device will be selected automatically. 5. Click Save. You will then be asked to select the destination path on your computer for saving the file. Clicking Save in the directory selection window will start the exporting process.

112 Burning Video to DVD 1. In the File menu, select the Save Movie option, or click the Save Movie button. 2. Select the Burn to DVD option. The following window will open: 3. In the Preset drop-down menu, select the color encoding system and quality that best suit your needs. You can also modify preset settings by clicking the Settings button. It will open a window that allows you to set the bitrate, aspect ratio, disc size, and some other parameters. 5. Click Save. The Create DVD module will be started. Now you can burn your video on DVD.

113 Uploading Videos to the Web 1. In the File menu, select the Save Movie option, or click the Save Movie button. 2. Select the Upload to the Web option from the submenu that appears. It will open the following window: 3. Select the desired video service. 4. Choose a video size from the Preset drop-down menu. Additional settings are available by clicking the Settings button. 5. Click Save. You will now be asked to specify a destination folder. Your video is now ready to be uploaded!
114 Share Online The Share Video & Photos module can help you easily upload photos, videos, and music to your favorite websites. You can queue files for uploading right from Movavi Screen Capture Studio or Movavi Video Editor or launch the program separately to upload previously created content. For example, you can choose Upload to the Web when you export a video from the Movavi Video Editor, and your video file will be opened in Share Online for uploading as soon as it's ready. If you want to find out more about uploading media files to the web, see the following sections: Uploading videos from the Movavi Video Editor Uploading videos from Movavi Screen Capture

115 Adding Media Files Before you begin uploading your videos and files online, you will need to add the files to the queue. If you used the Upload to the Web option in Movavi Screen Capture Studio or Movavi Video Editor to open Share Online, the files will already be added to the program, however you can always add additional files using one of the following ways: 1. Select the necessary files in a Windows Explorer window and drag them onto the Share Online window. 2. In the top part of the Share Online window, click Add File and browse for files you want to upload. 3. If you want to add all files within a folder, click Add Folder at the top of the window and select one or more folders in the Browse dialog box. Managing files on the list: To remove a file from the list, click the button to the right of it. If you want to temporarily exclude files from the upload queue, uncheck the box to the left of the file. The file will remain in the list, but will not be uploaded when you click the Upload button. To remove all files from the list, click Clear List at the top of the window.

116 Uploading Videos to YouTube Follow the instructions below to upload videos to YouTube. You will need access to a YouTube or Google account to upload the videos. 1. Add media files to the list. 2,. In the bottom part of the Share Online window, click the YouTube icon. You can also choose to upload to other services simultaneously by clicking their icons. 3. If you have not yet logged in, the program will ask for your login data*. Enter your YouTube username and password into the respective fields and click OK. 4. In the file list, click on a file to select it. The right part of the window will display a number of fields. Here, you can fill in some information about your video: Add an eye-catching name and description that will be displayed on the video's page on YouTube. Add a few tags describing the videos and select a relevant video category: this will help other users find your video. Define privacy settings: public will mean that any YouTube user can find your video, while private videos can only be seen by your friends and people that you send a link to. Check the length information. As per YouTube limitations, only verified accounts are allowed to upload videos longer than 15 minutes. For details on verifying your account and increasing your upload limit, please see Google's official support page. 5. Repeat step 4 for all files in the list. 6. When you're ready, click Upload to start uploading your files to the selected services. *Your data will only be used for authentication with the selected services and never transferred to third parties.
117 Uploading Videos to Facebook You will need access to a Facebook account to upload videos and other content via the Share Online module. 1. Add media files to the list. 2. In the bottom part of the window, click the Facebook icon. You can also select other services if you want to simultaneously upload files to them. 3. If you have not yet authenticated with Facebook, you will see a login window appear. Enter your and password and click Log In. If you don't want to sign in every time, check Keep me logged in to Movavi Share Online. 4. In the file list, click a file to select it. You will see some fields appear in the right pane. You can use these fields to add a name and description, as well as assign a number of tags to make your video easier to find. Please check the length of each video, as Facebook does not allow videos longer than 20 minutes. You can still split long videos into multiple files using the Share Online or Movavi Video Editor module and upload them together. Repeat this for all your files. 5. When you are ready, click Upload to begin uploading your files. Soon, they will appear on your Facebook page.

118 Uploading Videos to Vimeo Follow the instructions to upload videos to Vimeo. You will need access to a Vimeo Basic, Plus or PRO account. Please note that there may be upload limitations based on the type of account. For more information on account types and permissions, please see Vimeo's official help page. 1. Add files to the list. 2. On the bottom panel, click the Vimeo icon to select it as the uploading service. You can select more than one service. 3. If you haven't yet logged in to Vimeo, you will see an authentication window. Click Authenticate in the authorization window. A Vimeo authorization page will open in your browser. Log into your Vimeo account. After that, you will see a permission dialog box. Click Allow to enable Share Online to upload videos for you. Once you click Allow, you will be given a code. Copy this code and go back to the Share Online window, and then enter the code into the field of the authorization box. Click OK.

119 4. Click a video in the file list to select it. You will information about the video in the right-hand pane, with fields where you can fill out some information about your video: Title and description: by default, the title will be taken from the video's file name, but you can type a different one into the Title field. The description field is optional. Tags: enter a few words, separated by commas, that best categorize your video. These will help other users find the video. Privacy: this setting defines who will be able to see the video once it is uploaded: only you, only you and your contacts, or anybody on the Internet. Repeat this step for all of your videos. 5. Click Upload to begin uploading your videos to Vimeo.

120 Uploading Videos to Amazon S3 You can use the Share Online module to upload files to your Amazon S3 storage. 1. Add files to the program or use an export option in Movavi Screen Capture Studio or Movavi Video Editor. 2. In the Upload to panel at the bottom of the window, click the S3 icon to select Amazon S3 as the upload server. You can select more than one upload destination. 3. If you have not yet provided your Amazon S3 credentials, you will be asked for them now. Enter the necessary information and click OK. 4. In the file list, click a file to select it. You will see some fields appear in the right side of the window. You can use the fields to provide some information about the uploaded files. You will need to do this for each file separately. 5. To begin sending the files to the server, click Upload.
121 Uploading videos to FTP The Share Online module also supports FTP file uploads. 1. Add files to the program or use an export option in Movavi Screen Capture Studio or Movavi Video Editor. 2. In the bottom panel, click the FTP icon to select FTP as the upload service. You can also choose other services along with FTP to upload files to them as well. 3. If you haven't yet entered your FTP server information in account preferences, you will be asked for it now. 4. (Optional) Select a file in the file list. You will see its information appear on the right. Here, you can fill in more information about it and specify a folder where you would like to upload the file. Repeat this for all other files. 5. Click Upload, and your files will be sent to the FTP server.

122 Accounts To upload media files to a web site or a hosting service, you will need to provide your login credentials, such as a login and password, to allow Share Online to upload the files on your behalf. Your account data is stored by Share Online so that you will not have to re-enter it the next time you upload files to that service. The data is only used for authorization with the services you choose and is not sent to any other parties. To view information about saved accounts: 1. In the upper right-hand corner of the Share Online window, click Preferences. 2. A Preferences window will open. Click the Accounts tab at the top. Here, you can manage saved accounts, log in to services, and erase account data. You can check the username listed under a service to see which account you are logged in as. 3. To clear saved account data, click the Disconnect button next to the service. Next time you select this service, you will be asked to authorize again. You can also use the Disconnect button if you want to log in to a different account.
123 Contacting Support If you have any questions or concerns regarding Movavi software, you are welcome to contact our support team. Please describe your problem in as much detail as possible; any screenshots or log files will allow us to help you faster. The guaranteed response time for s is 3 business days. You can also try our live chat to get a quicker answer. Our [email protected] Phone number: Phone support is available Monday through Friday, 9 A.M. 12 P.M.; UTC +7 Have you checked the FAQ section? It is possible that your question has already been answered!
Movavi Screen Capture 4. User guide 2014
 Movavi Screen Capture 4 User guide 2014 Table of Contents Overview...3 Supported Formats...4 System Requirements...5 Hardware Acceleration...6 Copyright and License...7 Activating Software...10 Trial Limitations...11
Copyright 2006 TechSmith Corporation. All Rights Reserved.
 TechSmith Corporation provides this manual as is, makes no representations or warranties with respect to its contents or use, and specifically disclaims any expressed or implied warranties or merchantability
Movie Maker 2 Beginning
 Movie Maker 2 Beginning Quick Overview...3 Preparing a Folder...3 Collecting Resources...3 Pictures...4 Screen Resolution...4 Starting Windows Movie Maker...4 Which Version?...4 Windows Movie Maker 2 Window...4
Welcome to Corel VideoStudio Pro X5
 Contents Welcome to Corel VideoStudio Pro X5............................ 2 New Features and Enhancements................................ 4 Getting to Know the Workspace.................................
Icecream Screen Recorder. User Manual
 Icecream Screen Recorder User Manual 2016 1. Overview System Requirements OS Icecream Screen Recorder is compatible with the following versions of Windows: Windows Vista, Windows 7, Windows 8 and Windows
The main imovie window is divided into six major parts.
 The main imovie window is divided into six major parts. 1. Project Drag clips to the project area to create a timeline 2. Preview Window Displays a preview of your video 3. Toolbar Contains a variety of
Central Management Software CV3-M1024
 Table of Contents Chapter 1. User Interface Overview...5 Chapter 2. Installation...6 2.1 Beginning Installation...6 2.2 Starting the CMS software...10 2.3 Starting it from the Start menu...10 2.4 Starting
Camtasia Studio. Creating Screen Videos
 Camtasia Studio Creating Screen Videos WORKSHOP DESCRIPTION... 1 Overview 1 Prerequisites 1 Objectives 1 INTRODUCTION... 1 WHY USE CAMTASIA STUDIO?... 2 WHERE CAN I GET CAMTASIA STUDIO?... 2 HOW TO USE
IT Quick Reference Guides Using Windows 7
 IT Quick Reference Guides Using Windows 7 Windows Guides This sheet covers many of the basic commands for using the Windows 7 operating system. WELCOME TO WINDOWS 7 After you log into your machine, the
USING WINDOWS MOVIE MAKER TO CREATE THE MOMENT BEHIND THE PHOTO STORY PART 1
 PART 1 Windows Movie Maker lets you assemble a range of video, pictures, and sound elements to create a story. It is an application that comes with most PC computers. This tip sheet was created using Windows
Working with Windows Movie Maker
 518 442-3608 Working with Windows Movie Maker Windows Movie Maker allows you to make movies and slide shows that can be saved to your computer, put on a CD, uploaded to a Web service (such as YouTube)
Sharing Files and Whiteboards
 Your user role in a meeting determines your level of file sharing. The type of files you can share include documents, presentations, and videos. About Sharing Files, page 1 Changing Views in a File or
A Beginner s Guide to PowerPoint 2010
 A Beginner s Guide to PowerPoint 2010 I. The Opening Screen You will see the default opening screen is actually composed of three parts: 1. The Slides/Outline tabs on the left which displays thumbnails
Comparisons and Contrasts Between imovie 2 and Movie Maker 2
 Comparisons and Contrasts Between imovie 2 and Movie Maker 2 imovie 2 and Movie Maker 2 are both very simple digital video editing programs. Essentially, Movie Maker was created by Microsoft to mimic the
Sharing a Screen, Documents or Whiteboard in Cisco Unified MeetingPlace
 Sharing a Screen, Documents or Whiteboard in Cisco Unified MeetingPlace Release: 7.0 Revision Date: December 9, 2009 1:29 pm This section describes how to use the features in the Cisco Unified MeetingPlace
Embroidery Fonts Plus ( EFP ) Tutorial Guide Version 1.0505
 Tutorial Guide Version 1.0505") Embroidery Fonts Plus ( EFP ) Tutorial Guide Version 1.0505 1 Contents Chapter 1 System Requirements.................. 3 Chapter 2 Quick Start Installation.................. 4 System Requirements................
Embroidery Fonts Plus ( EFP ) Tutorial Guide Version 1.0505 1 Contents Chapter 1 System Requirements.................. 3 Chapter 2 Quick Start Installation.................. 4 System Requirements................
Sharing Presentations, Documents, and Whiteboards
 Chapter 19 19 Sharing Presentations, Documents, and Whiteboards Your user role in an event determines your level of sharing. Whichever role you take, the following table describes the basic tasks associated
SMART BOARD USER GUIDE FOR PC TABLE OF CONTENTS I. BEFORE YOU USE THE SMART BOARD. What is it?
 SMART BOARD USER GUIDE FOR PC What is it? SMART Board is an interactive whiteboard available in an increasing number of classrooms at the University of Tennessee. While your laptop image is projected on
OPERATION MANUAL. MV-410RGB Layout Editor. Version 2.1- higher
 OPERATION MANUAL MV-410RGB Layout Editor Version 2.1- higher Table of Contents 1. Setup... 1 1-1. Overview... 1 1-2. System Requirements... 1 1-3. Operation Flow... 1 1-4. Installing MV-410RGB Layout
Copyright 2002-2003 Kinoma Inc. All rights reserved.
 Kinoma Producer 2 Version 2.0 Copyright 2002-2003 Kinoma Inc. All rights reserved. Before using this software, please read the End User License Agreement that is supplied together with this software. http://www.kinoma.com
Digital Video Capture and Edit with imovie HD 6.0.2
 RESEARCH AND INSTRUCTIONAL SUPPORT REVISED: AUGUST 2006 Project Management Digital Video Capture and Edit with imovie HD 6.0.2 Plan out your time and process before beginning the capture and edit. A few
Camtasia Recording Settings
 Camtasia Recording Settings To Capture Video Step 1: Resolution and Recording Area In the select area section, you can choose either to record the full screen or a custom screen size. Select the dropdown
itunes Basics Website: http://etc.usf.edu/te/
 Website: http://etc.usf.edu/te/ itunes is the digital media management program included in ilife. With itunes you can easily import songs from your favorite CDs or purchase them from the itunes Store.
Microsoft PowerPoint 2010
 Microsoft PowerPoint 2010 Starting PowerPoint... 2 PowerPoint Window Properties... 2 The Ribbon... 3 Default Tabs... 3 Contextual Tabs... 3 Minimizing and Restoring the Ribbon... 4 The Backstage View...
ECHO360 PERSONAL CAPTURE
 ECHO360 PERSONAL CAPTURE Echo360 - Personal Capture allows a User an easy way to capture, edit, publish, and view lectures from their personal computers. Users and/or Instructors can use Echo360 to capture
ACS CLIENT SOFTWARE USER MANUAL
 ACS CLIENT SOFTWARE USER MANUAL 1 ACS USER GUIDE 1.1 System Requirement Recommended System Requirement OS CPU VGA RAM HDD WindowXP, Vista Pentium 4, 2Ghz 1024*768, 64MB 24bit color graphic card 1GB 20MB
GETTING STARTED TABLE OF CONTENTS
 imovie 11 Tutorial GETTING STARTED imovie 11 is consumer-level digital video editing software for Macintosh. You can use imovie 11 to edit the footage you film with digital video cameras and HD video cameras.
PowerPoint 2007 Basics Website: http://etc.usf.edu/te/
 Website: http://etc.usf.edu/te/ PowerPoint is the presentation program included in the Microsoft Office suite. With PowerPoint, you can create engaging presentations that can be presented in person, online,
WebEx Meeting Center User's Guide
 WebEx Meeting Center User's Guide Table of Contents Accessing WebEx... 3 Choosing the scheduler that works for you... 6 About the Quick Scheduler Page... 6 About the Advanced Scheduler... 8 Editing a scheduled
Introduction to dobe Acrobat XI Pro
 Introduction to dobe Acrobat XI Pro Introduction to Adobe Acrobat XI Pro is licensed under the Creative Commons Attribution-NonCommercial-NoDerivatives 4.0 International License. To view a copy of this
4.3. Windows. Tutorial
 4.3 Windows Tutorial May 2013 3 Introduction The best way to get started using Wirecast is to quickly work through all its main features. This tour presents a series of three tutorials, each designed
BB FlashBack v. User Manual and How-To Guide
 BB FlashBack v User Manual and How-To Guide I. Quick Start Guide... 1 Recording a movie... 2 How to make your first recording... 2 Editing your movie... 6 The toolbar... 6 Editing frames... 9 How to delete
Windows Live Movie Maker Tutorial
 Introduction Welcome to the Windows Live Movie Maker (WLMM) Tutorial. This tutorial will help you create, edit, and finalize your WLMM video project. Table of Contents Creating and Saving a Project.. Importing
Verizon Cloud Desktop Application Help Guide Version 4.1 72
 Verizon Cloud Desktop Application Help Guide Version 4.1 72 CONTENTS I. Getting started... 4 A. Verizon Cloud... 4 B. Main navigation... 5 C. System requirements... 5 D. Installing the application... 6
Snagit 10. Getting Started Guide. March 2010. 2010 TechSmith Corporation. All rights reserved.
 Snagit 10 Getting Started Guide March 2010 2010 TechSmith Corporation. All rights reserved. Introduction If you have just a few minutes or want to know just the basics, this is the place to start. This
Creating a Digital Movie with Pinnacle Studio (v. 10) Overview... 2. Using Pinnacle Studio... 3
 Overview... 2. Using Pinnacle Studio... 3") Creating a Digital Movie with Pinnacle Studio (v. 10) Overview... 2 Understanding Movie Formats...2 Permissions and Copyright...2 Using Pinnacle Studio... 3 Step One: Capturing Video from a Digital Camera...3
Creating a Digital Movie with Pinnacle Studio (v. 10) Overview... 2 Understanding Movie Formats...2 Permissions and Copyright...2 Using Pinnacle Studio... 3 Step One: Capturing Video from a Digital Camera...3
PowerPoint 2007: Basics Learning Guide
 PowerPoint 2007: Basics Learning Guide What s a PowerPoint Slide? PowerPoint presentations are composed of slides, just like conventional presentations. Like a 35mm film-based slide, each PowerPoint slide
Windows Movie Maker 2012
 Windows Movie Maker 2012 Open Windows Movie Maker A shortcut for Movie Maker should be on the desktop, but if it is not, you can search for the program by touching the right edge of the screen and swiping
Microsoft Picture Manager. Picture Manager
 Picture Manager Picture Manager allows you to easily edit and organize the pictures on your computer. Picture Manager is an application that was included with Microsoft Office suite for Windows 2003 and
BASIC VIDEO EDITING: IMOVIE
 IMOVIE imovie comes with Apple Mac computers and lets you assemble audio, video and photos to create your own movies. This tip sheet was compiled using imovie 11 so you may notice some differences if using
Windows Live Movie Maker
 Windows Live Movie Maker What is Windows Live Movie Maker? Windows Live Movie Maker is available on all computers that have Windows 7. Teachers and students use Windows Live Movie Maker to turn videos
Transferring Video Clips to Digital Video Using Pinnacle 15
 Transferring Video Clips to Digital Video Using Pinnacle 15 Understanding Movie Formats Before you can begin the process of converting VHS to digital video, you must decide what movie format you need,
Snagit 12. Snagit 12 Help. Version 12.4.1. August 2015 2015 TechSmith Corporation
 12 Version 12.4.1 August 2015 2015 TechSmith Corporation All rights reserved This manual, as well as the software described in it, is furnished under license and may be used or copied only in accordance
Windows Movie Maker Making a Narrated Slide Show
 Windows Movie Maker Making a Narrated Slide Show Step-by-Step Instructions 1. Plan your slide show by gathering the desired digital photographs, organizing them into the proper sequence for presentation,
SMART Board Menu. Full Reference Guide
 SMART Board Full Reference Guide Start-Up After entering Windows, click on the desktop icon SMART Board Tools. The SMART Board icon will appear in the system tray on the bottom right of the screen. Turn
BIGPOND ONLINE STORAGE USER GUIDE Issue 1.1.0-18 August 2005
 BIGPOND ONLINE STORAGE USER GUIDE Issue 1.1.0-18 August 2005 PLEASE NOTE: The contents of this publication, and any associated documentation provided to you, must not be disclosed to any third party without
Blackboard Collaborate Classroom in Desire2Learn. Presenters
 Blackboard Collaborate Classroom in Desire2Learn Presenters Copyright 2014 Information Technology Services Kennesaw State University This document may be downloaded, printed, or copied, for educational
SMART Board Training Outline Trainer: Basel Badran
 Sharjah Higher Colleges of Technology SMART Board Training Outline Trainer: Basel Badran What is a SMART Board? o Concept & Technology SMART Board Components: o Smart Tools Start Center Recorder Keyboard
Tutorial. Introduction to Windows Movie Maker 2.1. A Hands-on Workshop. from the Academic Technology Center. Distributed Learning Services, CIT
 Tutorial Introduction to Windows Movie Maker 2.1 A Hands-on Workshop from the Academic Technology Center Distributed Learning Services, CIT Adapted with permission by Waynesburg College AAM Copyright 2005
After Effects CS4. Getting Started. Getting Started. Essential Training Introduction
 After Effects CS4 Essential Training Introduction Getting Started Getting Started In this section we will go over, how to import and organize footage, create new compositions, how to handle all the adjustment
SMART Board User Guide for PC
 SMART Board User Guide for PC What is it? The SMART Board is an interactive whiteboard available in an increasing number of classrooms at the University of Tennessee. While your laptop image is projected
Any Video Converter User Manual 1. Any Video Converter. User Manual
 Any Video Converter User Manual 1 Any Video Converter User Manual Any Video Converter User Manual 2 1. Welcome to Any Video Converter...3 1.1 Main Window of Any Video Converter...3 1.2 Setting Program
Florence School District #1
 Florence School District #1 Module 2: SMART Board Basics and Beyond 1 SMART Board Software and Beyond In SMART Notebook software, you can create or open SMART Notebook software (.notebook) files. After
Reviewer s Guide. Morpheus Photo Animation Suite. Screenshots. Tutorial. Included in the Reviewer s Guide:
 Morpheus Photo Animation Suite Reviewer s Guide The all-in-one animation suite includes Morpheus Photo Morpher, Morpheus Photo Warper, Morpheus Photo Mixer, as well as all 15 sample morphs, warps, and
Getting Started Guide
 Getting Started Guide 2012 TechSmith Corporation. All rights reserved. 1 About this Guide Whether you re using Snagit on Windows or Mac, this guide will help you get started! Content that only applies
USER GUIDE Version 2.0
 USER GUIDE Version 2.0 TABLE of CONTENTS Introduction... 3 Hardware Overview... 3 Software Overview... 4 DAYSHIFT Panel... 5 Settings Panel... 6 Setup Tab... 6 Configure... 6 Show User Guide... 6 Preview
Dazzle. Digital Video Creator 100 User s Guide
 Dazzle Digital Video Creator 100 User s Guide Copyright SCM Microsystems. All rights reserved. Trademarks are used for informational purposes, and remain the property of their owners. Part number 401737
USER MANUAL SlimComputer
 USER MANUAL SlimComputer 1 Contents Contents...2 What is SlimComputer?...2 Introduction...3 The Rating System...3 Buttons on the Main Interface...5 Running the Main Scan...8 Restore...11 Optimizer...14
Sweet Home 3D user's guide
 1 de 14 08/01/2013 13:08 Features Download Online Gallery Blog Documentation FAQ User's guide Video tutorial Developer's guides History Reviews Support 3D models Textures Translations Forum Report a bug
User Guide. VT1708A VIA HD Audio Adeck For Windows 2000, Windows XP & Server 2003. Jun 13 2007 Revision 1.1e
 VT1708A VIA HD Audio Adeck For Windows 2000, Windows XP & Server 2003 Jun 13 2007 Revision 1.1e VT1708A VIA HD Audio Adeck For Windows 2000, Windows XP & Server 2003 Revision History Rev Date Initial Note
TVI End User Guide. Version: Summer 2009 Release
 TVI End User Guide Version: Summer 2009 Release Table of Contents Control Center for Windows...2 TVI Control Center for Windows XP/Vista...2 Features...2 System Requirements...3 Installing Control Center...3
Information Technology Lab School of Information University of Texas Summer 2005
 Introduction to Windows Movie Maker 2 1 Information Technology Lab School of Information University of Texas Summer 2005 1. Introduction This paper tutorial is designed as a basic introduction to Microsoft
Introduction to Final Cut Pro 7 - Editing Basics
 Workshop Objectives Become familiar with the Final Cut Pro workspace, basic editing, capturing footage, using tools, exporting to tape, or QuickTime. Learn effective workflow and file management strategies.
Done. Click Done to close the Capture Preview window.
 The Capture Preview window allows you to preview, edit, and customize a screen capture before it is saved to a file, inserted into your document, attached to an e-mail, or sent to a variety of other Output
Welcome to Bridgit @ CSU The Software Used To Data Conference.
 Welcome to Bridgit @ CSU The Software Used To Data Conference. Overview SMART Bridgit software is a client/server application that lets you share programs and information with anyone, anywhere in the world.
Multi-Site 4200. Remote Viewing Software. User Guide
 Multi-Site 4200 Remote Viewing Software User Guide Document 800-12064V1 Rev A 09/2012 User Guide Revisions Issue Date Revisions A 07/2012 New document. V1 Rev A 09/2012 Updated the description of the
VMware Horizon FLEX User Guide
 Horizon FLEX 1.5 This document supports the version of each product listed and supports all subsequent versions until the document is replaced by a new edition. To check for more recent editions of this
Contents. Hardware Configuration... 27 Uninstalling Shortcuts Black...29
 Contents Getting Started...1 Check your Computer meets the Minimum Requirements... 1 Ensure your Computer is Running in Normal Sized Fonts... 7 Ensure your Regional Settings are Correct... 9 Reboot your
OFFICE KEYBOARD (MT1210 & MT1405) OFFICE FEATURES
 OFFICE FEATURES") OFFICE KEYBOARD (MT1210 & MT1405) OFFICE FEATURES Thank you for purchasing OFFICE KEYBOARD. This User s manual contains all information that helps you to operate your keyboard. Please keep the software
OFFICE KEYBOARD (MT1210 & MT1405) OFFICE FEATURES Thank you for purchasing OFFICE KEYBOARD. This User s manual contains all information that helps you to operate your keyboard. Please keep the software
Introduction to Adobe Connect Video Conferencing System
 Introduction to Adobe Connect Video Conferencing System Adobe Connect is the Australian National University's web conferencing solution for staff and students. It has been integrated with the University's
Epson Brightlink Interactive Board and Pen Training. Step One: Install the Brightlink Easy Interactive Driver
 California State University, Fullerton Campus Information Technology Division Documentation and Training Services Handout Epson Brightlink Interactive Board and Pen Training Downloading Brightlink Drivers
Microsoft Word 2010. Quick Reference Guide. Union Institute & University
 Microsoft Word 2010 Quick Reference Guide Union Institute & University Contents Using Word Help (F1)... 4 Window Contents:... 4 File tab... 4 Quick Access Toolbar... 5 Backstage View... 5 The Ribbon...
Figure 3.5: Exporting SWF Files
 Li kewhatyou see? Buyt hebookat t hefocalbookst or e Fl ash + Af t eref f ect s Chr i sjackson ISBN 9780240810317 Flash Video (FLV) contains only rasterized images, not vector art. FLV files can be output
Getting Started with Vision 6
 Getting Started with Vision 6 Version 6.9 Notice Copyright 1981-2009 Netop Business Solutions A/S. All Rights Reserved. Portions used under license from third parties. Please send any comments to: Netop
SMS (Server Management Software) Digital Video Recorder. User s Manual
 Digital Video Recorder. User s Manual") SMS (Server Management Software) Digital Video Recorder User s Manual 1 SMS User s Guide Table of Contents Chapter 1 Overview.....03 1.1 In This Manual..03 1.2 Overview 03 1.3 SMS Features...03 1.4 Product
SMS (Server Management Software) Digital Video Recorder User s Manual 1 SMS User s Guide Table of Contents Chapter 1 Overview.....03 1.1 In This Manual..03 1.2 Overview 03 1.3 SMS Features...03 1.4 Product
NVMS - 1000 USER MANUAL. Version 2.1.0
 NVMS - 1000 USER MANUAL Version 2.1.0 Contents 1 Software Introduction... 1 1.1 Summary... 1 1.2 Operation Environment... 1 1.3 Install and Uninstall... 2 1.3.1 Install the Software... 2 1.3.2 Uninstall
Using WINK to create custom animated tutorials
 Using WINK to create custom animated tutorials A great way for students and teachers alike to learn how to use new software is to see it demonstrated and to reinforce the lesson by reviewing the demonstration.
Using MindManager 14
 Using MindManager 14 Susi Peacock, Graeme Ferris, Susie Beasley, Matt Sanders and Lindesay Irvine Version 4 September 2014 2011 Queen Margaret University 1. Navigating MindManager 14... 3 Tool Bars and
MS Word 2007 practical notes
 MS Word 2007 practical notes Contents Opening Microsoft Word 2007 in the practical room... 4 Screen Layout... 4 The Microsoft Office Button... 4 The Ribbon... 5 Quick Access Toolbar... 5 Moving in the
Hauppauge Capture. Copyright 2013 Hauppauge Computer Works
 Hauppauge Capture 1 1. Introduction Hauppauge Capture Application Hauppauge Capture Application combines Capture, Editing and Streaming all into one easy to use interface. This document will cover the
WHAT S NEW IN WORD 2010 & HOW TO CUSTOMIZE IT
 WHAT S NEW IN WORD 2010 & HOW TO CUSTOMIZE IT The Ribbon... 2 Default Tabs... 2 Contextual Tabs... 2 Minimizing and Restoring the Ribbon... 3 Customizing the Ribbon... 3 A New Graphic Interface... 5 Live
By Global Delight. Voila Screen Capture For Mac 1
 Voila Screen Capture For Mac By Global Delight Voila Screen Capture For Mac 1 Table Of Contents I. General Information...3 1. Product Overview...3 2. Target Market...3 3. Pricing & Availability...4 4.
Getting Started Guide
 Getting Started Guide Contents Welcome to Corel VideoStudio Pro X6............................ 2 New Features and Enhancements................................ 4 Understanding the Workspace..................................
Sanako Study 1200 USER GUIDE
 Sanako Study 1200 USER GUIDE Copyright 2015 Sanako Corporation. All rights reserved. Microsoft is a registered trademark. Microsoft Windows Vista, Windows 7 and Windows 8 are trademarks of Microsoft Corporation.
CORSAIR GAMING KEYBOARD SOFTWARE USER MANUAL
 CORSAIR GAMING KEYBOARD SOFTWARE USER MANUAL TABLE OF CONTENTS CORSAIR UTILITY ENGINE OVERVIEW PROFILES 1 9 Introduction 2 Starting the Corsair Utility Engine 2 Profiles: Settings for a Specific Program
Avigilon Control Center Web Client User Guide
 Avigilon Control Center Web Client User Guide Version: 4.12 Enterprise OLH-WEBCLIENT-E-E-Rev2 Copyright 2013 Avigilon. All rights reserved. The information presented is subject to change without notice.
Windows XP Pro: Basics 1
 NORTHWEST MISSOURI STATE UNIVERSITY ONLINE USER S GUIDE 2004 Windows XP Pro: Basics 1 Getting on the Northwest Network Getting on the Northwest network is easy with a university-provided PC, which has
GUIDE. Give PowerPoint a Voice: Developing. Narrated Presentations on a Windows PC. Donna Carnduff. [email protected].
 GUIDE Give PowerPoint a Voice: Developing Narrated Presentations on a Windows PC Donna Carnduff [email protected] Revised 6/10/2015 To register for workshops, visit http://oit.utk.edu/training Configure
Chapter 9 Slide Shows
 Impress Guide Chapter 9 Slide Shows Transitions, animations, and more Copyright This document is Copyright 2007 2013 by its contributors as listed below. You may distribute it and/or modify it under the
Select the name of the application and click on Force Quit.
 Mac and Windows Differences 1. Mouse buttons. The Mac mouse has a single button whereas a Windows mouse has two buttons. To display a contextual menu in a Mac environment, control+click on an object, unless
Microsoft PowerPoint 2011
 Microsoft PowerPoint 2011 Starting PowerPoint... 2 Creating Slides in Your Presentation... 3 Beginning with the Title Slide... 3 Inserting a New Slide... 3 Adding an Image to a Slide... 4 Downloading Images
Handout: Word 2010 Tips and Shortcuts
 Word 2010: Tips and Shortcuts Table of Contents EXPORT A CUSTOMIZED QUICK ACCESS TOOLBAR... 2 IMPORT A CUSTOMIZED QUICK ACCESS TOOLBAR... 2 USE THE FORMAT PAINTER... 3 REPEAT THE LAST ACTION... 3 SHOW
Easy VHS to DVD 3 & Easy VHS to DVD 3 Plus. Getting Started Guide
 Easy VHS to DVD 3 & Easy VHS to DVD 3 Plus Getting Started Guide ii Roxio Easy VHS to DVD Getting Started Guide www.roxio.com Get Started with Roxio Easy VHS to DVD 3 In this guide Welcome to Roxio Easy
Short Film Editing in Windows Movie Maker
 STC 1 Short Film Editing in Windows Movie Maker STC 2 Background Windows Movie Maker is a simple and easy-to-learn software for editing videos. Using Movie Maker, you can add video clips, pictures, and
ENLTV-FM3. PCI TV Tuner Adapter with FM Radio. User s Guide
 ENLTV-FM3 PCI TV Tuner Adapter with FM Radio User s Guide User s Notice No part of this manual, including the products and software described in it, may be reproduced, transmitted, transcribed, stored
Using Avaya Flare Experience for Windows
 Using Avaya Flare Experience for Windows Release 9.0 Issue 02.01 September 2013 Contents Chapter 1: About Flare Experience... 5 About Flare Experience... 5 Main window... 6 Button descriptions... 10 Chapter
DVR4C Remote Viewer Operation Manual Table of Contents EN 3 1. OVERVIEW...5 1.1 MINIMUM PC REQUIREMENTS...5 2. INSTALLING THE PROGRAM...
 DVR4x4RemoteViewer.book Page 3 Tuesday, February 15, 2005 9:19 AM DVR4C Remote Viewer Operation Manual Table of Contents EN 3 1. OVERVIEW...5 1.1 MINIMUM PC REQUIREMENTS...5 2. INSTALLING THE PROGRAM...5
Lenovo Online Data Backup User Guide Version 1.8.14
 Lenovo Online Data Backup User Guide Version 1.8.14 Contents Chapter 1: Installing Lenovo Online Data Backup...5 Downloading the Lenovo Online Data Backup Client...5 Installing the Lenovo Online Data
SMS (Server Management Software) Digital Video Recorder. User s Manual
 Digital Video Recorder. User s Manual") SMS (Server Management Software) Digital Video Recorder User s Manual 1 Table of Contents Chapter 1 Overview.....03 1.1 In This Manual..03 1.2 Overview 03 1.3 SMS Features...03 1.4 Product Information..03
SMS (Server Management Software) Digital Video Recorder User s Manual 1 Table of Contents Chapter 1 Overview.....03 1.1 In This Manual..03 1.2 Overview 03 1.3 SMS Features...03 1.4 Product Information..03
I. Create a New Project
 Judith Herb College of Education imovie 09 Tutorial Students in the Judith Herb College of Education are required to complete video projects in many classes as well as their student teaching. These videos