SolidWorks tutorial 13-5 Exciting. Includes SolidWorks SustainabilityXpress
|
|
|
- Marybeth Copeland
- 9 years ago
- Views:
Transcription
1 SolidWorks tutorial 13-5 Exciting Includes SolidWorks SustainabilityXpress A better world for our children and grandchildren Pre-vocational Secondary Education and Senior Secondary Vocational Education For SolidWorks Educational Release

2 , SolidWorks Corporation 300 Baker Avenue Concord, Massachusetts USA All Rights Reserved U.S. Patents 5,815,154; 6,219,049; 6,219,055 SolidWorks Corporation is a Dassault Systemes S.A. (Nasdaq:DASTY) company. The information and the software discussed in this document are subject to change without notice and should not be considered commitments by SolidWorks Corporation. No material may be reproduced or transmitted in any form or by any means, electronic or mechanical, for any purpose without the express written permission of SolidWorks Corporation. The software discussed in this document is furnished under a license and may be used or copied only in accordance with the terms of this license. All warranties given by SolidWorks Corporation as to the software and documentation are set forth in the SolidWorks Corporation License and Subscription Service Agreement, and nothing stated in, or implied by, this document or its contents shall be considered or deemed a modification or amendment of such warranties. SolidWorks is a registered trademark of SolidWorks Corporation. SolidWorks 2005 is a product name of SolidWorks Corporation. FeatureManager is a jointly owned registered trademark of SolidWorks Corporation. Feature Palette, PhotoWorks, and PDMWorks are trademarks of SolidWorks Corporation. ACIS is a registered trademark of Spatial Corporation. FeatureWorks is a registered trademark of Geometric Software Solutions Co. Limited. GLOBEtrotter and FLEXlm are registered trademarks of Globetrotter Software, Inc. Other brand or product names are trademarks or registered trademarks of their respective holders. COMMERCIAL COMPUTER SOFTWARE - PROPRIETARY U.S. Government Restricted Rights. Use, duplication, or disclosure by the government is subject to restrictions as set forth in FAR (Commercial Computer Software - Restricted Rights), DFARS (Commercial Computer Software and Commercial Computer Software Documentation), and in the license agreement, as applicable. Contractor/Manufacturer: SolidWorks Corporation, 300 Baker Avenue, Concord, Massachusetts USA Portions of this software are copyrighted by and are the property of Electronic Data Systems Corporation or its subsidiaries, copyright 2005 Portions of this software 1999, ComponentOne Portions of this software D-Cubed Limited. Portions of this product are distributed under license from DC Micro Development, Copyright DC Micro Development, Inc. All rights reserved Portions ehelp Corporation. All rights reserved. Portions of this software Geometric Software Solutions Co. Limited. Portions of this software mental images GmbH & Co. KG Portions of this software 1996 Microsoft Corporation. All Rights Reserved. Portions of this software 2001, SIMULOG. Portions of this software Spatial Corporation. Portions of this software 2005, Structural Research & Analysis Corp. Portions of this software Tech Soft America. Portions of this software Viewpoint Corporation. Portions of this software , Visual Kinematics, Inc. All Rights Reserved This tutorial was developed for SolidWorks Benelux and may be used by anyone who needs to learn how to use the 3D CAD software SolidWorks. Any other use of this tutorial or any portion thereof is prohibited. If you have questions, please contact your retailer. Intitiative: Jack van den Broek and Nenad Raskovic Adaptation to the educational level: Jack van den Broek (Technical school Dr. Knippenberg). Completed by: Nenad Raskovic 2

3 Tutorial 13-5 Base Sheet 3
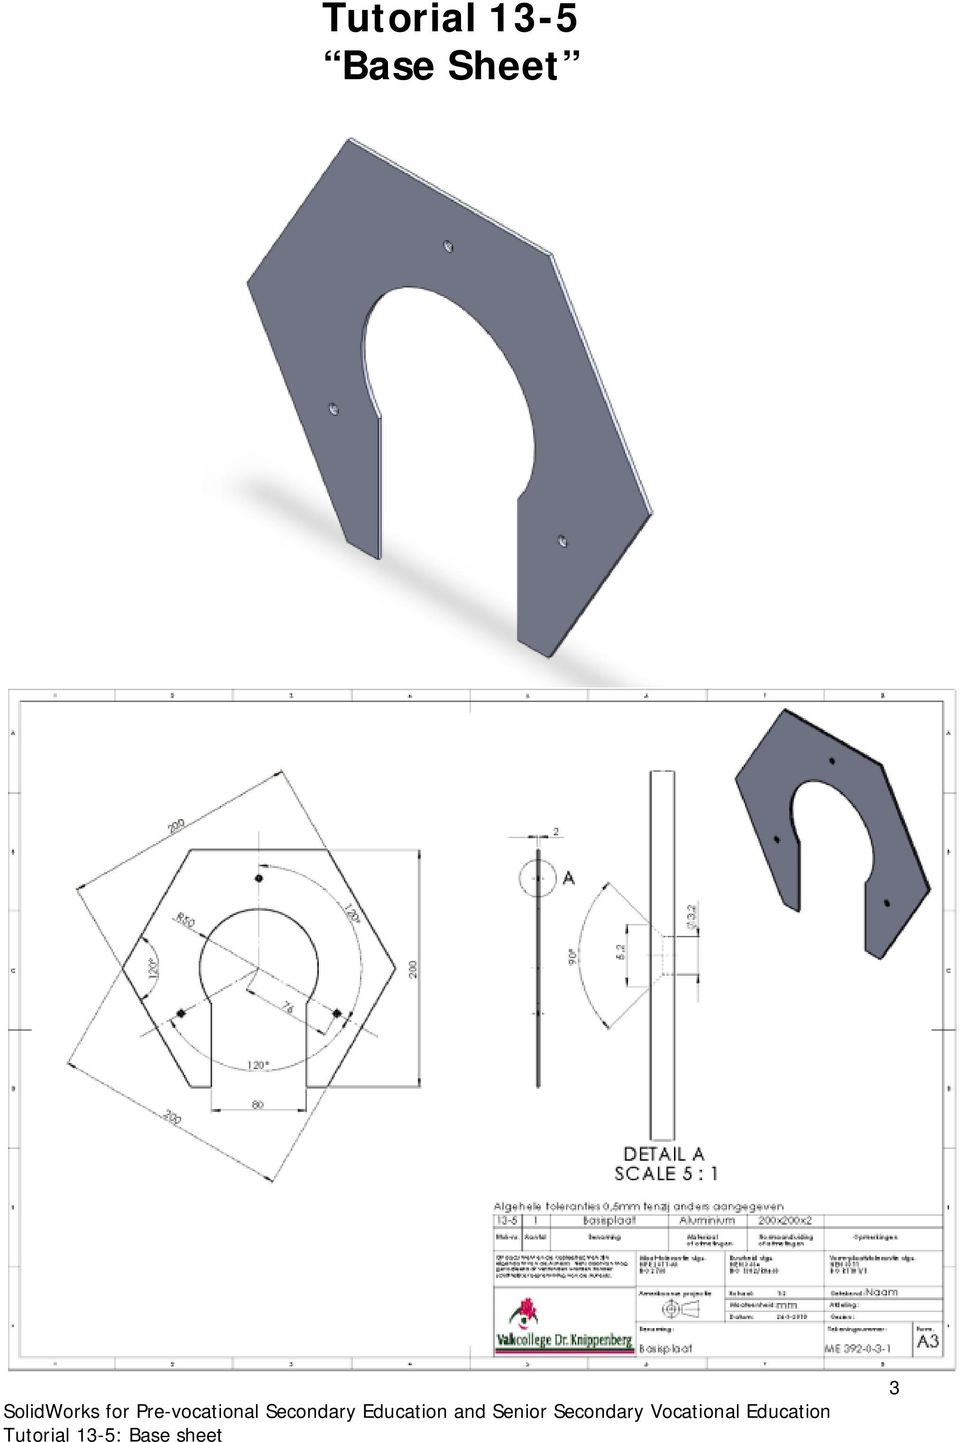
4 Base Sheet In this exercise, we will make a simple aluminum sheet. You will get acquainted with Sheet Metal as a function in SolidWorks. And, of course, you will make a working drawing of this piece. The Tutorial will also present SolidWorks Sustainability Xpress. We do this because we want to protect the environment. Work plan: You will make the base sheet according to the drawing below. 1. First, draw a hexagon. (Polygon) 2. Sketch a circle starting from the center of the hexagon. 3. Next, make an opening at the bottom of the circle and the hexagon. 4. After this, draw a pattern of 3 holes. 5. Finally, make a working drawing for use in the workshop. 4

5 1 Launch SolidWorks and open: You do this to create a new document Select: 2. Next, click on: You do this to activate the Sketch environment. 5

6 3 The base sheet is a regular hexagon. Click in the: Command-Manager on Polygon. In this exercise, we will draw a regular hexagon. 4 Draw a hexagon from point zero. 1. For the first point of the hexagon, click the origin. 2. For the second point, click at an arbitrary distance to the right of the origin. Be sure to work horizontally! See icon: 6

7 5 Make sure that in the: Property Manager, under: 1. The number of sides is set to 6 2. A circumscribed circle now determines the size. 3. Click OK. 6 The size of the circle should become Ø mm. Because of the dimensioning of Ø mm, the size on the sides of the hexagon will be 200 mm. If you select the option: Then the size displayed for the circle should be 200mm. Dimension it with the Smart Dimension function. 7

8 7 Draw a Ø 100mm circle from the origin: Next, dimension the circle Now, draw a Line straight to the top, as in the figure 2. Then, dimension this line as in the adjoining figure. The distance between the line and the center of the hexagon is 40 mm. 8

9 9 Draw a Centerline from the origin straight to the top. 1. Click the function: Centerline: 2. For the first point, click the origin. 3. Then, draw a Centerline straight to the top, as in the figure. 10 We will now mirror the line. Select: Mirror Entities 9

10 11 The Property Manager menu under Options shows the selected components you want to mirror. 1. First, select the line. 2. The window Entities To mirror displays the selected component, in this case, the line. 3. Click in the window: 4. Select the Centerline. Once you have selected the Centerline, it is displayed in the window Mirror about. 5. Click OK. 12 We want to remove the bottom of the circle and the hexagon to make a recess there. The bottom of the circle and the hexagon can be removed with the Trim Entities function. In the Command Manager, click Trim Entities 10

11 13 1. In the: Property Manager, select the option Trim to closest 2. Now, cut off the bottom part from the hexagon and the circle. In the example, the bottom part of the hexagon has already been cut off. 3. Click OK. 14 Now, draw a circle. The center of the circle must be on the centerline. Look at the example. 11

12 15 Enter the circle dimensions. The circle has a diameter of 3,2mm and a height of 76mm as measured from the origin. 16 We want to add two more circles to the Sketch. To do this, use the command Circular Sketch Pattern. 1. First, click the arrow to expand the menu. 2. Select 12

13 17 Now, do the following: 1. Set the number of copies to Check Equal Spacing. 3. Uncheck Add dimensions. 4. Click anywhere in the window Entities to Pattern. The window is empty at first, but as soon as you click the components to be copied, the window displays the selected components. 5. Select a 3.2mm circle. 6. Click OK. You have just found out that using Linear Sketch Pattern or Circular Sketch Pattern will considerably reduce your drawing time. You can easily add objects (lines, circles, rectangles, etc.) according to a specific pattern. 13

14 18 Using the Smart Dimensions function, dimension the circles you have just drawn. Also, enter 3.2mm as the dimension for both circles. The adjoining figure shows how this should look like. 19 The sketch still hasn't been completely defined yet. Adding dimensioning and/or relations provide a completely defined sketch. In this case, you want to add a relation. 1. Click the arrow Display/Delete Relations 2. Then choose 14

15 20 1. Select the center of the two lower circles. The plus sign shows you will be selecting the center. 2. The selected objects will appear in the blue window, in this case, Point. 3. Then, click the Horizontal button This will put both circles on one line. The function allows you to add various relations to the objects. For example, you can make two lines run parallel, or set them square without using the dimensioning tool. To display and/or remove all existing relations, use the function. 15

16 21 First, make sure the Sheet Metal buttons are available. The best way to do this is to add them to the Command Manager. 1. With the right mouse button, click a tab in Command Manager. 2. In the displayed menu, click: Sheet Metal. ATTENTION!! If Sheet Metal is already checked in your system, continue to step In: Command Manager, first click: Sheet Metal. 2. Then, click Base Flange/Tab. 16

17 23 1. In: Property Manager, enter 2mm as material gauge. 2. Click OK. Leave the rest of the menu unchanged. 24 Next, we will make the chamfer at the top of the circle. 1. In the: Command Manager, click the arrow Fillet. under 2. Click Chamfer. 17

18 25 You must now set and verify a few things. 1. Select the top edge of all three circles. (Use the CTRL key) 2. In the blue area, Edge has now been selected three times. 3. Make sure the 'Angle distance' option is selected. If not, check it. 4. As the chamfer distance, enter 1mm and 45 deg. 5. Make sure the option Full preview is selected. The model shows exactly what will happen. 6. If everything has been set correctly, click OK. 26 Change the material to 1060 Alloy. The model is now ready. In the toolbar, click Save and name the file: Base Sheet 18

19 SolidWorks Sustainability Xpress A better world for our children and grandchildren As a developer/designer, you must take several aspects into account. One of these aspects is the environmental impact of your design. SolidWorks Sustainability Xpress allows you to understand and visualize the environmental impact of your designs and, if necessary, improve the design. This includes carbon footprint calculation, ((Footprint) is a measure unit for CO2 emissions), and real-time feedback on the product, which measures energy consumption during the production of the model as well as the effects on the air and water during production, enabling you to adapt your design and improve the final values. In the next steps, you will learn how to use this new function. 19
 is a measure unit for CO2 emissions), and real-time feedback on the product, which measures energy consumption during the production")
20 27 Before continuing to, please make sure this SolidWorks function has been installed on your computer. 1. To open the menu, click the arrow in the Menu Bar: 2. Next, click Tools: 3. Make sure the function: has been installed. 4. If the function: Sustainability Xpress has already been installed, continue to the next step. Otherwise, follow the instructions below. If you are using SolidWorks student Edition version , you must download the application from the following address: Be sure you download the appropriate version, as there are two versions for Windows: 32 bits and 64 bits. If you are using SolidWorks student Edition version , you will find SustainabilityXpress under the tab Evaluate (1) then select SustainabilityXpress (2). 20

21 28 After launching the function: SolidWorks opens a new window to the right. 29 The window includes three important areas: 1. Enter the material properties here Specifiy here how and where you want to make the product. Next, enter the destination of the manufactured product. Four diagrams are displayed here. They show the environmental impact of production and transportation. 21
22 30 Let us now take a more detailed look at how Sustainability Xpress works. 1. In step 26, the material has already been defined as Aluminum 1060 Alloy. The software copied and pasted this automatically. 2. In the window: you enter this as: and for: you select Asia. This defines how you want to manufacture and where the production will tak e place. 3. In the window: choose Europe as the Region. This indicates that the product will be used in Europe. 4. Under: 4 diagrams are displayed. They describe the environmental impact of the product. 22
23 31 An important part of Sustainability Xpress is the window: As a designer, you can find here various types of information on the environmental impact of your product/design. 1. Clicking the arrows: will display four detailed diagrams. They allow you to quickly review the environmental impact during production and transportation of the component. E.g. CO2 impact on the environment, e.g. greenhouse gas production. E.g. The total amount of energy required to manufacture the product. E.g. Impact on the air! In particular, contribution to acid rain. E.g. Impact on water! Resulting in algal growth in coastal waters. 23
24 32 Let us now change the production location to see how the environmental impact changes if the base sheet is not produced in Asia but rather somewhere else, for example in Europe. 1. Change the: into Europe. 33 Now, watch the diagrams. There is a significant difference between the first and the second calculation. The emission of: This emission value is now lower than in the first calculation. 1. Current, (now) is green, meaning: better than the previous location. 2. Previous, grey represents the first calculation, the previous production location. 24
25 34 But what happens to these values if we choose a different material for the product? Sustainability Xpress has anticipated that possibility. Instead of having to search through a very long list of materials, you will see a list of similar materials. 1. Click: 35 A number of new values must be entered in the newly opened window. This allows you to request a search in one other type of materials only. Alternatively, you can ask the program to search through all materials. You can also specify and change different material properties. In this case, we will only change the tensile strength and yield strength requirements. 1. Enter Aluminum as the production material. 2. Scroll down to choose Aluminum. 3. The option is for tensile strength, and is for the yield value. 25
26 4. Let us choose a material with higher tensile strength. Click the scroll down menu and select greater than >. 5. We will leave the yield value of the material unchanged ~. 6. Click Find Similar Double-click the option 1345 Alloy. This is almost the same material as the one you had chosen (1060 Alloy). There is, however, one important difference: the tensile strength is significantly higher. 2. The diagram section immediately displays the new calculation. It is identical to the old one. That is because the material is almost the same. 3. You can now do the following: Accept, Edit or Cancel. 4. Let us choose Edit because we want to know what will happen if we choose steel instead of aluminum. 26
27 37 1. Choose Steel as the material. 2. Let us choose a higher tensile strength and a higher yield value. 3. Click Find Similar. 38 AISI 1020 is a low carbon machine steel offering the good general and structural steel properties. So, we will choose this type of steel. 1. Double-click: A ISI The diagram section shows this choice is better for the environment, except for the water. 3. Click Accept Click: Generate Report. This button allows you to generate a full report. 27
28 40 The report looks like this. Open the file Sustainability Report.docx to take a closer look. The report allows you to make an informed choice between the original and the alternative material selection If you click: Online Info, online information on CO2 emission during production will be displayed This button allows you to lock the Baseline. 2. This button allows you to import the baseline 28
29 43 Close the function: Sustainability Xpress. 1. Click the red x Now try a few other materials yourself to see which is the best solution (e.g. wood). Now, make a drawing for use in the workshop. 1. Click New: 2. Select: Diverse_template 3. Click OK. 45 In the menu, choose: 1. A3 _Vakcollege Dr_Knippenberg Click OK. 29
30 46 An empty drawing field is displayed. Do the following to create views. 1. Click 2. Click to open the Property Manager model view. 3. Make sure the appropriate part has been selected. 4. If not, use the button to find the appropriate part. 5. Click the arrow to continue In the menu: Number of Views Select: Multiple views. To position three views. 2. In the menu, choose the front view, the side view and the isometric view. The selected views are displayed in grey. 3. For Display Style, choose Hidden Lines Visible. 30
31 4. Leave the scale at: Use sheet scale. 5. If all went well, SolidWorks has positioned the three chosen views. 6. Click OK. Sometimes, a message like in the adjoined figure is displayed. In that case, click: Now select the isometric view. 2. Click: Shaded With Edges. 3. Click OK. 31
32 49 Distribute the views on the drawing sheet, as in the adjoi ned figure. 50 Add details to the drawing. 1. Click Detail View. 2. Draw a circle. 32
33 51 You will have to enter the following information: 1. Type a capital letter A here to assign an identification mark to the detail. 2. We want to enlarge the detail. Therefore, choose: 3. Enter the ratio 4. Click next to the top view to position the detail. 52 Draw a: Centerline from the center of the circle straight up. 1. Click: the arrow to open the Centerline function and select it. 2. Click in the middle of the circle; draw the Centerline, then click anywhere outside the model. 33
34 53 You will add two more lines using the function Circular Pattern. 1. Click the scroll down menu select: Circular Pattern. and 2. Enter 3 as quantity. 3. Click anywhere in the window: Entities to Pattern, then select the vertical line you have just drawn. 54 Dimension the drawing as in the adjoined example. Drag the bill of materials (Table) into the drawing and fill out the title block. Copy the data from the example in the adjoined figure. This completes your working drawing. Save the file as BaseSheet.slddrw List the most important things you have learned during this tutorial. 34
SolidWorks tutorial 13 Exciting
 SolidWorks tutorial 13 Exciting Pre-vocational Secondary Education and Senior Secondary Vocational Education For use with SolidWorks Educational Release 2009-2010 1995-2005, SolidWorks Corporation 300
SolidWorks. SolidWorks Teacher Guide. and Student Courseware
 SolidWorks SolidWorks Teacher Guide and Student Courseware SolidWorks Corporation Outside the U.S.: +1-978-371-5011 300 Baker Avenue Fax: +1-978-371-7303 Concord, Massachusetts 01742 USA Email: [email protected]
SolidWorks Tutorial 5
 SolidWorks Tutorial 5 Tic-Tac-Toe Preparatory Vocational Training and Advanced Vocational Training Dassault Systèmes SolidWorks Corporation, 75 Wyman Street Waltham, Massachusetts 05 USA Phone: +-800-69-9000
SolidWorks Tutorial 3 MAGNETIC BLOCK
 SolidWorks Tutorial 3 MAGNETIC BLOCK Magnetic Block In this exercise you will make a magnetic block. To do so, you will create a few parts, which you will assemble. You will learn the following new applications
SolidWorks Implementation Guides. Sketching Concepts
 SolidWorks Implementation Guides Sketching Concepts Sketching in SolidWorks is the basis for creating features. Features are the basis for creating parts, which can be put together into assemblies. Sketch
SolidWorks Tutorial 4 CANDLESTICK
 SolidWorks Tutorial 4 CANDLESTICK Candlestick In this tutorial you will make a simple container and a candlestick out of sheetmetal. You will learn about working with sheet metal in SolidWorks. We will
Introduction to Autodesk Inventor for F1 in Schools
 Introduction to Autodesk Inventor for F1 in Schools F1 in Schools Race Car In this course you will be introduced to Autodesk Inventor, which is the centerpiece of Autodesk s digital prototyping strategy
SolidWorks Building Blocks Tutorial. Toy-car
 SolidWorks Building Blocks Tutorial Toy-car From the age of until the age of For use with SolidWorks Educational Release 2010-2011 This tutorial was developed for SolidWorks Worldwide and may be used by
SolidWorks: Mirror, Revolve, and. Introduction to Robotics
 SolidWorks: Mirror, Revolve, and Circular Pattern Introduction to Robotics Let s Review At this point we have learned the following: Extrude Boss/Base Extruded Cut Adding Relations and Dimensions Linear
Introduction to Autodesk Inventor for F1 in Schools
 F1 in Schools race car Introduction to Autodesk Inventor for F1 in Schools In this course you will be introduced to Autodesk Inventor, which is the centerpiece of Autodesk s Digital Prototyping strategy
Introduction to CATIA V5
 Introduction to CATIA V5 Release 16 (A Hands-On Tutorial Approach) Kirstie Plantenberg University of Detroit Mercy SDC PUBLICATIONS Schroff Development Corporation www.schroff.com www.schroff-europe.com
Chapter 9. Editing Features. Learning Objectives
 Chapter 9 Editing Features Learning Objectives After completing this chapter, you will be able to: Edit features. Edit sketches of the sketch based features. Edit the sketch plane of the sketch based features.
Design Better Products. SolidWorks 2008. What s New for PDMWorks Enterprise
 Design Better Products SolidWorks 2008 What s New for PDMWorks Enterprise 1995-2007, Dassault Systèmes SolidWorks Corporation is a Dassault Systèmes S.A. (Nasdaq:DASTY) company. 300 Baker Avenue Concord,
SolidWorks. Engineering Design Project. The Mountainboard
 SolidWorks Engineering Design Project The Mountainboard SolidWorks Corporation 300 Baker Avenue Concord, Massachusetts 01742 USA Phone +1-800-693-9000 Outside the U.S.: +1-978-371-5011 Fax: +1-978-371-7303
2013 Getting Started Guide
 2013 Getting Started Guide The contents of this guide and accompanying exercises were originally created by Nemetschek Vectorworks, Inc. Vectorworks Fundamentals Getting Started Guide Created using: Vectorworks
Creating 2D Isometric Drawings
 1-(800) 877-2745 www.ashlar-vellum.com Creating 2D Isometric Drawings Using Graphite TM Copyright 2008 Ashlar Incorporated. All rights reserved. C62DISO0806. Ashlar-Vellum Graphite No matter how many Top,
CATIA Drafting TABLE OF CONTENTS
 TABLE OF CONTENTS Introduction...1 Drafting...2 Drawing Screen...3 Pull-down Menus...4 File...4 Edit...5 View...6 Insert...7 Tools...8 Drafting Workbench...9 Views and Sheets...9 Dimensions and Annotations...10
Basic 2D Design Be sure you have the latest information!
 Basic 2D Design mastercam x getting started tutorials Basic 2D Design December 2011 Be sure you have the latest information! Information might have been changed or added since this document was published.
Part Number: PMT1080-ENG Rev. 1
 2010 Dassault Systèmes, All Rights Reserved DraftSight and the DraftSight logos are trademarks of Dassault Systèmes or its subsidiaries in the US and/or other countries. Other brand or product names are
Solidworks Lesson 6 - Assembly & Part Drawings. UCF Engineering
 Solidworks Lesson 6 - Assembly & Part Drawings UCF Engineering Mechanical Drawings So far we have been dealing with creating parts and assemblies in SolidWorks, however, when you go to get a part machined,
SolidWorks 2006 What s New
 SolidWorks 2006 What s New 1995-2005, SolidWorks Corporation 300 Baker Avenue Concord, Massachusetts 01742 USA All Rights Reserved U.S. Patents 5,815,154; 6,219,049; 6,219,055; 6,603,486; 6,611,725; and
TABLE OF CONTENTS. INTRODUCTION... 5 Advance Concrete... 5 Where to find information?... 6 INSTALLATION... 7 STARTING ADVANCE CONCRETE...
 Starting Guide TABLE OF CONTENTS INTRODUCTION... 5 Advance Concrete... 5 Where to find information?... 6 INSTALLATION... 7 STARTING ADVANCE CONCRETE... 7 ADVANCE CONCRETE USER INTERFACE... 7 Other important
Sample Table. Columns. Column 1 Column 2 Column 3 Row 1 Cell 1 Cell 2 Cell 3 Row 2 Cell 4 Cell 5 Cell 6 Row 3 Cell 7 Cell 8 Cell 9.
 Working with Tables in Microsoft Word The purpose of this document is to lead you through the steps of creating, editing and deleting tables and parts of tables. This document follows a tutorial format
SpaceClaim Introduction Training Session. A SpaceClaim Support Document
 SpaceClaim Introduction Training Session A SpaceClaim Support Document In this class we will walk through the basic tools used to create and modify models in SpaceClaim. Introduction We will focus on:
Getting Started with CATIA Version 5
 WB Getting Started with CATIA Version 5 Page 1 CATIA User Interface Let s review the following key features: Multi-document support Standard and specific menus & toolbars (File, Edit, Insert, ) Standard
Chapter 1. Creating Sketches in. the Sketch Mode-I. Evaluation chapter. Logon to www.cadcim.com for more details. Learning Objectives
 Chapter 1 Creating Sketches in Learning Objectives the Sketch Mode-I After completing this chapter you will be able to: Use various tools to create a geometry. Dimension a sketch. Apply constraints to
GYM PLANNER. User Guide. Copyright Powerzone. All Rights Reserved. Software & User Guide produced by Sharp Horizon. www.sharphorizon.com.
 GYM PLANNER User Guide Copyright Powerzone. All Rights Reserved. Software & User Guide produced by Sharp Horizon. www.sharphorizon.com. Installing the Software The Powerzone gym Planner is a piece of software
BIGPOND ONLINE STORAGE USER GUIDE Issue 1.1.0-18 August 2005
 BIGPOND ONLINE STORAGE USER GUIDE Issue 1.1.0-18 August 2005 PLEASE NOTE: The contents of this publication, and any associated documentation provided to you, must not be disclosed to any third party without
CATIA Basic Concepts TABLE OF CONTENTS
 TABLE OF CONTENTS Introduction...1 Manual Format...2 Log on/off procedures for Windows...3 To log on...3 To logoff...7 Assembly Design Screen...8 Part Design Screen...9 Pull-down Menus...10 Start...10
Smart Board Notebook Software A guide for new Smart Board users
 Smart Board Notebook Software A guide for new Smart Board users This guide will address the following tasks in Notebook: 1. Adding shapes, text, and pictures. 2. Searching the Gallery. 3. Arranging objects
Using Microsoft Word. Working With Objects
 Using Microsoft Word Many Word documents will require elements that were created in programs other than Word, such as the picture to the right. Nontext elements in a document are referred to as Objects
Excel -- Creating Charts
 Excel -- Creating Charts The saying goes, A picture is worth a thousand words, and so true. Professional looking charts give visual enhancement to your statistics, fiscal reports or presentation. Excel
Part Design. Page 1 1997 2001 DASSAULT SYSTEMES. IBM Product Lifecycle Management Solutions / Dassault Systemes
 Part Design Page 1 Tutorial Objectives Description This tutorial is an introduction to Part Design. Message This tutorial illustrates how CATIA can Design precise 3D mechanical parts with an intuitive
SketchUp Instructions
 SketchUp Instructions Every architect needs to know how to use SketchUp! SketchUp is free from Google just Google it and download to your computer. You can do just about anything with it, but it is especially
CAD Student Guide. Engineering Design and Technology Series
 Engineering Design and Technology Series CAD Student Guide Dassault Systèmes SolidWorks Corporation, 175 Wyman Street, Waltham, Massachusetts 02451 USA Phone: +1-800-693-9000 Outside the U.S.: +1-781-810-5011
Getting Started Guide
 3D Architect Home Designer Getting Started Guide Produced and published in the UK by Eleco Software Limited 2014 Eleco plc. All rights reserved. The software and hardware names and labels used in this
Generative Drafting. Page 1 1997 2001 DASSAULT SYSTEMES. IBM Product Lifecycle Management Solutions / Dassault Systemes
 Generative Drafting Page 1 Tutorial Objectives Description This Tutorial is an introduction to Generative Drafting. Message To show how CATIA V5 allows the user to automatically generate associative drafting
RemoteWare Software Manager
 RemoteWare Software Manager Client User s Guide Version 2.0 RemoteWare Software Manager Client User s Guide Version 2.0 This document was prepared to assist licensed users of RemoteWare by XcelleNet, Inc.;
Embroidery Fonts Plus ( EFP ) Tutorial Guide Version 1.0505
 Tutorial Guide Version 1.0505") Embroidery Fonts Plus ( EFP ) Tutorial Guide Version 1.0505 1 Contents Chapter 1 System Requirements.................. 3 Chapter 2 Quick Start Installation.................. 4 System Requirements................
Embroidery Fonts Plus ( EFP ) Tutorial Guide Version 1.0505 1 Contents Chapter 1 System Requirements.................. 3 Chapter 2 Quick Start Installation.................. 4 System Requirements................
Getting Started Guide
 MadCap Software Getting Started Guide Capture 7 Copyright 2015 MadCap Software. All rights reserved. Information in this document is subject to change without notice. The software described in this document
AutoCAD Structural Detailing 2011. Getting Started with AutoCAD Structural Detailing, Reinforcement module
 AutoCAD Structural Detailing 2011 Getting Started with AutoCAD Structural Detailing, Reinforcement module 2010 Autodesk, Inc. All Rights Reserved. Except as otherwise permitted by Autodesk, Inc., this
Creating Fill-able Forms using Acrobat 8.0: Part 1
 Creating Fill-able Forms using Acrobat 8.0: Part 1 The first step in creating a fill-able form in Adobe Acrobat is to generate the form with all its formatting in a program such as Microsoft Word. Then
5. Tutorial. Starting FlashCut CNC
 FlashCut CNC Section 5 Tutorial 259 5. Tutorial Starting FlashCut CNC To start FlashCut CNC, click on the Start button, select Programs, select FlashCut CNC 4, then select the FlashCut CNC 4 icon. A dialog
ACS Version 10.6 - Check Layout Design
 ACS Version 10.6 - Check Layout Design Table Of Contents 1. Check Designer... 1 About the Check Design Feature... 1 Selecting a Check Template... 2 Adding a Check Template... 2 Modify a Check Template...
Adobe Acrobat Professional DC Tutorial
 Adobe Acrobat Professional DC Tutorial ADOBE ACROBAT Adobe Acrobat is a software program used to create forms, manuals, online book pages, maps and drafted images, that can be uploaded to a website, and
Understand the Sketcher workbench of CATIA V5.
 Chapter 1 Drawing Sketches in Learning Objectives the Sketcher Workbench-I After completing this chapter you will be able to: Understand the Sketcher workbench of CATIA V5. Start a new file in the Part
TurboCAD Architectural
 TurboCAD Architectural Version 15 Getting Started Guide IMSI/Design LLC, US 100 Rowland Blvd. Novato. CA 94945, USA Tel: +1-415-878-4000 Fax: +1-415-897-2544 Web Site www.imsisoft.com www.turbocad.com
Create a Poster Using Publisher
 Contents 1. Introduction 1. Starting Publisher 2. Create a Poster Template 5. Aligning your images and text 7. Apply a background 12. Add text to your poster 14. Add pictures to your poster 17. Add graphs
Introduction to Word 2007
 Introduction to Word 2007 You will notice some obvious changes immediately after starting Word 2007. For starters, the top bar has a completely new look, consisting of new features, buttons and naming
Sketcher. Preface What's New? Getting Started Basic Tasks Customizing Workbench Description Glossary Index
 Sketcher Preface What's New? Getting Started Basic Tasks Customizing Workbench Description Glossary Index Dassault Systèmes 1994-99. All rights reserved. Preface CATIA Version 5 Sketcher application makes
Getting Started in Tinkercad
 Getting Started in Tinkercad By Bonnie Roskes, 3DVinci Tinkercad is a fun, easy to use, web-based 3D design application. You don t need any design experience - Tinkercad can be used by anyone. In fact,
SDC. Schroff Development Corporation WWW.SDCACAD.COM PUBLICATIONS. MultiMedia CD by Jack Zecher
 MultiMedia CD by Jack Zecher An audioi/visual presentation of the tutorial exercises SDC PUBLICATIONS Schroff Development Corporation WWW.SDCACAD.COM AutoCAD 2002 Tutorial 2-1 Lesson 2 Geometric Construction
Internet Explorer 7. Getting Started The Internet Explorer Window. Tabs NEW! Working with the Tab Row. Microsoft QUICK Source
 Microsoft QUICK Source Internet Explorer 7 Getting Started The Internet Explorer Window u v w x y { Using the Command Bar The Command Bar contains shortcut buttons for Internet Explorer tools. To expand
Welcome to Bridgit @ CSU The Software Used To Data Conference.
 Welcome to Bridgit @ CSU The Software Used To Data Conference. Overview SMART Bridgit software is a client/server application that lets you share programs and information with anyone, anywhere in the world.
LANDWorksCAD for AutoCAD and Bricscad. Professional Landscape Design Software. Reference and User Manual. CAD International
 LANDWorksCAD for AutoCAD and Bricscad Professional Landscape Design Software Reference and User Manual CAD International www.cad.com.au www.cadinternational.com 2006-2012 - All rights reserved This page
Microsoft Office PowerPoint 2013
 Microsoft Office PowerPoint 2013 Navigating the PowerPoint 2013 Environment The Ribbon: The ribbon is where you will access a majority of the commands you will use to create and develop your presentation.
There are two distinct working environments, or spaces, in which you can create objects in a drawing.
 That CAD Girl J ennifer dib ona Website: www.thatcadgirl.com Email: [email protected] Phone: (919) 417-8351 Fax: (919) 573-0351 Autocad Model Space and Paper Space Model Space vs. Paper Space Initial
Creating and Using Links and Bookmarks in PDF Documents
 Creating and Using Links and Bookmarks in PDF Documents After making a document into a PDF, there may be times when you will need to make links or bookmarks within that PDF to aid navigation through the
Unit 21 - Creating a Button in Macromedia Flash
 Unit 21 - Creating a Button in Macromedia Flash Items needed to complete the Navigation Bar: Unit 21 - House Style Unit 21 - Graphics Sketch Diagrams Document ------------------------------------------------------------------------------------------------
Microsoft Word 2010. Quick Reference Guide. Union Institute & University
 Microsoft Word 2010 Quick Reference Guide Union Institute & University Contents Using Word Help (F1)... 4 Window Contents:... 4 File tab... 4 Quick Access Toolbar... 5 Backstage View... 5 The Ribbon...
Parametric Technology Corporation. Pro/ENGINEER Wildfire 4.0 Tolerance Analysis Extension Powered by CETOL Technology Reference Guide
 Parametric Technology Corporation Pro/ENGINEER Wildfire 4.0 Tolerance Analysis Extension Powered by CETOL Technology Reference Guide Copyright 2007 Parametric Technology Corporation. All Rights Reserved.
Microsoft Excel 2010 Charts and Graphs
 Microsoft Excel 2010 Charts and Graphs Email: [email protected] Web Page: http://training.health.ufl.edu Microsoft Excel 2010: Charts and Graphs 2.0 hours Topics include data groupings; creating
To Begin Customize Office
 To Begin Customize Office Each of us needs to set up a work environment that is comfortable and meets our individual needs. As you work with Office 2007, you may choose to modify the options that are available.
Creating Custom Crystal Reports Tutorial
 Creating Custom Crystal Reports Tutorial 020812 2012 Blackbaud, Inc. This publication, or any part thereof, may not be reproduced or transmitted in any form or by any means, electronic, or mechanical,
DOING MORE WITH WORD: MICROSOFT OFFICE 2010
 University of North Carolina at Chapel Hill Libraries Carrboro Cybrary Chapel Hill Public Library Durham County Public Library DOING MORE WITH WORD: MICROSOFT OFFICE 2010 GETTING STARTED PAGE 02 Prerequisites
3D Modeling in Vectorworks 2009 by Jonathan Pickup. mple
 3D Modeling in Vectorworks 2009 by Jonathan Pickup mple 3D Modeling in Vectorworks 2009 by Jonathan Pickup 3D Modeling Vectorworks 2009 Published by Nemetschek North America 2008 Jonathan Pickup Vectorworks
Online Sharing User Manual
 Online Sharing User Manual June 13, 2007 If discrepancies between this document and Online Sharing are discovered, please contact [email protected]. Copyrights and Proprietary Notices The information
In this session, we will explain some of the basics of word processing. 1. Start Microsoft Word 11. Edit the Document cut & move
 WORD PROCESSING In this session, we will explain some of the basics of word processing. The following are the outlines: 1. Start Microsoft Word 11. Edit the Document cut & move 2. Describe the Word Screen
Communicate: In Print
 Communicate: In Print A simple guide Work areas Communicate: In Print has two different modes in which to edit your documents: Create and Adjust modes. These are easily interchangeable and the toolbars
CONSTRUCTING SINGLE-SUBJECT REVERSAL DESIGN GRAPHS USING MICROSOFT WORD : A COMPREHENSIVE TUTORIAL
 CONSTRUCTING SINGLE-SUBJECT REVERSAL DESIGN GRAPHS USING MICROSOFT WORD : A COMPREHENSIVE TUTORIAL PATRICK GREHAN ADELPHI UNIVERSITY DANIEL J. MORAN MIDAMERICAN PSYCHOLOGICAL INSTITUTE This document is
Excel 2007 Basic knowledge
 Ribbon menu The Ribbon menu system with tabs for various Excel commands. This Ribbon system replaces the traditional menus used with Excel 2003. Above the Ribbon in the upper-left corner is the Microsoft
Section 1: Ribbon Customization
 WHAT S NEW, COMMON FEATURES IN OFFICE 2010 2 Contents Section 1: Ribbon Customization... 4 Customizable Ribbon... 4 Section 2: File is back... 5 Info Tab... 5 Recent Documents Tab... 7 New Documents Tab...
Pro/ENGINEER Wildfire 4.0 Basic Design
 Introduction Datum features are non-solid features used during the construction of other features. The most common datum features include planes, axes, coordinate systems, and curves. Datum features do
Speaker Drafting. Page 1 1997 2001 DASSAULT SYSTEMES
 Speaker Drafting Page 1 Tutorial Objectives Description This Tutorial is an introduction to Assembly Drafting. Message To show how CATIA V5 allows the user to automatically generate associative drafting
If you know exactly how you want your business forms to look and don t mind
 appendix e Advanced Form Customization If you know exactly how you want your business forms to look and don t mind detail work, you can configure QuickBooks forms however you want. With QuickBooks Layout
Using Parametric Equations in SolidWorks, Example 1
 Using Parametric Equations in SolidWorks, Example 1 (Draft 4, 10/25/2006, SW 2006) Introduction In this example the goal is to place a solid roller on a solid wedge. Their relationship will be governed
GUIDELINES FOR PREPARING POSTERS USING POWERPOINT PRESENTATION SOFTWARE
 Society for the Teaching of Psychology (APA Division 2) OFFICE OF TEACHING RESOURCES IN PSYCHOLOGY (OTRP) Department of Psychology, Georgia Southern University, P. O. Box 8041, Statesboro, GA 30460-8041
Drawing Basic Shapes:
 : Title: : Version: 1.0 First edition: November 2004 Contents Overview...ii Copyright and trademark information...ii Feedback... ii Acknowledgments...ii Modifications and updates... ii... iii Drawing
SMART Board Beginning
 SMART Board Beginning Downloading the Software... 2 600 Series SMART Board... 2 800 Series SMART Board... 3 SMART Board Cleaning Options... 4 SMART Board Pens... 4 SMART Board Help... 4 Using the On Screen
Drawing a little mechanical part using LibreCAD
 TUTORIAL Drawing a little mechanical part using LibreCAD Tutorial by Claudio Guarnieri CLAUDIO GUARNIERI: Drawing a little mechanical part using LibreCAD Page 1 of 17 Introduction Hello everyone! This
Windows XP Pro: Basics 1
 NORTHWEST MISSOURI STATE UNIVERSITY ONLINE USER S GUIDE 2004 Windows XP Pro: Basics 1 Getting on the Northwest Network Getting on the Northwest network is easy with a university-provided PC, which has
Microsoft Word 2011: Create a Table of Contents
 Microsoft Word 2011: Create a Table of Contents Creating a Table of Contents for a document can be updated quickly any time you need to add or remove details for it will update page numbers for you. A
Snagit 10. Getting Started Guide. March 2010. 2010 TechSmith Corporation. All rights reserved.
 Snagit 10 Getting Started Guide March 2010 2010 TechSmith Corporation. All rights reserved. Introduction If you have just a few minutes or want to know just the basics, this is the place to start. This
Microsoft PowerPoint 2010
 Microsoft PowerPoint 2010 Starting PowerPoint... 2 PowerPoint Window Properties... 2 The Ribbon... 3 Default Tabs... 3 Contextual Tabs... 3 Minimizing and Restoring the Ribbon... 4 The Backstage View...
3D-GIS in the Cloud USER MANUAL. August, 2014
 3D-GIS in the Cloud USER MANUAL August, 2014 3D GIS in the Cloud User Manual August, 2014 Table of Contents 1. Quick Reference: Navigating and Exploring in the 3D GIS in the Cloud... 2 1.1 Using the Mouse...
Microsoft Publisher 2010 What s New!
 Microsoft Publisher 2010 What s New! INTRODUCTION Microsoft Publisher 2010 is a desktop publishing program used to create professional looking publications and communication materials for print. A new
House Design Tutorial
 Chapter 2: House Design Tutorial This House Design Tutorial shows you how to get started on a design project. The tutorials that follow continue with the same plan. When we are finished, we will have created
Pipeliner CRM Phaenomena Guide Add-In for MS Outlook. 2015 Pipelinersales Inc. www.pipelinersales.com
 Add-In for MS Outlook 205 Pipelinersales Inc. www.pipelinersales.com Add-In for MS Outlook Learn how to use sales lead management with Pipeliner MS Outlook Add-In. CONTENT. Setting up Pipeliner Add-In
SolidWorks Lego Mindstorm
 Engineering Design and Technology Series SolidWorks Lego Mindstorm Dassault Systèmes SolidWorks Corporation, 175 Wyman Street Waltham, Massachusetts 02451 USA Phone: +1-800-693-9000 Outside the U.S.: +1-781-810-5011
To launch the Microsoft Excel program, locate the Microsoft Excel icon, and double click.
 EDIT202 Spreadsheet Lab Assignment Guidelines Getting Started 1. For this lab you will modify a sample spreadsheet file named Starter- Spreadsheet.xls which is available for download from the Spreadsheet
Pro/ENGINEER Wildfire 3.0 Tips
 Pro/ENGINEER Wildfire 3.0 Tips W. Durfee Keyboard/mouse shortcuts CTRL+D Default view Middle-Button Spin SHIFT+Middle Pan CTRL+Middle Zoom (press, drag up-down) CTRL+Middle Turn (press, drag left-right)
Microsoft Excel 2010 Tutorial
 1 Microsoft Excel 2010 Tutorial Excel is a spreadsheet program in the Microsoft Office system. You can use Excel to create and format workbooks (a collection of spreadsheets) in order to analyze data and
Getting Started on the Computer With Mouseaerobics! Windows XP
 This handout was modified from materials supplied by the Bill and Melinda Gates Foundation through a grant to the Manchester City Library. Getting Started on the Computer With Mouseaerobics! Windows XP
Word 2010: The Basics Table of Contents THE WORD 2010 WINDOW... 2 SET UP A DOCUMENT... 3 INTRODUCING BACKSTAGE... 3 CREATE A NEW DOCUMENT...
 Word 2010: The Basics Table of Contents THE WORD 2010 WINDOW... 2 SET UP A DOCUMENT... 3 INTRODUCING BACKSTAGE... 3 CREATE A NEW DOCUMENT... 4 Open a blank document... 4 Start a document from a template...
Interactive Drafting
 Interactive Drafting Preface What's New Getting Started Basic Tasks Advanced Tasks Workbench Description Customizing Glossary Index Dassault Systèmes 1994-99. All rights reserved. Preface CATIA Version
Part Design. Preface What's New? Getting Started Basic Tasks Advanced Tasks Workbench Description Customizing Glossary Index
 Part Design Preface What's New? Getting Started Basic Tasks Advanced Tasks Workbench Description Customizing Glossary Index Dassault Systèmes 1994-99. All rights reserved. Preface The CATIA Version 5 Part
FORD MOTOR COMPANY OF AUSTRALIA LTD
 Microcat MARKET Ford Australia User Guide Product developed and supported by: Catalogue information provided by: FORD MOTOR COMPANY OF AUSTRALIA LTD Contents Getting started... 2 Microcat MARKET overview...
GFI FAXmaker 14 for Exchange/Lotus/SMTP. Fax-Client Manual. By GFI Software Ltd
 GFI FAXmaker 14 for Exchange/Lotus/SMTP Fax-Client Manual By GFI Software Ltd http://www.gfi.com Email: [email protected] Information in this document is subject to change without notice. Companies, names,