EXPLODED VIEWS AND PARTS LIST
|
|
|
- Colin Matthews
- 9 years ago
- Views:
Transcription
1

2 INTRODUCTION Serpent created this racing car for the competitive electric 1/12th scale pan car class as the S120-L, which like all our previous cars, has been designed to win straight from the box. Featuring a number of truly innovative features such as a nicely shaped aluminium rear pod, floating horizontal damper, shaped side-links, easy adjustment and top quality materials throughout, the S120-L should see you in the winners circle in no time. In fact everything associated with this car is of the highest quality, from the packaging and supplied manuals, right through to the product and race support. INSTRUCTIONS Serpent s long tradition of excellence extends to their instruction manuals, and this instruction manual is no exception. The easy-to-follow layout is richly illustrated with 3D-rendered full-color images to make your building experience quick and easy. Following the instructions will result in a well-built, high-performance racecar that will soon be able to unleash its full potential at the racetrack. SETUP In certain assembly steps you need to make basic adjustments, which will give you a good initial setup for your Serpent S120-L. Fine-tuning the initial setup is an essential part of building a high-performance racecar like your S120-L. EXPLODED VIEWS AND PARTS LIST The exploded views and parts lists for the Serpent S120-L are presented in the Reference Guide section in the back of this manual. The exploded views show all the parts of a particular assembly step along with the Serpent part number. The parts lists indicate the part number and name of each part for easy reference when ordering. SAFETY Included with your Serpent S120-L kit is a document entitled Read This First that covers safety precautions for the assembly and use of this product. We strongly recommend that you thoroughly read and understand that document, and follow all the precautions.

3 The printed instruction manual included with your Serpent S120-L kit is very complete, though due to continuous product development, more up-to-date information may be provided at our Serpent.com website. All information about the Serpent S120-L is accessible from the Serpent S120-L product page found on Serpent.com and can be accessed by simply typing serpent.com/ into your web browsers address bar. From the Serpent S120-L product page you will find the very latest information about your Serpent S120-L: reports by team drivers and other experts, tips and tricks, setups, image gallery and downloadable files including the latest version of the instruction manual will be made available as downloadable PDF files. ASSEMBLY INSTRUCTIONS 6 REFERENCE GUIDE 30 PARTS LIST 35

4 Step number; the order in which you should assemble the indicated parts Length after assembly / Gap between two items Assembly path of one item into another Group of items (within lines) should be assembled first Direction the item should be moved Glue one item to another Press/Insert one item into another Connect one item to another Apply transmission grease (Grey), threadlock* (Blue), CA glue* (Red) or differential grease (Orange). (*Items not included.)
, threadlock* (Blue), CA glue* (Red) or differential grease (Orange).")
5

6 CA Glue To prevent the risk of the carbon fibre splitting in the event of a crash you should apply CA Glue around the chassis edge and battery slots as shown in red below. 6

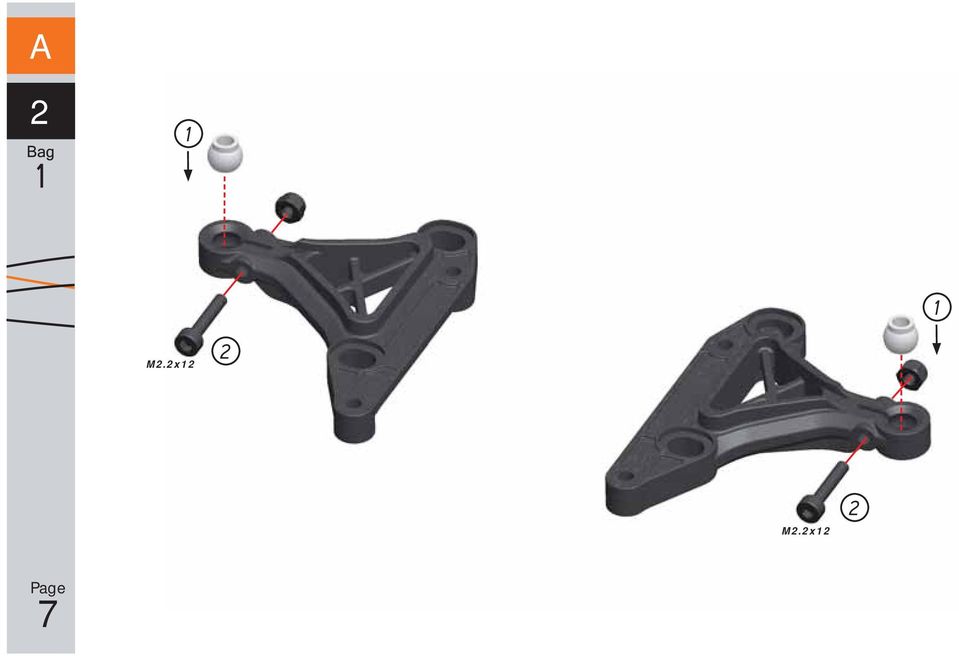
7 A 2 M2.2x12 M2.2x12 7
8 1mm Ride Height spacer 1mm Ride Height spacer M3x10 Ride Height of 3.5mm 8 M3x10 M3x10 M3x10

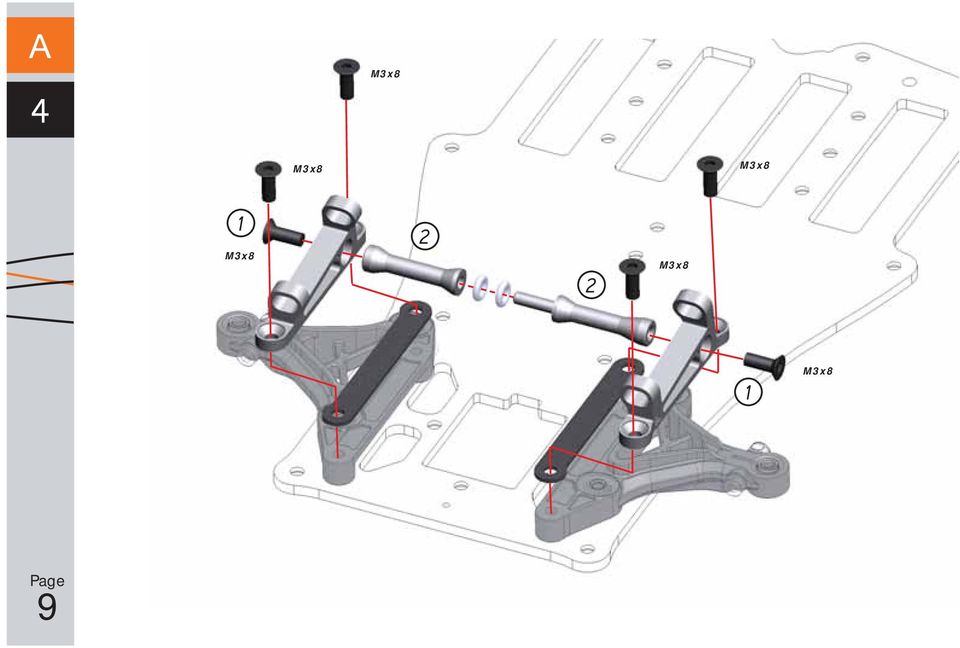
9 M3x8 M3x8 M3x8 M3x8 M3x8 M3x8 9
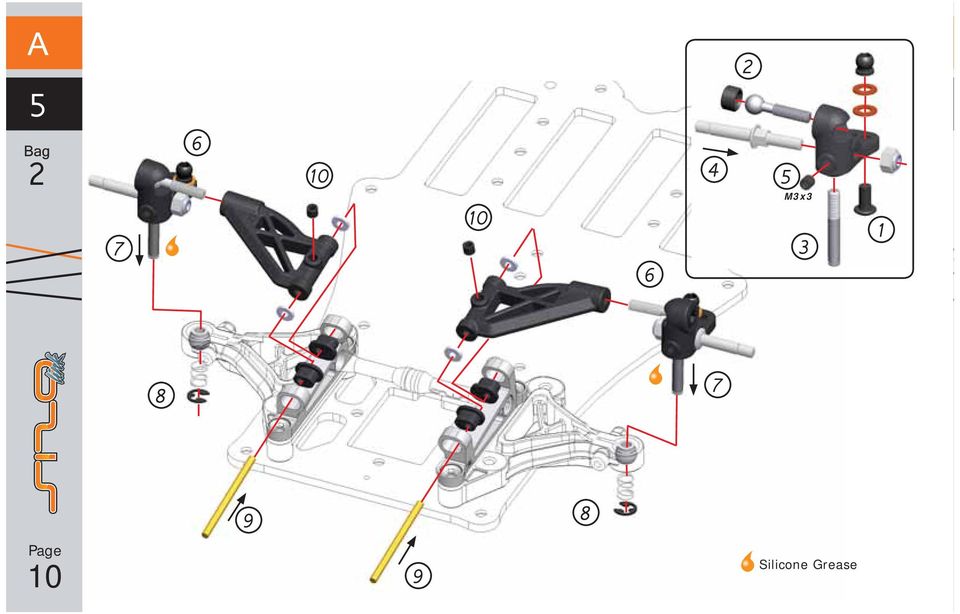
10 M3x3 10 Silicone Grease
11 M2.2x6 11 Don t tighten the screws yet M3x10 M3x10

12 M3x10 M3x10 M3x10 M3x10 M3x6 M3x6 M3x6 12 M3x6

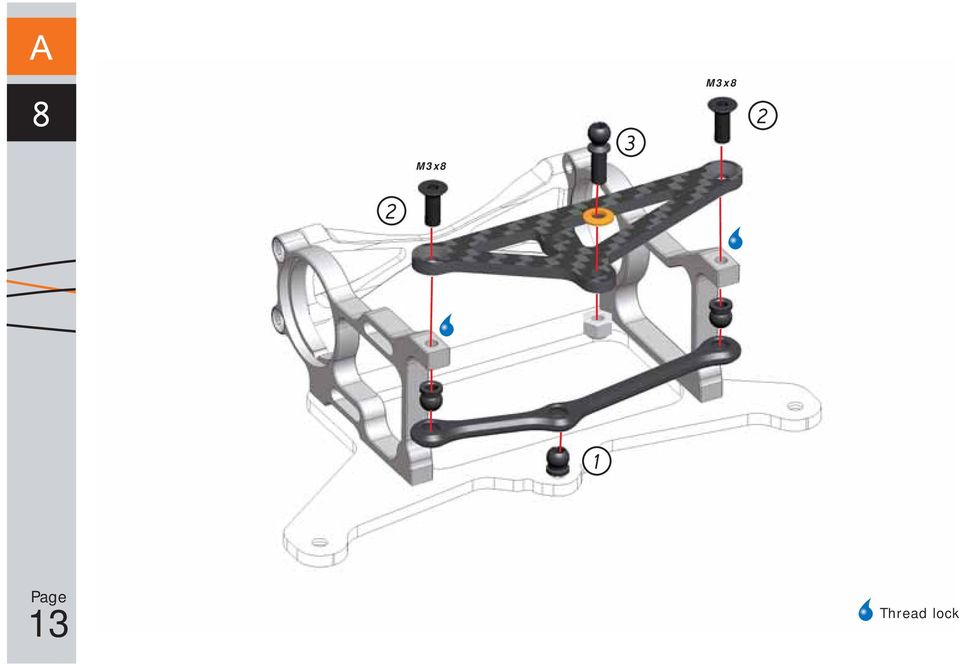
13 M3x8 M3x8 13 Thread lock
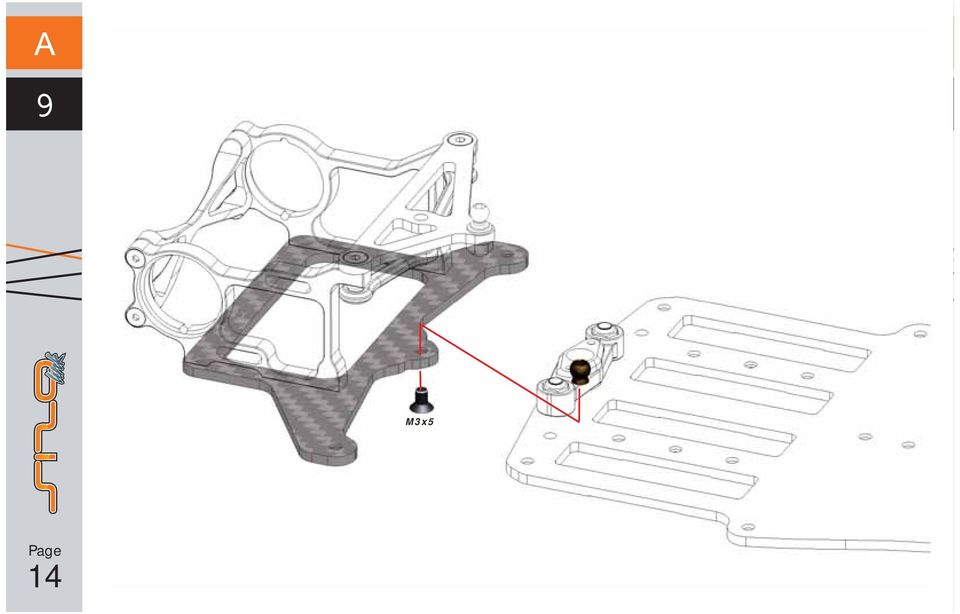
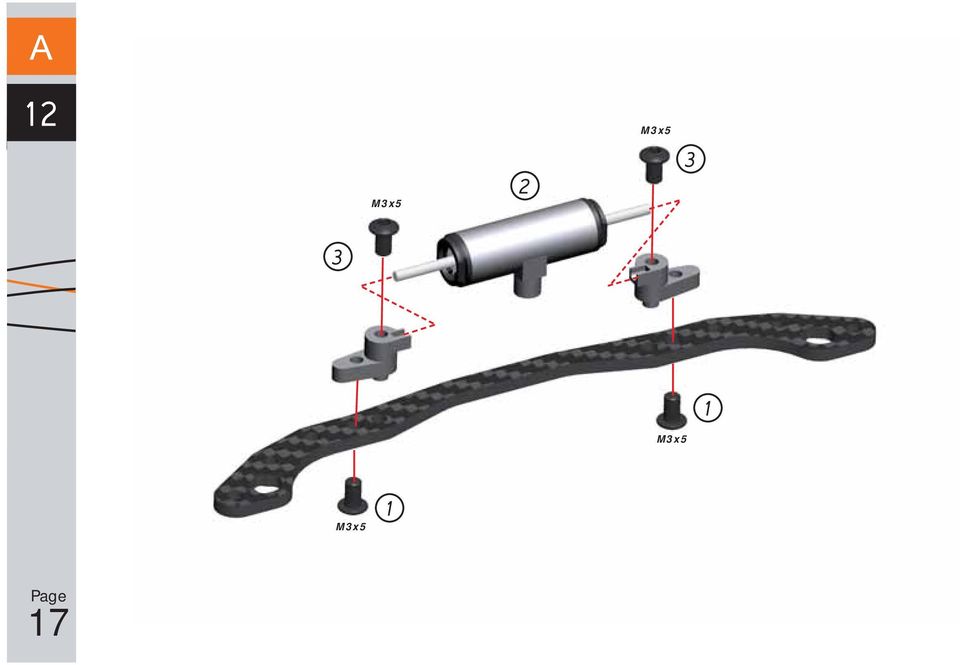
14 14 M3x5
15 Adjust movement and play with these screws Tighten these screws after assembling the links M2x6 M2x6 M3x5 M2x6 M3x5 M2x6 15 M3x5 Adjust movement and play with these screws M3x5

16 Unscrew the bottom half of the pre-assembled shock absorbers. 3 Massage some shock oil into the shock sponge before re-assembling the shock absorber FILLING Fill the shock body with the supplied shock absorber oil. BLEEDING Let the oil settle and allow the air to escape. FOR BOTH SHOCKS With the shock body filled with oil, slowly screw the end of the shock back onto the shock body. IMPORTANT! Do not cross thread! Oil will overflow through the built-in bleed channel in the threads. Tighten carefully until the bottom half seats against the shock body

17 M3x5 M3x5 M3x5 M3x5 17
18 M3x6 3mm M3x6 M3x10 M3x6 M3x6 M3x6 18

19 Note Spring washer orientation 19 Silicone Grease

20 Note Insert orientation M3x8 20 Ride Height of 3.5-4mm

21 M2.5x8 21 M3x6
22 22 M3x5
23 M3x6 NOT INCLUDED M3x8 M3x6 23 Use the following servo saver insert with these brands of servos Sanwa / KO / JR 24 - Hitec 25 - Futaba
24 NOT INCLUDED M3x6 24 M3x6
25 mm
26 M3x10 M3x10 26 M3x10 M3x10
27 Insert position for mounting the cells to the rear Insert position for mounting the cells to the front M3x5 M3x5 27
28 M3x8 M3x4 28
29 29
30
31
32 ??????
33
34
35 S120L Manual Decal sheets S120L (2) FRONT SUSPENSION Pivot ball-uni-4-5mm Bumpsteershim 3x6x0,5 (10) Upper Arm Mount 9L Upper Arm Mount 9R Distance Plate for Lower Arm 0.5mm Pivot Ball for Front Suspension Adjust Nut for Front Suspension Distance Shim for Upper Arms Hinge Pin Kingpin Pivot Ball for Upper Suspension Arm Stub Axle Upper Arm Adapter Upper Suspension Arm left Upper Suspension Arm right Distance Plate for Upper Arms Lower Suspension Arm left Lower Suspension Arm right Offset Steering Block left Offset Steering Block right Front nylon set O-ring 2.3 x 1.5mm (10) Wheel Nut low M Insert for lower A arm (4) Cross brace tube L+R S120L (3) Baljoint 4,5 (4) Front spring 22lbs S120L (2) Front spring 18lbs S120L (2) Front spring 26lbs S120L (2) CENTRAL ASSEMBLY Pivot ball-uni-4-5mm Antenna Shock Mount L+R Steering Rod Bumpsteershim 3x6x0,5 (10) Battery Insert Servo Saver Servo Saver insert 25T Servo Saver insert 23T Servo Saver insert 24T Chassis carbon 2.5mm S120L Cross brace S120L Side-link S120L (2) Center shock mount alu Shock bracket carbon S120L Pivot ball S120L (5) Pod pivot support S120L Standoff alu S120L (2) Spring retainer S120L (4) Servo mount alu S120L (3) Baljoint 4,5 (4) Side spring 5,5lbs S120L (2) REAR ASSEMBLY Pivot ball-uni-4-5mm Left side Clamp Hub M3x8mm Socket Screw special-head Bearing Adapter set (9x2) Pivotball with shaft (2) Pivotball shim (2) Shock rocker S120L Lower pod plate carbon S120L Top plate carbon S120L Motor pod left alu S120L Motor pod right alu S120L Motor pod backplate alu S120L Rear axle carbon S120L DIFFERENTIAL Trust Bearing Adapter Diff Balls,1/ Diff spring washer (4) Diff lock nut M4 (10) Differential-set S120L Diff hub S120L Diff washer S120L (2) SHOCK ABSORBERS Monoshock Body Shock Body Shock Spring Holder Revision set (o-ring, washers, clips) Shock Spring Adjust Nut Shock Cap Shock Seal Washer Shock Piston 3-hole Shock Piston 2-hole Monoshock Cap Monoshock Shock shaft Shock shaft Foam Insert for Shock Shock-absorber-set Mono-shock-absorber-set O-ring 6.0 x 1.0mm (10) O-ring 2.0 x 2.0mm (10) O-ring for spring adjuster (5) Baljoint 4,5 short (2) Center spring 14lbs S120L BODYMOUNT Body Adjust Nut Body Mount Body Mount front BEARINGS Axial Ball Bearing 4.2x9x Ball Bearing flanged 1/4x3/8x1/8 (2) Ball Bearing 1/4x3/8x1/8 (2) Ball bearing, flanged 1/8x5/16x9/64 (2) Bearing-set standard FASTENERS screw allen countersunk m3x10 (10) screw allen countersunk M3x8 (10) screw allen roundhead m3x6 (10) screw allen roundhead m3x10 (10) setscrew allen m3x8 (10) setscrew allen m3x3 (10)
36 screw allen countersunk m3x6 (10) screw allen roundhead m3x8 (10) screw allen countersunk m3x20 (10) screw allen countersunk m3x12 (10) screw allen roundhead m3x5 (10) Screw allen countersunk M2,5x10 (10) Screw allen countersunk M2,5x8 (10) Setscrew allen M3x6 (10) Nut nylock M3 (10) Screw allen cilinderhead M2x6 (10) Screw-set Nut nylock M2.2 (10) setscrew allen M3x10mm (10) setscrew allen M3x5mm (10) Screw allen countersunk M2.2x6mm (10) Screw allen countersunk M3x5mm (10) Screw allen countersunk M3x15mm (10) Roll Pin 1.5x10mm (10) C-clip 2mm (10) C-clip 3mm (10) Screw allen cilinderhead M2.2x12mm (10) Snapring 7mm (10) OPTIONALS Distance Plate for Lower Arm 1.0mm Distance Plate for Lower Arm 2.0mm Upper Arm Mount 6 L+R Upper Arm Mount 3 L+R Bearing Adapter 0.5mm Bearing Adapter 1.0mm Bearing Adapter 1.5mm Bearing Adapter 2.0mm Bearing Adapter 2.5mm Bearing Adapter 3.0mm Bearing Adapter 3.5mm Bearing Adapter 4.0mm Monoshock Shock shaft, Titanium-nitride Shock shaft, Titanium-nitride Hinge Pin Titanium Kingpin Titanium Side spring 4,5lbs S120L (2) Side spring 5,0lbs S120L (2) Side spring 6,0lbs S120L (2) Side spring 6,5lbs S120L (2) Side spring 7,0lbs S120L (2) Center spring 12lbs S120L Center spring 16lbs S120L Center spring 18lbs S120L Front spring 18lbs S120L (2) Front spring 24lbs S120L (2) Transponder riser S120L (3) Rear axle shim 6,5x8x0,25 (10) Support Lipo pack TOOLS 1468 Car-stand alu Serpent orange Tool bag Serpent MERCHANDISING 1865 Lanyard serpent grey-silver 1868 Pit-towel serpent orange 50x70cm 1869 Pit-towel serpent orange 140x60cm 1872 Rucksack serpent (35x45cm) black 1873 Rucksack serpent (48x61cm) black 1884 Decalsheet chrome 1/ Kit-bag serpent large black-orange 1982 Pit-bag Serpent medium (3 drawers) 1983 Pit-bag Serpent large (4 drawers) 1998 Cap serpent black-orange T-shirt serpent black (s) T-shirt serpent black (m) T-shirt serpent black (l) T-shirt serpent black (x)l T-shirt serpent black (xxl) Sweater serpent black (s) Sweater serpent black (m) Sweater serpent black (l) Sweater serpent black (xl) Sweater serpent black (xxl)
37 37
38
INSTRUCTION MANUAL & REFERENCE GUIDE
 INSTRUCTION MANUAL & REFERENCE GUIDE The Serpent S811 Cobra is a complete new platform for the 1/8 scale electric offroad category of racing. The Serpent S811 Cobra is designed to be a world champion,
INSTRUCTION MANUAL & REFERENCE GUIDE
 INSTRUCTION MANUAL & REFERENCE GUIDE Welcome to the Serpent owners network! By buying the Cobra GTe, you have become part of the fast growing base of Serpent drivers around the world, active in most classes
INSTRUCTION MANUAL & REFERENCE GUIDE
 INSTRUCTION MANUAL & REFERENCE GUIDE Welcome to the Serpent owners network! By buying the Cobra GT, you have become part of the fast growing base of Serpent drivers around the world, active in most classes
INSTRUCTION MANUAL & REFERENCE GUIDE
 INSTRUCTION MANUAL & REFERENCE GUIDE The Serpent S811-B 2.0 Cobra is a complete new platform for the 1/8 scale gas offroad category of racing. The Serpent S811-B 2.0 Cobra is designed to be a world champion,
E4RS/JS/JR II/III Parts List
 E4RS/JS/JR II/III Parts List Copyright: Lionel Troyon / HRC Distribution www.teammagicrc.net 03.12.2015 KF2201 Front Spool Set with Aluminium Outdrives REPLACED BY TM507213 KF2201 1 Front Spool Joints
STX ELECTRIC TOURING MODEL CAR 1:10SCALE STX-001 SOLID AXLE PULLEY ECCENTRIC CLAMP FRONT RIGHT - REAR LEFT ST03002-1
 STX STX-001 ELECTRIC TOURING MODEL CAR 1:10SCALE ST03001 SOLID AXLE PULLEY ST03001-1 SOLID AXLE KIT ST03002-1 ECCENTRIC CLAMP FRONT RIGHT - REAR LEFT ST03002-2 ECCENTRIC CLAMP FRONT LEFT - REAR RIGHT ST03003
Formula World GT 200 DRAFT COPY WWW.TEAMSPEEDMERCHANT.COM. f200.0.0d
 DRAFT COPY WWW.TEAMSPEEDMERCHANT.COM f200.0.0d 2 Introduction, Supplies and Additional Equipment Congratulations on your purchase of a Speed Merchant Formula World GT 200 competition chassis. This instruction
Build Tips for Sakura Zero S
 Build Tips for Sakura Zero S Revision Control Revision Revision Notes Report By Reviewed By Rev0 First Draft Marc Baynham Introduction The way in which a competition electric radio controlled car such
1993 SUSPENSION Volkswagen Front. EuroVan
 Article Text ARTICLE BEGINNING 1993 SUSPENSION Volkswagen Front EuroVan DESCRIPTION FWD independent suspension is an double-wishbone type with torsion bars mounted on upper control arm. Wheel is supported
6 inch A-Arm Lift Kit WARNING: 16-018/16-019. installation instructions. will fit CLUB CAR DS. included:
 Revised May 205 6-08/6-09 6 inch A-Arm Lift Kit will fit CLUB CAR DS installation instructions included: Rear Lift Blocks Main Suspension Assembly Spindles A-Arms Rear Shock Mounting Plates U-Bolts WARNING:
1/29/2008 DR50. Baja Motorsports Inc. P.O. Box 61150 Phoenix, AZ 85082 Toll Free: 888-863-2252 PART NUMBERS PRICES ARE SUBJECT TO CHANGE 1 of 45
 DR50 Toll Free: 888-863-2252 PART NUMBERS PRICES ARE SUBJECT TO CHANGE 1 of 45 CYLINDER & CYLINDER HEAD Part UPC Number Description Baja Description 1 DR50-001 842645074424 CYLINDER 1 1 2 DR50-002 842645074431
1/29/2008 DR70. Baja Motorsports Inc. P.O. Box 61150 Phoenix, AZ 85082 Toll Free: 888-863-2252 PART NUMBERS PRICES ARE SUBJECT TO CHANGE 1 of 43
 DR70 Toll Free: 888-863-2252 PART NUMBERS PRICES ARE SUBJECT TO CHANGE 1 of 43 CYLINDER & CYLINDER HEAD 1 DR70-001 883099044472 CYLINDER 1 1 2 DR70-002 883099044489 GASKET, CYLINDER 1 1 3 DR70-003 883099044496
SCION tc 2005-2008 COIL OVER SUSPENSION Preparation
 SCION tc 2005-2008 COIL OVER SUSPENSION Preparation Part Number: PTR11-21070 NOTE: Part number of this accessory may not be the same as the part number shown. Kit Contents: Item # Quantity Reqd. Description
DR90. Baja Motorsports Inc. P.O. Box 61150 Phoenix, AZ 85082 Toll Free: 888-863-2252 PART NUMBERS AND PRICES ARE SUBJECT TO CHANGE 1 of 51
 DR90 Toll Free: 888-863-2252 PART NUMBERS AND PRICES ARE SUBJECT TO CHANGE 1 of 51 CYLINDER & CYLINDER HEAD Part UPC Number Description Baja Description 1 DR90-001 842645048166 CYLINDER 1 1 2 DR90-002
HOME GYM. Model. Retain This Manual for Reference OWNER'S MANUAL. www.hyper-extension.com
 NOTE: Please read all instructions carefully before using this product Table of Contents Safety Notice www.hyper-extension.com HOME GYM 50036 Hardware Identifier Assembly Instruction Parts List Warranty
Pallet Jack. OWNER S MANUAL Model MH1230. Important Safety Instructions Assembly Instructions Parts and Hardware Identification
 OWNER S MANUAL Model MH1230 Important Safety Instructions Assembly Instructions Parts and Hardware Identification Pallet Jack CAUTION: Read, understand and follow ALL instructions before using this product
CLASS III TRUCK PARTS Baker
 CLASS III TRUCK PARTS Baker Identify replacement parts for Baker PAL, PAL-AR, PAL-WR 7.2 Instant Access to 250,000 Parts and Growing Baker PAL, PAL-AR, PAL-WR 1 000 774-1033 Toggle 26 000 757-1050 Tie
2011-14 F250 6 RADIUS ARM KIT
 92154000 Thank you for choosing Rough Country for your suspension needs. 2011-14 F250 6 RADIUS ARM KIT Rough Country recommends a certified technician installs this system. In addition to these instructions,
LG G5 Chassis Brace Gen 5 Camaro THE MOST POWERFUL HEADERS ON THE PLANET Brought to you by LG Motorsports 972-429-1963
 LG G5 Chassis Brace Gen 5 Camaro THE MOST POWERFUL HEADERS ON THE PLANET Brought to you by LG Motorsports 972-429-1963 Thank you for purchasing LG Motorsports products for your Gen 5 Camaro. Parts Inventory:
Ceriani Replica GP35R forks. Technical description
 Ceriani Replica GP35R forks Technical description This is an advanced racing replica of the GP35 forks. The legs are made from 6061 aluminium, mounted with CNC machined fittings, the stanchions are from
Gripper Kit for the Boe-Bot Robot (#28202)
") 599 Menlo Drive, Suite 100 Rocklin, California 95765, USA Office: (916) 624-8333 Fax: (916) 624-8003 General: [email protected] Technical: [email protected] Web Site: www.parallax.com Educational: www.stampsinclass.com
599 Menlo Drive, Suite 100 Rocklin, California 95765, USA Office: (916) 624-8333 Fax: (916) 624-8003 General: [email protected] Technical: [email protected] Web Site: www.parallax.com Educational: www.stampsinclass.com
SERVICE PARTS LIST PAGE 1 OF 6 BASE ASSEMBLY SPECIFY CATALOG NO. AND SERIAL NO. WHEN ORDERING PARTS 12" DUAL BEVEL COMPOUND MITER SAW B27A
 PAGE 1 OF 6 BASE ASSEMBLY 00 0 EXAMPLE: Component Parts (Small #) Are Included When Ordering The Assembly (Large #). SPECIFY CATALOG NO. AND NO. WHEN ORDERING PARTS 1 02-80-0050 Thrust Bearing (1) 2 05-80-0510
DR90. Baja Motorsports Inc. P.O. Box 61150 Phoenix, AZ 85082 Toll Free: 888-863-2252 PART NUMBERS AND PRICES ARE SUBJECT TO CHANGE 1 of 51
 DR90 Toll Free: 888-863-2252 PART NUMBERS AND PRICES ARE SUBJECT TO CHANGE 1 of 51 CYLINDER & CYLINDER HEAD 1 DR90-001 842645048166 CYLINDER 1 1 2 DR90-002 842645048173 GASKET, CYLINDER 1 1 3 DR90-003
BR150 Pmi Baja Reaction 150cc Go Kart (VIN PREFIX L4VM)
") Page 1 of 21 Product Information Baja Web > Product Information > Parts Lists > GOKART > BR150 Pmi Baja Reaction 150cc Go Kart (VIN PREFIX L4VM) BR150 Pmi Baja Reaction 150cc Go Kart (VIN PREFIX L4VM)
Page 1 of 21 Product Information Baja Web > Product Information > Parts Lists > GOKART > BR150 Pmi Baja Reaction 150cc Go Kart (VIN PREFIX L4VM) BR150 Pmi Baja Reaction 150cc Go Kart (VIN PREFIX L4VM)
LIFT-505. BMF Lift Kit. Yamaha Drive Gas or Electric. Installation Instructions
 LIFT-505 BMF Lift Kit Yamaha Drive Gas or Electric Installation Instructions Contents of LIFT-505 Yamaha Drive BMF Lift Kit: a (1 ea.) BMF A-Arm Assembly b (1 ea.) Driver Side Shock Tower c (1 ea.) Passenger
MUSTANG II IFS COMPLETE PARTS PACKAGE
 MUSTANG II IFS COMPLETE PARTS PACKAGE Your Southern Rods & Parts Mustang II IFS Parts Package contains the following items: 1 pr) Upper Control Arms (2023) 1) Upper Arm Bolt Kit (MP-001-A) 1 pr) Lower
MODEL 565E - 22 TON AIR/HYDRAULIC AXLE JACK
 1 565AKHU HYDRAULIC 1.22 O-RING - 2 REQUIRED UNIT 1.23 O-RING COMPLETE 1.24 TEFLON O-RING 2 REQUIRED 1.3 EXTENSION SCREW 1.3A SPRING PIN 1.4 SPRING SUPPORT 1.5 SCREW BUSHING 1.6 Y SHAPE SEAL RING 1.7 HEAD
FOR ANY QUESTIONS, PLEASE CALL US @ 727.347.9915 M-F 8:00a.m.-8:00p.m. EST. REAR BRAKES 1 AEROSPACE COMPONENTS 727.347.9915
 REAR BRAKES 1 AEROSPACE COMPONENTS 727.347.9915 REAR BRAKES Before getting started, remove all stock braking components. Pre-assembly of parts: Clean the bolts and the threads in the hat with acetone.
46431x92A Garden Tractor (1998) Page 1 of 16 Body Chassis
 Page 1 of 16 Body Chassis") 46431x92A Garden Tractor (1998) Page 1 of 16 Body Chassis 46431x92A Garden Tractor (1998) Page 2 of 16 Body Chassis 1 092546E701 Bracket, Seat 2 091963 Z Plate Assembly, Switch 3 164X26 Spring, Compression
46431x92A Garden Tractor (1998) Page 1 of 16 Body Chassis 46431x92A Garden Tractor (1998) Page 2 of 16 Body Chassis 1 092546E701 Bracket, Seat 2 091963 Z Plate Assembly, Switch 3 164X26 Spring, Compression
CHAPTER 2 : STERLING MIDI JUNIOR AND STERLING MIDI JUNIOR FOUR
 CHAPTER 2 : STERLING MIDI JUNIOR AND STERLING MIDI JUNIOR FOUR Sterling Midi Junior is a transportable rear wheel drive, three or four wheel electric powered Scoota with pneumatic tyres, upolstered seat
1. Lay out 2 pieces of 7/8" tubing and mark for bending as shown. Remember that the bend is in the shaded area as shown below in Figure 1.
 MINI BIKE PLANS Page 1 INTRODUCTION Before starting to build your Mini-Bike, be sure that you have all the parts shown on the material list. You will note that tubing has been used in the construction.
DR125 and DR150 Hensim Dirt Runner 125cc and 150cc Dirt Bike (VIN PREFIX LLCH or LUAH)
") Parts Lists - DR125 and DR150 Hensim Dirt Runner 125cc and 150cc Dirt Bike (VIN PR... Page 1 of 25 Product Information Baja Web > Product Information > Parts Lists > DIRTBIKE > DR125 and DR150 Hensim Dirt
Parts Lists - DR125 and DR150 Hensim Dirt Runner 125cc and 150cc Dirt Bike (VIN PR... Page 1 of 25 Product Information Baja Web > Product Information > Parts Lists > DIRTBIKE > DR125 and DR150 Hensim Dirt
INSTRUCTION MANUAL. Black Angel. www.copterx.com. Features. Kit Helicopter. Copyright 2009 KY MODEL Company Limited.
 INSTRUCTION MANUAL Features - Carbon fiber main blade, tail blade, fly paddle, tail fin for extra weight saving and durability. - CNC machined high grade aluminum rotor head and tail gear box to ensure
1/29/2008 DR125 / DR150. Baja Motorsports Inc. P.O. Box 61150 Phoenix, AZ 85082 Toll Free: 888-863-2252 PARTS AND PRICES ARE SUBJECT TO CHANGE 1 of 55
 DR125 / DR150 Toll Free: 888-863-2252 PARTS AND PRICES ARE SUBJECT TO CHANGE 1 of 55 CYLINDER HEAD ASSY. 1 125-001 883099006937 CYLINDER HEAD COVER 1 1 2 125-002 883099006944 BOLT M6X28 2 3 3 125-003 883099006951
Slide the new steering column shaft through the steering column from the driver compartment.
 Slide the new steering column shaft through the steering column from the driver compartment. Push the column shaft through the steering column until the machined end is out past the column lower bushing.
DR50 Hensim Dirt Runner 49cc Dirt Bike (VIN PREFIX LLCH or LUAH)
") Page 1 of 21 Product Information Baja Web > Product Information > Parts Lists > DIRTBIKE > DR50 Hensim Dirt Runner 49cc Dirt Bike (VIN PREFIX LLCH or LUAH) DR50 Hensim Dirt Runner 49cc Dirt Bike (VIN PREFIX
Page 1 of 21 Product Information Baja Web > Product Information > Parts Lists > DIRTBIKE > DR50 Hensim Dirt Runner 49cc Dirt Bike (VIN PREFIX LLCH or LUAH) DR50 Hensim Dirt Runner 49cc Dirt Bike (VIN PREFIX
SELF-STEERING AXLE TABLE OF CONTENTS
 SELF-STEERING AXLE TABLE OF CONTENTS Section 1 - Introduction Section 2 - Pre-Installation Check List Section 3 - Ride Height Adjustments Section 4 - Suspension Mount Section 5 - Axle Mount Section 6 -
STEERING HANDLEBAR/FRONT WHEEL/ FRONT SHOCK ABSORBER
 14 14 STEERING HANDLEBAR/FRONT WHEEL/ SCHEMATIC DRAWING ------------------------------------------------- 14-1 SERVICE INFORMATION------------------------------------------------ 14-2 TROUBLESHOOTING-----------------------------------------------------
TABLE OF CONTENTS. Section 1 - Assembling your new pit bike.
 Orion Pit Bike Sales Owners Manual (All information and content is the property of Orion Pit Bike Sales. Any attempt to copy or resell is a direct violation of our copyright. All violators will be prosecuted)
ILLUSTRATED PARTS LIST
 TW400 WITH 390cc HONDA ENGINE 390cc 2 WHEEL DRIVE UTILITY VEHICLE ILLUSTRATED S LIST 390cc 2WD B O D Y D I A G R A M 390cc 2WD F R A M E D I A G R A M 390cc 2WD D R I V E T R A I N D I A G R A M DESCRIPTION
Verify caster, camber and toe-in are correct before proceeding.
 If rotating the tie rod end 360 degrees changes the toe-in too much, use the rack tie rod to make smaller adjustments. Put the tie rod end in the steering arm and snug the castle nut before adjusting.
125 DUKE EU 2011 SPARE PARTS MANUAL: CHASSIS ENGLISH ART.NO.: 3CF8003K4EN
 SPARE PARTS MANUAL: CHASSIS ART.NO.: 3CF8003K4EN ENGLISH INDEX FRONT FORK, TRIPLE CLAMP HANDLEBAR, CONTROLS FRAME SIDE / CENTER STAND 3x 4x 5x 6x SHOCK ABSORBER SWING ARM EXHAUST SYSTEM AIR FILTER 7x
SLACK PERFORMANCE KARTS
 SLACK PERFORMANCE KARTS SET UP GUIDE Thank you for purchasing a 2013 Slack Axiom Chassis. Performance Mfg. strives to provide you with the very best chassis and components on the market today. Your satisfaction
12. REAR WHEEL/BRAKE/SUSPENSION
 12 12 12-0 SERVICE INFORMATION... 12-1 REAR BRAKE... 12-5 TROUBLESHOOTING... 12-2 REAR SHOCK ABSORBER... 12-8 REAR WHEEL... 12-3 REAR FORK... 12-9 SERVICE INFORMATION GENERAL INSTRUCTIONS When installing
S&W Race Cars and Components, Inc.
 S&W Race Cars and Components, Inc. 11 Mennonite Church Road Spring City, PA 19475 TECH & INFORMATION: 610-948-7303 ORDERS: 1-800-523-3353 OFFICE FAX: 610-948-7342 E-Z INFO FAX 610-792-1234 CAUTION!!! -
RC4WD Trail Finder 2 SWB. 1/10 Scale 4x4 Chassis Kit
 RC4WD Trail Finder 2 SWB 1/10 Scale 4x4 Chassis Kit Recommended Tools Hex Drivers (1.5mm, 2mm, 2.5mm) Thread Lock Cross Wrench Long Nose Pliers Tips for Assembly Use good quality hex drivers to avoid
Micro Cart User's Guide
 Micro Cart User's Guide To take full advantage of the ergonomic features of your new Sun Mountain Micro Cart, please read the following information. SUN MOUNTAIN 1 Your Micro Cart has several innovative
2510/2550 Dust Control Burnisher
 250/2550 Dust Control Burnisher Operator and Parts Manual TENNANT COMPANY Commercial Products 2875 RANSOM STREET HOLLAND MI 49424 U.S.A. FAX: 800 678 4240 CUSTOMER SERVICE: 800-982 7658 607597 Rev. 0 (2-00)
1/10 SCALE 4x4 TRUCK KIT
 1/10 SCALE 4x4 TRUCK KIT Recommended Tools Hex Drivers (1.5mm, 2mm, 2.5mm) Thread Lock Cross Wrench Long Nose Pliers Tips for Assembly Use good quality hex drivers to avoid stripping screw heads. Use thread
Trillium 40 Axis Spring Tensioner Wire Replacement Instructions
 Trillium 40 Axis Spring Tensioner Wire Replacement Instructions 1 Overview The objective is to replace the broken axis spring tensioner wire. This requires the following tasks: 1. Remove the seismometer
MEASURING WHEEL ALIGNMENT
 MEASURING WHEEL ALIGNMENT 2003-04 WHEEL ALIGNMENT Specifications & Procedures - Hummer - H2 Steering and vibration complaints are not always the result of improper alignment. One possible cause is wheel
KELGATE BRAKES - price list for 2014 Page 1
 KELGATE BRAKES - price list for 2014 Page 1 Description GBP (Kgms) Disc's:- FV = Fully Vented RV = Radially Vented New systems are supplied dry. 02-9028 Charge for bleeding per caliper 18.00 00-8080 GTK'
Number Wheeler P/N Description Set Rex P/N Notes 1 603500 Base 1 J001 2 603501 Support, Right 1 J002 3 603502 Support, Left 1 J003 4 600328 Nut (M8)
") 1 603500 Base 1 J001 2 603501 Support, Right 1 J002 3 603502 Support, Left 1 J003 4 600328 Nut (M8) 4 5 600130 Spring Washer (8mm) 4 6 600344 Roll Pin (M6x30) 4 7 600129 Socket Hd Cap Screw (M8x25) 4 8
1 603500 Base 1 J001 2 603501 Support, Right 1 J002 3 603502 Support, Left 1 J003 4 600328 Nut (M8) 4 5 600130 Spring Washer (8mm) 4 6 600344 Roll Pin (M6x30) 4 7 600129 Socket Hd Cap Screw (M8x25) 4 8
HYDRAULIC LIFT TABLE CART 2200-LB.
 HYDRAULIC LIFT TABLE CART 2200-LB. OWNER S MANUAL WARNING: Read carefully and understand all MACHINE ADJUSTMENT AND OPERATION INSTRUCTIONS before operating. Failure to follow the safety rules and other
Operations Manual 1/18TH SCALE ARR PRO VERSION OF THE CHAMPIONSHIP WINNING XXX-T
 1/18TH SCALE ARR PRO VERSION OF THE CHAMPIONSHIP WINNING XXX-T Operations Manual Introduction Thank you for choosing the Mini-T Pro from Team Losi Sport. This model requires you to install the Radio gear
2100 AD 015 0009 Mirror Elevator Ball Nut Replacement Procedure
 2100 AD 015 0009 Mirror Elevator Ball Nut Replacement Procedure Derek Guenther 1/28/2015 Rev. Purpose The purpose of this document is to describe the procedure necessary to replace one of the ball nuts
Range Road RR Series Semi-Automatic Firewood Processor. Crated Unit Assembly Manual
 Range Road RR Series Semi-Automatic Firewood Processor Crated Unit Assembly Manual 1 1) Undo 8-18mm x 19mm Nuts and bolts, 2 on each leg of top frame 2) Lift top of Metal crate off and move out of work
R O A D M A S T E R, I N C.
 R O A D M A S T E R, I N C. 11 10 20 12 4 18 19 1 2 13 16 ITEM QTY NAME MATERIAL 1...2... 1/2" x 3 1/2" BOLT... 350103-00 2...2... 1/2" x 2" BOLT... 350097-00 3...6... 1/2" x 1 1/2" BOLT... 350095-00 4...2...
FLOORTEC R 680 B. Part List US-English. Model: FLOORTEC R 680 B
 Model: Part List US-English Table of Contents General view 3 Rotomolded assembly 5 Chassis assembly 7 Drive assembly 9 Steering assembly 11 Control pedals assembly 13 Waste container assembly 15 Filter
Competition 4 & 6 suspension Lift Toyota Landcruiser & nissan patrol
 Competition 4 & 6 suspension Lift Toyota Landcruiser & nissan patrol Competition suspension Product Guidelines Guidelines for sale and recommendation of 4 (100mm) and 6 (150mm) Lifts for Toyota Landcruiser
Front axle components, overview
 just a test. Front axle components, overview 40-1 General Information Load bearing components and parts of the suspension must not be welded or straightened. Vehicles without drive axle must not be moved,
CorkSport Mazdaspeed 6 Rear Sway Bar 2006-2007 Mazdaspeed 6
 CorkSport Mazdaspeed 6 Rear Sway Bar 2006-2007 Mazdaspeed 6 Pre-Installation Notes: The CorkSport Rear Sway Bar is a great addition to improving the handling performance to the Mazdaspeed 6. It will minimize
2006 HEADSHOK Service Video #1
 LEFTY SPEED DLR DAMPING CARTRIDGE This document explains how to properly remove, disassemble, inspect, reassemble and reinstall the Lefty Speed DLR2 damping cartridge. It is a document to be used in conjunction
DYNA RIDER FOOTBOARD KIT
 -J0 REV. 0-0-0 DYNA RIDER FOOTBOARD KIT GENERAL Kit Number 000 Models For model fitment information, see the P&A Retail Catalog or the Parts and Accessories section of www.harley-davidson.com (English
BUGGY SETUP GUIDE. Volume GOKARTSUSA GY6 150, CN250. Buggy Setup Guide
 BUGGY SETUP GUIDE Volume 1 GOKARTSUSA GY6 150, CN250 Buggy Setup Guide GY6 150, CN250 DUNE BUGGY Buggy Setup Guide GOKARTSUSA.COM 2000 Highway 50 S. Lake Tahoe, CA 96150 Phone 800.603.1437 2 Table of Contents
VT SERIES. Owners Manual VARIABLE TRAVEL MOUNTAIN BIKE
 VT SERIES Owners Manual VARIABLE TRAVEL MOUNTAIN BIKE Multi purpose, Enduro, Trail ride, Light Freeride mountain bike Single pivot, linkage operated rear shock rear suspension Manitou Swinger SPV Air rear
88-98 Chevy / GMC Fullsize 4WD 6-Lug 2"- 2 1/2" Suspension Lift Installation Instructions
 88-98 Chevy / GMC Fullsize 4WD 6-Lug 2"- 2 1/2" Suspension Lift Installation Instructions Safety Glasses Metric / Standard Wrenches & Sockets Floor Jack Jack Stands Hack Saw Ball Joint Seperator Measuring
Rating when used as a weight carrying hitch without spring bars:
 BOLT-TOGETHER WEIGHT DISTRIBUTING HITCH SYSTEM Rating when used as a weight distributing hitch with spring bars: Part Number 48051 4805 48053 48054 Max Tongue Weight 550 Ibs. 750 Ibs. 1000 Ibs. 1400 lbs.
MGB Chrome Bumper Conversion
 MGB Chrome Bumper Conversion Installation Instructions For 1974 1/2-1980 MGB This kit requires cutting, welding, and painting. Professional installation recommended. Note: Every MGB body is slightly different
MÁQUINAS AGRÍCOLAS JACTO S.A. EDITION
 AJ English version EDITION - 06/007 CODE - 9790 Parts catalog MÁQUINAS AGRÍCOLAS JACTO S.A. Rua Dr. Luiz Miranda, 650 7580-000 - Pompéia - SP - Brasil Tel.: +55 4 3405-00 - Fax: +55 4 345 306 E-mail: [email protected]
MAN - MERCEDES - BENZ
 SAYFA: 1 10100 10102 10103 355 353 06 15 355 353 03 15 346 353 08 15 AXLE GEAR AXLE GEAR AXLE (WITH BUSHING TYPE) (WITH BUSHING TYPE) (WITH BUSHING TYPE) 2521 2517-2521-2622 10104 10105 10106 308 350 00
2016 Price Sheet. Custom Built Replacement Chassis
 2016 Price Sheet Custom Built Replacement Chassis 5557 Chevy Car Direct Replacment Chassis 15,895 5362 Corvette Direct Replacment Chassis 15,895 5557 Chevy Car Pro Street Chassis 16,895 5362 Corvette Pro
Volkswagen Jetta, Golf, GTI 1999, 2000 Brake System 46 Brakes - Mechanical Components (Page GR-46)
") 46 Brakes - Mechanical Components (Page GR-46) Front brakes Brake pads, removing and installing Brake pads, removing and installing FN 3 brake caliper, servicing FS III brake caliper, servicing Rear wheel
46 Brakes - Mechanical Components (Page GR-46) Front brakes Brake pads, removing and installing Brake pads, removing and installing FN 3 brake caliper, servicing FS III brake caliper, servicing Rear wheel
R O A D M A S T E R, I N C.
 R O A D M A S T E R, I N C. MOUNTING BRACKET KIT 14 8 7 4 13 5 6 ITEM QTY NAME MATERIAL 1...6...1/2" x 2 1/2" BOLT... 350099-00 2...2...1/2" x 1 1/2" BOLT... 350095-00 3...8...1/2" LOCK WASHER... 350309-00
AXLE SHAFTS - FRONT. 1993 Toyota Celica DESCRIPTION REMOVAL, DISASSEMBLY, REASSEMBLY & INSTALLATION. 1993 DRIVE AXLES Toyota FWD Axle Shafts
 AXLE SHAFTS - FRONT 1993 Toyota Celica 1993 DRIVE AXLES Toyota FWD Axle Shafts Toyota; Celica DESCRIPTION Axle shafts transfer power from transaxle to driving wheels. All axle shafts consist of a shaft
for DS3 R3 USER HANDBOOK
 USER HANDBOOK for DS3 R3 2 3 4 6 10 11 11 12 13 15 14 6 8 Introduction Tuning your dampers Detailed views : Mc Pherson Eyelet / eyelet Technical datas Tightening torques Maintenance and inspection Specific
R O A D M A S T E R, I N C.
 R O A D M A S T E R, I N C. ROADMASTER, Inc. 6110 NE 127th Ave. Vancouver, WA 98682 12 10 3 11 4 5 13 7 8 360-896-0407 fax 360-735-9300 www.roadmasterinc.com ITEM QTY NAME MATERIAL 1... 4...1/2 x 1 1/2
Gravity Racing Challenge STEM Team Competition Open Class High School Division Car Assembly Plans And Rules
 Gravity Racing Challenge STEM Team Competition Open Class High School Division Car Assembly Plans And Rules 1 Table Of Contents Introduction...Page 3 Floorboard...Page 4 Step One Steering Stop Installation...Page
SECTION VII PARTS BREAKDOWN
 SECTION VII PARTS BREAKDOWN 21 REAR TINE TILLER MAIN ASSEMBLY ITEM # PART # QTY DESCRIPTION 1 SEE PAGE 25 1 ENGINE-RIGHT ANGLE DRIVE-PULLEY ASSEMBLY 2 SEE PAGE 27 1 FRAME-TRANSMISSION-HOUSING ASSEMBLY
PREASSEMBLED ELEMENTS FOR LIFTING AND SLIDING DOORS
 SYSTEM COMPONENTS PREASSEMBLED ELEMENTS FOR FIFTING AND SLIDING DOORS s r ood gn i d i l s dna gn i t f i f r o f s t neme l e de l bme s s ae r P PREASSEMBLED ELEMENTS FOR LIFTING AND SLIDING DOORS These
DOOR PARTS SECTION D-1
 DOOR PARTS SECTION D-1 1 11 10 11 9 8 1 1 7 6 10 5 4 D- DOOR ASSEMBLY ITEM NO DESCRIPTION QTY. PART NO 1 SERVICE DOOR ASSEMBLY ~ * CONTROL PANEL 1 * DOOR GUARD 1 * 4 DOOR ROLLER ASSEMBLY 1 1148-7 5 T-HANDLE
For exploded diagram and part number information, refer to the Spare Parts Catalog available on our website at www.rockshox.com.
 For exploded diagram and part number information, refer to the Spare Parts Catalog available on our website at www.rockshox.com. 2 0 0 5 D U K E A I R X C / S L / R A C E S E R V I C E G U I D E Information
INTRODUCTION KINGPIN REPLACEMENT
 KINGPIN REPLACEMENT Author: Randy Baumann All information, illustrations and specifications are based on the best information available at the time of publication. The author cannot guarantee the accuracy
PEDAL CAR - GO CART ASSEMBLY & OPERATING INSTRUCTIONS
 PEDAL CAR - GO CART 42822 ASSEMBLY & OPERATING INSTRUCTIONS 3491 Mission Oaks Blvd., Camarillo, CA 93011 Visit our Web site at: http://www.harborfreight.com Copyright 2000 by Harbor Freight Tools. All
Power Window/Power Lock Installation. To begin with you will need all the parts listed below:
 Power Window/Power Lock Installation To begin with you will need all the parts listed below: From Donor Fiero: Fiero power window regulators Power window motors (Generic GM type part) -motors are riveted
For exploded diagram and part number information, refer to the Spare Parts Catalog available on our website at www.rockshox.com.
 For exploded diagram and part number information, refer to the Spare Parts Catalog available on our website at www.rockshox.com. Information contained in this publication is subject to change at anytime
INSTRUCTIONS FXSTSB (SPRINGER) FRONT END KIT 1WARNING -J01813 REV. 10-28-99 GENERAL. INSTALLATION Bearing Races and Fork Assembly
 FRONT END KIT 1WARNING -J01813 REV. 10-28-99 GENERAL. INSTALLATION Bearing Races and Fork Assembly") INSTRUCTIONS -J08 REV. 0-28-99 GENERAL This kit is designed for installation on 996 to 999 FXSTSB model motorcycles. We recommend this kit be installed by a factory trained technician at an authorized
INSTRUCTIONS -J08 REV. 0-28-99 GENERAL This kit is designed for installation on 996 to 999 FXSTSB model motorcycles. We recommend this kit be installed by a factory trained technician at an authorized
MOVIEtube CR. Cinematography Rig. Setup Camera Sony PDW-F3 (MTCR-P-10-01) Version 03-2011 / English
 Version 03-2011 / English") MOVIEtube CR Cinematography Rig (MTCR-P-10-01) Setup Camera Sony PDW-F3 Version 03-2011 / English Step by step assembly instruction 1) The MOVIEtube CR (MTCR-P-10-01) is supplied as shown in the picture
MOVIEtube CR Cinematography Rig (MTCR-P-10-01) Setup Camera Sony PDW-F3 Version 03-2011 / English Step by step assembly instruction 1) The MOVIEtube CR (MTCR-P-10-01) is supplied as shown in the picture
Installation Instructions
 May 2, 2016 1967-1969 Camaro and 1968-74 Nova Complete Sub Frame Installation Instructions The following instructions are intended for professional installers and are guidelines only. Speedtech Performance
Wiper Motor Marinco 2.5. Installation Instructions
 Wiper Motor Marinco 2.5 Installation Instructions Wiper Motor Marinco-2.5 The Marinco 2.5 Wiper Motor Offers the Following Features: Fully sealed base and housing which allows installation in outdoor wet
NBA Arena Portable System
 REQUIRED TOOLS AND MATERIALS: Two (2) Capable Adults Tape Measure Wood Board 6 x 6 (scrap) N53 W24700 South Corporate Circle Sussex, WI 53089 U.S.A. NBA Arena Portable System Sawhorse or Support Table
AXLE SHAFTS - FRONT. 1998 Pontiac Bonneville MODEL IDENTIFICATION DESCRIPTION & OPERATION TROUBLE SHOOTING REMOVAL & INSTALLATION
 AXLE SHAFTS - FRONT 1998 Pontiac Bonneville 1998-99 DRIVE AXLES FWD Axle Shafts - Cars - "C", "G" & "H" Bodies GM Aurora, Bonneville, Eighty Eight, LeSabre, LSS, Park Avenue, Regency, Riviera MODEL IDENTIFICATION
2003 ACCORD - Automatic Transmission Removal
 2003 ACCORD - Automatic Transmission Removal Special Tools Required Engine support hanger, A and Reds AAR-T-12566 Engine hanger balancer bar VSB02C000019 Front subframe adapter VSB02C000016 These special
Table of Contents. Overview 1. Pump Disassembly 2. Control Disassembly / Reassembly 7. Pump Reassembly 13. Adjustment Procedures DR Control 19
 Table of Contents Overview 1 Pump Disassembly 2 Control Disassembly / Reassembly 7 Pump Reassembly 13 Adjustment Procedures DR Control 19 Adjustment Procedures DRG Control 20 Adjustment Procedures DFR
2008 ACCORD - Front Knuckle/Hub/Wheel Bearing Replacement (page 18-13)
") 2008 ACCORD - Front Knuckle/Hub/Wheel Bearing Replacement (page 18-13) Exploded View Special Tools Required Ball joint remover, 28 mm 07MAC-SL0A202 Hub dis/assembly tool 07GAF-SD40100 Bearing driver attachment,
2008 ACCORD - Front Knuckle/Hub/Wheel Bearing Replacement (page 18-13) Exploded View Special Tools Required Ball joint remover, 28 mm 07MAC-SL0A202 Hub dis/assembly tool 07GAF-SD40100 Bearing driver attachment,
Number Wheeler P/N Description Set Rex P/N Notes
 1 607051 Base 1 A050 2 607052 Motor Cover 1 A052 3 600778 Socket Hd Cap Screw (M8x60) 2 4 607053 Scrap Receiver 1 A053 5 607054 Tank Upper Cover 1 A054 6 607055 Oil Pot 1 A055 7 607056 Strainer 1 A056
INSTALLATION INSTRUCTIONS. 6111 Air Spring Kit 2011+ Ford F250/F-350 Single Wheel 2WD 2011+ Ford F350 Dually 2WD IMPORTANT NOTES
 INSTALLATION INSTRUCTIONS 6111 Air Spring Kit 2011+ Ford F250/F-350 Single Wheel 2WD 2011+ Ford F350 Dually 2WD Thank you for purchasing a quality Hellwig Product. PLEASE READ THIS INSTRUCTION SHEET COMPLETELY
INSTRUCTIONS AND PARTS LIST FOR MODEL 70H & 75H HAND-OPERATED HYDRAULIC PRESS
 INSTRUCTIONS AND PARTS LIST FOR MODEL 70H & 75H HAND-OPERATED HYDRAULIC PRESS SETTING UP THE PRESS FOR OPERATION For shipping convenience, the gauge, pump handle, hoist crank, screw nose and base angles
3. Loosen 3 x grub screws in the Dec end cap and unscrew the cap and counterweight shaft. NEQ6 Belt Modification Kit.
 NEQ6 Belt Modification Kit. Thank you for your purchase. Please read these instructions fully before fitting. Your package should contain 2 off 47 & 2 off 12 tooth aluminium pulleys 2 off belts 6mm wide