Dismantling or replacement by the user. Connection to an alternate power source. Malfunction due to natural disasters (fire, flood, tsunami, etc.
|
|
|
- Matthew James
- 8 years ago
- Views:
Transcription
1
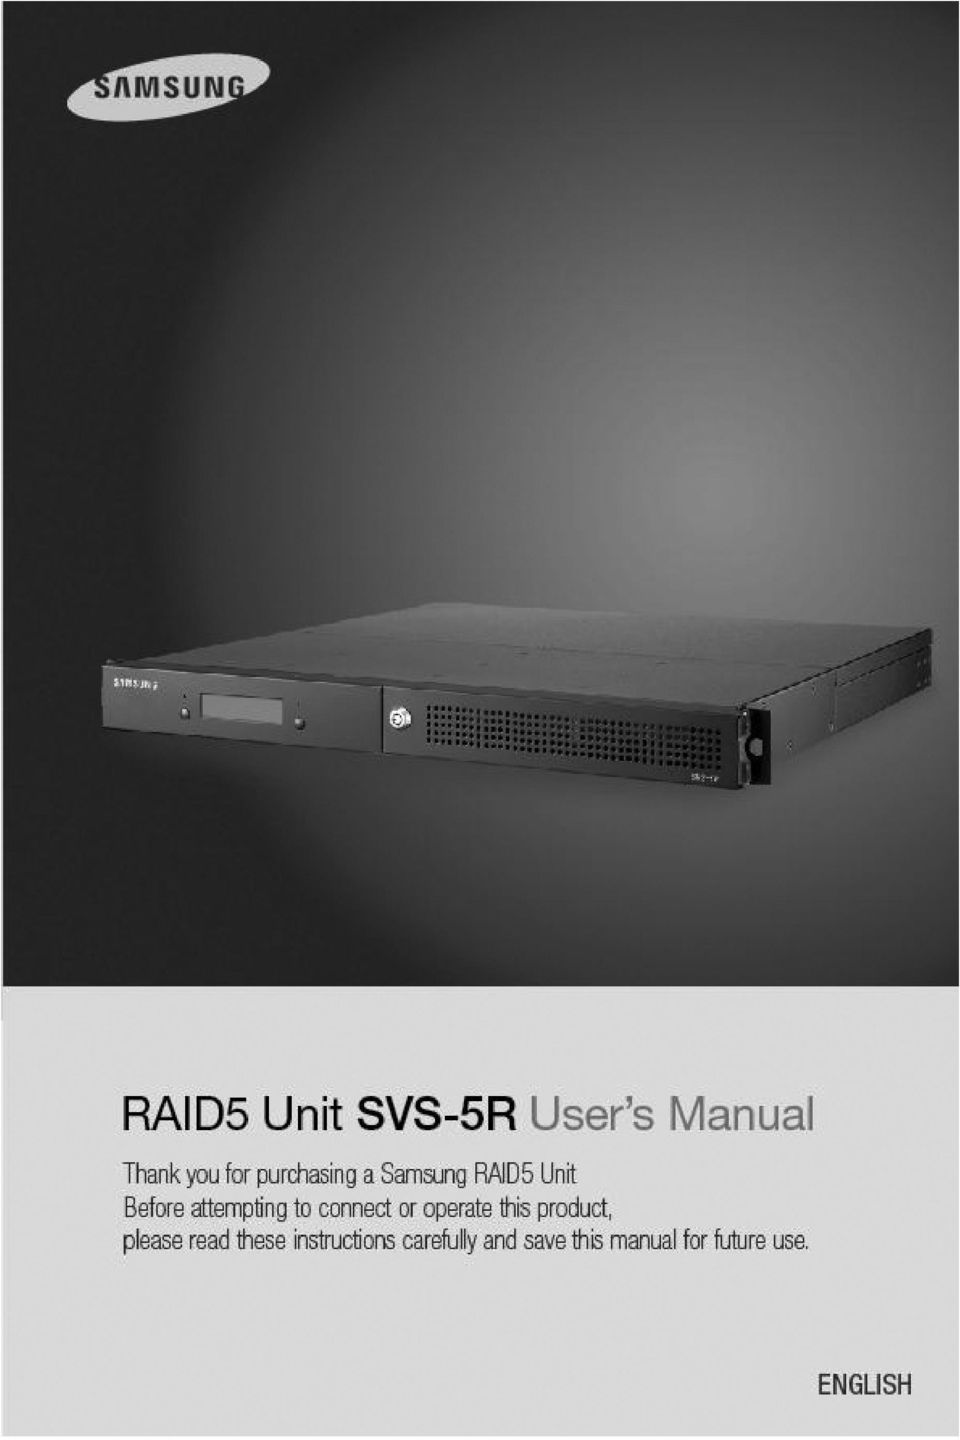
2 Preface Thank you for purchasing the Samsung DVR storage. This is a user instruction manual for the SVS-5R. The user installing and/or operating this item needs to be aware of this manual and any other manual referenced in this manual before installing or operating and use the item accordingly. This manual, and the software and hardware explained herein are protected by copyright law. All copying, reprinting and translating to other languages of part of or all of its contents without permission of Samsung Techwin Co., Ltd. are not allowed, except for fair use within the scope of copyright law. The specifications of this product are subject to change and upgrade without prior notice. Product Warranty and Limitations The manufacturer of this product is not responsible for any occurrence related to sales of this product, nor does the manufacturer delegate such responsibility to a third party. The product warranty does not cover accidents, negligence, abuse, or improper use for the item in whole or in any part. Additionally, the manufacturer does not provide warranty for any additional part or piece that was not supplied by the manufacturer. The warranty is valid for three years from the purchase date. During this period, the warranty does not cover the malfunctions in the following areas. Malfunction due to user s Dismantling or replacement by the user Connection to an alternate power source Malfunction due to natural disasters (fire, flood, tsunami, etc.) Replacement due to wear and tear (HDD, Fan, etc.) (The warranty of HDD and Fan is valid for one year from the purchase date.) This warranty specifically excludes product not of Samsung s manufacture, which may be included as an adjunctive product in any Samsung system. A service charge shall be charged for non-warranty products where the 3-year warranty has expired or voided by customer misuse as described in the cases above. 1

3 This product is a peripheral device for a security system, not a whole security system protecting against fire and theft. Samsung is not be liable, directly or indirectly, for any loss or damage which is caused by, alleged to be caused by or in connection with the use of the product. Assembly or installation of this item requires experience and technical skills, and unauthorized assembly or installation is strictly prohibited. Unauthorized assembly or installation may cause fire, electric shock, or product malfunction. Please contact your sales agent for help with safe assembly and installation. This manual, and the software and hardware explained herein may differ from your product depending on the version of the firmware and software. The product dimensions and design are subject to change and upgrade without prior notice. 2

4 Table of Contents CHAPTER 1. SAFETY WARNINGS Warning Symbols...5 CHAPTER 2. SUMMARY Features Components Part Names Front I Front II Back/Rear...12 CHAPTER 3. INSTALLATION Installing HDD Initializing a HDD...15 CHAPTER 4. OPERATION RAID Settings RAID RAID RAID RAID RAID5+Hotstandby RAID Rebuilding RAID RAID RAID RAID RAID5+Hotstandby

5 CHAPTER 5. CONNECTING TO DVR Adding/Removing a Hard Disk...37 HDD RECOMMENDED MODEL SPECIFICATION PRODUCT DIMENSIONS

6 Chapter 1. Safety Warnings 1.1 Warning Symbols Danger Misuse or wrongful operation of the item may result in death, injury, or bring about other harmful results. It indicates absolute caution must be observed when operating said item. Before Setup Please set up the proper voltage (AC 100V~240V) before connecting to a power source. Make sure the power is turned off before set up. There is a risk of shock or fire; be sure to avoid setting up in places with high humidity. To prevent electric or static shocks, connect the ground wire properly. During Use When opening the product cover, there is a risk of electric shock. Only a professional should open the cover. Do not plug in multiple products to a single power source; it is often the cause of short-circuits which may cause fire. Do not place water or any heavy items on top of the product; these may cause a malfunction. Do not use this item in a location containing propane gas, gasoline, or other flammable substances to avoid risk of explosion or fire. Do not touch the power plug with (wet) hands to avoid electric shock. Keep the cooling fan away from any electrical source. Do not pull on the power plug with any force; a damaged plug may cause electric shock or fire. Disassembly and Cleaning There is a risk of malfunction, shock, or other dangers. Do not disassemble or attempt to fix the product yourself. To prevent malfunction or shock, do not use a wet cloth or oil-based cleaning agent to clean the cover of the item. Clean the cover with a dry cloth.

7 Caution indicates caution should be observed when operating. Misuse or wrongful operation of the item may result in injury or damage to the item. It Upon Installation Please keep at least a 15cm distance between the cooling fan and the wall to provide sufficient ventilation. Do not drop or install on an unstable surface to avoid shocks and vibration. These may cause malfunctions. Do not install in areas exposed to direct sunlight or any heat source. Excessive heat may cause deformation and malfunctions. Please avoid installing a new camera while the existing camera is recording. This may decrease the video-quality. To avoid decreasing video quality, please only record after installation of a new camera is complete. During Use Avoid shock and vibration while operating or moving the item. Avoid movement, any impact, or throwing of the item during operation. Before adding hard disks from a third party, please contact your sales agent and avoid a possible malfunction. Using this product in conjunction with hard disks from unauthorized third parties is not covered by the product warranty. This product is a peripheral device for a security system, not a whole security system against fire and theft. Samsung shall not be liable, directly or indirectly, for any loss or damage which is caused by, alleged to be caused by or caused in connection with the use of this item. Samsung Techwin cares for the environment at all stages of product manufacturing to preserve the environment, and is taking a number of steps to provide customers with more environmentally friendly products. The Eco mark represents Samsung Techwin s wish to create environmentally friendly products, and indicates that the product satisfies the EU RoHS Directive. 6

8 FCC Compliance Statement Caution : Any changes or modifications in the construction of this device which are not expressly approved by the party responsible for compliance could void the user s authority to operate the equipment. NOTE : This equipment has been tested, and found to comply with the limitations for a Class A digital device, pursuant to part 15 of the FCC Rules. These limits are designed to provide reasonable protection against harmful interference when the equipment is operated in a commercial environment. This equipment generates, uses, and can radiate radio frequency energy, and if not installed and used in accordance with the instruction manual, may cause harmful interference to radio communications. Operation of this equipment in a residential area is likely to cause harmful interference, in which cause the user will be required to correct the interference at his own expense. Correct Disposal of This Product (Waste Electrical & Electronic Equipment) (Applicable in the European Union and other European countries with separate collection systems) This marking shown on the product or its literature, indicates that it should not be disposed with other household wastes at the end of its working life. To prevent possible harm to the environment or human health from uncontrolled waste disposal, please separate this from other types of wastes and recycle it responsibly to promote the sustainable reuse of material resources. Household users should contact either the retailer where they purchased this product, or their local government office, for details of where and how they can take this item for environmentally safe recycling. Business users should contact their supplier and check the terms and conditions of the purchase contract. This product should not be mixed with other commercial wastes for disposal.

9 Chapter 2. Summary Designed as a 19-inch rack mount unit, this SVS-5R external SATA (esata) storage device can be easily mounted in a cabinet along with DVR units. To achieve space efficiency, it is 1U high equipped with slots for a maximum of 4 SATA hard drives. It offers various levels of RAID (Redundant Array of Independent Disks) to provide enhanced data stability and overall system performance. Featuring the hot-swap drive bay option, the SVS-5R enables easy hard drive replacement when errors occur. When configuring the SVS-5R to RAID1, RAID0+1, RAID5, or RAID5+Hotstandby, you can replace SATA hard drives and then rebuild the RAID array when one or more connected SATA hard drives fail. 2.1 Features 1U 19-inch rack case Hardware RAID solution Maximum transfer speed of 3.0Gbps (SATA II) D1 480fps record and display frame rate Maximum 4 SATA hard drives (250GB~1TB) Supports RAID0, RAID1, RAID0+1, RAID5, and RAID5+Hotstandby Supports hot-swappable hard drive bays Front LCD for the RAID status display Error alarm with sound and light Mute switch for error alarm Supports Plug and Play and Hot Plug Maximized space efficiency and disk capacity at economical costs Expandable for more storage Supported Devices: SVS-3200, SVR-1680, SVR-1645, SVR-960, SVR-945 8

10 2.2 Components Please make sure that your product includes all of the accessories as shown below. SVS-5R HDD Main Frame (1ea) SATA Cable (1ea) USB Cable (1ea) AC Power Cord (1ea) Screws (1 bag) User s Manual (1ea) Program CD (1ea) Access Panel Lock (1 pair) Rack Mount Kit (1ea)
 Screws (1 bag) User s Manual (1ea) Program CD (1ea) Access")
11 2.3 Part Names Front I Name Function 1 Error LED (Red) The red LED turns on when the SVS-5R encounters an error. 2 Network LED (White) The white LED turns on when data is being transferred to or from the SVS-5R. 3 Access Panel Lock Locks or unlocks the front panel of the product. 4 Front LCD Shows the RAID Status of the SVS-5R, status of connected SATA hard drives, and RAID rebuilding information. 5 Settings Button Performs commands displayed in the front LCD. 10

12 2.3.2 Front II Name Function 1 Mute Switch Turns off the SVS-5R alarm sound when an error occurs during the RAID operation. 2 Power Switch Turns the SVS-5R on or off. 3 Power LED (Blue) The blue LED lights up when the SVS-5R is turned on.
 The blue LED lights up when the SVS-5R is")
13 2.3.3 Back/Rear Name Function 1 Power Connector Connects the power cord to the product. 2 Power Fan Keeps the SMPS inside the SVS-5R at an optimal temperature. 3 USB Port Used to set the SVS-5R RAID settings. 4 esata Port Used for data transfer to and from the SVS-5R.(DVR connection port) 5 Cooling FAN Keeps the SVS-5R at an optimal temperature. 12

14 Chapter 3. Installation 3.1 Installing HDD The SVS-5R supports a maximum of 4 SATA hard drives. To ensure proper installation, please follow the instructions below. Caution: All SATA hard drives must be of the same model. - Using the enclosed access panel lock, open the right front panel, and then the left front panel while holding down the two buttons on the left panel. - For the hot-swap drive bays, 1 and 3 are shaped identically to each other, while 2 and 4 are shaped identically. Please install them in the designated locations

15 - Remove a hot-swap drive bay by pulling the handle toward you. - Using the enclosed screws, secure a SATA hard drive to the hot-swap drive bay. 2 screw grooves are located on either side of the hot-swap drive bay. Caution: SATA hard drives are of different shape on the front and back. When securing a SATA hard drive to a hot-swap drive bay, please make sure to place the SATA connector on the opposite side of the handle of the drive bay. - Insert the hot-swap drive bay into the back of the main frame. Gently push the drive bay until it reaches the end of the main frame, and then secure it to the frame using the handle. Repeat the procedure to insert SATA hard drives to the other 3 hot-swap drive bays. 14

16 3.2 Initializing a HDD The SVS-5R shows the status of the RAID operation and connected SATA hard drives through an LCD on the front panel. Caution: The SVS-5R is initially set up to RAID5 4d. Should connected SATA drive fail, the front LCD indicates the degraded status of the SVS-5R. In this case, you can rebuild the RAID array by replacing the failed SATA hard drive. - Using the enclosed access panel lock, open the right front panel, and then press the power switch on the front panel for at least 2 seconds to turn on the SVS-5R. Power Switch - When the SVS-5R turns on, the front LCD displays a message as shown below. The SVS-5R is initially set up to RAID5 4d. To use 4 SATA hard drives for RAID5, please wait for 20 seconds after turning it on. To use a different RAID mode, please refer to 4-1.RAID Settings.

17 Caution: The following message appears each time the SVS-5R turns on. To keep the initial RAID settings, please wait 20 seconds after the product is turned on. To change the RAID settings, press the left button to move to the RAID resetting mode. Change RAID mode <-Okay? - If all 4 SATA hard drives are properly connected, the LCD on the front panel displays a message as shown in the window below on the left. To reset the RAID settings, press the left button. If at least one of 4 SATA hard drives fails to connect, the LCD displays a message as shown in the window below on the right. Caution: Pressing the left button resets the current RAID settings and deletes entire data saved in the SVS-5R. Please be cautious when using the button except one necessary case: to reset the RAID settings of newly equipped SATA hard drives. RAID5 4d <-Init? Cancel-> -- HALTED -- Bad Disk Count - When the RAID setting of the SVS-5R is reset successfully, the LCD displays a message as shown below. R5 4d next to the product name indicates the RAID5 mode is successfully configured for 4 SATA hard drives. d:oooo at the bottom right indicates the status of connected 4 SATA hard drives. The following initials indicate different statuses. e.g.) O: Operating properly F: Failed to connect R: Rebuilding S: on Standby X: Not equipped SVS-5R R5 4d d:oooo 16

18 Chapter 4. Operation 4.1 RAID Settings The SVS-5R supports RAID0, RAID1, RAID0+1, RAID5, and RAID5+Hotstandby. Caution: The SVS-5R is initially set up to RAID5 4d. RAID5 4d is to configure 4 SATA hard drives with the RAID5 settings. To use a different RAID mode, please use the Configuration Tool in the enclosed CD. - Connect plugs of the enclosed USB cable to the back side of the SVS-5R and a windowsinstalled PC. USB Cable - Press the power switch on the front of the SVS-5R for at least 2 seconds to turn on the SVS- 5R. Power Switch - When running Configuration Tool from the enclosed CD, the following window appears in the computer screen. The following instructions describe how to set up each available RAID mode. Caution: Please set up the RAID settings of the SVS-5R before connecting to a DVR to begin saving data.

19 4.1.1 RAID0 The SVS-5R supports RAID0. Using RAID0 requires 2 or 4 SATA hard drives. When configured to RAID0 with 2 or 4 SATA hard drives, the SVS-5R saves data as shown in the picture below. RAID0 saves data across all connected hard drives and storage; it has the fastest speed and uses the hard drives to full capacity. Caution: RAID0 has no fault tolerance; entire data of the SVS-5R is lost if even one SATA hard drive fails. RAID0 is not recommended for saving crucial data. 18

20 Block1 Block2 Block3 Block4 Block5 Block6 [For 2 HDDs] Block1 Block3 Block5 Block2 Block4 Block6 SVS-5R (RAID0) [HDD#1] Striping [HDD#2] Block1 Block2 Block3 Block4 Block5 Block6 [For 4 HDDs] SVS-5R (RAID0) Block1 Block2 Block3 Block4 Block5 Block6 Block7 Block8 Block9 Block10 Block11 Block12 [HDD#1] [HDD#2] [HDD#3] [HDD#4] Striping
![Block5 Block6 [For 4 HDDs] SVS-5R (RAID0) Block1 Block2 Block3 Block4 Block5 Block6](/docs-images/45/7978933/images/page_20.jpg "Block7 Block8 Block9 Block10 Block11 Block12 [HDD#1] [HDD#2] [HDD#3] [HDD#4]")
21 - To configure the SVS-5R to RAID0, you must change the RAID mode by using the Configuration Tool. When the following window appears on your screen, select RAID0 under Select RAID level. Under Select number of disks, select a number of connected SATA hard drives. Click Configure. - When the RAID settings are complete, the following popup window appears. Click Exit. - Clicking the Exit button resets the SVS-5R and displays the following message on the LCD at the front panel. To change the RAID mode, click the button on the left. Change RAID mode <-Okay? 20
22 - A confirmation message appears, asking if you really want to reset the RAID settings. Resetting the RAID settings will delete the entire data saved in the SVS-5R. When the following window appears, press the left button to reset the RAID settings. Warning!!! Data can be lost RAID0 4d <-Init? Cancel-> - When the RAID0 mode is successfully configured, the LCD at the front will display the following message. Connect to a DVR to begin saving data. SVS-5R R0 4d d:oooo RAID1 SVS-5R supports the RAID1. Using RAID1 requires 2 SATA hard drives; HDD#3 and HDD#4 are not used. When configured to RAID1, the SVS-5R saves data as shown in the picture below. In the RAID1 mode, each of the two hard drives stores identical data. Thus, data is not lost even if either SATA hard drive fails. When a SATA hard drive fails, the SVS-5R continues saving data to the other hard drive. To ensure data stability however, it is highly recommended that you replace the failed hard drive and rebuild the RAID array. In the RAID1 mode, total storage capacity of the SVS-5R is simply the capacity of one drive; please check total storage capacity of the SVS-5R before configuring it to RAID1.
23 Block1 Block2 Block3 Block4 Block5 Block6 Block1 Block2 Block3 Block1 Block2 Block3 SVS-5R (RAID1) [HDD#1] Mirroring [HDD#2] - To configure the SVS-5R to RAID1, you must change the RAID mode by using the Configuration Tool. When the following window appears on your screen, select RAID1 under Select RAID level. Select 2 under Select number of disks, then click Configure. - When the RAID settings are complete, the following popup window appears. Click Exit. 22
24 - Clicking the Exit button resets the SVS-5R and displays the following message on the LCD at the front panel. To change the RAID mode, press the left button. Change RAID mode <-Okay? - A confirmation message appears asking if you really want to reset the RAID settings. Resetting the RAID settings deletes ALL data saved in the SVS-5R. When the following window appears, press the left button to reset the RAID settings. Warning!!! Data can be lost RAID1 2d <-Init? Cancel-> - When the RAID1 mode is successfully configured the front LCD displays the following message. Connect to a DVR to begin saving data. SVS-5R R1 2d d:ooxx
25 4.1.3 RAID0+1 The SVS-5R supports RAID0+1. Using RAID0+1 requires 4 SATA hard drives. When configured to RAID0+1, the SVS-5R saves data as shown in the picture below. RAID0+1 uses both striping (RAID0) and mirroring (RAID1); it will store identical data to 2 RAID0 disk arrays. Thus, data is not lost even if a SATA hard drive or either disk array should fail. When a SATA hard drive or a disk array fails, the SVS-5R continues saving data to the other RAID0 disk array. To ensure data stability, however, it is highly recommended that you replace a failed hard drive and rebuild the RAID array. In the RAID0+1 mode, total storage capacity of the SVS-5R is simply the capacity of 2 drives; please check total storage capacity of the SVS-5R before configuring it to RAID0+1. The following describes possible instances when 2 SATA hard drives simultaneously fail during the RAID0+1 mode. e.g.) HDD#1, HDD#2 fail Rebuilding Can be rebuilt HDD#1, HDD#3 fail Halt, Entire data is lost HDD#1, HDD#4 fail Can be rebuilt HDD#2, HDD#3 fail Can be rebuilt HDD#2, HDD#4 fail Halt, Entire data is lost HDD#3, HDD#4 fail Can be rebuilt Block1 Block2 Block3 Block4 Block5 Block6 SVS-5R (RAID0+1) Mirroring Block1 Block2 Block1 Block2 Block3 Block4 Block3 Block4 Block5 Block6 Block5 Block6 [HDD#1] [HDD#2] [HDD#3] [HDD#4] Striping Striping 24
26 - To configure the SVS-5R to RAID0+1, you must change the RAID mode by using the Configuration Tool. When the following window appears in the screen, select RAID0+1 under Select RAID level. Select 4 under Select number of disks, then click Configure. - When the RAID settings are complete, the following popup window appears. Click Exit. - Clicking the Exit button resets the SVS-5R and displays the following message on the LCD at the front panel. To change the RAID mode, press the left button. Change RAID mode <-Okay?
27 - A confirmation message appears asking you if you really want to reset the RAID settings. Resetting the RAID settings will delete ALL saved in the SVS-5R. When the following window appears, press the left button to reset the RAID settings. Warning!!! Data can be lost RAID0+1 4d <-Init? Cancel-> - When the RAID0+1 mode is successfully configured, the LCD will display the following message. Connect to a DVR to begin saving data. SVS-5R R0+1 4d d:oooo RAID5 The SVS-5R supports RAID5. Using RAID5 requires 3 or 4 SATA hard drives. When configured to RAID5, the SVS-5R saves data as shown in the picture below. RAID5 uses block-level striping with parity data to save data across all connected SATA hard drives. Thus, data is not lost even if a hard drive fails. When a SATA hard drive fails, the SVS-5R continues saving data to the remaining hard drives. To ensure data stability however, it is highly recommended that you replace a failed hard drive and rebuild the RAID array. In the RAID5 mode, total storage capacity of the SVS-5R is the capacity of total SATA hard drives subtracted by one drive. Although RAID5 has decreased data storage capacity, it is most recommended as it is safest and has larger capacity than RAID
28 Block1 Block2 Block3 Block4 Block5 Block6 SVS-5R (RAID5) Block1 Block2 Block3 Parity(1,2,3) Block4 Block5 Parity(4,5,6) Block6 Block7 Parity(7,8,9) Block8 Block9 [HDD#1] [HDD#2] [HDD#3] [HDD#4] - To configure the SVS-5R to RAID5, you must change the RAID mode by using the Configuration Tool. When the following window appears on your screen, select RAID5 under Select RAID level. Under Select number of disks, select a number of connected SATA hard drives and click Configure. - When the RAID settings are complete, the following popup window appears. Click Exit.
29 - Clicking the Exit button resets the SVS-5R and displays the following message on the LCD at the front panel. To change the RAID mode, press the left button. Change RAID mode <-Okay? - A confirmation message appears, asking if you really want to reset the RAID settings. Resetting the RAID settings will delete ALL data saved in the SVS-5R. When the following window appears, press the left button to reset the RAID settings. Warning!!! Data can be lost RAID5 4d <-Init? Cancel-> - When the RAID5 mode is successfully configured, the LCD displays the following message. Connect to a DVR to begin saving data. SVS-5R R5 4d d:oooo 28
30 4.1.5 RAID5+Hotstandby SVS-5R supports RAID5+Hotstandby. Using RAID5+Hotstandby requires 4 SATA hard drives. When configured to RAID5+Hotstandby, the SVS-5R saves data as shown in the picture below. RAID5+Hotstandby uses 3 SATA hard drives in the RAID5 mode, while putting on the last drive on standby. Caution: In the RAID5+Hotstandby mode, HDD#4 in the SVS-5R is put on standby. When a SATA hard drive in the RAID5 mode fails, the standby drive replaces the failed drive to rebuild the RAID array and allow the SVS-5R to continue saving data. To ensure data stability however, it is highly recommended that you replace the failed hard drive immediately. In the RAID5+Hotstandby mode, total storage capacity of the SVS-5R is simply the capacity of 2 drives. It is more stable than RAID5, but has decreased storage capacity; please consider the storage capacity before using this mode. Block1 Block2 Block3 Block4 Block5 Block6 SVS-5R (RAID5+Hotstandby) Block1 Block2 Parity(1,2) Standby Block3 Parity(3,4) Block4 Parity(5,6) Block5 Block6 [HDD#1] [HDD#2] [HDD#3] [HDD#4]
31 - To configure the SVS-5R to RAID5+Hotstandby, you must change the RAID mode by using the Configuration Tool. When the following window appears in the screen, select RAID5 under Select RAID level. Select 3+Hotstandby under Select number of disks, then click Configure. - When the RAID settings are complete, the following popup window appears. Click Exit. - Clicking the Exit button resets the SVS-5R and displays the following message on the LCD at the front panel. To change the RAID mode, press the left button. Change RAID mode <-Okay? 30
32 - A confirmation message appears asking you if you really want to reset the RAID settings. Resetting the RAID settings will delete ALL data saved in the SVS-5R. When the following window appears, press the left button to reset the RAID settings. Warning!!! Data can be lost RAID5 3d+HS <-Init? Cancel-> - When the RAID5+Hotstandby mode is successfully configured, the LCD displays the following message. Connect to a DVR to begin saving data. SVS-5R R5 3d d:ooos 4.2 RAID Rebuilding When the SVS-5R is in the RAID rebuilding process and its connected DVR is in the Half D1 or D1 mode, activating the playback option may cause skipping frames. This skipping frame issue is simply caused by the RAID rebuilding process; once it is complete, the screen will no longer skip frames and no data is damaged RAID0 In the RAID0 mode, ALL data saved in the SVS-5R is lost if only ONE of the connected SATA hard drives fails. Caution: RAID0 does not offer the rebuilding option; you must replace a failed hard drive and reinitialize a RAID mode. - During the RAID0 mode when one of connected SATA hard drives fails, the front LCD of the SVS-5R displays the following message notifying you of the loss of ALL data. -- HALTED -- Bad Disk Count
33 Caution: RAID0 is not recommended for saving crucial data RAID1 During the RAID1 mode, when a SATA hard drive fails, replace it and then rebuild the RAID array. - During the RAID1 mode, when a SATA hard drive fails, the SVS-5R activates a beeping sound, as well as the RAID error LED. To disable the beeping sound, open the front panel using the access panel lock, and then press the front mute switch. The front LCD will display the SVS-5R status as Degraded. d:foxx; indicating a failed SATA hard drive. Degraded R1 2d d:foxx - When a failed SATA hard drive is replaced with a new one, the LCD displays the following message. Press the left button to start rebuilding the RAID array. RAID rebuilding? <-Okay? - During the rebuilding process, the front LCD displays the following message. This indicates a rebuilding SATA hard drive and the remaining time. Rebuild d:roxx 1h:31m - When the RAID array is successfully rebuilt, the front LCD displays the following message. SVS-5R R1 2d d:ooxx 32
34 4.2.3 RAID0+1 During the RAID0+1 mode, when a SATA hard drive fails, replace it and then rebuild the RAID array. - During the RAID0+1 mode, when a SATA hard drive fails, the SVS-5R activates beeping sounds and the RAID error LED. To disable the beeping sounds, open the front panel using the access panel lock, and then press the mute switch. The front LCD will display the SVS-5R status as Degraded. d:fooo; indicating a failed SATA hard drive. Degraded R0+1 4d d:fooo - When the failed SATA hard drive is replaced with a new one, the LCD displays the following message. Press the left button to start rebuilding the RAID array. RAID rebuilding? <-Okay? - During the rebuilding process, the front LCD displays the following message. It indicates a rebuilding SATA hard drive, and the time remaining until completion. Rebuild d:rooo 1h:31m - When the RAID array is successfully rebuilt, the front LCD displays the following message. SVS-5R R0+1 4d d:oooo
35 4.2.4 RAID5 During the RAID5 mode, when a SATA hard drive fails, replace it and then rebuild the RAID array. - During the RAID1 mode, when a SATA hard drive fails, the SVS-5R activates beeping sounds and the RAID error LED. To disable the beeping sounds, open the front panel using the access panel lock, and then press the mute switch. The front LCD will display the SVS-5R status as Degraded. d:fooo indicates a failed SATA hard drive. Degraded R5 4d d:fooo - When the failed SATA hard drive is replaced with a new one, the LCD displays the following message. Press the left button to start rebuilding the RAID array. RAID rebuilding? <-Okay? - During the rebuilding process, the front LCD displays the following message to indicate a SATA hard drive rebuilding, and the time remaining until completion. Rebuild d:rooo 1h:31m - When the RAID array is successfully rebuilt, the front LCD displays the following message. SVS-5R R5 4d d:oooo 34
36 4.2.5 RAID5+Hotstandby During the RAID5+Hotstandby mode, when a SATA hard drive fails, another hard drive in standby replaces the failed drive and rebuilds the RAID array. When replacing the failed SATA hard drive, the new hard drive is automatically set to standby status. - During the RAID5+Hotstandby mode, when a SATA hard drive fails, the SVS-5R activates beeping sounds and the RAID error LED. To disable the beeping sounds, open the front panel using the access panel lock, and then press the front mute switch. Check the front LCD to make sure that the standby SATA hard drive has replaced the failed drive and begun rebuilding the RAID array automatically. d:foor indicates both the failed SATA hard drive and rebuilding one as well as the time to remaining rebuild the RAID array. Rebuild d:foor 1h:31m SVS-5R R5 3d d:ooos - When the failed SATA hard drive is replaced with a new one, the LCD displays the following message. To put the new hard drive on standby, press the left button. RAID rebuilding? <-Okay? - The new hard drive is in standby mode while the RAID is being rebuilt. Rebuild d:soor 1h:31m - When the RAID array is successfully rebuilt, the front LCD displays the following message. SVS-5R R5 3d d:sooo
37 Chapter 5. Connecting to DVR The SVS-5R HDD extension unit uses the esata port to connect to a DVR. To ensure proper installation, please follow the instructions below. Applicable Models: SVR-3200, SVR-1680, SVR-1645, SVR-960, SVR Please check the esata port on the back side of the SVS-5R. esata Port - Connect plugs of the enclosed esata cable to the esata port of a DVR and the SVS-5R. Caution: Please use the enclosed esata cable to connect the SVS-5R to a DVR. 36
38 5.1 Adding/Removing a Hard Disk This section describes how to add, remove or format a hard disk. Select System Setup/Disk in the menu. Disk Manager Disk Manager is used to manage internal and external HDDs. It manages HDD status, bad blocks, disk size, enabled/disabled status, etc.
39 Type Model Bad Block Size( in MB) Enabled (Yes/No) : Displays disk locations and types. Int A (Internal A HDD), Int B (Internal B HDD), Ext (External HDD) : Displays HDD models. : Displays HDDs with bad blocks. 0 is displayed when there are no problems. Nothing is displayed for HDDs not in use. : Displays HDD sizes in MB. : Enables or disables HDDs. Yes: Enabled / No: Disabled To Change HDD to Yes - Enabled: While selecting No, press the [Enter] button or use the mouse wheel to open the notice window, which shows the following message: - Warning: This disk is usable without being formatted. Do you want to format the disk anyway? - - Select No to keep the previous data stored in the HDD and change it to Enabled-Yes. - Select Yes to delete the previous data stored in the HDD and change it to Enabled-Yes. To change HDD to No - Enabled: While selecting Yes, press the [Enter] button or use the mouse wheel to open the notice window to display the following message: - Warning: Do you want to remove the disk? - Select Yes to open the The disk has been removed. message and change the HDD to Enabled-No. - The HDD is now unused. Caution: The SVS-5R does not offer you to save data selectively to a hard drive; it automatically starts saving data starting from a last-enabled HDD. 38
40 HDD Recommended Model Seagate Technology Western Digital Size Model Size Model 1,000GB ST SV 1,000GB WD10EVCS 750GB ST SCE 750GB WD7500AVCS 500GB ST SCE 500GB WD5000AVJS 250GB ST SCE 250GB WD2500AVJS Specification SVS-5R Transmission Speed Up to 3.0Gbps (SATA II) Maximum Capacity Up to 4TB Internal HDD Up to 4 SATA HDDs (Support Hot-Swap Function) RAID RAID 0,1,0+1,5 esata 1 External SATA ports for DVR connection USB USB2.0, RAID configuration only Operating Temperature +5 C ~ +45 C (+41 F ~ +113 F) Operating Humidity 20%RH ~ 70%RH Input Voltage 115~230V AC ±10%, 50/60 Hz, Autoranging Dimensions (W H D) 482ⅹ44 433mm (18.97" 1.73" 17.04") Weight(4X hard disks) Approx. 6.4Kg (14.1 lb) Rack Mount Kit For mounting one unit in an EIA 19-inch rack Supported Devices SVR-3200/1680/1645/960/945 Certifications FCC (Class A), UL/cUL listed, CE (Class A)
41 Product Dimensions 40
42
Taurus Super-S3 LCM. Dual-Bay RAID Storage Enclosure for two 3.5-inch Serial ATA Hard Drives. User Manual March 31, 2014 v1.2 www.akitio.
 Dual-Bay RAID Storage Enclosure for two 3.5-inch Serial ATA Hard Drives User Manual March 31, 2014 v1.2 www.akitio.com EN Table of Contents Table of Contents 1 Introduction... 1 1.1 Technical Specifications...
esata External Storage
 esata External Storage Operation Manual DA-ES110 Before reading this manual This operation manual contains basic instruction on installing and using esata External Storage, an IDIS product. Users who are
Hydra Super-S Combo. 4-Bay RAID Storage Enclosure (3.5 SATA HDD) User Manual July 29, 2009 - v1.3
 User Manual July 29, 2009 - v1.3") 4-Bay RAID Storage Enclosure (3.5 SATA HDD) User Manual July 29, 2009 - v1.3 EN Introduction 1 Introduction 1.1 System Requirements 1.1.1 PC Requirements Minimum Intel Pentium III CPU 500MHz, 128MB RAM
4-Bay RAID Storage Enclosure (3.5 SATA HDD) User Manual July 29, 2009 - v1.3 EN Introduction 1 Introduction 1.1 System Requirements 1.1.1 PC Requirements Minimum Intel Pentium III CPU 500MHz, 128MB RAM
ICMP HDD. Installation manual
 ICMP HDD Installation manual R5905769/02 17/04/2015 Barco nv Noordlaan 5, B-8520 Kuurne Phone: +32 56.36.82.11 Fax: +32 56.36.883.86 Support: www.barco.com/en/support Visit us at the web: www.barco.com
1. User Safety Instructions
 Please note that this product is an Electromagnetic Compatibility (A-class) device that is meant to benefit a seller or user outside of home-use. It is the sole responsibility of the user to recover any
Hydra esata. 4-Bay RAID Storage Enclosure. User Manual January 16, 2009 - v1.0
 4-Bay RAID Storage Enclosure User Manual January 16, 2009 - v1.0 EN Table of Contents 1 Introduction... 1 1.1 System Requirements... 1 1.1.1 PC Requirements... 1 1.1.2 Mac Requirements... 1 1.1.3 Supported
Your Data Security Guardian. SafeTANK GR5630-WSB3+ User Manual. v.1.0 (Oct, 2012) www.raidon.com.tw
 www.raidon.com.tw") SafeTANK GR5630-WSB3+ User Manual v..0 (Oct, 202) Introduction Thank you for purchasing RAIDON products. This manual will introduce the GR5630-WSB3+. Before using your GR5630-WSB3+, please read this manual
SafeTANK GR5630-WSB3+ User Manual v..0 (Oct, 202) Introduction Thank you for purchasing RAIDON products. This manual will introduce the GR5630-WSB3+. Before using your GR5630-WSB3+, please read this manual
=============================== WARNING
 =============================== WARNING EXPLANATION OF GRAPHICAL SYMBOLS This symbol is intended to alert the user to the presence of unprotected dangerous voltage" within the product's enclosure that
Manual IB-3620 Series
 IB-RD3620SU3 1 IB-3620U3 CONTENT 1. Introduction... 3 1.1 General Information... 3 2. Hardware IB-3620 Series... 4 2.1 LED Indication / Button Front Panel... 4 2.2 Rear View... 5 3. HDD Installation...
XL-RAID-SATA2-USB. User Manual. v.1.2 (January, 2010)
") XL-RAID-SATA2-USB User Manual v.1.2 (January, 2010) With regard to this manual Thank you for using the product of Xtendlan Technology Inc. This manual will introduce XTENDLAN XL-RAID-SATA2-USB. Before
XL-RAID-SATA2-USB User Manual v.1.2 (January, 2010) With regard to this manual Thank you for using the product of Xtendlan Technology Inc. This manual will introduce XTENDLAN XL-RAID-SATA2-USB. Before
FUSION R400 RAID USB 3.0
 FUSION R400 RAID USB 3.0 1U Rackmount 4-Drive Hardware RAID 5 SATA Storage System with USB 3.0 Interface User s Guide For Windows Contents 1 Fusion R400 RAID USB 3.0 Features 1 2 Drive Installation and
5-BAY RAID STATION. Manual
 5-BAY RAID STATION Manual Content 1. Features 3 1.1 Overview 3 1.2 SATA features 3 1.3 USB features 4 2. Specifications 4 3. System requirements 4 4. The device at a glance 4 4.1 Rear panel 5 4.2 The LED
2» 10» 18» 26» PD3 34 00 42»
 » STARDOM Safe Capsule Series User Manual... 2» STARDOM Safe Capsule Serie Bedienungsanleitung... 10» Série STARDOM Safe Capsule Manuel de l utilisateur... 18 26 PD3500 34» Manual de usuario de STARDOM
2 Bay USB 3.0 RAID 3.5in HDD Enclosure
 2 Bay USB 3.0 RAID 3.5in HDD Enclosure SAT3520U3SR *actual product may vary from photos DE: Bedienungsanleitung - de.startech.com FR: Guide de l'utilisateur - fr.startech.com ES: Guía del usuario - es.startech.com
3.5 Dual Bay USB 3.0 RAID HDD Enclosure
 3.5 Dual Bay USB 3.0 RAID HDD Enclosure User Manual August 11, 2011 v1.1 MFG Part # MT2U3-MP BARCODE Introduction 1 Introduction 1.1 System Requirements 1.1.1 PC Requirements Minimum Intel Pentium III
User Manual. RK-2d / RK-2t. dedicated KVM switch and rackmount screen technology. Designed and manufactured by Austin Hughes
 dedicated KVM switch and rackmount screen technology User Manual RK-2d / RK-2t 1U Short Depth Keyboard Drawer Designed and manufactured by Austin Hughes 751 Legal Information First English printing, October
GENERAL INFORMATION COPYRIGHT... 3 NOTICES... 3 XD5 PRECAUTIONS... 3 INTRODUCTION... 4 FEATURES... 4 SYSTEM REQUIREMENT... 4
 1 Table of Contents GENERAL INFORMATION COPYRIGHT... 3 NOTICES... 3 XD5 PRECAUTIONS... 3 INTRODUCTION... 4 FEATURES... 4 SYSTEM REQUIREMENT... 4 XD5 FAMILULARIZATION... 5 PACKAGE CONTENTS... 5 HARDWARE
User s Manual. Home CR-H212. 2.5 2-BAY RAID Storage Enclosure
 User s Manual Home CR-H212 2.5 2-BAY RAID Storage Enclosure 1 Introduction 1.1 Features - 2-Bay Bus Powered Portable RAID Enclosure -Works with SATA HDD or SSD -Supports Big (JBOD), RAID0, RAID1, and Normal
Mercury Helios 2 ASSEMBLY MANUAL & USER GUIDE
 Mercury Helios 2 ASSEMBLY MANUAL & USER GUIDE TABLE OF CONTENTS INTRODUCTION...1 1.1 MINIMUM SYSTEM REQUIREMENTS 1.1.1 Apple Mac Requirements 1.1.2 PC Requirements 1.1.3 Supported PCIe Cards 1.2 PACKAGE
How To Use A Sata Dsa Hard Disk Storage System
 EXTERNAL RAID STORAGE OF HDDS INSTRUCTION MANUAL CAUTION RISK OF ELECTRIC SHOCK CAUTION TO REDUCE THE RISK OF ELECTRIC SHOCK, DO NOT OPEN COVER. NO USER SERVICEABLE PARTS INSIDE. REFER SERVICING TO QUALIFIED
Taurus - RAID. Dual-Bay Storage Enclosure for 3.5 Serial ATA Hard Drives. User Manual
 Dual-Bay Storage Enclosure for 3.5 Serial ATA Hard Drives User Manual v1.0 August 23, 2007 EN Table of Contents CHAPTER 1 - INTRODUCTION 1 CHAPTER 3 - SYSTEM SET UP 9 ICON KEY 1 THE TAURUS RAID 1 AVAILABLE
2 Bay FireWire 800/400/USB RAID Solution RAID 0, RAID 1, & JBOD. User Manual
 2 Bay FireWire 800/400/USB RAID Solution RAID 0, RAID 1, & JBOD User Manual CalDigit, Inc. 1941 Miraloma Ave, Unit B Placentia, CA 92870 USA www.caldigit.com The information of the products in this manual
4 Bay External Hard Drive Array RAID Tower esata USB 3.0 Enclosure. StarTech ID: SAT3540U3ER
 4 Bay External Hard Drive Array RAID Tower esata USB 3.0 Enclosure StarTech ID: SAT3540U3ER The SAT3540U3ER 4-Drive USB 3.0/eSATA to 3.5" SATA RAID Enclosure is a high-performance external RAID storage
Guardian MAXimus ASSEMBLY MANUAL & USER GUIDE
 Guardian MAXimus ASSEMBLY MANUAL & USER GUIDE TABLE OF CONTENTS 1. INTRODUCTION...1 1.1 MINIMUM SYSTEM REQUIREMENTS 1.1.1 Apple Mac Requirements 1.1.2 PC Requirements 1.1.3 Supported Drives 1.2 PACKAGE
4 Bay External Hard Drive Array RAID Tower esata USB 3.0 Enclosure. StarTech ID: SAT3540U3ER
 4 Bay External Hard Drive Array RAID Tower esata USB 3.0 Enclosure StarTech ID: SAT3540U3ER The SAT3540U3ER 4-Drive USB 3.0/eSATA to 3.5" SATA RAID Enclosure is a high-performance external RAID storage
Hydra Super-S LCM. 4-Bay RAID Storage Enclosure for four 3.5-inch Serial ATA Hard Drives. User Manual August 18, 2011 - v1.0 www.akitio.
 Hydra Super-S LCM 4-Bay RAID Storage Enclosure for four 3.5-inch Serial ATA Hard Drives User Manual August 18, 2011 - v1.0 www.akitio.com EN Hydra Super-S LCM Table of Contents Table of Contents 1 Introduction...
Version : 1.0. SR3620-2S-SB2 User Manual. SOHORAID Series
 Version : 1.0 SR3620-2S-SB2 User Manual SOHORAID Series Introduction About this Manual Thank you for using the product of RAIDON Technology Inc. This user manual will introduce the STARDOM SR3620-2S-SB2
Dual/Quad 3.5 SATA to USB 3.0 & esata External Hard Drive RAID/Non-RAID Enclosure w/fan. User s Manual
 Dual/Quad 3.5 SATA to USB 3.0 & esata External Hard Drive RAID/Non-RAID Enclosure w/fan User s Manual Package Contents: NextStar HX4/HX4R NextStar HX2R 1 2 1 2 3 4 3 4 5 6 5 6 7 1 NexStar HX4R/HX4 2 USB
How To Use An Nc Express5800 Card (Nec) With A Remote Management Card (Ec) On A Pc Or Mac Computer (Nemca) With An Ipa/Sda/Sdu) On An Ipad Or
 With A Remote Management Card (Ec) On A Pc Or Mac Computer (Nemca) With An Ipa/Sda/Sdu) On An Ipad Or") Remote Management Card User s Guide 07/2004 8115-01_RMC CONTENTS Safety Indications... 3 About Remote Management Card... 4 Components... 4 Installation / Removal / Replacement... 5 Installation... 6 Removal...
Remote Management Card User s Guide 07/2004 8115-01_RMC CONTENTS Safety Indications... 3 About Remote Management Card... 4 Components... 4 Installation / Removal / Replacement... 5 Installation... 6 Removal...
RocketStor SMART RAID
 RocketStor SMART RAID User Guide v1.0 1 Copyright HighPoint Technologies Inc., 1995-2012. All rights reserved. OS X and Macintosh are registered trademarks of Apple Corporation. All other trademarks and
NFC Communication Tray Model: HHX-IT3-Z
 INSTRUCTION MANUAL NFC Communication Tray Model: HHX-IT3-Z ENGLISH CONTENTS Introduction...3 Important safety information...4 Know your unit...6 Transferring data to the PC...7 Care and maintenance...8
User Manual. For more information visit www.caldigit.com
 User Manual For more information visit www.caldigit.com Contents 1. Introduction 03 Package Contents 06 T3 Diagram 07 2. Using the T3 08 Connecting the T3 08 How to create a RAID 09 - Mac OS X 09 - Windows
Business Audio System: Music & Messaging MP3 Player. by Grace Digital Audio. User Guide. Model No. GDI-USBM10
 Business Audio System: Music & Messaging MP3 Player by Grace Digital Audio User Guide Model No. GDI-USBM10 User Guide Contents Introduction 2 Safety & General Use Information 2 Features 3 Set Up & Operation
OWC Mercury Elite Pro Dual ASSEMBLY MANUAL & USER GUIDE
 OWC Mercury Elite Pro Dual ASSEMBLY MANUAL & USER GUIDE TABLE OF CONTENTS 1. INTRODUCTION...1 1.1 MINIMUM SYSTEM REQUIREMENTS 1.1.1 Apple Mac Requirements 1.1.2 PC Requirements 1.1.3 Supported Drives 1.2
VFS24/32HDIP. Public Display IP Monitor User Manual
 VFS24/32HDIP Public Display IP Monitor User Manual 2 Contents Before You Begin...4 Side Panel Control buttons...6 Connections...7 OSD Function...7 LCD monitor Mounting Guide...9 Getting started... 10 Power
2-Disk RAID USB and esata External Hard Drive. User Guide English
 2-Disk RAID USB and esata External Hard Drive User Guide English 1 Contents Introduction 3 Drive Contents: IMPORTANT Notice 3 Nero BACKITUP 2 Software 3 Controls, Connectors and Indicators 4 Front Panel
is605 Dual-Bay Storage Enclosure for 3.5 Serial ATA Hard Drives FW400 + FW800 + USB2.0 Combo External RAID 0, 1 Subsystem User Manual
 is605 Dual-Bay Storage Enclosure for 3.5 Serial ATA Hard Drives FW400 + FW800 + USB2.0 Combo External RAID 0, 1 Subsystem User Manual (English/Deutsch/ 中 文 ) v1.0 August 23, 2007 Table of Contents CHAPTER
3.5in esata USB Dual Removable SATA RAID External Hard Drive Enclosure StarTech ID: S352U2RER
 3.5in esata USB Dual Removable SATA RAID External Hard Drive Enclosure StarTech ID: S352U2RER This esata/usb External Dual SATA Hot-swap Hard Drive Enclosure lets you install two 3.5in SATA (SATA, SATA
7 High-Resolution Digital Photo Frame
 TM 16-1003 User s Guide 7 High-Resolution Digital Photo Frame One demo photo included, as illustrated Please read this user s guide before using your new photo frame. Package contents Photo Frame AC Adapter
USB3.0/eSATA/1394b-to-SATA II RAID SUBSYSTEM
 USB3.0/eSATA/1394b-to-SATA II RAID SUBSYSTEM Revision 1.0 Contents Preface... 3 Before You Begin... 4 Chapter 1 Introduction... 6 1.1 Technical Specification... 7 1.2 Identifying Parts of the RAID Subsystem...
Contents. Product Code -------------------------------------------------------15. Page 1
 Contents Important Safety Instructions -------------------------------------2 BT HP01 --------------------------------------------------------------4 BT HP01 Anatomy ---------------------------------------------------5
QNAP RAID Expansion Enclosure Hardware User Manual. 2014. QNAP Systems, Inc. All Rights Reserved.
 QNAP RAID Expansion Enclosure Hardware User Manual 2014. QNAP Systems, Inc. All Rights Reserved. Thank you for choosing QNAP products! This user manual provides descriptions of the hardware of the QNAP
How To Set Up A Hard Drive With A Harddrive With A 2Gb Hard Drive (I386) And 2Gb Drive (Amd64) On A Hardrive (I219) (Iee) (Amd66) (Ai219
 And 2Gb Drive (Amd64) On A Hardrive (I219) (Iee) (Amd66) (Ai219") 1 Package Contents Device User manual Power adapter Power cord USB 2.0 Cable FireWire 800 Cable (IEEE1394.B) esata cable 2 Front View of the Device A Drive eject button B LED indicator C Front door panel
1 Package Contents Device User manual Power adapter Power cord USB 2.0 Cable FireWire 800 Cable (IEEE1394.B) esata cable 2 Front View of the Device A Drive eject button B LED indicator C Front door panel
The Third Rail System User Manual
 The Third Rail System User Manual System Contents: Slim Case and Smart Battery for iphone 4 Slim Case for iphone 4 Smart Battery micro-usb Cable USB Adapter Cable User Manual Smart Battery only Smart Battery
COLOR VIDEO DOOR PHONE CDV-71BE/D
 COLOR VIDEO DOOR PHONE CDV-71BE/D 513-11, Sangdaewon-dong, Jungwon-gu, Seongnam-si, Gyeonggi-do, Korea Int l Business Dept. : Tel.; +82-31-7393-540~550 Fax.; +82-31-745-2133 Web site : www.commax.com Printed
USER S MANUAL. www.vantecusa.com
 USER S MANUAL www.vantecusa.com Package Contents: Dual 3.5 RAID Enclosure w/fan USB 3.0 & esata Interface 1 NexStar MX 2 USB 3.0 Cable 3 esata Cable 4 Power Adapter 5 User s Manual 6 Enclosure Stand 7
SMART Board 8055i and 8055i-SMP
 SMART Board 8055i and 8055i-SMP Interactive flat panel Installation guide Product registration If you register your SMART product, we ll notify you of new features and software upgrades. Register online
Mini-EPic System of RAID
 Mini-EPICa USB/IEEE 1394-to-SATA II RAID Subsystem Revision 1.2 Contents Preface... 3 Before You Begin... 4 Chapter 1 Introduction... 6 1.1 Technical Specification... 7 1.2 Identifying Parts of the RAID
DF-7506 1-to-2 SATA II RAID Box
 DF-7506 1-to-2 SATA II RAID Box Version 1.0 Table of Contents Chapter 1 Product Introduction...3 1.1 Features...3 1.1.1 Shipping Package Content...3 1.2 Front View...4 1.3 Rear View...6 1.4 Disk Drive
Verbatim PowerBay 4-Bay RAID Multi-Interface Drive Version 1.00
 Verbatim PowerBay 4-Bay RAID Multi-Interface Drive Version 1.00 User Manual Table of Contents Introduction... 2 Package Contents... 2 Controls, Connectors and Indicators... 2 About the Hard Drive... 4
Mini-2Bay RAID Subsystem, (RAID 0,1 selectable) w/ combo 1*USB 2.0 Connector and 1*eSATA (SATAII shielding) Connector User s Manual
 w/ combo 1*USB 2.0 Connector and 1*eSATA (SATAII shielding) Connector User s Manual") - 0 - Mini-2Bay RAID Subsystem, (RAID 0,1 selectable) w/ combo 1*USB 2.0 Connector and 1*eSATA (SATAII shielding) Connector User s Manual - 1-1. Product Overview Features: * Aluminum housing, anodized
- 0 - Mini-2Bay RAID Subsystem, (RAID 0,1 selectable) w/ combo 1*USB 2.0 Connector and 1*eSATA (SATAII shielding) Connector User s Manual - 1-1. Product Overview Features: * Aluminum housing, anodized
MCR1900 Media Converter 19-Slot Chassis
 MCR1900 Media Converter 19-Slot Chassis Installation Guide Part #5500304-11 Copyright Statement This document must not be reproduced in any way whatsoever, either printed or electronically, without the
esata 6G RAID PCIe 2.0 Controller Card
 esata 6G RAID PCIe 2.0 Controller Card User Manual Table of Contents Part 1: Introduction Page 3 a. Overview Page 3 b. MAXPower esata 6G RAID Features Page 3 c. What is esata 6Gb/s? Page 3 d. What is RAID?
User Manual. Video Doorphone CDV-1020AQ
 User Manual Video Doorphone CDV-1020AQ 513-11, Sangdaewon-dong, Jungwon-gu, Seongnam-si, Gyeonggi-do, Korea Int l Business Dept. Tel. : +82-31-7393-540~550 Fax. : +82-31-745-2133 Web site : www.commax.com
aseries A13B Mini Bullet Camera User Manual
 aseries A13B Mini Bullet Camera User Manual Thank you for purchasing our product. If there are any questions, or requests, please do not hesitate to contact the dealer. This manual applies to the MicroView
Tyan Computer. Transport PX22. Service Engineer s Manual
 Tyan Computer Transport PX22 Service Engineer s Manual 1 Precaution To read through the user manual, check all assembly and follow setup process before any operation on this server To keep paper clips,
How To Use An Esata External Hard Drive Enclosure (I386) With A Usb 2.0 And Usb 2/1.1 Hard Drive (I219) On A 2.5\" Hard Drive On A Mini Hard Drive Or An Ip
 With A Usb 2.0 And Usb 2/1.1 Hard Drive (I219) On A 2.5\ Hard Drive On A Mini Hard Drive Or An Ip") HDD external enclosure for data-storage mobility with USB 2.0 and esata interface USER Manual English AKASA Company notices The information contained in this document is subject to change without notice.
HDD external enclosure for data-storage mobility with USB 2.0 and esata interface USER Manual English AKASA Company notices The information contained in this document is subject to change without notice.
StorTrends 3400 Hardware Guide for Onsite Support
 StorTrends 3400 Hardware Guide for Onsite Support MAN-3400-SS 11/21/2012 Copyright 1985-2012 American Megatrends, Inc. All rights reserved. American Megatrends, Inc. 5555 Oakbrook Parkway, Building 200
BroadBand PowerShield. User Manual
 BroadBand PowerShield User Manual 990-0375G 12/2006 Chapter 1 General Information The PowerShield provides a power source for broadband telephony and other DC applications. Safety This Safety Guide contains
RAID R8 User Reference MI-U-RAID8/E1-0
 RAID R8 User Reference REF: MI-U-RAID8/E1-0 Copyright Notice 2004 Dedicated Microcomputers Group Ltd and its suppliers. All rights reserved. No part of this written material may be reproduced, stored in
User Manual Color video door phone
 User Manual Color video door phone CDV-70KM Thank you for purchasing COMMAX products. Please carefully read this User s Guide (in particular, precautions for safety) before using a product and follow instructions
ATX Mid Tower PC Case. MS800 Series. Ver. 121214
 ATX Mid Tower PC Case MS800 Series MS800 MS800 Plus Ver. 121214 ENGLISH 1 Cautionary Notes 1) Please read this manual thoroughly prior to installation. 2) Before installing, check the components and condition
How To Play Your Hard Disk Drive On A Mini Hard Disk (Ios) Or Usb (Miii) With A Hard Disk 2 (I2) Or Ios 2 (Mini Usb) With An External Hard Drive (Mini) Or Mini
 Or Usb (Miii) With A Hard Disk 2 (I2) Or Ios 2 (Mini Usb) With An External Hard Drive (Mini) Or Mini") - 0 - Mini-2Bay JBOD / RAID Subsystem, (RAID 0,1 and JBOD selectable) w/ 1*eSATA (SATAII shielding) Connector User s Manual - 1-1. Product Overview Features: * Aluminum housing, anodized surface, benefits
- 0 - Mini-2Bay JBOD / RAID Subsystem, (RAID 0,1 and JBOD selectable) w/ 1*eSATA (SATAII shielding) Connector User s Manual - 1-1. Product Overview Features: * Aluminum housing, anodized surface, benefits
OPERATOR S Manual All specifications are subject to change without notice
 OPERATOR S Manual All specifications are subject to change without notice Warning - U.S. This equipment has been tested and founded to comply with the limits for a Class A digital device pursuant to Part
How To Set Up A Hard Disk Drive With A Rkd (Sr5650) And A Hard Drive (Srs5650-Wbs1/Sb2)
 And A Hard Drive (Srs5650-Wbs1/Sb2)") Version : 1.0 SR5650-4S-WBS1 SR5650-4S-SB2 User Manual SOHORAID Series Introduction About this Manual Thank you for using the product of RAIDON Technology Inc. This user manual will introduce the STARDOM
Version : 1.0 SR5650-4S-WBS1 SR5650-4S-SB2 User Manual SOHORAID Series Introduction About this Manual Thank you for using the product of RAIDON Technology Inc. This user manual will introduce the STARDOM
ITC-BTTN Cellular Bluetooth Gateway. Owner s Manual 1
 ITC-BTTN Cellular Bluetooth Gateway Owner s Manual 1 2 Table of Contents Introduction...3 Package Contents...3 XLink Connections Diagram...4 Setup...5 Pairing your Bluetooth Cell Phone to the XLink...6
aseries DVR04/DVR08 DIGITAL VIDEO RECORDER Quick Operations Guide
 aseries DVR04/DVR08 DIGITAL VIDEO RECORDER Quick Operations Guide UD.7L0202B1365B01 Thank you for purchasing our product. If there is any question or request, please do not hesitate to contact dealer.
Meaco 30L and Meaco 40L dehumidifier instruction manual
 Meaco 30L and Meaco 40L dehumidifier instruction manual Please read this instruction manual before using the dehumidifier and keep safe for future reference SAFETY INSTRUCTIONS PLEASE READ ALL INSTRUCTIONS
SATA 150 RAID. user. Model 176767 MAN-176767-UM-1007-01
 SATA 150 RAID Controller PCI Card user manual Model 176767 MAN-176767-UM-1007-01 introduction Thank you for purchasing this MANHATTAN SATA 150 RAID Controller PCI Card, Model 176767. The easy-to-follow
Quick Installation Guide TK-209K TK-409K
 Quick Installation Guide TK-209K TK-409K Table of of Contents Contents English... 1. Before You Start... 2. How to Connect... 3. Operation... 1 1 2 4 Troubleshooting... 5 Version 09.07.2006 1. Before You
ToughTech Duo Users Manual
 ToughTech Duo Users Manual Models Covered: ToughTech Duo-QR ToughTech Duo-3SR RAID, RAID 0 and Single Drive operation modes. Default RAID Mirroring to assure data integrity and protection on the road.
Removable 2.5 SATA HDD Backup System
 Removable 2.5 SATA HDD Backup System SAT2510U3REM SAT2510U3S *actual product may vary from photos DE: Bedienungsanleitung - de.startech.com FR: Guide de l'utilisateur - fr.startech.com ES: Guía del usuario
dedicated KVM switch and rackmount screen technology User Manual IP-S101 Combo KVM Extender Designed and manufactured by Austin Hughes
 dedicated KVM switch and rackmount screen technology User Manual IP-S101 Combo KVM Extender Designed and manufactured by Austin Hughes 751 Legal Information First English printing, October 2002 Information
user s manual Battery Case model #: SPB3200 Battery Case Charger for Samsung Galaxy S 4
 user s manual model #: SPB3200 Charger for Samsung Galaxy S 4 What s Included Unpack the battery case and make sure all accessories are put aside so they will not be lost. hello. USB to Micro USB Cable
Content QUICKSTORE PORTABLE. 1. Features. 2. Specifications. 3. Parts and accessory. 4. The device at a glance. 5. Installing a SATA hard disk drive
 Manual Content 1. Features 2. Specifications 3. Parts and accessory 4. The device at a glance 5. Installing a SATA hard disk drive 6. The backup software 6.1 Installation 6.2 The user interface 6.2.1 The
HP SATA/SAS hard drive and Solid State Drive installation
 HP SATA/SAS hard drive and Solid State Drive installation This document describes how to install Serial ATA (SATA) and Serial Attached SCSI (SAS) hard drives or Solid State Drives (SSD) in an internal
VIDEO DOOR PHONE SYSTEM
 ENGLISH VIDEO DOOR PHONE SYSTEM USER MANUAL Manual covers IH-692 Master and IH-692 Slave Monitors PRECAUTIONS BEFORE INSTALLATION Connect this unit ONLY to other compatible units. Do not connect it to
FUTURE CALL PICTURE CARE PHONE MODEL: FC-1007 USER MANUAL
 FUTURE CALL PICTURE CARE PHONE MODEL: FC-1007 USER MANUAL Please follow instructions for repairing if any otherwise do not alter or repair any parts of device except specified. IMPORTANT SAFETY INSTRUCTIONS
ATTENTION RISQUE D ÉLECTROCUTION! NE PAS OUVRIR!
 Quick Start Guide ATTENTION RISQUE D ÉLECTROCUTION! NE PAS OUVRIR! CAUTION: TO REDUCE THE RISK OF ELECTRIC SHOCK, DO NOT REMOVE COVER (OR BACK). NO USER-SERVICEABLE PARTS INSIDE. REFER SER- VICING TO QUALIFIED
XL-RAID-SATA Data Backup System. User s Guide
 XL-RAID-SATA Data Backup System User s Guide Chapter 1 Introduction...1 1-1 Functions and Features... 1 1-2 Product Specification... 2 Chapter 2 Hardware Installation...3 2-1 Contents in the product package...
Recovering from a Hard Drive Failure
 APPENDIXB This appendix describes how to recover from a hard drive failure on a Multiservices Platform Series device. The process for doing so depends on the physical security product that you are using
XPanel V2. Remote Control Panel. User Manual. XILICA Audio Design
 XPanel V2 Remote Control Panel User Manual XILICA Audio Design Important Safety Instructions 1. READ THESE INSTRUCTIONS All the safety and operating instructions should be read before the product is operated.
Beckhoff onboard SATA-RAID
 Installation and operating instructions for Beckhoff onboard SATA-RAID Version: 1.3 Date: 2009-07-24 Table of contents Table of contents 1. 2. 3. 4. 5. 6. 7. General notes 2 Notes on the documentation
PAR Tablet 10 Quick Start Guide
 ParTech, Inc. 8383 Seneca Turnpike New Hartford, NY 13413 p.800.458.6898 www.partech.com PAR Tablet 10 Quick Start Guide PN 770505503 This material has been created in order to accommodate a wide range
Jarv Nmotion BTHL-201 Bluetooth Stereo Earbuds Users Guide
 Jarv Nmotion BTHL-201 Bluetooth Stereo Earbuds Users Guide Features: Bluetooth wireless technology Comfortable lightweight in-ear design with detachable sports ear hooks for added support High Definition
RAID. User Manual. For more information visit www.caldigit.com
 RAID User Manual For more information visit www.caldigit.com Contents 1. Introduction 03 Package Contents 06 T4 Diagram 07 2. Using the T4 08 Installing the Software 08 Connecting the T4 09 Create a RAID
SMART Board 8070i-SMP and 8070i
 SMART Board 8070i-SMP and 8070i Interactive flat panel Installation guide Product registration If you register your SMART product, we ll notify you of new features and software upgrades. Register online
ES-CAM2AU IP Camera. www.etiger.com
 ES-CAM2AU IP Camera www.etiger.com EN Box content Connect your smartphone to the camera - ES-CAM2AU x1 - Mounting bracket x1 - AC Adaptor x1 - User Manual x1 and apps Before using the ES-CAM2AU, download
**Please read this manual carefully before you use the product**
 -1- **Please read this manual carefully before you use the product** Description: The CEB-2355S is a multifunction storage device designed in a special body structure, which can be simply connected to
Quick Start Turning on the Tablet PC for the First Time
 User s Manual DL46 Getting Started Congratulations on your purchase of a Tablet PC. The Tablet PC is a fully functional PC with built-in LAN, and wireless connectivity. With your Tablet PC you will be
ES-CAM3A Outdoor IP Camera
 ES-CAM3A Outdoor IP Camera www.etiger.com EN Specifications - Image sensor: 1/3 CMOS, 3.15 MP - Video resolution: 160x90, 320x180, 640x360, 1280x720 (H.264) - Digital zoom: 2x - Focal: 3.6mm, Aperture:
Wall-Mounting your HP computer. User Guide
 Wall-Mounting your HP computer User Guide The only warranties for Hewlett-Packard products and services are set forth in the express statements accompanying such products and services. Nothing herein should
Ultrasonic support removal tank
 Ultrasonic support removal tank User guide and safety manual See inside for use and safety information. The Ultrasonic support removal tank automatically removes PLA support material from a printed ABS
User's Manual. Metapace L-1. Label Printer Rev. 1.00
 User's Manual Label Printer Rev. 1.00 Table of Contents Manual Information & Usage Precautions 3 1. Content Confirmation 6 2. Product Part Names 7 3. Installation & Usage 9 3-1 Power Connection 9 3-2 Interface
Portable Air Conditioner. OWNER S MANUAL Read these instructions before use. Model: MF08CESWW. Voltage rating: 115V~60Hz Power rating : 800W
 MODE ALARM Portable Air Conditioner OWNER S MANUAL Read these instructions before use 8 Model: MF08CESWW Voltage rating: 115V~60Hz Power rating : 800W Customer Support : 1-800-474-2147 For product inquiries
2-3 SAS/SATA II HDD Canister USER S MANUAL XC-23D1-SA10-0-R. Document number: MAN-00076-A
 2-3 SAS/SATA II HDD Canister XC-23D1-SA10-0-R USER S MANUAL Document number: MAN-00076-A ii Preface Important Information Warranty Our product is warranted against defects in materials and workmanship
NewAir AC-10100E / AC-10100H Portable Air Conditioner Owner s Manual PLEASE READ AND SAVE THESE INSTRUCTIONS
 NewAir AC-10100E / AC-10100H Portable Air Conditioner Owner s Manual PLEASE READ AND SAVE THESE INSTRUCTIONS ELECTRICAL SAFETY This appliance is for indoor use only. Always turn off the unit and unplug
RI-215A Operator s Manual. Part Number: 71-0045RK Revision 0 Released: 10/3/05
 RI-215A Operator s Manual Part Number: 71-0045RK Revision 0 Released: 10/3/05 Warranty RKI Instruments, Inc., warrants gas alarm equipment sold by us to be free from defects in materials and workmanship,
MICA HEATER INSTRUCTION MANUAL Model No: UHM-786 230V 50Hz 2200W
 MICA HEATER INSTRUCTION MANUAL Model No: UHM-786 230V 50Hz 2200W Safety Precautions To reduce the risk of personal injury or damage to property, basic safety precautions must be observed including the
Chapter 2 Array Configuration [SATA Setup Utility] This chapter explains array configurations using this array controller.
![Chapter 2 Array Configuration [SATA Setup Utility] This chapter explains array configurations using this array controller.](/thumbs/21/1077848.jpg "Chapter 2 Array Configuration [SATA Setup Utility] This chapter explains array configurations using this array controller.") Embedded MegaRAID SATA User's Guide Areas Covered Before Reading This Manual This section explains the notes for your safety and conventions used in this manual. Chapter 1 Overview This chapter introduces
Embedded MegaRAID SATA User's Guide Areas Covered Before Reading This Manual This section explains the notes for your safety and conventions used in this manual. Chapter 1 Overview This chapter introduces