Electrical Wiring Technical Bulletin
|
|
|
- Aubrie Shelton
- 10 years ago
- Views:
Transcription
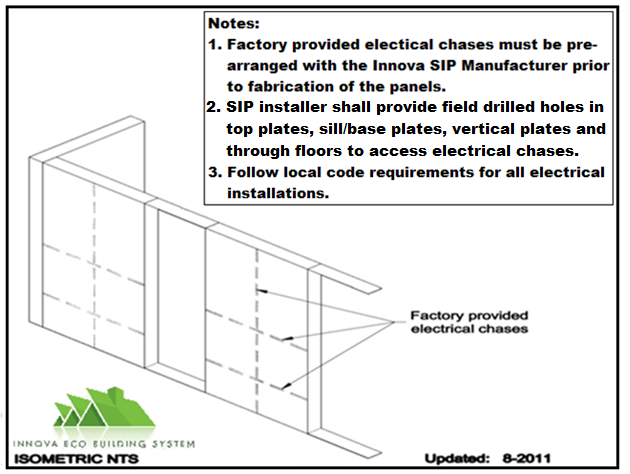
1 Electrical Wiring Technical Bulletin Overview In general, SIP construction is easier and more cost effective when things are planned and thought out before the panels are manufactured. This process will reduce the installation time in the field saving valuable time and money. Wiring in SIPs is no different than conventional construction electrical wiring. When an electrical installation in SIPs is forethought, not an afterthought, the installation will be much faster and easier. You have the option of ordering your SIPs panel package with custom installed electrical chases per your electrical drawings, factory installed generic electrical chases or you can order your panels without electrical chases and field install them in the locations necessary. Let s start out by understanding where the 1 diameter generic factory installed wire chases are located in the panel, where to drill for chases and when to do the drilling. When this drilling is done properly, the electrician should be able to wire a SIP building in about the same time as a stick-built building, or even faster as they become experienced working with the Innova Panel System. Factory Installed Wire Chases In the wall panels, Innova can include generic horizontal chases at the 16 level AFF (for outlets) and at the 44 level AFF (for switches and counter height outlets). Vertical chases, which are typically located 4 O.C., allow wire to run vertically though the wall panels to access switch locations and at other locations as needed to provide vertical wiring options for the electrician. (See figure G-10). (All wire chases are marked on the OSB or cement board surface with a 1 wide black ink marker.) Innova typically installs wire chases according to this standard, but for an additional charge, wire chases can be installed to exactly match an electrical plan. Custom wire chase placement per an electrical plan is done while the panel layout drawings are being designed. A detailed electrical plan would be required at that time to ensure proper coordination with the manufacturing process. Installing electrical chases in the field is a simple process that is detailed in this document. In roof panels, wire chases can be factory installed upon request. (Adding wire chases to roof panels will be done at a small additional charge.) When a building has a cathedral ceiling with a SIP roof, having wire chases installed in the panels will make wiring for lighting, fans, smoke detectors, etc. easier. Wiring can be run from an interior wall or can be run in conduit along an exposed overhead beam or hidden in a soffit used to conceal ductwork. There are many different options depending on the building use and floor plan. The roof ridge can also be used to run wiring from roof panel to roof panel as necessary. (See figure G-1 below) The roof ridge area is then filled with expandable foam (provided with kit) and the ridge piece (provided with kit) is installed, after the electrical wiring has been inspected by the building inspector.

2 Required Field Installed Chases and Holes As the structural insulated panels are installed, the SIP installer will need to provide an open chase way for the electrician by drilling the sill and top plates, and any lumber connecting splines as necessary to create access for the electrical wiring chases installed in the panels at the factory. If this step is skipped during panel installation, it is possible to cut and drill for access to the chases afterward, but it is much easier and faster to do this drilling during installation. When the electrician comes to the building site, they will review the electrical plan and wire run options to determine which chases to use. Most SIP buildings will still have stick-framed or metal stud framing for interior walls and conventional concrete floor systems, which give additional flexibility for wiring installations. Wiring is simplified if major horizontal wire runs take place in the floor systems, using horizontal panel chases for local runs only. When concrete slabs are installed, we recommend that the vertical chases in the panels be installed in the field to ensure proper alignment with the electrical slab rough-in. When the horizontal wire circuits must continue from one wall to another intersecting wall, the electrician can use a vertical chase to go up and over, then back down into the intersecting wall panel, or the electrician could cut a notch into the inside corner at the height of the wire chase then use this notch to pull the wire around the corner and into the intersecting wall. Wire Installation The recommended sequence for wiring is to first locate the outlet, switch, and other box locations. The locations are then marked on the interior OSB or cement board panel skin with a marker. (Boxes should be offset from the wire chase location so the box will not block the chase following installation.) Typically the electrician will use a tool like a RotoZip (figure G-3) and a template to cut the panel for the electrical boxes. After the openings are cut, the electrician will use a putty knife to pry out the cut panel and EPS foam as necessary to accommodate the electrical box. Care should be taken in not removing too much of the EPS insulation. The electrician will then fold over the end of the wire and push or pull the wire through the chases as required for the circuits. If needed, wires can be pulled using a fish tape or by a vacuum and string. Finally, the ends of the pulled wire will be inserted into the boxes and the boxes will be mounted using surface type fasteners. See detail G-2. After rough wiring is complete and the electrical boxes are mounted on the SIPs panel, carefully seal around the box using expanding foam sealant. Also, use expanding foam sealants to seal both used and unused chases at the top and bottom of the panels and anywhere else that chase openings are accessible.

3 Figure G- 1 Romex wiring installation between roof panels in roof ridge prior to foam and ridge cap piece installation Figure G-2 Figure G-3 Other Options for Wire Access Installing electrical chases in the field is a simple process. Many experienced SIP installers order the Innova building kits without electrical chases and install the chases in the field when installing the SIP panels. This is totally a matter of preference to the installer. Innova will manufacture the panels to the client s preference as long as the requirements are coordinated at the time of order. When no pre-cut panel chases are provided, there are various other options for field installation of the chases. A 1 round chase may be installed in the panel using a heated 1 steel ball bearing. Locate the area for the necessary switch or receptacle box and cut the necessary opening in the panel as described in the paragraph above. Place a 1 x 1 x 1 piece of metal angle into the panel opening pushing the angle into the midpoint of the panel. After the panel is installed and prior to installing the top plate a 1 ball bearing is heated using a portable torch. (See figure G-4) Using a level, mark a vertical line at the top inside face of the panel that is plumb with the desired electrical box location. Using vice grips the heated ball is then placed at the desired location at the top of the panel in the EPS foam area. Once the ball is positioned with your location mark, release the ball. (See figure G-5) If the panel is properly installed (plumb), the ball will melt the EPS foam to create a perfect plumb 1 round wire chase. The ball bearing will melt down to the angle positioned in the electrical box location and exit the panels face falling to the ground. Another method for field installing electrical chases is to lay the panel on its side, locate the box location on the panel face. Using a chalk line, mark the chase location on the panel face. Using a 1 conduit or #9 rebar, heat the end with a portable torch. When the end is red hot, insert the hot point into the EPS edge of the panel following the chalk line to the desired location. Remember to keep the conduit straight so that you have a properly aligned chase when finished. You can also use a long flexible drill bit to field drill the chases (see figure G-6) Additionally flush mounted chases such as WireMold can also be used for electrical options. (See figure G-7) Exposed conduit which conforms to local code requirements can also be used

4 as an option for garages and other industrial installations. (See figure G-8) In rooms where there is an aesthetic issue, like Foyers or dining rooms, it may be possible to locate the electrical outlets horizontally in the baseboard (local codes permitting), just above the floor. This makes the electrical outlet nearly go away visually since it no longer contrast with the wall color and doesn t present itself as an object intruding on the wall. (See figure G-9) Important Notes Standard Romex type wire, labeled as NM-B should be used. The wire should be sized by an electrical engineer and be of sufficient wire gauge as required for the anticipated maximum amperage loading of the building. Installing recessed lighting or can lights in a SIP roof is NOT recommended. If you wish to use recessed lighting, restrict these fixture locations to framed soffits and framed ceiling areas of the building. Figure G-4 Figure G-5 Figure G-6 Figure G-9 Baseboard Outlets Figure G-8 Commercial Wire Mold Figure G-7 Flush Mounted Wire Mold
 Important Notes Standard Romex type wire, labeled as NM-B should be used.")

5 Figure G-10

PANELIZED HOME INSTALLATION GUIDELINE
 PANELIZED HOME INSTALLATION GUIDELINE A typical home package will be constructed of Snap-N-Lock Insulated Panels clad with steel skins. 4" panels will be used for the walls, and 6" panels for the roof.
necessary for years of satisfactory service. SmartBlock insulating form concrete walls share the
 Chapter 7 PLUMBING AND ELECTRICAL 7.1 Introduction to Plumbing and Electrical Consideration of support services such as plumbing and electrical systems from the preliminary schematics phase through final
GENERAL WIRING RULES FOR HOUSES
 GENERAL WIRING RULES FOR HOUSES 1. Romex has to be installed in drilled holes in joists or studs even above suspended ceilings - No stapling to bottom edges of joists or studs. You may staple wire to flat
Fig. 2 WALL-TO-WALL PANEL CONNECTIONS CORNER WALL CONNECTION
 SIPS SCREWS WITH MINIMUM 1" PENETRATION IN WOOD MEMBER IN SIP WALL PANEL CONNECTED TO @ 24" O.C. MAXIMUM OUTSIDE SKIN EACH SIDE OF FRAMING TYP. AS RECOMMENDED BY FOAM CORE AS EACH SIDE OF FRAMING TYP.
CONSTRUCTION DETAILS & LOAD DESIGN CHARTS
 Office and Production 126 New Pace Rd., PO Box 279 Newcomerstown, OH 43832 1-800-446-2188, Fax: 740-498-4184 www.buildwithsips.com CONSTRUCTION DETAILS & LOAD DESIGN CHARTS Table of Contents Description
Cooktop Low-Profile Ventilation Hoods
 INSTALLATION GUIDE Cooktop Low-Profile Ventilation Hoods Contents Wolf Cooktop Low-Profile Ventilation Hoods........ 3 Cooktop Low-Profile Hood Specifications.......... 4 Cooktop Low-Profile Hood Installation............
March 14, 2007. Installation of Bay, Bow and Garden Windows
 March 14, 2007 Re: Installation of Bay, Bow and Garden Windows Attached are the Atrium Companies, Inc recommendation for the installation of bay, bow and garden windows. These instructions were developed
The minimum reinforcement for the stem wall is the placement of:
 PolySteel creates an ideal insulated stem wall for concrete slabs that can make this part of your project easier and faster, in addition to making your finished project more energy-efficient. Figures 3.20
DE Frame with C Series Sidelight
 TOOLS REQUIRED Tape measure 6' magnetic level 3' magnetic level Screw gun with clutch adjusted #2 phillips tip #3 phillips tip Screwdriver (used to adjust frame on will using oval slots) Pry Bar Powder
This handout is a guide only and does not contain all of the requirements of the Minnesota State Building Code or city ordinances.
 Basement Finishing Guide Community Development Department Building Inspections Division 5200 85 th Avenue North / Brooklyn Park, MN 55443 Phone: (763) 488-6379 / Fax: (763) 493-8171 6/15 www.brooklynpark.org
8/18/14. Introduction to. Framing. Terminology and Concepts
 8/18/14 Introduction to Framing Terminology and Concepts Terminology: Framing Level Two points on exactly the same horizontal plane. Square Intersecting lines or faces that form an exact 90 angle. Plumb
first look at GigaCrete s revolutionary new New Construction GigaHouse GigaHouse Utilizing GigaPanel
 first look at GigaCrete s revolutionary new New Construction GigaHouse GigaHouse Utilizing GigaPanel What is GigaCrete GigaCrete is a family of products based on low carbon footprint Green ceramic binders
INSTALLATION OF A BAY WINDOW
 INSTALLATION OF A BAY WINDOW Installation of a Bay Window These instructions relate to the replacement of an existing bay window or replacement of a straight window with a new bay window, in an opening
Electrical for Detached Garages: Updated Feb 19, 2016 for 2015 CE Code in force Jan. 1, 2016. Underground branch circuit feeding a detached garage:
 Electrical for Detached Garages: Updated Feb 19, 2016 for 2015 CE Code in force Jan. 1, 2016 * Garage construction requires permits (electrical, building) * Permits must be applied for at the time. * Dial
CLIENT. Inspection Report. 271 Front St. Alert Bay, B.C. Island Building Inspections V ANCOUVER I SLAND B. C.
 CLIENT Inspection Report 271 Front St. Alert Bay, B.C. Island Building Inspections 2013 V ANCOUVER I SLAND B. C. Elevation Photos For the Property at 271 Front Street Alert Bay, BC ELEVATION PICTURES Front
Typical Finished Basement Details
 Fauquier County, Virginia Typical Finished Basement Details Based on the 2012 International Residential Code Finished basements must be constructed in conformance with this document. For requirements,
WHI 90-Minute Rated Veneered Door Frame Installation Instructions
 No. 940-03-10 INSTALLATION INSTRUCTIONS 90 MINUTE RATED VENEERED DOOR FRAME DOOR REQUIREMENTS: Consult the door manufacturer to make sure that the doors are qualified for the hardware to be installed,
HOW TO INSTALL A BEAUTIFUL NEW KITCHEN
 HOW TO INSTALL A BEAUTIFUL NEW KITCHEN Easy to follow step-by-step kitchen cabinet installation TOOL AND MATERIAL LIST Hammer Pry bar Screwdriver Phillips Flathead Level Tape measure Pencil Straight edge
RESIDENTIAL PLUMBING ALTERATIONS PERMIT REQUIREMENTS
 RESIDENTIAL PLUMBING ALTERATIONS PERMIT REQUIREMENTS The following guidelines are intended to assist with the permit acquisition process with regard to Plumbing Alterations. Not all information, or additional
Premier & Deluxe 3-Season Room Sliding Glass Door
 DTSSGD-11 Premier & Deluxe 3-Season Room Sliding Glass Door Installation Instructions Screen Door Seal Left Side Track Top Track Assembly Right Side Track Right Side Trim Sliding Glass Door Sliding Screen
Best Barns USA Assembly Book
 Best Barns USA Assembly Book Revised November 27, 2013 the Easton - R 12'x 20' Manufactured by Reynolds Building Systems, Inc. 205 Arlington Drive Greenville, PA 16125 724-646-3775 This manual is copyrighted.
HURRICANE MITIGATION RETROFITS FOR EXISTING SITE-BUILT SINGLE FAMILY RESIDENTIAL STRUCTURES
 HURRICANE MITIGATION RETROFITS FOR EXISTING SITE-BUILT SINGLE FAMILY RESIDENTIAL STRUCTURES 101 Retrofits Required. Pursuant to Section 553.844 553.884, Florida Statutes, strengthening of existing site-built,
Guidelines for Earthquake Bracing Residential Water Heaters
 Guidelines for Earthquake Bracing Residential Water Heaters Department of General Services Division of the State Architect In accordance with the Health and Safety Code Section 19215, the Division of the
The better way to build TM. Installation Manual. EXTERIOR WALL SIPs
 The better way to build TM Installation Manual EXTERIOR WALL SIPs July 2015 EXTERIOR WALL SIPs Installation Manual Table of Contents Topics General Requirements................................... 3 Materials..............................................
Guidelines for Earthquake Bracing of Residential Water Heaters
 Guidelines for Earthquake Bracing of Residential Water Heaters Department of General Services Division of the State Architect 1102 Q Street, Suite 5100 Sacramento, CA 95814 Phone: (916) 324-7099 Fax: (916)
All-Season Sunroom Sliding Glass Door Installation Instructions
 ASRESGD-08 All-Season Sunroom Sliding Glass Door Installation Instructions Panel Frame Door Frame Left Side Foam Insulator IE241 H Bar Assembly Door Frame Top Track Panel Frame Door Frame Right Side Stationary
Mark Cramer Inspection Services, Inc.
 Mark Cramer Inspection Services, Inc. 492 Twentieth Avenue, Indian Rocks Beach, FL 34635-2970 (727) 595-4211 Fax (727) 596-7583 Certified Member #12085 American Society of Home Inspectors Construction
Acumen Enterprises, Inc.
 Hourly rates Discount w/o Rebate Electrician $78.00 10% $70.20 $70.73 HVAC Technician $78.00 10% $70.20 $70.73 Insulator $42.00 10% $37.80 $38.08 Sheet Metal Worker $74.00 10% $66.60 $67.10 Plumber/Pipefitter
2.9 WINDOW & DOOR BUCKS
 2.9 WINDOW & DOOR BUCKS Bucks provide attachment surfaces for windows and doors while holding back concrete from these openings during concrete placement. Mark the center and edges of openings as you place
DETAILED INSTALLATION GUIDE
 DETAILED INSTALLATION GUIDE Warning: Risk of Electrical Shock, Fire or Personal Injury Once Installed and your wiring is run through your SMARTWALL system there is risk of electrical shock, fire or personal
ELECTRICAL GUIDELINES FOR SINGLE-FAMILY HOME OWNERS:
 ELECTRICAL GUIDELINES FOR SINGLE-FAMILY HOME OWNERS: Chapter 12 of the Burlington Code of ordinances allows owner occupants of single family homes to do their own wiring if they choose. If you choose to
GENERAL ELECTRICAL REQUIREMENTS
 GENERAL ELECTRICAL REQUIREMENTS RECEPTACLE SPACING Within 6-feet of the edge of any door HABITABLE Not more than 12-feet apart along wall ROOMS: At all wall spaces 24 or more wide Within 24 of edge of
WASHROOM UPGRADE SIR CHARLES TUPPER BUILDING 2250 RIVERSIDE DRIVE, OTTAWA, ON SIR CHARLES TUPPER BUILDING A0.0 COVER SHEET / DRAWING LIST
 0 RIVERSIDE DRIVE, OTTAWA, ON A0.0 COVER SHEET / DRAWING LIST A0. LEGEND AND GENERAL NOTES A0. GENERAL NOTES A0. GENERAL NOTES A0. TYPICAL WASHROOM WALL/SINK SECTION A0. DETAIL - CONTROL JOINT A0. DETAIL
Installing Window and Door Mouldings
 Installing Window and Door Mouldings About Window and Door Mouldings The trim around windows and doors greatly influences the look and style of your interior. They also bridge the gaps and cover spaces
HfHMD uses LP SmartSide siding and trim.
 HfHMD uses LP SmartSide siding and trim. These products are: More durable than cement fiber board. Much more volunteer-friendly to install. When installed correctly, have a 5/50- year pro-rated warranty.
Built to Last. Built for Beauty. Good. Solid. Logix. TM
 Built to Last. Built for Beauty. Good. Solid. Logix. TM Quality, Value and Service Introducing LOGIX Insulated Concrete Forms. Based on the simple concept of interlocking blocks, LOGIX ICF gives you a
**ATTENTION** WE DO NOT PROMOTE OR ENCOURAGE YOU TO DO YOUR OWN ELECTRICAL WIRING!!! IT IS BY FAR THE MOST DANGEROUS THING YOU CAN ATTEMPT
 **ATTENTION** WE DO NOT PROMOTE OR ENCOURAGE YOU TO DO YOUR OWN ELECTRICAL WIRING!!! IT IS BY FAR THE MOST DANGEROUS THING YOU CAN ATTEMPT. YOU COULD PUT YOUR FAMILY AND WORLDLY POSSESSIONS IN DANGER!!!
Georgia Association of Home Inspectors
 Georgia Association of Home Inspectors Standards of Practice for Framing Inspections OVERVIEW The purpose of the GAHI (Georgia Association of Home Inspectors) Standards of Practice for Framing Inspections
Typical Finished Basement Details
 Fairfax County, Virginia Typical Finished Basement Details Based on the 2012 International Residential Code Finished basements must be constructed in conformance with this document. For requirements, details
Brick Veneer Construction
 Brick Veneer Construction Check list of suggested tools & support items Claw hammer Tape measure 3/4" [19 or 20] Wood chisel Wood or plastic shims Pry bar Utility knife Caulking and caulking gun Power
Set-Up Instructions. (Liner-Based System) UL LISTED. Important Read set-up instructions before assembly. Report any shortages within 72 hours
 UL LISTED. Important Read set-up instructions before assembly. Report any shortages within 72 hours") INDUSTRIAL POWER Set-Up Instructions (Liner-Based System) UL LISTED Important Read set-up instructions before assembly. Report any shortages within 72 hours Specializing in Environmental and Fire-Life
INDUSTRIAL POWER Set-Up Instructions (Liner-Based System) UL LISTED Important Read set-up instructions before assembly. Report any shortages within 72 hours Specializing in Environmental and Fire-Life
GROWTH MANAGEMENT DEPARTMENT 201 SE 3 rd ST, (Second Floor), Ocala, FL 34471 (352) 629-8421; FAX: (352) 629-8264
, Ocala, FL 34471 (352) 629-8421; FAX: (352) 629-8264") BUILDING CODE GUIDELINES FOR ELECTRICAL INSPECTIONS Building Code compliance is the obligation of design professionals and/or contractors. Plan Review and Inspection Guidelines are intended to be used
BUILDING CODE GUIDELINES FOR ELECTRICAL INSPECTIONS Building Code compliance is the obligation of design professionals and/or contractors. Plan Review and Inspection Guidelines are intended to be used
PDmB, Inc. Definitions
 Page 1 of 11 Definitions S Satisfactory Meets industry standards for proper material and installation NP Not Present Condition or item was not present at time of inspection NI Not Inspected Condition or
Sun Windows General Information Sun New Construction Window Installation Instructions
 Sun Windows General Information Section 1 G F H H H A. Apply Weather Resistive Barrier B. Apply Sill Flashing Tape C. Place Waterproof Sill Shims D. Caulk Back of Nail Fin Sides & Top, Set Window, Fasten
Installation Instructions For Slider Casement Air Conditioners
 Installation Instructions For Slider Casement Air Conditioners NOTE: These instructions describe installation in a typical wood framed window with a wood SLIDE-BY sash, or installation in a metal CASEMENT
Installation Instructions
 READ BEFORE INSTALLING UNIT For Through-the-Wall Air Conditioners To avoid risk of personal injury, property damage, or product damage due to the weight of this device and sharp edges that may be exposed:
Packaged Terminal Air Conditioner Wall Sleeve Installation
 Installation & Maintenance Data IM 1196 Group: PTAC Part Number: 910141799 Date: October 2013 Packaged Terminal Air Conditioner Installation x 42" PGAN with Top-Mounted Hydronic Heat Note: Installation
Installation Guide. Bath and Wall Surrounds SERIES 7104 1021861-2-B
 Installation Guide and Wall Surrounds SERIES 7104 1021861-2-B Thank You For Choosing Sterling We appreciate your commitment to Sterling value. Please take a few minutes to review this manual before you
AUTHORIZATION TO MARK
 AUTHORIZATION TO MARK This authorizes the application of the Certification Mark(s) shown below to the models described in the Product(s) Covered section when made in accordance with the conditions set
The better way to build TM. Installation Manual. FOUNDATION SIPs & FROST WALLS SIPs
 The better way to build TM Installation Manual FOUNDATION SIPs & FROST WALLS SIPs February 2016 PWF FOUNDATION & FROST WALL SIPs Installation Manual Table of Contents Topics General Requirements...................................
All work must conform to the National Electric Code, latest edition, and all other applicable codes and regulations.
 DIVISION 16 ELECTRICAL SECTION 16100 - ELECTRICAL PART 1 - GENERAL SCOPE All electrical work as shown on the drawings and as necessary to provide a complete electrical system. Include primary service,
Installation Instructions
 READ BEFORE INSTALLING UNIT For Slider Casement Air Conditioners To avoid risk of personal injury, property damage, or product damage due to the weight of this device and sharp edges that may be exposed:
PUBLIC RESTROOMS, DESIGN INTENT
 PUBLIC RESTROOMS, DESIGN INTENT 1.01 STRUCTURAL A. Where feasible, metal stud partitions will be constructed on a 6 high concrete curb. 1.02 MECHANICAL A. Restrooms will have a minimum of 15 air changes
Policy on Water Heater Installations Policy No. UPC 510-1-94 Effective: September 1, 1995 Revised: February 10, 1996
 CITY OF SAN JOSE BUILDING DIVISION POLICY Policy on Water Heater Installations Policy No. UPC 510-1-94 Effective: September 1, 1995 Revised: February 10, 1996 All new and replacement water heaters installed
INSTALLATION INSTRUCTIONS
 door frames Engineered product systems INSTALLATION INSTRUCTIONS door frames MINIMALIST DOOR FRAME Fry Reglet Flush Door frames are designed for use with 3 5/8 studs with ½ drywall both sides (4 5/8 throat
How To Build A Basement House
 Single Family Basement Finish Purpose of Guide The purpose of this guide is to assist you in the permit process for your project. This handout is intended as a basic plan submittal under the 2009 International
AMERICAN GOTHIC PLAYHOUSE
 AMERICAN GOTHIC PLAYHOUSE Project Plan #856 Sheet 1 of 5 Pick a spot and get started with the beautiful that your kids will love. The design of the playhouse includes 35 square feet of interior space plus
Uniform Construction Code (UCC) Building Permit Application Package
 Building Permit Application Package") Uniform Construction Code (UCC) Residential Building Permit Application Package Per the Uniform Construction Code (UCC) all structures must be built per the standards of the most currently adopted International
Uniform Construction Code (UCC) Residential Building Permit Application Package Per the Uniform Construction Code (UCC) all structures must be built per the standards of the most currently adopted International
KITCHEN AND BATH REMODELING BUILDING PERMIT REQUIREMENTS
 St. Louis County Department of Public Works Division of Code Enforcement KITCHEN AND BATH REMODELING BUILDING PERMIT REQUIREMENTS This guideline is intended to provide the homeowner/contractor with the
MGB Chrome Bumper Conversion
 MGB Chrome Bumper Conversion Installation Instructions For 1974 1/2-1980 MGB This kit requires cutting, welding, and painting. Professional installation recommended. Note: Every MGB body is slightly different
How to Install GoBoard:
 How to Install GoBoard: A Step-by-Step Guide Durable, Ultra-Lightweight, Waterproof Tile Backer Board Introducing GoBoard Every tiling project requires a durable, waterproof surface under the tile, called
H-Stud Area Separation Wall System
 12 TH EDITION 09 21 16.33/NGC H-Stud Area Separation Wall System 09 21 16.33 139 H-STUD AREA SEPARATION WALL SYSTEM The fire-protection of gypsum-based Area Separation Walls is demonstrated in dramatic
Vinyl Brick Mould Field Installation Instructions All Vinyl and Vinyl Clad Windows
 Vinyl Brick Mould Field Installation Instructions All Vinyl and Vinyl Clad Windows Viewed from the exterior. IMPORTANT: Please read before you begin installation. TABLE OF CONTENTS AND TOOL / MATERIAL
Pre-Drywall Inspection Report
 SM MEDALLION INSPECTIONS helping people make informed decisions Pre-Drywall Inspection Report 5657 Garden Valley Place Milton, Georgia 30024 Prepared for Betsy and Paul Dougherty January12, 2015 Medallion
The WANZ Guide to Window Installation
 The WANZ Guide to Window Installation as described in E2/AS1 Amendment 5 Ver. 1.1 Page 2 of 74 Contents Overview Page 5 Objective Page 5 Scope Page 5 Opening Preparation Page 7 Step P1 Preliminary Check
Inspection Item COMMENTS
 APPENDIX 9 AFFORDABLE HOUSING PROGRAM INSPECTION CHECKLIST Participating Jurisdiction: Homeowner Name: Assisted Property Address: Date of Physical Inspection of Property: Total Square Footage of Property:
COMPREHENSIVE PROPERTY INSPECTIONS
 COMPREHENSIVE PROPERTY INSPECTIONS Thank you for selecting CPI for your Deficiency Observation. A full home inspection was not performed on this property at the buyers request. This inspection is a limited
Builder Specifications for Solar Ready Homes
 Builder Specifications for Solar Ready Homes This document specifies the essential elements required to make a new home ready for the future installation of roof-mounted solar domestic hot water and photovoltaic
PANEL CONCEPTS LLLP.
 The Small Cottage Company DO-IT-YOURSELF CABINS & COTTAGES PANEL CONCEPTS INC. PANEL CONCEPTS LLLP. 2826 Gold 331 Creek N. M-33, Road Mio, Gold Michigan Creek, Montana 4864759733 (989) 826-6511 (406) 288-8585
We urge you to read and follow the attached installation instructions. Failure to do so may void the warranty of this garden window unit.
 Important Information for New Construction Installations Attention Installer! We urge you to read and follow the attached installation instructions. Failure to do so may void the warranty of this garden
Installation Instructions Double-Hung, Single-Hung, Casement, Awning, Sliding, Picture & Shapes Non-Impact & Impact Resistant Nailing Fin Windows
 Installation Instructions Double-Hung, Single-Hung, Casement, Awning, Sliding, Picture & Shapes Non-Impact & Impact Resistant Nailing Fin Windows americancraftsmanwindows.com Project Requirements: Read
Air Conditioner Duct Construction & Repair
 PROPER ROOF AIR CONDITIONER MOUNTING At Newmar, there are two different models of air conditioners available on all towable and motorized units. The different models are the Dometic Brisk and Penguin models,
Table of Contents. www.hunterfan.com. What to Expect with. Preparation. Tools Needed. Wiring. Hanging the Fan. Blades. Motor Housing.
 www.hunterfan.com Table of Contents What to Expect with Your Installation 30 inches Hanging the Fan Wiring 8 Maintenance, Operation & Cleaning Light Kit 13??? 14 1 9 Troubleshooting 11 5 Blades Motor Housing
Crawford Inspection Services C.C.B. # 76914 www.crawfordinspections.com
 Crawford Inspection Services C.C.B. # 76914 www.crawfordinspections.com Portland Area PO Box 665 West Linn, OR 97068 Ph: (503) 650-6957 Salem Area 5434 River Rd. N; #192 Keizer, OR 97303 Ph: (503) 362-5809
Plans will call for one of two soffit/fascia details:
 Plans will call for one of two soffit/fascia details: Ventilated vinyl soffit with bent aluminum fascia OR Ventilated LP Smartside soffit panels with 1x6 rabbeted fascia First, let s talk terminology:
Clad Direct Glaze Window Installation Instructions
 Clad Direct Glaze Window Installation Instructions Sill flashing and sealing: 2. An overview of the proper flashing sequence is shown in figure 1. Please read entire installation instructions carefully
SAMPLE INSTRUCTIONS. Best Barns USA Assembly Book. the Denver. 12'x 12' or 12'x16' Revised November 29, 2010
 Best Barns USA Assembly Book Revised November 29, 2010 SAMPLE INSTRUCTIONS the Denver 12'x 12' or 12'x16' Manufactured by Reynolds Building Systems, Inc. 205 Arlington Drive Greenville, PA 16125 724-646-3775
INSTALL INSTRUCTIONS KK-C-HVAC-1 HVAC UNIT 2003-2014 CHEVROLET/GMC VANS FOR
 INSTALL INSTRUCTIONS KK-C-HVAC-1 HVAC UNIT 2003-2014 CHEVROLET/GMC VANS FOR (For NEW 2007 ALL WHITE KWIK-KITS ONLY) Warning do not attempt to install A/C units unless you are experienced with servicing
Chapter 36 - STRAW BALE CONSTRUCTION SECTION 3601 - PURPOSE. SECTION 3602 - SCOPE. SECTION 3603 - DEFINITIONS.
 Austin City Code - Volume II TITLE 25 LAND DEVELOPMENT\CHAPTER 25-12 TECHNICAL CODES\ARTICLE 1: UNIFORM BUILDING CODE\25-12-3 LOCAL AMENDMENTS TO THE BUILDING CODE Chapter 36 - STRAW BALE CONSTRUCTION
CITY OF WHITE BEAR LAKE BUILDING INSPECTION DEPARTMENT 4701 Highway 61 White Bear Lake, MN 55110 Fax: 651-429-8503. Re-Roofing: Asphalt Shingles
 CITY OF WHITE BEAR LAKE BUILDING INSPECTION DEPARTMENT 4701 Highway 61 White Bear Lake, MN 55110 Fax: 651-429-8503 Re-Roofing: Asphalt Shingles This is a summary of the standard requirements based on the
Replacement Window Installation Guide Non-Impact & Impact Resistant Windows without Nailing Fin
 Replacement Window Installation Guide Non-Impact & Impact Resistant Windows without Nailing Fin americancraftsmanwindows.com Project Requirements: Failure to follow these instructions may void product
MONTGOMERY COUNTY EXECUTIVE REGULATION Offices of the County Executive. 101 Monroe Street. Rockville, Maryland 20850
 Montgomery County Regulation on: ADOPTION OF THE 2008 NATIONAL ELECTRICAL CODE DEPARTMENT OF PERMITTING SERVICES Issued by County Executive Regulation # 15-09 Authority: Code Section 17-2 and 17-3 Supersedes:
glass & Glazing Products
 glass & Glazing Products WallMaker Create an unlimited variety of bright, beautiful and secure interior environments with the easy-to-install Stylmark WallMaker glass wall system. This versatile system
INSTALLATION INSTRUCTIONS for Bifold Doors (JII103)
") Thank you for selecting JELD-WEN products. Attached are JELD-WEN s recommended installation instructions for premium composite, hollow and solid core molded Bifold Doors. Bifolds are designed for fast
Thank you for selecting JELD-WEN products. Attached are JELD-WEN s recommended installation instructions for premium composite, hollow and solid core molded Bifold Doors. Bifolds are designed for fast
Residential Roofing Guide
 Residential Roofing Guide TABLE OF CONTENTS Building Detail and Accessories...... 1 Panel Introduction and Handling...... 2 Cutting and Trimming.... 3 Roof Preparation..... 3 Roof Slope..... 3 Re-roofing...
Tundra Series Windows January 2016
 Tundra Series Windows January 2016 New Construction Installation Instructions Nail Fin, J-Fin and Brickmold Aplications product. ATTENTION! Read and understand all installation instructions before installing
Shingle Installation Guide
 Shingle Installation Guide Getting Started Dedicated to improving the environment, NewTech manufactures roofing tiles that are composed of up to 90% recycled post-industrial plastic. The manufacture of
GreenGuard Housewrap Installation Guide
 000768PACBPHW_Flashing Bro 5/23/03 2:52 PM Page 1 For the most current product information, go to www.green-guard.com. Pactiv Building Products believes the information and recommendations herein to be
UB1 AIR CONDITIONING UNIT INSTALLATION INSTRUCTIONS
 UB1 AIR CONDITIONING UNIT INSTALLATION INSTRUCTIONS INSTALLATION INSTRUCTIONS: Carefully read these instructions before installing your new air-conditioner. AUSTRALIAN AUTOMOTIVE AIR AL00500054E 1 Table
LIGHT FLOOR AND WALL FRAMING
 CHAPTER 1 LIGHT FLOOR AND WALL FRAMING In the normal sequence of construction events, the floor and wall activities follow the completed foundation work. In this chapter, we ll examine established methods
Envelope INSULATION BATT (2) Avoid Using Batt Insulation With Metal Framing. Pressure or Friction Fit
 Avoid Using Batt Insulation With Metal Framing. Pressure or Friction Fit") R-H-DI1 INSULATION BATT NR-E-IB1 Avoid Using Batt Insulation With Metal Framing Batt insulation should not be used with metal framing systems. Although it is common to see fiberglass batt insulation installed
R-H-DI1 INSULATION BATT NR-E-IB1 Avoid Using Batt Insulation With Metal Framing Batt insulation should not be used with metal framing systems. Although it is common to see fiberglass batt insulation installed
GARDEN WINDOW GLAZING AND DE-GLAZING INSTRUCTIONS
 GARDEN WINDOW GLAZING AND DE-GLAZING INSTRUCTIONS DE-GLAZING 1.) If there is any PVC cement covering the joints where external glazing bead strips meet, cut through the cement with a utility knife. 2.)
Window Installation Instructions
 Caution The correct installation methods of windows in full frame or insert applications is critical towards achieving the tested performance of the window and longterm enjoyment and energy savings for
800 Communications Circuits
 ARTICLE 800 Communications Circuits INTRODUCTION TO ARTICLE 800 COMMUNICATIONS CIRCUITS This article has its roots in telephone technology. Consequently, it addresses telephone and related systems that
Single Family Residential Basement Finish
 How to Use This Guide Building Guide Pottawattamie County Planning & Development Department Building & Safety Division Single Family Residential Basement Finish Provide two (2) sets of plans and complete
Home Inspection Report
 4949 Brownsboro Rd Suite 293 Louisville, KY 40223 (502) 414-1440 [email protected] Inspected By: William Carter, HI-1956 Home Inspection Report Prepared For: Edward Cullen Property Address:
Construction Technologies Career Field Pathways and Course Structure
 Courses in Structural Systems (DD) Construction Technologies Career Field Pathways and Course Structure PATHWAY COURSES SUBJECT CODE Construction Technology-Core and Sustainable Construction 1 178000 Carpentry
Building Code Inspections and Fees
 St. Mary s County Department of Land Use & Growth Management Customer Assistance Guide 22 Building Code Inspections and Fees May 10, 2014 This guide is intended to assist in the proper construction sequence