INSTALLATION OF A BAY WINDOW
|
|
|
- Ambrose Ryan
- 10 years ago
- Views:
Transcription
1 INSTALLATION OF A BAY WINDOW
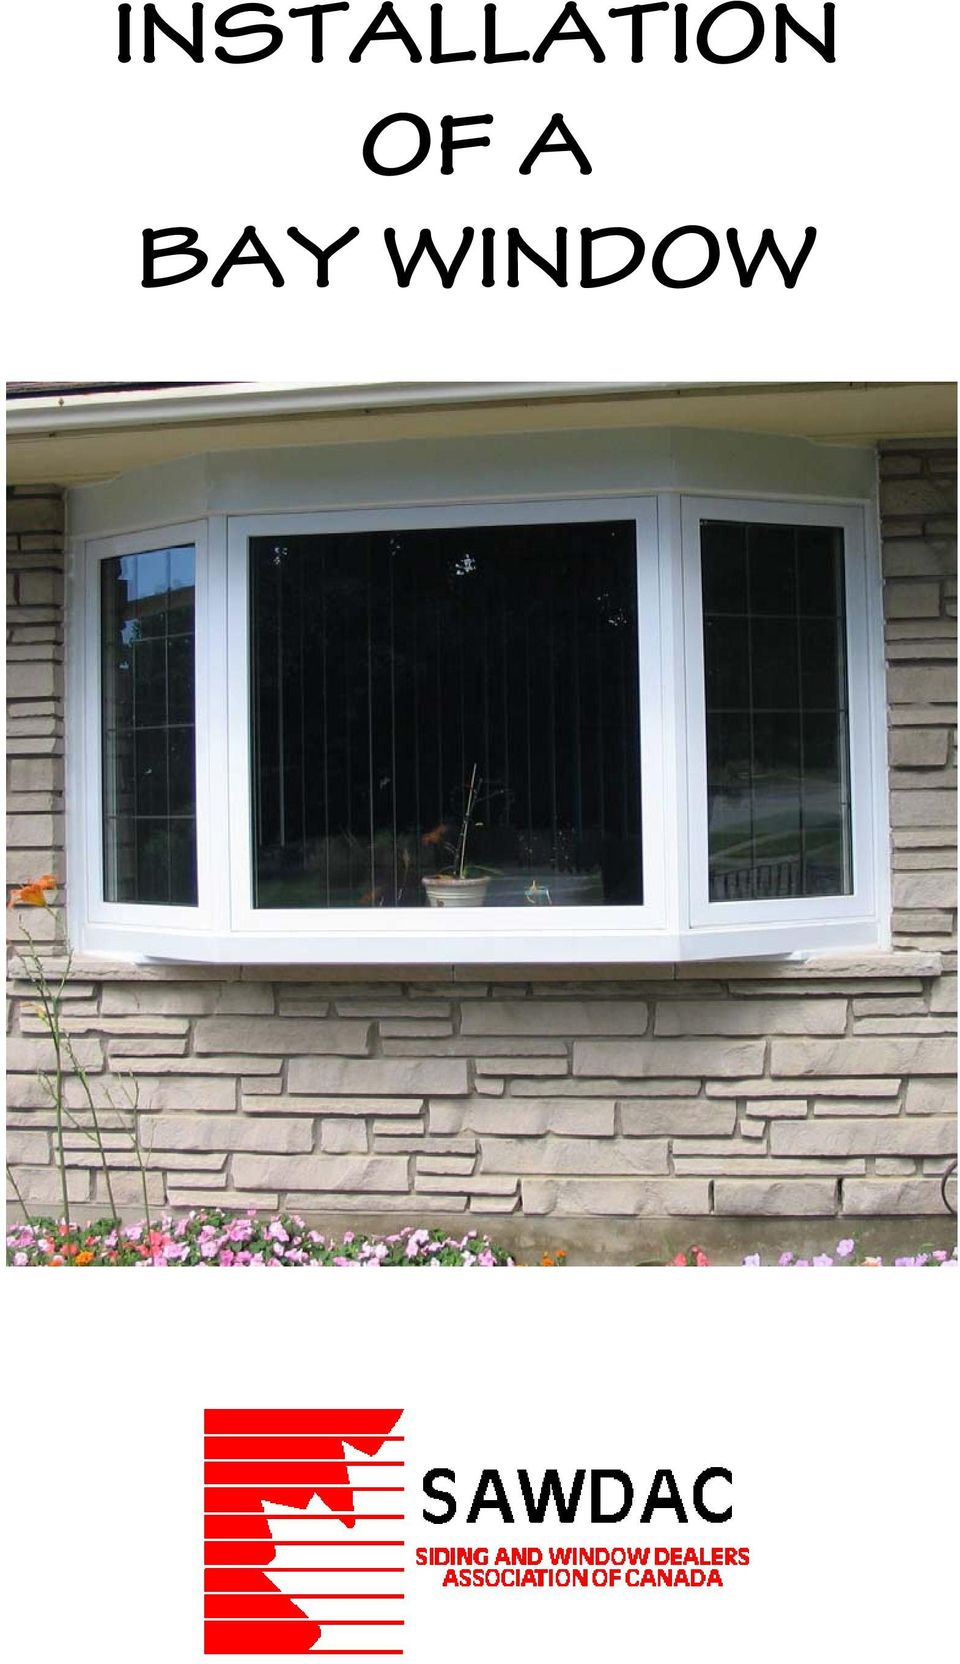
2 Installation of a Bay Window These instructions relate to the replacement of an existing bay window or replacement of a straight window with a new bay window, in an opening no more than 12 feet wide and 6.5 feet high. For larger windows, manufacturer s or engineer s specifications are required. These instructions refer to bay windows but principles and methods are the same for bow windows. To support a bay window from above the window must be located under a roof overhang. Any doubts about the structural capability of the roof overhang will require engineering evaluation. An alternative to roof support is installation of support brackets under the window seat. Bay Window Components: (Exhibit #1 and Exhibit #2) A bay window consists of a centre window unit, two side window units, a seat, a head and jambs with a projection that extends the window units beyond the rough stud opening (RSO). Bay windows can be assembled by the manufacturer or assembled by the contractor. Material used for head, seat and jambs is exterior grade plywood, minimum ¾ inch thickness. We recommend the use of an insulated head and seat. (Exhibit #3) Prepare Opening: Clean and prepare the RSO to allow for ½ inch to 1 inch shim space. In the case of a replacement, remove the old window including the head, seat and jambs. If necessary replace any rotted wood and remove the soffit in the area above the window. Cut away the interior drywall or plaster flush with the RSO. Level Sub-Sill: If sub-sill is level, fasten block shims (minimum 3/8 inch thick) of plywood or lumber no more than 16 inches apart across the sub-sill. Where sub-sill isn t level (bowed or twisted) level a straight edge on two corner shims. Then set shims of varying thickness and/or tapered shims at 16 inch centres along the sub-sill such that these shims make contact with the straight edge. Shims must be a minimum 2 inches x 4 inches in size (to support weight of window). Set Bay Window in Opening: This is at least a three-man operation. Set window in opening. One installer centres the window in the opening from the inside. Shim and Fasten Jambs: Place shims at each top corner between jamb and RSO. Use a straight edge (carpenters square) to insure jamb and head are flush with interior wall surface. Note that the jambs must be plumb and therefore some adjustment away from the interior wall surface may be necessary. If jambs are not plumb operating casements will not function properly. Install fastening screws (#8 x 3.5 inch min.) through shims. Then shim and fasten each bottom corner in the same way. Make sure the window jambs are plumb and as flush as possible to interior wall surface. Note: From this point on only one installer is needed. Helpers may leave. 1

3 Shim and fasten jambs at two equally spaced locations between top and bottom fasteners. Check that the interior of the window is plumb, level and square. Supporting a Bay Window: Since much of the weight of a bay window extends beyond the wall the bay window assembly may sag or deflect downward over time. Support is required. This support may come from above the window or below the window. Supporting a Bay Window from a Roof Overhang: In this method of support the load must be carried in a vertical line above the point of attachment. The point of attachment on the bay window is the window seat at the corner mullion (where centre light and side light meet). The point of attachment on the roof is a roof rafter. Roof Connection: (Exhibit #4) If a roof rafter is located directly above a corner mullion, fasten a ring bolt to one side of the rafter as close to the roof sheathing as possible and in a plumb vertical line above the corner mullion. When the corner mullion is located between rafters, a 1 steel conduit (EMT) is cut to fit between the rafters. This conduit is supported by two custom made plywood blocks (see Exhibit 12 parts list for plywood block details), fastened to the facing sides of two adjacent rafters. Install the conduit assembly as follows: Fasten a wood block to one rafter using #8 x 2 1/2 wood screws so that the 1 ¼ hole in the block is in the same vertical plane as the corner mullion. Then place a 2 ½ x ¼ steel ring and a wood block onto the conduit. Place one end of the conduit into the hole in the wood block already fastened into place. Position the other end of the conduit (with wood block) in line with the first wood block and fasten block to rafter. (Exhibit #5) Seat Connection: A: Ordering the Seat Attachment from the Window Manufacturer: Window manufacturer installs a threaded rod through each corner mullion from head to seat and attaches rod to window seat. The rod terminates above the head of the window in the form of an eye. Manufacturer insulates the corner mullion with foam then seals and installs coupler. Connect eye in window head to roof support: (Exhibit #6 & Exhibit #7) A turnbuckle, plus one or more S-hooks, as needed, complete the connection between the window and the roof. Tighten the turnbuckle as required to level the bay window. B: Cable to Seat Attachment: (Exhibit #8) In this case attachment to the window seat is done on site. Drill 5/16 holes in the seat and the head at the two corner mullions. Run a 6 x 5/16 eye bolt down through each of the two holes in the seat. Thread a nut with washer onto the end of each eye bolt under the seat. 2

4 One end of a 1/8 inch steel cable is fed down through a hole in the head, looped through the eye bolt and back up through the hole in the head. The two cable ends are looped through or over the rafter connection, pulled tight and clamped together using wire rope clips. Level Window: Tighten the nut(s) under the seat as required to level bay window. Install Corner Couplers: Insulate the coupler space with low expanding polyurethane foam. Be sure to keep foam away from cable so adjustments, if necessary, can be made. Run a bead of silicone sealant into each coupler attachment groove, all the way from top to bottom. Install coupler using a rubber mallet. Note: Do not pass steel cable through holes drilled in roof rafters or roof truss components. This may compromise the strength of the rafter. Finish Interior: To prevent possible deflection of the head, install shims every 24 inches between the head and the rough opening. Fasten with finishing nails at shim locations. Insulate space around window with low expanding polyurethane foam. Cut all shims off slightly less than flush and caulk the ends of shims. Install casing trim. Installation Issues Related to Bay Windows: Bracket Support: (Exhibit #9) Installing a bay window where there is no roof overhang above. Example: on the first floor of a two-story building. In this case brackets are secured under the seat to prevent deflection of the window. Weatherproofing Window Head Under Soffit: (Exhibit #10 & Exhibit 11) With the soffit removed, fasten a flashing to the outside edge of the window head. This flashing must extend at least 2 inches above the plane of the soffit. Fasten soffit j- channel to flashing at the plane of the soffit. Cut soffit panels to fit new shape and install. Weatherproofing Window Against Ice-Damming: During winter, weather conditions may cause an ice build-up along the bottom few feet of a roof (usually the overhang part of the roof). Water may back-up, leaking through the roof shingles, through the roof sheathing and onto the head of a bay window. Installing a flashing to the bottom side of the roof rafters will direct this water to the back of the fascia, where, it can drain without causing any damage to the bay window. Applying a self adhesive water-proof membrane over the head of the window and 6 inches up the wall provides additional protection against water from above. Replacing a Straight-wall Window with a Bay Window: Where there is no roof overhang above a bay window a roof must be constructed to drain rain water. This roof must project beyond the sill of the window to allow dripping water to clear the sill of the window. Where this roof meets the wall it must be flashed in behind the siding and/or brick to drain water running down the drainage membrane situated behind the siding and/or brick. 3

5 Exhibit Pictures: Bay Window Components Bay Window Components Eye for Cable attachment Head Side Window Unit Centre Window Unit Seat Side Window Unit Jamb Head Seat Jamb Exhibit #1 Exhibit #2 Exhibit #3 Exhibit #4 4

6 Exhibit Pictures Continued: Exhibit #5 Exhibit #6 Exhibit #7 Exhibit #8 5

7 Exhibit Pictures Continued: Exhibit #9 Exhibit #10 Head Flashing Exhibit #11 6

8 Exhibit #12 Bay Window Roof Support Parts List Parts list: 1) Support Blocks ¾ inch spruce plywood select grade 3 1/2 inches x 8 inches 2) Wood Screws #8 x 2 1/2 rust protected steel, flat head, wood screws 3) Steel Conduit Minimum 1 inch EMT (electrical metallic tubing) 4) Steel Cable Galvanized aircraft cable minimum diameter 1/8 inch 5) Eye Bolt + washer and nut Minimum 5/16 inch x 6 inch zinc plated eye bolt 6) Ring Minimum 2 1/2 inch x 1/4 inch zinc plated steel ring 7) S-Hook 3 inch x.5/16 inch zinc plated steel s-hook 8) Turnbuckle Minimum 5/16 inch x 9 3/8 inch zinc plated steel turnbuckle 9) Bolt ring Minimum 2 ½ inch x ¼ inch zinc plated steel bolt ring 10) Wire Rope Clip: Minimum 3/32 inch zinc plated wire rope clip Specs for the Support Blocks: 7
 Turnbuckle Minimum 5/16 inch x 9 3/8 inch zinc plated steel turnbuckle 9) Bolt ring Minimum 2 ½ inch x ¼ inch zinc plated steel bolt ring 10) Wire Rope")
March 14, 2007. Installation of Bay, Bow and Garden Windows
 March 14, 2007 Re: Installation of Bay, Bow and Garden Windows Attached are the Atrium Companies, Inc recommendation for the installation of bay, bow and garden windows. These instructions were developed
WINDOW INSTALLATION GUIDE
 WINDOW INSTALLATION GUIDE is not responsible for or liable for any use or misuse of the information contained in this window installation guide. Window Installation Guide This guide provides basic information
We urge you to read and follow the attached installation instructions. Failure to do so may void the warranty of this garden window unit.
 Important Information for New Construction Installations Attention Installer! We urge you to read and follow the attached installation instructions. Failure to do so may void the warranty of this garden
Window Installation Instructions
 Caution The correct installation methods of windows in full frame or insert applications is critical towards achieving the tested performance of the window and longterm enjoyment and energy savings for
We urge you to read and follow the attached installation instructions. Failure to do so may void the warranty of this garden window unit.
 Important Information for New Construction Installations Attention Installer! We urge you to read and follow the attached installation instructions. Failure to do so may void the warranty of this garden
Clad Direct Glaze Window Installation Instructions
 Clad Direct Glaze Window Installation Instructions Sill flashing and sealing: 2. An overview of the proper flashing sequence is shown in figure 1. Please read entire installation instructions carefully
Sun Windows General Information Sun New Construction Window Installation Instructions
 Sun Windows General Information Section 1 G F H H H A. Apply Weather Resistive Barrier B. Apply Sill Flashing Tape C. Place Waterproof Sill Shims D. Caulk Back of Nail Fin Sides & Top, Set Window, Fasten
INSTALLATION INSTRUCTIONS for Vinyl Windows with Integral Nailing Fin (JII001)
") Thank you for selecting JELD-WEN products. Attached are JELD-WEN s recommended installation instructions for Vinyl windows with an integral nailing fin. While the use of these installation instructions
Thank you for selecting JELD-WEN products. Attached are JELD-WEN s recommended installation instructions for Vinyl windows with an integral nailing fin. While the use of these installation instructions
Free 12 x 8 Shed Plan With Illustrations, Blueprints & Step By Step Details
 Free 12 x 8 Shed Plan With Illustrations, Blueprints & Step By Step Details Brought To You By: MyShedPlans Click Here To Download 12,000 Shed Plans >> 12 x 8 Basic Shed This 8 12-ft. shed features a simple
Cable Support System Guide for Andersen Bow, Bay, and Box Projecting Window Units
 for Andersen Bow, Bay, and Box Projecting Window Units Congratulations! You have just purchased one of the many fine Andersen products. Proper assembly, installation and maintenance are essential if the
Fig. 2 WALL-TO-WALL PANEL CONNECTIONS CORNER WALL CONNECTION
 SIPS SCREWS WITH MINIMUM 1" PENETRATION IN WOOD MEMBER IN SIP WALL PANEL CONNECTED TO @ 24" O.C. MAXIMUM OUTSIDE SKIN EACH SIDE OF FRAMING TYP. AS RECOMMENDED BY FOAM CORE AS EACH SIDE OF FRAMING TYP.
Storage Store the siding in a dry and ventilated area. Do not place it directly on the ground. Always cover the siding after a day s work.
 Installation Guide Before you begin, take the time to read this entire guide to clearly understand the requirements and steps to follow for proper installation. Warning Do not install defective material.
Brick Veneer Construction
 Brick Veneer Construction Check list of suggested tools & support items Claw hammer Tape measure 3/4" [19 or 20] Wood chisel Wood or plastic shims Pry bar Utility knife Caulking and caulking gun Power
4 5/16 Subframe Installation
 4 5/16 Subframe Installation The subframe system is a great installation tool for installing windows in masonry conditions. Typically subframes are used in masonry openings so that windows can be anchored
CONSTRUCTION DETAILS & LOAD DESIGN CHARTS
 Office and Production 126 New Pace Rd., PO Box 279 Newcomerstown, OH 43832 1-800-446-2188, Fax: 740-498-4184 www.buildwithsips.com CONSTRUCTION DETAILS & LOAD DESIGN CHARTS Table of Contents Description
CLIENT. Inspection Report. 271 Front St. Alert Bay, B.C. Island Building Inspections V ANCOUVER I SLAND B. C.
 CLIENT Inspection Report 271 Front St. Alert Bay, B.C. Island Building Inspections 2013 V ANCOUVER I SLAND B. C. Elevation Photos For the Property at 271 Front Street Alert Bay, BC ELEVATION PICTURES Front
SUPER SHED. Indoor shelter for your outdoor tools.
 SUPER SHED Indoor shelter for your outdoor tools. Not everyone needs a garden shed. But, if you've no more space on your garage wall for that new leaf rake, if you can't find your potting trowel because
Barewood Octagon and Elongated Windows Installation Instructions
 Step-by-step instructions to a beautiful window. Measuring and Installation of your new window from Century Specialty Windows couldn't be easier with our step-by-step instructions. Quality, function and
Installation Instructions Double-Hung, Single-Hung, Casement, Awning, Sliding, Picture & Shapes Non-Impact & Impact Resistant Nailing Fin Windows
 Installation Instructions Double-Hung, Single-Hung, Casement, Awning, Sliding, Picture & Shapes Non-Impact & Impact Resistant Nailing Fin Windows americancraftsmanwindows.com Project Requirements: Read
WHI 90-Minute Rated Veneered Door Frame Installation Instructions
 No. 940-03-10 INSTALLATION INSTRUCTIONS 90 MINUTE RATED VENEERED DOOR FRAME DOOR REQUIREMENTS: Consult the door manufacturer to make sure that the doors are qualified for the hardware to be installed,
How To Repair A Boat Landing Deck With A Boat Bed
 RESIDENTIAL INSULATED SHEATHING INSTALLATION GUIDE Residential Insulated Sheathing Installation Guide ROXUL COMFORTBOARD IS Table of Contents Slab-on-grade-to Above Grade Wall...1 Foundation Wall at Footing
Installation Instructions For Slider Casement Air Conditioners
 Installation Instructions For Slider Casement Air Conditioners NOTE: These instructions describe installation in a typical wood framed window with a wood SLIDE-BY sash, or installation in a metal CASEMENT
PANELIZED HOME INSTALLATION GUIDELINE
 PANELIZED HOME INSTALLATION GUIDELINE A typical home package will be constructed of Snap-N-Lock Insulated Panels clad with steel skins. 4" panels will be used for the walls, and 6" panels for the roof.
Installation Guide. Bath and Wall Surrounds SERIES 7104 1021861-2-B
 Installation Guide and Wall Surrounds SERIES 7104 1021861-2-B Thank You For Choosing Sterling We appreciate your commitment to Sterling value. Please take a few minutes to review this manual before you
Tundra Series Windows January 2016
 Tundra Series Windows January 2016 New Construction Installation Instructions Nail Fin, J-Fin and Brickmold Aplications product. ATTENTION! Read and understand all installation instructions before installing
INSTALLATION INSTRUCTIONS for Vinyl Windows without Nailing Fin (JII011) ImPOrTANT INFOrmATION & GlOssAry. rough OPeNINGs
 ImPOrTANT INFOrmATION & GlOssAry. rough OPeNINGs") Thank you for selecting JELD-WEN products. Attached are JELD-WEN s recommended installation instructions for vinyl windows without a nailing fin (including finless, flush fin and flange). Read these instructions
Thank you for selecting JELD-WEN products. Attached are JELD-WEN s recommended installation instructions for vinyl windows without a nailing fin (including finless, flush fin and flange). Read these instructions
Superform Products Ltd.
 TYPICAL CORNER REINFORCING NOTE : SEE ENGINEERED REBAR SCHEDULES SUPPLIED BY THE MANUFACTURER STEEL REINFORCEMENT WALL CORNER 90 Copyright 2012 Sept. 2012 5.1.1 Rebar Spacing 6" 12" Max. Load LB./FT. 2000
Installation Guide for Andersen Architectural Wood Inswing Entry Doors
 Installation Guide for Andersen Architectural Wood Inswing Entry Doors Congratulations! You have just purchased one of the many fine Andersen products. Proper assembly, installation and maintenance are
DE Frame with C Series Sidelight
 TOOLS REQUIRED Tape measure 6' magnetic level 3' magnetic level Screw gun with clutch adjusted #2 phillips tip #3 phillips tip Screwdriver (used to adjust frame on will using oval slots) Pry Bar Powder
InsulView Window Installation Instructions
 InsulView Window Installation Instructions 1. The entire building is normally sheeted with the 2" 2 ½ OR 3 wall panel and the windows installed at a later time. A window retrofit of an existing building
INSTALLATION INSTRUCTIONS for Vinyl Patio Doors with Integral Nailing Fin (JII006)
") Thank you for selecting JELD-WEN products. Attached are JELD-WEN s recommended installation instructions for Vinyl Patio Doors with nailing fin. Any local building code requirements supersede the recommended
Thank you for selecting JELD-WEN products. Attached are JELD-WEN s recommended installation instructions for Vinyl Patio Doors with nailing fin. Any local building code requirements supersede the recommended
Guidelines for Earthquake Bracing of Residential Water Heaters
 Guidelines for Earthquake Bracing of Residential Water Heaters Department of General Services Division of the State Architect 1102 Q Street, Suite 5100 Sacramento, CA 95814 Phone: (916) 324-7099 Fax: (916)
Replacement Window Installation Guide Non-Impact & Impact Resistant Windows without Nailing Fin
 Replacement Window Installation Guide Non-Impact & Impact Resistant Windows without Nailing Fin americancraftsmanwindows.com Project Requirements: Failure to follow these instructions may void product
Installation Guide for Andersen Architectural Clad Outswing Commercial Doors
 Installation Guide for Andersen Architectural Clad Outswing Commercial Doors Congratulations! You have just purchased one of the many fine Andersen products. Proper assembly, installation and maintenance
VA25014B0516 VA CINCINNATI PROJECT NO. 539-328 INPATIENT BED TOWER ADDITION (4 TH AND 5 TH FLOORS) SECTION 09 29 00 GYPSUM BOARD
 SECTION 09 29 00 GYPSUM BOARD") SECTION 09 29 00 GYPSUM BOARD PART 1 - GENERAL 1.1 DESCRIPTION This section specifies installation and finishing of gypsum board, vapor retarder and air and moisture barrrier. 1.2 RELATED WORK A. Installation
SECTION 09 29 00 GYPSUM BOARD PART 1 - GENERAL 1.1 DESCRIPTION This section specifies installation and finishing of gypsum board, vapor retarder and air and moisture barrrier. 1.2 RELATED WORK A. Installation
INSTALLATION INSTRUCTIONS IMPERVIA (Vent and Fixed) AWNING, CASEMENT, and LARGE AWNING WINDOW WITH FINS
 AWNING, CASEMENT, and LARGE AWNING WINDOW WITH FINS") 2009 Pella Corporation INSTALLATION INSTRUCTIONS IMPERVIA (Vent and Fixed) AWNING, CASEMENT, and LARGE AWNING WINDOW WITH FINS Part Number: 80WH0100 Installation Instructions for Typical Wood Frame Construction.
2009 Pella Corporation INSTALLATION INSTRUCTIONS IMPERVIA (Vent and Fixed) AWNING, CASEMENT, and LARGE AWNING WINDOW WITH FINS Part Number: 80WH0100 Installation Instructions for Typical Wood Frame Construction.
Chapter 36 - STRAW BALE CONSTRUCTION SECTION 3601 - PURPOSE. SECTION 3602 - SCOPE. SECTION 3603 - DEFINITIONS.
 Austin City Code - Volume II TITLE 25 LAND DEVELOPMENT\CHAPTER 25-12 TECHNICAL CODES\ARTICLE 1: UNIFORM BUILDING CODE\25-12-3 LOCAL AMENDMENTS TO THE BUILDING CODE Chapter 36 - STRAW BALE CONSTRUCTION
WINDOW INSTALLATION GUIDE FOR NEW CONSTRUCTION - WOOD FRAMING
 WINDOW INSTALLATION GUIDE FOR NEW CONSTRUCTION - WOOD FRAMING IMPORTANT NOTICES AND INFORMATION Read these instructions in their entirety prior to installing windows. Any local building code requirements
ROOF CONSTRUCTION Roof Styles Gable Roof Hip Roof Gambrel Roof
 ROOF CONSTRUCTION The overall appearance of a building is greatly affected by the roof lines and the roofing materials. The designer has many standard designs to choose from and should be able to find
The better way to build TM. Installation Manual. FOUNDATION SIPs & FROST WALLS SIPs
 The better way to build TM Installation Manual FOUNDATION SIPs & FROST WALLS SIPs February 2016 PWF FOUNDATION & FROST WALL SIPs Installation Manual Table of Contents Topics General Requirements...................................
HfHMD uses LP SmartSide siding and trim.
 HfHMD uses LP SmartSide siding and trim. These products are: More durable than cement fiber board. Much more volunteer-friendly to install. When installed correctly, have a 5/50- year pro-rated warranty.
Best Barns USA Assembly Book
 Best Barns USA Assembly Book Revised November 27, 2013 the Easton - R 12'x 20' Manufactured by Reynolds Building Systems, Inc. 205 Arlington Drive Greenville, PA 16125 724-646-3775 This manual is copyrighted.
How to Install GoBoard:
 How to Install GoBoard: A Step-by-Step Guide Durable, Ultra-Lightweight, Waterproof Tile Backer Board Introducing GoBoard Every tiling project requires a durable, waterproof surface under the tile, called
INSTALLATION INSTRUCTION - INSTRUCCIONES DE INSTALACION FOR DOUBLE-HUNG VENT REPLACEMENT WINDOW
 Vinyl Windows and Doors Manufactured by Pella Corporation INSTALLATION INSTRUCTION - INSTRUCCIONES DE INSTALACION FOR DOUBLE-HUNG VENT REPLACEMENT WINDOW Lea las instrucciones en español en el reverso.
Black Wolf POCKET BILLIARD TABLE INSTALLATION MANUAL. SERVICE DEPARTMENT P.O. BOX 68 BRISTOL, WI 53104
 Black Wolf TM POCKET BILLIARD TABLE INSTALLATION MANUAL www.brunswickbilliards.com SERVICE DEPARTMENT P.O. BOX 68 BRISTOL, WI 53104 51-905710-000 SEPTEMBER 2010 NOTE: Please use the instructions in this
Basement Window Installation Guide Hopper and Sliding
 Basement Window Installation Guide Hopper and Sliding americancraftsmanwindows.com Project Requirements: Installation must comply with all applicable building codes. Existing window frame, wall and weatherresistant
Important Information for Installer & Homeowner
 Important Information for Installer & Homeowner Homeowner: Please keep this information for your records, do not discard! Installation Instructions for Wood Frame Construction Replacement (See other side
Residential Roofing Guide
 Residential Roofing Guide TABLE OF CONTENTS Building Detail and Accessories...... 1 Panel Introduction and Handling...... 2 Cutting and Trimming.... 3 Roof Preparation..... 3 Roof Slope..... 3 Re-roofing...
Asphalt Shingle Application Requirements
 Alberta Allied Roofing Association Asphalt Shingle Application Requirements Section 1 Roof Decks 1.1 General Asphalt Shingles are not permitted to be installed directly over rigid insulation. When Asphalt
City of Tucson and Pima County Arizona Building Code Appendix Chapter 72 Straw-Bale Structures
 City of Tucson and Pima County Arizona Building Code Appendix Chapter 72 Straw-Bale Structures SECTION 7201 - PURPOSE The purpose of this appendix chapter is to establish minimum prescriptive standards
300mm. 2mm MIN GAP. PLACE 100mm X 100mm. SO THAT IT IS 38mm INTO
 INSTALL PEEL & STICK (P&S) GUSSETS WITH PRIMER AS PER MANUFACTURERS INSTRUCTIONS 2mm MIN GAP IN SHEATHING STEP 1 PLACE 100mm X 100mm PIECE OF P&S IN CORNER SO THAT IT IS 38mm INTO THE OPENING EACH WAY
The better way to build TM. Installation Manual. EXTERIOR WALL SIPs
 The better way to build TM Installation Manual EXTERIOR WALL SIPs July 2015 EXTERIOR WALL SIPs Installation Manual Table of Contents Topics General Requirements................................... 3 Materials..............................................
HURRICANE MITIGATION RETROFITS FOR EXISTING SITE-BUILT SINGLE FAMILY RESIDENTIAL STRUCTURES
 HURRICANE MITIGATION RETROFITS FOR EXISTING SITE-BUILT SINGLE FAMILY RESIDENTIAL STRUCTURES 101 Retrofits Required. Pursuant to Section 553.844 553.884, Florida Statutes, strengthening of existing site-built,
Introduction...COMB-2 Design Considerations and Examples...COMB-3
 SECTION DIRECTORY General Information Introduction...COMB-2 Design Considerations and Examples...COMB-3 Combination Assembly Recommendations and Limitations Composite Configurations...COMB-4 Typical Sealant
INSTALLATION INSTRUCTIONS for Vinyl Windows with Integral Nailing Fin (JII001) IMPORTANT INFORMATION AND GLOSSARY ROUGH OPENINGS
 IMPORTANT INFORMATION AND GLOSSARY ROUGH OPENINGS") Thank you for selecting JELD-WEN products. Attached are JELD-WEN s recommended installation instructions for Vinyl windows with an integral nail fin. Not all window types may be installed into every wall
Thank you for selecting JELD-WEN products. Attached are JELD-WEN s recommended installation instructions for Vinyl windows with an integral nail fin. Not all window types may be installed into every wall
PREMIUM LAMINATED ASPHALT SHINGLES Dallas, TX Tuscaloosa, AL Phillipsburg, KS
 Application Instructions for THESE ARE THE MANUFACTURER S APPLICATION INSTRUCTIONS FOR THE ROOFING CONDITIONS DESCRIBED. TAMKO BUILDING PRODUCTS, INC. ASSUMES NO RESPONSIBILITY FOR LEAKS OR OTHER ROOFING
Guidelines for Earthquake Bracing Residential Water Heaters
 Guidelines for Earthquake Bracing Residential Water Heaters Department of General Services Division of the State Architect In accordance with the Health and Safety Code Section 19215, the Division of the
application instructions
 application instructions ARCHITECTURAL COLLECTION PRIMED BOLD PROFILE 120 SERIES LAP SIDING (D5, T4, D8, T5, Q4) General At the time of manufacture, siding meets or exceeds the performance standards set
BRIDGE & SUPPLY COMPANY. Installation Guide. Ultra 2000. Includes:
 BRIDGE & SUPPLY COMPANY Installation Guide Ultra 2000 Includes: Ultra 2000 Installation Guide Stock Trim Profiles Ultra 2000 Trim Installation Guide Page 2 Table of Contents Ultra 2000 Profile, Colors
Packaged Terminal Air Conditioner Wall Sleeve Installation
 Installation & Maintenance Data IM 1196 Group: PTAC Part Number: 910141799 Date: October 2013 Packaged Terminal Air Conditioner Installation x 42" PGAN with Top-Mounted Hydronic Heat Note: Installation
SLIDING PATIO DOOR INSTALLATION INSTRUCTIONS USING FRAME SCREWS
 Vinyl Windows and Doors Manufactured by Pella Corporation Part Number: V984528 2012 Pella Corporation SLIDING PATIO DOOR INSTALLATION INSTRUCTIONS USING FRAME SCREWS Installation Instructions for Typical
Chapter 10 - Scaffolding Systems
 Chapter 10 - Scaffolding Systems Contents Chapter 10 - Scaffolding Systems... 10-1 Check and Oil the Pump Jacks... 10-4 Set Pump Jack Brackets... Error! Bookmark not defined. Set Pump Jack Poles... 10-5
Installing Window and Door Mouldings
 Installing Window and Door Mouldings About Window and Door Mouldings The trim around windows and doors greatly influences the look and style of your interior. They also bridge the gaps and cover spaces
How to Install UnderDeck The Original.
 How to Install UnderDeck The Original. TOOLS: Chalk Line Caulk Gun Garden hose or water bucket Gloves Hammer or Screw Gun Power Mitre Saw with OSB Blade Pencil Pliers Safety Glasses Straight Edge / Carpenter
SERIES 238 WINDOWS. NOTE: Read instructions completely before attempting any installation.
 1 Installation Instructions SERIES 238 WINDOWS Page 2: Page 3-4: Page 5: Page 6: Page 7: Opening Preparation and Wood Buck Installation Installation Instructions for Series 238 WINDOWS Figure 1: Buck preparation
RESIDENTIAL MASONRY A BEST PRACTICES GUIDE
 RESIDENTIAL MASONRY A BEST PRACTICES GUIDE Build With Brick Build With Boral CONTENTS BRICK :01 MASONRY CEMENT :03 MASONRY SAND :04 WALL TIES :05 STEEL LINTELS :07 DRAINAGE WALL SYSTEM :09 FLASHING :11
!!!!!! !!! Decra Plus DPSW010 DPSTW011 DPSW012 DPSW013 DPSW014 DPSW015 DPSW016 DPSW020 DPSW021 DPSW024 DPSW030 DPSW031 DPSW035 DPSW030 DPSW031 DPSW035
 Decra Plus Drawing no DPSW010 DPSTW011 DPSW012 DPSW013 DPSW014 DPSW015 Description Shown In Decra Brochure Most Commonly Used Detail t~êã=oççñ=b~îéë=aéí~áä=b~îéë=lîéêü~åö=táíü=fåëìä~íéç=c~ëåá~=~åç=pçññáí
Mark Cramer Inspection Services, Inc.
 Mark Cramer Inspection Services, Inc. 492 Twentieth Avenue, Indian Rocks Beach, FL 34635-2970 (727) 595-4211 Fax (727) 596-7583 Certified Member #12085 American Society of Home Inspectors Construction
INSTALLATION INSTRUCTIONS for Swinging French and Patio Doors (JII105)
") Thank you for selecting JELD-WEN products. Attached are JELD-WEN s recommended installation instructions for Steel, Fiberglass, Vinyl, and Wood French and Patio Doors. Read these instructions thoroughly
Thank you for selecting JELD-WEN products. Attached are JELD-WEN s recommended installation instructions for Steel, Fiberglass, Vinyl, and Wood French and Patio Doors. Read these instructions thoroughly
Table of Contents. Western States RustWall Wall and Soffit Panels Installation, Flashings & Shop Drawing Detail Guide
 Western States RustWall Wall and Soffit Panels Installation, Flashings & Shop Drawing Detail Guide Table of Contents Section Page Section Page Notes to Designer /Installers.. 1 Fastener Placement and Selection.2-3
Additions and Alterations
 Additions and Alterations Addition and alteration construction is a miscellaneous grouping of home improvement and renovation projects that are generally geared toward the enhancement of an existing principal
WINDOW PANNING AND TRIMS
 OCTOBER, 2010 PANNING AND TRIMS GENERAL INFORMATION 1 EXTERIOR PANNING Panning is primarily used to cover the perimeters of existing building openings prior to the installation of replacement windows.
Installation Instructions
 READ BEFORE INSTALLING UNIT For Slider Casement Air Conditioners To avoid risk of personal injury, property damage, or product damage due to the weight of this device and sharp edges that may be exposed:
Inspecting to a higher standard.
 Inspecting to a higher standard. Rob Hopkin Silver Spring, MD 20902 Monday, June 2, 2014 ProTec Inspection Services Inc. 19736 Selby Ave Poolesville, MD 20837 301-972-8531 www.protec-inspections.com [email protected]
GreenGuard Housewrap Installation Guide
 000768PACBPHW_Flashing Bro 5/23/03 2:52 PM Page 1 For the most current product information, go to www.green-guard.com. Pactiv Building Products believes the information and recommendations herein to be
FORM DESIGN. easy to work with, and generally available.
 Forms play a major role in concrete construction. They give the plastic concrete its shape and hold it until it hardens. Forms protect the concrete, assist in curing it, and support any reinforcing rods
INSTALLATION INSTRUCTIONS for Premium Pocket Windows (JII022) IMPoRtaNt INFoRMatIoN & glossary. safety & HaNdlINg
 IMPoRtaNt INFoRMatIoN & glossary. safety & HaNdlINg") Thank you for selecting JeLd-weN products. Attached are JeLd-weN s recommended installation instructions for pocket (replacement) double-hung, casement, awning, picture or transom windows, designed to
Thank you for selecting JeLd-weN products. Attached are JeLd-weN s recommended installation instructions for pocket (replacement) double-hung, casement, awning, picture or transom windows, designed to
Residential Garage Door Terminology
 A Air Infiltration: The leakage or passage of air through a door system Anodize: A hard non-corrosive oxide film on the surface of aluminum Astragal: A compressible or deformable seal provided on the bottom
Shingle Roofing: What s below the surface is important
 What s below the surface is important The roof is leaking, the shingles look old, and the downspouts are dripping. It must be time to replace the roof or is it? Shingle roofs may seem simple, but a roof
first look at GigaCrete s revolutionary new New Construction GigaHouse GigaHouse Utilizing GigaPanel
 first look at GigaCrete s revolutionary new New Construction GigaHouse GigaHouse Utilizing GigaPanel What is GigaCrete GigaCrete is a family of products based on low carbon footprint Green ceramic binders
Vinyl Greenhouse Window Page 2 of 6 New Contruction Installation Instructions
 New Construction Installation Instructions EPLACEMENT Installation Instructions Page 2 of 6 New Contruction Installation Instructions 1. Frame rough opening equal to window call out size. ough opening
How to secure your property after a disaster
 How to secure your property after a disaster The Red Guide to Recovery HOuse secured properly Board-Up of Windows, Doors and Roof Hole. Lot secured with Perimeter Fencing. Fires, floods, tornadoes, hurricanes,
Stormproof Your Roof. I ve done enough roof repairs to know that storm water that gets past the shingles
 Stormproof Your Roof Self-adhering underlayment provides critical protection in vulnerable locations BY MIKE GUERTIN I ve done enough roof repairs to know that storm water that gets past the shingles and
Ceiling Mounted Folding Attic Ladders Installation Instructions
 Ceiling Mounted Folding Attic Ladders Installation Instructions WARNING Before you start installing your new Louisville Ceiling Mounted Folding Attic Ladder, you must read and understand the following:
DuPont Tyvek ThermaWrap R5.0 Installation Guidelines for New Construction Using Vinyl, Brick and Stone Claddings
 Tyvek ThermaWrap R5.0 Installation Guidelines for New Construction Using Vinyl, Brick and Stone Claddings VERSION 1/16 FOR SINGLE FAMILY HOMES AND LOW RISE MULTI-FAMILY BUILDINGS LESS THAN 4 STORIES Tyvek
Installation Manual for STANDING SEAM ROOFING
 Installation Manual for STANDING SEAM ROOFING Absolute Steel Toll Free 877-833-3237 / Phone 480-768-1618 / Fax 480-768-1514 www.metalroofingsource.com Standing Seam features approximately one-inch high
STRUCTURAL CONCEPT FOR LIGHT GAUGE STEEL FRAME SYSTEM
 Chapter 9 STRUCTURAL CONCEPT FOR LIGHT GAUGE STEEL FRAME SYSTEM 9.1 BACKGROUND Steel is widely used in the construction of multi-storey buildings. However, steel construction is seldom used and is traditionally
Chapter 6 ROOF-CEILING SYSTEMS
 Chapter 6 ROOF-CEILING SYSTEMS Woodframe roof-ceiling systems are the focus of this chapter. Cold-formed steel framing for a roof-ceiling system also is permitted by the IRC but will not be discussed;
Premier & Deluxe 3-Season Room Sliding Glass Door
 DTSSGD-11 Premier & Deluxe 3-Season Room Sliding Glass Door Installation Instructions Screen Door Seal Left Side Track Top Track Assembly Right Side Track Right Side Trim Sliding Glass Door Sliding Screen
Retrofitting an Insulated Cold Roof
 Retrofitting an Insulated Cold Roof As a metal-roofing contractor in the Upper Peninsula of Michigan, I am frequently asked to fix roof leaks that have less to do with roofing than with the way poorly
Cedar Cottage Doghouse Plans
 Overlapping cedar shingles add an element of charm to this medium size doghouse. The walls, floor, and trim are constructed of solid cedar, making it naturally weather resistant and provides excellent
HomeSpec REPORT SUMMARY
 HomeSpec 04/25/2007 Ms. Rachel Trujeque Re: 13038 West Plum Road Lot #1225 - Peoria, AZ. 85383 - Pre Drywall Inspection Dear Ms. Trujeque, At your request, a visual pre drywall inspection of the above
Sliding Barn Door Hardware Installation Instructions BALDUR and ODEN
 Sliding Barn Door Hardware Installation Instructions BALDUR and ODEN Installation Instructions Structural Information For standard systems and most custom single door opening systems. General Overview
TABLE OF CONTENTS. I. TROUBLESHOOTING... 2 - Section 1.01: Common Problems/Solutions... 2
 BAL Accu-Slide System I. Table of Contents TABLE OF CONTENTS I. TROUBLESHOOTING... 2 - Section 1.01: Common Problems/Solutions... 2 II. GETTING STARTED... 5 - Section 2.01: Tools You Will Need... 5 - Section
K. D. FRAME ASSEMBLY FOR CLOSED STEEL STUD WALLS...Ins 10. FRAME INSTALLATION DETAILS FOR CLOSED STEEL STUD WALLS...Ins 11
 K. D. FRAME ASSEMBLY FOR MASONRY WALLS...........................Ins 2 FRAME INSTALLATION DETAILS FOR MASONRY WALLS......................Ins 3 INSTALLING EXISTING MASONRY WALL ANCHORS IN FRAME..................Ins
Angle Bay Window & Bow Window Installation Instructions
 Angle Bay Window & Bow Window Installation Instructions IMPORTANT: Please read before you begin installation. Part No. 207315 Install 105E 10/08 Printed in U.S.A. 2008 Table Of Contents And Tool / Material
Drexel Metals Inc. DMC 100SS 16oz min. Copper Mechanical Seam Metal Roof System over Plywood
 Drexel Metals Inc. DMC 100SS 16oz min. Copper Mechanical Seam Metal Roof System over Plywood Section 07411 Metal Roof Panels Part 1 General 1.1 Summary A. This section includes the following: a. Factory-formed
DuPont Tyvek ThermaWrap R5.0 Installation Guidelines for New Construction Using Stone Veneer or Lap Siding, e.g. Fiber Cement and Wood/Cedar
 Tyvek ThermaWrap R5.0 Installation Guidelines for New Construction Using Stone Veneer or Lap Siding, e.g. Fiber Cement and Wood/Cedar VERSION 1/16 FOR SINGLE FAMILY HOMES AND LOW-RISE MULTI-FAMILY BUILDINGS
KITCHENS. Tip PAGE 1 FITTING YOUR KITCHEN GUIDE. How to mark out a kitchen. Tools required for installing a kitchen STEP ONE STEP TWO STEP THREE
 FITTING YOUR KITCHEN GUIDE How to mark out a kitchen PAGE 1 Before starting on the installation, measure 870mm from the lowest point of the floor and mark a datum line around the room to indicate where
How To Repair A House
 Assessing Structural Damages Please note-this presentation is only intended to be used as a basic educational tool and is by no means all encompassing. Each property should be treated on a case by case