Application Note. Equipment Needed
|
|
|
- Nathan Dixon
- 8 years ago
- Views:
Transcription
1 Application Note Setting up a Quick Local Area Network for CRemote General Nuclear Industry Application Introduction to the fundamentals of CRemote and a standalone LAN for CANBERRA Contamination Monitors All of CANBERRA s personnel contamination monitors come with a standard Ethernet port and are setup to do networking out of the box. This networking can provide easy access to the monitors via a central PC which enables Radiation Protection (RP) personnel to get the operational status of equipment, track and clear potential instrument faults, view the interior of the monitor via integrated video camera, communicate with personnel in the monitor via speaker and headset, obtain photographic data of personnel identity when a contamination event occurs and get instant pictorial displays of the contamination s magnitude and location. This Application Note, the first in a series of contamination monitor specific network communication applications, will focus on the setup of a basic standalone network to enable communication between a dedicated PC and a series of contamination monitors to report instrument status, view fault conditions, and transmit radiation monitoring data from the contamination monitors to a PC located nearby the RCA exit. A few of the future Contamination Monitor Application Notes will cover the following topics: Setting up video monitoring and audio connections and communications between contamination monitors equipped with the IP Camera option (Argos and GEM -5 series monitors). Capturing event driven digital photographic records on instruments with the IP Camera option. Configuring CRemote to remote control contamination monitors. Updating this application note for the use of Windows 7. Configuring and calibrating CANBERRA s AccuRate morphology and self-shielding parameters. Getting the most of the Self Shielding and Alarm Testing parameters on GEM-5 gamma exit monitors. Background (problem) Network Security at the majority of nuclear facilities has become so burdensome that the simple addition of a computer is time consuming and often so cumbersome in review and procedures that many RP organizations simply give up. Other barriers to establishing even a standalone network may include the lack of networking expertise, or just the time required to perform the setup. CANBERRA s Application Support Group and experienced Field Support staff are available to assist in setting up network communications for these contamination monitors. Equipment Needed Standard plenum rated CAT5e or 6E network cablelength to be determined by distance between the monitors and the standalone PC. Plenum rated cable is suggested as it meets specific ANSI / NFPA standards to be flame retardant and have low smoke production in a fire. Make sure your cable complies with this standard. RJ-45 Connectors and Network Cable Crimpers and wire strippers, cable ties. If you don t want to make your own cables, there are any number of companies who can make cables to your length specifications. Contamination Monitor(s): we will be using Monitor software Version 8.03 but this currently works up to monitor version Wireless Network Router (wireless is optional). Network Switch(s) maybe optional depending upon the number of monitors and the distance between the RCA exit point and the RP office. CRemote Software (Version 1.06 will be used here). A standalone PC. Either a desktop or laptop will be sufficient. We ll set this up using an older spare/ unused PC running Windows XP Professional. This Application Note will be updated shortly for using Windows 7. 1

2 Basic Network Setup We ll be setting up a simple network using a Netgear Wireless G Router model WGR614 v10. In order to configure your network, most (if not all) routers have an internal web server to configure the router. Netgear routers have all the default addresses and passwords on the bottom of the unit for beginning startup. We will use the default username and password in this example, although these may be changed in the router setup if needed. You will need to configure the router by connecting a network port of the Router with an Ethernet cable and run it to the network port of your PC. Plug in and power the router and your computer if it is not already on. Configure your laptop for DHCP (Dynamic Host Control Protocol). This will enable the Router, once configured, to assign an IP address to your laptop. Open the control panel via Start Programs Control Panel and double click on the Network Connections icon, or right click on the network icon in the lower right corner of the main windows desktop. Follow the pictorials below: 2

3 Now open a browser on your PC. Repeat this configuration step on all the monitors by escaping out of the program, exiting the monitor program by pressing CTRL-F4. Logout as the Monitor user, and Login as the Administrator to make these changes. Once you have applied these changes, you will need to connect all the contamination monitors to a network switch (the size of the switch # of ports, will depend on the total number of contamination monitors you have. If you just have a few monitors and you have enough open ports on the back of your router, you can use your router by itself). You will need one LAN port to connect your PC to the Router, and the remaining open LAN ports will be used by your contamination monitors. If you have more monitors than you have available LAN ports, then you will need a Network Switch(s) to add more monitors. Connect any LAN port of your switch back to another switch, and ultimately one network cable needs to be connected to a LAN port of the Router to connect all the monitors, and switches to the same network. Do not use the WAN port of the Router in this configuration. 3
.")
4 Configure your router The basic router access default URL and username and passwords are usually listed on the bottom of the router, or in the user manual, in this case they are on the back of the router as seen below: LAN and WAN port configuration of the Router User name, password, URL 4

5 5
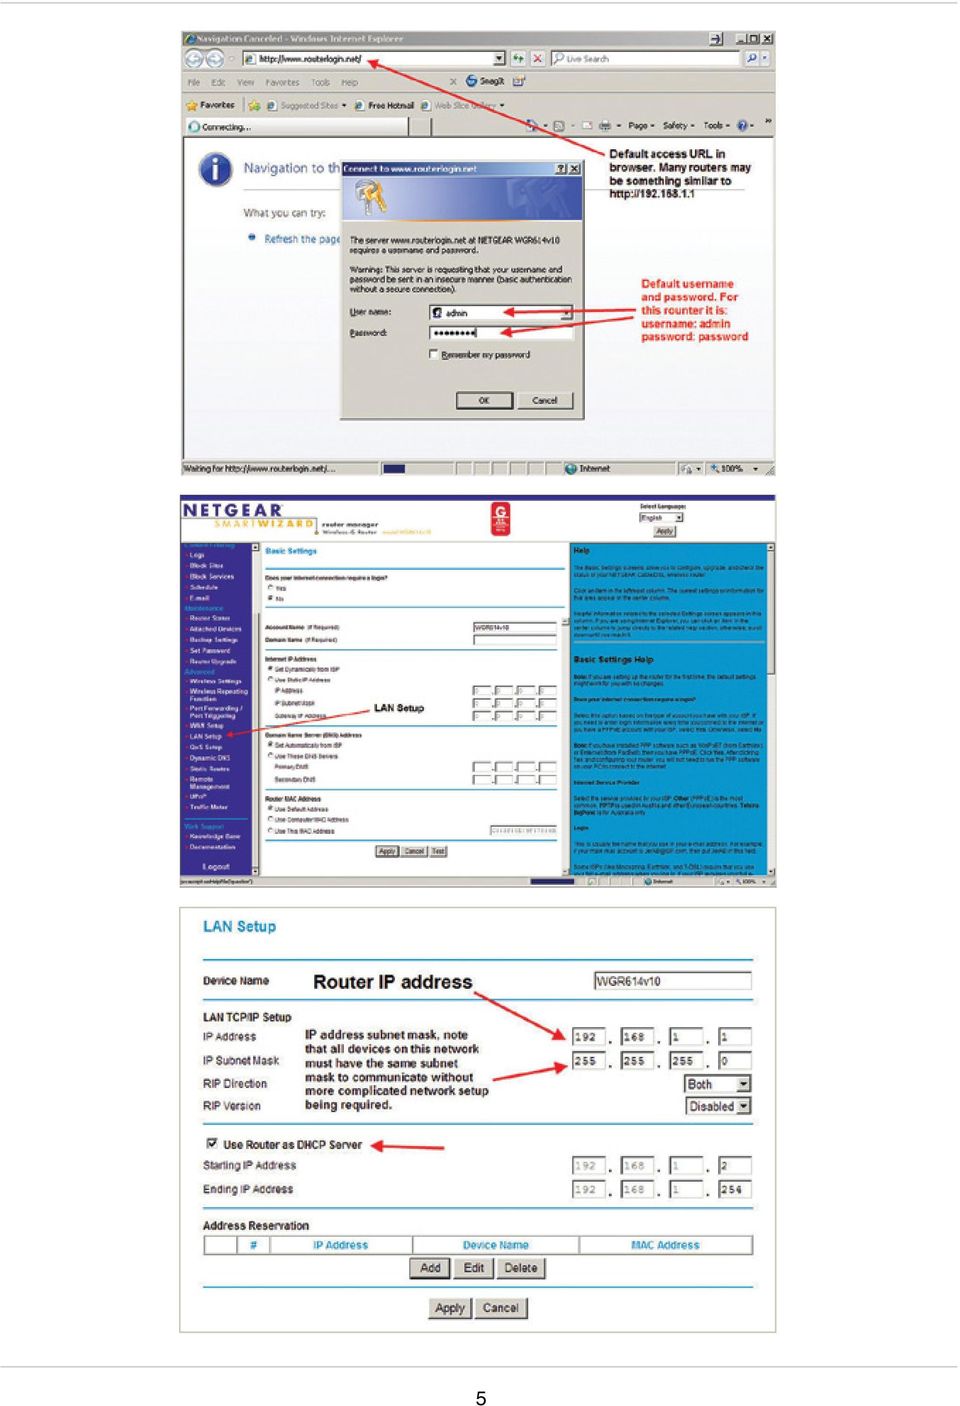
6 Select Apply. Network is now configured for DHCP and all devices connected to the network will now obtain an IP Address from your router. In order to keep everything constant, we will now add an IP Address Reservation for the PC running CRemote, as well as the IP Addresses of each monitor. Luckily the router has a utility menu which will collect all the device information that you will need in this case, the IP address of each monitor and the MAC Address of each monitor. This information is also populated in the LAN Setup screen when we select the Add Reservation button. Select the LAN Setup on the left menu area which will take you to this screen. Then select the Add button. 6

7 You will be taken to the Address Reservation Screen, Make your selections based on the following instructions: Now the address reservation is complete for the PC to run CRemote. You will now need to connect cabling up from each contamination monitor and run the cable to the back of your router, or switch. A cable must be run from each contamination monitor to the router, or if you have multiple contamination monitors you may need to add switches. Repeat this for the remaining Monitors that are on the network. If they are all successfully connected, each monitor will appear in the menu above and can be selected and added. 7

8 If a monitor is not available, the simplest way to add them is to restart each computer. To do this exit out of the Monitor program. ESC, then ALT-F4. Select Start Shutdown Restart the monitor. Upon restart the monitor should pickup the IP address from the Router. Alternatively, one can also open up a command prompt window and use the ipconfig command as follows: Start run, then type cmd in the window, and hit the return key, or click on the OK button: Then type the following commands in the command prompt window as seen below. This will release the IP, and then renew it with the reserved IP from the router. 8

9 At the completion of all these tasks, each monitor will now have an IP Address Reservation and be on the network. In the case here we see that the IP Address of the CRemote computer will be Save this IP address, you will need to enter it on each contamination monitor when configuring the network parameters on each Contamination Monitor. For now install CRemote on the PC which will be the main surveillance PC at the RP satellite station for that RCA. Instructions for CRemote. Run the installer, when the installer is compete a CRemote short cut icon will be installed on the computer Desktop. Double click on the icon to launch the program. The CRemote program will start up and appear somewhat like the figure below if the monitors are properly configured (we ll do this in a minute). If the Monitor ID and Location are not assigned in the Common Values Screen (Setup Menu F1) CRemote will use the IP Address of the computer in that Monitor. Note that it is VERY important to pick the location and ID of the contamination monitor which is meaningful to your RP staff. Obviously, just an IP address is not very helpful. 9

10 Monitor Program Software Setup We ll be using an ARGOS-5AB with the Zeus Gamma option as the example contamination monitor. However, the basic network settings and data communications will be identical for all CANBERRA contamination monitors. Let s look at the Setup required on the Argos monitor and see what s needed: Networking: Get to the Service Menu of the monitor (available by using the USB keyboard plugged into the computer of the monitor) by pressing the escape key. Once in the Service Menu, press the F3 key for the Setup Menu and then F9 the Data (Network) Transfer Screen. Common Values: As we just mentioned, the screen below should have location and identification values which are meaningful. The values should enable your RP staff to easily identify the location of the monitors (such as RCA 3) and the ID of the monitor (perhaps a plant instrument code such as RPI-RCA-3-Argos2 (The Monitor ID and Location ID fields are currently limited to 15 characters). The Serial Number is the number assigned by the factory and should remain as it was assigned. This enables ease of diagnostics by CANBERRA if DATALOG files are sent to Service. The format of the serial number is YYMM-XXX (year and month of manufacture, and the number of the monitor produced that year in sequential order). F3 10
 by pressing the escape key. Once in the Service Menu, press the F3 key for the Setup Menu and then F9 the Data (Network) Transfer Screen.")
11 Using the keyboard toggle the ± key on the Send Status Screen to set this to YES. Press the ESC key twice to retain your settings and return to the Service Menu. (Note that your menu may appear different for other settings, as these screen captures have been produced on a demonstration software version of the monitor.) F9 Using the keyboard toggle the ± key on the Send Status Screen to set this to YES. Press the ESC key twice to retain your settings and return to the Service Menu. (Note that your menu may appear different for other settings, as these screen captures have been produced on a demonstration software version of the monitor.) Once the values are set, escape back to the Service Menu. The CRemote Screen should now look like this (obviously your Common Values information will differ from this example). 11

12 Now place the monitor into service and the CRemote Console will appear as follows (the green status block indicates that the monitor has entered normal service: 12

13 What has also happened on the computer running CRemote is that individual folders for each monitor have been added in the CRemote Program folder which contain all the data from the monitor (at the present time we have the folder appended with the Computer Name of the Monitor): 13

14 If we change the setup in the Data (Network) Transfer folder to Monitor ID Location ID this unique name will now be the folder name with all the data: 14

15 And now the director structure has added the folder with this unique information which is much more useful: Now CRemote has been setup on a standalone network with a PC and some networking gear. If you have questions, don t hesitate to contact the Application Support Group through CANBERRA s main customer service number. Application Support Managers or Field Service Engineers can also help you setup a standalone network as part of a service contact or service agreement. 15

16 References 1. Institute of Nuclear Power Operations (INPO) INPO Guidelines for Radiological Protection at Nuclear Power Stations (2005). 2. American Nuclear Insurers (ANI) ANI Section 8.5 Radiation Protection Bioassay. (2008). 3. Argos-3/-5 Whole Body Surface Contamination Monitors, User s Manual, Canberra Industries (2010). Argos and GEM are trademarks of CANBERRA Co. AccuRate and Zeus are trademarks of Canberra Industries, Inc. Windows is a registered trademark of Microsoft Corporation in the United States and/or other countries. Measurement Solutions for Nuclear Safety and Security n CANBERRA is the Nuclear Measurements Business Unit of AREVA For more information please visit: 16 C /12

PC/POLL SYSTEMS Version 7 Polling SPS2000 Cash Register TCP/IP Communications
 PC/POLL SYSTEMS Version 7 Polling SPS2000 Cash Register TCP/IP Communications PC/POLL SYSTEMS supports native TCP/IP polling for the SPS2000 cash register. It is recommended users have the register updated
You may refer the Quick Installation Guide in the package box for more information.
 Hardware Installation: 1. Turn off your modem. 2. Use one Ethernet cable to connect your modem to WAN port (Blue) port of BR-6228nC. 3. Use another Ethernet cable to connect your PC to one LAN Port (Yellow)
c. Securely insert the Ethernet cable from your cable or DSL modem into the Internet port (B) on the WGT634U. Broadband modem
 on the WGT634U. Broadband modem") Start Here Follow these instructions to set up your router. Verify That Basic Requirements Are Met Assure that the following requirements are met: You have your broadband Internet service settings handy.
Start Here Follow these instructions to set up your router. Verify That Basic Requirements Are Met Assure that the following requirements are met: You have your broadband Internet service settings handy.
Connecting the DG-102S VoIP Gateway to your network
 Contents of Package: DG-102S VoIP Station Gateway Power adapter CD-ROM, including User s Manual Quick Install Guide Requirements: RS-232 Console Cable Two RJ-45 CAT-5 Straight-Through Cables For more information
Quick Installation Guide
 Model: FI8905E Quick Installation Guide Ourdoor POE Network Camera For Windows OS ------- Page 1 For MAC OS ------- Page 14 ShenZhen Foscam Intelligent Technology Co., Ltd Quick Installation Guide - For
Internet Guide. Prepared for 55 John Street
 Internet Guide Prepared for 55 John Street I. Internet Service How do I connect to the Internet? WiFi (Wireless Connectivity) is available throughout the building. In order to connect, you will need a
Quick Installation Guide
 V48.01 Model: FI8919W Quick Installation Guide Outdoor Pan/Tilt Wireless IP Camera For Windows OS ------- Page 1 For MAC OS ------- Page 15 ShenZhen Foscam Intelligent Technology Co., Ltd Quick Installation
DATA PROJECTOR XJ-A147/XJ-A247/XJ-A257 XJ-M146/XJ-M156 XJ-M246/XJ-M256. XJ-A Series. XJ-M Series. Network Function Guide
 DATA PROJECTOR EN XJ-A Series XJ-A147/XJ-A247/XJ-A257 XJ-M Series XJ-M146/XJ-M156 XJ-M246/XJ-M256 Network Function Guide In this manual, XJ-A Series and XJ-M Series refer only to the specific models listed
1. Hardware Installation
 4 Port 10/100M Internet Broadband Router with USB Printer server Quick Installation Guide #4824904AXZZ0 1. Hardware Installation A. System Requirement Before you getting started, make sure that you meet
Self Help Guide IMPORTANT! Configuring Your Router With Your Modem. Please read the following carefully; This Guide refers to the following Products:
 IMPORTANT! This Guide refers to the following Products: Configuring Your Router With Your Modem Please read the following carefully; Synopsis: A standard (Wireless) Router does not come equipped with the
Manual Wireless Extender Setup Instructions. Before you start, there are two things you will need. 1. Laptop computer 2. Router s security key
 1 Manual Wireless Extender Setup Instructions Before you start, there are two things you will need. 1. Laptop computer 2. Router s security key Setting up LAN Static IP on PC We need to set up a Static
Networking. General networking. Networking overview. Common home network configurations. Wired network example. Wireless network examples
 Networking General networking Networking overview A network is a collection of devices such as computers, printers, Ethernet hubs, wireless access points, and routers connected together for communication
Quick Start Guide NVR DS-7104NI-SL/W NVR. www.hikvision.com. First Choice For Security Professionals
 Quick Start Guide NVR DS-7104NI-SL/W NVR NOTE: For more detailed information, refer to the User s Manual on the CD-ROM. You must use your PC or MAC to access the files. www.hikvision.com Quick Start 1.
Determining Your MAC Address in Windows XP
 Determining Your MAC Address in Windows XP 1. Click Start then choose Run. 2. Type cmd into the Open: field and press the Enter key. 3. Type ipconfig /all at the prompt and press the Enter key. (Note:
Self Help Guide. Please read the following carefully; Synopsis: Requirements: A Computer with a working RJ45 LAN Port All Belkin Modem Routers
 IMPORTANT! This Guide refers to the following Products: Establishing A Connection From PC To Router Please read the following carefully; Synopsis: This Self-Help Guide is designed to assist you if you
DOORKING SYSTEMS 1830 SERIES NETWORK WORKSHOP LAN APPLICATIONS ACCESS CONTROL SOLUTIONS LOCAL AREA NETWORK (LAN) CONNECTION REV 04.
 CONNECTION REV 04.") DOORKING SYSTEMS ACCESS CONTROL SOLUTIONS 1830 SERIES NETWORK WORKSHOP LAN APPLICATIONS REV 04.11 LOCAL AREA NETWORK (LAN) CONNECTION Ethernet Connection: An Ethernet Cable, or wireless connection must
DOORKING SYSTEMS ACCESS CONTROL SOLUTIONS 1830 SERIES NETWORK WORKSHOP LAN APPLICATIONS REV 04.11 LOCAL AREA NETWORK (LAN) CONNECTION Ethernet Connection: An Ethernet Cable, or wireless connection must
Student Halls Network. Connection Guide
 Student Halls Network Connection Guide Contents: Page 3 Page 4 Page 6 Page 10 Page 17 Page 18 Page 19 Page 20 Introduction Network Connection Policy Connecting to the Student Halls Network Connecting to
Symphony Network Troubleshooting
 Symphony Network Troubleshooting Step 1) Review the Networking 101 presentation on the CD included with the Symphony. A basic understanding of networks is essential to this procedure. Step 2) Identify
Quick Installation Guide
 V46.01 Model: FI8918W Quick Installation Guide Indoor Pan/Tilt Wireless IP Camera Black White For Windows OS ------- Page 1 For MAC OS ------- Page 11 ShenZhen Foscam Intelligent Technology Co., Ltd Quick
Unified Communications Installation & Configuration Guide
 Unified Communications Installation & Configuration Guide Table of contents Page Applications License 1 Mitel 5110 Softphone 5 Click to Dial Application 22 Applications License Obtaining and Configuration
NETVIGATOR Wireless Modem Setup Guide. (TG789Pvn)
") NETVIGATOR Wireless Modem Setup Guide (TG789Pvn) Configure the NETVIGATOR Wireless Modem Make sure that system meets the following requirement prior to NETVIGATOR Wireless Modem usage: - Subscribers who
NETVIGATOR Wireless Modem Setup Guide (TG789Pvn) Configure the NETVIGATOR Wireless Modem Make sure that system meets the following requirement prior to NETVIGATOR Wireless Modem usage: - Subscribers who
D-Link DAP-1360 Repeater Mode Configuration
 D-Link DAP-1360 Repeater Mode Configuration Outline 1. Package Contents 2. System Requirements 3. Hardware Overview Connections LED s WPS LED/Button 4. Default Settings 5. Configuring your LAN Adapter
Digicom Remote Control for the SRT
 Digicom Remote Control for the SRT To operate the SRT remotely, use Remote Desktop; this is available free for Linux, Mac OS-X (from Microsoft), and is included with Windows XP and later. As RD uses a
Prestige 650R-31/33 Read Me First
 Prestige 650R-31/33 Read Me First Prestige Rear Panel Connections PORT DSL CONSOLE LAN 10/100M POWER Connect to a telephone jack using a telephone wire. CONNECTION Connect to a serial port (COM port) on
Directions for Connecting Computers running Windows XP to the Alverno College Network
 Directions for Connecting Computers running Windows XP to the Alverno College Network Alverno College NOTE: If your PC is running Windows XP, Microsoft s network client software is already installed and
Home Wi-Fi Gateway Instructions
 Home Wi-Fi Gateway Instructions 1. Connect the gateway. Use the coaxial cable provided by BendBroadband to connect the cable port (A) to your cable outlet. 2. Connect your computer to the cable modem gateway
BiPAC 7404V series. VoIP/(802.11g) ADSL2+ (VPN) Firewall Router. Quick Start Guide
 ADSL2+ (VPN) Firewall Router. Quick Start Guide") BiPAC 7404V series VoIP/(802.11g) ADSL2+ (VPN) Firewall Router Quick Start Guide VoIP/(802.11g) ADSL2+ (VPN) Firewall Router For more detailed instructions on configuring and using the Billion VoIP/(802.11g)
BiPAC 7404V series VoIP/(802.11g) ADSL2+ (VPN) Firewall Router Quick Start Guide VoIP/(802.11g) ADSL2+ (VPN) Firewall Router For more detailed instructions on configuring and using the Billion VoIP/(802.11g)
7 6.2 Windows Vista / Windows 7. 10 8.2 IP Address Syntax. 12 9.2 Mobile Port. 13 10.2 Windows Vista / Windows 7. 17 13.2 Apply Rules To Your Device
 TABLE OF CONTENTS ADDRESS CHECKLIST 3 INTRODUCTION 4 WHAT IS PORT FORWARDING? 4 PROCEDURE OVERVIEW 5 PHYSICAL CONNECTION 6 FIND YOUR ROUTER S LOCAL NETWORK IP ADDRESS 7 6.1 Windows XP 7 6.2 Windows Vista
AXIS Camera Station Quick Installation Guide
 AXIS Camera Station Quick Installation Guide Copyright Axis Communications AB April 2005 Rev. 3.5 Part Number 23997 1 Table of Contents Regulatory Information.................................. 3 AXIS Camera
MiraCosta College now offers two ways to access your student virtual desktop.
 MiraCosta College now offers two ways to access your student virtual desktop. We now feature the new VMware Horizon View HTML access option available from https://view.miracosta.edu. MiraCosta recommends
Quick Installation Guide
 V2.01 Model: FI9821W Quick Installation Guide Indoor HD Pan/Tilt Wireless IP Camera Black White For Windows OS ------- Page 1 For MAC OS ------- Page 16 ShenZhen Foscam Intelligent Technology Co., Ltd
Step by step guide for connecting PC to wired LAN at dormitories of University of Pardubice
 Step by step guide for connecting PC to wired LAN at dormitories of University of Pardubice English version Version 1.1 July 2008 Information Cente University of Pardubice Content A. Windows XP... 2 B.
DATA PROJECTOR XJ-A135/XJ-A145/XJ-A235/ XJ-A245
 DATA PROJECTOR XJ-A135/XJ-A145/XJ-A235/ XJ-A245 E Data Projector Wireless Function Guide Be sure to read the precautions in the User s Guide (Basic Operations) that comes with the Data Projector. Be sure
DATA PROJECTOR XJ-A146/XJ-A246/XJ-A256
 DATA PROJECTOR XJ-A146/XJ-A246/XJ-A256 E Data Projector Wireless Function Guide Be sure to read the precautions in the Setup Guide that comes with the Data Projector. Be sure to keep all user documentation
ADSL Router Quick Installation Guide Revised, edited and illustrated by Neo
 ADSL Router Quick Installation Guide Revised, edited and illustrated by Neo A typical set up for a router PCs can be connected to the router via USB or Ethernet. If you wish to use a telephone with the
RAPID BROADBAND INSTALLATION RAPID BROADBAND SUPPORT CONTACT DETAILS. support@rapidbroadband.ie AND TROUBLESHOOTING GUIDE. Email: Tel: 076 6708787
 RAPID BROADBAND INSTALLATION AND TROUBLESHOOTING GUIDE RAPID BROADBAND SUPPORT CONTACT DETAILS Email: support@rapidbroadband.ie Tel: 076 6708787 January 2008 1 INTERNET CONNECTION TROUBLESHOOTING GUIDE
Using Cisco UC320W with Windows Small Business Server
 Using Cisco UC320W with Windows Small Business Server This application note explains how to deploy the Cisco UC320W in a Windows Small Business Server environment. Contents This document includes the following
Network Setup Guide. 1 Glossary. 2 Operation. 1.1 Static IP. 1.2 Point-to-Point Protocol over Ethernet (PPPoE)
") Network Setup Guide 1 Glossary 1.1 Static IP Computers are communicated and recognized by their own unique IP addresses over the Internet. Static IP provided by your ISP (Internet Service Provider) means
Network Setup Guide 1 Glossary 1.1 Static IP Computers are communicated and recognized by their own unique IP addresses over the Internet. Static IP provided by your ISP (Internet Service Provider) means
Ethernet Radio Configuration Guide
 Ethernet Radio Configuration Guide for Gateway, Endpoint, and Repeater Radio Units April 20, 2015 Customer Service 1-866-294-5847 Baseline Inc. www.baselinesystems.com Phone 208-323-1634 FAX 208-323-1834
SwannEye HD Plug & Play Wi-Fi Security Camera Quick Start Guide Welcome! Lets get started.
 EN SwannEye HD Plug & Play Wi-Fi Security Camera Quick Start Guide Welcome! Lets get started. QHADS453080414E Swann 2014 1 1 Introduction Congratulations on your purchase of this SwannEye HD Plug & Play
Microsoft Office 365 with MailDefender
 (PC) for Microsoft Office 365 with MailDefender V1.0 Contents 1 Logging in to the Office 365 Portal... 3 1.1 Outlook Web Access Exchange & Lync... 3 1.2 Team Site SharePoint Online... 3 2 Configuring your
ETHERNET WEATHER STATION CONNECTIONS Application Note 33
 ETHERNET WEATHER STATION CONNECTIONS Application Note 33 With WeatherLink and a Device Server INTRODUCTION It is possible to substitute an Ethernet connection for the direct USB or serial connection that
Configuration and Access of FTP Server
 Configuration and Access of FTP Server TL-WR1042ND TL-WR1043ND TL-WR2543ND TL-WR842ND This guide applies to all the models above. Rev: 1.0.0 1910010521 CONTENTS Chapter 1. Topology and USB Device...2 1.1
Application Note. CRemote Remote Setup
 Application Note CRemote Remote Setup Purpose of Remote Control Remote control enables a Supervisory Computer to change the settings on remote CANBERRA Fixed Contamination Monitors. A remote control software
The initial set up takes a few steps, but then each time you want to connect it is just a two set process.
 Remote Access to your Desktop using VPN Overview VPN is a tool that enables you to access one computer from another. Typical uses for Pop Center members would be 1) access their pop center computer from
Wireless G Broadband quick install
 Wireless G Broadband Router quick install guide Model 503693 INT-503693-QIG-0608-02 Thank you for purchasing the INTELLINET NETWORK SOLUTIONS Wireless G Broadband Router, Model 503693. This quick install
P-2612HNU-Fx. 802.11n ADSL2+ VoIP IAD DEFAULT LOGIN DETAILS. Firmware V3.00 Edition 1, 1/2010. Password: 1234 User Name: admin Password: 1234
 P-2612HNU-Fx 802.11n ADSL2+ VoIP IAD Firmware V3.00 Edition 1, 1/2010 DEFAULT LOGIN DETAILS IP Address: User Login: Administrator Login: http://192.168.1.1 User Name: user Password: 1234 User Name: admin
Basics of Port Forwarding on a Router for Security DVR s
 Basics of Port Forwarding on a Router for Security DVR s The basic concept of setting up your router to allow for Off Site access to your DVR involves setting up the two necessary ports the Security DVR
quick reference guide
 quick reference guide / Product Overview Product Overview Wireless (Blue) The Wireless LED lights up when the wireless feature is enabled. It flashes when the Valet sends or receives data over the wireless
What is a Home Network? A home network is a collection of two or more home computers connected together through a wired or wireless connection.
 Building A Home Network What is a Home Network? A home network is a collection of two or more home computers connected together through a wired or wireless connection. Why should I network my computers
Citrix Client Install Instructions
 Citrix Client Install Instructions If you are using Citrix remotely, Information Technology Services recommends updating Citrix client to the newest version available online. You must be an administrator
Chapter 2 Preparing Your Network
 Chapter 2 Preparing Your Network This document describes how to prepare your network to connect to the Internet through a router and how to verify the readiness of your broadband Internet service from
3.5 EXTERNAL NETWORK HDD. User s Manual
 3.5 EXTERNAL NETWORK HDD User s Manual Table of Content Before You Use Key Features H/W Installation Illustration of Product LED Definition NETWORK HDD Assembly Setup the Network HDD Home Disk Utility
ipad Installation and Setup
 ipad Installation and Setup INDEX ipad Features Page 2 Charging.. Page 2 User Guide... Page 3 Setup for ipad use in the office (Office wireless network) Setup Office computers Verify Remote Desktop is
Network Projector Operation Guide
 Network Projector Operation Guide Table of contents Preparation...3 Connecting the projector with your computer...3 Wired connection... 3 Wireless connection (for selective models)... 4 QPresenter...7
V.I.P. Kit. Video Insight Pilot Kit. (Video Insight Pilot Kit).
.") V.I.P. Kit (Video Insight Pilot Kit). Video Insight Pilot Kit Please follow these instructions and everything should go very smoothly. Before you begin, you will need to establish (or obtain from your
V.I.P. Kit (Video Insight Pilot Kit). Video Insight Pilot Kit Please follow these instructions and everything should go very smoothly. Before you begin, you will need to establish (or obtain from your
How do I configure the wireless printer using a USB or Ethernet cable and install the printer driver in Windows?
 How do I configure the wireless printer using a USB or Ethernet cable and install the printer driver in Windows? STEP I: Gather the wireless network settings of your wireless access point or wireless router
Using Zistos PNSC over BGAN
 Using Zistos PNSC over BGAN Self powered Field Surveillance and Monitoring Version 01 12 th November 2009 1 Contents 1 Overview 1 2 Applications 1 3 Features & Benefits 1 4 Network Diagram 2 5 Connecting
CPEi 800/825 Series. User Manual. * Please see the Introduction Section
 CPEi 800/825 Series User Manual * Please see the Introduction Section Contents Introduction...iii Chapter 1: CPEi 800/825 User Guide Overview... 1-1 Powerful Features in a Single Unit... 1-2 Front of the
Immotec Systems, Inc. SQL Server 2005 Installation Document
 SQL Server Installation Guide 1. From the Visor 360 installation CD\USB Key, open the Access folder and install the Access Database Engine. 2. Open Visor 360 V2.0 folder and double click on Setup. Visor
Internet Access to a DVR365
 Configuration Details : Internet Access to DVR365 Page : 1 Internet Access to a DVR365 These instructions will show you how to connect your DVR365 to the internet via an ADSL broadband modem/router. The
FTP Server Application Guide REV: 1.1.0 1910010819
 FTP Server Application Guide REV: 1.1.0 1910010819 CONTENTS Chapter 1. Topology and USB Device... 1 1.1 Typical Topology... 1 1.2 Special Topology... 2 1.3 USB Device... 3 Chapter 2. Configuration of the
Quick Installation Guide
 Quick Installation Guide (For Windows & Mac OS) Outdoor Wireless IP Camera Package Contents V1.1 IP Camera Power Adapter Resource CD Ethernet Cable Mounting Bracket(except FI8919) Wi-Fi Antenna Quick Installation
Setting up the Swann HD IP cameras
 Setting up the Swann HD IP cameras Connecting the cameras to the network The Swann IP cameras are connected to the network with Category 5/5E/6 cables. The cameras feature Power over Ethernet for ease
EASE Scan Tool Customers. SECTION I - Installation
 Please Install Your EASE Scan Tool DVD Before Installing Any Other Software That Came With Your Package. SECTION I - Installation ATTENTION: Do NOT connect an EASE Vehicle Interface Device to your Computer
StarMOBILE Network Configuration Guide. A guide to configuring your StarMOBILE system for networking
 StarMOBILE Network Configuration Guide A guide to configuring your StarMOBILE system for networking INTRODUCTION... 3 BEFORE YOU BEGIN... 3 1) CONFIRM YOU HAVE THE LATEST SOFTWARE... 3 2) INSTALL THE STARMOBILE
If you need additional assistance please contact our Technical Support Center at 24 hours a day, 7 days a week.
 Cisco SPA 2100 Phone Adapter Installation Manual Index Installation of the Cisco SPA 2100 Phone Adapter to NationPhone P. 1 Index, before you begin, and what is included P.2 Installing the NationPhone
Table of Contents. 0. Internet Connectivity Assumptions..2. 0. Identifying the Network Wall Jack... 2. 0. Identifying the Ethernet Cable..
 Table of Contents 0. Internet Connectivity Assumptions..2 0. Identifying the Network Wall Jack... 2 0. Identifying the Ethernet Cable..4 0. Identifying the Network Interface Card...5 0. Connecting Your
Network Setup Guide. Introduction. Setting up for use over LAN
 Network Setup Guide This manual contains the setup information required to use the machine over wired LAN. If you use the machine with USB connection, refer to your setup sheet. Introduction To use the
CS 326e F2002 Lab 1. Basic Network Setup & Ethereal Time: 2 hrs
 CS 326e F2002 Lab 1. Basic Network Setup & Ethereal Time: 2 hrs Tasks: 1 (10 min) Verify that TCP/IP is installed on each of the computers 2 (10 min) Connect the computers together via a switch 3 (10 min)
Amcrest 960H DVR Quick Start Guide
 Amcrest 960H DVR Quick Start Guide Welcome Thank you for purchasing our Amcrest 960H DVR! This quick start guide will help you become familiar with our DVR in a very short time. Before installation and
If you are unable to set up your Linksys Router by using one of the above options, use the steps below to manually configure your router.
 This article describes how to manually configure a Linksys Router for broadband DSL that uses PPPoE (Point-to-Point Protocol over Ethernet) for authentication. For automatic configuration options, please
TE100-P21/TEW-P21G Windows 7 Installation Instruction
 Hardware Installation TE100-P21/TEW-P21G Windows 7 Installation Instruction 1. Go to http://www.trendnet.com/downloads/ to download the Windows 7 Utility. Save the file to your desktop. 2. Right click
How to Remotely View Security Cameras Using the Internet
 How to Remotely View Security Cameras Using the Internet Introduction: The ability to remotely view security cameras is one of the most useful features of your EZWatch Pro system. It provides the ability
How to set up a router to share you broadband connection
 How to set up a router to share you broadband connection Now that you've broadband at home, here's how to set up a router to connect your Macs and PCs. Shopping for routers is quite a chore especially
Vantage RADIUS 50. Quick Start Guide Version 1.0 3/2005
 Vantage RADIUS 50 Quick Start Guide Version 1.0 3/2005 1 Introducing Vantage RADIUS 50 The Vantage RADIUS (Remote Authentication Dial-In User Service) 50 (referred to in this guide as Vantage RADIUS)
Linksys Gateway SPA2100-SU Manual
 Linksys Gateway SPA2100-SU Manual Manuel de l'utilisateur Table of Contents Looking for Basic Setup Instructions?... 3 Most Recent Version of this Manual... 3 Advanced Setup Instructions... 4 Wiring Your
Sweex Wireless BroadBand Router + 4 port switch + print server
 Sweex Wireless BroadBand Router + 4 port switch + print server Advantages Internet Sharing - A broadband internet connection makes it possible for several PCs to use the internet simultaneously. Wireless
How to connect NUVICO DVR to the internet
 How to connect NUVICO DVR to the internet Section 1. Initial preparations Preparations Finding Network Information NUVICO Connecting Video Anywhere 1 Preparations Is the Internet service up and running
Figure 1 Sample WiseLink screens, showing MP3 music files (left) and photos (right) available as shared files from your networked PC or media server
 and photos (right) available as shared files from your networked PC or media server") SAMSUNG S GUIDE TO DLNA Welcome to the era of 21 st -century television! Samsung s added a new level of functionality to its HDTVs with DLNA CERTIFIED connectivity. Now, your compatible Samsung HDTV can
SAMSUNG S GUIDE TO DLNA Welcome to the era of 21 st -century television! Samsung s added a new level of functionality to its HDTVs with DLNA CERTIFIED connectivity. Now, your compatible Samsung HDTV can
F re Alarm Network etwo (FAN) T rou rou h Virt Vi ual u Private Network etwo (VPN) Dr. Dr Sa S mir H. Abdull--Ja J u a wad
 T rou rou h Virt Vi ual u Private Network etwo (VPN) Dr. Dr Sa S mir H. Abdull--Ja J u a wad") Fire Alarm Network (FAN) Through Virtual Private Network (VPN) By Dr. Samir H. Abdul-Jauwad Director General (Acting) Environment, Health and Safety Department July 07, 2013 1 Outline Introduction of Virtual
Fire Alarm Network (FAN) Through Virtual Private Network (VPN) By Dr. Samir H. Abdul-Jauwad Director General (Acting) Environment, Health and Safety Department July 07, 2013 1 Outline Introduction of Virtual
LockView 4.3.1 CompX Database & Network Configuration & Installation Manual
 LockView 4.3.1 CompX Database & Network Configuration & Installation Manual Table of Contents CompX Database & Network Configuration & Installation Manual Introduction... 4 Installation Requirements...
This document is intended to make you familiar with the ServersCheck Monitoring Appliance
 ServersCheck Monitoring Appliance Quick Overview This document is intended to make you familiar with the ServersCheck Monitoring Appliance Although it is possible, we highly recommend not to install other
Installation Guide Wireless 4-Port USB Sharing Station. GUWIP204 Part No. M1172-a
 Installation Guide Wireless 4-Port USB Sharing Station 1 GUWIP204 Part No. M1172-a 2011 IOGEAR. All Rights Reserved. PKG-M1172-a IOGEAR, the IOGEAR logo, MiniView, VSE are trademarks or registered trademarks
EC500 BASIC SOFTWARE SETUP GUIDE. Read This First. www.easyclocking.com. Easy Clocking EC500 Setup Guide - Page 1
 EC500 BASIC SOFTWARE SETUP GUIDE Read This First www.easyclocking.com Easy Clocking EC500 Setup Guide - Page 1 Step 1 - Registering the Software A"er installing the Easy Clocking So"ware, the next step
rs-ba1 remote control software quick reference guide
 rs-ba1 remote control software quick reference guide Contents Requirements... 2 Firewall Considerations... 3 Connecting to the RS-BA1 Locally... 4 Finding the IP of your Base Station Computer... 4 Setting
Digital telephony. Softphone Getting Started Guide. Business Edition TEL-GDA-AFF-002-0902
 Digital telephony Business Edition Softphone Getting Started Guide TEL-GDA-AFF-002-0902 Contents ABOUT THIS GUIDE 3 911 EMERGENCY SERVICES 3 DOWNLOADING THE SOFTWARE 3 CONFIGURING THE SOFTWARE 5 INITIALIZING
Chapter 1 Configuring Basic Connectivity
 Chapter 1 Configuring Basic Connectivity This chapter describes the settings for your Internet connection and your wireless local area network (LAN) connection. When you perform the initial configuration
FI8910W Quick Installation Guide. Indoor MJPEG Pan/Tilt Wireless IP Camera
 Model: FI8910W Quick Installation Guide (For Windows OS) (For MAC OS please go to page 17) Indoor MJPEG Pan/Tilt Wireless IP Camera Black White Package Contents IP Camera FI8910W with IR-Cut.x 1 DC Power
How to Setup and Connect to an FTP Server Using FileZilla. Part I: Setting up the server
 How to Setup and Connect to an FTP Server Using FileZilla The ability to store data on a server and being able to access the data from anywhere in the world has allowed us to get rid of external flash
Cisco 7940 How To. (c) 2003-2010 Bicom Systems
 2003-2010 Bicom Systems") Cisco 7940 How To Cisco 7940 How To All rights reserved. No parts of this work may be reproduced in any form or by any means - graphic, electronic, or mechanical, including photocopying, recording, taping,
Cisco 7940 How To Cisco 7940 How To All rights reserved. No parts of this work may be reproduced in any form or by any means - graphic, electronic, or mechanical, including photocopying, recording, taping,
1 PC to WX64 direction connection with crossover cable or hub/switch
 1 PC to WX64 direction connection with crossover cable or hub/switch If a network is not available, or if it is desired to keep the WX64 and PC(s) completely separated from other computers, a simple network
Quick Installation Guide DAP-1360. Wireless N 300 Access Point & Router
 DAP-1360 Wireless N 300 Access Point & Router BEFORE YOU BEGIN Delivery Package Access point DAP-1360 Power adapter DC 12V Ethernet cable (CAT 5E) (brochure). If any of the items are missing, please contact
Check Your Package Contents. CD-ROM containing Manual and Warranty
 This product can be set up using any current web browser, i.e., Internet Explorer 6 or Netscape Navigator 6.2.3. DVA-G3340S Wireless VoIP Router Before You Begin If you purchased this Router to share your
Wireless Router Setup Manual
 Wireless Router Setup Manual NETGEAR, Inc. 4500 Great America Parkway Santa Clara, CA 95054 USA 208-10082-02 2006-04 2006 by NETGEAR, Inc. All rights reserved. Trademarks NETGEAR is a trademark of Netgear,
Quick Installation Guide Network Management Card
 Rev.1.1 www.cyberpowersystems.com Quick Installation Guide Network Management Card Intelligent Network Management Card allows UPS to be managed, monitored, and configured via SNMP Card Configuration Tool
LockView 4.2 CompX Database & Network Configuration & Installation Manual
 LockView 4.2 CompX Database & Network Configuration & Installation Manual Table of Contents CompX Database & Network Configuration & Installation Manual Introduction... 4 Installation Requirements... 5
Quick Installation Guide
 V2.01 IP Wired / Wireless Camera Quick Installation Guide (For Windows OS) Model: FI8602/FI8602W ShenZhen Foscam Intelligent Technology Co., Ltd Packing List Quick Installation Guide 1) IP CAMERA X 1 2)
Table of Contents. Chapter1. Introduction...1. 1.1 Before Installation... 1 1.2 System Requirements... 1
 Table of Contents Chapter1. Introduction...1 1.1 Before Installation... 1 1.2 System Requirements... 1 Chapter2. IVS-110 1-Channel Internet Video Server...2 2.1 Package Content... 2 2.2 Physical Installation...
integration tools setup guide SIM 3 Remote Guide to controlling a SIM 3 Audio Analyzer remotely over a network connection from a laptop
 setup guide integration tools SIM 3 Remote Guide to controlling a SIM 3 Audio Analyzer remotely over a network connection from a laptop 2010 Meyer Sound. All rights reserved. SIM 3 Remote Setup Guide,