DECKING INSTALLATION, CARE & MAINTENANCE INSTRUCTIONS MOISTURESHIELD.COM limited lifetime warranty
|
|
|
- Alicia Harper
- 7 years ago
- Views:
Transcription
1 DECKING INSTALLATION, CARE & MAINTENANCE INSTRUCTIONS MOISTURESHIELD.COM limited lifetime warranty

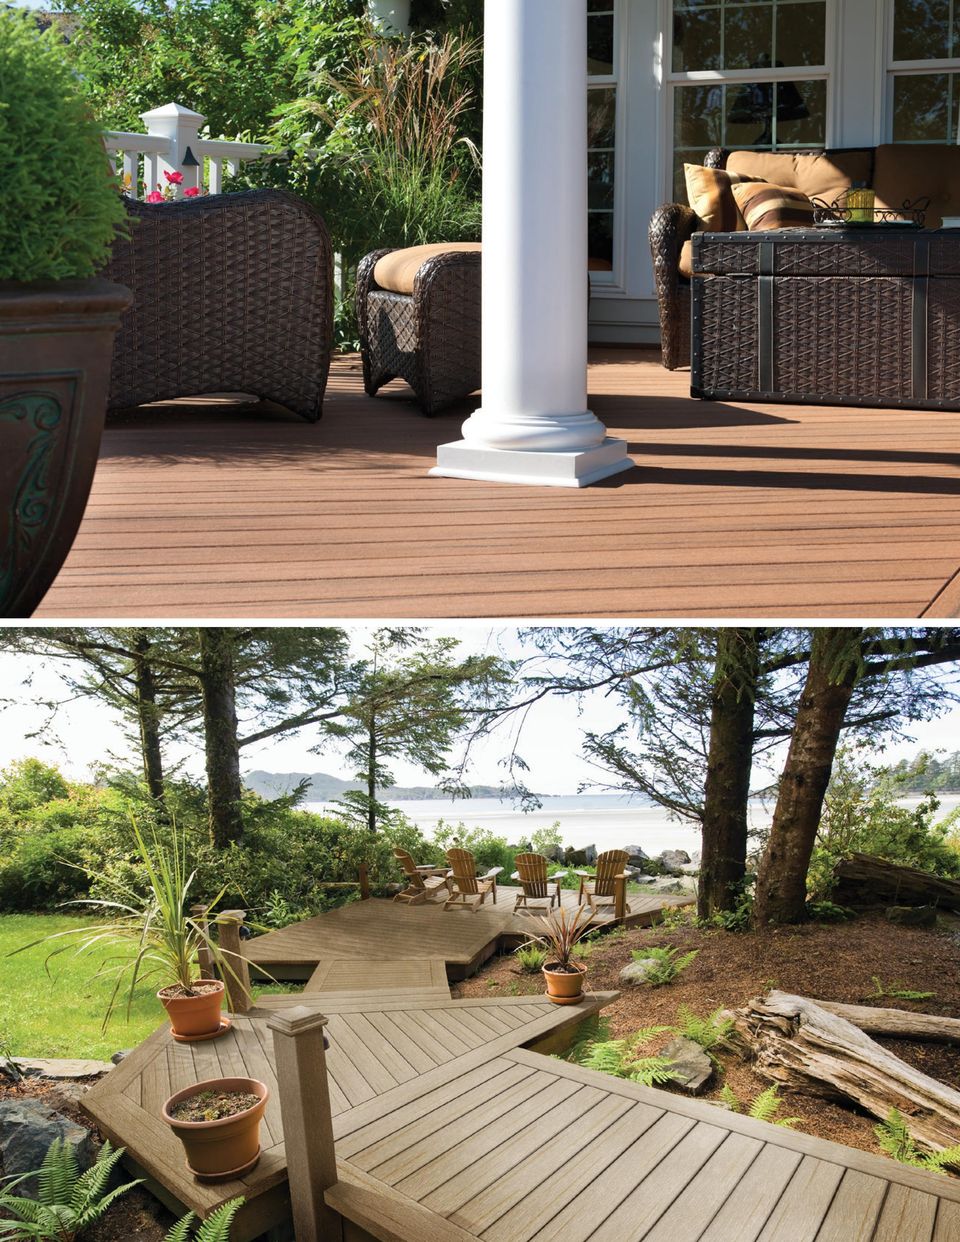
2 Welcome To The Even Greater Outdoors. Congratulations on choosing MoistureShield for your outdoor living experience. Take comfort in knowing that you selected an exceptional decking material built solidly on these key standards: performance, innovation and beauty. As a result of our continued technological advances like our total encapsulation process, MoistureShield is the only decking product that can be installed on or in the ground or even underwater. Enjoy the beauty and durability for years to come. Installation Instructions Easy step-by-step instructions for decking, railing and stairs. As with any building project, use proper eye and ear protection and follow local building codes. MoistureShield composite decking is for decking and accessories only. It is not to be used as structural material. Warranty MoistureShield Composite Decking is manufactured by Advanced Environmental Recycling Technologies, Inc. (A.E.R.T.), which warrants MoistureShield products against rot, decay and insect damage with a limited warranty from 20 years to a lifetime, depending on the product. For complete warranty details, please visit our website or call Customer Service. General Cleaning & Maintenance Instructions In an outdoor environment, periodic cleaning will help keep your deck looking new. As with any flooring surface, periodic cleaning is recommended. The following are suggested cleaners for occasional maintenance: Olympic Premium Deck Cleaner Behr 63 Deck Wash Jomax Deck Cleaner Concrobium XT Eco-Wash (non-bleach) For specific cleaning issues, please visit our website or call Customer Service at

3 DECKING SYSTEMS 1" 5" Essential 1.0" 5.0" LENGTH: 12, 16 and 20 feet 1" 6" Vantage 1.0" 5.4" LENGTH: 12, 16 and 20 feet 1" x 6" PRO 1.0" 5.4" LENGTH: 12, 16 and 20 feet 2" 4" Board 1.5" 3.5" LENGTH: 12 and 16 feet 2" 6" Board 1.5" 5.5" LENGTH: 12 and 16 feet Trim Board 0.65" 11.25" LENGTH: 12 feet

4 DECKING INSTALLATION Tools All you ll need is a hammer and screw gun, circular saw (carbide-tipped than 20 teeth is recommended), level, tape measure, rasp and blue chalk line. Manufacturer recommends blue chalk since other colored chalk may stain the deck. Fasteners Each post requires two, 1/2-inch, carriage bolts 8-inches minimum length with 1-1/4-inch flat washer on back with nut. For deck board fasteners, we recommend #7, 2-1/4-inch stainless steel trim head screws for the decking and railing. If you do not want the screw heads to show on the deck boards use the following technique: Using a #7, 2-1/4-inch stainless steel trim head screw, countersink the screw into the decking material approximately 1/4 of an inch. Using your thumb, lightly push the displaced decking material over the hole left by the trim head screw. Tap with a hammer, this will cover the trim head screw with decking material. Using a 2-inch driver bit allows you to better gauge screw depth. Tap hole with edge of hammer for best results. Hidden Fasteners Building Code Requirements For your convenience, some common building code requirements are reprinted here. Please check your local building codes requirements to be sure you are compliance in your area. Residential minimum handrail height is generally 36-inches. Multi-family minimum handrail height is sometimes 42-inches. Baluster maximum spacing is generally 4-inches (clear distance between balusters**). Maximum gap between bottom rail and deck surface is generally 4-inches.** Some codes require a 2-inch maximum gap for multi-family applications. ** Spacing note: The precise language is generally do not allow passage of a sphere 4-inch in diameter. Be sure to check on the tolerance requirements of your local building code. MoistureShield Deck Clips provide superior holding power, with a custom design that fits securely into the grooved profile of a MoistureShield deck board. Like our composite decking our clips are both beautiful and durable, extending the life of your deck by elevating the boards off the joists to reduce structural rot and mold. They re even backed back a limited lifetime warranty against any loose deck boards. Please see our Deck Clip Installation Guide for details on how to install your decking using our unique hidden fastners. Every board should be fastened to each joist by a clip on both sides. For butt joints, add a second joist to allow for a second clip W W W.MOISTURESHIELD.COM

5 POST & DECKING INSTALLATION 1. Layout and install joists at either 16-inch on-center (OC) when decking will be installed perpendicular to the joists, or 12-inch (OC) when deck boards will be installed diagonally or at an angle to the joists. Joists must be level. 2. Attach posts to decking frame. DO NOT NOTCH POSTS. The maximum distance from center of post to center of post is 72-inches. Square and level posts. A. Block posts and attach to rim joists with two bolts (1/2-inch carriage bolts 8-inch - minimum length with 1-1/4-inch flat washer and nut on back). Corner Post Interior Corner Post Exterior Bolt positions: The top bolt to be no more than 3-inches below the finished deck surface and the bolt spacing to be no less than 4-inches on-center. Line Post Interior Line Post Exterior

6 3. Install MoistureShield decking using 2-1/4-inch, #7 stainless steel trim head screws, two screws per board per joist recommended. Screws should be a minimum of 1/2-inch from the board end. A. Allow 1/4-inch side-to-side spacing between deck boards. Allow 1/8-inch (or greater) end-to-end spacing between ends of boards (butt joints). If installing in freezing weather, leave 1/4-inch (butt joints). B. Cut deck boards to fit around post. Leave 1/8-inch gap between board and post. 1/8 Gap 1/4 Gap C. Staggering the butt joints on long decks usually improves the overall appearance of the finished deck. Some people also prefer a distinctive pattern for the deck boards. To achieve an interesting design, install a pattern board, which eliminates butt joints. D. Once the boards are in place, adjust the blade depth of your saw to match the thickness of your deck boards. Use a blue chalk line to mark your cut and go. To avoid staining the deck boards, use blue carpenter s chalk. Rasp the edges to finish. Double or sister joists at butt joints to ensure plenty of room for fasteners. Pre-drill using a 7/64-inch bit when too close to the edge to prevent splitting. Drive screw at a slight angle into joist. 4. Additionally, for a finished look, install trim boards over the rim joists. Position flush with the top of the decking. A. Attach using 2-1/4-inch, #7 stainless steel trim head screws. One screw through the end or side of the decking, and three screws into the rim joist vertically. Repeat this step every inches horizontally through the length of the trim board. B. We recommend putting the screw through the thickest part of the deck board (center between the top and bottom of the board) when attaching the trim board, then the other three into the rim joist. *Trim can also be installed underneath boards when the boards overlap the joist. 5. Slip post collar over post onto deck if installing. Router or rasp end of deck board using 1/4-inch round for a finished look. Allow 3/16-inch overhang for any rim joist imperfections (straight). If you choose not to use the trim board, maximum recommended overhang is 1-1/2-inches Advanced Environmental Recycling Technologies, Inc. All trademarks are property of Advanced Environmental Recycling Technologies, Inc., unless otherwise noted. All rights reserved. June 2015.

7
Installation Instructions
 Installation Instructions Issued: March 10, 2004 GeoDeck Deck and Railing System (ICC-ES Legacy Report No. 21 71, former BOCA Report No. 21 71) Design and Installation Manual Congratulations! You have
www.cornholesupplies.com
 www.cornholesupplies.com How To Build Regulation Cornhole Boards Home of the Original Cornhole Bags and Boards Supply List: 1-4' X 8' Piece of Plywood (pre sanded) 4-2" X 4" X 8' Studs (2 by 4s make sure
Stair Parts Installation. Tricks
 Stair Parts Installation Tips & Tricks Introduction Your DIY staircase guide Welcome to the Stairpart home installation guide. Your stairway is both a functional and focal point in your home, so keeping
Vinyl Brick Mould Field Installation Instructions All Vinyl and Vinyl Clad Windows
 Vinyl Brick Mould Field Installation Instructions All Vinyl and Vinyl Clad Windows Viewed from the exterior. IMPORTANT: Please read before you begin installation. TABLE OF CONTENTS AND TOOL / MATERIAL
HfHMD uses LP SmartSide siding and trim.
 HfHMD uses LP SmartSide siding and trim. These products are: More durable than cement fiber board. Much more volunteer-friendly to install. When installed correctly, have a 5/50- year pro-rated warranty.
Residential Decks. Planning and Development Services Department
 Building Safety Division 8500 Santa Fe Drive Overland Park, KS 66212 (913) 895-6225 Fax (913) 895-5016 Email: permitservices@opkansas.org Planning and Development Services Department Residential Decks
Vinyl Greenhouse Window Page 2 of 6 New Contruction Installation Instructions
 New Construction Installation Instructions EPLACEMENT Installation Instructions Page 2 of 6 New Contruction Installation Instructions 1. Frame rough opening equal to window call out size. ough opening
This handout is a guide only and does not contain all of the requirements of the Minnesota State Building Code or city ordinances.
 Residential Decks Community Development Department Building Inspections Division 5200 85 th Avenue North / Brooklyn Park, MN 55443 Phone: (763) 488-6379 / Fax: (763) 493-8171 6/15 www.brooklynpark.org
Brick Veneer Construction
 Brick Veneer Construction Check list of suggested tools & support items Claw hammer Tape measure 3/4" [19 or 20] Wood chisel Wood or plastic shims Pry bar Utility knife Caulking and caulking gun Power
AZEK Rail Install Guide
 TRIM MOULDING DECK PORCH RAIL PAVERS AZEK Rail Install Guide Installing AZEK Rail with CableRail by Feeney... 1 Installing CableRail by Feeney for AZEK Rail... 7 Installing AZEK Rail Stairs with CableRail
Stainless Steel Cable Assemblies to Enhance Any Railing and Any View!
 2014 Feeney (9/14) King Architectural Metals Stainless Steel Cable Assemblies to Enhance Any Railing and Any View! Standard Cable Assemblies Easy-to-install, prefabricated cable assemblies are an attractive,
How to Build Your Own CornHole Game
 How to Build Your Own CornHole Game DIMENSIONS Here is a diagram with the basic measurements for the Cornhole board game. SUPPLIES 1/2 thick sheet of plywood one 4 x4 or two 2 x4 s 8 long 2 4 s (4) 4 1/2
AMERICAN GOTHIC PLAYHOUSE
 AMERICAN GOTHIC PLAYHOUSE Project Plan #856 Sheet 1 of 5 Pick a spot and get started with the beautiful that your kids will love. The design of the playhouse includes 35 square feet of interior space plus
Residential Deck Safety, Construction, and Repair
 Juneau Permit Center, 4 th Floor Marine View Center, (907)586-0770 This handout is designed to help you build your deck to comply with the 2006 International Residential Building code as modified by the
Tools Required. Recommended Adhesives Vinyl Bonding: - Christy s White Hot Vinyl Cement
 Assembly Instructions STEP-BY-STEP HANDRAIL INSTALLATION for 1-1/2" vinyl handrail component system Rise in inches Run in inches 8 8.5 9 9.5 10 10.5 11 11.5 12 12.5 13 13.5 14 14.5 15 8.5 47 45 43 42 40
Premier & Deluxe 3-Season Room Sliding Glass Door
 DTSSGD-11 Premier & Deluxe 3-Season Room Sliding Glass Door Installation Instructions Screen Door Seal Left Side Track Top Track Assembly Right Side Track Right Side Trim Sliding Glass Door Sliding Screen
How to Install UnderDeck The Original.
 How to Install UnderDeck The Original. TOOLS: Chalk Line Caulk Gun Garden hose or water bucket Gloves Hammer or Screw Gun Power Mitre Saw with OSB Blade Pencil Pliers Safety Glasses Straight Edge / Carpenter
Sun Windows General Information Sun New Construction Window Installation Instructions
 Sun Windows General Information Section 1 G F H H H A. Apply Weather Resistive Barrier B. Apply Sill Flashing Tape C. Place Waterproof Sill Shims D. Caulk Back of Nail Fin Sides & Top, Set Window, Fasten
1/8 Stainless Steel Cable Assemblies to Enhance Any Railing and Any View!
 2014 Feeney 1st Edition 1/8 Stainless Steel Cable Assemblies to Enhance Any Railing and Any View! Standard Cable Assemblies Distributed by EURO FORGINGS INC. Architectural Components for the Railing and
RadianceRail Installation Guide
 RadianceRail Installation Guide Installing RadianceRail with CableRail by Feeney... 2 Installing CableRail by Feeney for RadianceRail... 7 Installing RadianceRail Stairs with CableRail by Feeney... 10
Installing Window and Door Mouldings
 Installing Window and Door Mouldings About Window and Door Mouldings The trim around windows and doors greatly influences the look and style of your interior. They also bridge the gaps and cover spaces
Free 12 x 8 Shed Plan With Illustrations, Blueprints & Step By Step Details
 Free 12 x 8 Shed Plan With Illustrations, Blueprints & Step By Step Details Brought To You By: MyShedPlans Click Here To Download 12,000 Shed Plans >> 12 x 8 Basic Shed This 8 12-ft. shed features a simple
Chapter 3 Installing Over-the-Post Railing on an L-Shaped Stair
 49 Chapter 3 Installing Over-the-Post Railing on an L-Shaped Stair In this chapter: The Over-the-Post Balustrade System Determining the Rail Centerline Using Rail Bolts Making a Pitch Block Laying Out
How to Build a Poker Table
 How to Build a Poker Table www.pokertablematerials.com 10-Person Poker Table- 96 x 48 These are step by step instructions for building a poker table. The table will measure 48" x 96" and have a 4" wide
PANELIZED HOME INSTALLATION GUIDELINE
 PANELIZED HOME INSTALLATION GUIDELINE A typical home package will be constructed of Snap-N-Lock Insulated Panels clad with steel skins. 4" panels will be used for the walls, and 6" panels for the roof.
Cedar Cottage Doghouse Plans
 Overlapping cedar shingles add an element of charm to this medium size doghouse. The walls, floor, and trim are constructed of solid cedar, making it naturally weather resistant and provides excellent
INSTALLATION INSTRUCTIONS for Bifold Doors (JII103)
") Thank you for selecting JELD-WEN products. Attached are JELD-WEN s recommended installation instructions for premium composite, hollow and solid core molded Bifold Doors. Bifolds are designed for fast
Thank you for selecting JELD-WEN products. Attached are JELD-WEN s recommended installation instructions for premium composite, hollow and solid core molded Bifold Doors. Bifolds are designed for fast
INSTALLATION OF A BAY WINDOW
 INSTALLATION OF A BAY WINDOW Installation of a Bay Window These instructions relate to the replacement of an existing bay window or replacement of a straight window with a new bay window, in an opening
HOW TO INSTALL A BEAUTIFUL NEW KITCHEN
 HOW TO INSTALL A BEAUTIFUL NEW KITCHEN Easy to follow step-by-step kitchen cabinet installation TOOL AND MATERIAL LIST Hammer Pry bar Screwdriver Phillips Flathead Level Tape measure Pencil Straight edge
AZEK Rail Install Guide
 TRIM MOULDING DECK PORCH RAIL PAVERS AZEK Rail Install Guide Installing AZEK Rail with Glass Infill... 2 Installing AZEk Rail Stairs with Glass Infill... 9 Notes...14 Please read all instructions completely
POST AND FRAME STRUCTURES (Pole Barns)
") POST AND FRAME STRUCTURES (Pole Barns) Post and frame structures. The following requirements serve as minimum standards for post and frame structures within all of the following structural limitations:
POST AND FRAME STRUCTURES (Pole Barns) Post and frame structures. The following requirements serve as minimum standards for post and frame structures within all of the following structural limitations:
We urge you to read and follow the attached installation instructions. Failure to do so may void the warranty of this garden window unit.
 Important Information for New Construction Installations Attention Installer! We urge you to read and follow the attached installation instructions. Failure to do so may void the warranty of this garden
INSTALLATION INSTRUCTIONS for Premium Pocket Windows (JII022) IMPoRtaNt INFoRMatIoN & glossary. safety & HaNdlINg
 IMPoRtaNt INFoRMatIoN & glossary. safety & HaNdlINg") Thank you for selecting JeLd-weN products. Attached are JeLd-weN s recommended installation instructions for pocket (replacement) double-hung, casement, awning, picture or transom windows, designed to
Thank you for selecting JeLd-weN products. Attached are JeLd-weN s recommended installation instructions for pocket (replacement) double-hung, casement, awning, picture or transom windows, designed to
REDWOOD. Adirondack Chair. Naturally beautiful Easy to use Practical and economical Durable and stable Resistant to decay and insects
 B U I L D I T W I T H REDWOOD Adirondack Chair R E D W O O D Naturally beautiful Easy to use Practical and economical Durable and stable Resistant to decay and insects Adirondack Chair BUILD THE CHAIR
Basement Window Installation Guide Hopper and Sliding
 Basement Window Installation Guide Hopper and Sliding americancraftsmanwindows.com Project Requirements: Installation must comply with all applicable building codes. Existing window frame, wall and weatherresistant
Ceiling Mounted Folding Attic Ladders Installation Instructions
 Ceiling Mounted Folding Attic Ladders Installation Instructions WARNING Before you start installing your new Louisville Ceiling Mounted Folding Attic Ladder, you must read and understand the following:
VERSARAIL ALUMINUM STAIR RAILING INSTALLATION INSTRUCTIONS. Owner's Manual. Version. www.barretteoutdoorliving.com. Models
 Models VERSARAIL ALUMINUM STAIR RAILING 73013153 INSTALLATION INSTRUCTIONS 73013154 73013155 73013156 Owner's Manual Version 1.0 VERSASTAIR_BOM V1 3/2012 www.barretteoutdoorliving.com VERSARAIL ALUMINUM
Best Barns USA Assembly Book
 Best Barns USA Assembly Book Revised November 27, 2013 the Easton - R 12'x 20' Manufactured by Reynolds Building Systems, Inc. 205 Arlington Drive Greenville, PA 16125 724-646-3775 This manual is copyrighted.
DIY CABINET REFACING INSTALLATION GUIDE
 DIY CABINET REFACING INSTALLATION GUIDE CABINET REFACING INSTALLATION Are you ready to reface your outdated cabinets? This guide will show you how to install your new Facelifters Cabinet Refacing Products
Guidelines for Earthquake Bracing of Residential Water Heaters
 Guidelines for Earthquake Bracing of Residential Water Heaters Department of General Services Division of the State Architect 1102 Q Street, Suite 5100 Sacramento, CA 95814 Phone: (916) 324-7099 Fax: (916)
Barewood Octagon and Elongated Windows Installation Instructions
 Step-by-step instructions to a beautiful window. Measuring and Installation of your new window from Century Specialty Windows couldn't be easier with our step-by-step instructions. Quality, function and
WHI 90-Minute Rated Veneered Door Frame Installation Instructions
 No. 940-03-10 INSTALLATION INSTRUCTIONS 90 MINUTE RATED VENEERED DOOR FRAME DOOR REQUIREMENTS: Consult the door manufacturer to make sure that the doors are qualified for the hardware to be installed,
Customer Service 800.780.8889 or visit us online at smithnoble.com. Wood Shutters. Step by Step Installation. Troubleshooting Tips
 reflect your style TM Customer Service 800.780.8889 or visit us online at smithnoble.com Wood Shutters Step by Step Installation Troubleshooting Tips Easy Care Instructions STEP 1 Your New Shutter Thank
Replacement Window Installation Guide Non-Impact & Impact Resistant Windows without Nailing Fin
 Replacement Window Installation Guide Non-Impact & Impact Resistant Windows without Nailing Fin americancraftsmanwindows.com Project Requirements: Failure to follow these instructions may void product
STAIR TREAD & RISER INSTALLATION GUIDELINES
 STAIR TREAD & RISER INSTALLATION GUIDELINES ARTISTIC FINISHES DOES NOT WARRANTY THE COMPLETENESS OR ACCURACY OF ANY INSTALLATION. THE INSTALLATION CONTRACTER MUST HAVE THE EXPERIENCE AND KNOWLEDGE TO COMPLETE
Router Table Plans. www.bobsplans.com
 www.bobsplans.com Router Table Plans Increase the capabilities of your router with this weekend project. Features a sliding fence with EZ-Mount clamps. These clamps are simple to make and grip tightly
Gate Leg Drop Leaf Table Plans
 Preparing the table top blanks: Cut and glue enough 3/4 stock to make three panels 40 long by 24 wide (they will be cut to final size at a later time). While the glue dries we will work on the legs. Preparing
How to Install GoBoard:
 How to Install GoBoard: A Step-by-Step Guide Durable, Ultra-Lightweight, Waterproof Tile Backer Board Introducing GoBoard Every tiling project requires a durable, waterproof surface under the tile, called
Balance Beam Plans. Copyright 2007 Ben MacLeod Email: sales@betterplans.net Website: www.betterplans.net
 Balance Beam Plans Copyright 2007 Ben MacLeod Email: sales@betterplans.net Website: www.betterplans.net Balance Beam Plans By Ben MacLeod Copyright 2007 Tools required: -Mitre saw, circular saw, jig saw,
All-Season Sunroom Sliding Glass Door Installation Instructions
 ASRESGD-08 All-Season Sunroom Sliding Glass Door Installation Instructions Panel Frame Door Frame Left Side Foam Insulator IE241 H Bar Assembly Door Frame Top Track Panel Frame Door Frame Right Side Stationary
Happily PHOTOGRAPHY BY MICHAEL ANDERSON AND LARRY OKREND
 Ever Happily Rafter 18 HANDY APRIL/MAY 2012 PHOTOGRAPHY BY MICHAEL ANDERSON AND LARRY OKREND An easy-tobuild hip roof makes this gazebo a doable project for any DIYer BY JENNY STANLEY Figuring out precise
Unlike a porch, which is protected by a roof,
 Rehabbing a Rotted 34 Professional Deck Builder January/February 2013 Porch Stair A template helps to fit the bottom tread neatly around the posts by Emanuel Silva Unlike a porch, which is protected by
SPIRAL STAIR KIT INSTALLATION MANUAL
 SPIRAL STAIR KIT INSTALLATION MANUAL Effective January 1, 2014 If you have any questions, please call the location that your Stair Kit was purchased from: Broomall, Pennsylvania 1-800-52-7427 Ontario,
Window Installation Instructions
 Caution The correct installation methods of windows in full frame or insert applications is critical towards achieving the tested performance of the window and longterm enjoyment and energy savings for
WHAT S DIFFERENT ABOUT OUR CABLERAIL?
 WHAT S DIFFERENT ABOUT OUR CABLERAIL? Manufactured for use with: Covered under warranty by ONE trusted manufacturer Consumers want project simplicity. Offer them the added luxury by building high-end custom
MODEL# SLA001-3 "SLIDE & LOCK" A-FRAME POOL LADDER
 MODEL# SLA001-3 "SLIDE & LOCK" A-FRAME POOL LADDER IMPORTANT INSTRUCTIONS: : Read all instructions carefully & completely to become familiar with parts, assembly, safety and proper use of this product.
Gear PEPSI CAN STOVE INSTRUCTIONS
 Gear PEPSI CAN STOVE INSTRUCTIONS [NOTE: Updated Instructions are now available. The new stove is less likely to develop flame leaks and the fuel/air mixture is improved. Instructions for a simmer ring
DE Frame with C Series Sidelight
 TOOLS REQUIRED Tape measure 6' magnetic level 3' magnetic level Screw gun with clutch adjusted #2 phillips tip #3 phillips tip Screwdriver (used to adjust frame on will using oval slots) Pry Bar Powder
BEFORE YOU BEGIN TOOLS REQUIRED FOR INSTALLATION
 Vinyl Railing & Deck Systems STEP-BY-STEP INSTALLATION INSTRUCTIONS FOR DECK AND OXFORD RAILING Both EverNew decking and the Oxford railing system achieved certification from the NES (National Evaluation
March 14, 2007. Installation of Bay, Bow and Garden Windows
 March 14, 2007 Re: Installation of Bay, Bow and Garden Windows Attached are the Atrium Companies, Inc recommendation for the installation of bay, bow and garden windows. These instructions were developed
Stair Railing. Installation Guide
 Stair Railing Installation Guide THE BEST CHOICE FOR STRONG & DURABLE RAILING SYSTEMS Our exclusive manufacturing process ensures our vinyl railing will provide superior strength plus it is virtually maintenance
Uncovered Decks & Porches
 Uncovered Decks & Porches Building Guides for Homeowners Why Do I need a Permit? D I D Y O U K N O W? As owner-builder you are the responsible party of record on such a permit. If your work is being performed
HURRICANE MITIGATION RETROFITS FOR EXISTING SITE-BUILT SINGLE FAMILY RESIDENTIAL STRUCTURES
 HURRICANE MITIGATION RETROFITS FOR EXISTING SITE-BUILT SINGLE FAMILY RESIDENTIAL STRUCTURES 101 Retrofits Required. Pursuant to Section 553.844 553.884, Florida Statutes, strengthening of existing site-built,
WHAT S DIFFERENT. about TimberTech CableRail? Covered under warranty by ONE trusted manufacturer. Saves TIME and EFFORT
 WHAT S DIFFERENT about TimberTech CableRail? Covered under warranty by ONE trusted manufacturer Consumers want project simplicity. Offer them the added luxury by building high-end custom cable railing
Installation Instructions Double-Hung, Single-Hung, Casement, Awning, Sliding, Picture & Shapes Non-Impact & Impact Resistant Nailing Fin Windows
 Installation Instructions Double-Hung, Single-Hung, Casement, Awning, Sliding, Picture & Shapes Non-Impact & Impact Resistant Nailing Fin Windows americancraftsmanwindows.com Project Requirements: Read
Typical Deck Details
 Fairfax County, Virginia Typical Deck Details Based on the 2012 Virginia Residential Code The design details in this document apply to residential, single-level decks only. Construction cannot deviate
HALE PET DOOR INSTALLATION INSTRUCTIONS HALE STANDARD PANEL MODEL
 HALE PET DOOR INSTALLATION INSTRUCTIONS HALE STANDARD PANEL MODEL Please read these instructions carefully and completely before attempting to install Hale Pet Doors; they will guide you through the steps
INSTALLATION RECOMMENDATIONS. Outdoor Rubber Tiles
 INSTALLATION RECOMMENDATIONS Outdoor Rubber Tiles Prior to Installation: The Outdoor Rubber Tiles and accessory transition pieces intended for this installation have been shipped to you via a freight carrier
Standard Sleep Pod Side Entry Assembly Instructions
 Standard Sleep Pod Side Entry Assembly Instructions www.podtime.co.uk enquiries@podtime.co.uk Working House Ltd How to assemble your pod Pod assembly onsite is a relatively simple exercise for two people
2&3 SECTION LOFT LADDER
 TWIST CATCH ASSEMBLY A4 A2 A1 A3 A7 A6 A5 2&3 SECTION LOFT LADDER Images feature the 3 section loft ladder, but the same instructions apply to both 2 & 3 section ladders Installation and Operating Instructions
By SP Partners, LLC. www.rainbowatticstair.com INSTALLATION GUIDE. Prestige
 By SP Partners, LLC www.rainbowatticstair.com INSTALLATION GUIDE Prestige IMPORTANT READ THIS FIRST Inspect stair for any damage prior to installation. Stair is NOT to be installed while home is under
How to Build an Elevated Square Foot Garden
 How to Build an Elevated Square Foot Garden Thralls, Edmund L., Extension Faculty, Urban Horticulture Fact Sheet Horticulture - 010 Tools: The Institute of Food and Agricultural Sciences (IFAS) is an Equal
REDI-EXIT COMMERCIAL FIRE DOOR AND EXTERIOR DOOR KITS INSTALLATION GUIDELINES
 REDI-EXIT COMMERCIAL FIRE DOOR AND EXTERIOR DOOR KITS INSTALLATION GUIDELINES Tools Required Tape Measure Hammer Slotted Screw Driver #2 & #3 Philips Screw Driver 3-4 Foot Level 12 Pry Bar Cold Chisel
Storage Store the siding in a dry and ventilated area. Do not place it directly on the ground. Always cover the siding after a day s work.
 Installation Guide Before you begin, take the time to read this entire guide to clearly understand the requirements and steps to follow for proper installation. Warning Do not install defective material.
Composite Stone Veneer
 Composite Stone Veneer Installation Guide Ver 1 Jun 2015 www.compstone.com Composite Stone Veneer Installation Guide Contents Introduction & Overview 3 Required Tools 4 Optional Tools 4 Attachment Guidelines:
MGB Chrome Bumper Conversion
 MGB Chrome Bumper Conversion Installation Instructions For 1974 1/2-1980 MGB This kit requires cutting, welding, and painting. Professional installation recommended. Note: Every MGB body is slightly different
SHELVES. www.tedswoodworking.com
 SHELVES It's rare that bookshelves look as interesting as the objects you display on them. After all, how much can you decorate the edges of your shelves and sides? This unit is unusual because the shelves
Black Wolf POCKET BILLIARD TABLE INSTALLATION MANUAL. SERVICE DEPARTMENT P.O. BOX 68 BRISTOL, WI 53104
 Black Wolf TM POCKET BILLIARD TABLE INSTALLATION MANUAL www.brunswickbilliards.com SERVICE DEPARTMENT P.O. BOX 68 BRISTOL, WI 53104 51-905710-000 SEPTEMBER 2010 NOTE: Please use the instructions in this
HOW-TO LAY HARDBOARD OR PLYWOOD FLOOR OVERLAY
 HOW-TO HOW-TO LAY HARDBOARD OR PLYWOOD FLOOR OVERLAY Most floor coverings, if laid over uneven wooden floors, will wear unevenly and look unsightly. The answer is to cover the old boards with hardboard
These instructions will show you how to install an internal door into a non-loadbearing partition wall. The instructions are split into three parts.
 No 8 in the series of 'How to' brochures produced by PlaceMakers, New Zealand How to Frame and Hang a Door These instructions will show you how to install an internal door into a non-loadbearing partition
C O N V E Y O R C O M P O N E N T S C H A I N S B E L T S B E A R I N G S
 C O N V E Y O R C O M P O N E N T S C H A I N S B E L T S B E A R I N G S January 2009 Issue 6 Valu Guide Brackets The Ultimate in Adjustability and Cost Savings Valu Guide brackets are part of a family
CEILING SYSTEMS. Between us, ideas become reality. Installing. Suspended Ceilings. North America Version
 CEILING SYSTEMS Between us, ideas become reality Installing Suspended Ceilings North America Version 1 Installing Armstrong Suspended Ceilings An Armstrong suspended mineral fiber ceiling is functional,
INSTALLATION MANUAL For Grand Rib-3 / Multi Purpose / & Classic Rib Roofing Panels
 INSTALLATION MANUAL For Grand Rib-3 / Multi Purpose / & Classic Rib Roofing Panels Grand Rib-3 / Multi-Purpose / Classic Rib Grand Rib-3 / Multi-Purpose / & Classic Rib Grand Rib 3 panels are a strong,
The tablesaw may be your shop s most valuable cutting. Crosscut Sleds. Foolproof. Innovative approach guarantees perfect results
 Foolproof Crosscut Sleds Innovative approach guarantees perfect results B Y A L A N T U R N E R The tablesaw may be your shop s most valuable cutting tool, but for precise, repeatable crosscuts it needs
How to secure your property after a disaster
 How to secure your property after a disaster The Red Guide to Recovery HOuse secured properly Board-Up of Windows, Doors and Roof Hole. Lot secured with Perimeter Fencing. Fires, floods, tornadoes, hurricanes,
Cable railing. Standard Cable Assemblies. Visit us online at www.geobezdan.com. Email your questions to info@geobezdan.com.
 Cable railing Standard Cable Assemblies Visit us online at www.geobezdan.com. Email your questions to info@geobezdan.com. Figure 1 Figure 2 Figure 3 Figure 4 special end fittings are easy to install and
HORIZONTAL INSTALLATION
 THERMO/SOLAR Žiar s.r.o. MANUAL FOR INSTALLATION PV SUPPORTING FRAMES HORIZONTAL INSTALLATION Technical alternation reserved A1410 1 12/2014 CONTENT ORD.NO. PAGE Mounting information 3 Mounting, flat roof
Installation Directions for RubberForm Recycled Products Spill Berms
 Installation Directions for RubberForm Recycled Products Spill Berms 1. Tools Needed: a. Broom, mop, vacuum and cleaning solutions (green floor cleaner) If available, a Power-washer with hose if available
RELAZZO DECKING THE TERRACE. INSTALLATION GUIDE. Construction Automotive Industry. REHAU R20680 EN 05.2015 www.rehau.com/relazzo
 Construction Automotive Industry RELAZZO DECKING THE TERRACE. INSTALLATION GUIDE REHAU R20680 EN 05.2015 www.rehau.com/relazzo Scan the QR code and learn more: RELAZZO DECKING THE TERRACE. Installation
Guidelines for Earthquake Bracing Residential Water Heaters
 Guidelines for Earthquake Bracing Residential Water Heaters Department of General Services Division of the State Architect In accordance with the Health and Safety Code Section 19215, the Division of the
Installation Guide for Andersen Architectural Wood Inswing Entry Doors
 Installation Guide for Andersen Architectural Wood Inswing Entry Doors Congratulations! You have just purchased one of the many fine Andersen products. Proper assembly, installation and maintenance are
SECTION 05 42 16 COLD-FORMED METAL DECK FRAMING Elevations Steel Deck Framing by Trex
 (Specifier Note: The purpose of this guide specification is to assist the specifier in correctly specifying cold-formed metal deck framing products and execution. The specifier needs to edit the guide
Timber Decks. Technical Note. March 2007
 Timber Decks Technical Note. March 2007 This Technical Note contains general information for residential timber decks and floor frame structures for veranda s, patios etc which are exposed to the weather.
Raised Panel Doors Made Simple With Freud s 2+2 Raised Panel Bit Set
 Raised Panel Doors Made Simple With Freud s 2+2 Raised Panel Bit Set Congratulations on your purchase of Freud s world class 2 + 2 Raised Panel Bit Set. This revolutionary design combines two small wings
Assembly GUIDE. display wine cellar kits. Required. Suggested. Questions? 888.373.6057. or visit wineracksamerica.com
 Page 1 Middle Ladder End Ladder Display Tray Screwless Connector Package Contents * All models follow the same assembly procedure varying only in the number of middle ladders your rack will require. Depending
OLD BRICK ORIGINALS KILN-FIRED THIN BRICK VENEER Installation Guide. GeneralShale.com
 OLD BRICK ORIGINALS KILN-FIRED THIN BRICK VENEER Installation Guide GeneralShale.com OLD BRICK ORIGINALS THIN BRICK VENEER Page 2 INTRODUCTION Check local building codes for proper installation guidelines
Assembly and Usage Instructions
 Assembly and Usage Instructions A Product 5885 West Van Horn Tavern Road Columbia, MO 65203 www.caldwellshooting.com Instruction #1001667 Limited Warranty Every Caldwell product is warrantied to be free
STANDARD OPEN PATIO COVER
 STANDARD OPEN PATIO COVER BUILDING & SAFETY DIVISION 201 E. LA HABRA BLVD. LA HABRA, CA 90631 62-90-9710 Call Before You Dig 1-800-227-2600 PLEASE NOTE: This information Bulletin is made available to assist
How to Measure for Exterior Shutters
 Tools you may need: Measuring Tape Pencil Paper Ladder How to Measure for Exterior Shutters Measuring your windows properly is an important step to ensure your installation goes both smoothly and that
Residential Roofing Guide
 Residential Roofing Guide TABLE OF CONTENTS Building Detail and Accessories...... 1 Panel Introduction and Handling...... 2 Cutting and Trimming.... 3 Roof Preparation..... 3 Roof Slope..... 3 Re-roofing...