Free 12 x 8 Shed Plan With Illustrations, Blueprints & Step By Step Details
|
|
|
- Julia Tyler
- 9 years ago
- Views:
Transcription
1 Free 12 x 8 Shed Plan With Illustrations, Blueprints & Step By Step Details Brought To You By: MyShedPlans Click Here To Download 12,000 Shed Plans >>

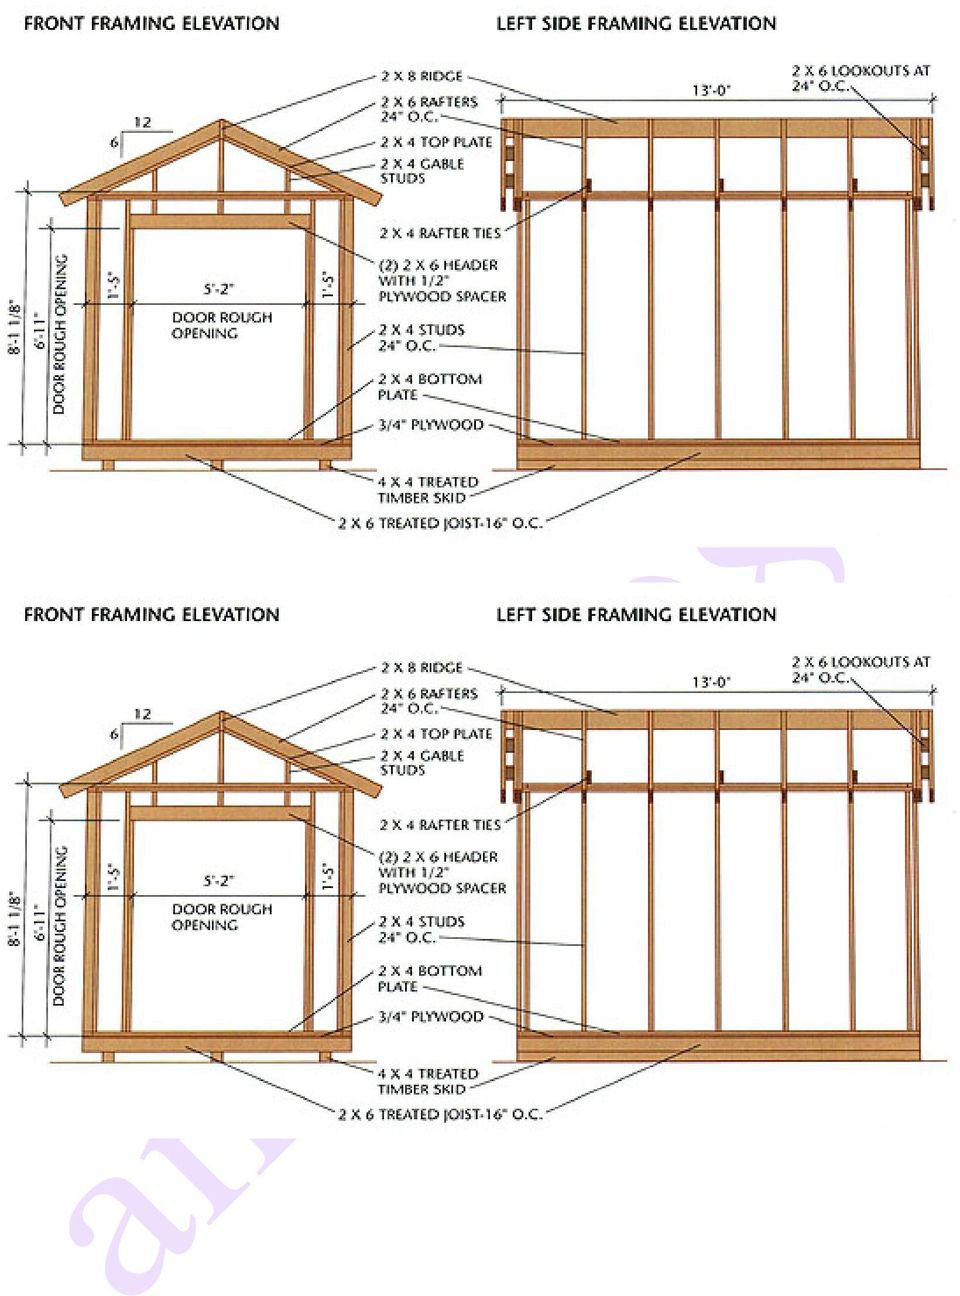
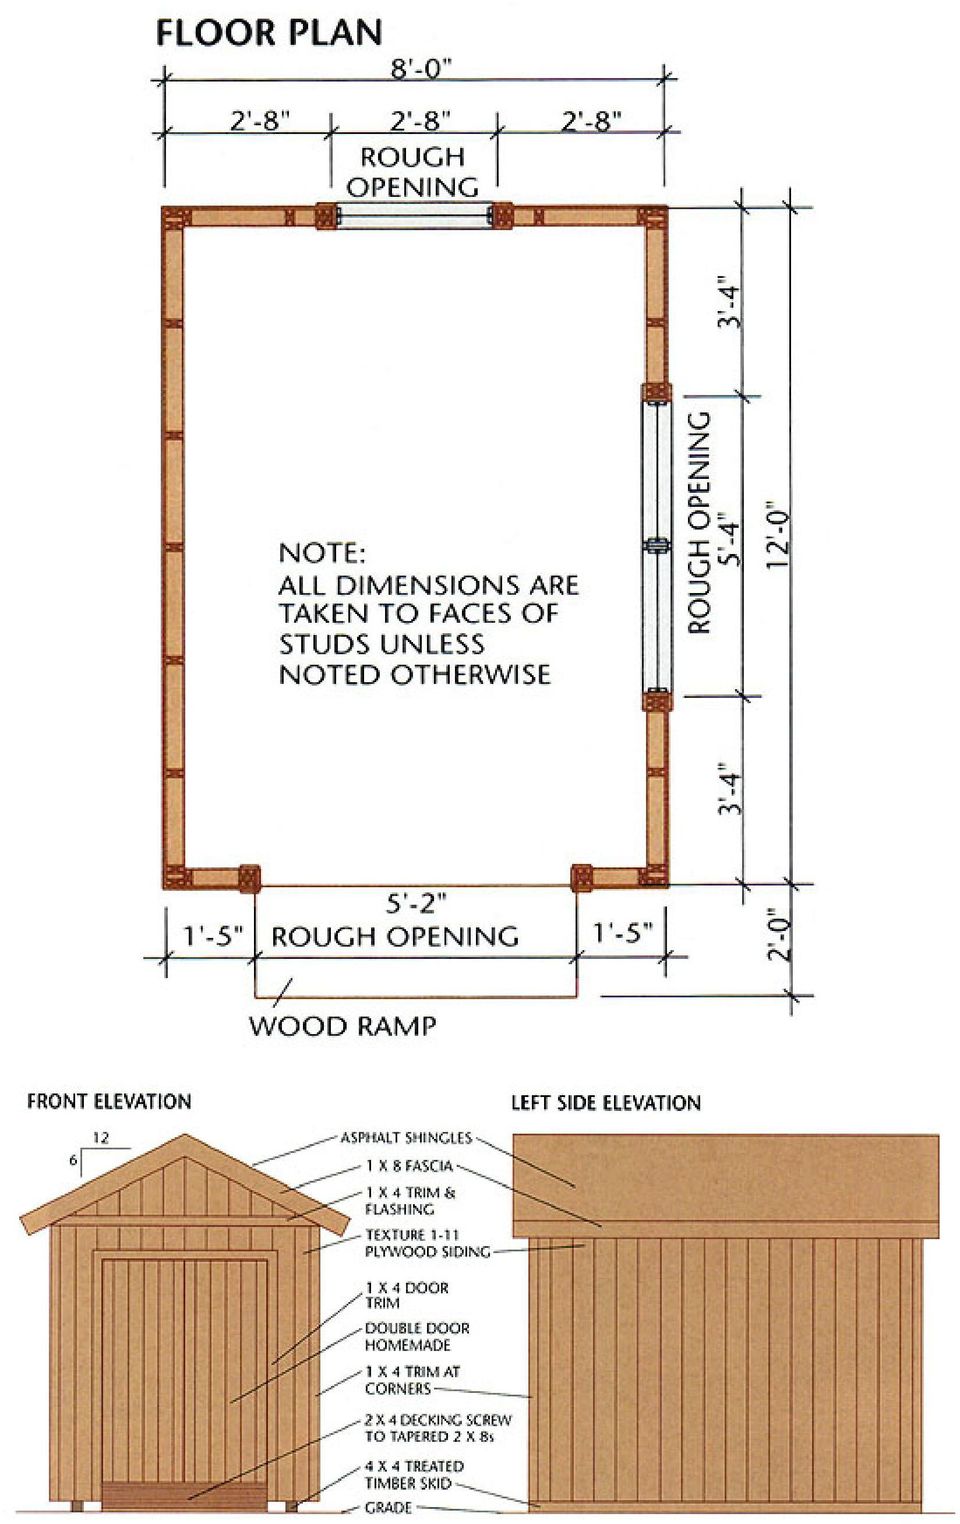
2 12 x 8 Basic Shed This 8 12-ft. shed features a simple gable roof, double doors, and side and rear windows for natural lighting. With full-height walls and doors, there's ample room for storing large items or creating a comfortable work space. An optional wood ramp helps in moving lawn mowers and other heavy equipment. The shed's simple construction makes it especially adaptable for different uses. For example, you can easily frame in additional windows to use the shed as a workshop or potting shed or omit all of the windows and devote the space entirely to secure storage. The finish materials for the basic shed also are true to its name: asphalt roof shingles, plywood siding, and simple trim details are appropriately practical for this classic outbuilding design. You can purchase prehung doors or build your own using the project plans.

3 Materials Description Quantity/Size Material Foundation Drainage material 1.4 cu. yd. Skids 12'-0" Floor Framing Rim joists joists Floor sheathing Joist clip angles 20 Wall Framing Bottom plates 12'-0" 8'-0" 3 sheets, 4 8' Compactible gravel 4 4 treated timbers 2 6 pressuretreated 2 6 pressuretreated 3/4" tongue-&- groove ext.-grade plywood 3" 3" 3" 16-gauge galvanized 12'-0", 8'-0" 2 4 Top plates 12'-0", 8'-0" 2 4 Studs 92 5/8" 2 4 Headers 10'-0'', 6'-0" 2 6 Header spacers 9'-0", 6'-0" 1/2" plywood 5" wide Gable Wall Framing Top plates 8'-0" 2 4 Studs 8'-0" 2 4 Roof Framing Rafters 6'-0" 2 6 Metal anchors rafters 10, with nails Simpson H1 Rafter ties 8'-0" 2 4 Ridge board 14'-0" 2 8 Lookouts 8'-0" 2 6 Subfascia 8'-0", 10'-0'' 2 6 Soffit nailers 8'-0" 2 2 Exterior Finishes Plywood siding ' 5/8" texture 1-11 plywood siding,

4 2 8 ft. grooves 8" o.c. Galvanized 18 gauge Z-flashing Wall & corner trim 10'-0" 1 4 S4S cedar Fascia 8'-0" 1 8 S4S cedar Plywood soffits 2 4 8' Soffit vents 4 12" Flashing (door/window trim) 8 linear ft. Roofing Roof 6 4 sheathing 8' Asphalt shingles 150 sq. ft. 15# building paper Metal drip edge Roof vents (optional) Door 150 sq. ft. 14'-0", 6'-0" 2 units 3/8" cedar or fir plywood Louver with bug screen Galvanized 18 gauge 1/2" ext.-grade plywood 250# per square (min.) Galvanized metal 3/4 4 1/4" (actual) S4S cedar 8'-0", Frame 6'-0" 8'-0", Stops 6'-0" 1 2 S4S cedar Panel 1 6 T&G V-joint material 8'-0" S4S cedar Z-brace 6'-0" 1 6 S4S cedar Construction adhesive 1 tube Exterior trim 8'-0", 6'-0" 1 4 S4S cedar Interior trim (optional) 8'-0", 6'-0" 1 2 S4S cedar Strap hinges 6, with screws Exterior hinges Windows 3/4 4 1/4" (actual) S4S cedar Frames 6'-0" Mullion 3'-0" 2 4 S4S cedar Stops 6'-0" 1 2 S4S cedar
 Door 150 sq. ft. 2 @ 14'-0\", 4 @ 6'-0\" 2 units 3/8\" cedar or fir plywood Louver with bug screen Galvanized 18 gauge 1/2\" ext.")
5 Glazing tape 30 linear ft. Glazing tape Glass 3 pieces field measure 1/4" clear, tempered Window muntins (optional) 8'-0" 1 1 S4S cedar Exterior trim 8'-0" 1 4 S4S cedar Interior trim (optional) 8'-0" 1 2 S4S cedar Ramp (Optional) Pads 6'-0" 2 8 pressuretreated 2 8 pressure- Stringers Decking Fasteners 16d common nails 10d common nails 10d galvanized casing nails 8d common nails 8d box nails 8d galvanized box nails 8d galvanized finish nails 3d galvanized box nails 7/8" galvanized roofing nails 1 1/2" joist hanger nails 1 1/4" wood screws 3 1/2" deck screws 3" deck screws 8'-0" 6'-0" 16 lbs. 1 lb. 1 lb. 1/2 lb. 3 lbs. 1 1/2 lbs. 7 lbs. 1/4 lb. 2 lbs 80 nails 70 screws 12 screws 50 screws treated 2 4 pressuretreated

6 2 1/2" deck screws 1 1/4" deck screws Siliconelatex caulk 40 screws 30 screws 1 tube

7
8

9

10

11
12

13
14

15

16 BUILDING THE BASIC SHED Step A: Build the Foundation & Floor Frame 1. Excavate the building site and add a 4" layer of compactible gravel. If desired, add an extension to the base for the optional wood ramp. Tamp the gravel thoroughly, making sure it is flat and level. 2. Cut three 4 4 treated timber skids at 144". Arrange and level the skids on the gravel bed, following the FLOOR FRAMING PLAN. 3. Cut two 2 6 rim joists at 144" and ten joists at 93". Mark the joist layout onto the rim joists, following the plan. Assemble frame with 16d galv. common nails; be sure to check each joist for crowning and install it with the crowned edge up. 4. Set the floor frame on top of the skids and measure the diagonals to make sure it's square. Install metal clip angles at each joist along the two outer skids, using 1 1/2" joist hanger nails and 16d galv. common nails, and toenail each joist to the center skid with 16d galv. nails. 5. Install the tongue-and-groove floor sheathing, starting with a full sheet at one corner of the frame. Use 8d galv. nails driven every 6" along the edges and every 12" in the field. Secure the joists to the outer skids with angles. Drive hanger nails into the joists and 16d nails into the skids.

17 Frame and raise the walls, then fasten adjacent walls together at the corner studs. Step B: Frame the Walls 1. Snap chalk lines on the floor for the wall plates. 2. Cut the 2 4 wall plates: four at 144" for the side walls and four at 89" for the front and back walls. 3. Mark the stud layouts onto the plates following the FLOOR PLAN. 4. Cut twenty-seven studs at 92 5/8", and cut six at 81 1/2" to serve as jack studs. 5. Build three headers with 2 6s and 1/2" plywood: one at 65" for the door opening, one at 67" for the right side window, and one at 35" for the rear window. 6. Assemble, raise, and brace the walls one at a time, then add the double top plates. Step C: Frame the Roof 1. Cut two pattern rafters, following the RAFTER TEMPLATE. Test-fit the rafters using a 2 8 spacer block, then cut the remaining twelve common rafters. Cut eight rafters for the gable end overhangs these do not have bird's mouth cuts. 2. Cut the 2 8 ridge board at 156". Draw the rafter layout onto the top plates and ridge board, using 16" on-center spacing. The outsides of the outer common rafters should be 6" from the ends of the ridge board. 3. Install the rafters. Reinforce the rafter-wall connection with metal anchors install them on all but the outer common rafters. 4. Cut three 2 4 rafter ties at 96", and clip the top outer corners so they won't project above the rafters. Position each tie next to a pair of rafters as shown in the FRAMING ELEVATIONS. Facenail each tie end to the rafter with three 10d nails, then toenail each tie end to the top wall plate with two 8d nails. 5. Cut the gable-wall plates to reach from the ridge to the wall plates. Install the plates with their outside edges flush with the outer common rafters. Cut and install the gable studs, following the FRAMING ELEVATIONS.

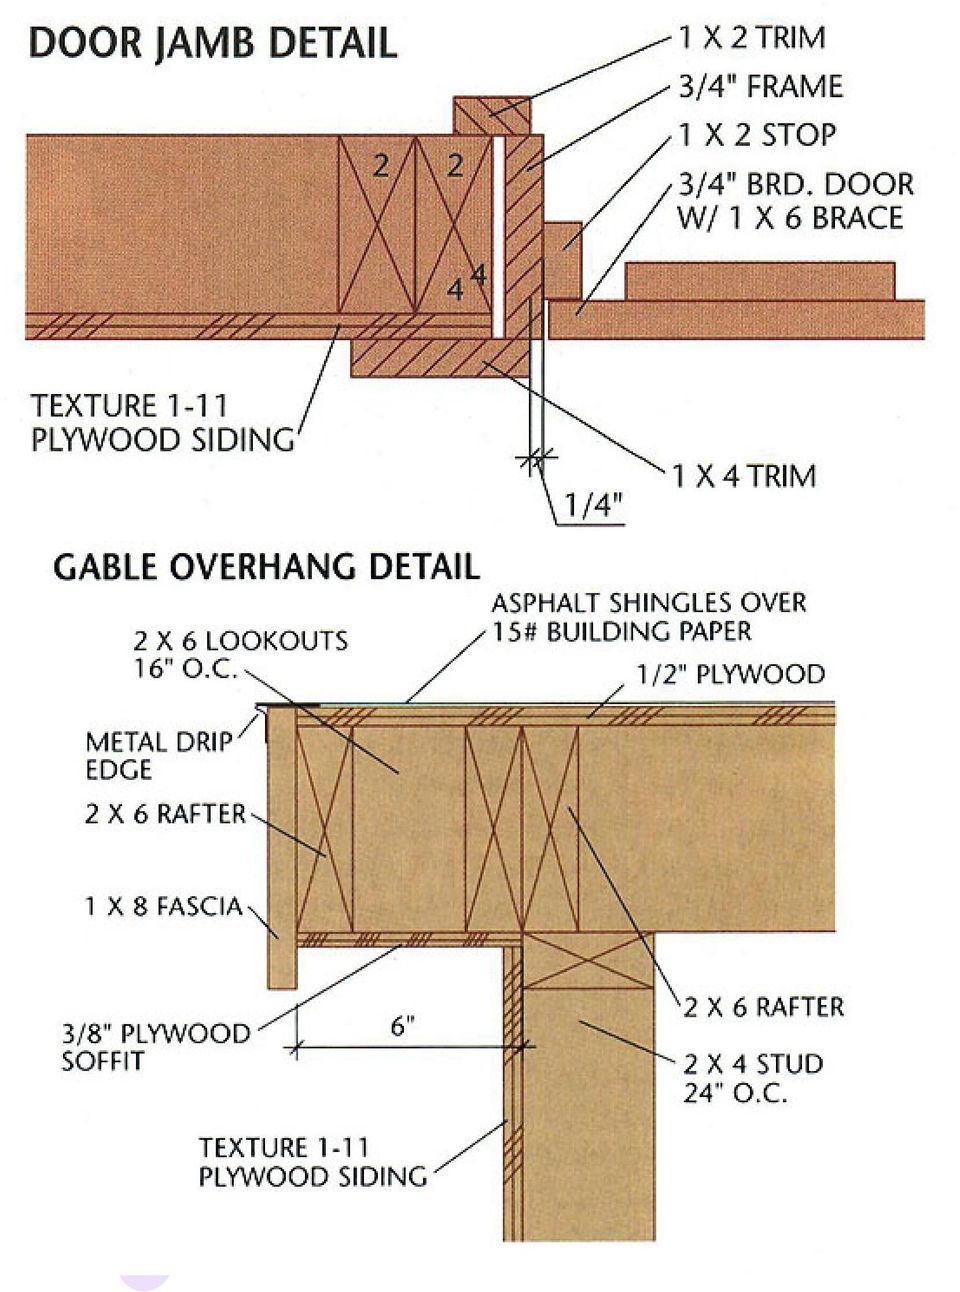
18 Fasten the bottom ends of the common rafters to the wall plates with metal anchors. Attach lookouts to four of the overhang rafters, then nail the overhang rafters to the outer common rafters. Step D: Build the Gable Overhangs 1. Cut twelve 2 6 lookouts at 3". Endnail the lookouts to each of the inner overhang rafters, using 16" on-center spacing (see the GABLE OVERHANG DETAIL). 2. Facenail the inner overhang rafters to the outer common rafters with 10d nails. 3. Fasten the outer overhang rafters to the ridge and lookouts, using 16d nails. Step E: Install the Fascia, Sheathing & Roofing
. 2.")
19 1. Cut and install the 2 6 subfascia along the eaves (see the EAVE DETAIL). Keep the ends flush with the outsides of the overhang rafters, and the bottom edges flush with the bottom rafter edges; use 16d nails. 2. Install the 1 8 fascia along the gable overhangs, then along the eaves, holding it 1/2" above the rafters so it will be flush with the sheathing; use 6d galv. finish nails. 3. Install the 1/2" plywood sheathing, starting at a lower corner of the roof; use 8d box nails driven every 6" along the edges and every 12" in the field of the sheets. 4. Attach metal drip edge along the eaves, then apply 15# building paper over the sheathing. Add dripedge along the gable ends, over the paper. 5. Install the asphalt shingles, starting at the eave edge. If desired, install roof vents. Install the plywood roof sheathing after installing the fascia. Nail every 6" at the edges and every 12" in the field. Rip the soffit panels to fit between the wall plates and fascia. Fasten the panels to the nailers, rafters, and subfascia.

20 Step F: Install the Soffits & Siding 1. Cut twelve 2 2 nailers to fit between the rafters, as shown in the EAVE DETAIL. Fasten the nailers between the rafters with 10d facenails or 8d toenails. 2. Rip the 3/8" plywood soffit panels to fit between the wall framing and the fascia. Fasten the soffits to the rafters with 3d galv. box nails. 3. Cut holes for four soffit vents: locate one vent in each of the two outer rafter bays, along the eave, on both sides of the building. Install the soffit vents. 4. Install the plywood siding, using 8d galv. finish nails. Butt the top edges of the siding against the soffits. Don't nail the siding to the rear-window and door headers in this step. At the gable ends, install Z-flashing along the top edge of siding, then continue the siding up to the soffits. Note: Along the side walls, 8-ft. siding will cover the floor plywood by about 1/2" (this is necessary); if you want the siding to cover the floor framing, use 4 9-ft. sheets. Step G: Build & Install the Doors 1. Cut out the bottom plate from the door opening. 2. Cut the door frame pieces from 3/4" 4 1/2" (actual dimension) cedar: cut the head jamb at 61 1/4" and the side jambs at 81 7/8". Assemble the frame by screwing through the head jamb and into the side jambs with 2 1/2" deck screws. 3. Cut 1 2 stops and install them inside the jambs with 1 1/4" deck screws or 3d galv. finish nails. If the doors will swing out, install the stops 2 1/4" from the outside edges of the frame; if they'll swing in, install the stops 2 1/4" from the inside edges. 4. Install the door frame in the rough opening, using shims and 10d galv. casing nails. Make sure the frame is square and plumb. 5. Cut twelve pieces of 1 6 tongue-&-groove boards at 81 3/4". For each door, fit together six boards with their ends flush, then mark the two end boards for trimming so that the total width is 30". Trim the end boards.

21 6. Cut the Z-brace boards following the DOOR ELEVATIONS. Lay the doors on a flat surface and attach the brace boards using construction adhesive and l 1/4" wood screws. 7. Install the hinges and hang the door, using shims to set the gaps at the bottom and top of each door. 8. Install flashing above the door, nail-off the siding, then install the 1 4 door trim, using 8d galv. finish nails. Use pairs of tapered shims to plumb and level the door frame in the rough opening. Assemble the window frames with screws. Add a 2 4 mullion in the center of the side window frame. Step H: Build & Install the Windows & Trim Note: If you've bought prehung windows for the shed, install them following the manufacturer's directions. To build homemade windows, use the following directions. 1. For each window, cut the 3/4" 4 1/4" frame stock to form a rectangular frame with outer dimensions that are 1/2" shorter and
22 narrower than the rough opening. Assemble the frame with 2 1/2" deck screws. Cut and install a 2 4 mullion in the center of the frame for the side-wall window. 2. Install each window frame in its rough opening, using shims and a level to make sure the frame is plumb and level and the jambs are straight. Fasten the frame with 10d galv. casing nails. 3. Cut the 1 2 stops. Bevel the outer sill stops as shown in the WINDOW JAMB DETAIL. Attach the inner stops with 6d galv. finish nails. Order the glass to fit. 4. Install the glass and outer stops, applying glazing tape to the stops on both sides of the glass. Install the 1 4 window trim. 5. Install the horizontal 1 4 trim as shown in the ELEVATIONS. Fasten the trim with 8d galv. finish nails. 6. Install the 1 4 corner trim so that it butts against the horizontal trim and extends to the bottom edges of the siding. 7. Caulk along all trim joints, where trim meets siding, and around the door and window trim. Step I: Build the Ramp (Optional) Determining the width and length (and thus the slope) of the ramp is up to you, but here is the basic construction procedure: 1. Determine the best slope for the ramp using boards or plywood set on the ground and the shed floor. Mark the ground to represent the end of the ramp. 2. Cut two 2 8 pads to the full width of the ramp. 3. Measure the distance from the ground to the shed floor; subtract 2" from that dimension to get the height of the tapered stringers. 4. Use the ground marking to determine the length of the stringers be sure to account for the 1 1/2" thickness of the decking. Cut the tapered stringers from 2 8 lumber: cut one for each end and one for every 16" to 24" in between. 5. Attach the pads to the stringers with 16d galv. nails driven through the bottom faces of the pads and into the stringers.
23 6. Cut 2 4s for the ramp decking the number needed depends on the length of the sloping sides of the stringers. Allow for a 1/8" gap between decking boards when calculating the number needed. 7. Attach the decking boards to the supports with 16d galv. nails or 3" deck screws, maintaining a 1/8" gap between boards. 8. Set the ramp in place against the shed and fasten it by toenailing through the end stringers and top decking board with 3 1/2" deck screws. Build the ramp with pressure-treated 2 8s and 2 4s, following the plan's size or building it to a custom size.
24 Did you enjoy this plan? If so, visit MyShedPlans now and download over 12,000 plans and blueprints This 12 x 8 Shed Plan Is Brought To You By MyShedPlans Click Here To Download Over 12,000 Shed Plans >> Visit MyShedPlans Today And See How Easy It Is To Build Beautiful Sheds With Easy-To-Follow Blueprints!
SUPER SHED. Indoor shelter for your outdoor tools.
 SUPER SHED Indoor shelter for your outdoor tools. Not everyone needs a garden shed. But, if you've no more space on your garage wall for that new leaf rake, if you can't find your potting trowel because
Best Barns USA Assembly Book
 Best Barns USA Assembly Book Revised November 27, 2013 the Easton - R 12'x 20' Manufactured by Reynolds Building Systems, Inc. 205 Arlington Drive Greenville, PA 16125 724-646-3775 This manual is copyrighted.
AMERICAN GOTHIC PLAYHOUSE
 AMERICAN GOTHIC PLAYHOUSE Project Plan #856 Sheet 1 of 5 Pick a spot and get started with the beautiful that your kids will love. The design of the playhouse includes 35 square feet of interior space plus
Fig. 2 WALL-TO-WALL PANEL CONNECTIONS CORNER WALL CONNECTION
 SIPS SCREWS WITH MINIMUM 1" PENETRATION IN WOOD MEMBER IN SIP WALL PANEL CONNECTED TO @ 24" O.C. MAXIMUM OUTSIDE SKIN EACH SIDE OF FRAMING TYP. AS RECOMMENDED BY FOAM CORE AS EACH SIDE OF FRAMING TYP.
INSTALLATION OF A BAY WINDOW
 INSTALLATION OF A BAY WINDOW Installation of a Bay Window These instructions relate to the replacement of an existing bay window or replacement of a straight window with a new bay window, in an opening
SAMPLE INSTRUCTIONS. Best Barns USA Assembly Book. the Denver. 12'x 12' or 12'x16' Revised November 29, 2010
 Best Barns USA Assembly Book Revised November 29, 2010 SAMPLE INSTRUCTIONS the Denver 12'x 12' or 12'x16' Manufactured by Reynolds Building Systems, Inc. 205 Arlington Drive Greenville, PA 16125 724-646-3775
8/18/14. Introduction to. Framing. Terminology and Concepts
 8/18/14 Introduction to Framing Terminology and Concepts Terminology: Framing Level Two points on exactly the same horizontal plane. Square Intersecting lines or faces that form an exact 90 angle. Plumb
March 14, 2007. Installation of Bay, Bow and Garden Windows
 March 14, 2007 Re: Installation of Bay, Bow and Garden Windows Attached are the Atrium Companies, Inc recommendation for the installation of bay, bow and garden windows. These instructions were developed
Custom 30 x 20-8 Garage Plan Plan #g233 By SDS-CAD Specialized Design Systems
 P O Box 34 Mendon, Utah Custom 30 x 20-8 Garage Plan Plan #g233 By Page 1 Title Page Page 2 Main Floor Plan Page 3 Foundation Plan Page 4 Elevation Views Page 5 Framing and Details Page 6 Typical Section
ROOF CONSTRUCTION Roof Styles Gable Roof Hip Roof Gambrel Roof
 ROOF CONSTRUCTION The overall appearance of a building is greatly affected by the roof lines and the roofing materials. The designer has many standard designs to choose from and should be able to find
HfHMD uses LP SmartSide siding and trim.
 HfHMD uses LP SmartSide siding and trim. These products are: More durable than cement fiber board. Much more volunteer-friendly to install. When installed correctly, have a 5/50- year pro-rated warranty.
DE Frame with C Series Sidelight
 TOOLS REQUIRED Tape measure 6' magnetic level 3' magnetic level Screw gun with clutch adjusted #2 phillips tip #3 phillips tip Screwdriver (used to adjust frame on will using oval slots) Pry Bar Powder
Happily PHOTOGRAPHY BY MICHAEL ANDERSON AND LARRY OKREND
 Ever Happily Rafter 18 HANDY APRIL/MAY 2012 PHOTOGRAPHY BY MICHAEL ANDERSON AND LARRY OKREND An easy-tobuild hip roof makes this gazebo a doable project for any DIYer BY JENNY STANLEY Figuring out precise
Chapter 6 ROOF-CEILING SYSTEMS
 Chapter 6 ROOF-CEILING SYSTEMS Woodframe roof-ceiling systems are the focus of this chapter. Cold-formed steel framing for a roof-ceiling system also is permitted by the IRC but will not be discussed;
Brick Veneer Construction
 Brick Veneer Construction Check list of suggested tools & support items Claw hammer Tape measure 3/4" [19 or 20] Wood chisel Wood or plastic shims Pry bar Utility knife Caulking and caulking gun Power
HURRICANE MITIGATION RETROFITS FOR EXISTING SITE-BUILT SINGLE FAMILY RESIDENTIAL STRUCTURES
 HURRICANE MITIGATION RETROFITS FOR EXISTING SITE-BUILT SINGLE FAMILY RESIDENTIAL STRUCTURES 101 Retrofits Required. Pursuant to Section 553.844 553.884, Florida Statutes, strengthening of existing site-built,
ROOF CONSTRUCTION Roof Styles Gable Roof Hip Roof Gambrel Roof
 ROOF CONSTRUCTION The overall appearance of a building is greatly affected by the roof lines and the roofing materials. The designer has many standard designs to choose from and should be able to find
Clad Direct Glaze Window Installation Instructions
 Clad Direct Glaze Window Installation Instructions Sill flashing and sealing: 2. An overview of the proper flashing sequence is shown in figure 1. Please read entire installation instructions carefully
The better way to build TM. Installation Manual. FOUNDATION SIPs & FROST WALLS SIPs
 The better way to build TM Installation Manual FOUNDATION SIPs & FROST WALLS SIPs February 2016 PWF FOUNDATION & FROST WALL SIPs Installation Manual Table of Contents Topics General Requirements...................................
Mark Cramer Inspection Services, Inc.
 Mark Cramer Inspection Services, Inc. 492 Twentieth Avenue, Indian Rocks Beach, FL 34635-2970 (727) 595-4211 Fax (727) 596-7583 Certified Member #12085 American Society of Home Inspectors Construction
Superform Products Ltd.
 TYPICAL CORNER REINFORCING NOTE : SEE ENGINEERED REBAR SCHEDULES SUPPLIED BY THE MANUFACTURER STEEL REINFORCEMENT WALL CORNER 90 Copyright 2012 Sept. 2012 5.1.1 Rebar Spacing 6" 12" Max. Load LB./FT. 2000
CONSTRUCTION DETAILS & LOAD DESIGN CHARTS
 Office and Production 126 New Pace Rd., PO Box 279 Newcomerstown, OH 43832 1-800-446-2188, Fax: 740-498-4184 www.buildwithsips.com CONSTRUCTION DETAILS & LOAD DESIGN CHARTS Table of Contents Description
1. Concrete: T W L / 27 = Concrete C.Y. Multiply Feet Thickness x Feet Width x Feet Length / 27 = Cubic Yards.
 Formulas: Formula Letters: H= Height BCY = Bank Cubic Yards L= Length CCY = Compact Cubic Yards P= Perimeter LCY = Loose Cubic Yards LF = Linear Feet or Lineal Feet BF = Board Foot or Feet SF = Square
2.9 WINDOW & DOOR BUCKS
 2.9 WINDOW & DOOR BUCKS Bucks provide attachment surfaces for windows and doors while holding back concrete from these openings during concrete placement. Mark the center and edges of openings as you place
Section A Roof Truss
 Section A Roof Truss Truss Types Wisconsin Truss, Inc. can build a variety of truss types, pictured below are some common examples. Common Bobtail Scissor Mono Studio Dual Slope Cathedral Tray Vault Parallel
Window Installation Instructions
 Caution The correct installation methods of windows in full frame or insert applications is critical towards achieving the tested performance of the window and longterm enjoyment and energy savings for
CLIENT. Inspection Report. 271 Front St. Alert Bay, B.C. Island Building Inspections V ANCOUVER I SLAND B. C.
 CLIENT Inspection Report 271 Front St. Alert Bay, B.C. Island Building Inspections 2013 V ANCOUVER I SLAND B. C. Elevation Photos For the Property at 271 Front Street Alert Bay, BC ELEVATION PICTURES Front
INSTALLATION INSTRUCTIONS for Vinyl Windows with Integral Nailing Fin (JII001)
") Thank you for selecting JELD-WEN products. Attached are JELD-WEN s recommended installation instructions for Vinyl windows with an integral nailing fin. While the use of these installation instructions
Thank you for selecting JELD-WEN products. Attached are JELD-WEN s recommended installation instructions for Vinyl windows with an integral nailing fin. While the use of these installation instructions
Sun Windows General Information Sun New Construction Window Installation Instructions
 Sun Windows General Information Section 1 G F H H H A. Apply Weather Resistive Barrier B. Apply Sill Flashing Tape C. Place Waterproof Sill Shims D. Caulk Back of Nail Fin Sides & Top, Set Window, Fasten
We urge you to read and follow the attached installation instructions. Failure to do so may void the warranty of this garden window unit.
 Important Information for New Construction Installations Attention Installer! We urge you to read and follow the attached installation instructions. Failure to do so may void the warranty of this garden
Page & Turnbull imagining change in historic environments through design, research, and technology
 DCI+SDE STRUCTURAL EVALUATIONS OFFICE BUILDING, TOOL SHED & WATER TANK, AND BLACKSMITH & MACHINE SHOP BUILDINGS SAN FRANCISCO, CALIFORNIA [14290] PRIMARY PROJECT CONTACT: H. Ruth Todd, FAIA, AICP, LEED
Plans will call for one of two soffit/fascia details:
 Plans will call for one of two soffit/fascia details: Ventilated vinyl soffit with bent aluminum fascia OR Ventilated LP Smartside soffit panels with 1x6 rabbeted fascia First, let s talk terminology:
Residential Decks. Planning and Development Services Department
 Building Safety Division 8500 Santa Fe Drive Overland Park, KS 66212 (913) 895-6225 Fax (913) 895-5016 Email: [email protected] Planning and Development Services Department Residential Decks
STANDARD OPEN PATIO COVER
 STANDARD OPEN PATIO COVER BUILDING & SAFETY DIVISION 201 E. LA HABRA BLVD. LA HABRA, CA 90631 62-90-9710 Call Before You Dig 1-800-227-2600 PLEASE NOTE: This information Bulletin is made available to assist
We urge you to read and follow the attached installation instructions. Failure to do so may void the warranty of this garden window unit.
 Important Information for New Construction Installations Attention Installer! We urge you to read and follow the attached installation instructions. Failure to do so may void the warranty of this garden
UNIVERSAL ASSEMBLY INSTRUCTIONS FOR VERSATUBE BUILDINGS CONTRACTOR SERIES 2 X 4 FRAMES
 UNIVERSAL ASSEMBLY INSTRUCTIONS FOR VERSATUBE BUILDINGS CONTRACTOR SERIES 2 X 4 FRAMES Our unique assembly process quickly transforms the individual pieces into a finished structure that will give you
6.0 Implementation: Retrofitting Gable End Walls with L-Bent Straps
 6.0 Implementation: Retrofitting Gable End Walls with L-Bent Straps Order of presentation: To give you a better appreciation of what is involved in doing a gable end bracing retrofit, the first section
Ceiling Mounted Folding Attic Ladders Installation Instructions
 Ceiling Mounted Folding Attic Ladders Installation Instructions WARNING Before you start installing your new Louisville Ceiling Mounted Folding Attic Ladder, you must read and understand the following:
How to Install UnderDeck The Original.
 How to Install UnderDeck The Original. TOOLS: Chalk Line Caulk Gun Garden hose or water bucket Gloves Hammer or Screw Gun Power Mitre Saw with OSB Blade Pencil Pliers Safety Glasses Straight Edge / Carpenter
Asphalt Shingle Application Requirements
 Alberta Allied Roofing Association Asphalt Shingle Application Requirements Section 1 Roof Decks 1.1 General Asphalt Shingles are not permitted to be installed directly over rigid insulation. When Asphalt
POST AND FRAME STRUCTURES (Pole Barns)
") POST AND FRAME STRUCTURES (Pole Barns) Post and frame structures. The following requirements serve as minimum standards for post and frame structures within all of the following structural limitations:
POST AND FRAME STRUCTURES (Pole Barns) Post and frame structures. The following requirements serve as minimum standards for post and frame structures within all of the following structural limitations:
Additions and Alterations
 Additions and Alterations Addition and alteration construction is a miscellaneous grouping of home improvement and renovation projects that are generally geared toward the enhancement of an existing principal
Retrofitting an Insulated Cold Roof
 Retrofitting an Insulated Cold Roof As a metal-roofing contractor in the Upper Peninsula of Michigan, I am frequently asked to fix roof leaks that have less to do with roofing than with the way poorly
WHI 90-Minute Rated Veneered Door Frame Installation Instructions
 No. 940-03-10 INSTALLATION INSTRUCTIONS 90 MINUTE RATED VENEERED DOOR FRAME DOOR REQUIREMENTS: Consult the door manufacturer to make sure that the doors are qualified for the hardware to be installed,
Eggers meticulously-crafted door frames are rivaled only by their beauty, quality and lasting performance. Turning nature s beauty into works of art
 D O O R F R A M E S Eggers meticulously-crafted door frames are rivaled only by their beauty, quality and lasting performance. Turning nature s beauty into works of art D O O R F R A M E S Eggers Industries
PANELIZED HOME INSTALLATION GUIDELINE
 PANELIZED HOME INSTALLATION GUIDELINE A typical home package will be constructed of Snap-N-Lock Insulated Panels clad with steel skins. 4" panels will be used for the walls, and 6" panels for the roof.
Important Information for Installer & Homeowner
 Important Information for Installer & Homeowner Homeowner: Please keep this information for your records, do not discard! Installation Instructions for Wood Frame Construction Replacement (See other side
Bungalow. Essential Elements. Prominent porch columns,
 Bungalow Essential Elements Prominent porch columns, especially square or battered piers Deep porches One or one and a half stories Roof that is either hipped with low pitch or gabled with moderate to
300mm. 2mm MIN GAP. PLACE 100mm X 100mm. SO THAT IT IS 38mm INTO
 INSTALL PEEL & STICK (P&S) GUSSETS WITH PRIMER AS PER MANUFACTURERS INSTRUCTIONS 2mm MIN GAP IN SHEATHING STEP 1 PLACE 100mm X 100mm PIECE OF P&S IN CORNER SO THAT IT IS 38mm INTO THE OPENING EACH WAY
Owner's Manual & Assembly Instructions
 Owner's Manual & Assembly Instructions PM01 BASE KIT Model No. FDN1014 717090311 CAUTION: SOME PARTS HAVE SHARP EDGES. CARE MUST BE TAKEN WHEN HANDLING THE VARIOUS PIECES TO AVOID A MISHAP. FOR SAFETY
DECKING INSTALLATION, CARE & MAINTENANCE INSTRUCTIONS. 866.729.2378 MOISTURESHIELD.COM limited lifetime warranty 866.729.2378 WWW.MOISTURESHIELD.
 DECKING INSTALLATION, CARE & MAINTENANCE INSTRUCTIONS 866.729.2378 MOISTURESHIELD.COM limited lifetime warranty Welcome To The Even Greater Outdoors. Congratulations on choosing MoistureShield for your
TYPICAL PATIO COVERS 111
 City of Laguna Niguel Building Division 30111 Crown Valley Pkwy Laguna Niguel, CA 92677 (949) 362-4360 FAX 362-4369 www.cityoflagunaniguel.org TYPICAL PATIO COVERS 111 PLEASE NOTE: This information Bulletin
How To Repair A Boat Landing Deck With A Boat Bed
 RESIDENTIAL INSULATED SHEATHING INSTALLATION GUIDE Residential Insulated Sheathing Installation Guide ROXUL COMFORTBOARD IS Table of Contents Slab-on-grade-to Above Grade Wall...1 Foundation Wall at Footing
INSTALLATION INSTRUCTIONS for Vinyl Windows without Nailing Fin (JII011) ImPOrTANT INFOrmATION & GlOssAry. rough OPeNINGs
 ImPOrTANT INFOrmATION & GlOssAry. rough OPeNINGs") Thank you for selecting JELD-WEN products. Attached are JELD-WEN s recommended installation instructions for vinyl windows without a nailing fin (including finless, flush fin and flange). Read these instructions
Thank you for selecting JELD-WEN products. Attached are JELD-WEN s recommended installation instructions for vinyl windows without a nailing fin (including finless, flush fin and flange). Read these instructions
Build a kids playhouse
 Build a kids playhouse Build a playhouse where kids can dream away the summer! Full plans and building details included. By Dan Michie For months, I tried to draw plans for a playhouse for my grandson,
PREMIUM LAMINATED ASPHALT SHINGLES Dallas, TX Tuscaloosa, AL Phillipsburg, KS
 Application Instructions for THESE ARE THE MANUFACTURER S APPLICATION INSTRUCTIONS FOR THE ROOFING CONDITIONS DESCRIBED. TAMKO BUILDING PRODUCTS, INC. ASSUMES NO RESPONSIBILITY FOR LEAKS OR OTHER ROOFING
DuPont Tyvek ThermaWrap R5.0 Installation Guidelines for New Construction Using Vinyl, Brick and Stone Claddings
 Tyvek ThermaWrap R5.0 Installation Guidelines for New Construction Using Vinyl, Brick and Stone Claddings VERSION 1/16 FOR SINGLE FAMILY HOMES AND LOW RISE MULTI-FAMILY BUILDINGS LESS THAN 4 STORIES Tyvek
How To Build A Gambrel Roof And A Gable End Roof
 Dutch Gable or Gambrel Roof and The Scotch Valley The folowing pages are an extract from Carp 12 text TAFE NSW Construction and Transport Division 71 HIP and VALLEY ROOFING GAMBREL / DUTCH GABLE The effect
These instructions will show you how to install an internal door into a non-loadbearing partition wall. The instructions are split into three parts.
 No 8 in the series of 'How to' brochures produced by PlaceMakers, New Zealand How to Frame and Hang a Door These instructions will show you how to install an internal door into a non-loadbearing partition
Installing Window and Door Mouldings
 Installing Window and Door Mouldings About Window and Door Mouldings The trim around windows and doors greatly influences the look and style of your interior. They also bridge the gaps and cover spaces
DuPont Tyvek ThermaWrap R5.0 Installation Guidelines for New Construction Using Stone Veneer or Lap Siding, e.g. Fiber Cement and Wood/Cedar
 Tyvek ThermaWrap R5.0 Installation Guidelines for New Construction Using Stone Veneer or Lap Siding, e.g. Fiber Cement and Wood/Cedar VERSION 1/16 FOR SINGLE FAMILY HOMES AND LOW-RISE MULTI-FAMILY BUILDINGS
Cedar Cottage Doghouse Plans
 Overlapping cedar shingles add an element of charm to this medium size doghouse. The walls, floor, and trim are constructed of solid cedar, making it naturally weather resistant and provides excellent
LIGHT FLOOR AND WALL FRAMING
 CHAPTER 1 LIGHT FLOOR AND WALL FRAMING In the normal sequence of construction events, the floor and wall activities follow the completed foundation work. In this chapter, we ll examine established methods
Classic Products, Inc. ClickLock Standing Seam Installation Manual
 Classic Products, Inc. ClickLock Standing Seam Installation Manual Classic Products, Inc. 8510 Industry Park Drive Piqua, OH 45356 800.543.8938 Table of Contents page Introduction 1. 1 Starter. 2. 1 Panels.
The WANZ Guide to Window Installation
 The WANZ Guide to Window Installation as described in E2/AS1 Amendment 5 Ver. 1.1 Page 2 of 74 Contents Overview Page 5 Objective Page 5 Scope Page 5 Opening Preparation Page 7 Step P1 Preliminary Check
BRIDGE & SUPPLY COMPANY. Installation Guide. Ultra 2000. Includes:
 BRIDGE & SUPPLY COMPANY Installation Guide Ultra 2000 Includes: Ultra 2000 Installation Guide Stock Trim Profiles Ultra 2000 Trim Installation Guide Page 2 Table of Contents Ultra 2000 Profile, Colors
BUILD A CARPORT. 2 - Planning the carport. 3 - Designing the carport
 BUILD A CARPORT You only need basic DIY and woodworking skills to build a carport. The most important part of the job is setting the supporting posts truly vertical - a job for which another pair of hands
9.0 Strengthening and Bracing Gable End Walls
 9.0 Strengthening and Bracing Gable End Walls Bear in mind that you may want to make the wall-to-wall connections before strengthening and bracing the gable end. This will depend on how you will be making
Barewood Octagon and Elongated Windows Installation Instructions
 Step-by-step instructions to a beautiful window. Measuring and Installation of your new window from Century Specialty Windows couldn't be easier with our step-by-step instructions. Quality, function and
Table of Contents. Western States Standing Seam SS675 Panel Installation, Flashings & Shop Drawing Detail Guide. Notes to Designer /Installers..
 Western States Standing Seam SS675 Panel Installation, Flashings & Shop Drawing Detail Guide Table of Contents Section Page Section Page Notes to Designer /Installers.. 1 Fastener Placement and Selection.2-3
Total Quantity: IMPORTANT: Plans are to be used with 3 x6 Plexiglass (SKU #298-017).
.") # Materials: Quantity Each: 4x4x8 3 2x4x8 2 2x8x8 1 4x8x3/4 plywood 1 3 x6 corkboard (can be 18 of the 1 x1 pieces) 1 3 x6 plexiglass 1 8 door casing 3 Primer 1 qt. Total Quantity: TIPS FOR SUCCESSFUL
# Materials: Quantity Each: 4x4x8 3 2x4x8 2 2x8x8 1 4x8x3/4 plywood 1 3 x6 corkboard (can be 18 of the 1 x1 pieces) 1 3 x6 plexiglass 1 8 door casing 3 Primer 1 qt. Total Quantity: TIPS FOR SUCCESSFUL
FLAT ROOF CARPORT RECOMMENDED INSTRUCTION MANUAL
 FLAT ROOF CARPORT RECOMMENDED INSTRUCTION MANUAL Table of Contents Introduction... 2 Components... 3 Step 1 Marking out the Perimeter of the Carport... 3 Step 2a Footing Set-Out for Concrete Block Pad
Building Construction. Lightweight construction. Conventional Construction
 Ventilation 53 Building Construction The firefighter s ability to safely and efficiently ventilate a building through its roof will depend to some degree on the firefighter s understanding of roof construction.
INSTALLATION MANUAL For Grand Rib-3 / Multi Purpose / & Classic Rib Roofing Panels
 INSTALLATION MANUAL For Grand Rib-3 / Multi Purpose / & Classic Rib Roofing Panels Grand Rib-3 / Multi-Purpose / Classic Rib Grand Rib-3 / Multi-Purpose / & Classic Rib Grand Rib 3 panels are a strong,
!!!!!! !!! Decra Plus DPSW010 DPSTW011 DPSW012 DPSW013 DPSW014 DPSW015 DPSW016 DPSW020 DPSW021 DPSW024 DPSW030 DPSW031 DPSW035 DPSW030 DPSW031 DPSW035
 Decra Plus Drawing no DPSW010 DPSTW011 DPSW012 DPSW013 DPSW014 DPSW015 Description Shown In Decra Brochure Most Commonly Used Detail t~êã=oççñ=b~îéë=aéí~áä=b~îéë=lîéêü~åö=táíü=fåëìä~íéç=c~ëåá~=~åç=pçññáí
Protecting Your Home From Hurricane Wind Damage
 T H E W I N D Protecting Your Home From Hurricane Wind Damage During a hurricane, homes may be damaged or destroyed by high winds and high waves. Debris can break windows and doors, allowing high winds
Cable Support System Guide for Andersen Bow, Bay, and Box Projecting Window Units
 for Andersen Bow, Bay, and Box Projecting Window Units Congratulations! You have just purchased one of the many fine Andersen products. Proper assembly, installation and maintenance are essential if the
PANEL CONCEPTS LLLP.
 The Small Cottage Company DO-IT-YOURSELF CABINS & COTTAGES PANEL CONCEPTS INC. PANEL CONCEPTS LLLP. 2826 Gold 331 Creek N. M-33, Road Mio, Gold Michigan Creek, Montana 4864759733 (989) 826-6511 (406) 288-8585
How to secure your property after a disaster
 How to secure your property after a disaster The Red Guide to Recovery HOuse secured properly Board-Up of Windows, Doors and Roof Hole. Lot secured with Perimeter Fencing. Fires, floods, tornadoes, hurricanes,
INSTALLATION INSTRUCTIONS for Premium Pocket Windows (JII022) IMPoRtaNt INFoRMatIoN & glossary. safety & HaNdlINg
 IMPoRtaNt INFoRMatIoN & glossary. safety & HaNdlINg") Thank you for selecting JeLd-weN products. Attached are JeLd-weN s recommended installation instructions for pocket (replacement) double-hung, casement, awning, picture or transom windows, designed to
Thank you for selecting JeLd-weN products. Attached are JeLd-weN s recommended installation instructions for pocket (replacement) double-hung, casement, awning, picture or transom windows, designed to
REQUIREMENTS FOR SUBMITTING PLANS FOR NEW CONSTRUCTION
 RESIDENTIAL: REQUIREMENTS FOR SUBMITTING PLANS FOR NEW CONSTRUCTION 2 COMPLETE SETS OF PRINTS WITH ENGINEERS STAMP ON FOUNDATION PLAN INCLUDING ELECTRICAL, PLUMBING, ETC. SITE PLAN SHOWING HOUSE LOCATION
Ladder Shelf Plans Final dimensions: 25 L x 21 W x 72 H
 Ladder Shelf Plans Final dimensions: 25 L x 21 W x 72 H Copyright 2011. MLCS Woodworking. Page 1 Router bits and supplies needed: 3/8 Rabbeting bit (#10691) 1 Bottom Cleaning bit (#7941) Top and Bottom
Installation Instructions Double-Hung, Single-Hung, Casement, Awning, Sliding, Picture & Shapes Non-Impact & Impact Resistant Nailing Fin Windows
 Installation Instructions Double-Hung, Single-Hung, Casement, Awning, Sliding, Picture & Shapes Non-Impact & Impact Resistant Nailing Fin Windows americancraftsmanwindows.com Project Requirements: Read
INSTALLATION INSTRUCTIONS
 door frames Engineered product systems INSTALLATION INSTRUCTIONS door frames MINIMALIST DOOR FRAME Fry Reglet Flush Door frames are designed for use with 3 5/8 studs with ½ drywall both sides (4 5/8 throat
Installation Instructions
 Installation Instructions Issued: March 10, 2004 GeoDeck Deck and Railing System (ICC-ES Legacy Report No. 21 71, former BOCA Report No. 21 71) Design and Installation Manual Congratulations! You have
Residential Roofing Guide
 Residential Roofing Guide TABLE OF CONTENTS Building Detail and Accessories...... 1 Panel Introduction and Handling...... 2 Cutting and Trimming.... 3 Roof Preparation..... 3 Roof Slope..... 3 Re-roofing...
Smooth cap sheet - 0-10 SQ $ 139.00. Smooth cap sheet - 11-50 SQ $ 63.00. Smooth cap sheet - 51-100 SQ $ 36.00 Smooth cap sheet - 101-200 SQ $ 36.
 Demolition/Removal of Work 4-ply built up roofing to the insulation (smooth cap sheet) Smooth cap sheet - 0-10 SQ $ 63.00 Smooth cap sheet - 11-50 SQ $ 63.00 Smooth cap sheet - 51-100 SQ $ 35.00 Smooth
H-Stud Area Separation Wall System
 12 TH EDITION 09 21 16.33/NGC H-Stud Area Separation Wall System 09 21 16.33 139 H-STUD AREA SEPARATION WALL SYSTEM The fire-protection of gypsum-based Area Separation Walls is demonstrated in dramatic
WINDOW INSTALLATION GUIDE
 WINDOW INSTALLATION GUIDE is not responsible for or liable for any use or misuse of the information contained in this window installation guide. Window Installation Guide This guide provides basic information
HOW TO INSTALL A BEAUTIFUL NEW KITCHEN
 HOW TO INSTALL A BEAUTIFUL NEW KITCHEN Easy to follow step-by-step kitchen cabinet installation TOOL AND MATERIAL LIST Hammer Pry bar Screwdriver Phillips Flathead Level Tape measure Pencil Straight edge
UNIT 4: SHEATHING AND SHINGLING THE ROOF
 KEY CONCEPTS 1. Identify tools needed for roofing 2. Steps to finishing a roof 3. Maintenance of a roof 4. Safety while roofing INSTRUCTIONAL ACTIVITIES 1. Complete Follow Up Worksheet from Unit 3 2. Roof
STRUCTURAL CONCEPT FOR LIGHT GAUGE STEEL FRAME SYSTEM
 Chapter 9 STRUCTURAL CONCEPT FOR LIGHT GAUGE STEEL FRAME SYSTEM 9.1 BACKGROUND Steel is widely used in the construction of multi-storey buildings. However, steel construction is seldom used and is traditionally
Residential Deck Safety, Construction, and Repair
 Juneau Permit Center, 4 th Floor Marine View Center, (907)586-0770 This handout is designed to help you build your deck to comply with the 2006 International Residential Building code as modified by the
INSTALLATION INSTRUCTIONS for Vinyl Windows with Integral Nailing Fin (JII001) IMPORTANT INFORMATION AND GLOSSARY ROUGH OPENINGS
 IMPORTANT INFORMATION AND GLOSSARY ROUGH OPENINGS") Thank you for selecting JELD-WEN products. Attached are JELD-WEN s recommended installation instructions for Vinyl windows with an integral nail fin. Not all window types may be installed into every wall
Thank you for selecting JELD-WEN products. Attached are JELD-WEN s recommended installation instructions for Vinyl windows with an integral nail fin. Not all window types may be installed into every wall
Leaky Homes Financial Assistance Package (FAP) Repair plan example
 Repair plan example") LEAKY HOMES FINANCIAL ASSISTANCE PACKAGE FACT SHEET Repair Plan Example - June 2014 Page 1 Leaky Homes Financial Assistance Package (FAP) Repair plan example Introduction This repair plan example is intended
LEAKY HOMES FINANCIAL ASSISTANCE PACKAGE FACT SHEET Repair Plan Example - June 2014 Page 1 Leaky Homes Financial Assistance Package (FAP) Repair plan example Introduction This repair plan example is intended
Historical Information
 Historical Information The use of gutters, or eaves troughs, dates from early colonial times when two boards were nailed together to form a functional V-shaped trough placed below the drip edge of the
Chapter 10 - Scaffolding Systems
 Chapter 10 - Scaffolding Systems Contents Chapter 10 - Scaffolding Systems... 10-1 Check and Oil the Pump Jacks... 10-4 Set Pump Jack Brackets... Error! Bookmark not defined. Set Pump Jack Poles... 10-5
K. D. FRAME ASSEMBLY FOR CLOSED STEEL STUD WALLS...Ins 10. FRAME INSTALLATION DETAILS FOR CLOSED STEEL STUD WALLS...Ins 11
 K. D. FRAME ASSEMBLY FOR MASONRY WALLS...........................Ins 2 FRAME INSTALLATION DETAILS FOR MASONRY WALLS......................Ins 3 INSTALLING EXISTING MASONRY WALL ANCHORS IN FRAME..................Ins
Raising the Roof Creating Roofs in Revit David Cohn
 David Cohn AB322-1 Roofs are one of the most complex architectural elements to model, but with Revit you can create just about any type of roof. This class will explore the best methods for creating various
Detached accessory structures that contain no conditioned floor area are exempt.
 RESIDENTIAL ROOFING PERMITS: A roofing permit is required for roofing of residential dwellings and garages in accordance with Section R105 of the International Residential Code. Updated 11/2013 City of