Teile und Zubehör - Einbauanleitung
|
|
|
- Tracy Skinner
- 7 years ago
- Views:
Transcription
1 Teile und Zubehör - Einbauanleitung F B Nachrüstsatz BMW Dachantenne Netz GSM seriengleiche Nachrüstung BMW 3er-Reihe Coupé, Limousine, touring (E 46/2/3/4) Nur zum Gebrauch in der BMW HO bestimmt. Einbauzeit ca.,5 Stunden. Die Einbauzeit kann je nach Zustand und Ausstattung des Fahrzeugs abweichen. Kenntnisse in der Karosserieelektrik sind Voraussetzung. BMW Parts and Accessories Installation Instruction BMW roof aerial retrofit kit for GSM network Retrofit kit identical to standard equipment BMW 3 Series Coupé, Saloon and touring (E 46/2/3/4) Instructions de montage des pièces et des accessoires BMW Kit de deuxième monte antenne de toit BMW réseau GSM deuxième monte identique à la série BMW Série 3 coupé, berline, touring (E 46/2/3/4) BMW Onderdelen en accessoires Montagehandleiding Naderhand in te bouwen set BMW dakantenne GSM net, naderhandse montage zoals vanaf fabriek BMW 3-serie coupé, sedan, touring (E 46/2/3/4) BMW Delar och tillbehör Monteringsanvisning Eftermonteringssats BMW takantenn GSM-nät serielik eftermontering BMW 3-serie coupé, sedan, touring (E 46/2/3/4) Ricambi e accessori BMW Istruzioni di montaggio Kit per il postmontaggio dell'antenna tetto BMW rete GSM postmontaggio uguale al sistema di serie per BMW Serie 3 Coupé, berlina, touring (E 46/2/3/4) BMW piezas y accesorios instrucciones de montaje Juego de reequipamiento de antena para el techo BMW red GSM reequipamiento igual de serie BMW Serie 3 Coupé, berlina, touring (E 46/2/3/4) Peças e Acessórios BMW Instruções de Montagem Equipamento de montagem posterior da antena de tejadilho BMW para a rede GSM Equipamento de montagem posterior igual ao de série para os modelos BMW da Série 3, Coupé, Berlina e touring (E 46/2/3/4)
 BMW")
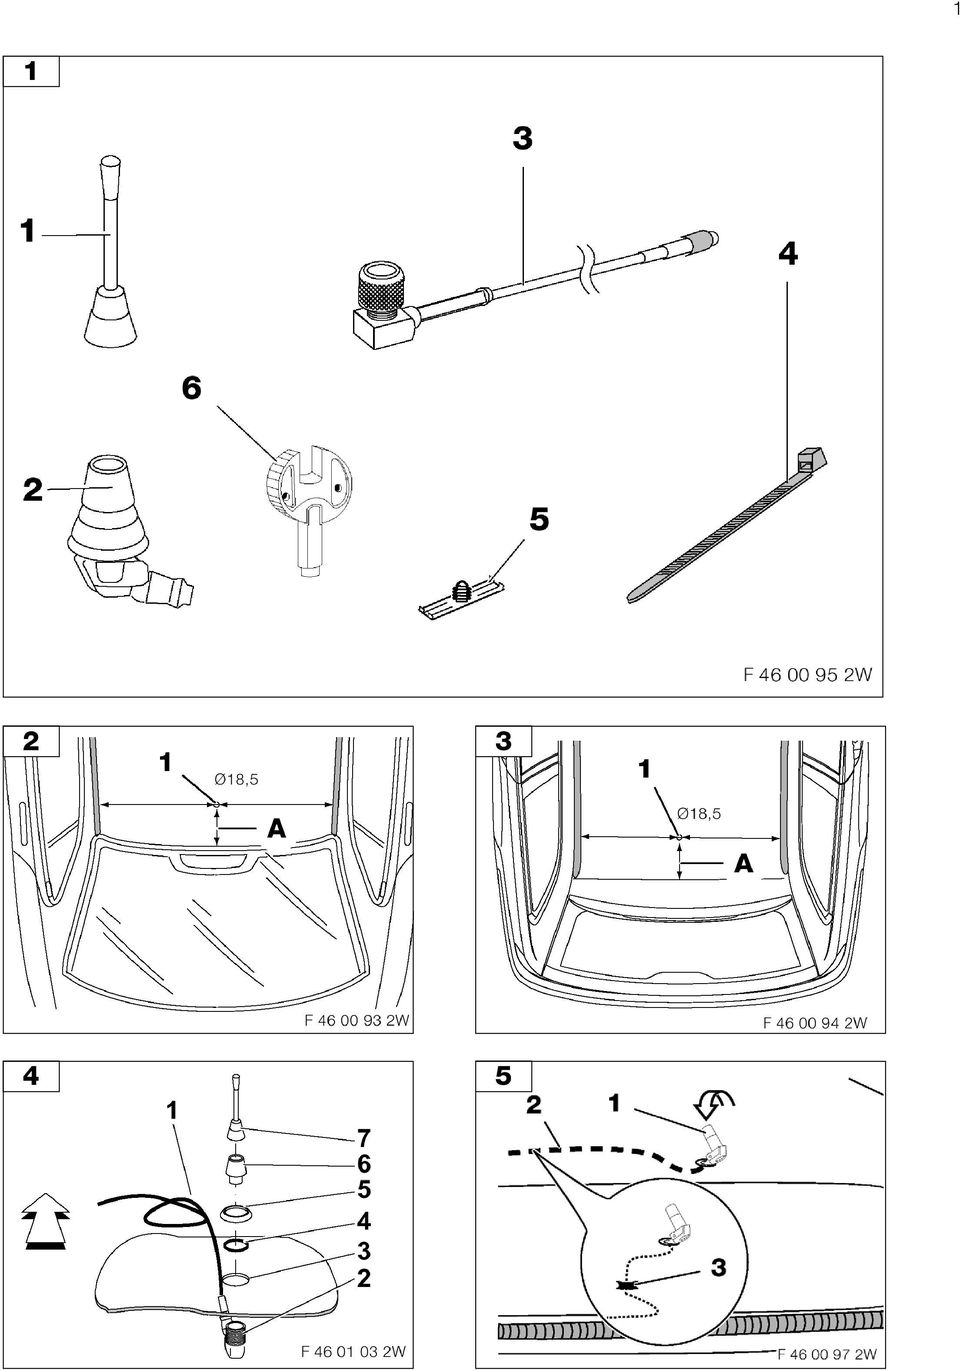
2 BMW roof aerial retrofit kit for GSM network Retrofit kit identical to standard equipment BMW 3 Series Coupé, Saloon and touring (E 46/2/3/4) For use within the BMW dealer organisation only. Installation time approx..5 hours. The installation time may differ depending on the condition of the car and the equipment in it. Knowledge of the body electrical system is required. General instructions Ensure that the cable or cables are not kinked or damaged when you install them in the car. When you pull down the roof liner, ensure that you do not break it. Drilled holes are to be deburred and coated with anti-corrosive paint as described in the BMW standard. Subject to technical modifications. Tools and equipment required Philips screwdriver set Wrench file set Open-ended spanner, size 20 mm /4 inch socket set Torch Insulating tape Angle cutter Drill Drill bit, 3 mm in diameter Water-soluble pen Goggles Table of contents Section. Preparations 2. Overview of installation kit 3. To drill the hole for the aerial 4. To install the aerial foot 5. To install the aerial cable. Preparations - Remove the left-hand boot trim (E46/2/4 only) - Remove the rear seat bench and rear seat backrest; in cars with a split rear seat backrest, remove the left-hand side section of the rear seat backrest (E46/2/4 only) - Remove the C pillar trims (E46/2/4 only) - Remove the D pillar trims (E46/3 only) - Remove the covers on the high level brake light (E46/2/4 only) - Remove the high level brake light (E46/2/4 only) - Remove the rear grab handles (E46/2/4 only) - Carefully release the roof liner from the rear fastening strip (E46/2/4 only) - Pull down the roof liner slightly (remove the noise insulation mat if fitted) 2. Overview of installation kit F W Textile adhesive tape Masking tape Step drill, diameter 4 20 mm Anti-corrosive paint Tape measure Item Description Quantity Aerial rod 2 Aerial foot 3 Aerial cable 4 Cable tie 5 5 Cable holder 2 6 Aerial wrench EN/7

3 3. To drill the hole for the aerial! To prevent damaging the roof liner, it must be pulled down far enough before the hole is drilled. E46/2/4 only F W Mark dimension A in the centre of the car as shown. Dimension A = 08 mm Predrill the hole () with a 3 mm drill bit and then enlarge it to a diameter of 8.5 mm with a step drill. Place the aerial cable (2) and aerial foot () into the hole from the outside. Lay the aerial cable (2) to the left-hand side of the car through the rubber grommet (3) using installation tape. The rubber grommet (3) is only visible from the interior of the car after you have pulled down the roof liner. F W Fit the sealing disc () and retaining ring (2) from the outside. Tighten the aerial nut (3) on the aerial foot (4) with a 20 mm open-ended spanner (torque 4 Nm). Tighten the aerial rod (5) with the supplied aerial wrench (torque 2 Nm). Then deburr the hole, remove the chippings and coat the hole with anti-corrosive paint. E46/3 only F W Mark dimension A in the centre of the car as shown. Dimension A = 58.8 mm Predrill the hole () with a 3 mm drill bit and then enlarge it to a diameter of 8.5 mm with a step drill. Then deburr the hole, remove the chippings and coat the hole with anti-corrosive paint. 4. To install the aerial foot E46/2/4 only F W Hold the aerial foot (2) from underneath. Fit the sealing disc (4) and retaining ring (5) from the outside (above). Screw on the aerial nut (6) loosely. Turn the aerial foot (2) so that the aerial cable connector is at the front (of the car), hold it and tighten the aerial nut with a 20 mm open-ended spanner (torque 4 Nm). Tighten the aerial rod (7) with the supplied aerial wrench (torque 2 Nm). E46/3 only 5. To install the aerial cable E46/2/4 only F W Do not push the roof liner downwards too much (there is a risk that it will break). Lay the aerial cable () along the recess (3) to the left-hand C pillar using a loop (2). Connect the enclosed cable holder (4) to the aerial cable () using insulation tape. Clip the cable holder into the existing body holes. Lay the aerial cable () with the angled plug through the existing foam grommet (5) into the boot to the installation site of the SE unit or FSE box and secure it with cable ties (6) along the audio wiring harness. E46/3 only F W Do not push the roof liner downwards too much (there is a risk that it will break). Lay the aerial cable () to the left-hand D pillar. Connect the enclosed cable holder (2) to the aerial cable using insulation tape. Clip the cable holder into the existing body holes. Lay the aerial cable () with the angled plug into the boot to the installation site of the SE unit or FSE box and secure it with cable ties (6) along the audio wiring harness. F W Before installing it in the car, connect the aerial cable (2) to the aerial foot (). 8/EN
 to the left-hand side of the car through the rubber grommet (3) using installation tape.")
4
5

6
Parts and Accessories Installation Instructions
 Parts and Accessories Installation Instructions R5 5 Z CD changer retrofit kit MINI (R 5 and R 53) LHD and RHD The installation time is approx..5 hours, but this may vary depending on the condition of
Parts and Accessories Installation Instructions
 Parts and Accessories Installation Instructions INFO 1 4 2 5 3 6 TONE SELET FM AM MODE MENU F 38 393 B Retrofit Kit On-board Monitor and Navigation System BMW 7 Series (E 38) These installation instructions
How To Wire Wire A Car To An Alarm System
 Teile und Zubehör - Einbauanleitung F 36 82 918 R Digitale Diebstahlwarnanlage DWA V für BMW 3er- Reihe (E36) mit Funkfernbedienung ab Band (SA 305) (Nur zum Gebrauch in der HO bestimmt). Einbauzeit ca.
BMW Parts and Accessories Installation Instructions
 BMW Parts and Accessories Installation Instructions Retrofit Anti-theft Alarm System (DWA) series-identical retrofit for BMW 5 Series saloon and touring (E 9, E 9/) left-hand drive F 9 005 W Installation
Time needed: ~3h for lid replacement only. Add 1h for operation harness in lid and ~2h more for installing drive unit and cable harness in trunk.
 DIY for replacing trunk lid and/or retrofitting electrical operation of trunk lid. This document is meant to be a support and give advice on the procedure but I will take no responsibility for any damage
Post Mount Light Installation*
 Post Mount Light Installation* *For the general installation of most Post Mount Spotlights, many vehicles may need slight modifications to these instructions. You will need the following tools: High torque
Parts and Accessories. Installation Instructions.
 Parts and Accessories. Installation Instructions. Rear-view camera retrofit MINI ONE (R 50) MINI COOPER (R 50) MINI COOPER S (R 53) These installation instructions are only valid for cars with SA 609 (navigation
Teile und Zubehör - Einbauanleitung
 Teile und Zubehör - Einbauanleitung Nachrüstsatz BMW Mobiltelefon Motorola 8700 (Netz GSM) seriengleiche Nachrüstung BMW 3er-Reihe Cabrio (E46/C) Die Einbauanleitung ist nur gültig für Fahrzeuge ohne (SA
TOYOTA Tundra 2007 - BACK-UP CAMERA SYSTEM Preparation
 Preparation Part Number(s): PT233-34070, PT923-35070-11, PT923-35070-43 NOTE: Part number of this accessory may not be the same as part number shown. Back Up Monitor Kit Contents PT923-35070-11 / PT923-35070-43
Installation instructions, accessories - Handsfree for cellular phone, system B, entry level
 XC90 Section Group Weight(Kg/Pounds) Year Month 3 39 0.5/1.1 2006 07 XC90 2003, XC90 2004 IMG-249663 Page 1 of 18 Required tools A0000162 A0000163 IMG-239664 M0000232 IMG-253123 IMG-252223 Page 2 of 18
A&A CORVETTE PERFORMANCE C6 BOOST & FUEL GAUGE INSTALLATION INSTRUCTIONS
 A&A CORVETTE PERFORMANCE C6 BOOST & FUEL GAUGE INSTALLATION INSTRUCTIONS 1. Check your gauges before you take them out of the packaging to make sure they are at 0 (zero) psi for both boost and fuel pressure.
V70 2011. Installation instructions, accessories. Digital radio DAB. Volvo Car Corporation Gothenburg, Sweden. V70 (08-) 2011 Volvo Cars Europe
 2011 Volvo Cars Europe") Instruction No Version Part. No. 31266810 1.1 31266809 Digital radio DAB IMG-295623 Page 1 of 13 Equipment IMG-242205 A0000162 IMG-239664 IMG-285783 Page 2 of 13 IMG-213320 Page 3 of 13 INTRODUCTION Read
Instruction No Version Part. No. 31266810 1.1 31266809 Digital radio DAB IMG-295623 Page 1 of 13 Equipment IMG-242205 A0000162 IMG-239664 IMG-285783 Page 2 of 13 IMG-213320 Page 3 of 13 INTRODUCTION Read
INSTALLATION INSTRUCTIONS
 INSTALLATION INSTRUCTIONS Accessory Application Publications No. XM RADIO SYSTEM 2003 ACCORD 4 DOOR AII 24378 Issue Date MARCH 2003 The XM Radio will not fit in a vehicle equipped with a rear entertainment
INSTALLATION INSTRUCTIONS
 INSTALLATION INSTRUCTIONS Accessory Application Publications No. ACCORD All 30209 2-AND 4-DOOR SYSTEM (VP, LX, SE) Issue Date AUG 2005 PARTS LIST Security System Attachment: P/N 08E55-SDA-100A Unit panel
INSTALLATION INSTRUCTIONS
 Rear Vision System Tailgate Handle Camera Mirror Display 2004-2014 Ford F-150 and 2008-2015 Ford Super Duty (Kit part numbers 9002-9521) Kit Contents: Mirror Tailgate Handle with camera and harness Interior
AM/FM ANTENNA RELOCATION KIT
 -J0 REV. 008-09-0 AM/FM ANTENNA RELOCATION KIT GENERAL Kit Number 766-09 Models This kit is used to relocate a fender-mounted AM/FM antenna to a Detachable Tour-Pak on specific model motorcycles. For model
TOYOTA TACOMA 2008- HANDS FREE BLU LOGIC Preparation
 TOYOTA TACOMA 2008- HANDS FREE BLU LOGIC Preparation Part #: PT923-00112 Conflicts: JBL Audio, Factory Navigation NOTE: Part number of this accessory may not be the same as the part number shown. Kit Contents:
WARNING! REQUIRED TOOLS & SUPPLIES: HIGH VOLTAGE
 INSTRUCTIONS Product: GEM Electric Motorcars Models: All Subject: Instructions for installing Stereo Accessory Estimated Completion Time:.75 Hours Parts: See Page # 7 REQUIRED TOOLS & SUPPLIES: (1) 3/8
INSTALLATION INSTRUCTIONS
 INSTALLATION INSTRUCTIONS Accessory Application Publications No. AII 26327 2004 S2000 Issue Date OCT 2004 PARTS LIST Security System: P/N 08E51-S84-100 Attachment Kit: P/N 08E55-S2A-101 2 Remote controls
AM/FM ANTENNA KIT (TOUR-PAK MOUNT)
") -J077 REV. 008-0-0 AM/FM ANTENNA KIT (TOUR-PAK MOUNT) GENERAL Kit Number 7-98A Models For model fitment information, see the P&A Retail Catalog or the Parts and Accessories section of www.harley-davidson.com
-J077 REV. 008-0-0 AM/FM ANTENNA KIT (TOUR-PAK MOUNT) GENERAL Kit Number 7-98A Models For model fitment information, see the P&A Retail Catalog or the Parts and Accessories section of www.harley-davidson.com
Fitting Instruction: Daytona 675 Street Triple from VIN 411984, Street Triple R from VIN 411984 A9930222
 English Fitting Instruction: Daytona 675 Street Triple from VIN 98, Street Triple R from VIN 98 A990 Thank you for choosing this Triumph genuine accessory kit. This accessory kit is the product of Triumph's
INSTALLATION INSTRUCTIONS
 INSTALLATION INSTRUCTIONS Accessory Application Publications No. All 24393 ACCORD (DX, LX) SYSTEM 2-AND 4-DOOR Issue Date AUG 2002 PARTS LIST Security System Attachment (LX): P/N 08E55-SDA-100A Unit panel
Front axle components, overview
 just a test. Front axle components, overview 40-1 General Information Load bearing components and parts of the suspension must not be welded or straightened. Vehicles without drive axle must not be moved,
POWER LOCK KIT GENERAL INSTALLATION -J04427 REV. 2007-12-04. Kit Number. Models. Additional Parts Required. Kit Contents
 -J0 REV. 00--0 POWER LOCK KIT GENERAL Kit Number -0, 0-0 Models For model fitment information, please see the P&A Retail Catalog or the Parts and Accessories section of www.harleydavidson.com (English
- power windows - alarm system - electric door mirror control - door warning light - central locking - seat memory
 Door Wiring Harness Plug Connections Binder -, Electrics Vehicle Type: (86) Model Year: 7 (V) Concern: Door wiring harness plug connections X11 / X12. Information: The rubber boot for the door connector
Front brakes (FN- 3), servicing
, servicing") j a t Front brakes (FN- 3), servicing 46-1 Front brakes, servicing Note: Install complete repair kit. After replacing brake pads and before moving vehicle, depress brake pedal several times firmly to properly
j a t Front brakes (FN- 3), servicing 46-1 Front brakes, servicing Note: Install complete repair kit. After replacing brake pads and before moving vehicle, depress brake pedal several times firmly to properly
BILLET HEADLAMP WITH SHORT/TALL MOUNTS
 -J099 REV. 00-0- BILLET HEADLAMP WITH SHORT/TALL MOUNTS GENERAL Kit Number 9-0, 9-0 Models Kit 9-0 is a -/ inch headlamp and kit 9-0 is a -/ inch headlamp. Both kits will fit the models listed in Table.
Boxster. Technical Information. Service 3/99 9415. Litronic Retrofit Kit
 Litronic Retrofit Kit 9 3/99 9415 Binder - 9, Electrics This bulletin replaces bulletin Grp. 9, #3/99, dated 5-20-99. Vehicle Type: Model Year: Concern: Information: As of 1997 (V) Retrofitting Litronic
BMW Parts and Accessories Installation Instructions
 BMW Parts and Accessories Installation Instructions 0 40 00 60 80 80 60 00 40 0 0 40 0 5 7 6 R/T F 53 008 W Retrofit Multi-Function Steering Wheel (MFL) Cruise Control System (GRA) series-identical retrofit
BMW Parts and Accessories Installation Instructions
 1 4 BMW Parts and Accessories Installation Instructions INFO 2 5 3 6 TONE SELECT FM AM MODE MENU F 39 0524 B Retrofit Kit Onboard Monitor and Navigation System BMW 5 Series (E 39) These installation instructions
Volkswagen Jetta, Golf, GTI 1999, 2000 Brake System 46 Brakes - Mechanical Components (Page GR-46)
") 46 Brakes - Mechanical Components (Page GR-46) Front brakes Brake pads, removing and installing Brake pads, removing and installing FN 3 brake caliper, servicing FS III brake caliper, servicing Rear wheel
46 Brakes - Mechanical Components (Page GR-46) Front brakes Brake pads, removing and installing Brake pads, removing and installing FN 3 brake caliper, servicing FS III brake caliper, servicing Rear wheel
Original BMW Accessory. Installation Instructions.
 Original BMW Accessory. Installation Instructions. Connector Retrofit for External Audio Sources BMW Series (E 46), BMW 5 Series (E9) from 9/, BMW X5 (E 5) from /, BMW X (E8), BMW Z4 (E85/E86) These installation
FL ADJUSTABLE RIDER BACKREST MOUNTING HARDWARE KIT
 -J070 REV. 0-0-0 FL ADJUSTABLE RIDER BACKREST MOUNTING HARDWARE KIT GENERAL Kit Number 9-09A Models For model fitment information, see the P&A Retail Catalog or the Parts and Accessories section of www.harley-davidson.com
INSTALLATION INSTRUCTIONS
 INSTALLATION INSTRUCTIONS Accessory Application Publications No. AII23628 2003 PILOT Issue Date MAY 2002 PARTS LIST Security System Kit (sold separately): P/N 08E51-S84-100 2 Remote controls Attachment
Installation instructions, accessories - Navigation system, RTI
 XC90 Section Group Weight(Kg/Pounds) Year Month 3 393 4/8.8 2007 08 Page 1 of 20 Required tools A0000162 IMG-239667 IMG-239664 IMG-239980 IMG-242205 R8802817 R3905015 Page 2 of 20 R3903812 IMG-213320 Page
Guide for Modified Assembly: Lightning McQueen. By: Collin Patterson, University of Delaware. Materials and Tools:
 Guide for Modified Assembly: Lightning McQueen By: Collin Patterson, University of Delaware Materials and Tools: PVC o 40 inches of 1 in diameter PVC o 25 inches of ¾ in PVC o 4 x 1 in elbows o 2 x ¾ in
TOYOTA PRIUS 2010- HANDS FREE BLU LOGIC Preparation
 TOYOTA PRIUS 2010- HANDS FREE BLU LOGIC Preparation Part #: PT923-00111 Conflicts: JBL Audio, Factory Navigation NOTE: Part number of this accessory may not be the same as the part number shown. Kit Contents:
INSTALLATION INSTRUCTIONS
 Rear Vision System Aftermarket and Factory 5.0, 8.4 and 6.1 MyGig Touch Screen Display (Factory Display requires Chrysler/Dodge dealer to activate) 2009 Current* Dodge Ram (Kit part number 1009-6503) *NOTE:
S OUNTING INSTRUCTION M M o u n t i n g k i t 2 &
 M O U N T I N G I N S T R U C T I O N S instructions This document is protected by copyright. The SICK AG company retains this right. Reproducing this document in whole or part is only permissible within
P150SC15. Designed for 2015 Ford F150 Super-Cab and Super-Crew vehicles without Sony System. 2015 Stillwater Designs P150SC15-A2-20150813
 P150SC15 Designed for 2015 Ford F150 Super-Cab and Super-Crew vehicles without Sony System Subwoofer Assembly Amplifier Assembly Amplifier Harness 2015 Stillwater Designs P150SC15-A2-20150813 M6 Bolt M6
XL PREMIUM OIL COOLER KIT
 -J05 REV. 0-0-0 XL PREMIUM OIL COOLER KIT GENERAL Kit Number 0008 Models For model fitment information, see the P&A Retail Catalog or the Parts and Accessories section of www.harley-davidson.com (English
Retrofit Instructions Installing a Sport Heated Steering Wheel - Leather, Multifunction BMW X5, E53, 2001 2006
 Retrofit Instructions Installing a Sport Heated Steering Wheel - Leather, Multifunction BMW X5, E53, 2001 2006 Disclaimer: This set of instructions is simply a guide on how I installed my own heated steering
TOYOTA TUNDRA 2015 Billet Grille w/led DRL
 TOYOTA TUNDRA 2015 Billet Grille w/led DRL Part Number: 00016-34088 Accessory Code: BG3000 Conflicts Models 1794 and Platinum Kit Contents Item # Quantity Reqd. Description 1 2 LED DRL 2 1 Driver Box 3
Assembly Instruction CAI- Connector with universal Endbell
 CANNON STANDARD Seite 1 von 17 CAI- Connector with universal Endbell Shell size 10 to 36 with APK contact / Trident T2P - contact Illustration and assembly exemplary of CAI Layout 20-0306 with APK / Trident
INSTALL/REMOVAL INSTRUCTIONS: WINDOW REGULATOR
 REMOVAL/INSTALL OF WINDOW REGULATOR (741-306) Honda Accord 2003 07 General Tech Tips: Use painter s tape rather than duct tape to secure window. It will not damage paint or leave sticky residue. A plastic
Installation instruction do88 Intercooler for Volvo S40 / V50 / C30
 Installation instruction do88 Intercooler for Volvo S40 / V50 / C30 This instruction shows how to replace the OEM intercooler with our performance intercooler. 2. 3. 1. 4. 5. Part number: ICM-170 6. At
FRONT BUMPER INSTALLATION INSTRUCTIONS 2007-2011 DODGE / MERCEDES SPRINTER
 Aluminess Products Inc 9402 Wheatlands Ct. #A Santee, CA 92071 619-449-9930 FRONT BUMPER INSTALLATION INSTRUCTIONS 2007-2011 DODGE / MERCEDES SPRINTER Please read before beginning Stainless steel hardware
CONTENTS TOOLS REQUIRED: Ratchet 13mm Socket 10mm Socket Phillips Screwdriver Pliers Panel Removal Tool. Amp Installation
 CONTENTS 1EA. SUBWOOFER ASSEMBLY P/N RUWRANGLER 1EA. 200 WATT AMP/BRACKET ASSEMBLY P/N RM11JKBTL - Bracket P/N RE08BTL200R - Amp 1EA. POWER HARNESS P/N RHWRANGLERPWR 1EA. OVERLAY HARNESS P/N RHWRANGLER
Installation instructions, accessories - Alarm siren
 XC90 Section Group Weight(Kg/Pounds) Year Month 3 36 2003 04 XC90 2003, XC90 2004, XC90 2005, XC90 2006, XC90 2007, XC90 2008, XC90 2009, XC90 2010 R3904364 Page 1 of 6 Required tools A0000162 A0000161
INSTALLATION INSTRUCTIONS: Viewline 52 mm
 -5 Safety information The product was developed, manufactured and inspected according to the basic safety requirements of EC Guidelines and state-of-the-art technology. The instrument is designed for use
INSTALLATION INSTRUCTIONS
 INSTALLATION INSTRUCTIONS Application Outboards Faria 5 Gauge Set* Publication No. Description Part Number Honda Code PII53606A White faced, flat lens 06300-ZW5-010ZB 6315410 Issue Date Black faced, flat
Installation instructions, accessories. Alarm, siren. Volvo Car Corporation Gothenburg, Sweden. Instruction No Version Part. No. 30633795 1.
 Instruction No Version Part. No. 30633795 1.0 Alarm, siren Page 1 / 12 Equipment A0000162 A0000161 A0801178 IMG-233902 Page 2 / 12 IMG-213320 Page 3 / 12 INTRODUCTION Read through all of the instructions
5 Mechanisms and accessories
 5 Mechanisms and accessories 51A SIDE OPENING ELEMENT MECHANISMS 52A NON-SIDE OPENING ELEMENT MECHANISMS 54A WINDOWS 55A EXTERIOR PROTECTION 56A EXTERIOR EQUIPMENT 57A INTERIOR EQUIPMENT X79 NOVEMBER 2009
Installation instructions, accessories. Cruise control. Volvo Car Corporation Gothenburg, Sweden. Instruction No Version Part. No. 30739998 1.
 Instruction No Version Part. No. 30739998 1.1 Cruise control Page 1 / 11 Equipment A0000162 A0000161 A0801178 D8802049 Page 2 / 11 M8802108 Page 3 / 11 IMG-223164 Page 4 / 11 IMG-213320 Page 5 / 11 INTRODUCTION
INSTALL/REMOVAL INSTRUCTIONS: WINDOW REGULATOR
 REMOVAL/INSTALL OF WINDOW REGULATOR (741-644) Cadillac Escalade, Chevrolet Suburban, Chevrolet Tahoe, GMC Yukon, Chevrolet Silverado, GMC Sierra 2000 05 General Tech Tips: Use painter s tape rather than
Coolant heater. Thermo Top - Z/C additional heating system. Installation instructions. Volvo S60, Volvo V70, and Volvo S80 Beginning Model Year: 2000
 Coolant heater Thermo Top - Z/C additional heating system Approval code ~~~ S 9 Installation instructions Volvo S60, Volvo V70, and Volvo S80 Beginning Model Year: 000 6 6 7 8 Volvo XC70 Beginning Model
Go-kart for little race-drivers
 Go-kart for little race-drivers Drill and drive. Go-kart What it lacks in speed, it more than makes up for in fun: the go-kart will excite little race-drivers. 1 Introduction It s only a go-kart, but it
INSTRUCTIONS FOR THE INSTALLATION AND OPERATION OF ACTIVATOR II
 INSTRUCTIONS FOR THE INSTALLATION AND OPERATION OF ACTIVATOR II ELECTRONIC TRAILER BRAKE CONTROL 5500 FOR 2, 4, 6 & 8 BRAKE SYSTEMS IMPORTANT: READ AND FOLLOW THESE INSTRUCTIONS CAREFULLY. KEEP THESE INSTRUCTIONS
INSTALL/REMOVAL INSTRUCTIONS: WINDOW LIFT MOTOR
 REMOVAL/INSTALL OF WINDOW LIFT MOTOR (742-273) Ford Expedition 1997 2002, Lincoln Navigator 1998 2002, Ford F-150 Super Crew Cab 2001 General Tech Tips: Use painter s tape rather than duct tape to secure
Depending on which elastic support you have you can secure the V2 power unit to the following seat bracket tubes: EXTERNAL DIAMETER 27.
 ASSEMBLY 1 - EPS V2 POWER UNIT (SOLUTION 5) 1.1 - POSITIONING INSIDE THE SEAT TUBE WITH ELASTIC SUPPORT IN THE SEAT BRACKET TUBE Depending on which elastic support you have you can secure the V2 power
Original BMW Accessory. Installation Instructions.
 Original BMW Accessory. Installation Instructions. USB/Audio Interface SA 6FL Retrofit BMW Series (E 8, E 8, E 87, E 88) BMW 3 Series (E 90, E 9, E 9, E 93) These installation instructions are only valid
INSTALLATION INSTRUCTIONS MULTI-MOUNT KIT Part Number: 75330 Application: Warn HP PowerPlant P/N 71800
 INSTALLATION INSTRUCTIONS MULTI-MOUNT KIT Part Number: 75330 Application: Warn HP PowerPlant P/N 71800 Your safety, and the safety of others, is very important. To help you make informed decisions about
Volkswagen Jetta, Golf, GTI 1999, 2000 Brake System 47 Brakes - Hydraulic Components (Page GR-47)
") 47 Brakes - Hydraulic Components (Page GR-47) FS III front brake calipers, servicing Front brake caliper piston, removing and installing FN 3 front brake calipers, servicing Front caliper piston, removing
47 Brakes - Hydraulic Components (Page GR-47) FS III front brake calipers, servicing Front brake caliper piston, removing and installing FN 3 front brake calipers, servicing Front caliper piston, removing
GENUINE PARTS INSTALLATION INSTRUCTIONS
 GENUINE PARTS INSTALLATION INSTRUCTIONS DESCRIPTION: Illuminated Kick Plate APPLICATION: Rogue (2011) PART NUMBER: 999G6 GX010 KIT CONTENTS: Item A B C G H QTY 1 1 1 D 1 E 1 F 3 15 6 Description Kick Plate,
HP 16/18-Port Cable Management Kit Installation Guide
 HP 16/18-Port Cable Management Kit Installation Guide Abstract This document describes how to attach the HP 16 Port or 18 Port Cable Management Kit to an HP rack. The cable management bracket is designed
5800 Temperature Sensor Cable Assembly
 5800 Temperature Sensor Cable Assembly Removal and Replacement Instruction Sheet #60-4702-070 Revision D, January 14, 2013 Overview The 5800 has two refrigeration temperature sensors, one attached to the
FRONT TURN SIGNAL RELOCATION KIT
 -J0 REV. 00-0-0 FRONT TURN SIGNAL RELOCATION KIT GENERAL Kit Number -0 Models This kit fits 00 and later Dyna model motorcycles (except FXDSE), relocating the front turn signal from the handlebars to the
SECURITY SYSTEM SMART SIREN KIT
 -J00876 REV. 009-0-09 SECURITY SYSTEM SMART SIREN KIT GENERAL Kit Number 688-0 Models For model fitment information, see the P&A Retail Catalog or the Parts and Accessories section of www.harley-davidson.com
INSTALLATION MANUAL INSIDE PASSENGER COMPARTMENT. HFC 134a FOR EUROPEAN SPEC. / GENERAL SPEC. AIR CONDITIONING ENGLISH
 HFC 134a Ozone Friendly Refrigerant FOR EUROPEAN SPEC. / GENERAL SPEC. AIR CONDITIONING ENGLISH AAAMU-60 / INSIDE PASSENGER COMPARTMENT INSTALLATION MANUAL 2000 (EUROPE) B.V.. All Rights Reserved. This
Back-Up Camera Installation Guide
 Hz Hz In This Guide: Back-up camera installation requires connecting power wiring to the existing reverse lighting circuit and adding a chassis ground, as well as routing a video signal cable to the front
For a simple splice connection look at figure 21. This basic type of splice can be used almost exclusively when hooking up your wiring.
 Page 1 of 10 IMPORTANT: Before starting installation, please be sure that all items which were supplied with the kit are accounted for. Note: These instructions are to be used in conjunction with the instructions
INSTALLATION INSTRUCTIONS
 INSTALLATION INSTRUCTIONS Accessory Application 2009 PILOT Publications No. AII 39408 Issue Date MAY 2008 PARTS LIST Steering Wheel Trim (With Cruise and Audio) P/N 08Z13-SZA-130B (Chocolate) P/N 08Z13-SZA-140B
SERVICE MANUAL. Corpus 3G. Seat system for electric wheelchair
 SERVICE MANUAL US Corpus 3G Seat system for electric wheelchair How to contact Permobil Head Office of the Permobil group Produced and published by Permobil AB, Sweden Version 4, 2014-07 Item No.: 205260-US-0
Installation Instructions. Thermo Call TC3
 Installation Instructions Thermo Call TC3 1 2 # 24990A 965 082 AMP 3 4 # 98393A # 67769A sw Improper installation or repair of Webasto heating and cooling systems can cause fire or the leakage of deadly
TECHNICAL GUIDE. For Self-Shielded Guns - 300, 400 and 500 amp SAFETY AND WARRANTY INFORMATION INSTALLATION MAINTENANCE GUIDE TECHNICAL DATA OPTIONS
 TECHNICAL GUIDE For Self-Shielded Guns - 300, 400 and 500 amp SAFETY AND WARRANTY INFORMATION INSTALLATION MAINTENANCE GUIDE TECHNICAL DATA OPTIONS EXPLODED VIEW & PARTS LIST TROUBLESHOOTING ORDERING INFORMATION
CHROME FRONT BRAKE MASTER CYLINDER KIT
 -J075 REV. 009-0-0 CHROME FRONT BRAKE MASTER CYLINDER KIT GENERAL Kit Number 5-99D, 5-99D Models These Chrome Master Cylinder Kits are designed to replace the original equipment front brake master cylinder
TABLE OF CONTENTS. I. TROUBLESHOOTING... 2 - Section 1.01: Common Problems/Solutions... 2
 BAL Accu-Slide System I. Table of Contents TABLE OF CONTENTS I. TROUBLESHOOTING... 2 - Section 1.01: Common Problems/Solutions... 2 II. GETTING STARTED... 5 - Section 2.01: Tools You Will Need... 5 - Section
GPS AutoSteer System Installation Manual
 GPS AutoSteer System Installation Manual Supported Vehicles John Deere Sprayers 4720 4630 4730 4830 AutoTrac Ready PN: 602-0227-01-A LEGAL DISCLAIMER Note: Read and follow ALL instructions in this manual
Step 1. Item 6. Item 1
 Voltage Regulators QD3/T350 Motor Replacement Kit Kit Number 57A63675100B Service Information S225-50-35 Contents General..................................... 1 Parts Supplied...............................
Installation Instructions
 Installation Instructions Built-In Dishwasher If you have questions, call 1-800-4-MY-HOME (1-800-469-4663) or visit our website at: www.sears.com BEFORE YOU BEGIN Read these instructions completely and
assembly instructions
 assembly instructions 1 // this guide is for Urban Chic gents & ladies. // this guide is for Urban Chic gents & ladies. 2 1 x ph screwdriver 2 x 10mm spanners 1 x 15mm spanners 1 x 13mm spanners 1 x 6mm
New method, replacement of window and window lift, front door
 SERVICE INFORMATION Number: 831-1646 Year: 1996 Month: Market: FEBRUARI ALL New method, replacement of window and window lift, front door Cars concerned All Saab 900 M94- Background A new method of removing
CUSTOM AUXILIARY FORWARD LIGHTING KIT
 -J0 REV. 0--0 CUSTOM AUXILIARY FORWARD LIGHTING KIT GENERAL Kit Number -0, 0000 Models This Custom Auxiliary Lighting Kit adds lamps and turn signals to 00 and later FLHX model motorcycles. Additional
Installation Instructions for Wamilton s Steering Cable Modification. Remove the cables from the white retaining clip
 Installation Instructions for Wamilton s Steering Cable Modification The steering cable on the 08 and later superjets is too short and limits the throw of the nozzle. By changing to an older style steering
BUILT-IN DISHWASHER INSTALLATION INSTRUCTIONS
 BUILT-IN DISHWASHER INSTALLATION INSTRUCTIONS PLEASE READ COMPLETE INSTRUCTIONS BEFORE YOU BEGIN LEAVE INSTALLATION INSTRUCTIONS AND USER'S GUIDE WITH OWNER ALL ELECTRIC WIRING AND PLUMBING MUST BE DONE
Drive shaft, servicing
 Volkswagen Passat B6 - Drive shaft, servicing Стр. 1 из 41 40-7 Drive shaft, servicing Drive shafts, overview I - Assembly overview: Drive axle with CV joint VL100 40-7, Drive axle with CV joint VL100,
MKV Golf GTI Rear Brake Service - Replace Pads and Rotors
 Page 1 Installation Procedures MKV Golf GTI Rear Brake Service - This tutorial is provided as a courtesy by ECS Tuning. Proper service and repair procedures are vital to the safe, reliable operation of
VW Jetta, Golf, New Beetle 1.9L TDi Unichip PnP Installation Instructions
 VW Jetta, Golf, New Beetle 1.9L TDi Unichip PnP Installation Instructions and Warranty Information Tools Required 10mm combination wrench, 13mm Socket (Jetta/Golf only), 3/8-inch or ¼-Inch drive ratchet,
DYNA RIDER FOOTBOARD KIT
 -J0 REV. 0-0-0 DYNA RIDER FOOTBOARD KIT GENERAL Kit Number 000 Models For model fitment information, see the P&A Retail Catalog or the Parts and Accessories section of www.harley-davidson.com (English
INSTRUCTIONS. FLHR/C/S (Road King) FRONT END LOWERING KIT 1WARNING -J03242 REV. 10-19-04. General. Removal (Left and Right Forks) Kit Number 54614-05
 FRONT END LOWERING KIT 1WARNING -J03242 REV. 10-19-04. General. Removal (Left and Right Forks) Kit Number 54614-05") INSTRUCTIONS -J04 REV. 0-9-04 General FLHR/C/S (Road King) FRONT END LOWERING KIT This kit is designed for installation on 00 and later FLHR/C/S Model Motorcycles. Road King models use the conventional
INSTRUCTIONS -J04 REV. 0-9-04 General FLHR/C/S (Road King) FRONT END LOWERING KIT This kit is designed for installation on 00 and later FLHR/C/S Model Motorcycles. Road King models use the conventional
2003 Audi A4. AUDI' '3.0L V6 - AVK Engine - A4 & A6
 Installation (A4) CAUTION: Before installation, ensure camshafts are aligned, crankshaft is locked in place and camshaft gear bolts are loose as described in removal procedures. When turning camshaft,
REMOTE AUXILIARY AIR CONDITIONING SYSTEM AND AIR DISTRIBUTION
 ENGLISH REMOTE AUXILIARY AIR CONDITIONING SYSTEM AND AIR DISTRIBUTION INSTALLATION GUIDELINES For International Prostar ISO 9001:2000 L 2647 Rev. 20090130 WARNING: Only trained technicians should perform
Installation Instructions: Electrical System for Towing Hitch
 General Data Part number Westfalia Vehicle Manufacturer Vehicle 321 600 300 153 ZGB 3T2 054 204 VW Passat B6 Limousine, Variant & Coupé, Passat B7, Touran, Golf V+VI, Golf Variant, Golf Plus, Jetta A5
REMOTE AUXILIARY AIR CONDITIONING SYSTEM AND AIR DISTRIBUTION
 ENGLISH REMOTE AUXILIARY AIR CONDITIONING SYSTEM AND AIR DISTRIBUTION INSTALLATION GUIDELINES For Freightliner Cascadia ISO 9001:2000 L 2653 Rev. 20090130 WARNING: Only trained technicians should perform
Installation Instructions. ThermoCall TC4. Entry/Advanced
 Installation Instructions ThermoCall TC4 Entry/Advanced Thermo Call TC4 1 2 # 24990A 965 082 AMP 3 4 # 98393A # 67769A Thermo Call TC4 5 ThermoCall TC4 Entry 1 2 3 4 5 6 7 8 9 10 11 12 sw Please refer
Installation Instructions: Electrical System for Towing Hitch... 3
 ... 3 Installation Instructions: Electrical System for Towing Hitch... 3 321 527 391 103-002 - 51/12 VW Polo A05 RHD Westfalia 321 525 300 143 VW Polo V RHD, 06/09-321 527 300 143 VW Polo V RHD, 06/09-4
C5 Sound Deadening & Insulation Kit Interior Removal & Installation Instructions
 C5 Sound Deadening & Insulation Kit Interior Removal & Installation Instructions Ok, let's start with taking the radio bezel dash area off first. Here is what the OEM radio looks like... First you flip
ISTRUZIONI DI MONTAGGIO FITTING INSTRUCTIONS INSTRUCTIONS DE MONTAGE MONTAGEANLEITUNG INSTRUCCIONES DE MONTAJE 1T, 3T, 5L
 Tel. +39 075.5280260 Fax +39 075.5287033 Via Pizzoni 37/39 06132 Perugia ITALY www.umbrarimorchi.it umbrarimorchi@umbrarimorchi.it ISTRUZIONI DI MONTAGGIO FITTING INSTRUCTIONS INSTRUCTIONS DE MONTAGE MONTAGEANLEITUNG
BILLET HEADLAMP SHELL
 -J008 REV. 007-07- BILLET HEADLAMP SHELL GENERAL Kit Number 770-0 Models For model fitment information, please see the P&A Retail Catalog or the Parts and Accessories section of www.harleydavidson.com