82387 No. 66 Singer Sewing Machine No. 66 Oscillating Hook, For Family Use INSTRUCTION MANUAL
|
|
|
- John Newton
- 9 years ago
- Views:
Transcription
1 Singer Sewing Machine No. 66 Oscillating Hook, For Family Use INSTRUCTION MANUAL Next Page

2 Main Parts Parts of the Machine Stand Instructions for Operating the Machine To Ensure Perfect Action of the Machine To Take Out the Bobbin To Wind the Bobbin To Replace the Bobbin To Set the Needle To Thread the Needle To Prepare for Sewing To Commence Sewing To Remove the Work Tensions To Regulate Tensions To Turn a Corner To Regulate the Length of Stitch To Regulate the Pressure on the Material To Sew Flannel or Bias Seams A Stitch to Ravel Easily To Oil the Machine Hints The Belt Machine WOrking Heavily To Avoid Breaking Needles Breaking of Needle Thread Breaking of Bobbin Thread Skipping of Stitches Attachments with the Machine Instructions for Using the Attachments Foot Hemmer -- Hemming -- Hemming and Sewing on Lace -- Felling Adjustable Hemmer -- Hemming -- Wide Hemming Binder -- Binding Bias Gauge -- To Bind with Dress Braid Ruffling Ruffler -- Ruffling Between Bands To Ruffle and Sew On -- Five Stitch Ruffling or Paiting Ruffler with Shirring Plate -- Shirring Quilter Tucker Under Braider Embroidary and Darning Relative Sizes of Needles and Thread

3 Main Parts Parts of the Machine Stand A. BELT GUIDE B. BAND WHEEL C. BAND WHEEL CRANK D. PITMAN E. TREADLE F. BELT SHIFTER G. LEG H. DRESS GUARD 3

4 INSTRUCTIONS FOR OPERATING THE MACHINE Raise the presser foot (B. Fig. 3) by means of the presser bar lifter (C, Fig. 3) to prevent injury to the foot (B. Fig. 3) and feed (A, Fig..3). It is necessary to understand the stop motion (D, Fig. 3) by which the balance wheel (E, Fig. 3) can be released when required, thus enabling the operator to become proficient in the use of the treadle and permitting the winding of bobbins without running the stitching mechanism. It also allows the operator to wind bobbins without removing partially sewn work and without unthreading the machine. To release the balance wheel (E, Fig. 3) turn the stop motion screw (D, Fig. 3, page 3) over toward you. It may be necessary to hold the balance wheel while loosening the stop motion screw. After releasing the balance wheel place your feet upon the treadle and with the right hand, turn the balance wheel over toward you. This will start the band wheel, treadle and pitman, the sewing mechanism having been disconnected. FIG.3. FRONT VIEW OF THE MACHINE Continue the motion thus begun by an alternate pressure of heel and toe, until a regular and easy movement is acquired, and the balance wheel kept in continuous rotation by use of the feet alone. When you are thoroughly familiar with the treadle movement, and can restart the machine without turning the balance wheel in the wrong direction, tighten the stop motion screw to connect the balance wheel with the stitching mechanism. Place a piece of cloth under the presser foot, let the foot down upon it, and operate the machine in this way without being threaded, until you have become accustomed to guiding the material. 4
 turn the stop motion screw (D, Fig.")
5 To Ensure Perfect Action of the Machine The balance wheel must always turn over toward the operator. Do not run the machine with the presser foot resting on the feed without cloth under the presser foot. Do not run the machine when both bobbin case and needle are threaded unless there is material under the presser foot. Do not try to help the machine by pulling the fabric lest you bend the needle. The machine feeds the work without assistance. The slide over the bobbin case should be kept closed when the machine is in operation. FIG. 4. REMOVING THE BOBBIN To Take Out the Bobbin Draw to the left the slide in the bed of the machine and press the forefinger of the right hand upon the bobbin ejected as shown above; this will raise the bobbin so that it can be easily taken out. 5

6 To Wind the Bobbin Release the balance wheel (E, Fig. 3, page 3) by turning the stop motion screw (D, Fig. 3, page 3) over toward you. Place the bobbin on the bobbin winder spindle (E, Fig. 6, page 7) and push it up closely against the shoulder, having the small pin in the spindle enter the hole in the side of the bobbin. Put the spool of thread on the spool pin (1, Fig. 5). Pass the end of the thread into the thread guide (2, Fig. 5) then up into the lower eyelet (3, Fig. 6) of the bobbin winder thread guide, into the notch (4, Fig. 6) and pass the thread through the hole in the left side of the bobbin (5, Fig. 6) from the inside. Press the bobbin winder pulley (B, FIG. 6) down on the balance wheel hub and the latch (C, Fig. 6) will drop down and hold it. Then operate the treadle the same as for sewing. FIG. 5. MACHINE THREADED FOR WINDING THE BOBBIN 6
 and pass the thread through the hole in the left side of the bobbin (5, Fig. 6) from the inside. Press the bobbin winder pulley (B, FIG. 6) down on the balance wheel hub and the latch (C, Fig.")
7 To Wind the Bobbin continued... The end of the thread must be held by the hand unti1 a few coils are wound and should then be broken off. Figs. 5 and 6 show the bobbin winder properly threaded and in position for winding. When sufficient thread has been wound upon the bobbin it is automatically released from the stop latch (C, Fig. 6). If the pressure of the rubber ring (B, Fig. 6) against the hub of the balance wheel is insufficient for winding the bobbin, loosen the adjusting screw (D, Fig. 6) and press the bobbin winder lightly until the rubber ring is in contact with the hub of the balance wheel; then tighten the screw. FIG. 6. WINDING THE BOBBIN 7
 against the hub of the balance wheel is insufficient for winding the bobbin, loosen the adjusting screw (D, Fig.")
8 To Replace the Bobbin Hold the bobbin between the thumb and forefinger of the left hand, the thread leading on top from the right toward the left, as shown in Fig. 7. Place the bobbin into the bobbin case and draw the thread into the slot (1, Fig. 8) in the bobbin case, as shown below. FIG. 7.REPLACING THE BOBBIN Draw the thread backward between the bobbin case and the tension spring until it reaches the notch (2, Fig. 9) then pull the thread toward the right as shown in Fig. 9. When closing the slide see that the thread is in the slot (3, Fig. 10) in the right edge of the slide, as shown below. FIG. 8. THREADING the BOBBIN CASE FIG. 9. BOBBIN CASE THREADED FIG. 10. UNDER THREADING COMPLETED 8
 then pull the thread toward the right as shown in Fig. 9. When closing the slide see that the thread is in the slot (3, Fig.")
9 To Set the Needle Turn the balance wheel over toward you until the needle bar moves up to its highest point in the sleeve (D, Fig. 5), loosen the thumb screw (C, Fig. 5) in the needle clamp (B. Fig. 5) and put the needle up into the clamp as far as it will go, with its flat side toward the right, then tighten the thumb screw. To Thread the Needle SEE FIG. 11 Turn the balance wheel over toward you until the thread take-up lever (5) is raised to its highest point. Place the spool of thread on the spool pin at the top of the machine; lead the thread into the thread guide (1) at the left, down, under and from right to left between the tension discs (2), into the small wire spring (3), under the thread regulator (4) at the left (not through the eye in the thread regulator), up and from right to left through the hole in the end of the thread take-up lever (5), down into the eyelet (6), into the lower wire guide (7), then from left to right through the eye of the needle (8). Draw about two inches of thread through the eye of the needle with which to commence sewing. FIG. 11. THREADING THE NEEDLE Instructions for threading the machine for darning and for embroidery are given on pages 34 and 35. 9
 at the left, down, under and from right to left between the tension discs (2), into the")
10 To Prepare for Sewing With the left hand hold the end of the needle thread, leaving it slack from the hand to the needle. Turn the balance wheel over toward you until the needle moves down and up again to its highest point, thus catching the bobbin thread; draw up the needle thread and the bobbin thread will come up with it through the hole in the throat plate (see Fig. 12). Lay both threads back under the presser foot. To Commence Sewing FIG. 12. DRAWING UP THE BOBBIN THREAD Place the material beneath the presser foot, lower the presser foot and commence to sew, turning the balance wheel over toward you. To Remove the Work Let the thread take-up lever rest at its highest point, raise the presser foot and draw the fabric back and to the left, pass the threads over the thread cutter (A, Fig. 12) and pull down lightly to sever them. Leave the ends of the threads under the presser foot. 10

11 Tensions For ordinary stitching the needle and bobbin threads should be locked in the centre of the thickness of the material, thus: FIG. 13. PERFECT STITCH If the tension on the needle thread is too tight, or if that on the bobbin thread is too loose, the needle thread will lie straight along the upper surface of the material, thus: To Regulate the Tensions The tension on the needle thread should only be regulated when the presser foot is down. Having lowered the presser foot, turn the small thumb nut (E, shown in Fig. 16, above, and Fig. 5, page 6) at the front of the tension discs over to the right to increase the tension. To decrease the tension, turn the thumb nut over to the left. FIG. 14. TIGHT NEEDLE THREAD TENSION If the tension on the bobbin thread is too tight or if hat on the needle thread is too loose, the bobbin thread will lie straight along the under side of the material, thus: FIG. 15. LOOSE NEEDLE THREAD TENSION FIG 16. NEEDLE THREAD TENSION The tension on the bobbin thread is regulated by the larger screw (Fig. 4) which is nearest the back in the bobbin case tension spring. To increase the tension, turn the screw over toward you. To decrease the tension, turn the screw over from you. When the tension on the bobbin thread has been once properly adjusted it is seldom necessary to change it, as a correct stitch can usually be obtained by varying the tension on the needle thread. 11
 at the front of the tension discs over to the right to increase the tension. To decrease the tension, turn the thumb nut over to the left. FIG. 14.")
12 To Turn a Corner Stop the machine with the needle at its lowest point. Raise the presser foot and turn the work as desired, using the needle as a pivot. To Regulate the Length of Stitch The length of stitch is regulated by the large thumb screw (A, Fig. 6) at the front of the machine near the bobbin winder. To lengthen the stitch turn this screw over to the right. To shorten the stitch turn this screw over to the left. To Regulate the Pressure on the Material For ordinary family sewing it is seldom necessary to change the pressure on the material. If sewing fine silk or flimsy material, lighten the pressure by turning the thumb screw (A, Fig. 5) on the top of the machine over to the left. To increase the pressure turn this screw over to the right. The pressure should be only heavy enough to prevent the material from rising with the needle and to enable the feed to move the work along evenly; a heavier pressure will make the machine run hard. To Sew Flannel or Bias Seams Use a short stitch and as light a tension as possible on the needle thread so as to leave the thread loose enough in the seam to allow the goods to stretch if necessary. A Stitch to Ravel Easily can be made if desired, by having the tension on the needle thread so light that the bobbin thread will not draw into the goods but lie straight, as shown in Fig

13 To Oil the Machine To ensure easy running the machine and stand requires oiling and if used continuously it should be oiled each day. With moderate use an occasional oiling is sufficient. Oil should be applied at each of the places shown by arrows in Figs. 17, 18 and 19. One drop of oil at each point is sufficient. Oil holes are provided in the machine for bearings which cannot be directly reached. To oil the mechanism under the slide, draw the slide (see Fig. 17) to the left and after removing the lint and dust which may have accumulated put a few drops of oil on the small piece of felt at the right of the bobbin ejector. The slide should then be closed. FIG. 17. FRONT VIEW, SHOWING OILING POINTS Take out the thumb screw (A, Fig. 17) near the lower end of the face plate, raise the plate and slip it off over the head of the screw near the upper end of the plate; put one drop of oil into each of the oil holes and joints. 13
 to the left and after removing the lint and dust which may have accumulated put a few drops of oil on the small piece of felt at the right of the bobbin ejector. The slide should then be closed.")
14 To Oil the Machine continued... At the back of the machine is a round plate or cover, fastened by a thumb screw; loosen the screw, turn the plate upward and fasten by tightening the screw; turn the balance wheel slowly and oil the moving parts inside then turn the cover down and fasten it as before. To reach the parts underneath the bed the belt must be thrown off the band wheel on the machine stand. For this purpose the belt shifter (F. Fig. 1, page 1) is placed at the front of the band wheel. By pressing the belt shifter lever to the left and working the treadle meanwhile, the belt is released and the machine can then be turned back on its hinges. The places to be oiled are indicated in Fig. 18, page 17, by arrows pointing to the oil holes and bearings. FIG. 18. OILING POINTS IN BASE OF MACHINE To oil the stand, put a drop of oil on each of the places shown by arrows in the above illustration (Fig. 19). FIG. 19. POINTS IN STAND 14
 is placed at the front of the band wheel.")
15 HINTS The Belt. See that the belt is not too tight; it should always be tight enough not to slip. If too loose remove the hook at one end, shorten the belt and rejoin. Machine Working Heavily. If the machine runs hard after standing idle for some time use a little kerosene in the oiling places, run the machine rapidly, then wipe clean and oil. To Avoid Breaking Needles. See that the presser foot or attachments are securely fastened by the thumb screw. Do not sew heavy seams or very thick goods with too fine a needle. A large needle and thread to correspond should be used on heavy work (see page 36). See that the needle is not bent and avoid pulling the material when stitching. Breaking of Needle Thread. If the needle thread breaks it may be caused by: Improper threading. Tension being too tight. The thread being too coarse for size of needle. The needle being bent, having a blunt point, or being set incorrectly. Breaking of Bobbin Thread. If the bobbin thread breaks it may be caused by: Improper threading of bobbin case. Tension being too tight. Skipping of Stitches. The needle may not be accurately set into the needle bar or the needle may be blunt or bent. The needle may be too small for the thread in use. Singer Needles are the best for every kind of sewing machine. They are the only satisfactory needles on the market and are sold in the Singer Green Needle Packet with the famous red letter "S" upon it. Singer Needles can be obtained from any Singer Shop or Singer Salesman. 15
. See that the needle is not bent and avoid pulling the material when stitching. Breaking of Needle Thread.")
16 ATTACHMENTS WITH THE MACHINE 16
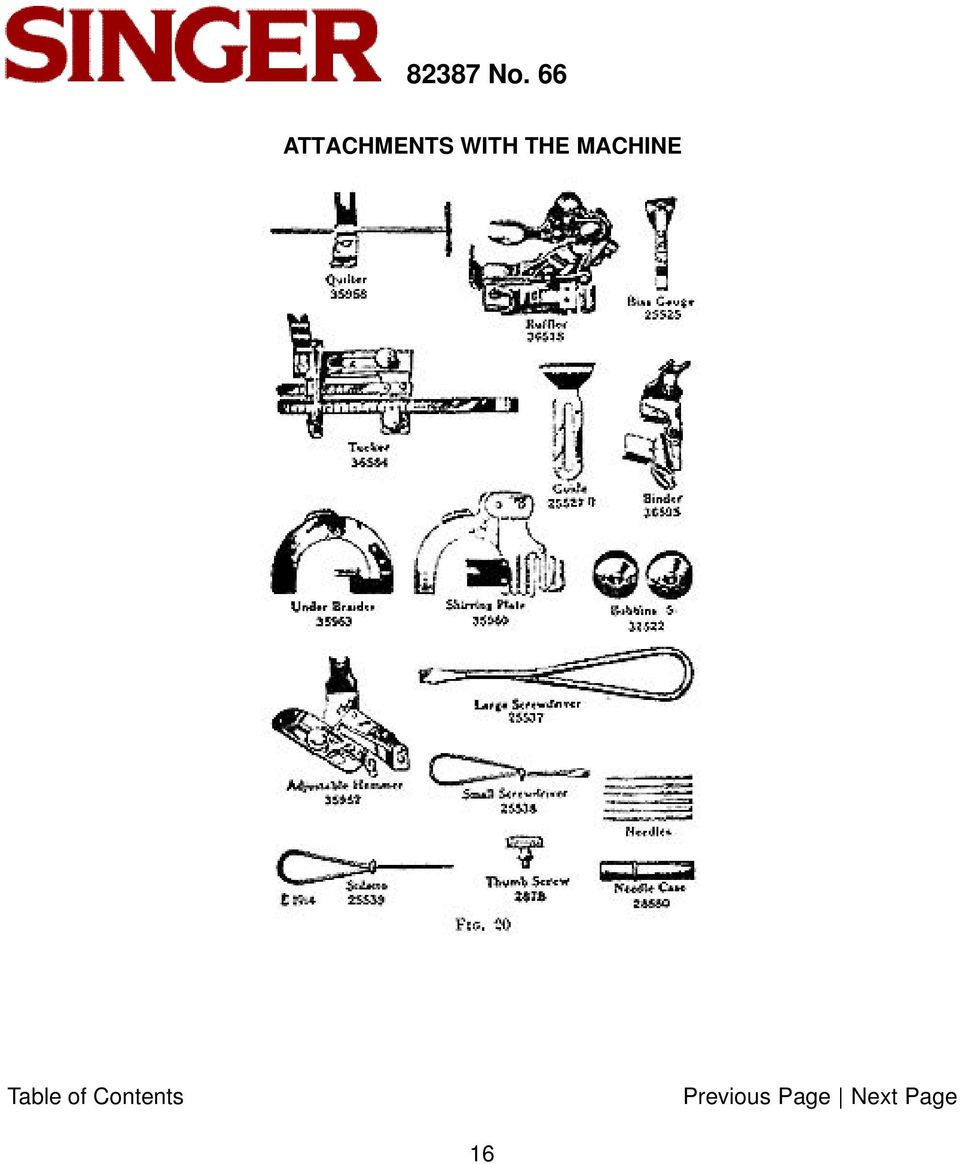
17 INSTRUCTIONS FOR USING THE ATTACHMENTS FOOT HEMMER - Hemming Raise the needle to its highest point. Remove the presser foot and attach the toot hemmer in its place (see Fig. 21). Clip off the right hand corner of the cloth, so that it will take the roll easily, turn up the edge about a quarter of an inch, insert it in the mouth of the hemmer and draw or push it along with the stiletto until under the needle. Then let down the presser bar and after taking two or three stitches, draw gently on the ends of the threads to help the work along till the feed catches it. In order to produce a smooth even hem the mouth of the hemmer must be kept just full. Fig 21. Fig. 21 shows also what is known as a bag seam or fell, made by passing two pieces of fabric through the hemmer together and hemming them down. 17

18 FOOT HEMMER Hemming and Sewing on Lace Start the hem as previously explained, and when it is well started raise the needle to its highest point. Raise the hemmer to relieve its pressure on tile hem, pass the end of the lace through the slot in the side of the hemmer, under the back of tile hemmer and over the hem, as shown in Fig. 22. Take care that the hem is not displaced in the hemmer and that the needle goes down through the lace and hem together. Then let down tile presser bar and guide the lace over the front of the hemmer, keeping it well into the slot. FIG

19 FOOT HEMMER Felling The two pieces of cloth to he felled should be laid one over the other, right sides together, the edge of the under piece being a little farther to tile right than the upper piece. Stitch them together using the hemmer as a presser foot, the front end of the hemmer forming a guide for tile edges of both pieces, the upper piece being guided by the inside and the under piece by the outside of the projecting front of the foot hemmer (see Fig. 23). Then open the work out flat, wrong side up, the edges straight, and taking the edges near the beginning of the seam in the right hand, and the ends of the threads in the left hand, draw the edges into the hemmer which will ill turn them as in hemming. Guide the second row of stitching by following the first row with the inside of the projecting front of the foot hemmer (see Fig. 24). FIG. 23 FIG

20 ADJUSTABLE HEMMER Hemming Remove the presser foot and attach the adjustable hemmer in its place as shown in Fig. 25. This hemmer will turn hems from 3/16 inch to 1 inch wide. The adjustment is made by loosening the thumb screw on the hemmer and moving the slide to the right or left until the hem turned is of the desired width. Enter the edge of the cloth into the hemmer under the scale and draw it back and forth until the hem is formed, stopping with the end under the needle. Lower the presser bar and commence to sew, being careful to guide cloth as to keep hemmer full. Felling can also be done with the adjustable hemmer FIG. 25 ADJUSTABLE HEMMER Wide Hemming To make a hem more than one inch wide take out the thumb screw in the hemmer and remove the slide and pointer; fold and crease down a hem of the desired width; pass the fold under the extension at the right of the hemmer, and the edge into the folder as shown in Fig. 26 and proceed to stitch the hem. FIG

21 BINDER Binding Remove the presser foot and attach the binder in its place. Pass the binding through the scroll of the hinder and draw it back under the needle. Place the edge of the goods to he bound between the scrolls of the hinder and draw it under the needle. Lower the presser bar and sew as usual. To make French folds proceed as directed for binding except that the fold is stitched on to the face of the material instead of on the edge (see Fig. 27). After loosening the binder set screw and adjusting the binder the line of stitching can be brought nearer the centre, this being more effective when making French folds. FIG. 27 FIG. 28 BIAS GAUGE The bias gauge may be used by placing it on the point of a pair of scissors, as below, and different widths of material may be cut by adjusting the slide (S. Fig. 28,). Bias binding for binder No should be cut fifteen-sixteenths of an inch wide if muslin or similar fabrics are used, and to do this the slide (S) should be placed half way between the lines marked "F" and "B." The edge of the goods should be passed through the attachment and against the slide while cutting. When binding with fine, soft or flimsy materials, cut the bias binding a suitable fraction wider. BINDER Bind with Dress Braid The braid being stitched on the edge it should fit the binder without turning in the edges, as is the case with bias binding. 21
22 RUFFLER Ruffling Remove the presser foot and attach the ruffler in its place, connecting the arm with the needle clamp, as shown in Fig. 29. The ruffler can be adjusted to make a gather or plait either at every stitch or once in every five stitches as the operator may choose. To make a ruffle with a gather or plait at every stitch see that the adjusting lever (A, Fig. 29) of the ruffling is at its lowest point. Place the material to be ruffled between the lower or separator blade and the ruffling blade, draw the material slightly back of the needle, lower the presser bar and proceed to sew. FIG. 29 To make a finer gather shorten the stroke of the ruffling blade by turning the regulating thumb screw (B. Fig. 29) over to the left, also shorten the stitch. To make a fuller gather or plait lengthen the stroke of the arm by turning the regulating thumb screw (B. Fig. 29) over to the right, also lengthen the stitch. By varying these adjustments many pleasing varieties of work can be accomplished. 22
23 RUFFLER Ruffling Between Bands Place the lower piece of material below the separator blade, the piece of material to be ruffled under the ruffling blade and over the separator blade and the upper piece of material over the ruffling blade, as shown in Fig. 30. TO RUFFLE AND SEW ON Place the band below the separator blade the piece to be ruffled between the separator blade and the ruffling blade, and proceed. The ruffler should never be operated without cloth between the blades. FIG. 30 RUFFLER Five Stitch Ruffling or Plaiting To make a five stitch ruffle or plait, raise the adjusting lever (A, Fig. 31) to its highest point. The ruffling blade will then move forward and back once every fifth stitch. FIG
24 RUFFLER WITH SHIRRING PLATE Shirring To attach the shirring plate (see Fig. 20) draw to the left the slide that covers the bobbin case, insert the downwardly projecting hooks on the shirring plate under the edge of the throat plate, push as far as possible to the right and press the pin into the hole at the right of the throat plate, then close the slide covering the bobbin case. The lower or separator blade of the ruffler is fastened by a screw. Loosen the screw, take off the separator blade and attach the ruffler to the presser bar as instructed. FIG. 32 Place the cloth between the ruffling blade and the shirring plate, lower the ruffler on the goods and operate as in ruffling. 24
25 QUILTER Remove the presser foot and attach the quilter foot in its place. The quilter guide can be used on either the right or left side of the needle and the distance of the guide from the needle determines the width of space between the rows of stitching. Slide the wire of the guide into the holder prepared for it on the foot and set it to the width desired. Let the quilter guide follow the edge of the goods, a straight crease, or a chalk line, as the case may be, for the first row of stitching. All succeeding rows are made straight and at a uniform distance by keeping the last row steadily under the guide. FIG
26 TUCKER Remove the presser foot and attach the tucker in its place. The width of the tuck is determined by the scale of figures nearest the needle, which shows in eighths and sixteenths of an inch the distance of the edge of the fold from the line of stitching. The crease or mark for the second and following tucks is determined by the scale nearest the operator and this is set by the line in front of the needle hole in the presser foot. For blind tucks without spaces set both scales at the same figure; to make spaces between the tucks move the front scale farther to the left until the desired space is obtained. Having adjusted the scales for tuck and space as desired, fold the material and crease by hand; pass the folded edge between the spring and spur near you, then between the two blades of the second scale, and back under the presser foot; draw to the right against the guide, lower the presser bar; see that the lever for the needle clamp to strike is in its backward position so as to form a crease for the next tuck, then proceed with the first tuck. FIG. 34 For the second tuck fold carefully at the crease made by the spur and place the edge of the first tuck underneath and against the spur at the left. The spur will serve as a guide and will also make a distinct crease for the next tuck. Always place the last tuck against the spur to ensure perfect work. When making the last tuck the lever upon which the needle clamp strikes while tucking should he raised to its highest point; while the lever is in this position no crease for a succeeding tuck is made upon the goods. 26
27 UNDER BRAIDER Remove the presser foot and attach the quilter foot in its place. Attach the under braider (see Fig. 20) as directed for the shirring plate (see page 30). The design to be braided must be stamped or traced on the wrong side of the goods. Pass the end of the braid back through the guides in the under braider and under the quilter foot as shown above. Lower the quilter foot and proceed to sew. FIG
28 EMBROIDERY AND DARNING While embroidery anti darning can be done on the machine when threaded for regular sewing, the use of feed cover plate (B. Fig. 36) No is recommended, as movable contact with the feed in some cases might interfere with the handling of the work. into position, and close the slide (see Fig. 36). Feed cover plates are not included in the regular sets of attachments; they are on sale at all Singer shops at the price of ten cents each. Do not change the adjustment of the feed dog in any way as it is essential that its position should remain as originally fixed. When the feed cover plate (B. Fig. 36) is used it is necessary to lead the needle thread through the eye in the thread regulator (A, Fig. 36) at the left of the tension discs, and not under the thread regulator. With this exception the threading is the same as for regular sewing (see Fig. 11). Remove the presser foot and let down the presser bar lifter to restore the tension on the needle thread, which is released and inoperative when the lifter is raised. To attach the feed cover plate draw to the left the slide that covers the bobbin case and insert the downwardly projecting hooks on the cover plate under the edge of the throat plate and push to the right. After bringing the hole at the right of the cover plate in line with the hole in the throat plate, press the cover 28
29 RELATIVE SIZES OF NEEDLES AND THREAD (Class and Variety of Needles Used, 15 x 1) SIZES OF NEEDLES CLASSES OF WORK Very thin Muslins, Cambrics,Linens, etc. Very fine Calicoes, Linens,Shirtings. fine Silk Goods, etc. Shirtings, Sheetings, Calicoes, Muslins, Silk and general domestic goods and all classes of general work. All kinds of heavy Calicoes, light Woolen Goods, heavy Silk, Seaming, Stitching,. etc. Tickings. Woolen Goods, Trousers, Boys' Clothing,Corsets, Cloaks, Mantles, etc. Heavy Woolens, Tickings, Bags, Heavy Coats, Trousers, etc. Heavy Clothing generally. Bags, Coarse Cloths and Heavy Goods. SIZES of COTTON, SILK OR LINEN THREAD 100 to 150 Cotton 00 & 000 Silk Twist 80 to 100 COTTON 0 Silk Twist 60 to 80 Cotton A & B Silk Twist 40 to 60 Cotton C Silk Twist 30 to 40 Cotton D Silk Twist 24 to 30 Cotton E Silk Twist 60 to 80 Linen 40 to 60 Linen or very Coarse Cotton When sending orders for needles always specify size required. Previous Page 29
INSTRUCTION MANUAL 127-3 & 128-3. with VIBRATING SHUTTLE. *A Trade Mark of THE SINGER MANUFACTURING CO.
 * 127-3 & 128-3 with VIBRATING SHUTTLE Copyright, U. S. A., 1915, 1923, 1929, 1932, 1935 and 1940, by The Singer Manufacturing Company All Rights Reserved for all Countries *A Trade Mark of THE SINGER
18974 (736) Singer No. 20-2. SINGER No. 20-2 ELECTRIC SEWING MACHINE INSTRUCTION MANUAL
 Singer No. 20-2. SINGER No. 20-2 ELECTRIC SEWING MACHINE INSTRUCTION MANUAL") SINGER No. 20-2 ELECTRIC SEWING MACHINE INSTRUCTION MANUAL Next Page Main Parts Accessories To start the Motor To Stop the Motor To Change the Speed Needles and Thread Relative Sizes of Needle and Thread
SINGER No. 20-2 ELECTRIC SEWING MACHINE INSTRUCTION MANUAL Next Page Main Parts Accessories To start the Motor To Stop the Motor To Change the Speed Needles and Thread Relative Sizes of Needle and Thread
Mini multi-purpose sewing machine
 TROUBLESHOOTING Problem Problem cause Amendment No power or the machine runs slowly Batteries are installed incorrectly Batteries are low Reinstall the batteries making sure they are the correct way around
SEWING MAINTENANCE CHECKLIST
 SEWING MAINTENANCE CHECKLIST Many Retail, Brand-name Marketing, Mail Order and Sourcing Companies are visiting existing and potential Contractor sewing facilities and evaluating their sewing capabilities
BOBBIN WINDER - TYPES & FUNCTION
 BOBBIN WINDER - TYPES & FUNCTION 13.1.006 The bobbin winder is a separate unit screwed on to the machine, adjacent to the balance wheel. Its function is to wind a reserve of cotton evenly onto an empty
MINI ELECTRIC SEWING MACHINE OPERATION MANUAL
 MINI ELECTRIC SEWING MACHINE OPERATION MANUAL 1 Parts & Accessories Takeup Lever(D) Spindle(C) Spool(E) MAIN UNIT Bobbin Holder(V) Bobbin winder Spool(T) Needle Clamp Screw(O) Adjusting Screw(Q) Needle
Thread Tensions All Machines
 Below are items related to thread tensions and tension problems as found on Brother embroidery equipment. They are listed in the order that they most often occur. Use this form only as a guide. Following
Accessories. Elna UK sewing machines. Cool Collection SewFun - 2100-2300 - 2600-2800. Super Cool 3210-5100. Quilter s Touch 6200-6600 - 7300
 Accessories Elna UK sewing machines Cool Collection SewFun - 2100-2300 - 2600-2800 Super Cool 3210-5100 Quilter s Touch 6200-6600 - 7300 Elna UK Southside, Bredbury, Stockport, Cheshire SK6 2SP Elna Sew
FRICTION BRAKE ON A LECLERC LOOM
 FRICTION BRAKE ON A LECLERC LOOM The friction brake permits a fine adjustment on the warp tension. It is particularly appreciated on a fine material and on fibers without elasticity such as linen and cotton.
Review VIDEO WORKSHEET #3533. Name: Hour:
 #3533 Name: Hour: VIDEO WORKSHEET Review Directions: After watching Sew Cool, answer the following questions. SEWING ESSENTIALS Match the sewing tool to the description. 1. Pins 2. Marking pens 3. Ruler
INSTRUCTION. Industrial Sewing Machines. No. 010012. First published : June 1997 Second edition : March 2001
 INSTRUCTION Industrial Sewing Machines First published : June 1997 Second edition : March 2001 No. 010012 INTRODUCTION Thank you for your purchasing Kansai Special's DLR Series. Read and study this instruction
UPPER TENSION MECHANISM - (66 & 99 models)
") UPPER TENSION MECHANISM - (66 & 99 models)..006 The principals of thread tension have already been covered in the section on How a Sewing Machine Works page [] E - 4. () The majority of tension adjustments
UPPER TENSION MECHANISM - (66 & 99 models)..006 The principals of thread tension have already been covered in the section on How a Sewing Machine Works page [] E - 4. () The majority of tension adjustments
Operation Manual KNOWING YOUR SEWING MACHINE STRAIGHT AND ZIGZAG STITCHING BUILT-IN STITCHES SEWING BUTTONHOLES AND BUTTONS
 5 6 KNOWING YOUR SEWING MACHINE STRAIGHT AND ZIGZAG STITCHING BUILT-IN STITCHES SEWING BUTTONHOLES AND BUTTONS USING ATTACHMENTS AND APPLICATIONS APPENDIX Operation Manual IMPORTANT SAFETY INSTRUCTIONS
Model label When calling for service, please note the MODEL and SERIES numbers that are inscribed on the back of your sewing machine.
 Type designation RS series has several types. The types are shown on the model label as follows: MODEL/MODELE(MODEL NAME) SERIES/SERIE RS SERIES/SERIE RS2000 SERIES/SERIE RS2000A SERIES/SERIE RS2000B SERIES/SERIE
SEWING MACHINE OPERATION MANUAL
 SEWING MACHINE OPERATION MANUAL IMPOR TANT SAFETY INSTRUCTIONS When using a sewing machine, basic safety precautions should always be taken, including the following: Read all instructions before using.
Tips and Techniques on the PR-620
 Techniques and Tips on the PR-620 Learn how to demonstrate the PR-620 and make it look as easy as it really is. Topics to be covered will be: basic operation, machine threading, screen icons, merging patterns,
BERNINA 1100 Series BERNINA BERNINA. 1100 Series OWNER S WORKBOOK. MASTERING YOUR BERNINA 1/04/02 1100 Series/1
 1100 Series MASTERING 1100 Series OWNER S WORKBOOK MASTERING 1/04/02 1100 Series/1 1100 Series Table of Contents SECTION A Pages 3-17 Let s Start With The Basics SECTION B Pages 18-37 4-Thread Techniques
STEADYfast Stabilizer Installation Notes Fifth Wheel and Travel Trailers 11/23/13
 STEADYfast Stabilizer Installation Notes Fifth Wheel and Travel Trailers 11/23/13 (See Supplemental Instructions for trailers with heavy duty round footplates and/or Power Leveling Systems) PHONE SUPPORT
How To Work With Beads. By Rowan
 R O W A N How To Work With Beads By Rowan HOW TO WORK WITH BEADS Adding beads to a knitted or crocheted design gives it a really special touch especially when the beads added are as stunning as those in
MAINTENANCE CATALOG INSTALLATION AND OPERATING INSTRUCTIONS FOR U.S. BLINDSTITCH MACHINES
 Stitching Perfection U.S. BLINDSTITCH MACHINE COMPANY MAINTENANCE CATALOG SERIES: 1118, 1099, 718, 99 STANDARD SUBCLASSES INSTALLATION AND OPERATING INSTRUCTIONS FOR U.S. BLINDSTITCH MACHINES 2011-15 85th
BOSTITCH. OPERATION and MAINTENANCE MANUAL. For: 15001DHD Series, 18001D27HD Series 18001DHD Series, 18001 DSHD Series WIRE STITCHER HEADS
 BOSTITCH OPERATION and MAINTENANCE MANUAL For: 15001DHD Series, 18001D27HD Series 18001DHD Series, 18001 DSHD Series WIRE STITCHER HEADS BEFORE REMOVING OR SERVICING HEADS, TURN ELECTRICAL SWITCH "OFF"
758 Heavy-duty Ratchet Guy Wire Cutter
 INSTRUCTION MANUAL 758 Heavy-duty Ratchet Guy Wire Cutter Read and understand all of the instructions and safety information in this manual before operating or servicing this tool. Register this product
KNITTING MACHINE Quick Tips for Knitting Success
 Visit our website: www.nsiinnovations.com KNITTING MACHINE Quick Tips for Knitting Success Intended for Adult Use No. 7590-08 Addendum BEFORE YOU START: Before you start knitting, wind your yarn into an
COLLARS TERMS TO KNOW
 CT-LMH.185 COLLARS Collars are an important part of a garment because they serve as the frame for your face. Since we tend to focus on the face, the styling and application of a collar is important to
Power Performance Precision
 Power Performance Precision Owner s manual 1 IMPORTANT SAFETY INSTRUCTIONS When using an electrical appliance, basic safety precautions should always be followed, including the following: Read all instructions
SAVE THESE INSTRUCTIONS SERVICING OF DOUBLE INSULATED PRODUCTS
 Owner's manual This household sewing machine is designed to comply with IEC/EN 60335-2-28 and UL1594. IMPORTANT SAFETY INSTRUCTIONS When using an electrical appliance, basic safety precautions should always
Range Road RR Series Semi-Automatic Firewood Processor. Crated Unit Assembly Manual
 Range Road RR Series Semi-Automatic Firewood Processor Crated Unit Assembly Manual 1 1) Undo 8-18mm x 19mm Nuts and bolts, 2 on each leg of top frame 2) Lift top of Metal crate off and move out of work
OD 1401 9 PRECISION MEASURING INSTRUMENTS
 SUBCOURSE EDITION OD 1401 9 PRECISION MEASURING INSTRUMENTS PRECISION MEASURING INSTRUMENTS SUBCOURSE OD1401 EDITION 9 Unites States Army Combined Arms Support Command Fort Lee, VA 23801-1809 5 CREDIT
O w n e r s M a n u a l
 Owner s Manual This household sewing machine is designed to comply with IEC/EN 60335-2-28 and UL594 IMPORTANT SAFETY INSTRUCTIONS When using an electrical appliance, basic safety precautions should always
PARTS FOR OTHER EMBROIDERY MACHINES
 PARTS FOR OTHER EMBROIDERY MACHINES PARTS FOR SINGER 114K & 114W, TREASURE and other "FREE HAND" CHAINSTITCH EMBROIDERY MACHINES - 8056-2 Nipple #2-8056-3 Nipple #3-8056-4 Nipple #4-8056-5 Nipple #5-8056-6
This household sewing machine is designed to comply with IEC/EN 60335-2-28 and UL1594.
 Owner s manual This household sewing machine is designed to comply with IEC/EN 60335-2-28 and UL1594. IMPORTANT SAFETY INSTRUCTIONS When using an electrical appliance, basic safety precautions should always
User s Guide KEEPING THE WORLD SEWING
 User s Guide KEEPING THE WORLD SEWING This household sewing machine is designed to comply with IEC/EN 60335-2-28 and UL1594 IMPORTANT SAFETY INSTRUCTIONS When using an electrical appliance, basic safety
Exakta 6x6 No. 602246
 Page 1/7 Repair of Exakta 6x6, 2 1/4, Single Lens Reflex Exakta 6x6 No. 602246 Access to Film ounter & Winding Mechanism For convenience remove the lens. The lens release is on the left side of the camera
This household sewing machine is designed to comply with IEC/EN 60335-2-28 and UL1594.
 Owner s manual This household sewing machine is designed to comply with IEC/EN 60335-2-28 and UL1594. IMPORTANT SAFETY INSTRUCTIONS When using an electrical appliance, basic safety precautions should always
REPLACEMENT INSTRUCTIONS FOR AWNING
 REPLACEMENT INSTRUCTIONS FOR AWNING Fabric Roller Tube Torsion Assembly For Models 8500 & 9000 Tools Required: Vise Grips Socket Wrench Set 3/16" rill Bit 1/8" Pop Rivets End Cap Guide Screwdriver Electric
Just-Like-Mine! Doll or Stuffed Toy. Car Seat. Instruction Manual. These instructions are for the following Joovy Style # s: 002, 003
 Just-Like-Mine! Doll or Stuffed Toy Car Seat Instruction Manual These instructions are for the following Joovy Style # s: 002, 003 Please read this instruction manual completely before using your doll
HAND CRIMP TOOL Specification Sheet Order No. 63819-0900
 HAND CRIMP TOOL Specification Sheet Order No. 63819-0900 FEATURES TYPE 4D ΠA full cycle ratcheting hand tool ensures complete crimps ΠErgonomic soft grip handles for comfortable crimping ΠA precision
INSTRUCTIONS FOR CHAIN LINK INSTALLATION Chain Link fence & Posts Meshdirect.co.uk
 INSTRUCTIONS FOR CHAIN LINK INSTALLATION Chain Link fence & Posts Meshdirect.co.uk This guide explains how to correctly install our chain link fencing and post system. The guide provides details of the
Pole Lathe and Shave Horse Design
 Pole Lathe and Shave Horse Design These pictures and accompanying words are Copyright Michael Hughes February 2002. They are not to be re-produced, in part or whole, without permission from the author.
Throw Pillow Cover Instructions
 Throw Pillow Cover Instructions Materials Required: (Fabric listed is for pillows up to 18! x 18!. Can be made to fit any dimensions) 1 yard of medium to heavy weight cotton 1 button (optional) 4 of! elastic
Alarms of American Mantel Clocks By David J. LaBounty, CMC FBHI
 Alarms of American Mantel Clocks By David J. LaBounty, CMC FBHI Introduction I can remember one of my greatest fears as an apprentice clockmaker. It would happen while I was working the front counter,
All seam allowances are 1/2 unless otherwise noted. All pattern pieces include the seam allowance. Please read all instructions before beginning.
 This structured bag has lots of pretty detailing. It s large enough to carry all of your essentials as well. Make it in a great patchwork, or stick to a single fabric! All seam allowances are 1/2 unless
Stitch Formation in Rotary Hook Sewing Machines ABSTRACT
 Stitch Formation in Rotary Hook Sewing Machines Douglas A. Kerr Issue 3 October 28, 2008 ABSTRACT Most modern general-purpose sewing machines form a lockstitch by way of the rotary hook technique. The
SERJEANT-AT-ARMS GOWN
 You will need: 1 2 m of black fabric Key: cut here 2 black cotton 3 sewing needle 4 sewing machine 5 scissors 6 tape measure fold here wrong side of fabric right side of fabric centre point stitching 7
BUILD A TABLETOP LOOM
 BUILD A TABLETOP LOOM From 1" x 2" stock (actual 3/4" x 1"1/2) cut: 4 pieces 15" long 4 pieces 5"1/2 long Use the above to make 2 frames for the front and back of the loom. From 1" x 4" stock (actual 3/4"
Original Assembly Guide
 TCT Multipurpose Single Bevel Sliding Compound Mitre Saw Original Assembly Guide Read instructions before assembling this tool. Table of Contents GB Assembly Guide Read instructions before assembling this
1000-LB. TRAILER JACK OWNER S MANUAL
 1000-LB. TRAILER JACK OWNER S MANUAL WARNING: Read carefully and understand all INSTRUCTIONS before operating. Failure to follow the safety rules and other basic safety precautions may result in serious
COMPACT ELITE MAT CUTTER
 INSTRUCTION MANUAL MODEL 350-1 COMPACT ELITE MAT CUTTER INSTRUCTIONS AND OPERATION MANUAL 32in (81cm) mat cutting system with bevel & straight cutters, production stops and 20 in (51 cm) squaring bar.
TERMINATION EQUIPMENT INSTRUCTION MANUAL TELE-PIERCE P/N 356-246
 TERMINATION EQUIPMENT INSTRUCTION MANUAL TELE-PIERCE P/N 356-246 OPERATION AND SERVICE INSTRUCTIONS AMPHENOL 157 SERIES TELE-PIERCE MULTI-WIRE TERMINATION TOOL 356-246 AMPHENOL TERMINATION SYSTEMS 1830
STEERING HANDLEBAR/FRONT WHEEL/ FRONT SHOCK ABSORBER
 14 14 STEERING HANDLEBAR/FRONT WHEEL/ SCHEMATIC DRAWING ------------------------------------------------- 14-1 SERVICE INFORMATION------------------------------------------------ 14-2 TROUBLESHOOTING-----------------------------------------------------
Circles Galore Quilt. Sewing supplies: Approximate size: 60 (152cm)
") Sewing supplies: PFAFF creative 3.0 sewing and embroidery machine PFAFF creative QUILTERS HOOP 200x200 (820940096) PFAFF Extension Table with Adjustable Guide (821031096) PFAFF 0A Standard Foot for IDT
Sewing supplies: PFAFF creative 3.0 sewing and embroidery machine PFAFF creative QUILTERS HOOP 200x200 (820940096) PFAFF Extension Table with Adjustable Guide (821031096) PFAFF 0A Standard Foot for IDT
OWNER S MANUAL Table Tennis Table Patent Pending
 OWNER S MANUAL Table Tennis Table Patent Pending Be sure to write your model number and serial number here for future reference. You can find these numbers printed on the bottom of the table. MODEL # T8179
HAND STITCHES. Standards CT-MMB.002
 CT-MMB.002 HAND STITCHES Hand stitches have many uses. Before the sewing machine, garment-making was done exclusively by hand. However, in today s home sewing world of sophisticated sewing machines and
Dolman Dress Women s PDF Pattern. Sizes XSmall thru XLarge. www.sewingrabbit.com
 Dolman Dress Women s PDF Pattern Sizes XSmall thru XLarge www.sewingrabbit.com The Dolman Dress Extra large, extra comfy, and extra stylish. The Dolman Dress is perfect for throwing on with your favorite
Cosmetics Case with Vinyl Interior Skill Level: Intermediate
 Cosmetics Case with Vinyl Interior Skill Level: Intermediate Designed By Lindsey Rhodes Sewn By Lindsey Rhodes http://lrstitched.com Use this step by step tutorial to create a roll-up cosmetics case with
4) Read and study the steps and illustrations first to get an overall picture of the project. Then come back and commence practice.
 Read and study the steps and illustrations first to get an overall picture of the project. Then come back and commence practice.") How to make a wire rosary Our Lady s Rosary Makers www.olrm.org Supplies Needed To make one wire rosary you need: Rosary Pliers 8 ft. of wire (we suggest wire no larger than 18 gauge and no smaller than
How to make a wire rosary Our Lady s Rosary Makers www.olrm.org Supplies Needed To make one wire rosary you need: Rosary Pliers 8 ft. of wire (we suggest wire no larger than 18 gauge and no smaller than
2. This is a close up of a typical area where the rocker is rusted out leaving holes under where the rocker moulding would be..
 ROCKER PANELS 55,56,57 CHEVY REPLACEMENT Do not throw away any pieces when you first remove them. There are many supports that are not reproduced and will need to be used again. When disassembling try
Weighted Pincushion Organizer
 Weighted Pincushion Organizer This sturdy pincushion has plenty of space to store pins and a wool felt strip for your needles. The hanging pocket is a perfect place for storing easily-misplaced tools like
Instructions for Using the Watch Works Tool Kit to Change a Watch Battery
 Instructions for Using the Watch Works Tool Kit to Change a Watch Battery Click on this link http://www.allamericanwatches.com/site/626101/product/e2306-a to purchase the Watch Battery Replacement Tool
Edgy Hexagons Quilt THROUGH THE NEEDLE LIVE. BERNINA Through The Needle Live. Written by: Nina McVeigh, BERNINA Educator
 BERNINA Through The Needle Live THROUGH THE NEEDLE LIVE Edgy Hexagons Quilt Written by: Nina McVeigh, BERNINA Educator SUPPLIES 1 Layer Cake Fabrics or an assortment of fat quarters 2 yds Solid 2 yds of
The 600. A superbly equipped computerised sewing machine with easy to use touch-button controls and luxury features.
 The 600 A superbly equipped computerised sewing machine with easy to use touch-button controls and luxury features. 429 Stitches Fully automatic thread tension Automatic thread trimming Side way feed Advanced
CIRCULAR SAW SAFETY Reviewed 9/24/2007
 1. General Safety Rules CIRCULAR SAW SAFETY Reviewed 9/24/2007 DANGER -- Keep hands away from cutting area behind the saw blade since kickback could cause the saw to jump backwards over your hand. Keep
Lathe Milling Attachment
 Lathe Milling Attachment By L C. MASON BY CLEVERLY stacking cold-rolled flat stock together, T-slots and slide for this lathe milling attachment are made without costly machinery. In fact, only two tools,
SECTION G2: CABLE PROCESSOR MODULE MAINTENANCE
 SECTION G2: CABLE PROCESSOR MODULE MAINTENANCE Cable Processor Module overview WARNING! When tipping the Cable Processor Module back, (after removing the toggle arm pin), use extreme caution not to drop
KNIT MITTENS PATTERN CHART (for Kids and Teens) Knit on 2 needles with the thumbs on the sides (Provided to Knitting4Peace by Carrie Epps)
 Knit on 2 needles with the thumbs on the sides (Provided to Knitting4Peace by Carrie Epps)") KNIT MITTENS PATTERN CHART (for Kids and Teens) Knit on 2 needles with the thumbs on the sides (Provided to Knitting4Peace by Carrie Epps) SIZES: (It may be helpful to highlight the size mitten you are
KNIT MITTENS PATTERN CHART (for Kids and Teens) Knit on 2 needles with the thumbs on the sides (Provided to Knitting4Peace by Carrie Epps) SIZES: (It may be helpful to highlight the size mitten you are
Build Your Own Solar Car Teach build learn renewable Energy! Page 1 of 1
 Solar Car Teach build learn renewable Energy! Page 1 of 1 Background Not only is the sun a source of heat and light, it s a source of electricity too! Solar cells, also called photovoltaic cells, are used
Finished size: Gauge: Abbreviations: (US terminology) Work in continuous rounds unless otherwise specified. 27 cm or 10.6 standing
 Work in continuous rounds unless otherwise specified. 27 cm or 10.6 standing") This is Pattern for baby only. Pattern for clothes and variations on bent arm or open mouth head you can find on AmigurumiBB.com as separate patterns or photo tutorials Materials needed: 2,0 mm crochet
This is Pattern for baby only. Pattern for clothes and variations on bent arm or open mouth head you can find on AmigurumiBB.com as separate patterns or photo tutorials Materials needed: 2,0 mm crochet
Seams to Me Tag File
 Seams to Me Tag File Created by Susan Beck This mixed media tag file is a fun way to organize technique swatches. It makes a great visual reference so you can remember what you ve learned and incorporate
MSK-8900M Industrial Sewing Machine
 MSK-8900M Industrial Sewing Machine INSTRUCTION MANUAL CONTENTS Operation instruction. Brief introduction. Main specifications. Main parts name 4. The method of installation 5 5. Pareparation before sewing
Repairing a Day/Night Shade made by Specialty Window Coverings. Introduction
 Repairing a Day/Night Shade made by Specialty Window Coverings Introduction Restringing a pleated shade can be exasperating hopefully the changes I made to the manufacturer s instructions will make the
10 TON HYDRAULIC PRESS
 10 TON HYDRAULIC PRESS Model Nos. CSA10F and CSA10B OPERATING & MAINTENANCE INSTRUCTIONS 0200 SPARE PARTS and SERVICING Please contact your nearest dealer, or CLARKE International, on one of the following
HYDRAULIC LIFT TABLE CART 2200-LB.
 HYDRAULIC LIFT TABLE CART 2200-LB. OWNER S MANUAL WARNING: Read carefully and understand all MACHINE ADJUSTMENT AND OPERATION INSTRUCTIONS before operating. Failure to follow the safety rules and other
Rating when used as a weight carrying hitch without spring bars:
 BOLT-TOGETHER WEIGHT DISTRIBUTING HITCH SYSTEM Rating when used as a weight distributing hitch with spring bars: Part Number 48051 4805 48053 48054 Max Tongue Weight 550 Ibs. 750 Ibs. 1000 Ibs. 1400 lbs.
S&G Model 2937 Group 1 Combination Lock
 Installation and Combination Changing Instructions S&G Model 2937 Group 1 Combination Lock NOTE: READ COMPLETE INSTRUCTIONS BEFORE INSTALLATION These instructions should be followed when installing the
Front brakes (FN- 3), servicing
, servicing") j a t Front brakes (FN- 3), servicing 46-1 Front brakes, servicing Note: Install complete repair kit. After replacing brake pads and before moving vehicle, depress brake pedal several times firmly to properly
j a t Front brakes (FN- 3), servicing 46-1 Front brakes, servicing Note: Install complete repair kit. After replacing brake pads and before moving vehicle, depress brake pedal several times firmly to properly
How to Build Your Own CornHole Game
 How to Build Your Own CornHole Game DIMENSIONS Here is a diagram with the basic measurements for the Cornhole board game. SUPPLIES 1/2 thick sheet of plywood one 4 x4 or two 2 x4 s 8 long 2 4 s (4) 4 1/2
DIY Trade Show Handcraft Display
 DIY Trade Show Handcraft Display (Uses Wire Hangers and Wine Bottles) www.lagniappepeddler.com Description: This pattern was designed for a simple display that can be made with items you may have on hand.
Triple Threat 3-in-1 Game Table 3 IN 1 GAME TABLE
 NG0M Triple Threat 3-in- Game Table 3 IN GAME TABLE Thank 3 in Y Game Table Thank you for your purchase of our product. We work around the clock and around the globe to ensure that our products maintain
3. Loosen 3 x grub screws in the Dec end cap and unscrew the cap and counterweight shaft. NEQ6 Belt Modification Kit.
 NEQ6 Belt Modification Kit. Thank you for your purchase. Please read these instructions fully before fitting. Your package should contain 2 off 47 & 2 off 12 tooth aluminium pulleys 2 off belts 6mm wide
Free Instructions. Finished Cape Size: Fits sizes 2 6, but may be modified as desired to fit other sizes. Fabric: Handy Notions: Instructions:
 Free Instructions Super Hero Cape Send hope, faith, and love to children living in shelters across the country. Capes for Kids represents hope. Since every cape is unique and handmade with love, each child
The Lose-the-Last-1o-Pounds Workout
 Printable Workout: www.myfitstation.com The Lose-the-Last-1o-Pounds Workout From The Women s Health Big Book of Exercises Phase 1) Week 1-4 It s time to finish off that fat for good! This 8-week plan from
Speed-Mat Rectangle Cutter
 Speed-Mat Rectangle Cutter 1 Honeycomb baseboard. 2 Left hold down. 14 3 Bottom hold down. 4 4 Left / right rule. 8 5 8 5 Left / right rule pointer. 1 6 Top / bottom rule. 7 Top / bottom rule pointer.
COMBINATION SLAB & TRIM SAW INSTRUCTIONS 12, 14, & 16 MODELS
 COMBINATION SLAB & TRIM SAW INSTRUCTIONS 12, 14, & 16 MODELS DESCRIPTION Covington s Combination Trim & Slab Saws are similar in design with different blade and pulley sizes. Sawing operations remain the
Model RC Armature-Slot- Insulation Folder
 Model RC Armature-Slot- Insulation Folder 21 Model RC will handle insulation material up to 8 wide between its guides. Creasing rollers are adjustable sideways to make troughs up to 6 wide. A fixed ruler-guide
TABLE OF CONTENTS. I. TROUBLESHOOTING... 2 - Section 1.01: Common Problems/Solutions... 2
 BAL Accu-Slide System I. Table of Contents TABLE OF CONTENTS I. TROUBLESHOOTING... 2 - Section 1.01: Common Problems/Solutions... 2 II. GETTING STARTED... 5 - Section 2.01: Tools You Will Need... 5 - Section
How To Make A Spiral Fluted And Wire Wrapped Dagger Handle
 Making A Spiral Fluted and Wire Wrapped Dagger Handle By: Steve Culver, MS Part 1 Making A Spiral Fluted and Wire Wrapped Dagger Handle By: Steve Culver, MS After the rough handle material is drilled through
Great Fit Knifty Knit Mitts
 Great Fit Knifty Knit Mitts Original design by Lisa Sawyer http://www.loomknittingdesigns.com Materials: Knifty Knitter red loom for women s size or Knifty Knitter green loom for men s size 150 yards or
OPERATING P L AYA B I L I T Y P R E C I S I O N D E S I G N
 P L AYA B I L I T Y P R E C I S I O N P E R F O R M A N C E OPERATING INSTRUCTIONS FOR: GolfWorks Loft and Lie Gauges code: HGCG/DGCG/LOLI2 4820 Jacksontown Road P.O. Box 3008 Newark, Ohio 43058-3008 Toll-Free:
ROTARY TUMBLER INSTRUCTIONS AND PARTS LIST
 ROTARY TUMBLER INSTRUCTIONS AND PARTS LIST Model 3-1.5B Model 45C Model 33B LORTONE 12130 Cyrus Way Mukilteo, WA 98275 (425) 493-1600 SETTING UP YOUR MACHINE For 45C Unit Only (33B & 3-1.5B already assembled)
M113 VEHICLE FAMILY RUBBER TRACK INSTALLATION INSTRUCTIONS SOUCY TRACK SYSTEM 04-M113-1ENS (SPLIT IDLER) Litho d in Canada 1 04-M113-1ENS
 Litho d in Canada 1 04-M113-1ENS") M113 VEHICLE FAMILY RUBBER TRACK INSTALLATION INSTRUCTIONS (SPLIT IDLER) 1 # TABLE OF CONTENTS List of parts and tools................................................3 Installation of complete kit...................................................5
M113 VEHICLE FAMILY RUBBER TRACK INSTALLATION INSTRUCTIONS (SPLIT IDLER) 1 # TABLE OF CONTENTS List of parts and tools................................................3 Installation of complete kit...................................................5
MODEL 2400 RAISED BED PLASTIC MULCH LAYER OPERATING MANUAL
 MODEL 2400 RAISED BED PLASTIC MULCH LAYER OPERATING MANUAL Rain-Flo Irrigation 929 Reading Road East Earl, Pa 17519 PH: 717-445-3000 Table Of Contents Bed Height...............................7 Cover Disk...............................9
Basic Spring Motor Roller Shades
 Comprehensive Roller Shade Installation Guide Basic Spring Motor Roller Shades ATTENTION!!! READ CAREFULLY! This shade has a reliable long-lasting Spring Motor. The Spring Motor must have proper tension
KAWAI VERTICAL PIANO REGULATION MANUAL
 KAWAI VERTICAL PIANO REGULATION MANUAL Vol 1.0 2011 1 25 KAWAI MUSICAL INSTRUMENTS MFG. CO., LTD. 1 Regulation Process Index 1 Tighten Screws, Check Action, Strike Point, Hammer Blow P3 2 Keys P4 3 Travel,
LONDON JUBILEE AND OLYMPIC CELEBRATION ITEMS BY HILARY GOODING FOR MAKOWER UK
 LONDON JUBILEE AND OLYMPIC CELEBRATION ITEMS BY HILARY GOODING FOR MAKOWER UK 118 Grey s Road, Henley on Thames, Oxon RG9 1QW www.makoweruk.com Email: [email protected] www.andoverfabrics.com LONDON Designed
Router. A. Identify the major parts of the router. B. Complete a written test on safety and operating procedures of the router with 100% accuracy.
 Router I. Competencies Given a properly adjusted router, instruction and demonstration of use, each student will be able to: A. Identify the major parts of the router. B. Complete a written test on safety
Installation Instructions 4508 4508S
 SYMPHONY Spread Lavatory Faucet with Speed Connect Drain Congratulations on purchasing your American Standard faucet with Speed Connect drain, a feature found only on American Standard faucets. Speed Connect
It's large enough to handle most welding job shop projects, yet small enough to make it a worth while home-workshop tool
 It's large enough to handle most welding job shop projects, yet small enough to make it a worth while home-workshop tool H Craft Print Project No. 272 ERE'S a metal bender that will enable you to bend
Per fection star ts here ṬM. Sewing. My Passion. per formance 5.2
 Per fection star ts here ṬM Sewing. My Passion. per formance 5.2 per formance 5.2 Through my passion for sewing I reveal my true self. Beautiful fabrics inspire me to let my imagination run free. My creations
Operating Manual Please Read Before Operating Unit
 Operating Manual Please Read Before Operating Unit Model RT2S Wire Stripper & Component Lead Cleaner Service and All Spare Parts Available The Eraser Company, Inc. PO Box 4961/ Oliva Drive Syracuse, NY