Router. A. Identify the major parts of the router. B. Complete a written test on safety and operating procedures of the router with 100% accuracy.
|
|
|
- Caitlin Hood
- 7 years ago
- Views:
Transcription
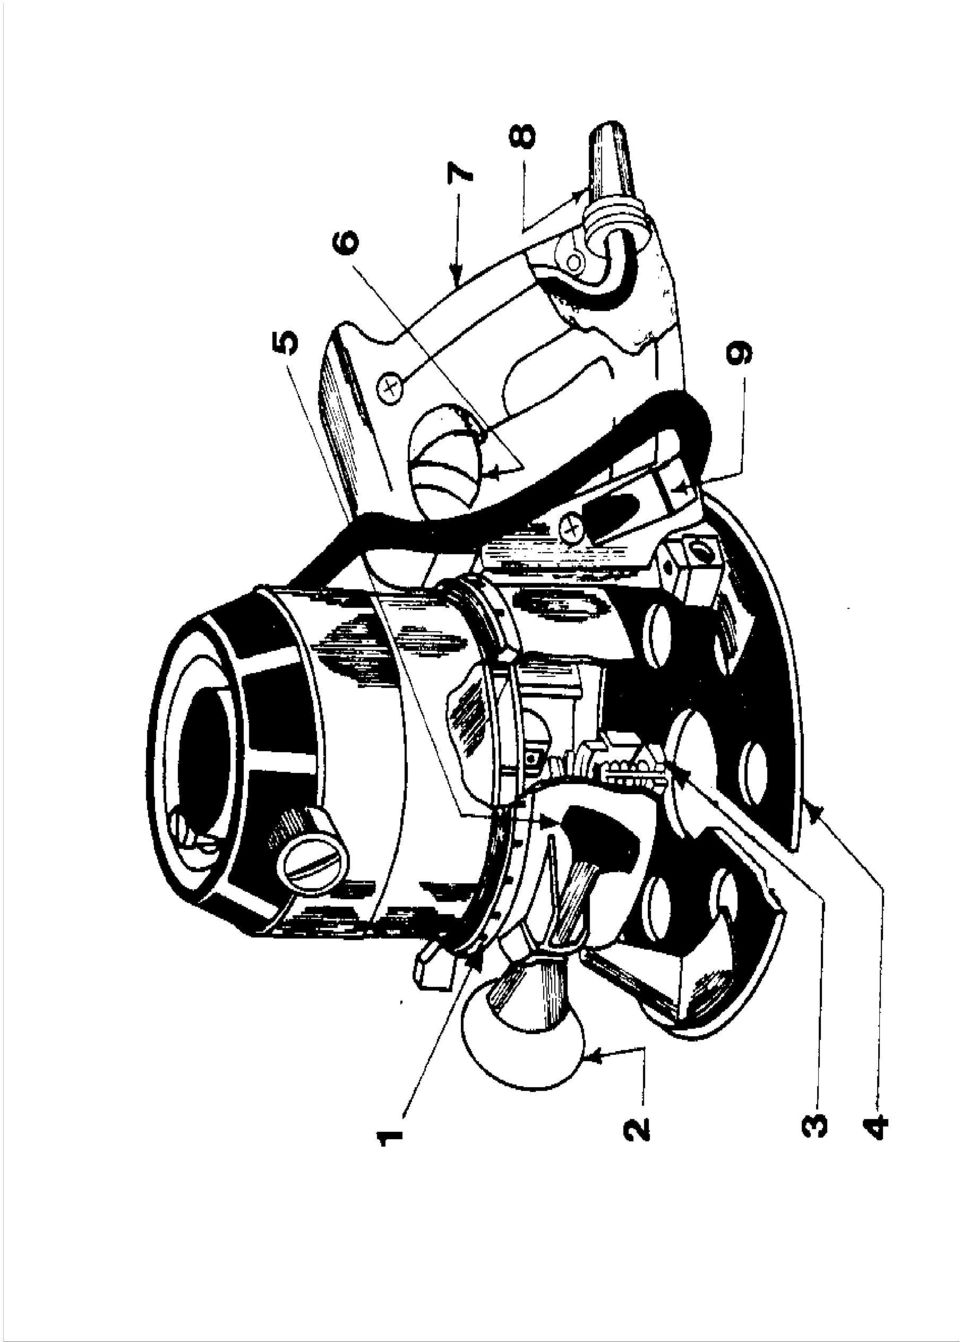
1 Router I. Competencies Given a properly adjusted router, instruction and demonstration of use, each student will be able to: A. Identify the major parts of the router. B. Complete a written test on safety and operating procedures of the router with 100% accuracy. C. Demonstrate the ability to change bits in the router, adjust router for correct depth of cut, and make router cuts while following all safety rules and correct operation procedures. II. Instructional Materials and Procedures A. Identification of basic router parts 1. Micrometer depth adjustment 2. Guide knob 3. Collet chuck 4. Base 5. Locking handle 6. Trigger switch 7. D-handle 8. Cord strain reliever 9. Motor disconnect

2 B. Router Safety 1. Check condition of the router and power cord. Make sure the handles, base switch and thumb locking screw are tight. See that the plug power cord and the cord strain reliever are not frayed, cut or pulled loose. 2. Wear safety glasses at all times while using the router. 3. Do not wear loose clothing, rings, bracelets or necklaces while operating the router. 4. Make sure the switch is off before the router is plugged into the electrical power source. 5. Have a firm grip on the router handle when you turn on the switch. Use both hands to hold the router while making cuts. 6. Make sure the router bit is not in contact with the stock before turning the switch on. 7. Be sure the stock is clamped securely to the work bench. 8. Keep the electrical cord positioned away from stock being cut to prevent the cord from being cut by the router bit. 9. Unplug the electric before making adjustments to the router or before inserting bits. 10. Do not stand on wet surfaces when using a router. 11. Wear a dust mask while using the router. C. Operating Procedures 1. Insert the bit at least ½ inch in the collet; then tighten the collet nut to hold the bit in place. 2. Adjust the cutter depth on the router with the electrical cord unplugged. 3. After the depth of cut adjustment is made experiment on a scrap piece of lumber to make sure it is correct. If further adjustment needs to be made, unplug the router! 4. Feed the router from the left to right on the work. Feed the router in same direction as the grain of the wood. 5. Feed the router with a uniform speed. Feeding too slowly will cause the bit to burn the wood while going too fast will result in rough cuts and excessive wear. 6. Guide the movement of the router by one of the following methods: a. A straight edge clamped to the top of the wood. b. A straight or circular guide attached to the router. c. Bit with a pilot end. d. Template or pattern. e. Freehand.

3 7. To prevent splintering, cut the middle section first, then move the router in the same direction as the grain of the wood. 8. After completing the cut, turn off the motor but do not lift the router from the work until the bit has stopped rotating. 9. Once the cut is completed, disconnect the power source, remove the bit and clean the router.

4 III. Written Test Router Safety and Operation Test Name Date Class Multiple Choice Place the letter of the most correct answer on the answer sheet. 1. The part used to hold bits in a portable router is the. a. collet b. jacobs chuck c. 4 jaw chuck d. pilot 2. When starting a cut with the router, the bit should. a. not be in contact with the stock b. be in place and ready to start cutting immediately c. slightly tilted to make starting easier d. elevated to make it easier to see 3. Feeding the router too fast will result in. a. fine cuts b. excessive wear c. splintering d. burning the stock 4. Which is not a safety precaution for the router. a. wear safety glasses b. hold the router with both hands c. use a bit with a pilot end d. disconnect electrical power before changing bits 5. When changing cutters, one should insert the shank of the bit inch into the chuck. a. 1/8 b. ¼ c. ¾ d. ½

5 6. Cutting with the router is more efficient if the router is moved. a. left to right b. right to left c. clockwise d. counter clockwise 7. Which of the following should be observed when using a router. a. do not stand in wet or damp places b. wear a dust mask c. neither a or b d. both a and b 8. The depth of cut adjustment on the router is made by turning the. a. collet adjustment b. micrometer depth adjustment c. guide adjustment d. frame adjustment 9. After a cut is completed, one should. a. lift router from work b. disconnect router c. shut off motor d. wait until bit stops rotating before doing anything 10. To prevent splintering at the corners, one should cut the first. a. end grain b. middle section c. left side d. right side 11. When cutting with a router the power cord should be located. a. in front of the router base. b. to the left of the stock. c. to the right of the stock. d. away from the line of work.

6 12. Before making a cut with the router, what check should be made. a. make sure the circuit breaker is off. b. make sure the switch is off before plugging in the router. c. make sure the router will not be over loaded d. both a and c 13. A major safety precaution to observe when changing router bits is. a. keep the bit clean and sharp b. keep the depth of cut adjusted to a minimum. c. unplug the router before changing the bit. d. loosen the micrometer adjustment so you can reach the bit. 14. When operating a router, it would not be safe to wear. a. a ring b. a bracelet c. loose clothing d. all of these 15. The correct procedure for holding the router while making a cut is. a. to hold on the stock with pressure on the cutter bit side b. to hold firmly with both hands c. to hold the handle with one hand and guide the router with the other hand d. to hold one hand on the handle and the other hand on the motor housing

7 IV. Performance Test for the Router Student Date Class The student performs the following while changing bits, adjusting and making cuts with the router. Yes No N/A 1. Safety glasses and guards properly in place. 2. The switch is in the off position before the router is plugged into the receptacle. 3. The stock to be cut is securely clamped. 4. A check is made to be sure nothing is in router s path. 5. The router cut is made in the same direction as the grain of the wood. The student demonstrates the acceptable ability to; 6. Start and stop the router correctly. 7. Properly adjust depth of cut. 8. Properly insert bits in a router. 9. Make a straight cut with a guide. 10. Make a freehand cut. 11. Properly select bits. 12. Make a decorative edge. Comments I do hereby certify that the student has satisfactorily demonstrated ability to operate the router by passing the above performance test. Signed (Student) Date Signed (Teacher) Date

8 Router Parts Identification Test Match the number of each router part with the correct part name. Name A. Cord strain reliever B. Guide knob C. Base D. Micrometer depth adjustment F. D-handle G. Locking handle H. Motor disconnect I. Trigger switch E. Collet chuck

9

10
Belt Sander. Given a properly adjusted belt sander, accessories, instruction and demonstration of use, each student will be able to:
 I. Competencies Belt Sander Given a properly adjusted belt sander, accessories, instruction and demonstration of use, each student will be able to: A. Identify the major parts of the belt sander. B. Pass
Reciprocating Saw. Given a properly adjusted reciprocating saw, accessories, instruction and demonstration of use, each student will be able to:
 Reciprocating Saw I. Competencies Given a properly adjusted reciprocating saw, accessories, instruction and demonstration of use, each student will be able to: A. Identify the major parts of the reciprocating
Portable Grinder. Given a properly adjusted portable grinder, instruction and demonstration of use, each student will be able to:
 Portable Grinder I. Competencies Given a properly adjusted portable grinder, instruction and demonstration of use, each student will be able to: A. Identify the major parts of the portable grinder. B.
Responsibilities of a Volunteer Leader
 Responsibilities of a Volunteer Leader Inspecting tools for safe conditions. Removing unsafe tools from use and immediately notifying site supervisor. Teaching safe tool use to volunteers on your crew.
CIRCULAR SAW SAFETY Reviewed 9/24/2007
 1. General Safety Rules CIRCULAR SAW SAFETY Reviewed 9/24/2007 DANGER -- Keep hands away from cutting area behind the saw blade since kickback could cause the saw to jump backwards over your hand. Keep
Complete Dovetail Jig Instructions
 Complete Dovetail Jig Instructions 18 15 1 12 13 8 (22818) 19 17 16 4 3 6 14 5 9 9 11 10 2 PARTS LIST - COMPLETE DOVETAIL JIG Introduction Your new dovetail jig will cut Full Through Dovetails and three
MONTANA STATE UNIVERSITY SCHOOL OF ARCHITECTURE WOOD SHOP SAFETY MANUAL. Craft Shop Manager Bill Clinton wclinton@montana.
 MONTANA STATE UNIVERSITY SCHOOL OF ARCHITECTURE WOOD SHOP SAFETY MANUAL Craft Shop Manager Bill Clinton wclinton@montana.edu 994 4402 1 Policies and Procedures 1. Eye Protection Eye protection must be
Belt/Disc Sander. Given a properly adjusted belt/disc sander, accessories, instruction and demonstration of use, each student will be able to:
 Belt/Disc Sander I. Competencies Given a properly adjusted belt/disc sander, accessories, instruction and demonstration of use, each student will be able to: A. Identify the major parts of the belt/disc
Resharpening Companion
 Resharpening Companion 10950 Correct Angles, Pictures, and Step-By-Step Instructions The Resharpening Companion is meant to be a guide and quick reference to help you resharpen. It is not meant to replace
Router Table. Operating Procedures for
 Operating Procedures for Router Table INTRODUCTION: The router table is a very versatile tool. It can be used to cut a molding profile, cut workpieces to match the shape of a pattern and cut a molding
Notes. Material 1. Tools the employee is expected to operate
 OSHA Standard29 CFR 1910.211-.247, Subpart O, Machinery and Machine Guarding, and Subpart P, Hand and Portable-Powered Tools and other Hand- Held Equipment. Hand Tool Safety Preparation 1. Read Applicable
Electric Meat Grinder
 Electric Meat Grinder OWNER S MANUAL WARNING: Read carefully and understand all INSTRUCTIONS before operating. Failure to follow the safety rules and other basic safety precautions may result in serious
CALIBRATION FOR LAL20X & LAL24X
 CALIBRATION AND FAULT FINDING FOR LAL20X & LAL24X DUMPY LEVELS MEASURING EXPERTS SINCE 1869 How The LAL20X & LAL24X Works The Automatic level is called Automatic because it requires only a simple basic
COMBINATION SLAB & TRIM SAW INSTRUCTIONS 12, 14, & 16 MODELS
 COMBINATION SLAB & TRIM SAW INSTRUCTIONS 12, 14, & 16 MODELS DESCRIPTION Covington s Combination Trim & Slab Saws are similar in design with different blade and pulley sizes. Sawing operations remain the
Operating Manual Please Read Before Operating Unit
 Operating Manual Please Read Before Operating Unit Model RT2S Wire Stripper & Component Lead Cleaner Service and All Spare Parts Available The Eraser Company, Inc. PO Box 4961/ Oliva Drive Syracuse, NY
37 POWER TOOLS DRILLS, PLANES, ROUTERS
 37 POWER TOOLS DRILLS, PLANES, ROUTERS Safety Basics Make sure that electric tools are properly grounded or double-insulated. Never remove or tamper with safety devices. Study the manufacturer's instructions
SKILL ATTACK PITCHING MACHINE PATENTS APPLIED FOR INSTRUCTION MANUAL. Includes: OPERATION SETUP USE & CARE SERVICE
 VOLLEYBALL SKILL ATTACK PITCHING MACHINE PATENTS APPLIED FOR INSTRUCTION MANUAL Includes: OPERATION SETUP USE & CARE SERVICE REV032813 SPORTS ATTACK, LLC. 800-717-4251 sportsattack.com WARRANTY STATEMENT
ROTARY TUMBLER INSTRUCTIONS AND PARTS LIST
 ROTARY TUMBLER INSTRUCTIONS AND PARTS LIST Model 3-1.5B Model 45C Model 33B LORTONE 12130 Cyrus Way Mukilteo, WA 98275 (425) 493-1600 SETTING UP YOUR MACHINE For 45C Unit Only (33B & 3-1.5B already assembled)
Auto Feed Screwdriver
 ENGLISH (Original instructions) INSTRUCTION MANUAL Auto Feed Screwdriver 684 00607 DOUBLE INSULATION IMPORTANT: Read Before Using. ENGLISH (Original instructions) SPECIFICATIONS Model 684 Screw strip 4
Router Table Plans. www.bobsplans.com
 www.bobsplans.com Router Table Plans Increase the capabilities of your router with this weekend project. Features a sliding fence with EZ-Mount clamps. These clamps are simple to make and grip tightly
MINI ELECTRIC SEWING MACHINE OPERATION MANUAL
 MINI ELECTRIC SEWING MACHINE OPERATION MANUAL 1 Parts & Accessories Takeup Lever(D) Spindle(C) Spool(E) MAIN UNIT Bobbin Holder(V) Bobbin winder Spool(T) Needle Clamp Screw(O) Adjusting Screw(Q) Needle
Raised Panel Doors Made Simple With Freud s 2+2 Raised Panel Bit Set
 Raised Panel Doors Made Simple With Freud s 2+2 Raised Panel Bit Set Congratulations on your purchase of Freud s world class 2 + 2 Raised Panel Bit Set. This revolutionary design combines two small wings
OPERATING INSTRUCTIONS FOR
 OPERATING INSTRUCTIONS FOR MEDECO KEY MACHINES FOR MEDECO ORIGINAL, BIAXIAL, MEDECO 3, KEYMARK CLASSIC & KEYMARK X4 PRODUCTS MEDECO HIGH SECURITY LOCKS ASSUMES NO RESPONSIBILITY FOR INJURY OR PROPERTY
ELECTRIC KNIFE SHARPENER
 PRODUCT MANUAL- M109 MODEL 401 ELECTRIC KNIFE SHARPENER Please read thoroughly before operation and keep for future reference Model 401 Knife Sharpener Specifications Model No. #401 Power Requirements
Mini multi-purpose sewing machine
 TROUBLESHOOTING Problem Problem cause Amendment No power or the machine runs slowly Batteries are installed incorrectly Batteries are low Reinstall the batteries making sure they are the correct way around
Multi-Pitch Pitching Machine USER MANUAL
 Multi-Pitch Pitching Machine USER MANUAL TABLE OF CONTENTS Thank you for purchasing the Cimarron Multi-Pitch Pitching Machine. The Cimarron Multi-Pitch Pitching Machine is a high performance pitching machine
IMPORTANT SAFETY RULES TO FOLLOW
 WARNING FLOOR & CARPET CLEANER Any piece of equipment can be dangerous if not operated properly. YOU are responsible for the safe operation of this equipment. The operator must carefully read and follow
#12 Professional Meat Grinders
 #12 Professional Meat Grinders MG-203100 (52021040) Manual Instruction Thank you, and congratulations on purchasing the Non-corrosive electric meat grinder. Your grinder comes complete with everything
Overview. Milling Machine Fundamentals. Safety. Shop Etiquette. Vehicle Projects Machine Shop
 Overview Milling Machine Fundamentals Wayne Staats, UW-Madison FSAE Safety Shop Etiquette Before Machining Indicating Calculating Feeds and Speeds Machining Maintenance Safety Respect the machines Common
Congratulations on your purchase of the Great Planes SLOT MACHINE, the first truly easy way to cut hinge slots in your model airplanes.
 INSTRUCTION MANUAL Congratulations on your purchase of the Great Planes SLOT MACHINE, the first truly easy way to cut hinge slots in your model airplanes. The Slot Machine you have purchased is equipped
SBC90. Abrasive Blast Cabinet Assembly & Operating Instructions
 SBC90 Abrasive Blast Cabinet Assembly & Operating Instructions READ ALL INSTRUCTIONS AND WARNINGS BEFORE USING THIS PRODUCT. SAVE THESE INSTRUCTIONS FOR FUTURE REFERENCE. This manual provides important
ROTARY TUMBLER INSTRUCTIONS AND PARTS LIST
 ROTARY TUMBLER INSTRUCTIONS AND PARTS LIST Model QT66 Model QT12 Model QT6 LORTONE 12130 Cyrus Way Mukilteo, WA 98275 (425) 493-1600 SETTING UP YOUR MACHINE Install The Barrel Guide: Using the machine
CT052 12 DOVETAIL JIG Manual
 CT052 12 DOVETAIL JIG Manual Table of Contents Introduction... 3 Commentary... 3 Important Safety Rules... 4 Features... 5 Unpacking... 6 Assembly... 6 Hand Lever... 6 Mounting... 6 Capacities... 7 Preparation...
How to Build Your Own CornHole Game
 How to Build Your Own CornHole Game DIMENSIONS Here is a diagram with the basic measurements for the Cornhole board game. SUPPLIES 1/2 thick sheet of plywood one 4 x4 or two 2 x4 s 8 long 2 4 s (4) 4 1/2
STEADYfast Stabilizer Installation Notes Fifth Wheel and Travel Trailers 11/23/13
 STEADYfast Stabilizer Installation Notes Fifth Wheel and Travel Trailers 11/23/13 (See Supplemental Instructions for trailers with heavy duty round footplates and/or Power Leveling Systems) PHONE SUPPORT
Hive Top Ventilation Shims
 Hive Top Ventilation Shims When preparing your bee hives for the winter, it is very important to provide for ventilation at the top of the hive. Through out the winter, the bees are expelling a lot of
Instructions for: TTW 1 Universal Service Replacement Blower Kit P/N 265-47200-00
 Instructions for: TTW 1 Universal Service Kit P/N 265-47200-00 (To be performed ONLY by qualified service providers) The Blowers on the Following Water Heaters are Serviced by This Kit: MITW -10 Series
TABLE OF CONTENTS. I. TROUBLESHOOTING... 2 - Section 1.01: Common Problems/Solutions... 2
 BAL Accu-Slide System I. Table of Contents TABLE OF CONTENTS I. TROUBLESHOOTING... 2 - Section 1.01: Common Problems/Solutions... 2 II. GETTING STARTED... 5 - Section 2.01: Tools You Will Need... 5 - Section
CETAC Z-Drive Assembly
 CETAC Z-Drive Assembly Replacement Guide Manual Part Number 610144 Rev 1, 2012 CETAC Technologies, Printed in USA Overview This guide describes the necessary steps to replace the Z-drive assembly on your
Read This Before Operating The BaseHit
 Read This Before Operating The BaseHit IMPORTANT OPERATING INSTRUCTIONS THE ACCURACY OF THE BASEHIT PITCHING MACHINE DEPENDS ON THE QUALITY, HARDNESS AND TYPE OF BALLS USED WITH THIS PRODUCT! TREND SPORTS
Instruction Manual. Image of SP-3015 & SP-3815. Important Safeguards. Automatic Dispensing Hot Water Pot with Reboil Function
 Important Safeguards READ ALL INSTRUCTIONS BEFORE USE. Instruction Manual Automatic Dispensing Hot Water Pot with Reboil Function Image of SP-3015 & SP-3815 SP-3015: 3.0L SP-3815: 3.8L SP-3017: 3.0L (Stainless
Multi Axis Engraver. Operations Manual. Vision Engraving & Routing Systems 17621 N. Black Canyon Hwy. Phoenix, AZ 85023 www.visionengravers.
 Multi Axis Engraver Operations Manual Vision Engraving & Routing Systems 17621 N. Black Canyon Hwy. Phoenix, AZ 85023 www.visionengravers.com Copyright 2005 Vision Computerized Engraving & Routing Systems
Hand and Power Tool Safety Tips
 Hand and Power Tool Safety Tips Selecting the Right Tool, Posture and Positioning Understanding grips, force and pressure Power Grip: provides maximum hand power for high force tasks. All the fingers should
15GAL STEEL OIL DRAIN WITH 110V PUMP
 15GAL STEEL OIL DRAIN WITH 110V PUMP OWNER S MANUAL WARNING: Read carefully and understand all ASSEMBLY AND OPERATION INSTRUCTIONS before operating. Failure to follow the safety rules and other basic safety
GUTTER MACHINE CONTROLS STANDARD
 GUTTER MACHINE CONTROLS STANDARD Note: determine what type of control package is installed on the machine. --more-- All operators should familiarize themselves with the appropriate controls prior to any
1. SAFETY RULES. 8. Avoid placing objects in the path of the blades.
 1 1. SAFETY RULES 1. To reduce the risk of electric shock, insure electricity has been turned off at the circuit breaker or fuse box before beginning. 2. All wiring must be in accordance with the National
INSTALLATION INSTRUCTIONS for Bifold Doors (JII103)
") Thank you for selecting JELD-WEN products. Attached are JELD-WEN s recommended installation instructions for premium composite, hollow and solid core molded Bifold Doors. Bifolds are designed for fast
Thank you for selecting JELD-WEN products. Attached are JELD-WEN s recommended installation instructions for premium composite, hollow and solid core molded Bifold Doors. Bifolds are designed for fast
ROUTER TABLE INSERT ASSEMBLY AND OPERATING INSTRUCTIONS
 ROUTER TABLE INSERT 94331 ASSEMBLY AND OPERATING INSTRUCTIONS 3491 Mission Oaks Blvd., Camarillo, CA 93011 Visit our Web site at http://www.harborfreight.com Copyright 2006 by Harbor Freight Tools. All
DO NOT OPERATE LANCELOT OR SQUIRE WITHOUT FIRST ADJUSTING THE SAFETY GUARD. ( See Below)
") Assembly Instructions - Lancelot and Squire King Arthur s Tools (KAT) is pleased to present the first tandem mounted saw chain accessories whereby differing combinations of Lancelot and Squire may be paired
Assembly Instructions - Lancelot and Squire King Arthur s Tools (KAT) is pleased to present the first tandem mounted saw chain accessories whereby differing combinations of Lancelot and Squire may be paired
Chelsea Loft Bed WARNING:
 Chelsea Loft Bed WARNING: Failure to follow these warnings and assembly instructions could result in serious injury or death. Read all instructions before assembling bunk bed. KEEP INSTRUCTIONS FOR FUTURE
8" BENCH GRINDER OWNER'S MANUAL
 8" BENCH GRINDER OWNER'S MANUAL WARNING: Read carefully and understand all INSTRUCTIONS before operating. Failure to follow the safety rules and other basic safety precautions may result in serious personal
Instructions Manual AmazonBasics 12-Sheet Cross-Cut Paper / CD / Credit Card Shredder with Basket ASIN# B005QAQFFS. Customer Service 1-866-216-1072
 Instructions Manual AmazonBasics 12-Sheet Cross-Cut Paper / CD / Credit Card Shredder with Basket ASIN# B005QAQFFS Customer Service 1-866-216-1072 Paper Shredder Instructions Manual Sheet Capacity 12 Sheets
Chapter 6 Machining Center Carbide Insert Fundamentals
 This sample chapter is for review purposes only. Copyright The Goodheart-Willcox Co., Inc. All rights reserved. N10G20G99G40 N20G96S800M3 N30G50S4000 N40T0100M8 N50G00X3.35Z1.25T0101 N60G01X3.25F.002 N70G04X0.5
MBSAW. Meat Cutting Band Saw With Meat Grinder Assembly & Operating Instructions
 06/2011 MBSAW Meat Cutting Band Saw With Meat Grinder Assembly & Operating Instructions READ ALL INSTRUCTIONS AND WARNINGS BEFORE USING THIS PRODUCT. This manual provides important information on proper
Thread Tensions All Machines
 Below are items related to thread tensions and tension problems as found on Brother embroidery equipment. They are listed in the order that they most often occur. Use this form only as a guide. Following
Cable Drum Machine. Operation Manual BC260 SERIES. Cleans 1 1/4" to 3" lines up to 50'
 Cable Drum Machine Operation Manual BC260 SERIES Cleans 1 1/4" to 3" lines up to 50' Used For: Sink, Shower & Floor Drains 42FM " WARNING - Read All Instructions, When Using Electric Tools, Basic Safety
Guide for Modified Assembly: Lightning McQueen. By: Collin Patterson, University of Delaware. Materials and Tools:
 Guide for Modified Assembly: Lightning McQueen By: Collin Patterson, University of Delaware Materials and Tools: PVC o 40 inches of 1 in diameter PVC o 25 inches of ¾ in PVC o 4 x 1 in elbows o 2 x ¾ in
MP-4V Heavy Duty Riveter / 39048
 MP-4V Heavy Duty Riveter / 39048 This newly designed heavy-duty air/hydraulic riveter is ergonomically designed with the professional in mind. The light weight 3.7 lbs. well balanced MP-4V includes a Vacuum
Front Panel Board Cable Replacement Instructions
 apple Mac Pro Front Panel Board Cable Replacement Instructions First Steps 1 Shut down computer. Note: Follow these instructions carefully. Failure to do so could damage your equipment and void its warranty.
MG1532 & MG2032 MIXER-GRINDERS
 MIXER-GRINDER MG1532 & MG2032 MIXER-GRINDERS MODEL MG1532 ML-134099 7.5 HP Grind Motor + 1 HP Mix Motor MG1532 ML-134103 5 HP Grind Motor + 1 HP Mix Motor MG1532 ML-134100 7.5 HP Grind Motor + 1 HP Mix
Safety, Operation and Maintenance Manual with Parts List
 Safety, Operation and Maintenance Manual with Parts List 20-Gallon Wet/Dry Vac Important Information and Safety Instructions PLEASE READ BEFORE USE! # 961130020 9/10-Rev 1 20-Gallon Wet/Dray Vac TABLE
Speed-Mat Rectangle Cutter
 Speed-Mat Rectangle Cutter 1 Honeycomb baseboard. 2 Left hold down. 14 3 Bottom hold down. 4 4 Left / right rule. 8 5 8 5 Left / right rule pointer. 1 6 Top / bottom rule. 7 Top / bottom rule pointer.
3/4 PIPE CLAMP WITH STAND
 3/4 PIPE CLAMP WITH STAND Model 94053 ASSEMBLY AND OPERATING INSTRUCTIONS (3/4 DIAMETER PIPE NOT INCLUDED.) 3491 Mission Oaks Blvd., Camarillo, CA 93011 Visit our Web site at: http://www.harborfreight.com
Construction Safety Guidelines
 Construction Safety Guidelines Your safety is the primary concern on the job site. You should be cautious at all times and ask questions if you are unsure about any situation. Since Habitat work crews
Wessel-Werk EBK 340. Electric Power Nozzle. Operating Manual Wessel-Werk GmbH Im Bruch 2 D-51580 Reichshof Germany www.wessel-werk.
 Wessel-Werk EBK 340 Electric Power Nozzle Operating Manual Wessel-Werk GmbH Im Bruch 2 D-51580 Reichshof Germany www.wessel-werk.com IMPORTANT SAFEGUARDS When using an electric appliance, basic precautions
Andersen Electric Window Opener for Andersen Awning and Roof Windows
 W A Electric Window Opener Electric Window Opener for Awning and Roof Windows Congratulations! You have just purchased one of the many fine products. For ease of installation and continued enjoyment of
Tablet 30W Tablet 92W
 Tablet 30W Tablet 92W Owner s Manual 1 CONTENTS TABLE OF CONTENTS Important Safety Instructions 3-4 Parts Exploded View & Identification Tablet 30 5 Tablet 92 6 Introduction Tablet 30 7-8 Tablet 92 9-10
OPERATING INSTRUCTIONS FOR THE MODEL 210B-2 SRA
 OPERATING INSTRUCTIONS FOR THE MODEL 210B-2 SRA SAFETY PRECAUTIONS FOR THE MODEL 210B-2 SRA System Under Pressure: Shut off air supply and disconnect air hose before disassembling or disconnecting parts.
FRICTION BRAKE ON A LECLERC LOOM
 FRICTION BRAKE ON A LECLERC LOOM The friction brake permits a fine adjustment on the warp tension. It is particularly appreciated on a fine material and on fibers without elasticity such as linen and cotton.
Anthro Tablet Charging Cabinets
 Owner's Manual for Anthro Tablet Charging Cabinets Covers part numbers beginning TAB16 and TAB20. Components at a Glance The open views of the front and side of the cabinet below are for the TAB20 cabinet.
EBK 340 / EBK 341 Electric Power Nozzle
 IMPORTANT SAFEGUARDS When using an electric appliance, basic precautions should always be followed, including the following: Read all instructions before using this Motorized Nozzle. EBK 340 / EBK 341
ZAPPY 3 OWNER S MANUAL. Read this manual completely before riding your Electric ZAPPY 3.
 ZAPPY 3 OWNER S MANUAL Read this manual completely before riding your Electric ZAPPY 3. TECHNICAL INFORMATION Model No. : ZAPPY 3 Product size Type of motor Motor power Battery type Battery Charger Charging
Table of Contents. www.hunterfan.com. What to Expect with. Preparation. Tools Needed. Wiring. Hanging the Fan. Blades. Motor Housing.
 www.hunterfan.com Table of Contents What to Expect with Your Installation 30 inches Hanging the Fan Wiring 8 Maintenance, Operation & Cleaning Light Kit 13??? 14 1 9 Troubleshooting 11 5 Blades Motor Housing
Owner s Manual & Safety Instructions
 Owner s Manual & Safety Instructions Save This Manual Keep this manual for the safety warnings and precautions, assembly, operating, inspection, maintenance and cleaning procedures. Write the product s
Bedienungsanleitung Akku-Bohrschrauber Manual de Instrucciones Taladro atornillador a batería Manual de operação Aparafusadora com bateria
 Art.-Nr. 1799-18 D E P GB F GR Bedienungsanleitung Akku-Bohrschrauber Manual de Instrucciones Taladro atornillador a batería Manual de operação Aparafusadora com bateria Instruction manual Cordless screwdriver/drill
Instructions for Using the Watch Works Tool Kit to Change a Watch Battery
 Instructions for Using the Watch Works Tool Kit to Change a Watch Battery Click on this link http://www.allamericanwatches.com/site/626101/product/e2306-a to purchase the Watch Battery Replacement Tool
National- Spencer Inc.
 9-27-2010 National- Spencer Inc. 19.2V HEAVY DUTY GREASE GUN PRODUCT SPECIFICATION Charger Input Power 110 VAC Battery Output Power 19.2V Battery Capacity 1500 MAH Battery Pack Charge Time 1 Hour Maximum
INSTALL/REMOVAL INSTRUCTIONS: WINDOW REGULATOR
 REMOVAL/INSTALL OF WINDOW REGULATOR (741-306) Honda Accord 2003 07 General Tech Tips: Use painter s tape rather than duct tape to secure window. It will not damage paint or leave sticky residue. A plastic
Char-Lynn Hydraulic Motor. Repair Information. 10 000 Series. October, 1997
 Char-Lynn Hydraulic Motor October, 1997 Repair Information Geroler Motor Two Speed 001 27 Retainer inside bore of valve plate bearingless motors only 4 15 16 3 6 35 Parts Drawing 25 2 2 1 19 17 36 40 47
SE-1200-EI. Operation & Parts Manual
 SE-1200-EI Operation & Parts Manual SE 1200 EI OWNERS MANUAL Table of Contents 1. Installation guide 2. Set-up instructions 3. Operation instructions 4. Cleaning 5. Troubleshooting 6. Parts manual 7. Electrical
OSCILLATAP SIEVE SHAKER MANUAL
 OSCILLATAP SIEVE SHAKER MANUAL Thank you for purchasing the OSCILLATAP sieve shaker. You and your company will enjoy many years of use from this quality testing system. The Oscillatap sieve shaker has
MIME 3330 Mechanics Laboratory LAB 5: ROTATING BENDING FATIGUE
 MIME 3330 Mechanics Laboratory LAB 5: ROTATING BENDING FATIGUE Introduction In this experiment, the finite life fatigue behavior of a smooth cylindrical specimen as shown in Figure 1 will be studied in
TRIMMING UNIT/DIAMOND MACHINE TST.13
 TRIMMING UNIT/DIAMOND MACHINE TST.13 REFERENCE BOOK rel. 02.15 TRIMMING UNIT/DIAMOND MACHINE TST.13 REL. 02.15 ENGLISH LANGUAGE 1 MACHINE DESCRIPTION TST.13 was designed and built for processing methacrylate.
Threaded-lid. Acorn. project that won t fall far from the lathe
 Threaded-lid Acorn A The fun Woodturner s project that won t fall far from the lathe By Nick Cook Above: Rich texturing to a 53 4" x 31 2" acorn box enhances the appeal of the Willard Baxter acorn shown
6 FUNCTION HAMMER DRILL
 6 FUNCTION HAMMER DRILL MODEL NO: CON1500RHD PART NO: 6479508 OPERATION & MAINTENANCE INSTRUCTIONS GC0712 INTRODUCTION Thank you for purchasing this CLARKE 6 Function Hammer Drill. Before attempting to
SET-UP AND INSTALLATION FOR LEAD SCREW CARTRIDGE ASSEMBLY
 SET-UP AND INSTALLATION FOR LEAD SCREW CARTRIDGE ASSEMBLY 82-13-1 O-Ring (Rear) The Lead Screw Assembly is shipped separately. Note: Install Electrical and Pneumatic Circuitry. Be Sure electrical and pneumatic
INSTRUCTION. Industrial Sewing Machines. No. 010012. First published : June 1997 Second edition : March 2001
 INSTRUCTION Industrial Sewing Machines First published : June 1997 Second edition : March 2001 No. 010012 INTRODUCTION Thank you for your purchasing Kansai Special's DLR Series. Read and study this instruction
Makes bends greater than 90 in a single operation
 TurnPro Tools TurnPro Indexing Tube Bender TurnPro HTB Indexing Handle Tube Bender Makes bends greater than 90 in a single operation Eliminates crossed handles Noassembly andreassembly ofbenderhandles
No Rainfall Data is Collected
 No Rainfall Data is Collected There are a number of issues that can cause the system to not collect rainfall data, from clogged collectors to hardware failure or improper part replacement. The most common
Machine/Woodworking Shop The Basic Rules
 Machine/Woodworking Shop The Basic Rules 1. Eye protection or face shields are required when working in the shop. A selection of protective goggles and safety glasses are available in the shop. The eyeglasses
COMPOUND SLIDE MITER SAW W - 12 INCH
 COMPOUND SLIDE MITER SAW W - 2 INCH 4288 ASSEMBLY AND OPERATING INSTRUCTIONS 349 Mission Oaks Blvd., Camarillo, CA 930 Visit our Web site at http://www.harborfreight.com Copyright 2002 by Harbor Freight
Basic Spring Motor Roller Shades
 Comprehensive Roller Shade Installation Guide Basic Spring Motor Roller Shades ATTENTION!!! READ CAREFULLY! This shade has a reliable long-lasting Spring Motor. The Spring Motor must have proper tension
HP Pavilion All-in-One MS200 series PC. Upgrading and Servicing Guide. Printed in
 HP Pavilion All-in-One MS200 series PC *579907-001* *579907-001* Printed in Upgrading and Servicing Guide Replacing a Wireless Keyboard or Mouse...2 Before You Begin... 2 Replacing the Keyboard or Mouse...
AZEK Rail Install Guide
 TRIM MOULDING DECK PORCH RAIL PAVERS AZEK Rail Install Guide Installing AZEK Rail with CableRail by Feeney... 1 Installing CableRail by Feeney for AZEK Rail... 7 Installing AZEK Rail Stairs with CableRail
Trillium 40 Axis Spring Tensioner Wire Replacement Instructions
 Trillium 40 Axis Spring Tensioner Wire Replacement Instructions 1 Overview The objective is to replace the broken axis spring tensioner wire. This requires the following tasks: 1. Remove the seismometer
SAFETY & OPERATING INSTRUCTIONS
 SAFETY & OPERATING INSTRUCTIONS EDLUND TOMATO LASER, Models ETL -316, -140 & -380 READ AND UNDERSTAND THIS MANUAL AND ALL INSTRUCTIONS BEFORE OPERATING THIS SLICER. 159 Industrial Parkway, Burlington,
Manual for GlobePharma Mini-Press II Rotary Tablet Press
 1 of 13 Preparing the Rotary Press 1. Make sure the rotary press is unplugged. 2. Open the bottom cabinet of the rotary press and take out the grey tool kit, and the beige box of punches and dies. 3. Take
National Optical & Scientific Instruments Inc. 11113 Landmark 35 Drive San Antonio, Texas 78233 Phone (210) 590-9010 Fax (210) 590-1104
 590-9010 Fax (210) 590-1104") National Optical & Scientific Instruments Inc. 11113 Landmark 35 Drive San Antonio, Texas 78233 Phone (210) 590-9010 Fax (210) 590-1104 INSTRUCTIONS FOR MODELS 106, 106-L 107, 107-L 108, 108-L 109-L ELEMENTARY
National Optical & Scientific Instruments Inc. 11113 Landmark 35 Drive San Antonio, Texas 78233 Phone (210) 590-9010 Fax (210) 590-1104 INSTRUCTIONS FOR MODELS 106, 106-L 107, 107-L 108, 108-L 109-L ELEMENTARY
1. SAFETY RULES WARNING TO REDUCE THE RISK OF FIRE, ELECTRIC SHOCK OR PERSONAL INJURY, MOUNT FAN TO OUTLET BOX MARKED "ACCEPTABLE FOR FAN SUPPORT".
 1 1. SAFETY RULES 1. To reduce the risk of electric shock, insure electricity has been turned off at the circuit breaker or fuse box before beginning. 2. All wiring must be in accordance with the National
JOURNEYMAN400 User s Guide Guía del usuario Mode d emploi
 2. SHARPEN BITS 1. ALIGN BITS 3. SPLIT POINTS JOURNEYMAN400 User s Guide Guía del usuario Mode d emploi Thank you... for buying your Drill Doctor 400. It will become a valuable tool because you will now