Retail Reception kiosk
|
|
|
- Philomena Gilbert
- 9 years ago
- Views:
Transcription
1
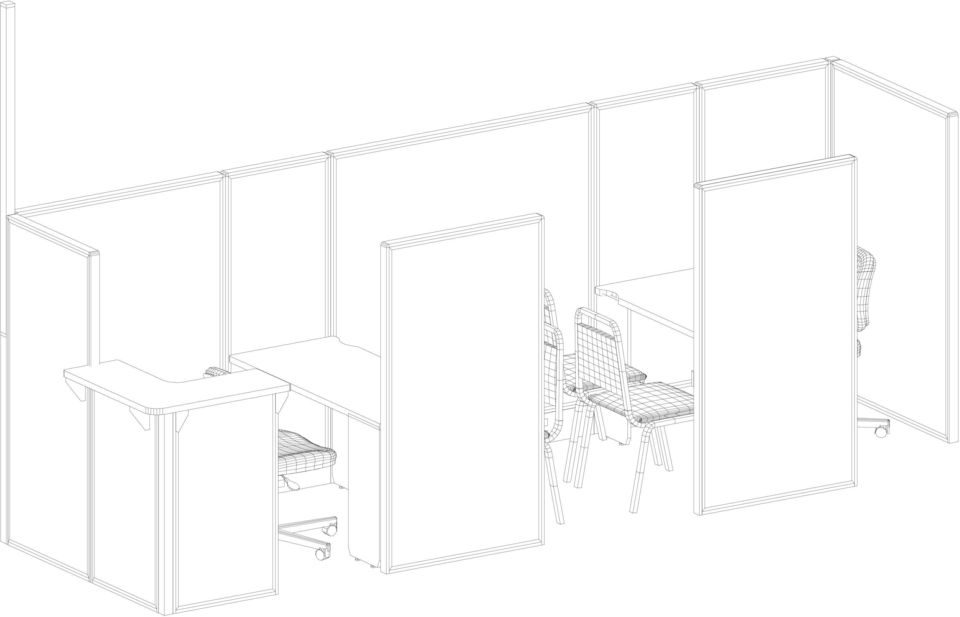
2 Retail Reception kiosk put 42" corner post in below 66" to allow post to extend above kiosk for raised box sign Mini cantilever option - 24" overhead support leg Mini cantilever option - 24" overhead 66/48E 66/24E 66/60E 66/24E 66/30E option - 30" overhead 66/30 42/ x x /42 42/24 66/36 66/36 support leg spanner rail

3

4 Retail privacy kiosk put 42" corner post in below 66" to allow post to extend above kiosk for raised box sign Mini cantilever option - 24" overhead support leg Mini cantilever option - 24" overhead 66/48E 66/24E 66/60E 66/24E 66/30E / x x /42 66/36 66/36 support leg spanner rail

5 Tools that will help you set up your kiosk 1. Rubber mallet 2. Cordless screw gun 12v or higher is better. It can be done with screwdrivers but the process is much easier with this tool. a. # 2 Phillips bit b. ¼ and 3/8 socket (might not be necessary) 3. Small level (optional) 4. Pliers 5. Box cutter 6. Flat blade screwdriver (to open metal raceways on panels) 7. 5 in 1 painter s tool (priceless when taking apart panels). Use to pull plastic connectors out of panels. Sample of 5 in 1 painters tool Other helpful hints Cleaning Kiosk panels are laminate and easily cleanable. Use an alcohol or ammonia based cleaner such as Windex to wipe down panels. Cleaners with any polish will streak and not look good. When storing your kiosk, take care in how you place the panels. Taking care will protect the panels and increase the life span of your kiosk. Most damage happens in the take down and transport of the kiosk. Have a box to store the small parts. Mark it well so you will have all the parts for next season. Do not store the panels flat. It is best to stack them against a wall. Poly wrapping the panels or placing some cardboard between each panel will help protect them.

6 Installation Instructions Jackson Hewitt Retail Kiosk General Kiosk Installation: Begin with 42" high panels positioned 90 degrees to each with connector post. Continue to build outside panels, clockwise per the layout. On two remaining panels install leg spacer first, then spanner rails into slots at height of leg. Screw on 12" leg to spacer. Note: Panels will have legs on opposite sides. Install worksurfaces Install 24x24 counter top. Install 30" steel overhead assy Install 24" steel overhead assy Install 24" tackboard. Unit by Unit Instructions: 1. Organize panels by size and open all panel hardware items. Carefully remove all panel Radius Top Caps. Screw out panel leveling glides apx. 1/4". Top Cap Leveling Glides 2. Begin with 42" high x 24" wide, non-electrical panel. Maxon Furniture Inc. an HNI Corporation company Customer Service REV. A November 2007 SHEET 1 OF 6

7 3. Install 42" high corner post. Place in slot at lower side of panel. Set corner post on bracket and slide in plastic into both panel & post t-slots. Cut off any excess just below aluminum frame. (See Parallel Panel Connection Instructions for details). 4. Install next 42" high x 24" wide, non-electrical panel. Adjust leveling glides to same height as first panel. Place Angle Alignment Bracket into panel slot near frame bottom so panel is 90 degrees to first. Slide panel along connector post so Angle Alignment Bracket engages in panel slot. Slide in plastic. Cut off any excess. Angle Alignment Bracket Corner Post Leveling Glides 5.Install 66" high x 30" wide, non-electrical panel. Adjust leveling glides. Place in lower panel slot. Slide in plastic to height of lower panel. Cut off any excess. Leveling Glide 6. Install 42" high corner post. Place in slot at lower side of panel. Set corner post on bracket and slide in plastic into both panel & post t-slots. Cut off any excess just below aluminum frame. (See Parallel Panel Connection Instructions for details). 7. Install 66" high x 48" wide, electrical panel. Adjust leveling glides. Place Angle Alignment Bracket into panel slot near frame bottom so panel is 90 degrees. Slide panel along connector post so Angle Alignment Bracket engages in panel slot. Slide in plastic. Cut off any excess. Angle Alignment Bracket Corner Post Leveling Glides SHEET 2 OF 6

8 8. Install 66" high corner post on top of 42" corner post. Slide corner post from above panels down onto plastic. Corner Post 9. Install 66" high x 24" wide, electrical panel. Adjust leveling glides. Place into lower panel slot. Slide in plastic. Cut off any excess. Leveling Glide 10.Install 66" high x 60" wide, electrical panel. Adjust leveling glides. Place in lower panel slot. Slide in plastic. Cut off any excess. Leveling Glide 11.Install 66" high x 24" wide, electrical panel. Adjust leveling glides. Place in lower panel slot. Slide in plastic. Cut off any excess. Leveling Glide 12.Install 66" high x 30" wide, electrical panel. Adjust leveling glides. Place in lower panel slot. Slide in plastic. Cut off any excess. Leveling Glide SHEET 3 OF 6

9 13. Install 66" high corner post. Place in slot at lower side of panel. Set corner post on bracket and slide in plastic into both panel & post t-slots. Cut off any excess just below aluminum frame. (See Parallel Panel Connection Instructions for details). Corner Post 14. Install 66" high x 42" wide, non-electrical panel. Adjust leveling glides. Place Angle Alignment Bracket into panel slot near frame bottom so panel is 90 degrees. Slide panel along connector post so Angle Alignment Bracket engages in panel slot. Slide in plastic. Cut off any excess. Angle Alignment Bracket Leveling Glides 15. Get 66" high x 36" wide, non-electrical panel. Place accross from 24" wide panel. Install Spanner Rail with spanner rail mini-cantilievers into panel slots at about 28" from the floor, and install the brace clip onto the panel's bottom rail. (see instructions) Install two panel mount mini-cantilever brackets on the 24" wide panel at 28" from the floor (see instructions) Spanner rail mini cantilevers. Panel mount mini cantilevers. Mount on 24" wide panel. 16. Get 54" long x 24" deep worksurface. Place worksurface on all four mini-cantilevers aligning with inserts on bottom of the worksurface. Screw in machine screws to attach worksurface (8 places) 17. Get Panel Brace. Slide "hooked" end under the 36" wide panel where the brace clip is located. Screw in the machine screw to attach the brace to the worksurface. Screw the panel brace to the sides of the brace clip with two Black Screws. (See instructions) 18. Repeat steps 15 thru 17 for other panel/worksurface. SHEET 4 OF 6

10 19. Install panel lock bar at straight panel connections (4 places). Install Lock Bar, bridging straight panel connections, using self-tapping screws. Make certain Lock Bar is centered between panels. (See Instructions) Lock Bar 20. Install metal Wedge Brackets at all panel to corner post connections (See instructions). (2 places - not on tall Sign Post corner) 20. Install panel Radius Top Caps back onto all panels. Top Cap 21. Install Corner Post Caps on open corner posts. (2 places - not on tall Sign Post Corner). 22. Install plastic Radius End Caps on all open ends of Radius Top Caps (7 places). Radius End Cap SHEET 5 OF 6
. 22.")
11 23. Install 24" Corner Counter Top per instructions. Place LH & RH Countertop Brackets in top panel slots on each side of both panels (8 brackets) Note: top flange should be inward. Place Counter Top surface on brackets and screw together. 24. Install 30" Steel Overhead Storage at corner (sign post) per instruction sheet. Place LH & RH End Panels into panel slots at top of panel. (Note: bends inward). Place Back Strip into panel slot at bottom of end panels. Snap Lower Shelf flanges into End Panel lower strips. Note: Key slot to front. Screw in Back Strip to underside flange of Lower Shelf. Snap Upper Shelf flanges into End Panel upper strips. Remove Keys from Door Slide. Place Door with Slides forward and mounting hinge down, aligning with holes on top. Screw in Door Slides (6 places). Align as necessary. Close and test key / locking of door. 25. Install 24" Steel Overhead Storage similar to step Install 24" Tack Board under Overhead Storage per instructions. Adjust and install into panel slots at desired height. SHEET 6 OF 6

12 42/60 42/60 42/24 30/2 24x60 24x60 18x42 42/24 66/24 66/ x48 24x48 66/30 66/24 66/24 11' 3 1/4" /30 66/36 66/48 10' 4" 66/36 Jackson Hewitt Tax Service 2 station mall kiosk

13 66/ / ' 10" 66/24 24x54 66/ /48 2H 30W 66/30 42/24 42/24

Premier & Deluxe 3-Season Room Sliding Glass Door
 DTSSGD-11 Premier & Deluxe 3-Season Room Sliding Glass Door Installation Instructions Screen Door Seal Left Side Track Top Track Assembly Right Side Track Right Side Trim Sliding Glass Door Sliding Screen
1 Door Tall Unit ASSEMBLY GUIDE. Page 1 of 9. WARNING: Contains small parts, keep out of reach of children.
 Page 1 of 9 ASSEMBLY GUIDE 1 Door Tall Unit IMPORTANT Before Commencing Assembly: Read all instructions COMPLETELY Ensure all listed parts are present If any parts are missing from Parts List 1, please
Speed-Mat Rectangle Cutter
 Speed-Mat Rectangle Cutter 1 Honeycomb baseboard. 2 Left hold down. 14 3 Bottom hold down. 4 4 Left / right rule. 8 5 8 5 Left / right rule pointer. 1 6 Top / bottom rule. 7 Top / bottom rule pointer.
IN00419 (rev A) Aqua 6 Glide Quadrant and Off-set Quadrant Enclosure
 Aqua 6 Glide Quadrant and Off-set Quadrant Enclosure") IN00419 (rev A) Aqua 6 Glide Quadrant and Off-set Quadrant Enclosure Instruction suitable for both Quadrant & Off-set Quadrant variations. Instruction suitable for both Right and Left Hand fixing variations
IN00419 (rev A) Aqua 6 Glide Quadrant and Off-set Quadrant Enclosure Instruction suitable for both Quadrant & Off-set Quadrant variations. Instruction suitable for both Right and Left Hand fixing variations
CHARISMA SHOWER/TUB DOOR INSTALLATION INSTRUCTIONS
 CHARISMA SHOWER/TUB DOOR INSTALLATION INSTRUCTIONS IMPORTANT DreamLine reserves the right to alter, modify or redesign products at any time without prior notice. For the latest up-to-date technical drawings,
DIRECTIONS FOR ASSEMBLING BASE & WALL CABINETS
 DIRECTIONS FOR ASSEMBLING BASE & WALL CABINETS TheRTAStore.com STEP 1: CLEAR A WORK SPACE Place your RTA cabinet panels on a smooth, scratch resistant surface in a large, open area. (Some people like to
OWNER S MANUAL Table Tennis Table Patent Pending
 OWNER S MANUAL Table Tennis Table Patent Pending Be sure to write your model number and serial number here for future reference. You can find these numbers printed on the bottom of the table. MODEL # T8179
Horizontal Mini Blinds Installation Guide
 Horizontal Mini Blinds Installation Guide We make it easy! BTG 468298 EN_ rev0614 For more safety information: 1-866-662-0666 or.www.healthcanada.gc.ca/blindcords Before starting Your new Blinds To Go
BUILT-IN DISHWASHER INSTALLATION INSTRUCTIONS
 BUILT-IN DISHWASHER INSTALLATION INSTRUCTIONS PLEASE READ COMPLETE INSTRUCTIONS BEFORE YOU BEGIN LEAVE INSTALLATION INSTRUCTIONS AND USER'S GUIDE WITH OWNER ALL ELECTRIC WIRING AND PLUMBING MUST BE DONE
SPIRAL STAIR KIT INSTALLATION MANUAL
 SPIRAL STAIR KIT INSTALLATION MANUAL Effective January 1, 2014 If you have any questions, please call the location that your Stair Kit was purchased from: Broomall, Pennsylvania 1-800-52-7427 Ontario,
WINDOW REPAIR MANUAL & REFERENCE GUIDE
 WINDOW REPAIR MANUAL & REFERENCE GUIDE TABLE OF CONTENTS DOUBLE HUNG & SINGLE HUNG PARTS 4-5 CASEMENT PARTS 6 SCREEN PARTS 7-8 HOW TO REMOVE TILT-IN SASH 9 HOW TO REMOVE A BALANCE 10 HOW TO INSTALL BALANCE
CONFER ABOVE GROUND CURVE STEP / ABOVE GROUND CURVE STEP SYSTEM ASSEMBLY AND INSTALLATION MANUAL
 SAVE THESE INSTRUCTIONS DEALER/INSTALLER: GIVE TO HOMEOWNER CONFER ABOVE GROUND CURVE STEP / ABOVE GROUND CURVE STEP SYSTEM ASSEMBLY AND INSTALLATION MANUAL Model CCX-AG Note: 40 lbs. of sand required!
Panel Track Installation Guide
 Panel Track Installation Guide We make it easy! BTG 493361 EN_0510 Before starting Your new Blinds To Go panel track is custom made to your specifications from the finest materials available. To ensure
Standard Sleep Pod Side Entry Assembly Instructions
 Standard Sleep Pod Side Entry Assembly Instructions www.podtime.co.uk [email protected] Working House Ltd How to assemble your pod Pod assembly onsite is a relatively simple exercise for two people
INSTRUCTIONS THOROUGHLY BEFORE BEGINNING***************
 Bill of Materials: RAC0012 Green Wing Aerodynamic Skirt Kit Item Part Number Description Quantity 1 RMC0218 Gen 2 Trailer Skirt Roadside 1 2 RMC0219 Gen 2 Trailer Skirt Curbside 1 3 RMC0041 Trailer Skirt
INSTRUCTIONS: LocknCharge Laptop Carts
 INSTRUCTIONS: LocknCharge Laptop Carts www.lockncharge.com Extra Tools required: Hammer, Philips head screwdriver, medium adjustable spanner. (Allen key supplied) (Panel colours for illustration purposes
majestic install ation guide barcelona three sided enclosure 24mm surface mounted wall channels and underframe to base
 majestic install ation guide barcelona three sided enclosure 24mm surface mounted wall channels and underframe to base These Instructions are for a left and right handed unit. The diagrams show a left
Installation Instructions 4508 4508S
 SYMPHONY Spread Lavatory Faucet with Speed Connect Drain Congratulations on purchasing your American Standard faucet with Speed Connect drain, a feature found only on American Standard faucets. Speed Connect
Vinyl Brick Mould Field Installation Instructions All Vinyl and Vinyl Clad Windows
 Vinyl Brick Mould Field Installation Instructions All Vinyl and Vinyl Clad Windows Viewed from the exterior. IMPORTANT: Please read before you begin installation. TABLE OF CONTENTS AND TOOL / MATERIAL
Customer Service 800.780.8889 or visit us online at smithnoble.com. Wood Shutters. Step by Step Installation. Troubleshooting Tips
 reflect your style TM Customer Service 800.780.8889 or visit us online at smithnoble.com Wood Shutters Step by Step Installation Troubleshooting Tips Easy Care Instructions STEP 1 Your New Shutter Thank
Hollow or Cinder Block Wall Mount Job Aid
 Summary This Job Aid covers: Hollow or Cinder Block Wall Mount Job Aid Hollow or Cinder Block wall Mount Bracket Installing the Mount Bracket into Cinder Block This Job Aid supports the Technician audience.
All-Season Sunroom Sliding Glass Door Installation Instructions
 ASRESGD-08 All-Season Sunroom Sliding Glass Door Installation Instructions Panel Frame Door Frame Left Side Foam Insulator IE241 H Bar Assembly Door Frame Top Track Panel Frame Door Frame Right Side Stationary
Cable Drum Installation
 20 Cable Drum Installation COUNTERBALANCE None Shake the TorqueMaster spring tube gently to extend the winding shafts out about 5" on each side. For single spring applications, there will be no left hand
Lunette 2 Series. Curved Fixed Frame Projection Screen. User s Guide
 Lunette 2 Series Curved Fixed Frame Projection Screen User s Guide Important Safety and Warning Precautions Please follow these instructions carefully to ensure proper maintenance and safety with your
Wren Kitchens Installation Tips... 3. Carefully check your kitchen delivery... 4. Measuring out and marking up... 5. Fitting the base cabinets...
 tra 1 Index Wren Kitchens Installation Tips... 3 Carefully check your kitchen delivery... 4 Measuring out and marking up... 5 Fitting the base cabinets... 6 Fitting the corner cabinets... 7 The 972mm or
Base Cabinet Assembly Instructions
 Base Cabinet Assembly Instructions Publication Number TSG-BCAI-001 Version 1.0 July 2012 2012 The Shekia Group, LLC (TSG) All Rights Reserved. Notice Every effort was made to ensure that the information
Installation Instructions
 Installation Instructions For Use with PXPV230, PXPV265, PXPD230, and PXPD265 models Attention! - Please read these instructions completely before attempting installation. Always unplug the power supply
DE Frame with C Series Sidelight
 TOOLS REQUIRED Tape measure 6' magnetic level 3' magnetic level Screw gun with clutch adjusted #2 phillips tip #3 phillips tip Screwdriver (used to adjust frame on will using oval slots) Pry Bar Powder
glass & Glazing Products
 glass & Glazing Products WallMaker Create an unlimited variety of bright, beautiful and secure interior environments with the easy-to-install Stylmark WallMaker glass wall system. This versatile system
5800 Temperature Sensor Cable Assembly
 5800 Temperature Sensor Cable Assembly Removal and Replacement Instruction Sheet #60-4702-070 Revision D, January 14, 2013 Overview The 5800 has two refrigeration temperature sensors, one attached to the
INSTALL/REMOVAL INSTRUCTIONS: WINDOW REGULATOR
 REMOVAL/INSTALL OF WINDOW REGULATOR (741-306) Honda Accord 2003 07 General Tech Tips: Use painter s tape rather than duct tape to secure window. It will not damage paint or leave sticky residue. A plastic
HALE PET DOOR INSTALLATION INSTRUCTIONS HALE STANDARD PANEL MODEL
 HALE PET DOOR INSTALLATION INSTRUCTIONS HALE STANDARD PANEL MODEL Please read these instructions carefully and completely before attempting to install Hale Pet Doors; they will guide you through the steps
Seismic Installation for Attic Storage System
 Your Performance Partner Seismic Installation for Storage System CONTENTS SSafety Precautions................................. 2 Required Tools..................................... 2 Parts and Fastener
Banner Clip Installation
 Banner Clip Installation For fabric graphics or solid fabric panel installation onto EZ6 or EZ12 truss. Graphics may be on either side of a banner. The top seam will determine which side faces you. Rigid
HOW TO INSTALL A BEAUTIFUL NEW KITCHEN
 HOW TO INSTALL A BEAUTIFUL NEW KITCHEN Easy to follow step-by-step kitchen cabinet installation TOOL AND MATERIAL LIST Hammer Pry bar Screwdriver Phillips Flathead Level Tape measure Pencil Straight edge
SE-1200-EI. Operation & Parts Manual
 SE-1200-EI Operation & Parts Manual SE 1200 EI OWNERS MANUAL Table of Contents 1. Installation guide 2. Set-up instructions 3. Operation instructions 4. Cleaning 5. Troubleshooting 6. Parts manual 7. Electrical
FRONT BUMPER INSTALLATION INSTRUCTIONS 2007-2011 DODGE / MERCEDES SPRINTER
 Aluminess Products Inc 9402 Wheatlands Ct. #A Santee, CA 92071 619-449-9930 FRONT BUMPER INSTALLATION INSTRUCTIONS 2007-2011 DODGE / MERCEDES SPRINTER Please read before beginning Stainless steel hardware
Installation Manual. Toilet Partitions, Dressing Compartments & Shower Stalls
 Installation Manual Toilet Partitions, Dressing Compartments & Shower Stalls Metpar Corp 95 State Street, Westbury, New York, USA, 11590 Tel: 516-333-2600 Fax: 516-333-2618 Internet: http://www.metpar.com
Your Simple Guide to Battery. www.firstalertpro.com. Replacement. Customer Care: 1-800-852-0086. www.firstalertpro.
 Previous Menu Your Simple Guide to Battery www.firstalertpro.com Replacement p e t s ts ep -by Customer Care: 1-800-852-0086 FA/1565 9/00 www.firstalertpro.com Table of Contents: page Introduction...............................
Post Mount Light Installation*
 Post Mount Light Installation* *For the general installation of most Post Mount Spotlights, many vehicles may need slight modifications to these instructions. You will need the following tools: High torque
50 TO 60 INSTALLATION INSTRUCTIONS v1.0
 50 TO 60 INSTALLATION INSTRUCTIONS v1.0 PLEASE READ Thank you for purchasing The TV Shield. Please read the following, before starting the installation process. UYou will need to unscrew the ten (10) black
Integral Kit Instructions
 Integral Kit Instructions For Fisher & Paykel Cabinet widths of 525, 635, 680, 790 mm wide For curved door Models Series B, C, D & G Manual 814980 Updated August 2008 IMPORTANT If your refrigerator has
Assembly Instructions Model 1544 Heart-Of-The-Kitchen Island
 Assembly Instructions Model 1544 Heart-Of-The-Kitchen Island A. These units are Ready-to-Assemble. Catskill uses positive fastening methods such as wood screws and in some places hidden Bastion fasteners.
IMPORTANT INSTALLATION GUIDE VALENCIA SQUARE CORNER SHOWER READ ALL INSTRUCTIONS CAREFULLY BEFORE STARTING THE INSTALLATION
 INSTALLATION GUIDE VALENCIA SQUARE CORNER SHOWER SEALANT REQUIRED TO COMPLETE THIS INSTALLATION: (Not supplied) Sika Sikasil NG (Arctic White) To seal the WHITE shower door and returns to the shower tray.
Triple Threat 3-in-1 Game Table 3 IN 1 GAME TABLE
 NG0M Triple Threat 3-in- Game Table 3 IN GAME TABLE Thank 3 in Y Game Table Thank you for your purchase of our product. We work around the clock and around the globe to ensure that our products maintain
MGB Chrome Bumper Conversion
 MGB Chrome Bumper Conversion Installation Instructions For 1974 1/2-1980 MGB This kit requires cutting, welding, and painting. Professional installation recommended. Note: Every MGB body is slightly different
Go-kart for little race-drivers
 Go-kart for little race-drivers Drill and drive. Go-kart What it lacks in speed, it more than makes up for in fun: the go-kart will excite little race-drivers. 1 Introduction It s only a go-kart, but it
HermanMiller Aeron Posturefit Installation AE905A AE905B AE905C
 HermanMiller Aeron Posturefit Installation AE905A AE905B AE905C Y How to assemble to your chair Parts Included Posturefit Mechanism For more information about our products and services or to see a list
GENUINE PARTS INSTALLATION INSTRUCTIONS
 GENUINE PARTS INSTALLATION INSTRUCTIONS DESCRIPTION: Illuminated Kick Plate APPLICATION: Rogue (2011) PART NUMBER: 999G6 GX010 KIT CONTENTS: Item A B C G H QTY 1 1 1 D 1 E 1 F 3 15 6 Description Kick Plate,
Coyote popup features
 Coyote popup features The Coyote popup display system combines strength, reliablility, and style in a lightweight and easy to use system. It is fully magnetic, making it simple to assemble and disassemble,
Navico-Northstar 2kW JRC Radar Package, Scanner Cable Removal and Replacement
 Navico-Northstar 2kW JRC Radar Package, Scanner Cable Removal and Replacement This work instruction describes the methods and means for which to remove and reinstall optional scanner cable configurations
VERSARAIL ALUMINUM STAIR RAILING INSTALLATION INSTRUCTIONS. Owner's Manual. Version. www.barretteoutdoorliving.com. Models
 Models VERSARAIL ALUMINUM STAIR RAILING 73013153 INSTALLATION INSTRUCTIONS 73013154 73013155 73013156 Owner's Manual Version 1.0 VERSASTAIR_BOM V1 3/2012 www.barretteoutdoorliving.com VERSARAIL ALUMINUM
KITCHENS. Tip PAGE 1 FITTING YOUR KITCHEN GUIDE. How to mark out a kitchen. Tools required for installing a kitchen STEP ONE STEP TWO STEP THREE
 FITTING YOUR KITCHEN GUIDE How to mark out a kitchen PAGE 1 Before starting on the installation, measure 870mm from the lowest point of the floor and mark a datum line around the room to indicate where
HP Laser Jet 4200/4240/4250/4300/4350 Swing Plate
 HP Laser Jet 4200/4240/4250/4300/4350 Swing Plate 1 Swing Plate Assembly-RM1-0043 1 Swing Plate Kit-5851-2766 (RM1-0043 plus RM1-1091 gear) CAUTION: Fuser may be hot. Turn off printer, unplug it and allow
Coyote popup features
 Coyote popup features The Coyote popup display system combines strength, reliablility, and style in a lightweight and easy to use system. It is fully magnetic, making it simple to assemble and disassemble,
SEQUEL ASSEMBLY INSTRUCTIONS. 6003 Compact Desk [email protected]
 BIUSA.COM [email protected] Component List Sequel is engineered for easy assembly. Carefully follow this procedure to prevent any damage. A - 4mm Hex Wrench B - 1/4-20 x 12 mm Flat Head Machine
DIY CABINET REFACING INSTALLATION GUIDE
 DIY CABINET REFACING INSTALLATION GUIDE CABINET REFACING INSTALLATION Are you ready to reface your outdated cabinets? This guide will show you how to install your new Facelifters Cabinet Refacing Products
Auto-belay Cable Replacement Process
 Auto-belay Cable Replacement Process Version 2.00 WARNING: The air pressure in the auto-belay system is what causes the cable to be retracted when releasing the cable or climbing the wall with the cable
TOYOTA TUNDRA 2015 Billet Grille w/led DRL
 TOYOTA TUNDRA 2015 Billet Grille w/led DRL Part Number: 00016-34088 Accessory Code: BG3000 Conflicts Models 1794 and Platinum Kit Contents Item # Quantity Reqd. Description 1 2 LED DRL 2 1 Driver Box 3
REPLACEMENT INSTRUCTIONS FOR AWNING
 REPLACEMENT INSTRUCTIONS FOR AWNING Fabric Roller Tube Torsion Assembly For Models 8500 & 9000 Tools Required: Vise Grips Socket Wrench Set 3/16" rill Bit 1/8" Pop Rivets End Cap Guide Screwdriver Electric
QWALL 4 ACRYLIC SHOWER WALL INSTALLATION INSTRUCTIONS
 QWALL 4 ACRYLIC SHOWER WALL INSTALLATION INSTRUCTIONS IMPORTANT DreamLine TM reserves the right to alter, modify or redesign products at any time without prior notice. For the latest up-to-date technical
BUTTERFLY SHOWER DOOR INSTALLATION INSTRUCTIONS
 BUTTERFLY SHOWER DOOR INSTALLATION INSTRUCTIONS IMPORTANT DreamLine reserves the right to alter, modify or redesign products at any time without prior notice. For the latest up-to-date technical drawings,
UNPACKING AND ASSEMBLY
 UNPACKING AND ASSEMBLY Assembly Instructions Step 1. Open the two boxes and remove all the parts. Lay out the parts as shown below and read through the assembly instructions before beginning assembly.
RAIN COLLECTOR S HELF MANUAL
 RAIN COLLECTOR S HELF MANUAL The Rain Collector Shelf provides a good mounting support for your Rain Collector II. The Rain Collector Shelf is designed to be attached to Davis Sensor Mounting Arm, and
FTC 2015-2016 DIY Mountain Build Guide
 FTC 2015-2016 DIY Mountain Build Guide Assembly Instructions Check out the DIY2015-2016 Prints and BoM for individual part details. Release 1.0 9/10/15 Page 1 This guide and Bill of Materials are for constructing
EXPLORE 4-Leg Teaming Table with Screen Share Assembly Instructions
 EXPLORE 4-Leg Teaming Table with Screen Share Monitor Display Requirements: your flat panel display must confirm to the following requirements. y With the stand removed, the monitor must not exceed 40
contents classic 3 switch 4 mini swing 5 sign wedge 6 chalkboards 7 all purpose A frames 8 H2O swingmaster 9 café banner 10 vision 11
 the sign selection pavement swing signs pavement foil signs A boards forecourt signs pavement banner stand systems A frame banners promotion units snapframe signage suspended poster rails contents PAVEMENT
SAVE THESE INSTRUCTIONS DEALER/INSTALLER: GIVE TO HOMEOWNER MODEL #7200
 SAVE THESE INSTRUCTIONS DEALER/INSTALLER: GIVE TO HOMEOWNER MODEL #7200 ROLLGUARD A-FRAME LADDER LADDER MUST BE ATTACHED TO POOL FRAME. DO NOT USE WITH INFLATABLE POOLS ASSEMBLY AND INSTALLATION MANUAL
Coyote popup features
 Coyote popup features The Coyote popup display system combines strength, reliablility, and style in a lightweight and easy to use system. It is fully magnetic, making it simple to assemble and disassemble,
How to Install UnderDeck The Original.
 How to Install UnderDeck The Original. TOOLS: Chalk Line Caulk Gun Garden hose or water bucket Gloves Hammer or Screw Gun Power Mitre Saw with OSB Blade Pencil Pliers Safety Glasses Straight Edge / Carpenter
Alpha System ADAPTABLE KEWAUNEE LABORATORY FURNITURE. encouraging new discovery
 Alpha System ADAPTABLE LABORATORY FURNITURE KEWAUNEE encouraging new discovery Alpha 6 partition modules with Kemresin worktops. Minneapolis, Minnesota Alpha 6 partition modules with Alpha overhead service
SWIM N DUNK CHALLENGE RESIDENTIAL BASKETBALL GAMES And COMMERCIAL ASSEMBLY AND INSTALLATION INSTRUCTIONS
 SWIM N DUNK CHALLENGE RESIDENTIAL BASKETBALL GAMES And COMMERCIAL BASKETBALL GAMES ASSEMBLY AND INSTALLATION INSTRUCTIONS CORPORATE HEADQUARTERS WESTERN SALES AND MANUFACTURING PLANT P.O. Box 400 Canby,
Guidelines for Earthquake Bracing of Residential Water Heaters
 Guidelines for Earthquake Bracing of Residential Water Heaters Department of General Services Division of the State Architect 1102 Q Street, Suite 5100 Sacramento, CA 95814 Phone: (916) 324-7099 Fax: (916)
TENSION ISSUES? ROLLER SEE PAGE 7
 ROLLER TENSION ISSUES? SEE PAGE 7 Roller Shade Installation Guide Important: If you have ordered a valance for your shade, you must first read the Valance Installation Guide found in your box. We make
KITCHEN INSTALLATION GUIDE
 KITCHEN INSTALLATION GUIDE The step-by-step guide to installing your new kitchen right The materials and tools you ll need This brochure is your guide to preparing and installing your new kitchen. Inside
New method, replacement of window and window lift, front door
 SERVICE INFORMATION Number: 831-1646 Year: 1996 Month: Market: FEBRUARI ALL New method, replacement of window and window lift, front door Cars concerned All Saab 900 M94- Background A new method of removing
4RU High Density Shelf Installation Instructions
 4RU High Density Shelf Installation Instructions Table of Contents General Product Information... 1.0 Safety Precautions... 2.0 Tools Required... 3.0 Package Contents... 4.0 Installing the Product Unpacking...
CRASH RAIL INSTALLATION HEIGHT
 PLEASE READ PLEASE READ THESE INSTRUCTIONS THOROUGHLY PRIOR TO BEGINNING THE INSTALLATION! THIS INSTRUCTION SHEET IS INTENDED TO PROVIDE A SPECIFIC GUIDE TO FOLLOW FOR THE INSTALLATION OF THIS. CONTAINED
Installation Instructions
 Installation Instructions READ BEFORE INSTALLING UNIT For Low Profile Window Air Conditioner INSTALLATION WARNINGS AND CAUTION Carefully read the installation manual before beginning. Follow each step
WILDING WALLBEDS BUNK BED INSTALLATION INSTRUCTIONS
 WILDING WALLBEDS BUNK BED INSTALLATION INSTRUCTIONS Instruction Booklet 18 WARNING! ALL MURPHY/WALLBED SYSTEMS CONTAIN POWERFUL LIFTING COMPONENTS. FAILURE TO USE AND FOLLOW THESE INSTRUCTIONS DURING THE
Installation Manual. SKU# 21000 series (Base Rails) SKU# 22000 series (Overhead Racks)
 SKU# 22000 series (Overhead Racks)") Installation Manual SKU# 21000 series (Base Rails) SKU# 22000 series (Overhead Racks) Welcome to the world of TracRac! We re delighted that you have chosen TracRac, the ultimate sliding truck rack system.
Installation Manual SKU# 21000 series (Base Rails) SKU# 22000 series (Overhead Racks) Welcome to the world of TracRac! We re delighted that you have chosen TracRac, the ultimate sliding truck rack system.
Base Cabinet with Self-storing Folding Doors and Floor
 Usable Kitchens When designing a kitchen for use by persons with mobility impairments, especially those who use wheelchairs, careful layout of the kitchen is crucial to maintaining accessibility. People
Build a Trade-Show Booth for Under $200!
 Build a Trade-Show Booth for Under $200! This corner booth, with a seven foot front and sweeping 4x8 backdrop, assembles in less than 20 minutes and can be built in one weekend. Materials Tools 4 x8 x3/4
Pulleys and Belt. Install the Major Accessory and Pulley. Install the Motor Pulley NOTE. Align the Motor Pulley and the Tool Pulley NOTE
 Pulleys and Belt Pulley Guard - 505862 Install the Major Accessory and Pulley 1. Place the short end of the mounting base holes, and insert - but don t tighten - the setscrews. If the Major Accessory has
Gripper Kit for the Boe-Bot Robot (#28202)
") 599 Menlo Drive, Suite 100 Rocklin, California 95765, USA Office: (916) 624-8333 Fax: (916) 624-8003 General: [email protected] Technical: [email protected] Web Site: www.parallax.com Educational: www.stampsinclass.com
599 Menlo Drive, Suite 100 Rocklin, California 95765, USA Office: (916) 624-8333 Fax: (916) 624-8003 General: [email protected] Technical: [email protected] Web Site: www.parallax.com Educational: www.stampsinclass.com
Black Wolf POCKET BILLIARD TABLE INSTALLATION MANUAL. SERVICE DEPARTMENT P.O. BOX 68 BRISTOL, WI 53104
 Black Wolf TM POCKET BILLIARD TABLE INSTALLATION MANUAL www.brunswickbilliards.com SERVICE DEPARTMENT P.O. BOX 68 BRISTOL, WI 53104 51-905710-000 SEPTEMBER 2010 NOTE: Please use the instructions in this
Triac Printed Circuit Board Replacement
 Technical Service Bulletin: Triac Printed Circuit Board Replacement TRONIC 5000C Pro Models: WH17, WH27, WH36 Introduction Fig. 1 ELECTRICITY IS EXTREMELY DANGEROUS. TAKE EXTRA PRECAUTIONS AND ENSURE ALL
Congratulations on your new IKEA Kitchen, and on the money you saved!
 Congratulations on your new IKEA Kitchen, and on the money you saved! INSTALLATION GUIDE FOR YOUR AKURUM KITCHEN Seven steps to a brand new kitchen It s time to discover another major advantage of investing
Rollator Cane and Brake Replacement SAFETY SUMMARY (CONTINUED)
") Rollator Cane and Replacement Assembly, Installation and Operating Instructions SAVE THESE INSTRUCTIONS NOTE: Check ALL parts for shipping damage. If shipping damage is noted, DO NOT use. Contact Carrier/Dealer
Rollator Cane and Replacement Assembly, Installation and Operating Instructions SAVE THESE INSTRUCTIONS NOTE: Check ALL parts for shipping damage. If shipping damage is noted, DO NOT use. Contact Carrier/Dealer
Replacement Instructions. Warning: During this procedure, keep small parts away from children.
 apple ibook G4 Memory Card Replacement Instructions Follow the instructions in this sheet carefully. Failure to follow these instructions could damage your equipment and void its warranty. Note: Written
GE Wireless Devices Battery Replacement
 60-506-319.5 Crystal Smoke Detector Two 9V Duracell 9V 1. Twist counter-clockwise until detector become loose from base. 2. Replace batteries observing correct polarity. 3. Replace detector by twisting
BODY-12, Door Handle - Removal, Installation, and Adjustment
 Introduction BODY-12, Door Handle - Removal, Installation, and Adjustment There are many different procedures floating around describing how to replace the door handles on a 944 and every one of them will
Table of Contents. www.hunterfan.com. What to Expect with. Preparation. Tools Needed. Wiring. Hanging the Fan. Blades. Motor Housing.
 www.hunterfan.com Table of Contents What to Expect with Your Installation 30 inches Hanging the Fan Wiring 8 Maintenance, Operation & Cleaning Light Kit 13??? 14 1 9 Troubleshooting 11 5 Blades Motor Housing
Sheet Metal Bending. By- Prem Mahendranathan
 Sheet Metal Bending By- BENDING n Bending is a manufacturing process by which a metal can be deformed by plastically deforming the material and changing its shape n Deformation about one axis PROFILES
Beadboard Wall Bookcase
 Beadboard Wall Bookcase Note: The maximum load for each shelf is 30lbs.This hanging system is meant for drywall/wood stud mounting only. If walls are concrete, brick or plaster, please consult your local
In-Ground Basketball System Owners Manual
 In-Ground Basketball System Owners Manual Customer Service Center N53 W4700 South Corporate Circle Sussex, WI 53089 U.S.A. Write Model Number From Box Here: WARNING! 3 Capable Adults REQUIRED TOOLS AND
Heavy Glass Frameless Shower Door With Return Panel
 202 Anderson Ave., elvue, KS 66407 Phone: 800-669-9867 Fax: 800-393-6699 www.onyxcollection.com Heavy Glass Frameless Shower Door With Return Panel Full Showers with Return ench Seat with Return FRLSDRPL-0116
INSTRUCTIONS FOR CHAIN LINK INSTALLATION Chain Link fence & Posts Meshdirect.co.uk
 INSTRUCTIONS FOR CHAIN LINK INSTALLATION Chain Link fence & Posts Meshdirect.co.uk This guide explains how to correctly install our chain link fencing and post system. The guide provides details of the
KEYPAD LOCK RETROFIT KIT
 KEYPAD LOCK RETROFIT KIT INSTRUCTIONS FOR ASSEMBLY IMPORTANT READ & SAVE THESE INSTRUCTIONS Tools Required for Assembly 5/32 hex (Allen) wrench #2 Phillips screwdriver Isopropyl alcohol or alcohol wipes