Cloud PBX User Guide. Quick Links. Using Your Desk Phone. Using the User Web Portal. Voic . Answering Rules and Time Frames. Contacts.
|
|
|
- Betty Lindsey
- 9 years ago
- Views:
Transcription
1 Quick Links Using Your Desk Phone Using the User Web Portal Voic Answering Rules and Time Frames Contacts Phones Music On Hold Call History Profile
2 CONTENTS Contents... ii Introduction... iv 1. Using Your Desk Phone... 5 Making Calls... 6 Making International Calls... 6 Extension Dialing... 6 Intercom... 6 Receiving Calls... 7 Voic Accessing Voic Setting Up Your Mailbox... 8 Alternate Greetings... 8 Voic Tree... 8 Handling Calls Attended Transfer Blind Transfer Transfers to External Numbers Voic Transfer Directed Call Pickup Way Conference Using the User Web Portal Accessing the Portal Desktop Call Control Incoming Calls Active Calls Home 15 Voic Messages Voic Settings Recording a Greeting Uploading a Greeting Recorded Name Answering Rules and Time Frames Time Frames ii
3 Contents If you select Days of the week and times If you select Specific dates or ranges Answering Rules Call Forward Drop-down Options Ring Timeout Allowing or Blocking Callers Contacts Filter and Search Add and Import Contacts Adding a Contact Importing Contacts Selecting Favorites Editing Contacts Phones Music On Hold Adding Music on Hold Files Playing an Introductory Greeting Call History Filtering the Call History Exporting the Call History Log Profile Index iii
4 INTRODUCTION Welcome to the. Your Cloud PBX combines the best in traditional phone system features with modern Internet Protocol (IP) capabilities. In this guide, you will learn how to perform many common tasks on your phone, as well as make full use of your web portal. iv
5 1. USING YOUR DESK PHONE Topics: Making Calls (page 6) Receiving Calls (page 7) Voic (page 7) While there are many different models of desk phones, they largely all work the same way. In this chapter, you will learn how to use common functions of your phone. Handling Calls (page 10) 5
6 Using Your Desk Phone Making Calls Making a call with your phone does not require a leading 9. You can dial on-hook or offhook. To dial on-hook 1. Dial the phone number. 2. Pick up the handset, headset, or speaker. To dial off-hook 1. Pick up the handset, headset, or speaker. 2. Dial the phone number. Calls to the US and Canada are all dialed using 10 or 11 digits. Local calls can be dialed using 7 digits. Making International Calls To dial an international call 1. Dial the international call code Dial the country code. 3. Dial the local number. International calling is commonly disallowed to prevent toll fraud. Extension Dialing Extensions on your system can be dialed using their 3-to-4 digit extension or by pressing the button on your phone corresponding to the desired extension. Intercom VoIP phones provide an intercom feature that allows you to instantly connect to other phones within your office. Intercom functionality is ideal for announcing visitors or asking a quick question. When one phone intercoms another extension, it does not ring the other phone. Instead, the other phone will beep, and then its microphone and speaker turn on. 6
7 Using Your Desk Phone To intercom 1. Dial 08ext. For example, to intercom extension 100, dial Receiving Calls When a call comes in, you can answer it via a headset, speakerphone, or handset. To answer a call using a handset Lift the handset off-hook. To answer a call using a speakerphone Press the Speaker button. To answer a call using a headset Usage depends on how the headset is connected. Often, you'll press the button on the headset or press the headset button on the phone. Voic Accessing Voic To access voic 1. Press the Messages button on your phone to access your voic box, or dial 5001 if you can not identify the voic button. 2. If you subscribe to multiple mailboxes, a list of mailboxes may appear. Select the mail box you want to access. 3. When prompted, enter your voic pin, and then press #. 7
8 Using Your Desk Phone To access another person s mailbox 1. Dial When prompted, enter the other person s extension number. 3. Enter the voic PIN of the other person s mailbox, followed by #. Setting Up Your Mailbox The first time you log in to your mailbox you are walked through recording your name for the directory and recording your personal greeting. The name recording is for the dial-by-name directory, so when someone enters the first three letters of your last name, it will play back your name recording. The greeting plays when your mailbox is reached. It is very important to make a custom message, as many callers will not leave messages at mailboxes that have generic greetings. Alternate Greetings Your mailbox supports multiple greetings for different scenarios like business trips and holidays. To record an alternate greeting 1. From your mailbox, press 6 for greetings, and then press 1 to record an alternate greeting. 2. When prompted for the greeting number press 2 for your next alternate greeting (1 is your default greeting). 3. After your recording is completed, select the active greeting by selecting option 3 in the greetings menu. Voic Tree On the next page you ll find a voic tree showing what to dial for each option in your mailbox. 8
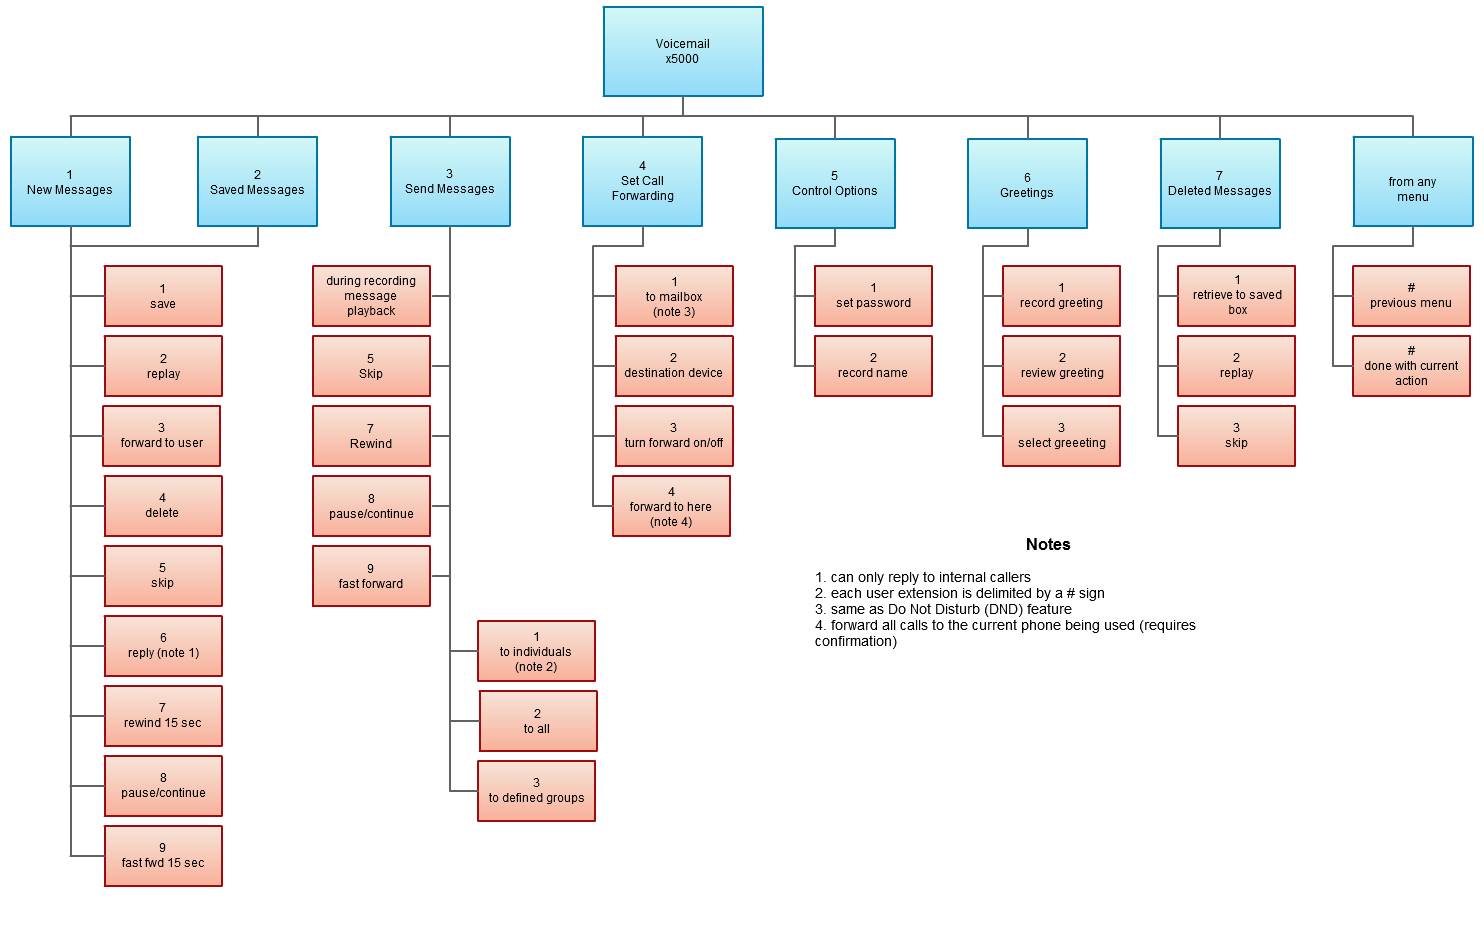
9 9
10 Handling Calls Your cloud PBX features various ways to move calls around, including attended transfer, unattended (blind) transfer, voic transfer, park, and more. In this section, references to BLFs are the 1-touch buttons to extensions common at front-desk phones. Attended Transfer Attended transfer allows you to speak to the transfer recipient prior to completing the transfer while the caller is on hold. To perform an attended transfer using Polycom and Yealink phones 1. Press the Transfer key/softkey on your phone. 2. Dial the recipient s extension or press their BLF. 3. Speak to the recipient, and then either press Transfer again to complete or cancel if the recipient cannot take the call. Blind Transfer Blind transfer goes straight to the recipient. To blind transfer using Polycom phones with older firmware 1. Press Transfer. 2. Press the Blind softkey. (if there is no Blind softkey see directions for new firmware) 3. Enter the extension of the recipient or the recipient s BLF. To blind transfer using Polycom phones with newer firmware 1. Press and hold the Transfer button. 2. Select Blind from the on screen menu 3. Enter the extension of the recipient or the recipient s BLF. Transfers to External Numbers A transfer can also go to an external number such as a cell phone. Follow the transfer directions above but instead of dialing an extension, dial a 10 digit phone number. 10
11 Using Your Desk Phone Voic Transfer Voic transfer goes straight to the recipient s voic box without ringing the recipient s phone. To perform a voic transfer Perform a blind transfer with a * prefix before the extension. For extension 111 s voic , for example, blind transfer to *111. Directed Call Pickup Directed call pickup (DCP) allows you to answer a call ringing at another station. To perform a directed call pickup Dial *8ext. If 111 is ringing, for example, dial *8111 to pick up that call. Phones with BLFs to the ringing station can also press the corresponding BLF. 3-Way Conference To make a 3-way conference 1. Call or be called by the first participant in the conference. 2. Press the Conference key/softkey, and then dial the second participant. 3. After the second participant picks up, press Conference again to connect everyone. 11
12 2. USING THE USER WEB PORTAL Topics: Accessing the Portal (page 13) Voic (page 16) Each extension of your Cloud PBX system has access to a powerful web portal for managing voic , call routing, and more. Answering Rules and Time Frames (page 21) Contacts (page 35) Phones (page 38) Music On Hold (page 39) Call History (page 42) Profile (page 46) 12
: Click in the Login name field and type ext@customerdomain.com, where customerdomain.com typically is the same as your email address domain.")
13 Accessing the Portal To access the web portal 1. Start a web browser. 2. Go to 3. At the login page (see Figure 2-1): Click in the Login name field and type [email protected], where customerdomain.com typically is the same as your address domain. Click in the Password field and enter your user password. Figure 2-1. Login Page Desktop Call Control Desktop call controls appear when making or receiving a call. These controls allow you to see who is calling and manage a current call. Incoming Calls Incoming calls appear in a window in the portal similar to the one in Figure 2-2. This window shows the caller ID name and number, along with Reject and Answer buttons. Selecting Reject sends the call to voic if available. The Answer button may not be available, depending upon your handset model. 13


14 Figure 2-2. Example of an Incoming Call Active Calls Figure 2-3 shows an active call window that displays the caller ID and call time. The three controls at the bottom of the window let you hold, hang up, or transfer the call. If you select transfer, a field appears for entering the extension of the recipient. If you prefix the recipient s extension number with 03, the call goes straight to voic . Figure 2-3. Example of Active Call Window 14
15 Home The Home page of your portal provides an at-a-glance view of everything going on with your extension. Table 2-1 describes the areas on the Home page. Figure 2-4. Example of Home Page Table 2-1. Fields in the Home Page Field Description New Messages Recent Call History Status Message Active Answering Rule Active Phones Shows new messages. You can play messages, click to call back, download, save, and delete. To see all the controls, hover over the message. Color-coded icons show your recent calls. Green icon = outbound call. Red icon = missed inbound calls. Blue icon = inbound received calls. To call back a number, click the phone number. Allows you to enter a status message that appears to other users of the portal. Your extension can have multiple answering rules. For example, you might ring your phone in one mode or forward to your cell in another mode. In this field, you can which answering rule is the active rule. Your extension may have multiple phones (for example, one in the office and one at home). This field shows which handsets are currently online. 15

16 Voic You configure voic using the Messages page. This page has two tabs for handling voic Messages see Messages below. Settings see Voic Settings on the next page. To display the Messages page, click the Messages icon at the top of the page: Messages The Messages tab allows you to manage your new, saved, and deleted voic , as well as greetings and other settings. Figure 2-5. Messages Page Like the Home page, you can play messages, click a number to call it back, and download, save, forward, and delete messages. To see all the controls available, hover the mouse pointer over a message. The New drop-down list allows you to review New, Saved, and Trash (recently deleted) messages. 16
17 Voic Settings Clicking the Settings tab displays options for controlling your voic order, timestamps, greetings, and voic to . Figure 2-6. Settings Tab Table 2-2. Fields in the Settings Tab Field Enable Voic check box Inbox Greetings Description Enables (check) or disables (uncheck) voic . These options affect audio voic (calling in) but not the portal. Sort Voic inbox by latest first = plays your newest messages first. Announce voic received time = plays the timestamp of the message. Announce incoming call ID = plays the caller ID number if available. Operator Forward = option to press 0 in a mailbox greeting and be directed elsewhere. Allows you to select an active voic greeting, listen to it, and record a new greeting. To select the active voic greeting, click it from the pull-down menu and click Save. To listen to a selected greeting on your PC, click the play button: To record a greeting, see Recording a Greeting on page
18 Field Description Unified Messaging Provides the following selections for adjusting your voic to settings. None = no is sent when voic is left. Send w/ hyperlink = a link to the voic is ed to you. Send w/ brief hyperlink = a link to the voic in plaintext is ed to you. Send w/ attachment (storage option) = an is sent to you with the audio file of the message attached. The storage option allows you to leave messages in your inbox as new, move to saved, or move to trash. Send w/ brief attachment (storage option) = an is sent to you in plaintext with the audio file of the message attached. The storage option allows you to leave messages in your inbox as new, move to saved, or move to trash. Recording a Greeting To record a greeting 1. From the Settings tab of the Messages page, click the speaker icon. A Manage Greetings page similar to the one in Figure 2-7 appears. 18
19 Figure 2-7. Manage Greetings Page 2. Next to New Greeting, click Record. The Browse button changes to a Call me at field. 19
20 Call me at field 3. In the Call me at field, enter a number to call. This can be an extension or a telephone number such as your cell phone. 4. In the Greeting name field, enter a name for this greeting. 5. Click the Call button. 6. At the prompt, record the new greeting. When you finish the greeting, press #. 7. Click Add Greeting at the bottom of the Manage Greetings page, and then click Done to close the page. Uploading a Greeting To upload a greeting 1. From the Settings tab of the Messages page, click the speaker icon. A Manage Greetings page similar to the one in Figure 2-7 on page 19 appears. 2. Hover over a greeting. Options appear for editing, deleting, or renaming the greeting. 3. Next to New Greeting, click Upload. 4. Click the Browse button. 5. In the Choose File to Upload dialog box, select a WAV or MP3 recording from your PC, and then click Open. The path and file name appear in the Browse field. 6. Click Upload. 7. Click Add Greeting at the bottom of the Manage Greetings page, and then click Done to close the page. 20

21 Recorded Name If your company has a dial-by-name directory, you must record your name for the directory to be found. You can click the play button to listen to your current name recording on your PC, or click the speaker button to record or upload a new name recording. Answering Rules and Time Frames Though Answering Rules and Time Frames are separate tabs, they are so interconnected that describing them together makes sense. Time Frames Time frames allow you to control the scheduling of the system. You configure time frames using the Time Frames page. To display this page, click the Time Frames icon at the top of the page: Three common time frames are: Open Hours (for example, M-F 9am-5pm) Holidays (Independence Day, Thanksgiving, New Year s, and so on) Closed Hours (all other times) Time frames can be both shared (system-wide and set by the administrator) or personal to your extension. You can add a time frame to your extension by clicking the Add Time Frame. 21
22 To add time frames 1. From the Time Frames page, click Add Time Frame. The Add a Timeframe page appears. 2. In the Name field, enter a name for this time frame. 3. Next to When, select the time period when the time frame will be applied: Always = select this option if the time frame will always be applied. Click Save to complete the procedure. Days of the week and times = select this option to select days and times when the time frame will be applied. Proceed to If you select Days of the week and times on page 23. Specific dates or ranges = select this option to specify a specific date or range of dates. Proceed to If you select Specific dates or ranges on page
23 If you select Days of the week and times Options appear for selecting days and times when the time frame will be applied (see Figure 2-8). Figure 2-8. Setting Days of the Week and Times 1. Using the check boxes next to the name of each day of the week, check the days when the time frame will be applied. A blue line to the right of checked day shows the default hours for this time frame (9:00 AM through 5:00 PM). 23
24 Default operating hours 2. To change the start time, drag the button on the left side of the blue bar either to the left to begin the start time earlier or to the right to begin the start time later. 3. To change the end time, drag the button on the right side of the blue bar either to the left to shorten the end time or to the right to lengthen the end time. Hint: To fine-tune start and end times, click start time or end time button, and then use the left and right arrow keys on your keyboard to change the time in 5-minute increments. 4. By default, each day is made up of one time period. However, you can use the icon to define two time periods per day. For example, the figure below shows a setup for an office that answers calls in the morning and afternoon, and then transfers calls to an answering 24
25 service over lunch, on Monday through Friday. By doing this, you would create two time frames (for example, one from 8 to noon and another from 1:00 to 5:00 PM). 5. Click Save to save your selections. The time frame appears as a row on the Time Frames page. 25
26 Hint: Moving the pointer over the blue text in the Description column shows the settings for that timeframe. 26

27 If you select Specific dates or ranges Fields appear for entering dates or ranges (see Figure 2-9). Figure 2-9. Setting Dates or Ranges 1. Click in the left field, and then select a starting date and time from the pop-up calendar. 2. Click in the right field, and then select an ending date and time from the pop-up calendar. 3. To specify additional ranges, click the icon to display another row of fields, and then repeat steps 1 and 2 in the new fields. Repeat this step for each additional date or range you want to specify. To delete a date or range, click the row. icon next to the appropriate 27

28 4. Click Save to save your selections. The time frame appears as a row on the Time Frames page. Hint: Moving the pointer over the blue text in the Description column shows the settings for that timeframe. 28

29 Answering Rules After you set up your time frames, you can create different answering rules for your time frames. You configure answering rules using the Answering Rules page. To display this page, click the Answering Rules icon at the top of the page: The left side of the Answering page has a Rings for n seconds drop-down list that allows you to specify the maximum ring time (one ring is generally 5 seconds). When that time expires, the caller will be forwarded to the Call Forward When Unanswered rule if defined; otherwise, the caller will be forwarded to voic if enabled. The right side of the Answering Rules page has buttons for adding answering rules, and specifying allowed and blocked numbers. Figure 2-10 shows examples of answering rules. In this figure: The extension has a rule to simultaneously ring many desk phones during Open Hours. Cell Forward rings many desk phones and a cell phone simultaneously. Holiday and closed hour rules go straight to voic . The active rule is the topmost rule that matches the conditions in the corresponding time frame. In Figure 2-10, for example, the time is around 1pm on Friday, so both Open Hours and Cell Forward rule match the time/day condition, but Open Hours is active because it is the topmost rule. You can change the order by using the arrows at left of each rule to drag the rules. Figure Sample Answering Rules 29
30 To add an answering rule 1. From the Answering Rules page, click Add Rule. The Add an Answering Rule page appears. From this page, you can create rules to screen callers, forward calls, and ring multiple numbers simultaneously. Figure Add an Answering Rule Page 2. Complete the fields in the Add an Answering Rule page (see Table 2-3). 3. Click Save. 30
31 Table 2-3. Fields in the Add an Answering Rule Page Field Time Frame Do not disturb Call screening Call Forwarding Always Call Forwarding On Active Call Forwarding When Busy Call Forwarding When Unanswered Call Forwarding When Offline Simultaneous ring Just ring user s extension Description Select the time frame when this answering rule will apply. No phone rings, goes straight to voic if available. Prompts caller to say their name, lets you screen the call before accepting. Immediately forwards to the number specified. See Call Forward Drop-down Options below. Forward calls to the number specified when you have one or more calls active. See Call Forward Drop-down Options below. Forwards calls to the number specified when your extension has used all available call paths. See Call Forward Drop-down Options below. Forwards calls to the number specified if the call is not answered after the specified ring timeout. See Call Forward Drop-down Options below. Automatically forwards if your desk phone loses communication (such as during a power outage). See Call Forward Drop-down Options below. Rings many phones at once. Check box options allow you to: Include the user s extension. Ring all your user s phones. Use the option Answer confirmation for offnet numbers to ensure that a person and not voic answers simrings to a cell/landline by prompting the answering party to press 1 to accept the call. An icon to the right of this option allows you to specify a ring delay. Note: A simring rings handsets, not users. So, for example, if 111 is listed, the simring will ring handset 111. If user 111 has a call forward set to their cell, however, the simring will not occur at the cell since simring rings handsets, not users. Rings just your phone. Call Forward Drop-down Options When entering an extension as a call forward option, a drop-down list allows you to forward the call to specific resources associated with that extension. Table 2-4 describes the options. Some options may not appear, depending on the features associated with the extension. Table 2-4. Call Forward Drop-down Options on the Add an Answering Rule Page Field Description Handset User Voic Queue Autoattendant Conference Bypasses the user answering rules and forwards to the handset associated with the specified user. Forwards to the user at that extension and follows the user s answering rules. Forwards to voic at the specified extension. Forwards to the queue associated with that user. Forwards to the auto attendant associated with that user. Forwards to a Conference bridge 31
32 Ring Timeout At the top of the page is the ring timeout selection. This option specifies the number of seconds that your phones will ring or forwarding rule before going to voic (when available). Allowing or Blocking Callers The Answering Rules page has an Allow/Block button that allows you to permit or block calls from certain numbers. Using this feature, you can block unwanted calls to your phone, as well as calls from anonymous and unwanted numbers. Allowed numbers bypass user Do Not Disturb and Call Screening rules to ring through immediately. 1. From the Answering Rules page, click Allow/Block. The Allow/Block page appears. This page has two lists, one for allowed phone numbers (on the left) and another for blocked phone numbers (on the right). Figure Allow/Block Page 2. To allow phone numbers, perform the following steps under ALLOWED NUMBERS: a. Click in the Enter a number field. b. Enter the number you want to allow. 32
33 c. Click the button. The number appears in the ALLOWED NUMBERS list and a brief message tells you the allowed number was added. d. To add more numbers, repeat step 2. e. To remove a number, click the button next to that number. Examples of allowed numbers Figure Example of Allowed Numbers 3. To block phone numbers, perform the following steps under BLOCKED NUMBERS: a. Click in the Enter a number field. b. Enter the number you want to block. c. Click the button. The number appears in the BLOCKED NUMBERS list and a brief message tells you the blocked number was added. d. To add more numbers, repeat step 3. e. To remove a number, click the button next to that number. 4. To block anonymous calls and calls from unknown numbers, check Block anonymous or unknown. 33
34 Examples of blocked numbers Figure Example of Blocked Numbers 5. When you are finished, click Done. 34
35 Contacts By default, contacts contain all the extensions on your system. However, you can add contacts to enable easier access to everyone you need to reach. You configure contacts using the Contacts page. To display this page, click the Contacts icon at the top of the page: The following figure shows an example of a Contacts page. The sections following the figure describe the key areas on the page. Filter and Search The All pull-down list allows you to search contacts by group. Using this list, you can select groups to search such as Favorites, Departments, Available, Busy, and more. Selecting a group filters the contacts on the page to show only the ones located in the group selected. The Enter a name or extension field below the drop-down list allows you to search by contact name or extension. Entering a name or extension in this field filters the contacts on the page to show only the ones that match your entry. Click the entry and redisplay all contacts. in this field to delete your Add and Import Contacts The Add Contact button allows you to add a contact one at a time. These are for external contacts only. Your contact list will automatically update with your internal extensions. Import will allow you to select a file from your PC, the import can accept CSVs from Microsoft Outlook and Gmail as well as vcards. 35
36 Adding a Contact To add a contact 1. From the Contacts page, click Add Contact. The Add Contact page appears. 2. Complete the fields in the Add Contact page (see Table 2-5). 3. Click Save. The contact appears on the Contacts page. Table 2-5. Fields in the Add Contact Page Field Description First Name Last Name Work number Mobile number Home number Contact s first name. Contact s last name (surname). Contact s work telephone number. Contact s mobile telephone number. Contact s home telephone number. Contact s address. 36
37 Importing Contacts To import contacts 1. From the Contacts page, click Import. The Import Contacts pop-up window appears. 2. Click the Browse button. 3. In the Choose File to Upload dialog box, go to the location where the file you want to import is located. Click the file, and then click Open. The path and file appear in the Browse field. 4. Click Import. The imported contacts appear on the Contacts page. Selecting Favorites When hovering over a contact, a light gray star appears next to the contact name. Clicking the star selects the contact as a favorite and changes the color of the star to yellow. Editing Contacts When hovering over a contact you ll see an edit button on the far right, click that button to edit the contact. 37

38 Phones The Phones page allows you to manage your phones. To display the Phones page, click the Phones icon at the top of the page: Each row shows a phone that has been added to the system, along with: Whether the phone is registered. The phone name and device type. The hyperlink below the Name column allows you to edit the phone information. You can also edit or delete phones using icons on the right side of the row. The phone s IP address, MAC address, and line number on the phone associated with your extension. Clicking the Refresh button updates the information shown on the page. The page has an Add Phone button that adds phones to your system. This task usually is performed by administrators and is not described in this guide. 38

39 Music On Hold Music on Hold allows you to specify personal music on hold for your extension. You configure music on hold files using the Music On Hold page. To display this page, click the Music on Hold icon at the top of the page: The Add Music button allows you to add music on hold files. When you add music on hold files, the file name appears on the Music On Hold page, along with the duration and file size. The Settings button allows you to play an introductory greeting. If you hover over a file you can see options to play the file, download the file, edit the name, or delete the file. If multiple files are uploaded you can rearrange them using the arrows at the left of the page. Adding Music on Hold Files To add music on hold files 1. From the Music On Hold page, click Add Music. The Add Music page appears. 39
40 2. Click the Browse button. 3. In the Choose File to Upload dialog box, go to the location where the file you want to import is located. Click the file, and then click Open. The path and file appear in the Browse field. NOTE: The music file must be in MP3 or WAV format, and must be properly licensed. 4. In the Song Name field, enter a name for the song. 5. Click Upload. The music file appears on the Music on Hold page. 40
41 Playing an Introductory Greeting To play an introductory greeting before having the music on hold file play 1. From the Music On Hold page, click Settings. The Music on Hold Settings page appears. 2. Check Play introductory greeting. 3. Click Save. 41

42 Call History The Call History page shows a log of all your extensions calls. It also provides tools to filter and export data. The left side uses color-coded icons to represent call status: Green = outbound calls Blue = inbound received calls Red = missed calls Moving your screen pointer over an icon displays a tooltip with the call status. For example: You can click a number in the Number column dial back the number. Clicking the Refresh button updates the information shown on the page. To display the Call History page, click the Call History icon at the top of the page: The following figure shows an example of the Call History page. The sections following the figure describe the Filters and Export buttons. 42
43 Filtering the Call History The Filters button allows you to filter the information displayed in the Call History page, so you can view only the information that interests you. To filter the call history 1. From the Call History page, click Filters. The Call History Filters page appears. 2. Complete the fields in the Add Contact page (see Table 2-6). 3. Click Set Filters. The Call History page appears, with only the items that match your criteria. 43
44 Date Range Caller Number Dialed Number Call Type Field Table 2-6. Fields in the Call History Filters Page Description To filter by a specified date range, click in the left field, and then select a starting date and time from the pop-up calendar (see Figure 2-15). Click in the right field, and then select an ending date and time from the pop-up calendar. To filter by a caller number, enter the caller s number. To filter by a dialed number, enter the dialed number. To filter by type of call, select a call type. Figure Selecting a Start Date from the Pop-up Calendar 44
45 Exporting the Call History Log To export the call history log 1. From the Call History page, click Export. Depending on your browser, the history log is downloaded to your computer or you are prompted to save the log. The log is in comma-separated-value (CSV) format. 2. After downloading the log, you can open it using Microsoft Excel, Google Docs, and other spreadsheet applications. 45
46 Profile Clicking the Profile link at the top-right of the page displays the Profile page. From this page, you can configure the settings in Table
47 Table 2-7. Fields in the Profile Page Field Description First Name Last Name Timezone Address(es) Record User s Calls Directory Options The first name and last name will be shown in contacts and used in the dial by name directory. Your local time zone. Address used for , password resets, etc. To add addresses, click the button to add fields for entering more addresses. Select whether the calls for this user will be recorded (Yes) or not recorded (No). Enables or disables announce in auto directory and list in directory features. Announce in Audio directory = check to include the user in the dial-by-name directory. List in Directory = check to add user to the internal extensions list (contacts). Caller ID Information Area Code Local area code for 7 digit dialing associated with the user. Caller ID For outbound calls, this is the number that recipients will see. 911 Caller ID For calls to 911, this is the e911-enabled number the 911 agent will see. Change Password New Password Confirm New Password Password for voic and the portal. Avoid using common codes like 0000 or For security, each typed password character is masked by a dot ( ). Please keep this number secure. We will never call you to request your passcode. 47
48 INDEX 3-way conference, 11 3 off-hook, 6 on-hook, 6 Directed call pickup, 11 A E Accessing portal, 14 voic , 7 voic remotely, 8 Active calls, 15 Allowing callers, 33 Alternate greetings, 8 Answering rules, 30 Attended transfers, 10 Extension dialing, 6 External number transfers, 11 Greeting recording, 19 uploading, 21 G H Blind transfers, 10 Blocking callers, 33 B Handling calls, 10 Home page, 16 I C Call forward, 32 Call handling, 10 Call history, 44 Callers, allowing or blocking, 33 Calls active, 15 incoming, 14 making, 6 receiving, 7 Contacts, 36 Dialing extension, 6 D Incoming calls, 14 Intercom, 6 International calls, 6 Introductory greeting, 43 M Mailbox setup, 8 Making international calls, 6 Messages page, 17 Music on hold, 41 Off-hook dialing, 6 On-hook dialing, 6 O 48
49 Index Park and hold, 11 Phones page, 39 Portal, 14 call history, 44 contacts, 36 home page, 16 Messages page, 17 music on hold, 41 profile, 48 Profile, 48 Receiving calls, 7 Recording a greeting, 19 Remote voic , 8 Ring timeout, 33 P R S Time frames, 22 Transfers attended, 10 blind, 10 external numbers, 11 voic , 11 Uploading a greeting, 21 Voic , 17 accessed, 7 accessed remotely, 8 settings, 18 transfer, 11 tree, 8 T U V Setting up your mailbox, 8 49
50 N2Net has made a good faith effort to ensure the accuracy of the information in this document and disclaims the implied warranties of merchantability and fitness for a particular purpose and makes no express warranties, except as may be stated in its written agreement with and for its customers. N2Net shall not be held liable to anyone for any indirect, special or consequential damages due to omissions or errors. The information and specifications in this document are subject to change without notice. Copyright All Rights Reserved. All trademarks and registered trademarks are the property of their respective owners. April 19, 2016
Cloud PBX User s Guide
 Cloud PBX User s Guide G12 Communications 1 (877) 311-8750 [email protected] Jackson St. #19390, Seattle, WA 98104 Contents Contents...2 Introduction...4 1. Using Your Desk Phones...4 Making Calls...4 Making
NEXTLEVEL INTERNET. NextLevel Voice User Guide
 NEXTLEVEL INTERNET NextLevel Voice User Guide N E X T L E V E L I N T E R N E T NextLevel Voice User Guide NextLevel Internet P.O. Box 502661 San Diego, CA 92150 Sales 858-836-0703 Support 858-836-0700
one Managing your PBX Administrator ACCESSING YOUR PBX ACCOUNT CHECKING ACCOUNT ACTIVITY
 one Managing your PBX Administrator ACCESSING YOUR PBX ACCOUNT Navigate to https://portal.priorityonenet.com/ and log in to the PriorityOne portal account. If you would like your web browser to keep you
itelecenter Virtual PBX Extension User Guide
 itelecenter Virtual PBX Extension User Guide Version 13 October 2011 COANetwork 2011 itelecenter Virtual PBX Extension User s Manual A Virtual PBX Extension can be set up for you by your itelecenter Administrator.
IPOne Phone System User Interface Guide
 IPOne Phone System User Interface Guide DoubleHorn Communications, LLC 1802 W. 6 th Street Austin, TX 78703 Main Office: 512-637-5200 Toll Free: 877-637-HORN (4676) DHC Support: Dial 611 IPOne Phone System
NEXTLEVEL INTERNET. NextLevel Voice Office Manager Guide
 NEXTLEVEL INTERNET NextLevel Voice Office Manager Guide N E X T L E V E L I N T E R N E T NextLevel Voice Office Manager Guide NextLevel Internet P.O. Box 502661 San Diego, CA 92150 Sales 858-836-0703
Extension Manual. User portal, Dial codes & Voice mail for 3CX Phone System Version 7.0
 Extension Manual User portal, Dial codes & Voice mail for 3CX Phone System Version 7.0 Copyright 2006-2008, 3CX ltd. http:// E-mail: [email protected] Information in this document is subject to change without
Web Portal User Guide
 Web Portal User Guide Fusion Hosted Voice Web Portal User Guide, Revision 2, September 2013 NCTC North Central 872 Highway 52 Bypass E Lafayette, TN 37083 615-666-2151 www.nctc.com Fusion Hosted Voice
TELUS Business ConnectTM. User Guide
 TELUS Business ConnectTM User Guide TELUS Business Connect User Guide Table of Contents Table of Contents 3 Part - Getting Started 4 Introduction 5 Overview 6 Messages 7 Call Log 8 Contacts 9 User Settings
Ipiphony Phone System. User Manual. 1 P a g e
 Ipiphony Phone System User Manual 1 P a g e About this Guide This guide explains how to use the basic features of your new Aastra phones. Not all features listed are available by default. Contact your
CenturyLink Smart IP Hosted Voice and Data
 CenturyLink Smart IP Hosted Voice and Data Hosted Voice End User Guide Document ID VPM 549 0001 1 TABLE OF CONTENTS 1. Introduction... 7 2. Advanced Phone Features... 8 2.1 Call Forwarding... 8 2.2 Speed
VoIP Quick Start Guide
 VoIP Quick Start Guide VoIP is made up of three elements: The Phone The Software (optional) The Web Version of the software (optional) Your new voice mail can be accessed by calling (971-722) 8988. Or,
WTC Communications Hosted PBX User Guide
 WTC Communications Hosted PBX User Guide Version 7.13.1 Section Subject Page 3 Making Calls...5 3.1 Internal...5 3.2 External...5 3.3 Emergency Calls...5 3.4 Speaker Phone...5 3.5 Ending Calls...5 4 Answering
End User Training Guide
 End User Training Guide Everything You Need to Get Started on Vonage Business Solutions End User Portal This guide will give you a comprehensive look at the Vonage Business Solutions online user interface
Hosted IP-PBX Phone System
 Administrator Guide Hosted IP-PBX Phone System Business Voice Systems Metro Connection Services Commercial DirecTV Managed Services Data Center Business Voice Systems Metro Broadband Services Data Center
ConnectDirect User Guide
 ConnectDirect User Guide For questions contact ConnectMe Customer Service Email: [email protected] Phone: 800-743-1208 Ext. 2 Page 1 Contents... 1 SECTION 1: Introduction... 4 SECTION 2: Login
Extension Manual User portal, Dial codes & Voice mail for 3CX Phone System Version 6.0
 Extension Manual User portal, Dial codes & Voice mail for 3CX Phone System Version 6.0 Copyright 2006-2008, 3CX ltd. http://www.3cx.com E-mail: [email protected] Information in this document is subject to change
Avaya one-x Mobile User Guide for iphone
 Avaya one-x Mobile User Guide for iphone Release 5.2 January 2010 0.3 2009 Avaya Inc. All Rights Reserved. Notice While reasonable efforts were made to ensure that the information in this document was
UniCom Enterprise Phone (Polycom CX600) User Guide
 User Guide") UniCom Enterprise Phone (Polycom CX600) User Guide 1 6 What is UniCom Enterprise?...1 Frequently Used Make a Call...6 What is Microsoft Lync?...1 Call Functions Use Call Controls...7 Who can use UniCom
UniCom Enterprise Phone (Polycom CX600) User Guide 1 6 What is UniCom Enterprise?...1 Frequently Used Make a Call...6 What is Microsoft Lync?...1 Call Functions Use Call Controls...7 Who can use UniCom
MaxMobile Communicator User Guide
 MaxMobile Communicator User Guide For Android Phones MAX Communication Server Release 7.0 October 2013 WARNING! Toll fraud is committed when individuals unlawfully gain access to customer telecommunication
Hosted PBX. TelePacific Communicator User Guide. Desktop Edition
 Hosted PBX TelePacific Communicator User Guide Desktop Edition 11/19/2014 CONTENTS Login... 2 Home Window... 3 Status Flag... 4 My Room... 6 Contacts Screen... 6 History... 8 Directory... 9 Dialpad...
Desktop Reference Guide
 Desktop Reference Guide 1 Copyright 2005 2009 IPitomy Communications, LLC www.ipitomy.com IP550 Telephone Using Your Telephone Your new telephone is a state of the art IP Telephone instrument. It is manufactured
TruConnect. Hosted PBX User Guide. Quick Start Guide - Page 2. Table of Contents - Page 5. 1-800-768-1212 www.truvista.net
 TruConnect Hosted PBX User Guide R R Quick Start Guide - Page 2. Table of Contents - Page 5. 1-800-768-1212 www.truvista.net TruConnect User Guide Page 1. Hosted TruConnect IP PBX Quick Reference Guide
Mass Announcement Service Operation
 Mass Announcement Service Operation The Mass Announcement Service enables you to automate calling a typically large number of contacts, and playing them a pre-recorded announcement. For example, a weather
Gazelle Hosted PBX V8.0 End User Guide
 Gazelle Hosted PBX V8.0 End User Guide Document VPM-777-200, Version 1.2 08 Apr 2013 Document Version 1.2 Gazelle Communications Metaswitch Hosted PBX V8.0 08 Apr 2013 End User Guide Contents 1 Introduction...
My Hosted PBX Portal User Guide https://mypbx.primus.ca/
 My Hosted PBX Portal User Guide https://mypbx.primus.ca/ Quick Click Features Call Log Tab Directory Tab Voice Mail Tab Phone Control Tab Concierge Tab Call treatments Find Me Follow Me Remote Phone Call
Avaya one-x Mobile User Guide for iphone
 Avaya one-x Mobile User Guide for iphone 18-602788 Issue 1 February 2008 2008 Avaya Inc. All Rights Reserved. Notice While reasonable efforts were made to ensure that the information in this document was
ESI Cloud PBX Quick-start Guide
 ESI Cloud PBX Quick-start Guide 0455-1154 Rev. A For on-line help, visit www.esi-estech.com/support. About ESI ESI (Estech Systems, Inc.) designs and manufactures high-performance phone systems for businesses
Cisco IP Phone Training
 Cisco IP Phone Training Objectives Overview Cisco IP Phone Layout Basic Phone Functions Voicemail Questions 2 Foot Stand Release Press the foot stand adjustment knob on the right-hand side of the phone.
Hosted PBX. Administrator Guide_Metaswitch. Version 7.2 Issue 1 29 Nov 2010
 Hosted PBX Administrator Guide_Metaswitch Version 7.2 Issue 1 29 Nov 2010 XACT COMMUNICATIONS 560 e. 3 RD STREET, SUITE 202 LEXINGTON, KY 40508 888.747.9228 Notices Copyright 2010 Xact Communications.
Lync TM Phone User Guide Polycom CX600 IP Phone
 The Polycom CX600 IP (Internet Protocol) phone is a full-featured unified communications desktop phone, optimized for use with Microsoft Lync environments. It features Polycom HD Voice technology for crystal-clear
Optimum Lightpath Hosted Voice User Guide
 Optimum Lightpath Hosted Voice User Guide V10-12-10 Table of Contents 1. Making and Answering Calls... 6 1.1 Internally... 6 1.2 Externally... 6 1.3 Emergency Calls... 6 1.4 Speaker Phone... 6 1.5 Ending
BetterVoice Platform User Guide
 BetterVoice Platform User Guide Table of Contents: 1. Call Continuity..... pg 1 2. Call Groups..... pg 2 3. Call Queues... pg 5 4. Caller ID... pg 9 5. Company Call Recording... pg 12 6. Conference Bridge......
Hosted Voice Quick Start Guide
 Hosted Voice Quick Start Guide EATEL 225-621-4100 Welcome Welcome to Hosted Voice from EATEL! This guide is intended to get you up and running for the basic features associated with the product. Pages
BT Cloud Phone. User guide for the Admin Portal. A guide to setting up and making the most of BT Cloud Phone.
 BT Cloud Phone. User guide for the Admin Portal. A guide to setting up and making the most of BT Cloud Phone. 2 What s in this guide. Emergency calls. 999 or 112 emergency calls. Each BT Cloud Phone number
Virtual Phone System User Guide v4.7
 Virtual Phone System User Guide v4.7 169 Saxony Road, Suite 212 Encinitas, CA 92024 Phone & Fax: (800) 477-1477 Welcome! Thank you for choosing FreedomVoice. This User Guide is designed to help you understand
Hosted IP-PBX Phone System Polycom Model 650 - Handset
 End User Guide Hosted IP-PBX Phone System Polycom Model 650 - Handset Business Voice Systems Metro Connection Services Commercial DirecTV Managed Services Data Center Business Voice Systems Metro Broadband
CISCO IP PHONE 6945 Series User Guide
 CISCO IP PHONE 6945 Series User Guide Notes Page 15 VOICE MAIL Setting up Voice Mail for the First Time: Press the messages key on your phone. Follow the recorded instruction to record your name, record
<Insert Picture Here> Contact Center Anywhere: Interaction Manager (IM) Overview
 Overview") Contact Center Anywhere: Interaction Manager (IM) Overview What is Interaction Manager? Interaction Manager is the software that each call center agent uses to take and place customer
Contact Center Anywhere: Interaction Manager (IM) Overview What is Interaction Manager? Interaction Manager is the software that each call center agent uses to take and place customer
IP-PBX User Manual. Table of Contents. Version 20090401
 Table of Contents IP-PBX User Manual Version 20090401 Table of Contents... 1 Your IP-PBX... 2 Who Should Read this Manual... 2 PBX Basic Features... 2 PBX Optional Features... 2 Terminology... 2 Your PBX
Hosted PBX Admin and End User Guide
 Hosted PBX Admin and End User Guide 3/11/15 CONTENTS Account / Authorization Codes 2 Advanced Hunting 3 Anonymous Call Rejection 3 Anywhere 4 Auto Attendant 5 Call Block 7 Caller ID 7 Call Forwarding 8
Cisco 7941 / 7961 IP Phone User Guide
 Cisco 7941 / 7961 IP Phone User Guide Emergency To dial 911 for emergency service, you must dial the Outside Access Digit first (usually 9) + 911. Customer Service / Technical Support (919) 459-2300, option
Corporate Telephony Toolbar User Guide
 Corporate Telephony Toolbar User Guide 1 Table of Contents 1 Introduction...6 1.1 About Corporate Telephony Toolbar... 6 1.2 About This Guide... 6 1.3 Accessing The Toolbar... 6 1.4 First Time Login...
OneSolutions Hosted IP PBX Cisco IP Phone Training
 OneSolutions Hosted IP PBX Cisco IP Phone Training Download the Service User Guides at: http://www.onecommunications.com/knowledgecenter.aspx?id=4704 2009 One Communications. The One Communications logo
Getting to Know Your Cisco VoIP Phone 303G, 504G, 508G and 514G
 Getting to Know Your Cisco VoIP Phone 303G, 504G, 508G and 514G Getting to know your new phone is easy. This guide will help you get started. You ll learn how to: Use the feature buttons Navigate your
RingCentral Office. Basic Start Guide FOR USERS
 RingCentral Office Basic Start Guide FOR USERS Contents 3 Getting Started 4 How to access your account 5 The Overview Page 6 Messages 7 Activity Log 8 Contacts 9 Settings 10 Tools 11 Do Not Disturb (DND)
VoIP Phone Quick Start Guide
 VoIP Phone Quick Start Guide What is VoIP? VoIP stand for Voice over Internet Protocol. This means that instead of using traditional phone lines to transmit calls, VoIP phones use an Internet connection.
REINVENTING COMMUNICATIONS. User s Guide !!!!!!!!!!!!!!!!!!!!!!!!!!!!!!!! User s Guide
 " $%&'()*+),$(,$- %&).$,./0)11111111111111111111111111111111111111223 %++(--0,4$5(,./0)6(&7)8$%'222111111111111111111111111229,%/04%$0,4$5(7)8$%'111111111111111111111111111111122: 5);(7%4(1111111111111111111111111111111111111111
Cisco 8851. Dial Plan. Feature and Session Buttons. Your Phone
 Cisco 8851 Dial Plan Internal Calls: Dial 5-digit extension External Calls: Domestic/Local: 9+1 Area Code + Number Int l: 9+011+Country Code + Number Emergency: 9+911 or 911 Your Phone 1. Incoming call
How To Use Allworx On A Pc Or Mac Or Ipod Or Ipo Or Ipode Or Ipro Or Iporode Or Mac (For A Mac) Or Ipore Or Ipos Or Ipob Or Ipocode (
 Or Ipore Or Ipos Or Ipob Or Ipocode (") Allworx User s Guide (Release 7.2.3.x) No part of this publication may be reproduced, stored in a retrieval system, or transmitted, in any form or by any means, electronic, mechanical, photocopy, recording,
Allworx User s Guide (Release 7.2.3.x) No part of this publication may be reproduced, stored in a retrieval system, or transmitted, in any form or by any means, electronic, mechanical, photocopy, recording,
How To Use Freedomvoice On A Cell Phone Or Landline Phone On A Pc Or Mac Or Ipad Or Ipa Or Ipo Or Ipod Or Ipode Or Ipro Or Ipor Or Ipore Or Ipoe Or Ipob Or
 Virtual Phone System User Guide v5.4 169 Saxony Road, Suite 212 Encinitas, CA 92024 Phone & Fax: (800) 477-1477 Welcome! Thank you for choosing FreedomVoice. This User Guide is designed to help you understand
RingCentral for Desktop. UK User Guide
 RingCentral for Desktop UK User Guide RingCentral for Desktop Table of Contents Table of Contents 3 Welcome 4 Download and install the app 5 Log in to RingCentral for Desktop 6 Getting Familiar with RingCentral
BullsEye Call Manager Quick Reference Guide
 This guidewill help you get started using your BullsEye digital voice services. For additional information, login to your MBA account and select HELP from the toolbar. Call Manager This tool allows you
Polycom VVX500 4 and 6-Line Touch Screen Desk Phone Quick Reference Guide
 Polycom VVX500 4 and 6-Line Touch Screen Desk Phone Quick Reference Guide Contents Introduction to your Polycom VVX500 Touch Screen Desk Phone... 3 Welcome... 3 Desk Phone... 3 Interacting with your Polycom
Unified Messaging. User Guide
 Unified Messaging User Guide Notice This user guide is released by Inter-Tel, Inc. as a guide for end-users. It provides information necessary to use Unified Messaging v2.2. The contents of this user
Telego User Guide. August 2011 Issue 1. Software Release 1.2
 Telego User Guide August 2011 Issue 1 Software Release 1.2 Copyright, Trademarks, and Legal Disclaimers 2011 Telego Telego, the names of Telego products, and Telego logos are trademarks owned by Telego.
AT&T Voice DNA User Guide
 AT&T Voice DNA User Guide Page 1 Table of Contents GET STARTED... 4 Log In... 5 About the User Dashboard... 9 Manage Personal Profile... 15 Manage Messages... 17 View and Use Call Logs... 22 Search the
Business Voice Feature Guide
 Business Voice Feature Guide TABLE OF CONTENTS Account / Authorization Codes 1 Advanced Hunting 2 Anonymous Call Rejection 2 Anywhere 3 Auto Attendant 4 Call Block 6 Caller ID 6 Call Forwarding 7 Call
IPOne Phone System User Guide
 IPOne Phone System User Guide DOUBLE THE SPEED. DOUBLE THE POWER. HALF THE COST. P h o n e B r o a d b a n d M e s s a g i n g DoubleHorn Communications, L.L.C. 1802 W. 6th Street Austin, TX 78703 Nationwide:
Polycom 2-Line Desk Phone Quick Reference Guide
 Polycom 2-Line Desk Phone Quick Reference Guide ACC-1142 PUG Table of Contents INTRODUCTION TO YOUR POLYCOM 2-LINE DESK PHONE... 2 WELCOME... 2 DESK PHONE... 2 HOW TO USE YOUR POLYCOM 2-LINE DESK PHONE...
Contents 1. Setting up your Phone Phone Setup Phone Usage 2. User Portal 3. Softphone for your computer 4. Faxing
 User Guide 1 Contents 1. Setting up your Phone Phone Setup Phone setup instructions Recording Voicemail Greeting and Voicemail Menu Testing tools Phone Usage Call Transfer, Call Forwarding and Do Not Disturb
WiLine Networks, Inc. Customer Admin Guide
 WiLine Networks, Inc Customer Admin Guide Copyright Copyright 2010, WiLine Networks, Inc. All rights reserved. This document may not be copied or otherwise reproduced, in whole or in part, except as specifically
Extension Manual. 3CX Assistant, MyPhone User portal, Dial codes & Voice mail for 3CX Phone System Version 8.0
 Extension Manual 3CX Assistant, MyPhone User portal, Dial codes & Voice mail for 3CX Phone System Version 8.0 Copyright 2006-2009, 3CX ltd. http:// E-mail: [email protected] Information in this document is
User Guide. Updated 1-1-11
 User Guide Updated 1-1-11 1 Contents 1. Setting up your Phone Phone Setup o Phone setup instructions o Recording Voicemail Greeting and Voicemail Menu o Testing tools Phone Usage o Call Transfer, Call
Shaw Business. Auto-Attendant User Guide
 Shaw Business Auto-Attendant User Guide Contents Steps to Setup an Auto-Attendant... 3 Plan your Auto-Attendant structure...4 Prepare custom greetings for each menu and sub-menu... 5 Providing Custom greetings
User Manual. 3CX VOIP client / Soft phone Version 6.0
 User Manual 3CX VOIP client / Soft phone Version 6.0 Copyright 2006-2008, 3CX ltd. http:// E-mail: [email protected] Information in this document is subject to change without notice. Companies names and data
Digital Voice Services Residential User Guide
 Digital Voice Services Residential User Guide 2 P a g e * Feature Access Codes *11 Broadworks Anywhere (pulling call to alternate phone) *62 Access Voicemail *72 Call Forwarding Always Activation *73 Call
Brekeke PBX Version 2 User Guide Brekeke Software, Inc.
 Brekeke PBX Version 2 User Guide Brekeke Software, Inc. Version Brekeke PBX Version 2 User Guide Revised October 2010 Copyright This document is copyrighted by Brekeke Software, Inc. Copyright 2010 Brekeke
TELEPHONE BUTTONS & ICONS TOUCHSCREEN OVERVIEW
 This Telephone Guide describes the various features available to you. Telephone Buttons and Icons describe the physical buttons and keys on the phone, the Touchscreen Overview outlines basic functions,
Digital Voice Services User Guide
 Digital Voice Services User Guide * Feature Access Codes *72 Call Forwarding Always Activation *73 Call Forwarding Always Deactivation *90 Call Forwarding Busy Activation *91 Call Forwarding Busy Deactivation
Hosted IP Phone System End User CommPortal User Guide (Polycom)
") Log into the End User CommPortal Open Internet browser (e.g., Internet Explorer) Browse to http://portal.popp.com Enter the following: Number: end user s 10-digit phone number Password: initial password
Log into the End User CommPortal Open Internet browser (e.g., Internet Explorer) Browse to http://portal.popp.com Enter the following: Number: end user s 10-digit phone number Password: initial password
Hosted VoIP Phone System. Admin Portal User Guide for. Call Center Administration
 Hosted VoIP Phone System Admin Portal User Guide for Call Center Administration Contents Table of Figures... 4 1 About this Guide... 6 2 Accessing the Hosted VoIP Phone System Administration Portal...
Fax Messages. You can double click a new message to show it on your computer or a right click on it will bring up more options as follows:
 Fax Messages If you have the Open Scape Fax Server installed you will be receiving faxes to your myportal. This tab shows you the fax messages you have received, the number you have received them from
Frontier Tandem. Administrator User Guide. Version 2.4 January 28, 2013
 Frontier Tandem Administrator User Guide Version 2.4 January 28, 2013 About This Document 1 Version 7.3 Jan 28, 2013 Frontier Tandem Administrator Guide CONFIDENTIAL About This Document The Frontier Small
IP Office Phone Manager Users Guide
 IP Office Phone Manager Users Guide 40DHB0002USAR Issue 6 (03/04/2002) Contents Getting Started... 3 Introduction... 3 Getting Started... 4 Phone Manager... 5 Main Window... 5 Call Status... 6 Call History...
Polycom Conference Phone Quick Reference Guide ACC-1144 PUG
 ACC-1144 PUG Polycom Conference Phone Quick Reference Guide Table of Contents INTRODUCTION TO YOUR POLYCOM CONFERENCE PHONE... 2 WELCOME... 2 CONFERENCE PHONE... 2 HOW TO USE YOUR POLYCOM CONFERENCE PHONE...
Contents. Cbeyond Communicator for Mobile (ios) extends TotalCloud Phone System (TCPS) calling capabilities to an iphone.
 extends TotalCloud Phone System (TCPS) calling capabilities to an iphone.") Cbeyond Communicator for TotalCloud Phone System for Mobile Cbeyond Communicator for Mobile (ios) extends TotalCloud Phone System (TCPS) calling capabilities to an iphone. Cbeyond Communicator is an intuitive
Cbeyond Communicator for TotalCloud Phone System for Mobile Cbeyond Communicator for Mobile (ios) extends TotalCloud Phone System (TCPS) calling capabilities to an iphone. Cbeyond Communicator is an intuitive
RingCentral for Google. User Guide
 RingCentral for Google User Guide RingCentral for Google User Guide Contents 2 Contents Introduction............................................................... 4 About RingCentral for Google..........................................................
Allworx Phone Functions
 Voicemail Shortcuts The following shortcuts are available while listening to a voicemail message: *1 REPLY to this message. *6 Play the NEXT message. *2 FORWARD this message. *7 REWIND the message 10 seconds.
CISCO IP PHONE MODEL 7960 & UNITY VOICEMAIL INCLUDES CISCO CALLMANAGER ATTENDANT CONSOLE. Getting Started Manual
 CISCO IP PHONE MODEL 7960 & UNITY VOICEMAIL INCLUDES CISCO CALLMANAGER ATTENDANT CONSOLE Getting Started Manual... 3 Getting Started... 3 Using LCD Icons... 3 Using the IP Phone Configuration Utility...
Communicator for Mac Help
 Communicator for Mac Help About the ShoreTel Communicator Introduction to the ShoreTel Communicator for Mac ShoreTel Communicator elements Learn about the window layout, panels, icons, buttons and notifications
Polycom VVX 500 Business Media Phone
 Tap to select and highlight screen items. To scroll, touch the screen, and swipe your finger up, down, right, or left. Lines View displays phone Lines, Favorites, and soft keys. If a phone Line has only
OCS Client Installation - Quick Start Guide. Web Conferencing & Secure Instant Messaging via Microsoft Office Communications Server 2007
 OCS Client Installation - Quick Start Guide Web Conferencing & Secure Instant Messaging via Microsoft Office Communications Server 2007 MailStreet Live Support: 866-461-0851 Document Revision: March, 2010
Metaswitch Hosted IP PBX. Administrator Guide. Version 7.2 Issue 1 30 Sep 2010. Document Number VPM-531-0100
 Metaswitch Hosted IP PBX Administrator Guide Version 7.2 Issue 1 30 Sep 2010 Document Number VPM-531-0100 Metaswitch Hosted IP PBX Administrator Guide CONFIDENTIAL Notices Copyright 2010 Metaswitch Networks.
Buddy User Guide. www.connectnz.co.nz 1
 Buddy User Guide www.connectnz.co.nz 1 Contents Please click titles to navigate through the guide CHAPTER 1 What is Buddy TM and first steps Setting up Buddy TM on your browser and logging in 3 CHAPTER
Unified Communicator Advanced Training Handout
 Unified Communicator Advanced Training Handout About Unified Communicator Advanced (UCA) Video Summary (must have access to the internet for this to launch) http://www.mitel.tv/videos/mitel_unified_communicator_advanced_na
Cisco Unified Communications System End-User Guide
 Cisco Unified Communications System End-User Guide Version 1.0 Revised July 25, 2012 Customized for Neptune School District Note: Information in this document is drawn from Cisco documentation. These guides
Getting Started. Getting Started with Time Warner Cable Business Class. Voice Manager. A Guide for Administrators and Users
 Getting Started Getting Started with Time Warner Cable Business Class Voice Manager A Guide for Administrators and Users Table of Contents Table of Contents... 2 How to Use This Guide... 3 Administrators...
Wave IP 2.0 SP1. Wave ViewPoint User Guide
 Wave IP 2.0 SP1 Wave ViewPoint User Guide 2011 by Vertical Communications, Inc. All rights reserved. Vertical Communications and the Vertical Communications logo and combinations thereof and Vertical ViewPoint
YOUR BT ONE PHONE ADMINISTRATOR GUIDE.
 ADMINISTRATOR USER GUIDE. YOUR BT ONE PHONE ADMINISTRATOR GUIDE. Everything you need to know to get the most out of BT One Phone. 1 WELCOME TO BT ONE PHONE. Hello. Welcome to BT One Phone, and a new way
UniCom with Office Communicator and Live Meeting. Quick Start Guide
 UniCom with Office Communicator and Live Meeting Quick Start Guide Table of Contents Understanding UniCom and Office Communicator... 1 What is UniCom?... 1 What Is Office Communicator?... 1 Who Can Use
BullsEye Call Manager Quick Reference Guide
 This guide will help you get started using your BullsEye digital voice services, and in particular, the Call Manager. What is the Call Manager? This tool allows you to control an IP-based phone directly
Voicemail Plus User Guide
 Voicemail Plus User Guide Version: 2.0_US Revised: 25 September 2007 Notices Copyright 2007 Vonage. All rights reserved. No part of this documentation may be reproduced in any form or by any means or used
UniCom Enterprise Phone (Polycom CX600) User Guide
 User Guide") UniCom Enterprise Phone (Polycom CX600) User Guide 1 6 What is UniCom Enterprise?...1 Frequently Used Make a Call...6 What is Microsoft Lync?...1 Call Functions Use Call Controls...7 Who can use UniCom
UniCom Enterprise Phone (Polycom CX600) User Guide 1 6 What is UniCom Enterprise?...1 Frequently Used Make a Call...6 What is Microsoft Lync?...1 Call Functions Use Call Controls...7 Who can use UniCom
Cisco Unified Communications System End-User Guide
 Cisco Unified Communications System End-User Guide Version 1.0 Revised 11/19/2012 Customized for East Orange School District Note: Information in this document is drawn from Cisco documentation. These
Hosted VoIP Phone System. Desktop Toolbar User Guide
 Hosted VoIP Phone System Desktop Toolbar User Guide Contents 1 Introduction... 3 1.1 System Requirements... 3 2 Installing the Telesystem Hosted VoIP Toolbar... 4 3 Accessing the Hosted VoIP Toolbar...
Premium Digital Voice Solution. User Guide
 Premium Digital Voice Solution User Guide Table of Contents How to Log into Account Portal & Changing your Password 1 How to Download Toolbar 2 Utilizing Voice Mail 3 Feature Guide & How to Configure
SMALL BUSINESS USER GUIDE
 SMALL BUSINESS USER GUIDE TABLE OF CONTENTS Anonymous Call Rejection 4 Anywhere 5 Call Block 6 Call Forwarding 7 Call Logs 8 Call Return 8 Call Transfer 8 Call Waiting 9 Caller ID 9 Do Not Disturb 10 Find
Overview. Logging in: Table of Contents. adminstrator webportal myphone.rcn.com/hostedvoice/bg
 Guide 3 Overview Logging in: Table of Contents One of the exciting benefits of RCN Hosted Voice is the ability to set-up and control your communications according to your business specific needs. You can
Intermedia Cloud Softphone. User Guide
 Intermedia Cloud Softphone User Guide FOR MORE INFO VISIT: CALL US EMAIL US intermedia.net +1.800.379.7729 [email protected] 1 Contents 1 Introduction... 3 1.1 Cloud Softphone Features... 3 2 Installation...