Hosted IP-PBX Phone System
|
|
|
- Theodore Harmon
- 8 years ago
- Views:
Transcription
1 Administrator Guide Hosted IP-PBX Phone System Business Voice Systems Metro Connection Services Commercial DirecTV Managed Services Data Center Business Voice Systems Metro Broadband Services Data Center Managed IT Services Commercial DirecTV 1

2 Table of contents Table of contents 2 1 Introduction SoundPoint IP Phone System Other Guides 5 2 CommPortal Business Group Administrator (BG Admin) Accessing CommPortal BG Admin Logging Into CommPortal BG Admin Using CommPortal BG Admin 8 3 Managing Lines with BG Admin Creating and Managing Departments Moving Lines Between Departments Logging into a Users Account 12 4 Managing Phones with BG Admin Modify Phone Description Moving Phones between Departments Assigning a Line to a Phone Removing a Line from a Phone Phone Profiles Managing Phone Profiles Adding a New Phone Profile Modifying a Phone Profile Logging Out of Phone Profiles Modifying Phone Configuration as User Copying Phone Configuration 23 5 Managing Multiple Appearance Directory Numbers (MADNs) (OPTIONAL SERVICE) Viewing MADNs Viewing and Modifying MADN MADN Lines Other Settings Changing MADN settings 27 6 Managing Multi Line Hunt Groups (MLHGs) (OPTIONAL SERIVCE) Viewing MLHGs Moving MLHGs to another Department Viewing and Modifying MLHG MLHG Pilots MLHG Lines Settings 31 7 Managing Call Pickup Groups Viewing Call Pickup Groups Moving Call Pickup Groups to another Department 32 2

3 7.3 Adding Call Pickup Groups Deleting Call Pickup Groups Viewing and Modifying Call Pickup Groups Managing Call Pick Up Group Lines Settings 35 8 Managing Short Codes Viewing Short Codes Moving Short Codes to another Department Adding Short Codes Adding Short Code Ranges Deleting Short Codes and Short Code Ranges Modifying Short Codes Modifying Short Code Ranges 40 9 Managing Extensions Viewing Extensions Adding Extensions Adding Extension Ranges Deleting Extensions and Extension Ranges Modifying Extensions Modifying Extension Ranges Managing Account Codes Viewing and Modifying Account Code Settings Modifying Settings Modifying Call Types Requiring Account Codes Choosing Validated or Non-validated Account Codes Setting Account Code Length Blocking Access after Incorrect Account Codes Setting Individual Line Properties Configuring Account Codes Viewing and Modifying Account Code Settings for a Line Viewing Business Group Call Logs Viewing External Calls Settings Viewing Number Blocks Auto-Attendant Easy / Premium Attendant Overview Easy Attendant Planning Your Easy Attendant Configuring Easy Attendant Premium Attendant Planning Your Premium Attendant Logging into Premium Attendant Configuring Premium Attendant Schedule Configuring Premium Attendant Announcements Configuring Premium Attendant Menus Configuring Premium Attendant Extensions 74 3

4 Configuring Premium Attendant Advanced Options Activating Premium Attendant Music on Hold CommPortal Access Logging In Viewing and Changing Your Security Settings Managing Recordings Assigning Recordings to Lines Using Glossary CommPortal Logging Into CommPortal as Another User Phones Phone Numbers MAC addresses Departments Phone Profiles Phone Profile Graphical View Phone Profile Table View Copying Phone Configuration Network Multiple Appearance Directory Numbers Multi Line Hunt Groups Call Pickup Groups Short Codes Extensions Account Codes Auto Attendant Easy / Premium Attendant Music on Hold Music on Hold Performing Rights 93 4

5 1 Introduction SoundPoint IP Phone System Welcome to your new Polycom Soundpoint IP phone System This Guide is intended to help Administrators of our Hosted IP PBX phone system perform the various tasks needed to administer the system, such as Adding new lines to the system Setting up your call groups Configuring your automated receptionist. It is split into sections which describe how to configure aspect of your phone system. There is a Glossary at the end of this Guide which explains the important. Depending on the phone model(s) you have chosen for your system, some of the functions/directions may not apply. 1.1 Other Guides There are other Guides which you may need to refer to when administering your phone system, and you will need to provide to the users of your phone system. These are: ITS Fiber Hosted IP PBX End User Quick Reference Guides. These are two page quick reference cards which describe the basic features of your new phones. You should distribute these Quick References to all of your end users. ITS Fiber Hosted IP PBX End User Guide. This is the more detailed version of the the guide, which describes how end users should use all of the functions and features of your phone system. You may only want to provide this guide to your more advanced power users, but you should understand its contents so you can provide help and guidance to your colleagues. 5
 you have chosen for your system, some of the functions/directions may not apply. 1.")
6 2 CommPortal Business Group Administrator (BG Admin) CommPortal provides a web interface to your phone system, and allows end users and Business Administrators to modify their settings. There are two CommPortal interfaces. 1. The first is for regular users to manage their business telephony settings. 2. The second is for Business Administrators to modify both global settings for the business and to modify end-users' settings. The second of these interfaces is the one which you will use to administer the phone system and is described by this document. For more details on using the first interface, please see the ITS Fiber Hosted IP PBX End User Guide. 2.1 Accessing CommPortal BG Admin To access the Business Group Administrator CommPortal interface point a browser at CommPortal is supported on Windows 2000, Windows XP, Windows 2003,Windows Vista and Windows 7, using the following browser versions: Internet Explorer 7 and above Mozilla Firefox 2.0 and above JavaScript must be enabled. 6

 4.")
7 2.2 Logging Into CommPortal BG Admin The following shows a sample CommPortal login page. To log into CommPortal, follow these steps: 1. Go to 2. Enter your phone number with administrative access 3. Enter the password (same password as for normal login in to CommPortal) 4. Click on Login. 7

8 2.3 Using CommPortal BG Admin Once you are logged into CommPortal you are presented with the Business Group Administrator s homepage. Down the left hand side of this page are a series of links which take you to the different pages within CommPortal. The main panel shows the contents of the page you ve selected. In the top right hand the top of the page is the name of the user you are logged in as and icons which: Log you out of CommPortal. Refresh the current CommPortal page. Open a new browser window with detailed help on using the current page. 8

9 3 Managing Lines with BG Admin The Lines page is the CommPortal Business Group Administrator s homepage and it will display once you ve logged in. This menu shows all the lines within the department that you are an administrator of. To view lines that are in sub-departments, select the sub-department using the dropdown list at the top of the page. 9


10 3.1 Creating and Managing Departments The BG Admin has the ability to create departments within the business group. To create a business group follow these steps: 1. From the BG Admin Page select the Departments link on the left of the page. And click the Add Department button at the bottom of the page and the following dialog appears. 2. Enter the following information: 1. Department Name 2. Parent Directory If this is a top level department, you will use the Business Group Name. If this is a sub department, this will be the Upper level department 3. Operator Number Enter the number of the line that will act as operator for this department 4. If you plan to limit the number of calls allowed for this Department, enter the following information a. Incoming & Outgoing Enter the total number of combined concurrent calls that this department will be permitted to have active at any given time. b. Incoming Enter the total number of concurrent incoming calls that this department will be permitted to have active at any given time. c. Outgoing Enter the number of concurrent outgoing calls that this department will be permitted to have active at any given time. 10

11 Example Departments: NOTE: To allow any mix of incoming & outgoing enter the same value in all three fields, or set both the Incoming and the Outgoing fields to Unlimited. 3.2 Moving Lines Between Departments To move lines between Departments, follow these steps: 1. Select the line using the checkbox to the left of the line 2. Select the department you wish to move the line to using the drop-down list at the bottom of the page. 3. Click on the Move button. 11


12 3.3 Logging into a Users Account To log on as a regular user, follow these steps: 1. Select the Individual Line icon to the right of the line. 2. This will launch the regular CommPortal interface for that line in a new browser window. For more details on modifying settings on behalf of an individual user see the ITS Fiber Hosted IP PBX End User Guide. 12


13 4 Managing Phones with BG Admin To access the Phones page select the Phones link on the left hand side of the page. This page shows you all of the known phones in the current department. To view the phones in sub-departments, select a different department using the drop-down list at the top of the page. 13


14 4.1 Modify Phone Description To change the description given to a phone, follow these steps: 1. Click on the current description of the phone. 2. Enter the new description. 3. Click on the Apply button. 4.2 Moving Phones between Departments To move a phone between departments, follow these steps: 1. Select the phone you wish to move using the checkbox to the left of the phone. 2. Select the department you wish to move the phone to using the drop-down list at the bottom of the page. 3. Click on the Assign to Department button. 14

15 4.3 Assigning a Line to a Phone To assign a phone to a line, follow these steps: 1. Select the phone you wish to assign a line to using the checkbox to the left of the phone. 2. Enter the number of the line you wish to assign to the phone using the Enter number box at the bottom of the page. 3. Click on the Assign to Line button. 4.4 Removing a Line from a Phone You may wish to remove a line from a phone if, for example, the phone breaks and you need to assign a new phone to the user. To remove a line from a phone, follow these steps: 1. Select the phone by using the checkbox to the left of the phone. 2. Select the department the unassigned phone should be part of. 3. Click on the Assign to Department button. 4.5 Phone Profiles Note that managing phone profiles requires Adobe Flash version 9.0 or greater Managing Phone Profiles To manage the phone profiles for the department you are an administrator for, follow these steps: 1. Click the manage your phone profiles link towards the top of the page. 2. This launches a new window with the Phone Profile Editor. 15


16 4.5.2 Adding a New Phone Profile By default a department does not contain any phone profiles. To add a new phone profile, follow these steps: 1. Click on the Create new profile button. 1. Select the type of phone you want to create a profile for. 2. Click on OK. 3. This creates a default profile for the phone. 16

17 450 Model handset shown. Your handset may appear differently Modifying a Phone Profile To modify a phone profile, follow these steps: 1. Place your mouse over the picture of the phone whose profile you want to modify. 2. Select Edit from the drop-down list that appears. Configuration Views There are two views of the phone profile configuration: 1. The graphical phone view. To select this view, click on the phone icon at the bottom right of the window. This is the default view. 17


18 2. A table view. To select the table view click on the table icon at the bottom right of the window. Graphical View To configure a phone key, follow these steps: 1. To see if a key can be configured place your mouse pointer over it. If the key glows blue it can be configured. If it glows red it cannot be configured. 2. To select a key to be configured, click on that key. 1. From the drop-down list select a function for this key. 18


19 z 1. Select a label for this key. If the phone you are configuring has a display next to the key, this is the label which will appear on the phone display for that key. If you are assigning certain types of function to a key you will also need to enter a value for that key. The functions which require this extra value are: Speed Dial. The value is the telephone number to be called. Enhanced Speed Dial. The value is the telephone number to be called. Monitored Extension. The value is the extension number to monitor. Enhanced Monitored Extension. The value is the extension number to monitor. Directed Pickup. The value is the extension number you wish to pick up calls for. Paging Group. Select a paging group from the drop down menu. Depending on your phone model and the level of the phone service you have subscribed to these features may not all be available to you. 19


20 1. Click on OK. 1. This change has now been temporarily stored to this phone profile. To permanently save a change click on Save changes. Note that changes will not be applied to the actual phones themselves until they are rebooted. Abandon any changes you have made in this session or since you last saved by clicking on Discard Changes. 20


21 Table View To change the value of a setting, follow these steps: 1. Expand the levels in the table view until the setting you wish to change is visible. 1. Select the value for that setting by clicking on it. 2. Depending on the type of setting you are changing this will either give you a dropdown list to select a new value from or give you a text box to enter a value. Select or enter a value. 21
22 1. To lock a setting so that neither end-users nor administrators of sub-departments can change it, select the Lock check-box. 2. To hide a setting so that neither end-users nor administrators of sub-departments can see it, select the Hide check-box. 1. To save your changes permanently click on Save changes. Changes won t be applied to the phones themselves until they are next rebooted. To abandon any changes you have made in this session, or since you last saved, click on Discard Changes Logging Out of Phone Profiles Close your browser window to log out of the Phone Profiles management. 22
23 4.6 Modifying Phone Configuration as User To log into and modify the phone settings as one of your users, follow these steps: 1. Click on the Individual Line icon to the right of the phone. 2. Follow the instructions on using the Phone Configurator to manage the configuration of individual phones which are given in the ITS Fiber Hosted IP PBX End User Guide. 4.7 Copying Phone Configuration To copy the configuration from one phone to another, follow these steps: 1. Modify the old phone as the user, by clicking on the Individual Line icon to the right of the phone. 2. Go to the table view, using the table view icon to the bottom right of the screen. 3. Select the Phone Profile object. 4. Select Edit->Copy. 5. Exit the Phone Configurator by closing the window. 6. Now log into the new phone as the user. 7. Go to the table view. 8. Select the Phone Profile object. 9. Select Edit->Paste. 10. Click on Save Changes. 23
24 5 Managing Multiple Appearance Directory Numbers (MADNs) (OPTIONAL SERVICE) 5.1 Viewing MADNs The MADNs page displays all of the MADNs within your department. To view MADNs in sub-departments, select the sub-department from the drop-down list at the top of the page. 24
25 5.2 Viewing and Modifying MADN To view more details about a MADN or change its settings click on the Groups icon to the right of the MADN number MADN Lines The MADN Lines tab displays all of the lines that will ring when the MADN is called. Adding Lines To add lines to the MADN, perform one of the following two steps: 1. If you know the number, enter it in the text box on the bottom right and click Add. 2. If you don t know the number, click on Add Lines. To select one or more lines to add, use the checkboxes to the left of the lines and click Add Selected. 25

26 Removing Lines To remove a line from the MADN, follow these steps: 1. Select the line to remove using the checkbox to the left of it. 2. Click on the Remove Selected button. 26

27 5.2.2 Other Settings The Other Settings tab shows you the Call Limit Algorithm in use for this MADN. 5.3 Changing MADN settings To view and change the settings for the MADN line, follow these steps: 1. Click on the Individual Line icon to the right of the MADN number. 2. This will open a new browser window and automatically log you into CommPortal for this number. Follow the instructions for configuring settings given in the ITS Fiber Hosted IP PBX End User Guide. 27
28 6 Managing Multi Line Hunt Groups (MLHGs) (OPTIONAL SERIVCE) 6.1 Viewing MLHGs The MLHGs page displays all of the MLHGs in your department. To view MLHGs in sub-departments, select the sub-department from the drop-down list at the top of the page. 6.2 Moving MLHGs to another Department To move an MLHG between Departments, follow these steps: 1. Select the MLHG using the checkbox to the left of the MLHG. 2. Select the department you wish to move the MLHG to using the drop-down list at the bottom of the page. 3. Click on the Move button. 28
29 6.3 Viewing and Modifying MLHG To view the details of an MLHG and to modify its settings you first need to select that MLHG. Do this by selecting the Group icon to the right of the MLHG. This takes you to a series of tabs for that MLHG MLHG Pilots The MLHG Pilots tab displays any pilot numbers for this MLHG. A pilot number is one which when called, enters this MLHG MLHG Lines This tab displays all of the lines which are members of this MLHG. There is an icon for each line which tells you whether each member is currently logged into this MLHG. 29

30 Adding Lines To add lines to the MLHG, perform one of the following two steps: 1. If you know the number, enter it in the text box on the bottom right and click Add. 2. If you don t know the number, click on Add Lines. To select one or more lines to add, use the checkboxes to the left of the lines and click Add Selected. Removing Lines To remove a line from the MLHG, follow these steps: 1. Select the line to remove by using the checkbox to the left of it. 2. Click on the Remove Selected button. Changing Positions To change the positions of lines within the MLHG, follow these steps: 1. Click on the Change Positions button. 2. Move lines up and down using the icons. 3. Click on Apply. 30
31 6.3.3 Settings The Settings tab lets you view and change various settings for the MLHG. Preferences The Preferences page allows you to rename the MLHG. To rename the MLHG, follow these steps: 1. Type the new name in the text box. 2. Click on Apply. Hunt Settings The Hunt Settings page allows you to see the call distribution algorithm that is currently in use for this MLHG and other detailed MLHG settings. 31
32 7 Managing Call Pickup Groups 7.1 Viewing Call Pickup Groups The Call Pickup Groups page displays all of the Call Pickup Groups in your department. To view Call Pickup Groups in sub-departments, select the sub-department from the drop-down list at the top of the page. 7.2 Moving Call Pickup Groups to another Department To move Call Pickup Groups between Departments, follow these steps: 1. Select the Call Pickup Group using the checkbox to the left of the Call Pickup Group. 2. Select the department you wish to move the Call Pickup Group to using the dropdown list at the bottom of the page. 3. Click on the Move button. 32

33 7.3 Adding Call Pickup Groups To create a new Call Pickup Group, follow these steps: 1. Click on Add Group. 2. Enter the name of the new Call Pickup Group in the text box. 3. Click on Add. 7.4 Deleting Call Pickup Groups To delete a Call Pickup Group, follow these steps: 1. Select the Call Pickup Group using the checkbox to the left of the Call Pickup Group. 2. Click on the Remove Selected button. 7.5 Viewing and Modifying Call Pickup Groups To view the details of a Call Pickup Group and to modify its settings, follow these steps: 1. Select that Call Pickup Group by selecting the Group icon to the right of the Call Pickup Group. 2. This takes you to a series of tabs for that Call Pickup Group. 33
34 7.5.1 Managing Call Pick Up Group Lines The Lines tab displays all the lines in this Call Pickup Group. Adding Lines To add lines to the Call Pickup Group perform one of the following two operations: 1. If you know the number, enter it in the text box on the bottom right and click Add. 2. If you don t know the number, click on Add Lines. To select one or more lines to add, use the checkboxes to the left of the lines and click Add Selected. Removing Lines To remove a line from the Call Pickup Group, follow these steps: 1. Select the line to remove by using the checkbox to the left of it. 34
35 2. Click on the Remove Selected button Settings The Settings tab lets you view and change the name of the Call Pickup Group. To change the name, follow these steps: 1. Enter the new name in the text box. 2. Click Apply. 35
36 8 Managing Short Codes 8.1 Viewing Short Codes The Short Codes page displays all of the Short Codes in your department. To view Short Codes in sub-departments, select the sub-department from the dropdown list at the top of the page. To view all of the Short Codes for all departments, select View All from the department drop-down list. 8.2 Moving Short Codes to another Department To move Short Codes between Departments, follow these steps: 1. Select the Short Code or Short Code range using the checkbox to the left of the Short Code or Short Code range. 2. Select the department you wish to move the Short Code or Short Code range to using the drop-down list at the bottom of the page. 3. Click on the Move button. 36

37 8.3 Adding Short Codes To create a new Short Code, follow these steps: 1. Click on Add. 2. Enter the number of the Short Code to add. 3. Enter the telephone number or internal code the Short Code should dial. 4. Click on Add. 8.4 Adding Short Code Ranges To create a new Short Code range, follow these steps: 1. Click on Add Range. 2. Enter the first and last numbers of the Short Code range to add. 3. Enter the telephone number or internal code the first Short Code in the range should dial. Then enter the telephone number or internal code for the last Short Code in the range. 4. Click on Add. 37

38 8.5 Deleting Short Codes and Short Code Ranges To delete Short Codes and Short Code Ranges, follow these steps: 1. Select the Short Code or Short Code range using the checkbox to the left of the Short Code or Short Code Range. 2. Click on the Remove Selected button. 38
39 8.6 Modifying Short Codes To modify an existing Short Code, follow these steps: 1. Click on either the Short Code number or the number the Short Code dials. 2. Modify the details. 3. Click on Save. 39
40 8.7 Modifying Short Code Ranges To modify an existing Short Code Range, follow these steps: 1. Click on either the Short Code Range numbers or the numbers the Short Code Range dials. 2. Modify the details. 3. Click on Save. 40
41 9 Managing Extensions 9.1 Viewing Extensions The Extensions page displays all of the Extensions in your business. 9.2 Adding Extensions To create a new Extension, follow these steps: 1. Click on Add. 2. Enter the number of the Extension to add. 3. Enter the telephone number of the line in your business that this Extension should map to. 4. Click on Add. 41

42 9.3 Adding Extension Ranges To create a new Extension range, follow these steps: 1. Click on Add Range. 2. Enter the first and last Extension numbers to add. 3. Enter the telephone number of first line in your business that this Extension range should map to. 4. Click on Add. 42
43 9.4 Deleting Extensions and Extension Ranges To delete Extensions and Extension Ranges, follow these steps: 1. Select the Extension or Extension range using the checkbox to the left of the Extension or Extension Range. 2. Click on the Remove Selected button. 9.5 Modifying Extensions To modify an existing Extension, follow these steps: 1. Click on either the Extension number or the phone number of the Extension. 2. Modify the details. 3. Click on Save. 43
44 9.6 Modifying Extension Ranges To modify an existing Extension Range, follow these steps: 1. Click on either the Extension Range numbers or the phone numbers the Extension Range dials. 2. Modify the details. 3. Click on Save. 44

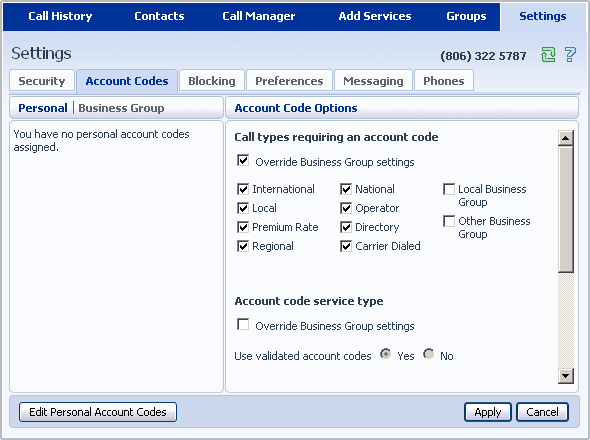
45 10 Managing Account Codes 10.1 Viewing and Modifying Account Code Settings The Account Codes page displays all of your business s account code settings. 45
46 10.2 Modifying Settings Modifying Call Types Requiring Account Codes Use the checkboxes to specify which types of calls will require Account Codes: International Whether account codes are required for calling international numbers. Local Whether account codes are required for local calls. Premium Rate Whether account codes are required for premium rate (1-900 number) calls. Regional Whether account codes are required for regional calls. National Whether account codes are required for long distance calls. Operator Whether account codes are required for operator calls. Directory Whether account codes are required for directory (411) calls. Carrier Dialed Whether account codes are required to make calls when dialing a carrier code (such as ). Local Business Group Whether account codes are required for local calls to other numbers within your business. Normally calls within your business will be local calls, but if you have multiple sites calls between numbers may be regional or national calls. In this case you need to use the Other Business Group setting. Other Business Group Whether account codes are required for non-local calls to other numbers within your business Note: You cannot require an account code for emergency calls, toll-free calls, or calls to service access codes. Once you have selected the call types, click Apply to save your changes. 46
47 Choosing Validated or Non-validated Account Codes To use Validated Account Codes, follow these steps: 1. Check Yes after User validated account codes. 2. Click Apply. To use Non-validated Account Codes, follow these steps: 1. Check No after User validated account codes. 2. Click Apply Setting Account Code Length To specify the length that should be used by your account codes, follow these steps: 1. Enter the length in the text box after Account code length:. 2. Click Apply Blocking Access after Incorrect Account Codes If you are using Validated Account Codes, a user s phone line will be blocked after an incorrect account code is entered too many times in succession. To change the number of incorrect entries the user is allowed, follow these steps: 1. Enter the value in the text box after Max incorrect attempts before account is blocked:. 2. Click Apply. 47
48 Setting Individual Line Properties To specify whether various settings can also be specified for each line in your business, perform one of the following operations. To allow which types of calls require account codes to be changed for each line, check Call types may be overridden per line. To allow the length of account codes to be changed for each line, check Account code length may be overridden per line. To allow lines to view the account codes that you have defined for the whole business, check Lines may view business group account codes. Set whether each line should be able to view, or both view and change, or not view their own account codes by selecting the relevant setting from the dropdown list at the bottom of the Account Code Options section. If you want to have per line account codes, but don t want the user to be able to configure these, configure these by logging on to CommPortal as that user. This is described in Section

49 Viewing and Modifying Account Code Settings for a Line. Once you have made your changes, click Apply to save them Configuring Account Codes To modify the account codes, follow these steps: 1. Click on Edit List. 2. To add an account code, follow these steps: Enter the code in the Account code text box. Enter the description in the Description text box. Click on Add. 3. To remove an account code, click the trash can icon to the right of the account code. 4. To change the description of an account code, remove it and then re-add it with the new description. 5. Once you have finished making changes, click on OK. 6. To save your changes you must now click Apply. 49
50 10.3 Viewing and Modifying Account Code Settings for a Line If you want to view or change a particular line s account code settings, follow these steps: Change the settings to allow you to do this as described in Section

51 Setting Individual Line Properties. 1. Go to the Lines page in CommPortal and log in as the line whose settings you wish to change, as described in Section Once you have logged in as this user, follow the instructions for modifying Account Codes in ITS Fiber Hosted IP PBX End User Guide. 51
52 52

53 10.4 Viewing Business Group Call Logs The Call Logs page enables Business Group Administrators with the appropriate permissions to access Business Group Call Logs. The Call Logs menu button is only available if the associated MetaSphere CFS has Business Group Call Logs enabled. The BG Administrator can click on the Call Logs menu button to launch a new page that allows them to export call logs for their Business Group fragment, and any departments under their control within their Business Group fragment, including. Request a report containing the logs of all calls made (up to a month at a time) to and from lines within their administration domain (whole business group or department and sub-departments) Filter call logs specifying a date range, and/or by department domain if the Business Group has them. Error messages are displayed if any of these filters are set to incorrect values. The UI will validate these filters once the Download button is clicked, and then display a dialog box while the report downloads. The BG Admin cannot access the main page or navigate to another page during this process, although they can cancel the operation. These call logs can then be imported into other programs, for example Microsoft Excel. When using Microsoft Excel, the BG Admin should use the Import Data menu option and change the data format of all telephone number columns to text to ensure that the telephone numbers in the call logs are displayed correctly. To download Call Logs follow these steps: 1. From the BG Admin page select the Call Logs link from the left of the page and the following appears 53

54 2. Enter the time frame (up to 30 days) and the department for the call logs that you would like to see. 3. Click the Download button. After the report is generated the following appears 4. Select the program to open the file or select save file. 54

55 11 Viewing External Calls Settings The External Calls page lets you view the settings that are in place for calls that are external to your business. External Calls This can take one of the following values: Not Permitted Calls outside of your business are not permitted. Unlimited There is no explicit limit to the number of concurrent external calls you can have, but there may be a limit to either the number of Incoming or Outgoing Calls you can make. Limited There is a limit to the number of concurrent calls you can have to outside of your business. Maximum number of external calls If the value of External Calls is Limited, the value of this setting specifies how many concurrent external calls there may be at any time. Incoming Calls This can take one of the following values: Not Permitted Inbound calls from outside of your business are not permitted. Unlimited There is no limit to the number of concurrent incoming external calls you can have, although you are still subject to any Maximum number of external calls. Limited There is a limit to the number of concurrent calls you can have from outside of your business. 55
56 Maximum number of simultaneous incoming calls If the value of Incoming Calls is Limited, the value of this setting specifies how many concurrent incoming external calls there may be at any time. Outgoing Calls This can take one of the following values: Not Permitted Outgoing calls to outside your business are not permitted. Unlimited There is no limit to the number of concurrent outgoing external calls you can have, although you are still subject to any Maximum number of external calls. Limited There is a limit to the number of concurrent calls you can have to outside of your business. Maximum number of simultaneous outgoing calls If the value of Outgoing Calls is Limited, the value of this setting specifies how many concurrent incoming external calls there may be at any time. Local carrier code This is a code that identifies which carrier will be used for any local calls your business makes. It is sometimes called PIC2. Long distance carrier code This is a code that identifies which carrier will be used for any long distance calls your business makes. It is sometimes called PIC1. International carrier code This is a code that identifies which carrier will be used for any international calls your business makes. It is sometimes called PIC3. 56

57 12 Viewing Number Blocks The Number Blocks page displays all of the telephone numbers which we have assigned to your business. 57
58 13 Auto-Attendant Easy / Premium Attendant 13.1 Overview There are two solutions for Auto Attendant functionality. Easy Attendant offers a very simple automated telephone menu. Callers to a business are directed to the automated TUI, providing key options to transfer to specific departments or individuals in the business, to transfer to a voic account directly, or to listen to a recorded announcement. You can choose to have either a single menu that plays when Easy Attendant is turned on, or two different menus for business and non-business hours that are used according to a pre-defined schedule. When Easy Attendant is turned off, you can either forward callers to another telephone number or play a message informing the caller that your business is currently closed. Premium Attendant, used mostly by small and medium business subscribers, offers an increased level of service compared to Easy Attendant. In addition to all the features offered by Easy Attendant, Premium Attendant allows multiple menus with a finer scheduling control. It also includes more call handling options, such as Voic by Name and Voic by Extension, as well as greater control over the actions taken for any given key press. 58

59 13.2 Easy Attendant This section outlines the required steps for configuring Easy Attendant Planning Your Easy Attendant Before you start to set up your Easy Attendant, it is a good idea to sketch out the operation of each menu on paper. This allows you to plan what options you need from the menu and how each one will operate. For example, the main menu for a pizza company may need to include the following options: 1. Play an announcement giving directions to the store, then return to the main menu so that the user can select another option. 2. Place an order with a server. 3. Speak to the manager. 4. Speak to another employee using dial-by-name. The sketch below shows how this menu would operate, including the key presses to access each option: In the diagram, option 1 (directions to the store) is shown with an arrow returning to the main Welcome menu so that the caller can select another option if required. This is because this option is playing a recording. The other options do not allow the return to the menu. 59

60 For out-of-hours and holiday operation, the Auto Attendant may provide an announcement that the store is closed (without allowing the caller to select any options), or it may provide an alternative set of menu options Configuring Easy Attendant To configure your Easy Attendant log into the Auto-Attendant, following these steps: 1. From the BG Administrator portal, select "Lines" and then click the "Individual Line" icon on the far right side of the page. As an alternative, you can access the CommPortal user login screen and enter the Easy Attendant Number and Password 2. The Screen then displays the Easy Attendant portal. 60

61 3. Begin Configuring your auto attendant by selecting either a single menu or a scheduled menu for business hours and non-business hours 4. If using a scheduled menu, begin setting up your Easy Attendant by recording the initial greeting by selecting the "listen/change" option on the lower right of the screen. 5. Now you are ready to define the specific menu items as defined in your plan to one of the following options. Play Announcement Transfer to Phone Transfer to Voic Dial by Extension Dial by Name 6. Repeat Steps 4 and 5 above for the Non-Business Hours menu. 61

62 7. Next you will need to establish your working hours by selecting the Schedule tab. Once in the Schedule screen, click on the Business Hours key and then click in the calendar and while holding down the left mouse button drag the mouse across the calendar to indicate the business hours. In the example below, the Business Hours are Monday Friday from 9:00 am until 5:00 PM. Any other time are considered non-working hours. 8. Next you will need to select any non-working days such as holidays by clicking on the calendar icon in the Special Days section of the Schedule page. You can choose individual non-working days by clicking on the date in the calendar, or you can use the Choose Public Holidays option to automatically add public holidays for your region. 62

63 9. If you will be using Dial by Name, then you will need to define which extensions will participate in dial by name and record the names of users in the extensions tab. To include or exclude and extension from dial by name, select the extensions as shown below and then click either Mark as Included or Mark as Excluded. To record the users name click on the record link for the user. 10. The final step in this process is to activate you Easy Attendant by clicking the Turn On button from the Main Tab. Your Easy Attendant is now active. 63

64 13.3 Premium Attendant This section outlines the required steps for configuring Premium Attendant Planning Your Premium Attendant Before you start to set up your Premium Attendant, it is a good idea to sketch out the operation of each menu on paper. This allows you to plan what options you need from the menu and how each one will operate. For example, the main menu for a sales company may include the following options: 1. Have a schedule Attendant. 2. Provide a main menu for business hours that provides the companies default greeting and menu. 3. Have the ability to transfer to a sales menu that provides additional menu options 4. Transfer to speak with the Billing department. 5. Dial by name 6. Dial by extension 7. Transfer to an operator. The sketch below shows how this menu would operate, including the key presses to access each option: 64

65 For out-of-hours and holiday operation, the Auto Attendant may provide an announcement that the store is closed (without allowing the caller to select any options), or it may provide an alternative set of menu options Logging into Premium Attendant To configure your Premium Attendant log into the Auto-Attendant, following these steps: From the BG Administrator portal, select "Lines" and then click the "Individual Line" icon on the far right side of the page. As an alternative, you can access the CommPortal user login screen and enter the Easy Attendant Number and Password. The Screen then displays the Easy Attendant portal 65

66 Configuring Premium Attendant Schedule Configure your weekly schedule by clicking on the Weekly Schedule and Holidays icon. Once in the Schedule screen, click on the Business Hours key and then click in the calendar and while holding down the left mouse button drag the mouse across the calendar to indicate the business hours. In the example below, the Business Hours are Monday Friday from 9:00 am until 5:00 PM. Any other time are considered nonworking hours. 66

67 Next you will need to select any non-working days such as holidays by clicking on the calendar icon in the Periods section of the Schedule page. You can choose individual non-working days by clicking on the date in the calendar, or you can use the Choose Public Holidays option to automatically add public holidays for your region. 67

68 Configuring Premium Attendant Announcements In order to use your Premium Attendant you will need to record the announcements that will be played as either you primary Business Hours and Non-Business Hours greeting as well as any other recorded announcements required. The example in would require three announcements, one each for Business Hours, Non-Business hours and the Sales menu. Click in the Announcements tab to begin configuration. 68

69 Click the Add New Announcement button. And follow the steps below. Enter the name and description of your announcement, then you can record the announcement. The record your announcement using a microphone or headset connected to your computer, click the Red record button. When finished recording press the stop button and click on the Add button at the bottom of the interface. To upload pre-recorded announcements click on the Upload Announcement button and browse to the location of your announcement and click upload. After you upload has completed click the Add button. To record the announcement using your telephone, create the announcement by adding a name and description and click on the Record By Phone icon. Make a note of the 69

70 announcement number and then click on the Add button. Next dial the main number for your Premium Attendant service provided by your service provider, enter the number for your Premium Attendant, enter the pin and enter follow the prompts to record your announcement using the announcement number noted in the previous step. 70

71 Configuring Premium Attendant Menus Next you will need to set up your Premium Attendant menu options. By default there are two menus defined in Premium Attendant. These could be used as your main business hours menu and you main non-business hours menu. You can additional menus as required by clicking the Add Button Begin to configure your menu by providing a name and description and selecting the Menu announcement to be used by this menu, and then click apply 71
72 Next you will need to configure the action for each key pressed for your menu by selecting the Keys link and selecting an option using the dropdown menus for each key pressed in the menu. The Options available are as follows: Use Default (This option is default for all keys for new menus Transfer to Phone Transfer to Voic (COS Controlled) Dial by Extension (COS Controlled including whether an announcement is automatically played giving initial instructions when this key is pressed, or whether these instructions must be recorded by the subscriber in the menu announcement) Dial by NameDial by Name (CoS controlled) Voic by Extension (CoS controlled) Voic by Name (CoS controlled) Transfer to Operator (CoS controlled, and only available for Premium Attendants in a Business Group) Intercept mailbox (CoS controlled) Go to Menu Return to Previous Menu Replay Menu Announcement Return Announcement Hang up Hang up 72
73 Next you will need to configure the Timeout behavior of your menu to address callers that do not press a key in this menu. Enter timeout duration and the timeout behavior from the dropdown list as seen below and click apply. 73

74 Configuring Premium Attendant Extensions If you plan on using dial by name or dial by extension, you will need to select the extensions and record a name for the dial by name. To start click the Extensions tab. And select the extensions you wish to be added or excluded and click either the Mark as Included or Mark as Excluded. To record names to be used for dial by name, click the listen/change icon and record the name using the recording interface shown below And click the Save button. 74

75 Configuring Premium Attendant Advanced Options In order to configure the advanced setting for your Premium Attendant, click on the advanced tab and define the default handling for each key press. These actions will be available to callers in all menus unless you assign an alternative action to the key in the per menu configuration. Next Click on the Error Handling link and set the value and behavior for Timeout, Call Transfers, Unknown Input and Invalid Extensions 75
76 Activating Premium Attendant Finally you will need to activate you Premium Attendant by going to the Main page and selecting the Turn On button. The Premium Attendant interface uses the following error messages and icons to alert you to incorrect or missing configuration. These are produced on page load, and are not updated dynamically. o o o The Main tab has a Service Status panel that states your current schedule period and the menu that callers will hear. It also reports if you have errors in any menus, or one or more announcements is missing audio. The Schedule and Menus pages use a banner line to report any errors. The following icons are used to indicate incorrect or incomplete configuration error icon warning icon If there are any errors in your configuration, you will be warned against turning on Premium Attendant, and in some cases this will be prohibited. 76
77 14 Music on Hold 14.1 CommPortal Access Logging In To log into the Music On Hold system click the Music On Hold link at the bottom of the left hand side of CommPortal. This opens up a new browser window with the Music On Hold administration system. If you are the administrator for the top-level department of your business then you will see three links at the top of the page, each taking you to a different section of the Music On Hold administration system. Security View and configure your security settings. Mappings This section allows you to configure different recordings to be played when different lines within your business put callers on hold. Resources This section allows you to upload and manage your recordings. If you are not an administrator for the top-level department of your business you will not see Resources as only administrators for the top-level department can manage recordings. 77
78 Viewing and Changing Your Security Settings To view your security settings, select the Security section. As well as accessing the Music On Hold system using CommPortal, you can also use your phone to access it. Using this page you can view and change the password you will need to enter to use the phone access. To change your password, follow these steps: 1. Enter the new password in the text box. 2. Click Apply. 78

79 Managing Recordings To access the recordings section, click on the Resources link. Global Media List The Global Media List section specifies any recordings that we have made available for your use. Whether we make any recordings available to you depend on which service you have subscribed to. You can t add or remove recordings from the Global Media List Assigning Recordings to Lines You can assign recordings either to all lines in your business, or different recordings per line. To do this you need to access the mappings section. 79
Hosted PBX. Administrator Guide_Metaswitch. Version 7.2 Issue 1 29 Nov 2010
 Hosted PBX Administrator Guide_Metaswitch Version 7.2 Issue 1 29 Nov 2010 XACT COMMUNICATIONS 560 e. 3 RD STREET, SUITE 202 LEXINGTON, KY 40508 888.747.9228 Notices Copyright 2010 Xact Communications.
Metaswitch Hosted IP PBX. Administrator Guide. Version 7.2 Issue 1 30 Sep 2010. Document Number VPM-531-0100
 Metaswitch Hosted IP PBX Administrator Guide Version 7.2 Issue 1 30 Sep 2010 Document Number VPM-531-0100 Metaswitch Hosted IP PBX Administrator Guide CONFIDENTIAL Notices Copyright 2010 Metaswitch Networks.
Frontier Tandem. Administrator User Guide. Version 2.4 January 28, 2013
 Frontier Tandem Administrator User Guide Version 2.4 January 28, 2013 About This Document 1 Version 7.3 Jan 28, 2013 Frontier Tandem Administrator Guide CONFIDENTIAL About This Document The Frontier Small
CenturyLink Smart IP Hosted Voice and Data Administrator Guide Document ID VPM5310002 October 1, 2009
 CenturyLink Smart IP Hosted Voice and Data Administrator Guide Document ID VPM5310002 October 1, 2009 TABLE OF CONTENTS 1. Introduction... 6 1.1 Purpose of this Guide... 6 1.2 Other Guides... 6 1.3 Phones
Secure Cloud Solutions Hosted IP PBX Administrator Guide
 Secure Cloud Solutions Hosted IP PBX Administrator Guide January 2010 TABLE OF CONTENTS 1. Introduction... 6 1.1 Purpose of this Guide... 6 1.2 Other Guides... 6 2. SMB Administrator CommPortal... 7 2.1
CenturyLink Smart IP Hosted Voice and Data
 CenturyLink Smart IP Hosted Voice and Data Hosted Voice End User Guide Document ID VPM 549 0001 1 TABLE OF CONTENTS 1. Introduction... 7 2. Advanced Phone Features... 8 2.1 Call Forwarding... 8 2.2 Speed
WTC Communications Hosted PBX User Guide
 WTC Communications Hosted PBX User Guide Version 7.13.1 Section Subject Page 3 Making Calls...5 3.1 Internal...5 3.2 External...5 3.3 Emergency Calls...5 3.4 Speaker Phone...5 3.5 Ending Calls...5 4 Answering
Online Tools. CommPortal ADMIN. Lines. Go to http://myphone.bayring.com/bg
 CommPortal ADMIN Go to http://myphone.bayring.com/bg User Name: Your 10-digit telephone number Password: Your voice mail password Lines To view the settings for an individual line, MADN or MLHG pilot number,
Hosted IP-PBX Phone System Polycom Model 650 - Handset
 End User Guide Hosted IP-PBX Phone System Polycom Model 650 - Handset Business Voice Systems Metro Connection Services Commercial DirecTV Managed Services Data Center Business Voice Systems Metro Broadband
Shaw Business. Auto-Attendant User Guide
 Shaw Business Auto-Attendant User Guide Contents Steps to Setup an Auto-Attendant... 3 Plan your Auto-Attendant structure...4 Prepare custom greetings for each menu and sub-menu... 5 Providing Custom greetings
TruConnect. Hosted PBX User Guide. Quick Start Guide - Page 2. Table of Contents - Page 5. 1-800-768-1212 www.truvista.net
 TruConnect Hosted PBX User Guide R R Quick Start Guide - Page 2. Table of Contents - Page 5. 1-800-768-1212 www.truvista.net TruConnect User Guide Page 1. Hosted TruConnect IP PBX Quick Reference Guide
Web Portal User Guide
 Web Portal User Guide Fusion Hosted Voice Web Portal User Guide, Revision 2, September 2013 NCTC North Central 872 Highway 52 Bypass E Lafayette, TN 37083 615-666-2151 www.nctc.com Fusion Hosted Voice
Cloud Hosted IP PBX BGAdmin Training
 Cloud Hosted IP PBX BGAdmin Training Welcome! Welcome to AirePBX! This BGAdmin (Business Group Administrator) training is designed to help you get comfortable with administration features and functions
Hosted Voice Business Group Administrator Quick Start Guide
 Hosted Voice Business Group Administrator Quick Start Guide 2 Get Started with EarthLink! This easy-to-use guide consists of a series of brief instructions designed to help you configure your new service.
Optimum Lightpath Hosted Voice User Guide
 Optimum Lightpath Hosted Voice User Guide V10-12-10 Table of Contents 1. Making and Answering Calls... 6 1.1 Internally... 6 1.2 Externally... 6 1.3 Emergency Calls... 6 1.4 Speaker Phone... 6 1.5 Ending
VoIP Phone Quick Start Guide
 VoIP Phone Quick Start Guide What is VoIP? VoIP stand for Voice over Internet Protocol. This means that instead of using traditional phone lines to transmit calls, VoIP phones use an Internet connection.
Virtual Office Account Manager Phone System Setup Guide. 8x8 Virtual Office Phone System Setup Guide
 8x8 Virtual Office Version 1.1, October 2011 Contents Introduction...3 System Requirements...4 Supported Operating Systems....4 Required Plug-ins....4 Supported Browsers....4 Required Firewall Ports...4
BT Hosted VoIP (Enhanced) User Manual
 User Manual") BT Hosted VoIP (Enhanced) User Manual Bringing it all together IT communications support Congratulations, and thank you for choosing BT Hosted VoIP A powerful business phone system at a fraction of the
BT Hosted VoIP (Enhanced) User Manual Bringing it all together IT communications support Congratulations, and thank you for choosing BT Hosted VoIP A powerful business phone system at a fraction of the
Desktop and Plugins from Vonage Business
 Desktop and Plugins from Vonage Business Installation and User Guide The Vonage Business Desktop reinvents the way you interact with your phone service, giving you extra control and convenience to manage
Gazelle Hosted PBX V8.0 End User Guide
 Gazelle Hosted PBX V8.0 End User Guide Document VPM-777-200, Version 1.2 08 Apr 2013 Document Version 1.2 Gazelle Communications Metaswitch Hosted PBX V8.0 08 Apr 2013 End User Guide Contents 1 Introduction...
Overview. Logging in: Table of Contents. adminstrator webportal myphone.rcn.com/hostedvoice/bg
 Guide 3 Overview Logging in: Table of Contents One of the exciting benefits of RCN Hosted Voice is the ability to set-up and control your communications according to your business specific needs. You can
RCN BUSINESS PHONE with Call Manager. Administrator Guide
 RCN BUSINESS PHONE with Call Manager Administrator Guide 3 Overview RCN Business Phone gives you the ability to set-up and manage your communications according to your business specific needs via an administrator
8x8 Virtual Office Account Manager Guide
 8x8 Virtual Office Account Manager Guide Version 1.2, June 2014 Effective May 10, 2013, the Privileges tab in the top navigation bar of the Account Manager was renamed My Account. Privileges and User Profiles
End User Training Guide
 End User Training Guide Everything You Need to Get Started on Vonage Business Solutions End User Portal This guide will give you a comprehensive look at the Vonage Business Solutions online user interface
Getting Started. Getting Started with Time Warner Cable Business Class. Voice Manager. A Guide for Administrators and Users
 Getting Started Getting Started with Time Warner Cable Business Class Voice Manager A Guide for Administrators and Users Table of Contents Table of Contents... 2 How to Use This Guide... 3 Administrators...
Hosted VoIP Phone System. Admin Portal User Guide for. Call Center Administration
 Hosted VoIP Phone System Admin Portal User Guide for Call Center Administration Contents Table of Figures... 4 1 About this Guide... 6 2 Accessing the Hosted VoIP Phone System Administration Portal...
Enswitch Administrator Guide
 Enswitch Administrator Guide July 2012 Enswitch Administrator Guide 1 Contents 1 Introduction... 5 1.1 The Purpose of this Document...5 1.2 Features...5 1.3 Workflows...5 2 User Enrollment... 6 3 User
IP Office Phone Manager Users Guide
 IP Office Phone Manager Users Guide 40DHB0002USAR Issue 6 (03/04/2002) Contents Getting Started... 3 Introduction... 3 Getting Started... 4 Phone Manager... 5 Main Window... 5 Call Status... 6 Call History...
How To Use Fairpoint.Com On A Cell Phone On A Pc Or Landline Phone On An Iphone Or Ipad Or Ipa Or Ipo Or Cell Phone (For A Cell) On A Landline Or Cellphone On A
 On A Landline Or Cellphone On A") Definition FairPoint Communications Hosted PBX is easy to use and manage. Hosted PBX is packed with a wide variety of useful standard, advanced and business group calling features, including voicemail.
Definition FairPoint Communications Hosted PBX is easy to use and manage. Hosted PBX is packed with a wide variety of useful standard, advanced and business group calling features, including voicemail.
Hosted PBX Calling Features and Voice Mail Guide
 Definition FairPoint Communications Hosted PBX is easy to use and manage. Hosted PBX is packed with a wide variety of useful standard, advanced and business group calling features, including voicemail.
BetterVoice Platform User Guide
 BetterVoice Platform User Guide Table of Contents: 1. Call Continuity..... pg 1 2. Call Groups..... pg 2 3. Call Queues... pg 5 4. Caller ID... pg 9 5. Company Call Recording... pg 12 6. Conference Bridge......
NEXTLEVEL INTERNET. NextLevel Voice User Guide
 NEXTLEVEL INTERNET NextLevel Voice User Guide N E X T L E V E L I N T E R N E T NextLevel Voice User Guide NextLevel Internet P.O. Box 502661 San Diego, CA 92150 Sales 858-836-0703 Support 858-836-0700
wowforbusiness.com Virtual Office WOW! Business VOMW.U.1407.O
 wowforbusiness.com Virtual Office (Easy Attendant) Guide WOW! Business VOMW.U.1407.O Virtual Office (Easy Attendant) Table of Contents Product Overview...3 CommPortal Login Screen...4 Main Page...5 Schedule...6
Business Solutions. Page 1
 2012 C Page 1 Contents Getting Started emerge Dashboard Login... 3 Main Profile Screen... 5 Group Services... 5 Auto Attendant Overview... 7 Modifying Auto Attendant Settings... 7 Auto Attendant Modify
ConnectDirect User Guide
 ConnectDirect User Guide For questions contact ConnectMe Customer Service Email: custsvc@connectmevoice.com Phone: 800-743-1208 Ext. 2 Page 1 Contents... 1 SECTION 1: Introduction... 4 SECTION 2: Login
ADMINISTRATOR GUIDE Call Queuing Administrator Guide V 2.0. 8x8 Call Queuing. Administrator Guide. Version 2.0 February 2011
 8x8 Call Queuing Administrator Guide Version 2.0 February 2011 Table of Contents Introduction...3 How an 8x8 Call Queue Works...4 Example: Primary and Secondary Queue Extension Group...4 Getting Started...5
8x8 Virtual Office Phone System Setup Guide
 8x8 Virtual Office May 2013 Effective May 10, 2013, the Privileges tab in the top navigation bar of the Account Manager was renamed My Account. Privileges and User Profiles can now be found in the My Account
NEXTLEVEL INTERNET. NextLevel Voice Office Manager Guide
 NEXTLEVEL INTERNET NextLevel Voice Office Manager Guide N E X T L E V E L I N T E R N E T NextLevel Voice Office Manager Guide NextLevel Internet P.O. Box 502661 San Diego, CA 92150 Sales 858-836-0703
Snom Phone Quick Start Guide
 Snom Phone Quick Start Guide Today s Phone Company 1.866.342.4283 www.megagate.com Table of Contents 1. Quick Reference information... 3 2. Introduction... 4 3. Making Calls... 5 3.1 Internally... 5 3.2
Lightpath Hosted Voice
 Lightpath Hosted Voice Call Queuing Agent/User Guide v06-01-15 CONTENTS 1 Information for Call Queuing Agent Lines... 1 1.1 Using Multi Line Hunt Groups... 1 1.1.1 Viewing MLHGs...1 1.1.2 Logging in and
8x8 Auto Attendant Administrator Guide
 8x8 Auto Attendant Administrator Guide Version 2.0, May 2010 Table of Contents Overview...3 Before You Start...4 Initial Set-Up...4 What To Expect...4 How to Call into Your Auto Attendant...4 Primary Auto
one Managing your PBX Administrator ACCESSING YOUR PBX ACCOUNT CHECKING ACCOUNT ACTIVITY
 one Managing your PBX Administrator ACCESSING YOUR PBX ACCOUNT Navigate to https://portal.priorityonenet.com/ and log in to the PriorityOne portal account. If you would like your web browser to keep you
Cloud PBX User Guide. Quick Links. Using Your Desk Phone. Using the User Web Portal. Voicemail. Answering Rules and Time Frames. Contacts.
 Quick Links Using Your Desk Phone Using the User Web Portal Voicemail Answering Rules and Time Frames Contacts Phones Music On Hold Call History Profile CONTENTS Contents... ii Introduction... iv 1. Using
FEATURE & VOICEMAIL OVERVIEW
 FEATURE & VOICEMAIL OVERVIEW Welcome to EarthLink Business Thank you for selecting us to provide your business communications. This guide is formatted to help you get the most from the EarthLink Business
Hosted VoIP Phone System. Admin Portal User Guide for. Call Center Administration
 Hosted VoIP Phone System Admin Portal User Guide for Call Center Administration Contents 1 About this Guide... 4 2 Accessing the Hosted VoIP Phone System Administration Portal... 5 3 Hosted VoIP Phone
FairPoint Hosted PBX Business Advantage Premium Service - User Tutorial
 FairPoint Hosted PBX Business Advantage Premium Service - User Tutorial Welcome This training will help you get the most from your new Hosted PBX service. Service: FairPoint Hosted PBX - Business Advantage
TELUS Business ConnectTM. User Guide
 TELUS Business ConnectTM User Guide TELUS Business Connect User Guide Table of Contents Table of Contents 3 Part - Getting Started 4 Introduction 5 Overview 6 Messages 7 Call Log 8 Contacts 9 User Settings
Personal Call Manager User Guide. BCM Business Communications Manager
 Personal Call Manager User Guide BCM Business Communications Manager Document Status: Standard Document Version: 04.01 Document Number: NN40010-104 Date: August 2008 Copyright Nortel Networks 2005 2008
VoiceManager User Guide Release 2.0
 VoiceManager User Guide Release 2.0 Table of Contents 2013 by Cox Communications. All rights reserved. No part of this document may be reproduced or transmitted in any form or by any means, electronic,
Hosted Voice. Administrator Guide
 Hosted Voice Administrator Guide Dear MegaPath Business Voice Administrator, Thank you for choosing MegaPath. We have designed this resource guide to help you get the most out of your new MegaPath phone
Virtual Phone System User Guide v4.7
 Virtual Phone System User Guide v4.7 169 Saxony Road, Suite 212 Encinitas, CA 92024 Phone & Fax: (800) 477-1477 Welcome! Thank you for choosing FreedomVoice. This User Guide is designed to help you understand
Cloud PBX User s Guide
 Cloud PBX User s Guide G12 Communications 1 (877) 311-8750 sales@g12com.com Jackson St. #19390, Seattle, WA 98104 Contents Contents...2 Introduction...4 1. Using Your Desk Phones...4 Making Calls...4 Making
Hosted VoIP Phone System. Desktop Toolbar User Guide
 Hosted VoIP Phone System Desktop Toolbar User Guide Contents 1 Introduction... 3 1.1 System Requirements... 3 2 Installing the Telesystem Hosted VoIP Toolbar... 4 3 Accessing the Hosted VoIP Toolbar...
Table of Contents INTRODUCTION... 5 ADMINISTRATION... 6 MANAGING ACD GROUPS... 8
 WorldSmart ACD Help Table of Contents INTRODUCTION... 5 OVERVIEW... 5 WHO CAN CREATE AND MANAGE ACD... 5 ADMINISTRATION... 6 CREATING A NEW GROUP... 6 ASSIGN PHONE NUMBER... 7 MANAGING ACD GROUPS... 8
Features & User Guide
 & User Guide Welcome to RCN Hosted Voice Thank you for choosing RCN Hosted Voice as your new telephone system. By partnering with RCN Business Services, you now have access to incredible state-of-the-art
Hosted Fax Mail. Hosted Fax Mail. User Guide
 Hosted Fax Mail Hosted Fax Mail User Guide Contents 1 About this Guide... 2 2 Hosted Fax Mail... 3 3 Getting Started... 4 3.1 Logging On to the Web Portal... 4 4 Web Portal Mailbox... 6 4.1 Checking Messages
Avaya one-x Communicator User Reference
 Avaya one-x Communicator User Reference Table Of Contents Introduction...1 Logging in to the server...3 Logging out of the server...5 Using your feature buttons...7 Using Avaya one-x Communicator with
5 Setting up a Contact Center
 contact_center.fm 5 This example describes the setup and configuration of an OpenScape Office Contact Center based on a fictional customer scenario. It is intended to assist you in setting up a customized
Web Portal User Guide Easily set up new calling features, or make changes to existing ones through TouchTone's Business VoIP Web Portal.
 Web Portal User Guide Easily set up new calling features, or make changes to existing ones through TouchTone's Business VoIP Web Portal. BUSINESS This guide covers: Accessing the Web Portal Setting up
Hosted PBX. TelePacific Communicator User Guide. Desktop Edition
 Hosted PBX TelePacific Communicator User Guide Desktop Edition 11/19/2014 CONTENTS Login... 2 Home Window... 3 Status Flag... 4 My Room... 6 Contacts Screen... 6 History... 8 Directory... 9 Dialpad...
Contents How do I gain access to the Horizon website... 2 Logging in as the Administrator... 2 How do I customise my Dashboard?...
 Contents How do I gain access to the Horizon website... 2 Logging in as the Administrator... 2 How do I customise my Dashboard?... 2 How do I setup the Horizon GUI?... 3 How do I setup the Company Administration?...
IP-PBX User Manual. Table of Contents. Version 20090401
 Table of Contents IP-PBX User Manual Version 20090401 Table of Contents... 1 Your IP-PBX... 2 Who Should Read this Manual... 2 PBX Basic Features... 2 PBX Optional Features... 2 Terminology... 2 Your PBX
My Account Quick Start
 My Account Quick Start for Verizon Business Digital Voice Service Guide for Office System Administrators Accessing My Account Phone Assignment Defining the User Site Services Auto Attendant Voice Portal
PBX Administrator Guide
 DDev8.10 1 PBX Administrator Guide URL for the site is https://hostedpbx.voxnetinc.com/login.php Enter you Username E mail address Enter your Password - Your extension The HOME page opens Here you can
Extension Manual. User portal, Dial codes & Voice mail for 3CX Phone System Version 7.0
 Extension Manual User portal, Dial codes & Voice mail for 3CX Phone System Version 7.0 Copyright 2006-2008, 3CX ltd. http:// E-mail: info@3cx.com Information in this document is subject to change without
Voice Portal and Auto Attendant ADMIN GUIDE
 Voice Portal and Auto Attendant ADMIN GUIDE Virtual PBX Broadsoft Voice Portal and Auto Attendant ADMIN GUIDE Virtual PBX Broadsoft CONTENTS 1.0 Voice Portal 1 1.1 Overview 1 1.2 Accessing Your Voice Portal
Verizon Collaboration Plug-In for Microsoft Outlook User Guide
 Verizon Collaboration Plug-In for Microsoft Outlook User Guide Version 4.11 Last Updated: July 2011 2011 Verizon. All Rights Reserved. The Verizon and Verizon Business names and logos and all other names,
Verizon Collaboration Plug-In for Microsoft Outlook User Guide
 Verizon Collaboration Plug-In for Microsoft Outlook User Guide Version 4.11 Last Updated: July 2011 2011 Verizon. All Rights Reserved. The Verizon and Verizon Business names and logos and all other names,
OneSolutions Hosted IP PBX FEATURES AND VOICE MAIL. overview A D V A N C E D T E L E C O M M U N I C A T I O N S S O L U T I O N S
 OneSolutions Hosted IP PBX FEATURES AND VOICE MAIL overview A D V A N C E D T E L E C O M M U N I C A T I O N S S O L U T I O N S INTRODUCTION Welcome to EarthLink Business Thank you for selecting us to
My Hosted PBX Portal User Guide https://mypbx.primus.ca/
 My Hosted PBX Portal User Guide https://mypbx.primus.ca/ Quick Click Features Call Log Tab Directory Tab Voice Mail Tab Phone Control Tab Concierge Tab Call treatments Find Me Follow Me Remote Phone Call
FOCUS ON YOUR BUSINESS, NOT YOUR BUSINESS COMMUNICATIONS. Welcome to Comcast Business VoiceEdge
 FOCUS ON YOUR BUSINESS, NOT YOUR BUSINESS COMMUNICATIONS. Welcome to Comcast Business VoiceEdge Table of Contents Welcome to Comcast Business VoiceEdge... 5 Quick Start: VoiceEdge Common Basic Features...
Orbitel. Residential Digital Phone Service User s Guide
 Orbitel Residential Digital Phone Service User s Guide All Rights Reserved Copyright 2005 The use, disclosure, modification, transfer, or transmittal of this work for any purpose, in any form, or by any
Voicemail Plus User Guide
 Voicemail Plus User Guide Version: 2.0_US Revised: 25 September 2007 Notices Copyright 2007 Vonage. All rights reserved. No part of this documentation may be reproduced in any form or by any means or used
AT&T Voice DNA User Guide
 AT&T Voice DNA User Guide Page 1 Table of Contents GET STARTED... 4 Log In... 5 About the User Dashboard... 9 Manage Personal Profile... 15 Manage Messages... 17 View and Use Call Logs... 22 Search the
Xpressions Web Assistant
 Xpressions Web Assistant Accessing your voicemail via the web Information Technology Services Outreach and Distance Learning Technologies 1 Copyright 2014 KSU Department of Information Technology Services
SINGLE NUMBER SERVICE - MY SERVICES MANAGEMENT
 Service Change Charge...$18 Monthly Service...$3/mo. LOGIN TO MY SERVICES In your web browser type in myservices.gondtc.com. Enter your Username (ten-digit phone number for example ) and Password. Your
IPOne Phone System User Interface Guide
 IPOne Phone System User Interface Guide DoubleHorn Communications, LLC 1802 W. 6 th Street Austin, TX 78703 Main Office: 512-637-5200 Toll Free: 877-637-HORN (4676) DHC Support: Dial 611 IPOne Phone System
Communicator for Mac Help
 Communicator for Mac Help About the ShoreTel Communicator Introduction to the ShoreTel Communicator for Mac ShoreTel Communicator elements Learn about the window layout, panels, icons, buttons and notifications
OmniTouch 8400 Instant Communications Suite. My Instant Communicator Desktop User guide. Release 6.7
 OmniTouch 8400 Instant Communications Suite My Instant Communicator Desktop User guide Release 6.7 8AL 90219 USAE ed01 Sept 2012 Table of content MY INSTANT COMMUNICATOR FOR THE PERSONAL COMPUTER... 3
Positron G-320 Business Phone System Setup Guide
 Positron G-320 Business Phone System Setup Guide 5101 Buchan Street, Suite 200 Montreal, Quebec H4P 2R9 Phone: (514)-345-2220 Support: (514)-664-4719 July 2011 Steps Once your Positron G-320 unit hardware
Voice Mail with E-Forward Online User Guide
 Voice Mail with E-Forward Online User Guide Check voice messages from any phone, your e-mail or online! Discover the ultimate convenience of managing your home and family life using Ponderosa Voice Mail
1 VoIP/PBX Axxess Server
 - 1 1 VoIP/PBX Axxess Server The Axxess Server supports comprehensive Voice Over Internet Protocol network services, which are based on the Open Source Asterisk VoIP software. The Axxess Server VoIP telephony
itelecenter Virtual PBX Extension User Guide
 itelecenter Virtual PBX Extension User Guide Version 13 October 2011 COANetwork 2011 itelecenter Virtual PBX Extension User s Manual A Virtual PBX Extension can be set up for you by your itelecenter Administrator.
Cisco IP Phone Training 8/26/15
 Cisco IP Phone Training 8/26/15 Using your Phone This document will provide information on the following: Introduce you to your phone Place, transfer, forward, park and pick up a call Set voice mail passwords
How To Use Freedomvoice On A Cell Phone Or Landline Phone On A Pc Or Mac Or Ipad Or Ipa Or Ipo Or Ipod Or Ipode Or Ipro Or Ipor Or Ipore Or Ipoe Or Ipob Or
 Virtual Phone System User Guide v5.4 169 Saxony Road, Suite 212 Encinitas, CA 92024 Phone & Fax: (800) 477-1477 Welcome! Thank you for choosing FreedomVoice. This User Guide is designed to help you understand
Premium Digital Voice Solution. User Guide
 Premium Digital Voice Solution User Guide Table of Contents How to Log into Account Portal & Changing your Password 1 How to Download Toolbar 2 Utilizing Voice Mail 3 Feature Guide & How to Configure
User Guide. Voice Services Self Care Portal. Logging In. Welcome to the Self Care Portal
 Logging In 1. From your Internet browser, enter the following URL: http://selfcare.ucc.ny.gov 2. Choose End User Self Care. 3. Enter your username and password: a. Username: Enter your LDAP user ID. (same
What is My Teamwork? What s new in this release? MY TEAMWORK 5.0 QUICK START GUIDE
 MY TEAMWORK 5.0 QUICK START GUIDE What is My Teamwork? My Teamwork is a converged communications solution that combines presence-aware instant messaging with the ability to make phone calls, conference
GCI VOICE. Auto-Attendant Voicemail User Interface Onboarding Guide. gci.com/business 08.17.15
 GCI VOICE Auto-Attendant Voicemail User Interface Onboarding Guide gci.com/business 08.17.15 2 Note: Please do not attempt to setup or change your Auto-Attendant feature by calling in to the MediaBox.
UniCom Enterprise Phone (Polycom CX600) User Guide
 User Guide") UniCom Enterprise Phone (Polycom CX600) User Guide 1 6 What is UniCom Enterprise?...1 Frequently Used Make a Call...6 What is Microsoft Lync?...1 Call Functions Use Call Controls...7 Who can use UniCom
UniCom Enterprise Phone (Polycom CX600) User Guide 1 6 What is UniCom Enterprise?...1 Frequently Used Make a Call...6 What is Microsoft Lync?...1 Call Functions Use Call Controls...7 Who can use UniCom
Auto Attendant or IVR Setup Guide DigiCloud IP PBX Solution
 Auto Attendant or IVR Setup Guide DigiCloud IP PBX Solution Auto Attendant DigiCloud Auto Attendant is a flexible utility designed to greet callers and transfer them either to an existing DigiCloudSwitch
MANAGED VOICE SOLUTIONS QUICK START GUIDE
 MANAGED VOICE SOLUTIONS QUICK START GUIDE WELCOME Welcome to Mediacom Business Managed Voice Solutions! This guide is intended to get you up-and-running for the basic features associated with the product.
Hosted Voice. Rely on us to take care of your business. YOUR QUICK START GUIDE TO THE LUS FIBER ALL BUSINESS HOSTED VOICE SYSTEM
 Hosted Voice YOUR QUICK START GUIDE TO THE LUS FIBER ALL BUSINESS HOSTED VOICE SYSTEM Rely on us to take care of your business. 1 2 Welcome. Welcome to ExecCONNECT from LUS Fiber! This guide is intended
Hosted IP Phone System Voice Operator Panel User Guide
 Voice Operator Panel Main Window: 1. Incoming Calls Incoming calls display here. 2. Outgoing Calls Outgoing calls display here. 3. Dial Enter [10-digit phone number] in this field to make an outgoing call.
Conference Center User Guide. Conference Center User Guide
 W AVECOM SOLUTIONS CONFERENCE CENTER USER GUIDE Conference Center User Guide Conference Center User Guide WAVECOM SOLUTIONS Conference Center User Guide Version 1.13a September 26, 2011 Wavecom Solutions
Digital Phone @ Home Tutorial
 Digital Phone @ Home Tutorial 2 Table of Contents Quick Start Guide... 4 Making Phone Calls... 5 Voicemail Setup... 6 Setup instructions:... 6 To Check Messages:... 6 Quick Key Reference:... 6 Customer
REINVENTING COMMUNICATIONS. User s Guide !!!!!!!!!!!!!!!!!!!!!!!!!!!!!!!! User s Guide
 " $%&'()*+),$(,$- %&).$,./0)11111111111111111111111111111111111111223 %++(--0,4$5(,./0)6(&7)8$%'222111111111111111111111111229,%/04%$0,4$5(7)8$%'111111111111111111111111111111122: 5);(7%4(1111111111111111111111111111111111111111
OSSmosis Administrator Portal
 OSSmosis Administrator Portal USER GUIDE TM 989 Old Eagle School Road Suite 315 Wayne, PA 19087 USA 610.964.8000 www.evolveip.net Release 1.0 Document Version 1.0 Copyright Notice Copyright 2010 Evolve
VIRTUAL PBX USER GUIDE
 VIRTUAL PBX USER GUIDE All you need to know Sales & Enquiries 1300 733 995 Business Support 1300 887 899 www.mynetfone.com.au/business P. 1 Customer Service At MyNetFone, we pride ourselves on delivering
OneSolutions Hosted IP PBX Cisco IP Phone Training
 OneSolutions Hosted IP PBX Cisco IP Phone Training Download the Service User Guides at: http://www.onecommunications.com/knowledgecenter.aspx?id=4704 2009 One Communications. The One Communications logo