HART INSTALLATION GUIDE
|
|
|
- Hortense Hodge
- 9 years ago
- Views:
Transcription
1 HART INSTALLATION GUIDE VERSION 1.0 JULY 01, 2014 Page 1 of 23

2 Table of Content Introduction... 3 Hardware/Software Specifications... 3 Software Downloads... 3 Installation Guide General Overview... 5 Installers Access Rights... 5 Types of Installations... 6 Server Installation... 6 Client and Standalone Installation The Installer... 6 Standalone & Client Installation Install the Software Desktop ICONS Opening the Application Initial Setup of HART Default Password Initial Setup First Data Created Add a Facility Add a System Administrator User Uninstalling the Software Windows All Programs Windows Control Panel Page 2 of 23

3 INTRODUCTION The Hospice Abstraction Reporting tool (HART) was developed by the Centers for Medicare & Medicaid Services (CMS). HART is a free to download and use Java based Windows application which provides an option for Hospice providers to collect and maintain facility, patient and HIS Record information for subsequent submission to the appropriate national data repository. HART displays electronic HIS Record forms similar to the paper version of the forms. Once the abstraction is completed, facilities are able to export their data from the application and submit it to the appropriate national data repository. All HART releases will consist of full releases and upgrades. All HART releases are developed into two (2) types of application software: Standalone Software Application Network Client/Server Application This Guide will be used to install and set up both types of software. A User Guide will also be provided, which covers all the user functionality found in HART, as well as the Help and Security features. On-Line Help is provided within the application once a successful login is completed. The Help Desk is also available to assist. The Help Desk is available for technical support and assistance with problems or questions regarding the software. Contact information for the QIES Help Desk: or [email protected] HARDWARE/SOFTWARE SPECIFICATIONS The QTSO home page lists the CMS websites for the System Requirements: NEW: FY2014 System Requirements [PDF 22KB] Effective 10/01/ /30/2014 OLD: FY2013 System Requirements [PDF 30KB] Effective 10/01/ /30/2013 SOFTWARE DOWNLOADS To download the files required for installing the HART software, navigate to the Centers for Medicare & Medicaid Services website or the QIES Technical Support Office (QTSO) website. The CMS Websites: Page 3 of 23

4 The QTSO Website: Complete the following steps to download HART from the QTSO Website: Enter QTSO Website: into your URL and display the website. 1. The HART download page displays. 2. Along the left-hand side, titled HART Downloads/Documentation, review the description as follows: a. HART 1.0 (posted 07/01/2014) NEW A production version of HART software (Version 1.0) is now available to download. To install HART, read and follow the HART Installation Guide. Please refer to the HART User Guide for further information regarding using the application. 3. Along the right-hand side, titled File Name, select the version needed for downloading the software. a. File Name HART User Guide HART_UserGuide_1.0 (PDF 3.10 MB) HART Installation Guide Page 4 of 23

5 HART_InstallationGuide_1.0 (PDF 1.3 MB) HART Install File (this install contains the stand-alone and client version of HART) Standalone readme text (1 KB) HART Setup-1.0.exe (156 MB) Server Install File (The server Install is only needed to connect multiple client computers to a centralized server) Network readme.txt (1 KB) HART ServerSetup-1.0.exe (3.34 MB) Note: Please continue to regularly check the QTSO Web site for software updates or additional information. 4. Click on the setup file required. 5. The File Download window will display. 6. Click Run. 7. The progress bar will illustrate the progress of the install. 8. The Icons for the Application AND the User Guide will appear on the desktop. INSTALLATION GUIDE GENERAL OVERVIEW INSTALLERS ACCESS RIGHTS Page 5 of 23

6 To install HART, the user must be logged into the PC as a Workstation Administrator. Users of the application must have read/write access to the location where the database is installed. TYPES OF INSTALLATIONS There are two types of installations available for the HART. The Network Client/Server install, which uses a server to support one or more individual workstations all accessing one database by multiple computers and users. o o Servers hold the central database and must be installed using the Server Install first. Clients are individual workstations that have access to the server. This is installed after the Server Installation has been successfully completed. The Standalone install, which is self-contained on one workstation. Examples are shown in the Software Downloads section of this document. NOTE: The Client and the Standalone installs use the same installation. There is a point in the process where the user must select one or the other: Standalone or Client. SERVER INSTALLATION The database, which the clients will connect to, must be installed first, using the Server installation. TIP: When selecting the Network Client/Server install, it is strongly recommended that the Server and the Client installations be performed on different workstations for ease of recovery. CLIENT AND STANDALONE INSTALLATION THE INSTALLER WINDOW SETTINGS In order to ensure the reliable operation of the software, it is imperative that the following Windows properties be set. Using the Microsoft Windows Operating Systems, which are supported, the Windows Font Size property must be set to Small Fonts". This property can be found under the Settings tab of desktop properties: Control Panel\Appearance and Personalization\Display\. SERVER INSTALLATION On the database server, complete the following steps to install. To download the appropriate files, see the Software Downloads section. Page 6 of 23

7 1. Click on the Server Setup. File name HARTServerSetup-1.0.exe. a. The File Download Security Warning screen displays. Click Run to start the installation. NOTE: Click Save to save the installation file to the workstation for installation at a later time. If installation files are saved to the workstation, double click the installation icon to start the installation. 2. The Setup is loading message displays. 3. The Welcome to the HART MySQL Server 1.0 Setup Wizard displays when the load is finished. This wizard will guide you through the installation of HART MySQL Server 1.0. It is recommended that you close all other applications before starting setup. This will make it possible to update relevant system files without having to reboot your computer. 4. Click Next to continue with the setup. 5. The License Agreement screen displays. Please review the license terms before installing HART MySQL 1.0. a. To the maximum extent permitted by applicable law, CMS and its contractors/distributors make no representations about the suitability, for any purpose or use, of the software and documents. Page 7 of 23

8 THE SOFTWARE AND DOCUMENTS ARE PROVIDED "AS IS" AND WITHOUT WARRANTY OF ANY KIND. ANY WARRANTIES, INCLUDING IMPLIED WARRANTIES OF MERCHANTABILITY, FITNESS FOR A PARTICULAR PURPOSE OR USE, TITLE, AND NON-INFRINGEMENT ARE HEREBY DISCLAIMED. Recipient shall not, in any event, be entitled to, and CMS or contractors/distributors shall not be liable for indirect, special, incidental, or consequential damages of any nature including, without being limited to, loss of use, data, or profit irrespective of the nature of the claim, whether in contract, tort, warranty, or otherwise. 6. Click I Agree to continue with the setup. 1. The Choose Installation Location screen displays. Choose the folder in which to install HART MySQL Server 1.0. Setup will install HART MySQL 1.0 in the selected folder. To install in a different folder, click Browse and select another folder or manually type in the location. Page 8 of 23

9 7. Click Next to continue. a. The Choose Port screen displays. Enter the port number. The default port number is Click Install to begin the installation. Page 9 of 23

10 9. Click the Install button. 10. A progress bar on the Installing screen allows the user to monitor the progress. 11. The Completing the HART MySQL Server 1.0 Setup Wizard displays. 12. Click Finish to complete this portion of the installation process. NOTE: There are no Desktop icons for the Server or the User Guide at the end of the Server Installation. The Client Installation must be run before your entire Installation process is complete. Go to the next step below. 13. Go to the Standalone & Client Installation section. NOTE: Firewall Settings: If the HART client is unable to connect to the database server please contact your IT System Administrator. It is likely that a firewall setting is blocking the connection. If connection problems continue please contact the QIES Help Desk. STANDALONE & CLIENT INSTALLATION Complete the following steps to install. INSTALL THE SOFTWARE Page 10 of 23

11 2. Double click on the appropriate Setup executable (filename extension =.exe): HARTSetup-1.0.exe 3. Click on Run. 4. The Setup message displays and will continuously update with the progress of the download. 5. The setup completes and the Welcome to the HART 1.0 Setup Wizard screen displays. This wizard will guide you through the installation of HART 1.0. It is recommended that you close all other applications before starting setup. This will make it possible to update relevant system files without having to reboot your computer. 6. Click Next to continue. 7. The License Agreement screen displays. Please review the license terms before installing HART 1.0. a. To the maximum extent permitted by applicable law, CMS and its contractors/distributors make no representations about the suitability, for any purpose or use, of the software and documents. THE SOFTWARE AND DOCUMENTS ARE PROVIDED "AS IS" AND WITHOUT WARRANTY OF ANY KIND. ANY WARRANTIES, INCLUDING IMPLIED WARRANTIES OF MERCHANTABILITY, FITNESS FOR A PARTICULAR PURPOSE OR USE, TITLE, AND NON-INFRINGEMENT ARE HEREBY DISCLAIMED. Recipient shall not, in any event, be entitled to, and CMS or contractors/distributors shall not be liable for indirect, special, incidental, or consequential damages of any nature including, without being limited to, loss of use, data, or profit irrespective of the nature of the claim, whether in contract, tort, warranty, or otherwise. Page 11 of 23

12 8. If you accept the terms of the agreement, click I Agree to continue. You must accept the agreement to install HART The Installation Type screen displays. 10. Select the type of installation required: a. Use the Standalone if: i. This is the first time installing the application and you don t have a business need to share your database. ii. A previous standalone build was installed and you wish to supply the upgrade. Page 12 of 23

13 Page 13 of 23
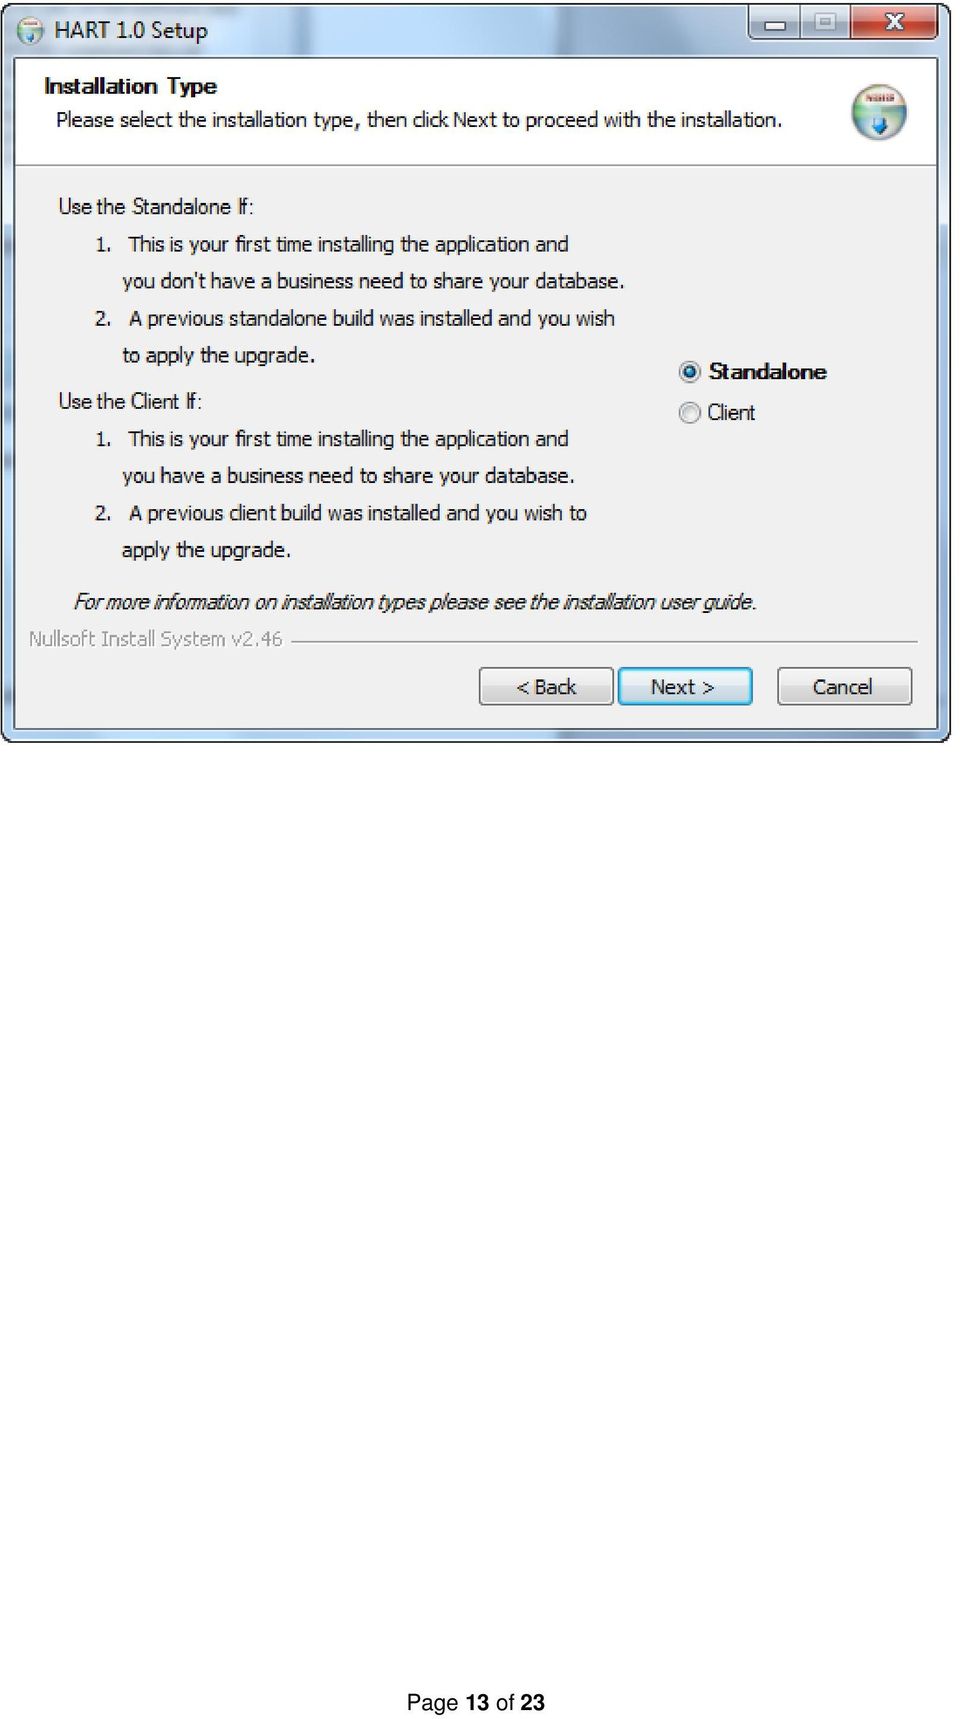
14 b. Use the Client if: i. This is your first time installing the application and you have a business need to share your database. ii. A previous client build was installed and you wish to apply the upgrade. 11. Click Next. Page 14 of 23

15 12. The Choose Installation Location screen displays. Choose the folder in which to install HART 1.0. Setup will install HART 1.0 in the selected folder. To install in a different folder, click Browse and select another folder or manually type in the location. a. Standalone default will be: i. C:\HART b. Client default will be: i. C:\<<HARTClient>> Page 15 of 23

16 13. Click Install or Upgrade to start the installation. NOTE: The install process itself determines whether this is a full install or an upgrade to the software that is already on the workstation. This is seen in the action buttons. 14. The Installing screen displays. A progress bar on this screen allows the user to monitor the progress. 15. When the install is complete, the Completing the HART 1.0 Setup Wizard displays. a. Standalone Completion screen with Run checked. The application will auto-launch. b. The Client Completion screen without Run Checked. The application will NOT auto-launch. 16. Click Finish to complete the installation process. Page 16 of 23

17 DESKTOP ICONS The Installation will place the application icon on the Desktop. The HART User Guide icon will also be placed on the Desktop. OPENING THE APPLICATION When the installation process is complete, the appropriate ICON will be available on the Desktop, depending upon which installation performed. INITIAL SETUP OF HART The initial user signing into the software, for the initial Setup, will be referred to as the default user. They will be required to set up at least one Facility and one System Administrator within the database before any other processing is allowed. DEFAULT PASSWORD The default User ID/Password will be the HART s lower-case acronym. They are case sensitive. HART User ID/password will be hart/hart The following steps are required to be completed to initialize the software. The User must complete the initial setup as the default user. 1. The application may be opened by double-clicking on the HART/HART Client ICON. 2. The HART splash screen displays momentarily. Page 17 of 23

18 3. The Login pop-up window is displayed. a. Enter the default User ID and enter the default Password. See Default Password above. b. Click Login. c. The Change Password screen displays and displays the password rules as follows: i. The new password and the confirm new password must match. ii. The new password must be at least 8 characters long. iii. The new password must be no more than 20 characters long. iv. The new password must not contain any space. v. The new password must not contain the User ID, First Name, Last Name, or . vi. The new password must not begin with a number. vii. The new password can only contain a maximum of 3 repetitive characters. viii. The new password must contain at least one for each of the following type of characters: 1. Upper-case Character: A-Z 2. Lower-case Character: a-z 3. Number: Special Character: &~`!-@#$%^*()_+={}[] \:;"'<>,.?/ Page 18 of 23

19 ix. The new password must not match any of the user's most recent 6 passwords. x. The new password will be set to expire in 60 days. d. Enter a new password in the New Password and Confirm New Password fields. The password is case sensitive and must match in both fields. e. Click Continue to complete the login process. f. When Cancel is clicked, then another Change Password pop-up comes up with the following message: You must change your password before accessing the system. If you do not change password, you will be logged off the system. g. Clicking Cancel on this pop-up takes the user back to the previous Change Password pop-up. Clicking OK takes the user to the login screen. h. The Security Questions screen displays and the questions are as follows: i. What city were you born in? ii. What year did you graduate from high school? iii. What is your favorite sport? iv. What was the make of your first car? v. What was the color of your first car? vi. What is your mother's maiden name? vii. What was the name of your first pet? Page 19 of 23

20 viii. What size shoe do you wear? ix. What is your favorite season of the year? x. What is your favorite movie? i. Complete the answers to at least six (6) questions of your choice. Then tab forward. j. Click OK. k. The initial application screen displays for the default user role. The password for the default user account has now been changed. INITIAL SETUP FIRST DATA CREATED Detail instructions for adding Facility data and System Administrator data are found in the HART User Guide. The follow sections provide only the most basic steps, with no screen shots. For detailed instructions, see the following sections in the HART User Guide: Facility Setup User Setup ADD A FACILITY During the initial setup, a Facility must be the first data record added. The default user must create at least one Facility. Complete the following steps to create a new Facility. 1. Select the Facility option from the Administration drop down on the Menu Bar. Page 20 of 23

21 2. The Facility Information screen displays. 3. Enter Facility data in the fields listed on the right side of the screen 4. After Facility information has been entered, click the Save icon. 5. Saved Facility information will display in the Facility Summary section on the left side of the screen. ADD A SYSTEM ADMINISTRATOR USER It is highly recommended to set up more than one System Administrator user as a back-up, in the event that one of the System Administrator users becomes locked. Complete the following steps to create a new System Administrator User ID. 1. Select the User option from the Administration drop down on the Menu Bar. 2. The User Information screen displays. 3. Enter user data in the column on the right side of the screen. Required fields display on the screen in bold type with an asterisk. 4. After user information has been entered, click the Save icon. 5. Saved user information will display in the User Summary section on the left side of the screen. 6. After successfully adding at least one System Administrator and at least one Facility, the user must log out of the application and log back in with the newly created System Administrator User ID. a. Select the Logout from the Security drop down on the menu bar. b. The login pop-up window displays. c. Enter the new System Administrator User ID, which was just added into HART, into the User Id field. d. Enter the same User ID in the Password field. Both the User ID and Password MUST be the same. They are case sensitive. Page 21 of 23
22 UNINSTALLING THE SOFTWARE WINDOWS ALL PROGRAMS The user will find the following list under Start - All Programs. Complete the following steps to uninstall the Standalone and Client/Server from the Start - All Programs drop down. 1. Click on Uninstall. 2. The question pop-up will ask if you are sure you want to completely remove HART 1.0 and all of its components? The database backup file(s) will NOT be removed. 3. Click on Yes if you wish to continue with the uninstall process. 4. The progress bar will illustrate the progress of the uninstall process. 5. When the Uninstall is complete, the final message will be displayed. HART 1.0 was successfully removed from your computer. 6. Click OK. Note: Uninstalling the Client install will not uninstall the Server and vice versa. You will have to manually uninstall both if you wish to remove the entire Client/Server application. Page 22 of 23
23 WINDOWS CONTROL PANEL Uninstalling the application and server may also be accomplished using Windows Control Panel /Uninstall or change a program feature. 1. Double-click on the desired install you wish to remove. 2. Follow the instructions to complete the uninstall process. Note: Uninstalling the Client install will not uninstall the Server and vice versa. You will have to manually uninstall both if you wish to remove the entire Client/Server application. Page 23 of 23
Inpatient Rehabilitation Assessment Validation and Entry Systems (jirven) Installation Guide. In support of Software Version 1.2.
 Installation Guide. In support of Software Version 1.2.") Inpatient Rehabilitation Assessment Validation and Entry Systems (jirven) Installation Guide In support of Software Version 1.2.0 October 01, 2015 Page 2 of 28 Table of Content QUICK ACCESS TIP: To navigate
Inpatient Rehabilitation Assessment Validation and Entry Systems (jirven) Installation Guide In support of Software Version 1.2.0 October 01, 2015 Page 2 of 28 Table of Content QUICK ACCESS TIP: To navigate
HART Demo Installation Guide
 HART Demo Installation Guide Demo Version 1.0 Page 1 of 17 Table of Content Demo Version 1.0... 1 Introduction... 3 Hardware/Software Specifications... 3 Installation Guide General Overview... 4 Installers
Dell Statistica 13.0. Statistica Enterprise Installation Instructions
 Dell Statistica 13.0 2015 Dell Inc. ALL RIGHTS RESERVED. This guide contains proprietary information protected by copyright. The software described in this guide is furnished under a software license or
Mercy s Remote Access Instructions
 Mercy s Remote Access Instructions ~~~~~~~~~~~~~~ Section A Windows 2000 / XP ~~~~~~~~~~~~~~ I. Install Meditech............................... A1 II. Install VPN Client............................. A3
Dell Statistica Document Management System (SDMS) Installation Instructions
 Installation Instructions") Dell Statistica Document Management System (SDMS) Installation Instructions 2015 Dell Inc. ALL RIGHTS RESERVED. This guide contains proprietary information protected by copyright. The software described
Dell Statistica Document Management System (SDMS) Installation Instructions 2015 Dell Inc. ALL RIGHTS RESERVED. This guide contains proprietary information protected by copyright. The software described
formerly Help Desk Authority 9.1.3 Upgrade Guide
 formerly Help Desk Authority 9.1.3 Upgrade Guide 2 Contacting Quest Software Email: Mail: Web site: [email protected] Quest Software, Inc. World Headquarters 5 Polaris Way Aliso Viejo, CA 92656 USA www.quest.com
INSTALLING AND USING ENTEL PROGRAMMER IN WINDOWS 7 Technical Support Bulletin
 INSTALLING AND USING ENTEL PROGRAMMER IN WINDOWS 7 Rev 1.1 Technical Support Bulletin 1 GENERAL DESCRIPTION: Due to the structural changes in Windows 7 compared to previous Windows versions the following
Batch Eligibility Long Term Care claims
 Hewlett Packard Enterprise Provider Electronic Solutions software lets Connecticut Medical Assistance Program providers verify patient s eligibility and submit and correct claims for services all electronically.
Installation Instruction STATISTICA Enterprise Small Business
 Installation Instruction STATISTICA Enterprise Small Business Notes: ❶ The installation of STATISTICA Enterprise Small Business entails two parts: a) a server installation, and b) workstation installations
Fax and SMS Quickguide
 INTRODUCTION U2 Fax and SMS allow faxes and SMS to be sent directly from a user s workstation via the Internet using U2 Webservices. This improves staff efficiency by removing the need to physically fax
STATISTICA VERSION 12 STATISTICA ENTERPRISE SMALL BUSINESS INSTALLATION INSTRUCTIONS
 STATISTICA VERSION 12 STATISTICA ENTERPRISE SMALL BUSINESS INSTALLATION INSTRUCTIONS Notes 1. The installation of STATISTICA Enterprise Small Business entails two parts: a) a server installation, and b)
STATISTICA VERSION 9 STATISTICA ENTERPRISE INSTALLATION INSTRUCTIONS FOR USE WITH TERMINAL SERVER
 Notes: STATISTICA VERSION 9 STATISTICA ENTERPRISE INSTALLATION INSTRUCTIONS FOR USE WITH TERMINAL SERVER 1. These instructions focus on installation on Windows Terminal Server (WTS), but are applicable
Client Program Installation Guide
 Siku Quanshu (Wenyuange Edition) Online Subscription Services Client Program Installation Guide 1. System Requirements The minimum requirements of the Siku Quanshu (Wenyuange Edition) Online Subscription
FUNCTIONALITY. 07/2015 v1.00 Outcome and Assessment Information Set (OASIS) FUNCTIONALITY 3-1 Submission User s Guide
 FUNCTIONALITY 3-1 Submission User s Guide") 3 FUNCTIONALITY INTRODUCTION... 2 ESTABLISHING THE COMMUNICATION CONNECTION... 2 MENU BAR... 7 FILE UPLOAD... 7 SUBMISSION STATUS... 7 HELP... 8 LOGOUT...11 WELCOME PAGE...11 SUBMITTING OASIS DATA...11
3 FUNCTIONALITY INTRODUCTION... 2 ESTABLISHING THE COMMUNICATION CONNECTION... 2 MENU BAR... 7 FILE UPLOAD... 7 SUBMISSION STATUS... 7 HELP... 8 LOGOUT...11 WELCOME PAGE...11 SUBMITTING OASIS DATA...11
IPSec VPN Client Installation Guide. Version 4
 IPSec VPN Client Installation Guide Version 4 Document version - 1.0-410003-25/10/2007 IMPORTANT NOTICE Elitecore has supplied this Information believing it to be accurate and reliable at the time of printing,
SOS SO S O n O lin n e lin e Bac Ba kup cku ck p u USER MANUAL
 SOS Online Backup USER MANUAL HOW TO INSTALL THE SOFTWARE 1. Download the software from the website: http://www.sosonlinebackup.com/download_the_software.htm 2. Click Run to install when promoted, or alternatively,
Remote Access: Citrix Client Setup
 Introduction: The following documentation is intended to assist first time or active users with installation of the Citrix ICA connection software required to access the MSVU Remote Access system desktop
Disabling Microsoft SharePoint in order to install the OneDrive for Business Client
 Disabling Microsoft SharePoint in order to install the OneDrive for Business Client If you try to setup and sync your OneDrive online documents with the client software and Microsoft SharePoint opens,
Prolific USB to SATA Bridge Controller Backup Software User s Manual
 Prolific USB to SATA Bridge Controller Backup Software User s Manual For Windows XP/Vista/7 For Software version 3.9.2.00 (6/28/2011) Contents About Prolific Backup Software System Requirements Using the
ACS EPF Download Manager Technical Guide. Table of Contents
 Table of Contents Introduction... 3 Administration... 3 Disclaimer... 3 System Requirements... 3 Software Download... 3 Software Installation... 4 Preparing for the Installation... 4 Unzip the Software
ProjectWise Explorer V8i User Manual for Subconsultants & Team Members
 ProjectWise Explorer V8i User Manual for Subconsultants & Team Members submitted to Michael Baker International Subconsultants & Team Members submitted by Michael Baker International ProjectWise Support
Magaya Software Installation Guide
 Magaya Software Installation Guide MAGAYA SOFTWARE INSTALLATION GUIDE INTRODUCTION Introduction This installation guide explains the system requirements for installing any Magaya software, the steps to
NOTE: If you encounter difficulties connecting to CMSNet, contact the CMSNet Help Desk at (888) 238-2122.
 238-2122.") 3 FUNCTIONALITY INTRODUCTION... 2 ESTABLISHING THE COMMUNICATION CONNECTION... 2 ACCESSING THE QIES ASAP SYSTEM FOR IRF-PAI SUBMISSIONS... 4 MENU BAR... 7 HELP... 8 ACCESSIBILITY POLICY... 9 CONTACT US...10
3 FUNCTIONALITY INTRODUCTION... 2 ESTABLISHING THE COMMUNICATION CONNECTION... 2 ACCESSING THE QIES ASAP SYSTEM FOR IRF-PAI SUBMISSIONS... 4 MENU BAR... 7 HELP... 8 ACCESSIBILITY POLICY... 9 CONTACT US...10
Virtual Office Remote Installation Guide
 Virtual Office Remote Installation Guide Table of Contents VIRTUAL OFFICE REMOTE INSTALLATION GUIDE... 3 UNIVERSAL PRINTER CONFIGURATION INSTRUCTIONS... 12 CHANGING DEFAULT PRINTERS ON LOCAL SYSTEM...
Partner. Sage Pastel. Accounting. Installation Guide
 Sage Pastel Accounting Partner Installation Guide Sage Pastel: +27 11 304 3000 Sage Pastel Intl: +27 11 304 3400 www.pastel.co.za www.sagepastel.com [email protected] [email protected] Sage Pastel Accounting
RSM Web Gateway RSM Web Client INSTALLATION AND ADMINISTRATION GUIDE
 RSM Web Gateway RSM Web Client INSTALLATION AND ADMINISTRATION GUIDE Installation and Administration Guide RSM Web Client and RSM Web Gateway 17 August, 2004 Page 1 Copyright Notice 2004 Sony Corporation.
Sage 100 ERP. Installation and System Administrator s Guide
 Sage 100 ERP Installation and System Administrator s Guide This is a publication of Sage Software, Inc. Version 2014 Copyright 2013 Sage Software, Inc. All rights reserved. Sage, the Sage logos, and the
Installation Guide. Research Computing Team V1.9 RESTRICTED
 Installation Guide Research Computing Team V1.9 RESTRICTED Document History This document relates to the BEAR DataShare service which is based on the product Power Folder, version 10.3.232 ( some screenshots
Dial-up Installation for CWOPA Users (Windows Operating System)
") Dial-up Installation for CWOPA Users (Windows Operating System) 1 Table of Contents Download and Install Digital Certificates... 3 Internet Explorer 8/9 Certificate Installation.3 Windows XP Instructions
Dial-up Installation for CWOPA Users (Windows Operating System) 1 Table of Contents Download and Install Digital Certificates... 3 Internet Explorer 8/9 Certificate Installation.3 Windows XP Instructions
Symantec Backup Exec TM 11d for Windows Servers. Quick Installation Guide
 Symantec Backup Exec TM 11d for Windows Servers Quick Installation Guide September 2006 Symantec Legal Notice Copyright 2006 Symantec Corporation. All rights reserved. Symantec, Backup Exec, and the Symantec
Start Here. Installation Guide. Rosetta Stone Standalone License. This Guide Will Show You How To: Install the Student Management System...
 Rosetta Stone Standalone License Installation Guide This Guide Will Show You How To: Install the Student Management System... Set Up the SMS... Install Rosetta Stone... 4 Configure Rosetta Stone (If Needed)...
Intel Unite Solution. Standalone User Guide
 Intel Unite Solution Standalone User Guide Legal Disclaimers & Copyrights All information provided here is subject to change without notice. Contact your Intel representative to obtain the latest Intel
NetBak Replicator 4.0 User Manual Version 1.0
 NetBak Replicator 4.0 User Manual Version 1.0 Copyright 2012. QNAP Systems, Inc. All Rights Reserved. 1 NetBak Replicator 1. Notice... 3 2. Install NetBak Replicator Software... 4 2.1 System Requirements...
VERITAS Backup Exec 9.1 for Windows Servers Quick Installation Guide
 VERITAS Backup Exec 9.1 for Windows Servers Quick Installation Guide N109548 Disclaimer The information contained in this publication is subject to change without notice. VERITAS Software Corporation makes
Getting Started with MozyPro Online Backup Online Software from Time Warner Cable Business Class
 Getting Started with MozyPro Online Backup Online Software from Time Warner Cable Business Class A Guide for Users MozyPro is an online backup service with an easy to use interface so you can start backing
Lepide Active Directory Self Service. Installation Guide. Lepide Active Directory Self Service Tool. Lepide Software Private Limited Page 1
 Installation Guide Lepide Active Directory Self Service Tool Lepide Software Private Limited Page 1 Lepide Software Private Limited, All Rights Reserved This User Guide and documentation is copyright of
VERITAS Backup Exec TM 10.0 for Windows Servers
 VERITAS Backup Exec TM 10.0 for Windows Servers Quick Installation Guide N134418 July 2004 Disclaimer The information contained in this publication is subject to change without notice. VERITAS Software
Using the GroupWise Client
 Spring 2006 (Our appreciation to Jennifer Sherouse for her assistance in editing and improving this document) Page 1 of 15 What is the GroupWise Client The GroupWise client is a program that installs on
How To Connect To Ecs.Org From A Pc Or Mac Or Ipad (For A Laptop) With A Network Connection (For Mac) With The Ipad Or Ipa (For Pc Or Ipac) With An Ipa Or Ip
 With A Network Connection (For Mac) With The Ipad Or Ipa (For Pc Or Ipac) With An Ipa Or Ip") 1) Getting a Windows username and password... 2 2) Download VPN Client... 4 3) Installing VPN... 11 4) Configure VPN... 18 5) Firewall... 20 6) Connecting using VPN... 20 7) Setting up a default connection...
1) Getting a Windows username and password... 2 2) Download VPN Client... 4 3) Installing VPN... 11 4) Configure VPN... 18 5) Firewall... 20 6) Connecting using VPN... 20 7) Setting up a default connection...
Remote Console Installation & Setup Guide. November 2009
 Remote Console Installation & Setup Guide November 2009 Legal Information All rights reserved. No part of this document shall be reproduced or transmitted by any means or otherwise, without written permission
Configuration Guide. Remote Backups How-To Guide. Overview
 Configuration Guide Remote Backups How-To Guide Overview Remote Backups allow you to back-up your data from 1) a ShareCenter TM to either a Remote ShareCenter or Linux Server and 2) Remote ShareCenter
DME-N Network Driver Installation Guide for M7CL/LS9/DSP5D
 DME-N Network Driver Installation Guide for M7CL/LS9/DSP5D ATTENTION SOFTWARE LICENSE AGREEMENT PLEASE READ THIS SOFTWARE LICENSE AGREEMENT ( AGREEMENT ) CAREFULLY BEFORE USING THIS SOFTWARE. YOU ARE ONLY
User Manual. Version 1.0.0.0. Yeastar Technology Co., Ltd.
 User Manual Version 1.0.0.0 Yeastar Technology Co., Ltd. Table of Contents 1 Introduction 3 2 Installing MySMS Software 4 3 Managing MySMS 9 3.1 Accessing MySMS 9 3.2 Multi-User Accounts 10 3.3 Managing
QUANTIFY INSTALLATION GUIDE
 QUANTIFY INSTALLATION GUIDE Thank you for putting your trust in Avontus! This guide reviews the process of installing Quantify software. For Quantify system requirement information, please refer to the
Installation Guidelines (MySQL database & Archivists Toolkit client)
") Installation Guidelines (MySQL database & Archivists Toolkit client) Understanding the Toolkit Architecture The Archivists Toolkit requires both a client and database to function. The client is installed
Installation Guidelines (MySQL database & Archivists Toolkit client) Understanding the Toolkit Architecture The Archivists Toolkit requires both a client and database to function. The client is installed
INSTALLATION INSTRUCTIONS FOR UKSSOGATEWAY
 INSTALLATION INSTRUCTIONS FOR UKSSOGATEWAY 1) Install the UKSSOGateway application on the desktop: The UKSSOGateway application passes information from the myuk portal to launch the FESClient. The FESClient
Welcome to EMP Monitor (Employee monitoring system):
:") Welcome to EMP Monitor (Employee monitoring system): Overview: Admin End. User End. 1.0 Admin End: Introduction to Admin panel. Admin panel log in. Introduction to UI. Adding an Employee. Getting and editing
Welcome to EMP Monitor (Employee monitoring system): Overview: Admin End. User End. 1.0 Admin End: Introduction to Admin panel. Admin panel log in. Introduction to UI. Adding an Employee. Getting and editing
2. PMP New Computer Installation. & Networking Instructions
 ONTARIO CHIROPRACTIC ASSOCIATION PATIENT MANAGEMENT PROGRAM PUTTING EXPERIENCE INTO PRACTICE PMP New Computer Installation & Networking Instructions This document provides installation instructions for
Quick Guide to Using your Nokia Phone with Windows 95 Fax - Exchange for Windows 95 or Windows Messaging for Windows 95
 Nokia 88xx series and 8210 03.02.00 This Quick Guide is a generic guide for all Nokia 88xx series and 8210 phones. When you are asked to select the modem you will see Nokia ****, please select one of the
Self Help Guides. Create a New User in a Domain
 Self Help Guides Create a New User in a Domain Creating Users & Groups This document is to be used as a guide to creating users and/or groups in a Domain Server environment; 1. Windows Server Domain exists,
STATISTICA VERSION 11 CONCURRENT NETWORK LICENSE WITH BORROWING INSTALLATION INSTRUCTIONS
 data analysis data mining quality improvement web-based analytics Notes STATISTICA VERSION 11 CONCURRENT NETWORK LICENSE WITH BORROWING INSTALLATION INSTRUCTIONS 1. The installation of the Concurrent network
Carillon eshop User s Guide
 Carillon eshop User s Guide Prepared by: Carillon Information Security, Inc. Version: 3.0 Updated on: 2015-01-29 Status: PUBLIC Contents Carillon eshop User Guide 1 Introduction... 4 1.1 Prerequisites...
PCLaw 11.0. Administration Guide
 PCLaw 11.0 Administration Guide About this guide This guide provides a list of tasks for installing PCLaw Practice Management Software. If you need additional information, refer to the PCLaw Support Center.
Interact for Microsoft Office
 Interact for Microsoft Office Installation and Setup Guide Perceptive Content Version: 7.0.x Written by: Product Knowledge, R&D Date: October 2014 2014 Perceptive Software. All rights reserved Perceptive
Table of Contents. 1. Overview... 3. 1.1 Materials Required. 3 1.2 System Requirements. 3 1.3 User Mode 3. 2. Installation Instructions..
 Table of Contents 1. Overview..... 3 1.1 Materials Required. 3 1.2 System Requirements. 3 1.3 User Mode 3 2. Installation Instructions.. 4 2.1 Installing the On Call Diabetes Management Software. 4 2.2
Installation Instruction STATISTICA. Concurrent Network License with Borrowing Domain Based Registration
 Installation Instruction STATISTICA Concurrent Network License with Borrowing Domain Based Registration Notes: ❶ The installation of the Concurrent network version entails two parts: a) a server installation,
Installation Instruction STATISTICA Enterprise Server
 Installation Instruction STATISTICA Enterprise Server Notes: ❶ The installation of STATISTICA Enterprise Server entails two parts: a) a server installation, and b) workstation installations on each of
Enterprise Vault Installing and Configuring
 Enterprise Vault Installing and Configuring Enterprise Vault 6.0 Legal Notice Copyright 2005 Symantec Corporation. All rights reserved. Symantec, the Symantec Logo, VERITAS, the VERITAS Logo, and Enterprise
http://docs.trendmicro.com
 Trend Micro Incorporated reserves the right to make changes to this document and to the products described herein without notice. Before installing and using the product, please review the readme files,
16.4.3 Lab: Data Backup and Recovery in Windows XP
 16.4.3 Lab: Data Backup and Recovery in Windows XP Introduction Print and complete this lab. In this lab, you will back up data. You will also perform a recovery of the data. Recommended Equipment The
OSPI SFTP User Guide
 OSPI SFTP User Guide NOTE: Please contact OSPI to request an account BEFORE setting up this software. In order to configure the software you will need account information from OSPI. Here are some steps
WhatsUp Gold v16.1 Installation and Configuration Guide
 WhatsUp Gold v16.1 Installation and Configuration Guide Contents Installing and Configuring Ipswitch WhatsUp Gold v16.1 using WhatsUp Setup Installing WhatsUp Gold using WhatsUp Setup... 1 Security guidelines
Keystone 600N5 SERVER and STAND-ALONE INSTALLATION INSTRUCTIONS
 The following instructions are required for installation of Best Access System s Keystone 600N5 (KS600N) network key control software for the server side. Please see the system requirements on the Keystone
Thirtyseven4 Endpoint Security (EPS) Upgrading Instructions
 Upgrading Instructions") Thirtyseven4 Endpoint Security (EPS) Upgrading Instructions Disclaimer: As with any software upgrade or new release, it is strongly encouraged to fully test the new build within your environment prior
Thirtyseven4 Endpoint Security (EPS) Upgrading Instructions Disclaimer: As with any software upgrade or new release, it is strongly encouraged to fully test the new build within your environment prior
Installing the BlackBerry Enterprise Server Management Software on an administrator or remote computer
 Installing the BlackBerry Enterprise Server Management Software on an administrator or Introduction Some administrators want to install their administrative tools on their own Windows 2000 computer. This
Lawson Employee Self Service User s Manual
 Lawson Employee Self Service User s Manual Table of Contents 1. Lawson Employee Self Service FAQ s page 1 2. Login Page page 6 3. Portal Home Page page 7 4. Benefits (a) Beneficiary page 8 (b) Current
Symantec Backup Exec System Recovery Exchange Retrieve Option User's Guide
 Symantec Backup Exec System Recovery Exchange Retrieve Option User's Guide Symantec Backup Exec System Recovery Exchange Retrieve Option User's Guide The software described in this book is furnished under
TSI Support for Autodesk Fabrication Software on Zendesk Help Desk Platform
 TSI Support for Autodesk Fabrication Software on Zendesk Help Desk Platform Table of Contents 1 Introducing TSI Support for Autodesk Fabrication Software on Zendesk Platform... 2 2 Initial Zendesk Login...
PRACTICAL VIDEO SOLUTIONS. ipulse Manager Software. Installation Guide. Software Version 1.0
 PRACTICAL VIDEO SOLUTIONS ipulse Manager Software Installation Guide Software Version 1.0 2007 VideogeniX Corp. ipulse Software Installation Guide P/N: 040-00004-001 NOTICE TO USERS 2007 VideogeniX Corporation.
Release 2.0. Cox Business Online Backup Quick Start Guide
 Cox Business Online Backup Quick Start Guide Release 2.0 Cox Business Online Backup Quick Start Guide i IMPORTANT: You must notify Cox in advance if you would like to move or relocate your telephone Service.
Microsoft Dynamics GP. Engineering Data Management Integration Administrator s Guide
 Microsoft Dynamics GP Engineering Data Management Integration Administrator s Guide Copyright Copyright 2007 Microsoft Corporation. All rights reserved. Complying with all applicable copyright laws is
Business Portal for Microsoft Dynamics GP 2010. Field Service Suite
 Business Portal for Microsoft Dynamics GP 2010 Field Service Suite Copyright Copyright 2010 Microsoft. All rights reserved. Limitation of liability This document is provided as-is. Information and views
Remedy ITSM Service Request Management Quick Start Guide
 Remedy ITSM Service Request Management Quick Start Guide Table of Contents 1.0 Getting Started With Remedy s Service Request Management. 3 2.0 Submitting a Service Request.7 3.0 Updating a Service Request
Preparing Your Server for an MDsuite Installation
 Preparing Your Server for an MDsuite Installation Introduction This document is intended for those clients who have purchased the MDsuite Application Server software and will be scheduled for an MDsuite
Backup Exec 15. Quick Installation Guide
 Backup Exec 15 Quick Installation Guide 21344987 Documentation version: 15 PN: 21344987 Legal Notice Copyright 2015 Symantec Corporation. All rights reserved. Symantec, the Symantec Logo, the Checkmark
Time Matters for Microsoft Outlook. Technology Preview User Guide
 Time Matters for Microsoft Outlook Technology Preview User Guide Contents Overview of Time Matters for Microsoft Outlook... 2 Requirements... 2 Install Time Matters for Microsoft Outlook... 3 Specify a
Baylor Secure Messaging. For Non-Baylor Users
 Baylor Secure Messaging For Non-Baylor Users TABLE OF CONTENTS SECTION ONE: GETTING STARTED...4 Receiving a Secure Message for the First Time...4 Password Configuration...5 Logging into Baylor Secure Messaging...7
ADP Workforce Now Security Guide. Version 2.0-1
 ADP Workforce Now Security Guide Version 2.0-1 ADP Trademarks The ADP logo, ADP, and ADP Workforce Now are registered trademarks of ADP, Inc. Third-Party Trademarks Microsoft, Windows, and Windows NT are
WorldShip Install on a Single or Workgroup Workstation
 PRE-INSTALLATION INSTRUCTIONS: This document discusses using the WorldShip DVD to install WorldShip. You can also install WorldShip from the web. Go to the following web page and click on the appropriate
Using Group Policies to Install AutoCAD. CMMU 5405 Nate Bartley 9/22/2005
 Using Group Policies to Install AutoCAD CMMU 5405 Nate Bartley 9/22/2005 Before we get started This manual provides a step-by-step process for creating a Group Policy that will install AutoCAD to a Windows
Web Remote Access. User Guide
 Web Remote Access User Guide Notice to Users 2005 2Wire, Inc. All rights reserved. This manual in whole or in part, may not be reproduced, translated, or reduced to any machine-readable form without prior
PRODUCT GUIDE. N u c l e u s D a t a R e c o v e r y. C o m P riv a t e L i m i t e d
 PRODUCT GUIDE Table of Contents 1. Introduction to Kernel SQL Password Recovery... 4 1.1 Using this Manual... 4 1.2 About Kernel SQL Password Recovery... 5 1.4 Who Should Use this Software?... 5 2. Getting
Introduction. Before you begin. Installing efax from our CD-ROM. Installing efax after downloading from the internet
 Introduction Before you begin Before you begin installing efax, please check the following: You have received confirmation that your application for the efax service has been processed. The confirmation
GUIDE. Web Client Application. Model: ER 4.0. Release 4.0.00 / Version No.: 1.01
 8e6R Enterprise Reporter USER GUIDE Web Client Application Model: ER 4.0 Release 4.0.00 / Version No.: 1.01 ii 8E6 TECHNOLOGIES, ENTERPRISE REPORTER WEB CLIENT USER GUIDE 8E6 ENTERPRISE REPORTER WEB CLIENT
Provider Electronic Solutions Software User s Guide
 Vermont Title XIX Provider Electronic Solutions Software User s Guide HP ENTERPRISE SERVICES 312 HURRICANE LANE, STE 101 PO BOX 888 WILLISTON VT 05495 Table of Contents 1 Introduction... 2 1.1 Provider
Customer Tips. Xerox Network Scanning TWAIN Configuration for the WorkCentre 7328/7335/7345. for the user. Purpose. Background
 Xerox Multifunction Devices Customer Tips dc07cc0432 October 19, 2007 This document applies to these Xerox products: X WC 7328/7335/7345 for the user Xerox Network Scanning TWAIN Configuration for the
Results CRM 2012 User Manual
 Results CRM 2012 User Manual A Guide to Using Results CRM Standard, Results CRM Plus, & Results CRM Business Suite Table of Contents Installation Instructions... 1 Single User & Evaluation Installation
http://docs.trendmicro.com/en-us/smb/hosted-email-security.aspx
 Trend Micro Incorporated reserves the right to make changes to this document and to the product described herein without notice. Before installing and using the product, review the readme files, release
3 Setting up Databases on a Microsoft SQL 7.0 Server
 3 Setting up Databases on a Microsoft SQL 7.0 Server Overview of the Installation Process To set up GoldMine properly, you must follow a sequence of steps to install GoldMine s program files, and the other
USING CAMPUS ANYWARE OVER THE VPN (WINDOWS XP)
") USING CAMPUS ANYWARE OVER THE VPN (WINDOWS XP) This document will explain how to install Campus Anyware on your machine (if needed), and how to run Campus Anyware from your machine while you are connected
USING CAMPUS ANYWARE OVER THE VPN (WINDOWS XP) This document will explain how to install Campus Anyware on your machine (if needed), and how to run Campus Anyware from your machine while you are connected
INSTALL/UPGRADE GUIDE: Amicus Small Firm Accounting
 INSTALL/UPGRADE GUIDE: Amicus Small Firm Accounting Contents Basics...2 Single-User Install...4 Multi-User Network Install...5 Getting Started (first time install)...7 Updating Templates (if upgrading)...9
Windows Domain Network Configuration Guide
 Windows Domain Network Configuration Guide Windows Domain Network Configuration Guide for CCC Pathways Copyright 2008 by CCC Information Services Inc. All rights reserved. No part of this publication may
DME-N Network Driver Installation Guide for LS9
 DME-N Network Driver Installation Guide for LS9 ATTENTION SOFTWARE LICENSE AGREEMENT PLEASE READ THIS SOFTWARE LICENSE AGREEMENT ( AGREEMENT ) CAREFULLY BEFORE USING THIS SOFTWARE. YOU ARE ONLY PERMITTED
E-Notebook SQL 12.0 Desktop Database Installation Guide. E-Notebook SQL 12.0 Desktop Database Installation Guide
 E-Notebook SQL 12.0 Desktop Database Installation Guide 1. Introduction... 3 2. Database System... 3 2.1. Software requirements... 3 2.2. Database Creation and Configuration... 4 2.2.1. Create and share
RealShot Manager Compression Server software
 RealShot Manager Compression Server software User Guide Software Version 1.0 RealShot Manager 2004 Sony Corporation Copyright Notice 2004 Sony Corporation. All rights reserved. This manual may not be reproduced,
Lepide Event Log Manager. Users Help Manual. Lepide Event Log Manager. Lepide Software Private Limited. Page 1
 Users Help Manual Lepide Event Log Manager Lepide Software Private Limited. Page 1 Users Help Manual for Lepide Event Log Manager Lepide Software Private Limited, All Rights Reserved This User Guide and
Verizon Remote Access User Guide
 Version 17.12 Last Updated: August 2012 2012 Verizon. All Rights Reserved. The Verizon names and logos and all other names, logos, and slogans identifying Verizon s products and services are trademarks
ilaw Installation Procedure
 ilaw Installation Procedure This guide will provide a reference for a full installation of ilaw Case Management Software. Contents ilaw Overview How ilaw works Installing ilaw Server on a PC Installing
Desktop Deployment Guide ARGUS Enterprise 10.6. 5/29/2015 ARGUS Software An Altus Group Company
 ARGUS Enterprise 10.6 5/29/2015 ARGUS Software An Altus Group Company for ARGUS Enterprise Version 10.6 5/29/2015 Published by: ARGUS Software, Inc. 3050 Post Oak Boulevard Suite 900 Houston, Texas 77056