PowerChute Network Shutdown v4.0. Installation Guide. Windows Linux/Unix Mac OS X Hyper-V/SCVMM VMware
|
|
|
- Martha Bradley
- 10 years ago
- Views:
Transcription
1 PowerChute Network Shutdown v4.0 Installation Guide Windows Linux/Unix Mac OS X Hyper-V/SCVMM VMware J-001 Publication Date: January, 2015

2 Introduction PowerChute TM Network Shutdown (PowerChute) works in conjunction with the UPS Network Management Card (NMC) to provide network-based shutdown of multiple computer systems. In the case of a UPS critical event, the software performs a graceful, unattended system shutdown before the UPS battery is exhausted. The number of protected systems is limited only by the capacity of the UPS. View these Application Notes for detailed information on using PowerChute in specific environments. After installation, it is essential to configure the software using the PowerChute Setup wizard. This ensures that PowerChute is aware of UPS critical events in order to protect your system. Product Center The PowerChute Product Center page has many links to useful up-to-date information. This includes background information on virtualization, loss of communications, and application notes which discuss varied subject matter including possible UPS configurations.

3 Software and Hardware Requirements To install PowerChute Network Shutdown (PowerChute), you must have the following: A supported operating system and web browser, as listed on the website, Operating System and Compatibility Chart. Disk space Task Commence PowerChute Network Shutdown installation process Install PowerChute Network Shutdown using a virtual appliance - Disk format: thin provisioned Install PowerChute Network Shutdown using a virtual appliance - Disk format: thick provisioned Installing PowerChute Network Shutdown with a private JRE Installing PowerChute Network Shutdown when a public JRE is already installed Disk Space Required 100 MB 2 GB 3 GB 135 MB 15 MB JRE You must have a supported Java Runtime Environment (JRE), as seen for the different operating systems PowerChute gives you the option of installing a private JRE. If there is no supported public JRE present on the OS, then you have to choose the private JRE option to continue with the installation. The minimum supported JRE is Java 7. For most operating systems, you can download a Java Runtime Environment from java.com. The computer hardware requirements are a 700 MHz processor and 256 MB of memory. On a graphical interface with PowerChute: A monitor with a minimum resolution of 800 x 600; however, 1024 x 768 or greater is recommended.

4 A UPS with a Smart Slot and a Network Management Card (part number AP9617, AP9618, AP9619, AP9630, AP9631, AP9635) with a firmware version of or later, or a Symmetra PX2 (which has an internal Network Management Card, OG-9354). - You can update your NMC firmware from the APC website. PowerChute Network Shutdown cannot be used with PowerNet SNMP Adapters (cards). If your card has a part number of AP9605, AP9606, AP9205, or AP9603, it is not compatible with PowerChute Network Shutdown. You must know the IP address for each NMC. Firewall PowerChute needs to be able to connect to the NMC Web Access port (default: TCP port 80) and receive data inbound to UDP port When the Windows Firewall is enabled, you can allow the PowerChute installation to configure the firewall automatically for the required ports. Windows PowerShell 2.0 or higher is required for Hyper-V support on PowerChute. For instructions on how to install PowerShell 2.0 on Windows Server 2008, see msdn.microsoft.com/en-us/library/ff637750(v=azure.10).aspx. You must have administrator or root privileges to run the installer. You must uninstall PowerChute Plus, PowerChute Business Edition, PowerChute Personal Edition, and PowerChute Server before installing PowerChute Network Shutdown.
 and receive data inbound to UDP port 3052.")
5 Preliminary Steps in Installing To install and operate the PowerChute Network Shutdown software, perform the following steps first. 1. Install the Network Management Card (NMC) in your UPS and configure it with an IP address before beginning the PowerChute installation. For installation instructions, see the Network Management Card installation guide. 2. Using the NMC user interface, configure the UPS and the Network Management Card. At a minimum, perform these tasks: b a. When configuring a shutdown, set the Low Battery Duration field value to at least five minutes. b. Set the authentication phrase for the administrator. The administrator authentication phrase and the administrator user name must be the same for the NMC and PowerChute. In the NMC, the default administrator user name and password are both apc, while the default setting for the authentication phrase is admin user phrase. We recommend that you change the defaults for security reasons. Different NMC account types and PowerChute With firmware version and above of the NMC, it is possible to add multiple users with different account types - Administrator, Device, Read-only, and Network-Only. PowerChute can use an Administrator or Device account instead of the built-in "apc" account to communicate with the NMC. To do this: 1. Create an account on the NMC, either an Administrator or Device account, using Configuration - Security - Local Users - Management. You must log on using the superuser account ("apc") to add new users. 2. On the NMC user interface, go to the Configuration - Shutdown page. 3. Select the new account you created from the User Name drop-down under PowerChute Shutdown Parameters. 4. Use the same user name in PowerChute. The Authentication Phrase must also match.

6 Installation Guide PowerChute Network Shutdown Windows section

7 Installing PowerChute Network Shutdown See these sections: Installing on Windows and Windows Server Core Upgrading the Software Uninstalling on Windows Silently Installing the Software

8 Installing on Windows and Windows Server Core To install on Windows in order to monitor a VMware host, see the VMware section of this help. To install on Hyper-V or SCVMM, see the Hyper-V/SCVMM section of this help. Follow these steps below. 1. Locate the PowerChute installation executable file, Setup-x32.exe or Setup-x64.exe, on the PowerChute CD or download it from the APC website. You must have administrator rights to run the installer. Double-click on the file. (If you downloaded from the website, you need to extract the exe file from the zip file). 2. A warning dialog, below, displays if you downloaded the exe from the web: click the Run button. 3. At the welcome dialog, click on Next to continue. At the License Agreement dialog, if you agree with the terms, click I Agree to continue. 4. When configuring for a Java Runtime Environment (JRE), the PowerChute installer checks the Windows Registry to determine if a supported public JRE version is installed. If a valid public JRE is detected, you can choose between using it or the private JRE that is bundled with PowerChute. See JRE for information on using a public or a private JRE installation.
. 2. A warning dialog, below, displays if you downloaded the exe from the web: click the Run button. 3.")
9 5. If Hyper-V is not detected, you see the VMware Support dialog shown below; choose Do not enable VMware Support. If Hyper-V is detected, you see the Hyper-V Support dialog shown below; choose Do not enable Hyper-V Support and click Next to proceed. 6. Enter an installation folder location or accept the default.

. Would you like this configuration to be performed automatically? See Firewall for more information.")
10 7. When your Windows Firewall is enabled, you can allow the PowerChute installation to configure the firewall automatically by choosing Yes when prompted: PowerChute Network Shutdown ports must be opened in the Windows Firewall to enable communication with the Network Management Card(s). Would you like this configuration to be performed automatically? See Firewall for more information. After installation, it is necessary to configure PowerChute in order to protect your system. On Windows, the PowerChute setup wizard opens automatically after you click the Finish button on this dialog: On Windows Server Core, you see the following dialog, follow the steps there:

11 Upgrading the Software If you have v3.1 or higher of PowerChute already installed on your target machine, the installation process asks you whether you want to perform an upgrade rather than a complete installation. Upgrading enables you to retain your existing configuration settings. For earlier versions of PowerChute, you must uninstall the software before installing v4.0. It is not necessary to run the PowerChute setup wizard after the upgrade on Windows. You cannot upgrade from a 32-bit version to a 64-bit version of PowerChute, you must do a full installation. Also, you must manually uninstall the old version first. Following the upgrade installation, to ensure that the PowerChute user interface enhancements are applied correctly, it is necessary to clear the browser history: In Internet Explorer - select Tools > Safety > Delete browsing history In Chrome - select Settings > Show advanced settings > Privacy > Clear browsing data In Firefox - select Open Menu > History > Clear Recent History

12 Uninstalling on Windows On Windows, use the Uninstall option under PowerChute Network Shutdown in the Windows Start menu. On Windows Server Core, follow these steps. 1. Open a command prompt window. 2. Type C:\Program Files\APC\PowerChute\uninstall.exe and press Enter. On Windows Server 2012, PowerChute must be uninstalled using Add/Remove Programs. 1. Right-click the PowerChute Network Shutdown menu option in the Start menu. 2. Click Uninstall in the options menu that displays on the bottom of the screen. To uninstall in silent mode: 1. Open a command prompt. 2. Type "C:\Program Files\APC\PowerChute\uninstall.exe" /S and press return.

13 Silently Installing the Software Installing silently means the installation is unattended or non-interactive. It is not possible to roll out your event configurations or shutdown settings using a silent installation. You can however, use pcnsconfig.ini to do this. See the section on INI files in the online help. PowerChute only supports silent installation in Single, Redundant and Parallel UPS configurations. Silent Install on Windows Perform the following steps: Edit the silent installations file to set the required parameters; see Editing your silent installation file. 1. Type the following on one line at the Windows command line: Setup.exe /S /F silentinstall.ini If a silent installation fails, see Appendix A: Error codes for silent installations.

14 Editing your silent installation file On Windows operating systems, the file that guides silent installations is named silentinstall.ini. The file is a plain text file and can be edited with a standard text editor. Each field or line has a value that the installer needs in order to carry out the installation. The table below explains the fields available in the silent installation file. Field name applicationdirectory= ACCEPT_EULA=yes *INSTALL_JAVA= System PCNS Description Specifies the installation folder. Type the folder name after =, ensuring it has valid characters for the operating system. Note: You can t use multiple-byte characters (Chinese for example) and some single byte high-ascii characters, e.g. ß, é, ä, in the installation path. Yes signifies acceptance of the software licence agreement. The installation will not proceed unless yes is specified here. The value System here signifies you want to use the public JRE for your PowerChute installation. The value PCNS here signifies you want to use the private JRE. *The installation detects whether the JRE meets the requirements, see JRE. REGISTER_WITH_NMC= yes no MODE= single redundant parallel NETWORKCONFIG= IPv4 IPv6 IPV6NETWORKCONFIG= unicast multicast IP_1= IP_2= IP_3= IP_4= IP_5= IP_6= IP_7= # IP_8= # IP_9= Using yes or no, specify whether PowerChute should be registered with the Network Management Card (NMC) or not. Use single, redundant, or parallel to specify the UPS configuration mode. For detailed information, see PowerChute Network Shutdown Operating Modes and supported UPS Configurations here. Specify your internet protocol with IPv4 or IPv6. When you are using IPv6 only (you entered NETWORKCONFIG= IPv6 above) you must specify the communication mechanism here. See also UNICAST_ADDRESS= and MULTICAST_ADDRESS=. For detailed information, see The Communications Process of PowerChute Network Shutdown here. On each line, specify the IP address of each NMC that will be communicating with this PowerChute installation. You can comment out unneeded entries by putting the # character at the beginning of the line (see examples 8 and 9).

15 Field name IP_1_Outlet= IP_2_Outlet= IP_3_Outlet= IP_4_Outlet= IP_5_Outlet= IP_6_Outlet= IP_7_Outlet= # IP_8_Outlet= # IP_9_Outlet= PORT= PROTOCOL= HTTP HTTPS ACCEPTCERTS= YES NO USERNAME= PASSWORD= AUTHENTICATION_PHRASE= LOCAL_IP_ADDRESS= UNICAST_ADDRESS= MULTICAST_ADDRESS= Description This applies only to UPS devices with outlet groups (for example, Smart-UPS SMX and SMT devices). Specify the outlet group that supplies power to the PowerChute installation. You can comment out unneeded entries by putting the # character at the beginning of the line (see examples 8 and 9). This is the NMC web port: 80 for HTTP; 443 for HTTPS. Use HTTP or HTTPS to specify which protocol you are using. When using the HTTPS protocol, SSL certificates are used to secure the connection. By default the NMC use a self-signed certificate, which needs to be accepted. Select YES to automatically accept a self-signed certificate. Select NO to accept a connection only if the NMC is configured with a valid certificate. Enter the user name, password, and authentication phrase to validate PowerChute communication with the NMC. (The authentication phrase reverts to the default if not specified). Note: We recommend that you change the defaults for security reasons. The acceptable characters for username and password are: the alphabet in both lowercase and uppercase (a to z and A to Z) numbers from 0 to 9 these characters: _!\"#$%&'()*+,-./:;<=>?@^`{ }[]~ The password length must be from 3 32 characters, and the username from 3 10 characters. The authentication phrase must be ASCII characters. This information applies to a PowerChute server with multiple network cards. Use it to specify the IP address of the card that will communicate with PowerChute. When you have specified IPv6 in NETWORKCONFIG= IPv4 IPv6 and unicast in IPV6NETWORKCONFIG= unicast multicast, you must specify your unicast host address here. When you have specified IPv6 in NETWORKCONFIG= IPv4 IPv6 and multicast in IPV6NETWORKCONFIG= unicast multicast, the Network Management card will send UDP packets to the multicast address you specify here.

16 Installation Guide PowerChute Network Shutdown Linux/UNIX section

17 Installing PowerChute Network Shutdown See these sections: Installation Steps on Linux and UNIX Upgrading the Software Uninstalling on Linux and UNIX Silently Installing the Software

18 Installation Steps on Linux and UNIX These instructions also apply when installing on Solaris, AIX and HP-UX. You must have root privileges to perform the installation. When installing on Solaris: Java 7 is bundled with the 32-bit version of PowerChute Java 8 is bundled only with the 64-bit version of PowerChute 1. If you are installing from the CD, locate your installation files in one of the following directories on the CD: Linux_x32 or Linux_x64. Copy them to a temporary directory on your server. 2. If you are installing from the website, locate the file pcns400linux.tar.gz on the APC website and copy it to a temporary directory on your server. Change your working directory to the temporary directory. Then type the following commands: gunzip pcns400linux.tar.gz tar -xf pcns400linux.tar 3. If you are not logged on as the root user, you need to run the installer using sudo, or switch to root user context using the su command and then run the installer../install.sh After a web download you need to grant execute permissions: chmod +x install.sh On HP-UX type the command su - root before running./install.sh 4. At the License Agreement, if you agree with the terms, type Yes and press the Enter key to continue. Type No to exit. 5. When configuring for a Java Runtime Environment (JRE), if a valid public JRE is detected, you can choose between using it or the private JRE that is bundled with PowerChute (see JRE). The private JRE is not available for AIX or HP-UX. If using the public JRE, you must enter its path. Enter an installation folder location or accept the default. You cannot specify a directory name that contains a space, either for the installation or the Java directory. If you do not specify an installation directory, it will be installed to the default: /opt/apc. After installation, it is necessary to configure your system in order to protect it. You must open the browser and enter the PowerChute URL: IP>:6547 Follow the steps in the PowerChute setup wizard to complete your configuration.

19 Upgrading the Software If you have v3.1 or higher of PowerChute already installed on your target machine, the installation process asks you whether you want to perform an upgrade rather than a complete installation. Upgrading enables you to retain your existing configuration settings. After an Linux upgrade, it is not necessary to run the PowerChute setup wizard. You cannot upgrade from a 32-bit version to a 64-bit version of PowerChute, you must do a full installation. Also, you must manually uninstall the old version first. Following the upgrade installation, to ensure that the PowerChute user interface enhancements are applied correctly, it is necessary to clear the browser history: In Internet Explorer - select Tools > Safety > Delete browsing history In Chrome - select Settings > Show advanced settings > Privacy > Clear browsing data In Firefox - select Open Menu > History > Clear Recent History

20 Uninstalling on Linux and UNIX On Linux: Run the uninstall script located in the PowerChute directory from a terminal prompt. /opt/apc/powerchute/uninstall To uninstall in silent mode, run the uninstall script located in the PowerChute directory, with the -q option. /opt/apc/powerchute/uninstall -q On UNIX, when the daemon starts, the script adds 1024 file handles. Delete ulimit -n 1024 from the PCNS startup script if you do not need them at: /opt/apc/powerchute/group1/powerchute.sh.

21 Silently Installing the Software Installing silently means the installation is unattended or non-interactive. It is not possible to roll out your event configurations or shutdown settings using a silent installation. You can however, use pcnsconfig.ini to do this. See the section on INI files in the online help. PowerChute only supports silent installation in Single, Redundant and Parallel UPS configurations. Silent Install on Linux Edit the silentinstall.sample file to set the required parameters; see Editing your silent installation file. Type the following command to start the installation, as an administrator:./install.sh f silentinstall.sample If a silent installation fails, see Appendix A: Error codes for silent installations.
22 Editing your silent installation file On the Linux operating system, the file that guides silent installations is named silentinstall.sample. The file is a plain text file and can be edited with a standard text editor. Each field or line has a value that the installer needs in order to carry out the installation. The table below explains the fields available in the silent installation file. Field name INSTALL_DIR= JAVA_DIR= ACCEPT_EULA=yes REGISTER_WITH_NMC= yes no MODE= single redundant parallel NETWORKCONFIG= IPv4 IPv6 IPV6NETWORKCONFIG= unicast multicast IP_1= IP_2= IP_3= IP_4= IP_5= IP_6= IP_7= # IP_8= # IP_9= IP_1_Outlet= IP_2_Outlet= IP_3_Outlet= IP_4_Outlet= IP_5_Outlet= IP_6_Outlet= IP_7_Outlet= # IP_8_Outlet= # IP_9_Outlet= Description Specifies the installation directory. Type the directory name after =, ensuring it has valid characters for the operating system. Note: You can t use multiple-byte characters (Chinese for example) and some single byte high-ascii characters, e.g. ß, é, ä, in the installation path. Specifies the JRE directory. Type the path where the public JRE is installed on the system e.g. /usr/local/bin/jre/jre1.7.0_40. If this value is blank or absent, the private JRE is installed. Yes signifies acceptance of the software licence agreement. The installation will not proceed unless yes is specified here. Using yes or no, specify whether PowerChute should be registered with the Network Management Card (NMC) or not. Use single, redundant, or parallel to specify the UPS configuration mode. For detailed information, see PowerChute Network Shutdown Operating Modes and supported UPS Configurations here. Specify your internet protocol with IPv4 or IPv6. When you are using IPv6 only (you entered NETWORKCONFIG= IPv6 above) you must specify the communication mechanism here. See also UNICAST_ADDRESS= and MULTICAST_ADDRESS=. For detailed information, see The Communications Process of PowerChute Network Shutdown here. On each line, specify the IP address of each NMC that will be communicating with this PowerChute installation. You can comment out unneeded entries by putting the # character at the beginning of the line (see examples 8 and 9). This applies only to UPS devices with outlet groups (for example, Smart-UPS SMX and SMT devices). Specify the outlet group that supplies power to the PowerChute installation. You can comment out unneeded entries by putting the # character at the beginning of the line (see examples 8 and 9).
23 Field name PORT= PROTOCOL= HTTP HTTPS ACCEPTCERTS= YES NO USERNAME= PASSWORD= AUTHENTICATION_PHRASE= LOCAL_IP_ADDRESS= UNICAST_ADDRESS= MULTICAST_ADDRESS= Description This is the NMC web port: 80 for HTTP; 443 for HTTPS. Use HTTP or HTTPS to specify which protocol you are using. When using the HTTPS protocol, SSL certificates are used to secure the connection. By default the NMC use a self-signed certificate, which needs to be accepted. Select YES to automatically accept a self-signed certificate. Select NO to accept a connection only if the NMC is configured with a valid certificate. Enter the user name, password, and authentication phrase to validate PowerChute communication with the NMC. (The authentication phrase reverts to the default if not specified). Note: We recommend that you change the defaults for security reasons. The acceptable characters for username and password are: the alphabet in both lowercase and uppercase (a to z and A to Z) numbers from 0 to 9 these characters: _!\"#$%&'()*+,-./:;<=>?@^`{ }[]~ The password length must be from 3 32 characters, and the username from 3 10 characters. The authentication phrase must be ASCII characters. This information applies to a PowerChute server with multiple network cards. Use it to specify the IP address of the card that will communicate with PowerChute. When you have specified IPv6 in NETWORKCONFIG= IPv4 IPv6 and unicast in IPV6NETWORKCONFIG= unicast multicast, you must specify your unicast host address here. When you have specified IPv6 in NETWORKCONFIG= IPv4 IPv6 and multicast in IPV6NETWORKCONFIG= unicast multicast, the Network Management card will send UDP packets to the multicast address you specify here.
24 Installation Guide PowerChute Network Shutdown Mac OS X section
25 Installing PowerChute Network Shutdown See these sections: Installing on Mac OS X Upgrading the Software Uninstalling on Mac OS X Silently Installing the Software
26 Installing on Mac OS X PowerChute must be installed on the machine to be protected. Perform the following steps: 1. Locate the PowerChute installation files on the PowerChute CD, or download it from the APC website. Copy the installation files from the Mac OS X folder to a folder on the Mac. 2. Open a terminal and navigate to the folder containing the installation script. 3. Run./install.command 4. In the terminal window you will be prompted to enter your password. 5. The PowerChute installer will display, click next to accept the License Agreement.
27 6. Enter the path to the directory in which you want to install PowerChute. Click Next to proceed with the installation. The installation cannot be canceled once it has begun. 7. The installation progress bar will display.
28 8. When the installation is successful, a window displays to prompt server configuration. 9. Click Open PCNS in browser to complete the PowerChute Configuration wizard. After installation, it is necessary to configure your system in order to protect it. Follow the setup wizard to specify your configuration.
29 Upgrading the Software PowerChute cannot be upgraded during installation on Mac OS X. To install a new version of PowerChute, you must manually uninstall the previous version and do a full installation of the latest version PowerChute v4.0.
30 Uninstalling on Mac OS X To uninstall PowerChute on Mac OS X: 1. Go to the folder where the installation files have been placed: /Users/Applications/Shared/APC/PowerChute 2. Double click on the file called uninstall.command 3. A terminal window opens to prompt you to enter your password. 4. A window opens to confirm the uninstall - click Yes to uninstall. 5. A window displays to confirm that uninstallation is complete. To uninstall in silent mode: 1. In a terminal window, navigate to the folder in which the PowerChute files are installed. 2. Enter the command./uninstall.command -q
31 Silently Installing the Software Installing silently means the installation is unattended or non-interactive. It is not possible to roll out your event configurations or shutdown settings using a silent installation. You can however, use pcnsconfig.ini to do this. See the section on INI files in the online help. PowerChute only supports silent installation in Single, Redundant and Parallel UPS configurations. Silent Install on Mac OS X Edit the silent installations file to set the required parameters; see Editing your silent installation file. For an installation on Mac OS X, navigate to the temporary folder on the new server, and type the following command on one line: Install.command s silentinstall.ini Using sudo will always prompt the user to enter a password. To do this completely silently, you could use this command: Echo password sudo S./install.command s The applicationdirectory should be the first line in the INI file. See Editing your silent installation file. If a silent installation fails, see Appendix A: Error codes for silent installations.
32 Editing your silent installation file The file that guides silent installations in Mac OS X is named silentinstall.ini. Each field or line has a value that the installer needs in order to carry out the installation. The table below explains the fields available in the silent installation file. Field name applicationdirectory= ACCEPT_EULA=yes REGISTER_WITH_NMC= yes no MODE= single redundant parallel NETWORKCONFIG= IPv4 IPv6 IPV6NETWORKCONFIG= unicast multicast IP_1= IP_2= IP_3= IP_4= IP_5= IP_6= IP_7= # IP_8= # IP_9= IP_1_Outlet= IP_2_Outlet= IP_3_Outlet= IP_4_Outlet= IP_5_Outlet= IP_6_Outlet= IP_7_Outlet= # IP_8_Outlet= # IP_9_Outlet= PORT= PROTOCOL= HTTP HTTPS Description Specifies the installation folder. Type the folder name after =, ensuring it has valid characters for the operating system. Note: You can t use multiple-byte characters (Chinese for example) and some single byte high-ascii characters, e.g. ß, é, ä, in the installation path. Yes signifies acceptance of the software licence agreement. The installation will not proceed unless yes is specified here. Using yes or no, specify whether PowerChute should be registered with the Network Management Card (NMC) or not. Use single, redundant, or parallel to specify the UPS configuration mode. For detailed information, see PowerChute Network Shutdown Operating Modes and supported UPS Configurations here. Specify your internet protocol with IPv4 or IPv6. When you are using IPv6 only (you entered NETWORKCONFIG= IPv6 above) you must specify the communication mechanism here. See also UNICAST_ADDRESS= and MULTICAST_ADDRESS=. For detailed information, see The Communications Process of PowerChute Network Shutdown here. On each line, specify the IP address of each NMC that will be communicating with this PowerChute installation. You can comment out unneeded entries by putting the # character at the beginning of the line (see examples 8 and 9). This applies only to UPS devices with outlet groups (for example, Smart-UPS SMX and SMT devices). Specify the outlet group that supplies power to the PowerChute installation. You can comment out unneeded entries by putting the # character at the beginning of the line (see examples 8 and 9). This is the NMC web port: 80 for HTTP; 443 for HTTPS. Use HTTP or HTTPS to specify which protocol you are using.
33 Field name ACCEPTCERTS= YES NO USERNAME= PASSWORD= AUTHENTICATION_PHRASE= LOCAL_IP_ADDRESS= UNICAST_ADDRESS= MULTICAST_ADDRESS= Description When using the HTTPS protocol, SSL certificates are used to secure the connection. By default the NMC use a self-signed certificate, which needs to be accepted. Select YES to automatically accept a self-signed certificate. Select NO to accept a connection only if the NMC is configured with a valid certificate. Enter the user name, password, and authentication phrase to validate PowerChute communication with the NMC. (The authentication phrase reverts to the default if not specified). Note: We recommend that you change the defaults for security reasons. The acceptable characters for username and password are: the alphabet in both lowercase and uppercase (a to z and A to Z) numbers from 0 to 9 these characters: _!\"#$%&'()*+,-./:;<=>?@^`{ }[]~ The password length must be from 3 32 characters, and the username from 3 10 characters. The authentication phrase must be ASCII characters. This information applies to a PowerChute server with multiple network cards. Use it to specify the IP address of the card that will communicate with PowerChute. When you have specified IPv6 in NETWORKCONFIG= IPv4 IPv6 and unicast in IPV6NETWORKCONFIG= unicast multicast, you must specify your unicast host address here. When you have specified IPv6 in NETWORKCONFIG= IPv4 IPv6 and multicast in IPV6NETWORKCONFIG= unicast multicast, the Network Management card will send UDP packets to the multicast address you specify here.
34 Installation Guide PowerChute Network Shutdown Hyper-V/SCVMM section
35 Installing PowerChute Network Shutdown See these sections: PowerChute Hyper-V Installation Installing on Windows Hyper-V/SCVMM PowerChute SCVMM Installation Hyper-V and SCVMM Configuration Upgrading the Software Uninstalling on Hyper-V and SCVMM Silently Installing the Software PowerChute Hyper-V Installation The Hyper-V server can be part of a Windows failover cluster or a standalone host. If it is part of a cluster, then PowerChute can perform a migration of the virtual machines to any available Hyper-V hosts in the same cluster during a shutdown. Remote Server Administration Tools The Remote Server Administration Tools must be installed for Hyper-V and Failover Clustering (Windows Server 2012). The PowerChute powershell scripts will not work correctly (for either VM migration or VM shutdown) if these are not installed. To verify: 1. Launch Powershell. 2. Run the command Get-Module -ListAvailable. 3. Check that Hyper-V and FailoverClusters are shown:
36 Installing on Windows Hyper-V/SCVMM Follow these steps below. 1. Locate the PowerChute installation executable file, Setup-x64.exe, on the PowerChute CD or download it from the APC website. You must have administrator rights to run the installer. Double-click on the file. (If you downloaded from the website, you need to extract the exe file from the zip file). 2. A warning dialog, below, displays if you downloaded the exe from the web: click the Run button. 3. At the welcome dialog, click on Next to continue. At the License Agreement dialog, if you agree with the terms, click I Agree to continue. Enter an installation folder location or accept the default. 4. When configuring for a Java Runtime Environment (JRE), if a valid public JRE is detected, you can choose between using it or the private JRE that is bundled with PowerChute. See JRE for information on using a public or a private JRE installation.

37 5. At the dialog below, choose Enable Hyper-V Support and your installation proceeds. 6. When your Windows Firewall is enabled, you can allow the PowerChute installation to configure the firewall automatically by choosing Yes when prompted: PowerChute Network Shutdown ports must be opened in the Windows Firewall to enable communication with the Network Management Card(s). Would you like this configuration to be performed automatically? See Firewall for more information. After installation, it is necessary to configure PowerChute in order to protect your system.
38 If you installed on Hyper-V server, you have to go to another machine in order to configure this installation of PowerChute. In the graphic below, Hyper-V machine at step 2 represents the machine name or the IP address of your Hyper-V machine. On a Windows machine when you have enabled Hyper-V in this installation process, the PowerChute setup wizard opens automatically after you click the Finish button.
39 PowerChute SCVMM Installation PowerChute can protect Hyper-V hosts that are managed by System Center Virtual Machine Manager (SCVMM). SCVMM should be configured on a physical machine. SCVMM configured on a virtual machine is not supported by PowerChute. PowerChute can be installed on the same server as SCVMM, or on a remote server. If PowerChute is installed on a remote server: It is necessary to also install the SCVMM console on that server to provide the Powershell modules used by PowerChute. It is necessary to add the machine account on which PowerChute is installed to the Administrator User Role in SCVMM settings. To add the machine account on which PowerChute is installed to the Administrator User Role in SCVMM: 1. In SCVMM Console, Click Settings. 2. Expand Security and select User Roles. 3. Right click on the Administrator role in the right hand pane and select Properties. 4. In the Administrator Properties dialog click Members. 5. Click the Add button and enter the machine name on which PowerChute is installed. 6. Click OK twice. 7. The PowerChute machine account should be listed under Role Members.

40 Hyper-V and SCVMM Configuration Powershell scripts are used to perform Live Migration of VMs and Graceful VM shutdown for Hyper-V and Maintenance Mode/Host Shutdown in SCVMM. By default, Windows prevents the execution of Powershell scripts. The PowerChute installation program will automatically detect if Powershell script execution is enabled and provide an option to enable it if it is not.to verify that the Execution Policy has been changed, open a new command prompt window and enter the command: powershell Get-ExecutionPolicy Verify that it has been set to remotesigned. If it is not set to remotesigned, open a command prompt and type the following powershell Set-ExecutionPolicy remotesigned For more information on the Execution Policy settings, see Microsoft Technet.
41 Upgrading the Software If you have v3.1 or higher of PowerChute already installed on your target machine, the installation process asks you whether you want to perform an upgrade rather than a complete installation. Upgrading enables you to retain your existing configuration settings. Following the upgrade installation, to ensure that the PowerChute user interface enhancements are applied correctly, it is necessary to clear the browser history: In Internet Explorer - select Tools > Safety > Delete browsing history In Chrome - select Settings > Show advanced settings > Privacy > Clear browsing data In Firefox - select Open Menu > History > Clear Recent History
42 Uninstalling on Hyper-V and SCVMM On Windows, use the Uninstall option under PowerChute Network Shutdown in the Windows Start menu. On Windows Server Core, follow these steps. 1. Open a command prompt window. 2. Type C:\Program Files\APC\PowerChute\uninstall.exe and press Enter. On Windows Server 2012, PowerChute must be uninstalled using Add/Remove Programs. 1. Right-click the PowerChute Network Shutdown menu option in the Start menu. 2. Click Uninstall in the options menu that displays on the bottom of the screen. To uninstall in silent mode: 1. Open a command prompt. 2. Type "C:\Program Files\APC\PowerChute\uninstall.exe" /S and press return.
43 Silently Installing the Software Installing silently means the installation is unattended or non-interactive. It is not possible to roll out your event configurations or shutdown settings using a silent installation. You can however, use pcnsconfig.ini to do this. See the section on INI files in the online help. PowerChute only supports silent installation in Single, Redundant and Parallel UPS configurations. Silent Install on Hyper-V Perform the following steps: Edit the silent installations file to set the required parameters; see Editing your silent installation file. 1. Type the following on one line at the Windows command line: Setup.exe /S /F silentinstall.ini If a silent installation fails, see Appendix A: Error codes for silent installations.
44 Editing your silent installation file On Hyper-V, the file that guides silent installations is named silentinstall.ini The file is a plain text file and can be edited with a standard text editor. Each field or line has a value that the installer needs in order to carry out the installation. The table below explains the fields available in the silent installation file. Field name applicationdirectory= ACCEPT_EULA=yes *INSTALL_JAVA= System PCNS Description Specifies the installation folder. Type the folder name after =, ensuring it has valid characters for the operating system. Note: You can t use multiple-byte characters (Chinese for example) and some single byte high-ascii characters, e.g. ß, é, ä, in the installation path. Yes signifies acceptance of the software licence agreement. The installation will not proceed unless yes is specified here. The value System here signifies you want to use the public JRE for your PowerChute installation. The value PCNS here signifies you want to use the private JRE. *The installation detects whether the JRE meets the requirements, see JRE. REGISTER_WITH_NMC= yes no MODE= single redundant parallel NETWORKCONFIG= IPv4 IPv6 IPV6NETWORKCONFIG= unicast multicast IP_1= IP_2= IP_3= IP_4= IP_5= IP_6= IP_7= # IP_8= # IP_9= IP_1_Outlet= IP_2_Outlet= IP_3_Outlet= IP_4_Outlet= IP_5_Outlet= IP_6_Outlet= IP_7_Outlet= # IP_8_Outlet= # IP_9_Outlet= Using yes or no, specify whether PowerChute should be registered with the Network Management Card (NMC) or not. Use single, redundant, or parallel to specify the UPS configuration mode. For detailed information, see PowerChute Network Shutdown Operating Modes and supported UPS Configurations here. Specify your internet protocol with IPv4 or IPv6. When you are using IPv6 only (you entered NETWORKCONFIG= IPv6 above) you must specify the communication mechanism here. See also UNICAST_ADDRESS= and MULTICAST_ADDRESS=. For detailed information, see The Communications Process of PowerChute Network Shutdown here. On each line, specify the IP address of each NMC that will be communicating with this PowerChute installation. You can comment out unneeded entries by putting the # character at the beginning of the line (see examples 8 and 9). This applies only to UPS devices with outlet groups (for example, Smart-UPS SMX and SMT devices). Specify the outlet group that supplies power to the PowerChute installation. You can comment out unneeded entries by putting the # character at the beginning of the line (see examples 8 and 9).
45 Field name PORT= PROTOCOL= HTTP HTTPS ACCEPTCERTS= YES NO USERNAME= PASSWORD= AUTHENTICATION_PHRASE= LOCAL_IP_ADDRESS= UNICAST_ADDRESS= MULTICAST_ADDRESS= VIRTUALINSTALL= VMware Hyper-V CONFIGURATION_MODE = Managed Unmanaged SCVMMSERVER_ADDRESS= Description This is the NMC web port: 80 for HTTP; 443 for HTTPS. Use HTTP or HTTPS to specify which protocol you are using. When using the HTTPS protocol, SSL certificates are used to secure the connection. By default the NMC use a self-signed certificate, which needs to be accepted. Select YES to automatically accept a self-signed certificate. Select NO to accept a connection only if the NMC is configured with a valid certificate. Enter the user name, password, and authentication phrase to validate PowerChute communication with the NMC. (The authentication phrase reverts to the default if not specified). Note: We recommend that you change the defaults for security reasons. The acceptable characters for username and password are: the alphabet in both lowercase and uppercase (a to z and A to Z) numbers from 0 to 9 these characters: _!\"#$%&'()*+,-./:;<=>?@^`{ }[]~ The password length must be from 3 32 characters, and the username from 3 10 characters. The authentication phrase must be ASCII characters. This information applies to a PowerChute server with multiple network cards. Use it to specify the IP address of the card that will communicate with PowerChute. When you have specified IPv6 in NETWORKCONFIG= IPv4 IPv6 and unicast in IPV6NETWORKCONFIG= unicast multicast, you must specify your unicast host address here. When you have specified IPv6 in NETWORKCONFIG= IPv4 IPv6 and multicast in IPV6NETWORKCONFIG= unicast multicast, the Network Management card will send UDP packets to the multicast address you specify here. Specify Hyper-V to enable the Hyper-V/SCVMM virtualization features. Specify Managed for configurations managed by SCVMM. Specify Unmanaged for unmanaged Hyper-V configurations. Specify the IP Address or the host name or the FQDN (Fully Qualified Domain Name) of the SCVMM Server.
46 Installation Guide PowerChute Network Shutdown VMware section
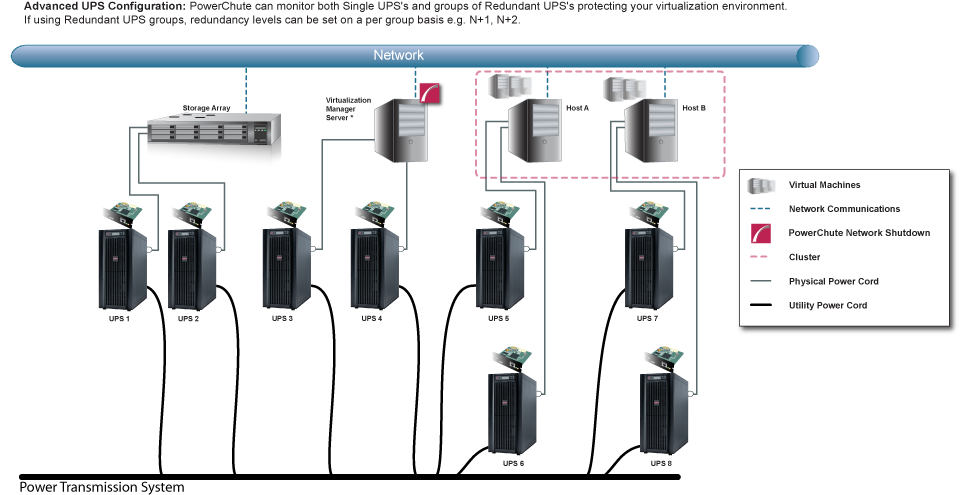
47 Installing PowerChute Network Shutdown with VMware Support You have three different ways of deploying or installing PowerChute in order to monitor VMware hosts: Installing on Windows to Monitor VMware Hosts Deploying the PowerChute Virtual Appliance Installing on vsphere Management Assistant (vma) See also Upgrading the software, Silently Installing the Software, Uninstalling. Recommendations on Deploying/ Installing PowerChute We recommend the following in a VMware environment: VMware Setup VMware Hosts in multiple clusters Single VMware host that is not managed by vcenter Server VMware hosts in one cluster for Single, Redundant or Parallel UPS configurations VMware hosts managed by vcenter Server which is running on a physical machine Using vcenter Server running on a VM or vcenter Server Virtual Appliance (VCSA) for Single, Redundant or Parallel UPS configurations Advanced UPS configuration, see graphic below. See application notes for background information. Recommended Deployment/ Installation of PowerChute PowerChute installed on a physical Windows machine PowerChute virtual appliance PowerChute virtual appliance or PowerChute installed on a physical Windows machine PowerChute installed on a physical Windows machine PowerChute virtual appliance or PowerChute installed on a physical Windows machine PowerChute installed on a physical Windows machine PowerChute does not support installation on a host that is part of a vsan enabled cluster. In a configuration that includes a vsan enabled cluster, PowerChute must be installed on a physical machine, or on a host that is not part of the vsan enabled cluster.
48
49 Installing on Windows to Monitor VMware Hosts PowerChute Network Shutdown can be installed on a physical Windows machine in order to remotely monitor VMware hosts. Follow these steps below. 1. Locate the PowerChute installation executable file for Windows, Setup-x32.exe or Setup-x64.exe, on the PowerChute CD or download it from the APC website. You must have administrator rights to run the installer. Double-click on the file. (If you downloaded from the website, you need to extract the exe file from the zip file). 2. A warning dialog, below, displays if you downloaded the exe from the web: click the Run button. 3. At the welcome dialog, click on Next to continue. At the License Agreement dialog, if you agree with the terms, click I Agree to continue. 4. When configuring for a Java Runtime Environment (JRE), if a valid public JRE is detected, you can choose between using it or the private JRE that is bundled with PowerChute. See JRE for information on using a public or a private JRE installation.

50 5. Choose Enable VMware Support at the dialog below. On a physical Windows machine with Hyper-V enabled or SCVMM console/server installed, PowerChute cannot monitor VMware hosts, and the configure VMware Support option screen is not shown. Please install PowerChute on a physical Windows machine that does not have Hyper-V enabled or SCVMM server/console installed. 6. Enter an installation folder location or accept the default and your installation proceeds. 7. When your Windows Firewall is enabled, you can allow the PowerChute installation to configure the firewall automatically by choosing Yes when prompted: PowerChute Network Shutdown ports must be opened in the Windows Firewall to enable communication with the Network Management Card(s). Would you like this configuration to be performed automatically? See Firewall for more information.
51 After installation, it is necessary to configure PowerChute in order to protect your system. The PowerChute setup wizard opens automatically after you click the Finish button.
52 Deploying the PowerChute Virtual Appliance The PowerChute Virtual Appliance is a virtual machine image with CentOS Linux 5.11 running PowerChute Network Shutdown v4.0 pre-installed. The Schneider Electric KBase index.cfm (FAQ ID is FA159775), provides information on installing the vsphere Client. To deploy the virtual appliance using the vsphere Desktop client: 1. Download the PowerChute virtual appliance file, PCNS_4.0_OVF10.ova from the APC website. 2. Log on to the VMware host or vcenter Server using your vsphere Client. 3. Select File - Deploy OVF Template from the menu.


53 4. At the Deploy from a file or URL field, enter the path to the.ova file. 5. The OVA details are displayed. Click the Next button.

54 6. When the End User License Agreement (EULA) is displayed, click Accept and then Next. 7. Accept the default name and specify the datacenter and then click on the + sign and highlight Discovered virtual machine if necessary, and click Next.
55 8. This step is not relevant if you are deploying to a standalone host. Specify a host or a cluster and click Next. If you specify a cluster, you will be asked to specify a host within that cluster. 9. This step is not relevant if you are deploying to a standalone host. Specify a configured datastore on your system that has sufficient disk space to deploy the virtual appliance. Click Next.

56 10. At Disk Format, choose the default disk layout option by clicking Next.
57 11. This step is not relevant if you are deploying to a standalone host - to configure a static IP address when deploying to a standalone host, use the Network configuration menu displayed at first boot of the appliance - see Step 14. At Networking Properties, if you want to use fixed IP-addressing, then fill in these field values as necessary. If you are using DHCP, you do not need to fill in the fields, so just click Next. 12. The options you have chosen display again, click Finish to commence the installation. The time taken to deploy the appliance depends on your network speed.
58 This message box below displays when the installation has completed successfully and PowerChute Network Shutdown 4.0 for VMware displays as a VM in the inventory: 13. Power on your PowerChute virtual machine. 14. The Network Configuration options will display. To set a static IP address choose 6) IP Address allocation for eth0. To view the DHCP Assigned IP address choose 0) Show Current Configuration. To proceed with the setup choose 1) Exit this program.
59 15. On the first boot of the appliance you will be prompted to create a password for the root user. 16. To access the PowerChute Network Shutdown user interface, you need to find out its URL. Click on the Console tab or right-click on the VM in the left-hand pane and select Open Console. The welcome screen displays. The URL of the new installation of PowerChute will display following the sentence To configure PowerChute Network Shutdown, browse to:. 17. Browse to to launch the PowerChute setup wizard.
60 To obtain the latest security-related updates, it is recommended to update the libraries installed on the Virtual Appliance. To update the Virtual Appliance libraries: - Log in to the PowerChute virtual appliance - Run the command yum update
61 - Install the updates - If a proxy server is used to connect to the Internet then the yum settings need to be updated to download the updates successfully. To do this edit /etc/yum.conf and add proxy details as shown: If you do not have Internet connectivity and wish to update any of the libraries on the Virtual Appliance, the updated RPMs must be manually copied to the Virtual Appliance and installed using the RPM command as outlined in Knowledge Base FA
62 To deploy the virtual appliance using the vsphere Web client: 1. Download the PowerChute virtual appliance file, PCNS_4.0_OVF10.ova from the APC website. 2. Log on to the VMware host or vcenter Server using your vsphere Client. 3. Select vcenter Servers > Deploy OVF Template... from the menu.


63 4. If the web client displays an error message to state that an update to the Client Integration Plug-in is required, download the Integration Plugin installer, close the web browser, run the installer and begin again at step 1. At the Deploy OVF Template choose Select Source > Local file and browse to the.ova file.

 is displayed, click Accept")
64 5. The OVA details are displayed. Click the Next button. 6. When the End User Licence Agreement (EULA) is displayed, click Accept and then Next.
65 7. Specify a name for the deployed template, navigate to the datacenter, click to expand and highlight Discovered virtual machine, and click Next. 8. This step is not relevant if you are deploying to a standalone host. Select a resource - specify a host or a cluster and click Next. If you specify a cluster, you will be asked to specify a host within that cluster.


66 9. This step is not relevant if you are deploying to a standalone host. Select storage - specify a configured datastore on your system that has sufficient disk space to deploy the virtual appliance. Click Next. 10. Setup networks - if using static IP allocation, fill in these field values as necessary. If you are using DHCP, you do not need to fill in the fields, so just click Next.
67 11. This step is not relevant if you are deploying to a standalone host - to configure a static IP address when deploying to a standalone host, use the Network configuration menu displayed at first boot of the appliance - see Step 14 of Deploying the Virtual appliance using the vsphere Desktop Client. Customize template - the option is presented to customize the deployment properties. Leave the option blank to choose the default options. 12. Review the options that have been chosen and click Finish to commence the installation. The time taken to deploy the appliance depends on your network speed.
68 When the installation has completed successfully PowerChute Network Shutdown 4.0 for VMware displays as a VM in the inventory. To complete the configuration, continue from step 13 of Deploying the Virtual Appliance using the vsphere Desktop client - Power on your PowerChute virtual machine.
69 Installing on vsphere Management Assistant (vma) PowerChute Network shutdown can also be installed on the vsphere Management Assistant (vma). There are two steps, see Deploying vma on a VMware Host. and Installing PowerChute on the vma. Deploying vma on a VMware Host. The web page vsphere Management Assistant provides more information. Alternatively, you can call VMware customer support. The Schneider Electric KBase (FAQ ID is FA159775), has some information on installing the vsphere Client. vsphere Management Assistant (vma) was previously known as VMware Infrastructure Management Assistant (VIMA). Follow these steps to install vma. 1. Download the vma installation files from vsphere Management Assistant, and extract the files. 2. Log on to the VMware host or vcenter server using your vsphere Client. 3. Select File - Deploy OVF Template from the menu.

 is displayed, click")
70 4. At the Deploy from a file or URL field, enter the path to the.ovf file you extracted at step 1 above. 5. The vma and OVF details are displayed. Click the Next button. 6. When the End User Licence Agreement (EULA) is displayed, click Accept and then Next.
71 7. Accept the default vma name (and location) or enter alternatives, and click Next. 8. At Disk Format, choose the default disk layout option by clicking Next.

72 9. The options you have chosen display again, click Finish. The vma software is now installed, and it should be displaying in the left-hand pane. 10. Select the vma in the left-hand pane. 11. Power on the vma virtual machine, then follow the instructions on configuring the IP address, setting vi-admin password, etc.
73 Installing PowerChute on the vma You must have root privileges to perform the installation. 1. If you are installing from the CD, locate your installation files in the ESXi directory on the CD. Copy them to a temporary directory on your server. 2. If you are installing from the website, locate this file on the APC website and copy it to a temporary directory on your server: pcns400esxi.tar.gz 3. Change your working directory to the temporary directory. Then type the following commands: sudo gunzip pcns400esxi.tar.gz sudo tar -xf pcns400esxi.tar 4. Type: sudo./install.sh After a web download you need to grant execute permissions: sudo chmod +x install.sh 5. At the License Agreement, if you agree with the terms, type Yes and press the Enter key to continue. Type No to exit. 6. When configuring for a Java Runtime Environment (JRE), if a valid public JRE is detected, you can choose between using it or the private JRE that is bundled with PowerChute (see JRE). If using the public JRE, you must enter its path. Enter an installation folder location or accept the default. You cannot specify a directory name that contains a space, either for the installation or the Java directory. If you do not specify an installation directory, it will be installed to the default: /opt/apc. The PowerChute Network Shutdown service starts automatically when the installation is completed. You can then delete the installation files. 7. Go to a computer that has a browser and open the PowerChute user interface with: Follow the steps in the PowerChute setup wizard to complete your configuration.
74 Upgrading the software Upgrading enables you to retain your existing configuration settings. Upgrades are only possible if your existing version of PowerChute is 3.1 or greater. If you have v3.1 or higher of PowerChute already installed on your target machine, the installation process asks you whether you want to perform an upgrade rather than a complete installation. See the table below for information on upgrades: PowerChute Install Type Installing on Windows to Monitor VMware Hosts Deploying the PowerChute Virtual Appliance Installing on vsphere Management Assistant (vma) Upgrade possible? Yes No Yes Following the upgrade installation, to ensure that the PowerChute user interface enhancements are applied correctly, it is necessary to clear the browser history: In Internet Explorer - select Tools > Safety > Delete browsing history In Chrome - select Settings > Show advanced settings > Privacy > Clear browsing data In Firefox - select Open Menu > History > Clear Recent History
75 Uninstalling Uninstalling PowerChute on a a vma: Run the uninstall script located in the PowerChute directory from a terminal prompt. /opt/apc/powerchute/uninstall To uninstall in silent mode, run the uninstall script located in the PowerChute directory, with the -q option. /opt/apc/powerchute/uninstall -q For a virtual appliance installation, you should delete the appliance from inventory: Right-click on the virtual appliance and choose Delete from disk.
76 Silently Installing the Software Installing silently means the installation is unattended or non-interactive. It is not possible to roll out your event configurations or shutdown settings using a silent installation. You can however, use pcnsconfig.ini to do this. See the section on INI files in the online help. PowerChute only supports silent installation in Single, Redundant and Parallel UPS configurations. Silent Install on VMware You cannot install silently using the virtual appliance method, see Deploying the PowerChute Virtual Appliance. Edit the silent installation file silentinstall.sample to set the required parameters; see Editing your silent installation file. Type the following command to start the installation: sudo./install.sh f silentinstall.sample If a silent installation fails, see Appendix A: Error codes for silent installations.
77 Editing your silent installation file When monitoring a VMware host with PowerChute Network Shutdown, your silent installation file is named silentinstall.ini. For Linux installations, the file is named silentinstall.sample. These are plain text files and can be edited with a text editor. The table below described the fields in the silent installation file to be configured: Field name Description The fields directly below, applicationdirectory and INSTALL_JAVA, are used when you are monitoring a VMware host from a Windows machine with PowerChute Network Shutdown (see Installing on Windows to Monitor VMware Hosts). applicationdirectory= ACCEPT_EULA=yes INSTALL_JAVA= System PCNS Specifies the installation folder. Type the folder name after =, ensuring it has valid characters for the operating system. Note: You can t use multiple-byte characters (Chinese for example) and some single byte high-ascii characters, e.g. ß, é, ä, in the installation path. Yes signifies acceptance of the software licence agreement. The installation will not proceed unless yes is specified here. The value System here signifies you want to use the public JRE for your PowerChute installation. The value PCNS here signifies you want to use the private JRE. The installation detects whether the public JRE meets the requirements. The fields directly below, INSTALL_DIR and JAVA_DIR, are used when you are monitoring a VMware host from a VM with PowerChute Network Shutdown (see Installing PowerChute Network Shutdown with VMware Support). INSTALL_DIR= JAVA_DIR= REGISTER_WITH_NMC= yes no MODE= single redundant parallel NETWORKCONFIG= IPv4 IPv6 IPV6NETWORKCONFIG= unicast multicast Specifies the installation directory. Type the path where the public JRE is installed on the system e.g. \usr\bin. Note: You can t use multiple-byte characters (Chinese for example) and some single byte high-ascii characters, e.g. ß, é, ä, in the installation path. Specifies the JRE directory. Type the directory name after =, ensuring it has valid characters for the operating system. If this value is blank or absent, the private JRE is installed. Specify a public JRE for PowerChute by setting the path to the JRE executable. See. Using yes or no, specify whether PowerChute should be registered with the Network Management Card (NMC) or not. Use single, redundant, or parallel to specify the UPS configuration mode. See the online help, UPS Configuration Options, for more information. Specify your internet protocol with IPv4 or IPv6. When you are using IPv6 only (having entered NETWORKCONFIG= IPv6 above) you must specify the communication mechanism here. See also UNICAST_ADDRESS= and MULTICAST_ADDRESS=. For detailed information, see The Communications Process of PowerChute Network Shutdown" here.
78 Field name IP_1= IP_2= IP_3= IP_4= IP_5= IP_6= IP_7= # IP_8= # IP_9= IP_1_Outlet= IP_2_Outlet= IP_3_Outlet= IP_4_Outlet= IP_5_Outlet= IP_6_Outlet= IP_7_Outlet= # IP_8_Outlet= # IP_9_Outlet= PORT= PROTOCOL= HTTP HTTPS ACCEPTCERTS= YES NO USERNAME= PASSWORD= AUTHENTICATION_PHRASE= LOCAL_IP_ADDRESS= UNICAST_ADDRESS= MULTICAST_ADDRESS= Description On each line, specify the IP address of each NMC that will be communicating with this PowerChute installation. You can comment out unneeded entries by putting the # character at the beginning of the line (see examples 8 and 9). This applies only to UPS devices with Outlet Groups (for example, Smart-UPS SMX and SMT devices). Specify the outlet group that supplies power to the PowerChute installation. You can comment out unneeded entries by putting the # character at the beginning of the line (see examples 8 and 9). This is the NMC web port: 80 for HTTP; 443 for HTTPS. Use HTTP or HTTPS to specify which protocol you are using. When using the HTTPS protocol, SSL certificates are used to secure the connection. By default the NMC use a self-signed certificate, which needs to be accepted. Select YES to automatically accept a self-signed certificate. Select NO to accept a connection only if the NMC is configured with a valid certificate Enter the user name, password, and authentication phrase to validate PowerChute communication with the NMC. (The authentication phrase reverts to the default if not specified). Note: We recommend that you change the defaults for security reasons. The acceptable characters for username and password are: the alphabet in both lowercase and uppercase (a to z and A to Z) numbers from 0 to 9 these characters: _!\"#$%&'()*+,-./:;<=>?@^`{ }[]~ The password length must be from 3 32 characters, and the username from 3 10 characters. The authentication phrase must be ASCII characters. This information applies to a PowerChute server with multiple network cards. Use it to specify the IP address of the card that will communicate with PowerChute. When you have specified IPv6 in NETWORKCONFIG= IPv4 IPv6 and unicast in IPV6NETWORKCONFIG= unicast multicast, you must specify your unicast host address here. When you have specified IPv6 in NETWORKCONFIG= IPv4 IPv6 and multicast in IPV6NETWORKCONFIG= unicast multicast, he Network Management card will send UDP packets to the multicast address you specify here.
79 Field name CONFIGURATION_MODE= Managed Unmanaged VCENTERSERVER_ADDRESS= VCENTERSERVER_USERNAME= VCENTERSERVER_PASSWORD= VCENTERSERVER_PROTOCOL = http https VCENTERSERVER_PORT = ESXIHOST_ADDRESS= ESXIHOST_USERNAME= ESXIHOST_PASSWORD= ESXIHOST_PROTOCOL = http https ESXIHOST_PORT = Description Specify the mode in which your ESXi servers are configured. See the online help for more information on this. When the CONFIGURATION_MODE= field above is managed, specify the IP Address or the host name or the FQDN (Fully Qualified Domain Name) of the vcenter server. When the CONFIGURATION_MODE= field above is managed, specify the user name of the vcenter server. When the CONFIGURATION_MODE= field above is managed, specify the password of the vcenter server. Specify the protocol by which vcenter Server communicates with PowerChute. Specify the vcenter Server Port. When the CONFIGURATION_MODE= field above is unmanaged, specify the IP Address or the host name or the FQDN (Fully Qualified Domain Name) of the ESXi host to be managed. When the CONFIGURATION_MODE= field above is unmanaged, specify the user name of the ESXi host. When the CONFIGURATION_MODE= field above is unmanaged, specify the password of the ESXi host Specify the protocol by which the ESXi Host communicates with PowerChute. Specify the port of the ESXi Host.
80 Appendix A: Error codes for silent installations When using silent installations (and upgrades), you can use the list of error codes in the table below to understand what s going wrong when the installation fails. For silent install using the shell script install.sh the error message is written to the terminal standard output. The error code can be retrieved using the $? variable. For Windows, the error code is written to a file called PCNSinstall.log. Error Code Error Message Description 0 Success: Indicates that installation succeeded. 1 Usage: install.sh [-f <config file>]: Silent install with configuration file. install.sh [-h -H]: Print help. Usage: Indicates that unrecognized parameters were passed to the installer. 4 Error: install.sh must be run with root privileges! Administrator Only: Indicates that a nonadministrator has tried to run the installer. 5 Error: Unknown OS. Unsupported OS: The installer has detected an Operating System it cannot support. 6 PowerChute Network Shutdown is already installed. Upgrade is not supported for this version. Please uninstall the existing PowerChute to continue with installation of PowerChute v.4.0. Installation cancelled. Upgrade Not Supported: Indicates that PowerChute cannot support upgrade from a previous installation of PowerChute. This can be due to the versioning being too old, or an attempted upgrade of a previous multiple install. 7 Installation cancelled. User Abort: Indicates that the user has aborted installation. 8 You must remove the installed version of PowerChute Plus. 9 You must remove the installed version of PowerChute Business Edition Server. 10 You must remove the installed version of PowerChute Server. PC Plus Detected: Indicates that the installer has aborted due to the detection of a version of PowerChute Plus. PowerChute Business Edition Detected: Indicates that the installer has aborted due to the detection a version of PowerChute Business Edition. PowerChute Server Detected: Indicates that the installer has aborted due to the detection of a version of PowerChute Server.
81 Error Code Error Message Description 12 One of: Error: Too many INSTALL_DIR in silentconfiguration.ini. Error: INSTALL_DIR must start with '/'. Installation directory must start with "/". Error: INSTALL_DIR must not contain white space. Error: INSTALL_DIR must not contain back slash "\". Error: INSTALL_DIR is not configured. Installation directory must not contain white space " ". Installation directory must not contain back slash "\". Failed to create directory <install directory>. Invalid Install Directory: Indicates that the installer has aborted due to an invalid target directory. 13 Installation cancelled. Invalid Java Version: Invalid version of Java specified in configuration file. 14 This version of PowerChute Network Shutdown does not support the Japanese language. Please consult for the required version of PowerChute Network Shutdown. Unsupported Locale: The installer has detected an attempt to install an English build on a Japanese system. 15 Can't find <zip filename> Zipfile Missing: Indicates that the installer cannot find the zipfile, from which to extract the PowerChute install. 16 Error: Invalid file <filename> Silent Configuration Missing: Indicates that the installer has aborted because the specified silent configuration file could not be read. 17 Error: EULA must be accepted by setting ACCEPT_EULA=YES in config file 18 [Error]: <configuration value> is not defined in <configuration file>. 19 [Error]: Too many <configuration value> in <configuration file> 20 One of: Error: Too many JAVA_DIR in <configuration file>. Error: JAVA_DIR must start with "/". Error: JAVA_DIR must not contain white space " ". Error: JAVA_DIR must not contain back slash "\". Error: Invalid JAVA_DIR. <directory> does not exist. Java is not available on the path. Please specify a java directory. EULA Not Accepted: Indicates that the installer has aborted because the End User Licence Agreement was not accepted. Silent Configuration Missing Parameter: Indicates that required parameters are missing from the silent configuration file. Silent Configuration Multiple Parameters: Indicates that a parameter is duplicated in the silent configuration file. Invalid Java Directory: Indicates that the installer has aborted due to an invalid Java directory specified in the silent configuration file. 21 [Error]: <21> Installation cancelled. Registry Failure: Indicates the installer has aborted due to an inability to write registry entries.
82 Error Code Error Message Description 22 [Error]: <22> Installation cancelled. Service Failure: The installer failed to register the PCNS service. 23 [Error]: <23> Installation cancelled. M11 Backup Failure: The installer has failed to back up the m11.cfg data store during an upgrade. 24 ERROR: Invalid value for LOCAL_IP_ADDRESS specified in silent configuration file. Aborting with error code <error code>. 25 ERROR: Cannot write to specified ini configuration file: <ini file> 28 ERROR: Invalid value for mode specified in silent configuration file. 29 ERROR: Invalid value for port specified in silent configuration file. 30 ERROR: Invalid value for protocol specified in silent configuration file. 31 ERROR: Not enough UPS Network Management Card addresses specified in silent configuration file for specified mode. 32 UPS Network Management Card has not responded to registration attempt. Registration has failed due to a timeout. 33 Bad UPS Network Management Card host address supplied. Registration has failed. 34 Could not connect to UPS Network Management Card. Registration has failed. 35 Could not register with UPS Network Management Card. Please check your configuration. 36 Incorrect security details given. Registration has failed. 37 UPS Network Management Cards specified are not part of a parallel setup. 40 UPS Network Management Cards are not of the same family. Registration has failed. 41 Registration has failed due to untrusted SSL certificates presented from the UPS Network Management Card. 42 ERROR: Invalid value for <outlet group> specified in silent configuration file. 43 ERROR: Invalid value for username specified in silent configuration file. The IP address was not specified: The installer cannot determine the host IP address, due to multiple network adapters. Invalid Localhost specified in the silent install configuration file. The IP address specified is not associated with the target server. Invalid INI. The silent installer cannot write to the pcnsconfig.ini file in the installation directory. Invalid Mode. Silent install configuration file specifies an invalid value for MODE. Invalid Port. Silent install configuration file specifies an invalid value for PORT. Invalid Protocol. Silent installation configuration file specifies an invalid value for PROTOCOL. The valid values are HTTP and HTTPS. A minimum of 2 IP addresses are required for Redundant, Parallel, and Advanced UPS Configurations. Registration failed with NMC due to timeout. The NMC host address and the connection attempt were both fine, but the NMC failed to respond. The registration failed with NMC due to a bad host address. Registration failed with NMC because incorrect security information - user name, password, authentication phrase - was sent. Registration failed with NMC for a reason other than those cited in the error codes directly above. Bad Security Values. Registration failed with NMC due to incorrect security credentials. Not Parallel: Parallel registration attempted, but the NMCs are not part of a parallel configuration. Not Same Models. Registration failed due to one or more NMCs not having the same model type. SSL Error. Registration failed due to one or more NMCs presenting an untrusted SSL Certificate. Invalid outlet group. Silent installation configuration file specifies an invalid value for IP_<n>_Outlet Invalid User Name specified in the silent install configuration file. The username has failed to pass the regex.
83 Error Code Error Message Description 44 ERROR: Invalid value for password specified in silent configuration file. 45 ERROR: Invalid value for authentication phrase specified in silent configuration file. 47 Failed to establish an SSL connection to the UPS Network Management Card. Please verify the address and port specified. 48 A valid JRE has not been detected. Please go to ( and install java, or change INSTALL_JAVA in the silentinstall.ini file. 49 Silent configuration file contains multiple UPS Network Management Card addresses. Only one is required for single mode. 50 ERROR: Invalid value for NetworkConfig specified in silent configuration file. Invalid Password specified in the silent install configuration file. The password given has failed to pass the regex. Invalid Authentication Phrase specified in the silent install configuration file. The authentication phrase has failed to pass the regex. There was an SSL handshake error. You need to install a supported public JRE or use the private JRE. There are too many NMC addresses set up: The silent installation configuration file specifies too many NMC addresses for the specified mode. The NetworkConfig field value is invalid in the INI silent configuration file. 51 ERROR: Invalid value for IPv6NetworkConfig specified in silent configuration file. The IPv6NetworkConfig field value is invalid in the INI silent configuration file. 59 ERROR: Network mode is <IPv4/IPv6>.Please enter valid <IPv4/IPv6> address for <NMC_IP/ IP_1/LOCAL_IP_ADDRESS>key. You have entered an IPv4 address instead of an IPv6 address or vice versa. Error codes only apply in a VMware environment. 52 ERROR: Invalid value for ESXiConfigurationMode specified in silent configuration file. The ESXiConfigurationMode field value is invalid in the INI silent configuration file. 53 ERROR: Connection to VCenter Server <vcenter Server IP/Hostname> failed. 54 ERROR: Connection to ESXi Host <ESXi IP/ Hostname> failed. There was a vcenter Server connection error. There was a VMware Host connection error. 55 Invalid vcenter Server address. You have entered an invalid vcenter Server hostname. 56 Invalid ESXi Host address. You have entered an invalid VMware hostname.
84 Schneider Electric IT Corporation Legal Disclaimer The information presented in this manual is not warranted by the Schneider Electric IT Corporation to be authoritative, error free, or complete. This publication is not meant to be a substitute for a detailed operational and site specific development plan. Therefore, Schneider Electric IT Corporation assumes no liability for damages, violations of codes, improper installation, system failures, or any other problems that could arise based on the use of this Publication. The information contained in this Publication is provided as is and has been prepared solely for the purpose of evaluating data center design and construction. This Publication has been compiled in good faith by Schneider Electric IT Corporation. However, no representation is made or warranty given, either express or implied, as to the completeness or accuracy of the information this Publication contains. IN NO EVENT SHALL SCHNEIDER ELECTRIC IT CORPORATION, OR ANY PARENT, AFFILIATE OR SUBSIDIARY COMPANY OF SCHNEIDER ELECTRIC IT CORPORATION OR THEIR RESPECTIVE OFFICERS, DIRECTORS, OR EMPLOYEES BE LIABLE FOR ANY DIRECT, INDIRECT, CONSEQUENTIAL, PUNITIVE, SPECIAL, OR INCIDENTAL DAMAGES (INCLUDING, WITHOUT LIMITATION, DAMAGES FOR LOSS OF BUSINESS, CONTRACT, REVENUE, DATA, INFORMATION, OR BUSINESS INTERRUPTION) RESULTING FROM, ARISING OUT, OR IN CONNECTION WITH THE USE OF, OR INABILITY TO USE THIS PUBLICATION OR THE CONTENT, EVEN IF SCHNEIDER ELECTRIC IT CORPORATION HAS BEEN EXPRESSLY ADVISED OF THE POSSIBILITY OF SUCH DAMAGES. SCHNEIDER ELECTRIC IT CORPORATION RESERVES THE RIGHT TO MAKE CHANGES OR UPDATES WITH RESPECT TO OR IN THE CONTENT OF THE PUBLICATION OR THE FORMAT THEREOF AT ANY TIME WITHOUT NOTICE. Copyright, intellectual, and all other proprietary rights in the content (including but not limited to software, audio, video, text, and photographs) rests with Schneider Electric It Corporation or its licensors. All rights in the content not expressly granted herein are reserved. No rights of any kind are licensed or assigned or shall otherwise pass to persons accessing this information. This Publication shall not be for resale in whole or in part. Schneider Electric Schneider Electric Schneider Electric SCHNEIDER ELECTRIC SCHNEIDER ELECTRIC SCHNEIDER ELECTRIC Schneider Electric
85 Worldwide Customer Support Customer support is available at no charge via or telephone. Contact information is available at Copyright Schneider Electric. All rights reserved J
Installation Guide. PowerChute Network Shutdown v4.1 Windows Linux/Unix Mac OS X Hyper-V/SCVMM VMware 990-2838K-001 07/2015
 Installation Guide PowerChute Network Shutdown v4.1 Windows Linux/Unix Mac OS X Hyper-V/SCVMM VMware 990-2838K-001 07/2015 Schneider Electric Legal Disclaimer The information presented in this manual is
How To Shut Down A Powerchute On A Hyperv V3.2.2 (Powerchute) On A Powerpack V3 (Powerchip) On An Uniden V3 On A Pc Or Mac (Powercheute)
 On A Powerpack V3 (Powerchip) On An Uniden V3 On A Pc Or Mac (Powercheute)") User Guide PowerChute Network Shutdown v4.1 Hyper-V and SCVMM 990-4595D-001 07/2015 Schneider Electric Legal Disclaimer The information presented in this manual is not warranted by Schneider Electric to
User Guide PowerChute Network Shutdown v4.1 Hyper-V and SCVMM 990-4595D-001 07/2015 Schneider Electric Legal Disclaimer The information presented in this manual is not warranted by Schneider Electric to
PowerChute Network Shutdown v4.1 Release Notes
 PowerChute Network Shutdown v4.1 Release Notes The release notes provide important information about PowerChute Network Shutdown (PowerChute), including known software issues and their solutions. For any
PowerPanel Business Edition Installation Guide
 PowerPanel Business Edition Installation Guide For Automatic Transfer Switch Rev. 5 2015/12/2 Table of Contents Introduction... 3 Hardware Installation... 3 Install PowerPanel Business Edition Software...
PowerChute TM Network Shutdown Security Features & Deployment
 PowerChute TM Network Shutdown Security Features & Deployment By David Grehan, Sarah Jane Hannon ABSTRACT PowerChute TM Network Shutdown (PowerChute) software works in conjunction with the UPS Network
Installing and Configuring vcenter Support Assistant
 Installing and Configuring vcenter Support Assistant vcenter Support Assistant 5.5 This document supports the version of each product listed and supports all subsequent versions until the document is replaced
Installing and Configuring vcloud Connector
 Installing and Configuring vcloud Connector vcloud Connector 2.7.0 This document supports the version of each product listed and supports all subsequent versions until the document is replaced by a new
VMware vcenter Support Assistant 5.1.1
 VMware vcenter.ga September 25, 2013 GA Last updated: September 24, 2013 Check for additions and updates to these release notes. RELEASE NOTES What s in the Release Notes The release notes cover the following
Using ESXi with PowerChute Business Edition
 Using ESXi with PowerChute Business Edition This help covers the following topics: Installing vma for an ESXi Host Server Configuring and Running ESXi 1 Installing vma for an ESXi Host Server vsphere Management
Enterprise Manager. Version 6.2. Installation Guide
 Enterprise Manager Version 6.2 Installation Guide Enterprise Manager 6.2 Installation Guide Document Number 680-028-014 Revision Date Description A August 2012 Initial release to support version 6.2.1
RSA Authentication Manager 8.1 Virtual Appliance Getting Started
 RSA Authentication Manager 8.1 Virtual Appliance Getting Started Thank you for purchasing RSA Authentication Manager 8.1, the world s leading two-factor authentication solution. This document provides
Core Protection for Virtual Machines 1
 Core Protection for Virtual Machines 1 Comprehensive Threat Protection for Virtual Environments. Installation Guide e Endpoint Security Trend Micro Incorporated reserves the right to make changes to this
Sharp Remote Device Manager (SRDM) Server Software Setup Guide
 Server Software Setup Guide") Sharp Remote Device Manager (SRDM) Server Software Setup Guide This Guide explains how to install the software which is required in order to use Sharp Remote Device Manager (SRDM). SRDM is a web-based
Sharp Remote Device Manager (SRDM) Server Software Setup Guide This Guide explains how to install the software which is required in order to use Sharp Remote Device Manager (SRDM). SRDM is a web-based
Consolidated Monitoring, Analysis and Automated Remediation For Hybrid IT Infrastructures. Goliath Performance Monitor Installation Guide v11.
 Consolidated Monitoring, Analysis and Automated Remediation For Hybrid IT Infrastructures Goliath Performance Monitor Installation Guide v11.5 (v11.5) Document Date: March 2015 www.goliathtechnologies.com
Installation Guide for Pulse on Windows Server 2008R2
 MadCap Software Installation Guide for Pulse on Windows Server 2008R2 Pulse Copyright 2014 MadCap Software. All rights reserved. Information in this document is subject to change without notice. The software
Quick Start Guide for VMware and Windows 7
 PROPALMS VDI Version 2.1 Quick Start Guide for VMware and Windows 7 Rev. 1.1 Published: JULY-2011 1999-2011 Propalms Ltd. All rights reserved. The information contained in this document represents the
Installation Guide for Pulse on Windows Server 2012
 MadCap Software Installation Guide for Pulse on Windows Server 2012 Pulse Copyright 2014 MadCap Software. All rights reserved. Information in this document is subject to change without notice. The software
Managing Multi-Hypervisor Environments with vcenter Server
 Managing Multi-Hypervisor Environments with vcenter Server vcenter Server 5.1 vcenter Multi-Hypervisor Manager 1.0 This document supports the version of each product listed and supports all subsequent
Setting Up a Unisphere Management Station for the VNX Series P/N 300-011-796 Revision A01 January 5, 2010
 Setting Up a Unisphere Management Station for the VNX Series P/N 300-011-796 Revision A01 January 5, 2010 This document describes the different types of Unisphere management stations and tells how to install
Installing and Configuring vcenter Multi-Hypervisor Manager
 Installing and Configuring vcenter Multi-Hypervisor Manager vcenter Server 5.1 vcenter Multi-Hypervisor Manager 1.1 This document supports the version of each product listed and supports all subsequent
Installing and Configuring vcloud Connector
 Installing and Configuring vcloud Connector vcloud Connector 2.0.0 This document supports the version of each product listed and supports all subsequent versions until the document is replaced by a new
Getting Started with ESXi Embedded
 ESXi 4.1 Embedded vcenter Server 4.1 This document supports the version of each product listed and supports all subsequent versions until the document is replaced by a new edition. To check for more recent
Verax Service Desk Installation Guide for UNIX and Windows
 Verax Service Desk Installation Guide for UNIX and Windows March 2015 Version 1.8.7 and higher Verax Service Desk Installation Guide 2 Contact Information: E-mail: [email protected] Internet: http://www.veraxsystems.com/
Deploy the ExtraHop Discover Appliance with Hyper-V
 Deploy the ExtraHop Discover Appliance with Hyper-V 2016 ExtraHop Networks, Inc. All rights reserved. This manual, in whole or in part, may not be reproduced, translated, or reduced to any machine-readable
VMware Quick Start Guide
 VMware Quick Start Guide Quick Start Guide Version 5.8 March 7, 2011 NOTICE The information contained in this document is believed to be accurate in all respects but is not warranted by Mitel Networks
Thinspace deskcloud. Quick Start Guide
 Thinspace deskcloud Quick Start Guide Version 1.2 Published: SEP-2014 Updated: 16-SEP-2014 2014 Thinspace Technology Ltd. All rights reserved. The information contained in this document represents the
F-Secure Messaging Security Gateway. Deployment Guide
 F-Secure Messaging Security Gateway Deployment Guide TOC F-Secure Messaging Security Gateway Contents Chapter 1: Deploying F-Secure Messaging Security Gateway...3 1.1 The typical product deployment model...4
CommandCenter Secure Gateway
 CommandCenter Secure Gateway Quick Setup Guide for CC-SG Virtual Appliance and lmadmin License Server Management This Quick Setup Guide explains how to install and configure the CommandCenter Secure Gateway.
Consolidated Monitoring, Analysis and Automated Remediation For Hybrid IT Infrastructures. Goliath Performance Monitor Installation Guide v11.
 Consolidated Monitoring, Analysis and Automated Remediation For Hybrid IT Infrastructures Goliath Performance Monitor Installation Guide v11.6 (v11.6) Document Date: August 2015 www.goliathtechnologies.com
VMware Identity Manager Connector Installation and Configuration
 VMware Identity Manager Connector Installation and Configuration VMware Identity Manager This document supports the version of each product listed and supports all subsequent versions until the document
Connection Broker Managing User Connections to Workstations, Blades, VDI, and More. Quick Start with Microsoft Hyper-V
 Connection Broker Managing User Connections to Workstations, Blades, VDI, and More Quick Start with Microsoft Hyper-V Version 8.1 October 21, 2015 Contacting Leostream Leostream Corporation http://www.leostream.com
WatchGuard Dimension v1.1 Update 1 Release Notes
 WatchGuard Dimension v1.1 Update 1 Release Notes Build Number 442674 Revision Date March 25, 2014 WatchGuard Dimension is the next-generation cloud-ready visibility solution for our Unified Threat Management
VMware vcenter Log Insight Getting Started Guide
 VMware vcenter Log Insight Getting Started Guide vcenter Log Insight 1.5 This document supports the version of each product listed and supports all subsequent versions until the document is replaced by
Quick Start Guide for Parallels Virtuozzo
 PROPALMS VDI Version 2.1 Quick Start Guide for Parallels Virtuozzo Rev. 1.1 Published: JULY-2011 1999-2011 Propalms Ltd. All rights reserved. The information contained in this document represents the current
Synchronizer Installation
 Synchronizer Installation Synchronizer Installation Synchronizer Installation This document provides instructions for installing Synchronizer. Synchronizer performs all the administrative tasks for XenClient
Reconfiguring VMware vsphere Update Manager
 Reconfiguring VMware vsphere Update Manager vsphere Update Manager 6.0 This document supports the version of each product listed and supports all subsequent versions until the document is replaced by a
WhatsUp Gold v16.1 Installation and Configuration Guide
 WhatsUp Gold v16.1 Installation and Configuration Guide Contents Installing and Configuring Ipswitch WhatsUp Gold v16.1 using WhatsUp Setup Installing WhatsUp Gold using WhatsUp Setup... 1 Security guidelines
RealPresence Platform Director
 RealPresence CloudAXIS Suite Administrators Guide Software 1.3.1 GETTING STARTED GUIDE Software 2.0 June 2015 3725-66012-001B RealPresence Platform Director Polycom, Inc. 1 RealPresence Platform Director
F-Secure Internet Gatekeeper Virtual Appliance
 F-Secure Internet Gatekeeper Virtual Appliance F-Secure Internet Gatekeeper Virtual Appliance TOC 2 Contents Chapter 1: Welcome to F-Secure Internet Gatekeeper Virtual Appliance.3 Chapter 2: Deployment...4
XenDesktop Implementation Guide
 Consulting Solutions WHITE PAPER Citrix XenDesktop XenDesktop Implementation Guide Pooled Desktops (Local and Remote) www.citrix.com Contents Contents... 2 Overview... 4 Initial Architecture... 5 Installation
CommandCenter Secure Gateway
 CommandCenter Secure Gateway Quick Setup Guide for CC-SG Virtual Appliance - VMware, XEN, HyperV This Quick Setup Guide explains how to install and configure the CommandCenter Secure Gateway. For additional
OnCommand Performance Manager 1.1
 OnCommand Performance Manager 1.1 Installation and Setup Guide For Red Hat Enterprise Linux NetApp, Inc. 495 East Java Drive Sunnyvale, CA 94089 U.S. Telephone: +1 (408) 822-6000 Fax: +1 (408) 822-4501
vrealize Air Compliance OVA Installation and Deployment Guide
 vrealize Air Compliance OVA Installation and Deployment Guide 14 July 2015 vrealize Air Compliance This document supports the version of each product listed and supports all subsequent versions until the
TANDBERG MANAGEMENT SUITE 10.0
 TANDBERG MANAGEMENT SUITE 10.0 Installation Manual Getting Started D12786 Rev.16 This document is not to be reproduced in whole or in part without permission in writing from: Contents INTRODUCTION 3 REQUIREMENTS
LifeSize Control Installation Guide
 LifeSize Control Installation Guide April 2005 Part Number 132-00001-001, Version 1.0 Copyright Notice Copyright 2005 LifeSize Communications. All rights reserved. LifeSize Communications has made every
Unitrends Virtual Backup Installation Guide Version 8.0
 Unitrends Virtual Backup Installation Guide Version 8.0 Release June 2014 7 Technology Circle, Suite 100 Columbia, SC 29203 Phone: 803.454.0300 Contents Chapter 1 Getting Started... 1 Version 8 Architecture...
13.1 Backup virtual machines running on VMware ESXi / ESX Server
 13 Backup / Restore VMware Virtual Machines Tomahawk Pro This chapter describes how to backup and restore virtual machines running on VMware ESX, ESXi Server or VMware Server 2.0. 13.1 Backup virtual machines
Quick Start - Virtual Server idataagent (VMware)
") Page 1 of 24 Quick Start - Virtual Server idataagent (VMware) TABLE OF CONTENTS OVERVIEW Introduction Key Features Complete Virtual Machine Protection Granular Recovery of Virtual Machine Data Minimal
Page 1 of 24 Quick Start - Virtual Server idataagent (VMware) TABLE OF CONTENTS OVERVIEW Introduction Key Features Complete Virtual Machine Protection Granular Recovery of Virtual Machine Data Minimal
WhatsUp Gold v16.3 Installation and Configuration Guide
 WhatsUp Gold v16.3 Installation and Configuration Guide Contents Installing and Configuring WhatsUp Gold using WhatsUp Setup Installation Overview... 1 Overview... 1 Security considerations... 2 Standard
PowerChute TM Network Shutdown in Redundant UPS Configurations
 PowerChute TM Network Shutdown in Redundant UPS Configurations By Sarah Jane Hannon ABSTRACT PowerChute TM Network Shutdown software works in conjunction with the UPS Network Management Card to provide
vcenter Operations Manager for Horizon Supplement
 vcenter Operations Manager for Horizon Supplement vcenter Operations Manager for Horizon 1.6 This document supports the version of each product listed and supports all subsequent versions until the document
Signiant Agent installation
 Signiant Agent installation Release 11.3.0 March 2015 ABSTRACT Guidelines to install the Signiant Agent software for the WCPApp. The following instructions are adapted from the Signiant original documentation
PHD Virtual Backup for Hyper-V
 PHD Virtual Backup for Hyper-V version 7.0 Installation & Getting Started Guide Document Release Date: December 18, 2013 www.phdvirtual.com PHDVB v7 for Hyper-V Legal Notices PHD Virtual Backup for Hyper-V
Virtual Data Centre. User Guide
 Virtual Data Centre User Guide 2 P age Table of Contents Getting Started with vcloud Director... 8 1. Understanding vcloud Director... 8 2. Log In to the Web Console... 9 3. Using vcloud Director... 10
XenClient Enterprise Synchronizer Installation Guide
 XenClient Enterprise Synchronizer Installation Guide Version 5.1.0 March 26, 2014 Table of Contents About this Guide...3 Hardware, Software and Browser Requirements...3 BIOS Settings...4 Adding Hyper-V
NexentaConnect for VMware Virtual SAN
 NexentaConnect for VMware Virtual SAN QuickStart Installation Guide 1.0.2 FP2 Date: October, 2015 Subject: NexentaConnect for VMware Virtual SAN QuickStart Installation Guide Software: NexentaConnect for
PowerChute TM Network Shutdown Operating Modes and supported UPS Configurations
 [APPLICATION NOTE #170] PowerChute TM Network Shutdown Operating Modes and supported UPS Configurations By Sarah Jane Hannon ABSTRACT PowerChute TM Network Shutdown software works in conjunction with the
Installing and Using the vnios Trial
 Installing and Using the vnios Trial The vnios Trial is a software package designed for efficient evaluation of the Infoblox vnios appliance platform. Providing the complete suite of DNS, DHCP and IPAM
User Manual. Onsight Management Suite Version 5.1. Another Innovation by Librestream
 User Manual Onsight Management Suite Version 5.1 Another Innovation by Librestream Doc #: 400075-06 May 2012 Information in this document is subject to change without notice. Reproduction in any manner
OnCommand Performance Manager 1.1
 OnCommand Performance Manager 1.1 Installation and Administration Guide For VMware Virtual Appliances NetApp, Inc. 495 East Java Drive Sunnyvale, CA 94089 U.S. Telephone: +1 (408) 822-6000 Fax: +1 (408)
Installing, Uninstalling, and Upgrading Service Monitor
 CHAPTER 2 Installing, Uninstalling, and Upgrading Service Monitor This section contains the following topics: Preparing to Install Service Monitor, page 2-1 Installing Cisco Unified Service Monitor, page
http://docs.trendmicro.com
 Trend Micro Incorporated reserves the right to make changes to this document and to the products described herein without notice. Before installing and using the product, please review the readme files,
Installing Oracle 12c Enterprise on Windows 7 64-Bit
 JTHOMAS ENTERPRISES LLC Installing Oracle 12c Enterprise on Windows 7 64-Bit DOLOR SET AMET Overview This guide will step you through the process on installing a desktop-class Oracle Database Enterprises
http://docs.trendmicro.com
 Trend Micro Incorporated reserves the right to make changes to this document and to the products described herein without notice. Before installing and using the product, please review the readme files,
4cast Client Specification and Installation
 4cast Client Specification and Installation Version 2015.00 10 November 2014 Innovative Solutions for Education Management www.drakelane.co.uk System requirements The client requires Administrative rights
Installing and Configuring WhatsUp Gold
 Installing and Configuring WhatsUp Gold This guide provides information about installing and configuring WhatsUp Gold v14.2, including instructions on how to run the WhatsUp web interface through an Internet
Table of Contents. Online backup Manager User s Guide
 Table of Contents Backup / Restore VMware Virtual Machines... Error! Bookmark not defined. Backup virtual machines running on VMware ESXi / ESX Server with VDDK / non VDDK... 2 Requirements and recommendations...
Pearl Echo Installation Checklist
 Pearl Echo Installation Checklist Use this checklist to enter critical installation and setup information that will be required to install Pearl Echo in your network. For detailed deployment instructions
Getting Started with Database Provisioning
 Getting Started with Database Provisioning VMware vfabric Data Director 2.0 This document supports the version of each product listed and supports all subsequent versions until the document is replaced
Installation Guide for FTMS 1.6.0 and Node Manager 1.6.0
 Installation Guide for FTMS 1.6.0 and Node Manager 1.6.0 Table of Contents Overview... 2 FTMS Server Hardware Requirements... 2 Tested Operating Systems... 2 Node Manager... 2 User Interfaces... 3 License
NSi Mobile Installation Guide. Version 6.2
 NSi Mobile Installation Guide Version 6.2 Revision History Version Date 1.0 October 2, 2012 2.0 September 18, 2013 2 CONTENTS TABLE OF CONTENTS PREFACE... 5 Purpose of this Document... 5 Version Compatibility...
Installing and Configuring VMware vcenter Orchestrator
 Installing and Configuring VMware vcenter Orchestrator vcenter Orchestrator 5.5.1 This document supports the version of each product listed and supports all subsequent versions until the document is replaced
Deployment and Configuration Guide
 vcenter Operations Manager 5 This document supports the version of each product listed and supports all subsequent versions until the document is replaced by a new edition. To check for more recent editions
BaseManager & BACnet Manager VM Server Configuration Guide
 BaseManager & BACnet Manager VM Server Configuration Guide For Self-Hosted BaseManager & BACnet Manager Servers Deployed as Virtual Machines August 27, 2015 Customer Service 1-866-294-5847 i Baseline Inc.
NetIQ Sentinel 7.0.1 Quick Start Guide
 NetIQ Sentinel 7.0.1 Quick Start Guide April 2012 Getting Started Use the following information to get Sentinel installed and running quickly. Meeting System Requirements on page 1 Installing Sentinel
Installation Instruction STATISTICA Enterprise Server
 Installation Instruction STATISTICA Enterprise Server Notes: ❶ The installation of STATISTICA Enterprise Server entails two parts: a) a server installation, and b) workstation installations on each of
Server Software Installation Guide
 Server Software Installation Guide This guide provides information on...... The architecture model for GO!Enterprise MDM system setup... Hardware and supporting software requirements for GO!Enterprise
Foglight. Foglight for Virtualization, Free Edition 6.5.2. Installation and Configuration Guide
 Foglight Foglight for Virtualization, Free Edition 6.5.2 Installation and Configuration Guide 2013 Quest Software, Inc. ALL RIGHTS RESERVED. This guide contains proprietary information protected by copyright.
Upgrade Guide BES12. Version 12.1
 Upgrade Guide BES12 Version 12.1 Published: 2015-02-25 SWD-20150413111718083 Contents Supported upgrade environments...4 Upgrading from BES12 version 12.0 to BES12 version 12.1...5 Preupgrade tasks...5
OnCommand Performance Manager 2.0
 OnCommand Performance Manager 2.0 Installation and Administration Guide For VMware Virtual Appliances NetApp, Inc. 495 East Java Drive Sunnyvale, CA 94089 U.S. Telephone: +1 (408) 822-6000 Fax: +1 (408)
WhatsUp Gold v16.2 Installation and Configuration Guide
 WhatsUp Gold v16.2 Installation and Configuration Guide Contents Installing and Configuring Ipswitch WhatsUp Gold v16.2 using WhatsUp Setup Installing WhatsUp Gold using WhatsUp Setup... 1 Security guidelines
Reconfiguring VMware vsphere Update Manager
 Reconfiguring VMware vsphere Update Manager vsphere Update Manager 5.5 This document supports the version of each product listed and supports all subsequent versions until the document is replaced by a
VMTurbo Operations Manager 4.5 Installing and Updating Operations Manager
 VMTurbo Operations Manager 4.5 Installing and Updating Operations Manager VMTurbo, Inc. One Burlington Woods Drive Burlington, MA 01803 USA Phone: (781) 373---3540 www.vmturbo.com Table of Contents Introduction
StruxureWare Power Monitoring 7.0.1
 StruxureWare Power Monitoring 7.0.1 Installation Guide 7EN02-0308-01 07/2012 Contents Safety information 5 Introduction 7 Summary of topics in this guide 7 Supported operating systems and SQL Server editions
Local Caching Servers (LCS): User Manual
: User Manual") Local Caching Servers (LCS): User Manual Table of Contents Local Caching Servers... 1 Supported Browsers... 1 Getting Help... 1 System Requirements... 2 Macintosh... 2 Windows... 2 Linux... 2 Downloading
Local Caching Servers (LCS): User Manual Table of Contents Local Caching Servers... 1 Supported Browsers... 1 Getting Help... 1 System Requirements... 2 Macintosh... 2 Windows... 2 Linux... 2 Downloading
vcloud Director User's Guide
 vcloud Director 5.5 This document supports the version of each product listed and supports all subsequent versions until the document is replaced by a new edition. To check for more recent editions of
Aspera Connect User Guide
 Aspera Connect User Guide Windows XP/2003/Vista/2008/7 Browser: Firefox 2+, IE 6+ Version 2.3.1 Chapter 1 Chapter 2 Introduction Setting Up 2.1 Installation 2.2 Configure the Network Environment 2.3 Connect
Bosch Video Management System High availability with VMware
 Bosch Video Management System High availability with VMware en Technical Note Bosch Video Management System Table of contents en 3 Table of contents 1 Introduction 4 1.1 Restrictions 4 2 Overview 5 3
Veeam Backup Enterprise Manager. Version 7.0
 Veeam Backup Enterprise Manager Version 7.0 User Guide August, 2013 2013 Veeam Software. All rights reserved. All trademarks are the property of their respective owners. No part of this publication may
Legal Notes. Regarding Trademarks. 2013 KYOCERA Document Solutions Inc.
 Legal Notes Unauthorized reproduction of all or part of this guide is prohibited. The information in this guide is subject to change without notice. We cannot be held liable for any problems arising from
Intelligent Power Protector User manual extension for Microsoft Virtual architectures: Hyper-V 6.0 Manager Hyper-V Server (R1&R2)
") Intelligent Power Protector User manual extension for Microsoft Virtual architectures: Hyper-V 6.0 Manager Hyper-V Server (R1&R2) Hyper-V Manager Hyper-V Server R1, R2 Intelligent Power Protector Main
Intelligent Power Protector User manual extension for Microsoft Virtual architectures: Hyper-V 6.0 Manager Hyper-V Server (R1&R2) Hyper-V Manager Hyper-V Server R1, R2 Intelligent Power Protector Main
Virtual Appliance Setup Guide
 Virtual Appliance Setup Guide 2015 Bomgar Corporation. All rights reserved worldwide. BOMGAR and the BOMGAR logo are trademarks of Bomgar Corporation; other trademarks shown are the property of their respective
Desktop Surveillance Help
 Desktop Surveillance Help Table of Contents About... 9 What s New... 10 System Requirements... 11 Updating from Desktop Surveillance 2.6 to Desktop Surveillance 3.2... 13 Program Structure... 14 Getting
In order to upload a VM you need to have a VM image in one of the following formats:
 What is VM Upload? 1. VM Upload allows you to import your own VM and add it to your environment running on CloudShare. This provides a convenient way to upload VMs and appliances which were already built.
System Administration Training Guide. S100 Installation and Site Management
 System Administration Training Guide S100 Installation and Site Management Table of contents System Requirements for Acumatica ERP 4.2... 5 Learning Objects:... 5 Web Browser... 5 Server Software... 5
Cisco Prime Collaboration Deployment Administration Guide, Release 10.5(1)
") Cisco Prime Collaboration Deployment Administration Guide, Release 10.5(1) First Published: May 07, 2014 Americas Headquarters Cisco Systems, Inc. 170 West Tasman Drive San Jose, CA 95134-1706 USA http://www.cisco.com
Cisco Prime Collaboration Deployment Administration Guide, Release 10.5(1) First Published: May 07, 2014 Americas Headquarters Cisco Systems, Inc. 170 West Tasman Drive San Jose, CA 95134-1706 USA http://www.cisco.com
Dell UPS Local Node Manager USER'S GUIDE EXTENSION FOR MICROSOFT VIRTUAL ARCHITECTURES Dellups.com
 CHAPTER: Introduction Microsoft virtual architecture: Hyper-V 6.0 Manager Hyper-V Server (R1 & R2) Hyper-V Manager Hyper-V Server R1, Dell UPS Local Node Manager R2 Main Operating System: 2008Enterprise
Acronis Backup & Recovery 10 Advanced Server Virtual Edition. Quick Start Guide
 Acronis Backup & Recovery 10 Advanced Server Virtual Edition Quick Start Guide Table of contents 1 Main components...3 2 License server...3 3 Supported operating systems...3 3.1 Agents... 3 3.2 License
Wavecrest Certificate
 Wavecrest InstallationGuide Wavecrest Certificate www.wavecrest.net Copyright Copyright 1996-2015, Wavecrest Computing, Inc. All rights reserved. Use of this product and this manual is subject to license.
VMware for Bosch VMS. en Software Manual
 VMware for Bosch VMS en Software Manual VMware for Bosch VMS Table of Contents en 3 Table of contents 1 Introduction 4 1.1 Restrictions 4 2 Overview 5 3 Installing and configuring ESXi server 6 3.1 Installing