User's Manual. Professional telephone with USB interface, SMS function and answering machine. tiptel 274. tiptel
|
|
|
- Osborne Bates
- 10 years ago
- Views:
Transcription
1 User's Manual (UK) Professional telephone with USB interface, SMS function and answering machine tiptel 274 tiptel

2

3 Safety instructions Safety instructions When installing, connecting and operating the telephone please observe the following instructions: This device has been tested to harmonised European regulation ETSI ES and is suitable for connecting to the public, analogue telephone network. Connect the connection cable to the appropriate sockets. Make sure the cables are laid in such a way that no accidents can occur. Connected cables must not be subject to excessive mechanical strain. Install the device away from sources of electrical disturbance. Only attach accessories that are authorised for this device. Never open the device yourself. Do not touch the wrap connections with sharp or metal objects. Use only a soft damp cloth to clean the device. Do not use abrasive liquids or chemicals to clean the device. Protect the device from moisture, dust, liquids and vapours. Do not use the device in direct sunlight. Do not use the device in areas that are at risk of explosions. Only use the original tiptel power adapter (item no ). 3

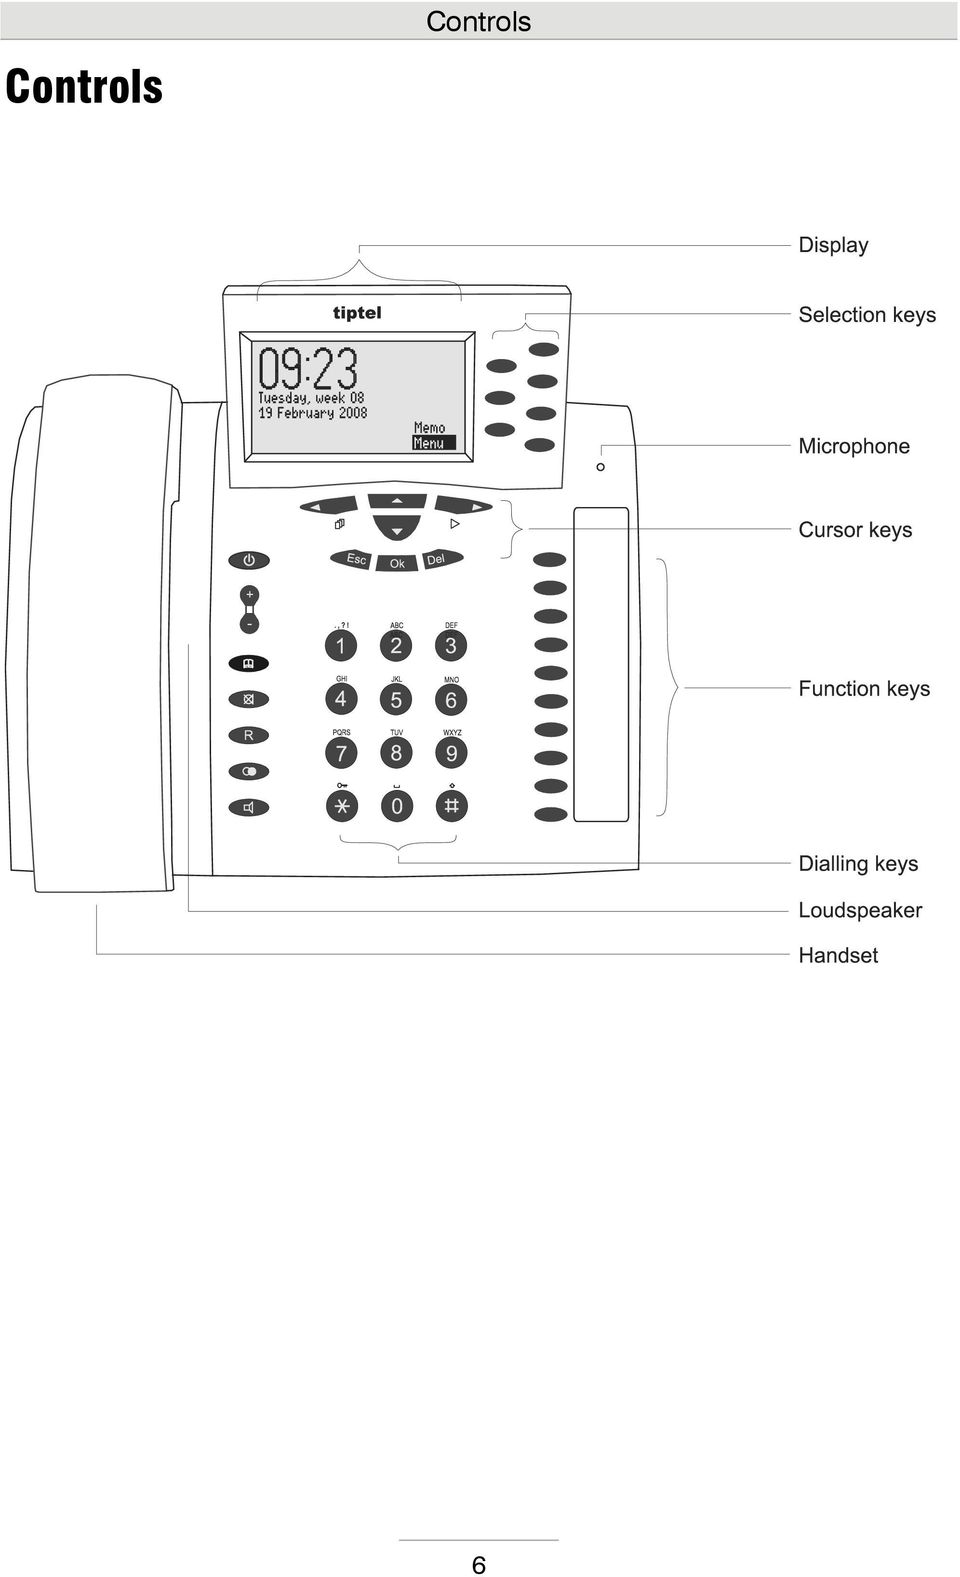
4 Key assignment Key assignment Selection buttons: For the quick selection of functions, menu options and entry fields that appear on the display next to the relevant button. Cursor key (left): Used for navigations and settings. In stand-by mode it opens the call lists. Cursor key (right): Used for navigations and settings. In Stand-by mode opens recorded messages of answering machine. Cursor keys (up/down): Used for navigation and highlighting the required function or menu option. OK button: Selects the highlighted function or menu option. Is used to confirm the new setting. ESC: Ends the current function, is used to close the open menu and return to standby. Cancels the setting, retains the old setting. DEL: Deletes the highlighted entry. For entry fields, deletes the digit to the right of the cursor. For playback deletes the incoming message (ICM) that is currently playing. 2 Sec. DEL for 2 sec.: Deletes complete lists. For entry fields, deletes the complete entry. Plus/Minus: Changes the volume. When signalling a call, changes the volume of the ringing tone. During a call changes the handset volume. When entering a telephone number they are used for entering special characters. Phone book: Opens the telephone book. 2 Sec. Phone book for 2 sec.: Opens the entry field for a new telephone book entry. 4

5 Key assignment Dialling keys: Used for entering numbers, names, texts, and dialling telephone numbers. Function keys: Entries from the telephone book can be saved as direct destinations. You can also add frequently used functions to these buttons. Mute button: Switches off the microphone, the caller hears an on-hold tune. In stand-by mode mutes/unmutes the ringing signal (do not disturb mode) Redial: Starts redialling the most recently called number. Speaker: Starts dialling a selected or entered call number. Switches the line to or from hands-free or headset (connection ). During a call with the handset switches to speaker. R key: Flash or hook flash function. Used to transfer calls on PABX. Has special functions in some networks. Answering machine: Switches answering machine on or off. Lights when answering machine is on. Flashes when there are new messages that have not been played back. Flickers when memory exhausted and no room left for new messages. 2 Sec Asterisk for 2 sec.: Activates and deactivates the key lock. 5
. During a call with the handset switches to speaker. R key: Flash or hook flash function. Used to transfer calls on PABX.")
6 Controls Controls 6
7 Contents Contents Safety instructions... 3 Key assignment... 4 Controls... 6 Contents... 7 Display icons... 9 Starting up Product package Installation Connecting Telephone functions/making calls Direct dial Indirect dialling (dialling preparation) Speakerphone Automatic redial/call back on busy Key lock Entering text Entering text via the dialling keys Summary of available characters Call lists General information Open call lists and call Telephone book General information Entering and saving entries Dialling from the telephone book Short messages (SMS) Configuring the telephone connection Registering and de-registering with your message center Entry options for short messages Inbox Outbox Templates Message center
... 23 Configuring the telephone connection.")
8 Contents Scheduler/timer Entry options for the scheduler Enter and manage dates Date notification Entry options for time control Programming time control Programming example for timer (control) Switching on time control Information & Service Selection options Information & service menu Settings Setting options Settings menu Adjusting the volume Answering machine Setting options for the answering machine Announcements ICMs Message transfer Settings Switching on the answering machine Monitoring/Personal Info (Memo) Answering machine remote control Dialling with your PC Dialling from the application Dialling by using AT commands Appendix Service Warranty CE mark Environmental compatibility Troubleshooting Factory default settings Technical Specifications Index
... 61 Answering machine remote control... 62 Dialling with your PC... 65 Dialling from the application.")
9 Display icons Display icons Signals a call, call when absent SMS sent or received New ICM, answering machine menu SMS menu Menu for dates and time control, immediate date Settings menu, basic settings, firmware update, switch call forwarding on/off Information and service menu Volume Transfer to telephone book Handset volume Text or number entry via dialling keys available Delete Ringing tone or announcement recorded via microphone Automatic answering, line busy Key lock active Time control switched on Answering machine announcement 2 switched on Message transfer switched on Headset detected on connection HS1 Remaining incoming message capacity Old inbox, old ICM New inbox, new ICM Outgoing call Call accepted Monitoring switched on Microphone switched off Hands-free switched on Call number back Playback, repeat Playback pause 9

10 Display icons Notes on errors and operation Data exchange with PC, flashes during transfer. Jump to next ICM Jump to previous ICM Save number Private call number Business number Mobile number Redialling Automatic call back Ringing tone switched off or selected call tone not working. Signals new messages that have not reviewed. Flashes when inbox memory exhausted. 10

11 Starting up Starting up Product package Your telephone package contains: Telephone incl. handset Spiral cable (handset cord) Telephone connection cable Mains plug 11.5V / 350 ma USB cable for connecting to a PC CD-ROM with drivers and application software User's Manual Installation Your telephone has been produced for normal operating conditions. Solvents in furniture varnish, polish, or oil can etch the pads on the bottom of the cabinet. Etched pads may leave tracks on the furniture. Therefore use a non-slip underlay, especially for new or freshly treated furniture. Connecting Before using your telephone you have to attach all of the essential cables. 1 Connect the spiral cable with the long end into the socket with the handset icon and the short end to the telephone handset. 2 Fit the small connector of the mains plug into the "POWER" jack and the plug into a mains power outlet. 3 Fit one plug of the telephone connection cable into the "LINE" jack and the other one into the telephone socket on the wall. 4 If you want to configure the device via the PC fit the USB cable with the square plug into the device and the flat plug into the PC. 11

12 Starting up 5 If you want to use the headset (accessory) simply insert the plug into the appropriate socket or. A wireless headset with DHSG interface goes into socket. Only one headset can be connected at any one time, either a standard or a wireless headset. For further details refer to page 47 Settings/Telephone/Headset. 12

13 Telephone functions/making calls Telephone functions/making calls During a call the call time is displayed to indicate the time that the line is occupied, giving you the opportunity of controlling duration of the current call at any time. If your PABX or network operator transfers tariff pulses, your telephone also indicates the call charges (refer to Settings/Telephone/Charging information ). Direct dial For direct dial, the numbers pressed are dialled immediately without the opportunity to correct them. Lift receiver and listen for dialling tone. Enter the telephone number using the dialling keys. To redial the most recent call number press redial. The numbers pressed are displayed and dialled immediately. The most recently dialled number is called again. To switch monitoring on and off, press speaker. To switch the microphone on and off press the mute button. To end the call, simply hang up. The speaker is switched on and those present can monitor the call. The microphone is switched off; your caller hears please wait and an on-hold tune. The connection is cut. 13

14 Telephone functions/making calls Indirect dialling (dialling preparation) For indirect dialling the numbers entered are not dialled immediately. Before dialling it is still possible to correct the entry. Enter the required telephone number using the dialling keys. In order to dial the telephone number entered, lift the receiver. The numbers pressed are displayed but not yet dialled. The call is connected and you can make your call. Speakerphone Instead of using the receiver you can also connect or receive the call using speakerphone. Press speaker (this corresponds to lifting the receiver). To switch from speakerphone to the receiver, simply lift the handset. The speakerphone icon is displayed. You can hear a dialling tone and can make your call. You can continue your call with the handset. Hold To switch from the handset to the speakerphone hold down speaker and hang up the receiver. You can continue your call with the speakerphone. 14
.")
15 Telephone functions/making calls To end the call, press speaker again (this corresponds to hanging up the handset). The connection is cut. If the headset is inserted into connection (headphone icon on the display) the speaker function does not work. Instead the call is transferred to the headset. Automatic redial/call back on busy If the person you are trying to call is constantly engaged your telephone can take over by repeatedly trying to call the other person. For automatic redialling the dialling is repeated 10 times every 15 seconds. With the "Call back on busy" function a call is signalled to you as soon as the person you are trying to reach is available. Your telephone network or extension system must support this function (refer also to your network operator and PABX manufacturer user instructions). To activate "Call back on busy" you usually dial a certain combination of digits (e.g. Hookflash *37#). The combination of digits must be pre-entered as described in "Settings/Telephone/Call back code". You call someone via the speakerphone (without lifting the receiver); the number is busy. "Subscriber busy" is displayed. Select the required function using the cursor keys (up/down). Call back or Redial is shown inversely. Press OK. For redialling the call is repeated up to 10 times. For call back this is indicated as soon as the called subscriber hangs up. 15

16 Telephone functions/making calls Make call via receiver or speaker. You can have your conversation now. You do not want automatic re-dial or call back on busy. Press Esc or simply wait 10 seconds. Standby is displayed again. The automatic redial/call back on busy function is only possible when the handset is not used. Key lock In order to protect your telephone against unwanted use you can activate the key lock. 2 Sec. To activate the key lock press this key for 2 sec. The key lock is activated, an icon appears in the top right of the screen. 2 Sec. To deactivate the key lock press this key once again for 2 sec. The key lock is disengaged, the icon disappears. 16

17 Entering text Entering text Entering text via the dialling keys With your telephone in text entering mode, you may enter numbers or text via the dialling keys. Which characters can be entered by which key you may see printed above those keys on the upper cabinet and also you can find this information in the table "Summary of available characters". If you press one of the dialling keys with your telephone in text entering mode, the first character will appear on the display. With each additional actuation the current character will be replaced with the next one. Example: You would like to write the letter "c". This letter "c" is in the third place of the dialling key "2". This means you will have to press "2" three times in a row. If you do not press the key any more for one second the current character will be accepted and the curse will jump one step forward. You can navigate within your text by using the cursor keys. For deleting a character please press "DEL". For deleting the whole text please press "DEL" for 2 seconds. Summary of available characters Key Assignment Key Assignment.,?! 1 : ; ( ) = + - / & % [ ] < M N O 6 Ö Ò m n o 6 ö ò A B C 2 Ä a b c 2 ä P Q R S 7 p q r s 7 ß D E F 3 È È d e f 3 è é T U V 8 Ü Ù t u v 8 ü ù G H I 4 Ì g h i 4 ì W X Y Z 9 w x y z 9 J K L 5 j k l 5 (Space) 0 $ (Shift) When pressing the (Shift)-key the next letter will be in upper case. Letters following a full stop will automatically start with an upper case character same as names. 17

18 Call lists Call lists General information Three call lists are integrated in your telephone - calls while absent, calls received and numbers dialled. Each list saves the last 20 calls including date, time and any call charges. If the caller's telephone number is transferred during a call this is also displayed. If the telephone number is included in your telephone book, the caller's name is displayed. The telephone numbers from the call list can be dialled directly. You can delete individual entries or the complete list. You can transfer telephone numbers into the telephone book. Open call lists and call In stand-by mode press cursor key (left). The screen changes and shows the choice of call lists. Select the required list using the cursor keys (up/down). The selected line is highlighted. Press OK. The screen changes and shows the selected list. 18
.")
19 Call lists You can scroll through individual entries using the cursor keys (up/down). Press OK to view the highlighted call. Press Del to delete the highlighted call. 2 Sec. To delete the whole list press Del. for 2 sec. The newest call is at the top of the list. The required call shows both date and call time on the display. If the call number is not included in the telephone book the Save number option also appears. The call will be deleted. All entries will be deleted. Press speaker to make a call. The call is connected, the speaker switches itself on. Or Simply lift the receiver. The call is connected and you can make your call. 19

20 Telephone book Telephone book General information The telephone book manages the names and telephone numbers of your business partners. You can save up to 250 entries. An entry is made up of the name (search string) and up to 3 telephone numbers. The name must begin with a letter. The telephone number should begin with an area code so that the corresponding name can be displayed later when the call number is received. You do not have to enter the code for your local network if you have already done so in the settings (refer "Settings/My phone number". All entries are sorted alphabetically. Entering and saving entries 2 Sec. Press phone book key for 2 sec. The entry field for a new entry is shown on the screen. Enter the name by using the dialling keys. (please see page 17 "Entering text via the dialling keys"). Select the call number s memory space with the cursor keys (up/down). Enter the telephone number using the dialling keys. You have to enter something here for the entry to be saved. The icons stand for business, mobile and private. Pushed digits will be displayed. 20

21 Telephone book With this key you can enter special characters. Press this key to delete individual characters. 2 Sec. To delete the whole line press Del. for 2 sec. To confirm the entry press OK. Press Esc to leave the entry field. P = Wait for dial tone / 3 sec. pause i = Internal (for PABX) F = Flash (for PABX) H = Hookflash (for PABX) S = SMS call notification target (answering machine) The digit to the right of the cursor will be deleted. The selected line will be deleted. The entry space stops flashing, the entry is confirmed. The standby status is displayed again. If you have set your telephone to receive an outside line automatically, the prefix for the outgoing call is dialled automatically before each number included in the telephone book (see also Settings, PABX/outside lines ). To avoid this happening in case of internal numbers, you have to enter I before the internal number. Dialling from the telephone book Press phone book Use the dialling keys to enter the first character of the name you are searching for, e.g. M for Miller. The phone book opens up at letter "A". All names with "M" will appear. You may enter up to five characters for narrowing your search. 21
22 Telephone book You can select the required entry using the cursor keys (up/down). The selected entry is highlighted. Press OK to confirm. The screen changes and shows the selected entry. Use the cursor keys (up/down) to select between the three possible numbers or the Edit entry option. Press speaker to make a call. The selected line is highlighted. The call is connected, the speaker switches itself on. or Simply lift the receiver. The call is connected and you can make your call. To end the call press speaker. The call is ended, the screen shows standby again. or Simply replace the receiver. The connection is cut. 22
23 Short messages (SMS) Short messages (SMS) The SMS service allows you to send or receive SMS messages to other terminals. The messages are not transferred directly to the other terminal but instead are sent to your network operator's message center. Your telephone supports so-called Long Messages, so your messages can contain up to 459 characters (3 chained messages). You can save up to 20 messages in the inbox. To use the SMS function it is essential support for transferring the call number (CLIP) exists. Then all you have to do is register with your message center and away you go. You can also send your short message to a subscriber that does not have an SMSenabled device. Then the short message is read out loud as a voice message. Please refer to your network operator's information material for this and other functions. Please observe the following points so that you can send and receive short messages (SMS) with your telephone. Configuring the telephone connection Analogue telephone connection If you have an analogue telephone connection, please check whether you can access the "Call number transfer" and "Call number display" (CLIP, incoming and outgoing) functions. To do so, please enquire of your network operator whether these features are available for your connection. ISDN connection If you have an ISDN connection check that call number display (CLIP) is activated and that call number transfer (CLIR) is not suppressed in your PABX. 23
24 Short messages (SMS) Registering and de-registering with your message center You have to register your telephone for your network operator's SMS service to receive fixed network SMS. In Germany, for example, you can reach Deutsche Telekom message center nationally by calling " ". Enter this number under "SMS center". The registration process varies between network operators. Ask your telephone network provider how to do this. For example, for Deutsche Telekom you have to send an SMS to register including the following content: "ANMELD" to the target call number 8888 You will then receive a confirmation message from Deutsche Telekom SMS service. Now you can be sure that you can send and receive SMS using your telephone. You can deactivate receiving SMS messages by sending "ABMELD" to target call number Future SMS that are sent to your call number are then read as voice messages. As of: August 2006 Entry options for short messages Inbox... All SMS received are listed here. You have the following choices under Options: save, answer, transfer, call number or save as template. Outbox... You have the option of creating a new message, changing an old one or deleting it. Templates... You can create up to 10 different templates, change or delete old templates. 24
25 Short messages (SMS) Message center... Enter the number for the message center here. Your network operator will provide the correct number. You can also enter a second center for another supplier. It is then possible to receive SMS messages via both centers. Please note that in contrast messages are only sent via the first center. Inbox If you have new, unread messages (SMS) the envelope icon appears. If this icon flashes is no space left in the inbox for new messages. Delete older messages to free space. Press OK. The main menu will be displayed. Press OK. The messages menu is displayed. Press OK. The inbox is displayed. 25
26 Short messages (SMS) You can scroll through individual entries using the cursor keys (up/down). To read the highlighted message, press OK. To delete the highlighted message press Del. 2 Sec. To delete the whole inbox press Del. for 2 sec. New, unread messages are marked with an arrow. The selected message is displayed. The message is deleted. All entries are deleted. You can scroll through the messages using the cursor keys (up/down). Press OK to go to the options. You can now save the number, reply to the sender, forward the SMS, call the sender or save the SMS as a template. Press Esc to leave the menu. 26
27 Short messages (SMS) The device must be in standby for you to receive a message (SMS). Your telephone will not respond if you are currently scrolling through the menu or changing settings. This ensures that you cannot be disturbed (for example when entering an SMS). Outbox Press OK. The main menu is displayed. Press OK. The messages menu is displayed. Highlight Outbox with the cursor keys (up/down). Press OK. The display changes and shows the outbox. 27
28 Short messages (SMS) Enter your message by using the dialling keys. (please see page 17 "Entering text via the dialling keys"). In the top line of the screen you see how many characters you can still write. Use the cursor keys to move in the text, check what you wrote and insert something. To delete individual characters press Del. 2 Sec. To delete the whole text press Del. for 2 sec. To send the SMS press OK. The digit to the right of the cursor will be deleted. The outbox will be deleted. The display changes to send. Enter the recipient s number via the dialling keys. Ensure that you always state the whole number otherwise the SMS can not be delivered. To confirm the number press OK. 28
29 Short messages (SMS) To fetch the recipient s number from the telephone book, highlight the from telephone book line and press OK. Look for the recipient in your personal telephone book. Highlight Send with the cursor keys (up/down). The highlight jumps to Send. To send the SMS press OK. The SMS is sent and the device returns to standby mode. Templates You can save up to 10 templates that you can individually modify, delete and send. Open the message menu as described in "Inbox" and "Outbox". The messages menu is displayed. Highlight Templates with the cursor keys (up/down). Press OK. The display switches to the templates. 29
30 Short messages (SMS) Highlight the required template with the cursor keys (up/down). Press Del to delete the highlighted template. 2 Sec. To delete all templates press Del. for 2 sec. In order create or edit the marked template press OK. The start of the selected template is displayed. The template is deleted. All templates are deleted. The selected template is displayed. Create, edit and send template as described in detail under Inbox. 30
31 Short messages (SMS) Message center Enter the telephone number for your message center here (e.g. Deutsche Telekom ). If you are using the device in a different country or network, your network operator will tell you the call number of your message center. In some countries you have to enter two telephone numbers one to send and the other to receive. The send number must then be saved as Center 1. Open the message menu and highlight the message center entry. Press OK. The display changes and the cursor flashes at the first digit for Center 1. Enter the number of the message center using the dialling keys. Highlight Center 2 with the cursor key (down) and if necessary enter this. If you have set up two message centers you can receive SMS messages from both. But you always send via the first center. 31
32 Scheduler/timer Dates/time control You can manage up to 20 dates with additional information. You can enter one-off, daily, weekly and annual dates. The time control function contains up to 20 switching times during which the answering machine, message forwarding, call forwarding and ringing tone melody can be switched on/off or changed. Entry options for the scheduler Event... You can enter up to 50 characters as additional information via the dialling keys. Date Signalling... Non-recurring, daily, weekly or annually. Enter how frequently the date should be signalled. Time... Enter the time for the signal. Date... Enter the date. The field only appears for nonrecurring and annual dates. Weekday... Enter the week day for weekly dates. 32
33 Dates/time control Enter and manage dates Press OK. The main menu is displayed. Search for Scheduler/timer with the cursor keys (up/down). Press OK. The display changes and shows the Scheduler/timer menu. Press OK. A list appears with all the dates. Search for the date that you wish to edit or delete using the cursor keys (up/down). 33
34 Dates/time control Delete the selected date by pressing Del. 2 Sec. To delete the whole list press Del. for 2 sec. Confirm the selected date by pressing OK. The date is deleted. All dates will be deleted. The display changes and shows the entry field for additional information. Enter the information (event) via the dialling keys (please see page 17 "Entering text via the dialling keys"). Press OK. The display shows the number of characters still available to the top right. The display changes and shows the entry field for the date. 34
35 Dates/time control Set the required signal using the cursor keys (left/right). Depending on the signal the time, date and week day appear. Use the cursor keys (up/down) to select the time, date or week day. Use the dialling keys if necessary to set the date and time. For weekly dates set the week day with the cursor keys (left/right). To confirm the entry press OK. To stop the entry press Esc several times. The entry space stops flashing, the setting is confirmed. Standby is displayed again. Date notification When the date is due, you will hear an acoustic signal and "Schedule" or the additional information you entered is displayed. To stop press Esc several times. The acoustic signal goes silent when you press the button for the first time. Standby is again displayed when you press the button the second time. The acoustic signal stops automatically after one minute. Non-recurring dates are erased after notification. 35
36 Dates/time control Entry options for time control Time control list Switching time Time... Enter the time when the function should be switched on, off or changed. Weekday (from/to)... Enter the week days when the switching time should be carried out. Announcement... 1 to 3, off or -. For settings 1 to 3 the answering machine will be switched on with the corresponding announcement. With Off the announcement and answering machine is switched off. - means no change to the current setting. Message transfer... On, off or -. - means no change to the current setting. Call forwarding... On, off or -. - means no change to the current setting. Ringing/melody... 1 to 20, off or -. You can change or switch off the ringing tone/melody. - means no change to the current setting. Timer... On or off. You can switch the time control on and off here. 36
37 Dates/time control Programming time control Press OK. The main menu is displayed. Search for Scheduler/timer with the cursor keys (up/down). Press OK. The display changes and shows the Scheduler/timer menu. Highlight the timer list with the cursor keys (up/down). Press OK. A list appears with all the switching times. Search for the switching time that you wish to edit or delete using the cursor keys (up/down). 37
38 Dates/time control Delete the selected switching time with Del. 2 Sec. To delete the whole list press Del. for 2 sec. Confirm the selected switching time with OK. The switching time will be deleted. All switching times will be deleted. The display changes and shows the entry field for the action that is to be executed at the required point in time. Select the setting with the cursor keys (up/down) and change it with the cursor keys (left/right). Finally select Switching time. The screen shows all setting options. Press OK. The display changes and shows the entry field for the switching time. 38
39 Dates/time control Set the required switching time with the dialling keys. The entry location flashes. Select weekday from/to with the cursor keys (up/down). Set the weekdays using the cursor keys (left/right). To confirm the entry press OK. To stop the entry press Esc several times. For daily switching times enter from Mo to Su. E.g. if you only want to switch on Fridays only enter from Fr to Fr. The entry space stops flashing, the setting is confirmed. Standby is displayed again. 39
40 Dates/time control Programming example for timer (control) You would like the answering machine to switch on announcement 1 on Mondays to Fridays at and switch off at When the office closes on Friday and over the weekend, Announcement 2 is to be switched on around the clock. The ringing tone should be switched off during the week from to and at the weekend. Ringing tone melody 5 should sound at other times. This requires 3 switching times. Switching time: 1 Switching time: 2 Switching time: 3 40
41 Dates/time control Switching on time control Open the Scheduler/timer menu with OK and the cursor keys (up/down) and highlight Timer. The display changes and shows the Scheduler/timer menu. Use the cursor keys (left/right) to switch between on and off. Press OK to confirm. To stop the entry press Esc several times. The display switches between on and off. The display stops flashing. On the screen a clock icon appears to indicate that time control is activated. 41
42 Information & Service Information & Service This allows you to monitor call charges, view the number of incoming and outgoing calls, delete the telephone book or return the device to its default settings on delivery. You can also view information on the current firmware and installed languages. Selection options Call charges... Here you can view the total tariff units and the total charges since the last counter reset (tariff pulses must be transferred from your PABX or network operator). Call counter... Here you can view the total of all outgoing and incoming calls since the last counter reset. Delete phone book... After a confirmation prompt that also shows you the number of existing entries the complete telephone book can be deleted. Reset to default... After a confirmation prompt you can reset the default settings. Apart from the time and telephone book, everything is deleted or reset. Firmware... Here you can view the current firmware version and the language versions currently installed. Please use the PC application software to update the firmware or languages. Information & service menu Press OK. The main menu is displayed. Search for Information & Service with the cursor keys (up/down). 42
43 Information & Service Press OK. The information & service menu is displayed. Highlight the required rubric with the cursor keys (up/down). Press OK. The display changes to the selected rubric, e.g. call charges. Make further selections using the cursor keys (up/down). Press OK to confirm the selection. Press Esc repeatedly to leave the menu. The required option is executed. Standby is displayed again. 43
44 Settings Settings Setting options General Language... German, English, French, Italian or Dutch Display Contrast... Enables you to set the contrast in up to 16 steps. Brightness... Enables you to set the brightness in up to 16 steps. Backlight... Automatic or on. For the "automatic" setting the backlight is switched off automatically after 10 seconds. If you want the backlight on continuously, select "On". My phone number Number... Enter your own number here so that it is announced along with the fixed elements of the answering machine s texts for identification purposes. Area code... If you enter the area code/dialling prefix here it will not be used for calls with caller display in the same local network. Change PIN... You can change the PIN here. The PIN is number containing 1 to 4 digits. On delivery it is preset to Blocked numbers/key lock Key lock... On or off. When the key lock is activated all keys are locked and can be released temporarily by entering the PIN. Numeric block lock... On or off. When the numeric block lock is active it is not possible to use the dialling keys to dial. Phone book lock... On or off. When the phone book lock is active it is not possible to open the telephone book. 44
45 Settings Blocked numbers... You can block up to 10 call numbers or groups for dialling here. If, for example, you wish to block all international calls enter the call number 00. Exception numbers... You can enter up to 10 exceptions here. For example, if you have blocked all international numbers but want to have Holland as an exception, enter the call number Clock Time, date Time... Enables you to re-set the time. Date... Enables you to re-set the date. DST... Daylight saving time (Yes/no). Select "Yes" if you want your telephone to change automatically to daylight saving time on the last Sunday in March and to standard time on the last Sunday in October. Network time... Yes or no. You can transfer the time to the internal clock if this is permitted by your telephone network or your PABX (the year is not transferred and must be set manually). Telephone Ringing tones Melody... 1 to 20 or off. Melodies 1 to 10 are firmly installed and cannot be changed. You can record melodies 11 to 20 yourself via the integrated microphone. When off has been set your telephone will keep quiet (no signal). Volume... 1 to 7. Set here the required volume. Ascending... On or off. If you switch ascending on, the volume of the call melody automatically gets louder as the signal time continues (no matter the preset volume). Record tone... This menu option only appears for Melody 11 to 20 if the melody has not yet been recorded or deleted. Delete ringing tone... This menu option only appears for Melody 11 to 20 if the melody has already been recorded. 45
46 Settings Charging information Cost per unit... Enter the price for each tariff unit. You can find the price from your network supplier or from the PABX configuration. This requires the network supplier and PABX to support the tariff pulse. Currency... Enter the currency icon here. Three entry characters are available. Call-back code... Enter the call-back code of your network operator (for Deutsche Telekom network e.g. H*37#). H eans the signal key with hook flash. PABX Flash key (R)... F (Flash) or H (Hook flash). For PABX the flash (short, approx. 95ms) is usually used to start functions. In contrast the hook flash (long, approx. 240 ms) is used by Deutsche Telekom. Outgoing call... Enter your prefix for the public telephone network (e.g. 0) here. Your telephone will then automatically enter a pause after dialling an outside line to prevent incorrect dialling. If you select the automatic exchange connection before each external call number from the telephone book, call lists (calls while absent, calls received) and message center (SMS) the outside line number is dialled automatically. Internal call back code Enter the call back code for your PABX (for tiptel PABX e.g. F*37#). F refers to the signal button with Flash, enabling your device can detect internal call numbers; the outside line number must be entered. CLIP correction... Some PABX systems add numbers before the received call number. This results in incorrect messages for the received call number. In order to recognise and delete the additional numbers you can enter them here. Function keys... Select the function that you want to use via a function key and then press the required function key. You can also select names from the telephone book directly on the function keys. 46
47 Settings Headset... Automatic or DSHG. Setting "Automatic" allows automatic detection of a "standard" headset. When using a headset with DHSG interface please use "DHSG" setting. Music on hold... On or Off. Here you can select whether after pressing the mute key the caller will hear music on hold or not. Call filter Filter list... Enables you to view and edit all existing filter entries. A maximum of 20 entries are available. New entry Number/name... Enter the name and call number (including area code) for the subsequent filter properties. You may also create number groups by entering the first digit(s) of the group, e.g Filter properties then apply to all groups starting with 015. Ringing/melody... 1 to 20, off or -. Enter here the ringing tone you want to apply to the previously entered call number (individual ringing tone). Set to off so that no call is signalled for this caller. Select - to cancel the setting. Answering machine... 1 to 3, off or -. In order to activate the answering machine for this particular caller enter the required announcement. Set to off to switch off the answering machine for this particular caller. Select - to cancel the setting. Calls without CLIP Ringing/melody... 1 to 20, off or -. Enter the ringing tone that should be applied to calls where no call number is transmitted. Set to off so that no call is signalled for this caller. Select - to cancel the setting. Answering machine... 1 to 3, off or -. In order to activate the answering machine for this particular caller enter the required announcement. Set to off to switch off the answering machine for this particular caller. Select - to cancel the setting. 47
48 Settings Call forwarding Number/name... Enter the name and call number to where the call should be forwarded. Call forwarding can be activated and deactivated via the time control. For manual control you can also set call forwarding to the function keys, see Function keys. Please note that for some networks and PABX you have to enter # after the call number. Enable with... Enables you to enter the code to switch on call forwarding (you will usually find the codes to switch on or off in the operating instructions of your network provider or PABX manufacturer). For Deutsche Telekom network enter *21*. Disable with... Enables you to enter the code to switch off call forwarding. For the Deutsche Telekom network enter #21#. 48
49 Settings Settings menu Press OK. The main menu is displayed. Search for Settings using the cursor keys (up/down). Press OK. The settings menu is displayed. Highlight the required rubric with the cursor keys (up/down). Press OK. For settings with fixed selection lists, e.g. Language use cursor keys (left/right) to make the setting. The display changes to the selected rubric, e.g. General. The screen shows the various setting options. The entry location flashes. 49
50 Settings or For numerical and text entries use the dialling keys (please see page 17 "Entering text via the dialling keys"). Press OK to confirm the setting. To stop the entry press Esc several times. The entry location flashes. The entry location stops flashing. Standby is displayed again. Adjusting the volume You can set the volume when the device is on standby. When the receiver is lifted the handset volume changes; during call signalling the volume of the ringing tone melody changes. Adjust volume with minus/plus. The volume bar shows the current setting. 50
51 Answering machine Answering machine Your telephone has an easy to operate answering machine with 3 Announcements, remote control and message forwarding. Setting options for the answering machine Announcement... 1 to 3. Select the announcement to welcome the caller. Edit announcements Announcement... 1 to 3. Select the announcement that you wish, e.g. to record. Answer only mode... off or on. Select on if the caller has no option to leave a message for the previous announcement. Record... This menu option appears if the selected announcement has not yet been recorded or has been deleted. Playback... You can play back your announcement here. Delete... You can delete the existing announcement, e.g. to record a new one. Messages... You can find all messages here. Message transfer Function... On or off. You can switch the message transfer on and off here. Repetitions... 1, 2 or no repeats. Enter here how often the dialling is to be repeated if nobody answers. Playback cycles... 1 to 8 times. You can set here how often to replay the forwarding message. Destination number... Enter the forwarding destination, e.g. mobile number (to be informed by SMS, enter S before the call number). 51
52 Answering machine Settings Recording duration... 1 to 5 minutes or open ended. Enables you to limit the time that is available to callers to leave a message. Ringing tones... 1 to 9. Enables you to set the number of ringing tones before calls are answered. Remote control... The remote access code is a 1 to 4 digit number between 0 and Quick check... If you want to access the remote control quickly without having to enter the access code you can, for example, enter your mobile phone call number here. If this call number is detected for a call the device starts remote control immediately. Announcements Your telephone has 3 individual announcements. The announcements can be switched in the menu or via the time control. A distinction is made between two operating types: announcements with and without the option to record an incoming message. For announcements that can record an incoming message the caller can leave a message after the announcement. For announcements that cannot record an incoming message (answer only mode) the caller is given information but can not leave a message. Press OK. The main menu is displayed. Search for Answering machine using the cursor keys (up/down). 52
53 Answering machine Press OK. The display changes and shows the answering machine menu. Use the cursor keys (left/right) to set the announcement that the caller should hear. The announcement switches between 1, 2 and 3. Search for Edit announcements with the cursor keys (up/down). Press OK. The announcement menu appears. Select the required option using the cursor keys (up/down). Set the required setting using the cursor keys (left/right). The entry location flashes. or Press OK to record the announcement. The display changes; a short signal sounds to start recording. Speak about 15cm away from the microphone. 53
54 Answering machine To end the recording or setting press OK. To stop the entry press Esc several times. The recording is ended; the display indicates additional options for playing back and deleting the announcement. The display returns to standby. If no individual announcement has been recorded the caller hears a standard text. ICMs Your telephone can save and manage up to 50 ICMs. If you have new, unheard ICMs, the "answering machine key" flashes. Press OK. The main menu is displayed. Search for Answering machine using the cursor keys (up/down). 54
55 Answering machine Press OK. The display changes and shows the answering machine menu. Search for ICM using the cursor keys (up/down). Press OK. The ICM list appears in the display. The highlighting is on the first, new ICM. Use the cursor keys (up/down) to select the required ICM that you wish to listen to or delete. Use the cursor keys (left/right) to display the date and time. Delete the selected ICM with Del. 2 Sec To delete all ICMs press Del. for 2 sec. Playback the selected ICM with OK. The date and time of the selected ICM are shown alternatively. The incoming recording is deleted. All incoming messages are deleted. The display changes and displays the playback. 55
56 Answering machine Select the required option using the cursor keys (up/down). In addition to the playback options there is also the option of calling the subscriber directly or transferring the number to the telephone book. Pause, to pause the playback. Continue, to continue after the pause. Start, to start the recording from the start after a pause. Repeat to repeat the playback for the last 3 seconds. Next and previous, to jump between the recordings. Press OK to confirm the options. To stop the playback press Esc several times. The display returns to standby. Use the plus/minus keys to modify the volume during playback. 56
57 Answering machine Message transfer For message transfer your telephone dials the saved call number after each new ICM on the answering machine. When the subscriber picks up he will hear the following announcement: "Automatic call,..x.. incoming messages, please collect remotely, I repeat " or if you have entered your own call number (my phone number) as identification "automatic call from subscriber (own call number),..x.. incoming messages, please collect remotely, I repeat". It is possible to start remote control for the recorded message(s) during the message. Proceed as described in "Carry out remote control" (*Code#). If the target number is busy or nobody was reached the call is repeated after 5 minutes. Depending on the setting the device makes one, two or no repetitions. You can also be informed by SMS about new messages. Then simply insert S before the destination number. Your device must of course be set up for SMS, see the SMS chapter. Open the message menu as described in "announcement" and "ICM". The display shows the answering machine menu. Search for Forwarding using the cursor keys (up/down). Press OK. The Forwarding menu appears. 57
58 Answering machine Select the required option using the cursor keys (up/down). Set the required setting using the cursor keys (left/right). The entry location flashes. or Use the dialling keys for the destination number. As an option you can still enter a name(please see page 17 "Entering text via the dialling keys"). The entry location flashes. Press OK to confirm the setting. To stop the entry press Esc several times. The entry location stops flashing. The display returns to standby. During ongoing message transfer the message transfer icon flashes. 58
59 Settings Answering machine Maximum ICM length, number of ringing tones before answering, remote control code and the call number for quick remote control can all be set, see Chapter Setting options for the answering machine (page 51). Open the message menu as described in "Announcement" and "ICM". The display shows the answering machine menu. Search for Settings using the cursor keys (up/down). Press OK. The settings for the answering machine are displayed. Select the required option using the cursor keys (up/down). 59
60 Answering machine Set the required setting using the cursor keys (left/right). The entry location flashes. or Use the dialling keys to enter the remote control code or quick check. You can also enter a name(please see page 17 "Entering text via the dialling keys"). The entry location flashes; the numbers and letters entered are displayed. Press OK to confirm the setting. To cancel the entry press Esc several times. The entry location stops flashing. The display returns to standby. Switching on the answering machine Incoming messages can be screened. You can change the volume with the plus/minus keys. You can take the call personally at any time by lifting the receiver or pressing the speaker key. 60
61 Answering machine Press answering machine. Press answering machine again to switch off. The key lights up. The answering machine icon is displayed. The number to the right of the icon indicates the announcement selected. The icon for the answering machine disappears. Make sure there is sufficient memory available for the recording. If necessary delete individual or all incoming messages. If there is no more memory capacity no other calls will be answered. Monitoring/Personal Info (Memo) During the call you can record the content via the monitoring function. In standby you can record personal information via the integrated microphone using the memo function. Search for Record or Memo with the cursor keys (up/down). During a call Monitoring is available; in standby Memo is available. Press OK. To stop the recording press Esc. Monitoring starts to flash and signals ongoing recording. The display changes for Personal Info (Memo). The display stops flashing and the recording ends. Monitoring and Memos are saved in the same way as a normal ICM and can be listened to at any time as described in ICM (Page 54). 61
62 Answering machine Answering machine remote control You can access your telephone remotely from anywhere in the world using the keypad on a Dual-tone Multiple Frequency (DTMF) touchtone telephone. You need a personal access code to access the phone remotely. You can set your personal remote access code as described in "Settings" (Page 44). Call telephone. You hear the current greeting. Start entry with the asterisk. The announcement stops. Enter the remote access code via the telephone keypad. If you make a mistake delete the entry using the asterisk key and start again. To confirm the entry press the hash button. Start the required function by entering the corresponding number. A voice message confirms recognition of each digit. If the correct code is detected your telephone notifies you via a voice message. If the code is incorrect, the device terminates the connection. If there are new messages they are played back automatically. Press digit 8 to end a function. The current function ends. End remote access by pressing asterisk and hash in succession. 180 seconds after the last button entry your telephone asks whether you are still on the line with the "Please quit" voice message. You must respond to this quit request within 8 seconds by pressing any key otherwise the device breaks the connection. Remote control for announcements function To playback all messages Press 3. To playback new messages Press 2. The playback starts with the first recording. Starts playing recordings that have not yet been heard. 62
63 Answering machine Repeat Press 5 during playback. To pause playback Press 8. To continue playback Press 5. Skip Press 4 for back or 6 for forwards during playback. To delete the current message Press 7 during playback. To delete all messages Press * and 7 in succession. The last three seconds are repeated. Playback is paused. Playback is continued from where it was paused (e.g. after a quit request). The message you are listening to is skipped or repeated. The current incoming message is deleted. All incoming messages are deleted. Room monitoring function Room monitoring/intercom Press 1. The speakerphone switches on and you can hear what is going on in the vicinity of your telephone. People present can hear your voice from the loudspeaker. Remote switching processes function... To switch message transfer on/off Press * and 4 in succession. To switch timer on/off Press * and 3 in succession. Changing the outgoing message Press 7 and then the required outgoing message 1... Press 3. The current status "on" or "off" is announced. The current status "on" or "off" is announced. The selected outgoing message is played back for checking. The next caller is greeted with this message. 63
64 Changing announcements remotely Answering machine... Changing the outgoing message Press 9 and then the required outgoing message 1... Press 3. After recording the outgoing message press 8. The telephone asks you to speak. The recording ends and the announcement is played back so that you can check it. The message is played back again for checking after you change or modify it. Your telephone will then ask you whether you are still on the line with the "Please quit" voice message. You must respond to this quit request within 8 seconds by pressing any key otherwise the device breaks the connection. Remote activation of call forwarding Activating call forwarding Press * and 1 in succession The current call number is stated, see also Call forwarding. Press number 8 to cancel the function. The function is cancelled without being executed. Press * and # in succession to execute the function. After ending the remote control you telephone switches call forwarding on. All new calls are forwarded to the new call number. Switching off the answering machine remotely Switching answering machine off Press * and 0 in succession. Your telephone disconnects and will not answer any more calls. Switching on answering machine remotely Call telephone. Enter the remote access code via the telephone keypad. Start entry with * and confirm with #. After 50 seconds the device answers with a beep. The greeting is played for checking. The device can be operated remotely (e.g. to record a greeting). After quitting the function your telephone will receive calls. 64
65 Dialling with your PC Dialling with your PC Your telephone supports CTI (Computer Telephony Integration). In addition to the USB driver needed for the tiptel application software you will also have to install the CTI driver. Driver and Installation Manual please find on the CD that came along with your telephone (release V1.12 or later) or on our homepage in the download section. Dialling from the application From within your PC application (e.g. Outlook) you can set up a connection and then process the call via your telephone. In dialling options select the device "Tiptel". The place where to find those dialling options may not be the same with different applications. If needed please use the online help of your PC application software. Please make sure that the USB cable has been connected properly. Following functions are supported by your telephone: Connect / Dialling allowed digits 0...9, * and #! inserts a signal key (R), inserts a dialling pause. Disconnect. Take call. Call signalling and caller ID (CLIP). Transfer of caller's name if it I known from the telephone book or if it is being transferred by the provider. Busy line notification. Please make sure that there is always only one PC program enabled for access to the telephone. You may need to close other telephony applications first. 65
66 Dialling with your PC Dialling by using AT commands In case you wish to write your own PC application please note the following: Transfer parameters: Baud, 8 Bit, no parity, 1 stop bit, no flow control. Following commands are supported: ATD Connect e.g. ATD12345 (Number is being dialled) ATH Disconnect ATA Take call Commands that have been received correctly will by acknowledged by the telephone with OK AT-commands must be sent in capital letters and without spaces. Following messages can be sent by the telephone: RING Call signalling NMBR = Caller's number NAME = Test Caller's name (if known) VCON Will be sent at the end of dialling <DLE>b Line busy All messages except "line busy" have the following format: <CR><LF><Message><CR><LF> Please note that the strings <DLE> (Ctrl P), <CR> (Ctrl M) and <LF> (Ctrl J) are control digits. 66
67 Appendix Appendix Service You have purchased a modern product from Tiptel.com GmbH Business Solutions, which was developed and manufactured in Ratingen near Duesseldorf. Our very modern production facilities ensure a consistently high level of quality. This is demonstrated by our DIN EN ISO 9001 certification. In the unlikely event that any problems should occur or you if have any questions concerning the operation of the system, please contact your specialist dealer. He/she is your contact within the warranty period. Tiptel.com GmbH has set up a special number for technical support for specialist dealers so that you can obtain qualified advice from them. If your dealer ins not able to assist you, you can also contact Tiptel.com GmbH direct. Initial information is available from our Internet site mentioned below in the Support heading under FAQ Frequently asked questions. You can also reach our experienced technical support staff by , fax or telephone during the times given: In Germany In Austria In Switzerland [email protected] a.m. to 5.00 p.m. (Mon-Fri) a.m. to 5.00 p.m. (Mon-Thu), a.m. to 2.00 p.m. (Fri) a.m. to 5.00 p.m. (Mon-Fri) Tel * Vanity TIPTEL* * with costs as per announcement Telephone 01 / Fax 01 / Telephone 01 / Fax 044 / If you have any questions about your telephone line, please contact your network provider. 67
68 Warranty Appendix Your contact for services arising from warranty obligations is the specialist dealer where you bought the device. Tiptel.com GmbH will grant a warranty for 2 years from the date of handover for the material and manufacture of the telecommunications terminal device. Initially, the purchaser shall have only the right of subsequent performance. Subsequent performance entails either repair or the supply of an alternative product. Exchanged devices or parts shall become the property of the specialist dealer. If subsequent performance is unsuccessful the purchaser can request either a reduction in the purchase price or withdrawal from the contract. The purchaser must notify the dealer of any defects found without undue delay. Proof of the warranty entitlement shall be furnished by standard proof of purchase (receipt or invoice). The warranty entitlement shall expire if the purchaser or an unauthorized third party interferes with the device. Damage caused by inappropriate handling, operation, storage, force majeure or other external influences shall not be covered by the warranty. The warranty shall not cover any consumables (e.g. batteries) or defects that only slightly impair the ability to use the product to a limited extent. Claims for damage caused by transport shall be asserted to the shipping company. Notes on processing: Repairs are completed only by the Tiptel.com GmbH Service Department. With our 48-hour repair service you will usually receive a repaired device or a replacement after 2 working days plus the usual delivery period. If the device is repaired during the warranty period, the warranty shall not be extended for the replaced parts or for the device. This warranty is not transferable and shall expire if the device is sold to another party. It shall also expire if anyone other than Tiptel Service staff interferes with the equipment or if the serial number on the equipment is removed or rendered illegible. The device is marked with a warranty seal. Please ensure that this is not damaged because would cause your warranty to lapse. The General Terms and Conditions of Tiptel.com GmbH, which are part of the contract with a dealer, shall also apply. In the event of a complaint, the defective 68
69 Appendix product should be sent to the address below together with a description of the defect and proof of purchase. In Germany In Austria In Switzerland Tiptel.com GmbH Tiptel GmbH Tiptel AG Business Solutions Service Service Service Halskestraße 1 Tenschertstraße 5 Bahnstrasse Ratingen 1230 Vienna 8105 Regensdorf If you are making a warranty claim, Tiptel.com GmbH shall pay for the return shipping. CE mark This device is authorised for connection to the analogue public telephone network in all EU member states in line with European requirements. As a result of technical differences in various countries however there is no unlimited warranty that the device will work successfully with all telephone connection. Tiptel.com GmbH hereby declares that the device complies with all of the fundamental requirements of the European Directive 1999/5/EC. Conformity is confirmed by the CE symbol affixed to the equipment. Further details concerning the conformity declaration are available at the following Internet address: Environmental compatibility Provided the phone is used for its intended purpose, no contact with harmful substances is possible. The device contains no batteries. The synthetic materials used in this device consist of partially recycled granulate. Our packaging does not contain any synthetic materials. Only cardboard and paper from partially recycled material is used. If your telephone has ended its useful life Tiptel.com GmbH will take back the device free of charge. The device will be dismantled properly and recycled. 69
70 Troubleshooting Appendix Power failure Emergency operation is possible during power failure. You can dial using the dialling keys and make a call using the handset. Incoming calls are signalled by a standard ringing tone with a fixed volume. The internal clock stops. But all settings are retained so that the previous status is reset when power returns. You may need to reset the time. Using the following table try to define the cause of a problem and resolve the error. Problem Possible cause Remedy/Recommendation No display. No contact with mains power supply. Display too weak or dark. Contrast set incorrectly. Set contrast. Check all cables and plugs. If necessary try another plug. No sound. Volume set to zero. Adjust volume. No dialling tone No contact with connection cable. Check all cables and plugs. No call signalling in PABX. No call signal switched on. Check PABX programming. Buzzing or other interference in the speaker or receiver. Incorrect or no connection when dialling from PABX. Call charges not displayed No automatic call-back on busy Interference from cordless telephone, cordless headset, monitor etc. The prefix for the public network has not been entered. Network operator or PABX does not support the function or function is not authorised. You received the call, the call is free. Call back code not entered, network operator or PABX does not support the function or function is not authorised. Change installation location. Enter prefix. Check with network operator or PABX as to whether function is supported or needs to be authorised. Enter call back code. Check with network operator or PABX as to whether function is supported or needs to be authorised. 70
71 Appendix Problem Possible cause Remedy/Recommendation No automatic call-back on busy Can not set up call forwarding No call number displayed when a call is received During SMS transfer you see the error message "Transmission error, please try again later" SMS transmission works fine, but reception does not work. Call back code not entered, network operator or PABX does not support the function or function is not authorised. Call forwarding settings are missing or incorrect. Network operator or PABX does not support the function or function is not authorised. Network operator or PABX does not support the function or function is not authorised. The caller has suppressed his call number or has a secret number. The call comes from a public telephone. The call is made via a telephone network that does not support transferring call numbers. Wrong message centre phone number. With some providers it is necessary to add an additional 0 (zero) at the end of the phone number. Maybe there are two terminal units configured for SMS at the same telephone line. Enter call back code. Check with network operator or PABX as to whether function is supported or needs to be authorised. Make, check and if nec. change settings. Check with network operator or PABX as to whether function is supported or needs to be authorised. Check with network operator or PABX as to whether function is supported or needs to be authorised. Verify once again the message centre's phone number and eventually add one additional 0 (zero) at the end. Make sure that only one of the terminal units is configured for SMS. Delete the SMS center's phone number to deactivate the SMS function. 71
72 Factory default settings Appendix The default settings for the telephone are shown in the following list. You can individually change these defaults. It is possible to reset the device to its original settings at any time by opening the Information & Service menu. Language English Contrast 8 Brightness 16 Backlight Auto. My phone number - PIN 0000 Key lock Off Number lock Off Telephone book lock Off Blocked numbers - Exception numbers - DST Yes Network time No Ringing melody 1 Volume 4 Ascending volume Off Cost per unit 0,000 Currency Call-back code - Flash key (R) F (Flash) Prefix for outgoing call - Automatic prefix for public access No Internal call back code (PABX) - CLIP correction (PABX) - Function buttons - Call filter - Call forwarding - Answering machine Off Announcement 1 Answer only mode Off Announcements - Message transfer Off Repetitions 2 Playback cycles 5 Destination number - Recording duration 2 minutes 72
73 Appendix Ringing tones 2 Remote access code - Quick check - Time control - Dates - Short messages (SMS) - Call lists - 73
74 Appendix Technical Specifications Dimensions (W x H x D) tiptel 274 Power adapter 230 x 100 x 210 mm 53 x 68 x 44 mm Weight tiptel 274 Power adapter Operating voltage Power adapter Stand by power consumption Ambient temperature Number of outgoing messages g 270 g 230 V / 50 Hz < 2 W 0 40 C Announcements Recording method Digital; 64 kbit/s Total recording capacity approx. 25 min. (incl. announcements and ringing tones) Number of ICMs Max. 50 Telephone/memory Call lists Telephone book Call numbers (names) SMS inbox Long Message (SMS) Signal key (R) Flash Hook flash 3 lists of 20 entries each 250 entries with 3 call numbers each 25 characters 20 short messages 459 characters 95ms 240ms Ringing tones Fixed ringing tone melodies 10 Spaces for own recordings 10 Audio format (WAV) for PC transfer PCM; 8 khz; 8 Bit; Mono CLIP (caller display) Tariff pulse (charging information) Data retained after power failure Time Display Dual mode DTMF / FSK 12 / 16 khz; 50 mv 3 V > 10 years Network synchronous Graphics LCD 64 x 128 pixels, backlit 74
75 Index Index A Answering machine Area code Automatic redialling B Backlight Basic settings Blocking numbers Brightness C Call back on busy Call charges... 18, 42 Call counter Call filter Call forwarding... 48, 64 Call lists Call-back code Caller's name Calls received Calls while absent CD-ROM CE mark Change PIN Charging information CLIP correction Connecting Contrast Controls... 6 Currency symbol D Date notification Dates Daylight saving time Delete telephone book Dial tone/dial pause Dialled numbers Dialling by using AT-commands Dialling from the telephone book Dialling with your PC Direct dial Display icons... 9 E Enter dates Entering text Environmental compatibility F Factory default settings Firmware version Flash Function keys H Handset Handset volume Headset... 12, 15, 47 Hookflash I ICM Inbox... 24, 25 Indirect dialling Individual ringing tone Information & Service Installation Installing... 3 Internal Internal call back code K Key assignment... 4 Key lock... 16, 44 L Length of ICM Long Messages M Mains plug Making calls Message center... 25, 31 Message forwarding Message transfer Monitoring... 13, 61 Music on hold Mute button My phone number
76 Index N Network time Number lock Number of ringing tones O OGM only mode OGMs Outbox... 24, 27 Outside line P PABX Packaging Personal Info (Memo) Playback OGM Power adapter... 3 Power failure Product package Programming example for timer Programming the time control Q Quick access Quit request R Record OGM Record tone Redial Remote access code... 52, 62 Remote control Remote deletion Ringing tone melody Ringing tone volume... 45, 50 Ringing tone/melody Room monitoring S Safety instructions... 3 Service Set language Setting volume Settings Settings menu Settings/My phone number Short messages Signal key (R) Skip SMS SMS-icon Speakerphone Spiral cable Standard time Starting up Switch off code (AWL) Switch on code (AWL) Switching on the answ. machine Switching on time control Switching time T Tariff pulse Tariff pulses Tariff units... 42, 46 Technical specifications Telephone book Telephone book lock Telephone connection cable Templates (SMS)... 24, 29 Time control Time control list Transfer by SMS Troubleshooting U USB cable W Warranty
77
78
79
80 Tiptel.com GmbH Business Solutions Halskestraße 1 D Ratingen Phone.: * Vanity Tel.: TIPTEL* Contact / Internet: * (with costs as per announcement) Tiptel GmbH Ricoweg 30/B1 A Wiener Neudorf Tel.: Fax: [email protected] Internet: Tiptel AG Bahnstrasse 46 CH Regensdorf Tel.: Fax: [email protected] Internet: Tiptel B.V. Camerastraat 2 NL 1322 BC Almere Telefoon: 0900 BELTIPTEL of (niet gratis) Fax: [email protected] Internet: Tiptel NV Leuvensesteenweg 510 bus 4 B 1930 Zaventem Telefoon: (1,12 Euro / min.) Fax: [email protected] Internet: Tiptel sarl 23, avenue René Duguay-Trouin F Voisins-Le-Bretonneux Tél. : 01 / Fax : 01 / [email protected] (UK) 09/2008 Internet : EDV
Professional answering machine with time control, SMS service and message transfer. Retell 540 office
 Manual (UK) Professional answering machine with time control, SMS service and message transfer Retell 540 office Safety instructions Safety instructions When installing, connecting and operating the Retell
BT Paragon 550. User Guide
 BT Paragon 550 User Guide Section Welcome to your BT Paragon 550 corded digital telephone and answering machine Directory lets you store up to 100 names and numbers for easy dialling. Send and receive
How To Use A Telephone In European Europe
 ISDN-Telephone Integral TS 13 connected to Integral 33 systems Operating Instructions We give you the edge. Familiarise yourself with your telephone Important notes What you should definitely read -- Your
Motorola C12A. Digital Cordless Telephone with Digital Answering Machine. For C1211A, C1212A, C1213A and C1214A
 Digital Cordless Telephone with Digital Answering Machine Motorola C12A For C1211A, C1212A, C1213A and C1214A Warning: Charge the handset for 24 hours before use. Welcome... to your new Motorola C12A Digital
Dialog 4220 Lite/Dialog 4222 Office
 Dialog 4220 Lite/Dialog 4222 Office System telephones for MD110 Communication System User Guide Flinders University Table of Contents Description 2 Incoming Calls... 10 Outgoing Calls... 12 During Calls
User s Guide EKT-824
 User s Guide EKT-824 The Communiqué Telephone Station Table of Contents Introduction 3 About This Guide 3 The Basics Answering and Making Calls 4 Answering an External Call 4 Answering an Internal Call
Home Phone with Answering Machine Sonus 1500. Quick set-up and user guide
 Home Phone with Answering Machine Sonus 1500 Quick set-up and user guide 2 Important please read first Only use the line cord, power supply and rechargeable batteries supplied with your phone. Make sure
UK s best selling phone brand. User Guide. BT3710 Digital Cordless Phone With Answering Machine
 UK s best selling phone brand User Guide BT3710 Digital Cordless Phone With Answering Machine 2 This User Guide provides you with all the information you need to get the most from your phone You must set
2.4 GHz Dual Handset Cordless Telephone Answering System 2255 with Caller ID/Call Waiting
 USER S MANUAL Part 2 2.4 GHz Dual Handset Cordless Telephone Answering System 2255 with Caller ID/Call Waiting Please also read Part 1 Important Product Information AT&T and the globe symbol are registered
User's Manual (UK) ISDN Telephone System
 ISDN Telephone System") User's Manual (UK) ISDN Telephone System tiptel.com 410 tiptel.com 810 tiptel.com 411 tiptel.com 811 tiptel.com 822 XT/Rack tiptel.compact 42/82 IP 8 tiptel.compact 84 Up4/Rack tiptel Table of Contents
User's Manual (UK) ISDN Telephone System tiptel.com 410 tiptel.com 810 tiptel.com 411 tiptel.com 811 tiptel.com 822 XT/Rack tiptel.compact 42/82 IP 8 tiptel.compact 84 Up4/Rack tiptel Table of Contents
User s manual. w w w. v t e c h p h o n e s. c o m. Models: mi6885/mi6889/mi6890
 User s manual w w w. v t e c h p h o n e s. c o m Models: mi6885/mi6889/mi6890 Table of contents Getting started...................... 5 Parts checklist for mi6885............... 5 Parts checklist for
BT Freestyle 750. User Guide
 BT Freestyle 750 User Guide Welcome to your BT Freestyle 750 Digital Cordless Telephone Answering Machine Answering machine with up to 15 minutes digital recording time and helpful voice prompts. 50 Name
BT Synergy 5500 User Guide
 BT Synergy 5500 User Guide Welcome to your BT Synergy 5500 Digital Cordless Telephone Answering Machine Display with blue backlight. 250 Name and number phonebook. Copy phonebook entries between other
User Guide. BT Graphite 2500. Think before you print!
 BT Graphite 2500 User Guide This new interactive user guide lets you navigate easily through the pages and allows you to be directed straight to any websites or email addresses that are referenced Simply
Home Phone with Answering Machine Aura 1500. Quick set-up and user guide
 Home Phone with Answering Machine Aura 1500 Quick set-up and user guide 2 Important please read first Only use the line cord, power supply and rechargeable batteries supplied with your phone. Make sure
Cisco IP Phone Models 7941 and 7945 Quick Reference Guide December 23, 2011
 Emergency Calls Dial 911 or 3 911 Cisco IP Phone Models 7941 and 7945 Quick Reference Guide December 23, 2011 Place a Call Lift handset (or press the Speaker button, the line button, or New Call soft key)
IP Phone System: Cisco 7960G and 7940G
 IP Phone System: Cisco 7960G and 7940G Table of Contents: IP Phone System 7940G and 7960G CISCO IP PHONE ROAD MAP...1 NAVIGATE THE PHONE SYSTEM AND USE THE LCD SCREEN...2 SOFT KEYS... 2 USE THE NAVIGATION
Instruction Manual. CORTELCO 2700 Single-Line / Multi-Feature Set
 1 Instruction Manual CORTELCO 2700 Single-Line / Multi-Feature Set Table of Contents Why VoiceManager SM with Cortelco Phones?... 2 Cortelco 2700 Set Features... 3 Telephone Set Part Identification...
UK s best selling phone brand. Quick Set-up and User Guide. BT3510 Digital Cordless Phone with Answering Machine
 UK s best selling phone brand Quick Set-up and User Guide BT3510 Digital Cordless Phone with Answering Machine 2 Important please read first Only use the line cord, power supply and rechargeable batteries
Operating Instructions. Telephone System tiptel 1/8 fax clip tiptel 2/8 clip. (Release 2) tiptel
 tiptel") Operating Instructions (UK) Telephone System tiptel 1/8 fax clip tiptel 2/8 clip (Release 2) tiptel Table of Contents Connection of 8 extensions..........3 Connection of 7 extensions and 1 door intercom................4
Operating Instructions (UK) Telephone System tiptel 1/8 fax clip tiptel 2/8 clip (Release 2) tiptel Table of Contents Connection of 8 extensions..........3 Connection of 7 extensions and 1 door intercom................4
UK s best selling phone brand. User Guide. BT Decor 2500 Corded Phone
 UK s best selling phone brand User Guide BT Decor 2500 Corded Phone 2 This User Guide provides you with all the information you need to get the most from your phone. Before you make your first call you
General notes: To avoid problems, always use:
 Questions and answers If you have any questions about the use of your phone, you can contact us at www.gigaset.com/service at any time. For more information about combining different Gigaset devices, visit:
Model No. KX-TGP500. Model No. KX-TGP550
 Panasonic Telephone Systems KX-TGP500/KX-TGP550 KX-TGP500, KXTGP500, TGP500, KX-TGP550, KXTGP550, TGP550 www.voicesonic.com Phone 877-289-2829 User Guide SIP Cordless Phone Model No. KX-TGP500 Model No.
Model No. KX-TGP500. Model No. KX-TGP550
 User Guide SIP Cordless Phone Model No. KX-TGP500 Model No. KX-TGP550 Model shown is KX-TGP500. Model shown is KX-TGP550. Thank you for purchasing a Panasonic product. You can configure some of the features
Printed in China. Issue 4 AT&T 12/11. Message Guard is a registered trademark of Advanced American Telephones.
 www.telephones.att.com 2011 Advanced American Telephones. All Rights Reserved. AT&T and the AT&T logo are trademarks of AT&T Intellectual Property licensed to Advanced American Telephones, San Antonio,
How To Use A Ppanasonic Cell Phone With A Cell Phone From A Cellphone From Alexa (Panasonic) For A Long Distance Phone From An Older Model (Panoramos) For An Extra Money (Panamontani
 For A Long Distance Phone From An Older Model (Panoramos) For An Extra Money (Panamontani") INTERCOM PLEASE READ BEFORE USE AND SAVE. Integrated Telephone System Operating Instructions Model No. KX-TS8B KX-TS8W Pulse-or-tone dialing capability KX-TS8W LINE Caller ID Compatible Panasonic World
INTERCOM PLEASE READ BEFORE USE AND SAVE. Integrated Telephone System Operating Instructions Model No. KX-TS8B KX-TS8W Pulse-or-tone dialing capability KX-TS8W LINE Caller ID Compatible Panasonic World
Ascotel IntelliGate Communications Systems A150 A300 2025 2045 2065. Office 60IP User s Guide
 Ascotel IntelliGate Communications Systems A150 A300 2025 2045 2065 Office 60IP User s Guide Operating and Display Elements Operating and Display Elements 1 4 5 6 7 2 8 9 10 16 11 12 13 17 14 15 3 Operating
Eurit 435. Cordless ISDN telephone DECT. User Manual
 Eurit 435 Cordless ISDN telephone DECT User Manual Important: This user manual contains safety precautions! Please read carefully before putting the telephone into operation, and store in a safe place.
BT Paragon 650. User Guide
 BT Paragon 650 User Guide Section Welcome to your BT Paragon 650 corded digital telephone and answering machine Directory lets you store up to 200 names and numbers for easy dialling. Copy the whole directory
UK s best selling phone brand. User Guide. BT Decor 2200 Corded Phone
 UK s best selling phone brand User Guide BT Decor 2200 Corded Phone 2 This User Guide provides you with all the information you need to get the most from your phone. Before you make your first call you
Operating Instructions
 2.4GHz Expandable Cordless Phone System Operating Instructions Model No. KX-TG2770S Pulse-or-tone dialing capability Preparation Telephone System PLEASE READ BEFORE USE AND SAVE. Caller ID Compatible Charge
DIVERTING CALLS: EXTENSION DIVERT... 36 Diverting all calls from your extension... 36 Diverting your calls while you are at another extension (Follow
 Contents WELCOME...1 USING THIS DOCUMENT...1 BT CONTACT DETAILS...1 ABOUT YOUR BT QUANTUM TELEPHONES...2 BT QUANTUM SYSTEMPHONES...2 BT 8568 Digital Systemphone...2 BT 8528 Digital Systemphone...5 BT 5360
Polycom SoundPoint IP 650
 Polycom SoundPoint IP 650 User Guide For training/documentation, please visit us @ http://customertraining.verizonbusiness.com or call 1 800 662 1049 2009 Verizon. All Rights Reserved. The Verizon and
Polycom SoundPoint IP 550
 Polycom SoundPoint IP 550 User Guide For training/documentation, please visit us @ http://customertraining.verizonbusiness.com or call 1 800 662 1049 2009 Verizon. All Rights Reserved. The Verizon and
Business Communications Manager Telephone Feature Card
 Business Communications Manager Telephone Feature Card 2002 Nortel Networks P0993297 Issue 01 Buttons The Business Series Terminal (T-series) Feature button is a small globe icon. The M-series Feature
Operating Instructions
 5.8 GHz Digital Cordless Phone Operating Instructions Model No. KX-TG5050 Pulse-or-tone dialing capability The unit is Caller ID compatible. To display the Caller s name and phone number, you must subscribe
VoIP Handset User Manual. Digital Voice Quality Business Grade Handset Easy Plug & Play
 Digital Voice Quality Business Grade Handset Easy Plug & Play Table of Contents 1.0 Getting Started... 1 1.1 Unpacking the box... 1 1.2 Assembling the Phone... 2 2.0 Phone Button Features... 3 3.0 Phone
BT Granite User Guide
 BT Granite User Guide Think before you print! This new interactive user guide lets you navigate easily through the pages and allows you to be directed straight to any websites or email addresses that are
User Guide. BT Concero 1500. Think before you print!
 BT Concero 1500 User Guide This new interactive user guide lets you navigate easily through the pages and allows you to be directed straight to any websites or email addresses that are referenced. Simply
Printed in China. Issue 1.2 AT&T 03/07. Advanced American Telephones. AT&T and the AT&T logo are trademarks of AT&T Knowledge Ventures, licensed to
 2007 Advanced American Telephones. All rights reserved. AT&T and the AT&T logo are trademarks of AT&T Knowledge Ventures, licensed to Advanced American Telephones. Printed in China. Issue 1.2 AT&T 03/07
Edition 4 26 March 97. Response 130 telephone and answering machine. User guide
 Edition 4 26 March 97 Response 130 telephone and answering machine User guide At a glance Directory label For making a note of numbers stored in the memories. One-touch dial memory buttons Allows you to
Designed to block nuisance calls. Quick Set-up and User Guide. BT6500 Digital Cordless Phone with Answering Machine
 Designed to block nuisance calls Quick Set-up and User Guide BT6500 Digital Cordless Phone with Answering Machine 2 Important please read first Only use the line cord, power supply and rechargeable batteries
User Guide. BT Diverse 7150 Plus. Think before you print!
 BT Diverse 7150 Plus User Guide This new interactive user guide lets you navigate easily through the pages and allows you to be directed straight to any websites or email addresses that are referenced.
ISDN 970 Telephone USER MANUAL. Copyright 1999 Lucent Technologies Inc. All rights reserved. Printed in Mexico. Issue L3 847937794
 ISDN 970 Telephone USER MANUAL Copyright 1999 Lucent Technologies Inc. All rights reserved. Printed in Mexico. Issue L3 847937794 Table of Contents ABOUT ISDN... 3 ISDN TERMS... 3 A GUIDE TO THIS MANUAL...
Operating Manual IP222 IP232
 Operating Manual IP222 IP232 Release 9.00, hotfix 17, 1. edition November 2012 Brand names are used with no guarantee that they may be freely employed. Almost all hardware and software designations in
Euroset 5005. Connections
 Euroset 5005 Connections 1 Repertory keys 2 Recall key 3 Redial key 4 Handset volume control key 5 Pause key 6 Speed dial key 7 Set key 8 Mute key 1 Touches d accès rapide 2 Touche de double appel 3 Touche
User Guide for the Orchid Key Phones KP416 & KP832
 User Guide for the Orchid Key Phones KP416 & KP832 Contents Page Introduction 2 Setting Up 2 Setting Date & Time 2 Making & Answering Calls 2 Call Pick 3 Call Transfer 3 Calls On Hold 3 Caller Display
Speakerphone/ Answering System 1855
 ATT-1855CIB-d04.qxd 3/19/05 5:08 PM Page 1 User Manual (Part 2) Speakerphone/ Answering System 1855 with Caller ID & Call Waiting CALLER ID ATT-1855CIB-d04.qxd 3/19/05 5:08 PM Page 2 User Manual (Part
TABLE: The 2420 Telephone Components
 2420 Telephone TABLE: The 2420 Telephone Components 1. Display, Call Appearance and Feature buttons: Call Appearance Keys allow the user to handle multiple calls and the display shows call information.
SIP-T22P User s Guide
 SIP-T22P User s Guide Thank you for choosing this T-22 Enterprise IP Phone. This phone is especially designed for active users in the office environment. It features fashionable and sleek design, and abundant
TELEPHONE BUTTONS & ICONS TOUCHSCREEN OVERVIEW
 This Telephone Guide describes the various features available to you. Telephone Buttons and Icons describe the physical buttons and keys on the phone, the Touchscreen Overview outlines basic functions,
2 line (1 symbol, 1 display) / 16 character display
 / 16 character display") Aastra Office 60 & 60IP Overview of the phone 2 line (1 symbol, 1 display) / 16 character display Message and Phone Status LEDs Absence Redial Phone Book Loudspeaker Microphone key Volume (+ / -) Call
Aastra Office 60 & 60IP Overview of the phone 2 line (1 symbol, 1 display) / 16 character display Message and Phone Status LEDs Absence Redial Phone Book Loudspeaker Microphone key Volume (+ / -) Call
How To Use A 9608 Phone On A Cell Phone On Sim Sims 2 (Satellite) On A Sims 3 (Cell Phone) On An Iphone Or Ipad Or Ipa 2 (Cellphone) On Sims 4
 On A Sims 3 (Cell Phone) On An Iphone Or Ipad Or Ipa 2 (Cellphone) On Sims 4") AVAYA 9608 SIP DESKPHONE INSTRUCTIONS MESSAGE WAITING INDICATOR YOUR PHONE 9608 PHONE INSTRUCTIONS If there are messages in your Avaya Voice Mailbox, the light on the top right corner of your telephone
AVAYA 9608 SIP DESKPHONE INSTRUCTIONS MESSAGE WAITING INDICATOR YOUR PHONE 9608 PHONE INSTRUCTIONS If there are messages in your Avaya Voice Mailbox, the light on the top right corner of your telephone
NEC SL1100 Telephone System. Quick Reference Guide. For: Certified Customers Only! Notes: IP4WW-12/24 Series Desktop Digital Terminals with Voicemail
 Notes: For Questions or Service Contact: Certified Alarm Co. of Alabama Inc. 2904 Jackson Hwy Sheffield Al. 35660 (256) 383-1225 www.certified-alarm.com www.necsl1100.com NEC SL1100 Telephone System IP4WW-12/24
IP Office 9608 Telephone Quick Reference Guide
 9608 Telephone Quick Reference Guide Your 9608 Telephone The supports the 9608 telephone. The phone supports 24 programmable call appearance/feature buttons. The labels for these are displayed in the main
Aastra 673xi / 675xi. Telephony with SIP Phones at the Aastra 800/OpenCom 100 Communications System User Guide
 Aastra 673xi / 675xi Telephony with SIP Phones at the Aastra 800/OpenCom 100 Communications System User Guide Welcome to Aastra Thank you for choosing this Aastra product. Our product meets the strictest
8200/8200a. Cordless telephone User Guide
 8200/8200a Cordless telephone User Guide This telephone has been designed for ease of use. Please read the instructions and keep it handy for future reference. If you have any problems with your phone,
Four-Line Intercom Speakerphone 944
 1 USER S MANUAL Part 2 Four-Line Intercom Speakerphone 944 Please also read Part 1 Important Product Information AT&T and the globe symbol are registered trademarks of AT&T Corp. licensed to Advanced American
Ipiphony Phone System. User Manual. 1 P a g e
 Ipiphony Phone System User Manual 1 P a g e About this Guide This guide explains how to use the basic features of your new Aastra phones. Not all features listed are available by default. Contact your
Before you start. How to use this Guide Use this Key to identify what a button or status display looks like in an instruction sequence.
 BeoCom 6000 Guide Before you start 3 This Guide contains instructions in how to use the BeoCom 6000 handset with either a BeoLine ISDN, a BeoLine PSTN or a BeoCom 6000 base. ISDN or PSTN? ISDN and PSTN
How to Use Your IP Office 5410/5420 Telephone
 Performance figures and data quoted in this document are typical, and must be specifically confirmed in writing by Avaya before they become applicable to any particular order or contract. The company reserves
Digital Phone 4029 Operation Guide
 Digital Phone 4029 Operation Guide 1 Content Page No. 1. Getting to know your telephone (Model : 4029) ------------------------ 4 5 2. Using Your Phone - Basic Call Feature - 2.1 - Making a Call (Internal
 DO NOT RETURN THIS PRODUCT TO THE STORE! Please read the following important information For Siemens Customer Care, product operation information, or for problem resolution, call toll-free 1-888-777-0211
Nortel IP Phone 1140E User Guide
 Nortel IP Phone 1140E User Guide NN10300-023 Document status: Standard Document version: 0103 Document date: 13 April 2007 All Rights Reserved The information in this document is sourced in Canada, the
Gigaset DX800A all in one New and updated functions
 Gigaset DX800A all in one / en / A31008-xxxx-xxxx-x-xxxx / DX800A-aio-III-ReleaseNotesIVZ.fm / 08.11.2011 Gigaset DX800A all in one New and updated functions Gigaset DX800A all in one New and updated functions
Polycom SoundPoint 650 Quick Guide
 Polycom SoundPoint 650 Quick Guide ISC Networking & Telecommunications University of Pennsylvania October 2009, v.2 Contents Icons and Indicator Lights Telephone Icons 4 Envelope/Message Waiting Icon.4
User s Manual. w w w. v t e c h p h o n e s. c o m. Model: ia5874, ia5876, ia5877
 User s Manual w w w. v t e c h p h o n e s. c o m Model: ia5874, ia5876, ia5877 Table of Contents GETTING STARTED................... 4 Before You Begin..................... 4 Parts Check List:...................
User s manual. Corded telephone. w w w.v t e c h c a n a d a. c o m. Big Button Big Display. Model:CD1281 DIR CID
 User s manual w w w.v t e c h c a n a d a. c o m DIR CID Model:CD1281 Corded telephone Big Button Big Display Congratulations on purchasing your new VTech product. Before using this telephone, please read
Nortel VoIP Phone User Guide An overview of features
 Nortel VoIP Phone User Guide An overview of features IP Phone 1120E Click phone for enlarged and labeled picture. IP Phone 1140E Click phone for enlarged and labeled picture. Basic Phone Functions Adjusting
Four-Line Intercom Speakerphone 964
 1 USER S MANUAL Part 2 Four-Line Intercom Speakerphone 964 2000 Advanced American Telephones. All rights reserved. Printed in Indonesia. 850002940 Issue 1AT&T 6/00 Please also read Part 1 Important Product
Alcatel OmniPCX Office Alcatel 4028/4029
 Alcatel OmniPCX Office Alcatel 408/409 First User manual How Introduction How to use this guide Thank you for choosing a 408/409 telephone manufactured by Alcatel. Your 408 (IP) or 409 (digital) terminal
1. Primary Phone Line 2. Programmable Button Indicators 3. Soft Key Labels 4. Status Line 5. Call Activity Area 6. Phone Tab 7.
 CISCO IP 7975 Series QUICK REFRENCE 1. Programmable Buttons 2. Foot stand Button 3. Display Button 4. Messages Button 5. Directies Button 6. Help Button 7. Settings Button 8. Services Button 9. Volume
Four-Line Intercom Speakerphone 955
 1 USER S Revised: August 3, 2000 MANUAL Part 2 Four-Line Intercom Speakerphone 955 2000 Advanced American Telephones. All rights reserved. Printed in Indonesia. 850004037 Issue 1AT&T 8/00 Please also read
AVAYA VOICE OVER INTERNET PROTOCOL (VOIP) TELEPHONE USER MANUAL. Revised by Leeward CC IT October 2012. University of Hawaiʻi Community Colleges
 TELEPHONE USER MANUAL. Revised by Leeward CC IT October 2012. University of Hawaiʻi Community Colleges") AVAYA VOICE OVER INTERNET PROTOCOL (VOIP) TELEPHONE USER MANUAL Revised by Leeward CC IT October 2012 University of Hawaiʻi Community Colleges Hawaiian Telecom Copyright 2012 Table of Contents PLACING
AVAYA VOICE OVER INTERNET PROTOCOL (VOIP) TELEPHONE USER MANUAL Revised by Leeward CC IT October 2012 University of Hawaiʻi Community Colleges Hawaiian Telecom Copyright 2012 Table of Contents PLACING
AVAYA 9608/9611G SIP DESKPHONE INSTRUCTIONS
 AVAYA 9608/9611G SIP DESKPHONE INSTRUCTIONS MESSAGE WAITING INDICATOR PHONE DISPLAY NAVIGATION ARROWS and the OK BUTTON PHONE BUTTON MESSAGE BUTTON CONTACTS HISTORY HOME HEADSET SPEAKER VOLUME BUTTON MUTE
2 Session buttons. 1 Phone Screen
 1 Phone Screen 2 Session buttons Shows information about your phone, including directory number (extension), call information (for example caller ID, icons for an active call or call on hold) and available
INTRODUCTION TO YOUR BT MICRO... 2 WELCOME... 2 BT MICRO FEATUREPHONE... 2 HOW TO USE YOUR BT MICRO FEATURE PHONE... 3
 Table of Contents INTRODUCTION TO YOUR BT MICRO... 2 WELCOME... 2 BT MICRO FEATUREPHONE... 2 HOW TO USE YOUR BT MICRO FEATURE PHONE... 3 Phone setup... 3 Answering and making calls... 3 Transferring calls...
Welcome to BT Inspiration An introduction to your new BT Inspiration System and its documentation 6 Featurephone basics 7
 Contents PAGE Welcome to BT Inspiration An introduction to your new BT Inspiration System and its documentation 6 Featurephone basics 7 Your BT Inspiration Featurephone 7 Facility menus and scroll keys
User Guide. IP Multimedia 1110, 1120, 1140 & 1150 phones
 User Guide IP Multimedia 1110, 1120, 1140 & 1150 phones Content 1. IP Phone buttons & usage 2. Logging on / off your IP Phone 3. Changing your password 4. Making a call 5. Receiving a call 6. Placing a
Carrier VoIP Nortel IP Phone 2004 User Guide (CICM) Release: CICM 10.1 Document Revision: 09.01. www.nortel.com NN10300-009
 Release: CICM 10.1 Document Revision: 09.01. www.nortel.com NN10300-009") Nortel IP Phone 2004 User Guide (CICM) Release: CICM 10.1 Document Revision: 09.01 www.nortel.com NN10300-009. Release: CICM 10.1 Publication: NN10300-009 Document status: Standard Document release date:
Nortel IP Phone 2004 User Guide (CICM) Release: CICM 10.1 Document Revision: 09.01 www.nortel.com NN10300-009. Release: CICM 10.1 Publication: NN10300-009 Document status: Standard Document release date:
Cloud Voice Service Cisco Unified IP Phone 6921 User Guide. (Version 1.0)
") Cisco Unified IP Phone 6921 User Guide (Version 1.0) Table of Content 1 Phone Set Features and Functions... 3 1.1 Operation for IP Phone 6921... 3 2 Location of Control... 4 3 Preference Setup... 6 3.1
Cisco Unified IP Phone 6921 User Guide (Version 1.0) Table of Content 1 Phone Set Features and Functions... 3 1.1 Operation for IP Phone 6921... 3 2 Location of Control... 4 3 Preference Setup... 6 3.1
USER GUIDE. Cisco Small Business Pro. SPA 500 Series IP Phones Models 504G, 508G, and 509G. Provided by
 USER GUIDE Cisco Small Business Pro SPA 500 Series IP Phones Models 504G, 508G, and 509G Provided by Understanding Your Phoneʼs Lines and Buttons Use the following graphic and table to identify the parts
Part 2. Copyright 1998 Philips Consumer Communications L.P. All rights reserved. Printed in Mexico. Issue 1AT&T 848229506
 2 User's Manual for Two-Line Digital Answering System Telephone with Speakerphone 1872 Fold open this paper for information about this telephone's installation and operation. Please read Part 1 Important
Model PBX 416+ Programming & User Guide
 Model PBX 416+ Programming & User Guide 1 Introduction... 5 Installation hints... 5 Wall mounting... 5 System programming... 6 System password... 6 Changing the password... 6 Exchange line set up... 6
Integral T3 / T3 IP Classic
 Integral T3 / T3 IP Classic connected to Integral 55 Services Internet Call / Contact Center CTI / CRM Messaging Telephony Networking User s guide 2 Table of Contents Table of Contents Table of Contents...
User Guide. BT Inspire 1500. Think before you print!
 BT Inspire 1500 User Guide This new interactive user guide lets you navigate easily through the pages and allows you to be directed straight to any websites or email addresses that are referenced. Simply
TABLE OF CONTENTS CHAPTER 2. BASIC OPERATION TURNING THE PHONE ON / OFF...16. DO s...14 DON Ts...14
 TABLE OF CONTENTS CHAPTER 1. BEFORE USING YOUR PHONE PACKAGE CONTENTS...6 HANDSET DESCRIPTION...7 BATTERY USAGE...11 POWER CONNECTION...13 BATTERY HANDLING INFORMATION...14 DO s...14 DON Ts...14 CHAPTER
Alcatel Premium Reflexes Alcatel Easy Reflexes. Alcatel OmniPCX Office ARCHITECTS OF AN INTERNET WORLD
 Alcatel Premium Reflexes Alcatel Easy Reflexes Alcatel OmniPCX Office ARCHITECTS OF AN INTERNET WLD User guide how Thank you for choosing one of our Reflexes, range of telephones, and for your confidence
Quick start guide. CL4939 Big button big display telephone/answering system with caller ID/ call waiting
 Quick start guide CL4939 Big button big display telephone/answering system with caller ID/ call waiting Introduction This quick start guide provides you basic installation and use instructions A limited
Basic Training Syllabus
 Mastering the ShoreTel IP Communication System Basic Training Syllabus Personal Call Manager - P a g e 1 Objectives of the class: Understanding new technology can at times appear challenging. However,
Telephone Features User Guide. BCM50 2.0 Business Communications Manager
 Telephone Features User Guide BCM50 2.0 Business Communications Manager Document Status: Standard Document Version: 01.01 Part Code: NN40020-100 Date: September 2006 Telephone button icons Use this guide
Alcatel OmniPCX Enterprise IP Touch 4068 IP Touch 4038
 Alcatel OmniPCX Enterprise IP Touch 408 IP Touch 408 User manual Introduction How to use this guide Thank you for choosing a telephone from the IP Touch range manufactured by Alcatel. Your IP Touch digital
Converse 320. Userfriendly Guide
 Converse 0 Userfriendly Guide Return Diversion Minder On Off At a glance IMPORTANT Next Inserts a space in a number when storing numbers in the memory. Clear Used to edit numbers when pre-dialling or when
Training Guide For 7960 & 7940 Series Cisco IP Phones
 Training Guide For 7960 & 7940 Series Cisco IP Phones Prepared by: Corporate Technologies, LLC 2000 44 th Street SW, Suite 100 Fargo, ND 58103 (701) 893-4000 1 Table of Contents: Section I: GETTING STARTED
AVAYA 9608 & 9611G IP DESKPHONE INSTRUCTIONS
 AVAYA 9608 & 9611G IP DESKPHONE INSTRUCTIONS 1 MESSAGE WAITING INDICATOR PHONE DISPLAY NAVIGATION ARROWS and the OK BUTTON PHONE BUTTON MESSAGE BUTTON CONTACTS HISTORY HOME HEADSET SPEAKER VOLUME BUTTON