DiscPilot Networking Software
|
|
|
- Jemimah Flowers
- 10 years ago
- Views:
Transcription
1 COMPLETE SOLUTIONS FOR ON-DEMAND CD and DVD PRODUCTION DiscPilot Networking Software User guide Thank you for purchasing a Verity Systems 1

2 DiscPilot Document Reference No. (Ver 1.01) Production Standard VERITY SYSTEMS LTD VERITY SYSTEMS, INC. 2 Eastern Road 5441 Merchant Circle, Unit A Aldershot Placerville Hampshire California GU12 4TD United Kingdom United States Tel: +44 (0) Tel: (530) Fax: +44 (0) Fax: (530) [email protected] [email protected] COPYRIGHT This document is the property of Verity Systems and it may not be reproduced, copied or exhibited to a third party without the written permission of Verity Systems. Verity Systems reserves the right to amend or modify the specifications and design criteria applying to these products. 2

3 SOFTWARE WARRANTY (LIMITED) If you discover physical defects in the media on which the software is distributed or in the User s Manual, Verity Systems will replace the media or manual for a period of ninety (90) days after the purchase by the retail customer. You must return the disk or manual to Verity Systems or an authorized Verity Systems dealer within the warranty period accompanied by proof of purchase. VERITY SYSTEMS DISCLAIMS ALL IMPLIED WARRANTIES ON THE PRODUCT, INCLUDING WITHOUT LIMITATION WARRANTIES OF MERCHANTABILITY, PERFORMANCE AND FITNESS FOR A PARTICULAR PURPOSE. Verity Systems WILL NOT BE LIABLE FOR ANY BUG, ERROR, OMISSION, DEFECT, DEFICIENCY, OR NONCONFORMITY IN ANY SOFTWARE. AS A RESULT, THE SOFTWARE IS SOLD AS IS, AND THE PURCHASER ASSUMES THE ENTIRE RISK AS TO ITS QUALITY AND PERFORMANCE. VERITY SYSTEMS SHALL IN NO EVENT BE LIABLE FOR DIRECT, INDIRECT, SPECIAL, INCIDENTAL, CONTINGENT OR CONSEQUENTIAL DAMAGES RESULTING FROM ANY DEFECT IN THE SOFTWARE OR ITS DOCUMENTATION INCLUDING DAMAGES FROM LOSS OF DATA, EVEN IF VERITY SYSTEMS OR AN AUTHORIZED VERITY SYSTEMS DEALER HAS BEEN ADVISED OF THE POSSIBILITY OF SUCH DAMAGES. YOU AGREE THAT VERITY SYSTEMS LIABILITY, ARISING OUT OF CONTRACT, NEGLIGENCE, STRICT LIABILITY IN TORT OR WARRANTY SHALL NOT EXCEED ANY AMOUNTS PAID BY YOU FOR THIS PRODUCT. Any written or oral information or advice given by Verity Systems dealers, distributors, agents or employees will in no way increase the scope of this warranty. Nor may you rely on such oral or written communication. Some states do not allow the exclusion or limitation of implied warranties or liability for incidental or consequential damages, so the above limitation or exclusion may not apply to you. This warranty gives you specific legal rights, and you may also have other rights that vary from state to state. Software License Agreement This is a legal agreement between you and Verity Systems Ltd. ( verity Systems ), covering your use of DiscPilot (the software ). Be sure the read the following agreement before using the software. BY USING THE SOFTWARE (REGARDLESS IF YOU HAVE REGISTERE THE SOFTWARE OR NOT), YOU ARE AGREEING TO BE BOUND BY THE TERMS OF THIS AGREEMENT. IF YOU DO NOT AGREE TO THE TERMS OF THIS AGREEMENT, DO NOT USE THE SOFTWARE AND DESTROY ALL COPIES IN YOU POSSESSION. The software is owned by Verity Systems and is protected by United States copyright laws and international treaty provisions. Therefore, you must treat the software like any other copyrighted material (e.g., a book or a musical recording). Paying the license fee allows you the right to use one copy of the software on a single computer. You may not use this software to copy copyrighted material without the permission of the copyright owner. You may not rent or lease the software, nor may you modify, adapt, translate, reverse engineer, decompile, or disassemble the software. If you violate any part of this agreement, you right to use this software terminates automatically and you must then destroy all copies of the software in your possession. The software and its related documentation are provided As IS and without warranty of any kind and Verity Systems expressly disclaims all other warranties, expressed or implied, including, but not limited to, the purpose. Under no circumstances shall Verity Systems be liable for any incidental, special, or consequential damages that result from the use or inability to use the 3

4 software or related documentation, even if Verity Systems has been advised of the possibility of such damages. In no event shall Verity Systems liability exceed the license fee paid, if any. All written or oral information or advise given by Verity Systems dealers, distributors, agents or employees will in no way increase the scope of this license or warranty. Nor may you reply on such oral or written communication. Some states do not allow the exclusion or limitation of implied warranties or liability for incidental or consequential damages, so the above limitation or exclusion may not apply to you. This warranty gives you specific legal rights, and you may also have other rights which vary from state to state. This agreement shall be governed by the laws of the State of California. If for any reason a court of competent jurisdiction finds any provision of the agreement, or portion thereof, to be unenforceable, that provision of the agreement shall be enforced to the maximum extent permissible so as to affect the intent of the parties, and the remainder of this agreement shall continue in full force and effect. 4

5 TABLE OF CONTENTS Section 1 Introduction.. 6 Section 2 System Requirements System Requirements DiscPilot System Requirements PublisherNET Other Systems Requirement Considerations.7 Section 3 Software Installation Installing PublisherNET Server Installing DiscPilot Installing Nero Installing Print Drivers Installing DiscPilot and CD Label Designer 9 Section 4Connection Set Up Connecting the CopyDisc to the Server PC Connecting to the PublisherNET Server (server PC only) Connecting DiscPilot to the PublisherNet Server Job Type Printer Type Ink Level Disconnecting DiscPilot from the PublisherNet Server Section 5Operating DiscPilot Make a Disc Create and Record a New Image Print Label Only Transfer Files Create Image Create Label Help

6 SECTION 1: Introduction Disc Pilot provides networked duplication on all CopyDisc duplicators, CopyDisc printers and combined CopyDisc duplicators and printers as a factory fitted option. This easy to use yet sophisticated and versatile CD and DVD duplicator and printer management software system, provides multiple users with access to one or more of Verity Systems range of automatic duplicators and combined duplicators and printers. DiscPilot allows a CopyDisc to act as a peripheral device across a network. DiscPilot is a completely new way of networking your CopyDisc. Instead of relying on a traditional Cat5 cable network connection, uses a high speed USB connection for improved reliability and data transmission rates. Verity Systems PublisherNET forms the link between the CopyDisc and the host PC. PublisherNET establishes a connection with the CopyDisc through the USB connection and manages data transmission. This Windows based software suite enables you to duplicate an ISO master stored on your file server, and to request the required number of discs for your duplicator to produce. CD master images can be stored on the file server and the required number of copies requested direct from the nominated PC. CD/DVD image masters and print images (where applicable) can also be selected from the duplicator. DiscPilot has the ability to queue jobs (with or without print images). For example: an operator could queue 8 separate masters for duplication. DiscPilot has a fully integrated disc image creation tool (using Nero technology) and a fully integrated disc label creator. From within DiscPilot you can create your labels, disc images, combine and send them as a job and manage the files on your CopyDisc hard drive. The diagram below shows the typical setup of the CopyDisc. USB connection Host PC with PublisherNET installed. This manages the connection; this PC can also have DiscPilot installed. CopyDisc Duplicator/Printer Network connections Any PCs on the same network with DiscPilot installed can connect to the CopyDisc through the host PC. 6

7 SECTION 2: System Requirements 2.1 System Requirements Disc Pilot Operating system Windows XP Pro (service pack 2 or higher) Windows 2000 (service pack 4 or higher) Hardware Your PC must have a 500 MHz system or higher recommended You must have at least 64 MB RAM memory, more recommended Graphics card with 8 MB or higher Ideally a screen resolution of 1024x768 or greater 700 MB of free hard drive space, more would be better. 10/100 Mbps Ethernet capability 2.2 System Requirements PublisherNET Operating system Windows XP Home (up to 5 clients Windows XP Pro (service pack 2 or higher, up to 11 clients) Windows Server 2003 (or higher, over 11 clients) Hardware Your Server must have a 500 MHz system or higher recommended You must have at least 64 MB RAM memory, more recommended Graphics card with 2 MB or higher Ideally a screen resolution of 800x600 or greater 700 MB of free hard drive space, more would be better. 10/100 Mbps Ethernet capability 1 off USB2 ports NOTE: The Server and Client can be run on the same PC in which case the Client specification would apply but there would be no requirement for a network connection. 2.3 Other System Requirement Considerations The system requirements shown above assume a small network or duplicators running basic jobs via the DiscPilot software. The requirements for any given network will depend on the size and number of simultaneous duplicators being targets. The memory requirement when creating print file images depends on the printer being targeted. The lowest memory requirements are for the Prism thermal printer with the largest memory requirements being for the TEAC p-55 printer. Creating print file images is very processor intensive, so a fast CPU is recommended. Building ISO images can be very processor and I/O intensive for short periods of time, so a fast CPU and fast hard disk are also recommended, 7

8 SECTION 3: Software Installation The following details the installation procedure for the PublisherNET server and for the DiscPilot client. PublisherNET need only be installed once on to the server PC whilst DiscPilot can be installed on to many client PCs to allow multiple users to access the CopyDisc across your network. 3.1 Installing the PublisherNET Server The PublisherNET server should be installed on the server PC only. Insert the PublisherNET software CD into the host PC s CD-ROM and follow the on screen instructions. A PublisherNET icon (shown below) should appear on the host PC s desktop. The PublisherNET folders (Jip, Shared and Uninstall) should be automatically installed into the Program Files folder on the server PC. Once installed, these folders have to be shared, I.E. access rights have to be given to any subsequent client PCs. The Publisher NET Server application has a shared folder called PublisherNet\Shared. It is this shared folder that DiscPilot on client PCs should be connected to. This folder is normally located in Program Files/PublisherNet Server/Shared. 3.2 Installing DiscPilot DiscPilot comes with 3 software discs which must be installed on every client PC s intending to use DiscPilot. Each disc will guide you through the installation process by the Setup Wizard Installing Nero DiscPilot requires Nero version 6.6 to 7. If you already have Nero 6.6 to 7 installed on your PC you do not need to install the Nero software. If however your version of Nero is not 6.6 you will need to remove that version of Nero and install Nero version 6.6 included. Insert the NERO software CD into the client PC s CD-ROM and follow the onscreen instructions. NOTE: Nero needs to be installed in the default folder (this is usually Program Files) otherwise DiscPilot will not be able to locate it once loaded. If you already have Nero installed on your PC and it is not located in the default folder you will need to remove it and reinstall Installing the Printer Driver Insert the Printer Driver CD (Disc No. 2) into your PC s CD-ROM and follow the onscreen instructions. The OptiPrinter Pro print driver should auto-install. This is a requirement of the CD Label Designer software, even if the printer you are using with the CopyDisc is not the OptiPrinter Pro. To install other print drivers, go to the control panel on the server PC, select Printers and then select Add Printer. Follow the on screen instructions and when the wizard asks you to select the printer model, click the Have Disk button. Browse to the appropriate 8
 should appear on the host PC s desktop.")
9 printer folder (e.g. Prism), drill down until you reach the.inf file and click open. Continue with the Wizard to install the print driver Installing CD Label Designer and DiscPilot Insert Disc No.3 containing the CD Label Designer and DiscPilot software into the client PC s CD-ROM and follow the onscreen instructions to install both programs. 9

10 SECTION 4: Connection Set Up Before DiscPilot can be run, you will need to connect the Server PC to the PublisherNET server. 4.1 Connecting the CopyDisc to the Server PC Firstly connect the CopyDisc to the Server PC via the USB cable. 4.2 Connecting to PublisherNET Server (Server PC only) Double click the PublisherNET icon on the desktop to open to PublisherNET server. The following screen will appear. Select File and then select Connect from the drop down menu. 10

11 The Connection Dialogue box will open. The connection dialogue box offers you options: SERVER JOBS, CLIENT JOBS and MEDIA TYPE. The SERVER JOBS option allows you to pause the processing of jobs while allowing the CopyDisc to remain online. This means that users can still submit jobs but you can safely top-up media levels. Jobs submitted while the system is paused will resume once the processing option is reselected. 11

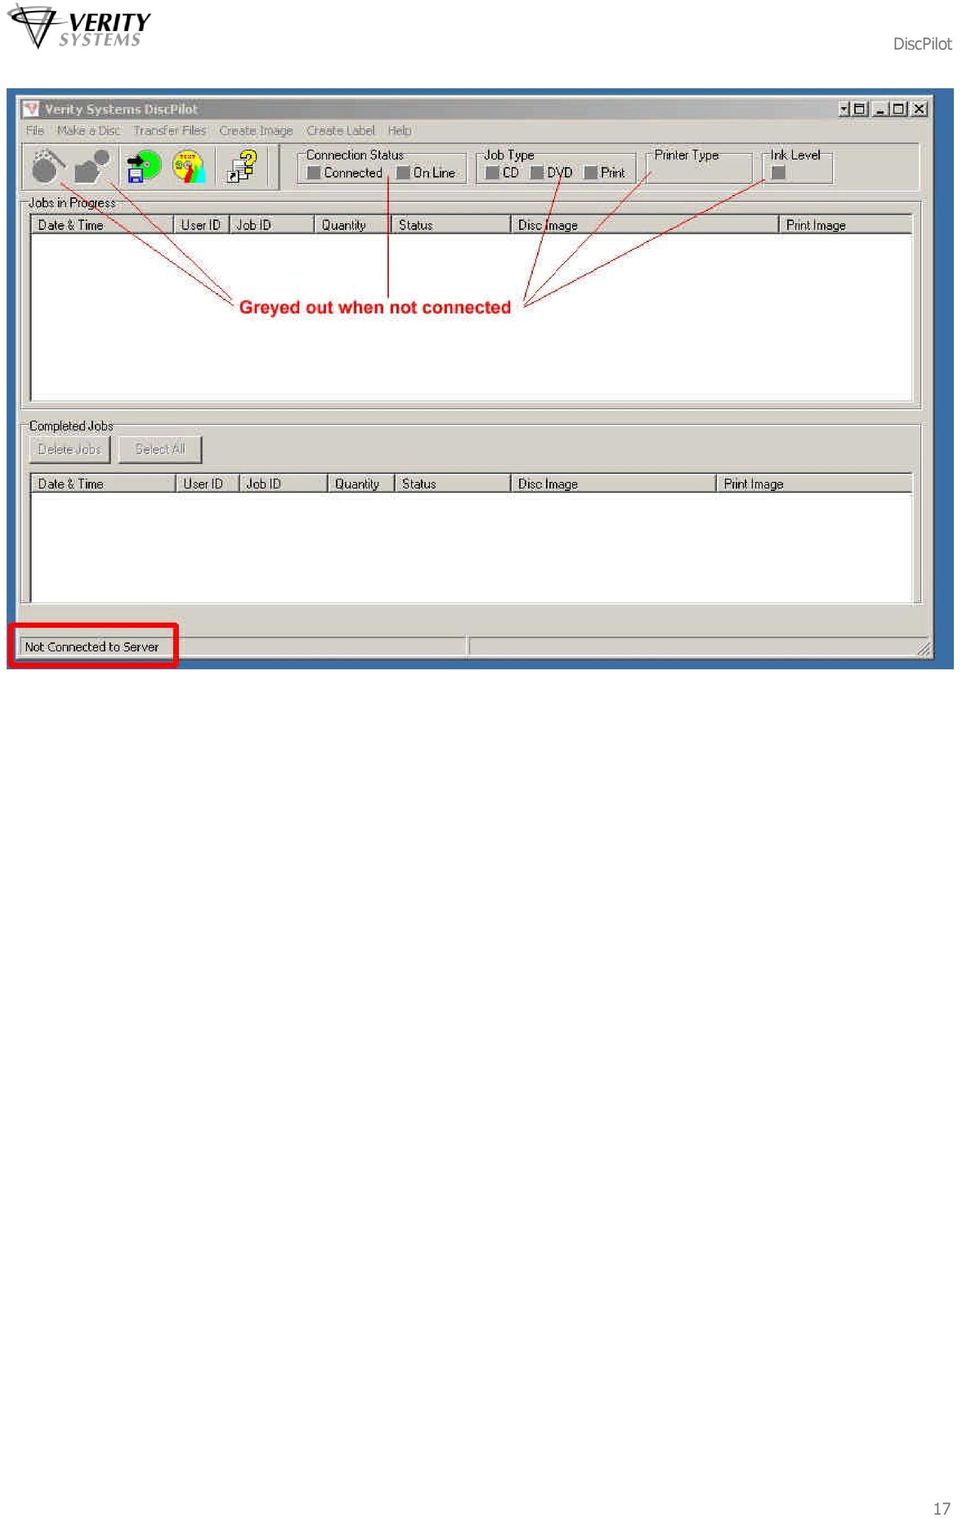
12 The CLIENT JOBS option allows you to refuse users connection to the CopyDisc. MEDIA TYPE offers you the choice of CD, DVD or Print Only. Select the correct option depending on the type of media that is currently loaded onto the CopyDisc. This will inform users via the Job Type indicator (see section 4.3) on the DiscPilot screen, of what type of jobs they can submit. If the CopyDisc unit is a print only unit, I.E. no drives fitted, select the Print Only option. Users will be able to see that they can only print to the CopyDisc and not burn discs. All of these options are changeable while the connection is live by using the drop down menus in PublisherNET. For example, if you change the loaded media from CD to DVD, you should change this option within PublisherNET so that your users know what type of jobs they can currently submit. Once selected, press Connect. This establishes the PublisherNET server on the host PC. If you wish, you could install DiscPilot on the Server PC also. If so, PublisherET should remain running in the background whilst you operate DiscPilot. You can now minimise this screen, if you wish. 4.3 Connecting DiscPilot to the PublisherNET Server Open DiscPilot by double clicking the DiscPilot icon (see below) on your PC s desktop. The following screen will open. You will notice that the Connection Status indicators are greyed out and at the bottom of the screen, the status bar shows Not Connected to Server. DiscPilot will not be fully operational until a connection between it and the PublisherNET server has been established. You are able to create image and print files without the PublisherNET and DiscPilot connection being established, and these icons are clearly visible as a result, but you will not be able to produce discs via DiscPilot until a connection is made. See sections 5.5 and 5.6 for details on how to create image and print files. 12

13 13

14 To connect to PublisherNET, select the File menu item and from the drop down menu select Connect. This will open the Connect Dialog box and allow you to browse for the PublisherNET Server. To browse to the server, clisk on the Browse button and navigate to the PublisherNET Server s Shared folder. 14

15 In the above example, the PublisherNET Server is located on the remote PC Xtronix-4. The Publisher NET Server application has a shared folder called PublisherNet\Shared. It is this shared folder that DiscPilot should be connected to. This folder is normally located in Program Files/PublisherNet Server/Shared. If the DiscPilot application has been connected to a Server previously, the path to that server will be displayed. If the DiscPilot application has not been connected to a server previously, the path will be blank. When the correct Server path is displayed, use the Connect button to connect to the Server. When all the Server files have been validated, the Connect screen will close and the DiscPilot main screen will show that the DiscPilot is connected to the Server. The Connection Status indicator will be green and will flash yellow every 15 seconds as it polls the Server. The status bar at the bottom of the screen shows the name of the PublisherNET Server that the DiscPilot is connected to. 4.4 Job Type The Job Type file shows what type of media is currently loaded ontot he CopyDisc and thus what type of jobs are possible to submit. This is defined in the PublisherNET software. 4.5 Printer Type Printer type shows the model of printer that is connected to the CopyDisc (if applicable). This means that the user can ensure they create or select an appropriate PRN file to work on the system. This is defined by the type of printer setup in the CopyDisc s setup menu. 15

16 4.6 Ink Level Ink Level displays the ink level within the OptiPrinter Pro printer attached to the CopyDisc. This feature is only available with the OptiPrinter pro inkjet printer. 4.7 Disconnecting DiscPilot from the PublisherNET Server To disconnect from the server, select the File menu item. From the drop down menu, select Disconnect. This will cause DiscPilot to disconnect from the PublisherNET Server. NOTE: The drop down menu will only show the Disconnect option if the DiscPilot client is actually connected to a server. The following screen will appear, prompting you to confirm that you wish to disconnect from the server. Once disconnected, the Connection Status indicator will turn grey and the status bar at the bottom of the screen will show that DiscPilot is not connected. 16

17 17
18 Section 5: Operating DiscPilot Once all connections have been established, you are ready to start using DiscPilot to copy and print discs remotely from your PC. 5.1 Make A Disc The Make a Disc wizard provides the user with easy to use, step by step procedures for copying and/or printing discs. To launch the wizard, click the Disc Wizard icon (highlighted below) or click the Make A Disc menu item. The Disc Creation Wizard is launched. 18

19 You will be asked to provide a name for the job you are creating. All jobs submitted must have a unique Job ID. The Job ID must not be the same as any jobs already present on the Jobs in progress panel. Enter a Job ID and click the Next button. 19

20 Next, choose the type of job you wish to create. Record an Existing Image: This is an image stored on either the local PC hard disc, a network resource or on the remote CopyDisc s internal hard drive itself. Create and Record a New Image: This will launch Nero and allow you to create a new data or audio image file. (See Section 5.2) Print Label Only: This will allow you to print a label without copying (burning) an image. (See Section 5.3) Once you have chosen the type of job you wish to create, click the Next button. If you chose to record an existing image, the next screen asks the location of the existing image file. CopyDisc CD: Click this button for CD image files (data and audio) stored on the remote CopyDisc s internal hard drive. CopyDisc DVD: Click this button for DVD image files (data only) stored on the remote CopyDisc s internal hard drive. Network: Click on this button for image files stored on the local PC s hard drive or stored on a network resource. Click on the required button to select the existing image file. 20
 Print Label Only: This will allow you to print a label without copying (burning) an image. (See Section 5.3) Once you have chosen the type of job you wish to create, click the Next button.")
21 NOTE: Image files can either be ISO Data Image format (.iso), Nero Data Image format (.nrg) or Nero Audio Image format (.nrg). Choose the required image file from those listed. The above example shows CD image files stored on the remote CopyDisc s internal hard drive. Click on the required file to highlight it and then click the Next button. 21
22 The above shows the selection of the image file. Click on Next. You will now be asked if you want to print a label onto the CD after it has copied. 22
23 Do Not Print Label: Select this option if no label is to be printed. Choose an Existing Print Label File: Select this option to print a label file stored either on the local hard disc, a network resource or on the remote CopyDisc s internal hard drive. Create a New Print Label: Select this option to create a new print label. This will launch the Label Creator application to allow you to create a new label. Select the required option and click the Next button. If you elect to print an existing print label, the above screen will appear. CopyDisc: Click this button for print files stored on the remote CopyDisc s internal hard drive. Network: Click this button for print files stored on the local PC s hard drive or stored upon a network resource. Click on the required button to select the print file. 23
24 NOTE: Print files are in the printer output format (.prn) and the correct file for the printer currently attached to the CopyDisc must be chosen. For example, if the CopyDisc features an OptiPrinter Pro inkjet printer, you must ensure that the.prn file chosen is a.prn file created using the OptiPrinter Pro print driver has been selected. Choose the required image file from those listed. The above example shows print files stored on the remote CopyDisc s internal hard drive. Click on the required file to highlight it and then click the Next button. 24
25 The above shows the selection of the print file PRN_1.PRN. Click Next to progress to the nest level. The next screen shows the selection you have made, detailing the image file and the print file chosen. 25
26 You should now enter the number of copies that are to be made and if the copies are to be verified, the Verify after Copy box should be ticked. To submit the job, the Submit Job button should be clicked. This will cause the job to be sent to the remote CopyDisc unit. Now that the job has been submitted it is sent to the remote CopyDisc. This may take a few minutes if large image files have to be copied over the network to the CopyDisc. When the file submission is complete, the Disc Wizard is closed and the job is shown in the Jobs in progress panel. 26
27 - When the job is complete, the job is moved from the Jobs in progress panel to the Completed Jobs panel. 5.2 Create and Record a New Image If you do not have an existing image you are able to create one on-the-fly by selecting this option from the Make A Disc wizard. Selecting this option will launch Nero, a fully integrated disc image creation tool. From within DiscPilot you can create your disc images and send them as a job and manage the files on your CopyDisc hard drive. 27
28 Chose the Create and Record a New Image option and then click the Next button. In the first instance, select the type of image file you wish to create. Data CD (.nrg): Select this to create a data CD. Data DVD (.nrg): Select this to create a data DVD. 28
29 Audio CD (.nrg): select this to create an Audio CD. Select the type of image and then click the Next button. Nero will then be launched. Nero can then be used to create Data or Audio images. NOTE: Refer to the Nero Help files for details on how to create data and Audio images. When the image is ready to burn, instead of burning it to a CD or DVD drive, use the Image Recorder to make an image file. 29
30 Give the image file a unique name, file type (.nrg or.iso) and location when prompted by Nero. This name will be passed to DiscPilot when Nero is closed. When Nero has compiled the image file, the following prompt will appear. Click OK and then click Next and finally Exit to close down Nero and return to DiscPilot. NOTE: The default image type for Nero Data CDs or DVDs is the Nero format.nrg. It is possible to create ISO image files with Nero by selecting the ISO image format in the Nero Image Recorder Save File dialog. DiscPilot can accept either Nero format (.nrg) or ISO format (.iso) image files. 30
31 DisPilot will then ask you to confirm that the Image File shown is in fact the one you wish to use. Click Next to confirm. 5.3 Print Label Only Selecting this option allows you to print a label without copying (burning) an image. Select Print Label Only and then click Next. 31
32 Next, choose the type of job you wish to create. Print an Existing Label: This is a print file (.prn) stored on either the local hard disc, a network resource or on the remote CopyDisc s internal hard drive itself. Create a New Label: This will launch Label Designer and allow you to create a new print file (.prn). Once you have chosen the type of job you wish to create, click the Next button Printing an Existing Label If you chose to print an existing print file (.prn), the next screen will ask you to choose the location of the file. 32
33 CopyDisc: Click this button for print files (.prn) stored on the remote CopyDisc s internal hard drive. Network: Click on this button for print files(.prn) stored on the local PC s hard drive or stored on a network resource. Click on the required button to select the existing image file. Choose the required print file from those listed. The above example shows print files stored on network folder. Click on the required file to highlight it and then click the Open button. NOTE: Be sure that you select a print file(.prn) that has been created using the appropriate print driver for the printer in use. If the CopyDisc is fitted with an OptiPrinter pro inkjet printer, ensure that the print file (,prn) you select has been created using the OptiPrinter Pro print driver. 33
34 The above shows the selection of the print file. Click on Next. You should now enter the number of copies that are to be made. To submit the job, the Submit Job button should be clicked. This will cause the job to be sent to the remote CopyDisc unit. 34
35 Now that the job has been submitted it is sent to the remote CopyDisc. When the file submission is complete, the Disc Wizard is closed and the job is shown in the Jobs in progress panel. 35
36 When the job is complete, the job is automatically moved from the Jobs in progress panel to the Completed Jobs panel Create a New Label Selecting Create a new label and then clicking Next will launch the CD Label Designer software. 36
37 The CD Label Designer can be used to create print files -.prn(s). NOTE: Refer to the CD label Designer Help files for details on how to design and create disc labels. 37
38 When printing the label file, ensure that the correct printer type for the CopyDisc is selected. When CD Label Designer is closed, the user will be given the opportunity to name and save the label file that was created. At this stage CD label Designer is giving you the opportunity to save the image you have just created as a CD Label Designer file (.cld). DiscPilot only works with.prn files and you will be given the opportunity to create a.prn file of the image you have created when you exist CD Label Designer completely. You can however choose to save the.cld file at this stage as it allows you to open the file at a later stage to amend, should you wish. When you close the CD Label Designer program completely, you will return automatically to DiscPilot. The following prompt will appear asking you to save the label print file you have just created as a.prn file. Choose a location to save the print file. 38
39 Click Save. The above shows the selection of the print file. You should now enter the number of copies that are to be made. To submit the job, the Submit Job button should be clicked. This will cause the job to be sent to the remote CopyDisc unit. Now that the job has been submitted it is sent to the remote CopyDisc. When the file submission is complete, the Disc Wizard is closed and the job is shown in the Jobs in progress panel. When the job is complete, the job is moved from the Jobs in progress panel to the Completed Jobs panel. 39
40 5.5 Transfer Files The File Transfer Wizard allows the user to transfer (copy) image and print files to the remote CopyDisc s internal hard drive. To start the file Transfer Wizard, click on the File Transfer Wizard icon or select Transfer Files from the menu. 40
41 Give your transfer job an ID. All jobs submitted must have a unique ID. The ID must not be the same as any other jobs already present on the Jobs In Progress panel. Enter the Job ID and click the Next button. Choose the type of transfer job. ISO Image File (.iso): Select this to copy an ISO Data image file to the remote CopyDisc s internal hard drive. Nero Image File (.nrg): Select this to copy an Nero Data image file or a Nero Audio Image file to the remote CopyDisc s internal hard drive. Print File(.prn): Select this to copy a Print File to the remote CopyDisc s internal hard drive. NOTE: 1. When Nero Data Image file is copied to the remote CopyDisc s hard drive, it is converted and renamed to an ISO file (e.g. Image.nrg becomes Image.iso) 2. When a nero Audio Image file is copied to the remote CopyDisc s hard drive, it is converted to a Bin and CUE file (e.g. Image.nrg becomes Image bin and cue.bin. Only the Image bin file will appear in the remote CopyDisc s file list, but the associated.cue file is also stored. 3. When copying print files, it is important to ensure that the print file is of the correct format for the printer type connected to the remote CopyDisc. 41
42 4. File names must not be longer than 14 characters, this includes the extension (e.g ) Browse for an image file. The image file can be stored on the local PC s hard drive or on a network resource. Click the Browse button to search for the image. 42
43 Choose the required image. The above example shows ISO Data image files stored on the local PC s drive. Click on the required file to highlight it and then click the Open button. The above screen shows the selection of the image file. Click the Submit Job button. This will cause the job to be sent to the remote CopyDisc. 43
44 Now that the job has been submitted, the job is sent to the CopyDisc. This maytake a few minutes if large image files have to be copied over the network to the remote CopyDisc. When the file submission is complete, the Disc Wizard is closed and the job is shown in the Jobs in Progress panel. NOTE: The Quantity entry has File Copy rather than a numeric quantity. When the job is completed, the job is moved from the Jos in progress panel to the Completed Jobs panel. 5.5 Create Image It is possible to create an image file without using the Disc Wizard as referred to in section 5.2. To create an image file, click on the Create an Image File icon or on the Create Image menu item. This will launch Nero and allow you to create a new data or audio image file. 5.6 Create Label It is possible to create a label print file (.prn) without using the Disc Wizard as referred to in section 5.3. To create a label print file, click on the Create a Label File icon or on the Create Label menu item. This will launch CD label Designer and allow you to create a label print file. 5.7 Help Disc Pilot Help Selecting DiscPilot Help from the menu displays the help file. 44
45 5.7.2 About Selecting About from the menu shows the About box. The About box shows the version level of the software. 45
46 Supplied by: Verity Systems Ltd. Verity Systems, Inc. 2 Eastern Road 5441 Merchant Circle, Unit A Aldershot Placerville Hampshire CA GU12 4TD United States United Kingdom Toll Free: (800) Tel: +44 (0) Tel: (530) Fax: +44 (0) Fax: (530) [email protected] [email protected] 46
/ WMS / LITE INDUSTRIAL)
") Acknowledgements Trademark Information COREflex Software Microsoft, Windows, Windows NT/ 2000/ XP, and Access are registered trademarks of Microsoft Corporation. Quickbooks is a registered trademark of
Acknowledgements Trademark Information COREflex Software Microsoft, Windows, Windows NT/ 2000/ XP, and Access are registered trademarks of Microsoft Corporation. Quickbooks is a registered trademark of
DME-N Network Driver Installation Guide for M7CL/LS9/DSP5D
 DME-N Network Driver Installation Guide for M7CL/LS9/DSP5D ATTENTION SOFTWARE LICENSE AGREEMENT PLEASE READ THIS SOFTWARE LICENSE AGREEMENT ( AGREEMENT ) CAREFULLY BEFORE USING THIS SOFTWARE. YOU ARE ONLY
DME-N Network Driver Installation Guide for LS9
 DME-N Network Driver Installation Guide for LS9 ATTENTION SOFTWARE LICENSE AGREEMENT PLEASE READ THIS SOFTWARE LICENSE AGREEMENT ( AGREEMENT ) CAREFULLY BEFORE USING THIS SOFTWARE. YOU ARE ONLY PERMITTED
OPERATING and MAINTENANCE MANUAL
 COMPLETE SOLUTIONS FOR ON-DEMAND CD and DVD PRODUCTION Automated CD & DVD Standalone Printer Series OPERATING and MAINTENANCE MANUAL Thank you for purchasing a Verity Systems CopyDisc Series Duplicator
TOOLS for CC121 Installation Guide
 TOOLS for CC121 Installation Guide ATTENTION SOFTWARE LICENSE AGREEMENT PLEASE READ THIS SOFTWARE LICENSE AGREEMENT ( AGREEMENT ) CAREFULLY BEFORE USING THIS SOFTWARE. YOU ARE ONLY PERMITTED TO USE THIS
RDC-7 Windows XP Installation Guide
 RDC-7 Windows XP Installation Guide CONTENTS 1. End User License Agreement...3 2. Important notes...4 3. Customer support...4 4. Installing the USB driver...4 I. Prior to installation...4 II. Installation
LS9 Editor Installation Guide
 LS9 Editor Installation Guide ATTENTION SOFTWARE LICENCING AGREEMENT PLEASE READ THIS SOFTWARE LICENSE AGREEMENT ( AGREEMENT ) CAREFULLY BEFORE USING THIS SOFTWARE. YOU ARE ONLY PERMITTED TO USE THIS SOFTWARE
Welcome to Maritime Information Systems Merchant Vessel Database (MVDB)
") Welcome to Maritime Information Systems Merchant Vessel Database (MVDB) MVDB for Windows 95* and Windows 98 offers a complete U.S. Vessel Documentation database capable of searching, saving, exporting,
Welcome to Maritime Information Systems Merchant Vessel Database (MVDB) MVDB for Windows 95* and Windows 98 offers a complete U.S. Vessel Documentation database capable of searching, saving, exporting,
YAMAHA ASIO DirectKS Driver for Windows Owner's Manual
 YAMAHA ASIO DirectKS Driver for Windows Owner's Manual ATTENTION SOFTWARE LICENSE AGREEMENT PLEASE READ THIS SOFTWARE LICENSE AGREEMENT ( AGREEMENT ) CAREFULLY BEFORE USING THIS SOFTWARE. YOU ARE ONLY
AXIS Camera Station Quick Installation Guide
 AXIS Camera Station Quick Installation Guide Copyright Axis Communications AB April 2005 Rev. 3.5 Part Number 23997 1 Table of Contents Regulatory Information.................................. 3 AXIS Camera
OPERATING and MAINTENANCE MANUAL
 COMPLETE SOLUTIONS FOR ON-DEMAND CD and DVD PRODUCTION CD-R/DVD±R Automated Duplicator Combined Duplicator and Printer Series OPERATING and MAINTENANCE MANUAL 1 Thank you for purchasing a Verity Systems
Scanner Wedge for Windows Software User Guide
 Scanner Wedge for Windows Software User Guide Contents INSTALLING THE SCANNER WEDGE SOFTWARE 2 ACTIVATING THE SCANNER CONNECTION 3 TRACING SCANNER OUTPUT 7 FORMATTING OUTPUT 9 SELECTING START-UP OPTIONS
CANON FAX L360 SOFTWARE MANUAL
 CANON FAX L360 SOFTWARE MANUAL Before You Begin the Installation: a Checklist 2 To ensure a smooth and successful installation, take some time before you begin to plan and prepare for the installation
PRODUCT GUIDE. N u c l e u s D a t a R e c o v e r y. C o m P riv a t e L i m i t e d
 PRODUCT GUIDE Table of Contents 1. Introduction to Kernel SQL Password Recovery... 4 1.1 Using this Manual... 4 1.2 About Kernel SQL Password Recovery... 5 1.4 Who Should Use this Software?... 5 2. Getting
PC System Recovery. Guide
 PC System Recovery Guide Copyright Notice No part of this publication may be copied, transmitted, stored in a retrieval system or translated into any language in any form or by any means without the expressed
Operating Instructions
 Operating Instructions (For Setting up the Printer Driver and the Panasonic Document Management System) Digital Imaging Systems Model No. DP-800P / 800E / 806P Installation Table of Contents Installation
Corrosion Data Management Software Version 3.1.3
 Corrosion Data Management Software Version 3.1.3 Metal Samples Corrosion Monitoring Systems A Division of Alabama Specialty Products, Inc. 152 Metal Samples Road, Munford, AL 36268 Phone: 256-358-4202
UFR II Driver Guide. UFR II Driver Ver. 2.20 ENG
 UFR II Driver Guide UFR II Driver Ver. 2.20 Please read this guide before operating this product. After you finish reading this guide, store it in a safe place for future reference. ENG 0 Ot UFR II Driver
COM Port Stress Test
 COM Port Stress Test COM Port Stress Test All rights reserved. No parts of this work may be reproduced in any form or by any means - graphic, electronic, or mechanical, including photocopying, recording,
Printer Driver Installation Manual
 Printer Driver Installation Manual Copyrights Any unauthorized reproduction of the contents of this document, in part or whole, is strictly prohibited. Limitation of Liability SATO Corporation and its
CompleteView Alarm Client User s Manual. Version 3.8
 CompleteView Alarm Client User s Manual Version 3.8 Table Of Contents Introduction... 1 Overview... 2 System Requirements... 2 Configuration... 3 Starting the Alarm Client... 3 Menus... 3 File Menu...
How To Run Qqripper On A Cd Or Mp3 Player (For Pc)
") QQripper The Autoloader Software Automates Music Disc Ripping with Windows Media Player or itunes For automated ripping of a stack of music CD; Convert audio tracks from music discs to hard disk or MP3
QQripper The Autoloader Software Automates Music Disc Ripping with Windows Media Player or itunes For automated ripping of a stack of music CD; Convert audio tracks from music discs to hard disk or MP3
SOFTWARE INSTALLATION AND USB CONNECTION GUIDE
 SOFTWARE INSTALLATION AND USB CONNECTION GUIDE ENGLISH LYT1086-001A COPYRIGHT 2003 VICTOR COMPANY OF JAPAN, LTD. M3D3/D1 DSC Printed in Japan 1202-HO-ID-VP JVC SOFTWARE LICENSE AGREEMENT IMPORTANT TO CUSTOMERS:
Customer Appointment Manager
 Customer Appointment Manager Getting Started Guide Standard & Pro Editions This page is intentionally blank. ii License Agreement Software License Agreement PLEASE READ THIS DOCUMENT CAREFULLY BEFORE USING
Installing USB Drivers With Microsoft Windows XP
 Installing USB Drivers With Microsoft Windows XP Legal Notice No part of this guide may be reproduced, transmitted, transcribed, stored in a retrieval system, or translated into any computer language,
Exeba -ATS. User Guide. Escan Technologies Corporation
 Escan Technologies Corporation Exeba -ATS User Guide Escan Technologies Corp. 12140 Severn Way Riverside, CA 92503 Phone (909) 270-0043 Fax (909) 270-0920 1 ESCAN TECHNOLOGIES CORPORATION Exeba -ATS User
NCD ThinPATH Load Balancing Startup Guide
 NCD ThinPATH Load Balancing Startup Guide Copyright Copyright 1999 by Network Computing Devices, Inc. (NCD).The information contained in this document is subject to change without notice. Network Computing
Installation & Upgrade Guide. Hand-Held Configuration Devices Mobility DHH820-DMS. Mobility DHH820-DMS Device Management System Software
 Installation & Upgrade Guide Hand-Held Configuration Devices Mobility DHH820-DMS Mobility DHH820-DMS Device Management System Software WARNING notices as used in this manual apply to hazards or unsafe
CompleteView Alarm Client User Manual. CompleteView Version 4.3
 CompleteView Alarm Client User Manual CompleteView Version 4.3 Table of Contents Introduction...1 Overview... 2 System Requirements... 2 Configuration...3 Starting the Alarm Client... 3 Menus... 3 File
DME Setup Manual. Workflow
 DME Setup Manual Workflow This manual describes the process of setting up a DME system, from making the initial DME processor settings (DME64N / DME24N / DME8i-C / DME8o-C / DME4io-C / DME8i-ES / DME8o-ES
Intel Device View. User Guide
 Intel Device View User Guide Year 2000 Capable An Intel product, when used in accordance with its associated documentation, is Year 2000 Capable when, upon installation, it accurately stores, displays,
Updates Click to check for a newer version of the CD Press next and confirm the disc burner selection before pressing finish.
 Backup. If your computer refuses to boot or load Windows or if you are trying to restore an image to a partition the Reflect cannot lock (See here), and then you will have to start your PC using a rescue
Power Log PC Application Software
 Power Log PC Application Software Users Manual May 2007 Rev. 1, 5/08 2007-2008 Fluke Corporation. All rights reserved. Specifications are subject to change without notice. All product names are trademarks
FAS Asset Accounting FAS CIP Accounting FAS Asset Inventory SQL Server Installation & Administration Guide Version 2011.1
 FAS Asset Accounting FAS CIP Accounting FAS Asset Inventory SQL Server Installation & Administration Guide Version 2011.1 2011 Sage Software, Inc. All rights reserved. Published by Sage 2325 Dulles Corner
Crestron VMK-WIN TouchPoint Virtual Mouse & Keyboard Software for Windows Installation Guide
 Crestron VMK-WIN TouchPoint Virtual Mouse & Keyboard Software for Windows Installation Guide This document was prepared and written by the Technical Documentation department at: Crestron Electronics, Inc.
VERITAS Backup Exec 9.1 for Windows Servers Quick Installation Guide
 VERITAS Backup Exec 9.1 for Windows Servers Quick Installation Guide N109548 Disclaimer The information contained in this publication is subject to change without notice. VERITAS Software Corporation makes
e-dpp 4.0.2 May 2013 Quick Installation Guide Microsoft Windows 2003 Server, XP, Vista, 7 Access Database
 e-dpp 4.0.2 May 2013 Microsoft Windows 2003 Server, XP, Vista, 7 Access Database ELTECHS Engineering and Consulting Co., Ltd., Japan www.eltechs.co.jp Tel No. +81 (47) 490-1010 Fax No. +81 (47) 490-1011
QuickBack. User s Guide
 QuickBack Data backup, volume cloning and file / folder archiving utility. Features automated scheduling, compression, encryption, CD/DVD burning and can preserve volume backup bootability. Part of the
2-Bay Raid Sub-System Smart Removable 3.5" SATA Multiple Bay Data Storage Device User's Manual
 2-Bay Raid Sub-System Smart Removable 3.5" SATA Multiple Bay Data Storage Device User's Manual www.vipower.com Table of Contents 1. How the SteelVine (VPMP-75211R/VPMA-75211R) Operates... 1 1-1 SteelVine
Employee Time Clock User Manual
 Employee Time Clock User Manual PURPOSE: This software package was created to maintain accurate account of the employees working hours. Employees new and old - can easily be added/deleted and viewed at
hp digital home networking wireless USB network adapter hn210w quick start guide
 hp digital home networking wireless USB network adapter hn210w quick start guide Revision #: 15 Page: 1 of 11 Printed: 08/15/01 04:44 PM The Hewlett-Packard Company makes no warranty of any kind with regard
DSG SoftPhone & USB Phone Series User Guide
 DSG SoftPhone & USB Phone Series User Guide Table of Contents Overview Before You Start Installation Step 1. Installing DSG SoftPhone Step 2. Installing USB Phone Step 3. System Check First Time Use Step
VERITAS Backup Exec TM 10.0 for Windows Servers
 VERITAS Backup Exec TM 10.0 for Windows Servers Quick Installation Guide N134418 July 2004 Disclaimer The information contained in this publication is subject to change without notice. VERITAS Software
CompleteView Pop Up Monitor User s Manual. Version 3.8
 CompleteView Pop Up Monitor User s Manual Version 3.8 Table of Contents Introduction... 3 End User License Agreement... 4 System Requirements... 5 Installation... 6 Operating the Pop Up Monitor... 11 Normal
Centran Version 4 Getting Started Guide KABA MAS. Table Of Contents
 Page 1 Centran Version 4 Getting Started Guide KABA MAS Kaba Mas Welcome Kaba Mas, part of the world-wide Kaba group, is the world's leading manufacturer and supplier of high security, electronic safe
ivms-4200 Client Software Quick Start Guide
 ivms-4200 Client Software Quick Start Guide Notices The information in this documentation is subject to change without notice and does not represent any commitment on behalf of HIKVISION. HIKVISION disclaims
KEPServerEX Client Connectivity Guide
 KEPServerEX Client Connectivity Guide For Clear Controls ClearView KTSM-00023 v. 1.04 KEPWARE END USER LICENSE AGREEMENT AND LIMITED WARRANTY The software accompanying this license agreement (the Software)
Database Client/Server
 Part IV Database Client/Server Database Server 1. Run srvadmin.exe (you can add to the Windows Startup folder). Figure IV.1 DBISAM Database Server Icon Figure IV.2 DBISAM Database Server Status E-Mon Energy
Ash Capture Control User Guide
 Ash Capture Control User Guide Revision 1.4 Table of Contents Software Installation... 3 Hardware Installation... 6 System Block Diagram... 7 Using Ash Capture Control... 8 Launching the Application...
Dell Statistica 13.0. Statistica Enterprise Installation Instructions
 Dell Statistica 13.0 2015 Dell Inc. ALL RIGHTS RESERVED. This guide contains proprietary information protected by copyright. The software described in this guide is furnished under a software license or
Motorola Phone Tools. Quick Start
 Motorola Phone Tools Quick Start Contents Minimum Requirements...2 Before Installing Motorola Phone Tools...3 Installing Motorola Phone Tools...4 Mobile Device Installation and Configuration...5 Online
File Management Utility. T u t o r i a l
 File Management Utility T u t o r i a l Contents System Requirements... 2 Preparing Files for Transfer to GlobalMark... 2 Application Launch... 2 Printer Setup... 2 Communication Status... 4 Communication
5-Bay Raid Sub-System Smart Removable 3.5" SATA Multiple Bay Data Storage Device User's Manual
 5-Bay Raid Sub-System Smart Removable 3.5" SATA Multiple Bay Data Storage Device User's Manual www.vipower.com Table of Contents 1. How the SteelVine (VPMP-75511R/VPMA-75511R) Operates... 1 1-1 SteelVine
LPR for Windows 95/98/Me/2000/XP TCP/IP Printing User s Guide. Rev. 03 (November, 2001)
") LPR for Windows 95/98/Me/2000/XP TCP/IP Printing User s Guide Rev. 03 (November, 2001) Copyright Statement Trademarks Copyright 1997 No part of this publication may be reproduced in any form or by any
LPR for Windows 95/98/Me/2000/XP TCP/IP Printing User s Guide Rev. 03 (November, 2001) Copyright Statement Trademarks Copyright 1997 No part of this publication may be reproduced in any form or by any
USB 2.0 VGA ADAPTER USER MANUAL
 USB 2.0 VGA ADAPTER USER MANUAL CONTENTS INTRODUCTION... 3 FEATURES... 3 SYSTEM REQUIREMENTS... 3 PACKAGE CONTENTS... 3 SUPPORTED COMMON DISPLAY RESOLUTION... 4 TECHNICAL SPECIFICATIONS... 4 INSTALLATION
Global Server Installation Guide
 Global Server Installation Guide AVEVA Solutions Ltd Disclaimer Information of a technical nature, and particulars of the product and its use, is given by AVEVA Solutions Ltd and its subsidiaries without
Option nv, Gaston Geenslaan 14, B-3001 Leuven Tel +32 16 317 411 Fax +32 16 207 164 http://www.option.com Page 1 of 14
 Page 1 of 14 ! " #!"#$ % &&' Page 2 of 14 1 INTRODUCTION One of the highly desirable features of the GlobeSurfer III device is the ability to network together Printers and External Hard Disk drives (aka
Installing the Gerber P2C Plotter USB Driver
 Installing the Gerber P2C Plotter USB Driver 1 You can install a Gerber P2C plotter using a USB connection and communicate with it using compatible design software. The following procedures describe installing
Symantec Backup Exec TM 11d for Windows Servers. Quick Installation Guide
 Symantec Backup Exec TM 11d for Windows Servers Quick Installation Guide September 2006 Symantec Legal Notice Copyright 2006 Symantec Corporation. All rights reserved. Symantec, Backup Exec, and the Symantec
GX-2009 Data Logger Management Program Operator s Manual
 GX-2009 Data Logger Management Program Operator s Manual Part Number: 71-0163RK Revision: C Released: 3/19/12 www.rkiinstruments.com Warranty RKI Instruments, Inc. warrants gas alarm equipment sold by
Table of Content. Introduction. Software Install and Uninstall. Software Features and GUI. Quick Getting Started Guide. Frequently Asked Questions
 Table of Content Introduction Overview System Requirements Software Install and Uninstall Install Uninstall Software Features and GUI Software Menu Options Software Navigation Quick Getting Started Guide
Getting Started with DLS 2002 Downloading Software
 Getting Started with DLS 2002 Downloading Software DLS downloading software allows the user to program, monitor, and operate all DSC panels Before installing this software, read the licensing agreement.
Installation Manual LATC-W1
 Installation Manual PRODUCT NAME Controller Setting Software MODEL / Series / Product Number LATC-W1 [Before using this product] Read the "End-User License Agreement" shown on the next page carefully and
Acer LCD Monitor Driver Installation Guide
 1 Contents 1 Contents... 1 2 Introduction... 2 3 Installation Guide... 2 3.1 PC requirements... 2 3.2 Installing the Acer LCD Monitor Driver on Windows Vista... 3 3.2.1 Hardware first install... 3 3.2.2
POS-X Stock Manager User s Guide
 POS-X Stock Manager User s Guide Version 1.3 Copyright 2005 POS-X Inc. All rights reserved. POS-X.com 1-800-790-8657 1 POS-X Stock Manager User s Guide Stock Manager Version 1.1.67 POS-X Inc. Telephone:
Table of Contents. 2 Getting Started Guide
 Table of Contents Welcome... 3 Training & Support... 3 Accessing the online support center... 4 1. System Requirements... 5 2. Installing the Free Evaluation Version... 7 3. Software Download Instructions...
Image Backup and Recovery Procedures
 Image Backup and Recovery Procedures Thank you for purchasing a Fujitsu computer. Fujitsu is committed to bringing you the best computing experience with your new system. It is very important that you
INSTALLATION GUIDE. AXIS Camera Station
 INSTALLATION GUIDE AXIS Camera Station About this Guide This guide is intended for administrators and users of the AXIS Camera Station, and is applicable for software release 3.50 and later. It covers
PN-T321 LCD MONITOR. USB Flash Drive Media Tool OPERATION MANUAL
 PN-T321 LCD MONITOR USB Flash Drive Media Tool OPERATION MANUAL Contents Introduction...2 Installing/Uninstalling the Software...3 System Requirements...3 Installing the Software...3 Uninstalling...3 Using
Gilibrator 2. Flow Monitoring Software. Version 2.0 for Windows (Windows 98 or later) USER MANUAL
 USER MANUAL") Gilibrator 2 Flow Monitoring Software Version 2.0 for Windows (Windows 98 or later) USER MANUAL 16333 Bay Vista Dr. Clearwater, FL 33760 (800) 451-9444 (727) 539-0550 (FAX) Revision A Document No. 360-0049-01
Gilibrator 2 Flow Monitoring Software Version 2.0 for Windows (Windows 98 or later) USER MANUAL 16333 Bay Vista Dr. Clearwater, FL 33760 (800) 451-9444 (727) 539-0550 (FAX) Revision A Document No. 360-0049-01
Pleiades USB/LAN. User Manual. & Installation Guide. External Storage Enclosure for 3.5 Hard Drive. v1.1
 Pleiades USB/LAN External Storage Enclosure for 3.5 Hard Drive User Manual & Installation Guide v1.1 Table of Contents CHAPTER 1 - INTRODUCTION - 1 - CHAPTER 4 LAN DISK SETUP - 11 - ICON KEY - 1 - NETWORK
RSM Web Gateway RSM Web Client INSTALLATION AND ADMINISTRATION GUIDE
 RSM Web Gateway RSM Web Client INSTALLATION AND ADMINISTRATION GUIDE Installation and Administration Guide RSM Web Client and RSM Web Gateway 17 August, 2004 Page 1 Copyright Notice 2004 Sony Corporation.
NOTE: PLEASE DO NOT ATTEMPT TO INSTALL THE SOFTWARE BEFORE READING THIS DOCUMENT.
 INLINE 5 Software INSTALL BULLETIN Page 2: Installing INLINE 5 Page 6: Removing INLINE 5 NOTE: PLEASE DO NOT ATTEMPT TO INSTALL THE SOFTWARE BEFORE READING THIS DOCUMENT. IMPROPER INSTALLATION OR USE CAN
System Requirements. Installation. Microsoft SQL Express 2008 R2 Installation
 Contents System Requirements... 3 Installation... 3 Microsoft SQL Express 2008 R2 Installation... 3 Microsoft.NET Framework 4.0 Installation... 7 InFocus Management Tool Installation... 8 Log In... 10
Database Binary Backup PC Utility
 Database Binary Backup PC Utility Reference Manual (Version 3.xx) DRAFT 2 The flexible way to communicate The information contained in this document is proprietary and is subject to all relevant copyright,
TRENDnet. <a href="mailto:webmaster@ trendnet.com"> www.trendnet.com. Quick Installation Guide. Product Warranty Registration
 Quick Installation Guide Product Warranty Registration website at http://www.trendnet.com www.trendnet.com Please take a moment to register your product online.
CODESOFT Installation Scenarios
 CODESOFT Installation Scenarios NOTES: CODESOFT is a separate install from existing versions of CODESOFT. You will need to make note of your current settings (default directories, etc.) so you can duplicate
ENLTV-FM3. PCI TV Tuner Adapter with FM Radio. User s Guide
 ENLTV-FM3 PCI TV Tuner Adapter with FM Radio User s Guide User s Notice No part of this manual, including the products and software described in it, may be reproduced, transmitted, transcribed, stored
formerly Help Desk Authority 9.1.3 Upgrade Guide
 formerly Help Desk Authority 9.1.3 Upgrade Guide 2 Contacting Quest Software Email: Mail: Web site: [email protected] Quest Software, Inc. World Headquarters 5 Polaris Way Aliso Viejo, CA 92656 USA www.quest.com
Temperature & Humidity SMS Alert Controller
 Temperature & Humidity SMS Alert Controller Version 7 [Windows XP/Vista/7] GSMS THR / GSMS THP Revision 110507 [Version 2.2.14A] ~ 1 ~ SMS Alarm Messenger Version 7 [Windows XP/Vista/7] SMS Pro series
OBD2 PCM Programmer Quick Start Guide
 OBD2 PCM Programmer Quick Start Guide Table of Contents Introduction... 1 Minimum PC Requirements... 1 Program Installation... 1 Program Registration... 2 Program Setup... 3 Reading the PCM... 3 Programming
Image Backup and Recovery Procedures
 Image Backup and Recovery Procedures Thank you for purchasing a Fujitsu computer. Fujitsu is committed to bringing you the best computing experience with your new system. It is very important that you
Vess A2000 Series. NVR Storage Appliance. Windows Recovery Instructions. Version 1.0. 2014 PROMISE Technology, Inc. All Rights Reserved.
 Vess A2000 Series NVR Storage Appliance Windows Recovery Instructions Version 1.0 2014 PROMISE Technology, Inc. All Rights Reserved. Contents Introduction 1 Different ways to backup the system disk 2 Before
How to Download Images Using Olympus Auto-Connect USB Cameras and Olympus Master
 How to Download Images Using Olympus Auto-Connect USB Cameras and Olympus Master Introduction Auto-Connect USB is a feature that allows Olympus digital cameras to emulate a Hard disk drive when connected
Testo USB driver Windows XP, Vista and Windows 7. Information for use
 Testo USB driver Windows XP, Vista and Windows 7 Information for use en 2 General information General information Please take the time to read the Installation Instructions through carefully and make sure
Regulatory Compliance. IC Certification. FCC Certification. Declaration of Conformity
 VP6495 Regulatory Compliance This device complies with Part 15 of the FCC Rules. Operation is subject to the following two conditions: (1) This device may not cause harmful interference, and (2) This device
V2.7.x Installation on a Database Server Note: This document is to be used on a new database server installation.
 V2.7.x Installation on a Database Server Note: This document is to be used on a new database server installation. REVISION A DATE: 10/01/2009 CA3000 Software Installation Procedure Continental Access and
TotalShredder USB. User s Guide
 TotalShredder USB User s Guide Copyright Notice No part of this publication may be copied, transmitted, stored in a retrieval system or translated into any language in any form or by any means without
INSTALLATION AND UPGRADE
 1 INSTALLATION AND UPGRADE This chapter will explain how to install PastPerfect on a single computer or a network. It will also show you how to load data from an older version of PastPerfect. At the end
Penpower WorldocScan. User's Guide
 Penpower User's Guide Version: V1.0 Release: July 2008 Penpower Technology Ltd. Software User License Agreement You are licensed to legally use this software program ( the Software ) by Penpower Technology
Introduction 1-1 Installing FAS 500 Asset Accounting the First Time 2-1 Installing FAS 500 Asset Accounting: Upgrading from a Prior Version 3-1
 Contents 1. Introduction 1-1 Supported Operating Environments................ 1-1 System Requirements............................. 1-2 Security Requirements........................ 1-3 Installing Server
NETKEEPER Help Desk Captain SQL Installation with MSDE
 NETKEEPER Help Desk Captain SQL Installation with MSDE Multima Corporation 1 Rosewood Court East Greenwich, RI 02818-1543 Disclaimer: The pictures in this manual are representative of the program screens
C. System Requirements. Apple Software is supported only on Apple-branded hardware that meets specified system requirements as indicated by Apple.
 ENGLISH APPLE INC. SOFTWARE LICENSE AGREEMENT FOR APPLE STORE APPLICATION PLEASE READ THIS SOFTWARE LICENSE AGREEMENT ("LICENSE") CAREFULLY BEFORE USING THE APPLE SOFTWARE. BY USING THE APPLE SOFTWARE,
Samsung KIES Online User Update Procedure **
 Samsung KIES Online User Update Procedure ** ** IMPORTANT NOTES 1) Please backup all personal data stored on your mobile device (Contacts, Calendar, SMS, Email, Photos, Apps, Audio, Video, Documents and
Ver. 4.10 USERS MANUAL
 Ver. 4.10 USERS MANUAL First Edition Riteapprove SE User Document v4.10 Copyright 2010 by S. Ten Nines California LLC. All rights reserved. No part of this guide may be reproduced in any way or by any
ZConverter. Windows Backup v 3.5
 ZConverter ZConverter Windows Backup v 3.5 [User Guide] NOTE : DO NOT COPY, REPRODUCE OR REDISTRIBUTE WITHOUT EXPRESS WRITTEN CONSENT OF THE AUTHOR Copyright 2004-2010 ISA Technologies, Inc. ZConverter
LabelWriter. Print Server. User Guide
 LabelWriter Print Server User Guide Copyright 2010 Sanford, L.P. All rights reserved. 08/10 No part of this document or the software may be reproduced or transmitted in any form or by any means or translated