Starduino: 8-Bit Super Mario Tree Topper
|
|
|
- Lynette Rodgers
- 9 years ago
- Views:
Transcription
1 Starduino: 8-Bit Super Mario Tree Topper Created by John Park Last updated on :10:10 PM EST

2 Guide Contents Guide Contents Overview Print the Star Make the Blinky Electronics Code the Arduino Assemble the Awesome Starduino Page 2 of 25

3 Overview Let's build an 8-bit tree topper! This project uses the GEMMA to run a NeoPixel ring stuffed inside a 3D printed Mario star. You start out by printing four star model parts. Then, you'll build and program the circuit. Next comes assembly, and finally you'll power it up and place it atop your tree! (Thanks to Artie Beavis ( / AtmelMakes ( for the name!) Before you start, you should be familiar with using your 3D printer, and read up on these guides: Introducing GEMMA ( NeoPixel Uberguide ( Adafruit Guide to Excellent Soldering ( You'll need: 3D printer, such as Printrbot ( Translucent filament ( and black filament ( for 3D printer GEMMA ( mini Arduino-compatible microcontroller (can also substitute Trinket) RGB NeoPixel ( LEDs 16 x ring Soldering iron and solder Solid core ( or stranded ( wire (20 to 26 gauge) Helping third hand tool Wire strippers Flush diagonal cutters USB cable ( - A/MiniB - 3ft 5V 1A USB port power supply ( or USB battery pack ( Page 3 of 25
 Adafruit Guide to Excellent Soldering (http://adafru.it/dri) You'll need: 3D printer, such as Printrbot (http://adafru.it/1760) Translucent filament (http://adafru.")
4 Print the Star Time to heat and squeeze a length of humble, nondescript plastic filament into a delightful, three dimensional object! The model was built in Rhino using NURBS curves, extrusions, and solid booleans. The star has a cylindrical section designed to fit the GEMMA and NeoPixel ring, as well as a slot for the USB cable. The rectangular base piece has a complimentary section as well as posts to snap into the holes in the star once the electronics are in place, and a tubular section that to slide over the top of your tree. Page 4 of 25

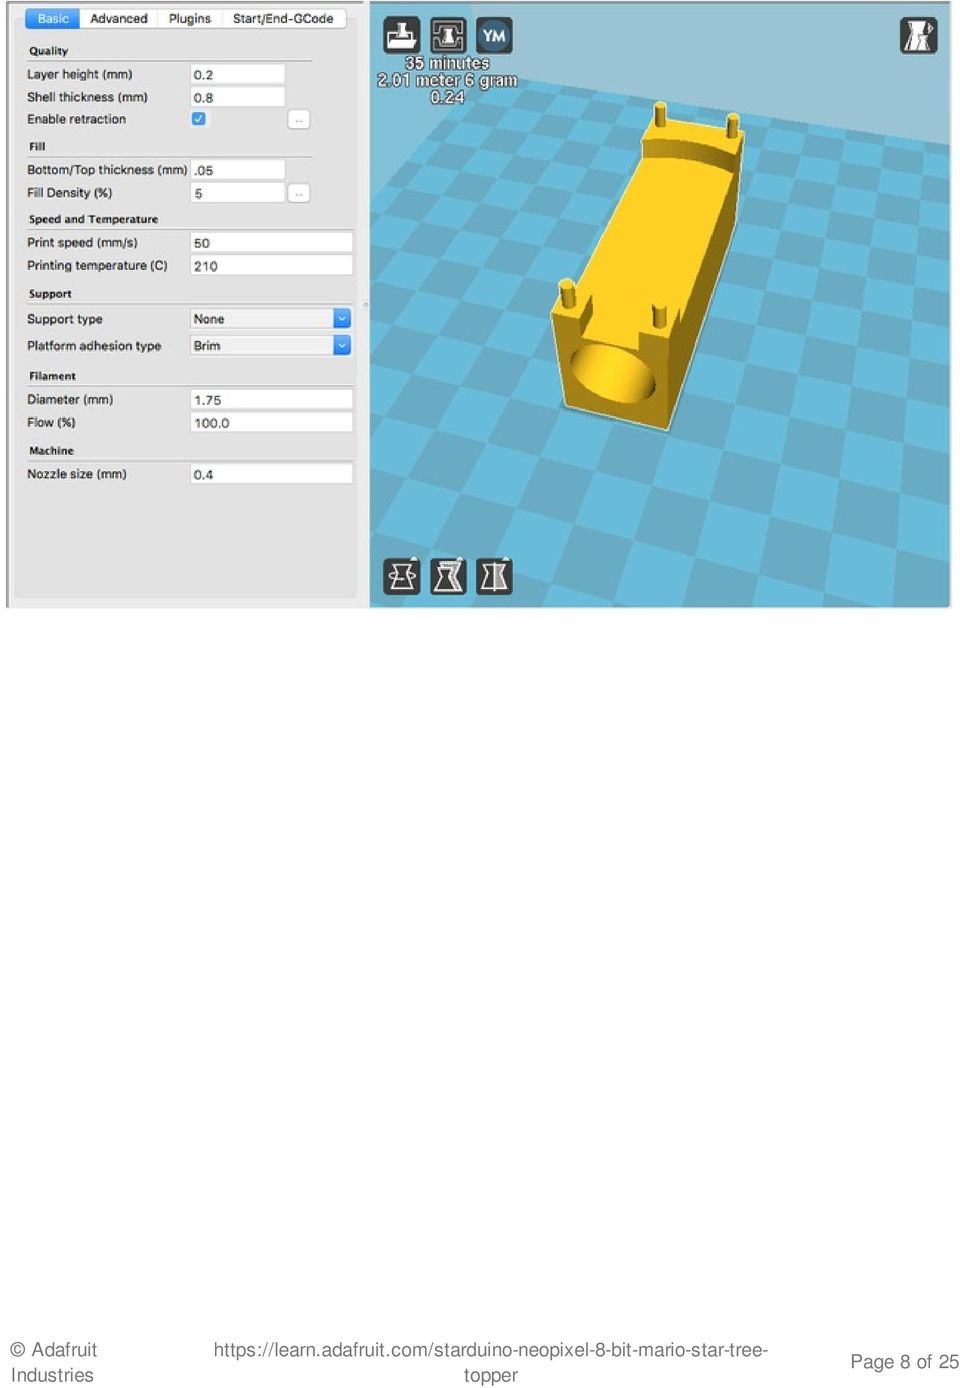
5 First, you'll need to download the model files from the link below. Download STL files Once downloaded, load the first model, StarduinoBody.stl, into CURA or another 3D printer slicer package. Page 5 of 25

6 Adjust the settings to suit your printer -- a fairly low resolution print with 5-10% infill works well. Then, load natural/translucent filament into your printer and print! Page 6 of 25

7 Next, load the StarduinoBase.stl model and print it with the same settings as the body. Page 7 of 25

8 Page 8 of 25
9 The final parts to print are the eyes. You may want to switch to black filament for these prints. Or, you may print with the same filament as before and then simply ink the eyes with black permanent marker. You can choose to print one eye at a time or both in one print job. Page 9 of 25

10 Once you've completed making the eyes, go ahead and press fit them into the star. Page 10 of 25

11 Page 11 of 25

12 Make the Blinky Electronics Controlling the NeoPixel ring's individual LEDs from the GEMMA is quite simple. Since the NeoPixels are individually addressable, the only connections needed between the ring and the GEMMA are for voltage, ground, and control signal. That's just three wires! Cut three short lengths of wire (enamel covered motor wire is used here, but you can use any type that you have handy). Strip a bit off their ends, then solder these connections: GEMMA GND -> NeoPixel Gnd GEMMA Vout -> NeoPixel Vcc GEMMA D0 -> NeoPixel IN Page 12 of 25
.")
13 Page 13 of 25

14 Page 14 of 25

15 Once sodering is completed, bend and tuck the wiring so that the GEMMA fits neatly inside the NeoPixel ring. Page 15 of 25

16 Page 16 of 25

17 Code the Arduino To program GEMMA, make sure you have followed the instructions found in the "Introducing GEMMA" guide ( Once you've got the GEMMA working, you can play with different example sketches, or code your own blinky pattern. If you'd like an exciting, fiery pattern to run, download and install the FastLED Arduino library found here ( and then copy the following Arduino sketch. #include <FastLED.h> #define LED_PIN 5 #define COLOR_ORDER GRB #define CHIPSET WS2811 #define NUM_LEDS 30 #define BRIGHTNESS 200 #define FRAMES_PER_SECOND 60 bool greversedirection = false; CRGB leds[num_leds]; void setup() { delay(3000); // sanity delay FastLED.addLeds<CHIPSET, LED_PIN, COLOR_ORDER>(leds, NUM_LEDS).setCorrection( TypicalLEDStri FastLED.setBrightness( BRIGHTNESS ); } void loop() { // Add entropy to random number generator; we use a lot of it. // random16_add_entropy( random()); Fire2012(); // run simulation frame } FastLED.show(); // display this frame FastLED.delay(1000 / FRAMES_PER_SECOND); // Fire2012 by Mark Kriegsman, July 2012 // as part of "Five Elements" shown here: //// Page 17 of 25

18 //// // This basic one-dimensional 'fire' simulation works roughly as follows: // There's a underlying array of 'heat' cells, that model the temperature // at each point along the line. Every cycle through the simulation, // four steps are performed: // 1) All cells cool down a little bit, losing heat to the air // 2) The heat from each cell drifts 'up' and diffuses a little // 3) Sometimes randomly new 'sparks' of heat are added at the bottom // 4) The heat from each cell is rendered as a color into the leds array // The heat-to-color mapping uses a black-body radiation approximation. // // Temperature is in arbitrary units from 0 (cold black) to 255 (white hot). // // This simulation scales it self a bit depending on NUM_LEDS; it should look // "OK" on anywhere from 20 to 100 LEDs without too much tweaking. // // I recommend running this simulation at anywhere from frames per second, // meaning an interframe delay of about milliseconds. // // Looks best on a high-density LED setup (60+ pixels/meter). // // // There are two main parameters you can play with to control the look and // feel of your fire: COOLING (used in step 1 above), and SPARKING (used // in step 3 above). // // COOLING: How much does the air cool as it rises? // Less cooling = taller flames. More cooling = shorter flames. // Default 50, suggested range #define COOLING 55 // SPARKING: What chance (out of 255) is there that a new spark will be lit? // Higher chance = more roaring fire. Lower chance = more flickery fire. // Default 120, suggested range #define SPARKING 120 void Fire2012() { // Array of temperature readings at each simulation cell static byte heat[num_leds]; // Step 1. Cool down every cell a little for( int i = 0; i < NUM_LEDS; i++) { heat[i] = qsub8( heat[i], random8(0, ((COOLING * 10) / NUM_LEDS) + 2)); } Page 18 of 25
 to 255 (white hot).")
19 // Step 2. Heat from each cell drifts 'up' and diffuses a little for( int k= NUM_LEDS - 1; k >= 2; k--) { heat[k] = (heat[k - 1] + heat[k - 2] + heat[k - 2] ) / 3; } // Step 3. Randomly ignite new 'sparks' of heat near the bottom if( random8() < SPARKING ) { int y = random8(7); heat[y] = qadd8( heat[y], random8(160,255) ); } } // Step 4. Map from heat cells to LED colors for( int j = 0; j < NUM_LEDS; j++) { CRGB color = HeatColor( heat[j]); int pixelnumber; if( greversedirection ) { pixelnumber = (NUM_LEDS-1) - j; } else { pixelnumber = j; } leds[pixelnumber] = color; } Plug the GEMMA into a USB cable connected to your computer, press and release the reset button on the GEMMA (the red LED on the GEMMA will blink) and then use the Arduino software IDE to upload the sketch to the board. Page 19 of 25
![Map from heat cells to LED colors for( int j = 0; j < NUM_LEDS; j++) { CRGB color = HeatColor( heat[j]); int pixelnumber; if( greversedirection ) { pixelnumber = (NUM_LEDS-1) - j; } else {](/docs-images/48/23798285/images/page_19.jpg "pixelnumber = j; } leds[pixelnumber] = color; } Plug the GEMMA into a USB cable connected to your computer, press and release the reset button on the GEMMA (the red LED on the GEMMA will blink) and")
20 Page 20 of 25

21 Page 21 of 25
22 Page 22 of 25
23 Assemble the Awesome Starduino The final step is to put the electronics into the star. Simply place the NeoPixel/GEMMA bundle into the cylindrical recess in the star with the LEDs facing forward, plug in the USB cable, and then place the base model onto the backside, snapping the four posts into place. It should all hold together nicely via friction. Page 23 of 25
24 Page 24 of 25
25 Plug the USB cable into a power source -- either a wall adapter or a battery -- and watch it sparkle! All that's left is to top your tree with your rad 8-bit Super Mario star! Last Updated: :10:11 PM EST Page 25 of 25
DIY Pocket LED Gamer - Tiny Tetris!
 DIY Pocket LED Gamer - Tiny Tetris! Created by Jianan Li Last updated on 2014-12-11 11:00:38 AM EST Guide Contents Guide Contents Overview Menu Brightness Adjust Tetris Snake Paint Parts & Tools Parts
Arduino Lesson 1. Blink
 Arduino Lesson 1. Blink Created by Simon Monk Last updated on 2015-01-15 09:45:38 PM EST Guide Contents Guide Contents Overview Parts Part Qty The 'L' LED Loading the 'Blink' Example Saving a Copy of 'Blink'
Bluetooth + USB 16 Servo Controller [RKI-1005 & RKI-1205]
![Bluetooth + USB 16 Servo Controller [RKI-1005 & RKI-1205]](/thumbs/40/21161302.jpg "Bluetooth + USB 16 Servo Controller [RKI-1005 & RKI-1205]") Bluetooth + USB 16 Servo Controller [RKI-1005 & RKI-1205] Users Manual Robokits India [email protected] http://www.robokitsworld.com Page 1 Bluetooth + USB 16 Servo Controller is used to control up to
Bluetooth + USB 16 Servo Controller [RKI-1005 & RKI-1205] Users Manual Robokits India [email protected] http://www.robokitsworld.com Page 1 Bluetooth + USB 16 Servo Controller is used to control up to
7" Portable HDMI Monitor
 7" Portable HDMI Monitor Created by Ruiz Brothers Last updated on 2015-10-28 06:10:09 PM EDT Guide Contents Guide Contents Overview DIY Monitor Connect to a Raspberry pi Use as a second monitor Camera
Cell Phone Charging Purse
 Cell Phone Charging Purse Created by Becky Stern Last updated on 2015-02-20 01:00:16 PM EST Guide Contents Guide Contents Overview Prepare USB and Power Supply Create a Charging Shelf Install Coil in Bag
Arduino Lesson 14. Servo Motors
 Arduino Lesson 14. Servo Motors Created by Simon Monk Last updated on 2013-06-11 08:16:06 PM EDT Guide Contents Guide Contents Overview Parts Part Qty The Breadboard Layout for 'Sweep' If the Servo Misbehaves
DS1307 Real Time Clock Breakout Board Kit
 DS1307 Real Time Clock Breakout Board Kit Created by Tyler Cooper Last updated on 2015-10-15 11:00:14 AM EDT Guide Contents Guide Contents Overview What is an RTC? Parts List Assembly Arduino Library Wiring
Character LCDs. Created by Ladyada. Last updated on 2013-07-26 02:45:29 PM EDT
 Character LCDs Created by Ladyada Last updated on 2013-07-26 02:45:29 PM EDT Guide Contents Guide Contents Overview Character vs. Graphical LCDs LCD Varieties Wiring a Character LCD Installing the Header
User Guide Reflow Toaster Oven Controller
 User Guide Reflow Toaster Oven Controller Version 1.5-01/10/12 DROTEK Web shop: www.drotek.fr SOMMAIRE 1. Introduction... 3 2. Preparation of THE REFLOW CONTROLLER... 4 2.1. Power supply... 4 2.2. USB
DIY Wearable Pi with Near-Eye Video Glasses
 DIY Wearable Pi with Near-Eye Video Glasses Created by Ruiz Brothers Last updated on 2015-02-20 09:31:15 AM EST Guide Contents Guide Contents Overview 3D Printing Disassembly Assembly Video Configurations
ROTOPOD PERISCOPE LIGHTING KIT (for MCWHLR & Daniel D/Xeno Periscopes)
") ROTOPOD PERISCOPE LIGHTING KIT (for MCWHLR & Daniel D/Xeno Periscopes) 14-APR-2012_rev 1.2 I designed the Periscope Lighting Kit to be as flexible as possible. Every LED is individually controllable. I
ROTOPOD PERISCOPE LIGHTING KIT (for MCWHLR & Daniel D/Xeno Periscopes) 14-APR-2012_rev 1.2 I designed the Periscope Lighting Kit to be as flexible as possible. Every LED is individually controllable. I
FUEL CELL CAR SCIENCE KIT ASSEMBLY GUIDE. Battery operation instructions:
 FUEL CELL CAR SCIENCE KIT ASSEMBLY GUIDE Battery operation instructions: 1. The removing and inserting of batteries is to be conducted by the adults only. Unscrew the screw holding the battery pack s cover
Printrbot Getting Started Guide. For models: Printrbot Plus (v2) Printrbot LC (v2) Printrbot jr
 Printrbot LC (v2) Printrbot jr") Printrbot Getting Started Guide For models: Printrbot Plus (v2) Printrbot LC (v2) Printrbot jr Contents 4 Chapter 1: Welcome 4 Overview 4 Support 5 Chapter 2: Your Printrbot has arrived... now what? 5
Printrbot Getting Started Guide For models: Printrbot Plus (v2) Printrbot LC (v2) Printrbot jr Contents 4 Chapter 1: Welcome 4 Overview 4 Support 5 Chapter 2: Your Printrbot has arrived... now what? 5
Arduino Lesson 0. Getting Started
 Arduino Lesson 0. Getting Started Created by Simon Monk Last updated on 204-05-22 2:5:0 PM EDT Guide Contents Guide Contents Overview Parts Part Qty Breadboard Installing Arduino (Windows) Installing Arduino
HYDRA HV OPERATION MANUAL. 2.0 Making Connections on your HYDRA speed control. Rosin core electrical solder
 HYDRA HV OPERATION MANUAL Starting Power Safe power on arming program helps prevent motor from accidentally turning on. Always use extreme care with high power systems. Auto shut down when signal is lost
Printrbot Getting Started Guide. For models: Simple
 Printrbot Getting Started Guide For models: Simple Contents 4 4 4 5 5 5 6 6 6 6 7 8 Chapter 1: Welcome Overview Support Chapter 2: Your Printrbot has arrived... now what? Printrbot Kits Pre-Assembled Printrbots
Getting started with the O Watch
 Getting started with the O Watch Congratulations on your very own O Watch kit! O Watch kit has all the pieces you will need to make your watch. In this project you will learn how electronic parts fit together
DEPARTMENT OF ELECTRONICS ENGINEERING
 UNIVERSITY OF MUMBAI A PROJECT REPORT ON Home Security Alarm System Using Arduino SUBMITTED BY- Suman Pandit Shakyanand Kamble Vinit Vasudevan (13103A0011) (13103A0012) (13103A0018) UNDER THE GUIDANCE
PLEASE READ ALL DIRECTIONS BEFORE STARTING INSTALLATION
 PARTS LIST FUEL AND IGNITION 2012-2014 Yamaha T-Max 530 Installation Instructions 1 Power Commander 1 USB Cable 1 Installation Guide 2 Power Commander Decals 2 Dynojet Decals 2 Velcro strips 1 Alcohol
12 Volt 30 Amp Digital Solar Charge Controller Installation & Operation Manual
 12 Volt 30 Amp Digital Solar Charge Controller Installation & Operation Manual This 30Amp charge controller is designed to protect your 12Volt Lead-acid or Gel-cell battery from being overcharge by solar
step 1 Unpack the lunchbox And check whether you have got all the components~ If you have questions please contact us at: info@unitunlikely.
 step 1 Unpack the lunchbox And check whether you have got all the components~ If you have questions please contact us at: [email protected] This part is called the PCB (printed circuit board). All
TSL2561 Luminosity Sensor
 TSL2561 Luminosity Sensor Created by lady ada Last updated on 2015-06-12 12:10:28 PM EDT Guide Contents Guide Contents Overview Wiring the TSL2561 Sensor Using the TSL2561 Sensor Downloads Buy a TSL2561
Arduino Lesson 13. DC Motors. Created by Simon Monk
 Arduino Lesson 13. DC Motors Created by Simon Monk Guide Contents Guide Contents Overview Parts Part Qty Breadboard Layout Arduino Code Transistors Other Things to Do 2 3 4 4 4 6 7 9 11 Adafruit Industries
tidesmarine Smart Seal Temperature Alarm System Generation II Installation Instructions Starboard side cable
 tidesmarine Smart Seal Temperature Alarm System Generation II Installation Instructions Starboard side cable Port side cable (with black cable tie attached) Power cable Preparing for Installation 1 Overall
User s Manual. BNC Mini-High Res, 75 Ohm Termination Kit Connector Installation Guide (60-073-01)
") User s Manual BNC Mini-High Res, 75 Ohm Termination Kit Connector Installation Guide (60-073-01) BNC Termination Kit Instructions This document is a compilation of Extron s instructions, together with
User s Manual BNC Mini-High Res, 75 Ohm Termination Kit Connector Installation Guide (60-073-01) BNC Termination Kit Instructions This document is a compilation of Extron s instructions, together with
IR Communication a learn.sparkfun.com tutorial
 IR Communication a learn.sparkfun.com tutorial Available online at: http://sfe.io/t33 Contents Getting Started IR Communication Basics Hardware Setup Receiving IR Example Transmitting IR Example Resources
Transfer of Energy Forms of Energy: Multiple Transformations
 Transfer of Energy Forms of Energy: Multiple Transformations Discovery Question What energy transformations are used in everyday devices? Introduction Thinking About the Question Materials Safety Trial
Adafruit Proto Shield for Arduino
 Adafruit Proto Shield for Arduino Created by lady ada Last updated on 2016-08-04 11:06:30 PM UTC Guide Contents Guide Contents Overview Make it! Lets go! Preparation Prep Tools Parts list Parts List Optional
WINDOWS 7/8 instruction guide for your Printrbot printer and computer software
 Software To start printing with your Printrbot Simple 3d printer, you need to download 3 pieces of software and two digital models (STL files). 1. The teensy Serial Driver. This connects the printer to
FTDI VCP DRIVER (free) (WIN/MAC/LINUX) http://www.ftdichip.com/drivers/vcp.htm
 (WIN/MAC/LINUX) http://www.ftdichip.com/drivers/vcp.htm") 002 - CONNECTING THE PRINTER Now that you have an idea what 3D printing entails, we can continue and connect the printer to your computer. First make sure you have a computer with a decent amount of RAM
002 - CONNECTING THE PRINTER Now that you have an idea what 3D printing entails, we can continue and connect the printer to your computer. First make sure you have a computer with a decent amount of RAM
3D Print Link's Hylian Shield
 3D Print Link's Hylian Shield Created by Ruiz Brothers Last updated on 2015-07-14 04:20:12 PM EDT Guide Contents Guide Contents Overview Parts, Tool & Supplies 3D Printing 3D Printed Parts Slicer Settings
3D Printing with NinjaFlex
 3D Printing with NinjaFlex Created by Ruiz Brothers Last updated on 2016-01-21 05:10:08 PM EST Guide Contents Guide Contents Overview Ninjaflex VS SemiFlex The Original NinjaFlex NinjaFlex Wearables, LED
Odyssey of the Mind Technology Fair. Simple Electronics
 Simple Electronics 1. Terms volts, amps, ohms, watts, positive, negative, AC, DC 2. Matching voltages a. Series vs. parallel 3. Battery capacity 4. Simple electronic circuit light bulb 5. Chose the right
K8025 VIDEO PATTERN GENERATOR. Check the picture quality of your monitor or TV, ideal for adjustment or troubleshooting.
 K8025 ILLUSTRATED ASSEMBLY MANUAL H8025IP 1 VIDEO PATTERN GENERATOR Check the picture quality of your monitor or TV, ideal for adjustment or troubleshooting. Forum Participate our Velleman Projects Forum
Arduino Lesson 4. Eight LEDs and a Shift Register
 Arduino Lesson 4. Eight LEDs and a Shift Register Created by Simon Monk Last updated on 2014-09-01 11:30:10 AM EDT Guide Contents Guide Contents Overview Parts Part Qty Breadboard Layout The 74HC595 Shift
The $25 Son of a cheap timer This is not suitable for a beginner. You must have soldering skills in order to build this kit.
 The $25 Son of a cheap timer This is not suitable for a beginner. You must have soldering skills in order to build this kit. Micro Wizard has been manufacturing Pinewood Derby timers for over 10 years.
12 Volt 30 Amp Digital Solar Charge Controller
 12 Volt 30 Amp Digital Solar Charge Controller User s Manual WARNING Read carefully and understand all INSTRUCTIONS before operating. Failure to follow the safety rules and other basic safety precautions
Battery Power for LED Pixels and Strips. Created by Phillip Burgess
 Battery Power for LED Pixels and Strips Created by Phillip Burgess Guide Contents Guide Contents Overview About Batteries Diode Fix for Alkaline Batteries Powering the Microcontroller Estimating Running
RS232/DB9 An RS232 to TTL Level Converter
 RS232/DB9 An RS232 to TTL Level Converter The RS232/DB9 is designed to convert TTL level signals into RS232 level signals. This cable allows you to connect a TTL level device, such as the serial port on
RGB LED Strips. Created by lady ada. Last updated on 2015-12-07 12:00:18 PM EST
 RGB LED Strips Created by lady ada Last updated on 2015-12-07 12:00:18 PM EST Guide Contents Guide Contents Overview Schematic Current Draw Wiring Usage Example Code Support Forums 2 3 5 6 7 10 12 13 Adafruit
AstroPrint 3D Printing
 AstroPrint 3D Printing Created by Ruiz Brothers Last updated on 2016-01-11 02:50:10 PM EST Guide Contents Guide Contents Overview WiFi 3D Printing Monitor 3D Printers Easy Installation Parts and Things
Guide for Modified Assembly: Lightning McQueen. By: Collin Patterson, University of Delaware. Materials and Tools:
 Guide for Modified Assembly: Lightning McQueen By: Collin Patterson, University of Delaware Materials and Tools: PVC o 40 inches of 1 in diameter PVC o 25 inches of ¾ in PVC o 4 x 1 in elbows o 2 x ¾ in
Creator Start-up Guide
 www.ff3dp.com Creator Start-up Guide Zhejiang Flashforge 3D Technology Co., Ltd. www.ff3dp.com Contents Precautions:... 1 1. What's in the box?...1 2. Unboxing... 2 3. Initial Hardware Installation...5
Eric Mitchell April 2, 2012 Application Note: Control of a 180 Servo Motor with Arduino UNO Development Board
 Eric Mitchell April 2, 2012 Application Note: Control of a 180 Servo Motor with Arduino UNO Development Board Abstract This application note is a tutorial of how to use an Arduino UNO microcontroller to
Installation Guide for Hive Active Heating
 Installation Guide for Hive Active Heating Important note: Installation should only ever be carried out by a qualified engineer. Technical Support If you need to contact Hive s Technical Support team during
Electronics and Soldering Notes
 Electronics and Soldering Notes The Tools You ll Need While there are literally one hundred tools for soldering, testing, and fixing electronic circuits, you only need a few to make robot. These tools
Adafruit MCP9808 Precision I2C Temperature Sensor Guide
 Adafruit MCP9808 Precision I2C Temperature Sensor Guide Created by lady ada Last updated on 2014-04-22 03:01:18 PM EDT Guide Contents Guide Contents Overview Pinouts Power Pins I2C Data Pins Optional Pins
SA-9600 Surface Area Software Manual
 SA-9600 Surface Area Software Manual Version 4.0 Introduction The operation and data Presentation of the SA-9600 Surface Area analyzer is performed using a Microsoft Windows based software package. The
Name: Bicycle Cellphone Charger Circuit Assembly Manual Device: Nokia/Blackberry List of Components:
 Name: Bicycle Cellphone Charger Circuit Assembly Manual Device: Nokia/Blackberry List of Components: Serial numbername Quantity Component number 1 5 V Regulator 1 U2 2 10 MicroFarad Capacitor 1 C1 3 22
Mirror Mount Video Monitor/Recorder with Front and Rear View Night Cameras PLCMDVR5
 Mirror Mount Video Monitor/Recorder with Front and Rear View Night Cameras PLCMDVR5 www.pyleaudio.com Instruction Manual Installation and Connection: 1. Please disconnect your car battery. 2. In the contents
Basic Pulse Width Modulation
 EAS 199 Fall 211 Basic Pulse Width Modulation Gerald Recktenwald v: September 16, 211 [email protected] 1 Basic PWM Properties Pulse Width Modulation or PWM is a technique for supplying electrical power
DotStar Belly Dance Fans
 DotStar Belly Dance Fans Created by Erin St Blaine Last updated on 2015-12-02 09:10:13 AM EST Guide Contents Guide Contents Overview Materials For Building One Fan Building the Fans Acrylic Fan Base Electronics
Pololu DRV8835 Dual Motor Driver Shield for Arduino
 Pololu DRV8835 Dual Motor Driver Shield for Arduino Pololu DRV8835 Dual Motor Driver Shield for Arduino, bottom view with dimensions. Overview This motor driver shield and its corresponding Arduino library
TECHNICAL SERVICE DEPARTMENT Technical Service Bulletin 1-800-432-8373. 2 Inch PowerVent LED Indicator Explanations & Troubleshooting Table
 New Robertshaw control valve was introduced in May 2008 as a replacement part. See last page for troubleshooting this replacement part. All voltage inputs are 120V. All electrical connectors are Molex
WIRE, TERMINAL AND CONNECTOR REPAIR CONDUCTORS
 CONDUCTORS Conductors are needed to complete the path for electrical current to flow from the power source to the working devices and back to the power source. Special wiring is needed for battery cables
Start A New Project with Keil Microcontroller Development Kit Version 5 and Freescale FRDM-KL25Z
 Start A New Project with Keil Microcontroller Development Kit Version 5 and Freescale FRDM-KL25Z This tutorial is intended for starting a new project to develop software with Freescale FRDM-KL25Z board
Motion Activated Camera User Manual
 Brinno MAC200 User Manual Last Modified on 12/23/2015 7:51 pm EST Motion Activated Camera User Manual www.brinno.com Register@online http://www.brinno.com/support/register.html contact us: [email protected]
Setting up the Hardware and Software. for a 3D Printer
 Setting up the Hardware and Software for a 3D Printer Caroline Kerbelis Application Note March 28th 2014 Design Team 8 ECE 480 Abstract The purpose of team 8 s project is to design, fabricate, simulate,
Arduino Lesson 9. Sensing Light
 Arduino Lesson 9. Sensing Light Created by Simon Monk Last updated on 2014-04-17 09:46:11 PM EDT Guide Contents Guide Contents Overview Parts Part Qty Breadboard Layout Photocells Arduino Code Other Things
Arduino Lesson 5. The Serial Monitor
 Arduino Lesson 5. The Serial Monitor Created by Simon Monk Last updated on 2013-06-22 08:00:27 PM EDT Guide Contents Guide Contents Overview The Serial Monitor Arduino Code Other Things to Do 2 3 4 7 10
Sample. What Electricity Can Do LESSON 2. Overview and Objectives. Background
 What Electricity Can Do Overview and Objectives Background Light bulbs are such an integral part of everyday life that most people can t imagine being without them. Because people tend to take light bulbs
EPSON Perfection 1650/1650 PHOTO. Scanner Parts. Scanner Specifications. Basic Specifications. device Effective pixels
 Scanner Parts Start and indicator light Photo Print USB port The has a transparency unit built into the scanner lid and holder for 35 mm film and slides: EPSON Perfection 1650 owners can purchase an optional
AXE114S BINARY CLOCK. revolution Revolution Education Ltd. Email: [email protected] Web: www.rev-ed.co.uk Version 1.1 12/09/08 AXE114.PMD.
 AXE114S BINARY CLOCK Features: The PICAXE binary clock kit tells the time by lighting up blue LEDs in a binary pattern. This is a useful tool for teaching students binary code or simply just confusing/
* DISCLAIMER: Contents. How to Use This Guide: COMMERCIAL INSTALL GUIDE 2
 COMMERCIAL INSTALL GUIDE 2 Contents How to Use This Guide: The first section of this guide is designed to assist you with the installation of your DECK Monitoring hardware. The revenue grade meter and
Lesson 8: Simon - Arrays
 Lesson 8: Simon - Arrays Introduction: As Arduino is written in a basic C programming language, it is very picky about punctuation, so the best way to learn more complex is to pick apart existing ones.
Lab E1: Introduction to Circuits
 E1.1 Lab E1: Introduction to Circuits The purpose of the this lab is to introduce you to some basic instrumentation used in electrical circuits. You will learn to use a DC power supply, a digital multimeter
SPL 2-00/-01 OPERATION INSTRUCTIONS
 SPL 2-00/-01 OPERATION INSTRUCTIONS Powerline Ethernet Adapter 500 Mbps EN Read and keep Operation Instructions SPL 2-00/-01 Safety Notes Do NOT use this product near water, for example, in a wet basement
FOLGER TECHNOLOGIES, LLC 2020 i3 3D Printer Kit
 FOLGER TECHNOLOGIES, LLC 2020 i3 3D Printer Kit CONFIG GUIDE Rev. A http://www.folgertech.com 2020 Prusa i3 Config Guide Page: 1 / 15 You did it! You built your Folger Tech 2020 i3 Printer and now you
How to Move Canon EF Lenses. Yosuke Bando
 How to Move Canon EF Lenses Yosuke Bando Preface This instruction is intended to be helpful to those who are interested in making modifications to camera lenses to explore/reproduce focus sweep, focal
Alfa Romeo 147 On board instruments installation guide
 Alfa Romeo 147 On board instruments installation guide Alfa Romeo 147 On board instruments installation guide This guide is describing how I installed oil temperature and oil pressure gauges to my Alfa
HEAT PUMP PROGRAMMABLE THERMOSTAT
 HEAT PUMP PROGRAMMABLE THERMOSTAT SA PM 3 COOL TEMP Form 44014-01 r010408 Model 43168 Owners Manual 1 Congratulations! Heat Pump Programmable Thermostat Model 43168 THERMOSTAT CONTROLS Switches & Buttons...15
Table of Contents. Use. Troubleshooting. Setup. Welcome. 11 How to arm/disarm system/camera(s) 19 Sync Module setup issues. 3 Installing the Blink app
 19 Sync Module setup issues. 3 Installing the Blink app") User Guide Table of Contents Welcome Setup Use Troubleshooting 2 What s in the box 2 What you need 3 Installing the Blink app 4 Setting up the Sync Module 5 Connecting the Sync Module to Your Wi-Fi 7 Adding
User Guide Table of Contents Welcome Setup Use Troubleshooting 2 What s in the box 2 What you need 3 Installing the Blink app 4 Setting up the Sync Module 5 Connecting the Sync Module to Your Wi-Fi 7 Adding
2.2" TFT Display. Created by Ladyada. Last updated on 2014-03-31 12:15:09 PM EDT
 2.2" TFT Display Created by Ladyada Last updated on 2014-03-31 12:15:09 PM EDT Guide Contents Guide Contents Overview Connecting the Display Test the Display Graphics Library Bitmaps Alternative Wiring
Introduction to Arduino
 Introduction to Arduino // Basic Arduino reference sheet: Installation: Arduino: http://www.arduino.cc/en/guide/homepage Fritzing: http://fritzing.org/download/ Support: Arduino: http://www.arduino.cc,
1.8" TFT Display Breakout and Shield
 1.8" TFT Display Breakout and Shield Created by lady ada Last updated on 2015-04-09 03:48:28 PM EDT Guide Contents Guide Contents Overview Breakout Pinouts Breakout Assembly Prepare the header strip: Add
FAQs. Conserve package. Gateway... 2 Range Extender... 3 Smart Plug... 3 Thermostat... 4 Website... 7 App and Mobile Devices... 7
 FAQs Conserve package Gateway... 2 Range Extender... 3 Smart Plug... 3 Thermostat... 4 Website... 7 App and Mobile Devices... 7 FAQs Gateway Can I have someone install my system for me? If you are concerned
Clio 2 Pictorial Installation Guide
 Clio 2 Pictorial Installation Guide Fastchip imfd gauge module support for PLX Devices: DM-5 Digital Gauges System Driver - RSTuner VCI and software supplied by: http://www.fastchip.nl Gauges supplied
Micrio WS1 Replacement Wind Speed Sensor and WC1 Replacement Wind Compass Sensor for Raymarine ST50 and ST60 Wind Instruments. Rev 4.
 Micrio WS1 Replacement Wind Speed Sensor and WC1 Replacement Wind Compass Sensor for Raymarine ST50 and ST60 Wind Instruments. Rev 4.1 The Micrio WS1 Wind Speed Sensor and WC1 Compass Sensor are direct
PROXIMITY CARD READERS C-10, C-20, C60, C70
 Installation Manual PROXIMITY CARD READERS C-10, C-20, C60, C70 VERSION 1.0 CONTENTS 1. General information................................. 3 2. Technical data......................... 4 3. Connection
Phoenix Hoop Manual. www.spin-fx.com V1.0
 Phoenix Hoop Manual www.spin-fx.com V1.0 Welcome to your Phoenix Hoop manual! This guide will walk you through a few basic instructions and important safety guidelines to ensure that you and your hoop
USER MANUAL V5.0 ST100
 GPS Vehicle Tracker USER MANUAL V5.0 ST100 Updated on 15 September 2009-1 - Contents 1 Product Overview 3 2 For Your Safety 3 3 ST100 Parameters 3 4 Getting Started 4 4.1 Hardware and Accessories 4 4.2
TEECES DOME LIGHTING SYSTEMS
 This lighting system was designed by John V (Teeces) to be a simple, customizable, expandable and affordable solution for dome lighting. An Arduino micro-controller is used to tell LED driver chips which
MCP4725 Digital to Analog Converter Hookup Guide
 Page 1 of 9 MCP4725 Digital to Analog Converter Hookup Guide CONTRIBUTORS: JOELEB To DAC, or Not to DAC... When learning about the world of microcontrollers, you will come across analog-to-digital converters
Mobile Device Power Monitor Battery Connection Quick Start Guide
 Mobile Device Power Monitor Battery Connection Quick Start Guide Distributed By: Monsoon Solutions, Inc. www.msoon.com Introduction The Power Tool software and the Mobile Device Power Monitor hardware
FG MOISTURE MONITOR Installation & Operation Manual
 FG MOISTURE MONITOR Installation & Operation Manual Issue 3.0 7/20/10 1 Contents SERVICE AND TECHNICAL SUPPORT... 2 INSTALLATION:... 3 MOISTURE SENSOR INSTALLATION:... 3 SENSOR CONNECTOR:... 5 MONITOR
PHYS 2P32 Project: MIDI for Arduino/ 8 Note Keyboard
 PHYS 2P32 Project: MIDI for Arduino/ 8 Note Keyboard University April 13, 2016 About Arduino: The Board Variety of models of Arduino Board (I am using Arduino Uno) Microcontroller constructd similarly
AUTOMOTIVE LED LIGHT CATALOG
 AUTOMOTIVE LED LIGHT CATALOG #74 Wedge Flat LED Light 44423 #74 (T5) Wedge Flat LED Light. 1 LED. Durable, shock and vibration proof, instant On/Off. Monochromatic (pure) color, low heat generation, virtually
BUILDING INSTRUCTIONS
 etap2hw 38 mm I2C to LCD Interface BUILDING INSTRUCTIONS October 2013 P. Verbruggen Rev 1.01 15-Oct-13 Page 1 Table of Contents Chapter 1 General Information 1.1 ESD Precautions 1.2 Further Supplies 1.3
Cover Page. Factory Radio Other Documents Available For This Vehicle:
 & nstall Publication, Duplication, or Retransmission Of This Document Not Expressly Authorized n Writing By The nstall Doctor s Prohibited. Protected By U.S. Copyright Laws. 1997,1998,,2000. Factory Radio
Android Programming Family Fun Day using AppInventor
 Android Programming Family Fun Day using AppInventor Table of Contents A step-by-step guide to making a simple app...2 Getting your app running on the emulator...9 Getting your app onto your phone or tablet...10
Flora MIDI Drum Glove
 Flora MIDI Drum Glove Created by Becky Stern Last updated on 2015-02-19 02:31:07 PM EST Guide Contents Guide Contents Overview Sew Piezos Circuit Diagram Solder FLORA circuit Code Adding MIDI support to
ILISC515-A Shift Interlock (Manual Lift Door) 2015 Ford Transit, 3.7L and 3.5L
 2015 Ford Transit, 3.7L and 3.5L") An ISO 9001:2008 Registered Company ILISC515-A Shift Interlock (Manual Lift Door) 2015 Ford Transit, 3.7L and 3.5L Introduction The ILISC515-A is a microprocessor driven system for controlling wheelchair
An ISO 9001:2008 Registered Company ILISC515-A Shift Interlock (Manual Lift Door) 2015 Ford Transit, 3.7L and 3.5L Introduction The ILISC515-A is a microprocessor driven system for controlling wheelchair
Trinket Bluetooth Alarm System
 Trinket Bluetooth Alarm System Created by Mike Barela Last updated on 2015-02-20 03:15:06 PM EST Guide Contents Guide Contents Overview Alarm Basics Theory Multiple Sensors, One Pin Design Annunciation
Model 201 Wiegand Touchpad Reader Installation Guide
 Model 201 Wiegand Touchpad Reader Installation Guide P/N 460353001C 15AUG11 2011 UTC Fire & Security. All rights reserved. This document may not be copied in whole or in part or otherwise reproduced without
Solar Home System. User Manual. AEH-SHS01-10W2L Solar Home System 2 Lamps
 Solar Home System User Manual AEHSHS0110W2L Solar Home System 2 Lamps All rights reserved Specifications subject to change without prior notice 2 Dear Customer, Thank you for purchasing Schneider Electric
Review of. 4x IOcards (PCBs) Manufactured by Opencockpits
 Manufactured by Opencockpits") Review of 4x IOcards (PCBs) Manufactured by Opencockpits Intro We all know flight simulation hardware as yokes, pedals, throttle quadrant, various complete P&P modules etc. which certainly helps in creating
Review of 4x IOcards (PCBs) Manufactured by Opencockpits Intro We all know flight simulation hardware as yokes, pedals, throttle quadrant, various complete P&P modules etc. which certainly helps in creating