BUNK BED. Model No.: DA3797E - Espresso DA3797P- Pine. UPC CODE: (Espresso) (Pine) NOTE: Lot number: Date of purchase:
|
|
|
- Cecily McKenzie
- 7 years ago
- Views:
Transcription
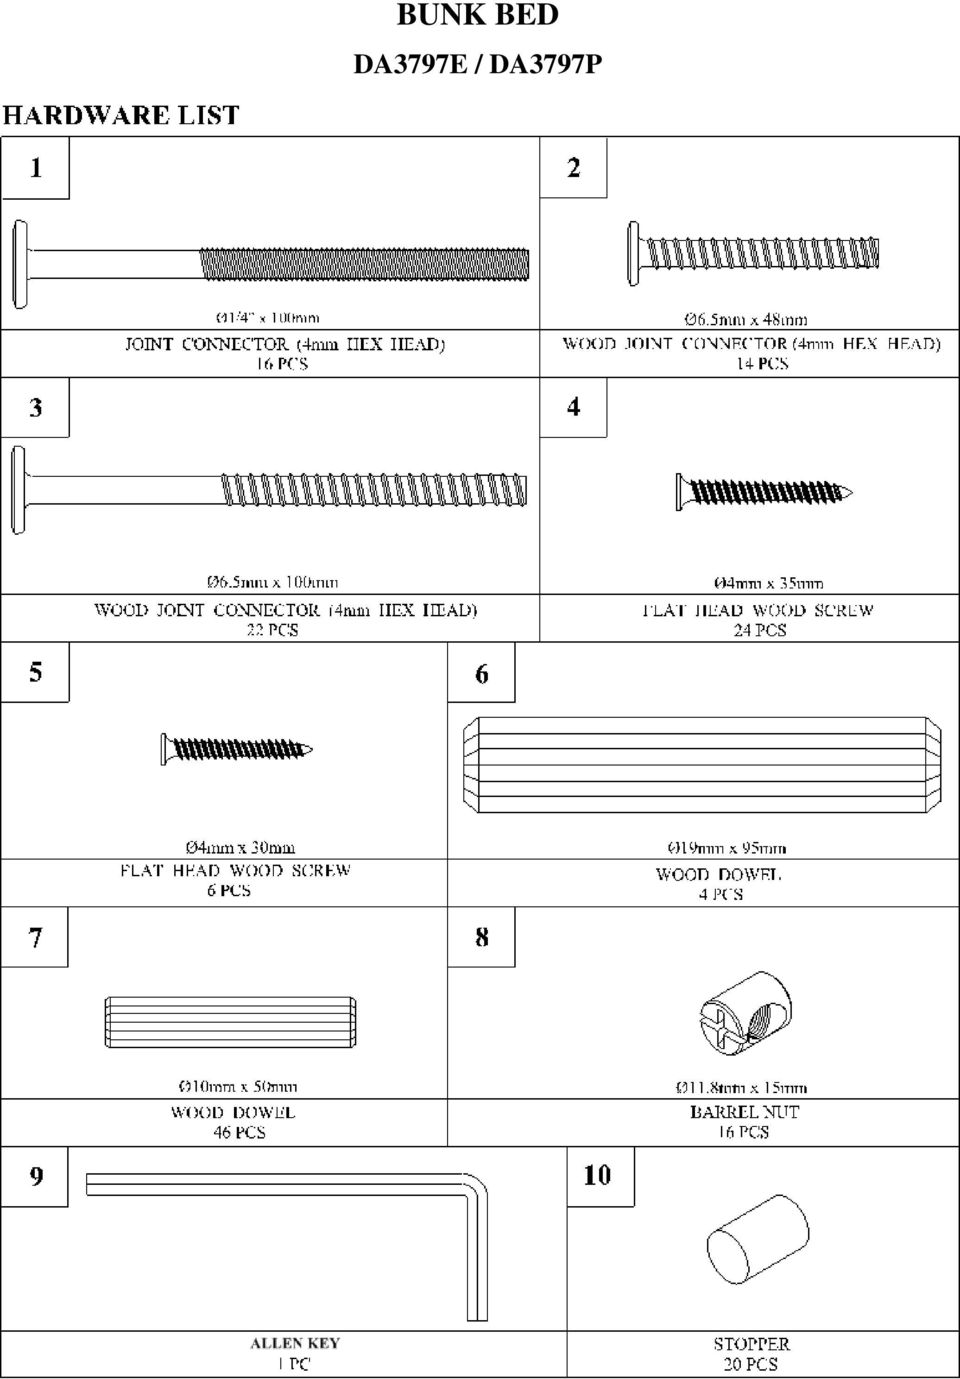
1 BUNK BED Model No.: DA3797E - Espresso DA3797P- Pine UPC CODE: (Espresso) (Pine) NOTE: THIS INSTRUCTION BOOKLET CONTAINS IMPORTANT SAFETY INFORMATION. PLEASE READ AND KEEP FOR FUTURE REFERENCE. Lot number: (TAKEN FROM CARTON) Date of purchase: / / DO NOT RETURN PRODUCT TO THE STORE. If a part is missing or damaged, contact our customer service department. We will replace the part FREE of charge. Tel # : das@dorel.com Fax #:
 Date of purchase: / / DO NOT RETURN PRODUCT TO THE STORE.")
2 * STRANGULATION HAZARD - NEVER ATTACH OR HANG ITEMS TO ANY PART OF THE BUNK BED THAT ARE NOT DESIGNED FOR USE WITH THE BED; FOR EXAMPLE, BUT NOT LIMITED TO HOOKS, BELTS AND JUMP ROPES. * FOLLOW THE INFORMATION ON THE WARNINGS APPEARING ON THE UPPER BUNK END STRUCTURE AND ON THE CARTON. DO NOT REMOVE WARNING LABEL FROM BED. * THE MATTRESS PLATFORM IS DESIGNED TO SUPPORT A MATTRESS WITHOUT THE NEED FOR A POSTURE BOARD OR BOX SPRING. * ALWAYS USE THE RECOMMENDED SIZE MATTRESS OR MATTRESS SUPPORT, OR BOTH, TO HELP PREVENT THE LIKELIHOOD OF ENTRAPMENT OR FALLS. * * * CUSTOMER SERVICE If you are missing parts or have any questions about this product, contact our customer service representative first! CALL You can also order parts by writing to the address listed below. Please include the product model number, color and a detailed description of the part. Customer Service Department No Albert-Hudon Boulevard, Suite 100 Montreal, Quebec Canada, H1G 3L1 das@dorel.com WARNING USE ONLY COIL SPRING MATTRESSES ON BOTH THE UPPER AND LOWER BUNKS. FAILURE TO DO SO CAN RESULT IN INJURY. USE ONLY MATTRESSES WHICH ARE 74"-75" LONG AND 37 1/2" /2" WIDE ON UPPER AND ON LOWER BUNKS. ENSURE THICKNESS OF MATTRESS DOES NOT EXCEED 6". SURFACE OF MATTRESS MUST BE AT LEAST 5" (127MM) BELOW THE UPPER EDGE OF GUARDRAILS. DO NOT ALLOW CHILDREN UNDER 6 YEARS OF AGE TO USE THE UPPER BUNK. * MAXIMUM WEIGHT CAPACITY: 165 LBS (75 KGS) PER LEVEL * ALWAYS USE GUARDRAILS ON BOTH LONG SIDES OF THE UPPER BUNK. IF THE BUNK BED WILL BE PLACED NEXT TO THE WALL, THE GUARDRAIL THAT RUNS THE FULL LENGTH OF THE BED SHOULD BE PLACED AGAINST THE WALL TO PREVENT ENTRAPMENT BETWEEN THE BED AND WALL (APPLICABLE FOR BUNK BEDS WITH FULL LENGTH GUARDRAILS ON ONE SIDE). * PERIODICALLY CHECK AND ENSURE THAT THE GUARDRAIL, LADDER AND OTHER COMPONENTS ARE IN THEIR PROPER POSITION, FREE FROM DAMAGE, AND THAT ALL CONNECTORS ARE TIGHT. * DO NOT ALLOW HORSEPLAY ON OR UNDER THE BED AND PROHIBIT JUMPING ON THE BED. * DO NOT USE SUBSTITUTE PARTS. CONTACT CUSTOMER SERVICE FOR REPLACEMENT PARTS. * USE OF A NIGHT LIGHT MAY PROVIDE ADDED SAFETY PRECAUTION FOR A CHILD USING THE UPPER BUNK. * THE USE OF WATER OR SLEEP FLOTATION MATTRESSES IS PROHIBITED. * ALWAYS USE THE LADDER FOR ENTERING AND LEAVING THE UPPER BUNK. * PROHIBIT MORE THAN ONE PERSON ON UPPER BUNK. * KEEP THESE INSTRUCTIONS FOR FUTURE USE.


3 NOTES * READ EACH STEP CAREFULLY BEFORE STARTING. IT IS VERY IMPORTANT THAT EACH STEP OF INSTRUCTION IS PERFORMED IN THE CORRECT ORDER. IF THESE STEPS ARE NOT FOLLOWED IN SEQUENCE, ASSEMBLY DIFFICULTIES WILL OCCUR AND CAN RESULT IN INJURY. * CAUTION: ADULT ASSEMBLY REQUIRED * MAKE SURE ALL PARTS ARE INCLUDED. WORK IN SPACIOUS AREA, PREFERABLY ON A SMOOTH SOFT SURFACE. * ASSEMBLY WILL REQUIRE TWO PEOPLE. * MOST BOARD PARTS ARE LABELLED OR STAMPED ON THE RAW EDGE. * PHILLIPS SCREWDRIVER (NOT INCLUDED) IS REQUIRED. * A RUBBER MALLET (NOT INCLUDED) IS RECOMMENDED TO FACILITATE ASSEMBLY. * BED IS DESIGNED FOR CHILDREN RANGING FROM 6 YEARS OF AGE TO YOUNG TEENAGERS. CARE AND CLEANING Dust regularly with a soft, dry cloth. We do not recommend the use of chemical cleaners or wax on our lacquered furniture as it may damage the finish. Keep solvents, alcohol, nail polish and polish removers away from your hardwood furniture surfaces. MAINTENANCE Check bolts/screws periodically and tighten them if necessary. LIMITED WARRANTY DOREL ASIA warrants its product to be free from defects in material and workmanship and agrees to remedy any such defect. This warranty covers 1 year from the date of original purchase. This warranty is valid only upon presentation of proof of purchase. This is solely limited to the repair or replacement of defective furniture components and no assembly labor is included. This warranty does not apply to any product which has been improperly assembled, subjected to misuse or abuse or which has been altered or repaired in any way. This warranty gives you specific legal rights and you may also have other rights which vary from Province to Province. WARNING: Should this product become damaged, and/or components are broken or missing, DO NOT USE.
 IS REQUIRED. * A RUBBER MALLET (NOT INCLUDED) IS RECOMMENDED TO FACILITATE ASSEMBLY.")
4 BUNK BED
5 BUNK BED

6 BUNK BED

7 BUNK BED STEP 1 One of the headboard top crosses (F) has a label on it, do not use it in this step. Insert stoppers (10) and top headboard slats (S) into the headboard bottom cross (G) and push down until firmly in place. Slide the headboard top cross (F) onto the top headboard slats (S). Insert wood dowels (7) into ends of headboard top cross (F) and headboard bottom cross (G). Attach top posts (A and B) using wood joint connectors (3) as shown. NOTE: Headboard top cross (F) and headboard bottom cross (G) may require that they be pulled closer together or further apart in order to allow wood dowels (7) to align with holes in top posts (A and B).
 using wood joint connectors (3) as shown.")
8 BUNK BED STEP 2 Repeat the previous step to assemble the remaining three sets of headboards. Be sure to pair the bottom posts (D) and (E) for one pair; (E) and (D) for another; and the top posts (C) and (A) for the last pair. NOTE: Be sure to use headboard top cross (F) with label attached to it between top posts (A) and (C). See illustration for label orientation.
 with label attached to it between top posts")
9 BUNK BED K K I I Holes Holes STEP 3 Attach the two headboards with bottom posts (D and E) to bottom side rails (I and K) using joint connectors (1) and barrel nuts (8) as shown. NOTE: This is the lower bunk.
 and barrel nuts (8) as shown.")
10 BUNK BED M M 3 M STEP 4 Insert a wood dowel (7) into each end of the long guardrails (M). Attach two long guardrails (M) and two top side rails (H and J) to top posts (A and B) & (A and C) as shown. Fasten top side rails (H and J) with joint connectors (1) and barrel nuts (8). Fasten long guardrails (M) with wood joint connectors (3). Use Allen key (9) to tighten all joint connectors. NOTE: This is the upper bunk.
 with wood joint connectors (3).")
11 I I H1 A BUNK BED STEP 5 Insert two slats (T) into the center slots of the bottom side rails (I and K) of the bottom bunk as shown. NOTE: Once inserted, there should be three empty spaces left on each side.

12 Headboard I I H1 J Footboard A WOOD SCREWS BUNK BED STEP 6 Insert slats (L) into remaining holes on the bottom side rails (I and K) on the lower bunk. Secure slats (L) to the bottom side rails (I and K) with flat head wood screws (4) using a Phillips head screw driver (not included). Repeat step 5 and 6 to attach slats (T and L) to the upper bunk. NOTE: Slats (T and L) will be placed between two wooden blocks. NOTE: If you notice that any slats (L) are not perfectly flat, be sure to assemble them so that slat (L) curves up in the middle and down at the ends.
 to the upper bunk. NOTE: Slats (T and L) will be placed between two wooden blocks.")
13 I I H1 J A BUNK BED A A 6 6 N N 5 5 R R B B 6 6 M M H H R R J J J 5 5 I I I C C K K STEP 7 Place four wood dowels (6) into the holes in the bottom posts (D and E). Stack the top bunk onto the bottom bunk with the help of another person. Insert wood dowels (7) in the ends of short guardrails (N). Attach short guardrails (N) to top post (A) with wood joint connectors (3). Attach the guardrail leg (R) to the short guardrails (N) and top side rail (H) with flat head wood screws (5). Attach the other guardrail leg (R) to long guard rails (M) and top side rail (J) with flat head wood screws (5). Use a Phillips head screwdriver (not included) to install screws (5).
 to the short guardrails (N) and top side rail (H) with flat head wood screws (5).")
14 Headboard I H1 DIAGRAM SLAT 1 J A BUNK BED 7 8 PCS 2 8 PCS STEP 8 To assemble the ladder, insert wood dowels (7) into the end of the ladder steps (Q). Attach long ladder end (O) and short ladder end (P) to ladder steps (Q) with wood joint connectors (2) and Allen key (9).
 and short ladder end (P) to ladder steps")
15 I I H1 J Footboard A BUNK BED Slats are not shown in illustration for clarity 2 N H I STEP 9 2 6PCS Attach the ladder to the short guardrails (N), the top side rail (H) and bottom side rail (I) with wood joint connectors (2) as shown. NOTE: If slat (L) is covering the ladder mounting holes, remove slat (L) and replace after the ladder is attached.
 is covering the ladder mounting holes, remove slat (L) and replace")
16 CONVERTING THE BUNK BED INTO TWO SINGLE BEDS Remove the ladder and all the guardrails. With the help of another person, remove the top bunk from the lower bunk. Disassemble the side rails from all headboards (top and lower bunks). Re-assemble the headboards (with tall posts) and footboards (with short posts) to side rails. NOTE: Switching the headboards will allow the two single beds to be identical (the headboards will have taller posts and the footboards will have the shorter posts).
 and footboards (with short posts) to side rails.")
17 BUNK BED CAUTION: This unit is intended for use only with the products and/or maximum weights indicated. Use with other products and/or products heavier than the maximum weights indicated may result in instability or cause possible injury. DO NOT ALLOW HORSEPLAY ON OR UNDER THE BED AND PROHIBIT JUMPING ON THE BED. DO NOT ALLOW CHILDREN UNDER 6 YEARS OF AGE TO USE THE UPPER BUNK. BED IS DESIGNED FOR CHILDREN RANGING FROM 6 YEARS OF AGE TO YOUNG TEENAGERS. MAXIMUM WEIGHT CAPACITY:165 LBS (75 KGS) PER LEVEL. USE ONLY MATTRESSES WHICH ARE 74"-75" LONG AND 37 1/2" /2" WIDE ON UPPER AND ON LOWER BUNKS. ENSURE THICKNESS OF MATTRESS DOES NOT EXCEED 6". USE ONLY COIL SPRING MATTRESSES ON BOTH THE UPPER AND LOWER BUNKS. FAILURE TO DO SO CAN RESULT IN INJURY. DO NOT RETURN PRODUCT TO THE STORE. If a part is missing or damaged, contact our customer service department. We will replace the part FREE of charge. Tel # : das@dorel.com Fax #:
 PER LEVEL.")
18 MODEL #: B A E C B D Customer Service PLEASE DO NOT RETURN THIS PRODUCT TO THE STORE PLEASE CONTACT CUSTOMER SERVICE REPRESENTATIVES AT THE FOLLOWING NUMBERS SHOULD THERE BE ANY MISSING OR DEFECTIVE PART(S). Customer Service Phone Number Customer Service Fax Number das@dorel.com Request Date: Name: Shipping Address: Street & Number: City & Province: Postal Code: Day Time Phone Number: (including area code) Date & Place of Purchase: Part(s) description and quantity: (Please be sure to list model number or SKU number) Customer Service Representative Mailing Address: Customer Service Department No. 413, Albert-Hudon Boulevard, Suite 100, Montreal, QC, Canada, H1G 3L1
 Customer Service Representative Mailing Address: Customer Service Department No.")
Chelsea Loft Bed WARNING:
 Chelsea Loft Bed WARNING: Failure to follow these warnings and assembly instructions could result in serious injury or death. Read all instructions before assembling bunk bed. KEEP INSTRUCTIONS FOR FUTURE
pottery barn kids MADELINE BUNK BED
 pottery barn kids MADELINE BUNK BED! WARNING: Failure to follow these warnings and assembly instructions could result in serious injury or death. To help prevent serious or fatal injuries from entrapment
How To Make A Thomas Bunk Bed
 pottery barn kids THOMAS BUNK BED WARNING: Failure to follow these warnings and assembly instructions could result in serious injury or death. Read all instructions before assembling bunk bed. KEEP INSTRUCTIONS
DOREL ASIA 3-PC COUNTER HEIGHT BAR SET. Model No: DA3729 UPC CODE: 0-65857-16286-8 NOTE: / /
 DOREL ASIA PC COUTER HEIGHT BAR SET Model o: DA9 UPC CODE: 058588 OTE: THIS ISTRUCTIO BOOKLET COTAIS IMPORTAT SAFETY IFORMATIO. PLEASE READ AD KEEP FOR FUTURE REFERECE. Lot number: (TAKE FROM CARTO) Date
Whalen Furniture Mfg. Inc. Factory No. 43-11696 Page # 1
 ADULT ASSEMBLY REQUIRED DUE TO THE PRESENCE OF SMALL PARTS, SHARP POINTS, SHARP EDGES If you have any questions regarding assembly or if you are missing parts, do not return this item to Sam s Wholesale
Item #: BTOL Assembly Instructions
 Item #: BTOL Assembly Instructions For our most current instructions, to request missing, lost or broken parts, or for any other Customer Service issues, please visit our website at www.walkeredison.com
Samuel Shorty Bunk Bed
 Samuel Shorty unk ed - Please keep for future reference / 88/999 0/8 IMPORTANT NOTE: The top surface of the mattress should not come above this line. imensions Width - 8cm epth - 8cm eight - 0cm IMPORTANT
WILDING WALLBEDS BUNK BED INSTALLATION INSTRUCTIONS
 WILDING WALLBEDS BUNK BED INSTALLATION INSTRUCTIONS Instruction Booklet 18 WARNING! ALL MURPHY/WALLBED SYSTEMS CONTAIN POWERFUL LIFTING COMPONENTS. FAILURE TO USE AND FOLLOW THESE INSTRUCTIONS DURING THE
Convertible Crib and Changer (M668)
") Model No.: M668 PO #: Serial #: Convertible Crib and Changer (M668) THIS PRODUCT IS NOT INTENDED FOR INSTITUTIONAL OR COMMERCIAL USE. If you have any questions or missing parts, please contact us. DO NOT
Model No.: M668 PO #: Serial #: Convertible Crib and Changer (M668) THIS PRODUCT IS NOT INTENDED FOR INSTITUTIONAL OR COMMERCIAL USE. If you have any questions or missing parts, please contact us. DO NOT
Triple Threat 3-in-1 Game Table 3 IN 1 GAME TABLE
 NG0M Triple Threat 3-in- Game Table 3 IN GAME TABLE Thank 3 in Y Game Table Thank you for your purchase of our product. We work around the clock and around the globe to ensure that our products maintain
Lunette 2 Series. Curved Fixed Frame Projection Screen. User s Guide
 Lunette 2 Series Curved Fixed Frame Projection Screen User s Guide Important Safety and Warning Precautions Please follow these instructions carefully to ensure proper maintenance and safety with your
OAK WORKBENCH WITH 2 DRAWERS
 OAK WORKBENCH WITH 2 DRAWERS Model 93991 ASSEMBLY Instructions Visit our website at: http://www.harborfreight.com Read this material before using this product. Failure to do so can result in serious injury.
SAVE THESE INSTRUCTIONS DEALER/INSTALLER: GIVE TO HOMEOWNER MODEL #7200
 SAVE THESE INSTRUCTIONS DEALER/INSTALLER: GIVE TO HOMEOWNER MODEL #7200 ROLLGUARD A-FRAME LADDER LADDER MUST BE ATTACHED TO POOL FRAME. DO NOT USE WITH INFLATABLE POOLS ASSEMBLY AND INSTALLATION MANUAL
CONFER ABOVE GROUND CURVE STEP / ABOVE GROUND CURVE STEP SYSTEM ASSEMBLY AND INSTALLATION MANUAL
 SAVE THESE INSTRUCTIONS DEALER/INSTALLER: GIVE TO HOMEOWNER CONFER ABOVE GROUND CURVE STEP / ABOVE GROUND CURVE STEP SYSTEM ASSEMBLY AND INSTALLATION MANUAL Model CCX-AG Note: 40 lbs. of sand required!
OWNER S MANUAL Table Tennis Table Patent Pending
 OWNER S MANUAL Table Tennis Table Patent Pending Be sure to write your model number and serial number here for future reference. You can find these numbers printed on the bottom of the table. MODEL # T8179
758 Heavy-duty Ratchet Guy Wire Cutter
 INSTRUCTION MANUAL 758 Heavy-duty Ratchet Guy Wire Cutter Read and understand all of the instructions and safety information in this manual before operating or servicing this tool. Register this product
BUTTERFLY SHOWER DOOR INSTALLATION INSTRUCTIONS
 BUTTERFLY SHOWER DOOR INSTALLATION INSTRUCTIONS IMPORTANT DreamLine reserves the right to alter, modify or redesign products at any time without prior notice. For the latest up-to-date technical drawings,
Brookland Trunk/Coffee Table Stock # BROTCT
 LOT NUMBER: DATE PURCHASED: / / Brookland Trunk/Coffee Table Stock # BROTCT ADULT ASSEMBLY REQUIRED If you have any questions regarding assembly or if parts are missing, DO NOT return this item to the
3/4 PIPE CLAMP WITH STAND
 3/4 PIPE CLAMP WITH STAND Model 94053 ASSEMBLY AND OPERATING INSTRUCTIONS (3/4 DIAMETER PIPE NOT INCLUDED.) 3491 Mission Oaks Blvd., Camarillo, CA 93011 Visit our Web site at: http://www.harborfreight.com
Page 2 of 6. Fittings Checklist. Care & Maintenance. Additional Tools Required. General Hints & Tips When
 MANHATTAN STORAGE BED PLEASE READ this sheet prior to assembly to familiarise yourself with the various stages of construction. Carefully open the pack supplied and check the contents against the parts
Wall-Mounting your HP computer. User Guide
 Wall-Mounting your HP computer User Guide The only warranties for Hewlett-Packard products and services are set forth in the express statements accompanying such products and services. Nothing herein should
Customer Service 800.780.8889 or visit us online at smithnoble.com. Wood Shutters. Step by Step Installation. Troubleshooting Tips
 reflect your style TM Customer Service 800.780.8889 or visit us online at smithnoble.com Wood Shutters Step by Step Installation Troubleshooting Tips Easy Care Instructions STEP 1 Your New Shutter Thank
Assembly and Usage Instructions
 Assembly and Usage Instructions A Product 5885 West Van Horn Tavern Road Columbia, MO 65203 www.caldwellshooting.com Instruction #1001667 Limited Warranty Every Caldwell product is warrantied to be free
149mm. Walk-Thru Assembly Gate. MODEL NO: 1161, 1167 Owner s Manual. www.regalo-baby.com
 149mm 210mm Walk-Thru Assembly Gate MODEL NO: 1161, 1167 Owner s Manual READ ALL INSTRUCTIONS BEFORE ASSEMBLY AND USE OF GATE. KEEP INSTRUCTIONS FOR FUTURE USE. www.regalo-baby.com... Regalo International,
Extra Tall Wide Span Gate
 Extra Tall Wide Span Gate MODEL NO: 1154 Owner s Manual 11/19/2013_BL READ ALL INSTRUCTIONS BEFORE ASSEMBLY AND USE OF GATE. KEEP INSTRUCTIONS FOR FUTURE USE. www.regalo-baby.com... Regalo International,
1 Door Tall Unit ASSEMBLY GUIDE. Page 1 of 9. WARNING: Contains small parts, keep out of reach of children.
 Page 1 of 9 ASSEMBLY GUIDE 1 Door Tall Unit IMPORTANT Before Commencing Assembly: Read all instructions COMPLETELY Ensure all listed parts are present If any parts are missing from Parts List 1, please
CordlessPleated FabricShade including Top-Down/Bottom-Up. owner's handbook
 CordlessPleated FabricShade including Top-Down/Bottom-Up owner's handbook July, 2013 español página 9 2 INSTALLATION INSTRUCTIONS Step 1. Check Package Contents Missing part? Call 1-800-264-1190 Mounting
SAVE THESE INSTRUCTIONS DEALER/INSTALLER: GIVE TO HOMEOWNER MODEL #6100 INPOOL LADDER 42" TO 54" ASSEMBLY AND INSTRUCTION MANUAL
 SAVE THESE INSTRUCTIONS DEALER/INSTALLER: GIVE TO HOMEOWNER MODEL #6100 INPOOL LADDER 42" TO 54" ASSEMBLY AND INSTRUCTION MANUAL The Anti-Entrapment Barrier is included in this ladder for the U.S. and
PGL5/6 - Parking Garage Luminaire Installation Instructions
 P.O. Box 60080 16555 East Gale Ave. City of Industry, California 91716-0080 626/968-5666 FAX 626/330-3861 PGL5/6 - Parking Garage Luminaire Installation Instructions PGL51/61 PGL52/62 PGL53/63 PGL54/64
Basic Spring Motor Roller Shades
 Comprehensive Roller Shade Installation Guide Basic Spring Motor Roller Shades ATTENTION!!! READ CAREFULLY! This shade has a reliable long-lasting Spring Motor. The Spring Motor must have proper tension
Beadboard Wall Bookcase
 Beadboard Wall Bookcase Note: The maximum load for each shelf is 30lbs.This hanging system is meant for drywall/wood stud mounting only. If walls are concrete, brick or plaster, please consult your local
TABLE OF CONTENTS. Introduction/Customer Service Information...2. Warranty Information...3. Warnings/Safety Pre-cautions...4-5
 V062211 TABLE OF CONTENTS Introduction/Customer Service Information....2 Warranty Information......3 Warnings/Safety Pre-cautions....4-5 Hardware Identifier.......6 Assembly Instruction......7-9 How To
Installation Instructions:
 Portable Guardrail System Model Numbers: 7900060, 7900061, 7900062, 7900063 Installation Instructions: Portable Guardrail System This instruction is intended to meet the Manufacturer s Instructions requirement
QWALL 4 ACRYLIC SHOWER WALL INSTALLATION INSTRUCTIONS
 QWALL 4 ACRYLIC SHOWER WALL INSTALLATION INSTRUCTIONS IMPORTANT DreamLine TM reserves the right to alter, modify or redesign products at any time without prior notice. For the latest up-to-date technical
INSTALLATION INSTRUCTIONS for Bifold Doors (JII103)
") Thank you for selecting JELD-WEN products. Attached are JELD-WEN s recommended installation instructions for premium composite, hollow and solid core molded Bifold Doors. Bifolds are designed for fast
Thank you for selecting JELD-WEN products. Attached are JELD-WEN s recommended installation instructions for premium composite, hollow and solid core molded Bifold Doors. Bifolds are designed for fast
THE CRACKER BARREL OLD COUNTRY STORE ROCKING CHAIR ASSEMBLY INSTRUCTIONS
 THE CRACKER BARREL OLD COUNTRY STORE ROCKING CHAIR ASSEMBLY INSTRUCTIONS Manufacturer of Solid Hardwood Rocking Chairs Since 1834 Thank you for purchasing a quality rocking chair from Cracker Barrel Old
About this Manual. Support for Your Product
 About this Manual We ve added this manual to the Agilent website in an effort to help you support your product. This manual is the best copy we could find; it may be incomplete or contain dated information.
Beautifully Traditional
 Arcade 800mm Single Sliding Door Quadrant - nickel Arcade 900mm Single Sliding Door Quadrant - nickel ARC48 ARC49 INSTALLATION INSTRUCTIONS A www.arcadebathrooms.com IMPORTANT - Please read before installation
Foodservice Equipment Specialists P.O. Box 880 Saco, ME. / U.S.A. 04072 877-854-8006 * FAX (207) 283-8080
 283-8080") Foodservice Equipment Specialists P.O. Box 880 Saco, ME. / U.S.A. 04072 877-854-8006 * FAX (207) 283-8080 FOR SERVICE ASSISTANCE U.S. AND CANADA CALL: 1-877-854-8006 24 HOURS/DAY 7 DAYS/WEEK TABLE OF CONTENTS
Foodservice Equipment Specialists P.O. Box 880 Saco, ME. / U.S.A. 04072 877-854-8006 * FAX (207) 283-8080 FOR SERVICE ASSISTANCE U.S. AND CANADA CALL: 1-877-854-8006 24 HOURS/DAY 7 DAYS/WEEK TABLE OF CONTENTS
INSTRUCTION BOOK FOR. Single Monitor Video Conference Cart
 INSTRUCTION BOOK FOR Single Monitor Video Conference Cart Procedure 1. Remove contents from cartons and examine for damaged or missing parts. The keys for the cabinet doors are tied to the outside of the
Circo Kids. >> assembly instructions 92345 F. 3 Drawer Dresser. DPCI # 249-20 - 0201 (White) DPCI # 249-20 - 0211 (Chocolate)
 DPCI # 249-20 - 0211 (Chocolate)") Circo Kids 3 Drawer Dresser DPCI # 249-20 - 0201 (White) DPCI # 249-20 - 0211 (Chocolate) >> assembly instructions 92345 F 1 FREE! Do not go back to your store! we will help you! Missing or Damage parts?
Circo Kids 3 Drawer Dresser DPCI # 249-20 - 0201 (White) DPCI # 249-20 - 0211 (Chocolate) >> assembly instructions 92345 F 1 FREE! Do not go back to your store! we will help you! Missing or Damage parts?
Fabric Replacement Top Installation Instructions
 Replacement Top Installation Instructions For: Wrangler/YJ 88-95 Part Number: 51120 Special Note: If your Wrangler is a 1986 or 1987 model, this kit is not the correct product. Please order Part Number
Table of Contents. www.hunterfan.com. What to Expect with. Preparation. Tools Needed. Wiring. Hanging the Fan. Blades. Motor Housing.
 www.hunterfan.com Table of Contents What to Expect with Your Installation 30 inches Hanging the Fan Wiring 8 Maintenance, Operation & Cleaning Light Kit 13??? 14 1 9 Troubleshooting 11 5 Blades Motor Housing
COMPACT ELITE MAT CUTTER
 INSTRUCTION MANUAL MODEL 350-1 COMPACT ELITE MAT CUTTER INSTRUCTIONS AND OPERATION MANUAL 32in (81cm) mat cutting system with bevel & straight cutters, production stops and 20 in (51 cm) squaring bar.
Digital Fingerprint safe
 Digital Fingerprint safe Model 96846 Operation Instructions Diagrams within this manual may not be drawn proportionally. Due to continuing improvements, actual product may differ slightly from the product
Seismic Installation for Attic Storage System
 Your Performance Partner Seismic Installation for Storage System CONTENTS SSafety Precautions................................. 2 Required Tools..................................... 2 Parts and Fastener
RZ Guardrail System Installation Manual
 TM RZ Guardrail System Installation Manual RZ Guardrail System Compliance is based on OSHA standards: (Standards - 29 CFR) 1910.23 (e) and (Standards - 29 CFR) 1926.502 (b) Failure to read, understand
INSTALLATION INSTRUCTIONS
 INSTALLATION INSTRUCTIONS Video Conference Shelf for Low Profile Flat-Panel Mounts NORTH AMERICA 3130 East Miraloma Avenue Anaheim, CA 92806 USA USA and Canada Phone: 1.800.368.9700 Fax: 1.800.832.4888
INSTRUCTION BOOK FOR. Dual Monitor Video Conferencing Cart
 INSTRUCTION BOOK FOR Dual Monitor Video Conferencing Cart Procedure 1. Remove contents from cartons and examine for damaged or missing parts. The keys for the cabinet doors are tied to the outside of the
Combination Unit 5'6" Windows a i o P t
 for Andersen 5'6" Double-Hung Venting s Windows a i o P t o rs D o Congratulations You have just purchased one of the many fine Andersen products. For ease of assembly and installation and continued enjoyment
TOLL FREE: (866) 591-7792. E-Mail: techmail@vigoindustries.com. www.vigoindustries.com VANITY SPECIFICATIONS. VANITY COMPONENTS Model VG09042K1
 591-7792. E-Mail: techmail@vigoindustries.com. www.vigoindustries.com VANITY SPECIFICATIONS. VANITY COMPONENTS Model VG09042K1") VANITY SPECIFICATIONS VANITY COMPONENTS Model VG09042K1 MODEL VG09042K1 FEATURES Freestanding cabinet Soft closing sliding cabinet drawer hardware White, single hole ceramic sink Cabinet ships assembled
VANITY SPECIFICATIONS VANITY COMPONENTS Model VG09042K1 MODEL VG09042K1 FEATURES Freestanding cabinet Soft closing sliding cabinet drawer hardware White, single hole ceramic sink Cabinet ships assembled
HAIR CLIPPER. Model No. HC5150 HC5150 2. 3.
 All technical modifications reserved. 09/08. TSC 08.0634 HAIR CLIPPER 2. 3. 1. Model No. HC5150 4. 10/UK/HC5150 Version 03/10 Part No. T22-29458 REMINGTON is a Registered Trade Mark of Spectrum Brands,
Cardio-Tramp REBOUNDER MANUAL. Please review this important information regarding your STOTT PILATES
 Cardio-Tramp REBOUNDER MANUAL Please review this important information regarding your STOTT PILATES Cardio-Tramp Rebounder and keep it handy for future reference. IMPORTANT! This manual contains important
MODEL T200-F18 MODEL T125-F18 Finish Nailers
 P MODEL T200-F18 MODEL T125-F18 Finish Nailers IMPORTANT! DO NOT DESTROY It is the customer s responsibility to have all operators and service personnel read and understand this manual. OPERATING MANUAL
Application Instructions
 Application Instructions WARNING This brace is a supportive brace only and is not intended or guaranteed to prevent injury. Purchaser agrees to the following: 1 Innovation Sports, Inc. accepts no responsibility
Destiny Shower Enclosure Installation Instructions
 Destiny Shower Enclosure Installation Instructions IMPORTANT Please read carefully the following instructions before installing your shower enclosure. If you have any questions on this shower enclosure
Calvert USA, Inc. Attic Stairs
 Calvert USA, Inc. Attic Stairs Instructions for installation of vertical opening access stairs Model numbers: 7035 through 7047 Calvert USA, Inc., P.O. Box 841, Solomons, MD 20688, Tel. (410) 286-1430,
OPERATORS MANUAL MG22 MEAT GRINDER MG22/0209 ED 1 0011220
 OPERATORS MANUAL MG22 MEAT GRINDER MG22/0209 ED 1 0011220 TO INSURE BOTH SAFE AND TROUBLE-FREE PERFORMANCE, WE STRESS THAT ALL PERSONNEL THAT WILL BE INVOLVED WITH YOUR NEW UNIVEX MEAT GRINDER MUST READ
DTM04 TANK MONITOR DTM08 TANK MONITOR Dtm12 TANK MONITOR. Installation and Operation Manual
 DTM04 TANK MONITOR DTM08 TANK MONITOR Dtm12 TANK MONITOR Installation and Operation Manual 1 ENGLISH Safety Instructions 2 Features 2-3 Specifications 3 Installation 4-5 Wiring Diagrams 6-7 Warranty 8
MODEL G300 BRAKE BLEEDER
 MODEL G300 BRAKE BLEEDER Installation, Operation & Repair Parts Information Branick Industries, Inc. 4245 Main Avenue P.O. Box 1937 Fargo, North Dakota 58103 REV060616 P/N: 81-0035G 1 THIS PAGE INTENTIONALLY
Daycare and Nursery Equipment Safety
 Daycare and Nursery Equipment Safety There are hundreds of types of nursery equipment on the market intended to be used with children. However, many of these products are used incorrectly, poorly designed,
Articulating TV Wall Mount for 19" to 70" Flat Panel TVs
 THIS INSTRUCTION BOOKLET CONTINS IMPORTNT SETY INORMTION. PLESE RED ND KEEP OR UTURE REERENCE. Lot Number: Date: rticulating TV Wall Mount for 19" to 7" lat Panel TVs Model No: DCD1319 Option 1 Option
Equipped with AEM Dryflow Filter No Oil Required! INSTALLATION INSTRUCTIONS PART NUMBER 21-754DS. 2012-2015 BMW 335i 3.0L
 Equipped with AEM Dryflow Filter No Oil Required! INSTALLATION INSTRUCTIONS PART NUMBER 21-754DS 2012-2015 BMW 335i 3.0L 1 ITEM NO. PART NUMBER DESCRIPTION QTY. 1 21-2057DK AIR FILTER 1 2 9-0442 TUBE;
MALONER. Installation & Loading Instructions - Please Read Before Beginning. Step 1: Installing Carriers to Cross Bars
 SeaWing V-STYLE KAYAK CARRIER 60mm 50mm Rubber Plugs SeaWing Kayak Carriers 12 Load Straps Jawz Universal Adapters Mounting Bolts T-Knobs 12 Safety Lines MD Series Only Installation & Loading Instructions
CRASH RAIL INSTALLATION HEIGHT
 PLEASE READ PLEASE READ THESE INSTRUCTIONS THOROUGHLY PRIOR TO BEGINNING THE INSTALLATION! THIS INSTRUCTION SHEET IS INTENDED TO PROVIDE A SPECIFIC GUIDE TO FOLLOW FOR THE INSTALLATION OF THIS. CONTAINED
ECM-D70T / ECM-D70T1.5
 Elliptical Ceiling Dual Mount for 37 to 50 Flat Panels INSTALLATION INSTRUCTIONS CREATING POSITIVE CUSTOMER EXPERIENCES 9531-041-001-01 Contents ECM-D70T / ECM-D70T1.5 Installation Tools... 3 Parts List...
ROTOR LOADER OWNER S MANUAL
 ROTOR LOADER OWNER S MANUAL ROTOR LOADER OWNER S MANUAL WARNING IMPORTANT SAFETY INSTRUCTIONS AND GUIDELINES. Misuse of paintball equipment may cause serious injury or death. QUICK SET-UP GUIDE BATTERY
HOME GYM. Model. Retain This Manual for Reference OWNER'S MANUAL. www.hyper-extension.com
 NOTE: Please read all instructions carefully before using this product Table of Contents Safety Notice www.hyper-extension.com HOME GYM 50036 Hardware Identifier Assembly Instruction Parts List Warranty
Installation Instructions
 PUSH Installation Instructions A DA C O M PLIA NT shown with optional Bradley 90-75 faucet Front-Mounted Barrier Free Rectangular Bowl Stainless Steel Lav Table of Contents Pre-Installation Information...........2
White Industries Rear Hub Instructions
 White Industries Rear Hub Instructions Tool required: 2mm allen/hex wrench, 19mm socket, 20mm socket, and mallet. 1. Loosen the set screws located in the adjusting collar by using a 2mm allen wrench inserted
39HQ Airovision Air Handling Units
 39HQ Airovision Air Handling Units Mounting instructions CONTENTS 1 - TRANSPORT AND LIFTING INSTRUCTIONS... 3 1.1 - General... 3 1.2 - Transport and storage... 3 1.3 - Roof edge protection during transport
Make yourself comfortable with Staples brand furniture.
 Make yourself comfortable with Staples brand furniture. Check us out online and in store for more great ways to add some easy to your day. black glass desk instructions 2 (30ST) Staples BLACK GLASS DSK
http://waterheatertimer.org/troubleshoot-rheem-tankless-water-heater.html
 http://waterheatertimer.org/troubleshoot-rheem-tankless-water-heater.html TECHNICAL SERVICE DEPARTMENT Removal, Cleaning, & Reinstallation of the Burner Assembly For models 74 & GT199 Required tools -
P6946 WARNING. www.fisher-price.co.uk. Rocker. Swing. IMPORTANT! KEEP INSTRUCTIONS FOR FUTURE REFERENCE. Infant Seat
 P6946 Rocker Swing WARNING IMPORTANT! KEEP INSTRUCTIONS FOR FUTURE REFERENCE. Infant Seat www.fisher-price.co.uk Consumer Information WARNING To prevent injury or death from falls or being strangled in
VISION SHOWER DOOR & TUB DOOR INSTALLATION INSTRUCTIONS
 VISION SHOWER DOOR & TUB DOOR INSTALLATION INSTRUCTIONS IMPORTANT DreamLine TM reserves the right to alter, modify or redesign products at any time without prior notice. For the latest up-to-date technical
Replacement Instructions. Warning: During this procedure, keep small parts away from children.
 apple ibook G4 Memory Card Replacement Instructions Follow the instructions in this sheet carefully. Failure to follow these instructions could damage your equipment and void its warranty. Note: Written
LUCCI AIRFUSION QUEST II CEILING FAN
 LUCCI AIRFUSION QUEST II CEILING FAN WITH IR REMOTE INSTALLATION OPERATION MAINTENANCE WARRANTY INFORMATION CAUTION READ INSTRUCTIONS CAREFULLY FOR SAFE INSTALLATION AND FAN OPERATION. V1.0 QUEST II IR
ATLANTA 90CM HIGH BEDSTEAD
 ATLANTA 90CM HIGH BEDSTEAD Stock number: 480X-52 Thank you for purchasing this product. Please read the instructions carefully before use to ensure safe and satisfactory operation of this product. Pre-assembly
Combination Unit (shown from interior) WARNING
 WARNING") for Andersen Double-Hung Venting s Windows a i o P t o rs D o Congratulations You have just purchased one of the many fine Andersen products. For ease of assembly and installation and continued enjoyment
for Andersen Double-Hung Venting s Windows a i o P t o rs D o Congratulations You have just purchased one of the many fine Andersen products. For ease of assembly and installation and continued enjoyment
1. SAFETY RULES WARNING TO REDUCE THE RISK OF FIRE, ELECTRIC SHOCK OR PERSONAL INJURY, MOUNT FAN TO OUTLET BOX MARKED "ACCEPTABLE FOR FAN SUPPORT".
 1 1. SAFETY RULES 1. To reduce the risk of electric shock, insure electricity has been turned off at the circuit breaker or fuse box before beginning. 2. All wiring must be in accordance with the National
Reachout Lock Replacement for Andersen 2-Panel and 4-Panel 400 Series Frenchwood Gliding, 200 Series Narroline, and Perma-Shield Gliding Patio Doors
 for Andersen 2-Panel and 4-Panel 400 Series Frenchwood Gliding, 200 Series Narroline, and Perma-Shield Gliding Patio Doors Thank you for choosing Andersen. For questions call 1-888-888-7020. For more information
Sliding Door Hardware Installation Instructions
 Sliding Door Hardware Installation Instructions Installation Instructions Structural Information For standard systems and most custom single door opening systems. General Overview ff All Krown Lab sliding
MODEL# SLA001-3 "SLIDE & LOCK" A-FRAME POOL LADDER
 MODEL# SLA001-3 "SLIDE & LOCK" A-FRAME POOL LADDER IMPORTANT INSTRUCTIONS: : Read all instructions carefully & completely to become familiar with parts, assembly, safety and proper use of this product.
5800 Temperature Sensor Cable Assembly
 5800 Temperature Sensor Cable Assembly Removal and Replacement Instruction Sheet #60-4702-070 Revision D, January 14, 2013 Overview The 5800 has two refrigeration temperature sensors, one attached to the
Retail Reception kiosk
 Retail Reception kiosk put 42" corner post in below 66" to allow post to extend above kiosk for raised box sign Mini cantilever option - 24" overhead support leg Mini cantilever option - 24" overhead 66/48E
Installation Instructions 4508 4508S
 SYMPHONY Spread Lavatory Faucet with Speed Connect Drain Congratulations on purchasing your American Standard faucet with Speed Connect drain, a feature found only on American Standard faucets. Speed Connect
INSTALLATION INSTRUCTIONS
 ` 820 RT 910 Cheswick, PA 15024 412-828-3599 WORLD LEADER IN REMOVABLE HARDTOPS SMOOTHLINE.COM INSTALLATION INSTRUCTIONS Solstice/Sky Club Racer Thank you for purchasing the finest Hardtop available on
Portable Ladder Safety
 Portable Ladder Safety Agenda Importance of Ladder Safety An Approved Ladder Controlling Hazards Inspecting the Ladder Set Up Use Importance of Ladder Safety Any fall can be serious, and a fall from the
Weatherproof Tournament Table Tennis Table
 Weatherproof Tournament Table Tennis Table Owner s Manual Model Number 7035-590 Absolutely Weatherproof Printed on 100% recycled paper.! Made in Germany Thank you for purchasing our high quality KETTLER
Table of Contents WARNING SYMBOLS AND DEFINITIONS
 Table of Contents SAFETY INSTALLATION OPERATION MAINTENANCE Safety... 2 Specifications... 4 Installation... 5 Operation... 8 WARNING SYMBOLS AND DEFINITIONS Maintenance... 9 Parts List and Assembly Diagram...
All in One Activity Walker Instruction Manual
 All in One Activity Walker Instruction Manual Read all instructions BEFORE assembly and USE of product. KEEP INSTRUCTIONS FOR FUTURE USE. Record the following information for quick reference. Note: Illustrations
Installation & Maintenance Instructions
 (400mm) 15-3/4" (35mm) 1-3/8" (95mm) 3-3/4" K Series (Model A) Fan Forced Wall Heaters (485mm) 19-1/8" (463mm) 18-1/4" FILE #E21609 Installation & Maintenance Instructions Dear Owner, Congratulations Thank
Installation Instructions GOOSENECK MOUNTING KIT Chevrolet/GMC 1500/2500/3500 All except 4-door Crew-Cab
 GOOSENECK MOUNTING KIT Equipment Required: Fastener Kit: F Wrenches: 3/4, 7/8, 15/16 Drill Bits: 1/4 Other Tools: Drill WARNING: Under no circumstances do we recommend exceeding the towing vehicle manufacturers
ROUTER TABLE INSERT ASSEMBLY AND OPERATING INSTRUCTIONS
 ROUTER TABLE INSERT 94331 ASSEMBLY AND OPERATING INSTRUCTIONS 3491 Mission Oaks Blvd., Camarillo, CA 93011 Visit our Web site at http://www.harborfreight.com Copyright 2006 by Harbor Freight Tools. All
Chapter 10 - Scaffolding Systems
 Chapter 10 - Scaffolding Systems Contents Chapter 10 - Scaffolding Systems... 10-1 Check and Oil the Pump Jacks... 10-4 Set Pump Jack Brackets... Error! Bookmark not defined. Set Pump Jack Poles... 10-5
Express5800/120Ed. Rack Mount Kit Installation Procedures PN: 455-01607-001
 Express5800/120Ed Rack Mount Kit Installation Procedures PN: 455-01607-001 Proprietary Notice and Liability Disclaimer The information disclosed in this document, including all designs and related materials,
Architect/Contractor Information Package
 Architect/Contractor Information Package 3M SelfCheck System C-Series C1 Model 877 This package provides architects and contractors with the information necessary for the successful installation of the
INSTALLATION MANUAL. Contents JAPANESE ENGLISH GERMAN FRENCH ITALIAN SPANISH. To the installing technician: CEILING BRACKET
 Be sure to read this installation manual thoroughly prior to installation. If installation methods or non-standard parts not specified in this installation manual are used, accidents or injury may result.
Active and Passive Sash Replacement
 for Andersen Gliding Windows Read all instructions carefully before attempting this procedure. If you have any questions about your ability to complete the procedure, call Andersen at 1-888-888-7020 for