Item #: BTOL Assembly Instructions
|
|
|
- Phillip Ball
- 9 years ago
- Views:
Transcription
1 Item #: BTOL Assembly Instructions For our most current instructions, to request missing, lost or broken parts, or for any other Customer Service issues, please visit our website at or call us at Revised 10/2010

2 Instruction Manual IMPORTANT INFORMATION READ BEFORE ASSEMBLING THIS PRODUCT Follow the information on the warning labels found on the bunk bed and on the packaging. Do not remove the warning label from the bed. Use only a mattress with the dimensions in.l x in.w x 9 in.h on the upper bunk. The surface of the mattress must be at least 5 in. (127mm) below the upper edge of the guardrails. Mattress must not exceed the maximum thickness of 9 in. Always use the recommended size of mattress or mattress support, or both, to help prevent the likelihood of entrapment or falls. The use of a water or sleep flotation mattress is prohibited. Replacement parts, including additional guardrails, may be obtained from any of Walker Edison Furniture Company s dealers or by contacting us online at DO NOT use substitute parts. Contact the manufacturer or dealer for replacement parts. Always use guardrails on the upper bunk. If the bunk bed will by placed next to a wall, the guardrail running the full length of the bed should by placed against the wall to prevent entrapment between the bed and the wall. Periodically check that the guardrails, ladders and other components of the bed are in their proper position, free from damage, and that all connectors are tight. Always use the ladder to access the upper bunk. DO NOT allow children under 6 years of age to use the upper bunk. DO NOT allow horseplay on or under the bed. Prohibit jumping on the bed. Prohibit more than one person on the upper bunk. The use of a night light may provide an added safety precaution for a child using the upper bunk. STRANGULATION HAZARD Never attach or hang items to any part of the bunk bed that are not designed for use with the bed; including but not limited to hooks, belts and jump ropes. Keep these instructions for future reference.

3 Parts List
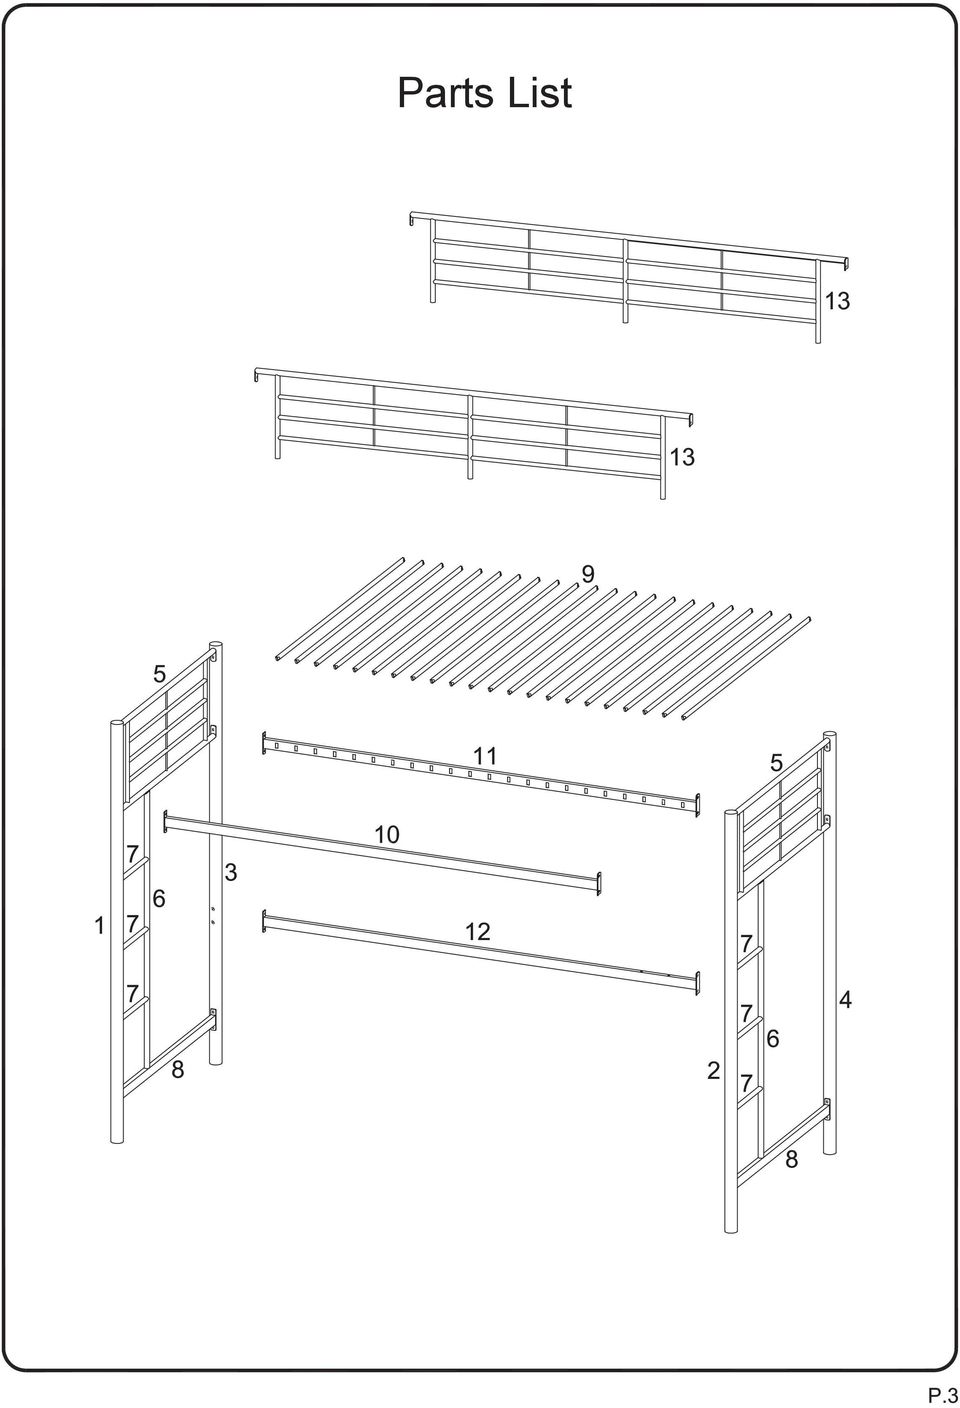
4 Hardware List Medium bolt 6 pcs Large bolt 8 pcs Small bolt 48 pcs Double-ended bolt 6 pcs Large washer 8 pcs Small washer 34 pcs Angle bracket 2 pcs Plastic plug 4 pcs Plastic tab lock 44 pcs Plastic link 21 pcs Rounded washer 12 pcs Large wrench 1 pc Small wrench 1 pc

5 1 Attach post (1) to the left side of ladder rungs (7) using double-ended screws (D) and rounded washers (K). Attach ladder rail (6) to the right side of ladder rungs (7) using medium bolts (A) and rounded washers (K). Tighten medium bolts (A) with small wrench (M). 1 3 Attach guardrail (5) and crossbar (8) to post (1) using small bolts (C) and small washers (F). Attach post (3) to guardrail (5) and crossbar (8) using small bolts (C) and small washers (F). Tighten small bolts (C) with small wrench (M).
 and crossbar (8) to post (1) using small bolts (C) and small washers (F).")
6 Secure ladder rail (6) to guardrail (5) using small bolt (C) and small washer (F). Secure ladder rail (6) to crossbar (8) using large bolt (B) and large washer (E). Tighten small washer (F) with small wrench (M) and large bolt (B) with large wrench (L). Attach post (2) to the right side of ladder rungs (7) using double-ended screws (D) and rounded washers (K). Attach ladder rail (6) to the left side of ladder rungs (7) using medium bolts (A) and rounded washers (K). Tighten medium bolts (A) with small wrench (M).
 to the right side of ladder rungs (7) using double-ended screws (D) and rounded washers (K).")
7 Attach guardrail (5) and crossbar (8) to post (2) using small bolts (C) and small washers (F). Attach post (4) to guardrail (5) and crossbar (8) using small bolts (C) and small washers (F). Tighten small bolts (C) with small wrench (M). 6 Secure ladder rail (6) to guardrail (5) using small bolt (C) and small washer (F). Secure ladder rail (6) to crossbar (8) using large bolt (B) and large washer (E). Tighten small washer (F) with small wrench (M) and large bolt (B) with large wrench (L).
 to guardrail (5) using small bolt (C) and small washer (F).")
8 Attach crossbars (10,11,12) to the assembly from Step 3 using small bolts (C) and small washers (F). Tighten small bolts (C) with small wrench (M).
 with small")
9 Attach crossbars (10,11,12) to the assembly from Step 6 using small bolts (C) and small washers (F). Tighten small bolts (C) with small wrench (M).
 with small")
10 11 10 Insert mattress support bars (9) into the provided slots of crossbars (10,11). Secure mattress support bars (9) by snapping plastic tab locks (I) into the provided slots of crossbars (10,11). Note that it may be necessary to apply more pressure to some plastic tab locks than others.

11 J 9 Snap plastic links (J) onto the middle of mattress support bars (9).

12 Attach guardrails (13) to posts (1,2,3,4) using small bolts (C) and small washers (F). Tighten small bolts (C) with small wrench (M).
 with small")
13 10 Secure front guardrail (13) to crossbar (10) using large bolts (B) and large washers (E). Secure back guardrail (13) to crossbar (11) using large bolts (B), large washers (E) and, where applicable, angle brackets (G).* Tighten large bolts (B) with large wrench (L). *OPTIONAL: Angle brackets (G) can be used to attach the bed to a wall for additional support. You must use hardware suitable for the particular wall type, which is not included as there are many different wall types. You must also mount the bed to the structure of the wall (i.e. wood studs, metal studs or cement/brick) directly. DO NOT attach the bed to the surface of the wall without anchoring into the structural framework of the wall. Please seek professional advice if you are unsure of your own ability to do this correctly. Walker Edison Furniture Company makes no representation of warranty, expressed or implied, to the strength of any structure and the wall s ability to hold your bed. You assume all responsibility and indemnify Walker Edison Furniture Company of any and all damages that may be incurred by attaching your bed to the wall.
 directly.")
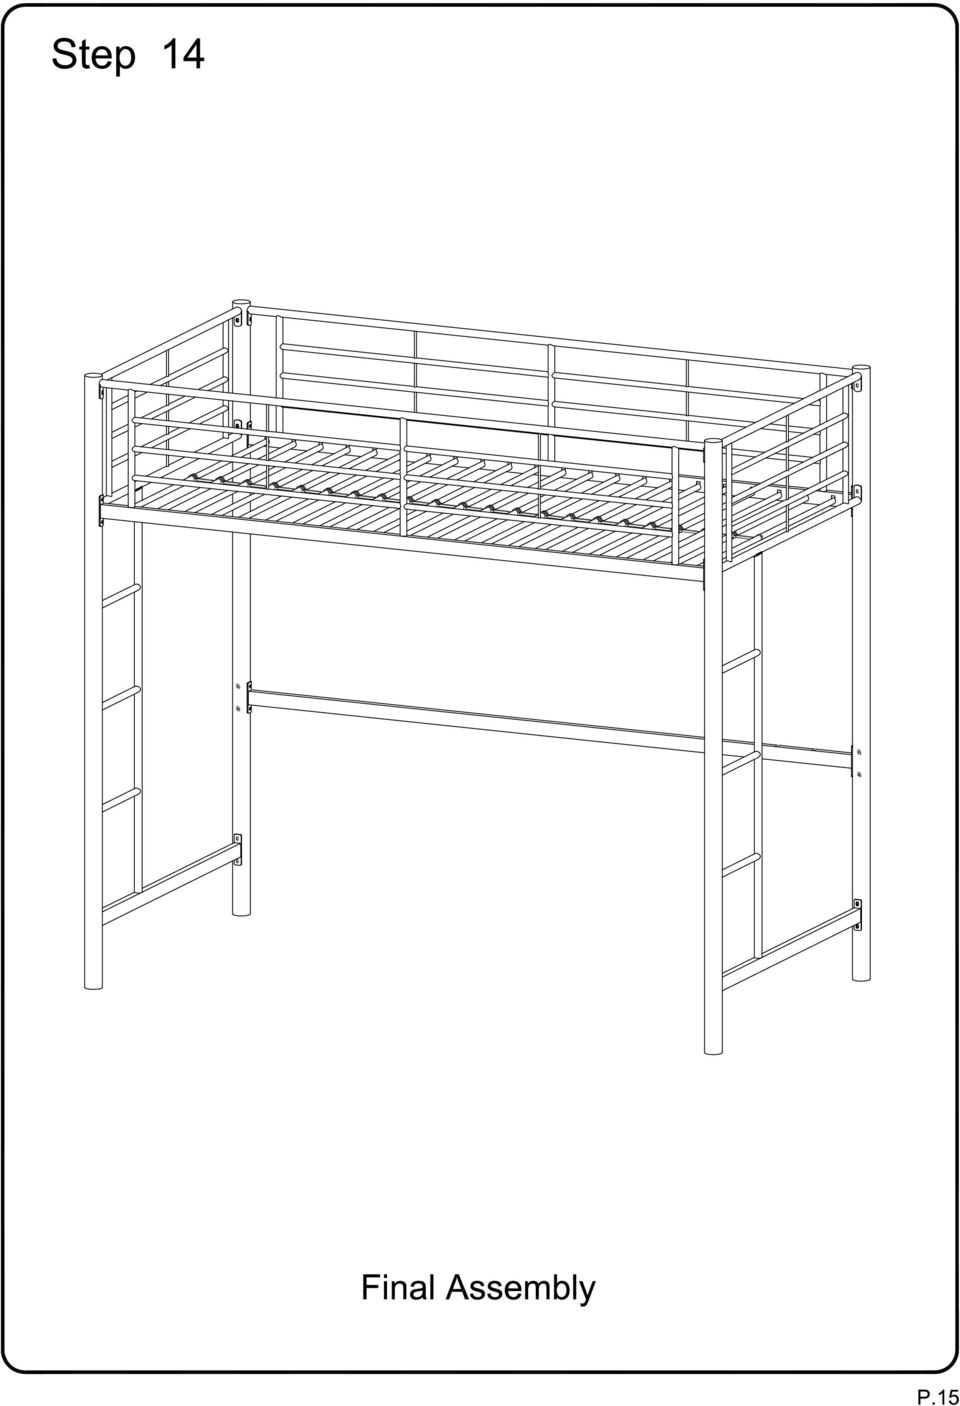
14 Screw small bolts (C) and insert plastic plugs (H) into the bunk bed assembly. This will fill the holes that are used only with the optional accessory attachments, which are sold separately.

15
Whalen Furniture Mfg. Inc. Factory No. 43-11696 Page # 1
 ADULT ASSEMBLY REQUIRED DUE TO THE PRESENCE OF SMALL PARTS, SHARP POINTS, SHARP EDGES If you have any questions regarding assembly or if you are missing parts, do not return this item to Sam s Wholesale
Chelsea Loft Bed WARNING:
 Chelsea Loft Bed WARNING: Failure to follow these warnings and assembly instructions could result in serious injury or death. Read all instructions before assembling bunk bed. KEEP INSTRUCTIONS FOR FUTURE
pottery barn kids MADELINE BUNK BED
 pottery barn kids MADELINE BUNK BED! WARNING: Failure to follow these warnings and assembly instructions could result in serious injury or death. To help prevent serious or fatal injuries from entrapment
How To Make A Thomas Bunk Bed
 pottery barn kids THOMAS BUNK BED WARNING: Failure to follow these warnings and assembly instructions could result in serious injury or death. Read all instructions before assembling bunk bed. KEEP INSTRUCTIONS
BUNK BED. Model No.: DA3797E - Espresso DA3797P- Pine. UPC CODE: 0-65857-16117-5 (Espresso) 0-65857-16116-8 (Pine) NOTE: Lot number: Date of purchase:
 0-65857-16116-8 (Pine) NOTE: Lot number: Date of purchase:") BUNK BED Model No.: DA3797E - Espresso DA3797P- Pine UPC CODE: 0-65857-16117-5 (Espresso) 0-65857-16116-8 (Pine) NOTE: THIS INSTRUCTION BOOKLET CONTAINS IMPORTANT SAFETY INFORMATION. PLEASE READ AND KEEP
BUNK BED Model No.: DA3797E - Espresso DA3797P- Pine UPC CODE: 0-65857-16117-5 (Espresso) 0-65857-16116-8 (Pine) NOTE: THIS INSTRUCTION BOOKLET CONTAINS IMPORTANT SAFETY INFORMATION. PLEASE READ AND KEEP
WILDING WALLBEDS BUNK BED INSTALLATION INSTRUCTIONS
 WILDING WALLBEDS BUNK BED INSTALLATION INSTRUCTIONS Instruction Booklet 18 WARNING! ALL MURPHY/WALLBED SYSTEMS CONTAIN POWERFUL LIFTING COMPONENTS. FAILURE TO USE AND FOLLOW THESE INSTRUCTIONS DURING THE
Samuel Shorty Bunk Bed
 Samuel Shorty unk ed - Please keep for future reference / 88/999 0/8 IMPORTANT NOTE: The top surface of the mattress should not come above this line. imensions Width - 8cm epth - 8cm eight - 0cm IMPORTANT
AMF112 Instruction Manual
 AMF112 Instruction Manual Scan here to view product demo and install videos or visit san.us/103 Milestone AV Technologies 6436 City West Parkway Eden Prairie, MN 55344 USA Customer Service Americas: 800-359-5520
A701 (6904-002018 <01>)
") A70 () Wood Stud mm (7/6 in.).4 mm (3/3 in.) 6 mm (5/64 in.) 3 mm (/8 in.) Sanus Hwy 36 West Saint Paul, MN 553 USA Customer Service Americas: 800-359-550 65-484-7988 [email protected] Europe, Middle East,
A70 () Wood Stud mm (7/6 in.).4 mm (3/3 in.) 6 mm (5/64 in.) 3 mm (/8 in.) Sanus Hwy 36 West Saint Paul, MN 553 USA Customer Service Americas: 800-359-550 65-484-7988 [email protected] Europe, Middle East,
AMF112 (6904-002010 <00>) 13mm (1/2 in.)
 13mm (1/2 in.)") AMF112 () Concrete Wood 13mm (1/2 in.) 5.5mm (7/32 in.) 10mm (3/8 in.) Sanus Systems 2221 Hwy 36 West Saint Paul, MN 55113 USA Customer Service Americas: 800-359-5520 651-484-7988 [email protected] Europe,
AMF112 () Concrete Wood 13mm (1/2 in.) 5.5mm (7/32 in.) 10mm (3/8 in.) Sanus Systems 2221 Hwy 36 West Saint Paul, MN 55113 USA Customer Service Americas: 800-359-5520 651-484-7988 [email protected] Europe,
SAN25 (6904-002001 <00>)
") SAN25 () Wood 002752.eps Concrete 13mm (1/2 in.) 5mm (3/16 in.) Sanus Systems 2221 Hwy 36 West Saint Paul, MN 55113 USA Customer Service Americas: 800-359-5520 651-484-7988 [email protected] Europe, Middle
SAN25 () Wood 002752.eps Concrete 13mm (1/2 in.) 5mm (3/16 in.) Sanus Systems 2221 Hwy 36 West Saint Paul, MN 55113 USA Customer Service Americas: 800-359-5520 651-484-7988 [email protected] Europe, Middle
Convertible Crib and Changer (M668)
") Model No.: M668 PO #: Serial #: Convertible Crib and Changer (M668) THIS PRODUCT IS NOT INTENDED FOR INSTITUTIONAL OR COMMERCIAL USE. If you have any questions or missing parts, please contact us. DO NOT
Model No.: M668 PO #: Serial #: Convertible Crib and Changer (M668) THIS PRODUCT IS NOT INTENDED FOR INSTITUTIONAL OR COMMERCIAL USE. If you have any questions or missing parts, please contact us. DO NOT
Seismic Installation for Attic Storage System
 Your Performance Partner Seismic Installation for Storage System CONTENTS SSafety Precautions................................. 2 Required Tools..................................... 2 Parts and Fastener
MODEL# SLA001-3 "SLIDE & LOCK" A-FRAME POOL LADDER
 MODEL# SLA001-3 "SLIDE & LOCK" A-FRAME POOL LADDER IMPORTANT INSTRUCTIONS: : Read all instructions carefully & completely to become familiar with parts, assembly, safety and proper use of this product.
TONNEAU INSTALLATION GUIDE
 TONNEAU INSTALLATION GUIDE Warranty, Care & Maintenance Model 4056 Toyota Tacoma Double Cab 5' Short Bed 2005-Current (With Multi-Track System) EASY AS 1-2-3! NORMAL INSTALLATION TIME 30 MINUTES For Warranty
CONFER ABOVE GROUND CURVE STEP / ABOVE GROUND CURVE STEP SYSTEM ASSEMBLY AND INSTALLATION MANUAL
 SAVE THESE INSTRUCTIONS DEALER/INSTALLER: GIVE TO HOMEOWNER CONFER ABOVE GROUND CURVE STEP / ABOVE GROUND CURVE STEP SYSTEM ASSEMBLY AND INSTALLATION MANUAL Model CCX-AG Note: 40 lbs. of sand required!
RAIN COLLECTOR S HELF MANUAL
 RAIN COLLECTOR S HELF MANUAL The Rain Collector Shelf provides a good mounting support for your Rain Collector II. The Rain Collector Shelf is designed to be attached to Davis Sensor Mounting Arm, and
Lunette 2 Series. Curved Fixed Frame Projection Screen. User s Guide
 Lunette 2 Series Curved Fixed Frame Projection Screen User s Guide Important Safety and Warning Precautions Please follow these instructions carefully to ensure proper maintenance and safety with your
Guidelines for Earthquake Bracing of Residential Water Heaters
 Guidelines for Earthquake Bracing of Residential Water Heaters Department of General Services Division of the State Architect 1102 Q Street, Suite 5100 Sacramento, CA 95814 Phone: (916) 324-7099 Fax: (916)
Installation Instructions HighRock 4x4 TM
 Installation Instructions HighRock 4x4 TM Slider Step Vehicle Application: Jeep YJ and TJ Wrangler 1986 2006 Part Number: 49312 www.bestop.com - We re here to help! Visit our web site and click on Ask
Elo Touch Solutions Wall-mounting Kit for the 5501L IDS Touchmonitors
 Installation Manual Elo Touch Solutions Wall-mounting Kit for the 5501L IDS Touchmonitors SW602206 Rev B Table of Contents Chapter 1: Safety Warning... 3 Chapter 2: Kit Contents... 4 Included in Kit...
Horizontal Mini Blinds Installation Guide
 Horizontal Mini Blinds Installation Guide We make it easy! BTG 468298 EN_ rev0614 For more safety information: 1-866-662-0666 or.www.healthcanada.gc.ca/blindcords Before starting Your new Blinds To Go
ESTATE WAGON MODEL 300 OWNER MANUAL
 ESTATE WAGON MODEL 300 OWNER MANUAL Country Manufacturing, Inc. P.O. Box 104 Fredericktown, OH 43019 PH: 740-694-9926 FAX: 740-694-5088 I. INTRODUCTION The Model 300 Four Wheeled Wagon (ESTATE VERSATILITY
Garden Oasis BAY WINDOW GAZEBO SEARS ITEM # 80164. Warning:
 Garden Oasis BY WINDOW GZBO SRS ITM # 806 Warning:. When assembling and using this product, basic safety precautions should always be followed to reduce the risk of personal injury and damage to equipment.
Guidelines for Earthquake Bracing Residential Water Heaters
 Guidelines for Earthquake Bracing Residential Water Heaters Department of General Services Division of the State Architect In accordance with the Health and Safety Code Section 19215, the Division of the
TENSION ISSUES? ROLLER SEE PAGE 7
 ROLLER TENSION ISSUES? SEE PAGE 7 Roller Shade Installation Guide Important: If you have ordered a valance for your shade, you must first read the Valance Installation Guide found in your box. We make
GreenWay Solar LED Path and Trail Lighting System. Installation and Owner s Manual
 GreenWay Solar LED Path and Trail Lighting System Installation and Owner s Manual Important Notes and Warnings This installation and instruction manual provides installation, operation, and maintenance
FL ADJUSTABLE RIDER BACKREST MOUNTING HARDWARE KIT
 -J070 REV. 0-0-0 FL ADJUSTABLE RIDER BACKREST MOUNTING HARDWARE KIT GENERAL Kit Number 9-09A Models For model fitment information, see the P&A Retail Catalog or the Parts and Accessories section of www.harley-davidson.com
SAVE THESE INSTRUCTIONS DEALER/INSTALLER: GIVE TO HOMEOWNER MODEL #6100 INPOOL LADDER 42" TO 54" ASSEMBLY AND INSTRUCTION MANUAL
 SAVE THESE INSTRUCTIONS DEALER/INSTALLER: GIVE TO HOMEOWNER MODEL #6100 INPOOL LADDER 42" TO 54" ASSEMBLY AND INSTRUCTION MANUAL The Anti-Entrapment Barrier is included in this ladder for the U.S. and
Wall braces with a swivel head are included to accommodate all roof pitches.
 ULTRA JACK MODEL # 2000 Wall braces with a swivel head are included to accommodate all roof pitches. Product Specifications Model # 2000 Description: Ultra Jack Unit Pack: Weight per Pack: 1 / Carton 32
Table of Contents WARNING SYMBOLS AND DEFINITIONS
 Table of Contents SAFETY INSTALLATION OPERATION MAINTENANCE Safety... 2 Specifications... 4 Installation... 5 Operation... 8 WARNING SYMBOLS AND DEFINITIONS Maintenance... 9 Parts List and Assembly Diagram...
UPLIFT Height Adjustable Standing Desk (T-Frame) DIRECTIONS FOR ASSEMBLY AND USE - - ALSO - - Watch our assembly video
 DIRECTIONS FOR ASSEMBLY AND USE - - ALSO - - Watch our assembly video") UPLIFT Height Adjustable Standing Desk (T-Frame) DIRECTIONS FOR ASSEMBLY AND USE - - ALSO - - Watch our assembly video http://bit.ly/9ywwh! CAUTION MAKE SURE NO OBSTACLES ARE IN THE DESK S PATH AND ALL
UPLIFT Height Adjustable Standing Desk (T-Frame) DIRECTIONS FOR ASSEMBLY AND USE - - ALSO - - Watch our assembly video http://bit.ly/9ywwh! CAUTION MAKE SURE NO OBSTACLES ARE IN THE DESK S PATH AND ALL
FRONT BUMPER INSTALLATION INSTRUCTIONS 2007-2011 DODGE / MERCEDES SPRINTER
 Aluminess Products Inc 9402 Wheatlands Ct. #A Santee, CA 92071 619-449-9930 FRONT BUMPER INSTALLATION INSTRUCTIONS 2007-2011 DODGE / MERCEDES SPRINTER Please read before beginning Stainless steel hardware
Awning Instructions. Standard Manual 1.5m to 4.5m
 Awning Instructions Standard Manual 1.5m to 4.5m English Standard Manual Instructions Contents Warning 1.5m 3.0m Awnings 4 x Expansion bolts (2 per bracket)** 2 x brackets 1 x Awning 1 x Winder handle
CRASH RAIL INSTALLATION HEIGHT
 PLEASE READ PLEASE READ THESE INSTRUCTIONS THOROUGHLY PRIOR TO BEGINNING THE INSTALLATION! THIS INSTRUCTION SHEET IS INTENDED TO PROVIDE A SPECIFIC GUIDE TO FOLLOW FOR THE INSTALLATION OF THIS. CONTAINED
6720616592.00-1.SD. Flat roof. Rack Mounting. Installation instructions 6 720 647 036 (2010/11) AU
 AU") 6720616592.00-1.SD Flat roof Rack Mounting AU Installation instructions 2 Contents AU Contents 1 Key to symbols and safety instructions....... 3 1.1 Explanation of symbols................ 3 1.2 Safety
6720616592.00-1.SD Flat roof Rack Mounting AU Installation instructions 2 Contents AU Contents 1 Key to symbols and safety instructions....... 3 1.1 Explanation of symbols................ 3 1.2 Safety
By SP Partners, LLC. www.rainbowatticstair.com INSTALLATION GUIDE. Prestige
 By SP Partners, LLC www.rainbowatticstair.com INSTALLATION GUIDE Prestige IMPORTANT READ THIS FIRST Inspect stair for any damage prior to installation. Stair is NOT to be installed while home is under
Express5800/120Ed. Rack Mount Kit Installation Procedures PN: 455-01607-001
 Express5800/120Ed Rack Mount Kit Installation Procedures PN: 455-01607-001 Proprietary Notice and Liability Disclaimer The information disclosed in this document, including all designs and related materials,
Andersen Electric Window Opener for Andersen Awning and Roof Windows
 W A Electric Window Opener Electric Window Opener for Awning and Roof Windows Congratulations! You have just purchased one of the many fine products. For ease of installation and continued enjoyment of
INSTALLATION AND OPERATING INSTRUCTIONS For Model GL1 Gate Locks
 Securitron Magnalock Corp. www.securitron.com ASSA ABLOY, the global leader Tel 800.624.5625 [email protected] in door opening solutions INSTALLATION AND OPERATING INSTRUCTIONS For Model GL1 Gate
MEDIUM FLAT PANEL DISPLAY STATIC MOUNT MSR Series
 INSTALLATION INSTRUCTIONS MEDIUM FLAT PANEL DISPLAY STATIC MOUNT The static mount accommodates medium flat panel displays weighing up to 125 lbs (57 kgs). The teardrop holes in the mount allow for quick
Standard Royal Inspiration Station
 IS2 Standard Royal Inspiration Station R Assembly uide IS2_2013_A Check out our other products online at www.copernicused.com or assistance, please contact us: 1-800-267-8494 Email [email protected]
DE Frame with C Series Sidelight
 TOOLS REQUIRED Tape measure 6' magnetic level 3' magnetic level Screw gun with clutch adjusted #2 phillips tip #3 phillips tip Screwdriver (used to adjust frame on will using oval slots) Pry Bar Powder
Models HD920EV HD930EV LW5000EV WD962KEV WD962KPEV WD962MLEV 349544
 .. Belt Drive Battery Backup Garage Door Opener Models HD920EV HD930EV LW5000EV WD962KEV WD962KPEV WD962MLEV 349544 FOR RESIDENTIAL USE ONLY Please read this manual and the enclosed safety materials carefully!
Chapter 10 - Scaffolding Systems
 Chapter 10 - Scaffolding Systems Contents Chapter 10 - Scaffolding Systems... 10-1 Check and Oil the Pump Jacks... 10-4 Set Pump Jack Brackets... Error! Bookmark not defined. Set Pump Jack Poles... 10-5
Basic Spring Motor Roller Shades
 Comprehensive Roller Shade Installation Guide Basic Spring Motor Roller Shades ATTENTION!!! READ CAREFULLY! This shade has a reliable long-lasting Spring Motor. The Spring Motor must have proper tension
Installation Instructions
 85-3976 rev. 05 08-13 Installation Instructions Thank you for purchasing this antisway bar kit. Please read through these instructions before installation. Rear Anti-Sway Bar Kit for Dodge Ram Pick-Up
CHARISMA SHOWER/TUB DOOR INSTALLATION INSTRUCTIONS
 CHARISMA SHOWER/TUB DOOR INSTALLATION INSTRUCTIONS IMPORTANT DreamLine reserves the right to alter, modify or redesign products at any time without prior notice. For the latest up-to-date technical drawings,
Installation Manual. SKU# 21000 series (Base Rails) SKU# 22000 series (Overhead Racks)
 SKU# 22000 series (Overhead Racks)") Installation Manual SKU# 21000 series (Base Rails) SKU# 22000 series (Overhead Racks) Welcome to the world of TracRac! We re delighted that you have chosen TracRac, the ultimate sliding truck rack system.
Installation Manual SKU# 21000 series (Base Rails) SKU# 22000 series (Overhead Racks) Welcome to the world of TracRac! We re delighted that you have chosen TracRac, the ultimate sliding truck rack system.
Trundle Bed Plans (For Use Under Twin or Full-Size Standard Length Beds)
") Bunk Beds Unlimited Trundle Bed Plans (For Use Under Twin or Full-Size Standard Length Beds) On the following pages we have included all of the necessary drawings and requirements for a Modified twin-size
Bunk Beds Unlimited Trundle Bed Plans (For Use Under Twin or Full-Size Standard Length Beds) On the following pages we have included all of the necessary drawings and requirements for a Modified twin-size
2&3 SECTION LOFT LADDER
 TWIST CATCH ASSEMBLY A4 A2 A1 A3 A7 A6 A5 2&3 SECTION LOFT LADDER Images feature the 3 section loft ladder, but the same instructions apply to both 2 & 3 section ladders Installation and Operating Instructions
ATS Overhead Table Shelf System INSTRUCTION MANUAL
 ATS Overhead Table Shelf System INSTRUCTION MANUAL ATS Overhead Table Shelf System Instruction Manual Warranty Newport Corporation warrants this product to be free of defects in material and workmanship
Hollow or Cinder Block Wall Mount Job Aid
 Summary This Job Aid covers: Hollow or Cinder Block Wall Mount Job Aid Hollow or Cinder Block wall Mount Bracket Installing the Mount Bracket into Cinder Block This Job Aid supports the Technician audience.
RZ Guardrail System Installation Manual
 TM RZ Guardrail System Installation Manual RZ Guardrail System Compliance is based on OSHA standards: (Standards - 29 CFR) 1910.23 (e) and (Standards - 29 CFR) 1926.502 (b) Failure to read, understand
HOME GYM. Model. Retain This Manual for Reference OWNER'S MANUAL. www.hyper-extension.com
 NOTE: Please read all instructions carefully before using this product Table of Contents Safety Notice www.hyper-extension.com HOME GYM 50036 Hardware Identifier Assembly Instruction Parts List Warranty
GPS AutoSteer System Installation Manual
 GPS AutoSteer System Installation Manual Supported Vehicles John Deere Sprayers 4720 4630 4730 4830 AutoTrac Ready PN: 602-0227-01-A LEGAL DISCLAIMER Note: Read and follow ALL instructions in this manual
Panel Track Installation Guide
 Panel Track Installation Guide We make it easy! BTG 493361 EN_0510 Before starting Your new Blinds To Go panel track is custom made to your specifications from the finest materials available. To ensure
SERVICE MANUAL. Corpus 3G. Seat system for electric wheelchair
 SERVICE MANUAL US Corpus 3G Seat system for electric wheelchair How to contact Permobil Head Office of the Permobil group Produced and published by Permobil AB, Sweden Version 4, 2014-07 Item No.: 205260-US-0
KEEP FOR FUTURE REFERENCE MRTALP VERTICAL LIFT BAR READ ALL INSTRUCTIONS AND WARNINGS BEFORE USING THIS PRODUCT
 KEEP FOR FUTURE REFERENCE INSTRUCTIONS P.O. Box 368 908 West Main Laurel, MT USA 59044 phone 800-548-7341 phone 406-628-8231 fax 406-628-8354 International Version MODEL NUMBER: LB10VLB MRTALP VERTICAL
CP2 Buried Cable Pedestal Initial & Rehab Installation Instructions
 Printing 3 March 2008 CP2 Buried Cable Pedestal Initial & Rehab Installation Instructions This instruction is intended for CP2 cable pedestal installations and replacements. The following tools will be
Standard Sleep Pod Side Entry Assembly Instructions
 Standard Sleep Pod Side Entry Assembly Instructions www.podtime.co.uk [email protected] Working House Ltd How to assemble your pod Pod assembly onsite is a relatively simple exercise for two people
OAK WORKBENCH WITH 2 DRAWERS
 OAK WORKBENCH WITH 2 DRAWERS Model 93991 ASSEMBLY Instructions Visit our website at: http://www.harborfreight.com Read this material before using this product. Failure to do so can result in serious injury.
Owner s Guide and Installation Manual. Vancouver Model Name. 21321, 21328 Model No. English Español
 For Your Records and Warranty Assistance For reference, also attach your receipt or a copy of your receipt to the manual. Vancouver Model Name 21321, 21328 Model No. Type A Models Owner s Guide and Installation
Installation Instructions
 READ BEFORE INSTALLING UNIT For Slider Casement Air Conditioners To avoid risk of personal injury, property damage, or product damage due to the weight of this device and sharp edges that may be exposed:
INSTRUCTION BOOK FOR. Single Monitor Video Conference Cart
 INSTRUCTION BOOK FOR Single Monitor Video Conference Cart Procedure 1. Remove contents from cartons and examine for damaged or missing parts. The keys for the cabinet doors are tied to the outside of the
Wanda Technology Inc. Side Post Aluminum Umbrella OWNER S MANUAL
 Wanda Technology Inc. Side Post Aluminum Umbrella Portofino II Series OWNER S MANUAL US Patents: 6,439,249 ; 6,692,135 ; 6,598,990 ; 6,966,667 6,945,263 ; 6,923,194 ; 6,830,058 ; 6,565,060 6,511,033 ;
Beadboard Wall Bookcase
 Beadboard Wall Bookcase Note: The maximum load for each shelf is 30lbs.This hanging system is meant for drywall/wood stud mounting only. If walls are concrete, brick or plaster, please consult your local
R O A D M A S T E R, I N C.
 R O A D M A S T E R, I N C. ROADMASTER, Inc. 6110 NE 127th Ave. Vancouver, WA 98682 6 13 11 MOUNTING BRACKET KIT Cable Tab 14 12 7 15 9 Cable Tab 360-896-0407 fax 360-735-9300 www.roadmasterinc.com ITEM
Page 2 of 6. Fittings Checklist. Care & Maintenance. Additional Tools Required. General Hints & Tips When
 MANHATTAN STORAGE BED PLEASE READ this sheet prior to assembly to familiarise yourself with the various stages of construction. Carefully open the pack supplied and check the contents against the parts
EZ-Steer Assisted Steering System
 EZ-Steer Assisted Steering System Installation Instructions Platform Kit P/N 53059-21 Case IH Puma 165 Puma 180 Puma 195 Puma 210 New Holland T7030 T7040 T7050 T7060 Revision A June 2007 Part Number 53345-21-EU2
Small Flat Panel Lift Arm FSA-1004 and KSA-1004
 I N S T A L L A T I O N I N S T R U C T I O N S Small Flat Panel Lift Arm FSA-1004 and KSA-1004 The Lift Arm is an accessory that can be used with a broad range of Small Flat Panel Displays. The allows
VersaRack Installation Instructions. masterack. Tools Required:
 masterack Versaack Installation Instructions ll of us at asterack wish to thank you for your purchase of the Versaack. We are proud of this product and hope that you fi nd it a functional as well as a
Rating when used as a weight carrying hitch without spring bars:
 BOLT-TOGETHER WEIGHT DISTRIBUTING HITCH SYSTEM Rating when used as a weight distributing hitch with spring bars: Part Number 48051 4805 48053 48054 Max Tongue Weight 550 Ibs. 750 Ibs. 1000 Ibs. 1400 lbs.
KEYPAD LOCK RETROFIT KIT
 KEYPAD LOCK RETROFIT KIT INSTRUCTIONS FOR ASSEMBLY IMPORTANT READ & SAVE THESE INSTRUCTIONS Tools Required for Assembly 5/32 hex (Allen) wrench #2 Phillips screwdriver Isopropyl alcohol or alcohol wipes
MIRAGE. Set-Up Instructions. www.skyline-exhibits.com
 MIRAGE Set-Up Instructions www.skyline-exhibits.com Table of Contents Mirage is available in many sizes from 32 tall tabletops to 92 tall backwalls. The following set-up and repacking instructions depict
R O A D M A S T E R, I N C.
 R O A D M A S T E R, I N C. ROADMASTER, Inc. 6110 NE 127th Ave. Vancouver, WA 98682 12 10 3 11 4 5 13 7 8 360-896-0407 fax 360-735-9300 www.roadmasterinc.com ITEM QTY NAME MATERIAL 1... 4...1/2 x 1 1/2
Installation Instructions Avalanche XUV Cap IMPORTANT! IMPORTANT!
 Installation Instructions Avalanche XUV Cap IMPORTANT! Read all instructions carefully before commencing any work. Always wear safety equipment. Some installation steps will require two or more installers.
Pulleys and Belt. Install the Major Accessory and Pulley. Install the Motor Pulley NOTE. Align the Motor Pulley and the Tool Pulley NOTE
 Pulleys and Belt Pulley Guard - 505862 Install the Major Accessory and Pulley 1. Place the short end of the mounting base holes, and insert - but don t tighten - the setscrews. If the Major Accessory has
ALLDATA Online - 2006 Dodge Truck RAM 2500 Truck 2WD L6-5.9L DSL Turbo VI... Service and Repair
 Page 1 of 15 Home Account Contact ALLDATA Log Out Help PAUL REDEHOFT Select Vehicle New TSBs Technician's Reference Component Search: OK 2006 Dodge Truck RAM 2500 Truck 2WD L6-5.9L DSL Turbo VIN C Conversion
Models HD920EV HD930EV LW5000EV WD962KEV WD962KPEV WD962MLEV 349544
 .. Belt Drive Battery Backup Garage Door Opener Models HD920EV HD930EV LW5000EV WD962KEV WD962KPEV WD962MLEV 349544 FOR RESIDENTIAL USE ONLY Please read this manual and the enclosed safety materials carefully!
Installation Instructions
 Installation Instructions READ BEFORE INSTALLING UNIT For Low Profile Window Air Conditioner INSTALLATION WARNINGS AND CAUTION Carefully read the installation manual before beginning. Follow each step
3/4 PIPE CLAMP WITH STAND
 3/4 PIPE CLAMP WITH STAND Model 94053 ASSEMBLY AND OPERATING INSTRUCTIONS (3/4 DIAMETER PIPE NOT INCLUDED.) 3491 Mission Oaks Blvd., Camarillo, CA 93011 Visit our Web site at: http://www.harborfreight.com
HEAVY DUTY STAIR LIFT SYSTEM Installation and Service Manual
 HEAVY DUTY STAIR LIFT SYSTEM Installation and Service Manual WARNING! STRICT ADHERENCE TO THESE INSTALLATION INSTRUCTIONS is required and will promote the safety of those installing this product, as well
Product Notice. Safety Notice: Sales Hold
 Product Notice Ariens Company 655 W. Ryan St. Brillion, WI 54110 www.ariens.com Product Family: Ariens and Gravely 36 Power Brushes Subject: Sales Hold Inspect and Repair Dealer Action: SALES HOLD Do not
Check for deteriorated, shifting or missing tie-down pads. Replace if needed.
 C C 0 5 C H A S S I S F R A M E Chassis Frame Overview The Blue Bird Vision s chassis frame consists of two main C-channel rails which run the entire length of the bus, and several different kinds of cross
SPIRAL STAIR KIT INSTALLATION MANUAL
 SPIRAL STAIR KIT INSTALLATION MANUAL Effective January 1, 2014 If you have any questions, please call the location that your Stair Kit was purchased from: Broomall, Pennsylvania 1-800-52-7427 Ontario,
MODEL G300 BRAKE BLEEDER
 MODEL G300 BRAKE BLEEDER Installation, Operation & Repair Parts Information Branick Industries, Inc. 4245 Main Avenue P.O. Box 1937 Fargo, North Dakota 58103 REV060616 P/N: 81-0035G 1 THIS PAGE INTENTIONALLY
PITCHED ROOF STRUCTURES
 PITCHED ROOF STRUCTURES for framed and frameless photovoltaic modules Needed tools and materials: cordless screwdriver 10mm and 13mm spanners 5mm Allen key bolts, screws and tools for fixing the system
Wall-Mounting your HP computer. User Guide
 Wall-Mounting your HP computer User Guide The only warranties for Hewlett-Packard products and services are set forth in the express statements accompanying such products and services. Nothing herein should
HermanMiller Aeron Posturefit Installation AE905A AE905B AE905C
 HermanMiller Aeron Posturefit Installation AE905A AE905B AE905C Y How to assemble to your chair Parts Included Posturefit Mechanism For more information about our products and services or to see a list
The Drink-Aide The NEW look of independence
 The Drink-Aide The NEW look of independence Introducing Drink-Aide What is Drink-Aide? The Drink-Aide is a water bottle that attaches easily to a wheelchair for use by persons with little or no upper
AM/FM ANTENNA RELOCATION KIT
 -J0 REV. 008-09-0 AM/FM ANTENNA RELOCATION KIT GENERAL Kit Number 766-09 Models This kit is used to relocate a fender-mounted AM/FM antenna to a Detachable Tour-Pak on specific model motorcycles. For model
INSTRUCTIONS: LocknCharge Laptop Carts
 INSTRUCTIONS: LocknCharge Laptop Carts www.lockncharge.com Extra Tools required: Hammer, Philips head screwdriver, medium adjustable spanner. (Allen key supplied) (Panel colours for illustration purposes
Re-board Accessories
 Re-board Accessories Plastic Screws Plastic screws specially developed for 16 mm Re-board, but works with most thicknesses. A special version comes with a loop for hanging (only available in transparent
Unpacking, Installation, and Customization
 Unpacking, Installation, and Customization NetShelter WX Enclosure AR100 AR100HD Contents Unpacking... 1 How to Unpack the Enclosure............................... 1 Please Recycle..........................................
Owner s Manual Read and keep this manual. Patents World Wide
 Owner s Manual Read and keep this manual. Patents World Wide S & S Industries, Inc., Sarasota, FL, USA www.trail-gator.com Copyright 2008 All Rights Reserved The following manual is provided to assist
LG G5 Chassis Brace Gen 5 Camaro THE MOST POWERFUL HEADERS ON THE PLANET Brought to you by LG Motorsports 972-429-1963
 LG G5 Chassis Brace Gen 5 Camaro THE MOST POWERFUL HEADERS ON THE PLANET Brought to you by LG Motorsports 972-429-1963 Thank you for purchasing LG Motorsports products for your Gen 5 Camaro. Parts Inventory:
Auto-belay Cable Replacement Process
 Auto-belay Cable Replacement Process Version 2.00 WARNING: The air pressure in the auto-belay system is what causes the cable to be retracted when releasing the cable or climbing the wall with the cable
Stair Railing. Installation Guide
 Stair Railing Installation Guide THE BEST CHOICE FOR STRONG & DURABLE RAILING SYSTEMS Our exclusive manufacturing process ensures our vinyl railing will provide superior strength plus it is virtually maintenance
Installation Instructions For Slider Casement Air Conditioners
 Installation Instructions For Slider Casement Air Conditioners NOTE: These instructions describe installation in a typical wood framed window with a wood SLIDE-BY sash, or installation in a metal CASEMENT