Destiny Shower Enclosure Installation Instructions
|
|
|
- Kory Lawrence
- 9 years ago
- Views:
Transcription
1 Destiny Shower Enclosure Installation Instructions IMPORTANT Please read carefully the following instructions before installing your shower enclosure. If you have any questions on this shower enclosure installation - please call our technical support specialists Monday to Friday 9:00AM 6:00PM EST at Option 3 or our technical support group at [email protected] Preparation 1. After opening the case, read this introduction carefully, check all the packed parts are complete by cross checking all the components against the Diagram of Shower Enclosure Components. Examine for shipping damage. If the unit has been damaged or has a finishing defect, please contact your local distributor within 2 business days. Please note that Bath Authority / DreamLine will not replace any damaged product or parts free of charge, ONCE the product has been installed. Your distributor s responsibility for damage in transit is limited after the shower package has been transferred to the transportation company, so you may have to contact the transportation company directly to report damage. Contact your distributor or DreamLine if you have any questions. 2. You should make sure that the floor is leveled and solid and will be able to support the total weight of the unit and its occupant. You should also consult your local building codes on questions on installation compliance standards. 3. Install all of the required plumbing and drainage before securing the shower. Use a competent and licensed (if required by local code) plumber for all plumbing installation. 4. Please insure that prior to the installation the floor is leveled and the walls are at right angles. While some adjustment in leveling of the tray is possible, irregular floor level or improper angle of side walls will result in serious problems for your installation. Please, note that there are some adjustments and drilling might be necessary during the installation process. Tools Required Electric drill, Masonry drill bit (D=6mm not provided), Pencil, Phillips screwdriver, Slotted screwdriver, Tape measure, Spirit level with horizontal and vertical indicators. Note: If glass has silk, print or molded designs, please put clear side toward inside. 1

2 Detailed Diagram of Enclosure Components Packing List 01 Wall profile 2pcs 11 Screw ST pcs 02 Side stationary glass 2set 12 Screw ST pcs 03 Angle connection profile 2pcs 13 Screw ST pcs 04 Glass profile 2pcs 14 Screw ST pcs 05 Guide rail 2pcs 15 Screw cover 12set 06 Glass door 2pcs 16 Wall anchors 8pcs 07 Stationary glass 2pcs 17 Glass holder 4pcs 08 Handle 2pair 18 Single roller assemble 4pair 09 Anti water strip 4pcs 19 Tray 1pcs 10 Single side strip 2pcs Now you have checked that all components are there, you are now ready to start the installation of your Dreamline shower enclosure. 2

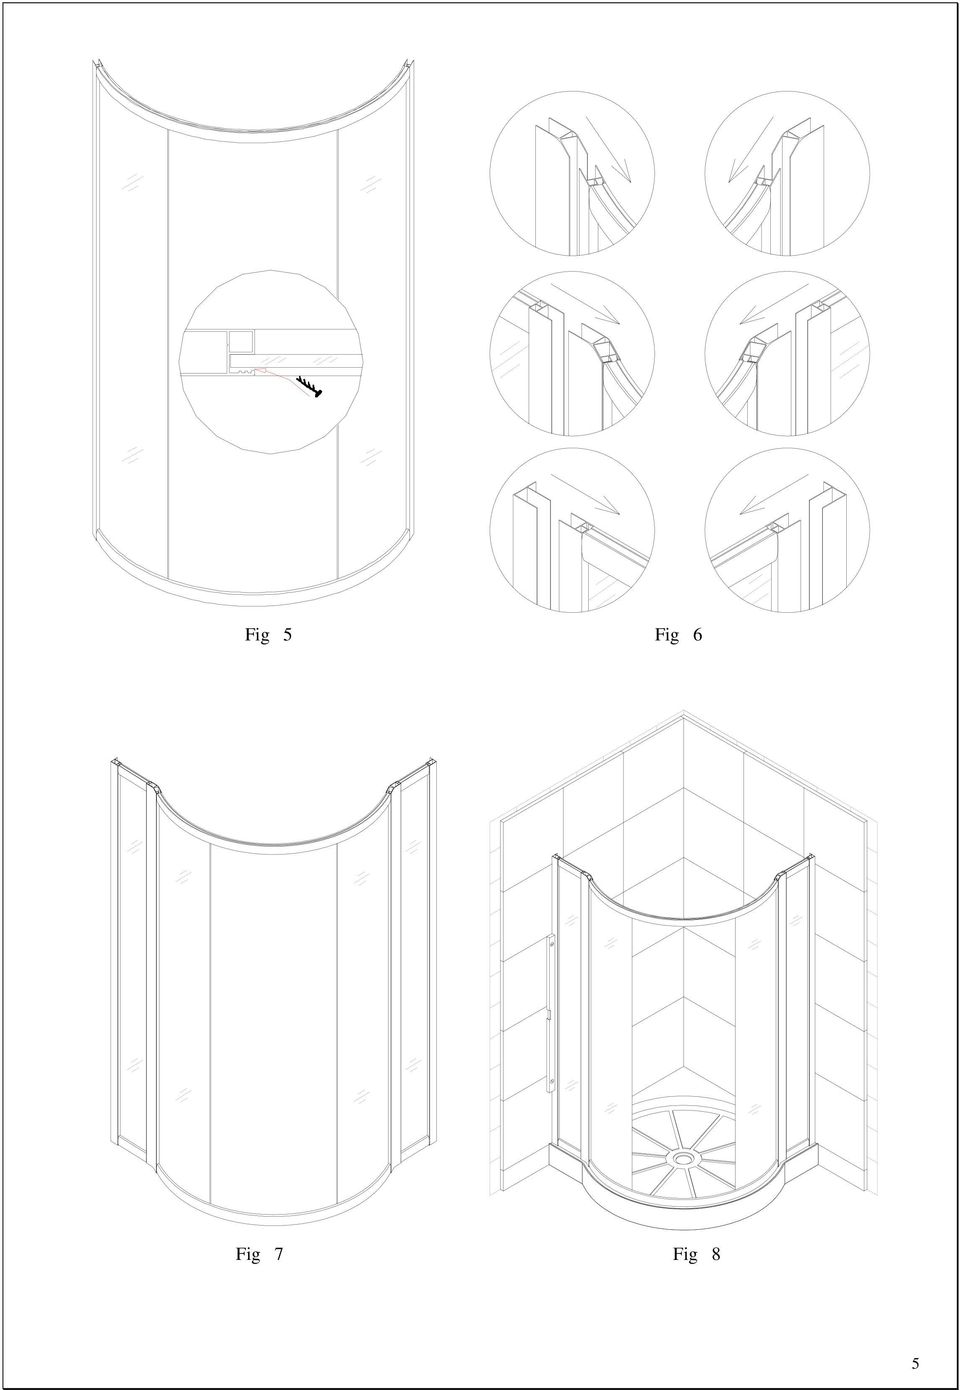
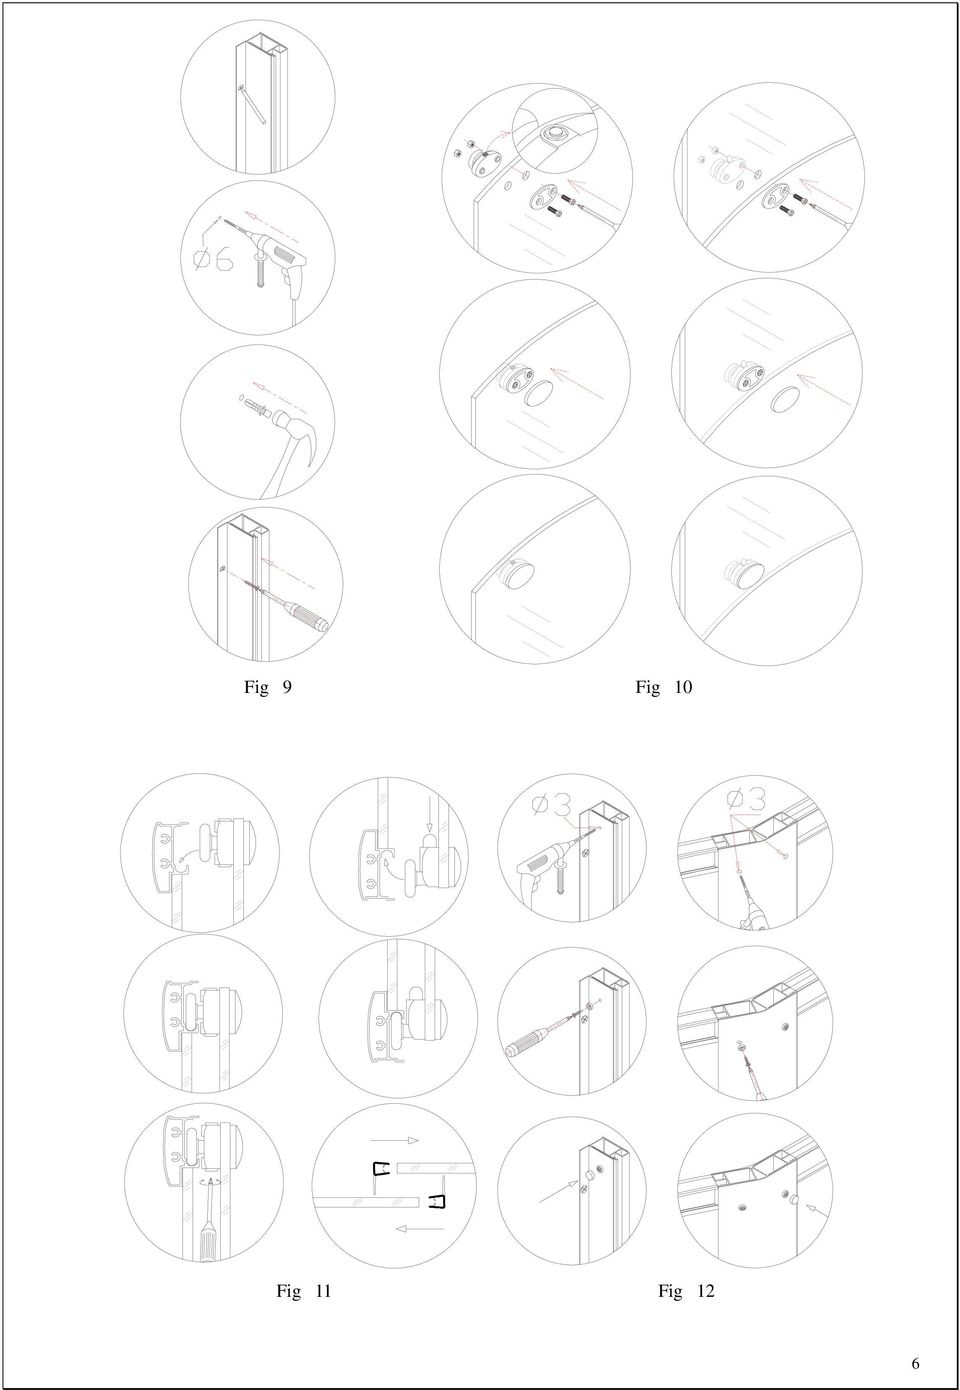
3 Enclosure Installation Install the shower tray as per the manufactures instructions making sure that tray is level in all directions. 1. Assemble Glass profile (4) with Guide rail (5) using ST4.2x25 round head self tapping screw (fig 3). Note that top Guide rail (fig 1) is different from bottom Guide rail (fig 2) - plastic stopper is in different direction. 2. Push the Stationary glass (7) into Glass profile groove, and then fasten it by Glass holder (16) to the Guide rail (fig 4). 3. Secure another side of Stationary glass inside of the Glass profile groove with Single side plastic strip (10). Push Single side plastic strip between glass and side of groove (fig 5). 4. Push the Angle connection profile (3) all way over the Glass profile; than push the Side stationary glass (2) into the Angle connection profile (fig 6). 5. Push the Wall profile (1) all the way over the Glass profile (2). Be sure to keep a tong with predrilled holes inside of shower (fig 6). 6. Carry the assembled unit (fig7) on the top of tray; push it against wall (fig 8). You can adjust position of the shower by pulling it partially out of the Wall profile. 7. Now adjust one of Wall profiles vertically using level and mark holes on the wall (fig 8). Using help to hold this profile in the right position, level another profile and mark holes. Gently move the assembled unit on the side, drill holes into the wall, insert anchors (16) (fig 9). 8. Place the whole shower assembly on the tray and attach it to the wall using ST screws (11). 9. Do final check and adjustment of the shower assemble position on the tray. Now drill small holes in the Wall profiles, Angle connection profiles and Glass profiles and connect it together using ST4.2x10 round head screws (13) and Screw covers (15) (fig 12). ( Do not use a power screwdriver) 10. Install the Roller assembles and the Hooks on the Glass door. Hang the Glass door on to guide rail (fig 10). 11. Hang the Hooks onto bottom guide rail. 12. Adjust the Roller assembly bottom screw up and down to make the door moving smoothly (fig 11). 13. Install Handle (8) on The Glass door. 14. Install Waterproof flanged strip (9). One on the Stationary glass (7) and another on the Glass door (on the side which is opposite of handles) (fig11). 15. Seal with silicon between Wall profile, Glass Profile, bottom rail and tray (fig 13). 3
. Push Single side plastic strip between glass and side of groove (fig 5). 4.")
4 Fig 1 Fig 2 Fig 3 Fig 4 4
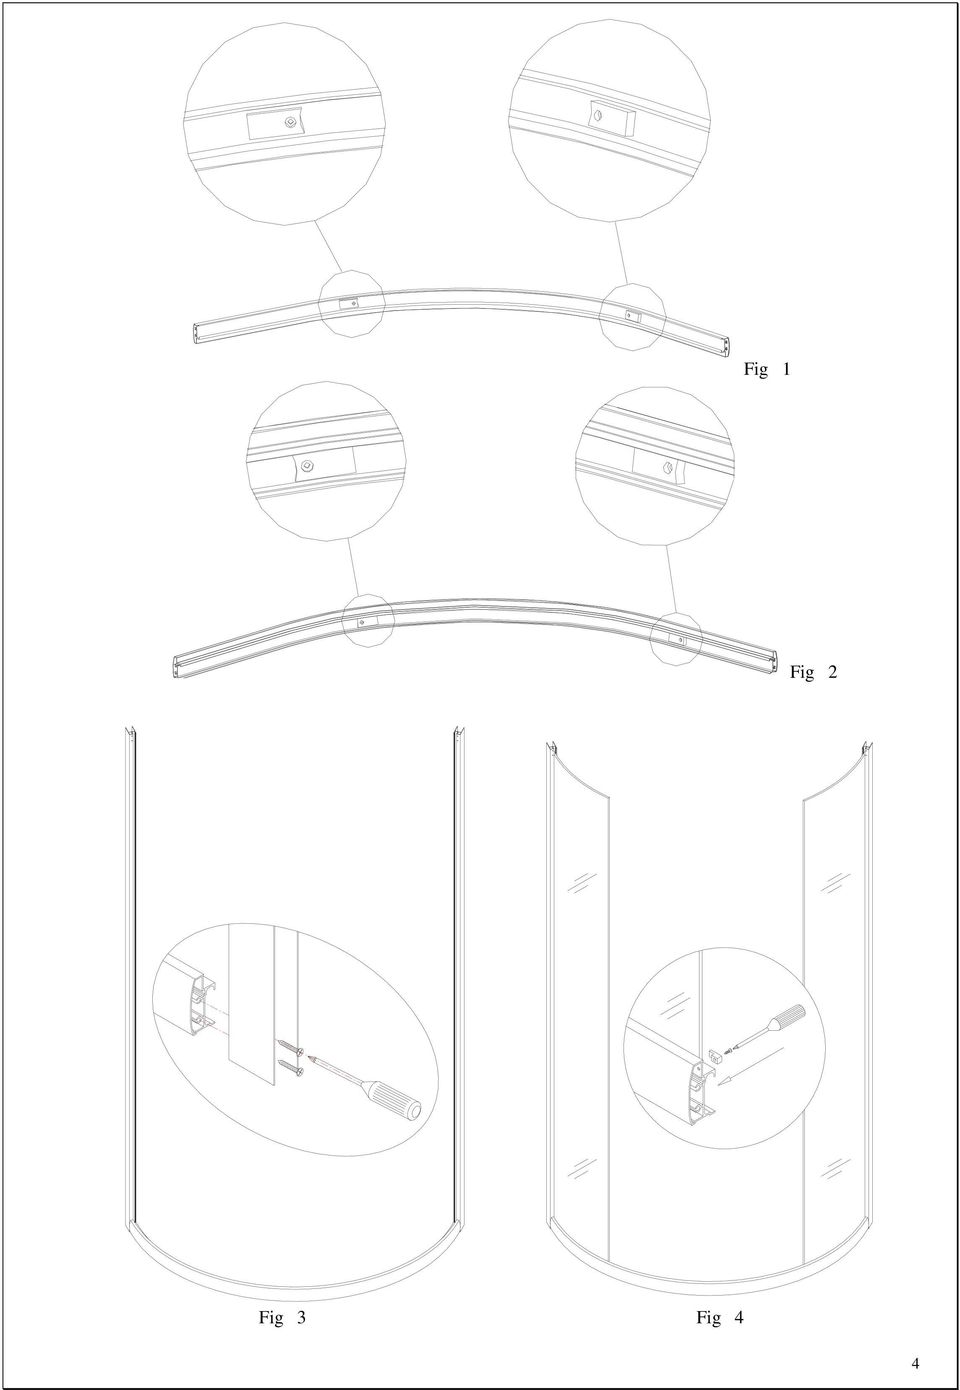
5 Fig 5 Fig 6 Fig 7 Fig 8 5
6 Fig 9 Fig 10 Fig 11 Fig 12 6
7 Fig. 13 Product Maintenance 1. Tempered glass can be clean with nonabrasive bathroom cleaner or any glass cleaner you use elsewhere in your home. Rinse off any glass cleaner that gets on the aluminum as soon as possible to avoid damage to the anodized surface. Avoid striking it with any sharp or hard objects. Such damage can cause either immediate or delayed breakage of tempered glass. 2. The aluminum in your shower door is durable and resistant to water damage. It is advisable, but not necessary to wipe it with your towel after your shower. Clean it as often as needed to keep the buildup off. Never use any type of abrasive cleaner. Use only a soft damp cloth and nonabrasive bathroom cleaners. 3. Maintenance of wheel: A: for plastic wheel, use a little lubricating oil to keep it smooth and long last. B: for metal wheel except adding of oil, if shower has not been used for a long time, you can dry the wheel and put a little grease to keep it well working conditions. C: Adjust wheel screw periodically to guarantee moving door effective bearing and sliding. Our product may have changes without prior notice 7

8 Bath Authority LLC / DreamLine Shower Enclosure, Jetted/Steam Shower and Shower Columns Limited Warranty CONSUMER RESPONSIBILITIES Your DreamLine Shower Products will remain beautiful for many years if you take care of them. Some of the waterproofing plastic strips and other seals will need to be replaced when they show signs of wear, yellowing, or are not watertight. Refer to the parts list of your manual for all seals. Water conditions in various parts of the country will determine any extra cleaning attention you may have to give your new shower enclosure or jetted shower. DreamLine does not recommend the use of harsh abrasive cleansers on any of its products. Harsh cleansers will damage the metal or glass finish on your shower enclosure or jetted shower. REQUESTING SERVICE Here s what you need to do if you require service: 1. Contact the dealer who sold and/or installed the product. They should be able to solve any problems you may have. 2. If your dealer or contractor cannot solve the problem, they will contact or supply you with the name of the local DreamLine Distributor or a DreamLine Direct Technical Specialist 3. If you are unable to obtain warranty service through either your contractor or DreamLine distributor, please write us directly at Bath Authority LLC / DreamLine 909 Louis Drive Warminster, PA ATTN: Customer Service Department 4. Include all pertinent information regarding your claim, including a complete description of the product, model numbers, colors, finishes, and the date the product was installed. Include a description of the problem and a photocopy of your invoice and purchase receipt(s) for the products involved. Also please provide information on the name and contact telephone numbers of the contractor and distributor. Please note that under any circumstances, DreamLine products should not be returned to your dealer, distributor or directly to DreamLine without a written Return Merchandise Authorization (RMA). LIMITED ONE-YEAR WARRANTY This warrantee extends only to the original owner/end-user for personal household use only. For commercial uses, additional limitations may apply. DreamLine warrants acrylic surface against blistering or cracking and chipping resulting from defect in the acrylic surface material when used under normal condition and service for a period of one (1) year from the purchase date. DreamLine warrants mirrors, shower doors, shower massage systems, faucet finishes and fittings to be free from defects in workmanship and materials under normal use and service for a period of one (1) year. DreamLine further warrants the structure of the acrylic shell against loss of water through the fiberglass laminate of the acrylic body as a result of defect in materials and workmanship for a period of five (5) years from the purchase date. DreamLine will, at its election, repair, replace, or make appropriate credit adjustment where DreamLine optional inspection discloses any such defects occurring in normal usage within the warrantee periods. Please note that DreamLine is not responsible for any installation or removal costs. Improper modification of any enclosure, jetted shower or shower column components may void the warrantee - so please install the product as directed in the manual. This warrantee does not cover any claim arising from abuse, misuse, negligence, accident, improper installation or operations on the part of the purchaser. This warrantee is void if the DreamLine product is subject to alterations, or if repairs are attempted by anyone other than an authorized agent of DreamLine. This warrantee does not extend to any plumbing or components installed by dealers, installers or by any party other then DreamLine. Implied warranties, including that of merchantability or fitness for a particular purpose, are expressly limited in duration to the duration of this warranty. DreamLine disclaims any liability for special, incidental, or consequential damages. Some states do not allow limitations on how long an implied warranty lasts or the exclusion or limitation of special, incidental, or consequential damages, so these limitations and exclusions may not apply to you. This warranty gives you specific legal rights. You may also have other rights which vary from state to state. This limited warranty provides specific legal rights as they apply within the USA, and other rights may be available, but may vary from country to country. This is our exclusive written warranty for DreamLine Shower Enclosure, Jetted/Steam Shower and Shower Column purchases made after May DreamLine reserves the right to modify this warranty at any time, and the consumer understands that such modification will not alter the warranty conditions applicable at the time of the sale of the product. 8

9 9

Acrylic Walls Installation Instructions
 Acrylic Walls Installation Instructions IMPORTANT Please read carefully the following instructions before installing your shower acrylic walls. If you have any questions on this shower acrylic walls installation
VISION SHOWER DOOR & TUB DOOR INSTALLATION INSTRUCTIONS
 VISION SHOWER DOOR & TUB DOOR INSTALLATION INSTRUCTIONS IMPORTANT DreamLine TM reserves the right to alter, modify or redesign products at any time without prior notice. For the latest up-to-date technical
INFINITY-Z SHOWER DOOR & TUB DOOR INSTALLATION INSTRUCTIONS
 INFINITY-Z SHOWER DOOR & TUB DOOR INSTALLATION INSTRUCTIONS IMPORTANT DreamLine TM reserves the right to alter, modify or redesign products at any time without prior notice. For the latest up-to-date technical
NIAGARA Shower Cabin Installation Instructions
 NIAGARA Shower Cabin Installation Instructions IMPORTANT Please read carefully the following instructions before installing your shower cabin. If you have any questions on this shower cabin installation
BUTTERFLY SHOWER DOOR INSTALLATION INSTRUCTIONS
 BUTTERFLY SHOWER DOOR INSTALLATION INSTRUCTIONS IMPORTANT DreamLine reserves the right to alter, modify or redesign products at any time without prior notice. For the latest up-to-date technical drawings,
ENIGMA-X SHOWER DOOR & TUB DOOR INSTALLATION INSTRUCTIONS
 ENIGMA-X SHOWER DOOR & TUB DOOR INSTALLATION INSTRUCTIONS IMPORTANT DreamLine TM reserves the right to alter, modify or redesign products at any time without prior notice. For the latest up-to-date technical
DREAMLINE EXCLUSIVE LIMITED WARRANTY
 DREAMLINE EXCLUSIVE LIMITED WARRANTY This warranty applies to DreamLine products purchase after June 1, 2015. DreamLine offers the following warranty for its products and components thereof. This warranty
CHARISMA SHOWER/TUB DOOR INSTALLATION INSTRUCTIONS
 CHARISMA SHOWER/TUB DOOR INSTALLATION INSTRUCTIONS IMPORTANT DreamLine reserves the right to alter, modify or redesign products at any time without prior notice. For the latest up-to-date technical drawings,
SLIMLINE SHOWER BASE
 SLIMLINE SHOER BASE SHOER BASE DIMENSIONS AND INSTALLATION INSTRUCTIONS IMPORTANT DreamLine TM reserves the right to alter, modify or redesign products at any time without prior notice. For the latest
QWALL 4 ACRYLIC SHOWER WALL INSTALLATION INSTRUCTIONS
 QWALL 4 ACRYLIC SHOWER WALL INSTALLATION INSTRUCTIONS IMPORTANT DreamLine TM reserves the right to alter, modify or redesign products at any time without prior notice. For the latest up-to-date technical
Beautifully Traditional
 Arcade 800mm Single Sliding Door Quadrant - nickel Arcade 900mm Single Sliding Door Quadrant - nickel ARC48 ARC49 INSTALLATION INSTRUCTIONS A www.arcadebathrooms.com IMPORTANT - Please read before installation
TOLL FREE: (866) 591-7792. E-Mail: [email protected]. www.vigoindustries.com VANITY SPECIFICATIONS. VANITY COMPONENTS Model VG09042K1
 591-7792. E-Mail: techmail@vigoindustries.com. www.vigoindustries.com VANITY SPECIFICATIONS. VANITY COMPONENTS Model VG09042K1") VANITY SPECIFICATIONS VANITY COMPONENTS Model VG09042K1 MODEL VG09042K1 FEATURES Freestanding cabinet Soft closing sliding cabinet drawer hardware White, single hole ceramic sink Cabinet ships assembled
VANITY SPECIFICATIONS VANITY COMPONENTS Model VG09042K1 MODEL VG09042K1 FEATURES Freestanding cabinet Soft closing sliding cabinet drawer hardware White, single hole ceramic sink Cabinet ships assembled
Important Information
 Single Door Quadrant Instruction Manual ESQ Important Information Toughened glass is completely safe for use in our shower enclosures and bath screens; providing our products are installed according to
Curved Quadrant Instruction Manual
 Curved Quadrant Instruction Manual Consumer Guarantee - Please make sure the purchaser/end user completes and returns the Guarantee card which is enclosed with this product. Failure to validate the Guarantee
IMPORTANT INFORMATION
 Curved Quadrant Instruction Manual CQ IMPORTANT INFORMATION Toughened glass is completely safe for use in our shower enclosures and bath screens; providing our products are installed according to our guidelines.
COASTLINE QUADRANT ENCLOSURE. Installation / Maintenance Instructions Rev 05.12 05.14
 COASTLINE QUADRANT ENCLOSURE Installation / Maintenance Instructions Rev 05.12 05.14 IMPORTANT NOTES : Please Read Carefully & retain these instructions for Future Reference. 1. For ease & safety we advise
Quadrant Shower Enclosure. Telephone 0844 484 7678. Cleaning. All chrome surfaces should be cleaned using a clean damp cloth.
 Cleaning All chrome surfaces should be cleaned using a clean damp cloth. Quadrant Shower Enclosure No abrasive cleaning agents or materials should be used. General glass cleaner can be used for the screen,
IN00419 (rev A) Aqua 6 Glide Quadrant and Off-set Quadrant Enclosure
 Aqua 6 Glide Quadrant and Off-set Quadrant Enclosure") IN00419 (rev A) Aqua 6 Glide Quadrant and Off-set Quadrant Enclosure Instruction suitable for both Quadrant & Off-set Quadrant variations. Instruction suitable for both Right and Left Hand fixing variations
IN00419 (rev A) Aqua 6 Glide Quadrant and Off-set Quadrant Enclosure Instruction suitable for both Quadrant & Off-set Quadrant variations. Instruction suitable for both Right and Left Hand fixing variations
Retractable Screen. Replacement Screen Instructions
 Retractable Screen Patent Pending Replacement Screen Instructions For RTS, RET, & RTM Products ATTENTION! Retractable screens are not intended to provide security or provide for the retention of objects,
PATHWAY Classic Series with Handrails Portable Wheelchair Ramp INSTRUCTIONS FOR USE 6428 REV A 05-21-09
 PATHWAY Classic Series with Handrails Portable Wheelchair Ramp INSTRUCTIONS FOR USE. INSTRUCTIONS 1) FOR EZ-ACCESS PATHWAY RAMP WITH HANDRAILS 850 pound weight capacity. Available in 4, 6, 8 & 10 lengths.
T H A N K Y OU F O R Y OUR P U R C H A S E O F A N E S S E N T I A V A N I T Y, P L E A S E R E A D T H E S E V A N I T Y C A R E A N D I N S T A L L
 T H A N K Y OU F O R Y OUR P U R C H A S E O F A N E S S E N T I A V A N I T Y, P L E A S E R E A D T H E S E V A N I T Y C A R E A N D I N S T A L L AT I O N I N S T R U C T I O N S C A R E F U L LY CAR
Sealant. 30" Model No. 35020. D: 17-7/8" TO 18-3/8" (454 to 466mm) W: 29-3/4" TO 30-1/4" (756 to 768mm) Under Countertop Installation
 W: 29-3/4 TO 30-1/4 (756 to 768mm) Under Countertop Installation") INSTALLATION INSTRUCTIONS CARE AND MAINTENANCE London Kitchen Sinks 24" Sink model number 35030 30" Sink model number 35020 36" Sink model number 35040 Thank you for selecting Porcher. To ensure this product
INSTALLATION INSTRUCTIONS CARE AND MAINTENANCE London Kitchen Sinks 24" Sink model number 35030 30" Sink model number 35020 36" Sink model number 35040 Thank you for selecting Porcher. To ensure this product
Premier & Deluxe 3-Season Room Sliding Glass Door
 DTSSGD-11 Premier & Deluxe 3-Season Room Sliding Glass Door Installation Instructions Screen Door Seal Left Side Track Top Track Assembly Right Side Track Right Side Trim Sliding Glass Door Sliding Screen
MODEL VG08008 CONTENT PACKING LIST / TOOLS NEEDED PANEL DIMENSIONS FITTINGS / TECHNICAL DATA WALL/CORNER INSTALLATION CARE AND TROUBLE SHOOTING
 CONTENT PACKING LIST / TOOLS NEEDED PANEL DIMENSIONS FITTINGS / TECHNICAL DATA WALL/CORNER INSTALLATION CARE AND TROUBLE SHOOTING WARRANTY 1 PACKING LIST DESCRIPTION MODEL NUMBER - PANEL HOUSING 88062
INSTALLATION MANUAL. Glass Vessel Sink. www.kraususa.com I toll free: 1.800.755.0703 I 2013-2014 Kraus USA Inc.
 INSTALLATION MANUAL Glass Vessel Sink www.kraususa.com I toll free: 1.800.755.0703 I 2013-2014 Kraus USA Inc. Thank You Kraus would like to take this opportunity to thank you for purchasing our products.
Folding Bath Screen Instruction Manual
 Folding Bath Screen Instruction Manual Consumer Guarantee - Please make sure the purchaser/end user completes and returns the Guarantee card which is enclosed with this product. Failure to validate the
POZZI WINDOW COMPANY LIMITED WARRANTY WINDOWS, DOORS AND COMPONENT PARTS
 POZZI WINDOW COMPANY LIMITED WARRANTY WINDOWS, DOORS AND COMPONENT PARTS POZZI WINDOW COMPANY warrants, subject to the conditions and restrictions contained below, that each window, door and component
Basic Spring Motor Roller Shades
 Comprehensive Roller Shade Installation Guide Basic Spring Motor Roller Shades ATTENTION!!! READ CAREFULLY! This shade has a reliable long-lasting Spring Motor. The Spring Motor must have proper tension
OAK WORKBENCH WITH 2 DRAWERS
 OAK WORKBENCH WITH 2 DRAWERS Model 93991 ASSEMBLY Instructions Visit our website at: http://www.harborfreight.com Read this material before using this product. Failure to do so can result in serious injury.
FAUCET SPECIFICATIONS. Vessel Bathroom Faucet Model VG03023 MODEL VG03023
 FAUCET SECIFICATIONS Vessel Bathroom Faucet Model VG03023 MODEL VG03023 FEATURES Solid brass construction Single hole construction Ceramic disk cartridge Single lever faucet Standard plumbing connections
Triple Threat 3-in-1 Game Table 3 IN 1 GAME TABLE
 NG0M Triple Threat 3-in- Game Table 3 IN GAME TABLE Thank 3 in Y Game Table Thank you for your purchase of our product. We work around the clock and around the globe to ensure that our products maintain
IMPORTANT INSTALLATION GUIDE VALENCIA SQUARE CORNER SHOWER READ ALL INSTRUCTIONS CAREFULLY BEFORE STARTING THE INSTALLATION
 INSTALLATION GUIDE VALENCIA SQUARE CORNER SHOWER SEALANT REQUIRED TO COMPLETE THIS INSTALLATION: (Not supplied) Sika Sikasil NG (Arctic White) To seal the WHITE shower door and returns to the shower tray.
Customer Service 800.780.8889 or visit us online at smithnoble.com. Wood Shutters. Step by Step Installation. Troubleshooting Tips
 reflect your style TM Customer Service 800.780.8889 or visit us online at smithnoble.com Wood Shutters Step by Step Installation Troubleshooting Tips Easy Care Instructions STEP 1 Your New Shutter Thank
LACAVA. Table of Contents. Owner s Manual. Wall-mounted & Vessel Sinks PS#:
 LACAVA 2243 S. Throop St. Chicago, IL 60608 [email protected] www.lacava.com Owner s Manual Important: Keep this manual for future technical assistance and/or replacement parts. Please read the instructions
Stainless Steel Sink Work Center With Portable Sink, Colander and Cutting Board
 SKU: 463780 / QK09 Owner s Manual Stainless Steel Sink Work Center With Portable Sink, Colander and Cutting Board THANK YOU for selecting American Standard the benchmark of fine quality for over 00 years.
London Farm Kitchen Sinks
 INSTALLATION INSTRUCTIONS CARE AND MAINTENANCE London Farm Kitchen Sinks 24" Sink model number 35120 30" Sink model number 35130 36" Sink model number 35140 Certified to comply with ANSI A112.19.3.M CAN/C.S.A
INSTALLATION INSTRUCTIONS BL-8704
 INSTALLATION INSTRUCTIONS BL-8704 EXPOSED BLACK LEVER THERMOSTATIC MIXING VALVE WITH RISER KIT, HANDSET, LEVER DIVERTER, 8 ROSE AND ADJUSTABLE RISER PIPE BRACKET. Dimensions in Inches (& Millimetres) 1
CordlessPleated FabricShade including Top-Down/Bottom-Up. owner's handbook
 CordlessPleated FabricShade including Top-Down/Bottom-Up owner's handbook July, 2013 español página 9 2 INSTALLATION INSTRUCTIONS Step 1. Check Package Contents Missing part? Call 1-800-264-1190 Mounting
INSTALLATION INSTRUCTIONS MK-8704
 INSTALLATION INSTRUCTIONS MK-8704 EXPOSED MACKINTOSH THERMOSTATIC MIXING VALVE WITH RISER KIT, HANDSET, LEVER DIVERTER, 8 ROSE AND ADJUSTABLE RISER PIPE BRACKET. Dimensions in Inches (& Millimetres) 1
Window Care, Warranty & Service
 Window Care, Warranty & Service another inspired idea Window Care Service Hotline (888) 630-4100 CONGRATULATIONS! All of us at United Window & Door wish you warmth and happiness in your new home. We are
TracRac G2. Overhead Rack Installation Instructions. TracRac Inc. 994 Jefferson St. FallRiver MA 02721 www.tracrac.com 800-501-1587 IN-42000_B
 IN-42000_B TracRac G2 Overhead Rack Installation Instructions TracRac Inc. 994 Jefferson St. FallRiver MA 02721 www.tracrac.com 800-501-1587 Thank you for your purchase of a TracRac G2 Sliding Cargo Manaagement
Cardio-Tramp REBOUNDER MANUAL. Please review this important information regarding your STOTT PILATES
 Cardio-Tramp REBOUNDER MANUAL Please review this important information regarding your STOTT PILATES Cardio-Tramp Rebounder and keep it handy for future reference. IMPORTANT! This manual contains important
Installation Instructions / Warranty
 Installation Instructions / Warranty Downpour 10 27474XX1 7 27476XX1 Raindance AIR 12 27493XX1 Shower Arm 15 27413XX1 9 27422XX1 Extension Pipe for Ceiling Mount 27479XX0 Downpour 10 Showerhead 27474XX1
XONYX Solid Surface Owner's Manual
 XONYX Solid Surface Owner's Manual 1. IMPORTANT SAFETY CAUTION: Never allow children to use the bath/shower cabin without adult supervision to avoid accidents. CAUTION: Physically challenged people must
CULINAIRE COLLECTION STAINLESS STEEL KITCHEN SINKS
 SELF RIMMING CULINAIRE COLLECTION STAINLESS STEEL KITCHEN SINKS MODELS 501.103, 502.103, 502.403, 504.103, 50.103, 510.103 Thank you for selecting American-Standard...the benchmark of fine quality for
Installation Instructions / Warranty
 Installation Instructions / Warranty Uno 38475XX1 38379XX1 Steel 35375801 35379801 Massaud 18743001 18747001 Starck X 10385XX1 10386XX1 Starck 10375XX1 10379XX1 Citterio M 34715XX1 34716XX1 Citterio 39384XX1
Installation Instructions / Warranty
 Installation Instructions / Warranty Axor Citterio 39384XX1 39387XX1 Axor Citterio 39385XX1 39386X1 Axor Massaud 18743001 18747001 Axor Starck X 10385XX1 10386XX1 Axor Starck 10375XX1 10379XX1 Axor Terrano
Columbia flooring will resist fading from exposure to sunlight or artificial light.
 LIMITED LIFETIME WARRANTY AND MAINTENANCE FOR RESIDENTIAL USE Columbia is so confident in the design and durability of our Columbia flooring products and accessories, that we back them with a Limited Lifetime
ACE. PIVOT AND BI-FOLD DOOR Installation and User Guide. These instructions must be left with the user 1 1115815-W2-D
 ACE PIVOT AND BI-FOLD DOOR Installation and User Guide These instructions must be left with the user 1 CONTENTS Introduction...3 General...3 Guarantee...3 Recommended Usage...3 Pack Contents...4 Safety
 MEDION LIMITED WARRANTY Medion warrants that the product accompanied by this limited warranty is free from manufacturing defects in material or workmanship for a period of 12 months from the date of original
Wetroom Panel (Concealed Fix)
") Wetroom Panel (Concealed Fix) Instruction Manual DXFCPCF Important Information Toughened glass is completely safe for use in our shower enclosures and bath screens; providing our products are installed
Wetroom Panel (Concealed Fix) Instruction Manual DXFCPCF Important Information Toughened glass is completely safe for use in our shower enclosures and bath screens; providing our products are installed
Elavo White Ceramic Round Vessel Bathroom Sink
 INSTALLATION MANUAL Elavo White Ceramic Round Vessel Bathroom Sink KCV-143 www.kraususa.com I toll free: 1.800.775.0703 I 2014-2015 Kraus USA Inc. I REV. August 13, 2015 Thank you for purchasing Kraus
IN00378 (rev A) Corner Entry
 Corner Entry") IN00378 (rev A) Corner Entry Before You Start Check that the tray has been installed correctly and that it is level (Fig. A), tiled down onto and sealed to the manufacturer s guidelines. Please Note: All
IN00378 (rev A) Corner Entry Before You Start Check that the tray has been installed correctly and that it is level (Fig. A), tiled down onto and sealed to the manufacturer s guidelines. Please Note: All
INSTRUCTION BOOK FOR. Single Monitor Video Conference Cart
 INSTRUCTION BOOK FOR Single Monitor Video Conference Cart Procedure 1. Remove contents from cartons and examine for damaged or missing parts. The keys for the cabinet doors are tied to the outside of the
6mm Two Door Offset Quadrant
 Installation Guide 6mm Two Door Offset Quadrant 226MBJ 0914RN Offset Quadrant 226MBJ.indd 1 07/08/2015 14:03 Cu w Before you Start Please read this Installation Guide fully. Although these instructions
By SP Partners, LLC. www.rainbowatticstair.com INSTALLATION GUIDE. Prestige
 By SP Partners, LLC www.rainbowatticstair.com INSTALLATION GUIDE Prestige IMPORTANT READ THIS FIRST Inspect stair for any damage prior to installation. Stair is NOT to be installed while home is under
All-Season Sunroom Sliding Glass Door Installation Instructions
 ASRESGD-08 All-Season Sunroom Sliding Glass Door Installation Instructions Panel Frame Door Frame Left Side Foam Insulator IE241 H Bar Assembly Door Frame Top Track Panel Frame Door Frame Right Side Stationary
Unpacking, Installation, and Customization
 Unpacking, Installation, and Customization NetShelter WX Enclosure AR100 AR100HD Contents Unpacking... 1 How to Unpack the Enclosure............................... 1 Please Recycle..........................................
ATS Overhead Table Shelf System INSTRUCTION MANUAL
 ATS Overhead Table Shelf System INSTRUCTION MANUAL ATS Overhead Table Shelf System Instruction Manual Warranty Newport Corporation warrants this product to be free of defects in material and workmanship
Beadboard Wall Bookcase
 Beadboard Wall Bookcase Note: The maximum load for each shelf is 30lbs.This hanging system is meant for drywall/wood stud mounting only. If walls are concrete, brick or plaster, please consult your local
Convertible Crib and Changer (M668)
") Model No.: M668 PO #: Serial #: Convertible Crib and Changer (M668) THIS PRODUCT IS NOT INTENDED FOR INSTITUTIONAL OR COMMERCIAL USE. If you have any questions or missing parts, please contact us. DO NOT
Model No.: M668 PO #: Serial #: Convertible Crib and Changer (M668) THIS PRODUCT IS NOT INTENDED FOR INSTITUTIONAL OR COMMERCIAL USE. If you have any questions or missing parts, please contact us. DO NOT
WARNING: FAILURE TO FOLLOW THESE RULES MAY RESULT IN SERIOUS PERSONAL INJURY CAUTION: INSTALLATION LOCATION:
 Revision Level: 01 Revision Date: 07/07/2011 Please read all instructions carefully to help ensure a correct and SAFE installation of your Second Wind Ultraviolet Germicidal Air Purifier. Failure to do
Digital Fingerprint safe
 Digital Fingerprint safe Model 96846 Operation Instructions Diagrams within this manual may not be drawn proportionally. Due to continuing improvements, actual product may differ slightly from the product
CW-4622 INSTALLATION INSTRUCTIONS CB-4622 RISER KIT TO SUIT BLACK LEVER EXPOSED VALVES & BATH/SHOWER VALVES
 INSTALLATION INSTRUCTIONS CB-4622 RISER KIT TO SUIT BLACK LEVER EXPOSED VALVES & BATH/SHOWER VALVES CW-4622 RISER KIT WITH WHITE LEVER DIVERTER TO SUIT EXPOSED VALVES & BATH/SHOWER VALVES CB-4622 CW-4622
Installation Instructions / Warranty
 Installation Instructions / Warranty Vertical Spray Bidet Fitting Rough 1322X181 Citterio 39224xx0 Citterio 39225xx0 Starck 10220xx0 Steel 35220800 Uno 38220xx0 Terrano 37224xx0 Terrano 37225xx0 Carlton
Important Operating Instructions and Warranty Information On Your New Electronic AMSEC Safe
 Important Operating Instructions and Warranty Information On Your New Electronic AMSEC Safe MODEL: IRC916E, IRC412 Read Contents Carefully For Trouble-Free Operation of Your Safe Dear Valued Customer:
INSTRUCTION BOOK FOR. Dual Monitor Video Conferencing Cart
 INSTRUCTION BOOK FOR Dual Monitor Video Conferencing Cart Procedure 1. Remove contents from cartons and examine for damaged or missing parts. The keys for the cabinet doors are tied to the outside of the
Replacement Window Installation Guide Non-Impact & Impact Resistant Windows without Nailing Fin
 Replacement Window Installation Guide Non-Impact & Impact Resistant Windows without Nailing Fin americancraftsmanwindows.com Project Requirements: Failure to follow these instructions may void product
Easy Assembly Instructions & Rules
 Model #64-2000 Easy Assembly Instructions & Rules 4-in-1 Casino Table DO NOT RETURN TO STORE. FOR ALL RETURNS AND WARRANTY COVERAGE PLEASE CALL GLD PRODUCTS: 1-800-225-7593 Please provide model number,
Close Coupled & Back To Wall WC Saintaryware. Fitting Instructions
 Close Coupled & Back To Wall WC Saintaryware Fitting Instructions Before starting any installation project please consider the following: Prior to drilling into walls, check there are no hidden electrical
POWER GEAR SLIDE OUT MANUAL
 POWER GEAR SLIDE OUT MANUAL Operation Guide FLUSH FLOOR SLIDE OUT SYSTEM FOR AMERICAN COACH PRODUCTS 82 S0220 01 Rev. 1 AMERICAN COACH SLIDE OUT MANUAL FLUSH FLOOR SYSTEM TABLE OF CONTENTS SECTION PAGE
SOLAR ELECTRIC MODULE ES-124 & ES-62T Owners Manual and Installation Guide
 SOLAR ELECTRIC MODULE ES-124 & ES-62T Owners Manual and Installation Guide circuit. Reverse connection will damage the module and may result in fire. CAUTIONS Solar electric modules produce DC electricity
Combination Unit 5'6" Windows a i o P t
 for Andersen 5'6" Double-Hung Venting s Windows a i o P t o rs D o Congratulations You have just purchased one of the many fine Andersen products. For ease of assembly and installation and continued enjoyment
Super Slider ADJUSTABLE FROM 3.5-12 Model #HD26229
 Super Slider ADJUSTABLE FROM 3.5-12 Model #HD26229 IMPORTANT!!! ALL PERSONS USING THIS EQUIPMENT MUST READ AND UNDERSTAND ALL INSTRUCTIONS. FAILURE TO DO SO MAY RESULT IN SERIOUS INJURY OR DEATH. USERS
FAQs. 19. Does the sub floor need to be level before I install my new direct-to-stud bathtub or shower base?
 1. Where is the serial number of my tub located? 2. What can I use to clean my tub or shower? 3. What is an Above Floor Rough-in? 4. Can I replace my towel bar? 5. What are grommets? 6. Why do some bathing
INSTALLATION INSTRUCTIONS
 INSTALLATION INSTRUCTIONS ODEON IN-WALL TANK K-6283K/ K-6284K/ K-6286K Read installation guide in illustration and word file carefully, and install the tank according to instructions in the guide to avoid
Product Warranty and Replacement Procedure Forme Limited Warranty
 Product Warranty and Replacement Procedure Forme Limited Warranty 1.0 Warranty Periods Tucosi Pty Ltd T AS - Forme Bathroom Collection (Forme) warranty covers items that are found to be defective due to
Installation and Maintenance Instructions
 Limited One Year Warranty T&S warrants to the original purchaser (other than for purposes of resale) that such product is free from defects in material and workmanship for a period of one (1) year from
Important Operating Instructions and Warranty Information On Your New Electronic AMSEC Safe
 Important Operating Instructions and Warranty Information On Your New Electronic AMSEC Safe MODELS: ES712, ES914, ES149, ES1814, ES813, ES916, ES1014, ES2014, ES412, WES149, WES2114 Read Contents Carefully
81000 Series Aluminum Gate Valve Installation and Repair Manual
 High Vacuum Valves Leader in Quality and Value 81000 Series Aluminum Gate Valve Installation and Repair Manual Dear Customer, Thank you for choosing HVA as your vacuum valve supplier. Your valve will give
Foodservice Equipment Specialists P.O. Box 880 Saco, ME. / U.S.A. 04072 877-854-8006 * FAX (207) 283-8080
 283-8080") Foodservice Equipment Specialists P.O. Box 880 Saco, ME. / U.S.A. 04072 877-854-8006 * FAX (207) 283-8080 FOR SERVICE ASSISTANCE U.S. AND CANADA CALL: 1-877-854-8006 24 HOURS/DAY 7 DAYS/WEEK TABLE OF CONTENTS
Foodservice Equipment Specialists P.O. Box 880 Saco, ME. / U.S.A. 04072 877-854-8006 * FAX (207) 283-8080 FOR SERVICE ASSISTANCE U.S. AND CANADA CALL: 1-877-854-8006 24 HOURS/DAY 7 DAYS/WEEK TABLE OF CONTENTS
Fabric Replacement Top Installation Instructions
 Replacement Top Installation Instructions For: Wrangler/YJ 88-95 Part Number: 51120 Special Note: If your Wrangler is a 1986 or 1987 model, this kit is not the correct product. Please order Part Number
TWIN EAGLES ALL WEATHER ELECTRIC RADIANT HEATER
 TWIN EAGLES, INC. Defining the Art of Outdoor Cooking TWIN EAGLES ALL WEATHER ELECTRIC RADIANT HEATER OWNER S MANUAL MODEL TEEH-1512 TEEH-2524 TEEH-3524 NEED ASSISTANCE? PLEASE CALL: (562) 802-3488 This
Active and Passive Sash Replacement
 for Andersen Gliding Windows Read all instructions carefully before attempting this procedure. If you have any questions about your ability to complete the procedure, call Andersen at 1-888-888-7020 for
LIMITED ONE-YEAR WARRANTY SELLER S RESPONSIBILITY
 LIMITED ONE-YEAR WARRANTY SELLER S RESPONSIBILITY Except as covered by a manufacturers limited warranty, the Seller hereby provides a Limited Warranty for the dwelling against defects in the original material
Sun Windows General Information Sun New Construction Window Installation Instructions
 Sun Windows General Information Section 1 G F H H H A. Apply Weather Resistive Barrier B. Apply Sill Flashing Tape C. Place Waterproof Sill Shims D. Caulk Back of Nail Fin Sides & Top, Set Window, Fasten
Bathroom Installation Guide
 Bathroom Installation Guide Step-by-step installation of your cabinets We do a lot of groundwork to make it as simple as possible for you to assemble and install your new bathroom furniture yourself. We
Calvert USA, Inc. Attic Stairs
 Calvert USA, Inc. Attic Stairs Instructions for installation of vertical opening access stairs Model numbers: 7035 through 7047 Calvert USA, Inc., P.O. Box 841, Solomons, MD 20688, Tel. (410) 286-1430,
VERTICAL / FIXED BEAM CLAMP I-BEAM ANCHOR ADJUSTABLE FROM 4-14 Model # HD26249
 VERTICAL / FIXED BEAM CLAMP I-BEAM ANCHOR ADJUSTABLE FROM 4-14 Model # HD26249 IMPORTANT!!! ALL PERSONS USING THIS EQUIPMENT MUST READ AND UNDERSTAND ALL INSTRUCTIONS. FAILURE TO DO SO MAY RESULT IN SERIOUS
& CLEANING GUIDE MAINTAIN BEAUTY & PERFORMANCE
 & CLEANING GUIDE MAINTAIN BEAUTY & PERFORMANCE BATHS, SHOWERS & WHIRLPOOLS MADE OF SOLID VIKRELL Everything Sterling puts its name on is painstakingly designed and precision-engineered to ensure excellence.
ILLUSION FRAMELESS SHOWER ENCLOSURE INSTALLATION INSTRUCTIONS
 PREPARATION Approximate Installation Time: Tools Required for Installation: 60 minutes Hacksaw Electric Drill 3/16 Masonry Bit Pencil/Felt tip pen Safety Glasses Measuring Tape Masking Tape Standard Screw
DIY CABINET REFACING INSTALLATION GUIDE
 DIY CABINET REFACING INSTALLATION GUIDE CABINET REFACING INSTALLATION Are you ready to reface your outdated cabinets? This guide will show you how to install your new Facelifters Cabinet Refacing Products
Information Technology Solutions
 Information Technology Solutions Aluminum Sliding Door Assembly Instructions Shield Doors & Windows Bi-fold Door Assembly Instructions For Support Please Call 03 8339 2252 Aluminum Sliding Door Assembly
MTV-FS1 / FS1T / FSB375
 MTV-FS1 / FS1T / FSB375 MYE Entertainment Freestanding LCD TV Floor Stand with Base Assembly Instructions man_mtvfs1_b3 www.myeclubtv.com Table of Contents Parts List 3 Parts Identification......3 Hardware
ROUTER TABLE INSERT ASSEMBLY AND OPERATING INSTRUCTIONS
 ROUTER TABLE INSERT 94331 ASSEMBLY AND OPERATING INSTRUCTIONS 3491 Mission Oaks Blvd., Camarillo, CA 93011 Visit our Web site at http://www.harborfreight.com Copyright 2006 by Harbor Freight Tools. All
Everyday life at home puts high demands on bathroom furniture. GODMORGON furniture and GODMORGON legs, VITVIKEN, ODENSVIK, BRÅVIKEN and NORRVIKEN
 GODMORGON Everyday life at home puts high demands on bathroom furniture. GODMORGON furniture and GODMORGON legs, VITVIKEN, ODENSVIK, BRÅVIKEN and NORRVIKEN washbasins and GODMORGON storage units endure
the Company will not warrant ANSI A156.2 Grade 2 lever Product installed in educational facilities and student housing.
 product warranties Commercial Applications Limited Warranty Schlage Lock Company, LLC (the Company ) extends a three year limited warranty to the original user of the products manufactured by the Company
glass & Glazing Products
 glass & Glazing Products WallMaker Create an unlimited variety of bright, beautiful and secure interior environments with the easy-to-install Stylmark WallMaker glass wall system. This versatile system