buzztouch for Android
|
|
|
- Constance Gordon
- 10 years ago
- Views:
Transcription
1 buzztouch for Android A User s Guide By GoNorthWest June

2 Table of Contents 1. Welcome! 2. Sign Up For buzztouch 3. Basic Hardware and Software Requirements 4. Setting Up Your Android Development Environment (Mac OS X) 5. Setting Up Your Android Development Environment (Windows) 6. Configuring Your Android Virtual Device (AVD) 7. Compiling and Running Your App 8. Adding Files To Your Project 9. All About Keystores and Signing 10. Getting A Google Maps API Key 11. Publishing Your App to Google Play 12. Common Problems and Solutions 13. Problem Reporting and Basic Debug 14. Final Thoughts 2

3 Chapter 1 Welcome! So, you ve stumbled across buzztouch, the most amazing app development site on the entire Internet (probably in the entire universe as well!), and you re super stoked to get to work and send your ideas out to the world! Very cool! When I came across the site, I just wanted to get my app developed and out to the masses. But it turns out that the whole process is a bit more involved than just designing your app on buzztouch and then releasing it on the market. You need to download the source code, compile it, test it in a simulator and a real device (if you have one), sign it, and upload it to the appropriate market. This may seem like a lot of work, and it is, but it s not as hard as you might think. The purpose of this guide is to walk you step-by-step through the process of signing up for buzztouch, creating your app, setting up your Android development environment, and publishing your app for users to download. Hopefully this guide will help even the most inexperienced of users get up and running quickly and painlessly! This book will be free to begin with. I do know that some people feel better if they can send something my way, so here are two methods you can use to do that. Like I said nothing is expected, but everything is greatly appreciated! PayPal Donation: Amazon.com Wish List: Ready to start? Good! Let s go! 3
, sign it, and upload it to the appropriate market.")
4 Chapter 2 Sign Up For buzztouch It would be easy to assume that you ve already signed up for buzztouch at this point, and perhaps you have, but it s entirely possible that you re reading this book to get an idea of what it s all about. Fair enough. If you haven t signed up for buzztouch yet, and you re ready to take the plunge, then head over to this link and complete your registration: Once you have created the registration form, a confirmation will be sent to you with a link to a confirmation screen. Click that link, and you ll be confirmed and ready to go! Now, and in the future, head to the following link and sign in to your account: You re now signed up and ready to start developing your Android applications! But wait I think it would be highly worth your time to spend some time at buzztouch U! Time for buzztouch U! Now that you ve signed up for buzztouch, you absolutely should block out some time and go through the videos at buzztouch U. You can find them here: You should start with the buzztouch Learning Path so you fully understand what buzztouch is about, and how to operate within it. After that, it s your choice on either the ios or Android path. I m assuming since you re reading this book that you ll want to follow the Android Learning Path. In those 9 lessons, you will learn a ton about Android, Eclipse, and how programming works in general. You ll be amazed at the things you ll walk away with! This book should be used in conjunction with the buzztouch U videos. It is NOT meant to replace the learning that can be found in those videos; rather, it is meant to help get you through some of the various problems that inevitably come up during the development process. You cannot go wrong by taking the time to engage in buzztouch U! 4

5 Basic Hardware and Software Requirements Chapter 3 In order to develop apps for Android devices, there are some things that must be put into place first. buzztouch enables you to design your app, and then provides the source code for your project, but you then have to compile, test, and submit your app to the appropriate marketplace. In order to do that, your development environment must meet some minimum requirements.. So, here we go with a list of what you need to have in order to make your app dreams come true! A Windows or Linux PC, or a Mac. The awesome thing about the Android development environment is that it s available on Windows, Linux or Mac. So, if you want to develop ios and Android applications, getting a Mac will help you do both. If you are interested in just Android apps, then your current PC is probably up to the task. Eclipse + Android SDK. Eclipse is the Integrated Development Environment (IDE) for Android, and Google provides the Android Software Development Kit (SDK). You need both of these in order to compile the projects you get from buzztouch. Both have packages that run on Windows, Linux or Mac. Membership in Android Market or Amazon.com Appstore for Android. Technically speaking, this is not a requirement for distributing your apps to the world. All you need for that is a development certificate (which you can generate for free, unlike with Apple), and a way to get your apk file to somebody. But, if you want to use the conventional method for distributing your app, and increase your chances of making money from it, you ll probably want to join one of these programs. A device to test on. OK this is not an absolute requirement, but testing your app on more than just the Android emulator is very important. An emulator is just that it emulates what a real device is like. If you don t have a real device, find a friend that does and have them test it it s as simple as ing the apk to them or posting it on the web. Or, post a message on the forum...lots of people are willing to help out. Willingness to explore and learn. Despite how accessible buzztouch has made app development, it s not as easy as you might think, and Android apps have their fair share of issues in the development process. It ll be immensely helpful to yourself, and to those who eventually respond to your questions in the forums, if you have spent some time trying to learn the required skills by utilizing the resources already out there. Please don t expect us to lead you step-by-step through the process if you re not willing to give it a go first. You ll learn and understand more in the long run if you spend some time trying to work it out on your own first. It s far more rewarding that way! 5

6 Helpful Resources Eclipse : Android SDK : buzztouch Forum : buzztouch Videos : Setting up your Android Dev Environment : v1.1.pdf Problem Reporting and Basic Debugging : 6

7 Chapter 4 Setting Up Your Android Development Environment (Mac OS X) Setting up the Android development environment can be a bit well challenging if you don t have all the pieces in place before you start. The aim of this chapter is to visually walk you through the process of downloading what you need, installing it, and making the correct configurations. Once you do that, you re all set to actually work with the source code you download from buzztouch! Hopefully these instructions will make things just a bit easier for you! The basic process you are about to undertake is the following: 1. Download the required software 2. Unzip and move the Android SDK to the desired location 3. Unzip and move the Eclipse IDE to the desired location 4. Install the ADT Plugin for Eclipse 5. Configure the Android SDK for Development Tools and Google API 6. Configure the Android Virtual Device (AVD) 7. Celebrate because you re done and ready to work with your app! Note: This tutorial assumes a fresh install of all software components. If you ve got a previous install, consider deleting all the folders and starting fresh. But remember to copy over any extra files or keys you may have created! Let s get started! 1. Download required software. In order to make this all work, there are several pieces of software you have to download and install: a. Eclipse: I chose to download Eclipse Classic 3.7.2, which was the most recent version available at the time of this writing. I downloaded the 32-bit version for Mac OS X, but there is also a 64-bit version if you are running 64-bit OS X. Here are the links I used to get this package /eclipse-SDK macosx-cocoa.tar.gz 7

, much like the ios SDK for iphones/ipads, that must be used within Eclipse for development.")
8 /eclipse-SDK macosx-cocoa-x86_64.tar.gz b. Android Development SDK: This is the software development kit (SDK), much like the ios SDK for iphones/ipads, that must be used within Eclipse for development. Here are the links I used for this portion c. Java JDK: Windows has the requirement of a JDK, but it appears that the Java that comes with Mac OS X is enough for our needs here. So, there is nothing you need to download. If you want to check what version of Java is running on your computer, you can open a console window and type java version and you ll get something like the following: d. Once you get all the software downloaded, you should have a file listing that looks something like this : 2. Install the Android SDK (android-sdk_r17-macosx.zip). To install the Android SDK in Mac OS X, all you need to do is unzip the package that you downloaded, and place it wherever you want to on your system. I chose to put the folder in the Applications folder, but I don t think it much matters. You may have to adjust a few things that come later depending on where you place the folder. Begin by right-clicking on the package you downloaded (I put mine on the Desktop), and using the Archive Utility to extract the files. 8

9 After you have extracted the files, you ll see a newly created folder called android-sdk-macosx. Drag that folder to wherever you want. Like I mentioned, I put it in the Applications folder. 3. Install Eclipse IDE (eclipse-sdk macosx-cocoa.tar.gz). To install the Eclipse IDE in Mac OS X, you again simply need to extract the files from the zipped tar package, and then move them to wherever you want Eclipse to reside. And, again, I chose that location to be the Applications folder. Begin by right-clicking on the package you downloaded and using the Archive Utility to extract the files. After you have extracted the files, you ll see a newly created folder called eclipse. Drag that folder to wherever you want. I put mine in the Applications folder. 9

10 You re done installing Eclipse and the Android SDK. Now it s time to install the ADT Plugin for Eclipse. 4. Install the ADT Plugin for Eclipse. This part of the procedure installs the Android Development Tools (ADT) plugin for Eclipse. It s what ties together Eclipse and the Android SDK. You install it via Eclipse, using the Help Install New Software menu of Eclipse. First thing is to fire up Eclipse. Double-click on the Eclipse executable in the Applications/Eclipse folder (or wherever you put it), and you ll see the Eclipse splash screen. The first thing you ll have to decide is where to configure your workspace. Unless you have a reason to change from the default, go with what it suggests. One you have that set, and hit OK, the main Eclipse screen should come up. Do a happy dance now, because this is proof positive that Eclipse is installed on your system! 10
, and you ll see the Eclipse splash screen.")

11 Now you want to go to Help Install New Software, and configure the screen to hit the correct software repository. Here is the initial screen you ll get. 11

 and the Location (https://dl-ssl.google.")
12 I cut off the bottom part of the actual screen you ll get to save space. The important stuff is at the top of the screen anyway. See the Add button on the right-hand side near the top? Click that puppy, and here s what you ll get. OK, that s not totally what you ll get. You ll need to type in both the Name (ADT Plugin for Eclipse) and the Location ( Now you can hit OK. After a few seconds it ll connect to the Google site, and then you ll see this screen (again, cropped for space). Go ahead and hit Select All as I ve done in this example. To be honest, I don t know if you absolutely need everything here, but I figured better safe than sorry! Hit Next to review the Install Details. 12


13 Hit Next again, and select I accept the terms of the license agreements. That should enable the Finish button, which you should now hit. The following screen will pop up, which indicates you are now installing the software! In the course of the install, you may see the following security warning. Just go ahead and hit OK and things will proceed. At this point, you may get a series of errors, and one of them may look like this. 13


14 Click on Open Preferences, and see this screen (cropped for space). Click on Browse and navigate to where you put the Android SDK folder. In my example, it ll look like this (cropped!). Click Apply, then OK, and you re all done! Now it s time to configure the Android SDK for Development Tools and the Google APIs. You re almost done! 5. Configure the Android SDK for Development Tools and Google API. This is where you configure the Android SDK Manager to download the tools you will need to create buzztouch apps. This is essentially downloading the Google API's Platform 2.2 and API level 8. Keep in mind a common mistake, as pointed out in the Readme file provided by buzztouch with your Android source code : A common mistake is to assume Android 2.2 API's and Google 2.2 API's are the same, they are not. This is important to keep in mind if you grab the wrong ones, you won t be able to get your program to work. Start by bringing up the Android SDK Manager in Eclipse. Do this by starting Eclipse, then going to Window Android SDK Manager. The following screen will appear, and your goal is to make 14

15 it look like the image you see here. Select what I selected, and you ll be good for both buzztouch v1.4, v1.5 and v2.0 apps. Now click Install 6 packages (or whatever number you end up having), and you ll get this screen. 15


16 Click on the Accept All radio button, which should turn all the checkmarks in the packages list to green. Now hit Install. Watch the log until it says you are done and you can close. Then hit Close. This part of the process may take some time depending on the speed of your Internet connection, so feel free to grab a coffee or something to pass the time with. Once the install is done, and it says you can hit Close, you ve successfully installed the Android SDK, Eclipse, and the ADT Plugin for Eclipse! You are basically done, unless you want to create an Android Virtual Device (AVD), or emulator, as it s often called. If you re ready for that, head on over to Chapter 6: Configuring Your Android Virtual Device (AVD). Congratulations on making it through one of the more difficult parts of developing for Android! Hopefully this chapter has made it as painless a process as possible. 16
, or emulator, as it s often called.")
17 Chapter 5 Setting Up Your Android Development Environment (Windows) Like I said in the previous chapter, setting up the Android development environment can be a bit well challenging if you don t have all the pieces in place before you start. The aim of this chaper is to visually walk you through the process of downloading what you need, installing it, and making the correct configurations. Once you do that, you re all set to actually work with the source code you download from buzztouch! Hopefully these instructions will make things just a bit easier for you! The basic process you are about to undertake is the following: 1. Download the required software 2. Use the installer package to install Java Developers Kit (JDK) 3. Use the installer package to install the Android SDK 4. Configure the Android SDK for Development Tools and Google API 5. Unzip and move the Eclipse IDE to the desired location 6. Install the ADT Plugin for Eclipse 7. Configure the Android Virtual Device (AVD) 8. Celebrate because you re done and ready to work with your app! Note: This tutorial assumes a fresh install of all software components. If you ve got a previous install, consider deleting all the folders and starting fresh. But remember to copy over any extra files or keys you may have created! Let s get started! 1. Download required software. In order to make this all work, there are several pieces of software you have to download and install: a. Java JDK: Eclipse requires a Java Development Kit (JDK). You have to use the Java Developers Kit here not just the Java Runtime Engine (JRE), which most of you already have installed. This is a very crucial distinction without it, things will not work. Here are the links I used for this download, and I grabbed Java SE Development Kit 7u4 which was the latest version at the time of this writing
 3.")

18 b. Eclipse: I chose to download Eclipse Classic 3.7.2, which was the most recent version available at the time of this writing. I downloaded the 32-bit version for Windows, but there is also a 64-bit version if you are running 64-bit Windows. Here are the links I used to get this package /eclipse-SDK win32.zip /eclipse-SDK win32-x86_64.zip c. Android Development SDK: This is the software development kit (SDK), much like the ios SDK for iphones/ipads, that must be used within Eclipse for development. Here are the links I used for this portion Once you get all the software downloaded, you should have a file listing that looks something like this: 2. Use the installer package to install Java Developers Kit (JDK) Double-click on the JDK install package you downloaded from above, and follow the prompts. This MUST be installed before you can install the Android SDK without it, SDK installation will fail. Your install screens should look something like the following: 18
, much like the ios SDK for iphones/ipads, that must be used within Eclipse for development.")


19 Notice it says the JavaFX SDK will be installed following the JDK installation. You don t need that for Android development, so when the time comes for that, you can hit cancel with no problems. 19


20 The screen above gives you the option on where to install the JDK (if you have a preference), and what components you want. Just go with the defaults unless you have a reason to change, and are comfortable making that selection. Kick back and watch the progress meter it ll go fairly quickly. Once its done, you ll see the screen below, and you can hit continue to finish up! 20

21 At this point it ll ask you about installing JavaFX SDK. You don t need it, so you can hit Cancel safely, and you re done. The first piece of the puzzle is now in place! 3. Use the installer package to install the Android SDK Now it s time to install the Android Software Development Kit (SDK). You might be thinking to yourself that you need to install Eclipse first, but that s not true, and we can save that for later on. In fact, it s the Android Development Tools (ADT) plugin for Eclipse that actually ties the Android stuff to Eclipse, so we have plenty of time to get things in order. Double-click on the Android SDK install package you downloaded from above, and follow the prompts. Your install screens should look something like the following: Hit Next, and you ll see the screen below. Sometimes, for reasons unknown, it will fail to find a JDK, even though there is one installed. If that happens to you, just hit the back button, then Next again, and it may resolve itself. See this link for an explanation of the problem: 21

22 The install program has found the JDK, so we re good to go. Hit Next to proceed with the install process. 22

23 In this screen you are asked to select the install location for the Android SDK. You can change it if you d like, or retain the default. I choose to retain the defaults. Now you re given the opportunity to create a Start Menu Folder for the Android SDK Tools. I generally accept the defaults here, and then hit Install. 23

24 The install will go pretty quickly, and then you ll be presented with the following screen. You can, if you d like, choose to Start SDK Manager and download the API s necessary for working with buzztouch. Since things are going well up to this point, let s keep rolling with it. Leave that box checked, and hit Finish. 4. Configure the Android SDK for Development Tools and Google API This is one of the most important parts of setting up your Android development environment. It is during this procedure that you will be selecting, downloading and installing the Google APIs that are necessary for compiling and running your app. Android development is a bit confusing in that there are Android APIs, and Google APIs that can be used for development. The essential difference is that the Google APIs include the Google Maps API, which is necessary for Location Map screens. The Android API only includes core Android APIs, and does not support all the functionality that buzztouch provides. So, it s vitally important that for buzztouch v1.4, you select the Google APIs under Android 1.6 (API 4), and for buzztouch v1.5 and v2.0, you select the Google APIs under Android 2.2 (API 8). The exact items you need are highlighted below. Make sure your screen looks like the following one. 24

25 It should be noted that you can and probably should use Google APIs that are newer than the required ones. You just need to make sure your AndroidManifest.xml file reflects the requirements. But that s for another tutorial. Remember: Google APIs and Android APIs are not the same! Don t make the mistake of thinking they are, or your app won t compile. This is one of the most common mistakes seen on the buzztouch forums. Once you have the correct items selected as noted above, hit Install x packaged (where x is however many you have), and then you ll get the following screen. Hit the Accept All radio button so that all the packages listed have a green checkmark next to them. You re essentialy accepting licenses for these packages here nothing worth reading! 25

26 Now that you ve hit install, you ll see a progress indicator. Even with a fast Internet connection, this is going to take quite some time. So, take a few minutes hop online and order me a case of Fruit Punch SoBe and before you know it, the green progress indicator you see below will be all the way full! Pretty soon you ll see a Downloading packages complee notification, and you re done! Verify that all the packages you want show as installed. 26

27 You ve now completed the installation and configuration of the Android SDK. Congratulations! Time to move on to the next step! 5. Unzip and move the Eclipse IDE to the desired location This is the easiest thing you ll do today. Simply unzip the package you downloaded into the folder of your choice. I recommend c:\eclipse. Your folder structure should now basically look like what you see below. The eclipse.exe file is what you launch to start the program. Feel free to create a shortcut on your desktop, or pin it to your Start Menu (which I did). You ll want to run this program as Administrator. 27

28 See, I told you that was easy! If you re stuck because you re not sure how to unzip something, I recommend heading to and downloading WinRAR. It allows for right-clicking on a zip file and deciding where to unzip it to. Cool stuff! 6. Install the ADT Plugin for Eclipse We now need to install the Android Development Tools for Eclipse. This is a pretty simple process, and doesn t take too long. It ll give you the extra few things you need for developing Android applications (remember that Eclipse is an IDE capable of developing many, many things). But without these tools, you simply cannot tie together the Android SDK and Eclipse for use in developing apps. Start Eclipse by double-clicking on the Eclipse icon you created earlier. After Eclipse has launched go to Help Install New Software This will bring up the following install dialogue box. You ll see that there is no site selected, and thus no option on which software to install. 28

29 Click the Add button and the you ll get this: Specify the same information you see above. For clarity, the link you want is: You can give it whatever name you want. Hit OK. Once you ve done that, you ll get the following screen: 29

30 Well, that s half the screen, but you get the picture! These are your options for install, and it includes the Android Development Tools (ADT). I went ahead and selected everything figuring I may need some of the other stuff in the future. Hit Next. This screen verifies the details of what you are going to install. Hit Next. 30

31 If you feel the need, review the licenses for the stuff you are going to install here. Most important point on this screen is to select I accept the terms of the license agreements. If you don t, you won t be able to install. Hit Next. 31

32 Congratulations! ADT is now installing! Sit back and relax at least until you see this screen: Nothing to be worried about here. Just hit OK and move on. It s all good. After install is done, the program will ask if you would like to reset Eclipse so the changes can take effect. Say Reset Eclipse, wait for it to restart, and you can move on to the next step. At this point, you are basically done, unless you want to create an Android Virtual Device (AVD), or emulator, as it s often called. If you re ready for that, head on over to Chapter 6: Configuring Your Android Virtual Device (AVD). Congratulations on making it through one of the more difficult parts of developing for Android! Hopefully this chapter has made it as painless a process as possible. 32

33 Configuring Your Android Virtual Device (AVD) Chapter 6 Now that you have the Android development environment set up and configured, you re ready to start building and testing your programs. But, while it s preferable to test your app on an actual device, it s possible that you don t have one. In comes the Android Virtual Device to the rescue! Keep in mind, however, that the AVD is an emulator it emulates what an actual device would do. And while it is super useful in helping you test and debug your app, it cannot do some things that a real device can do like use GPS to get real coordinates. So, there will be limitations to what you can accomplish with the AVD, but it you keep that in mind, and also try to find a real device to test on, this can still be a super valuable weapon in your development arsenal. Enough blather let s get on to creating an AVD! To begin, go to Windows AVD Manager. 33

34 This will bring up the AVD Manager screen, which, since you currently have no AVDs configured, will look like this: There are two different AVDs that you could create one for buzztouch v1.4, and one for buzztouch v1.5/v2 Since they both use different Google APIs, You ll have to create one for each if you develop for both. If you are only doing one or the other, then you only need to create an AVD for that particular version of buzztouch. In order to create an AVD for buzztouch v1.4, click New and fill in the information like you see below: 34
35 You can adjust the size of the SD Card to your liking, but I choose to keep it near the minimum 9MB, simply because I m not using the SD Card feature, and because it loads faster with a smaller SD Card configured. I also leave the default Built-in skin of WVGA800, but you can change the resolution to a device size of your liking. In order to create an AVD for buzztouch v1.5/bt Server 2.0, click New and fill in the information like you see below: 35

36 You can adjust the size of the SD Card to your liking, but I choose to keep it near the minimum 9MB, simply because I m not using the SD Card feature, and because it loads faster with a smaller SD Card configured. I also leave the default Built-in skin of WVGA800, but you can change the resolution to a device size of your liking. Now that you are done creating your virtual devices, your Android Virtual Device manager should look something like what you see below. The important thing is that the correct Google APIs are selected for the version of buzztouch that you are using, and that there is a green checkmark next to each virtual device, indicating that it is good. 36
 or terminal window (Mac), navigate to the tools folder of your Android SDK installation, where you will see various emulator executables.")
37 At this point you are done defining your AVD. You can launch an AVD by selecting it from the panel above, and hitting the Start button. Or, you can open up a command prompt (Windows) or terminal window (Mac), navigate to the tools folder of your Android SDK installation, where you will see various emulator executables. Then you can type in the following command to launch your emulator (launching the v1.5 emulator in this example): Launching the emulator is super, super, super slow, and sometimes times out if you are trying to do it from within Eclipse and install your app at the same time. There is no known fix to this yet. Sometimes you ll just have to exit the emulator and start again! Depending on the version of the emulator that you started, you should get a screen that looks like the following. To unlock, using your mouse, just pull the lock graphic to the right! 37
 key will take you to the main screen. The Menu key will present you with any menu options for your current screen (and is a way to refresh your app).")
38 At this point, just start playing around with it to see what it can do. The buttons on the right side of the emulator represent keys on a device (usually a phone). The Home (house) key will take you to the main screen. The Menu key will present you with any menu options for your current screen (and is a way to refresh your app). The Arrow button will take you back a screen. Have fun playing around! There s lots you can do here, and at the very least, you should test each and every one of your Android apps on the emulator! 38
39 Chapter 7 Compiling and Running Your App The time has come for you to actually run and potentially use that Android app you have spent so many hours creating at buzztouch! Your environment is ready you have an Emulator all set up and ready to go and you ve downloaded your source code from buzztouch, so you re ready to compile your app. Cool! Wait what? Source code? Compile? What the heck am I talking about, you ask?! This is a slight digression, but something I think worth spending a few words on. The buzztouch website allows you to define and connect the screens and content for an Android application. This is done through screen creation, media uploads, a method to link it all together as well as the ability to tweak all kinds of app parameters (background color, functionality, GPS, etc). Some people might think that after the app has been designed on buzztouch, it s ready to download and send to the store. Not quite. What buzztouch gives you after you have designed your app is a package of files source code that can be used to build the final app. That source code contains all the necessary information to create an app with the screens you described, as well as interact with the user in the way you intend. But, by itself, the source code can t do anything. That s where Eclipse and the Android SDK come in. Using your Eclipse environment, you will import your project from buzztouch, compile your code (translate the code into instructions the device can understand), sign your app (so people can be confident it really came from you), and create the apk file (which is the final binary that you load on your device, or submit to Google Play). Seems a bit complicated, but it s not. That s all you really need to understand. So, let s get started. We ll start by showing you how to download your source code, and then look at two methods for getting your project into Eclipse and exiting with an apk. Downloading Source Code As we discussed above, you ll need your source code package in order to compile your all. Getting that is pretty simple! Here are the steps: 1. Log into buzztouch.com 2. Click on your account name 3. Click on Applications 4. In the list of applications you are presented with (assuming you have created one!), click on the application you want source code for 39
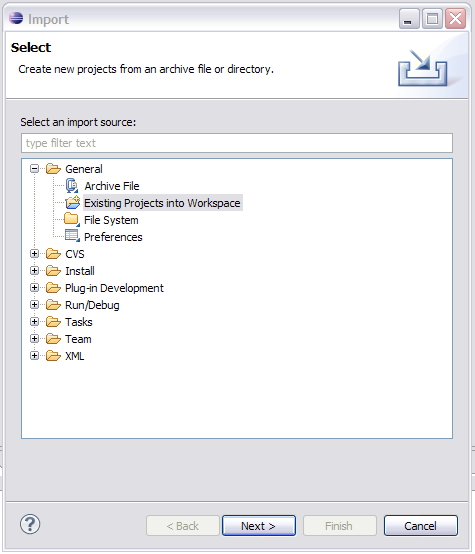
40 5. Click Download Project Source Code 6. Click Prepare Package For Download (Android option is on the right side of the screen) 7. Watch it prepare your package and be amazed at the process! 8. Click Download zip archive (x.x MB) 9. Save the package to a location you will remember! 10. Go to the zipped package and unzip it using a program like WinRAR for Windows, or Archive Utility for Mac. You now have an unzipped copy of your source code. If you are interested, take some time and look around the contents you can t hurt anything by just looking! You ll see a number of folders, many of them with various.java files in them. This is the code that actually does the things that you want your app to do (but you know that anyway, since you ve completed buzztouch U by this point!). You ll also see, in the assets folder your BT_Config.txt file. This is the JSON file that literally defines almost every aspect of your app something else you already know from doing buzztouch U (getting the hint here!?). Lots of stuff to explore in these packages, so take some time, check things out, and try to get a better understanding of what s going on under the hood. OK time to bring your project into Eclipse and get some work done! Method One: Import Your Project When you download your Android code package from buzztouch, you re essentially getting a complete project. All the files you need are contained in the zipped folder you get. So, importing your project into Eclipse is as easy as specifying the folder location, proving a bit of info, and hitting OK! Let s get started! 1. Start Eclipse. Start Eclipse by either double-clicking on the icon you set up for it somewhere, or double-clicking on the eclipse.exe file that is found in your installation path. For me, it s at c:\eclipse\eclipse.exe (on a Windows machine). 2. Import Your Project. a. Go to File Import. 40

41 b. From the resulting dialogue box, expand General if necessary, and then select Existing Projects into Workspace. Hit Next. 41
42 42

43 c. Make sure Select root directory is selected, then hit Browse and select the unzipped folder that you got from buzztouch. Just select the root folder none of the ones beneath it, and none of the files individually. 43

44 d. Your project should show up in the Projects: box, and should be check marked. Hit Finish. e. Wait while Eclipse builds your workspace. You can see the progress in the lower righthand corner of Eclipse. 44
45 f. Once the workspace is built, your project should be loaded and ready for you to work with. You should see a screen similar to the following. We ll address the warnings and stuff later this is just about getting your project into Eclipse. Method Two: Start A New Android Project. This method starts an entirely new project, but uses files that you point Eclipse to. It ll say a project already exists in your source folder, but that s OK, just select it, and it ll build the project based on those files. 1. Start Eclipse. Start Eclipse by either clicking on the icon you set up for it somewhere, or doubleclicking on the eclipse.exe file that is found In your installation path. For me, it s at c:\eclipse\eclipse.exe (Windows). 2. Start a new Android Project. 1. Go to File New Project. You might have an option for Android Project, but you might not. So, just select Project 45

46 2. From the resulting dialogue box, expand Android if necessary, and select Android Project. Hit Next. 46

47 3. Specify a Project Name (I use the same name as what I have in the BT control panel for the app). Select Create Project From Existing Source and browse to your download folder. Select the root folder from the source package you downloaded and unzipped from BT. Hit Finish. 47

48 4. Wait while Eclipse builds your workspace. You can see the progress in the lower righthand corner of Eclipse. 48

49 5. Once the workspace is built, your project should be loaded and ready for you to work with. You should see a screen similar to the following. We ll address the warnings and stuff later this is just about getting your project into Eclipse. Congratulations! Your project is now loaded into Eclipse and ready for you to work with. See that wasn t so bad! Before you can actually run your application, you ll need to make sure it s error free. It s OK if there are warnings in your application those are just what they sound like, but you can t have any errors. Take a look at the Problems tab and see what s there. In this particular example, there are only warnings, so that s a good thing. However initially, when I loaded this project, it came up with a bunch of errors. I struggled for a bit to understand why, and then 49
50 decided to check and make sure the correct Google API was being referenced. It was not, and when I corrected it, all was well. So, if you see errors in you project, do the following: 1. Go to File.Properties and click on Android. For buzztouch v1.5/v2.0 apps, you need to make sure you have selected Google APIs 2.2/8. If you have not, none of this will work. Make sure that, and only that, API is checked, and hit Apply. Then hit OK. Go to File Refresh (F5) and refresh your project. Hopefully all the errors will disappear! If they don t, something else is wrong, and you ll need to post a message on the forum to ask for help, or see the list of Common Android Issues later in this book. Now that your app is error free (remember, warnings are OK), you re ready to compile and run it in the simulator. You should have an Android Virtual Device set up in Eclipse per my other book. It will get loaded automatically when you run your app. To run your app in the virtual device, do the following: 1. Highlight your project in Package Explorer 2. Go to Run Run As Android Application. Or, you could hit the green circle icon you see on the toolbar. 3. Click on the Console tab so you can monitor what s happening. If things are going well, you ll see output that looks like this: [ :26:28 - buzztouch] [ :26:28 - buzztouch] Android Launch! [ :26:28 - buzztouch] adb is running normally. [ :26:28 - buzztouch] Performing com.thunderdroid.bt_activity_root activity launch [ :26:29 - buzztouch] Automatic Target Mode: launching new emulator with compatible AVD 'buzztouch_v1.5' [ :26:29 - buzztouch] Launching a new emulator with Virtual Device 'buzztouch_v1.5' [ :27:15 - buzztouch] New emulator found: emulator-5554 [ :27:15 - buzztouch] Waiting for HOME ('android.process.acore') to be launched Wait while everything loads this often takes several minutes. Seriously you can get a cup of coffee, or perhaps arrange to send me a case of SoBe Fruit Punch (my favorite drink!) while it s loading. The AVD is super slow to load. If everything goes well, your app will show up in your AVD, and you ll be doing the happy dance! 50
 So, now you know that your app works, and after spending countless hours making it look beautiful, you re ready to test it on a real device, or publish it somewhere for the general masses.")
51 (Yeah, I know that s a totally lame looking app, but it was just something I threw together to demonstrate this stuff for you. I m working on some better stuff I promise!) So, now you know that your app works, and after spending countless hours making it look beautiful, you re ready to test it on a real device, or publish it somewhere for the general masses. Let s take a look at how you Export your app and create the.apk package you need in order to install it on a device. To start, we re only going to worry about creating the debug package, using the debug.keystore, until we have a more complete discussion about keystores in a future chapter. 51
.")
52 Here s the process for creating a debug package: 1. Highlight your project in Package Explorer. 2. Go to File Export, and select Export Android Application. Expand the Android section if you don t see that option. Hit Next. 3. Select the project to export. It should already be filled in with your project name (most likely buzztouch). If not, browse to the folder your project is in. Note the statement on the screen that says The manifest debuggable attribute is set to true. This is what you want. Hit Next. 4. Navigate to your debug.keystore file, and enter the keystore password ( android is the default). Hit Next. 52
 and password (")
53 5. Choose Use Existing Key, and select your debug.keystore alias (default is androiddebugkey ) and password ( android ). Hit Next. 53

54 6. Browse to the location you want to have your package saved to, then hit Finish. 7. Check the location to make sure the file was created! If all is good, you can now deploy this on your test device. I ve found that putting it on the web somewhere and having a person surf to the package is the easiest way to install. Creating a release package is basically the same process as a debug package. The main differences are the keystore you use, and the fact that the debuggable attribute is set to false. Here s what you do: 54

55 1. Double-click on the AndroidManifest.xml file in your project tree. You ll find that in Project Explorer. Several tabs should open up, one called Application. In that tab you will find many fields that can be changed, one of which is called Debuggable. You want to set this to false. 2. Highlight your project in Package Explorer. 3. Go to File Export, and select Export Android Application. Expand the Android section if you don t see that option. Hit Next. 4. Select the project to export. It should already be filled in with your project name. If not, browse to the folder your project is in. Hit Next. 5. Navigate to your release.keystore file, and enter the keystore password (I have no idea what it would be for you). Hit Next. 55
56 6. Choose Use Existing Key, and select your release.keystore alias and password. Hit Next. 7. Browse to the location you want to have your package saved to, then hit Finish. That s it! Just like with the debug process, you should now have a.apk file somewhere that can be loaded into whatever marketplace you want to distribute from. 56
. Such content might include images, books (HTML, Word, Excel, PDF), audio and video.")
57 Chapter 8 Adding Files to Your Project There may come a time when you want to include files in the app itself, which means the content is immediately available to your users (instead of downloading via the network). Such content might include images, books (HTML, Word, Excel, PDF), audio and video. Most buzztouch projects handle this without any problems, as you are able to specify both local and URL files. If you specify a local one, however, it needs to be added to your project files so it can be compiled into your app. Here s how you do that! 1. Open your project in Eclipse, and view it in Package Explorer. That s window you see on the left side of the screen. This will show you the file structure for your project. Notice that this project has the default files provided by buzztouch. 57

58 2. Open your buzztouch project in Windows Explorer or Mac Finder, and navigate to the BT_Docs folder. Notice that what you see here, and what you see in Package Explorer, they match. 3. Add the files you want to be included to your BT_Docs folder in Explorer or Finder. 4. Go to File Refresh, or press the F5 Key, and the project will begin to refresh. The following dialogue box will pop up. 58

59 5. Verify that your files are now visible In the Package Explorer. 6. Do a Project Clean and then Run Run As Android Application. Your files should now be part of your app! Overall the process is pretty simple. The key thing to always keep in mind is that new files added to your project folder the set of folders that you downloaded from buzztouch must also be added to both your Xcode and Eclipse projects. If you don t indicate that there are new files that should be included in the build process, then they ll never show up in your app. Follow these steps, and you should be OK! 59
60 Chapter 9 All About Keystores and Signing If you are creating an Android application, Google requires that those applications are signed with a certificate. This signing process is significantly easier than what Apple makes ios developers go through, as Android developers can generate their own certificates for signing applications, using commonly available tools like keystore, which comes with your Java JDK. Google requires that all applications be signed, be it a development or release application. Each requires a different certificate, so let s take a look at each. Signing For Development/Debug When you installed your Android SDK, you got with it a debug.keystore that can be used to sign your application for debug purposes. The default locations for the debug.keystore appears to be these locations for the following platforms: Windows: C:\Books and Settings\<USER>\.android Mac: \Users\<USER>\android If you don t find anything at these locations on your computer, just do a search for keystore and you should find what you re looking for. The debug.keystore ships with the following default parameters: Keystore name: "debug.keystore" Keystore password: "android" Key alias: "androiddebugkey" Key password: "android" CN: "CN=Android Debug,O=Android,C=US" This information becomes important when you go to sign your application for debug. Once you have your application ready for testing, and you want to create a debug package, you can follow these steps: 1. Make sure that android:debuggable="true" is set in your AndroidManifest.xml file. This file is located in the root of your project folder that you got from buzztouch. 2. Highlight your project in Package Explorer, right-click, and select Export. 3. Select Android Export Android Application and then Next. 60
, and hit Next. 6. Select the androiddebugkey alias and use android as the password. Select Next. 7.")
61 4. The Project name should already be filled in, since you are working directly from that project. Hit Next. 5. Select Use Existing Keystore and hit Browse to navigate to your debug.keystore, and select it. Then enter your password (android), and hit Next. 6. Select the androiddebugkey alias and use android as the password. Select Next. 7. Now you ll want to select a destination for your.apk file. As always, make sure it s somewhere you remember. You can also give your package a name at this step. Notice that in this example, the expiration date for the debug key is in So no worries! 61
, so long as it doesn t go into a store.")
62 8. Hit Finish, and the debug package for your application will be built! Congratulations on building and signing your Android application! You can now distribute it in whichever way you want ( , the web, etc), so long as it doesn t go into a store. Debug apps are not allowed in stores (meaning, if debuggable= true is set, it won t get accepted). Keep in mind that you don t have to use the default debug.keystore that comes with your Android SDK. I m not entirely sure why you would want to create your own perhaps you want people to specifically know it came from you, but the option exists to create it during this same process. Just select Create New Keystore instead of using the existing keystore, and you ll be prompted through the process. Signing For Release/Distribution OK, you ve done all your testing, everything is in order, and you re ready to put your store in one of the various marketplaces. Cool! The process for signing your application for release/distribution is the same as for debug/development, but in this case you use a release.keystore instead. You can create a release.keystore during the export process. 1. Make sure that android:debuggable="false" is set in your AndroidManifest.xml file. This file is located in the root of your project folder that you got from buzztouch. 2. Highlight your project in Package Explorer, right-click, and select Export. 3. Select Android Export Android Application and then Next. 4. The Project name should already be filled in, since you are working directly from that project. Hit Next. 5. Select Create new keystore and fill in a keystore location and passwords (keep them strong!). 62
63 6. Provide the requested information. Use a strong password, and pick a nice validity duration (I used 25 years). This can be the release key you use forever, and it identifies you as the signer of the application. So, keep it legit, and keep it secure! Hit Next. 7. Now you ll want to select a destination for your.apk file. As always, make sure it s somewhere you remember. You can also give your package a name at this step. 63
64 8. Hit Finish, and the release package for your application will be built! Congratulations on building and signing your Android application! You are now ready to officially place it in the Marketplace! That pretty much sums up the Android signing process! The two keystores you created, debug and release, will be used again in a different tutorial on getting a Google Maps API key. You should make a backup of our release key, as it identifies you as the author of your app, and should not be compromised. 64
65 Chapter 10 Getting a Google Maps API Key If you are creating an Android application that uses maps in it (which is a very cool feature to have!), you re going to need a Google Maps API key from, you guessed it, Google! The process can be a bit confusing, and is booked here: Let s take a few minutes and walk through the process step-by-step. We ll do this on a Windows XP box, but the steps are essentially the same on a Mac or Linux box. You re going to do the following: Get the MD5 Fingerprint of your Signing Certificate Get the MD5 Fingerprint of your SDK Debug Certificate Register your fingerprints (not the ones on your hand!) with the Google Maps Service Add the Maps API Keys to your application Let s begin by making sure the appropriate keystores are in place. When you installed your Android SDK, it automatically created a debug.keystore, which you use for, you guessed it, debug signing! The default locations for the debug.keystore appear to be these locations for the following platforms: Windows: C:\Books and Settings\<USER>\.android Mac: \Users\<USER>\android If you don t find anything at these locations on your computer, just do a search for keystore and you should find what them. The debug.keystore ships with the following default parameters: Keystore name: "debug.keystore" Keystore password: "android" Key alias: "androiddebugkey" Key password: "android" CN: "CN=Android Debug,O=Android,C=US" If, for some reason, you debug.keystore does not exist, or become corrupted, you can create a new one by doing a build of your application, and it will automatically be created. 65

66 In addition to the debug.keystore, you ll also need a release keystore created in order to get your Google Maps API key. There are basically two ways to create it via the command line, and by building your application for release, and creating the keystore at that time. 1. Command Line Method. Open a command prompt (Windows)or terminal session (Linux/Mac) and issue the following command: a. keytool -genkey -v -keystore you-decide.keystore -alias alias_name -keyalg RSA -keysize validity Release Build Method. With this method, you will build your app in release mode, and create the keystore along the way. a. Make sure that android:debuggable="false" is set in your AndroidManifest.xml file. This file is located in the root of your project folder that you got from buzztouch. b. Highlight your project in Package Explorer, right-click, and select Export. c. Select Android Export Android Application and then Next. d. The Project name should already be filled in, since you are working directly from that project. Hit Next. e. Select Create new keystore and fill in a keystore location and passwords (keep them strong!). f. Provide the requested information. Use a strong password, and pick a nice validity duration (I used 25 years). This can be the release key you use forever, and it identifies you as the signer of the application. So, keep it legit, and keep it secure! Hit Next. 66

67 g. Now you ll want to select a destination for your.apk file. As always, make sure it s somewhere you remember. You can also give your package a name at this step. h. Hit Finish, and the release package for your application will be built! You ll also now have a release keystore good for 25 years, and you can use it to request your Google Maps API key! So, this has been a bit of a long process to get ready to request our MD5 fingerprints, but we re ready for that now. This is a command line procedure, and is accomplished as follows: 1. Get the MD5 Fingerprint of your Signing Certificate. From the command line or terminal session, enter the following command. 67
68 a. keytool -list -alias your_release_key_alias -keystore your_release.keystore -storepass your_password -keypass your_password The result of this command should look something like this: Certificate fingerprint (MD5): 91:EF:AA:33:DD:CC:C2:1D:7F:AB:9C:49:DC:36:D9:3B 2. Get the MD5 Fingerprint of your SDK Debug Certificate. From the command line or terminal session, enter the following command. a. keytool -list -alias androiddebugkey -keystore debug.keystore -storepass android -keypass android The result of this command should look something like this: Certificate fingerprint (MD5): G1:88:33:77:99:22:7F:A1:A1:47:87:10:90:C6:53:6C At this point, you have all the information you need to request your Google Maps API debug and release keys! Follow these steps, and you ll be up and running soon! 1. Go to 2. If you don't have a Google account, use the link on the page to set one up. 3. Read the Android Maps API Terms of Service carefully. If you agree to the terms, indicate so using the checkbox on the screen. 4. Paste the MD5 certificate fingerprint of the certificate that you are registering into the appropriate form field. 5. Click "Generate API Key" The website will generate a code that looks something like this: 0oYoJTnGQYNBciyXYZfbutxABCBqAsEjshrbpIw Get an API key for both your debug and release MD5 fingerprints and write them down for safe keeping. I created a file that contains my MD5 fingerprints (along with the command I used to get them) and the corresponding API key. That way I have all the info I need in one place. You re now ready for the last step, which is configuring your Android application with the correct keys. Double check the Readme.txt file that comes with your Android project package from buzztouch, but at the time of this writing, the location for placing your keys is in the res\values\string.xml file. If you open it up, you ll see the following two lines near the top: 68
69 <string name="googlemapsapikeydebug">yourgooglemapskeyfordebug</string> <string name="googlemapsapikeyrelease">yourgooglemapskeyforrelease</string> Paste your keys in the appropriate line, and you re good to go! 69

70 Chapter 11 Publishing Your App to Google Play The moment you ve been waiting for has finally arrived. You ve designed your app, tested it, tweaked it, and created the final file. There s only one more step left time to publish! There are multiple ways you could distribute your Android app: Publish on Google Play Publish on Amazon Marketplace your app to people Post it on a website A jillion other methods! This chapter will focus on publishing your app to Google Play, which is arguably the most popular way to get your app onto the millions (literally!) of Android devices across the world. Ready? Let s get started! First thing you need to do is head over to the following URL and set up your Google Play Android Developer Account. Remember it ll cost you $25 to sign up (onetime fee). If you already have a Google account (any of them), this will be super easy. Once you log into your Developer Console, you ll be presented with a screen that looks similar to this. It ll be different if you already have apps published. 70
71 Click the Upload Application button to start the process of submitting a new app. You ll see this screen: If for some reason you are not ready with your.apk file, that s OK just hit Close. It ll then take you to the next screen in the process. If you do have your.apk file ready, hit Browse, navigate to the file, and then hit Upload. When it s done, you ll get directed to the same screen that you would if you had hit Close. 71
72 This is the first part of a longer screen, but it s really the meat of what you need to provide in order to publish your app. Here s a synopsis of what you ll need to provide (these are required): 1. At least two (2) screenshots. They need to be in either.png or.jpg format, and should be in one of the following dimensions: a. 320x480, b. 480x800 c. 480x854 d. 1280x720 e. 1280x A high resolution application icon with 512x512 dimensions 3. A title for your app (30 characters max) 4. A description in English of your app (what do you want your users to know about it?) 5. An Application Type 6. A Category 7. Copy Protection decision a. Off (allows the app to be copied from the device) b. On (helps prevent copying) 8. A content rating 9. Price (Free, unless you configure a Merchant Account) 10. Countries you want it available in 11. Contact information (be sure to provide at least one) a. Website b. c. Phone 12. Acknowledgement of a couple consent items 72
73 Once you provide all that information, upload the.apk if you haven t already, you then have two choices: 1. Publish Make it available to the world! 2. Save Save the info until you have everything in order. Here are some screen shots of what we were talking about in the steps on the previous page: 73

74 Bam! That s it! In an amount of time that seems to range from a couple minutes to a couple hours, your app will be live at Google Play, and available for download by literally millions of people! Here s a screen shot of what it might look like. Congratulations on being a published app developer! 74
75 Chapter 12 Common Problems and Solutions What follows below is a random listing of some common Android-related problems you may face, and their solutions. This list will grow as we produce more apps and run into more issues! Problem: AndroidManifest.xml is missing. 1. The reason for this error is currently unknown. Here are some potential solutions. Turn off everything and restart Verify your installation of Eclipse Verify AndroidManifest.xml actually exists in Package Explorer Right-click on Project, select Android Tools Build Project Properties Problem: Project has no default.properties file! Edit the project properties to set one. 1. There are multiple reasons for this, but it basically refers to a problem with your default.properties file. The easiest way to fix this is to right-click on your project in Project Explorer, and pick Android Tools Fix Project Properties. Problem: Android requires compiler compliance level 5.0 or 6.0. Found '1.7' instead. Please use Android Tools > Fix Project Properties. 1. For whatever reason, your project properties are not set correctly. Right-click on your project and select "Properties -> Java Compiler", check "Enable project specific settings" and select 1.5 or 1.6 from "Compiler compliance settings" select box. Try different levels if the first one does not work Problem: Installation error: INSTALL_FAILED_INSUFFICIENT_STORAGE 1. It seems like there are a gagillion reasons for this, and no real solutions, but apparently increasing the amount of memory available to your AVD works in many instances. Solution #1 : Find the.android folder on your system. That s where your AVD configuration files are. In my Windows system, it s located at C:\Books and Settings\mf\.android\avd\. Open up the <avdname>.avd file and 75
76 put this line in it : disk.datapartition.size=2048. What this apparently does it change the size of the partition dedicated to the AVD to 2Gb, which appears to be more than enough for most apps. Since editing this file, I have not received the INSTALL_FAILED_INSUFFICIENT_STORAGE message. Solution #2: Right click the root of your Android Project, go to "Run As" then go to "Run Configurations..." locate the "Android Application" node in the tree at the left, then select your project and go to the "Target" tab on the right side of the window look down for the "Additional Emulator Command Line Options" field (sometimes you'll need to make the window larger) and finally paste "- partition-size 1024" there. Click Apply and then Run to use your emulator. Solution #3 : Go to Eclipse's Preferences, then Select Launch Add -partitionsize 1024 on the Default emulator option field, then click Apply and use your emulator as usual Problem: Your Android v1.5 or v2.0 app has a map screen in it, and the Google Map tiles are not showing up when the screen is launched. All the pins are there, but no map tiles. Often times this works in the emulator, but then fails to work when you publish the app. Using a combination of experience and some info s blog ( here are the steps to configure maps (not including driving directions) for your Android app. 1. Obtain a Google Maps API Key. You can use this book to get you through that process: 2. Copy and paste the Release and Debug API Keys into your \res\values\strings.xml file. The lines you need are near the top of the file, and look like the following. Once done, save and close the file. <string name="googlemapsapikeydebug">debugkey</string> <string name="googlemapsapikeyrelease">releasekey</string> 3. In the \res\layout\ screen_map.xml file, change the line that reads android:apikey="@string/googlemapsapikeydebug" TO android:apikey="@string/googlemapsapikeyrelease" (notice all that has changed is the word Debug to Release) 76
77 4. In your AndroidManifest.xml file, which is in the root folder of your project, uncomment the lines near the bottom of the file that look like the following. For clarity, check the README file that came with your project. <!-- required libraries for maps --> <uses-library android:name="com.google.android.maps"/> 5. Save everything, compile your app, sign it using your Release key, and publish! 77
78 Chapter 13 Problem Reporting and Basic Debug We ve all seen the post in the forum that goes something like this: Tried to compile my app, and it doesn t work! Please help! Or maybe it goes something like this: Got errors when I tried to compile my app, and it won t run on my device. What do I do? The people who participate in the buzztouch forum are some of the most amazing and intelligent people I have ever been involved with, but the only way they can help you fix your problems is if you give as much information as possible in your problems reports, and you provide as much debug help as possible. Without some basic information in the initial post, we all have to spend time asking a set of questions that should always be answered right from the start. I believe that the following should be included in every problem report you put in the forums: 1. buzztouch Version : v1.4 or v Android, ios or Both 3. What version of Xcode/iOS SDK? 4. What version of Eclipse/Android SDK? 5. The most complete problem description you can give. More details are better than fewer details, and actual error messages pasted into the post are very helpful. Don t just say it doesn t work or that there are errors tell us how it s not working, and what the actual error messages are! 6. Screen captures so we can see what s going on are often extremely helpful. Remember the saying; a picture is worth a thousand words! DropBox is a great place to host images, and best of all it s FREE! (use this link to sign up and I ll get an extra 250MB of space free when you do! You will be amazed and how much help you will get from your fellow forum users if you provide this basic information. Lots of times we can look at what you post and the answer is obvious because we ve run into the same issues before ourselves. But sometimes there s literally not enough information to even begin to debug the problem, and it s highly unlikely that a person will visit your post again to see if you ve updated it with more info. Do it right the first time, and you ll get your problem solved quicker! Now that you know what sort of information is most helpful to people in the forum, let s take a look at how to set up your environment to show helpful debug info. Both Xcode and Eclipse provide some tools 78

79 that let you know exactly what s going on with every step of your app compiling and running. I ll show you how to configure some of that now. Configuring Eclipse For Debug Information Eclipse provides many useful options for debugging your application. Here s what a typical screen might look like running Eclipse (Indigo) that has the Android SDK installed in it. There s a lot going on here, and you can add or subtract what you want by clicking on the X for a particular pane, or by adding views and such through the tool bar. Just click around and you ll eventually get things configured the way you want them. 79

80 The area at the bottom of your screen is where you ll find most of the debug screens that will be helpful to you as you try and figure out what s going on in your application. If for some reason you don t see the same panes that I do, you can enable them pretty easily by going to Window Show View and selecting the views that you wish to see. Here s what that looks like: I ve highlighted two views Console and LogCat as being the most useful for debugging. Let s take a look at what each does. The Console view pretty much gives you an indication on whether your app is being loaded into the Android Virtual Device (AVD) you created and tied to your app. If there are problems launching the console, installing the app, or anything related to that, those will be logged here. Here s an example of what you hope to see in the Console, because, in this case, it means your app loaded successfully and you re off and running! 80

81 If for some reason the AVD has a problem initializing and launching, or the app won t install to the AVD, you ll get errors logged here. The next place of interest is LogCat. This view logs pretty much every move made in your app. It reports on the existence, or non-existence of files or other resources. It tells you which files are being loaded, and from where. It tells you if there was an error, and what it was. If you experience a problem with your app, this is the first place you should look for information on what went wrong. Here s a peek at what you can expect to find. As I indicated, there is tons and tons of seriously useful information here, and it can all be copied and pasted to the forum for review by others. I don t think I would copy everything that would be way too much! The best approach here is to do something in the AVD that isn t working, and copy the information that gets logged as a result of that action. Then you can easily correlate your actions with 81

82 particular failures. It s absolutely worth your time to play around with LogCat and see how amazing it is you ll probably learn a lot about your app that you never knew! The final section I want to mention is the Problems view. This view gives you an indication of any Warnings or Problems that might prevent your app from compiling or running correctly. It looks pretty much like this: In this particular example, all we see here are Warnings, and not all Warnings are things you need to be concerned about, and they generally won t prevent your app from compiling. However, if you see some Problems listed here, they will prevent your app from being compiled, and they need to be resolved before you can move on. If you experience weird app behavior, it s probably worth a few minutes to look through this view. That pretty much sums up the basics for Eclipse! Between those three views, you should have plenty of great debug information to help you solve your problem, or to post to the forum so others can help. 82
83 Chapter 14 Final Thoughts With your discovery of buzztouch.com, and your dedication to making it through this way too long book, you have started on a journey you probably never imagined, and one you ll probably never stop being on. There s nothing quite like spending hours and hours in front of your computer, piecing together the parts of what you know is going to be an amazing app, then publishing it and watching the download count increase! It s an accomplishment you should be very, very proud of. Good luck with your app making. If you have some time, consider dropping a line to David, Parker and Stephen at buzztouch ([email protected]) letting them know what an awesome product they have. I m sure they d appreciate it. Comments? Post them in the forum or me at [email protected]. A list of current book versions can be found here: Revision Log v1.0 06/16/12 Initial release of book. GoNorthWest 83
Setting Up Your Android Development Environment. For Mac OS X (10.6.8) v1.0. By GoNorthWest. 3 April 2012
 v1.0. By GoNorthWest. 3 April 2012") Setting Up Your Android Development Environment For Mac OS X (10.6.8) v1.0 By GoNorthWest 3 April 2012 Setting up the Android development environment can be a bit well challenging if you don t have all
Setting Up Your Android Development Environment For Mac OS X (10.6.8) v1.0 By GoNorthWest 3 April 2012 Setting up the Android development environment can be a bit well challenging if you don t have all
Android Development Setup [Revision Date: 02/16/11]
![Android Development Setup [Revision Date: 02/16/11]](/thumbs/27/12023871.jpg "Android Development Setup [Revision Date: 02/16/11]") Android Development Setup [Revision Date: 02/16/11] 0. Java : Go to the URL below to access the Java SE Download page: http://www.oracle.com/technetwork/java/javase/downloads/index.html Select Java Platform,
Android Development Setup [Revision Date: 02/16/11] 0. Java : Go to the URL below to access the Java SE Download page: http://www.oracle.com/technetwork/java/javase/downloads/index.html Select Java Platform,
Installing the Android SDK
 Installing the Android SDK To get started with development, we first need to set up and configure our PCs for working with Java, and the Android SDK. We ll be installing and configuring four packages today
Download and Installation Instructions. Android SDK and Android Development Tools (ADT)
") Download and Installation Instructions for Android SDK and Android Development Tools (ADT) on Mac OS X Updated October, 2012 This document will describe how to download and install the Android SDK and
Download and Installation Instructions for Android SDK and Android Development Tools (ADT) on Mac OS X Updated October, 2012 This document will describe how to download and install the Android SDK and
How To Run A Hello World On Android 4.3.3 (Jdk) On A Microsoft Ds.Io (Windows) Or Android 2.7.3 Or Android 3.5.3 On A Pc Or Android 4 (
 On A Microsoft Ds.Io (Windows) Or Android 2.7.3 Or Android 3.5.3 On A Pc Or Android 4 (") Developing Android applications in Windows Below you will find information about the components needed for developing Android applications and other (optional) software needed to connect to the institution
Developing Android applications in Windows Below you will find information about the components needed for developing Android applications and other (optional) software needed to connect to the institution
Fahim Uddin http://fahim.cooperativecorner.com [email protected]. 1. Java SDK
 PREPARING YOUR MACHINES WITH NECESSARY TOOLS FOR ANDROID DEVELOPMENT SEPTEMBER, 2012 Fahim Uddin http://fahim.cooperativecorner.com [email protected] Android SDK makes use of the Java SE
Getting Started with Android Development
 Getting Started with Android Development By Steven Castellucci (v1.1, January 2015) You don't always need to be in the PRISM lab to work on your 4443 assignments. Working on your own computer is convenient
Lab 0 (Setting up your Development Environment) Week 1
 Week 1") ECE155: Engineering Design with Embedded Systems Winter 2013 Lab 0 (Setting up your Development Environment) Week 1 Prepared by Kirill Morozov version 1.2 1 Objectives In this lab, you ll familiarize yourself
ECE155: Engineering Design with Embedded Systems Winter 2013 Lab 0 (Setting up your Development Environment) Week 1 Prepared by Kirill Morozov version 1.2 1 Objectives In this lab, you ll familiarize yourself
Android: Setup Hello, World: Android Edition. due by noon ET on Wed 2/22. Ingredients.
 Android: Setup Hello, World: Android Edition due by noon ET on Wed 2/22 Ingredients. Android Development Tools Plugin for Eclipse Android Software Development Kit Eclipse Java Help. Help is available throughout
Android Environment SDK
 Part 2-a Android Environment SDK Victor Matos Cleveland State University Notes are based on: Android Developers http://developer.android.com/index.html 1 2A. Android Environment: Eclipse & ADT The Android
Download and Installation Instructions. Android SDK and Android Development Tools (ADT) Microsoft Windows
 Microsoft Windows") Download and Installation Instructions for Android SDK and Android Development Tools (ADT) on Microsoft Windows Updated September, 2013 This document will describe how to download and install the Android
Download and Installation Instructions for Android SDK and Android Development Tools (ADT) on Microsoft Windows Updated September, 2013 This document will describe how to download and install the Android
Android Setup Phase 2
 Android Setup Phase 2 Instructor: Trish Cornez CS260 Fall 2012 Phase 2: Install the Android Components In this phase you will add the Android components to the existing Java setup. This phase must be completed
Android Environment SDK
 Part 2-a Android Environment SDK Victor Matos Cleveland State University Notes are based on: Android Developers http://developer.android.com/index.html 1 Android Environment: Eclipse & ADT The Android
UP L18 Enhanced MDM and Updated Email Protection Hands-On Lab
 UP L18 Enhanced MDM and Updated Email Protection Hands-On Lab Description The Symantec App Center platform continues to expand it s offering with new enhanced support for native agent based device management
POOSL IDE Installation Manual
 Embedded Systems Innovation by TNO POOSL IDE Installation Manual Tool version 3.4.1 16-7-2015 1 POOSL IDE Installation Manual 1 Installation... 4 1.1 Minimal system requirements... 4 1.2 Installing Eclipse...
Download and Installation Instructions. Android SDK and Android Development Tools (ADT) Microsoft Windows
 Microsoft Windows") Download and Installation Instructions for Android SDK and Android Development Tools (ADT) on Microsoft Windows Updated May, 2012 This document will describe how to download and install the Android SDK
Download and Installation Instructions for Android SDK and Android Development Tools (ADT) on Microsoft Windows Updated May, 2012 This document will describe how to download and install the Android SDK
How to Install Applications (APK Files) on Your Android Phone
 on Your Android Phone") How to Install Applications (APK Files) on Your Android Phone Overview An Android application is stored in an APK file (i.e., a file named by {Application Name}.apk). You must install the APK on your Android
How to Install Applications (APK Files) on Your Android Phone Overview An Android application is stored in an APK file (i.e., a file named by {Application Name}.apk). You must install the APK on your Android
Android Programming: Installation, Setup, and Getting Started
 2012 Marty Hall Android Programming: Installation, Setup, and Getting Started Originals of Slides and Source Code for Examples: http://www.coreservlets.com/android-tutorial/ Customized Java EE Training:
Oracle FLEXCUBE Direct Banking Android Tab Client Installation Guide Release 12.0.3.0.0
 Oracle FLEXCUBE Direct Banking Android Tab Client Installation Guide Release 12.0.3.0.0 Part No. E52543-01 April 2014 Oracle Financial Services Software Limited Oracle Park Off Western Express Highway
USING STUFFIT DELUXE THE STUFFIT START PAGE CREATING ARCHIVES (COMPRESSED FILES)
") USING STUFFIT DELUXE StuffIt Deluxe provides many ways for you to create zipped file or archives. The benefit of using the New Archive Wizard is that it provides a way to access some of the more powerful
USING STUFFIT DELUXE StuffIt Deluxe provides many ways for you to create zipped file or archives. The benefit of using the New Archive Wizard is that it provides a way to access some of the more powerful
The "Eclipse Classic" version is recommended. Otherwise, a Java or RCP version of Eclipse is recommended.
 Installing the SDK This page describes how to install the Android SDK and set up your development environment for the first time. If you encounter any problems during installation, see the Troubleshooting
Generate Android App
 Generate Android App This paper describes how someone with no programming experience can generate an Android application in minutes without writing any code. The application, also called an APK file can
CEFNS Web Hosting a Guide for CS212
 CEFNS Web Hosting a Guide for CS212 INTRODUCTION: TOOLS: In CS212, you will be learning the basics of web development. Therefore, you want to keep your tools to a minimum so that you understand how things
Introduction to Android Development
 2013 Introduction to Android Development Keshav Bahadoor An basic guide to setting up and building native Android applications Science Technology Workshop & Exposition University of Nigeria, Nsukka Keshav
Setting up Sudoku example on Android Studio
 Installing Android Studio 1 Setting up Sudoku example on Android Studio Installing Android Studio Android Studio provides everything you need to start developing apps for Android, including the Android
Titanium Mobile: How-To
 Titanium Mobile: How-To Getting Started With Appcelerator Titanium For Windows Release GSW August 17, 2010 Copyright 2010 Appcelerator, Inc. All rights reserved. Appcelerator, Inc. 444 Castro Street, Suite
Tutorial on Basic Android Setup
 Tutorial on Basic Android Setup EE368/CS232 Digital Image Processing, Spring 2015 Windows Version Introduction In this tutorial, we will learn how to set up the Android software development environment
Getting Started with Dynamic Web Sites
 PHP Tutorial 1 Getting Started with Dynamic Web Sites Setting Up Your Computer To follow this tutorial, you ll need to have PHP, MySQL and a Web server up and running on your computer. This will be your
Home Course Catalog Schedule Pricing & Savings Training Options Resources About Us
 1 of 14 12/04/2012 06:46 PM Hello, Jonathan Earl My Account Logout GS-35F-0556S CONTACT US Search TOLL FREE 877-932-8228 Home Course Catalog Schedule Pricing & Savings Training Options Resources About
CheckBook Pro 2 Help
 Get started with CheckBook Pro 9 Introduction 9 Create your Accounts document 10 Name your first Account 11 Your Starting Balance 12 Currency 13 Optional password protection 14 We're not done yet! 15 AutoCompletion
Contents First Time Setup... 2 Setting up the Legal Vault Client (KiteDrive)... 3 Setting up the KiteDrive Outlook Plugin... 10 Using the Legal Vault
... 3 Setting up the KiteDrive Outlook Plugin... 10 Using the Legal Vault") Contents First Time Setup... 2 Setting up the Legal Vault Client (KiteDrive)... 3 Setting up the KiteDrive Outlook Plugin... 10 Using the Legal Vault Outlook Plugin... 13 Using KiteDrive to Send Large
Contents First Time Setup... 2 Setting up the Legal Vault Client (KiteDrive)... 3 Setting up the KiteDrive Outlook Plugin... 10 Using the Legal Vault Outlook Plugin... 13 Using KiteDrive to Send Large
Islamic University of Gaza. Faculty of Engineering. Computer Engineering Department. Mobile Computing ECOM 5341. Eng. Wafaa Audah.
 Islamic University of Gaza Faculty of Engineering Computer Engineering Department Mobile Computing ECOM 5341 By Eng. Wafaa Audah June 2013 1 Setting Up the Development Environment and Emulator Part 1:
BuzzTouch ios Push Notifications
 BuzzTouch ios Push Notifications Niraj Shah January 27, 2013 Version 1.1 BuzzTouch ios Push Notifications 1 Introduction 1.1 An overview of Apple's Push Notifications 5 2 On the Mac with Keychain Access
Android 4.4 App Development Essentials
 Android 4.4 App Development Essentials Neil Smyth This book is for sale at http://leanpub.com/android44appdevelopmentessentials This version was published on 2014-02-15 This is a Leanpub book. Leanpub
Samsung Xchange for Mac User Guide. Winter 2013 v2.3
 Samsung Xchange for Mac User Guide Winter 2013 v2.3 Contents Welcome to Samsung Xchange IOS Desktop Client... 3 How to Install Samsung Xchange... 3 Where is it?... 4 The Dock menu... 4 The menu bar...
The Social Accelerator Setup Guide
 The Social Accelerator Setup Guide Welcome! Welcome to the Social Accelerator setup guide. This guide covers 2 ways to setup SA. Most likely, you will want to use the easy setup wizard. In that case, you
ADT Plugin for Eclipse
 ADT Plugin for Eclipse Android Development Tools (ADT) is a plugin for the Eclipse IDE that is designed to give you a powerful, integrated environment in which to build Android applications. ADT extends
Android Development Tools for Eclipse
 Android Development Tools for Eclipse Sanjay Shah Khirulnizam Abd Rahman Chapter No. 1 "Installing Eclipse, ADT, and SDK" In this package, you will find: A Biography of the author of the book A preview
TUTORIAL ECLIPSE CLASSIC VERSION: 3.7.2 ON SETTING UP OPENERP 6.1 SOURCE CODE UNDER WINDOWS PLATFORM. by Pir Khurram Rashdi
 TUTORIAL ON SETTING UP OPENERP 6.1 SOURCE CODE IN ECLIPSE CLASSIC VERSION: 3.7.2 UNDER WINDOWS PLATFORM by Pir Khurram Rashdi Web: http://www.linkedin.com/in/khurramrashdi Email: [email protected] By
Using 2Can. There are three basic steps involved in migrating all of your data from your BlackBerry to your Android phone:
 Using 2Can There are three basic steps involved in migrating all of your data from your BlackBerry to your Android phone: 1. Backup your BlackBerry 2. Transfer the backup file to your new Android phone
Intellect Platform - The Workflow Engine Basic HelpDesk Troubleticket System - A102
 Intellect Platform - The Workflow Engine Basic HelpDesk Troubleticket System - A102 Interneer, Inc. Updated on 2/22/2012 Created by Erika Keresztyen Fahey 2 Workflow - A102 - Basic HelpDesk Ticketing System
Developing In Eclipse, with ADT
 Developing In Eclipse, with ADT Android Developers file://v:\android-sdk-windows\docs\guide\developing\eclipse-adt.html Page 1 of 12 Developing In Eclipse, with ADT The Android Development Tools (ADT)
IOIO for Android Beginners Guide Introduction
 IOIO for Android Beginners Guide Introduction This is the beginners guide for the IOIO for Android board and is intended for users that have never written an Android app. The goal of this tutorial is to
Application Development Setup Guide
 epos-print SDK for Android Application Development Setup Guide M00048500 Rev. A Cautions No part of this document may be reproduced, stored in a retrieval system, or transmitted in any form or by any means,
IBM TRIRIGA Anywhere Version 10 Release 4. Installing a development environment
 IBM TRIRIGA Anywhere Version 10 Release 4 Installing a development environment Note Before using this information and the product it supports, read the information in Notices on page 9. This edition applies
Creating a Google Play Account
 Creating a Google Play Account Updated March, 2014 One of the most effective ways to get your application into users hands is to publish it on an application marketplace like Google Play. This document
How to Set Up Your PC for Android Application Development
 Introduction Application Note How to Set Up Your PC for Android Application Development Supported Environments: Windows 7 (32/64 bit), Windows Vista (32/64 bit), Windows XP * This application note was
How to Set Up Your PC for Android Application Development
 Introduction Application Note How to Set Up Your PC for Android Application Development Supported Environments: Windows 7 (32/64-bit), Windows Vista (32/64-bit), Windows XP * This application note was
13 Managing Devices. Your computer is an assembly of many components from different manufacturers. LESSON OBJECTIVES
 LESSON 13 Managing Devices OBJECTIVES After completing this lesson, you will be able to: 1. Open System Properties. 2. Use Device Manager. 3. Understand hardware profiles. 4. Set performance options. Estimated
ios App for Mobile Website! Documentation!
 ios App for Mobile Website Documentation What is IOS App for Mobile Website? IOS App for Mobile Website allows you to run any website inside it and if that website is responsive or mobile compatible, you
M100 System File Manager Help
 Copyright (c) Vuzix Corporation 2013-2014. All Rights Reserved. M100 System File Manager Help Section I) Installation of the M100 Section II) General Information Section III) Troubleshooting Section IV)
How to Create an Android Application using Eclipse on Windows 7
 How to Create an Android Application using Eclipse on Windows 7 Kevin Gleason 11/11/11 This application note is design to teach the reader how to setup an Android Development Environment on a Windows 7
Tutorial: Android Object API Application Development. SAP Mobile Platform 2.3 SP02
 Tutorial: Android Object API Application Development SAP Mobile Platform 2.3 SP02 DOCUMENT ID: DC01939-01-0232-01 LAST REVISED: May 2013 Copyright 2013 by Sybase, Inc. All rights reserved. This publication
CAS CLOUD WEB USER GUIDE. UAB College of Arts and Science Cloud Storage Service
 CAS CLOUD WEB USER GUIDE UAB College of Arts and Science Cloud Storage Service Windows Version, April 2014 Table of Contents Introduction... 1 UAB Software Policies... 1 System Requirements... 2 Supported
With a single download, the ADT Bundle includes everything you need to begin developing apps:
 Get the Android SDK The Android SDK provides you the API libraries and developer tools necessary to build, test, and debug apps for Android. The ADT bundle includes the essential Android SDK components
Server & Workstation Installation of Client Profiles for Windows
 C ase Manag e m e n t by C l i e n t P rofiles Server & Workstation Installation of Client Profiles for Windows T E C H N O L O G Y F O R T H E B U S I N E S S O F L A W General Notes to Prepare for Installing
MEAP Edition Manning Early Access Program Hello! ios Development version 14
 MEAP Edition Manning Early Access Program Hello! ios Development version 14 Copyright 2013 Manning Publications For more information on this and other Manning titles go to www.manning.com brief contents
PTC Integrity Eclipse and IBM Rational Development Platform Guide
 PTC Integrity Eclipse and IBM Rational Development Platform Guide The PTC Integrity integration with Eclipse Platform and the IBM Rational Software Development Platform series allows you to access Integrity
TM Online Storage: StorageSync
 TM Online Storage: StorageSync 1 Part A: Backup Your Profile 1: How to download and install StorageSync? Where to download StorageSync? You may download StorageSync from your e-storage account. Please
Android Programming. Høgskolen i Telemark Telemark University College. Cuong Nguyen, 2013.06.18
 Høgskolen i Telemark Telemark University College Department of Electrical Engineering, Information Technology and Cybernetics Cuong Nguyen, 2013.06.18 Faculty of Technology, Postboks 203, Kjølnes ring
Your First App Store Submission
 Your First App Store Submission Contents About Your First App Store Submission 4 At a Glance 5 Enroll in the Program 5 Provision Devices 5 Create an App Record in itunes Connect 5 Submit the App 6 Solve
PLEASE NOTE: The client data used in these manuals is purely fictional.
 Welcome! CAREWare Quick Start guides will walk you through the basics of setting up, managing and using the main CAREWare functions. It is intended for non-technical users who just need to get basic information
Running a Program on an AVD
 Running a Program on an AVD Now that you have a project that builds an application, and an AVD with a system image compatible with the application s build target and API level requirements, you can run
Android Development. http://developer.android.com/develop/ 吳 俊 興 國 立 高 雄 大 學 資 訊 工 程 學 系
 Android Development http://developer.android.com/develop/ 吳 俊 興 國 立 高 雄 大 學 資 訊 工 程 學 系 Android 3D 1. Design 2. Develop Training API Guides Reference 3. Distribute 2 Development Training Get Started Building
ANDROID APPS DEVELOPMENT FOR MOBILE AND TABLET DEVICE (LEVEL I)
") ANDROID APPS DEVELOPMENT FOR MOBILE AND TABLET DEVICE (LEVEL I) Who am I? Lo Chi Wing, Peter Lecture 1: Introduction to Android Development Email: [email protected] Facebook: http://www.facebook.com/peterlo111
ANDROID APPS DEVELOPMENT FOR MOBILE AND TABLET DEVICE (LEVEL I) Who am I? Lo Chi Wing, Peter Lecture 1: Introduction to Android Development Email: [email protected] Facebook: http://www.facebook.com/peterlo111
Configuring the Server(s)
") Introduction Configuring the Server(s) IN THIS CHAPTER. Introduction. Overview of Machine Configuration Options. Installing and Configuring FileMaker Server. Testing Your Installation. Hosting Your File.
Introduction Configuring the Server(s) IN THIS CHAPTER. Introduction. Overview of Machine Configuration Options. Installing and Configuring FileMaker Server. Testing Your Installation. Hosting Your File.
Q N X S O F T W A R E D E V E L O P M E N T P L A T F O R M v 6. 4. 10 Steps to Developing a QNX Program Quickstart Guide
 Q N X S O F T W A R E D E V E L O P M E N T P L A T F O R M v 6. 4 10 Steps to Developing a QNX Program Quickstart Guide 2008, QNX Software Systems GmbH & Co. KG. A Harman International Company. All rights
REMOTE DESKTOP IN WINDOWS XP
 REMOTE DESKTOP IN WINDOWS XP Why would you want to connect remotely to another desktop on your network, you ask? Say you are at home comfortably working in bed and your laptop doesn t have the word processing
APNS Certificate generating and installation
 APNS Certificate generating and installation Quick Guide for generating and installing an Apple APNS Certificate Version: x.x MobiDM Quick Guide for APNS Certificate Page 1 Index 1. APPLE APNS CERTIFICATE...
Building graphic-rich and better performing native applications. Pro. Android C++ with the NDK. Onur Cinar
 Building graphic-rich and better performing native applications Pro Android C++ with the NDK Onur Cinar For your convenience Apress has placed some of the front matter material after the index. Please
How to Install Eclipse. Windows
 1.00/1.001/1.002 Spring 2012 How to Install Eclipse Windows In 1.00/1.001/1.002, you will use the Eclipse Integrated Development Environment (IDE) to create, compile, and run Java programming assignments.
Programming with Android: SDK install and initial setup. Dipartimento di Informatica: Scienza e Ingegneria Università di Bologna
 Programming with Android: SDK install and initial setup Luca Bedogni Marco Di Felice Dipartimento di Informatica: Scienza e Ingegneria Università di Bologna SDK and initial setup: Outline Ø Today: How
Table of Contents. Oxygen Web Client... 34 Uploading my files... 34 Versioning my files... 34 Deleting my files... 36
 Oxygen User Guide Table of Contents What is Oxygen Cloud?... 3 Getting Started with Oxygen!... 4 Registering... 4 Access My Files from Any Device... 6 What is an Oxygen Space?... 7 Types of Spaces... 8
How To Install Database Oasis On A Computer Or Computer (For Free)
") INSTALLATION INSTRUCTIONS Table of Contents Installation Instructions 1 Table of Contents 1 System Requirements 2 Installation 3 Selecting where to Install the Professional Server 3 Installing Prerequisites
INSTALLATION INSTRUCTIONS Table of Contents Installation Instructions 1 Table of Contents 1 System Requirements 2 Installation 3 Selecting where to Install the Professional Server 3 Installing Prerequisites
WA1826 Designing Cloud Computing Solutions. Classroom Setup Guide. Web Age Solutions Inc. Copyright Web Age Solutions Inc. 1
 WA1826 Designing Cloud Computing Solutions Classroom Setup Guide Web Age Solutions Inc. Copyright Web Age Solutions Inc. 1 Table of Contents Part 1 - Minimum Hardware Requirements...3 Part 2 - Minimum
Quick and Easy Solutions With Free Java Libraries Part II
 A Quick and Easy Solutions With Free Java Libraries Part II By Shaun Haney s mentioned in Part I of "Quick and Easy Solutions With Free Java Libraries," BBj allows developers to integrate Java objects
Introducing Xcode Source Control
 APPENDIX A Introducing Xcode Source Control What You ll Learn in This Appendix: u The source control features offered in Xcode u The language of source control systems u How to connect to remote Subversion
Attix5 Pro Server Edition
 Attix5 Pro Server Edition V7.0.3 User Manual for Linux and Unix operating systems Your guide to protecting data with Attix5 Pro Server Edition. Copyright notice and proprietary information All rights reserved.
FlexSim LAN License Server
 FlexSim LAN License Server Installation Instructions Rev. 20150318 Table of Contents Introduction... 2 Using lmtools... 2 1. Download the installation files... 3 2. Install the license server... 4 3. Connecting
Adobe Summit 2015 Lab 718: Managing Mobile Apps: A PhoneGap Enterprise Introduction for Marketers
 Adobe Summit 2015 Lab 718: Managing Mobile Apps: A PhoneGap Enterprise Introduction for Marketers 1 INTRODUCTION GOAL OBJECTIVES MODULE 1 AEM & PHONEGAP ENTERPRISE INTRODUCTION LESSON 1- AEM BASICS OVERVIEW
Installation and Troubleshooting Guide for SSL-VPN CONNECTIONS Access
 Installation and Troubleshooting Guide for SSL-VPN CONNECTIONS Access Version 1 Revised 11/29/2007 Table of Contents Java Installation:...4 Browser Configuration:...4 Citrix Client Installation:...8 Attempting
Introduction: The Xcode templates are not available in Cordova-2.0.0 or above, so we'll use the previous version, 1.9.0 for this recipe.
 Tutorial Learning Objectives: After completing this lab, you should be able to learn about: Learn how to use Xcode with PhoneGap and jquery mobile to develop iphone Cordova applications. Learn how to use
Eclipse installation, configuration and operation
 Eclipse installation, configuration and operation This document aims to walk through the procedures to setup eclipse on different platforms for java programming and to load in the course libraries for
So you want to create an Email a Friend action
 So you want to create an Email a Friend action This help file will take you through all the steps on how to create a simple and effective email a friend action. It doesn t cover the advanced features;
Team Foundation Server 2013 Installation Guide
 Team Foundation Server 2013 Installation Guide Page 1 of 164 Team Foundation Server 2013 Installation Guide Benjamin Day [email protected] v1.1.0 May 28, 2014 Team Foundation Server 2013 Installation Guide
Tutorial: Android Object API Application Development. SAP Mobile Platform 2.3
 Tutorial: Android Object API Application Development SAP Mobile Platform 2.3 DOCUMENT ID: DC01939-01-0230-01 LAST REVISED: March 2013 Copyright 2013 by Sybase, Inc. All rights reserved. This publication
unisys ClearPath eportal Developer 6.1 Unisys Multi-Device App Developer s Guide March 2015 8230 0898 001
 unisys ClearPath eportal Developer 6.1 Unisys Multi-Device App Developer s Guide March 2015 8230 0898 001 NO WARRANTIES OF ANY NATURE ARE EXTENDED BY THIS DOCUMENT. Any product or related information described
Chapter 14: Links. Types of Links. 1 Chapter 14: Links
 1 Unlike a word processor, the pages that you create for a website do not really have any order. You can create as many pages as you like, in any order that you like. The way your website is arranged and
RingCentral Office@Hand from AT&T Desktop App for Windows & Mac. User Guide
 RingCentral Office@Hand from AT&T Desktop App for Windows & Mac User Guide RingCentral Office@Hand from AT&T User Guide Table of Contents 2 Table of Contents 3 Welcome 4 Download and install the app 5
Mercy s Remote Access Instructions
 Mercy s Remote Access Instructions ~~~~~~~~~~~~~~ Section A Windows 2000 / XP ~~~~~~~~~~~~~~ I. Install Meditech............................... A1 II. Install VPN Client............................. A3
STEPfwd Quick Start Guide
 CERT/Software Engineering Institute June 2016 http://www.sei.cmu.edu Table of Contents Welcome to STEPfwd! 3 Becoming a Registered User of STEPfwd 4 Learning the Home Page Layout 5 Understanding My View
Android Tutorial. Larry Walters OOSE Fall 2011
 Android Tutorial Larry Walters OOSE Fall 2011 References This tutorial is a brief overview of some major concepts Android is much richer and more complex Developer s Guide http://developer.android.com/guide/index.html
A Practical Guide to creating, compiling and signing an Android Application using Processing for Android.
 A Practical Guide to creating, compiling and signing an Android Application using Processing for Android. By Joseph Alexander Boston http://www.jaboston.com IMPORTANT NOTE: EVERYTHING YOU INSTALL SHOULD
Advantages. manage port forwarding, set breakpoints, and view thread and process information directly
 Part 2 a Android Environment SDK Victor Matos Cleveland State University Notes are based on: Android Developers http://developer.android.com/index.html 1 Android Environment: Eclipse & ADT The Android
GREEN HOUSE DATA. E-Mail Services Guide. Built right. Just for you. greenhousedata.com. Green House Data 340 Progress Circle Cheyenne, WY 82007
 GREEN HOUSE DATA Built right. Just for you. E-Mail Services Guide greenhousedata.com 1 Green House Data 340 Progress Circle Cheyenne, WY 82007 Table of Contents Getting Started on Business Class Email
How to build your first Android Application in Windows
 APPLICATION NOTE How to build your first Android Application in Windows 3/30/2012 Created by: Micah Zastrow Abstract This application note is designed to teach the reader how to setup the Android Development
10 STEPS TO YOUR FIRST QNX PROGRAM. QUICKSTART GUIDE Second Edition
 10 STEPS TO YOUR FIRST QNX PROGRAM QUICKSTART GUIDE Second Edition QNX QUICKSTART GUIDE A guide to help you install and configure the QNX Momentics tools and the QNX Neutrino operating system, so you can
Setting up a local working copy with SVN, MAMP and rsync. Agentic - 2009
 Setting up a local working copy with SVN, MAMP and rsync Agentic - 2009 Get MAMP You can download MAMP for MAC at this address : http://www.mamp.info/en/downloads/index.html Install MAMP in your APPLICATION
Adobe Dreamweaver CC 14 Tutorial
 Adobe Dreamweaver CC 14 Tutorial GETTING STARTED This tutorial focuses on the basic steps involved in creating an attractive, functional website. In using this tutorial you will learn to design a site