Cut zip ties and remove 2 plastic wiring harness brackets.
|
|
|
- Bertram Butler
- 7 years ago
- Views:
Transcription
1
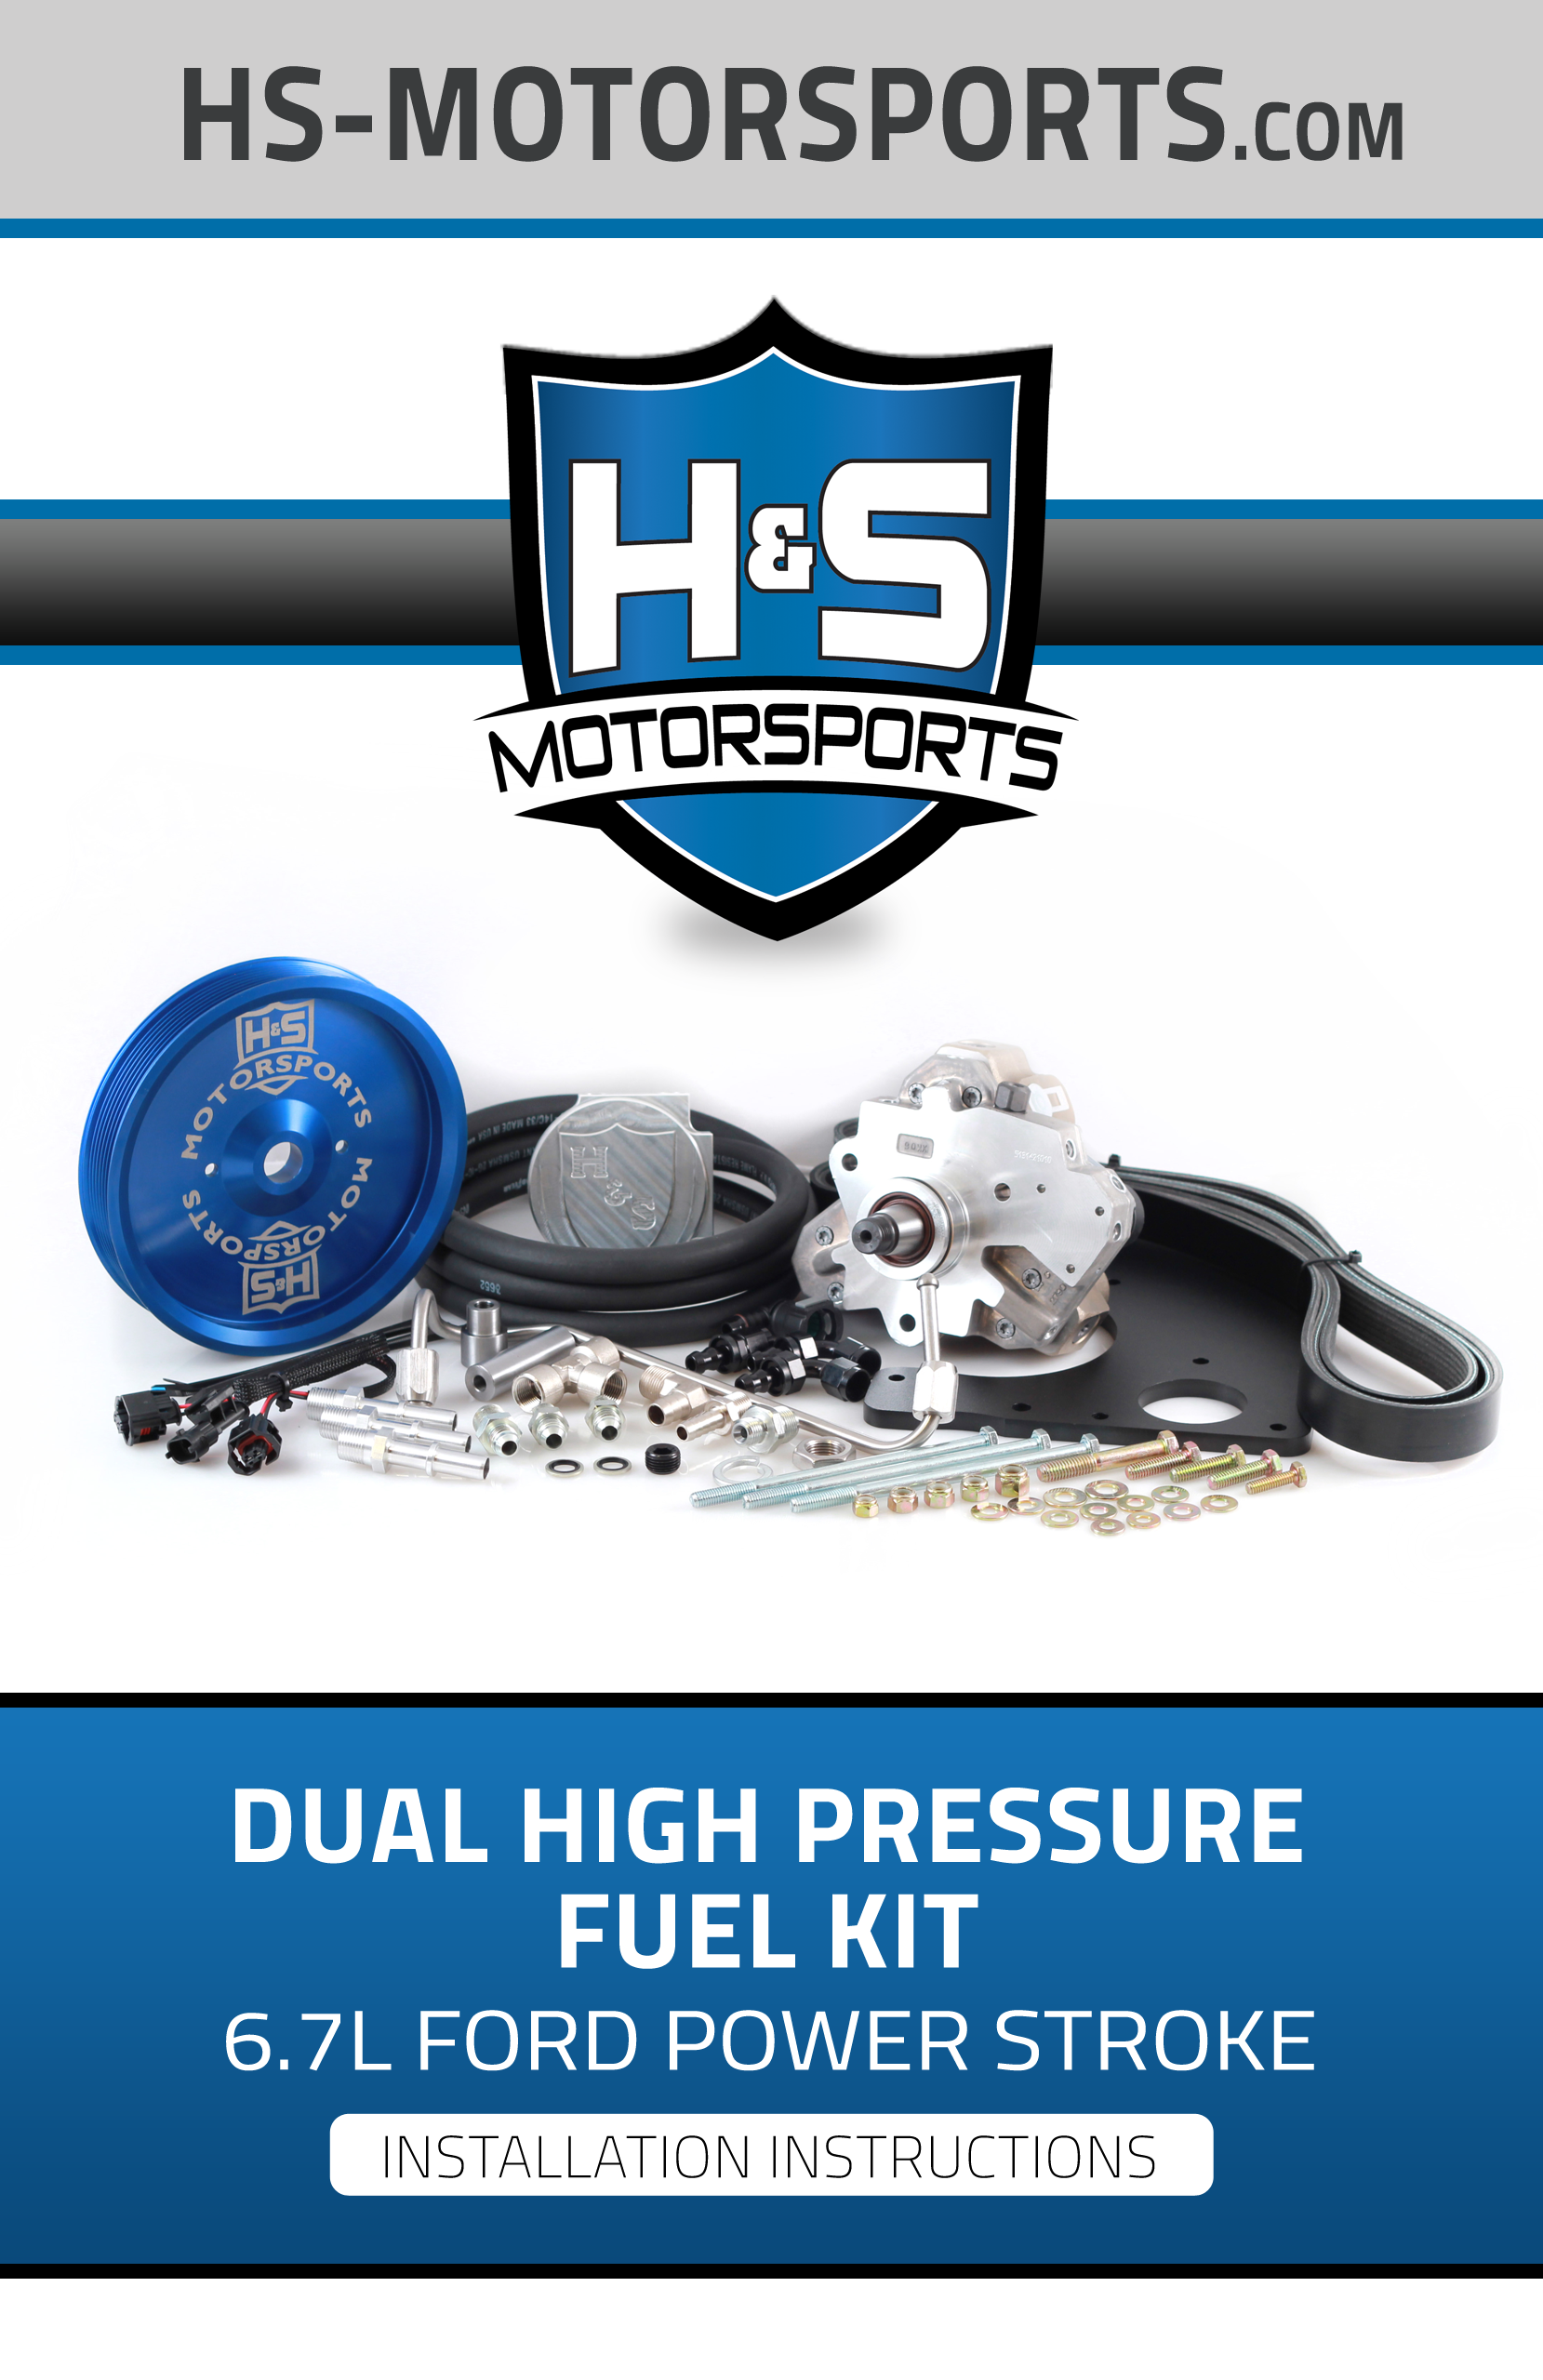
2 TROUBLESHOOTING: Please read and understand all installation instructions before proceeding with the installation. If you have questions during the installation of this product, please H&S Motorsports support at Included parts: 1 - New Bosch Cp3 Pump 1 - HSM Pulley 1 - Serpentine Belt 1 - Pump Bracket/ Hardware 1 - Injection Pump Harness 1 - High Pressure Fuel Line/ Fittings 1 - HSM Fuel Filter Conversion Kit/ Fittings Note: Custom tuning must be used with this product. More information can be found at This kit may not work with some factory parts installed. STEP 1 Disconnect battery terminals, remove air box and tube assembly. STEP 2 Cut zip ties and remove 2 plastic wiring harness brackets L Ford Dual High Pressure Fuel Kit
3 STEP 3 Locate and unplug factory Cp4 wire harness connector. Re-route harness toward front of engine exposing for easy access. Remove grey locking connector. The outer tabs must be removed in order to connect to new supplied harness. Re-install locking connector to factory harness. 3
4 STEP 4 Plug male factory Cp4 harness into new supplied female harness. Plug the opposite male harness into factory Cp4 pump. STEP 5 Unplug cooling fan speed sensor harness. Loosen and remove bolt holding cooling fan wire harness assembly. Loosen cooling fan Hub nut. Note: May require fan clutch hub tool as shown. STEP 6 Remove cooling fan and wire harness assembly. Place fan carefully into fan shroud. Note: Do not need to completely remove fan assembly from truck L Ford Dual High Pressure Fuel Kit
5 STEP 7 Remove fan shroud support stud that s attached to the secodary water pump as shown. STEP 8 Remove Serpentine belt. Remove both upper idler pulleys. STEP 9 Remove 2 upper fan hub bolts. Remove 1 secondary water pump bolt. 5
6 STEP 10 Grind / Cut Idler post down for Cp3 pulley clearance. Note: May be necessary to remove Fan Hub assembly multiple times to achieve proper clearance. If the Fan Hub assembly is removed from vehicle make sure rear alignment dowels are reinstalled properly and undamaged. STEP 11 Remove passenger front fuel rail plug using a 10mm 12 point torx socket. Install supplied rail feed fitting. Torque to 74 ft lbs L Ford Dual High Pressure Fuel Kit
7 STEP 12 Install supplied Cp3 pump bracket onto New OEM Bosch Cp3 pump with 3 5/16 bolts, washers and nyloc nuts. Torque to 20 ft lbs. STEP 13 Gather hardware for Pump and bracket installation. 3 M8x1.25x150mm bolts, 3 flat washers, 1 lateral support spacer. Re-use one of the factory fan hub bolts with the lateral support spacer. STEP 14 Lower pump assembly with bracket into place with the lateral support spacer and factory bolt. Start bolt, but do not tighten. 7
8 STEP 15 Before installing fuel line make sure to blow compressed air through line making sure it is free of any debris. Place a dab of oil on tip of each end of the line to help seat fitting later when torqued. With Cp3 mounting bracket bolts still loose install supplied High pressure fuel line loosely to the new Cp3. STEP 16 Install the 3 m8x1.25x150mm bolts into pump bracket. Tighten evenly while supporting weight of pump to ensure no binding. Torque to 20 ft lbs. STEP 17 Install supplied Cp3 Pulley, lock washer and nut. Torque to 74 ft lbs. Note: Check for clearance where factory idler post was ground/cut down and check clearance between secondary water pump pulley. Clearance L Ford Dual High Pressure Fuel Kit
9 STEP 18 Install the lower portion of the high pressure fuel line onto the fuel rail feed fitting. Torque the upper and lower high pressure fuel line nuts to ft-lbs. Note: Place a dab of oil on tip of line to help seat fitting. STEP 19 Remove factory shoulder bolt and spacer from factory Idler pulley. Install 3/8 washer/bolt, nyloc nut and supplied Idler spacer. STEP 20 Install factory Idler into upper bracket hole. 9


10 STEP 21 Install Serpentine belt. Note: If you have a factory dual sided Serpentine belt you must re-use. If the Serpentine belt is single sided it must be replaced with the new supplied belt. Crank Pulley STEP 22 Re-install cooling fan. Bolt fan speed sensor into lower hole on pump bracket with 1/4 bolt washers and nyloc nut. Reconnect speed sensor wire harness. Note: some wire harness brackets may require some bending in order to fit properly. STEP 23 Connect new harness and install fuel feed and return fittings with O-ringed washers into Cp L Ford Dual High Pressure Fuel Kit
11 Fuel Return STEP 24 Install a 3/8 straight and a 90 degree pushlock fitting onto fuel feed and return fittings. Route two 3/8 inch fuel lines toward factory fuel filter location. These fuel lines will need to be cut to length. The straight pushlock fitting hose line will be connecting to the rear of the fuel filter conversion kit while the 90 degree line will be connecting to the 3/8 barb on the Fuel T. Note: Push-lock fittings do not require hose clamps. Put a dab of oil on hose barb end and push hose on to barb. Route Fuel lines away from heat or any places where the lines will rub. Routing may vary due to different fueling and turbo setups. Filter Housing straight 90 Degree Fuel T Fuel Feed 90 Degree Fuel Pump STEP 25 Unclip and remove 3 factory fuel line connectors. The lines are push lock only, so no tools are required. Remove factory fuel filter. 11
12 STEP 26 Gather hardware for fuel filter conversion installation. Using Teflon tape or thread sealant install all fittings as shown. Make sure to install the larger diameter of the two fuel line posts on the right side of the filter housing. Larger post STEP 27 Install the main filter post in the center of the housing. Make sure that shorter end of the threads are facing toward the housing, thread filter post into housing until tight against the knurled stops. No sealant needed on the main filter post L Ford Dual High Pressure Fuel Kit
13 STEP 28 Lubricate fuel filter gasket with a dab of oil and install onto filter housing. Install protective boot onto filter. STEP 29 Place the fuel filter conversion back into the factory location. Attach the factory fuel line push lock fittings onto the supplied fuel line posts as shown. 13
14 Fuel Return STEP 30 Route the 3/8 inch hose from the 90 degree hose barb fitting on the rear of the fuel filter conversion kit to the rear of the Cp3 low pressure/return straight push lock fitting. Note: Push-lock fittings do not require hose clamps. Put a dab of oil on hose barb end and push hose on to barb. Hose will need to be cut to length. Filter Housing 90 Degree Fuel T Fuel Feed Fuel Pump STEP 31 Gather hardware for low pressure return fuel system as shown. Assemble fittings using Teflon tape or thread sealant. The 90 degree 1/2 fitting will have to be clocked correctly as shown in picture for the return T assembly to fit correctly L Ford Dual High Pressure Fuel Kit
15 STEP 32 Install supplied parts on the driver side low pressure fuel lines. Place the new supplied Grey push lock clip onto the fuel line where the factory Blue push lock clip was located. Attach the Blue push lock clip to the supplied push lock fitting as shown. Route the 3/8 inch hose from the 3/8 inch straight barb fitting to the 90 degree push lock fitting on the rear of the Cp3 pump. Tighten clamps STEP 33 Tighten all clamps and fittings. Turn key on, allow fuel system to prime. Check for any leaks. STEP 34 Be sure to install your dual pump specific custom tuning prior to running the vehicle! 15
16
INSTALLATION INSTRUCTIONS. 6111 Air Spring Kit 2011+ Ford F250/F-350 Single Wheel 2WD 2011+ Ford F350 Dually 2WD IMPORTANT NOTES
 INSTALLATION INSTRUCTIONS 6111 Air Spring Kit 2011+ Ford F250/F-350 Single Wheel 2WD 2011+ Ford F350 Dually 2WD Thank you for purchasing a quality Hellwig Product. PLEASE READ THIS INSTRUCTION SHEET COMPLETELY
M-9424-463V Intake Manifold INSTALLATION INSTRUCTIONS
 Please visit www.fordracingparts.com for the most current instruction information!!! PLEASE READ ALL OF THE FOLLOWING INSTRUCTIONS CAREFULLY PRIOR TO INSTALLATION. AT ANY TIME YOU DO NOT UNDERSTAND THE
INSTALLATION INSTRUCTIONS. 6108 Air Spring Kit 2011+ Ford F250 Single Wheel 4WD 2011+ Ford F350 Dually 4WD (2011 F350 Single Wheel 4WD use p/n 6113)
") INSTALLATION INSTRUCTIONS 6108 Air Spring Kit 2011+ Ford F250 Single Wheel 4WD 2011+ Ford F350 Dually 4WD (2011 F350 Single Wheel 4WD use p/n 6113) Thank you for purchasing a quality Hellwig Product. PLEASE
INSTALLATION INSTRUCTIONS 6108 Air Spring Kit 2011+ Ford F250 Single Wheel 4WD 2011+ Ford F350 Dually 4WD (2011 F350 Single Wheel 4WD use p/n 6113) Thank you for purchasing a quality Hellwig Product. PLEASE
XL PREMIUM OIL COOLER KIT
 -J05 REV. 0-0-0 XL PREMIUM OIL COOLER KIT GENERAL Kit Number 0008 Models For model fitment information, see the P&A Retail Catalog or the Parts and Accessories section of www.harley-davidson.com (English
TITAN Fuel Tanks. INSTALLATION INSTRUCTIONS G e n e r a t i o n V
 TITAN pt. no.: 02 0000 0143 Important: Please read these instructions carefully and completely before starting the installation. TITAN Fuel Tanks INSTALLATION INSTRUCTIONS G e n e r a t i o n V Extended
Figure 2 The fan and shroud also needs to be removed for access to the four a/c compressor bolts and removal of the compressor from the top.
 Here are some pictures to show what s required when replacing the A/C compressor, expansion valve and receiver/drier on a 2001 Volvo V70. Even if you don t replace these A/C parts these pictures can help
REMOVAL AND INSTALLATION
 303-01C-1 REMOVAL AND INSTALLATION Engine Body On Special Tool(s) Adapter For 303-D043 303-D043-02 or equivalent Special Tool(s) 303-01C-1 Turbocharger Lifting Bracket 303-1266 Wrench, Fan Clutch Nut 303-214
INSTALLATION MANUAL MODEL RP-100
 INSTALLATION MANUAL FOR 24 VALVE 5.9L CUMMINS POWERED DODGE TRUCKS 2003 THROUGH 2004.5 MODEL RP-100 READ THESE INSTRUCTIONS THOROUGHLY BEFORE BEGINNING INSTALLATION 5400 BUSINESS 50 WEST SUITE 8 573 635-0555
2011-14 F250 6 RADIUS ARM KIT
 92154000 Thank you for choosing Rough Country for your suspension needs. 2011-14 F250 6 RADIUS ARM KIT Rough Country recommends a certified technician installs this system. In addition to these instructions,
Katana Supercharger Installation Instructions Rev. E Page 1 of 23
 Katana Supercharger Installation Instructions Rev. E Page 1 of 23 READ FITTING INSTRUCTIONS IN FULL BEFORE INSTALLATION This article is sold without warranty expressed or implied. No warranty or representation
ALLDATA Online - 2006 Dodge Truck RAM 2500 Truck 2WD L6-5.9L DSL Turbo VI... Service and Repair
 Page 1 of 15 Home Account Contact ALLDATA Log Out Help PAUL REDEHOFT Select Vehicle New TSBs Technician's Reference Component Search: OK 2006 Dodge Truck RAM 2500 Truck 2WD L6-5.9L DSL Turbo VIN C Conversion
Solstice/Sky Water Pump Replacement
 Solstice/Sky Water Pump Replacement The water pump on the Solstice/Sky is starting to need replacement on some vehicles. This guide will help in replacing the water pump while the engine is still in the
Volkswagen Jetta, Golf, GTI 1999, 2000 Brake System 47 Brakes - Hydraulic Components (Page GR-47)
") 47 Brakes - Hydraulic Components (Page GR-47) FS III front brake calipers, servicing Front brake caliper piston, removing and installing FN 3 front brake calipers, servicing Front caliper piston, removing
47 Brakes - Hydraulic Components (Page GR-47) FS III front brake calipers, servicing Front brake caliper piston, removing and installing FN 3 front brake calipers, servicing Front caliper piston, removing
SALEEN SPEEDLAB SERIES VI STANDARD SC UPGRADE KIT
 SALEEN SPEEDLAB SERIES VI STANDARD SC UPGRADE KIT INSTALLATION MANUAL: 2005 MUSTANG 4.6 3V MANUAL P/N: 10-8002-C14338C SUPERCHARGER KIT P/N: 10-1607-B14083* Saleen Performance, Inc. 1225 East Maple Rd.,
Slide the new steering column shaft through the steering column from the driver compartment.
 Slide the new steering column shaft through the steering column from the driver compartment. Push the column shaft through the steering column until the machined end is out past the column lower bushing.
P7100 PUMP INSTALLATION INSTRUCTIONS Diesel Care & Performance Inc
 P7100 PUMP INSTALLATION INSTRUCTIONS Diesel Care & Performance Inc Installation Timing Pin Location CAUTION: Before installing the injection pump, be sure that number 1 cylinder is at the Top Dead Center
COOLING SYSTEM Section Page
 5 COOLING SYSTEM Section Page 5.1 COOLANT PRE-HEATER... 5-3 5.2 COOLANT PUMP NON-EGR ENGINE... 5-7 5.3 COOLANT PUMP EGR ENGINE... 5-13 5.4 FRONT CONNECTOR HOUSING NON-EGR ENGINE... 5-17 5.5 FRONT CONNECTOR
Oregon Fuel Injection
 Corporate Office: P.O. Box 21121, VE Pump Removal and Installation Cummins Lock Timed Applications Removal Clean the exterior of the injection pump and mounting surfaces. 1. Disconnect the fuel return
COOPER S PULLEY UPGRADE KIT INSTALLATION INSTRUCTIONS PART NUMBER NME5011
 COOPER S PULLEY UPGRADE KIT INSTALLATION INSTRUCTIONS PART NUMBER NME5011 Below are instructions for the Mini Mania Pulley Upgrade Kit, Part Number NME5011. Please take all necessary precautions for working
STEERING HANDLEBAR/FRONT WHEEL/ FRONT SHOCK ABSORBER
 14 14 STEERING HANDLEBAR/FRONT WHEEL/ SCHEMATIC DRAWING ------------------------------------------------- 14-1 SERVICE INFORMATION------------------------------------------------ 14-2 TROUBLESHOOTING-----------------------------------------------------
Installation Guide for the TJ LCG PRO Suspension System (Low Center of Gravity) Available 4 or 5
 Available 4 or 5") INSTALLATION GUIDE Installation Guide for the TJ LCG PRO Suspension System (Low Center of Gravity) Available 4 or 5 Take every precaution to make this installation a safe procedure. Make safety the number
INSTALLATION GUIDE Installation Guide for the TJ LCG PRO Suspension System (Low Center of Gravity) Available 4 or 5 Take every precaution to make this installation a safe procedure. Make safety the number
FRONT TURN SIGNAL RELOCATION KIT
 -J0 REV. 00-0-0 FRONT TURN SIGNAL RELOCATION KIT GENERAL Kit Number -0 Models This kit fits 00 and later Dyna model motorcycles (except FXDSE), relocating the front turn signal from the handlebars to the
GPS AutoSteer System Installation Manual
 GPS AutoSteer System Installation Manual Supported Vehicles John Deere Sprayers 4720 4630 4730 4830 AutoTrac Ready PN: 602-0227-01-A LEGAL DISCLAIMER Note: Read and follow ALL instructions in this manual
Important: Please read these instructions carefully and completely before starting the installation. TITAN Fuel Tanks
 TITAN pt. no.: 03 0000 0120 Important: Please read these instructions carefully and completely before starting the installation. TITAN Fuel Tanks INSTALLATION INSTRUCTIONS G e n e r a t i o n V Extended
16 April 2012 1032011-F 1994-2002 Dodge Adjustable Track bar with Relocation Bracket 1
 16 April 2012 1032011-F 1994-2002 Dodge Adjustable Track bar with Relocation Bracket 1 BD Adjustable Track Bar w/bracket Dodge 2500-3500 4WD Models 1994-2002 Dodge 1500 4WD Model 1994-2001 P/N# 1032011-F
Equipped with AEM Dryflow Filter No Oil Required! INSTALLATION INSTRUCTIONS PART NUMBER 21-754DS. 2012-2015 BMW 335i 3.0L
 Equipped with AEM Dryflow Filter No Oil Required! INSTALLATION INSTRUCTIONS PART NUMBER 21-754DS 2012-2015 BMW 335i 3.0L 1 ITEM NO. PART NUMBER DESCRIPTION QTY. 1 21-2057DK AIR FILTER 1 2 9-0442 TUBE;
SCION FR-S 2013 - PERFORMANCE AIR INTAKE Preparation 2.0L F-4
 Preparation 2.0L F-4 Part Number: PTR03-18130 Please see Page 12 for important Care and Maintenance information! Kit Contents Item # Qty. Service Part # Description 1 1 PTR03-18130-AC TRD Air Box Base
This kit may void factory warranty please check with manufacturer.
 Mfg Company TM Thank you for purchasing a Sinister Manufacturing Company EGR delete kit. Precision manufactured using aircraft quality 304 stainless steel and billet aluminum; this EGR kit is designed
AWE Tuning Air/Air Intercooler Kit for 2000-04 Audi 2.7T
 AWE Tuning Air/Air Intercooler Kit for 2000-04 Audi 2.7T Congratulations on your purchase of the AWE Tuning Intercoolers for your 2.7T Audi. Hundreds of hours of design and operational testing were spent
LG G5 Chassis Brace Gen 5 Camaro THE MOST POWERFUL HEADERS ON THE PLANET Brought to you by LG Motorsports 972-429-1963
 LG G5 Chassis Brace Gen 5 Camaro THE MOST POWERFUL HEADERS ON THE PLANET Brought to you by LG Motorsports 972-429-1963 Thank you for purchasing LG Motorsports products for your Gen 5 Camaro. Parts Inventory:
INSTALLATION INSTRUCTIONS
 INSTALLATION INSTRUCTIONS Accessory Application Publications No. AII23628 2003 PILOT Issue Date MAY 2002 PARTS LIST Security System Kit (sold separately): P/N 08E51-S84-100 2 Remote controls Attachment
INSTALLATION MANUAL MODEL RP-150
 INSTALLATION MANUAL FOR 24 VALVE 5.9L CUMMINS POWERED DODGE TRUCKS 2003 THROUGH 2004.5 MODEL RP-150 READ THESE INSTRUCTIONS THOROUGHLY BEFORE BEGINNING INSTALLATION 5400 BUSINESS 50 WEST SUITE 8 573 635-0555
P150SC15. Designed for 2015 Ford F150 Super-Cab and Super-Crew vehicles without Sony System. 2015 Stillwater Designs P150SC15-A2-20150813
 P150SC15 Designed for 2015 Ford F150 Super-Cab and Super-Crew vehicles without Sony System Subwoofer Assembly Amplifier Assembly Amplifier Harness 2015 Stillwater Designs P150SC15-A2-20150813 M6 Bolt M6
Turbocharger system components, servicing
 21-1 Turbocharger system components, servicing Engine codes: AAZ, 1Z, AHU Observe rules of cleanliness Page 21-10 Turbocharger hoses and lines, connecting Page 21-11 WARNING! Do not re-use any fasteners
POWER LOCK KIT GENERAL INSTALLATION -J04427 REV. 2007-12-04. Kit Number. Models. Additional Parts Required. Kit Contents
 -J0 REV. 00--0 POWER LOCK KIT GENERAL Kit Number -0, 0-0 Models For model fitment information, please see the P&A Retail Catalog or the Parts and Accessories section of www.harleydavidson.com (English
WARNING TO END USER, INSTALLER AND SELLER OF THIS PART!
 WARNING TO END USER, INSTALLER AND SELLER OF THIS PART! By installing this part you are accepting full responsibility and liability for proper wheel and tire fitment after installation. It is the installer
TITAN Fuel Tanks. Extended Capacity Replacement Tank for Diesel Chevrolet / GMC Trucks
 Important: Please read these instructions carefully and completely before starting the installation. TITAN Fuel Tanks INSTALLATION INSTRUCTIONS G e n e r a t i o n V Extended Capacity Replacement Tank
Installing a new 928 Motorsports All-Aluminum Radiator
 928 Motorsports Supercharger Installation Copyright 2008, 928 Motorsports, LLC All Rights Reserved Installing a new 928 Motorsports All-Aluminum Radiator Copyright 2008 928 Motorsports, LLC. Toll-Free
MGA Alternator Conversion
 MGA Alternator Conversion Installation Instructions For 1955 to 1962 MGA PART # 130-078 and #130-088 440 Rutherford St. P.O. Box 847 Goleta, CA 93117 1-800-667-7872 FAX 805-692-2525 www.mossmotors.com
Range Road RR Series Semi-Automatic Firewood Processor. Crated Unit Assembly Manual
 Range Road RR Series Semi-Automatic Firewood Processor Crated Unit Assembly Manual 1 1) Undo 8-18mm x 19mm Nuts and bolts, 2 on each leg of top frame 2) Lift top of Metal crate off and move out of work
Intake Manifold: Service and Repair
 2000 Chevy Truck S10/T10 P/U 2WD L4-2.2L VIN 4 Copyright 2008, ALLDATA 9.90 Page 1 Intake Manifold: Service and Repair Removal Procedure 1. Disconnect the battery negative cable. Refer to Battery Replacement.
LIFT-505. BMF Lift Kit. Yamaha Drive Gas or Electric. Installation Instructions
 LIFT-505 BMF Lift Kit Yamaha Drive Gas or Electric Installation Instructions Contents of LIFT-505 Yamaha Drive BMF Lift Kit: a (1 ea.) BMF A-Arm Assembly b (1 ea.) Driver Side Shock Tower c (1 ea.) Passenger
CorkSport Mazdaspeed 6 Rear Sway Bar 2006-2007 Mazdaspeed 6
 CorkSport Mazdaspeed 6 Rear Sway Bar 2006-2007 Mazdaspeed 6 Pre-Installation Notes: The CorkSport Rear Sway Bar is a great addition to improving the handling performance to the Mazdaspeed 6. It will minimize
STEERING SYSTEM - POWER
 STEERING SYSTEM - POWER 1990 Nissan 240SX 1990 STEERING Nissan - Power Rack & Pinion Axxess, Maxima, Pulsar NX, Sentra, Stanza, 240SX, 300ZX DESCRIPTION The power steering system consists of a rack and
430 Power/Electronics Replacement
 Replacing the main board WARNING Before proceeding, turn off the main power switch and unplug the power cord. Caution Make sure you are properly grounded with an ESD strap before continuing. The main printed
R O A D M A S T E R, I N C.
 R O A D M A S T E R, I N C. 11 10 20 12 4 18 19 1 2 13 16 ITEM QTY NAME MATERIAL 1...2... 1/2" x 3 1/2" BOLT... 350103-00 2...2... 1/2" x 2" BOLT... 350097-00 3...6... 1/2" x 1 1/2" BOLT... 350095-00 4...2...
TECHNICAL GUIDE. For Self-Shielded Guns - 300, 400 and 500 amp SAFETY AND WARRANTY INFORMATION INSTALLATION MAINTENANCE GUIDE TECHNICAL DATA OPTIONS
 TECHNICAL GUIDE For Self-Shielded Guns - 300, 400 and 500 amp SAFETY AND WARRANTY INFORMATION INSTALLATION MAINTENANCE GUIDE TECHNICAL DATA OPTIONS EXPLODED VIEW & PARTS LIST TROUBLESHOOTING ORDERING INFORMATION
Before installation it is important to know what parts you have and what the capabilities of these parts are.
 INSTALLATION GUIDE Before installation it is important to know what parts you have and what the capabilities of these parts are. The Recon XZT is the smallest and most powerful gauge of its kind. With
Volkswagen B3 Passat Manual Transmission 02A 34 Manual Transmission - Controls, Assembly (Page GR-34) 02A 5-speed. Gearshift cable/lever installing
 02A 5-speed. Gearshift cable/lever installing") 34 Manual Transmission - Controls, Assembly (Page GR-34) 02A 5-speed Gearshift cable/lever installing Gearshift housing repairing Gearshift lever repairing lever/relay lever, installing Gearshift mechanism
34 Manual Transmission - Controls, Assembly (Page GR-34) 02A 5-speed Gearshift cable/lever installing Gearshift housing repairing Gearshift lever repairing lever/relay lever, installing Gearshift mechanism
INSTALLATION INSTRUCTIONS: HARLEY-DAVIDSON DYNA HI-OUTPUT GRENADES 2-INTO-2 PART# 16899/16896/46896/46899
 INSTALLATION INSTRUCTIONS: HARLEY-DAVIDSON DYNA HI-OUTPUT GRENADES 2-INTO-2 PART# 16899/16896/46896/46899 Congratulations, you have purchased the finest exhaust system available for your motorcycle. Your
FRONT BUMPER INSTALLATION INSTRUCTIONS 2007-2011 DODGE / MERCEDES SPRINTER
 Aluminess Products Inc 9402 Wheatlands Ct. #A Santee, CA 92071 619-449-9930 FRONT BUMPER INSTALLATION INSTRUCTIONS 2007-2011 DODGE / MERCEDES SPRINTER Please read before beginning Stainless steel hardware
specializing in AIR CONDITIONING, PARTS AND SYSTEMS for your classic vehicle PERFECT FIT IN-DASH HEAT/ COOL/ DEFROST 1967-72 CHEVROLET PICKUP
 specializing in AIR CONDITIONING, PARTS AND SYSTEMS for your classic vehicle PERFECT FIT IN-DASH HEAT/ COOL/ DEFROST 1967-72 CHEVROLET PICKUP CONTROL & OPERATING INSTRUCTIONS The controls on your new Perfect
ENGINE FUEL FUEL FILTER... FUEL HEATER... INJECTOR... SUPPLY PUMP... COMMON RAIL... FUEL PRESSURE LIMITTER...
 FUEL FILTER............................ FUEL HEATER.......................... INJECTOR.............................. SUPPLY PUMP.......................... COMMON RAIL.......................... FUEL PRESSURE
Installation Instructions for Water Methanol Stage 1
 Installation Instructions for Water Methanol Stage 1 Installation- Mechanical Step 1 Reservoir Install Install 1/8 NPT ¼ OD elbow into 3/8-1/8 NPT reducer bushing using GOOP sealant (Right). Install this
Rear wheel brakes, servicing. Стр. 1 из 45. Note:
 Volkswagen Touareg - Rear wheel brakes, servicing Стр. 1 из 45 46-2 Rear wheel brakes, servicing Rear brakes, FN 44 brake caliper, servicing Note: After replacing brake pads, depress brake pedal firmly
2003 ACCORD - Automatic Transmission Removal
 2003 ACCORD - Automatic Transmission Removal Special Tools Required Engine support hanger, A and Reds AAR-T-12566 Engine hanger balancer bar VSB02C000019 Front subframe adapter VSB02C000016 These special
M-2004-MBA Brake Duct Kit 2013 BOSS 302, Mustang GT and California Special INSTALLATION INSTRUCTIONS
 Please visit www.fordracingparts.com for the most current instruction information.!!! PLEASE READ ALL OF THE FOLLOWING INSTRUCTIONS CAREFULLY PRIOR TO INSTALLATION. AT ANY TIME YOU DO NOT UNDERSTAND THE
INSTALLATION INSTRUCTIONS FOR 2006-2009 VW MK5
 CI100018 INSTALLATION INSTRUCTIONS FOR 2006-2009 VW MK5 Rabbit, Jetta 2.5L These instructions are applicable to vehicles equipped with either manual or automatic transmissions Thank you for choosing to
SB-C-CTS/10TW3 SKU# 94552 2008 & Up Cadillac CTS/CTS-V
 INSTALLATION GUIDE for the SB-C-CTS/10TW3 SKU# 94552 2008 & Up Cadillac CTS/CTS-V If you choose to perform the installation yourself, it is absolutely vital that the Stealthbox be properly mounted to the
with installation dynafact boost GAUGE this manual is for use with systems 64050-64054
 owners manual with installation instructions dynafact boost GAUGE this manual is for use with systems 64050-64054 GENERAL INSTALLATION PRACTICES This manual is an installation guide for all 1. Banks DynaFact
Ford F-250 / 350 2-1/2 Coil Kit. Ford F-250, F350 2011-2015. Part#: 013255
 Part#: 013255 Ford F-250 / 350 2-1/2 Coil Kit Ford F-250, F350 2011-2015 Rev.040815 491 W. Garfield Ave., Coldwater, MI 49036. Phone: 517-279-2135 Web/live chat: www.bds-suspension.com. E-mail: tech@bds-suspension.com
Installation instruction do88 Intercooler for Volvo S40 / V50 / C30
 Installation instruction do88 Intercooler for Volvo S40 / V50 / C30 This instruction shows how to replace the OEM intercooler with our performance intercooler. 2. 3. 1. 4. 5. Part number: ICM-170 6. At
R O A D M A S T E R, I N C.
 R O A D M A S T E R, I N C. ROADMASTER, Inc. 6110 NE 127th Ave. Vancouver, WA 98682 6 13 11 MOUNTING BRACKET KIT Cable Tab 14 12 7 15 9 Cable Tab 360-896-0407 fax 360-735-9300 www.roadmasterinc.com ITEM
ADDING AN ELECTRIC AUXILIARY FAN TO RADIATOR STACK ON 03 ALPINE COACH
 ADDING AN ELECTRIC AUXILIARY FAN TO RADIATOR STACK ON 03 ALPINE COACH The original design of the 03 Alpine Coaches (and perhaps other years as well) did not include any kind of engine fan engage mechanism
11. COOLING SYSTEM 11-0 COOLING SYSTEM BET & WIN 50
 11 COOLING SYSTEM SERVICE INFORMATION------------------------------------------------ 11-1 TROUBLESHOOTING----------------------------------------------------- 11-1 RADIATOR ------------------------------------------------------------------
Overview PARTS LIST. B. Lever mounting base C. Flush handle assembly D. Grey/Blue float stop E. Grey float (Full Flush) F. Flush valve washer
 F. Flush valve washer") Overview READ ENTIRE INSTRUCTIONS BEFORE STARTING INSTALLATION PARTS LIST A. Flush valve B. Lever mounting base C. Flush handle assembly D. Grey/Blue float stop E. Grey float (Full Flush) F. Flush valve
Overview READ ENTIRE INSTRUCTIONS BEFORE STARTING INSTALLATION PARTS LIST A. Flush valve B. Lever mounting base C. Flush handle assembly D. Grey/Blue float stop E. Grey float (Full Flush) F. Flush valve
R O A D M A S T E R, I N C.
 R O A D M A S T E R, I N C. 22 9 8 7 10 17 26 20 15 Cable Tab 21 1 16 Cable Tab 6 5 25 ITEM QTY NAME PART # 1...2...#10 x 3/4 SELF DRILLING SCREW...350247-35 2...6...1/2 FLAT WASHER...350308-00 3...6...1/2
Cooling system components, removing and installing
 Engine BHW Cooling system components, removing and installing Page 1 / 24 19-1 Cooling system components, removing and installing Warning! When doing any repair work, especially in the engine compartment,
Walbro 255lph Inline Fuel Pump Install Procedure
 Walbro 255lph Inline Fuel Pump Install Procedure Note: Instructions are based on a single in tank pump with under car OEM VW filter. Total install time for a qualified technician is approximately 2 hrs.
READ AND UNDERSTAND ALL INSTRUCTIONS AND WARNINGS PRIOR TO INSTALLATION OF SYSTEM AND OPERATION OF VEHICLE.
 491 W. Garfield Ave., Coldwater, MI 49036 Phone: 517-279-2135 Web/live chat: www.bds-suspension.com E-mail: tech-bds@sporttruckusainc.com Product: GM Leaf Spring READ AND UNDERSTAND ALL INSTRUCTIONS AND
ReadyLift (Part# 66-5075) Strut Extension, Installation Instructions Toyota Tundra New Body Style 2WD & 4WD
 Strut Extension, Installation Instructions Toyota Tundra New Body Style 2WD & 4WD") SAFETY WARNING: recommends this system be installed by a professional technician. In addition to these instructions, professional knowledge of disassembly/ reassembly procedures and post installation checks
SAFETY WARNING: recommends this system be installed by a professional technician. In addition to these instructions, professional knowledge of disassembly/ reassembly procedures and post installation checks
CUSTOM AUXILIARY FORWARD LIGHTING KIT
 -J0 REV. 0--0 CUSTOM AUXILIARY FORWARD LIGHTING KIT GENERAL Kit Number -0, 0000 Models This Custom Auxiliary Lighting Kit adds lamps and turn signals to 00 and later FLHX model motorcycles. Additional
Volkswagen Jetta, Golf, GTI 1999, 2000 Brake System 46 Brakes - Mechanical Components (Page GR-46)
") 46 Brakes - Mechanical Components (Page GR-46) Front brakes Brake pads, removing and installing Brake pads, removing and installing FN 3 brake caliper, servicing FS III brake caliper, servicing Rear wheel
46 Brakes - Mechanical Components (Page GR-46) Front brakes Brake pads, removing and installing Brake pads, removing and installing FN 3 brake caliper, servicing FS III brake caliper, servicing Rear wheel
R O A D M A S T E R, I N C.
 R O A D M A S T E R, I N C. ROADMASTER, Inc. 6110 NE 127th Ave. Vancouver, WA 98682 4 MOUNTING BRACKET KIT 1 2 3 360-896-0407 fax 360-735-9300 www.roadmasterinc.com ITEM QTY NAME PART # 1...2... #10 x
BILLET HEADLAMP SHELL
 -J008 REV. 007-07- BILLET HEADLAMP SHELL GENERAL Kit Number 770-0 Models For model fitment information, please see the P&A Retail Catalog or the Parts and Accessories section of www.harleydavidson.com
BILLET HEADLAMP WITH SHORT/TALL MOUNTS
 -J099 REV. 00-0- BILLET HEADLAMP WITH SHORT/TALL MOUNTS GENERAL Kit Number 9-0, 9-0 Models Kit 9-0 is a -/ inch headlamp and kit 9-0 is a -/ inch headlamp. Both kits will fit the models listed in Table.
INSTALLATION INSTRUCTIONS
 INSTALLATION INSTRUCTIONS Accessory Application Publications No. AII 26327 2004 S2000 Issue Date OCT 2004 PARTS LIST Security System: P/N 08E51-S84-100 Attachment Kit: P/N 08E55-S2A-101 2 Remote controls
INSTALLATION INSTRUCTIONS PART NUMBER:
 Equipped with AEM Dryflow Filter No Oil Required! INSTALLATION INSTRUCTIONS PART NUMBER: 21-475B (Blue Finish) 21-475C (Gun Metal Grey Finish) 21-475P (Vacuum Metalized Chrome-VMC) 21-475R (Red Finish)
2001-2005 Fuel Pickup Kit Installation Guide
 2001-2005 Fuel Pickup Kit Installation Guide 2001-2005 Fuel Pickup Kit Installation Guide PPE offers super tanks that are easy to install and fit perfectly beneath your vehicle without compromising clearance
DYNA RIDER FOOTBOARD KIT
 -J0 REV. 0-0-0 DYNA RIDER FOOTBOARD KIT GENERAL Kit Number 000 Models For model fitment information, see the P&A Retail Catalog or the Parts and Accessories section of www.harley-davidson.com (English
Installation Instructions
 Installation Instructions Page 1 of 16 January 2008 Equipment Parts, Trailer Hitch Ver 3.0 Accessory Development SUBJECT TRAILER HITCH KIT (US Only) - P/N 71 60 0 413 359 MODEL X5 (E70): Select Vehicle
16 March 2015 1045440-2003-2007 r700 Dodge Cummins Primary Upgrade (I-00279) 1 P/N# 1045440
 1 P/N# 1045440") 16 March 2015 1045440-2003-2007 r700 Dodge Cummins Primary Upgrade (I-00279) 1 Dodge Cummins (2003-07) R700 Primary Turbocharger Upgrade Kit P/N# 1045440 - Installation Manual - Please read all instructions
16 March 2015 1045440-2003-2007 r700 Dodge Cummins Primary Upgrade (I-00279) 1 Dodge Cummins (2003-07) R700 Primary Turbocharger Upgrade Kit P/N# 1045440 - Installation Manual - Please read all instructions
PERFECT FIT SERIES IN-DASH HEAT/ COOL/ DEFROST 1967 CHEVROLET IMPALA
 specializing in AIR CONDITIONING, PARTS AND SYSTEMS for your classic vehicle PERFECT FIT SERIES IN-DASH HEAT/ COOL/ DEFROST 1967 CHEVROLET IMPALA CONTROL & OPERATING INSTRUCTIONS The controls on your new
BULB REPLACEMENT BROCHURE
 BULB REPLACEMENT BROCHURE Contents Contents Explanation of Symbols 03 Audi A1 04 06 Audi A4 1.9 TDI with Xenon Headlights (from years of manufacture 2000 to 2005) 07 10 Audi A4 (8K5 / 8K2) with Bi-Xenon
Technical Guide 08/15/14
 Technical Guide 08/15/14 1 Table of Contents Contact information.3 Identifying your system..4-8 Model Number Serial number location Parts of your fuel system..9-14 Fuel pump diagram Wire harness schematics
Use subject to terms and conditions posted at http://www.burgertuning.com/terms.htm
 Use subject to terms and conditions posted at http://www.burgertuning.com/terms.htm THIS PART IS LEGAL FOR USE ONLY IN COMPETITION RACING VEHICLES AS DEFINED UNDER CALIFORNIA LAW, AND IS NOT LEGAL FOR
Not required for most applications Not required for most applications High pressure (12-803 provided) High pressure (12-803 provided)
 High pressure (12-803 provided)") ELECTRIC FUEL PUMPS P/N 12-801-1, 712-801-1, 12-802-1, 712-802-1, 12-815-1, & 712-815-1 FUEL PRESSURE REGULATORS P/N 12-803, 12-501, 12-804, 12-500, & 15812NOS Installation Instructions THESE INSTRUCTIONS
ELECTRIC FUEL PUMPS P/N 12-801-1, 712-801-1, 12-802-1, 712-802-1, 12-815-1, & 712-815-1 FUEL PRESSURE REGULATORS P/N 12-803, 12-501, 12-804, 12-500, & 15812NOS Installation Instructions THESE INSTRUCTIONS
Subject: Pre-Formed and Pre-Flared Hydraulic Brake Pipe Kits Now Available for Service
 Subject: Pre-Formed and Pre-Flared Hydraulic Brake Pipe its Now Available for Service Models: 2000-2006 adillac Escalade Models 2000-2006 hevrolet Avalanche, Suburban, Tahoe 1999-2007 hevrolet Silverado
R O A D M A S T E R, I N C.
 R O A D M A S T E R, I N C. MOUNTING BRACKET KIT 14 8 7 4 13 5 6 ITEM QTY NAME MATERIAL 1...6...1/2" x 2 1/2" BOLT... 350099-00 2...2...1/2" x 1 1/2" BOLT... 350095-00 3...8...1/2" LOCK WASHER... 350309-00
R O A D M A S T E R, I N C.
 R O A D M A S T E R, I N C. ROADMASTER, Inc. 6110 NE 127th Ave. Vancouver, WA 98682 12 10 3 11 4 5 13 7 8 360-896-0407 fax 360-735-9300 www.roadmasterinc.com ITEM QTY NAME MATERIAL 1... 4...1/2 x 1 1/2
1.00 IN (25.4 MM) DIAMETER BATWING MINI-APE HANDLEBAR KITS
 DIAMETER BATWING MINI-APE HANDLEBAR KITS") REV. 04-09-09.00 IN (5.4 MM) DIAMETER BATWING MINI-APE HANDLEBAR KITS GENERAL Kit Numbers 57474-, 57485- Models For model fitment information, see the P&A retail catalog or the Parts and Accessories section
REV. 04-09-09.00 IN (5.4 MM) DIAMETER BATWING MINI-APE HANDLEBAR KITS GENERAL Kit Numbers 57474-, 57485- Models For model fitment information, see the P&A retail catalog or the Parts and Accessories section
R O A D M A S T E R, I N C.
 R O A D M A S T E R, I N C. 11 7 6 1 2 10 13 8 ITEM QTY NAME PART # 1...2...1/2 x 5 1/2 BOLT...350108-00 2...4...1/2 x 1 3/4 BOLT...350096-00 3...6...1/2 LOCK WASHER...350309-00 4...6...1/2 HEX NUT...350258-00
MGB Air Conditioning Installation Instructions For 1962-76 LHD cars w/supercharger
 MGB Air Conditioning Installation Instructions For 1962-76 LHD cars w/supercharger PART #363-405 MOSS MOTORS, LTD. 440 Rutherford St. P.O. Box 847 Goleta, CA 93117 1-800-667-7872 FAX 805-692-2525 www.mossmotors.com
EZ-Steer Assisted Steering System
 EZ-Steer Assisted Steering System Installation Instructions Platform Kit P/N 53059-21 Case IH Puma 165 Puma 180 Puma 195 Puma 210 New Holland T7030 T7040 T7050 T7060 Revision A June 2007 Part Number 53345-21-EU2
HYBRID CAM PLATE AND HIGH VOLUME OIL PUMP KIT
 -J056 REV. 0-05-0 HYBRID CAM PLATE AND HIGH VOLUME OIL PUMP KIT GENERAL Kit Number 584- Models For model fitment information, see the P&A retail catalog or the Parts and Accessories section of www.harley-davidson.com
SECURITY SYSTEM SMART SIREN KIT
 -J00876 REV. 009-0-09 SECURITY SYSTEM SMART SIREN KIT GENERAL Kit Number 688-0 Models For model fitment information, see the P&A Retail Catalog or the Parts and Accessories section of www.harley-davidson.com
Instructions for: TTW 1 Universal Service Replacement Blower Kit P/N 265-47200-00
 Instructions for: TTW 1 Universal Service Kit P/N 265-47200-00 (To be performed ONLY by qualified service providers) The Blowers on the Following Water Heaters are Serviced by This Kit: MITW -10 Series
INSTALLATION INSTRUCTIONS
 INSTALLATION INSTRUCTIONS Accessory Application 2009 PILOT Publications No. AII 39408 Issue Date MAY 2008 PARTS LIST Steering Wheel Trim (With Cruise and Audio) P/N 08Z13-SZA-130B (Chocolate) P/N 08Z13-SZA-140B
1.8 CRANKSHAFT OIL SEALS
 SERIES 60 SERVICE MANUAL 1.8 CRANKSHAFT OIL SEALS An oil seal is fitted between each end of the crankshaft and the bores of the flywheel housing and gear case cover to retain the lubricating oil in the
Fitting Instruction: Daytona 675 Street Triple from VIN 411984, Street Triple R from VIN 411984 A9930222
 English Fitting Instruction: Daytona 675 Street Triple from VIN 98, Street Triple R from VIN 98 A990 Thank you for choosing this Triumph genuine accessory kit. This accessory kit is the product of Triumph's