IDS X64 Installer Manual D Issued August 2010
|
|
|
- Vincent Briggs
- 9 years ago
- Views:
Transcription
1 1

2 2

3 Contents 1. Introduction to the IDS X Features of the IDS X Installation and Wiring Installation Requirements End-of-Line Resistors Box Tamper Input Connecting the Telephone Communicator - Advanced Programmable Outputs Key-Switch or Remote Control Unit Installing a Zone Expander Module IDS Remote Receiver Radio Transmitter Connection Hardware Default Switch Enrolling Keypads and Other Bus-wired Peripherals Replacing a Damaged Keypad / Bus-wired Peripheral Defaulting Keypads Event Log Access Codes Normal User Code Master User Code Maid s Code (Arm to Disarm Code) Duress Code Installer Code Maintenance Code Download Code How to Read Location Values Programming of the Panel Entering Installer or Maintenance Mode Programming Standard Locations Programming Extended Locations Using the String Method Using Sub-locations Programming a Location or Sub-location with a Bitmap Programming Location Summary Zones Global Setup Daylight Savings Miscellaneous - Advanced Communications Setup - Advanced Phone Numbers
... 16 6.1.3 Duress Code... 16 6.2 Installer Code... 16 6.3 Maintenance Code.")
4 9.7 Zone Properties No Movement - Advanced Auto Arm - Advanced Security Codes Partition Options Delays Options to Configure Keypads Reporting Codes - Advanced Global Reporting Codes Zone Reporting Codes Partition Reporting Codes User Reporting Codes Programmable Outputs Output Disarm Clear Partition Event Driven Outputs - Advanced Zone Programmable Output Events Output Pulse Timing - Advanced Output Scheduling On Time - Advanced Output Scheduling Off Time - Advanced Output Scheduling On/Off Days - Advanced Event Reporting Options - Advanced Keypad Information Panel Information Index of Programming Locations Cross Reference Lookup Programming Quick Reference Guide

5 Figures Figure 1: Connection Diagram without Tamper per Zone Figure 2: How Telephone Numbers Work Figure 3: Paging Indication on the Classic Keypad Figure 4: Paging Indication on the Curved Keypad Tables Table 1: Values Represented by each Zone LED Table 2: Binary Coded Decimal Four Digit Display Table 3: Hexadecimal Values Table 4: Defaulting Data Table 5: Zone Types Table 6: Zone Types in String Format Table 7: Zone Types in Sub-location Format Table 8: Loop Response Time Data Table 9: Global Options Data Table 10: Trouble Display Options Table 11: Number of Digits Data Table 12: Month Data Table 13: Day of Week Data Table 14: Week of Month Data Table 15: Auto Test Interval Data Table 16: Download Code Disable Data Table 17: Default Switch Disable Data Table 18: Communications Format Data Table 19: Reporting Communications Options Data Table 20: Download Options Data Table 21: Phone Number Example Table 22: Zone Type Properties Data Table 23: Arm/ Disarm Days Data Table 24: Zones per Partition Page Table 25: Partition Arm Options Data Table 26: Extended Partition Options Data Table 27: Keypad Options Data Table 28: Clear Programmable Onboard Outputs Data Table 29: Clear Programmable Zone Expander Outputs Data Table 30: Clear Programmable Keypad Outputs Data Table 31: Partition Programmable Output Events for Locations Table 32: Partition Programmable Output Events for Locations Table 33: Output Address Physical Mapping Data Table 34: Output Actions Data Table 35: Default Programmable Events Data Table 36: Default Programmable Events Data with no Default Action Table 37: Global Programmable Output Events Default Data Table 38: Output Scheduling On/Off Days Data Table 39: Outputs per Location Table 40: Split Reporting Zones Bitmap Data Table 41: Global Split Reporting 1 Bitmap Data Table 42: Global Split Reporting 2 Bitmap Data Table 43: Global Split Reporting 3 Bitmap Data Table 44: Global Split Reporting 4 Bitmap Data Table 45: Split Reporting Partitions 1-8 Data

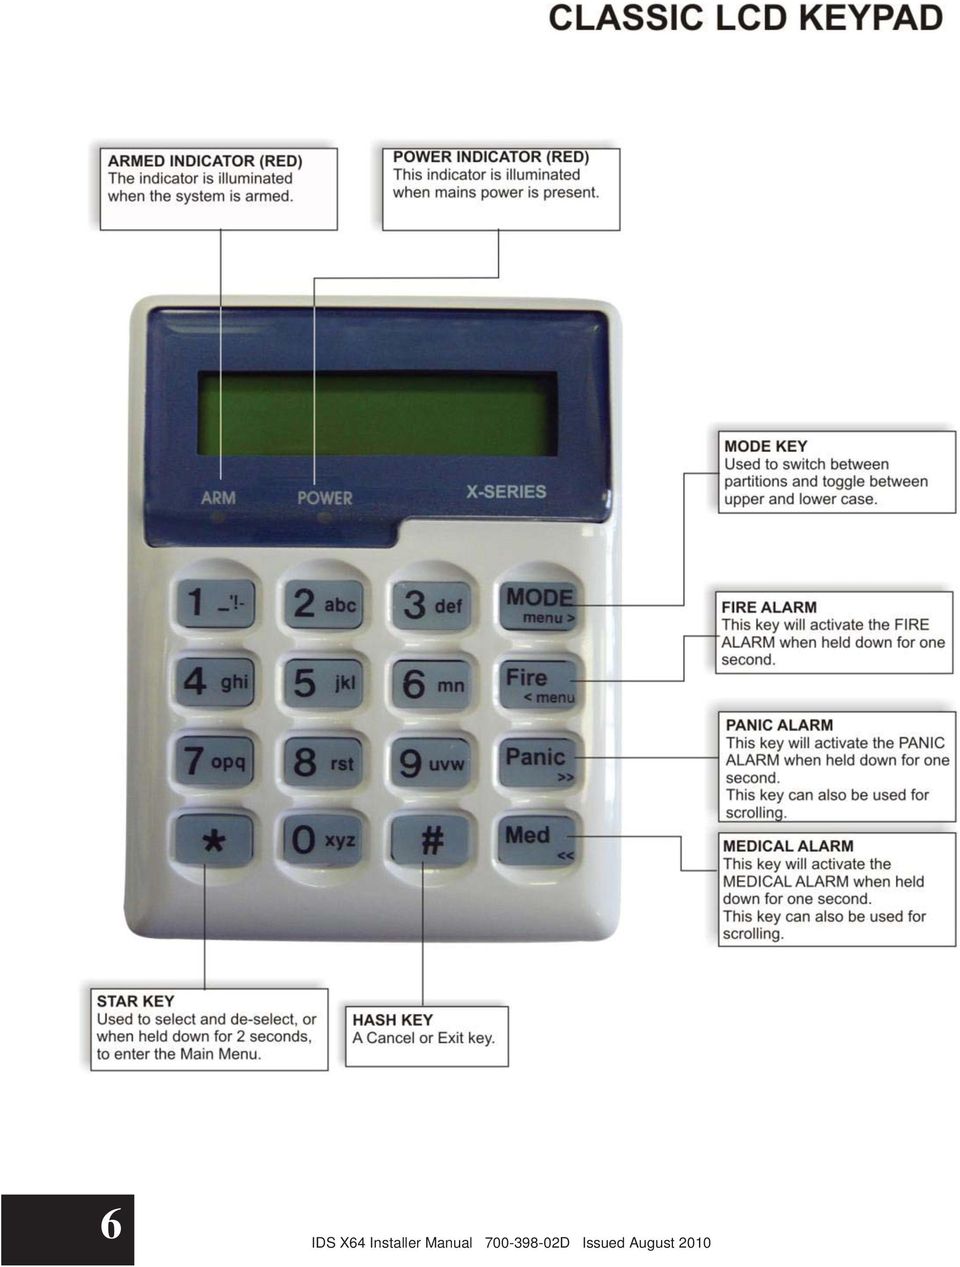
6 6
7 7

8 8

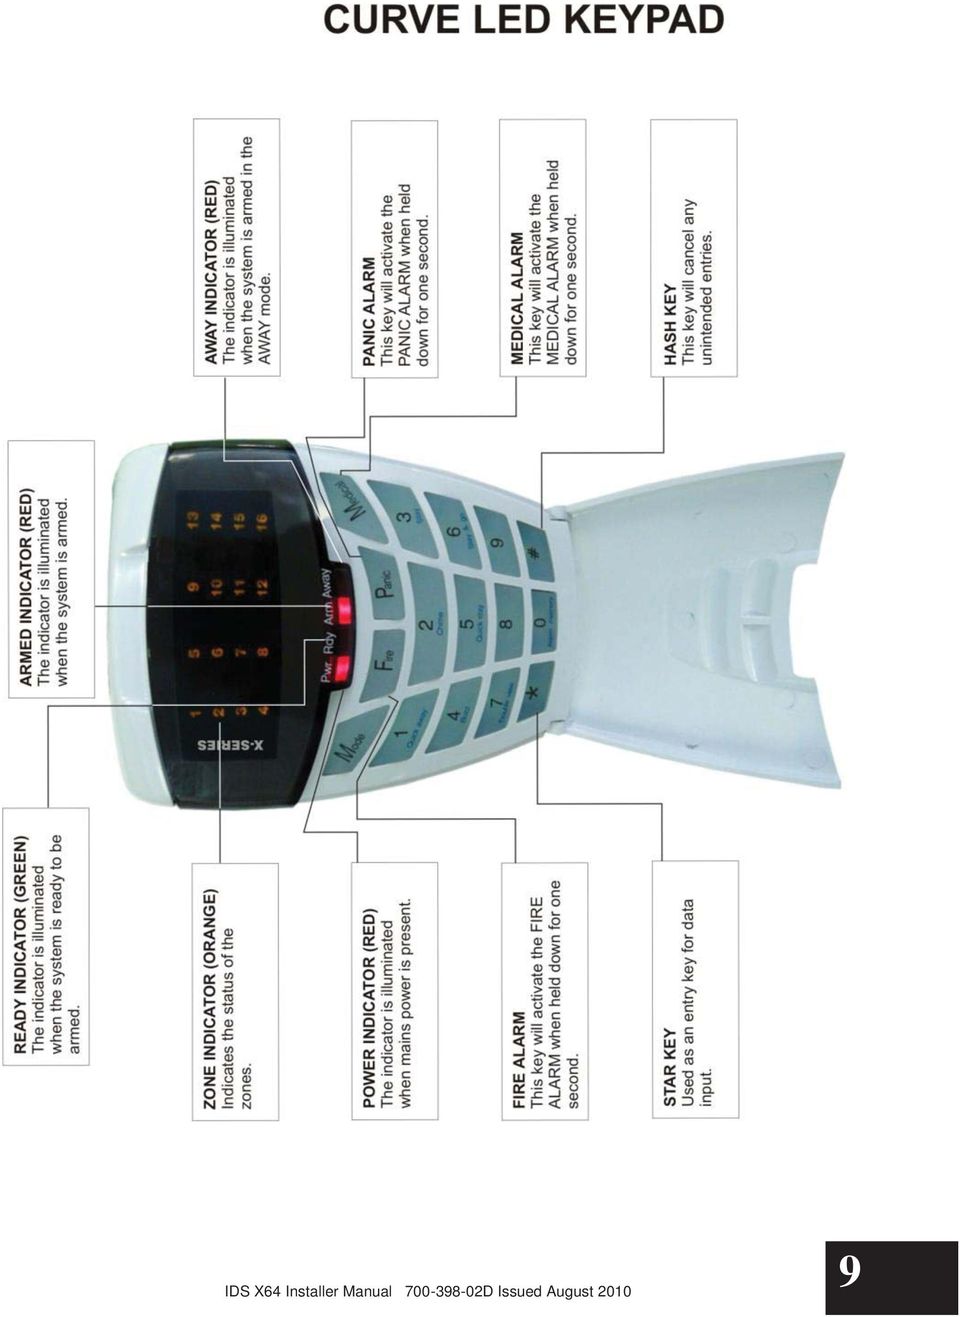
9 9
10 Section: 1 1. Introduction to the IDS X64 Thank you for purchasing an IDS Alarm Panel. The IDS X64 is a versatile, Bylaw 25 compliant, expandable Alarm Panel. It has up to 8 partitions and can be expanded from 8-64 zones. Most features are configurable and may be programmed directly through a keypad or via serial PC connection or telephone system, using the IDS Download Software and appropriate modem (P/N: ). There are up to 64 programmable burglary zones, a dedicated panic zone, monitored siren output, auxiliary power output, and 5 onboard programmable outputs expandable to 25, which may be programmed to perform various trigger/switching functions. For correct operation, the IDS X64 must be used in conjunction with the specified transformer / battery combination (ask your sales representative for a copy of the IDS Power Budget spreadsheet to identify your needs) and appropriate peripheral sensors and signalling devices. X-SERIES products are not compatible with any previous IDS products, such as the IDS816 and IDS Features of the IDS X64 Zones and Partitions: 8 onboard zones, expandable to 16 onboard zones with a X64 8-zone Plug-in Expander (P/N: X-08PI) A very cost-effective 16 zone solution Further expandable to 64 zones with the use of up to 6 bus-wired X64 8-zone Unpowered Expander modules (P/N: X-08S) or 8 keypad zones - 1 per keypad 8 partitions 4 stay profiles per partition Users: 128 users Options to set user codes as Master, Duress, Maid, Arm only, Disarm only or Programmable Output. System Options: Tamper reporting per zone using double end-of-line resistors (12K and 4K7) 5 programmable outputs on the Alarm Panel, expandable to 25 when using zone expanders (2 per expander), and keypads (1 per keypad) Event log (1000 events) date and time relative Auto arm/disarm capability per partition and by day of the week. No movement auto arm and medical reporting Panel firmware installer upgradable via serial data cable Telephone communicator that supports Ademco, FBI, Silent Knight, Contact ID, and SIA Fax defeat/answering machine override Dual reporting provides for duplicated reporting to two independent central base stations Split reporting to report to either 1 of 2 dual reporting number pairs Comprehensive lightening protection Dynamic battery self test Low battery monitoring and cut-out circuit Dual power supply, with an independent battery charging circuit, means more onboard power for simplified alarm installation 10
.")
11 Section: 2 2. Installation and Wiring Please refer to: Figure 1: Connection Diagram without Tamper per Zone and familiarise yourself with the following sections. *The kick start jumper must be in-circuit when using only a battery (i.e. no AC). Simply short the pins out with a screwdriver, or use a jumper. Remove the short/jumper once the Panel Status LED lights up (indicating power up), as leaving it on disables the low battery cut-out.* Figure 1: Connection Diagram without Tamper per Zone 11

12 Section: Installation Requirements A suitable transformer with an output voltage of 16 Vac ±10% with a 32VA minimum rating must be used. A 48VA transformer is recommended for larger installations. A 12V sealed lead acid battery with a minimum capacity of 7AH must be used. The backup period after mains failure will depend on the number of keypads, sensors, and bus-wired peripheral devices connected to the system. Connect a 12V self-driven siren or piezo siren (not a horn speaker) to the siren output. The panel can supply a total continuous current of 750mA to bus-wired peripheral devices such as keypads, remotes, receivers, passives etc; from Aux 12V terminals End-of-Line Resistors All zones, including Panic zones, are end-of-line supervised. All zones, whether they are used or unused, need to be terminated with a 3K3 resistor (resistor colour-code is orange, orange, red, gold). For maximum security, the end-of-line resistor must be placed inside or as close to the sensor as possible. For tamper by zone, 4K7 and 12K end-of- line resistors must be connected instead of a single 3K3 resistor. If the panel is unarmed and a tamper condition occurs, the siren will not sound but a tamper condition will be reported if it is enabled to do so. See Table 40 to enable/disable this option. If the panel is armed and a tamper condition occurs, an audible alarm will register, and a tamper condition AND zone violation will be reported Box Tamper Input The box tamper input does not require an end-of-line resistor, but does require a normally closed contact. The panel is shipped with the box tamper input bypassed with tamper. To use it, remove the jumper and connect a normally closed contact onto the terminals. Refer to Figure 1 for the box tamper position on the Alarm Panel Connecting the Telephone Communicator - Advanced Refer to: Figure 1: Connection Diagram without Tamper per Zone. For optimum lightning protection, connect a low resistance earth to the communicator earth input. Always connect the telephone communicator in line seizure mode and never in parallel with the telephone. Ensure the telephone receiver is connected to the communicator terminals marked phone and the incoming line to the terminals marked line Programmable Outputs An IDS Relay Board (P/N: ) must be used when any device requiring a current greater than 50mA is connected to a programmable output. The programmable output circuitry consists of a 12V source with a 56 series resistor. Current sink is via a 1, 000 resistor to ground. The maximum output voltage is 13.6Vdc. The maximum output current is 25mA. Programmable outputs are primarily connected for radio transmitter. However, they are also used for connecting, LEDs, sirens, bus-wired peripherals, etc. 12
 to the siren output.")
13 Section: Key-Switch or Remote Control Unit A key-switch or non-ids remote receiver may be connected to any zone to allow remote arm/disarm and remote panic capability. When using a key-switch or remote control unit, a 3K3 resistor must be connected between the zone input and ground. Use only a spring-loaded momentary key-switch or non-latching remote control unit. 2.2 Installing a Zone Expander Module When installing a zone expander module refer to the document supplied with the module. Note that up to 6 bus-wired, 8-zone expander modules (P/N: X-08S) and 1 plug-in expander (P/N: X-08PI) may be added to the IDS X64 Alarm Panel. Zones 9-16 are reserved for the Plug-in Zone Expander module. 2.3 IDS Remote Receiver Up to 4 IDS Remote Receivers (P/N: X02-DI) may be connected to the keypad Bus. Using this facility allows remote arming and disarming of the panel while providing user identification for a maximum of 128 remotes. For a full list of features and benefits of the receiver, please see the manual that comes with it. 2.4 Radio Transmitter Connection When connecting a radio transmitter, use the TX terminal provided on the panel to supply power to the transmitter. This output is protected by a 4 Amp fuse. 3. Hardware Default Switch Use the hardware default switch (refer to Figure 1) to return the panel to its factory default settings. The procedure to default the panel is as follows: 1. Remove the battery and AC power from the panel 2. If you are only using a battery make sure that the kick-start jumper is in circuit 3. Hold down the default switch and reapply power to the panel (battery or AC) 4. Wait for the Panel Status LED to flash 5. Release the default switch 6. Remove the kick-start jumper, if one was used 7. Defaulting is complete once the Panel Status LED starts flashing The effects of applying the default: 1. Factory default values are restored to all locations 2. All attached keypad IDs are defaulted 3. The event log is not defaulted 4. The system default event is logged to the event log The hardware default switch can be disabled in location 35. See also: Defaulting the Panel or Master User Code location 0. 13
 and 1 plug-in expander (P/N: 860-06-X-08PI) may be added to the IDS X64 Alarm Panel.")
14 Section: 4 4. Enrolling Keypads and Other Bus-wired Peripherals Keypads must be enrolled on the system before they can be used. Keypads are allocated an ID in the order in which they are enrolled. To enrol a keypad: 1. Wire it to the keypad BUS 2. Press the [#] key Repeat this process with the remaining keypads where more than 1 keypad is used. The first keypad enrolled will have an ID of 1, the second enrolled will have an ID of 2, the third an ID of 3 etc. All the zone and LEDs will flash on a keypad that does not have an ID. The POWER and READY LEDs will be on for a keypad that has an ID and no zone violations. Only the POWER LED will be on for a keypad that has an ID with a zone violation. The LED for that zone will also flash. Trouble shooting If the ID process, for an LED keypad, has failed zones 1-8, and zones 9-16 will flash alternately. At this point press the [#] key to retry. If the flashing persists, try the following steps: 1. Check all wiring 2. Check that you have not exceeded 8 keypads on the bus 3. Contact the IDS helpdesk for further support To enrol other devices (IDS Remote Receivers or Zone Expanders); consult the installation manuals for those devices. The IDS X64 Alarm Panels can accept 6 zone expanders and 4 remote receivers. 4.1 Replacing a Damaged Keypad / Bus-wired Peripheral To replace a damaged device (non-dipswitch like a keypad): 1. Disconnect only the faulty device. 2. Program a value of [4] into location 0 to free up all redundant IDs (previously unallocated IDs remain free), wait for approximately 10 seconds then continue to step Connect the replacement device and enrol it by pressing [#] for keypads it will now be enrolled in the first available address. If other devices are disconnected (or damaged), at the time of performing step 2, their addresses will also be freed. Any new devices being enrolled will automatically be allocated addresses beginning from the lowest free address. When you free up the ID of the damaged unit, the panel settings, relevant to the ID, will be defaulted too. Therefore, the keypad will need to be re-added to a partition. If a new keypad was enrolled, go to location 243 to check the keypad s ID (1-8). Solution If there are problems with device IDs on a complex installation, do not assign IDs randomly, rather, at the end of the installation, default all device IDs and then enroll them in sequence. To re-enrol a Zone Expander or a Remote Receiver (dipswitch); consult the installation instructions for the particular device. 14

15 Section: Defaulting Keypads To default the ID of an individual keypad: 1. Remove power to the keypad (or the whole panel if easier). 2. Hold down the [1] and [3] keys simultaneously until the beep (for at least 3 seconds). 3. Restore the power. 4. Wait for three seconds and then release the keys (there will not be a beep). 5. All the keypad LEDs will flash simultaneously indicating that the keypad has been de-registered 4. Wait for five seconds and ensure that the Panel Status LED on the panel is flashing. 5. Press the [#] key to allocate a new ID to the defaulted keypad. Keypad IDs are allocated incrementally. 6. The ID of any (correctly registered) keypad can be viewed in location 243 from the keypad of interest. To default the ID of ALL keypads: 1. Enter a value of [3] into location 0. [INSTALLER CODE] [*] [0] [*] [3] [*] 2. On pressing the final [*], wait a few seconds and ALL the keypad LEDs will begin flashing. (Do NOT press the [#] key at the end of this sequence, unless you wish the keypad you are using to be registered in the first address). 3. Re-enrol all keypads by pressing the [#] key on each keypad in the CORRECT sequence to ensure that keypad zone and partition allocation is as required by the user. 5. Event Log A comprehensive log of the most recent events is retained in the non-volatile EEPROM. The log may be retrieved using the up/download software, or on the LCD keypad. (See the LCD Keypad Manual or User Manual to see how to view the event log). The IDS Download Software is available for Inhep account customers, at no cost, to collect your event logs via direct serial download, or via a modem. 6. Access Codes The panel supports up to 128 users. The user codes can have various properties assigned to them. These properties allow the user codes to have different functions. 6.1 Normal User Code A normal user code is used to arm/disarm the panel, and to access certain user options Master User Code When assigned to a user, this property allows the user to act as a master user. The Master User Code has full access to programming all the user options. For a full list of user programmable options, refer to the X64 User Manual. 15

16 Section: Maid s Code (Arm to Disarm Code) This property may be used to limit access to the premises. A Maid's Code will only disarm the system if the same code was used for arming. If armed with a code other than this code, the system will view an attempt to disarm using a Maid's Code as an invalid entry. Any valid user code will disarm the system if it has been armed with a Maid s Code Duress Code This property denotes a user code as a special code to be used in the unique situation where an intruder forces one to disarm the system "under duress". When the [DURESS CODE] is entered, the Alarm Panel disarms normally - however a DURESS REPORTING CODE is transmitted to the monitoring company to inform them that you have been forced to disarm the Alarm Panel by an intruder. It is advisable to choose a code that can easily be remembered by all family (or staff) members. 6.2 Installer Code The Installer Code (location 197) is used by the installer to program and configure the Alarm Panel. It has full access to all installer mode menus as listed in this manual. 6.3 Maintenance Code The Maintenance Code (location 199) acts in a similar way to the Installer Code, but it has limited access to installer menus. The default Maintenance Code is 8888, or for a 6-digit code. This code is used to access the following locations: Locations Locations Locations Locations Locations Locations : Siren Time and Delay : Keypad Lockout and Sleep : Daylight Savings : No Movement, Auto Arm : No Movement, Medical Alarm : Auto Arm Times The assignment of this property to a user allows the relevant user to perform certain maintenance tasks that would ordinarily require the use of the installer code. 6.4 Download Code The Download Code, location 198, (in conjunction with the Installer Code) is required for download access via the IDS Download Software. The default Download Code is 9999 or for a 6-digit code. It is possible to program location 34 to either allow or disallow defaulting of the Download Code. 16

17 Section: 7 7. How to Read Location Values Values within a data program location will be displayed by the zone LEDs in binary coded decimal format i.e. zone LEDs 1-4 indicate units (ones) and zone LEDs 5-8 indicate tens (tens), and so on. To read a binary value on the keypad, add up the values represented by each lit LED as shown in Table 1. Table 1: Values Represented by each Zone LED Zone LED Value Digit Zone LED Value Digit Zone 1 1 Zone 9 1 Zone 2 2 Zone 10 2 Units Zone 3 4 Zone 11 4 Hundreds Zone 4 8 Zone 12 8 Zone 5 1 Zone 13 1 Zone 6 2 Zone 14 2 Tens Zone 7 4 Zone 15 4 Zone 8 8 Zone 16 8 Thousands EXAMPLE: Imagine the following zone LEDs are on: Zone 1, Zone 3 and Zone 5. Units are represented by the sum of Zone 1 and Zone 3 (i.e ). Tens of units are represented by the value of Zone 5 (i.e. 1 x ten). Therefore, the displayed value is (1+4) + (10) = 15. Values within a time program location are displayed in a similar format as per Table 2. Table 2: Binary Coded Decimal Four Digit Display Zone LED Calculation Unit Zone LED Calculation Unit 1 (x 1 = 1) 9 (x 1 = 1) 2 (x 2 = 0) 10 (x 2 = 2) M S 3 (x 4 = 4) 11 (x 4 = 4) Mm:Ss 4 (x 8 = 0) 12 (x 8 = 0) = 45:36 5 (x 1 = 1) 13 (x 1 = 1) M = LEDs 4 through 1 6 (x 2 = 0) 14 (x 2 = 2) m = LEDs 5 through 8 m s 7 (x 4 = 4) 15 (x 4 = 1) S = LEDs 12 through 9 8 (x 8 = 0) 16 (x 8 = 0) s = LEDs 16 through 13 Using an LCD keypad means that data and time information can be read directly without a need to convert. 17

18 Section: 8 8. Programming of the Panel The X64 can be fully programmed using the X64 LED keypad; the system is optimised to use an LCD keypad. The following section describes how programming data is represented in the X64 and how to program it, specifically with the LED keypad. For all programming procedures, the [*] key functions as the <ENTER> key and the [#] hash key functions as a <CLEAR> or an <EXIT> program key. Invalid data entries are indicated by means of an error beep consisting of 3 short beeps of the keypad buzzer. There are two location categories: Standard locations which are single tiered and do not contain any sub-locations. Extended locations, which are double tiered and have strings or sub-locations depending on the installers programming preference. Both standard and extended locations may contain further sub-categories referred to as bitmapped locations. For both main categories, clear visual keypad prompts are provided, which aid the programming process. When you use the [*] key to scroll through a bitmapped location, it will scroll through the pages. When using the [*] key to scroll through numbered locations, it will scroll through the bytes. Alpha-numeric locations (location 51 - telephone number), will show 1 digit per press of the [*] key. Numeric locations (location 197 installers code), will show 2 digits per press of the [*] key. To view how the data is represented, please see Table 1. Below are various programming symbols you will see throughout the manual: Indicates programming a standard location Indicates programming using the string method Indicates programming a sub-location Indicates programming a location/sub-location with a bitmap Where a hexadecimal number must be programmed, use the [MODE] key as per Table 3. Table 3: Hexadecimal Values Hex Value Decimal Value Key Strokes A 10 [MODE] key then [0] key B 11 [MODE] key then [1] key C 12 [MODE] key then [2] key D 13 [MODE] key then [3] key E 14 [MODE] key then [4] key F 15 [MODE] key then [5] key 18
![For all programming procedures, the [*] key functions as the <ENTER> key and the [#] hash key functions as a <CLEAR> or an <EXIT> program key.](/docs-images/44/21278631/images/page_18.jpg "Invalid data entries are indicated by means of an error beep consisting of 3 short beeps of the keypad buzzer.")
19 Section: 8 The hex values of A-F can be used for account codes. Only B-F can be used for telephone numbers. This means that for locations 50-54, A is NOT a hex number but is rather used to CLEAR a telephone number. 8.1 Entering Installer or Maintenance Mode The following steps show how to enter into installer or maintenance mode. 1. Ensure that all partitions are unarmed. 2. Press the [#] key followed by the [INSTALLER CODE] or the [MAINTENANCE CODE]. 3. The default installer code is 9999 or alternatively should a 6-digit default installer code have been used. 4. Press the [*] key and a long beep will confirm entry into program mode. If a correct code has been entered, the green READY LED will flash. This will not work if the dialler is active at the time, or if one of the partitions are armed. 8.2 Programming Standard Locations The following steps show how to program standard locations. 1. Ensure the panel is in program mode - the READY LED will be flashing. 2. Enter the [LOCATI NO.] of the program location you wish to view or change. 3. Press the [*] key, until the beep. The READY LED will become solid and the AWAY LED will flash. 4. The zone LEDs will display the data stored in the program location in binary format. 5. Enter the [NEW DATA] followed by the [*] key. A long beep will indicate a valid entry and the AWAY LED will turn off. The READY LED will flash. 6. If you do not wish to change the data, press the [#] key. The READY LED will continue flashing and the AWAY LED will turn off. 7. Repeat steps 2-5 until all the necessary locations have been programmed. 8. Press the [#] key to exit program mode. 9. The READY LED will stop flashing and the panel will return to the standby mode. When programming a standard location, any attempt to enter invalid data will result in an error beep (3 short beeps). The AWAY LED will remain on after the error beeps. Re-enter the correct data. There is no need to press the [#] key. EXAMPLE: [INSTALLER CODE] [*] [0] [*] [VALUE] [*] When you enter a standard location and press the [*] key, you will NOT be entering a sub-location as there is no sub-location to enter. What will happen is that you will scroll through the information in that location. If you enter a digit, you will be changing the information stored in that position of the location, or the location itself. 19

20 Section: 8 EXAMPLE: If you want to scroll through all the entries within a location with a LED keypad, you will input the following data: [INSTALLER CODE] [*] [LOCATI NO.] [*] [*] [*] [*], etc. Scrolling through with the [*] key will show you all the numbers in a location. At the end of the allowed locations, there will be a long beep to indicate that you are back at entry one of the location. If you go to location 61 Primary Account Codes, and then press the [*] key again followed by a digit, you will be changing just the digit in that string. 8.3 Programming Extended Locations The following steps show you how to program extended locations. These are locations that have sublocations. There are two ways to program extended locations: the string method or by using sublocations Using the String Method Using the string method is a fast and efficient way to program the X64. By filling in the programming sheets, the installer can first plan the installation, and then very quickly program multiple locations. 1. Ensure that the panel is in program mode - the READY LED will be flashing. 2. Enter the [LOCATI NO.] of the program location that you wish to view or change. 3. Press the [*] key. The READY LED is on and the ARM and AWAY LEDs will flash. 4. The first sub-location of data on the LED keypad is displayed. 5. Enter the [STRING] for the program locations that you wish to change. 6. Press the [*] key, a long beep indicates a valid data entry. 7. The ARM and AWAY LEDs turn off and the READY LED will flash for the next location. 8. If you do not wish to change the data within this location, press the [#] key. The READY LED will continue flashing and the ARM and AWAY LEDs will turn off. 9. Repeat steps 2-7 until all extended locations have been programmed. 10. Press the [#] key again to exit from program mode. 11. The READY LED will stop flashing and the panel will return to standby mode. To view the rest of the string, use the [*] key to advance one sub-location at a time. At the end of the allowed locations, there will be a long beep to indicate that you are back at entry one of the location. The mode automatically reverts to Sub-location Mode - see Using Sub-locations. When programming using the string method, any attempt to enter invalid data will result in an error beep (3 short beeps). The AWAY and ARM LEDs will remain on after the error beeps. Re-enter the correct data. There is no need to press the [#] key. EXAMPLE: [INSTALLER CODE] [*] [1] [*] [ ] [*] 20

21 Section: Using Sub-locations Sub-location programming is the classic IDS programming method. It is a personal choice as to which method works for the individual installer. 1. Ensure that the panel is in program mode - the READY LED will be flashing. 2. Enter the [LOCATI NO.] of the program location that you wish to view or change. 3. Press the [*] key. The READY LED is on and the ARM and AWAY LEDs will flash. 4. Enter the [SUB-LOCATI NO.] (after you have programmed your location) for the program location that you wish to view or change. 5. Press the [*] key. The READY LED will remain on. The ARM LED will change from flashing to steady, with the AWAY LED continuing to flash, indicating sub-location mode. 6. Enter the [NEW DATA] followed by the [*] key. A long beep will indicate a valid entry. The READY LED is on. The ARM and AWAY LEDs will flash. 7. If you do not wish to change the data within this sub-location, press the [#] key. This takes you back to the locations programming section. The READY LED is on and the ARM and AWAY LEDs will flash. 8. Repeat steps 5-6 until all sub-locations at the current location have been programmed. 9. Press the hash [#] key to exit from the current location, the ARM and AWAY LED will turn off and the READY LED will continue flashing. 10. Repeat steps 2 to 9 until all extended locations have been programmed. 11. Press the [#] key again to exit from program mode. 12. The READY LED will stop flashing and the panel will return to standby mode. When programming a sub-location, any attempt to enter invalid data will result in an error beep (3 short beeps). The AWAY and ARM LEDs will remain on after the error beeps. Re-enter the correct data. There is no need to press the [#] key. EXAMPLE: [INSTALLER CODE] [*] [1] [*] [1] [*] [1] [*] [2] [*] [2] [*] [3] [*] [4] [*] When you enter a location containing sub-locations and press the [*] key, you will initially enter the first sub-location. Each time you press the [*] key you will jump to the next sub-location. If you enter a digit, you will be changing the information stored in that sub-location itself. At the end of the allowed sublocations, there will be a long beep to indicate that you are back at the first sub-location. 8.4 Programming a Location or Sub-location with a Bitmap A bitmapped location allows the installer to program multiple panel features within a single location. This is achieved by using the individual zone LEDs to indicate which features are enabled or disabled. By referring to the appropriate location reference tables, the installer can view the entire selection of features associated with that location. 1. Ensure that the panel is in program mode - the READY LED will be flashing. 2. Enter the [LOCATI NO.] of the program location that you wish to view or change. 3. Press the [*] key. The READY LED is on. The AWAY LED flashes whilst in bitmap programming mode. 4. Each LED represents a specific state of a feature. A lit zone LED indicates that a feature is enabled. An unlit LED indicates that a feature is disabled. 21
22 Section: 8 5. To toggle a selected feature or, press the corresponding LED zone number followed by the [*] key. 6. Once a complete selection of features has been configured, press the [#] key to exit. When programming a location/sub-location with a bitmap, any attempt to enter invalid data will result in an error beep (3 short beeps). The LED zone number will not change its state. EXAMPLE: Location 16 allows the installer to enable up to twelve trouble conditions that may be displayed. Refer to Table 10 for default enabled trouble conditions. Upon entering program mode and viewing the contents of location 16, it will be noted that the enabled trouble condition LEDs will be on. To enable the Communications Fail Trouble Display (indicated by zone 2 LED) press the [2] key followed by the [*] star key. A long beep will indicate a valid entry and the zone 2 LED will turn on indicating that Communications Fail Trouble Display has been enabled. Continue selection (or de-selection) of the desired trouble conditions. Once a final selection has been made, press the [#] key to exit the location. The AWAY LED will turn off and a long beep will indicate the return to location entry mode. 9. Programming Location Summary A detailed description of each location and its options follow. LOCATI 0 Defaulting the Panel or Master user Code This location allows you to default the panel, user codes and their properties, and bus-wired peripherals. Refer to Table 4 for the values, that can be programmed, and their actions. [INSTALLER CODE] [*] [0] [*] [VALUE] [*] Table 4: Defaulting Data Value Action Will reset all locations to the factory default values. 0 (Master User Code 1234) and all keypad IDs will be defaulted. Will default the Primary Master User Code back to or if 6 digits are being used. 1 Master User Code properties will also be defaulted. 2 Defaults ALL user codes and their properties. 3 Defaults ALL keypads. Remove Missing Devices. Any missing devices (keypads, for example), will have its address freed up, making its address 4 available for a new device when it is enrolled. This MUST be performed when replacing a faulty device. (You must wait for 10 seconds.) The valid data range is:
23 9.1 Zones LOCATIS 1-8 Individual Zone Type Setup (Zones 1 64) These locations allow you to program the zone types for zones 1-64.The zones are divided into 8 zones per location. After the zone type is programmed for zones 9 through 64, they will need to be assigned to a partition before being enabled. Refer to section 9.11 Partition Options to see how to add zones to partitions and what options are available. Each location represents a set of 8 zones: Location 1 is zones 1-8 Location 2 is zones 9-16 Location 3 is zones Location 4 is zones Location 5 is zones Location 6 is zones Location 7 is zones Location 8 is zones Refer to Table 5 for available zone types. If you require a panic zone whose status can be viewed on a keypad, use a panic on zones 1-64 by programming 03 into the zone. Do NOT use the dedicated panic for this purpose, as it cannot be viewed on a keypad. Zones 1-8 are onboard zones. Zones 9-16 are plug-in expander zones. Zones are expander zones. 23
24 Table 5: Zone Types Value Zone Type DISABLED A zone violation of a Disabled zone is ignored by the Alarm Panel and will not be indicated on the keypad. PRIMARY ENTRY/EXIT ZE Violations of an Entry/Exit zone are ignored during the exit delay period of the arming procedure. Violating an Entry/Exit zone when armed will initiate the entry delay period. If a valid User Code is not entered before the entry delay period expires, an alarm condition will be registered. Failure to exit through an Entry/Exit zone after arming will cause the panel to Stay Arm. This zone may also function as an Entry/Exit zone that is COMM to two partitions. In such a case, should a user violate this zone and then disarm this partition, the OTHER partition will rearm after the entry delay. FOLLOWER ZE A Follower zone is not monitored during the Entry/Exit delay period; therefore it will not cause a violation. This allows the user to enter/exit via the Follower zone. A Follower zone will behave as an Instant zone while the panel is armed and an Entry/Exit zone is not violated prior to violation of the Follower zone. PANIC/PRIORITY ZE Regardless of whether the panel is armed or not, a violation of a Priority zone will cause the Alarm Panel to register a panic condition. This zone type CANNOT be bypassed. INSTANT ZE Violation of an Instant zone will cause the Alarm Panel to register an alarm condition. ARM/DISARM ZE Violation of an Arm/Disarm zone will cause the panel to toggle between (away) armed and disarmed. It is typical to connect a momentary key-switch, or non-latching remote control unit to this zone. A zone must be added to a partition in order for it to arm. SECDARY ENTRY/EXIT ZE The Secondary entry delay will be activated if this zone is violated while the panel is armed. FIRE ZE Violation of a Fire zone will cause the siren to sound regardless of whether the panel is armed or not. The siren will sound intermittently (one second on, one second off). For correct operation, a programmable output programmed as a fire detector power output must be used to control power to the fire detector (refer to Table 35). TAMPER ZE Violation of a Tamper zone will be reported to the base station regardless of whether the panel is armed or disarmed. If the panel is armed, the siren will sound. 24 HOUR ALARM ZE Regardless of whether the panel is armed or not, a violation of a 24 Hour Alarm zone will cause the Alarm Panel to register a panic condition. WARNING ZE Violation of a Warning zone will cause the siren to beep. The violation is logged in the event log but it is not reported to the base station. Warning zones may be included and will be counted when used as part of the cross-zone. PUSH TO ARM ZE Violation of a Push to Arm zone during the exit delay will immediately arm the panel. OUTDOOR INSTANT ZE Violation of an Outdoor Instant zone will cause the panel to register an alarm condition. This is a reporting code and it functions in the same way as zone type
25 How to program using the string method: To program 8 zones at a time, fill in a row with the corresponding zone types (2 digits per type, found in Table 5) and enter these values as one long 16-digit string for location 1. This method can be used for the remaining 56 zones by noting that location 2 references zones 9 to 16, location 3 references zones 17 to 24, etc. I.e. To program the defaulted zone types (Table 6) for the first 16 zones use the following: [INSTALLER CODE] [*] [1] [*] reference zones 1-8 [ ] [*] [2] [*] reference zones 9-16 [ ] [*] How to program using the sub-location method: To program zones using the sub-location method, program 1 (as indicated by [ ] sub-location (followed by the [*] key) and then enter the zone type (followed by the [*] key). Then press the [*] key again to advance to the next sub-location. For sub-locations, the zone type does not have to be 2 digits, i.e. enter 1 or 01. To repeat for further zones, enter the second zone number (followed by the [*] key) and then the zone type (followed by the [*] key). This can be repeated for all 64 zones. I.e. To program the defaulted zone types for the first four zones use the following: [INSTALLER CODE] [*] [1] [*] reference zones 1-8 [1] [*] [1] [*] [*] zone 1, zone type 1 [2] [*] [2] [*] [*] zone 2, zone type 2 [3] [*] [4] [*] [*] zone 3, zone type 4 [4] [*] [4] [*] [*] zone 4, zone type 4 How to program using the [*] key to advance: A third method to program zones using the star advance method is to enter the location number corresponding to a group of 8 zones you wish to program. Each press of the [*] key will step through a zone. I.e. To change zone 12 to an Instant zone, use the following: [INSTALLER CODE] [*] [2] [*] reference zones 9 16 [*] move to zone 10 [*] move to zone 11 [*] move to zone 12 [4] [*] zone type 4 Table 6 & Table 7 represent the default zone types for the 64 zones represented in 2 different programming methods. 25
26 Table 6: Zone Types in String Format Zones Loc Sub-loc As Strings Zone Type n/a ref above table n/a All Disabled n/a All Disabled n/a All Disabled n/a All Disabled n/a All Disabled n/a All Disabled n/a All Disabled Table 7: Zone Types in Sub-location Format Zone Loc Sub-Loc As Sub-locations Zone Type Entry / Exit Follower Audible Instant Audible Instant Audible Instant Audible Instant Audible Instant Audible Instant The valid data range is: 00 05, 08, Global Setup LOCATI 10 Zone Shutdown Count (default = 5) This location determines the number of times a zone may be violated while the panel is armed before it is automatically bypassed. Disarming the panel will clear all bypassed zones. The Zone Shutdown Count set here applies to all zones that have option 3 (shutdown zone) enabled in locations [INSTALLER CODE] [*] [1] [0] [*] [ZE SHUTDOWN COUNT] [*] The valid data range is: LOCATI 11 Programmable Zone Loop Response Time (default = 2) The zone loop response time is the period of time for which a zone must remain violated before a violation is registered. The time is calculated in 12 millisecond increments starting at 12ms. A partial table between the values of 1 and 255 is shown in Table 8; times not shown on the table can be calculated as per the following example: 198 x = 2.38 seconds. (This is an advanced location). To program the time into this location, the format is [MMSS]. [INSTALLER CODE] [*] [1] [1] [*] [ZE LOOP RESPSE TIME] [*] 26
27 The valid data range is: Table 8: Loop Response Time Data Value Response Time Value Response Time 1 12 ms ms 2 24 ms ms 3 36 ms ms 4 48 ms ms 5 60 ms seconds 6 72 ms seconds 7 84 ms seconds 8 96 ms seconds ms seconds ms seconds ms seconds ms seconds ms seconds ms seconds ms seconds ms seconds LOCATI 12 Cross-zone Delay Time (default = 0030) This location defines the cross-zone delay timer period in minutes and seconds, and it is used in conjunction with location 13. (This is an advanced location). To program the time into this location, the format is [MMSS]. [INSTALLER CODE] [*] [1] [2] [*] [MMSS] [*] The valid data range is: 00m00s 59m59s. LOCATI 13 Cross-zone Count (default = 3) If the panel is armed and the total number of violations of zones programmed as cross-zones (locations ) reaches this count within the time period programmed into location 12, an alarm condition will be registered. Any single zone enabled as a cross-zone, which is violated continuously for the time specified in location 12 will also register an alarm condition. [INSTALLER CODE] [*] [1] [3] [*] [CROSS-ZE COUNT] [*] The valid data range is: 1-15, with 0 to disable. 27
28 LOCATI 14 Global Options This location allows you to configure the global options for the X64 Alarm Panel. Table 9 shows the available options. For each enabled option, the corresponding locations that configure that option must also be programmed for correct operation. Table 9: Global Options Data LED On / Off Action 1 A user assigned to any partition may cancel the siren Only a user assigned to the partition that triggered the siren may cancel the siren 2 Enable keypad trouble beep Disable keypad trouble beep 3 Enable telephone line monitoring Disable telephone line monitoring 4 Enable keypad beep on successful reporting to the base station Disable keypad beep on successful reporting to the base station 5 Enable keypad Fire, Medical and Panic keys Disable keypad Fire, Medical and Panic keys 6 Enable the display of bypassed and stay zones when armed Disable the display of bypassed and stay zones when armed 7 Enable the siren delay Disable the siren delay 8 Enable box tamper monitoring Disable box tamper monitoring 9 Enable siren monitoring Disable siren monitoring 10 Enable bus-wired peripheral tamper monitoring* Disable bus-wired peripheral tamper monitoring* 11 Enable onboard dedicated panic silent Disable onboard dedicated panic audible 12 Enable low battery monitoring** Disable low battery monitoring** 13 Enable low battery cut-out** Disable low battery cut-out** Default values are shaded * Option 9 in location 16 must be enabled for this to work. ** Option 12 needs to be enabled in order for option 13 to work. 28
29 If mains power is present, then the battery is monitored every 30 minutes. If it is detected that the battery voltage has dropped, option 12 will be reported if it is enabled. If mains power is not present, then the battery is monitored every minute. If the battery voltage drops below 10V, then the battery will cut-out if option 13 is enabled. If the battery voltage drops below 11V, then option 12 will be reported if it is enabled. LOCATI 15 AC Fail / Restore Reporting Delay (default = 0004) In the event of a power failure (although instantly displaying the trouble indication) the panel will wait for this period of time before REPORTING the mains failure to the base station. The same time period applies before the restoral event is reported and logged. This delay eliminates unnecessary reporting if the AC power is removed for a short time period. It is important to note that an AC restoral will only be reported if an AC failure was reported first, i.e. the delay period was exceeded. Provided the back up battery is in good condition, short AC power failures will not affect the functioning of the alarm system. To program the time into this location, the format is [HHMM]. [INSTALLER CODE] [*] [1] [5] [*] [HHMM] [*] The valid data range is: 00h01m 18h00m. LOCATI 16 Trouble Display Enable This location determines which trouble conditions are indicated on the keypad when viewing the trouble display. A trouble condition is indicated by a flashing POWER LED. The POWER LED will only stop flashing once the trouble condition has been cleared. Trouble conditions will be reported if programmed to do so in locations 571 and 572, regardless of whether or not they are enabled for display. The trouble condition can be viewed by holding down the [7] key until the keypad beeps once. See Viewing Trouble Conditions in the User manual. Table 10 lists the available trouble conditions that can be selected for viewing when you press the [7] key. 29
30 Table 10: Trouble Display Options LED On / Off Action 1 Enable AC fail trouble display Disable AC fail trouble display 2 Enable reporting communications fail trouble display Disable reporting communications fail trouble display 3 Enable telephone line monitoring trouble display Disable telephone monitoring line trouble display 4 Enable siren monitoring trouble display Disable siren monitoring trouble display 5 Enable low battery monitoring trouble display Disable low battery monitoring trouble display 6 Enable Aux. 12V monitoring trouble display Disable Aux. 12V monitoring trouble display 7 Enable engineer's reset trouble display Disable engineer s reset trouble display 8 Enable box tamper trouble display Disable box tamper trouble display 9 Enable bus-wired peripheral tamper trouble display Disable bus-wired peripheral tamper trouble display 10 Enable bus-wired peripheral fail trouble display Disable bus-wired peripheral fail trouble display 11 Enable bus-wired peripheral low power/ battery trouble display Disable bus-wired peripheral low power/ battery trouble display 12 Enable EEPROM trouble display Disable EEPROM trouble display Default values are shaded Explanation of Trouble Conditions AC Fail This occurs when the Alarm Panel does not receive any power from your mains electricity. Causes of this can be a power failure, or your transformer is not plugged in or faulty. This trouble condition will only clear once the power has been restored. Reporting Communications Failure This occurs when communication to the monitoring company is not successful. The event will clear upon exiting the trouble viewing mode. Telephone Line Monitoring The causes of this could be a fault, or short, on the phone line; or the phone line could be cut. This trouble condition will only clear once the phone line restored. Siren Monitoring This can occur when the siren has been removed from circuit or the siren fuse on the panel has blown. This trouble condition will only clear once the siren has been put back into circuit or the fuse has been replaced. 30
31 Low Battery Monitoring This trouble condition can be caused by a low battery voltage, a dead battery, or no battery. If the battery is there, try charging it. If this not does work, then the battery needs to be replaced. This trouble condition will only clear once the battery voltage has been restored. Aux 12V Monitoring This trouble condition indicates that the fuse has blown, or that there is a fault This trouble condition will only clear once the fault has been restored. Engineer s Reset An alarm condition has occurred, the Installer needs to come and clear the condition by entering an installer code. The panel cannot be armed until this has occurred, nor will the trouble condition clear. Box Tamper The metal housing where the panel is stored has been opened. To clear trouble condition, make sure the door to the housing is closed and then view the trouble condition. Bus-wired Peripheral Tamper A peripheral device could be a keypad, remote receiver or bus-wired zone expander. This trouble condition indicates that one of these devices has been tampered with. To clear this trouble condition, restore the tampered device and then view the tamper. Bus-wired Peripheral Fail The panel has lost communication to one of the peripherals attached to it. Bus-wired Peripheral Low Power / Battery Supply voltage to a peripheral has dropped below the recommended limit. EEPROM The panel is not communicating correctly due to a serious error. LOCATI 17 Siren Time Out Period (default = 0200) The siren time out period is the period of time for which the siren will sound after it has been activated. To program the time into this location, the format is [MMSS]. [INSTALLER CODE] [*] [1] [7] [*] [MMSS] [*] The valid data range is: 00m01s 59m59s. LOCATI 18 Siren Delay (default = 0200) This location sets the siren delay period between when an audible alarm condition is registered and the siren is activated. The alarm condition will however be reported to the base station as soon as it occurs. Panic zones and Fire zones will cause an immediate siren even if siren delay is programmed. Option 7 in location 14 (Global Options) must be enabled for the siren delay to have an effect. To program the time into this location, the format is [MMSS]. [INSTALLER CODE] [*] [1] [8] [*] [MMSS] [*] The valid data range is: 00m01s 59m59s. 31
32 LOCATI 20 Keypad Lockout Count (default = 4) If a partition has a keypad lockout enabled, the value entered in this location determines the number of consecutive incorrect codes to activate a keypad lockout. The keypad will remain locked for the time programmed in location 21. Activating a Keypad Panic (or dedicated panic zone or entering a duress code) will unlock the keypad. Option 4 in locations (Extended Partition Options) must be enabled for the keypad lockout count to have an effect. [INSTALLER CODE] [*] [2] [0] [*] [KEYPAD LOCKOUT COUNT] [*] The valid data range is: LOCATI 21 Keypad Lockout Time (default = 0030) The value determines the period of time for which the keypad will remain locked out if the keypad lockout count programmed into location 20 has been exceeded. After this period has elapsed, a locked out keypad will return to an unlocked state. Keypad lockout is enabled by partition; refer to locations for extended partition options, but this period applies to all partitions. To program the time into this location, the format is [MMSS]. [INSTALLER CODE] [*] [2] [1] [*] [MMSS] [*] The valid data range is: 00m01s 59m59s. LOCATI 22 Keypad Sleep Delay (default = 0500) This location sets the time out period before the keypad enters sleep mode. After the delay period, if there is no keypad activity (on any keypad) the backlighting and all other status and alarm LEDs will turn off. The POWER LED and if appropriate, the ARM LED will remain on. The following events will bring a keypad out of sleep mode: Zone violations/restorals, Tamper violations/restorals, or key presses. To program the time into this location, the format is [MMSS]. [INSTALLER CODE] [*] [2] [2] [*] [MMSS] [*] The valid data range is: 00m01s 59m59s. LOCATI 23 User, Installer & Maintenance Code - Number of Digits (default = 4) This location determines whether user, installer and maintenance codes are 4 or 6 digits in length. The value programmed into this location has no effect on the download code, which is always 4- digits in length. Refer to Table 11 to view the defaults for 4-digit and 6-digit codes. If the code length is changed from 6 to 4, then all user codes are automatically set to their default values as per Table 11. This is to avoid duplicate user codes being inadvertently created when they have the same first 4 digits. 32
33 Table 11: Number of Digits Data Code Old four-digit code New six-digit code Installer Code Maintenance Code Master User Code User Codes XXXX XXXX00 [INSTALLER CODE] [*] [2] [3] [*] [NUMBER OF DIGITS] [*] The valid data range is either 4 or 6. LOCATI 24 Number of Account Code Digits (default = 4) This location sets the account code length to either 4 or 6 digits. If the length of your account codes is 4 digits and then they are changed to 6 digits, the last two digits will be set to 0. [INSTALLER CODE] [*] [2] [4] [*] [NUMBER OF DIGITS] [*] The valid data range is: 4 or Daylight Savings LOCATI 25 Month to Start Daylight Saving (default = 1) Select the month for Daylight Saving to commence, as per Table 12. Table 12: Month Data Value Month Value Month 0 Disabled 7 July 1 January 8 August 2 February 9 September 3 March 10 October 4 April 11 November 5 May 12 December 6 June [INSTALLER CODE] [*] [2] [5] [*] [MTH] [*] The valid data range: 1 12, with 0 to disable. If this location is disabled, then by default, locations 26 and 27 will also be disabled. This means that even if you put values into locations 26 and 27, daylight savings will not commence. 33
34 LOCATI 26 Day of Week to Start Daylight Saving (default = 1) Select the day of the week for Daylight Saving to commence, as per Table 13. Table 13: Day of Week Data [INSTALLER CODE] [*] [2] [6] [*] [DAY] [*] The valid data range is: 1 7. Value Day 1 Monday 2 Tuesday 3 Wednesday 4 Thursday 5 Friday 6 Saturday 7 Sunday LOCATI 27 Week of Month to Start Daylight Saving (default = 1) Select the week of the month for Daylight Saving to commence as per Table 14. To set the last week of each month, set the value to 5. Table 14: Week of Month Data [INSTALLER CODE] [*] [2] [7] [*] [WEEK] [*] The valid data range is: 1 5. Value Day 1 Week One 2 Week Two 3 Week Three 4 Week Four 5 Last Week LOCATI 28 Month to End Daylight Saving (default = 1) Select the month as per Table 12, to disable Daylight Saving. [INSTALLER CODE] [*] [2] [8] [*] [MTH] [*] The valid data range: 1 12, with 0 to disable. If this location is disabled, then by default, locations 29 and 30 will also be disabled. This means that even if you put values into locations 29 and 30, daylight savings will not start. LOCATI 29 Day of Week to End Daylight Saving (default = 1) Select the day of the week as per Table 13, to disable Daylight Saving. [INSTALLER CODE] [*] [2] [9] [*] [DAY] [*] 34
35 The valid data range is: 1 7. LOCATI 30 Week of Month to End Daylight Saving (default = 1) Select the week of the month as per Table 14, to disable Daylight Saving. [INSTALLER CODE] [*] [3] [0] [*] [WEEK] [*] The valid data range is: 1 5. LOCATI 31 Daylight Saving Time Offset (default = 60) Enter the daylight saving time offset that will be sued while daylight saving is enabled. Refer to locations [INSTALLER CODE] [*] [3] [1] [*] [DAYLIGHT SAVING TIME SET] [*] The valid data range is: Miscellaneous - Advanced LOCATI 32 Auto Test Report Interval (default = 1) The value programmed into this location determines the duration of time between Automatic System Tests. Input the value as per Table 15. Table 15: Auto Test Interval Data Value Time Period Value Time Period 0 Report every hour 8 Every eight days 1 Report daily 9 Every nine days 2 Every two days 10 Every ten days 3 Every three days 11 Every eleven days 4 Every four days 12 Every twelve days 5 Every five days 13 Every thirteen days 6 Every six days 14 Every fourteen days 7 Every seven days 15 Every fifteen days [INSTALLER CODE] [*] [3] [2] [*] [AUTO TEST REPORT INTERVAL] [*] The valid data range is: LOCATI 33 Auto Test Time (default = 0010) Enter the time when the auto test will be reported. The format is [HHMM] based on a 24-hour clock. (All 4 digits must be entered.) [INSTALLER CODE] [*] [3] [3] [*] [HHMM] [*] The valid data range is: 00h00m 23h59m. 35
36 EXAMPLE: If a value of [7] was programmed into location 32 and [1400] was programmed into this location, the auto test would be sent every 7 days at 2:00 pm. LOCATI 34 Download Code Default Disable (default = 0) This location allows you to set whether the download code is defaulted back to 9999 in the event that the panel is defaulted. Refer to Table 16 for the values that can be programmed. [INSTALLER CODE] [*] [3] [4] [*] [DOWNLOAD CODE DEFAULT DISABLE] [*] Table 16: Download Code Disable Data The valid data range is: 0 or 10. Value Action 0 Enable Download code defaulting 10 Disable Download code defaulting LOCATI 35 Hardware Default Switch Disable (default = 0) This location allows you to select whether the Hardware Default Switch is enabled. Refer to Table 17 for the values that can be programmed. For the detailed operation of this switch, refer to Section 3 Hardware Default Switch. [INSTALLER CODE] [*] [3] [5] [*] [HARDWARE DEFAULT SWITCH DISABLE] [*] Table 17: Default Switch Disable Data The valid data range is: 0 or 10. Value Action 0 Enable Hardware Default Switch 10 Disable Hardware Default Switch 9.5 Communications Setup - Advanced The X64 Alarm Panel has the capabilities for dual reporting as well as split reporting. Dual reporting is when an alarm condition is reported to both telephone numbers within a telephone module. The condition will only be considered reported once it has been sent to both numbers. Split reporting is when the panel has to report to either 1 of 2 dual reporting number pairs. Refer to Figure 2 to see how telephone numbers work. Refer to Table 40 to see the available options for zone split reporting. EXAMPLE: A monitoring company will have all the alarm conditions reported to base station one. All the trouble conditions will be reported to base station two. If the system is armed by zone, the system will report a close by user 129. If the system is armed using the quick arm key [1], the system will report a close by user
37 If the system is armed using the quick stay key [5], the system will report a close by user 131. If the system is armed using the stay arm and go key [6], the system will report a close by user 132. If the system is armed by means of the auto arm function, the system will report a close by user 133. If the system is armed with the download software, the system will report a close by user 134. These user numbers are hard coded, and they are used when the above actions are reported to a monitoring company. In order for these codes to be report, option 7 in Table 45 needs to be enabled. NOTES CTACT ID: If the panel has been programmed to use Contact ID, it will not be necessary to program individual reporting codes. Provision has been made to enable/disable the reporting of certain groups of codes. Any event that relates to a specific zone, or to a specific user, will have the relevant zone/user number appended to the end of the Contact ID reporting code. LOCATI 41 Telephone Number 1 Communications Format (default = 5) The value entered into this location selects the primary communication format. Select from Table 18 the value that corresponds to the required format. During communication, the green LED on the PCB will turn on indicating that the panel has taken the telephone off-hook. If programmed accordingly, the keypad will beep after receiving a handshake from the base station. This indicates a successful transmission of data. Refer to Table 18 for the available communication formats. [INSTALLER CODE] [*] [4] [1] [*] [COMMUNICATIS FORMAT] [*] The valid data range is: 0 8. Refer to section 9.16 Event Reporting Options - Advanced, to see how to enable split reporting. Table 18: Communications Format Data Value Format Name Description 0 Ademco Express Dual Tone HS, DTMF 1 FBI 4 x 2 (With Parity) 1.8kHz TX, 2.3kHz HS, 40PPS 2 FBI 4 x 2 (No Parity) 1.8kHz TX, 2.3kHz HS, 20PPS 3 Silent Knight 4 x 2 Fast 1.9kHz TX, 1.4kHz, 20PPS 4 Silent Knight 4 x 2 Slow 1.9kHz TX, 1.4kHz, 20PPS 5 Contact ID Dual Tone HS, DTMF 6 Reserved 7 SIA Reporting Bell 103 FSK, HS 8 Reserved TX HS PPS = Transmit = Handshake = Pulses per Second LOCATI 42 Telephone Number 2 Communications Format (default = 5) If dual reporting is enabled then this format will be used to report to phone number 2, which belongs to reporting module 1. Refer to Table 18 for the available communication formats. 37
38 [INSTALLER CODE] [*] [4] [2] [*] [COMMUNICATIS FORMAT] [*] The valid data range is: 0 8. LOCATI 43 Telephone Number 3 Communications Format (default = 5) If dual reporting is enabled then this format will be used to report to phone number 3, which belongs to reporting module 2. Refer to Table 18 for the available communication formats. [INSTALLER CODE] [*] [4] [3] [*] [COMMUNICATIS FORMAT] [*] The valid data range is: 0 8. LOCATI 44 Telephone Number 4 Communications Format (default = 5) If dual reporting is enabled then this format will be used to report to phone number 4, which belongs to reporting module 2. Refer to Table 18 for the available communication formats. [INSTALLER CODE] [*] [4] [4] [*] [COMMUNICATIS FORMAT] [*] The valid data range is: 0 8. LOCATI 45 Communication Delay (default = 0020) This location sets the period of time that the panel will wait before reporting zone violations and restorals. If the alarm is cancelled within this time, violations and restorals will not be reported. Violations will however be logged in the event log. Panic events will be reported instantly regardless of any selected delay period. Option 3 in locations (Extra Partition Options) must be enabled for the communication delay to have an effect. To program the time into this location, the format is [MMSS]. [INSTALLER CODE] [*] [4] [5] [*] [MMSS] [*] The valid data range is: 00m01s 59m59s. LOCATI 46 Reporting Communications Options The panel may be programmed to report to a single central station (single reporting) or to report to two central stations (dual reporting). Refer to Table 19 for a list of reporting options. Table 19: Reporting Communications Options Data LED On / Off Action 1 Enable Tone Dialling Enable Pulse Dialling 2 Join the Telephone Numbers Together Keep Two Separate Telephone Numbers 3 Enable Dual Reporting Disable Dual Reporting Default values are shaded 38
39 If option 3 is enabled, then option 2 will not work. You cannot join telephone numbers with dual reporting enabled. LOCATI 47 Number of Dial Attempts (default = 6) This location determines the maximum number of dial attempts that the panel will make in order to contact the base station. This applies to any of the four phone numbers programmed into locations If this location is disabled, the Alarm Panel will not report to any base stations. [INSTALLER CODE] [*] [4] [7] [*] [NUMBER OF DIAL ATTEMPTS] [*] The valid range of data: 1 9, with 0 to disable. LOCATI 48 Download Options This location configures options relating to remote connections made to the X64 via the onboard telephone dialler. Refer to Table 20 for the values you can select. Fax defeat is useful for downloading when a fax or answering machine is connected to the same phone line as the Alarm Panel. If this feature is enabled, dial the panel and hang up before three rings. Dial the panel again within one minute. The panel will then pick up the call on the first ring thereby preventing the fax / answering machine from answering the call before the alarm. If forced answer is enabled the [8] key may be used to force the panel to go off hook, answering the line. If Auto Pickup is enabled it will pick up the line after the number of rings programmed into location 49. The Call-back feature, when enabled, allows the download software/ to request that the panel call it back using the phone number as programmed into location 50. Table 20: Download Options Data LED On / Off Action 1 Enable Fax Defeat Disable Fax Defeat 2 Enable Forced Answer Disable Forced Answer 3 Enable Auto Pickup Disable Auto Pickup 4 Enable Call-back Disable Call-back Default values are shaded LOCATI 49 Number of Rings to Answer (default = 15) This location determines the number of rings before the panel answers" the telephone line. In the event that the panel answers the call and no valid download logon sequence, or DTMF signal, is received within 40 seconds, the panel will terminate the call and hang up the line. [INSTALLER CODE] [*] [4] [9] [*] [NUMBER OF RINGS TO ANSWER] [*] 39
40 The valid data range is: Phone Numbers NOTES SINGLE REPORTING: Single reporting works by dialling the first programmed number within the chosen telephone module. If there is no answer, the second phone number will be dialled. If the second telephone number picks up the call, then the reporting is considered successful. If the second phone number does not pick up, then it will dial the first number again. It will alternate between the phone numbers, until one is successful, up to the number of dial attempts programmed into location 47. If a phone number has no value programmed into it, it implies that it is disabled. NOTES DUAL REPORTING: By enabling dual reporting it is possible to select a different format for each reporting medium. In this instance, all data will be transmitted to each phone number (i.e. reported twice) using the format specified for that particular number. Both numbers need to be programmed for dual reporting to work. If the dual reporting feature is enabled, an event must be communicated to both telephone numbers before the event is considered reported. This feature cannot be used with the join phone numbers option. (See location 46). If dual reporting is enabled the dual reporting output will be set when the panel dials the second phone number, and cleared when it hangs up at the end of transmission. This output follows the hook relay. It may be used to trigger switching from the telephone line to a radio transmitter. NOTES HOW TO PROGRAM A PHE NUMBER: Enter numbers consecutively with no other key presses between each digit. Inserting pauses A pause may be inserted at any point within the telephone number: Entering a value of [MODE] [3] will provide a 12-second pause, [MODE] [4] will provide an 8-second pause and a value of [MODE] [5] will provide a 4-second pause. To dial a * enter [MODE] [1] To dial a # enter [MODE] [2] For a 12-second pause enter [MODE] [3] (On the LCD keypad it will be displayed as a + ) For a 8-second pause enter [MODE] [4] (On the LCD keypad it will be displayed as a = ) For a 4-second pause enter [MODE] [5] (On the LCD keypad it will be displayed as a - ) [MODE] [0] will clear the phone number, anything entered into this location after that will NOT be registered. EXAMPLE: Phone number 1 is to be dialled as follows: [0] followed by a 4-second pause then [ ]. The key sequences are as follows per Table
41 Table 21: Phone Number Example Data entered Explanation [INSTALLER CODE][*] To enter program mode [5][1][*] To enter location 51 (phone number 1) [0] To dial the zero [MODE][5] This programmes the 4 second pause [0][3][1] This enters the area code [7][0][5][1][3][7][3] The remainder of the number [*] To program the number [#] To exit installer menu Refer to Figure 2 to see how telephone numbers work. Figure 2: How Telephone Numbers Work LOCATI 50 Call-back Telephone Number The phone number programmed into this location will be used to respond to a call-back request from the IDS download software/pc. (This is an advanced location). Option 4 in location 48 (Download Options) must be enabled for the call-back telephone number to have an effect. [INSTALLER CODE] [*] [5] [0] [*] [CALL-BACK NUMBER] [*] LOCATI 51 Telephone Number 1 Program this location to set the primary telephone number. A maximum of 24-digits can be entered. Enter the digits consecutively and after the last digit has been entered, terminate with the [*] key. [INSTALLER CODE] [*] [5] [1] [*] [TELEPHE NUMBER 1] [*] LOCATI 52 Telephone Number 2 Program this location to set the secondary telephone number. A maximum of 24-digits can be entered. Enter the digits consecutively and after the last digit has been entered, terminate with the [*] key. 41
42 [INSTALLER CODE] [*] [5] [2] [*] [TELEPHE NUMBER 2] [*] LOCATI 53 Telephone Number 3 Program this location to set the third telephone number. A maximum of 24-digits can be entered. Enter the digits consecutively and after the last digit has been entered, terminate with the [*] key. [INSTALLER CODE] [*] [5] [3] [*] [TELEPHE NUMBER 3] [*] LOCATI 54 Telephone Number 4 Program this location to set the fourth telephone number. A maximum of 24-digits can be entered. Enter the digits consecutively and after the last digit has been entered, terminate with the [*] key. [INSTALLER CODE] [*] [5] [4] [*] [TELEPHE NUMBER 4] [*] LOCATIS Primary Account Codes (Partitions 1-8) The primary account code is always used for reporting, regardless of whether single or dual reporting is used. This account code is reported to the first telephone number in the telephone module. Each location represents a partition: Location 61 is partition 1 Location 62 is partition 2 Location 63 is partition 3 Location 64 is partition 4 Location 65 is partition 5 Location 66 is partition 6 Location 67 is partition 7 Location 68 is partition 8 [INSTALLER CODE] [*] [LOCATI] [*] [PRIMARY ACCOUNT CODE] [*] Refer to section 8.2 Programming Standard Locations to see how to scroll through data in a location using the [*] key. The length of the account code, either 4 or 6 digits, is set in location 24. If the length of the account code is changed from 4 to 6 digits, then the account codes will automatically have 00 at the end of them to make them 6 digits in length. LOCATIS Secondary Account Code (Partitions 1-8) The secondary account code is only used when dual reporting is enabled. This account code is reported to the second telephone number in the telephone module. Each location represents a partition: Location 71 is partition 1 Location 72 is partition 2 Location 73 is partition 3 Location 74 is partition 4 Location 75 is partition 5 Location 76 is partition 6 Location 77 is partition 7 42
43 Location 78 is partition 8 [INSTALLER CODE] [*] [LOCATI] [*] [SECDARY ACCOUNT CODE] [*] The length of the account code, either 4 or 6 digits, is set in location 24. If the length of the account code is changed from 4 to 6 digits, then the account codes will automatically have 00 at the end of them to make them 6 digits in length. Refer to section 8.2 Programming Standard Locations to see how to scroll through data in a location using the [*] key. 9.7 Zone Properties LOCATIS Zone Type Properties (Zones 1 64) Locations are used to configure properties for zones 1-64 respectively. Each location contains a bitmap of 5 zone type properties, as per Table 22. Tamper by Zone Individual zones may be enabled for tamper by zone. If the panel is unarmed and a tamper condition occurs, the siren will not activate but a tamper condition will be reported. If the panel is armed and a tamper condition occurs on the particular zone, an audible alarm condition will register and a tamper condition will be reported. Cross-zoning This feature is useful for reducing false alarms. Violating zones with the cross-zone property enabled will not immediately generate an alarm. The Cross-zone Delay Time is started as per location 12. Depending on the value programmed into location 13 (Cross-zone Trip Count), the zone (or any other zone with cross-zone option enabled) must trip the number of times programmed into location 13 before an alarm is generated. An alarm will also be generated should any single zone remain violated for the entire delay period (location 12). An Entry/Exit cannot be configured as a cross-zone. Each cross-zone will have its own timer. Shutdown Zone While armed, if the number of alarm violations generated by a swinger zone equals the shutdown count (location 10), the Alarm Panel no longer reports violations of that swinger zone. The swinger shutdown counter will reset when the system is disarmed and re-armed, it can be programmed to try and re-enable the zone automatically when the 24 hour self-test report is generated. Each zone has its own shutdown count programmable from 1 to 15. Silent Zone This property allows any zone that would ordinarily activate the siren to be programmed as a Silent zone i.e. the violation of a Silent zone, while the system is armed, will not activate the siren. However, the relevant reporting code (if programmed) will still be reported. All zones can be programmed as a Silent zone, except for the Fire zone. Chime Zone The chime mode allows the user to monitor nominated zones while the system is disarmed. The keypad buzzer will sound five times when the nominated zone is violated - the siren will NOT sound and no alarm condition will be reported. Peripherals sending zone updates to the panel will not cause chimes on a zone unless the zone is restored and then violated. 43
44 Stay Profile Stay zones are zones that are bypassed automatically when the system is STAY ARMED. To avoid triggering the alarm, zones such as bedrooms that are protected by Passive Infra-Red (PIR) detectors or windows that may be opened, must be bypassed when staying at home. Stay zones need only be programmed once. Each time the system is armed in the Stay Mode the preselected stay zones will be bypassed automatically. The panel allows for 4 unique STAY PROFILES to be stored, consisting of a pre-selected combination of STAY and BUZZ zones, to suit a specific STAY ARM requirement. STAY and BUZZ zones can be programmed for each profile only once the particular profile has been selected. Buzz Profile Violation of a Buzz zone when Stay Armed will cause the keypad buzzer to sound for a period of 30 seconds during which time a valid user code must be entered. If a valid user code is not entered during this period, the system will register an alarm condition. This feature helps prevent unnecessary false alarms. If an Entry/Exit zone is programmed as a Buzz zone, violation of the Entry/Exit zone (when the panel is Stay Armed) will cause the keypad buzzer to sound for the duration of the entry delay time (in place of the default 30 seconds). This, if the panel is Stay Armed, allows the user to enter the premises and disarm the panel. If it is not programmed as a Buzz zone, the alarm will be triggered immediately. If the panel was stay armed, a violation of the Entry/Exit zone will always start the Entry/Exit delay Any Entry/Exit zone programmed as a Buzz zone will not buzz. Table 22: Zone Type Properties Data LED / Zone Properties LED / Zone Properties 1 Enable Tamper by Zone Stay Profile 1 9 Disable Tamper by Zone 2 Enable Cross-zone Stay Profile 2 10 Disable Cross-zone 3 Enable Shutdown Zone Stay Profile 3 11 Disable Shutdown Zone 4 Enable Silent Zone Stay Profile 4 12 Disable Silent Zone 5 Enable Chime Zone Buzz Profile 1 13 Disable Chime Zone 6 Reserved Buzz Profile 2 14 Reserved 7 Reserved Buzz Profile 3 15 Reserved 8 Reserved Buzz Profile 4 16 Reserved Default values are shaded Please see section 14 of the User manual for more information on how to select stay profiles and how to switch between them. 44
45 9.8 No Movement - Advanced LOCATI 171 No Movement Auto Arm Time Out (default =00) If no violations are registered for the period of time specified in this location then the alarm will auto arm. This may be used if you forget to arm when leaving for work; the alarm will then automatically away arm itself if no violations were registered. This function is only available if values have been programmed into locations 172 and 173. This No Movement Auto Arm event reports a close event, using user number 133, but only if CID or SIA reporting has been selected. Enter a 2-digit duration in hours for each of the 8 partitions and program as a 16-digit string, followed by the [*] key. [INSTALLER CODE] [*] [1] [7] [1] [*] [PARTITI NO.] [*] [AUTO ARM TIME OUT] [*] The valid data range is: 01 23, with 00 to disable. Partition no. is: 1-8. Refer to section Using Sub-locations to see how to scroll from one sub-location to another using the [*] key. If this location is disabled, then by default, locations 172 and 173 will also be disabled. This means that even if you put values into locations 172 and 173, no movement auto arm will not commence. LOCATI 172 No Movement Auto Arm Start (default = 0000) Program the start time to start checking for no movement. For example, if you leave your premises at 06:50 am, program the start time to be 07:00. Enter a 4-digit time [HHMM] for each of the 8 partitions and program as a 32-digit string, followed by the [*] key. [INSTALLER CODE] [*] [1] [7] [2] [*] [PARTITI NO.] [*] [HHMM] [*] The valid data range: 00h00m 23h59m. Partition no. is: 1-8. Refer to section Using Sub-locations to see how to scroll from one sub-location to another using the [*] key. LOCATI 173 No Movement Auto Arm End (default = 2400) Program the end time to stop checking for no movement. For example, using 07:00 programmed into location 172 and if 2 hours is needed, then program 09:00. Enter a 4-digit time [HHMM] for each of the 8 partitions and program as a 32-digit string, followed by the [*] key. [INSTALLER CODE] [*] [1] [7] [3] [*] [PARTITI NO.] [*] [HHMM] [*] 45
46 The valid data range: 00h00m 23h59m. Partition no. is: 1-8. Refer to section Using Sub-locations to see how to scroll from one sub-location to another using the [*] key. LOCATI 174 No Movement Medical Alarm Time Out (default = 00) If no movement is detected, while the panel is disarmed, for the period of time specified in this location then the alarm will activate. This function is only available if values have been programmed into locations 175 and 176. This No Movement Medical Alarm event reports a medical event, (see location 339 if custom reporting codes have been used). EXAMPLE: This may be used to monitor for elderly people who have suddenly become incapacitated and are unable to sound the panic. Enter a 2-digit duration in hours for each of the 8 partitions and program as a 16-digit string, followed by the [*] key. [INSTALLER CODE] [*] [1] [7] [4] [*] [PARTITI NO.] [*] [ALARM TIME OUT] [*] The valid data range is: 01 23, with 00 to disable. Partition no. is: 1-8. Refer to section Using Sub-locations to see how to scroll from one sub-location to another using the [*] key. If this location is disabled, then by default, locations 175 and 176 will also be disabled. This means that even if you put values into locations 175 and 176, no movement medical alarm will not commence. LOCATI 175 No Movement Medical Alarm Start (default = 0100) The start time can be set for when you know that the person will be awake and active. Program the start time to start checking for movement. For example, you expect a person to be awake at 6 am, program the start time to be 06:00. Enter 4-digit time [HHMM] for each of the 8 partitions and program as a 32-digit string, followed by the [*] key. [INSTALLER CODE] [*] [1] [7] [5] [*] [PARTITI NO.] [*] [HHMM] [*] The valid data range: 00h00m 23h59m. Partition no. is: 1-8. Refer to section Using Sub-locations to see how to scroll from one sub-location to another using the [*] key. 46
47 LOCATI 176 No Movement Medical Alarm End (default = 0100) Program the end time to stop checking for movement. For example, using 06:00 programmed into location 175 and if 2 hours is needed, then program 08:00. Enter a 4-digit time [HHMM] for each of the 8 partitions and program as a 32-digit string, followed by the [*] key. [INSTALLER CODE] [*] [1] [7] [6] [*] [PARTITI NO.] [*] [HHMM] [*] The valid data range: 00h00m 23h59m. Partition no. is: 1-8. Refer to section Using Sub-locations to see how to scroll from one sub-location to another using the [*] key. 9.9 Auto Arm - Advanced LOCATI 180 Auto Arm Time (default = 2400) This location sets the time at which a particular partition will auto arm. To disable this location, enter 2400 as the time. EXAMPLE: To auto arm at 11:35 pm, enter All four digits must be entered, including any leading zeros (0100 for 1 am). Enter a 4-digit time for each of the 8 partitions and program as a 32-digit string, followed by the [*] key. [INSTALLER CODE] [*] [1] [8] [0] [*] [PARTITI NO.] [*] [HHMM] [*] The valid data range is: 00h00m 23h59m, with 24h00m to disable. Partition no. is: 1-8. Refer to section Using Sub-locations to see how to scroll from one sub-location to another using the [*] key. LOCATIS Auto Arm/Disarm Days (default = all ) These bitmapped locations set the days on which the selected partition will auto arm and disarm at the times programmed in locations 180 and 189 respectively. Refer to Table 23 for the data you can input. Each location represents a partition: Location 181 is partition 1 Location 182 is partition 2 Location 183 is partition 3 Location 184 is partition 4 Location 185 is partition 5 Location 186 is partition 6 Location 187 is partition 7 Location 188 is partition 8 47
48 Table 23: Arm/ Disarm Days Data LED ARM Days of the Week LED DISARM Days of the Week 1 Monday 9 Monday 2 Tuesday 10 Tuesday 3 Wednesday 11 Wednesday 4 Thursday 12 Thursday 5 Friday 13 Friday 6 Saturday 14 Saturday 7 Sunday 15 Sunday All (Arm Day Disabled) All (Disarm Day Disabled) Select the days to ARM (LEDs 1-7) and DISARM (LEDs 9-15) by toggling them on/off. The valid data range is: 1 7, and If no zone number LEDs are lit then it means it is disabled. LOCATI 189 Auto Disarm Time (default = 2400) This location sets the time at which a particular partition will auto disarm. To disable this location, enter 2400 as the time. EXAMPLE: To auto disarm at 06:00 am, enter All four digits must be entered, including any leading zeros (0100 for 1 am). Enter a 4-digit time for each of the 8 partitions and program as a 32-digit string, followed by the [*] key. [INSTALLER CODE] [*] [1] [8] [9] [*] [PARTITI NO.] [*] [HHMM] [*] The valid data range is: 00h00m 23h59m, with 24h00m to disable. Partition no. is: 1-8. Refer to section Using Sub-locations to see how to scroll from one sub-location to another using the [*] key. For this auto disarm to be active; partition option 15 must be enabled in locations and the appropriate disarm days) selected in locations LOCATI 190 Auto Arm Delay (default = 0200 i.e. 2 minutes) This location sets the delay period for the keypad buzzer warning, which is initiated before the panel auto arms. At the completion of the Auto Arm Delay, the panel will arm. A valid user code entered during the delay period will cancel the auto arming. [*] key. Enter a 4-digit time for each of the 8 partitions and program as a 32-digit string, followed by the 48 [INSTALLER CODE] [*] [1] [9] [0] [*] [PARTITI NO.] [*] [MMSS] [*] The valid data range is: 00m01s 59m59s. Partition no. is: 1-8.
49 Refer to section Using Sub-locations to see how to scroll from one sub-location to another using the [*] key Security Codes LOCATI 197 Installer Code (default = 9999) This location is used to change the installer code to a code that is more preferable. [INSTALLER CODE] [*] [1] [9] [7] [*] [NEW INSTALLER CODE] [*] Refer to section 8.2 Programming Standard Locations to see how to scroll through data in a location using the [*] key. Refer to location 23 to set the number of digits in the installer code. LOCATI 198 Download Code (default = 9999) This location is used to change the download code to a code that is more preferable. The download code (in conjunction with the installer code) is required for download access to the Alarm Panel. A value of [10] programmed into location 34 will prevent the download code from being defaulted when performing a hardware default. [INSTALLER CODE] [*] [1] [9] [8] [*] [NEW DOWNLOAD CODE] [*] If the panel is defaulted, the download code will revert to The download code is 4-digits in length. LOCATI 199 Maintenance Code (default = 8888) Users can be given limited access to installer mode by entering the maintenance code programmed in this location. Panel functions that can be edited in maintenance mode are: Siren time Siren delay Keypad lockout count Keypad sleep delay All daylight savings settings All partition auto arm settings All no zone activity auto arm settings All no zone activity alarm settings [INSTALLER CODE] [*] [1] [9] [9] [*] [NEW MAINTENACE CODE] [*] Refer to location 23 to set the number of digits in the maintenance code. 49
50 9.11 Partition Options LOCATIS Partition Zone Allocation Program these locations to allocate zones to each of the 8 partitions. Lit zone number LEDs represent the zones allocated to the selected partition. The zones are displayed as 4 pages of 16 zones each as per Table 24. To scroll to the next page of 16 zones, press the [*] key. Zones are common, which means that one zone can be allocated to more than one partition. The keypad start zone in location 241 needs to be programmed for keypads displaying zone numbers higher than 16. Each location represents a partition number: Location 201 is partition 1 Location 202 is partition 2 Location 203 is partition 3 Location 204 is partition 4 Location 205 is partition 5 Location 206 is partition 6 Location 207 is partition 7 Location 208 is partition 8 Figure 3 and Figure 4 show the order in which the LEDs display to show you which zones you are viewing as per Table 24. Figure 3: Paging Indication on the Classic Keypad Figure 4: Paging Indication on the Curved Keypad Table 24: Zones per Partition Page Page LED READY ARM AWAY POWER Zones
51 LOCATIS Partition Arm Options (Partitions 1 8) These locations are used to configure arm options for each partition. Refer to Table 25 for the values that can be selected. Each location represents a partition: Location 211 is partition 1 Location 212 is partition 2 Location 213 is partition 3 Location 214 is partition 4 Location 215 is partition 5 Location 216 is partition 6 Location 217 is partition 7 Location 218 is partition 8 (This is an advanced location). Quick Arm: This option allows the user to arm the panel by holding down the [1] key for three seconds. The keypad will beep once to indicate that the arm sequence has begun. Force Arm: With this option enabled, the panel will arm with violated zones e.g. an open window. This forces any violated zones to be temporarily bypassed when the panel arms. If such bypassed zones restore during the arm cycle (the window is closed, for example), the zone is automatically re-activated (un-bypassed) and a subsequent violation will trigger an alarm. Siren Toot on Away Arm / Disarm: This option allows the user an audible confirmation that arming or disarming of the panel has occurred. The siren is programmed to give a short beep after successful arming, and two short beeps after disarming. This is useful when used in conjunction with remote or key-switch arming/disarming. Engineer Reset: Enabling this option will prevent the panel from being rearmed after an alarm condition has occurred. In order to re-arm the panel, the installer will be required to enter a valid installer code. If option 7 is set in location 16, an engineer reset trouble condition will also be displayed on the keypad. 51
52 Table 25: Partition Arm Options Data LED On / Off Action Enable Instant Arm Disable Instant Arm Enable Instant Key-switch Arm Disable Instant Key-switch Arm Enable Quick Away Arm Key Disable Quick Away Arm Key Enable Quick Stay Arm Key Disable Quick Stay Arm Key Enable Auto Stay Arm if No Exit Zone is Triggered* Disable Auto Stay Arm if No Exit Zone is Triggered* Enable Auto Stay Arm if No Exit Zone is Triggered When Arming with a Keyswitch* Disable Auto Stay Arm if No Exit Zone is Triggered When Arming with a Key-switch * Enable Forced Arm Disable Forced Arm Enable Zone Bypassing Disable Zone Bypassing Enable Arm with Zones in the Entry Route Violated Disable Arm with Zones in the Entry Route Violated Enable Siren Toot on Arm Disable Siren Toot on Arm Enable Siren Toot on Disarm Disable Siren Toot on Disarm Enable the Entry Beep Disable the Entry Beep Enable the Exit Beep Disable the Exit Beep Enable Engineer's Reset Disable Engineer's Reset Enable Auto Disarm Disable Auto Disarm Default values are shaded * For option 5 or 6 to work, option 2 needs to be disabled. 52
53 LOCATIS Extra Partition Options (Partitions 1-8) These locations are used to configure extended options for each partition. Refer to Table 26 for the values that can be selected. Each location represents a partition: Location 221 is partition 1 Location 222 is partition 2 Location 223 is partition 3 Location 224 is partition 4 Location 225 is partition 5 Location 226 is partition 6 Location 227 is partition 7 Location 228 is partition 8 (This is an advanced location). Table 26: Extended Partition Options Data LED On/ Off Action Enable Automatic Re-enabling of Shutdown Zones at the Time of the Dialler test 1 Disable Automatic Re-enabling of Shutdown Zones at the Time of the Dialler test Enable Bypassing of Common Zones Disable Bypassing of Common Zones Enable Delay Before Communications Disable Delay Before Communications Enable Keypad Lockout Disable Keypad Lockout Enable Silent Keypad Panic Disable Silent Keypad Panic Default values are shaded 9.12 Delays LOCATI 230 Exit Delay Period (default = 0030) The exit delay period is the amount of time between arming the panel and successfully exiting the premises without violating Entry/Exit and Follower zones. The exit delay will begin after the system is armed by either: Entering a valid user code Pressing the [1] key and holding it down until the system is armed Pressing the [6] key and holding it down until the system is armed Enter a 4-digit exit delay period for each of the 8 partitions and program as a 32-digit string, followed by the [*] key. [INSTALLER CODE] [*] [2] [3] [0] [*] [PARTITI NO.] [*] [MMSS] [*] 53
54 The valid data range is: 00m00s 59m59s. Partition no. is: 1-8. Refer to section Using Sub-locations to see how to scroll from one sub-location to another using the [*] key. LOCATI 231 Primary Entry Delay Period (default = 0030) The primary entry delay begins after the violation of a Primary Entry/Exit zone. During this delay, it is permissible to violate Follower zones without causing an alarm condition if an Entry/Exit zone was violated first. If a Follower zone is violated without a prior Entry/Exit zone violation, it will be treated as an Instant zone. If an Instant zone is violated during this period, an alarm condition will immediately be registered. Enter a 4-digit entry delay period for each of the 8 partitions and program as a 32-digit string, followed by the [*] key. [INSTALLER CODE] [*] [2] [3] [1] [*] [PARTITI NO.] [*] [MMSS] [*] The valid data range is: 00m00s 59m59s. Partition no. is: 1-8. Refer to section Using Sub-locations to see how to scroll from one sub-location to another using the [*] key. LOCATI 232 Secondary Entry Delay Period (default = 0030) The secondary entry delay begins after the violation of a Secondary Entry/Exit zone. During this delay, it is permissible to violate Follower zones without causing an alarm condition if an Entry/Exit zone was violated first. Enter a 4-digit entry delay period for each of the 8 partitions and program as a 32-digit string, followed by the [*] key. [INSTALLER CODE] [*] [2] [3] [2] [*] [PARTITI NO.] [*] [MMSS] [*] The valid data range is: 00m00s 59m59s. Partition no. is: 1-8. Refer to section Using Sub-locations to see how to scroll from one sub-location to another using the [*] key Options to Configure Keypads LOCATI 240 Keypad Partition (default = Partition 1) Program this location to allocate each keypad to a partition. Enter the partition number to which each keypad, with an ID 1-8, must be allocated. To view the ID of a keypad refer to location 243. key. 54 Enter 1 digit for each of the 8 keypads and program as an 8-digit string, followed by the [*]
55 [INSTALLER CODE] [*] [2] [4] [0] [*] [KEYPAD NO.] [*] [PARTITI NO.] [*] The valid data range is: 1 8. Partition no. is: 1-8. Refer to section Using Sub-locations to see how to scroll from one sub-location to another using the [*] key. LOCATI 241 Keypad Display Start Zone (default = Zone 1) The zones which a particular LED keypad displays is determined by programming the keypad start zone location. The number programmed into this location is the zone which will be assigned to LED 1 on the keypad. The keypad will display subsequent zones in order. The keypad will only display zones belonging to its partition. Enter a 2-digit display start zone (01 64) for each of the 8 keypads and program as a 16- digit string, followed by the [*] key. [INSTALLER CODE] [*] [2] [4] [1] [*] [KEYPAD NO.] [*] [START ZE] [*] The valid data range is: Refer to section Using Sub-locations to see how to scroll from one sub-location to another using the [*] key. This only applies to LED keypads and not LCD keypads. LOCATI 242 Keypad Zone Number (default = 0 i.e. Disabled) A keypad zone must be allocated to any zone number (1 64), before it can be used. The corresponding zone type must be programmed in locations 1 8 and the properties configured in locations If you configure a keypad to a zone number that is already a wired zone, then the keypad will take priority on the zone number. Enter a 2-digit zone number (01 64) for each of the 8 keypads and program as a 16-digit string, followed by the [*] key. [INSTALLER CODE] [*] [2] [4] [2] [*] [KEYPAD NO.] [*] [ZE NO.] [*] The valid data range: Refer to section Using Sub-locations to see how to scroll from one sub-location to another using the [*] key. LOCATI 243 View Keypad ID View the data in this location to determine the Keypad ID (1 8). [INSTALLER CODE] [*] [2] [4] [3] [*] This is a read-only location and no data no can be changed. 55
56 LOCATIS Keypad Options These locations are used to configure options for a keypad. Refer to Table 27 for the available options. Each location represents a keypad: Location 251 is keypad 1 Location 252 is keypad 2 Location 253 is keypad 3 Location 254 is keypad 4 Location 255 is keypad 5 Location 256 is keypad 6 Location 257 is keypad 7 Location 258 is keypad 8 (This is an advanced location). Table 27: Keypad Options Data LED On / Off Action The keypad will timeout back to its default partition after it has been used to view another partition 1 The keypad will not timeout and will continue to show current partition information 2 Keypad sleep mode enabled Keypad sleep mode disabled 3 Enable Global Keypad Status Disable Global Keypad Status Default values are shaded LED 3 must be in order for LED 1 to have any effect. The Global Keypad Status will allow sixteen zones to be displayed regardless of the partition to which either the keypad or zones are assigned. On a LED keypad from the keypad start zone number plus 16 zones. On a LCD keypad from the keypad start zone number up to 64 zones. 56
57 9.14 Reporting Codes - Advanced This section describes how to configure custom reporting codes if the format of said reporting code is not Contact ID o r SIA Global Reporting Codes LOCATI 300 Global Reporting Code 1 This location is used to configure global reporting codes to be used in the event that neither Contact ID nor SIA formats are used. These codes will be used for any of the other formats selected in section 9.5 Communications Setup - Advanced have been selected. Sub-location 1 is AC Fail The Alarm Panel will transmit this code in the event of an AC failure but only after the AC failure delay time has elapsed (location 15). Option 1 in Table 41 needs to be enabled. Sub-location 2 is AC Restore The Alarm Panel will transmit this code once the AC restore delay time has elapsed (location 15). It will however only be reported if an AC failure was registered. Option 4 in Table 42 needs to be enabled. Sub-location 3 is Low Battery Monitor Fail A low battery condition is reported when the battery voltage drops below 11V for a period longer than 5 minutes or immediately if it drops below 10V. Option 5 in Table 41 needs to be enabled. Sub-location 4 is Low Battery Monitor Restore This code is reported once the battery voltage rises above 12V for a period of five minutes. Option 8 in Table 42 needs to be enabled. Sub-location 5 is Auto Test This code is reported at regular intervals (location 32). Option 8 in Table 43 needs to be enabled. Sub-location 6 is Download This code is reported once successful access to the panel has been obtained. Option 1 in Table 44 needs to be enabled. Sub-location 7 is Siren Monitor Fail This code is reported when the siren fuse blows or when the siren or siren wiring is tampered with. Option 4 in Table 41 needs to be enabled. Sub-location 8 is Aux 12V Monitor Fail This code is reported when there is a problem with the Aux 12V. Option 6 in Table 41 needs to be enabled. Enter a 2-digit reporting code for each of the 8 sub-locations and program as a 16-digit string, followed by the [*] key. [INSTALLER CODE] [*] [3] [0] [0] [*] [SUB-LOCATI] [*] [REPORTING CODE] [*] The valid data range is: 01-FF, with 00 to disable. If any of the sub-locations are disabled here, then the reporting codes will not report even if they are enabled at 9.16 Event Reporting Options - Advanced. Refer to section Using Sub-locations to see how to scroll from one sub-location to another using the [*] key. 57
58 The values are hexadecimal. Refer to Table 3 on how to program hexadecimal values. LOCATI 301 Global Reporting Code 2 This location is used to configure global reporting codes to be used in the event that Neither Contact ID or SIA formats are used. These codes will be used when any of the other formats in section 9.5 Communications Setup - Advanced have been selected. Sub-location 1 is Reserved This sub-location is reserved. Sub-location 2 is Bus-wired Peripheral Tamper This code is reported when there is a tamper condition on any external device attached to the keypad bus. Option 1 in Table 42 needs to be enabled. Sub-location 3 is Bus-wired Peripheral Fail This code is reported when any external device attached to the keypad bus goes missing. Option 2 in Table 42 needs to be enabled. Sub-location 4 is Box Tamper This code is reported when the box tamper contacts are open for a period exceeding 200 ms. Option 8 in Table 41 needs to be enabled. Sub-location 5 is Dedicated Panic This code is reported when the dedicated panic zone is violated. Option 7 in Table 43 needs to be enabled. Sub-location 6 is Reserved This sub-location is reserved. Sub-location 7 is Telephone Line Tamper If telephone line monitoring is enabled (location 14), this code is reported if there is a tamper on the telephone line. Option 3 in Table 41 needs to be enabled. Sub-location 8 is Telephone Line Restore If telephone line monitoring is enabled (location 14), this code is reported once the telephone line integrity has been restored. Option 6 in Table 42 needs to be enabled. Enter a 2-digit reporting code for each of the 8 sub-locations and program as a 16-digit string, followed by the [*] key. When programming using the string method, reserved sub-locations will still need data to be inputted into them to maintain the 16-digits needed to successfully program. Inputting data into a reserved sublocation will not affect the value of the sub-location. Reserved sub-locations have a value of 00. [INSTALLER CODE] [*] [3] [0] [1] [*] [SUB-LOCATI] [*] [REPORTING CODE] [*] The valid data range is: 01-FF, with 00 to disable. If any of the sub-locations are disabled here, then the reporting codes will not report even if they are enabled at 9.16 Event Reporting Options - Advanced. Refer to section Using Sub-locations to see how to scroll from one sub-location to another using the [*] key. The values are hexadecimal. Refer to Table 3 on how to program hexadecimal values. 58
59 LOCATI 303 Global Reporting Code 4 This location is used to configure global reporting codes to be used in the event that Neither Contact ID or SIA formats are used. These codes will be used when any of the other formats in section 9.5 Communications Setup - Advanced have been selected. Sub-location 1 is Wired Zone Expander Low Power Supply Monitoring This code is reported when a wired zone expander experiences a low power supply. Sub-location 2 is Wired Zone Expander Low Power Supply Restore This code is reported when a wired zone expander recovers from a low power supply. Sub-location 3 is Reserved This sub-location is reserved. Sub-location 4 is Reserved This sub-location is reserved. Sub-location 5 is Reserved This sub-location is reserved. Sub-location 6 is Reserved This sub-location is reserved. Sub-location 7 is Reserved This sub-location is reserved. Sub-location 8 is Reserved This sub-location is reserved. Enter a 2-digit reporting code for each of the 8 sub-locations and program as a 16-digit string, followed by the [*] key. When programming using the string method, reserved sub-locations will still need data to be inputted into them to maintain the 16-digits needed to successfully program. Inputting data into a reserved sublocation will not affect the value of the sub-location. Reserved sub-locations have a value of 00. [INSTALLER CODE] [*] [3] [0] [3] [*] [SUB-LOCATI] [*] [REPORTING CODE] [*] The valid data range is: 01-FF, with 00 to disable. If any of the sub-locations are disabled here, then the reporting codes will not report even if they are enabled at 9.16 Event Reporting Options - Advanced. Refer to section Using Sub-locations to see how to scroll from one sub-location to another using the [*] key. The values are hexadecimal. Refer to Table 3 on how to program hexadecimal values Zone Reporting Codes LOCATIS Zone Alarm Reporting Code The 2-digit zone alarm code is reported when the zone is violated during an arm cycle or if a Panic or 24- Hour zone is violated. Option 1 in Table 40 needs to be enabled. Each location represents a set of 16 zones: Location 304 is zones 1-16 Location 305 is zones Location 306 is zones Location 307 is zones
60 Enter a 2-digit reporting code for each of the 16 zones and program as a 32-digit string, followed by the [*] key. [INSTALLER CODE] [*] [LOCATI] [*] [ZE NO.] [*] [REPORTING CODE] [*] The valid data range is: 01-FF, with 00 to disable. If any of the sub-locations are disabled here, then the reporting codes will not report even if they are enabled at 9.16 Event Reporting Options - Advanced. Refer to section Using Sub-locations to see how to scroll from one sub-location to another using the [*] key. The values are hexadecimal. Refer to Table 3 on how to program hexadecimal values. LOCATIS Zone Alarm Restoral Reporting Code The 2-digit zone restoral code is reported when the zone has returned to the unviolated condition after triggering an alarm. Option 2 in Table 40 needs to be enabled. Each location represents a set of 16 zones: Location 308 is zones 1-16 Location 309 is zones Location 310 is zones Location 311 is zones Enter a 2-digit reporting code for each of the 16 zones and program as a 32-digit string, followed by the [*] key. [INSTALLER CODE] [*] [LOCATI] [*] [ZE NO.] [*] [REPORTING CODE] [*] The valid data range is: 01-FF, with 00 to disable. If any of the sub-locations are disabled here, then the reporting codes will not report even if they are enabled at 9.16 Event Reporting Options - Advanced. Refer to section Using Sub-locations to see how to scroll from one sub-location to another using the [*] key. The values are hexadecimal. Refer to Table 3 on how to program hexadecimal values. LOCATIS Zone Tamper Reporting Code The 2-digit tamper code is reported if tamper by zone has been enabled and a zone tamper occurs. Option 5 in Table 40 needs to be enabled. Each location represents a set of 16 zones: Location 312 is zones 1-16 Location 313 is zones Location 314 is zones Location 315 is zones Enter a 2-digit reporting code for each of the 16 zones and program as a 32-digit string, followed by the [*] key. 60
61 [INSTALLER CODE] [*] [LOCATI] [*] [ZE NO.] [*] [REPORTING CODE] [*] Section: 9 The valid data range is: 01-FF, with 00 to disable. If any of the sub-locations are disabled here, then the reporting codes will not report even if they are enabled at 9.16 Event Reporting Options - Advanced. Refer to section Using Sub-locations to see how to scroll from one sub-location to another using the [*] key. The values are hexadecimal. Refer to Table 3 on how to program hexadecimal values. LOCATIS Zone Tamper Restore Reporting Code The 2-digit tamper restore code is reported when a zone tamper has been cleared. Option 6 in Table 40 needs to be enabled. Each location represents a set of 16 zones: Location 316 is zones 1-16 Location 317 is zones Location 318 is zones Location 319 is zones Enter a 2-digit reporting code for each of the 16 zones and program as a 32-digit string, followed by the [*] key. [INSTALLER CODE] [*] [LOCATI] [*] [ZE NO.] [*] [REPORTING CODE] [*] The valid data range is: 01-FF, with 00 to disable. If any of the sub-locations are disabled here, then the reporting codes will not report even if they are enabled at 9.16 Event Reporting Options - Advanced. Refer to section Using Sub-locations to see how to scroll from one sub-location to another using the [*] key. The values are hexadecimal. Refer to Table 3 on how to program hexadecimal values. LOCATIS Zone Bypass Reporting Code The 2-digit zone bypass code is reported when a zone has been bypassed while the panel is armed. Option 3 in Table 40 needs to be enabled. Each location represents a set of 16 zones: Location 320 is zones 1-16 Location 321 is zones Location 322 is zones Location 323 is zones Enter a 2-digit reporting code for each of the 16 zones and program as a 32-digit string, followed by the [*] key. [INSTALLER CODE] [*] [LOCATI] [*] [ZE NO.] [*] [REPORTING CODE] [*] The valid data range is: 01-FF, with 00 to disable. 61
62 If any of the sub-locations are disabled here, then the reporting codes will not report even if they are enabled at 9.16 Event Reporting Options - Advanced. Refer to section Using Sub-locations to see how to scroll from one sub-location to another using the [*] key. The values are hexadecimal. Refer to Table 3 on how to program hexadecimal values. LOCATIS Zone Force Arm Reporting Code The 2-digit force zone arm code is transmitted if a partition is programmed to allow forced arming (arming with a violated zone) and a zone is violated at the time of arming. Option 4 in Table 40 needs to be enabled. Each location represents a set of 16 zones: Location 324 is zones 1-16 Location 325 is zones Location 326 is zones Location 327 is zones Enter a 2-digit reporting code for each of the 16 zones and program as a 32-digit string, followed by the [*] key. [INSTALLER CODE] [*] [LOCATI] [*] [ZE NO.] [*] [REPORTING CODE] [*] The valid data range is: 01-FF, with 00 to disable. If any of the sub-locations are disabled here, then the reporting codes will not report even if they are enabled at 9.16 Event Reporting Options - Advanced. Refer to section Using Sub-locations to see how to scroll from one sub-location to another using the [*] key. The values are hexadecimal. Refer to Table 3 on how to program hexadecimal values. LOCATIS Zone Swinger Shutdown Reporting Code The 2-digit swinger shutdown zone code is reported if the system is armed and a zone is automatically bypassed as a result of multiple violations of that zone. Option 7in Table 40 needs to be enabled. Each location represents a set of 16 zones: Location 328 is zones 1-16 Location 329 is zones Location 330 is zones Location 331 is zones Enter a 2-digit reporting code for each of the 16 zones and program as a 32-digit string, followed by the [*] key. [INSTALLER CODE] [*] [LOCATI] [*] [ZE NO.] [*] [REPORTING CODE] [*] The valid data range is: 01-FF, with 00 to disable. If any of the sub-locations are disabled here, then the reporting codes will not report even if they are enabled at 9.16 Event Reporting Options - Advanced. 62
63 Refer to section Using Sub-locations to see how to scroll from one sub-location to another using the [*] key. The values are hexadecimal. Refer to Table 3 on how to program hexadecimal values. LOCATIS Zone Swinger Shutdown Restore Reporting Code The 2-digit zone swinger shutdown restore code is reported when a swinger shutdown zone is automatically restored i.e. un-bypassed. Option 8 in Table 40 needs to be enabled. Each location represents a set of 16 zones: Location 332 is zones 1-16 Location 333 is zones Location 334 is zones Location 335 is zones Enter a 2-digit reporting code for each of the 16 zones and program as a 32-digit string, followed by the [*] key. [INSTALLER CODE] [*] [LOCATI] [*] [ZE NO.] [*] [REPORTING CODE] [*] The valid data range is: 01-FF, with 00 to disable. If any of the sub-locations are disabled here, then the reporting codes will not report even if they are enabled at 9.16 Event Reporting Options - Advanced. Refer to section Using Sub-locations to see how to scroll from one sub-location to another using the [*] key. The values are hexadecimal. Refer to Table 3 on how to program hexadecimal values Partition Reporting Codes LOCATI 336 Duress Reporting Code The 2-digit duress code is reported when a duress code is entered into any keypad belonging to the specified partition. Option 1 in Table 45 needs to be enabled. Enter a 2-digit reporting code for each of the 8 partitions and program as a 16-digit string, followed by the [*] key. [INSTALLER CODE] [*] [3] [3] [6] [*] [PARTITI NO.] [*] [REPORTING CODE] [*] The valid data range is: 01-FF, with 00 to disable. If any of the sub-locations are disabled here, then the reporting codes will not report even if they are enabled at 9.16 Event Reporting Options - Advanced. Partition no. is: 1-8. Refer to section Using Sub-locations to see how to scroll from one sub-location to another using the [*] key. The values are hexadecimal. Refer to Table 3 on how to program hexadecimal values. 63
64 LOCATI 337 Keypad Panic Reporting Code This location is configured per partition. This 2-digit code is reported when the [P] key on any keypad belonging to the specified partition is held down for two seconds. Option 2 in Table 45 needs to be enabled. Enter a 2-digit reporting code for each of the 8 partitions and program as a 16-digit string, followed by the [*] key. [INSTALLER CODE] [*] [3] [3] [7] [*] [PARTITI NO.] [*] [REPORTING CODE] [*] The valid data range is: 01-FF, with 00 to disable. If any of the sub-locations are disabled here, then the reporting codes will not report even if they are enabled at 9.16 Event Reporting Options - Advanced. Partition no. is: 1-8. Refer to section Using Sub-locations to see how to scroll from one sub-location to another using the [*] key. The values are hexadecimal. Refer to Table 3 on how to program hexadecimal values. LOCATI 338 Fire Reporting Code The 2-digit fire code is reported when the [F] key on any keypad belonging to the specified partition is held down for two seconds. Option 3 in Table 45 needs to be enabled. Enter a 2-digit reporting code for each of the 8 partitions and program as a 16-digit string, followed by the [*] key. [INSTALLER CODE] [*] [3] [3] [8] [*] [PARTITI NO.] [*] [REPORTING CODE] [*] The valid data range is: 01-FF, with 00 to disable. If any of the sub-locations are disabled here, then the reporting codes will not report even if they are enabled at 9.16 Event Reporting Options - Advanced. Partition no. is: 1-8. Refer to section Using Sub-locations to see how to scroll from one sub-location to another using the [*] key. The values are hexadecimal. Refer to Table 3 on how to program hexadecimal values. LOCATI 339 Medical Reporting Code The 2-digit medical code is reported when the [M] key on any keypad belonging to the specified partition is held down for two seconds. Option 4 in Table 45 needs to be enabled. Enter a 2-digit reporting code for each of the 8 partitions and program as a 16-digit string, followed by the [*] key. [INSTALLER CODE] [*] [3] [3] [9] [*] [PARTITI NO.] [*] [REPORTING CODE] [*] The valid data range is: 01-FF, with 00 to disable. 64
65 If any of the sub-locations are disabled here, then the reporting codes will not report even if they are enabled at 9.16 Event Reporting Options - Advanced. Partition no. is: 1-8. Refer to section Using Sub-locations to see how to scroll from one sub-location to another using the [*] key. The values are hexadecimal. Refer to Table 3 on how to program hexadecimal values. LOCATI 340 Keypad Lockout Reporting Code The 2-digit keypad lockout code is reported when a keypad lockout condition occurs on any keypad belonging to the specified partition. Option 5 in Table 45 needs to be enabled. Enter a 2-digit reporting code for each of the 8 partitions and program as a 16-digit string, followed by the [*] key. [INSTALLER CODE] [*] [3] [4] [0] [*] [PARTITI NO.] [*] [REPORTING CODE] [*] The valid data range is: 01-FF, with 00 to disable. If any of the sub-locations are disabled here, then the reporting codes will not report even if they are enabled at 9.16 Event Reporting Options - Advanced. Partition no. is: 1-8. Refer to section Using Sub-locations to see how to scroll from one sub-location to another using the [*] key. The values are hexadecimal. Refer to Table 3 on how to program hexadecimal values User Reporting Codes LOCATIS Close Reporting Code The 2-digit close code is reported when the panel is AWAY ARMED. This location is configured per user. Refer to the User Manual where option 1 of User Reporting Codes Enabled, needs to be enabled. Each location represents a set of 16 users: Location 342 represents users 1-16 Location 343 represents users Location 344 represents users Location 345 represents users Location 346 represents users Location 347 represents users Location 348 represents users Location 349 represents users Enter a 2-digit reporting code for each of the 16 users and program as a 32-digit string, followed by the [*] key. [INSTALLER CODE] [*] [LOCATI] [*] [USER] [*] [REPORTING CODE] [*] The valid data range is: 01-FF, with 00 to disable. 65
66 If any of the sub-locations are disabled here, then the reporting codes will not report even if they are enabled at 9.16 Event Reporting Options - Advanced. Refer to section Using Sub-locations to see how to scroll from one sub-location to another using the [*] key. The values are hexadecimal. Refer to Table 3 on how to program hexadecimal values. LOCATIS Stay Close Reporting Code The 2-digit stay close code is reported when the panel is STAY ARMED. This location is configured per user. Refer to the User Manual where option 2 of User Reporting Codes Enabled, needs to be enabled. Each location represents a set of 16 users: Location 350 represents users 1-16 Location 351 represents users Location 352 represents users Location 353 represents users Location 354 represents users Location 355 represents users Location 356 represents users Location 357 represents users Enter a 2-digit reporting code for each of the 16 users and program as a 32-digit string, followed by the [*] key. [INSTALLER CODE] [*] [LOCATI] [*] [USER] [*] [REPORTING CODE] [*] The valid data range is: 01-FF, with 00 to disable. If any of the sub-locations are disabled here, then the reporting codes will not report even if they are enabled at 9.16 Event Reporting Options - Advanced. Refer to section Using Sub-locations to see how to scroll from one sub-location to another using the [*] key. The values are hexadecimal. Refer to Table 3 on how to program hexadecimal values. LOCATIS Open Reporting Code The 2-digit open code is reported when the panel is DISARMED. This location is configured per user. Refer to the User Manual where option 3 of User Reporting Codes Enabled, needs to be enabled. Each location represents a set of 16 users: Location 358 represents users 1-16 Location 359 represents users Location 360 represents users Location 361 represents users Location 362 represents users Location 363 represents users Location 364 represents users Location 365 represents users Enter a 2-digit reporting code for each of the 16 users and program as a 32-digit string, followed by the [*] key. 66
67 [INSTALLER CODE] [*] [LOCATI] [*] [USER] [*] [REPORTING CODE] [*] The valid data range is: 01-FF, with 00 to disable. If any of the sub-locations are disabled here, then the reporting codes will not report even if they are enabled at 9.16 Event Reporting Options - Advanced. Refer to section Using Sub-locations to see how to scroll from one sub-location to another using the [*] key. The values are hexadecimal. Refer to Table 3 on how to program hexadecimal values. LOCATIS Siren Cancel Reporting Codes The 2-digit siren cancel code is reported when the siren is CANCELLED. This location is configured per user. Refer to the User Manual where option 4 of User Reporting Codes Enabled, needs to be enabled. Each location represents a set of 16 users: Location 366 represents users 1-16 Location 367 represents users Location 368 represents users Location 369 represents users Location 370 represents users Location 371 represents users Location 372 represents users Location 373 represents users Enter a 2-digit reporting code for each of the 16 users and program as a 32-digit string, followed by the [*] key. [INSTALLER CODE] [*] [LOCATI] [*] [USER] [*] [REPORTING CODE] [*] The valid data range is: 01-FF, with 00 to disable. If any of the sub-locations are disabled here, then the reporting codes will not report even if they are enabled at 9.16 Event Reporting Options - Advanced. Refer to section Using Sub-locations to see how to scroll from one sub-location to another using the [*] key. The values are hexadecimal. Refer to Table 3 on how to program hexadecimal values. Cancelling a Silent Alarm or Silent Panic will not cause the cancel siren code to be reported Programmable Outputs Output Disarm Clear LOCATI 380 Clear Programmable Onboard Outputs on Disarming This bitmapped location allows onboard programmable outputs 1-5 to be cleared (set low) on disarming. The output/s to be cleared will be displayed by zone number LEDs. The programmable outputs will clear when ANY partition is disarmed. Refer to Table 28 to view which zone number LED corresponds to which onboard output. 67
68 Regardless of which partition they are allocated to, disarming any partition will clear these outputs. Table 28: Clear Programmable Onboard Outputs Data LED Disarm Clear Output 1 Output 1 2 Output 2 3 Output 3 4 Output 4 5 Output 5 LOCATIS Clear Programmable Zone Expander Outputs on Disarming This bitmapped location allows the 2 outputs of the 6 zone expanders to be cleared (set low) on disarming. The output(s) to be cleared will be displayed by zone number LEDs. The programmable outputs will clear when ANY partition is disarmed. Refer to Table 29 to view which zone number LED corresponds to which zone expander output. Each location represents a zone expander: Location 381 represents zone expander 1 Location 382 represents zone expander 2 Location 383 represents zone expander 3 Location 384 represents zone expander 4 Location 385 represents zone expander 5 Location 386 represents zone expander 6 Table 29: Clear Programmable Zone Expander Outputs Data LED Output 1 Output 1 2 Output 2 LOCATI 389 Clear Programmable Keypad Outputs on Disarming This bitmapped location allows the single outputs of the 8 keypads to be cleared (set low) on disarming. The output/s to be cleared will be displayed by zone number LEDs. The programmable outputs will clear when ANY partition is disarmed. Refer to Table 30 to view which zone number LED corresponds to which keypad output. Table 30: Clear Programmable Keypad Outputs Data LED Output 1 Keypad 1 2 Keypad 2 3 Keypad 3 4 Keypad 4 5 Keypad 5 6 Keypad 6 7 Keypad 7 8 Keypad 8 68
69 Partition Event Driven Outputs - Advanced The following locations determine allow you to assign outputs and output actions to partition events for each partition. LOCATIS Partition Programmable Output Events These locations allow you to configure various programmable output events per partition. See locations , Global Programmable Output Events for details on programming the programmable output events. Table 31 and Table 32 summarise the partition specific events that can be assigned to the outputs. Only one output and action can be assigned per partition, unless otherwise stated.the maximum current available from a programmable output is 25mA. For zone and keypad events, any zone or keypad assigned to a particular partition being programmed will trigger an output if that event occurs. On an LED keypad, LEDs 1-8 represent the output number, and LEDs 9-16 represent the action. Table 31: Partition Programmable Output Events for Locations Loc Partition P1 P2 P3 P4 P5 P6 P7 P8 390 Close Programmable Output Event Stay Close Programmable Output Event Open Programmable Output Event Cancel Programmable Output Event Alarm Restoral Programmable Output Event Bypass Programmable Output Event Forced Arm Programmable Output Event Zone Tamper Programmable Output Event Zone Tamper Restoral Programmable Output Event Zone Shutdown Programmable Output Event Zone Shutdown Restoral Programmable Output Event Keypad Panic Programmable Output Event Keypad Fire Programmable Output Event Keypad Medical Programmable Output Event Keypad Lockout Programmable Output Event Duress Programmable Output Event Verifies Cross-zone Trigger Programmable Output Event Burglary Programmable Output Event Panic Programmable Output Event Fire Programmable Output Event (Refer to zones 1-8) Tamper Zone Programmable Output Event Enter a 4-digit value (2 digits as per Table 33 and 2 digits as per Table 34) for each partition and program as a 32-digit string, followed by the [*] key. [INSTALLER CODE] [*] [LOCATI] [*] [PARTITI] [*] [OUTPUT] [ACTI] [*] 69
70 Table 32: Partition Programmable Output Events for Locations Siren Programmable Output Event Strobe Programmable Output Event Chime Programmable Output Event Arm Follow Programmable Output Event Only an output can be entered for programmable output events Partition no. is: 1-8. Enter a 2-digit value for each partition and program as a 16-digit string, followed by the [*] key. [INSTALLER CODE] [*] [LOCATI] [*] [PARTITI NO.] [*] [OUTPUT] [*] A NOTE ARM FOLLOW: An output which has been set as an Arm Follow Programmable Output Event will mimic the ARM LED on the keypad. The output will be set High when the partition is armed, set Low when the partition is disarmed, and will flash when the partition has an alarm condition. The benefit of this is that you can attach a siren, Remote Arm/Disarm LED Unit ( ), etc to your Alarm Panel for an audible/visual display of the panel s state. Table 33 lists the addresses for the physical outputs and Table 34 lists the output actions. Table 33: Output Address Physical Mapping Data Address Physical Outputs Address Physical Outputs 00 Disabled 21 Reserved 01 Onboard output 1 22 Reserved 02 Onboard output 2 23 Reserved 03 Onboard output 3 24 Reserved 04 Onboard output 4 25 Reserved 05 Onboard output 5 26 Reserved 06 Zone expander 1 output 1 27 Reserved 07 Zone expander 1 output 2 28 Reserved 08 Zone expander 2 output 1 29 Reserved 09 Zone expander 2 output 2 30 Reserved 10 Zone expander 3 output 1 31 Reserved 11 Zone expander 3 output 2 32 Reserved 12 Zone expander 4 output 1 33 Reserved 13 Zone expander 4 output 2 34 Keypad 1 output 14 Zone expander 5 output 1 35 Keypad 2 output 15 Zone expander 5 output 2 36 Keypad 3 output 16 Zone expander 6 output 1 37 Keypad 4 output 17 Zone expander 6 output 2 38 Keypad 5 output 18 Reserved 39 Keypad 6 output 19 Reserved 40 Keypad 7 output 20 Reserved 41 Keypad 8 output 70
71 Table 34: Output Actions Data Value Output Action 00 Set Output High (Set) 01 Set Output Low (Reset) 02 Pulse Output High 03 Pulse Output Low Table 35 lists the default output and action for locations Table 35: Default Programmable Events Data Loc Event Default Output Default Action 390 Close Programmable Output Event Output 3 [03] Set High [00] 391 Stay Close Programmable Output Event Disabled [00] 392 Open Programmable Output Event Output 3 [03] Set Low [01] 393 Cancel Programmable Output Event Disabled [00] 394 Alarm Restoral Programmable Output Event Disabled [00] 395 Bypass Programmable Output Event Disabled [00] 396 Forced Arm Programmable Output Event Disabled [00] 397 Zone Tamper Programmable Output Event Disabled [00] 398 Zone Tamper Restoral Programmable Output Event Disabled [00] 399 Zone Shutdown Programmable Output Event Disabled [00] 400 Zone Shutdown Restoral Programmable Output Event Disabled [00] 401 Keypad Panic Programmable Output Event Output 1 [01] Pulse High [02] 402 Keypad Fire Programmable Output Event Output 4 [04] Pulse High [02] 403 Keypad Medical Programmable Output Event Output 5 [05] Pulse High [02] 404 Keypad Lockout Programmable Output Event Disabled [00] 405 Duress Programmable Output Event Output 1 [01] Pulse High [02] 406 Verifies Alarm Programmable Output Event Disabled [00] 407 Burglary Programmable Output Event Output 2 [02] Pulse High [02] 408 Panic Programmable Output Event Output 1 [01] Pulse High [02] 409 Fire Programmable Output Event (Refer to Table 5) Disabled [00] 410 Tamper Zone Programmable Output Event Disabled [00] Table 36: Default Programmable Events Data with no Default Action Loc Event Default Output 411 Siren Programmable Output Event Disabled [00] 412 Strobe Programmable Output Event Disabled [00] 413 Chime Programmable Output Event Disabled [00] 414 Arm Follow Programmable Output Event Disabled [00] Once a programmable output has been enabled, the default action will be Pulse High [02]. 71
72 Zone Programmable Output Events The following locations are used to program the various zone outputs. LOCATIS Zone Programmable Output Events An output can be assigned to a zone such that in the event of that zone causing an alarm condition, the chosen output performs the selected option. A list of available actions and their corresponding values is shown in Table 35. Regardless of the action selected for a particular output, if it is programmed to clear on disarming of the panel (locations ), the output will revert to clear (set low) after any partition disarmed. Each location represents a set of 8 zones: Location 415 is zones 1-8 Location 416 is zones 9-16 Location 417 is zones Location 418 is zones Location 419 is zones Location 420 is zones Location 421 is zones Location 422 is zones Enter a 4-digit output and action for each of the 8 zones and program as 32-digit strings, followed by the [*] key. [INSTALLER CODE] [*] [4] [1] [5] [*] [ZE NO.] [*] [OUTPUT] [ACTI] [*] Refer to section 8.2 Programming Standard Locations to see how to scroll through data in a location using the [*] key. LOCATIS Global Programmable Output Events These locations allow you to configure the global programmable output events. Refer to Table 37 to view the programmable output events per location. LEDs 1-8 represent the output number, and LEDs 9-16 represent the action. Once a programmable output has been enabled, the default action will be Pulse High [02]. If dual reporting is enabled, an output allocated to the dual reporting programmable output event will be set when the panel dials the second phone number, and cleared when it hangs up at the end of the transmission. This output follows the hook relay. It may be used to trigger switching from the telephone line to a radio transmitter. There is no output action for the fire sensor power and dual reporting programmable output events. 72
73 Table 37: Global Programmable Output Events Default Data Loc Sublocation Output Action Event Default Default AC Fail Programmable Output Event Disabled [00] 2 AC Restore Programmable Output Event Disabled [00] 3 Low Battery Programmable Output Event Disabled [00] 4 Low Battery Restore Programmable Output Event Disabled [00] 5 Auto Test Programmable Output Event Disabled [00] 6 Download Programmable Output Event Disabled [00] 7 Siren Tamper Programmable Output Event Disabled [00] 8 Aux 12V Trouble Programmable Output Event Disabled [00] Reserved Disabled [00] 2 Bus-wired Peripheral Tamper Programmable Output Event Disabled [00] 3 Bus-wired Peripheral Fail Programmable Output Event Disabled [00] 4 Box Tamper Programmable Output Event Disabled [00] 5 Dedicated Panic Programmable Output Event Output [01] Pulse High [02] 6 Communication Fail Programmable Output Event Disabled [00] 7 Telephone Line Tamper Programmable Output Event Disabled [00] 8 Telephone Line Restore Programmable Output Event Disabled [00] Reserved 2 Reserved 3 Reserved 4 Reserved 5 Reserved 6 Reserved 7 Reserved 8 Reserved 1 Wired Zone Expander Low Battery Programmable Output Disabled [00] 426 Event 2 Wired Zone Expander Low Battery Restore Programmable Disabled [00] Output Event 3 Fire Sensor Power Programmable Output Event Disabled [00] No Action 4 Dual Reporting Programmable Output Event Disabled [00] No Action 5 Reserved 6 Reserved 7 Reserved 8 Reserved Enter a 4-digit value (2 digits as per Table 33 and 2 digits as per Table 34) for each programmable output and program as a 32-digit string, followed by the [*] key. (This is an advanced location). [INSTALLER CODE] [*] [LOCATI] [*] [SUB-LOCATI] [*] [OUTPUT] [ACTI] [*] Refer to section Using Sub-locations to see how to scroll from one sub-location to another using the [*] key. Once a programmable output has been enabled, the default action will be Pulse High [02]. 73
74 Output Pulse Timing - Advanced The following locations determine the length of time for which an output will pulse high before returning to a clear state. LOCATI 428 Onboard Output Pulse Time (default = 0002 ) Enter a 4-digit time, [MMSS], for each of the 5 onboard outputs and program as a 20-digit string, followed by the [*] key. [INSTALLER CODE] [*] [4] [2] [8] [*] [OUTPUT NO.] [*] [MMSS] [*] The valid data range is: 00m00s 59m59s. Output no. is: 1-5. LOCATI Zone Expander Output Pulse Time (default = 0002 ) Enter a 4-digit time, [MMSS], for each of the 6 zone expanders output and program as an 8- digit string, followed by the [*] key. [INSTALLER CODE] [*] [LOCATI [*] [OUTPUT NO.] [*] [MMSS] [*] The valid data range is: 00m00s 59m59s. Output no. is: 1-2. Refer to section Using Sub-locations to see how to scroll from one sub-location to another using the [*] key. LOCATI 437 Keypad Output Pulse Time (default = 0002 ) Enter a 4-digit time, [MMSS], for each of the 8 keypads output and program as a 32-digit string, followed by the [*] key. [INSTALLER CODE] [*] [4] [3] [7] [*] [OUTPUT NO.] [*] [MMSS] [*] The valid data range is: 00m00s 59m59s. Output no. is: Output Scheduling On Time - Advanced The following locations determine the time of day for each of the programmable outputs to turn on/off. These outputs can either be set high (on) or low (off). For the following locations to work the appropriate on/off days (locations ), must be selected. LOCATI 438 Onboard Output Time (default = 2400) Enter a 4-digit time, [HHMM], for each of the 5 onboard outputs and program as a 20-digit string, followed by the [*] key. [INSTALLER CODE] [*] [4] [3] [8] [*] [OUTPUT NO.] [*] [HHMM] [*] 74
75 The valid data range is: 00h00m 23h59m, with 24h00m to disable. Output no. is: 1-5. LOCATI Zone Expander Output Time (default = 2400) Enter a 4-digit time, [HHMM], for each of the 6 zone expanders output and program as an 8- digit string, followed by the [*] key. [INSTALLER CODE] [*] [LOCATI] [*] [OUTPUT NO.] [*] [HHMM] [*] The valid data range is: 00h00m 23h59m, with 24h00m to disable. Output no. is: 1-2. Refer to section Using Sub-locations to see how to scroll from one sub-location to another using the [*] key. LOCATI 447 Keypad Output Time (default = 2400) Enter a 4-digit time, [HHMM], for each of the 8 keypads output and program as a 32-digit string, followed by the [*] key. [INSTALLER CODE] [*] [4] [4] [7] [*] [OUTPUT NO.] [*] [HHMM] [*] The valid data range is: 00h00m 23h59m, with 24h00m to disable. Output no. is: Output Scheduling Off Time - Advanced The following locations determine the programmed time for the programmable output to turn off. These outputs can either be set high (on) or low (off). For the following locations to work the appropriate on/off days (locations ), must be selected. LOCATI 448 Onboard Output Time (default = 2400) Enter a 4-digit time, [HHMM], for each of the 5 onboard outputs and program as a 20-digit string, followed by the [*] key. [INSTALLER CODE] [*] [4] [4] [8] [*] [OUTPUT NO.] [*] [HHMM] [*] The valid data range is: 00h00m 23h59m, with 24h00m to disable. Output no. is: 1-5. LOCATI Zone Expander Output Time (default = 2400) Enter a 4-digit time, [HHMM], for each of the 6 zone expander outputs and program as an 8- digit string, followed by the [*] key. [INSTALLER CODE] [*] [LOCATI] [*] [OUTPUT NO.] [*] [HHMM] [*] The valid data range is: 00h00m 23h59m, with 24h00m to disable. Output no. is:
76 Refer to section Using Sub-locations to see how to scroll from one sub-location to another using the [*] key. LOCATI 457 Keypad Output Time (default = 2400) Enter a 4-digit time, [HHMM], for each of the 8 keypad outputs and program as a 32-digit string, followed by the [*] key. [INSTALLER CODE] [*] [4] [5] [7] [*] [OUTPUT NO.] [*] [HHMM] [*] The valid data range is: 00h00m 23h59m, with 24h00m to disable. Output no. is: Output Scheduling On/Off Days - Advanced Outputs can be scheduled to set and reset at specified times on specific days of the week. To disable scheduling of an output ensure that all days are deselected. LOCATIS Output On/Off Days The on/off days for the outputs, to turn on or off, in Table 39 can be programmed by using the values in Table 38. Table 38: Output Scheduling On/Off Days Data LED Days of the Week LED Days of the Week 1 Monday 9 Monday 2 Tuesday 10 Tuesday 3 Wednesday 11 Wednesday 4 Thursday 12 Thursday 5 Friday 13 Friday 6 Saturday 14 Saturday 7 Sunday 15 Sunday All (Arm Day Disabled) All (Disarm Day Disabled) 76
77 Table 39: Outputs per Location Loc. Event Output 458 Onboard Output 1 Refer to Table Onboard Output 2 Refer to Table Onboard Output 3 Refer to Table Onboard Output 4 Refer to Table Onboard Output 5 Refer to Table Zone Expander 1, Output 1 Refer to Table Zone Expander 1, Output 2 Refer to Table Zone Expander 2, Output 1 Refer to Table Zone Expander 2, Output 2 Refer to Table Zone Expander 3, Output 1 Refer to Table Zone Expander 3, Output 2 Refer to Table Zone Expander 4, Output 1 Refer to Table Zone Expander 4, Output 2 Refer to Table Zone Expander 5, Output 1 Refer to Table Zone Expander 5, Output 2 Refer to Table Zone Expander 6, Output 1 Refer to Table Zone Expander 6, Output 2 Refer to Table Reserved Refer to Table Reserved Refer to Table Reserved Refer to Table Reserved Refer to Table Reserved Refer to Table Reserved Refer to Table Reserved Refer to Table Reserved Refer to Table Reserved Refer to Table Reserved Refer to Table Reserved Refer to Table Reserved Refer to Table Reserved Refer to Table Reserved Refer to Table Reserved Refer to Table Reserved Refer to Table Keypad 1 Refer to Table Keypad 2 Refer to Table Keypad 3 Refer to Table Keypad 4 Refer to Table Keypad 5 Refer to Table Keypad 6 Refer to Table Keypad 7 Refer to Table Keypad 8 Refer to Table 38 77
78 9.16 Event Reporting Options - Advanced The following locations from enable disable the reporting of events programmed into locations If a reporting code has been programmed, and the reporting of that code is not enabled here then the reporting code will not report. LOCATIS Split Reporting Zones 1-64 Locations 501 (zone 1) 564 (zone 64) represent a bitmap of 64 split reporting zone locations. Table 40: Split Reporting Zones Bitmap Data LED On/Off Action LED On/Off Reporting Pair Enable zone alarm reporting Telephone module 2 9 Disable zone alarm reporting Telephone module 1 Enable zone alarm restore reporting Disable zone alarm restore reporting Enable zone bypass reporting Disable zone bypass reporting Enable zone force arm reporting Disable zone force arm reporting Enable zone tamper reporting Disable zone tamper reporting Enable zone tamper restore reporting Disable zone tamper restore reporting Enable zone swinger shutdown reporting Disable zone swinger shutdown reporting Enable zone swinger shutdown restore reporting Disable zone swinger shutdown restore reporting Telephone module 2 Telephone module 1 Telephone module 2 Telephone module 1 Telephone module 2 Telephone module 1 Telephone module 2 Telephone module 1 Telephone module 2 Telephone module 1 Telephone module 2 Telephone module 1 Telephone module 2 Telephone module 1 Default values are shaded See section 9.5 Communications Setup - Advanced. 78
79 LOCATI 571 Global Split Reporting 1 Table 41: Global Split Reporting 1 Bitmap Data LED On/Off Action LED On/Off Reporting Pair Enable AC fail reporting Telephone module 2 9 Disable AC fail reporting Telephone module 1 Enable communication fail reporting * Disable communication fail reporting * Enable telephone line tamper reporting Disable telephone line tamper reporting Telephone module 2 Telephone module 1 Telephone module 2 Telephone module 1 Enable siren fail reporting Telephone module 2 12 Disable siren fail reporting Telephone module 1 Enable panel low battery fail reporting Disable panel low battery fail reporting Enable aux 12V fuse fail reporting Disable aux 12V fuse fail reporting Telephone module 2 Telephone module 1 Telephone module 2 Telephone module 1 Reserved Reserved 15 Reserved Reserved 8 Enable box tamper reporting Disable box tamper reporting 16 Telephone module 2 Telephone module 1 Default values are shaded * The reporting code is only supported by Contact ID or SIA, and thus will not be reported if any other format has been selected. 79
80 LOCATI 572 Global Split Reporting 2 Table 42: Global Split Reporting 2 Bitmap Data LED On/Off Action LED On/Off Reporting Pair 1 Enable bus-wired peripheral Telephone module 2 tamper reporting 9 Disable bus-wired peripheral Telephone module 1 tamper reporting 2 Enable bus-wired peripheral Telephone module 2 fail reporting 10 Disable bus-wired peripheral Telephone module 1 fail reporting 3 Enable bus-wired peripheral Telephone module 2 low battery reporting * 11 Disable bus-wired peripheral Telephone module 1 low battery reporting * Enable AC restore reporting Telephone module 2 12 Disable AC restore reporting Telephone module 1 Enable communications restore reporting** Disable communications restore reporting ** Enable telephone line restore reporting Disable telephone line restore reporting Enable siren restore reporting ** Disable siren restore reporting ** Enable panel low battery restore reporting Disable panel low battery restore reporting Default values are shaded Telephone module 2 Telephone module 1 Telephone module 2 Telephone module 1 Telephone module 2 Telephone module 1 Telephone module 2 Telephone module 1 * The reporting code is only supported by Contact ID, and thus will only be reported if Contact ID has been selected. * *The reporting code is only supported by Contact ID or SIA, and thus will not be reported if any other format has been selected. 80
81 LOCATI 573 Global Split Reporting 3 Table 43: Global Split Reporting 3 Bitmap Data LED On/Off Action LED On/Off Reporting Pair Enable aux 12V fuse restore Telephone module 2 reporting* 1 9 Disable aux 12V fuse restore Telephone module 1 reporting* Reserved Reserved 10 Reserved Reserved Enable box tamper restore reporting * Disable box tamper restore reporting * Enable bus-wired peripheral tamper restore reporting* Disable bus-wired peripheral tamper restore reporting* Enable bus-wired peripheral fail restore reporting * Disable bus-wired peripheral fail restore reporting * Enable bus-wired peripheral low battery restore reporting** Disable bus-wired peripheral low battery restore reporting** Enable dedicated panic reporting Disable dedicated panic reporting Telephone module 2 Telephone module 1 Telephone module 2 Telephone module 1 Telephone module 2 Telephone module 1 Telephone module 2 Telephone module 1 Telephone module 2 Telephone module 1 Enable auto test reporting Telephone module 2 16 Disable auto test reporting Telephone module 1 Default values are shaded *The reporting code is only supported by Contact ID or SIA, and thus will not be reported if any other format has been selected. ** The reporting code is only supported by Contact ID, and thus will only be reported if Contact ID has been selected. 81
82 LOCATI 574 Global Split Reporting 4 Table 44: Global Split Reporting 4 Bitmap Data LED On/Off Action LED On/Off Reporting Pair Enable download reporting Telephone module 2 9 Disable download reporting Telephone module 1 Reserved Reserved 10 Reserved Reserved Reserved Reserved 11 Reserved Reserved Reserved Reserved 12 Reserved Reserved Reserved Reserved 13 Reserved Reserved Reserved Reserved 14 Reserved Reserved Reserved Reserved 15 Reserved Reserved Reserved Reserved 16 Reserved Reserved Default values are shaded 82
83 LOCATIS Split Reporting Partitions 1-8 Table 45: Split Reporting Partitions 1-8 Data LED On/Off Action LED On/Off Reporting Pair Enable duress reporting Telephone module 2 9 Disable duress reporting Telephone module 1 Enable keypad panic reporting Disable keypad panic reporting 10 Telephone module 2 Telephone module 1 Enable fire reporting Telephone module 2 11 Disable fire reporting Telephone module 1 Enable medical reporting Telephone module 2 12 Disable medical reporting Telephone module 1 Enable keypad lockout reporting Disable keypad lockout reporting 13 Telephone module 2 Telephone module 1 Reserved Reserved 14 Reserved Reserved Enable armed without user code reporting Disable armed without user code reporting 15 Telephone module 2 Telephone module 1 Reserved Reserved 16 Reserved Reserved Default values are shaded Each location represents a partition: Location 581 is partition 1 Location 582 is partition 2 Location 583 is partition 3 Location 584 is partition 4 Location 585 is partition 5 Location 586 is partition 6 Location 587 is partition 7 Location 588 is partition 8 83
84 Section: Keypad Information [1] and [3] To view information for an individual keypad, press the [1] and [3] keys simultaneously and then quickly release. The LCD keypad will display Keypad Info. Use the [PANIC] and [MED] keys to scroll through the available information. Lowest Zone This displays the start zone of the keypad (this is only applicable to LED keypad, therefore, the LCD keypad will always display 01) Highest Zone This displays the end zone of the keypad (this is only applicable to the LED keypad, therefore, the LCD keypad will always display 64) Zone Mask This displays the zones. The information is read from right to left. Each hex character displays information for 4 zones Version Nr This displays the version number of the keypad firmware Version Date This displays the date the version was created When phoning the helpdesk for technical support, it is important to be able to give them the firmware version of the keypad. This will help with the troubleshooting process. 11. Panel Information [*] [*] To view information for the panel, hold down the [*] key to enter the user menu, then press the [*] key again to enter into the panel information. Use the [*] key to scroll through the information. FW This displays the firmware version of the panel HW This displays the hardware version of the panel BL This displays the boot loader version of the panel BN This displays the build number of the panel When phoning the helpdesk for technical support, it is important to be able to give them all (or at least) some of information for the panel. This will help with the troubleshooting process. 84
85 Index of Programming Locations LOCATI 0 Defaulting the Panel or Master user Code LOCATIS 1-8 Individual Zone Type Setup (Zones 1 64) LOCATI 10 Zone Shutdown Count (default = 5) LOCATI 11 Programmable Zone Loop Response Time (default = 2) LOCATI 12 Cross-zone Delay Time (default = 0030) LOCATI 13 Cross-zone Count (default = 3) LOCATI 14 Global Options LOCATI 15 AC Fail / Restore Reporting Delay (default = 0004) LOCATI 16 Trouble Display Enable LOCATI 17 Siren Time Out Period (default = 0200) LOCATI 18 Siren Delay (default = 0200) LOCATI 20 Keypad Lockout Count (default = 4) LOCATI 21 Keypad Lockout Time (default = 0030) LOCATI 22 Keypad Sleep Delay (default = 0500) LOCATI 23 User, Installer & Maintenance Code - Number of Digits LOCATI 24 Number of Account Code Digits (default = 4) LOCATI 25 Month to Start Daylight Saving (default = 1) LOCATI 26 Day of Week to Start Daylight Saving (default = 1) LOCATI 27 Week of Month to Start Daylight Saving (default = 1) LOCATI 28 Month to End Daylight Saving (default = 1) LOCATI 29 Day of Week to End Daylight Saving (default = 1) LOCATI 30 Week of Month to End Daylight Saving (default = 1) LOCATI 31 Daylight Saving Time Offset (default = 60) LOCATI 32 Auto Test Report Interval (default = 1) LOCATI 33 Auto Test Time (default = 0010) LOCATI 34 Download Code Default Disable (default = 0) LOCATI 35 Hardware Default Switch Disable (default = 0) LOCATI 41 Telephone Number 1 Communications Format (default = 5) LOCATI 42 Telephone Number 2 Communications Format (default = 5) LOCATI 43 Telephone Number 3 Communications Format (default = 5) LOCATI 44 Telephone Number 4 Communications Format (default = 5) LOCATI 45 Communication Delay (default = 0020) LOCATI 46 Reporting Communications Options LOCATI 47 Number of Dial Attempts (default = 6) LOCATI 48 Download Options LOCATI 49 Number of Rings to Answer (default = 15) LOCATI 50 Call-back Telephone Number LOCATI 51 Telephone Number LOCATI 52 Telephone Number LOCATI 53 Telephone Number LOCATI 54 Telephone Number LOCATIS Primary Account Codes (Partitions 1-8) LOCATIS Secondary Account Code (Partitions 1-8) LOCATIS Zone Type Properties (Zones 1 64) LOCATI 171 No Movement Auto Arm Time Out (default =00) LOCATI 172 No Movement Auto Arm Start (default = 0000) LOCATI 173 No Movement Auto Arm End (default = 2400) LOCATI 174 No Movement Medical Alarm Time Out (default = 00) LOCATI 175 No Movement Medical Alarm Start (default = 0100) LOCATI 176 No Movement Medical Alarm End (default = 0100) LOCATI 180 Auto Arm Time (default = 2400)
86 LOCATIS Auto Arm/Disarm Days (default = all ) LOCATI 189 Auto Disarm Time (default = 2400) LOCATI 190 Auto Arm Delay (default = 0200 i.e. 2 minutes) LOCATI 197 Installer Code (default = 9999) LOCATI 198 Download Code (default = 9999) LOCATI 199 Maintenance Code (default = 8888) LOCATIS Partition Zone Allocation LOCATIS Partition Arm Options (Partitions 1 8) LOCATIS Extra Partition Options (Partitions 1-8) LOCATI 230 Exit Delay Period (default = 0030) LOCATI 231 Primary Entry Delay Period (default = 0030) LOCATI 232 Secondary Entry Delay Period (default = 0030) LOCATI 240 Keypad Partition (default = Partition 1) LOCATI 241 Keypad Display Start Zone (default = Zone 1) LOCATI 242 Keypad Zone Number (default = 0 i.e. Disabled) LOCATI 243 View Keypad ID LOCATIS Keypad Options LOCATI 300 Global Reporting Code LOCATI 301 Global Reporting Code LOCATI 303 Global Reporting Code LOCATIS Zone Alarm Reporting Code LOCATIS Zone Alarm Restoral Reporting Code LOCATIS Zone Tamper Reporting Code LOCATIS Zone Tamper Restore Reporting Code LOCATIS Zone Bypass Reporting Code LOCATIS Zone Force Arm Reporting Code LOCATIS Zone Swinger Shutdown Reporting Code LOCATIS Zone Swinger Shutdown Restore Reporting Code LOCATI 336 Duress Reporting Code LOCATI 337 Keypad Panic Reporting Code LOCATI 338 Fire Reporting Code LOCATI 339 Medical Reporting Code LOCATI 340 Keypad Lockout Reporting Code LOCATIS Close Reporting Code LOCATIS Stay Close Reporting Code LOCATIS Open Reporting Code LOCATIS Siren Cancel Reporting Codes LOCATI 380 Clear Programmable Onboard Outputs on Disarming LOCATIS Clear Programmable Zone Expander Outputs on Disarming LOCATI 389 Clear Programmable Keypad Outputs on Disarming LOCATIS Partition Programmable Output Events LOCATIS Zone Programmable Output Events LOCATIS Global Programmable Output Events LOCATI 428 Onboard Output Pulse Time (default = 0002 ) LOCATI Zone Expander Output Pulse Time (default = 0002 ) LOCATI 437 Keypad Output Pulse Time (default = 0002 ) LOCATI 438 Onboard Output Time (default = 2400) LOCATI Zone Expander Output Time (default = 2400) LOCATI 447 Keypad Output Time (default = 2400) LOCATI 448 Onboard Output Time (default = 2400) LOCATI Zone Expander Output Time (default = 2400) LOCATI 457 Keypad Output Time (default = 2400) LOCATIS Output On/Off Days LOCATIS Split Reporting Zones
87 LOCATI 571 Global Split Reporting LOCATI 572 Global Split Reporting LOCATI 573 Global Split Reporting LOCATI 574 Global Split Reporting LOCATIS Split Reporting Partitions
88 88 Index 2 24 Hour Alarm Zone A AC Fail / Restore Reporting Delay Alarm Reporting Code Alarm Restoral Reporting Code Arm Stay Arm/Disarm Zone Auto Arm Days Auto Arm Delay Auto Arm Time Auto Disarm Time Auto Test Interval Auto Test Time... 35, 36 B Battery Bitmapped Location... 18, 21, 95 Box Tamper... 12, 28, 30, 73, 79, 81 Bypass Reporting Code C Call-back Phone Number Clear Programmable Onboard Outputs on Disarming Close Reporting Code Communication Delay Contact ID... 37, 79, 80, 81 Cross-zone Count Cross-zone Delay Timer... 27, 43 Cross-zoning... 27, 43 D Damaged Keypad Daylight Saving Default Keypad Partition Defaulting Keypads Devices (Enrolling) Disabled Zone Download Code Download Software... 15, 39, 41 Dual Reporting... 38, 40, 42, 73 Duress Reporting Code (Explanation) E Earth End-of-Line Resistors Engineer Reset (Explanation) Enrolling Keypads Entering Program Mode... 19, 95 Entry Delay... 44
89 Event Log... 13, 15, 24, 38 Exit Delay Exit Delay Period Expander Module - Installation F Fire Zone... 24, 31, 43 Follower Zone Force Arm (Explanation) Force Arm Reporting Code G Global Options... 28, 31 H Hardware Default Switch I Installation Installer Code... 16, 33, 49 Instant Zone K Keypad Bus... 13, 14 Keypad Fire Reporting Code (Explanation) Keypad Lockout Count Keypad Lockout Reporting Code (Explanation) Keypad Medical Reporting Code (Explanation) Keypad Options Keypad Panic Reporting Code (Explanation) Keypad Setup (Individual) Keypad Sleep Delay Key-switch... 13, 24, 51, 52 L Lightning Protection Location Values log See Event Log M Mains Failure... 12, 29 N Number of Account Code Digits Number of Dial Attempts Number of Rings to Answer O Open Reporting Code Outdoor Instant Zone Output Pulse Time (Programme Location)
90 P Panic/Priority Zone Partition Options Partition Programmable Outputs Peripheral Devices... 12, 28, 30 Primary Account Code (Partition Setup) Primary Communicator Format Primary Entry Delay Period Primary Entry/Exit Zone... 24, 54 Programmable Outputs... 12, 67, 69, 72, 73 Programmable Zone Loop Response Time Programming a Bitmapped Location Programming Extended Locations... 20, 95 Programming Location Summary Programming Standard Locations... 19, 95 Q Quick Arm (Explanation) R Radio Transmitter Connection Remote Control Receiver Remote Control Unit... 13, 24 Remote Receiver... 13, 14 Replacing a Damaged Keypad Device Reporting Options resistors... 12, 13 S Schedule Time Secondary Account Code (Partition Setup) Secondary Communicator Format Secondary Entry/Exit Zone Silent Zone... 43, 44 Siren... 30, 43 Siren Cancel Reporting Code Siren Delay... 28, 31 Siren Toot on Away Arm / Disarm (Explanation) Stay Close Reporting Code Stay Mode Stay Profile Stay Zone...See Zone Swinger Shutdown Swinger Shutdown Reporting Code Swinger Shutdown Restore Reporting Code T Tamper Tamper by Zone... 43, 60 Tamper Reporting Code Tamper Restore Reporting Code Tamper Zone... 24, 69 Telephone Communicator - Connecting Transformer Trouble Display... 22, 29 90
91 W Warning Zone Wiring... 11, 14 Z Zone Buzz Entry/Exit Stay Zone Properties Zone Shutdown Count
92 92
93 93
94 Cross Reference Lookup Arming / Disarming Basic Setup Location 18 Locations Advanced Setup Locations Communications Basic Setup Locations Locations Locations Advanced Setup Locations Daylight Savings Basic Setup Locations General Keypads Basic Setup Locations Location 23 Advanced Setup Locations Locations Basic Setup Locations Locations Advanced Setup Locations No Movement Advanced Setup Locations Outputs Basic Setup Locations Location 389 Locations Locations Advanced Setup Locations Locations Locations Locations Locations Location 457 Partitions Basic Setup Locations Advanced Setup Locations Locations Reporting Codes Basic Setup Locations Locations Locations Advanced Setup Locations Locations Security Zones Basic Setup Locations Basic Setup Locations 1 8 Locations Locations Advanced Setup Locations
95 Programming Quick Reference Guide Entering Program Mode [#] [INSTALLER CODE] [*] to enter program mode. A long beep will confirm entry. The READY LED will flash. Programming Standard Locations The panel is in program mode the READY LED is flashing. [LOCATI NUMBER] [*] The READY LED is solid on, and the AWAY LED will flash. Either [NEW DATA] [*] or [#] to exit. If data is entered, a long beep will confirm entry. In both instances, the READY LED will to flash and the AWAY LED will turn off. [#] to exit. The READY LED will stop flashing. The panel is now in standby mode. Programming Extended Locations with Strings Panel is in program mode the READY LED is flashing. [LOCATI NUMBER] [*] The READY LED is solid on, and the ARM and AWAY LEDs will flash. [STRING] [*] The ARM and AWAY LEDs turn off, and the READY LED will flash. If you do not want to change data press [#]. The READY LED will continue to flash, whilst the ARM and AWAY LEDs turn off. [#] to exit. The READY LED will stop flashing. The panel is now in standby mode. Programming Extended Locations with Sub-locations Panel is in program mode the READY LED is flashing. [LOCATI NUMBER] [*] The READY LED is solid on, and the ARM and AWAY LEDs will flash. [SUB-LOCATI NUMBER] [*] The READY and ARM are solid on, and AWAY is flashing. [NEW DATA] [*] The READY LED is solid on, and the ARM and AWAY LEDs will flash. [#] if you do not wish to make changes. The READY is flashing, and the ARM and AWAY LEDs turn off. [#] to exit current location. The READY is flashing, and the ARM and AWAY LEDs turn off. [#] to exit. The READY LED will stop flashing. The panel is now in standby mode. Programming a Bitmapped Location Panel is in program mode the READY LED is flashing. [LOCATI NUMBER] [*] The READY LED is solid, and the AWAY LED flashes. [#] to exit current location. READY is flashing. [#] to exit. The READY LED will stop flashing. The panel is now in standby mode. 95
96 96
IDS X-Series User Manual 700-398-01D Issued July 2012
 1 2 Contents 1. Introduction to the IDS X-Series Panels... 7 2. Before Operating Your Alarm System... 7 3. Understanding the Keypad LEDs... 8 3.1 Viewing Data on an LED Keypad... 12 3.1.1 LED Status Indicators...
User s Information Guide R1A
 HSC505-R Home Security Controller - User Manual Release R1a Pi HSC505 and Pi HSC505R Home Security Controller User s Information Guide R1A Page 1 QD Dynamics (Pty) Ltd reserves the right to make changes
Control/Communicator Installation Manual
 DAS NETWORX NX-8 Control/Communicator Installation Manual Page General Description... 2 Ordering Information... 2 Option Definitions... 2 Programming the LED Code Pads... 4 Programming the NX-8... 8 Types
IDS. Users Guide to Keypad Functions S E C U R I T Y MANUAL NO. 700-171-01B ISSUED AUG 2002 VERSION 1.18
 INHEP DIGITAL IDS S E C U R I T Y Users Guide to Keypad Functions MANUAL NO. 700-171-01B ISSUED AUG 2002 VERSION 1.18 Summary of Operation A rm/ disarm [#] + [USER CODE] Quick Quick Quick Away Arm Stay
INSTALLATION MANUAL PC2525. Version 1.1
 INSTALLATION MANUAL PC2525 Version 1.1 TABLE OF CONTENTS FEATURES 1 SPECIFICATIONS 1 INSTALLATION 2 Mounting the Panel... 2 Mounting the Keypad... 2 Auxiliary Power Connection... 2 Bell/Siren Connection...
Solution-16 Operators Manual ISSUE 1.60
 Solution-16 Operators Manual ISSUE 1.60 !"#$%&"'()*+ Operators Manual Copyright 2002 by, SYDNEY, AUSTRALIA Document Part Number MA880O DOCUMENT ISSUE 1.60 Printed 22 March 2002 This documentation is provided
ICP-CC488 ICP-CC488 EN. Control Panel. Quick Reference Guide
 ICP-CC488 EN Quick Reference Guide ICP-CC488 Control Panel ICP-CC488 Quick Reference Guide Notices EN 2 Copyright Notice Unless otherwise indicated, this publication is the copyright of Bosch Security
ICP-CC488. Installation Guide ICP-CC488 Control Panel
 ICP-CC488 EN Installation Guide ICP-CC488 Control Panel ICP-CC488 Installation Guide Notices EN 2 Copyright Notice Unless otherwise indicated, this publication is the copyright of Bosch Security Systems,
NetworX NX-6V2. LED Keypad User Manual
 NetworX NX-6V2 LED Keypad User Manual POWER Light is on when AC power is present; flashes to indicate a low battery condition. ARMED Light is on when armed; off when disarmed; flashes to indicate a previous
!"#$%&"'()**+),-+)).( /'0%1##1%&"'(21'$1#( ISSUE 1.40
**+),-+)).( /'0%1##1%&'(21'$1#( ISSUE 1.40") !"#$%&"'()**+),-+)).( /'0%1##1%&"'(21'$1#( ISSUE 1.40 MA8XXI 34&0(5167(410(877'(&'9#$:7:(;"
!"#$%&"'()**+),-+)).( /'0%1##1%&"'(21'$1#( ISSUE 1.40 MA8XXI 34&0(5167(410(877'(&'9#$:7:(;"
D24 ALARM CONTROL PANEL USER S MANUAL REVISION 1.1 A$12.00 INC GST
 D24 ALARM CONTROL PANEL USER S MANUAL REVISION 1.1 A$12.00 INC GST Ness Security Products Pty Ltd Quality Endorsed Company ISO9001 LIC.No. QEC2074 NSW Head Office only WWW.NESS.COM.AU Australia s largest
SECURITY SYSTEM NOTES
 SECURITY SYSTEM NOTES Installing/Service Company For Service Call Central Station Duress Code FUNCTION CODES Function Code Controls Function This system is is not partitioned. EMERGENCY ACTIVATION KEYS
CONTENTS 4. HOW TO UNSET THE PANEL...7
 Pi-8 USER MANUAL CONTENTS 1. THE KEYPAD AND ITS OPERATION...3 1.1 DESCRIPTION OF THE KEYPAD LEDS... 3 1.1.1 READY LED (RED)...3 1.1.2 TAMPER LED (RED)...3 1.1.3 POWER LED (GREEN)...3 1.1.4 CIRCUIT LEDs
Solution 862 Operators Manual. Issue 1.00
 Solution 862 Operators Manual Issue 1.00 Solution 862 Operators Manual Copyright 1998 by Electronics Design and Manufacturing Pty Limited, SYDNEY, AUSTRALIA Document Part Number MA406O Document Issue
NESS D16. 16 Zone Control Panel and Dialler OWNER S MANUAL
 NESS D16 16 Zone Control Panel and Dialler OWNER S MANUAL REVISION 2, JULY 2001 Ness Security Products Pty Ltd Quality Endorsed Company ISO9001 LIC.No. QEC2074 NSW Head Office only WWW.NESS.COM.AU Australia
Users Guide to Keypad Functions
 Users Guide to Keypad Functions MANUAL NO. 700-175-01J ISSUED JAN 2002 VERSION 1.41 Summary of Operation A rm/ disarm [#] + [USER CODE] Quick Quick Quick Panic Fire Medical Away Arm Stay Arm Stay Arm &
Solution 880 Operators Manual ISSUE 1.10
 Solution 880 Operators Manual ISSUE 1.10 Solution 880 Operators Manual Copyright 2001 by, SYDNEY, AUSTRALIA Document Part Number MA408O DOCUMENT ISSUE 1.10 Printed 25 May 2001 This documentation is provided
TABLE OF CONTENTS FEATURES 2 SPECIFICATIONS 2
 TABLE OF CONTENTS FEATURES 2 SPECIFICATIONS 2 INSTALLATION 3 Mounting the Panel... 3 Mounting the Keypad... 3 Auxiliary Power Connection... 3 PGM Terminal Connections... 3 Bell/Siren Connection... 3 Keypad
PRT3 Printer Module: ASCII Protocol Programming Instructions
 PRT3 Printer Module: ASCII Protocol Programming Instructions We hope this product performs to your complete satisfaction. Should you have any questions or comments, please visit www.paradox.com and send
CM705B - Universal Expander Module CM707B - Plug On Zone Expander Security Systems
 CM705B - Universal Expander Module CM707B - Plug On Zone Expander Security Systems EN Security System CM705B CM705B - Universal Expander Module The CM705B universal expander provides a cost effective way
Security System. User Guide for the LED Command Center
 Security System User Guide for the LED Command Center MY SECURITY COMPANY IS: CALL BEFORE TEST: THIS SECURITY SYSTEM IS CONNECTED TO TELEPHONE NUMBER: THE SECURITY CONTROL PANEL IS CONNECTED TO THE PHONE
Reference & Installation Manual
 & Versions 4.4 (728ULT) & 4.1 (738ULT) 728ULT 738ULT Reference & Installation Manual Table of Contents Introduction... 1 About This Manual... 1 New Features... 1 Main Features... 1 Specifications... 1
SECTION 13850 DETECTION AND ALARM
 SECTION 13850 DETECTION AND ALARM PART 1 GENERAL 1.01 SUMMARY A. Section Includes 1. Control Panel 2 Associated Equipment B. Products Installed But Not Supplied Under This Section 1. Section 16140 - Wiring
SECURITY SYSTEM NOTES
 SECURITY SYSTEM NOTES Installing/Service Company For Service Call Central Station Duress Code FUNCTION CODES Function Code Controls Function EMERGENCY ACTIVATION KEYS (check if enabled) Fire Auxiliary
NX-8 Installation manual Page 1 Date 13/03/04
 NetworX NX-8 Installation Manual NX-8 Installation manual Page 1 Date 13/03/04 CONTENTS CONTENTS...2 GENERAL INFORMATION...4 ORDERING INFORMATION...4 FEATURE DEFINITIONS...5 PROGRAMMING THE NX-8 KEYPADS...12
Using your LED Plus keypad
 Using your LED Plus keypad System 238 System 2316 System 238i System 2316i Part Number 5-051-372-00 Rev B Thank you for purchasing this C&K alarm system Your system is one of the most powerful and advanced
SCORPION. micron security products
 SCORPION 4120 6020 & 8020 USER INSTRUCTIONS Thank you for purchasing a Quality Micron Security Alarm Controller. Micron product is manufactured to exacting quality standards. We understand the importance
NetworX NX-8 Control/Communicator Installation Manual
 NetworX NX- Control/Communicator Installation Manual Table of Contents General Description... Ordering Information... Feature Definitions... - Programming the LED Keypads... Programming the NX-... 9- Types
TABLE OF CONTENTS FEATURES
 TABLE OF CONTENTS FEATURES 2 Keypad Programmable... 2 EEPROM Memory... 2 Static/Lightning Protection... 2 Supervision... 2 Operation... 2 SPECIFICATIONS 2 PC1550 Control Panel... 2 PC1500RK Keypad... 2
APR-PRT3 Printer Module: C-Bus Programming Instructions
 APR-PRT3 Printer Module: C-Bus Programming Instructions We hope this product performs to your complete satisfaction. Should you have any questions or comments, please visit www.paradox.com and send us
NX-8V2 Control Panel Installation Manual
 NX-8V2 Control Panel Installation Manual P/N I-NX8V2-IM REV H ISS NOV12 Copyright Disclaimer Trademarks and patents Intended use Contact information Customer support 2012 UTC Fire & Security Americas Corporation,
System Introduction S E C T I O N 1
 System Introduction S E C T I O N 1 1.1 Specifications Flexible Zone Configuration Six fully programmable zones; system expandable to eight zones using keypad zone inputs and wireless zones 38 access codes:
CAPTAIN 6. USER GUIDE System ver. 6.0. 6 Zones Intruder Alarm System. PIMA Electronic Systems Ltd. www.pima-alarms.com
 CAPTAIN 6 6 Zones Intruder Alarm System USER GUIDE System ver. 6.0 PIMA Electronic Systems Ltd. www.pima-alarms.com P/N 4410049, G2 XX en, Jan. 2010 2 CAPTAIN 6 User Guide SAFETY INSTRUCTIONS Your CAPTAIN-i
CONTENTS QUICK SETUP & INSTALLATION USER MANUAL. SUPA8 Quick Setup & User Manual
 SUPA8 Quick Setup & User Manual QUICK SETUP & INSTALLATION CONTENTS FACTORY DEFAULTS... 1 INSTALLATION OF THE SECURITY SYSTEM... 2 COMMISSIONING THE DIALLER PANEL... 5 ZONE INPUT CONNECTIONS... 7 PANEL
SECURITY SYSTEM NOTES. EMERGENCY ACTIVATION KEYS (check if enabled) PROGRAMMED FUNCTIONS
 PROGRAMMED FUNCTIONS") SECURITY SYSTEM NOTES Installing/Service Company For Service Call Installation Date / / Central Station Duress Code EMERGENCY ACTIVATION KEYS (check if enabled) Fire Auxiliary Emergency Police PROGRAMMED
SECURITY SYSTEM NOTES Installing/Service Company For Service Call Installation Date / / Central Station Duress Code EMERGENCY ACTIVATION KEYS (check if enabled) Fire Auxiliary Emergency Police PROGRAMMED
ICP-CC404 ICP-CC404 EN. Control Panel. User s Guide
 ICP-CC404 EN User s Guide ICP-CC404 Control Panel ICP-CC404 User's Guide Copyright Notice Copyright Notice Unless otherwise indicated, this publication is the copyright of Bosch Security Systems, Inc.
Series. NX-6-EUR Control Panel. Installation manual
 GE Security NetworX TM Series NX-6-EUR Control Panel Installation manual NX-6-EUR Installation manual Page 2 28/04/05 CONTENTS CONTENTS...3 GENERAL INFORMATION...5 ORDERING INFORMATION...5 FEATURE DEFINITIONS...6
SECURITY SYSTEM NOTES SPECIAL CODES ENTRY / EXIT DELAY TIMES ARM / DISARM CODES
 SECURITY SYSTEM NOTES Installing/Service Company For Service Call SPECIAL CODES "Chime" Digit 1 "Partial Arm" Digit 2 "Quick Arm" Digit 3 ENTRY / EXIT DELAY TIMES Exit Delay Time Entry Delay Time Secondary
System Programming Guide
 & System Programming Guide Software Versions 5.0 (728ULT) and 5.0 (738ULT) Installer Code (default - 728 Ultra: 282828; 738 Ultra: 383838) Full access to programming, except user access codes (PINs). No
616, 626, 636 & 646 Keypads
 616, 626, 636 & 646 Keypads User s Manual TABLE OF CONTENTS 1.0 BASIC OPERATION...2 2.0 ACCESS CODES...4 3.0 ARMING & DISARMING...6 4.0 PANIC ZONES...13 5.0 KEY ACCESS PROGRAMMING.14 6.0 ADDITIONAL FEATURES...15
SECURITY SYSTEM MANUAL
 SECURITY SYSTEM MANUAL CONTACT NUMBERS: Phase 3 Security 403-783-2199 Technical Difficulties, Account Updates, & Any Other Inquiries: Consolidated Monitoring 1-800-232-7290 False Alarms & Holiday Procedures
User Guide. RX-406 LED Keypad For CAPTAIN-I Ver.5.5 & up
 RX-406 LED Keypad For CAPTAIN-I Ver.5.5 & up User Guide PIMA Electronic Systems Ltd. 5 Hatzoref Street, Holon 58856, Israel +972-3-6506444 +972-3-5500442 [email protected] http://www.pima-alarms.com
500r+ Installation and User Guide
 500r+ Installation and User Guide Compatible Equipment 502rUK-50 Watch/Pendant PA. 509rUK-50 Smoke Detector 515rUK-00 10 metre passive infra red movement detector. 525rUK-00 Remote Set/Unset (Full and
CA60 Plus Software Version 3.1 User Manual May 2000
 TeleT eletek ek CA60 Plus Software Version 3.1 User Manual May 2000 CONTENTS 1. CA60Plus Keypad... 3 1.1. LED display... 3 1.2. Keys... 4 1.3. Combinations of Keys... 4 1.4. Audible Indication... 4 2.
2 4PI175 issue 1_6/01. How to unset system in alarm. Programs 1, 2 and 3. Access codes. How to operate Personal Attack
 Access codes Contents Unset system indications - - - - - - - - - - - System indication - - - - - - - - - - - - Access codes - - - - - - - - - - - - - - - - How to operate Personal - - - - - - How to unset
SPECIAL CODES AUXILIARY CODES SYSTEM NOTES
 Installing/Service Company Monitoring Center SPECIAL CODES Master Code Duress Code AUXILIARY CODES "Quick Arm" " Chime" 08 02 09 03 10 04 11 05 12 06 13 07 14 SYSTEM NOTES Exit Delay Time Entry Delay Time
Operating Guide. Alert 8D Version 8 Zone Controller Arrowhead Alarm Products Ltd
 8 Alert 8D Version 8 Zone Controller Arrowhead Alarm Products Ltd Operating Guide 20 1 Proudly Designed and Manufactured in New Zealand Installer Notes: Please contact your alarm installer if you require
Application Notes. 1.21 Partition Programming (PC1616/1832/1864 V4.2) Page 42. Panels: POWER SERIES (PC1616/1832/1864 V4.
 Page 42. Panels: POWER SERIES (PC1616/1832/1864 V4.") Application Notes 1.21 Partition Programming (PC1616/1832/1864 V4.2) Panels: POWER SERIES (PC1616/1832/1864 V4.2) Overview: The PC1616 supports 2 true partitions. The PC1832 supports 4 true partitions.
Application Notes 1.21 Partition Programming (PC1616/1832/1864 V4.2) Panels: POWER SERIES (PC1616/1832/1864 V4.2) Overview: The PC1616 supports 2 true partitions. The PC1832 supports 4 true partitions.
ACP10 10 Zone Intruder Alarm System
 ACP10 10 Zone Intruder Alarm System Installation Manual Contents 1. System Overview... 4 System Configuration... 4 Control Panel... 4 Remote Keypads... 5 LED Remote Keypad... 5 LCD Remote Keypad... 5 USB-Link...
SPECIAL CONTROL BUTTON FUNCTIONS
 Operating Guide 1 2 3 CONTENTS Page No. OPERATING YOUR ALARM 5 General Information 5 Arming the Alarm 5 Disarming the Alarm 6 Arming in Stay Mode 7 Disarming Stay Mode 8 Bypassing Zones 8 Manual Panic,
ICP-CC488 ICP-CC488 EN. Control Panel. User s Guide
 ICP-CC488 EN User s Guide ICP-CC488 Control Panel ICP-CC488 User's Guide Notices EN 2 Copyright Notice Unless otherwise indicated, this publication is the copyright of Bosch Security Systems, Inc. ( Bosch
Firmware version: 1.10 Issue: 7 AUTODIALER GD30.2. Instruction Manual
 Firmware version: 1.10 Issue: 7 AUTODIALER GD30.2 Instruction Manual Firmware version: 2.0.1 Issue: 0.6 Version of the GPRS transmitters configurator: 1.3.6.3 Date of issue: 07.03.2012 TABLE OF CONTENTS
SECURITY SYSTEM NOTES AREA LISTINGS SPECIAL CODES ENTRY / EXIT DELAY TIMES ARM / DISARM CODES ZONE DESCRIPTIONS
 SECURITY SYSTEM NOTES Installing/Service Company For Service Call Area 1 Area 2 Area 3 AREA LISTINGS SPECIAL CODES "Quick Arm" Digit "Partial Arm" Digit "Chime" Digit ENTRY / EXIT DELAY TIMES Exit Delay
System Programming Guide (728ULT)
") System Programming Guide (728ULT) Software Version 4.4 Installer Code (Default: 282828) Full access to programming, except user access codes (PINs). No access to arming/disarming. Use only numeric keys
System Programming Guide (728ULT) Software Version 4.4 Installer Code (Default: 282828) Full access to programming, except user access codes (PINs). No access to arming/disarming. Use only numeric keys
32-Zone Wireless Transceiver Security Systems MG5000 V3.2 MG5050 V3.2. 5- to 32-Zone Expandable Security Systems SP5500 V3.2 SP6000 V3.2 SP7000 V3.
 32-Zone Wireless Transceiver Security Systems MG5000 V3.2 MG5050 V3.2 5- to 32-Zone Expandable Security Systems SP5500 V3.2 SP6000 V3.2 SP7000 V3.2 Always Armed, Never Disarmed Programming Guide PARADOX.COM
642 LCD Keypad User Manual
 642 LCD Keypad User Manual TABLE OF CONTENTS Introduction...3 Legend... 3 Basic Operation...5 Keypad Indicator Lights... 5 Visual Feedback... 5 Auditory Feedback... 6 Info List... 7 Access Codes...8 User
GE Concord 4 Quick User Guide
 GE Concord 4 Quick User Guide GE Concord 4 Quick User Guide Page 1 Before Calling Is the keypad beeping? Press *. This will silence the beeping and let you know where the trouble is. Is there a flashing
How To Set A Timer On A Gg System
 ZONE ZONE 2 ZONE ZONE ZONE 5 ZONE 6 ZONE 7 ZONE Power PA XR2/ XR2+ Intruder alarm system Operating Instructions ZONE ZONE 2 ZONE ZONE ZONE 5 ZONE 6 ZONE 7 ZONE 0 2 5 6 7 9 Omit Prog Remote LED keypad 0
SCORPION Z16040C Alarm Controller User Instructions
 SCORPION Z16040C Alarm Controller User Instructions Thank you for choosing to purchase this micron security alarm controller. Micron product is manufactured to exacting quality standards. We understand
www.ealarm.com.my P/N 5-051-371-00 Rev D
 System 236 System 236i P/N 5-051-371-00 Rev D Thank you for purchasing this C&K alarm system Your system is one of the most powerful and advanced alarm systems on the market today, designed to provide
HomeSafe Security Panel User s Guide 5400 Series
 HomeSafe Security Panel User s Guide 5400 Series CONTENTS Features... 4 Introduction... 5 Keypad... 6 Keypad Indicators... 7 OPERATION by KEYPAD... 8 Arming... 9 Disarming... 10 Resetting Alarms... 10
SECURITY ALARM CONTROL PANEL QUICK SETUP & USER MANUAL
 SECURITY ALARM CONTROL PANEL QUICK SETUP & USER MANUAL PINKERTON Quick Setup & User Manual QUICK SETUP & INSTALLATION CONTENTS FACTORY DEFAULTS...1 INSTALLATION OF THE SECURITY SYSTEM...2 COMMISSIONING
Solution 16 plus. User Guide Security System
 Solution 16 plus EN Security System Copyright Notice Unless otherwise indicated, this publication is the copyright of Bosch Security Systems Pty Ltd ( Bosch ). All rights are reserved.you may download
Destiny 4100. Destiny 4100. Owners Manual
 Destiny 4100 Destiny 4100 Owners Manual TABLE OF CONTENTS INTRODUCTION Control Panel...3 Detection Devices...3 Telephone Keypads...3 GLOSSARY... 4-5 LOCAL PHONE ACCESS Using Your Telephones As Keypads...6
SECURITY SYSTEM NOTES SPECIAL CODES AUXILIARY ARM / DISARM CODES ENTRY / EXIT DELAY TIMES ZONE DESCRIPTIONS
 SECURITY SYSTEM NOTES Installing/Service Company For Service Call SPECIAL CODES Master Code Duress Code "Quick Arm" Digit "Chime" Digit "Entry-Guard" Digit AUXILIARY ARM / DISARM CODES 02 12 22 03 13 23
NetworX Series. NX-148E LCD Keypad. User Manual
 NetworX Series NX-148E LCD Keypad User Manual TABLE OF CONTENTS I. GLOSSARY OF TERMS... 3 II. UNDERSTANDING THE LIGHTS... 4 III. KEYPAD FUNCTIONS... 5 ARMING YOUR SYSTEM IN THE AWAY MODE... 5 MAKING YOUR
Solution-16 Operators Manual ISSUE 1.40
 Solution-16 Operators Manual ISSUE 1.40 Solution-16 Operators Manual Copyright 1995-97 by, SYDNEY, AUSTRALIA Document Part Number MA880O Document Issue 1.40 Printed 29 July 1997 This documentation is
9452/9453 Installation and User Guide
 9452/9453 Installation and User Guide Compatible Equipment 9425 Remote Keypad 9040 Internal Sounder 660 Speech Communicator 8440 4-Channel Minicom 496330 Issue 1 1 of 10 9452/3 Introduction The 9452 and
D24 USER S MANUAL ALARM CONTROL PANEL AND DIALLER. Ness D24 control panel User s manual A$15.00 INC GST. Revision 2
 D24 ALARM CONTROL PANEL AND DIALLER USER S MANUAL A$15.00 INC GST Ness D24 control panel User s manual Revision 2 Ness Security Products Pty Ltd Quality Endorsed Company ISO9001 LIC.No. QEC2074 NSW Head
NetworX Series. NX-216E Zone Expander Module Installation and Startup
 NetworX Series NX-E Zone Expander Module Installation and Startup 00 GE Security All rights reserved. These instructions do not purport to cover all details or variations in equipment nor to provide every
Understanding the Code Pad lights...4. Code Pad tones...5. Fully arming the system On MODE...6. Fully arming the system - Quick Arm MODE...
 TABLE OF CONTENTS...Glossary of terms...2...code Pad Diagram...3 Understanding the Code Pad lights...4 Code Pad tones...5 Fully arming the system On MODE...6 Fully arming the system - Quick Arm MODE...6
728 SERIES REFERENCE & INSTALLATION MANUAL 728+ VERSION 3.2. 728 series
 728 SERIES 728+ VERSION 3.2 728 series REFERENCE & INSTALLATION MANUAL TABLE OF CONTENTS INTRODUCTION... 2 About This Manual... 2 Features... 2 Specifications... 3 Accessories and Keypads... 3 About Paradox...
Using Your. Security System. With LED Keypad S5030, S5031, S5032
 Using Your Security System With LED Keypad S5030, S5031, S5032 Contents 1 Overview Your Security System... 1 How Your Security System Works... 2 Your System's Programming... 3 Getting Used to Your System...
SECURITY SYSTEM NOTES. Security System Configuration
 Installing / Service Company: For Service Call: SECURITY SYSTEM NOTES Security System Configuration Master Code: Auxiliary Code(s) 2 3 4 5 6 "Quick Arm" Digit: Exit Delay Time Auxiliary Exit Delay Time
Using Your. Security System With Icon Keypad S5020, S5021, S5022
 Using Your Security System With Icon Keypad S5020, S5021, S5022 Contents 1 Overview Your Security System... 1 How Your Security System Works... 2 Your System's Programming... 3 Getting Used to Your System...
HUNTER-PRO 32 Ver. 3.8 Intruder Alarm System RXN-9/416 User Guide
 HUNTER-PRO 32 Ver. 3.8 Intruder Alarm System RXN-9/416 User Guide PIMA Electronic Systems Ltd. 5 Hatzoref Street, Holon 58856, Israel +972-3-5587722 +972-3-5500442 [email protected] http://www.pima-alarms.com
Master User Guide Premier Elite Series
 Master User Guide Premier Elite Series INS177-8 Overview Premier Elite Series Master User Guide Contents 1. Overview... 5 Introduction... 5 Keypads... 7 Emergency Keys... 8 The Quick Arm Keys... 9 Keypad
SPR-5 FOUR SECTOR COMPOS I TE CONTROL UN I T.
 SPR-5 FOUR SECTOR COMPOS I TE CONTROL UN I T. -SECTORS- EXIT 1 2 3 4 POWER OFF 4 SECTOR SPR-5 The SPR-5 is the culmination of many years experience in control module and power supply design and manufacture,
Microprocessor Home Security System
 numbers of sensor s activations in the zone and after which activations the zone will be discarded (ignored). On every system s arming the counter is cleared in self. 6.3.11. 2 - Triger Timer - enter a
SECURITY SYSTEM NOTES SPECIAL CODES. Security System Configuration
 Installing / Service Company: SECURITY SYSTEM NOTES For Service Call: Master Code SPECIAL CODES Duress Code Security System Configuration Auxiliary Code(s) Quick Arm" Digit: 2 9 3 10 4 11 5 12 6 13 7 14
Elite 8D/Lite Version 8 Zone Controller. Arrowhead Alarm Products Ltd. Operating Guide. Proudly Designed and Manufactured in New Zealand
 Elite 8D/Lite Version 8 Zone Controller 8 Arrowhead Alarm Products Ltd Operating Guide 1 Proudly Designed and Manufactured in New Zealand 2 CONTENTS Page No. INTRODUCTION 4 About your Alarm 4 OPERATING
Cerber C612 12-Zone and 2-Partition Burglary Control Panel For your home and office
 Cerber C612 12-Zone and 2-Partition Burglary Control Panel For your home and office Doc 10905/ 09.2005/ version 2.0 User s Guide 1. INTRODUCTION...4 General Features...4 User Codes...4 Installer Codes...5
AC-115 Compact Networked Single Door Controller. Installation and User Manual
 AC-115 Compact Networked Single Controller Installation and User Manual December 2007 Table of Contents Table of Contents 1. Introduction...5 1.1 Key Features... 6 1.2 Technical Specifications... 7 2.
How To Control A Car Alarm On A Car With A Remote Control System
 MODEL CA100 REMOTE CONTROL AUTO ALARM SYSTEM INSTALLATION & OPERATION INSTRUCTIONS WIRING DIAGRAM Black Antenna Wire 6 Pin 6 Pin Mini Connector Valet Switch Blue LED Indicator Blue Wire: (-) 200mA Unlock
XP-600 Programming Instructions
 Hexadecimal Data Entry To Enter a hexadecimal digit enter the following A= A1 D= A4 B= A2 E= A5 C= A3 F= A6 XP-600 Programming Instructions Note These Programming Instructions are intended to be used in
First Alert FA140C/142C Installer Notes M. Leuck
 First Alert FA140C/142C Installer Notes M. Leuck 1. Programming can only be done by 6139 Alpha keypads, standard 6128 keypad cannot be used to program zones 2. Program new Master Code in section *20 (old
NESS D8 ALARM CONTROL PANEL AND DIALLER USER S MANUAL. NESS D8 CONTROL PANEL V4 USER MANUAL Revision 5 A$12.00 INC GST
 NESS D8 ALARM CONTROL PANEL AND DIALLER USER S MANUAL NESS D8 CONTROL PANEL V4 USER MANUAL Revision 5 A$12.00 INC GST Ness Security Products Pty Ltd Quality Endorsed Company ISO9001 LIC.No. QEC2074 NSW
Program Entry Guide. Control Panels
 EN Program Entry Guide Control Panels D6412/D4412 Program Entry Guide EN 2 Documentation Conventions Type Styles Used in this Manual To help identify important items in the text, the following type styles
Digiplex LCD Keypad DGP-641. User s Manual
 Digiplex LCD Keypad DGP-641 User s Manual 1.0 TABLE OF CONTENTS INTRODUCTION...6 1.1 Legend... 6 BASIC OPERATION... 7 2.1 Auditory Feedback (Beep Tones)... 8 2.2 Keypad Indicator Lights... 8 2.3 LCD Screen...
WIRING HARNESS FOR AS635P4. BLUE PLUG RED, BLUE, BLACK, WHITE - Plug in dual stage sensor harness
 WIRING HARNESS FOR AS635P4 ANTENNA NOT USED 5 PIN WHITE PLUG 2 PIN WHITE PLUG GREEN - PARKING BRAKE INPUT (-) BLUE - NOT USED 3 PIN BLUE PLUG RED, BLUE, BLACK, WHITE - Plug in dual stage sensor harness
ACTIVE 5 ENGINEERING MANUAL
 ACTIVE 5 ENGINEERING MANUAL C & K Systems Ltd C031-066 Issue 3 THE ACTIVE 5 INSTALLATION MANUAL. Date: Feb 1997 INTRODUCTION. The Active 5 is a microprocessor controlled intruder alarm panel. It features
NetworX Series. NX- 4/8 Code Pad. User Manual (Australian Version)
") NetworX Series NX- 4/8 Code Pad User Manual (Australian Version) Table Of Contents Code Pad Diagram... Inside Front Glossary of Terms...2 Understanding the Code Pad lights...3 Code Pad Tones...4 Fully
NetworX Series NX- 4/8 Code Pad User Manual (Australian Version) Table Of Contents Code Pad Diagram... Inside Front Glossary of Terms...2 Understanding the Code Pad lights...3 Code Pad Tones...4 Fully
User Guide for the DS7060 Control/Communicator
 DS7060 User Guide Copyright 1996-97 Detection Systems, Inc. User Guide for the DS7060 Control/Communicator Copyright 1996-97 Detection Systems, Inc. Detection Systems, Inc., 130 Perinton Parkway, Fairport,
TS590. Intruder Alarm Control Panel. SYSTEM OPEN 17:30 01 Jan ENT 0 ESC
 TS590 Intruder Alarm Control Panel 7:0 0 Jan _ ~ A B 5 6 C 7 8 9 D 0 ESC Setting the System Enter your passcode XXXX then leave the protected area. Unsetting the System Go directly to the keypad and en
Security System User's Guide
 Security System User's Guide Security System Glossary As security system technology has evolved, a special jargon has developed. Some terms widely used within the industry are these: Arm and Disarm Your
ABUS WIRELESS ALARM SYSTEM
 ABUS WIRELESS ALARM SYSTEM These installation instructions are published by Security-Center GmbH & Co. KG, Linker Kreuthweg 5, D-86444 Affing/Mühlhausen. All rights including translation reserved. Reproductions
tattletale User Guide Consumer unit version 2.48 1 P a g e
 tattletale User Guide Consumer unit version 2.48 1 P a g e Contents Basic 1... 4 Base Unit Features... 4 Initial Setup... 4 Arming... 5 Disarming... 5 Quiet Button... 5 Settings... 5 Settings 2... 6 Quick
How To Use An F145C-1 With A Sim Sims 2 (Aq) And A Sims 1 (Aux) (Aipa) (For Aq) (F145C) (Ios) (Power
 And A Sims 1 (Aux) (Aipa) (For Aq) (F145C) (Ios) (Power") First Alert FA145 Installer Notes M. Leuck 1. Programming can only be done by 6139 Alpha keypads, standard 6128 keypad cannot be used to program zones 2. Program new Master Code in section *20 (old version)
First Alert FA145 Installer Notes M. Leuck 1. Programming can only be done by 6139 Alpha keypads, standard 6128 keypad cannot be used to program zones 2. Program new Master Code in section *20 (old version)
ATS Control Panel. User s Manual
 ATS Control Panel User s Manual ARITECH is a division of GE Interlogix BV COPYRIGHT 2004 GE Interlogix BV. All rights reserved. GE Interlogix BV grants the right to reprint this manual for internal use
Ademco Vista-20P/First Alert FA-168C Basic Commands
 Zones 64 total Ademco Vista-20P/First Alert FA-168C Basic Commands Wireless Yes, Zones 09 to 48 + 16 Keyfob Zones (Zones 49 to 64) Batteries Downloadable Partitions 2 12 volt Rechargable inside main Panel,