VirtualDJ 8 Denon MC4000 1
|
|
|
- Morgan Houston
- 9 years ago
- Views:
Transcription
1 VirtualDJ 8 Denon MC4000 1
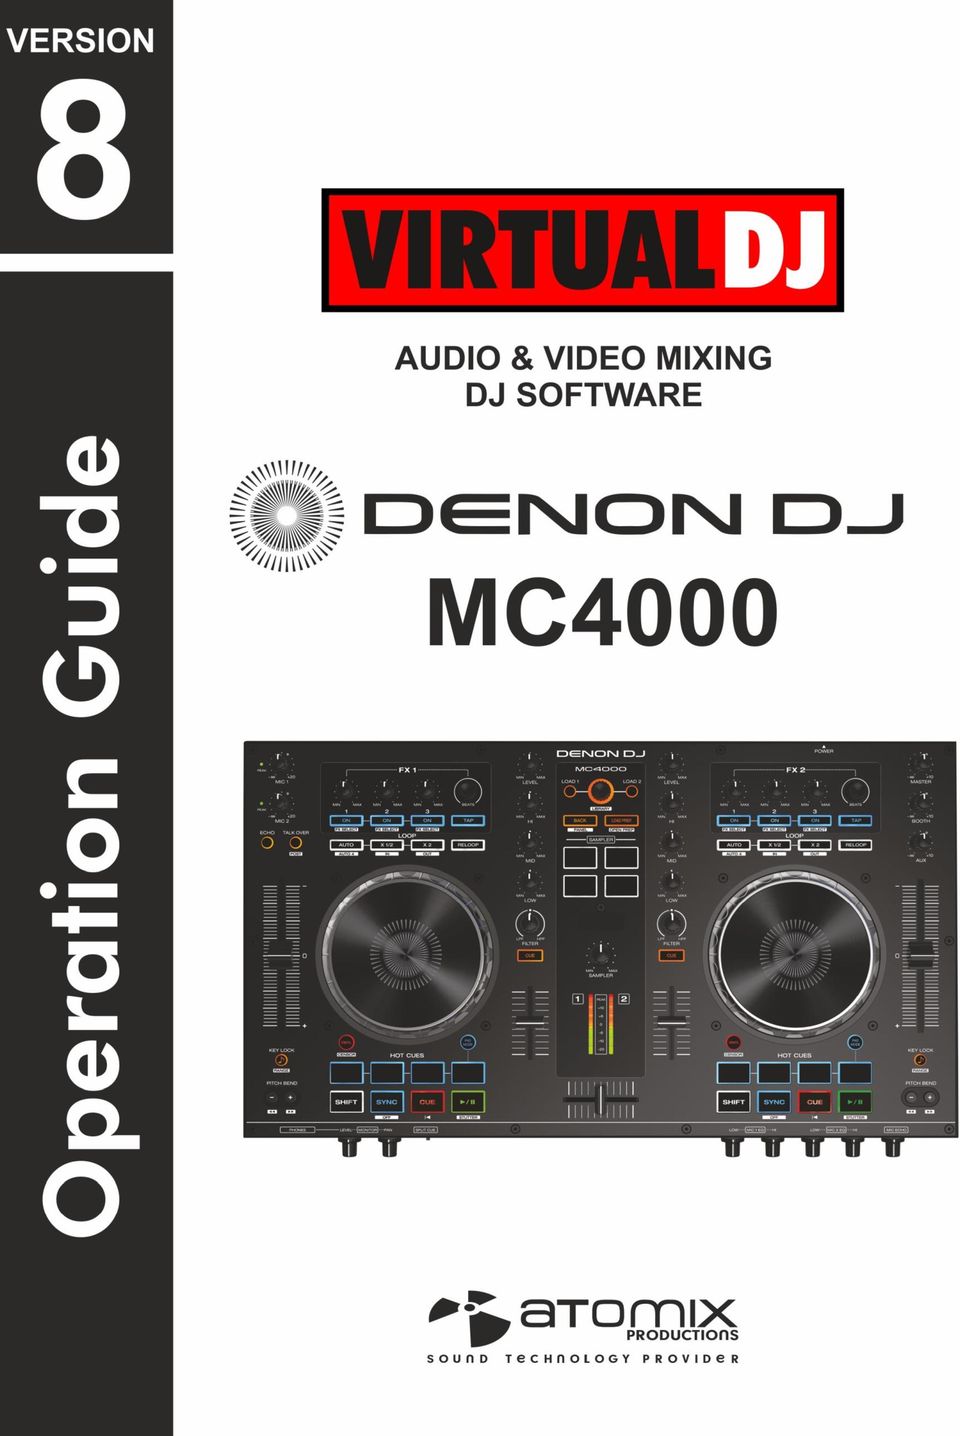
2 Table of Contents INSTALLATION... 3 Connections... 3 Firmware... 3 Drivers... 3 VirtualDJ 8 Setup... 3 Advanced Setup... 4 A. MIXER... 6 B. BROWSER... 6 C. SAMPLER... 7 D. DECK CONTROLS... 8 E. HOTCUES... 9 HotCues 1-4 mode... 9 HotCues 5-8 mode... 9 Hot-Loop 1-4 mode Loop Rolls mode F. EFFECTS & LOOPS G. MICROPHONE H. MASTER I. REAR PANEL J. FRONT PANEL INPUTS & RECORDING VirtualDJ 8 Denon MC4000 2

. Power on MC4000.")
3 INSTALLATION Connections Use the included power adapter (6V DC, 3A, center-positive) to connect MC4000 to a power outlet. Connect the unit s USB socket with a USB port of your computer. Connect a pair of amplified speakers or amplifier to the Master Output sockets (RCA or XLR). Power on MC4000. Firmware Windows & Mac Currently there is no firmware available, but please make sure of that by visiting the MC4000 product page. Drivers Windows only Download and install the latest ASIO drivers from: No drivers need to be installed for Mac OSX computers VirtualDJ 8 Setup Download and install VirtualDJ 8 from (in case you have not done already) Once VirtualDJ 8 is launched, a Login Window will appear. Login with your virtualdj.com account s credentials. A Pro Infinity, a PLUS or a Pro Subscription License is required to use the Denon DJ MC4000. Without any of the above Licenses, the controller will operate for 10 minutes each time you restart VirtualDJ. VirtualDJ 8 Denon MC4000 3


4 A detection window will appear next, asking to use or not the pre-defined audio setup with the built-in sound card of the MC4000. Select Use Soundcard and click OK The unit is now ready to operate. Advanced Setup MIDI Operation The unit should be visible in the CONTROLLERS tab of Config and the factory default available/selected from the Mappings drop-down list. The factory default Mapping offers the functions described in this Manual, however those can be adjusted to your needs via VDJ Script actions. Find more details at AUDIO Setup The unit has a pre-defined Audio setup and a special button in the AUDIO tab of Config to provide that. See also Inputs & Recording. Please read the manual of the unit for further connections/capabilities. For further software settings please refer to the User Guides of VirtualDJ 8. VirtualDJ 8 Denon MC4000 4

5 S. SHIFT. Press and hold this button to access secondary functions of other controls on the MC4000 M. PAD MODE. Press and hold this button to access a different mode for the HotCue PADS or Sampler PADS VirtualDJ 8 Denon MC4000 5

6 A. MIXER 1. CROSSFADER. Blends audio between the left and right decks 2. VOLUME. Use these faders to adjust the Volume of each deck. 3. VU METERS The Led Meters indicate the Output Level of each deck 4. CUE/PFL. Press these buttons to send this deck's pre-fader signal to the Cue Channel for monitoring. When engaged, the button will be lit. 5. FILTER. Use these knobs to apply a High/Low Pass Filter on the left/right decks. 6. EQ LOW. Adjusts the low (bass) frequencies of each deck. 7. EQ MID. Adjusts the middle (mid) frequencies of each deck 8. EQ HIGH. Adjusts the high (treble) frequencies of each deck 9. GAIN. Adjusts the audio level (gain) of the corresponding deck B. BROWSER 10. LOAD. Use these buttons to load the selected track from the Browser to the left or right deck. Hold the same button for more than 2 seconds to unload the same deck. Hold SHIFT down and then use these buttons to clone the deck to the opposite one. 11. LIBRARY. Use this encoder to scroll through Folders or Files. Hold SHIFT down and use this encoder to scroll faster (+/- 10 tracks per step). Push the encoder to set focus to the Songs List. 12. BACK Use this button to set focus to the Folders List. If the focus is on the Folders list, use this button to expand/collapse sub-folders. Hold SHIFT down and then use this button to cycle through the available center panels of the default GUI of VirtualDJ (Mixer, Video, Scratch an Master view) VirtualDJ 8 Denon MC4000 6
 frequencies of each deck 8. EQ HIGH. Adjusts the high (treble) frequencies of each deck 9. GAIN. Adjusts the audio level (gain) of the corresponding deck B. BROWSER 10. LOAD.")
7 13. LOAD/PREP. Press this button to add the selected track to the Automix List of Sideview. Hold SHIFT down to set focus to Sideview. If focus is on the Sideview hold SHIFT down and then use this button to cycle through the Sideview windows (Automix, Sidelist, Karaoke, Sampler and Shortcuts) Hold SHIFT down and press this button for more than 2 seconds to open/close the Sideview. C. SAMPLER 14. SAMPLER BUTTONS. Use these buttons to trigger Samples 1 to 4 of the selected Sampler Bank of VirtualDJ. Hold down any of the PAD MODE buttons (M) and then use the left Sampler buttons to select the previous and next Sampler Bank. Hold down any of the PAD MODE button (M) and then use the right Sampler buttons to select the previous and next Sampler mode (On/Off, Stutter, Hold and Unmute) Depending on the selected Sampler mode, hold SHIFT down and then use the same Sampler buttons to stop the playing samples. 15. SAMPLER VOLUME. Use this knob to adjust the Master Volume of the Sampler (will affect the Output Volume of all Samples) VirtualDJ 8 Denon MC4000 7
 and then use the left Sampler buttons to select the previous and next Sampler Bank.")
8 D. DECK CONTROLS 16. PLAY. Plays / Pauses the track. Press and hold SHIFT and then press this button to "stutter-play" the track from the last set Cue Point. 17. CUE. When the Deck is paused, you can set a Cue Point by moving the Platter to place the Audio Pointer at the desired location and then pressing the Cue Button. During playback, you can press the Cue Button to return the track to this Cue Point. (If you did not set a Cue Point, then it will return to the beginning of the track.). If the Deck is paused, you can press and hold the Cue Button to play the track from the Temporary Cue Point. Releasing the Cue Button will return the track to the temporary Cue Point and pause it. To continue playback without returning to the Temporary Cue Point, press and hold the Cue Button, then press and hold the Play Button, and then release both buttons. Press and hold SHIFT and then press this button to return to the beginning of the track. 18. SYNC. Press this button to automatically match the corresponding Deck's tempo and phase with the opposite Deck's (or the Master Deck s if using a 4 decks Skin) tempo and phase. Hold SHIFT down and then press this button to set this deck as Master Deck (for 4 decks skins). 19. PITCH BEND. Press and hold these buttons down to temporary speed up/slow down the song while pressed. When released, the track playback will return to the speed designated by the Pitch Fader. Hold SHIFT down and then use these buttons to move the track forward or backwards by 8 beats (seek) 20. KEYLOCK. Press this button to "lock" the track's pitch to its original key. The track's tempo will remain at the speed designated by the Pitch Fader. Hold SHIFT down and then use this button to select the next available range of the Pitch Fader ( from ±6%, ±8%, ±10%, ±12%, ±20%, ±25%, ±33%, ±50% to ±100%). 21. PITCH. Adjust the track's playback speed (tempo). VirtualDJ 8 Denon MC4000 8

9 22. JOG. Touch sensitive jogwheel. Use the jogwheel to scratch (if Vinyl mode is selected) or pitch bend. The Jogwheel also offers Loop In and Loop Out point adjustment (see Effects & Loops) 23. SCRATCH. Press this button to set the Jogwheel to Vinyl (Scratch) or CD (Bend) mode. In Vinyl mode, use the outer part of the Jogwheel to bend (temporary speed up slow down the tempo of the track). Hold SHIFT down and then keep this button down to play the track in reverse. When the button is released, the track will continue playing from the position it would have been if never used (CENSOR). E. HOTCUES The 4 Pads (24) offer 4 different modes, depending on the PAD MODE selection button (M). Hold the PAD MODE button down and then press one the 4 Pads to select a mode as per the image. HotCues 1-4 mode Hold the PAD MODE button (M) down and then press Pad Nr1 button to select the HotCues 1-4 mode. The LED of the PAD MODE selection button will be turned off after the selection. Each one of the 4 Pads assigns a Hot Cue Point (1 to 4) or returns the track to that Hot Cue Point. When a Pad is unlit, you can assign a Hot Cue Point by pressing it at the desired point in your track. Once it is assigned, the Hot Cue Button will light up blue. Hold SHIFT and then press any of the 4 Pads to delete its assigned Hot Cue Point. HotCues 5-8 mode Hold the PAD MODE button (M) down and then press Pad Nr2 button to select the HotCues 5-8 mode. The LED of the PAD MODE selection button will be turned on blue after the selection. VirtualDJ 8 Denon MC4000 9
 offer 4 different modes, depending on the PAD MODE selection button (M). Hold the PAD MODE button down and then press one the 4 Pads to select a mode as per the image.")
10 Same as the HotCues 1-4 mode, each one of the 4 Pads assigns a Hot Cue Point (5 to 8) or returns the track to that Hot Cue Point. When a Pad is unlit, you can assign a Hot Cue Point by pressing it at the desired point in your track. Once it is assigned, the Pad will light up blue. Hold SHIFT and then press any of the 4 Pads to delete its assigned Hot Cue Point. Hot-Loop 1-4 mode Hold the PAD MODE button (M) down and then press Pad Nr3 button to select the Hot- Loops 1-4 mode. The LED of the PAD MODE selection button will be turned on red after the selection. Each one of the 4 Pads assigns a Hot Cue Point (1 to 4) or returns the track to that Hot Cue Point, but in both cases, it also triggers a Loop. The currently selected length will be used for the triggered Loop While loop is triggered, press the same Pad to disable the Loop. The LED of the Pad will turn red if the HotCue is assigned and will flash while the loop is triggered. Hold SHIFT down and then press a pad to delete its assigned Hot Cue Point. Use the LOOP HALF and LOOP DOUBLE buttons (38) to half and double the size of the applied Loop. Loop Rolls mode Hold the PAD MODE button (M) down and then press Pad Nr4 button to select the Loop Rolls mode. The LED of the PAD MODE selection button will be turned on purple after the selection. Each one of the 4 Pads triggers a momentary (while pressed) Loop Roll of a different size in beats as per the image. Once the Pad is released, the track will continue to play from the position it would have been if the Loop was never triggered. VirtualDJ 8 Denon MC

11 F. EFFECTS & LOOPS Loops 25. AUTO. Use this button to enable/disable a Loop of a pre-selected length in beats. The LED of this button will blink if a Loop is enabled. Hold SHIFT down and then use this button to enable/disable a Loop of 4 beats length 26. HALF. Use this button to half the size in beats of the pre-selected Auto-Loop Hold SHIFT down and then use this button to set a Loop In (Entry) point for manual looping. While a Loop is triggered, hold SHIFT down and then use this button to set the jogwheel to Loop-In mode (led will blink) and fine adjust the Loop-In point using the jogwheel. 27. DOUBLE. Use this button to double the size in beats of the pre-selected Auto-Loop Hold SHIFT down and then use this button to set a Loop Out (Exit) point for manual looping. While a Loop is triggered, hold SHIFT down and then use this button to set the jogwheel to Loop-Out mode (led will blink) and fine adjust the Loop-Out point using the jogwheel. 28. RELOOP. Use this button to trigger the last triggered Loop (Reloop) Hold SHIFT down and then use this button to enable/disable the Loop Roll mode (led will blink when enabled). When the Loop Roll mode is enabled the Loops will act temporary and when exit, the track will continue playing from the position it would have been if the Loop was never triggered. Effects Both Effect units (on the left and right side) offer 2 different modes and controls for the Effects applied on the corresponding deck. Hold SHIFT down and then press the TAP (32) button to toggle between the Single FX and Multi FX effects mode. The LED of the TAP button will be turned on blue if the Multi-FX mode is selected. The Single FX mode offers a single Effect slot with up to 6 Effect parameters and 2 Effect Buttons. The Multi FX mode offers 3 Effect slots with up to 2 Effect Parameters per slot. 29. FX1 ON Single FX Mode. Press this button to trigger the selected Effect. Hold SHIFT down and then press this button to open/close the FX GUI of the selected Effect. VirtualDJ 8 Denon MC
 and fine adjust the Loop-In point using the jogwheel. 27. DOUBLE.")
12 Multi FX Mode. Press this button to trigger the selected Effect on FX Slot 1. Hold SHIFT down and then press this button to select the next Effect for FX Slot FX2 ON Single FX Mode. Press this button to select the previous Effect. Hold SHIFT down and then press this button to enable/disable the 1 st Effect button of the Effect (if available). Multi FX Mode. Press this button to trigger the selected Effect on FX Slot 2. Hold SHIFT down and then press this button to select the next Effect for FX Slot FX3 ON Single FX Mode. Press this button to select the next Effect. Hold SHIFT down and then press this button to enable/disable the 2 nd Effect button of the Effect (if available). Multi FX Mode. Press this button to trigger the selected Effect on FX Slot 3. Hold SHIFT down and then press this button to select the next Effect for FX Slot TAP. Manually adjust the tempo of the song. Tap this button at the same tempo as the track to help the software detect a different BPM reading (if needed). Hold SHIFT down and then use this button to toggle between the Single and Multi FX modes. 33. FX1 KNOB. Single FX Mode. The knob controls the 1 st parameter of the selected Effect. Hold SHIFT down and then use this knob to control the 4 th parameter of the selected Effect. Multi-FX Mode: The knobs control the 1 st parameter of the selected Effect on FX Slot 1. Hold SHIFT down and then use this knob to control the 2 nd parameter of the selected Effect on FX Slot FX2 KNOB. Single FX Mode. The knob controls the 2 nd parameter of the selected Effect. Hold SHIFT down and then use this knob to control the 5 th parameter of the selected Effect. Multi-FX Mode: The knobs control the 1 st parameter of the selected Effect on FX Slot 2. Hold SHIFT down and then use this knob to control the 2 nd parameter of the selected Effect on FX Slot FX3 KNOB. Single FX Mode. The knob controls the 3 rd parameter of the selected Effect. Hold SHIFT down and then use this knob to control the 6 th parameter of the selected Effect. Multi-FX Mode: The knobs control the 1 st parameter of the selected Effect on FX Slot 3. Hold SHIFT down and then use this knob to control the 2 nd parameter of the selected Effect on FX Slot BEATS ENC. Use the left BEATS Encoder to select the Video Transition and the right BEATS encoder to select the Video Effect for Master. VirtualDJ 8 Denon MC
. Multi FX Mode.")
13 Push the left encoder to trigger the selected Video Transition and the right encoder to trigger the selected Master Video Effect. Hold SHIFT down and then use the left encoder to adjust the 1 st parameter of the selected video Transition (if available) and the right encoder to adjust the 1 st parameter of the selected Master Video Effect (if available) Hold SHIFT down and then push the left encoder to open/close the FX GUI of the selected Video Transition and the right one to open/close the FX GUI of the selected Master Video Effect. G. MICROPHONE 37. MIC1 LEVEL. Adjust the gain (input level), of MIC1 Microphone Input 38. MIC2 LEVEL. Adjust the gain (input level), of MIC2 Microphone Input 39. ECHO. Use this button to enable/disable the Echo Effect on both Microphone Inputs. The amount of the applied Echo Effect is controlled from the front panel of the unit. 40. TALK OVER. Use this button to enable/disable Talk Over (led will blink when engaged). When enabled, the MC4000 detects the MIC inputs and attenuates the audio signal level of the master output. When using the microphone, this function prevents the microphone audio from being covered by the music, making speech easier to hear Hold SHIFT down and use this button to disable/enable MIC Inputs (Announcements) to the Booth Output. H. MASTER 25. MASTER VOLUME : Adjusts the Master Output Volume (Hardware operation - movement not visible on the VirtualDJ GUI) 26. BOOTH VOLUME. Adjusts the Booth Output Volume (Hardware operation movement not visible on the VirtualDJ GUI) 27. AUX VOLUME. Adjust the gain (input level), of the Auxiliary Input (Hardware Operation not visible on the VirtualDJ GUI) VirtualDJ 8 Denon MC
, of MIC1 Microphone Input 38. MIC2 LEVEL. Adjust the gain (input level), of MIC2 Microphone Input 39. ECHO.")
14 I. REAR PANEL 28. POWER: Use included power adapter (6V DC, 3A, center-positive) to connect MC4000 to a power outlet. While the power is switched off, plug the cable into MC4000 first, and then plug the other end into a power outlet. Use the Power Switch to turn the MC4000 on and off. Turn on the MC4000 after all input devices have been connected and before you turn on amplifiers. Turn off amplifiers before you turn off the unit 29. USB. This USB connection sends and receives audio and control information from a connected computer. 30. BOOTH OUTPUT (TRS): Use standard TRS cables to connect this output to a booth monitoring system. The level of this output is controlled by the Booth knob on the top panel. 31. MASTER OUTPUT (XLR): Connect this low-impedance XLR output to a PA system or powered monitors. The level of this output is controlled with the Master knob on the top panel. 32. MASTER OUTPUT (RCA): Use standard RCA cables to connect this output to a speaker or amplifier system. The level of this output is controlled by the Master knob on the top panel. 33. AUX. Use standard RCA cables to connect this input to an external analogue media source (CD, MPE player etc). The level of this input is controlled by the AUX knob on the top panel. 34. MIC2 INPUT. Connect a 1/4" microphone to this input. 35. MIC1 INPUT. Connect a 1/4" or a XLR microphone to this input. J. FRONT PANEL VirtualDJ 8 Denon MC
: Use standard TRS cables to connect this output to a booth monitoring system.")
15 36. HEADPHONES SOCKET. Connect your 1/4" or 1/8" headphones to this output for cueing and mix monitoring. 37. HEADPHONES VOLUME. Adjusts the volume level of the headphone output. 38. HEADPHONES MIX: Turn to mix between Cue and Program in the Headphone channel. When all the way to the left, only channels routed to Cue will be heard. When all the way to the right, only the Program mix will be heard. 39. HEADPHONES SPLIT. When this switch is in the ON position, the headphone audio will be "split" such that all channels sent to Cue are mixed to mono and applied to the left headphone channel and the Program mix is mixed to mono and applied to the right channel. When the switch is in the OFF position, Cue and Program audio will be "blended" together. 40. MIC1 EQ. Adjust the Low and High Frequencies of the Microphone 1 Input channel. 41. MIC2 EQ. Adjust the Low and High Frequencies of the Microphone 2 Input channel. 42. MIC ECHO. Use this knob to apply an Echo Effect on both Microphone Inputs. INPUTS & RECORDING The pre-defined Audio configuration of VirtualDJ 8 for the Denon DJ MC4000 provides the ability to record your mix without any further adjustments. However, since both Microphone and AUX Inputs of the Denon DJ MC4000 are directly routed to the Master Output of the unit (Hardware Inputs), those cannot be controlled from VirtualDJ or included in the Audio Setup. If you wish to record both the software mix and the Inputs (Microphones and Aux) at the same time, you will need to: - Route the Booth Output of the MC4000 to a Line Input of a different sound card (could be the MIC/LINE Input of your computer s built-in sound card) using suitable cables - Add a Record Line to the Audio Setup using the Input of the 2 nd sound card. VirtualDJ 8 Denon MC

16 Useful Links VirtualDJ web-page: VirtualDJ Support Center: VirtualDJ 8 Operation Guides: Denon DJ web-page: Denon DJ Support Center: Denon DJ MC4000 product page: Denon DJ MC4000 User Guide: Hardware Integration Department ATOMIX PRODUCTIONS Reproduction of this manual in full or in part without written permission from Atomix Productions is prohibited. VirtualDJ 8 Denon MC

VirtualDJ 8 Numark NV 1
 VirtualDJ 8 Numark NV 1 Table of Contents INSTALLATION... 3 Firmware & Drivers... 3 VirtualDJ 8 Setup... 3 Advanced Setup... 4 A. Front Side - Headphones... 5 B. Rear side - Connections... 6 C. MIXER...
VirtualDJ 8 Numark IDJLIVE II 1
 VirtualDJ 8 Numark IDJLIVE II 1 Table of Contents Installation... 3 Firmware & Drivers... 3 VirtualDJ 8 Setup... 3 Advanced Setup... 4 Operation... 5 Tailored skin... 7 Advanced Audio Setup... 8 Using
Introduction. Quick Start. Box Contents. Support. 1. Install the Software. 2. Connect and Start DJing!
 User Guide English Introduction Box Contents NV Power Cable USB Cable Software Download Card Quickstart Guide Safety & Warranty Manual Support For the latest information about this product (system requirements,
QUALITY AV PRODUCTS INMATE/INMATE USB PROFESSIONAL 19" MIXER. User Guide and Reference Manual
 INMATE/INMATE USB PROFESSIONAL " MIXER User Guide and Reference Manual INTRODUCTION Welcome to the NEWHANK INMATE and INMATE USB professional " mixers series user manual. INMATE and INMATE USB both offer
For HOME and BROADCASTER versions the options are kept simple for quick configuration.
 TABLE OF CONTENTS INTRODUCTION 3 HOME and BROADCASTER VERSION SETUPS 3 CONFIGURATION OPTIONS DEFINED 4 BASIC (QUICK) CONFIGURATIONS 5 HEADPHONES 5 EXTERNAL MIXERS 8 MICROPHONE 11 LINE INPUTS 12 ADVANCED
DDJ-SB. DJ Controller. Operating Instructions
 DJ Controller DDJ-SB http://pioneerdj.com/support/ The Pioneer DJ support site shown above offers FAQs, information on software and various other types of information and services to allow you to use your
DDJ-SR. DJ Controller. Operating Instructions
 DJ Controller DDJ-SR http://pioneerdj.com/support/ The Pioneer DJ support site shown above offers FAQs, information on software and various other types of information and services to allow you to use your
Multi Player CDJ-350. TRAKTOR PRO Connection Guide
 Multi Player CDJ-350 TRAKTOR PRO Connection Guide Introduction The CDJ-350 is equipped with a computer control mode that allows DJ software developed by other companies to be controlled upon connecting
DJ Controller. Operating Instructions
 DJ Controller http://www.prodjnet.com/support/ The Pioneer website shown above offers FAQs, information on software and various other types of information and services to allow you to use your product
GETTING STARTED WITH DJCONTROL AIR+ AND DJUCED 40
 GETTING STRTED WITH DJCONTROL IR+ ND DJUCED 40 Installation 1-C ONNECTING HEDPHONES, MICROPHONE ND SPEKERS Insert the CD-ROM. Front panel: HEDPHONES ND MICROPHONE Run the installer program. Follow the
Product Overview. Package content : 1 x DJ Mouse 1 x Scratch mat 1 x PC/MAC DJ software
 s 3 P M R U O Y CONTROL Package content : 1 x DJ Mouse 1 x Scratch mat 1 x PC/MAC DJ software Dj-Tech is proud to announce the first Dj mouse ( patent pending ), as it said, this mouse is fully designed
Traktor Audio Configuration
 Traktor Audio Configuration 1. Select the S4 CoreAudio (for Mac) or S4 ASIO (for Windows) driver. 2. Select Internal mixing mode and set the Output Monitor and Output Master using the available outputs
Mbox Basics Guide. Version 6.7 for LE Systems on Windows XP or Mac OS X. Digidesign
 Mbox Basics Guide Version 6.7 for LE Systems on Windows XP or Mac OS X Digidesign 2001 Junipero Serra Boulevard Daly City, CA 94014-3886 USA tel: 650 731 6300 fax: 650 731 6399 Technical Support (USA)
DJ CONTROL AIR and DJUCED Reference Manual
 DJ CONTROL AIR and DJUCED Reference Manual More information (forum, tutorials, videos...) available at www.herculesdjmixroom.com A. DJUCED overview... 3 1. Browser area... 4 a) Definition... 4 b) Organization...
Multi Player CDJ-850. TRAKTOR PRO/PRO 2 Connection Guide
 Multi Player CDJ-850 TRAKTOR PRO/PRO 2 Connection Guide Introduction The CDJ-850 is equipped with a computer control mode that allows DJ software developed by other companies to be controlled upon connecting
ENGLISH Core Kontrol D4i
 MANUAL ENGLISH Core Kontrol D4i V1 Highlite International B.V. Vestastraat 2 6468 EX Kerkrade the Netherlands Table of contents Warning... 2 Safety Instructions... 2 Operating Determinations... 3 Return
Document authored by: Native Instruments GmbH Software version: 2.7 (11/2014)
") Manual Disclaimer The information in this document is subject to change without notice and does not represent a commitment on the part of Native Instruments GmbH. The software described by this document
Manual Disclaimer The information in this document is subject to change without notice and does not represent a commitment on the part of Native Instruments GmbH. The software described by this document
User Manual. DXS-1000 Player
 User Manual DXS-1000 Player Table of contents 1. Safety instructions... 3 1.1. FOR SAFE AND EFFICIENT OPERATION... 3 2. Operation... 4 3. Software Display... 8 2 / 9 1. Safety instructions This device
Document authored by: Native Instruments GmbH TRAKTOR software version: 2.6 (10/2012)
") Setup Guide Disclaimer The information in this document is subject to change without notice and does not represent a commitment on the part of Native Instruments GmbH. The software described by this document
Setup Guide Disclaimer The information in this document is subject to change without notice and does not represent a commitment on the part of Native Instruments GmbH. The software described by this document
Audio Only Broadcast through Flash Media Live Encoder On Windows
 Audio Only Broadcast through Flash Media Live Encoder On Windows This user guide will take you through the steps of setting up an audio-only broadcast on a Windows PC. Other user-guides are available at
Basics. Mbox 2. Version 7.0
 Basics Mbox 2 Version 7.0 Copyright 2005 Digidesign, a division of Avid Technology, Inc. All rights reserved. This guide may not be duplicated in whole or in part without the express written consent of
CROSS DJ. CROSS DJ for U-MIX CONTROL PRO CROSS DJ LE. CROSS DJ LE for U-MIX CONTROL 2 USER MANUAL. Fine DJ Solutions.
 CROSS DJ CROSS DJ for U-MIX CONTROL PRO CROSS DJ LE CROSS DJ LE for U-MIX CONTROL 2 USER MANUAL Fine DJ Solutions. Contents 1/ Welcome /5 2/ Software Installation /7 2.1 Installation on Windows /7 2.2
DS-MP-150 ORDERCODE D1230
 DS-MP-150 ORDERCODE D1230 Congratulations! You have bought a great, innovative product from DAP Audio. The DAP Audio DS-MP-150 brings excitement to any venue. Whether you want simple plug-&-play action
Document authored by: Brian Smith, Patryk Korman TRAKTOR software version: 2.6 (10/2012)
") Manual Disclaimer The information in this document is subject to change without notice and does not represent a commitment on the part of Native Instruments GmbH. The software described by this document
Manual Disclaimer The information in this document is subject to change without notice and does not represent a commitment on the part of Native Instruments GmbH. The software described by this document
remotebox Remote Control Application for the XDJ-R1 Operating Instructions
 Remote Control Application for the XDJ-R remotebox http://pioneerdj.com/support/ The Pioneer DJ support site shown above offers FAQs, information on software and various other types of information and
CONTENTS 1. INTRODUCTION... 3 2. MINIMUM SYSTEM REQUIREMENTS... 3 3. AFTER UNPACKING YOUR DJ 4SET... 4
 CONTENTS 1. INTRODUCTION... 3 2. MINIMUM SYSTEM REQUIREMENTS... 3 3. AFTER UNPACKING YOUR DJ 4SET... 4 4. INSTALLATION... 5 4.1. Installing drivers and software... 5 4.1.1. Installation in Windows 7 /
Core Kontrol D1 ORDERCODE D1265 Highlite International B.V.
 Core Kontrol D1 ORDERCODE D1265 Highlite International B.V. Vestastraat 2 6468 EX Kerkrade The Netherlands Congratulations! You have bought a great, innovative product from DAP Audio. The DAP Audio Core
MEP-7000 FREQUENTLY ASKED QUESTIONS (FAQS)
") MEP-7000 FREQUENTLY ASKED QUESTIONS (FAQS) Note: Unless otherwise stated, PC connection refers to a Microsoft Windows operating system. What can I connect to the MEP-7000 using the USB ports? There are
MEP-7000 FREQUENTLY ASKED QUESTIONS (FAQS) Note: Unless otherwise stated, PC connection refers to a Microsoft Windows operating system. What can I connect to the MEP-7000 using the USB ports? There are
USER GUIDE ENGLISH ( 3 6 )
") USER GUIDE ENGLISH ( 3 6 ) GUÍA DEL USUARIO ESPAÑOL ( 7 10 ) GUIDE D'UTILISATION FRANÇAIS ( 11 14 ) GUIDA PER L'USO ITALIANO ( 15 18 ) BENUTZERHANDBUCH DEUTSCH ( 19 22 ) USER GUIDE (ENGLISH) Box Contents
USER GUIDE ENGLISH ( 3 6 ) GUÍA DEL USUARIO ESPAÑOL ( 7 10 ) GUIDE D'UTILISATION FRANÇAIS ( 11 14 ) GUIDA PER L'USO ITALIANO ( 15 18 ) BENUTZERHANDBUCH DEUTSCH ( 19 22 ) USER GUIDE (ENGLISH) Box Contents
OVERVIEW Playbacks: Shortcuts: Memories: Data Entry Wheels: Touchpad: Master and Blackout:
 OVERVIEW The MIDIcon is a USB MIDI control panel designed to work alongside the Elation lighting software packages. The Midicon is USB powered and uses the USB class drivers so that no driver needs to
Professional 24-bit USB Audio Interface. User s Guide
 Professional 24-bit USB Audio Interface User s Guide - Copyright 2016 Revision 1, January 2016 www.esi-audio.com INDEX 1. Introduction... 4 1.1 Features... 4 2. Installation... 5 2.1 System Recommendation...
How to Install TRAKTOR KONTROL S8
 Setup Guide Disclaimer The information in this document is subject to change without notice and does not represent a commitment on the part of Native Instruments GmbH. The software described by this document
XONE:23C QUICK START GUIDE
 XONE:23C QUICK START GUIDE Download Software Download Device Drivers Mac OS X The XONE:23C is class compliant and will work on a Mac without drivers, but for optimal performance we recommend you install
Open Pro Tools. Click File/ New Session and name your session.
 RECORD USING MIC BOOTH Open Pro Tools. Click File/ New Session and name your session. If you are working to video click File/ Import / Video and select your video. When the video pops up as a track a small
Focusrite Saffire 6 USB. User Guide
 Focusrite Saffire 6 USB User Guide 1 IMPORTANT SAFETY INSTRUCTIONS 1. Read these instructions. 2. Keep these instructions. 3. Heed all warnings. 4. Follow all instructions. 5. Do not use this apparatus
USER GUIDE ENGLISH ( 3 6 )
") USER GUIDE ENGLISH ( 3 6 ) GUÍA DEL USUARIO ESPAÑOL ( 7 10 ) GUIDE D'UTILISATION FRANÇAIS ( 11 14 ) GUIDA PER L'USO ITALIANO ( 15 18 ) BENUTZERHANDBUCH DEUTSCH ( 19 22 ) USER GUIDE (ENGLISH) Box Contents
USER GUIDE ENGLISH ( 3 6 ) GUÍA DEL USUARIO ESPAÑOL ( 7 10 ) GUIDE D'UTILISATION FRANÇAIS ( 11 14 ) GUIDA PER L'USO ITALIANO ( 15 18 ) BENUTZERHANDBUCH DEUTSCH ( 19 22 ) USER GUIDE (ENGLISH) Box Contents
Apogee ONE. QuickStart Guide. V3, March, 2013
 Apogee ONE QuickStart Guide V3, March, 2013 Contents Overview!... 5 Introduction! 5 Package contents! 6 ONE Panel Tour! 8 Optional Battery Power! 9 Connecting to your Mac!... 10 System Requirements! 10
DJPower Version 2008 Overview
 DJPower Version 2008 Overview The DJPower program is specifically designed for DJ s. The program has been created with the help of professional DJ s in both the United States and Europe. As a DJ, DJPower
DR-1 Portable Digital Recorder OWNER'S MANUAL
 » D01019610A DR-1 Portable Digital Recorder OWNER'S MANUAL Contents 1 Introduction... 3 Main functions... 3 Supplied accessories... 3 Recycling the rechargeable battery... 3 Notes about this manual...
Soundcraft Signature MTK Recording Guide
 Soundcraft Signature MTK Recording Guide S O U N D C R A F T S I G N AT U R E M T K R E C O R D I N G G U I D E 2 Table of Contents USB Overview... 04 Installing the Drivers (PC Only)... 04 Finding the
Midi Fighter Twister. User Guide. Ver 1.01 DJTECHTOOLS.COM
 Midi Fighter Twister User Guide DJTECHTOOLS.COM Ver 1.01 Introduction This user guide is split in two parts, first covering the Midi Fighter Twister hardware, then the second covering the Midi Fighter
GETTING STARTED WITH STUDIO ONE ARTIST
 GETTING STARTED WITH STUDIO ONE ARTIST 2009, PreSonus Audio Electronics, Inc. All Rights Reserved. TABLE OF CONTENTS Studio One Artist Features...3 System Requirements...4 Installation and Authorization...5
Document authored by: Native Instruments GmbH Software version: 2.6.4 (09/2013)
") Setup Guide Disclaimer The information in this document is subject to change without notice and does not represent a commitment on the part of Native Instruments GmbH. The software described by this document
Setup Guide Disclaimer The information in this document is subject to change without notice and does not represent a commitment on the part of Native Instruments GmbH. The software described by this document
Audio-Technica AT-LP60-USB, AT-LP120-USB, AT-LP240-USB & AT-LP1240-USB Turntables. Software Guide
 Audio-Technica AT-LP60-USB, AT-LP120-USB, AT-LP240-USB & AT-LP1240-USB Turntables Software Guide Audio-Technica USB Turntables Contents A note about software... 2 System requirements... 2 Installing Audacity
miditech Audiolink II
 miditech Audiolink II "Class Compliant" USB Audio Interface (WinXP/Vista/Win7/Mac OSX no drivers necessary) 16 Bit/ 48 khz resolution line stereo interface XLR Mic preamp with 48 V Phantom Power and gain
USER GUIDE. Publication AP8509. Allen & Heath 1 XONE:K2 User Guide
 USER GUIDE Publication AP8509 Allen & Heath 1 XONE:K2 User Guide Limited One Year Warranty This product is warranted to be free from defects in materials or workmanship for period of one year from the
User Guide FFFA001106. www.focusrite.com
 User Guide FFFA001106 www.focusrite.com TABLE OF CONTENTS OVERVIEW.... 3 Introduction...3 Features.................................................................... 3 Box Contents...3 System Requirements....4
Recording using Cubase LE 6
 PowerMate 3 /CMS 3 Application Note 1 Recording using Cubase LE 6 This document describes how to record a live event using the DIGITAL AUDIO INTERFACE of the PowerMate 3 / CMS 3. In preparation for the
VirtualDJ DJC MP3 e2 CONTENTS 1) INTRODUCTION... 3. 2) SYSTEM REQUIREMENTS... 3 a) PC... 3 b) Mac... 3
 INTRODUCTION... 3. 2) SYSTEM REQUIREMENTS... 3 a) PC... 3 b) Mac... 3") CONTENTS VirtualDJ DJC MP3 e2 1) INTRODUCTION... 3 2) SYSTEM REQUIREMENTS... 3 a) PC... 3 b) Mac... 3 3) VIRTUALDJ DJC MP3 E2 OVERVIEW... 4 a) Browser area: folders area + files area... 4 b) Deck A...
CONTENTS VirtualDJ DJC MP3 e2 1) INTRODUCTION... 3 2) SYSTEM REQUIREMENTS... 3 a) PC... 3 b) Mac... 3 3) VIRTUALDJ DJC MP3 E2 OVERVIEW... 4 a) Browser area: folders area + files area... 4 b) Deck A...
AUDIO KONTROL 1. Operation Manual
 AUDIO KONTROL 1 Operation Manual The information in this document is subject to change without notice and does not represent a commitment on the part of NATIVE INSTRUMENTS GmbH. The software described
Getting Started Guide
 Getting Started Guide Overview Launchpad Mini Thank you for buying our most compact Launchpad grid instrument. It may be small, but its 64 pads will let you trigger clips, play drum racks, control your
VirtualDJ 8 Quick Setup Guide 1
 VirtualDJ 8 Quick Setup Guide 1 Table of Contents Welcome to VirtualDJ 8!... 3 Installation... 4 WINDOWS... 4 MAC... 5 Opening VirtualDJ 8 for the first time... 7 Installation Notes... 9 Application paths...
Playing Audio through the Zodiac DAC using S/PDIF (electrical or optical input cable) Source. Playing Audio through the Zodiac DAC using USB Sources
 Source. Playing Audio through the Zodiac DAC using USB Sources") Using the Zodiac DAC with Mac OS X (Screenshots taken using OS X Version 10.6.6) Playing Audio through the Zodiac DAC using S/PDIF (electrical or optical input cable) Source Playing Audio through the Zodiac
Using the Zodiac DAC with Mac OS X (Screenshots taken using OS X Version 10.6.6) Playing Audio through the Zodiac DAC using S/PDIF (electrical or optical input cable) Source Playing Audio through the Zodiac
User Manual. Please read this manual carefully before using the Phoenix Octopus
 User Manual Please read this manual carefully before using the Phoenix Octopus For additional help and updates, refer to our website To contact Phoenix Audio for support, please send a detailed e-mail
OVERVIEW HARDWARE. Mode buttons. USB Micro socket. Kensington Security Slot. 8x8 playable grid. Mode buttons
 OVERVIEW Launchpad Mini is a compact version of the celebrated Novation Launchpad for the ipad generation. 64 three-colour pads enable you to produce and perform music with your ipad by triggering samples
Since the explanations use actual screen shots, potentially complicated setting screens are made easy!
 VariOS Tips Do you want to have the VariOS play a much greater role in the music production process? Do you want to use the VariOS with your sequencer, such as SONAR or Logic? If so, you need to read these
Getting Started with a blank desk...3. Understanding the Rear Panel and Top Connectors...3. Understanding the Front Panel...5
 2nd Edition Table of contents Getting Started with a blank desk...3 Understanding the Rear Panel and Top Connectors...3 Understanding the Front Panel...5 Controlling Channel Faders...6 Changing INPUT PATCH...7
User Manual. For additional help please send a detailed e-mail to [email protected]. - 1 Phoenix Audio Technologies www.phnxaudio.
 User Manual Please read the instructions in this manual before using the Duet Please refer to our website www.phnxaudio.com for more information, specifically to our Q&A section in our Support page. For
MIDI Setup with TonePort UX2 and KB37
 MIDI Setup with TonePort UX2 and KB37 Table of Contents FOOTSWITCH CONNECTIONS... 2 TONEPORT KB37 CONTROLLER LAYOUT... 3 TONEPORT KB37 DEFAULT MESSAGES... 4 Default message map for GearBox 3.0... 4 Default
Kanguru Micro MP3 PRO USB2.0 User s Manual
 Kanguru Micro MP3 PRO USB2.0 User s Manual MP3/WMA Player + Digital Voice Recorder FM Tuner + USB Flash Drive Copyright 2005, All Rights Reserved. This manual applies to 1.1 or later versions of the Kanguru
MixMeister EZ Converter Setup & Troubleshooting Contents:
 MixMeister EZ Converter Setup & Troubleshooting Contents: Windows Vista and Windows 7 Setup Instructions... 2 Windows XP Setup Instructions... 4 Macintosh OSX - Setup Instructions... 6 Troubleshooting...
How to Start Making Music in Pro Tools
 How to Start Making Music in Pro Tools Read this guide if you are new to Pro Tools or are just starting out making your own music. Inside, you ll find quick examples of how to record, compose, mix, and
Message from the Development Team. Contents. Message from the Development Team..2. Panel Controls and Terminals...3. Using the UR22mkII...
 EN Contents Contents Message from the Development Team..2 Panel Controls and Terminals...3 Front Panel...3 Rear Panel...5 Software...7 Using the UR22mkII...10 Connections...10 Configuring Audio Driver
0 0 0 2 D C 1.0 2005 B Y JA E E D L O TR N O -C B
 B-CONTROL DEEJAY 10 2005 B-CONTROL DEEJAY 1) 2) 3) 4) 5) ( ) 6) 7) 8) ( ) 9) 10) 11) / 12) / - ¼ Spezielle Studiotechnik GmbH 13) 14) 15) 2005 Spezielle Studiotechnik GmbH Spezielle Studiotechnik GmbH
USING YOUR DMX PROFUSION
 Set Up Guide USING YOUR DMX PROFUSION io FOR 1 Connect 2 Set Up 3 Listen SIMPLE PERSONALIZED UNLIMITED ECONOMICAL LICENSED Welcome Thank you for choosing DMX to provide your Pandora listening experience
QUICK SETUP GUIDE SETUP FOR ICONNEX SOUNDCARD AND AUDACITY RECORDING SOFTWARE
 QUICK SETUP GUIDE SETUP FOR ICONNEX SOUNDCARD AND AUDACITY RECORDING SOFTWARE SETUP GUIDE Congratulations on your purchase of the ikey Audio iconnex soundcard. This guide will help you setup the iconnex
User Guide. VT1708A VIA HD Audio Adeck For Windows 2000, Windows XP & Server 2003. Jun 13 2007 Revision 1.1e
 VT1708A VIA HD Audio Adeck For Windows 2000, Windows XP & Server 2003 Jun 13 2007 Revision 1.1e VT1708A VIA HD Audio Adeck For Windows 2000, Windows XP & Server 2003 Revision History Rev Date Initial Note
Midi Fighter 3D Remix Deck Firmware
 Midi Fighter 3D Remix Deck Firmware The Remix Deck firmware unlocks remix deck functionality for the Midi Fighter 3D in Traktor 2.5. This document describes how to flash your Midi Fighter with the new
1 All safety instructions, warnings and operating instructions must be read first.
 ONYX USER MANUAL 2 Dateq ONYX Manual Safety instructions EN Safety instructions 1 All safety instructions, warnings and operating instructions must be read first. 2 All warnings on the equipment must be
user manual It is important to read this user manual prior to using your new product for the first time.
 user manual Thank you for purchasing an Acoustic Research product. We pride ourselves on the quality and reliability of all our electronic products. For service or repairing, please contact the authorized
Document authored by: Native Instruments GmbH Software version: 2.7 (01/2015)
") Setup Guide Disclaimer The information in this document is subject to change without notice and does not represent a commitment on the part of Native Instruments GmbH. The software described by this document
Setup Guide Disclaimer The information in this document is subject to change without notice and does not represent a commitment on the part of Native Instruments GmbH. The software described by this document
MTX Setup Manual. Special Notice. MTX Setup Manual 1
 MTX Setup Manual This manual serves as an introduction to possible installation methods and application examples for the MTX series of DSP processors used in conjunction with MTX Editor control software.
1. Introduction. 2. What s in the Box
 Table of Contents 1. Introduction.............................................................................................2 2. What s in the Box........................................................................................2
DDJ-T1 DJ CONTROLLER. Operating Instructions
 DJ CONTROLLER DDJ-T http://www.prodjnet.com/support/ The Pioneer website shown above offers FAQs, information on software and various other types of information and services to allow you to use your product
Digital Video Capture and Edit with imovie HD 6.0.2
 RESEARCH AND INSTRUCTIONAL SUPPORT REVISED: AUGUST 2006 Project Management Digital Video Capture and Edit with imovie HD 6.0.2 Plan out your time and process before beginning the capture and edit. A few
To reduce the risk of electrical shocks, fire, and related hazards:
 Owner s Manual 1 Contents 1. Safety Notes 5 2. Introduction 6 3. Features 7 4. Installation Guide 8 5. Front Panel Explained 9 6. Rear Panel Explained 10 7. Software Control Panel 12 8. Advanced User Tips
PCDJ Leverbaar. Bericht van 24-09-2008. Geplaatst door: Dieter Popelier. De producten van PCDJ zijn terug op stock!!
 DJ PCDJ Leverbaar Bericht van 24-09-2008 Geplaatst door: Dieter Popelier De producten van PCDJ zijn terug op stock!! Er zijn 3 nieuwe softwarepaketten: PCDJ VJ, PCDJ DEX en PCDJ Reflex maar ook de oude
CONTROL SWITCHER User s Manual (Preliminary)
") CONTROL SWITCHER User s Manual (Preliminary) www.voodoolab.com Copyright 2010 by Digital Music Corporation. This publication is protected by copyright and all rights are reserved. Voodoo Lab, Control Switcher,
CONTROL SWITCHER User s Manual (Preliminary) www.voodoolab.com Copyright 2010 by Digital Music Corporation. This publication is protected by copyright and all rights are reserved. Voodoo Lab, Control Switcher,
LSR4300 Control Center Software
 LSR4300 Control Center Software User Guide Updated for version 2.0 software Table Of Contents Introduction...3 System Requirements...4 Installation...4 Launching The Software...5 Reference...7 Main Screen...7
USER GUIDE. Publication AP7080. Allen & Heath 1 XONE:1D User Guide
 USER GUIDE Publication AP7080 Allen & Heath 1 XONE:1D User Guide Limited One Year Warranty This product is warranted to be free from defects in materials or workmanship for period of one year from the
USB AUDIO INTERFACE. UR22 Operation Manual 1
 USB AUDIO INTERFACE EN DE FR ES IT ZH JA UR22 Operation Manual 1 Contents Contents Contents...2 A Message From the Development Team...3 Accessory disk...3 Power supply...3 Cubase AI Download...3 How to
SESSION MUSIC PRODUCER The Make-Music-Now Vocal Recording Studio
 SESSION MUSIC PRODUCER The Make-Music-Now Vocal Recording Studio Quick Start Guide Session Music Producer Quick Start Guide 1 Introduction Congratulations on your purchase of M-Audio Session Music Producer:
DIGICLIENT 8.0 Remote Agent Software
 DIGICLIENT 8.0 Remote Agent Software MODEL: D17800 Series Instruction Manual English Version 1.0 Copyright 2007 Digimerge Technologies Inc Table of Contents Table of Contents About the DigiClient 8.0...
MV-8800 Production Studio
 ÂØÒňΠWorkshop MV-8800 Production Studio Using the MV-8800 with an External Sequencer 2007 Roland Corporation U.S. All rights reserved. No part of this publication may be reproduced in any form without
Understanding the DriveRack PA. The diagram below shows the DriveRack PA in the signal chain of a typical sound system.
 Understanding the DriveRack PA The diagram below shows the DriveRack PA in the signal chain of a typical sound system. The diagram below shows all the pieces within a sound system that the DriveRack PA
40 Watt Mixer Amplifier Owners Manual with Media Player
 40 Watt Mixer Amplifier with Media Player Model #USB-80 2009 MCM Electronics MCM Custom Audio MCM Electronics Centerville, Ohio www.mcmelectronics.com SAFETY INSTRUCTIONS Please be sure to read all the
Marantz PMD660 Digital Recorder Guide
 Marantz PMD660 Digital Recorder Guide August 2005 Set Up Inserting a Compact Flash Card The PMD660 records onto CF or Compact Flash Cards. To insert a CF card: 1. Open the CF Card Door on the front side
Classroom Setup... 2 PC... 2 Document Camera... 3 DVD... 4 Auxiliary... 5. Lecture Capture Setup... 6 Pause and Resume... 6 Considerations...
 Classroom Setup... 2 PC... 2 Document Camera... 3 DVD... 4 Auxiliary... 5 Lecture Capture Setup... 6 Pause and Resume... 6 Considerations... 6 Video Conferencing Setup... 7 Camera Control... 8 Preview
PM1122 INT DIGITAL INTERFACE REMOTE
 PM1122 INT DIGITAL INTERFACE REMOTE PM1122 INT front panel description: 1. Clear wireless remotes knob: push this button for more than 2 seconds to clear the list of all assigned wireless remote settings
UPDATING THE DM 24 FIRMWARE VIA MIDI
 Special Notes for IF FW/DM Users Updating the DM 24 Firmware to V3.00 Please note that this update is only necessary if using the IF FW/DM FireWire interface card with the DM 24. If you are not using this
USER S MANUAL LEN15M
 USER S MANUAL LEN15M LEN 15M MAJORCOM FEATURES - REPRODUCTION METHOD AND SOUND QULITY Can reproduce and record high sound quality of sound by using 256kbps transmission rate on MP3 method. - STORAGE CAPACITY
Amcrest 960H DVR Quick Start Guide
 Amcrest 960H DVR Quick Start Guide Welcome Thank you for purchasing our Amcrest 960H DVR! This quick start guide will help you become familiar with our DVR in a very short time. Before installation and
US-122L/US-144 Release Notes
 US-122L/US-144 Release Notes Updates Always ensure that you are running the latest driver software and US-122L or US-144 firmware by visiting TASCAM s web site (http://www.tascam.com). Important Notice
Editor / Plug-In Editor Manual
 Editor / Plug-In Editor Manual E 3 Table of Contents Introduction................................................. Main features...................................................................... Please
Eclipse 180 User s Manual
 Eclipse 180 User s Manual Congratulations on purchasing your Eclipse Personal Media Player! To get the most out of your purchase, please take the time to carefully read through this manual. Foreword If
BTX180 Wireless Bluetooth Speaker
 BTX180 Wireless Bluetooth Speaker User Manual 2012 Kinivo LLC. All rights reserved. Kinivo is a trademark of Kinivo LLC. Bluetooth word mark and the Bluetooth logo are registered trademarks of Bluetooth
Lenovo Miix 2 8. User Guide. Read the safety notices and important tips in the included manuals before using your computer.
 Lenovo Miix 2 8 User Guide Read the safety notices and important tips in the included manuals before using your computer. Notes Before using the product, be sure to read Lenovo Safety and General Information
Quick Start Guide. DVR DS-7200HWI-SH Series DVR. www.hikvision.com. First Choice For Security Professionals
 Quick Start Guide DVR DS-7300HWI-SH Series DVR DS-7200HWI-SH Series DVR NOTE: For more detailed information, refer to the User s Manual on the CD-ROM. You must use your PC or MAC to access the files. www.hikvision.com