Privacy Button IP7133/IP7134. IP Surveillance
|
|
|
- Silvester Jefferson
- 8 years ago
- Views:
Transcription
1 Privacy Button IP7133/IP7134 IP Surveillance
2 Table of Contents Overview3 Read before use 3 Package contents 3 Physical description 4 Installation 7 Network deployment 7 Software installation 9 Accessing the Network Camera 10 Using web browsers 10 Using RTSP players 12 Using 3GPP-compatible mobile devices 13 Using VIVOTEK recording software 14 Main Page 15 Client Settings 18 Configuration 20 System 20 Security 22 Network 23 Wireless LAN (IP7134 only) 30 DDNS 33 Access list 35 Audio and video 36 Motion detection 41 Application 43 System log 50 View parameters 51 Maintenance 52 Appendix 56 URL Commands of the Network Camera 56 Technical Specifications 88 Technology License Notice 89 Electromagnetic Compatibility (EMC) User's Manual

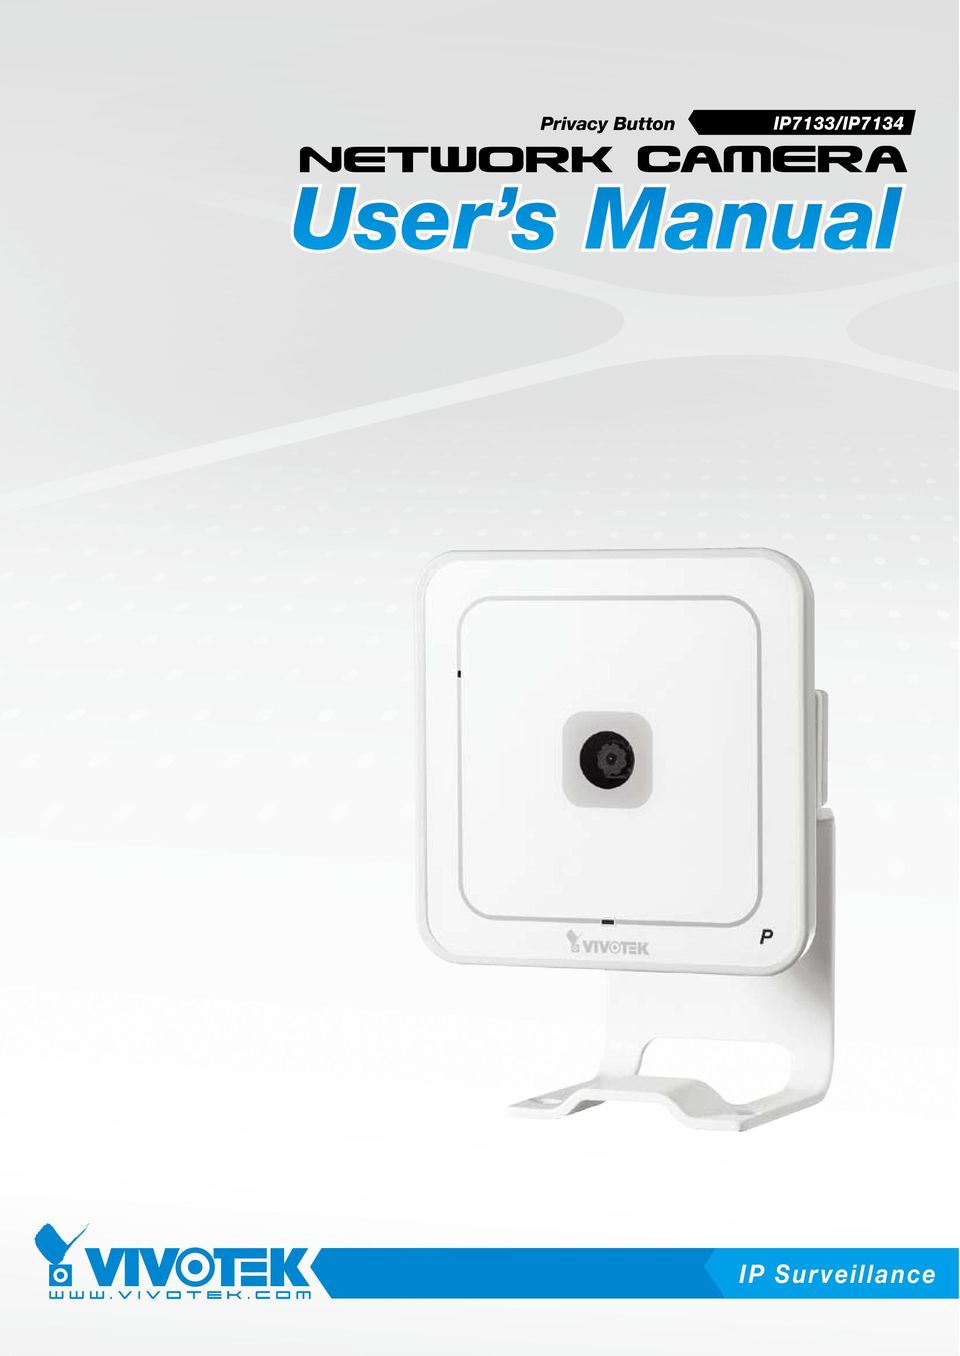
3 Overview VIVOTEK IP7133 (Wired)/IP7134 (Wireless) is an easy-to-use network camera, specifically designed for home security applications with a compact, stylish exterior. Despite its ultracompact size, it incorporates with a good many advanced features to fit your needs. Embedded with the VIVOTEK VVTK-1000 SoC, it enables to simultaneously deliver dual streams in MPEG-4 and MJPEG with different video resolution and quality upon different devices such as PC or 3G cell phones. With this network camera, you can quickly, easily access it to view the current status of your children, the elderly, or even your pets with live, clear videos while you re away from home. IP7134 also supports built-in b/g WLAN capability, which can prevent your elegant home decoration from tangled cablings. Additionally, it comes with a push button on the front side for privacy use. You are able to manually stop the operation of video monitoring with ease while getting back home. This considerate design avoids the feeling of being monitored all day long. With the delicate design and versatile functions, VIVOTEK IP7133/IP7134 is definitely the best choice for the fundamental establishment of home security. Read before use The use of surveillance devices may be prohibited by law in your country. The Network Camera is not only a high-performance web-ready camera but also can be part of a flexible surveillance system. It is the user s responsibility to ensure that the operation of such devices is legal before installing this unit for its intended use. It is important to first verify that all contents received are complete according to the Package contents listed below. Take notice of the warnings in Quick Installation Guide before the Network Camera is installed; then carefully read and follow the instructions in the Installation chapter to avoid damages due to faulty assembly and installation. This also ensures the product is used properly as intended. The Network Camera is a network device and its use should be straightforward for those who have basic network knowledge. It is designed for various applications including video sharing, general security/surveillance, etc. The Configuration chapter suggests ways to best utilize the Network Camera and ensure proper operations. For the creative and professional developers, the URL Commands of the Network Camera section serves to be a helpful reference to customize existing homepages or integrating with the current web server. Package contents IP7133/IP7134 Power adapter Camera stand Software CD Warranty card Quick installation guide Screws User's Manual - 3

4 Physical description Front panel Built-in Microphone Lens Status LED P Privacy button Connectors Power cord socket Recessed reset button RESET ETHERNET IO Ethernet 10/100 RJ45 socket General I/O terminal block General I/O Terminal Block This Network Camera provides a general I/O terminal block which is used to connect external input / output devices. The pin definitions are described below. 1: Power 2: Digital output 3: Digital input 4: Ground 4 - User's Manual

5 DI/DO Diagram Refer to the following illustration for connection method. 5V PIN 1 Power+5V PIN 2 Digital output +5V PIN 3 Digital input PIN 4 Ground Status LED The LED indicates the status of the Network Camera. Status LED Privacy button Description Solid red Solid blue Power is being supplied to the camera. Blinking red Blinking blue The camera is booting up. Solid red OFF The camera is trying to obtain an IP address. Blinking green OFF An IP address has been successfully assigned to the camera and the camera is working. Blinking red OFF During firmware upgrading. Blinking green and red OFF Restore the camera. User's Manual - 5

6 Hardware Reset ETHERNET IO P RESET Status LED Reset button There is a reset button on the back cover of the Network Camera. It is used to reboot the Network Camera or restore the Network Camera to factory default. Sometimes rebooting the Network Camera could set the Network Camera back to normal state. If the problems remain after rebooted, restore the Network Camera to factory default and install again. Reboot: Press and release the reset button. The status LED will blinks in red. Restore: Press the reset button continuously until the status LED blinks in red and green simultaneously. Note that all settings will be restored to factory default. 6 - User's Manual

7 POWER COLLISION LINK RECEIVE PARTITION POWER COLLISION LINK RECEIVE PARTITION VIVOTEK - A Leading Provider of Multimedia Communication Solutions Installation Network deployment Setup the Network Camera over the Internet This section explains how to configure the Network Camera to Internet connection. 1. If you have external devices such as sensors and alarms, make connection from general I/O terminal block. 2. Connect the camera to a switch via Ethernet cable. Use Catagory 5 Cross Cable when Network Camera is directly connected to PC. 3. Connect the supplied power cable from the Network Camera to a power outlet : Power 2: Digital output 3: Digital input 4: Ground There are several ways to setup the Network Camera over the Internet. The first way is to setup the Network Camera behind a router. The second way is to utilize a static IP. The third way is to use PPPoE. Internet connection via a router Before setting up the Network Camera over the Internet, make sure you have a router and follow the steps below. 1. Connect your Network Camera behind a router, the Internet environment is illustrated as below. About how to get your IP address, please refer to Software installation on page 9 for details. Internet WAN (Wide Area Network ) Router IP address : from ISP IP address : Subnet mask : Default router : LAN (Local Area Network) Router IP address : Cable or DSL Modem IP address : Subnet mask : Default router : User's Manual - 7

8 2. In this case, if the Local Area Network (LAN) IP address of your Network Camera is , please forward the following ports for the Network Camera on the router. HTTP port RTSP port RTP port for audio RTCP port for audio RTP port for video RTCP port for video If you have changed the port numbers on the Network page, please open the ports accordingly on your router. For information on how to forward ports on the router, please refer to the user s manual of your router. 3. Find out the public IP address of your router provided by your ISP (Internet Service Provider). Use the public IP and the secondary HTTP port to access the Network Camera from the Internet. Please refer to Network Type on page 23 for details. Internet connection with static IP Choose this connection type if you are required to use a static IP for the Network Camera and follow the steps below. 1. Set up the Network Camera in LAN. Please refer to Software installation on page 9 for details. 2. Go to Configuration > Network > Network Type. Select LAN > Use fixed IP address. 3. Enter the static IP, Subnet mask, Default router, Primary DNS provided by your ISP. Internet connection via PPPoE (Point-to-Point over Ethernet) Choose this connection type if you are connected to the Internet via a DSL Line. Please refer to PPPoE on page 24 for details. 8 - User's Manual
. Use the public IP and the secondary HTTP port to access the Network Camera from the Internet.")
9 Software installation Installation Wizard 2 (IW2), free-bundled software packaged in the product CD, helps to set up your Network Camera in LAN. 1. Install the IW2 under the Software Utility directory from the software CD. Double click the IW2 shortcut on your desktop to launch the program. 2. The program will conduct analyses on your network environment. After your network environment is analyzed, please click Next to continue the program. 3. The program will search all VIVOTEK devices on the same LAN. 4. After searching, the main installer window will pop up. Click on the MAC and model name which match the product label on your device to connect to the Network Camera. IP7133 MAC:0002D ! Assembled from tested components Complete system not tested FCC ID: RRK D User's Manual - 9

10 Accessing the Network Camera This chapter explains how to access the Network Camera through web browsers, RTSP players, 3GPP-compatible mobile devices, and VIVOTEK recording software. Using web browsers 1. Launch your web browser (ex. Microsoft Internet Explorer, Mozilla Firefox or Netscape). 2. Enter the IP address of the Network Camera in the address field. Press Enter. 3. The live video will be displayed in your web browser. Network Camera NOTE For Mozilla Firefox or Netscape users, your browser will use Quick Time to stream the live video. Network Camera Network Camera 10 - User's Manual

11 By default, the Network Camera is not password-protected. To prevent unauthorized accesses, it is highly recommended to set a password for the Network Camera. For more information about how to enable password protection, please refer to Security on page 22. If you see a warning message at initial access, click Yes to install an ActiveX control on your computer. If you see a dialog box indicating that your security settings prohibit running ActiveX Controls, please enable your ActiveX Controls for your browser. 1. Choose Tools > Internet Options > Security > Custom Level. 2. Look for Download signed ActiveX controls; select Enable or Prompt. Click OK. User's Manual - 11

12 Using RTSP players To view the MPEG-4 streaming media using RTSP players, you can use one of the following players that support RTSP streaming. Quick Time Player Real Player VLC media player mpegable Player pvplayer 1. Launch a RTSP player. 2. Choose File > Open URL. An URL dialog box will pop up. 3. Type the URL command in the text box. The format is rtsp://<ip address>:<rtsp port>/<rtsp Streaming access name for stream1 or stream2> For example: rtsp:// :554/live.sdp 4. The live video will be displayed in your player. For more information on how to configure RTSP access name, please refer to RTSP Streaming on page 28 for details User's Manual

13 Using 3GPP-compatible mobile devices To view the streaming media through 3GPP-compatible mobile devices, make sure the Network Camera can be accessed from the Internet. For more information on how to set up the Network Camera over the Internet, please refer to Setup the Network Camera over the Internet on page 7. To utilize this feature, please check the following settings on your Network Camera: 1. Because most players on 3GPP mobile phones do not support RTSP authentication, make sure the authentication mode of RTSP streaming is set to disable. For more information, please refer to RTSP Streaming on page As the 3G network bandwidth is limited, you can t use large video size. Please set the video and audio streaming parameters as listed below. For more information, please refer to Audio and video on page 36. Video Mode MPEG-4 Frame size 176 x 144 Maximum frame rate 5 fps Intra frame period 1S Video quality (Constant bit rate) 40kbps Audio type (GSM-AMR) 12.2kbps 3. As most ISP and players only support port number 554 to allow RTSP streaming to go through, please set the RTSP port to 554.For more information, please refer to RTSP Streaming on page Launch the players on 3GPP-compatible mobile devices, (ex. Real Player). Type the URL commands in the player. The format is rtsp://<public ip address of your camera>:<rtsp port>/<rtsp Streaming access name for stream1 or stream2>. For example: rtsp:// :554/live.sdp User's Manual - 13

14 Using VIVOTEK recording software The product software CD also contains VIVOTEK s recording software, allowing simultaneous monitoring and video recording for multiple Network Cameras. Please install the recording software, then launch the program to add the Network Camera to the Channel list. For detailed information about how to use the recording software, please refer to the user s manual of the software or download the manual from User's Manual

15 Main Page This chapter explains the layout of the main page. It is composed of the following four sections: VIVOTEK INC. Logo, Menu, Host Name, and Live Video Window. Logo of VIVOTEK INC. Network Camera Host name Menu Live view window VIVOTEK INC. Logo Click this logo to visit VIVOTEK website. Menu Snapshot: Click this button to capture and save still images. The captured images will be displayed in a pop-up window. Right-click the image and choose Save Picture As to save it in JPEG (*.jpg) or BMP (*.bmp) format. Language: Click this button to choose a language for the displayed interface. Language options are available in: English, Deutsch, Español, Français, Italiano, 日 本 語, Português, 簡 体 中 文, and 繁 體 中 文. Configuration: Click this button to access the configuration page of Network Camera. It is suggested that a password is applied to the Network Camera so that only the administrator can configure the Network Camera. For more information, please refer to Configuration on page 20. Client Settings: Click this button to access the client setting page. For more information, please refer to Client Settings on page 18. Digital Output: Click this button to turn on or off the digital output device. Host Name The host name can be customized to fit your needs. For more information, please refer to System on page 20. User's Manual - 15

16 Live Video Window The following window is displayed when the video mode is set to MPEG-4: Video title Title and time IP7133(TCP-AV) IP :14: /09/15 MPEG-4 protocol and media options Time Video and audio control buttons Video title: The video title can be configured. For more information, please refer to Video settings on page 36. Time: Display the current time. For more information, please refer to Video settings on page 36. Title and time: Video title and time can be stamped on the streaming video. For more information, please refer to Video settings on page 36. MPEG-4 protocol and media options: The transmission protocol and media options for MPEG-4 video streaming. For more information, please refer to Client Settings on page 18. Video and audio control buttons: Depending on the Network Camera model and Network Camera configuration, some buttons may not be available. Digital zoom edit: Uncheck Disable digital zoom to enable the zoom operation. The navigation screen indicates which part of the image is being magnified. To control the zoom level, drag the slider bar. To move to a different area you want to magnify, drag the navigation screen. Start MP4 recording: Click this button to record video clips in MP4 file format to your computer. Press the Stop MP4 recording button to end recording. When you exit the web browser, video recording stops accordingly. To specify the storage destination and the file name, please refer to MP4 Saving Options on page 19 for details. Pause: Pause the transmission of streaming media. The button becomes clicking the Pause button. Resume: Resume the transmission of streaming media. The button becomes clicking the Resume button. Resume button after Pause button after Stop: Stop the transmission of streaming media. Click the transmission. Resume button to continue Volume: When the computer. mute function is not activated, move the slider bar to adjust the volume at local Mute: Turn off the volume at local computer. Click to turn on the audio function User's Manual

17 The following window is displayed when the video mode is set to MJPEG: Video title Title and time IP7133 IP :14: /09/15 Time Video control buttons Video title: The video title can be configured. For more information, please refer to Video settings on page 36. Time: Display the current time. For more information, please refer to Video settings on page 36. Title and time: Video title and time can be stamped on the streaming video. For more information, please refer to Video settings on page 36. Video control buttons: Depending on the Network Camera model and Network Camera configuration, some buttons may not be available. Digital zoom edit: Uncheck Disable digital zoom to enable the zoom operation. The navigation screen indicates which part of the image is being magnified. To control the zoom level, drag the slider bar. To move to a different area you want to magnify, drag the navigation screen. Start MP4 recording: Click this button to record video clips in MP4 file format to your computer. Press the Stop MP4 recording button to end recording. When you exit the web browser, video recording stops accordingly. To specify the storage destination and the file name, please refer to MP4 Saving Options on page 19 for details. User's Manual - 17

18 Client Settings This chapter explains how to select the streaming source, transmission mode and saving options at local computer. It is composed of the following four sections: Stream Options, MPEG- 4 Media Options, MPEG-4 Protocol Options and MP4 Saving Options. When completed with the settings on this page, click Save on the page bottom to enable the settings. Stream Options The Network Camera supports MPEG-4 and MJPEG dual streams. For more information, please refer to Video settings on page 36. MPEG-4 Media Options Select to stream video or audio data. This works only when the video mode is set to MPEG-4. MPEG-4 Protocol Options Depending on your network environment, there are four transmission modes of MPEG-4 streaming: UDP unicast: This protocol allows for more real-time audio and video streams. However, network packets may be lost due to network burst traffic and images may be broken. Activate UDP connection when occasions require time-sensitive responses and the video quality is less important. Note that each unicast client connecting to the server takes up additional bandwidth and the Network Camera allows up to ten simultaneous accesses. UDP multicast: This protocol allows multicast-enabled routers to forward network packets to all clients requesting streaming media. This helps to reduce the network transmission load of the Network Camera while serving multiple clients at the same time. Note that to utilize this feature, the Network Camera must be configured to enable multicast streaming at the same time. For more information, see RTSP Streaming on page User's Manual

19 TCP: This protocol guarantees the complete delivery of streaming data and thus provides better video quality. Nevertheless, the downside with this protocol is that its real-time effect is not as good as that of the UDP protocol. HTTP: This protocol allows the same quality as TCP protocol and you don t need to open specific port for streaming under some network environments. Users inside a firewall can utilize this protocol to allow streaming data to come through. MP4 Saving Options Users can record the live video as they are watching it by clicking Start MP4 Recording on the main page. Here, you can specify the storage destination and file name. Folder: Specify a storage destination for the recorded video files. File Name Prefix: Enter the text that will be put in front of the video file name. Add date and time suffix to the file name: Select this option to add date and time to the file name suffix. CLIP_ File name prefix Date and time suffix The format is: YYYYMMDD_HHMMSS User's Manual - 19

20 Configuration Only Administrators can access the system configuration page. Each category in the left menu will be explained in the following sections. System This section explains how to configure the basic settings for the Network Camera, such as the host name and system time. It is composed of the following three columns: System, System Time and DI and DO. When completed with the settings on this page, click Save on the page bottom to enable the settings. System Host name: Set a desired name for the Network Camera. The text will be displayed at the top of the main page. Turn of the LED indicators: If you don t want to let others know that the network camera is on, you can select this option to turn off the LED indicators. System Time 20 - User's Manual

21 Time zone: According to your local time zone, select one from the drop-down list. Keep current date and time: Select this option to reserve the current date and time of the Network Camera. The Network Camera s internal real-time clock maintains the date and time even when the power of the system is turned off. Sync with computer time: Select this option to synchronize the date and time of the Network Camera with the local computer. The read-only date and time of the PC is displayed as updated. Manual: The administrator can enter the date and time manually. Note that the date and time format are [yyyy/mm/dd] and [hh:mm:ss]. Automatic: The Network Time Protocol is a protocol serves synchronize computer clocks by periodically querying an NTP Server. NTP server: Assign the IP address or domain name of the time-server. Leaving the text box blank connects the Network Camera to the default time-servers. Update interval: Select to update the time with the NTP server on hourly, daily, weekly, or monthly basis. Enable Daylight Saving Time: Select this option to enable daylight saving time (DST). During DST, the system clock moves one hour ahead. Please follow the steps below to enable daylight saving time: 1. Select the time zone for your Network Camera first. 2. Select Enable Daylight Saving Time. 3. The starting time and ending time of the DST will be displayed in this option. 4. To manually configure the daylight saving time rules, please refer to Upload / Export Daylight Saving Time Configuration File on page 53 for details. DI and DO Digital input: Select High or Low to define normal status of the digital input. The Network Camera will report the current status. Digital output: Select Grounded or Open to define normal status of the digital output. The Network Camera will show whether the trigger is activated or not. User's Manual - 21
22 Security This section explains how to enable password protection and create multiple accounts. It is composed of the following three columns: Root Password, Add User and Manage User. Root Password The administrator account root is permanent and can not be deleted. Please note that if you want to add more accounts, you must apply a password for the root account first. 1. Type the password identically in both text boxes. 2. Click Save to enable password protection. 3. A window will be prompted for authentication; type the correct user s name and password in related fields to access the Network Camera. Add User Administrators can add up to twenty user accounts. 1. Input the new user s name and password. 2. Select the desired security level. Click Add to enable the settings. Access rights are sorted by user types. There are three kinds of user types. Only administrators can access the Configuration page. Operators and viewers can not access the configuration page. Though operators can not access the page, they are capable of using the url commands to get and set the value of parameters. For more information, please refer to URL Commands of the Network Camera on page 56. Viewers can only access the main page. Manage User Here you can change user s access rights or delete user accounts. 1. Pull down the user list to find an account. 2. Make necessary changes and then click Save or Delete to enable the settings User's Manual
23 Network This section explains how to configure wired network connection for the Network Camera. It is composed of the following five columns: Network Type, HTTP, Two way audio, FTP and RTSP Streaming. When completed with the settings on this page, click Save to enable the settings. Network Type LAN Select this option when the Network Camera is deployed in a local area network (LAN) and is intended to be accessed by local computers. Get IP address automatically: Select this option to obtain an available dynamic IP address assigned by a DHCP server each time the camera is connected to the LAN. Use fixed IP address: Select this option to manually assign a static IP address to the Network Camera. The Network Camera can automatically restart and operate normally after a power outage. Please refer to Internet connection with static IP on page 8 for details. Subnet mask: This is used to determine if the destination is in the same subnet. The default value is Default router: This is the gateway used to forward frames to destinations in a different subnet. Invalid router setting will fail the transmission to destinations in different subnet. Primary DNS: The primary domain name server that translates hostnames into IP addresses. Secondary DNS: Secondary domain name server that backups the Primary DNS. Primary WINS server: The primary WINS server that maintains the database of computer name and IP address. Secondary WINS server: The secondary WINS server that maintains the database of computer name and IP address. User's Manual - 23
24 Enable UPnP presentation: Select this option to enable UPnP TM presentation for your Network Camera so that whenever a Network Camera is presented to the LAN, shortcuts of connected Network Cameras will be listed in My Network Places. Currently, UPnP TM is supported by Windows XP or later. Note that to utilize this feature, please make sure the UPnP TM component is installed on your computer. Network Camera Network Camera ( ) Enable UPnP port forwarding: To access the Network Camera from the Internet, select this option to allow the Network Camera to open ports on the router automatically so that video streams can be sent out from a LAN. To utilize of this feature, make sure that your router supports UPnP TM and it is activated. PPPoE (Point-to-point over Ethernet) Select this option to configure your Network Camera to make it accessible from anywhere as long as there is an Internet connection. Note that to utilize this feature, it requires an account provided by your ISP. Follow the steps below to acquire your Network Camera s public IP address. 1. Set up the Network Camera in LAN. 2. Go to Configuration > Application > Server Settings (please refer to Server Settings on page 45) to add a new server -- or FTP server. 3. Go to Configuration > Application > Media Settings (please refer to Media Settings on page 43). Select System log so that you will receive a list of system log in TXT file format which contains the Network Camera s public IP address in your or on the FTP server. 4. Go to Configuration > Network > Network Type. Select PPPoE and enter the user name and password provided by your ISP. Click Save to enable the settings. 5. The Network Camera starts to reboot. 6. Disconnect the power source of the Network Camera; remove it from the LAN environment to the Internet. NOTE If the default ports are already used by other device connecting to the same router, the Network Camera will select other ports for the Network Camera. If UPnP TM is not supported by your router, you will see the following message: Error: Router does not support UPnP port forwarding User's Manual
25 Steps to enable UPnP TM user interface on your computer: Note that you must log on to the computer as a system administrator to install the UPnP TM components. 1. Go to Start, click Control Panel, and then click Add or Remove Programs. 2. In the Add or Remove Programs dialog box, click Add/Remove Windows Components. 3. In the Windows Components Wizard dialog box, select Networking Services and then click Details. 4. In the Networking Services dialog box, select Universal Plug and Play and then click OK. User's Manual - 25
26 5. Click Next in the following window. 6. Click Finish. UPnP TM is enabled. How does UPnP TM work? UPnP TM networking technology provides automatic IP configuration and dynamic discovery of devices added to a network. Services and capabilities offered by networked devices, such as printing and file sharing, are available among each other without bothersome network configuration. In the case of Network Cameras, you will see Network Camera shortcuts at My Network Places. Enabling UPnP port forwarding allows the Network Camera to open secondary HTTP port on the router, not HTTP port, meaning that you have to add the secondary HTTP port number behind the Network Camera s public address in order to access the Network Camera from the Internet. For example, when the HTTP port is set to 80 and the secondary HTTP port is set to 8080, refer to the list below for the Network Camera s IP address. From the Internet In LAN or If the PPPoE settings are incorrectly configured or the Internet access is not working, restore the Network Camera to factory default; please refer to Restore on page 52 for details. After the Network Camera is reset to factory default, it is accessible in LAN. HTTP Authentication: Depending on your network security requirements, the Network Camera provides two types of security settings for a HTTP transaction: basic and digest. If basic authentication is selected, the password is sent in plain text format; there can be potential risks of being intercepted. If digest authentication is selected, user credentials are encrypted in MD5 algorithm and thus provide better protection against unauthorized accesses. HTTP port / Secondary HTTP port: By default, the HTTP port is set to 80 and the secondary HTTP port is set to Also, they can be assigned with another port number between 1025 and If the ports are incorrectly assigned, the following warning messages are displayed: 26 - User's Manual
VS8100. Video Server User s Manual. H.264 Compact Size Easy Installation. Rev. 1.0
 VS8100 Video Server User s Manual H.264 Compact Size Easy Installation Rev. 1.0 Table of Contents Revision History...3 Package Contents...3 Overview... 4 Read Before Use...4 Physical Description...5 Network
MN-700 Base Station Configuration Guide
 MN-700 Base Station Configuration Guide Contents pen the Base Station Management Tool...3 Log ff the Base Station Management Tool...3 Navigate the Base Station Management Tool...4 Current Base Station
TENVIS Technology Co., Ltd. User Manual. For H.264 Cameras. Version 2.0.0
 TENVIS Technology Co., Ltd User Manual For H.264 Cameras Version 2.0.0 Catalogue Basic Operation... 3 Hardware Installation... 3 Search Camera... 3 Get live video... 5 Camera Settings... 8 System... 8
NetworkCam. MZ-3333-01 User's Manual
 NetworkCam MZ-3333-01 User's Manual Package Contents Network Camera Power adapter - 1 - Installation Hardware Installation Please verify that your product package contains all the accessories listed in
Table of Contents. Overview3 Read Before Use...3 Package Contents...3 Physical Description...4
 Rev. 1.0 Table of Contents Overview3 Read Before Use...3 Package Contents...3 Physical Description...4 Installation 5 Hardware Installation...5 Network Deployment...7 Software Installation...10 Ready to
IP8130W/8131W. Cube Network Camera. User s Manual. IP8130W/8131W: 1MP 802.11n WLAN WPS. Rev. 1.0
 IP8130W/8131W Cube Network Camera User s Manual IP8130W/8131W: 1MP 802.11n WLAN WPS Rev. 1.0 Table of Contents Overview 4 Revision History 4 Read Before Use 5 Package Contents 5 Symbols and Statements
SkyIPCam 250W Wireless Network Camera. Model # AIC250W. User s Manual
 SkyIPCam 250W Wireless Network Camera Model # AIC250W User s Manual Ver. 1B Table of Contents 1. Introduction... 4 2. Getting Started... 5 3. Installing the Setup Wizard... 6 4. Gathering Information...
Quick Installation Guide
 V48.01 Model: FI8919W Quick Installation Guide Outdoor Pan/Tilt Wireless IP Camera For Windows OS ------- Page 1 For MAC OS ------- Page 15 ShenZhen Foscam Intelligent Technology Co., Ltd Quick Installation
WN-200HD. 2 Mega-Pixels. 2.0 Mega Pixel Wireless 150Mbps IPCamera. High Quality 2.0 MegaPixel Image. Full Feature 150Mbps Wireless N Camera
 2.0 Mega Pixel Wireless 150Mbps IPCamera S till couldn't find a way to watch your children or the elders when you are in busy or on duty? Or just need an easy solution for monitoring your office, store
Wifi Pan/Tilt IP Camera User Manual
 Wifi Pan/Tilt IP Camera User Manual Rev. 3.0 Software Version 3.00 May. 25 th.2009 Table of Contents 1. PRODUCT VIEWS...3 1.1. PRONT PANEL...3 1.2. BACK PANEL...3 1.3. ACCESSORIES...4 2. SETUP AND STARTUP...5
B Series Robot Model. IP Camera 2013-7 V4.18. User Manual
 B Series Robot Model IP Camera 2013-7 V4.18 User Manual Index 1 INTRODUCTION... 3 2 APPEARANCE AND INTERFACE... 5 3 VISIT IP CAMERA FROM LAN... 6 4 VISIT IP CAMERA FROM WAN... 10 5 OTHER SETTINGS... 12
How To Use A Wireless Pan & Tilt Camera On A Pc Or Mac Or Ipad (For Pc) For Free (For Mac) For A Week (For A Week) For $99.99) For Two Weeks (For Ipad)
 For Free (For Mac) For A Week (For A Week) For $99.99) For Two Weeks (For Ipad)") User Manual Wireless Pan & Tilt Camera CIPCAMPTIWL v1.0 Index 1 INTRODUCTION... 4 1.1 THE PACKAGE INCLUDES... 4 1.2 FUNCTION AND FEATURES... 4 1.3 TECHNICAL SPECIFICATIONS... 4 2 APPEARANCE AND INTERFACE...
User Manual Wireless Pan & Tilt Camera CIPCAMPTIWL v1.0 Index 1 INTRODUCTION... 4 1.1 THE PACKAGE INCLUDES... 4 1.2 FUNCTION AND FEATURES... 4 1.3 TECHNICAL SPECIFICATIONS... 4 2 APPEARANCE AND INTERFACE...
Release Date: 2007/05/18 Manual Revision: 1.00. technical@vivotek.com sales@vivotek.com Copyright 2000-2007. All rights reserved - 1 - www.vivotek.
 Product name: Video Server (VS7100) Release Date: 2007/05/18 Manual Revision: 1.00 Web site: Email: Made in Taiwan. technical@vivotek.com sales@vivotek.com Copyright 2000-2007. All rights reserved - 1
LevelOne. FCS-0010 10/100Mbps Network Camera / WCS-0010 11g Network Camera. User s Manual
 LevelOne FCS-0010 10/100Mbps Network Camera / WCS-0010 11g Network Camera User s Manual Ver. 1.00-0707 Copyright (c) 2007 Digital Data Communications Co., Ltd. All Rights Reserved All the features and
LOREX CLIENT Remote Software 4.0
 LOREX CLIENT Remote Software 4.0 Instruction Manual English Version 2.0 MODEL: L20WD800 Series www.lorexcctv.com Copyright 2008 LOREX Technology Inc. Table of Contents Table of Contents Software Installation...
VS-100. PoE. H.264 PoE Video Server. H.264 Compression H.264 DI/DO. Compression Rate Comparison MJPEG MPEG4 H.264.
 H.264 Video Server T he AirLive is a one channel video server for easily upgrade your old CCTV camera to a network-enabled IP camera and hence convert your local surveillance system into a global one.
Wireless Day / Night Cloud Camera TV-IP751WIC (v1.0r)
") (v1.0r) TRENDnet s Wireless Day / Night Cloud Camera, model, takes the work out of viewing video over the internet. Previously to view video remotely, users needed to perform many complicated and time
(v1.0r) TRENDnet s Wireless Day / Night Cloud Camera, model, takes the work out of viewing video over the internet. Previously to view video remotely, users needed to perform many complicated and time
Wireless PTZ Cloud Camera TV-IP851WC (v1.0r)
") (v1.0r) TRENDnet s Wireless PTZ Cloud Camera, model, takes the work out of viewing video over the internet. Previously to view video remotely, users needed to perform many complicated and time consuming
(v1.0r) TRENDnet s Wireless PTZ Cloud Camera, model, takes the work out of viewing video over the internet. Previously to view video remotely, users needed to perform many complicated and time consuming
CHAPTER 2: USING THE CAMERA WITH THE APP
 TABLE OF CONTENTS OVERVIEW... 1 Front of your camera... 1 Back of your camera... 2 ACCESSORIES... 3 CHAPTER 1: Navigating the Mobile Application... 4 Device List: How to Use this Page... 4 My Messages:
FI8910W Quick Installation Guide. Indoor MJPEG Pan/Tilt Wireless IP Camera
 Model: FI8910W Quick Installation Guide (For Windows OS) (For MAC OS please go to page 17) Indoor MJPEG Pan/Tilt Wireless IP Camera Black White Package Contents IP Camera FI8910W with IR-Cut.x 1 DC Power
PC-ZViewer User Manual
 PC-ZViewer User Manual For further help, please visit www.zmodo.com Contents Preface... 3 Statement... 3 Intended Reader... 3 Terms in this Manual... 3 Software Introduction... 3 Operating Environment...
2MP H.264/ MPEG-4/ MJEPG
 2-MegaPixel Outdoor 30fps 25 meter IR IPCAM T he is a high-end 2.0 MegaPixel (MP) network camera which designs for professional outdoor surveillance and security applications. This 2.0MP IP camera offers
TL-SC3130G Wireless 2-Way Audio Surveillance Camera
 TL-SC3130G Wireless 2-Way Audio Surveillance Camera REV: 2.0.3 1910010494 COPYRIGHT & TRADEMARKS Specifications are subject to change without notice. is a registered trademark of TP-LINK TECHNOLOGIES CO.,
20M IR Mega-Pixel CMOS Network Camera. JNC-V2428M-PoE. User s Manual. Date: 7/02/2010 Firmware Version: V3.2.70
 20M IR Mega-Pixel CMOS Network Camera JNC-V2428M-PoE User s Manual Date: 7/02/2010 Firmware Version: V3.2.70 Content Content...1 1. Preface...2 2. Product Specifications...2 3. Product Installation...4
NBG2105. User s Guide. Quick Start Guide. Wireless Mini Travel Router. Default Login Details. Version 1.00 Edition 1, 11/2012
 NBG2105 Wireless Mini Travel Router Version 1.00 Edition 1, 11/2012 Quick Start Guide User s Guide LAN IP Address Default Login Details 192.168.1.1 (Router Mode) 192.168.1.2 (Other Modes) Passwordwww.zyxel.com
IP-200PHD-24. 2 Mega-Pixels. 2.0 Mega Pixel Passive PoE IPCamera. High Quality 2.0 MegaPixel Image. Easy to Install. 1600x1200 Pixels.
 2.0 Mega Pixel Passive PoE IPCamera S till couldn't find a way to watch your children or the elders when you are in busy or on duty? Or just need an easy solution for monitoring your office, store or garage?
WRE2205. User s Guide. Quick Start Guide. Wireless N300 Range Extender. Default Login Details. Version 1.00 Edition 1, 06/2012
 WRE2205 Wireless N300 Range Extender Version 1.00 Edition 1, 06/2012 Quick Start Guide User s Guide Default Login Details LAN IP Address http://192.168.1.2 User Name admin Passwordwww.zyxel.com 1234 Copyright
USER GUIDE Cisco Small Business
 USER GUIDE Cisco Small Business WBPN Wireless-N Bridge for Phone Adapters December 2011 Cisco and the Cisco Logo are trademarks of Cisco Systems, Inc. and/or its affiliates in the U.S. and other countries.
1.3 CW-720IR. 720P Day/Night Wireless IPCAM. 1.3M Resolution and Quality Enhancement 64GB. Audio. IR for. Two-Way
 CW-720IR 720P Day/Night Wireless IPCAM Easy Plug-n-Play Installation H.264 and MJPEG Encoder 30fps at 1280x1024 / 1280x720 IR LED for Day/Night Surveillance WDR, LDC, De-Fog Function Two-Way Motion, and
Multi-Profile CMOS Infrared Network Camera
 Multi-Profile CMOS Infrared Network Camera Quick Start Guide About multi-profile Multi-profile stands for simultaneously video stream. The Network Camera and Video Server can generate MPEG4 and MJPEG streaming
PLA4231. User s Guide. Quick Start Guide. 500 Mbps Powerline Wireless N Extender. Default Login Details. Version 1.00 Edition 1, 12/2012
 PLA4231 500 Mbps Powerline Wireless N Extender Version 1.00 Edition 1, 12/2012 Quick Start Guide User s Guide Default Login Details LAN IP Address http://192.168.1.2 Password 1234 www.zyxel.com Copyright
WRE6505. User s Guide. Quick Start Guide. Wireless AC750 Range Extender. Default Login Details. Version 1.00 Edition 1, 4 2014
 WRE6505 Wireless AC750 Range Extender Version 1.00 Edition 1, 4 2014 2.4G 5G Quick Start Guide User s Guide Default Login Details LAN IP Address 192.168.1.2 User Name admin www.zyxel.com Password 1234
Nokia Siemens Networks. CPEi-lte 7212. User Manual
 Nokia Siemens Networks CPEi-lte 7212 User Manual Contents Chapter 1: CPEi-lte 7212 User Guide Overview... 1-1 Powerful Features in a Single Unit... 1-2 Front of the CPEi-lte 7212... 1-2 Back of the CPEi-lte
Quick Installation Guide
 V2.01 Model: FI9821W Quick Installation Guide Indoor HD Pan/Tilt Wireless IP Camera Black White For Windows OS ------- Page 1 For MAC OS ------- Page 16 ShenZhen Foscam Intelligent Technology Co., Ltd
LW310V2 Sweex Wireless 300N Router
 LW310V2 Sweex Wireless 300N Router Please notice! On the included CD-ROM you will find the Setup Wizard. This easy install procedure will show you how to setup the router step-by-step. Do not expose the
Network Video Recorder. Operation Manual
 Network Video Recorder Operation Manual Content 1 Product Description... 1 1.1 Product Overview... 1 1.2 Specification... 1 2 Product Structure Introduction... 2 2.1 Back Interface... 2 2.2 Front Panel...
Quick-Start Guide. Remote Surveillance & Playback SUPER DVR MONITORING SOFTWARE. For use on Q-See s QSDT series of PC Securitiy Surveillance Cards
 Quick-Start Guide SUPER DVR MONITORING SOFTWARE Remote Surveillance & Playback For use on Q-See s QSDT series of PC Securitiy Surveillance Cards 2 CONFIGURING ROUTER FOR REMOTE ACCESS REMOTE SURVEILLANCE
Quick Start Guide. WRV210 Wireless-G VPN Router with RangeBooster. Cisco Small Business
 Quick Start Guide Cisco Small Business WRV210 Wireless-G VPN Router with RangeBooster Package Contents WRV210 Router Ethernet Cable Power Adapter Product CD-ROM Quick Start Guide Welcome Thank you for
AirCam POE-200HD. H.264 1.3 MegaPixel POE Dome. H.264 Compression. 1.3 Mega-Pixel Video Quality
 AirCam POE-200HD H.264 1.3 MegaPixel POE Dome T he AirLive AirCam POE-200HD is a highend 1.3 -megapixel network camera designed for professional indoor surveillance and security applications. Megapixel
1.3 Mega-Pixel Video Quality
 AirCam POE-250HD H.264 1.3 MegaPixel POE Vandal Proof Dome T he POE-250HD is a high-end 1.3 MegaPixel network camera designed for professional outdoor surveillance and security applications. MegaPixel
This section will focus on basic operation of the interface including pan/tilt, video, audio, etc.
 Catalogue Basic Operation... 2 For Internet Explorer... 2 For Other Non-IE Web Browsers... 5 Camera Settings... 6 System... 6 About... 6 PT Setting... 7 Backup and Restore Setup... 8 NTP Setting... 8 System
1.3 CW-720. 1280x720 Pixels. 640x480 Pixels. 720P Wireless 150Mbps IPCAM. High Quality 720P MegaPixel Image
 CW-720 720P Wireless 150Mbps IPCAM 30FPS at 1.3 Mega Mode 30FPS at 720P Mode 150Mbps Wireless-B/G/N Use 10X Times Less Storage with H.264 Video Compression Micro SD Card Slot for Local Storage ios and
Broadband Phone Gateway BPG510 Technical Users Guide
 Broadband Phone Gateway BPG510 Technical Users Guide (Firmware version 0.14.1 and later) Revision 1.0 2006, 8x8 Inc. Table of Contents About your Broadband Phone Gateway (BPG510)... 4 Opening the BPG510's
Professional Surveillance System User s Manual
 Professional Surveillance System User s Manual \ 1 Content Welcome...4 1 Feature...5 2 Installation...6 2.1 Environment...6 2.2 Installation...6 2.3 Un-installation...8 3 Main Window...9 3.1 Interface...9
CPEi 800/825 Series. User Manual. * Please see the Introduction Section
 CPEi 800/825 Series User Manual * Please see the Introduction Section Contents Introduction...iii Chapter 1: CPEi 800/825 User Guide Overview... 1-1 Powerful Features in a Single Unit... 1-2 Front of the
3.5 EXTERNAL NETWORK HDD. User s Manual
 3.5 EXTERNAL NETWORK HDD User s Manual Table of Content Before You Use Key Features H/W Installation Illustration of Product LED Definition NETWORK HDD Assembly Setup the Network HDD Home Disk Utility
NVMS-1200. User Manual
 NVMS-1200 User Manual Contents 1 Software Introduction... 1 1.1 Summary... 1 1.2 Install and Uninstall... 1 1.2.1 Install the Software... 1 2 Login Software... 3 2.1 Login... 3 2.2 Control Panel Instruction...
Quick Installation Guide
 V2.01 IP Wired / Wireless Camera Quick Installation Guide (For Windows OS) Model: FI8602/FI8602W ShenZhen Foscam Intelligent Technology Co., Ltd Packing List Quick Installation Guide 1) IP CAMERA X 1 2)
DATA PROJECTOR XJ-A146/XJ-A246/XJ-A256
 DATA PROJECTOR XJ-A146/XJ-A246/XJ-A256 E Data Projector Wireless Function Guide Be sure to read the precautions in the Setup Guide that comes with the Data Projector. Be sure to keep all user documentation
HELP...47 Installing the DCS-2121 Behind a Router...48 1) Identify Your Camera on the Network...48 2) Assign a Local IP Address and Port for Your
 Identify Your Camera on the Network...48 2) Assign a Local IP Address and Port for Your") Table of Contents Package Contents...1 Minimum System Requirements...2 Introduction...3 Features and Benefits...4 Hardware Overview...5 Hardware Installation...7 Attach the Antenna...7 Connect the camera
Table of Contents Package Contents...1 Minimum System Requirements...2 Introduction...3 Features and Benefits...4 Hardware Overview...5 Hardware Installation...7 Attach the Antenna...7 Connect the camera
IP Wireless / Wired Camera NIGHT VISION & REMOTE PAN/TILT ROTATE. User Manual
 IP Wireless / Wired Camera NIGHT VISION & REMOTE PAN/TILT ROTATE User Manual WELCOME This model IP Camera is an integrated wireless IP Camera solution. It combines a high quality digital Video Camera with
DATA PROJECTOR XJ-A135/XJ-A145/XJ-A235/ XJ-A245
 DATA PROJECTOR XJ-A135/XJ-A145/XJ-A235/ XJ-A245 E Data Projector Wireless Function Guide Be sure to read the precautions in the User s Guide (Basic Operations) that comes with the Data Projector. Be sure
Megapixel PoE Day / Night Internet Camera TV-IP572PI (v1.0r)
") (v1.0r) PRODUCT OVERVIEW The Megapixel PoE Day / Night Internet Camera, model TV- IP572PI, transmits real-time Megapixel video over the Internet. Record crisp video in complete darkness for distances of
(v1.0r) PRODUCT OVERVIEW The Megapixel PoE Day / Night Internet Camera, model TV- IP572PI, transmits real-time Megapixel video over the Internet. Record crisp video in complete darkness for distances of
IP Power Stone 4000 User Manual
 IP Power Stone 4000 User Manual Two Outlet Remote AC Power Controller Multi Link, Inc. 122 Dewey Drive Nicholasville, KY 40356 USA Sales and Tech Support 800.535.4651 FAX 859.885.6619 techsupport@multi
Link Link sys E3000 sys RE1000
 User Guide High Performance Extender Wireless-N Router Linksys Linksys RE1000 E3000Wireless-N Table of Contents Contents Chapter 1: Product Overview 1 Front 1 Top 1 Bottom 1 Back 2 Chapter 2: Advanced
USER GUIDE. Wireless-G Internet Home Monitoring Camera. Model: WVC54GCA
 USER GUIDE Wireless-G Internet Home Monitoring Camera Model: WVC54GCA About This Guide About This Guide Icon Descriptions While reading through the User Guide you may see various icons that call attention
IP Camera (L series) User manual 2013-05 V1.1
 User manual 2013-05 V1.1") Dear users, the configuration for this camera is professional, so please read the user manual carefully before using the camera. IP Camera (L series) User manual 2013-05 V1.1 Statement If the user manual
Dear users, the configuration for this camera is professional, so please read the user manual carefully before using the camera. IP Camera (L series) User manual 2013-05 V1.1 Statement If the user manual
Wireless Router Setup Manual
 Wireless Router Setup Manual NETGEAR, Inc. 4500 Great America Parkway Santa Clara, CA 95054 USA 208-10082-02 2006-04 2006 by NETGEAR, Inc. All rights reserved. Trademarks NETGEAR is a trademark of Netgear,
your Gateway Windows network installationguide 802.11b wireless series Router model WBR-100 Configuring Installing
 your Gateway Windows network installationguide 802.11b wireless series Router model WBR-100 Installing Configuring Contents 1 Introduction...................................................... 1 Features...........................................................
CONTENTS. 1. Outline of how to use.1 2. How to setup each step...1
 CONTENTS 1. Outline of how to use.1 2. How to setup each step...1 2.1 Connect your IP Camera to the LAN..1 2.2 Install the following software before view video.....2 2.3 Basic configuration setting...2
Networking. General networking. Networking overview. Common home network configurations. Wired network example. Wireless network examples
 Networking General networking Networking overview A network is a collection of devices such as computers, printers, Ethernet hubs, wireless access points, and routers connected together for communication
N300 WiFi Range Extender
 Model EX2700 User Manual July 2014 202-11395-01 350 East Plumeria Drive San Jose, CA 95134 USA Support Thank you for selecting NETGEAR products. After installing your device, locate the serial number on
DSL-2600U. User Manual V 1.0
 DSL-2600U User Manual V 1.0 CONTENTS 1. OVERVIEW...3 1.1 ABOUT ADSL...3 1.2 ABOUT ADSL2/2+...3 1.3 FEATURES...3 2 SPECIFICATION...4 2.1 INDICATOR AND INTERFACE...4 2.2 HARDWARE CONNECTION...4 2.3 LED STATUS
ImagineWorldClient Client Management Software. User s Manual. (Revision-2)
") ImagineWorldClient Client Management Software User s Manual (Revision-2) (888) 379-2666 US Toll Free (905) 336-9665 Phone (905) 336-9662 Fax www.videotransmitters.com 1 Contents 1. CMS SOFTWARE FEATURES...4
ImagineWorldClient Client Management Software User s Manual (Revision-2) (888) 379-2666 US Toll Free (905) 336-9665 Phone (905) 336-9662 Fax www.videotransmitters.com 1 Contents 1. CMS SOFTWARE FEATURES...4
Movie Cube. User s Guide to Wireless Function
 Movie Cube User s Guide to Wireless Function Table of Contents 1. WLAN USB Adapter Connection...3 2. Wireless Setup...4 2.1 Infrastructure (AP)...5 2.2 Peer to Peer (Ad Hoc)...7 2.3 Settings for PC...8
IP8152 Fixed. Network Camera. User s Manual. 1.3MP Compact Size Supreme Night Visibility. Rev. 1.1b
 IP8152 Fixed Network Camera User s Manual 1.3MP Compact Size Supreme Night Visibility Rev. 1.1b Table of Contents Overview 4 Revision History 4 Read Before Use 5 Package Contents 5 Symbols and Statements
IP camera User Manual
 IP camera User Manual Safety Instructions These instructions are intended to assist users with the operation of the IP camera and also to instruct on how to avoid dangerous situations or damage to the
A Division of Cisco Systems, Inc. GHz 2.4 802.11g. Wireless-G. Access Point with SRX. User Guide WIRELESS WAP54GX. Model No.
 A Division of Cisco Systems, Inc. GHz 2.4 802.11g WIRELESS Wireless-G Access Point with SRX User Guide Model No. WAP54GX Copyright and Trademarks Specifications are subject to change without notice. Linksys
Table of Contents. Wireless Installation Considerations... 10. Software Installation...11
 Table of Contents Table of Contents Product Overview...4 Package Contents...4 System Requirements...4 Introduction...5 Features... 6 Hardware Overview...7 Hardware Installation...9 Wireless Installation
UIP1868P User Interface Guide
 UIP1868P User Interface Guide (Firmware version 0.13.4 and later) V1.1 Monday, July 8, 2005 Table of Contents Opening the UIP1868P's Configuration Utility... 3 Connecting to Your Broadband Modem... 4 Setting
Installation Steps Follow these steps to install the network camera on your local network (LAN):
:") 1. Description The Network Camera supports the network service for a sensor image with progressive scan, which can be monitored on a real-time screen regardless of distances and locations. By using its
1. Description The Network Camera supports the network service for a sensor image with progressive scan, which can be monitored on a real-time screen regardless of distances and locations. By using its
N300 WiFi Range Extender WN2000RPT User Manual
 N300 WiFi Range Extender WN2000RPT User Manual December 2013 202-11333-01 350 East Plumeria Drive San Jose, CA 95134 USA Support Thank you for selecting NETGEAR products. After installing your device,
WAP3205 v2. User s Guide. Quick Start Guide. Wireless N300 Access Point. Default Login Details. Version 1.00 Edition 2, 10/2015
 WAP3205 v2 Wireless N300 Access Point Version 1.00 Edition 2, 10/2015 Quick Start Guide User s Guide Default Login Details Web Address http://zyxelsetup Password www.zyxel.com 1234 Copyright 2014 ZyXEL
Barracuda Link Balancer Administrator s Guide
 Barracuda Link Balancer Administrator s Guide Version 1.0 Barracuda Networks Inc. 3175 S. Winchester Blvd. Campbell, CA 95008 http://www.barracuda.com Copyright Notice Copyright 2008, Barracuda Networks
Ethernet Radio Configuration Guide
 Ethernet Radio Configuration Guide for Gateway, Endpoint, and Repeater Radio Units April 20, 2015 Customer Service 1-866-294-5847 Baseline Inc. www.baselinesystems.com Phone 208-323-1634 FAX 208-323-1834
USER GUIDE BUSINESS SERIES. 2.4 GHz Wireless-G PTZ Internet Camera with Audio. Model:WVC200, WVC210
 USER GUIDE BUSINESS SERIES 2.4 GHz Wireless-G PTZ Internet Camera with Audio Model:WVC200, WVC210 Table of Contents Table of Contents Chapter 1: Getting Started....................... 1 How to Use this
English version. LW320/LW321 Sweex Wireless 300N Router. Package Contents. Terminology list
 LW320/LW321 Sweex Wireless 300N Router Do not expose the Sweex Wireless 300N Router to extreme temperatures. Do not place the device in direct sunlight or in the direct vicinity of heating elements. Do
2 Setting Up the Hardware for a Wired Ethernet Network... 13. 3 Setting Up the Software for an Ethernet Network... 21
 Contents 1 Networking Basics............................................... 1 Selecting a network connection........................................ 2 Wired Ethernet network...........................................
Chapter 2 Connecting the FVX538 to the Internet
 Chapter 2 Connecting the FVX538 to the Internet Typically, six steps are required to complete the basic connection of your firewall. Setting up VPN tunnels are covered in Chapter 5, Virtual Private Networking.
INSTRUCTION MANUAL Neo Coolcam IP Camera
 INSTRUCTION MANUAL Neo Coolcam IP Camera Revised: June 28, 2013 Thank you for purchasing from SafetyBasement.com! We appreciate your business. We made this simple manual to help you enjoy your new product
3.1 RS-232/422/485 Pinout:PORT1-4(RJ-45) RJ-45 RS-232 RS-422 RS-485 PIN1 TXD PIN2 RXD PIN3 GND PIN4 PIN5 T+ 485+ PIN6 T- 485- PIN7 R+ PIN8 R-
 RJ-45 RS-232 RS-422 RS-485 PIN1 TXD PIN2 RXD PIN3 GND PIN4 PIN5 T+ 485+ PIN6 T- 485- PIN7 R+ PIN8 R-") MODEL ATC-2004 TCP/IP TO RS-232/422/485 CONVERTER User s Manual 1.1 Introduction The ATC-2004 is a 4 Port RS232/RS485 to TCP/IP converter integrated with a robust system and network management features
MODEL ATC-2004 TCP/IP TO RS-232/422/485 CONVERTER User s Manual 1.1 Introduction The ATC-2004 is a 4 Port RS232/RS485 to TCP/IP converter integrated with a robust system and network management features
Wireless Pan&Tilt Network Camera. User Manual CIPCAMPTIWL V2.0
 Wireless Pan&Tilt Network Camera User Manual CIPCAMPTIWL V2.0 1 Installation Environment Keep away from the places for high-temperature, heat source and direct sunlight; Keep away from water and when get
SATO Network Interface Card Configuration Instructions
 SATO Network Interface Card Configuration Instructions Table of Contents 1. Reset of wired/wireless interface card... 3 2. Installing the All-In-One Utility (recommended)... 4 3. Configuring wired/wireless
EW-7438RPn V2 User Manual
 EW-7438RPn V2 User Manual 09-2013 / v1.0 CONTENTS I. Product Information... 1 I-1. Package Contents... 1 I-2. System Requirements... 1 I-3. LED Status... 1 I-4. Hardware Overview... 3 I-5. Safety Information...
TW100-BRF114 Firewall Router. User's Guide. Cable/DSL Internet Access. 4-Port Switching Hub
 TW100-BRF114 Firewall Router Cable/DSL Internet Access 4-Port Switching Hub User's Guide Table of Contents CHAPTER 1 INTRODUCTION...1 TW100-BRF114 Features...1 Package Contents...3 Physical Details...
TL-SC3171G Wireless Day/Night Surveillance Camera
 TL-SC3171G Wireless Day/Night Surveillance Camera REV: 1.0.1 1910010431 COPYRIGHT & TRADEMARKS Specifications are subject to change without notice. is a registered trademark of TP-LINK TECHNOLOGIES CO.,
Quick Installation Guide
 V46.01 Model: FI8918W Quick Installation Guide Indoor Pan/Tilt Wireless IP Camera Black White For Windows OS ------- Page 1 For MAC OS ------- Page 11 ShenZhen Foscam Intelligent Technology Co., Ltd Quick
P160S SIP Phone Quick User Guide
 P160S SIP Phone Quick User Guide Version 2.2 TABLE OF CONTENTS 1.0 INTRODUCTION... 1 2.0 PACKAGE CONTENT... 1 3.0 LIST OF FIGURES... 2 4.0 SUMMARY OF KEY FUNCTIONS... 3 5.0 CONNECTING THE IP PHONE... 4
DVG-2101SP VoIP Telephone Adapter
 This product can be set up using any current web browser, i.e., Internet Explorer 6 or Netscape Navigator 6.2.3. DVG-2101SP VoIP Telephone Adapter Before You Begin 1. If you purchased this VoIP Telephone
Table of Contents. Wireless Security...40 What is WEP?...40 Configure WEP...41 What is WPA?...42 Configure WPA-PSK (Personal)... 43.
... 43.") Table of Contents Table of Contents Product Overview...4 Package Contents...4 System Requirements... 4 Introduction...5 Features... 6 Hardware Overview...7 Connections... 7 LEDs...8 Configuration...9 Web-based
Table of Contents Table of Contents Product Overview...4 Package Contents...4 System Requirements... 4 Introduction...5 Features... 6 Hardware Overview...7 Connections... 7 LEDs...8 Configuration...9 Web-based
User Manual DIR-632. Multifunction Wireless Router Supporting WiMAX, 3G GSM/CDMA with Built-in 8-port Switch
 DIR-632 Multifunction Wireless Router Supporting WiMAX, 3G GSM/CDMA with Built-in 8-port Switch October 2011 Contents Chapter 1. Introduction...5 Contents and Audience...5 Conventions...5 Document Structure...5
N600 WiFi USB Adapter
 Model WNDA3100v3 User Manual December 2014 202-11470-01 350 East Plumeria Drive San Jose, CA 95134 USA Support Thank you for selecting NETGEAR products. After installing your device, locate the serial
VSG1432. User Setup Guide. 802.11n Wireless VDSL2 4-port Gateway. Default Login Details. www.zyxel.com. Firmware Version 1.10 Edition 1, 10/2011
 VSG1432 User Setup Guide 802.11n Wireless VDSL2 4-port Gateway Default Login Details IP Address http://192.168.1.254 Username admin Password telus Firmware Version 1.10 Edition 1, 10/2011 www.zyxel.com
MJPEG INDOOR SERIES B E F OR E Y OU B E GIN. WiFi indoor IP Camera
 MJPEG INDOOR SERIES WiFi indoor IP Camera B E F OR E Y OU B E GIN Please unpack the box carefully and identify that all the parts are present. The Camera is suitable for indoor use. Check the voltage of
LevelOne WAP - 0005. User s Manual. 108 Mbps Wireless Access Point
 LevelOne WAP - 0005 108 Mbps Wireless Access Point User s Manual TABLE OF CONTENTS CHAPTER 1 INTRODUCTION... 1 Features of your Wireless Access Point... 1 Package Contents... 3 Physical Details... 3 CHAPTER
Quick Start Guide. RV 120W Wireless-N VPN Firewall. Cisco Small Business
 Quick Start Guide Cisco Small Business RV 120W Wireless-N VPN Firewall Package Contents Wireless-N VPN Firewall Ethernet Cable Power Adapter Quick Start Guide Documentation and Software on CD-ROM Welcome
AirCam OD-325HD-2.5MM
 H.264 MegaPixel Outdoor 25M IR Night vision POE Camera T AirCam OD-325HD-2.5MM AirCam OD-325HD-2.5MM is a high-end 1.3 MegaPixel network camera designed for professional outdoor surveillance and security
Broadband Router ALL1294B
 Broadband Router ALL1294B Broadband Internet Access 4-Port Switching Hub User's Guide Table of Contents CHAPTER 1 INTRODUCTION... 1 Broadband Router Features... 1 Package Contents... 3 Physical Details...
How To Check If Your Router Is Working Properly On A Nr854T Router (Wnr854) On A Pc Or Mac) On Your Computer Or Ipad (Netbook) On An Ipad Or Ipa (Networking
 On A Pc Or Mac) On Your Computer Or Ipad (Netbook) On An Ipad Or Ipa (Networking") Chapter 7 Using Network Monitoring Tools This chapter describes how to use the maintenance features of your RangeMax NEXT Wireless Router WNR854T. These features can be found by clicking on the Maintenance
Chapter 7 Using Network Monitoring Tools This chapter describes how to use the maintenance features of your RangeMax NEXT Wireless Router WNR854T. These features can be found by clicking on the Maintenance
Configuring the WT-4 for ftp (Infrastructure Mode)
") Introduction En Configuring the WT-4 for ftp (Infrastructure Mode) This document provides basic instructions on configuring the WT-4 wireless transmitter and a ftp server for transmission over an infrastructure
Introduction En Configuring the WT-4 for ftp (Infrastructure Mode) This document provides basic instructions on configuring the WT-4 wireless transmitter and a ftp server for transmission over an infrastructure