Development and Alumni Relations Systems (DARS)
|
|
|
- Arabella Stevenson
- 10 years ago
- Views:
Transcription
1 Development and Alumni Relations Systems (DARS) BBIS (Blackbaud Internet Solutions) Part 1 (DARS Version 3.0) Manual Version 1.0 Part 1 of the BBIS Manual Covers: Interface and Navigation Website Design Forms For guidance and documentation on how to use Parts in BBIS please refer to Part 2 of this manual.

2 Table of Contents 1. Introduction Intended Audience Using this Manual Conventions Data Protection BBIS 2.1 BBIS v3.0 New Features Tutorial Videos BBIS Interface and Navigation (Program Basics) Users Navigation Menu Bar Action Bar Internet Browser Buttons (Back/Forward) Common Procedures HTML Editor HTML Editor Functions Formatting Tab Insert Tab View Tab Image Tab Table Tab Menus on the Toolbar Merge Fields Style Sheet Options View HTML Content with Specific CSS Applied HTML Editor Table and Line Properties Insert/Edit Table Page Table Row Properties Page Table Cell Properties Page Insert Horizontal Line Search Page Insert Image Insert Page/Document Link Constituencies Website Design Website Overview Website Accessibility HTTP Secure Users, Roles and Logging in Security Overview Pages & Templates Buttons in Pages & Templates Create a Web Page View/Edit Web Page Properties Design a Web Page Create a Template Edit Template Properties... 45

3 4.3.7 Design a Template Files Upload Files Search for Files Edit File Properties Layouts Create Layouts Edit Layout Properties Preview a Layout Design a layout Style Sheets Create Style Sheets Edit Style Sheet Properties Preview a Style Sheet Design a Style Sheet Apply a Style Sheet Image Library Search for Images Upload Images Edit Image Properties Photo Albums on Your Website Adding Video Create Group Sign-up Pages Friendly URLs Create a friendly URL Edit a Friendly URL Delete a Friendly URL Approvals Forms 5.1 Online Forms: Process Overview Create Forms Create a New Form Copy a Form Design Forms Design a Form Form Types Form Designer Style Sheets Form Sections and Steps Add a Step Reorder a Step Add a Section to a Step Reorder Sections Form Elements Form Elements Table Attribute Elements Biographical Fields Profile Update Form Signup Form Communication Preferences Contact Information Education Form Elements User Login Element Primary Employment... 89

4 Relationships Properties Form Tab Properties Step Properties Element Tab Properties Communication Preferences Form: Advanced Properties Profile Update Form: Addresses Advanced Properties Education Advanced Properties Addresses and Phones Advanced Properties Name Format Types Primary Address and Business Primary Address Advanced Properties Relationships Advanced Properties Property Descriptions Form Permission Task Groups Form Part Create and Design a Form Part Further Help and Information DARS Support Centre DARS Project Additional DARS Documentation IT Services Programmes and Projects IT Services Training Team Document Information

5 1. Introduction This manual has been designed primarily as a reference guide to be used in conjunction with the DARS008: Internet Solutions Essentials training course. 1.1 Intended Audience Users who complete this course will be able to navigate Blackbayd Internet Solutions, design page layout, templates and styles, manage content parts, and create forms.. You will require the BBIS web editor or web developer role in order to access and use the functionality described in this manual. If you are unsure of your role and access rights to Blackbaud Internet Solutions, please contact the DARS helpdesk. 1.2 Using this Manual This manual will be updated on a regular basis as and when updates to the DARS system are implemented. Check the version updates chart at the end of the document to ensure you are using the most current version. Please think twice before printing this document. If a printed copy is necessary, ensure it is printed double-sided and always recycle old versions. 1.3 Conventions The conventions and icons used in this manual are described below: Indicates additional useful information. Indicates an important piece of information, take particular care to read the information in these boxes. Bold Text Indicates menu names and window titles. [F4] Keys on the keyboard are indicated in bold in square brackets [ ]. File > Open Moves through a navigation path are indicated with a >. In this case you would click on the File menu, then select Open

6 1.4 Data Protection Ensure you are familiar with the Data Protection laws before adding data to records. All information recorded should be specific to Fundraising and be aware that you should not record sensitive information such as religious or medical information without the permission of the constituent. Please ensure you are familiar with the information on the following websites: Data Protection & DARS The DARS Participation Agreement and Data Access Protocol can be downloaded from the DARS Website: Website: University Policy on Data Protection Users should familiarise themselves with the University s policy on Data Protection by reading the information available at: Website: University Data Protection Officer Further information about the Data Protection Act can be obtained from the website of the University s Data Protection Officer: Website: Regulations relating to the use of Information Technology Facilities All university members should adhere to the following regulations when using IT facilities: Website:

7 2. BBIS Blackbaud Internet Solutions (BBIS) is an easy-to-use system for creating and editing websites that directly integrate with the database. BBIS provides website tools for visitors, alumni and donors to register as members of BBIS, sign up to events, update their database profile and contact details, join groups of interest, manage their communication preferences, search for fellow alumni, process donations to the University of Oxford. Many college and departments manage their own BBIS alumni or giving websites as part of a larger website community. 2.1 BBIS v3.0 New Features Self-service passwords Alumni and BBIS users alike can now manage their own passwords through the new password reset tool, rather than relying on password reminders (and contacting the Office to request a reset). Improved browser compatibility Manage the content and appearance of your site in a range of browsers including IE, Chrome, Firefox, Safari and more. Friendly URLS All pages, images and documents can now be given friendly URLs by default, resulting in a better experience for visitors and higher rankings for your website in search engines. New use of Files Documents are now stored as Files on BBIS meaning you don t need to add parts to your site to display these, and they can also have friendly file name URL s. Easier editing A new ribbon style editor makes it easier to create and amend Formatted Text and Image parts (and others); there are also now quick links to the editor from the Page Builder. Bulk file management Pages, documents and images can now be moved or deleted in bulk, with easily visible buttons, and documents and images can also be bulk-approved. You can arrange pages, documents and images into folders too, making them easier to manage, and deleted pages and parts can be recovered from a deleted files repository if necessary. New profile update forms Give your alumni greater choice over which postal addresses, phone numbers and addresses they would like recorded as primary on DARS. Copy Pages You can now make copies of pages and edit/use them as templates saving you time when managing themed websites. It allows you to choose whether you wish to use the same parts as the original page or create copies of each part. Personal Notes A new Personal Notes part provides a place for website users to communicate their life changes, share narratives, and provide other personal information to you, all of which are captured into constituent documentation notes. Query Results Display It is now possible to display the results of queries built within DARS on web pages, subject to Data Protection considerations, enabling much more dynamic content to be presented to alumni and friends. Flexible communication preferences Alumni will now be able to set communication preferences for multiple types; this means that we can remove the need for a Net Community Preferred address type.

8 Responsive design It is easier in v3.0 to toggle between desktop and mobile views when managing responsive design elements. Advanced donation forms A more customisable online giving capability is available for advanced website developers to utilise in Performance improvements There have been various performance improvements, including that designation search on giving pages will now load more quickly for donors. Better transaction processing Online donations are now managed through the standard Enhanced Revenue Batch in DARS, supported by much-improved criteria for matching constituents. Survey Part fix The essay question now allows website users to enter more than 255 characters on the essay question. (Note: Ignore the message which states that it is limited to 255 characters.) In-built tutorials You will now be able to access a range of video tutorials; for example in the Pages and Templates area there are a range of hints and tips on how to create content and manage pages. 2.2 Tutorial Videos Tutorial videos are available on a number of pages in BBIS, and can be accessed from the button toward top right of page. For example, the Pages & Templates area has videos on creating pages, adding content to pages and adding pages to menus. Note: These videos are produced by Blackbaud, and therefore will not include any Oxford specific customizations or business processes information.

9 3. BBIS Interface and Navigation (Program Basics) DARS BBIS (BBIS) provides your organisation with a website program for users of all levels. You can create web pages with multiple layers of layout, template, and page design. You can generate and send an to individuals and groups; define user roles and set security for each section; and track statistics about website usage. Website users can also make donations or register for events with online forms you create. In addition, BBIS can integrate your website and your other Blackbaud products. Website users enter data into areas of your website such as profiles and donation forms, and you can download that data to another Blackbaud program. This documentation is for the administrative side of BBIS, which consists of Site explorer, , Users & security, and Administration. Together, these sections contain all the tools you need to create your organisation s website. 3.1 Users Depending on your role, you will perform different tasks to fulfill your website needs. For example, if you are the Site Administrator, your job in BBIS is most likely to create web pages from start to finish and assign roles to users. If you are the Director of Special Events, your job may be to update last year s Golf Tournament web page with this year s golf tournament information. If you are the Data Entry Manager, your job is to download information from the website and integrate the information with DARS (Blackbaud CRM). Lastly, your constituents use BBIS directly from your website. Important: Your organisation should assign full Administrator rights to only a select number of users. These users should be knowledgeable in all areas of website design and BBIS. Certain areas, such as Site explorer, are crucial for your website. A small change can affect multiple web pages. This functionality saves your organisation a lot of time and effort. However, if a change is incorrect, you have to spend time and effort to correct the change. We strongly encourage you to establish security that limits general users access to these areas. Constituents perform tasks such as registering for events and making donations. After a constituent submits these tasks, you can download the information to DARS. This section outlines possible main user roles and provides a roadmap for the main tasks each role performs in BBIS. A wide range of users perform tasks in BBIS i.e. User tasks. Many tasks are captured in the user roles of an administrator, a website designer, a user from DARS who also uses BBIS (most likely someone in the Development office), and a constituent. Some individuals (most likely in development) at your organisation may have responsibilities that are common to both BBIS and DARS i.e. Integration tasks. For example, your events data entry person may also be responsible for updating the events page on your website.

10 For information about online and offline tasks a user can perform, see Website Design, Managing Parts, the section in the Fundamentals 1 manual, and other DARS manuals as required. 3.2 Navigation The BBIS component of DARS contains the commands necessary to complete all website functions. Learning to navigate is the first step to use BBIS to its fullest potential. 1. To access BBIS, click in the Web functional area of DARS. The BBIS main page opens. 2. To create and manage websites, click. The the Site explorer page opens. 3. Click on the required option. For example,.

11 3.2.1 Menu Bar The menu bar opens at the top of all pages across BBIS. For users with administrative rights, the menu bar also opens on your website. Use the menu bar to access the different sections of BBIS and perform various tasks. To view your live website, click or against the specific line in the grid on the page. To return to BBIS, use the browser back button or select an option from the menu bar. You can toggle between BBIS and your website to view changes as you make them. To create a page, part, template, or style sheet, select an option under. To return to a recently viewed part, page, template, style sheet, or design, click. Under History, you can access the past 10 parts, pages, templates, and style sheets, and the past 20 designs that you edited. The items that appear are based on your user login. To create and edit content for your website, select an option under. You use these options to design your website. You create layouts to give your website a consistent look and feel, and then you create pages and templates based on the layouts. You create parts to place content on your website, and you use style sheets to control content appearance. You can also upload and store images, create friendly URLs for web pages, and manage the approval process for Formatted Text and Images parts. For more information about Site explorer, see Website Design. To manage lists and design messages, select an option under. You use these options to manage communications with website users and view reports. You create templates for messages and lists of recipients, and then you create the messages, newsletters,

12 acknowledgements, and create templates for ecards. For more information, see the Blackbaud Guide. To manage security for your website, select an option under. You use these options to manage user accounts; create user groups, task groups, and security assignments to apply security throughout your website; and import data from other Blackbaud programs to create website users. For more information about Users & security, see the Blackbaud Users & Security Guide. To configure system properties and other administrative settings, select an option under. You use these options to select whether to host a single website or multiple sites for your organisation and to configure global and site-specific settings. You can also configure merchant accounts to accept payments, set privacy settings for profile fields, and create code tables for event categories. For more information about BBIS Administration, see the Blackbaud BBIS Administration Guide. For information about BBIS, select an option under. You can access the help file, view PDF versions of the help files, watch a tutorial about how to navigate BBIS and view specific information about your version of BBIS. If you host multiple sites, the current site breadcrumb trail displays on the bottom left of the menu bar. To manage a different site, click and select the site from the dropdown list. Sites only appear if you have rights to them. Your username displays on the right of the menu bar. To log out, click Action Bar Action buttons appear against a line item on a page according to the content/type of item. Some appear on most pages, for example, (view). (delete). However others may not appear on all pages, for example, Internet Browser Buttons (Back/Forward) To navigate back and forth between pages in BBIS, use the Back and Forward arrow buttons on your Internet browser toolbar. All other buttons in browser control Internet settings. 3.3 Common Procedures Throughout BBIS, you can perform similar tasks from different parts. For example, you use an HTML editor to format and layout several features, such as , newsletters, and content on web pages. You can use a search page from different parts to help find and select data to use, such as a constituent query to use to create a Directory part or an appeal for a Donation form.

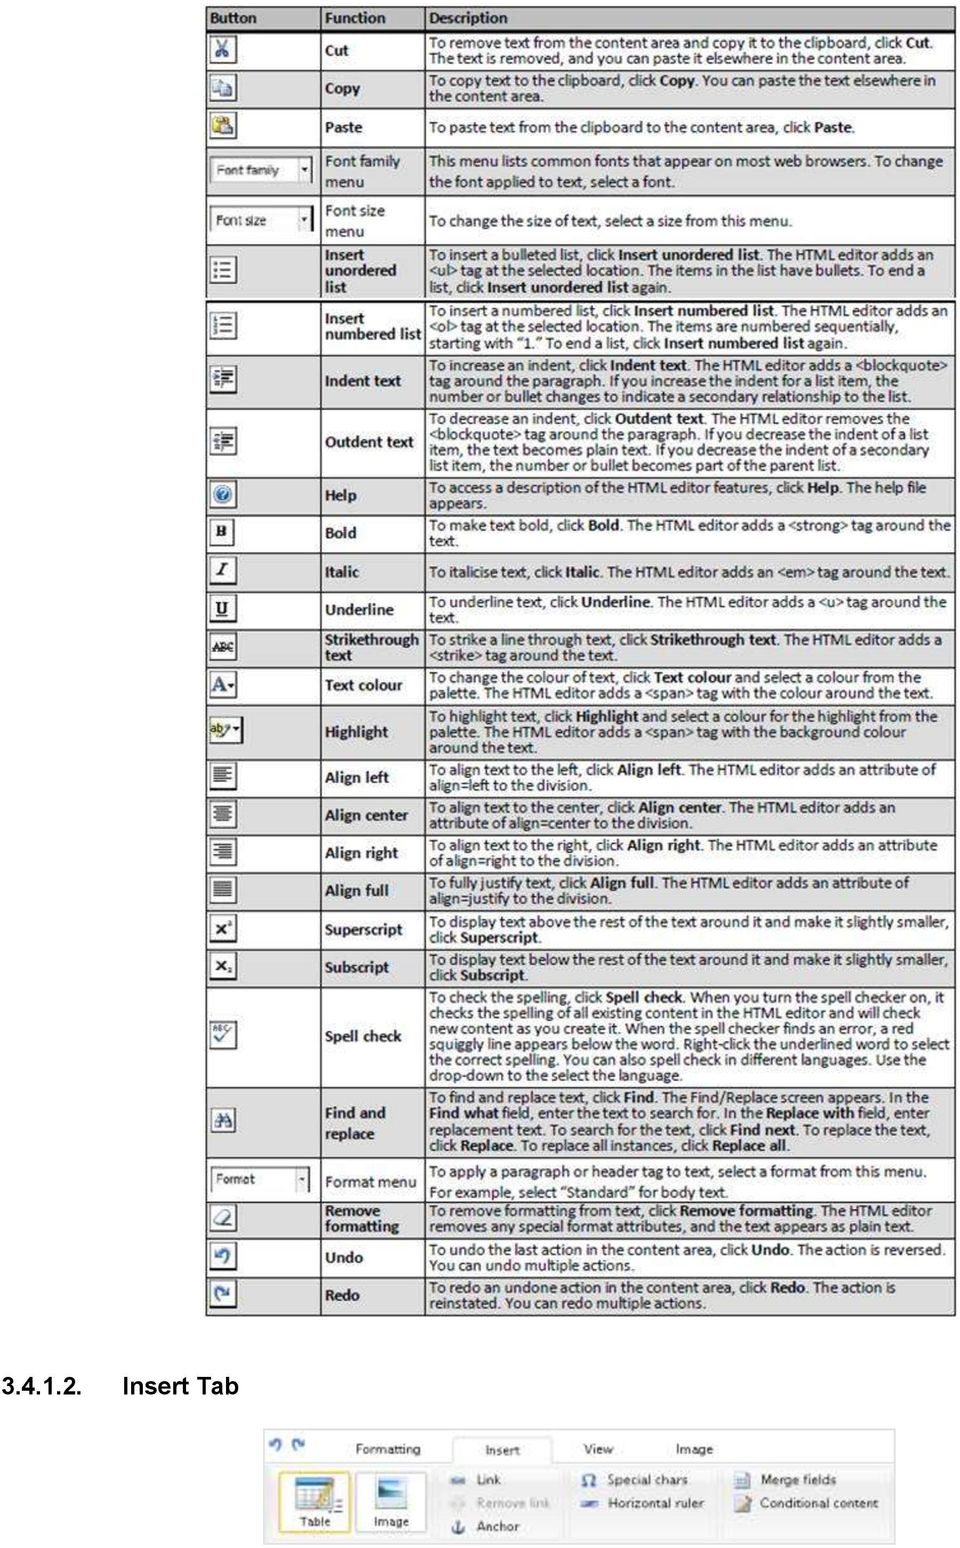
13 3.4 HTML Editor BBIS provides a powerful HTML editor to allow you to format and lay out content. With the HTML editor, you can update content easily and safely while you maintain control over the design and content. Before you create content in the HTML editor, you should design custom stylesheets to create unique elements such as colours, spacing, and font types and sizes for your website. For more information about stylesheets, see Website Design. You can use the HTML editor in different views, depending on your HTML experience and where you access the HTML editor in BBIS. Important: When you create and design s in BBIS, use inline styles, such as <div style= background-color:blue; >Welcome colour</div>. Do not define classes or use external references because vendors, such as Gmail or Outlook, are not guaranteed to render the styles correctly when the recipient reads the . Normal view: When you open the HTML editor to create or edit content, it opens in normal view. This view is similar to a standard word processing application. By default in normal view, when you press [Enter], you create a <p> tag in the HTML content to indicate a new paragraph. When you press [Shift]+[Enter], you create a <br> tag to indicate a single carriage return in the content. Tip: Your system administrator can adjust this configuration in Administration. HTML view: To view or edit the HTML source code, click in the View tab. The HTML Source editor opens. To return to the normal view, close the window. You cannot use the HTML view to embed your own form via HTML in the HTML editor. We recommend you put the form on a page that is not stored in BBIS but can be referenced in an iframe. For more information about how to include customised forms in BBIS, contact the DARS Support Centre. Preview: To view the content as it will appear on the web page and to test hyperlinks, click tab. The Preview screen opens. To return to the normal view, close the window. in the View HTML Editor Functions These tables explain the buttons and menus on the toolbar of the HTML editor. Some features have more buttons available than others.


14 Note: : On your website, users can use an HTML editor with a limited set of these buttons on some parts. With the HTML editor, users can also insert images, tables, or links Formatting Tab

15 Insert Tab


16 View Tab


17 Image Tab Table Tab

18 Menus on the Toolbar


19 3.4.2 Merge Fields To create personalised content, use merge fields to display offline information. For example, in an , you can insert the First name merge field so it displays Hello, <First name> to the recipient. 1. To add merge fields, click on the Insert tab. The merge fields list opens in a separate window that you can move around. 2. To view the available fields, click the plus sign next to a group of fields to expand the list. 3. You can double-click or drag and drop merge fields from the window to the content area. 4. You can add multiple fields at a time. To do this, place your cursor to the left or right of the group name or fields (not over the group or fields) and click and drag your mouse to select them. After the fields are selected, you can drag them as a group to the content area Style Sheet Options On your website, BBIS uses the style sheet associated with a web page s layout to render the content you enter in the HTML editor. Because the part on which you enter the HTML content may be shared across multiple web pages with different style sheets, you may need to edit the content as necessary to improve its readability with a specific style sheet. When you use the HTML editor in the normal view, you can view the content as it opens with different style sheets applied. Note: Other styles, such as those applied to the containers of the part, may affect how the content opens on the web page. To see how the HTML content ultimately opens on a specific web page, we recommend you use Pages & templates. For information see Pages & templates.

20 3.4.4 View HTML Content with Specific CSS Applied 4. On the View tab in the HTML editor toolbar for formatted text and images parts, click. The Style sheet Options dialogue box opens. 5. In the Edit using style sheet field, select the style sheet to apply to the content in the HTML editor. 6. Depending on the style sheet, the background and foreground colours of the HTML editor may affect the readability of your text. Change the background and foreground colours of the HTML editor as necessary to edit the content. a. Tick. b. Click next to Editor background colour or Editor default font colour. c. The Select a colour dialogue box opens. Select a colour on the Picker, Palette or Named tabs, or enter its hexadecimal value in the colour field. d. Click. You return to the Style sheet Options dialogue box. 7. Click. You return to the HTML editor. The content opens with the selected style sheet and colours applied HTML Editor Table and Line Properties In the normal view, you can use the HTML editor to design tables, table rows, table cells, and horizontal lines that divide the web page. You can also adjust the properties for these items to determine characteristics such as size, styles, and colour.


21 Insert/Edit Table Page 1. To create a table, click on the Insert tab in the HTML editor toolbar. The Insert/Edit Table dialogue box opens. 2. On the General tab you can edit general properties such as column number, alighment, width and border. 3. On the Advanced tab, edit properties such as language code, background image, language direction, and border and background colours. We recommend only users familiar with HTML and CSS style elements adjust the properties on the Advanced tab.
22 4. When finished, click. The table displays in the HTML editor screen. 5. To edit the table, select it and and click on the Table tab. To expand the editing area, hover the mouse over the resize. in the bottom right corner. A double headed arrow appears. Click and drag to Table Row Properties Page 1. To edit the properties of a table row, select it and click on the Table tab. The Table Row Properties dialogue box opens.

23 2. On the General tab you can edit general properties such as row type, alignment and height. 3. On the Advanced tab, edit properties such as style, language direction and code, background image and colour. We recommend only users familiar with HTML and CSS style elements adjust the properties on the Advanced tab. 4. Use the field at the bottom of the page to select which rows to update with changes the current row, odd rows in the table, even rows in the table, or all rows in the table. 5. Click Table Cell Properties Page 1. To edit the properties of a table cell, select it and click on the Table tab. The Table Cell Properties dialogue box opens

24 2. On the General tab you can edit general properties such as alignment, type, width and height. 3. On the Advanced tab, edit properties such as style, language direction and code, background image, and border and background colour. We recommend only users familiar with HTML and CSS style elements adjust the properties on the Advanced tab

25 4. Use the field at the bottom of the page to select which cells to update with changes the current cell, all cells in the row, all cells in the column, or all cells in the table. 5. Click Insert Horizontal Line 1. To insert a horizontal line, click on the Insert tab. The Insert horizontal ruler dialogue box opens. 2. Enter the width and height for the line. 3. Select whether to include a shadow or not. 4. Click Search Page You may need to select data from the database to create parts for your website. For example, you can select a constituent query to use to create a Directory part or an appeal for a Donation form on your website. To help find and select data to use, BBIS provides a search page specific to the type data you need. On the Search page, you can enter search criteria to help find the data. The criteria options available depend on the type of data needed. Search results that appear in the grid must match all the criteria you enter. We recommend you search by one or two of the most helpful criteria types. If you enter too much criteria, you can exclude the data you want. The search page appears during the creating a new part process. See for more detailed information on creating Parts. 1. Once the initial Properties and Targeting & security information are entered on the New Part page, click.
26 2. Depending on the options selected above (in this example the Directory part type was selected), the search page (similar to below) opens. 3. On the search page, enter the criteria to use to find the data. The criteria options available depend on the type of data you need. To search the database for all data of that type, leave the criteria fields empty. 4. Click Search. BBIS searches the database for data that meet the criteria entered and displays the results in the grid.
27 5. If the search returns multiple pages of results, use the First, Previous, Next, and Last buttons to navigate through the pages of results. 6. In the grid, find the data to use and click Select next to its listing. You return to the previous page Insert Image From the HTML editor and several parts, such as the Navigation Buttons part, Weblog part, and User Photos Form part, you can insert an image from the Image Library. 1. Open the relevant part for editing. On the Edit Part page click on the Insert tab. The Select Image From Image Library page opens. 2. You can select images by navigating to the relevant folder in the Folders tab, or Select the Search tab and search by name, tag, ID, image type, approval status, or site. After you click, the images that meet the criteria appear in the grid. 3. If the image/s you require are not in the library, you can upload them by clicking. Images must be *.bmp, *.gif, *.ico, *.jpeg, *.jpg, or *.png files. For more information see Image Library. 4. To insert an image to the part/screen, select it and click. You return to the previous page.
28 3.4.8 Insert Page/Document Link From the HTML editor and several parts, such as the Formatted Text and Images and Menu parts, you can create a hyperlink to a personal page, web page, Communication Preferences Form, or a document on your website. You can also link to a web page version of an message, or create links to desktop and mobile versions of your content. From this page, the user can add a link to another web page. If the user has a personal page on your website, the user can also link to it. 1. On the Edit Part page, click on the Insert tab. The Insert Link dialogue box opens. Note: To access the page link page from the HTML editor, such as on the Helplets tab or in , click Insert link on the toolbar. 2. Select whether to create or remove a link from the part. To create a link to another page on your website, select and browse to the page to link. To link to a BBIS page, you must have rights to view pages. To create a link to a page defined in Sites & settings, a Communication Preferences Form, a web page version of an message, or a desktop or mobile version of your content, select one of four ways:. In the Page field, select the option to link. The options available generate in o o The home page, login page, and privacy page defined in Sites & settings appear. For more information, see the Blackbaud BBIS Administration Guide. Pages that include a Communication Preferences Form appear. For more information, see Forms.
29 o o When you use the HTML editor to design an message, the View message on web page option opens. Select this to provide a way for recipients to view your design on a web page. You do not manually create the page the message opens on and you cannot open it in Pages & templates. BBIS automatically renders your HTML design to display the message and you can only access it from the link in the message. When you design a layout, Menu part, or Formatted Text and Images part, the View desktop version and View mobile version options appear. You can create links to one or both options to allow users to toggle between the desktop and mobile versions of your content. Note: To include a link to the mobile version of your content, you must first create a mobile optimised layout and style sheet. For more information, see Website Design. To link to a specific location on the page, click. In the Anchor field, select the predefined anchor to link to. For information about how to insert an anchor, see HTML Editor Functions. To create another type of link, select. In the Type field, select the type of link to create. For example, select ftp:, or telnet. In the URL field, enter the exact path to the page to link. To create a link to a document on your website, such as a Adobe Acrobat (*.pdf) file or a MS Word document (*.docx), select document to link. and browse to the To remove an existing link from the part, select. 3. To open the linked page or document in a separate window, enter a name for the window in the field. Tip: To display multiple linked pages or documents in the same separate window, enter the same window name in the field for each relevant link. 4. Click. You return to the Edit Part page Constituencies In DARS, constituencies define the affiliations that constituents have with your organisation. In BBIS, several part types include Constituency fields where you can select constituencies to associate with website users who submit data. For example, you can assign a constituency of Friend for users who donate on your website or a constituency of Event Participant for users who register for events. When you download data from these parts, the constituencies are added to the constituent records of website users on the Constituencies tab in DARS.
30 Note: The constituencies in the Constituency fields are determined by the Constituencies code table in DARS. You can edit the entries in this code table from the Code Tables page in Administration. For more information see the Blackbaud BBIS Administration Guide. Review the following information for details about the Constituency fields on various part types. User Login The code applies to new and existing constituent records and is specific to each User Login part. For example, you can create separate login parts for subsites you create, such as multiple chapters. The constituency for a login part may be Atlanta Member. Donation Form The constituency applies to new and existing constituents. This is the same for the donation steps in a Personal Page Manager part. Oxford Event Registration The constituency applies to new and existing event registrants.
31 4. Website Design This section describes how to create and edit the parts for your web pages in Site explorer. From Site explorer, you can design page layout, create and use templates, and add and remove part type information and images. To create web pages you will need the site administrator role with Supervisor rights. See Navigation for details on how to access Site explorer Website Overview The diagram below shows how to construct a web page from start to finish using BBIS functionality. Stylesheets, Layouts, and templates sections are for Administrator use only. Most likely, you will not need to create layouts and templates for a new web page, but will use existing web pages and templates. If you have edit rights, you can create and update web pages and part types. The Administrator must assign these security rights to user roles.
32 Site explorer contains multiple sections. Each plays a major part when you design and construct a web page: In the Pages & templates section you store each web page and template individually for quick access, and you can create, edit, and delete pages for your website and view the URL path for each page. To create a web page, you add content parts from the Parts section to your page in Pages & templates. Note: Templates are the framework for your website and establish consistency throughout your site. Administrators can create, edit, and delete templates in Pages & templates. When you create web pages, you can start with an existing template. In the Image library you store, add, delete, and approve images for your website. In addition, you can view a preview of an image to make sure it opens on the page correctly. Images must be saved as a *.bmp, *.gif, *.jpg or *.jpeg file. An image does not appear on your website until you add it to a web page. In the Parts section you create, edit, and delete reusable content information, such as a user login and user profile form. A content part does not appear on your website until you add it to a web page. To create a web page, you add parts to your page in Pages & templates. You can also assign security rights to roles for each content part in Parts. Note: With some parts and layouts, you use an HTML editor to format and lay out several features, such as , newsletters, and content on web pages. With the HTML editor, you can update content easily and safely while you maintain control over the website design and content. Administrators use the Layouts section to design and place panes on your web page. In Pages & templates, these panes contain parts and images. In the Layouts section, an administrator can customise layouts, insert rows, add bullets, and adjust font size and style. Administrators use the Style sheets section to create style sheets containing unique elements such as colours, font types and size, and spacing for your website. Style sheets, written in Cascading Style Sheet (CSS) format, are easier to use than other methods such as HTML. Unless you specify a custom style sheet, your website uses the default style sheets. In the Style sheets section, you can create custom style sheets that override a default style. In the Files section you add, delete, and approve files for your website. Files also provides you with access to all documents part files in one location Website Accessibility Websites should be designed so that they conform to guidelines defined by the World Wide Web Consortium (W3C) and its Web Accessibility Initiative (WAI). The W3C created the WAI to explain how to provide web content to people with disabilities. The WAI guidelines are intended for use by all web content developers such as page authors and website designers, and for developers of authoring tools. A select number of parts meet strict WAI level AA
33 compliance guidelines by way of automated validation, while others meet WAI level A compliance. For more information about the creation or design of a WAI compliant website, contact Blackbaud Support or visit the Web Accessibility Initiative (WAI) website HTTP Secure In its popular deployment on the internet, HTTPS provides authentication of the web site and associated web server that one is communicating with, which protects against man-in-the-middle attacks. Additionally, it provides bidirectional encryptionof communications between a client and server, which protects against eavesdropping and tampering with and/or forging the contents of the communication. In practice, this provides a reasonable guarantee that one is communicating with precisely the web site that one intended to communicate with (as opposed to an imposter), as well as ensuring that the contents of communications between the user and site cannot be read or forged by any third party. Historically, HTTPS connections were primarily used for payment transactions on the World Wide Web, e- mail and for sensitive transactions in corporate information systems. In the late 2000s and early 2010s, HTTPS began to see widespread use for protecting page authenticity on all types of websites, securing accounts and keeping user communications, identity and web browsing private. A site must be completely hosted over HTTPS, without having some of its contents loaded over HTTP, or the user will be vulnerable to some attacks and surveillance. For example, having scripts etc. loaded insecurely on an HTTPS page makes the user vulnerable to attacks. Also having only a certain page that contains sensitive information (such as a log-in page) of a website loaded over HTTPS, while having the rest of the website loaded over plain HTTP, will expose the user to attacks. On a site that has sensitive information somewhere on it, every time that site is accessed with HTTP instead of HTTPS the user and the session will get exposed. Similarly, cookies on a site served through HTTPS have to have the secure attribute enabled. All DARS BBIS websites are HTTP Secured. 4.2 Users, Roles and Logging in Security Overview The security model for BBIS allows you to manage a structure that include components like users, roles, tasks and security assignments. These components answer the security questions of who, what and where Users

34 The user record authenticates a website user s identify. User records are created manually by a supervisor or automatically when a user signs up for a website through the user login, or personal page manager parts. Roles Roles are use records grouped together manually or by query. Roles can also include other roles. Task Groups Task groups assign feature permissions for administrative tasks. These permissions include the features accessible from the menu bar, such as Site Explorer and Administration. For example, a Supervisor creates a task group called Content Authors and Selects full rights for pages, images and templates. Note: Task groups do not determine who has task rights. Task groups simply organise rights to assiociate with a role in Security assignments. Task groups are not directly connected to user records or roles. In addition to the administrative security in Task groups, you can assign view, edit, delete and change security rights for users and roles for your website. You can assign rights for individual parts, pages, templates and images on the Targeting and Security tab. For example, on a Documents part, you can assign view rights to the Board Members role so they can review the minutes from the previous Board meeting. Security Assignments Create security assignments to associate roles and task groups to apply security to a site. If you host one website, all security assignments apply to the default site. If you host multiple websites, security assignments apply to specific sites. For more information on Security please watch the overview of Security in BBIS Logging In You will be able to log into your website and manage it by logging in via your alumni login part or via a direct link to a hidden BBIS Page. If you try to login via a BBIS hidden page you will be shown the below page:
35 4.3 Pages & Templates In Pages & templates, you create, edit, and delete web pages and templates that contain reusable parts. To fit the needs of your website, you can customise pages and templates. When you create or edit a page on the page design page, you can add or create parts in editable panes inherited from the template. You can edit and remove parts on the web page. Think of Pages & templates as the shell for your website. BBIS stores pages and templates here for you to access each piece. Although you can manage parts in Parts, we recommend that you create and update parts in Pages & templates. This allows you to preview the page and see how parts fit together. You can assign security rights to user roles for web pages and templates. You use security rights to protect web pages and templates that are secure, complicated in design, or appear repeatedly on your website. When you host multiple sites, you can create pages and templates for individual sites. To do this, log in to the site and create the page or template Buttons in Pages & Templates The design page in Pages & templates allows you to design pages and templates. You use buttons to edit or create parts and perform other tasks. For information about the buttons on the design page in Pages & templates, review the following table. For information about how to design pages or templates, see Design a Web Page and Design a template. Button Function Description
36 Template part or Page part When you design a page and a part is on the template, the Template part button appears. Click the button to access options such as Insert part, New part, and Edit Page Template. If a part is on the page, the Page part button opens. In addition to the Template part options, this button includes Edit, Cut, and Paste options. Pane The design page contains pane buttons to add or create parts. Panes are content placeholders that default from the layout. Click the button to access options such as Insert part, New part, and Show/Hide Part Markers. After you insert a part, the Template pane or Page part button replaces the pane button. Template part or Page part for a part in the approval process If this button appears, the part is in the content approval workflow. When you click the button, the part status and a menu appear. The part status, such as Draft, opens at the top of the menu. The menu includes options such as Set Approval Status, Publish Now, Reject Changes, Insert part, and New part. The menu items vary according to security rights and roles. If you cannot view a menu item, check with your system supervisor. Edit part The Edit part button appears for parts within a Targeted Content part. To edit a part, click the button. To edit the Targeted Content part, click the Template part or Page part button. In the menu, select Edit. For information about the Targeted Content part, see the Parts Guide. Enable navigation For menu parts, if you want to open the corresponding page from the page design page, click Enable navigation Create a Web Page To create a web page, you select a template and add parts to the page. The page design page contains editable panes based on the template where you can add or create parts. You can also edit or remove parts. Although you can manage parts in Parts, we recommend that you create and update parts from the page in Pages & templates. This allows you to preview the page and see how parts fit together.
37 You can assign security rights to user roles for each web page. You use security rights to protect web pages that are secure, complicated in design, or appear repeatedly on your website. For more information about security, see the Blackbaud Users & Security Guide. When you create a page and include one of these parts, the second part is not available for the page. If an existing page includes both parts, a warning message informs you that the parts are incompatible. 1. From Site explorer click. The Pages & templates page opens. 2. Click New page. The New Page dialogue box opens. Note: You can also create a web page based on an existing web page. In Pages & templates, select a page in the grid and click. The Copy page appears. The original page values default in the Page name, Browser title, and Page URL fields with (Copy) appended. You can keep or edit the information, and then click. 3. In the Page name field, enter a name to identify the web page in Pages & templates. The page name does not appear on your website.
38 4. The page name defaults in the Browser title field. You can leave the page name or enter a different name to appear on the web page title bar. When you edit page settings in Sites & settings, you select whether to display this browser title and whether to include your organisation name and site name. 5. In the Folder field, select a folder for the page. You can use folders to group related web pages. By default, BBIS stores pages in the root Website folder. You cannot edit this folder. 6. In the Site to select template from field, select a site to narrow the list of templates you can use for the page. You can select a template from another site even though the page is for the site you are currently on. If you do not host multiple websites, your single site defaults in the field. 7. In the Template field, select a template. To create a new template, see Create a Template. 8. In the Page URL field, BBIS suggests a URL for the new page based on the page name or browser title you enter and the folder you select to store the page in. For example, if you enter 2014 Annual Fund for the page name and select to store the page in the Donation folder, BBIS suggests to use the URL Donation/2014-Annual-Fund. You can leave the suggested URL or enter your own unique URL for the page. If the URL exists for another page, the field displays a warning to indicate you cannot use it. Tip: These page URLs enhance search engine optimisation (SEO) for your website by including keywords in the URLs and links that search engines use to index content. BBIS does not include the root Website folder in the URL. The full URL opens just below the Page URL field. You can select the full URL to copy it, but you cannot change it. 9. In the Metadata description field, enter a description to embed in the page s HTML coding. When search engines include the page in search results, the description opens with a link to the page. 10. In the Metadata keywords field, enter keywords for search engines to include in online searches. For example, you can use keywords to describe pages that have little text or to include terms that are not on the page but are likely search criteria. Separate keywords with commas. The metadata fields are each limited to 255 characters. In general, search engines do not examine more than 255 characters of metadata. Note: The page s HTML coding also includes metadata for the last date the page was modified. This date reflects the most recent change to the page or to a part on the page. However, it does not include changes to parts stored within parts on the page. For example, a Targeted Content part can contain multiple parts to display content according to user roles. If a system supervisor modifies these parts but not the Targeted Content part itself, the change is not reflected in the metadata. 11. To apply metadata keywords from the template, tick. Tip: Each keyword opens only once in a web page s META tag. If you enter duplicate keywords or inherit duplicate keywords from the template, they only appear once in the HTML coding.
39 12. To assign security rights for the page, select the Targeting & security tab. For each user role, you can manage rights to view, edit, delete, and change security for the page. 13. Click. The page design screen opens. For information see Design a Web Page View/Edit Web Page Properties 1. Navigate to the Pages & templates page, as per instructions in previous section. 2. To view the properties for a web page, select it in the grid. The page content displays below the grid. Select the Properties tab to view information such as whether the page uses Secure Sockets Layer authentication and the number of page hits. 3. To edit a page properties, click in the Action bar beside the page line in the grid. The Page properties dialogue box opens. a Make changes as necessary. The options on the Properties tab and Targeting & Security tab are the same as on the New Page page. For more information, see Create a Web Page. b Click Design a Web Page To design a web page, you add parts to the page. The page design page contains editable panes where you can add, edit, or remove parts. Although you can manage parts in Parts, we recommend that you create and update parts in Pages & templates. This allows you to preview the page and see how the parts fit together. 1. Navigate to the Pages & templates page. 2. Click against the relevant page in the grid. The Page Designer screen opens.


40 3. To add a part to an empty pane, click. If a part exists in the pane, click. The relevant menu opens. If the Page part button displays an hourglass, the part is in the content approval workflow. For information about the menu items, see Buttons in Pages & Templates. Tip: Depending on the template, the Page Designer screen may contain multiple panes for parts. A template. button opens with parts from the To add the page to a menu, select on a menu part. The Menu part opens and defaults to the Design tab.
41 In the box on the left, select where you want the page to appear in the menu, then click and enter menu item properties for the page. For more information about menu item properties, see Parts. Tip: The Add page to menu option opens for menu parts on a page and from a template. When you add a page to a menu part for a template, it is important to remember the menu changes for all pages that use that template. To edit a part, select. The Edit Part dialogue box opens. When you copy a page and then edit a part that is shared across multiple pages or websites, a message opens to ask if you want to update the part for all pages and websites, or insert a new copy of the part on that page. When you edit a shared part from the page design page, you can click create a new copy of the part at the top of the existing part to copy the part for that page. The copied part replaces the previous part on the page so your changes do not affect other pages or websites that share the original part. For more information see Managing Parts. To remove a part, select. BBIS saves the part to the clipboard. To place it in another pane, select. Important: You can cut and paste parts from one pane to another, but if your session times out, BBIS clears the clipboard. When you reopen BBIS, you can no longer paste the part. To add a part, select. The Select a Part dialogue box opens. You can search for parts by folder, part type, name, or site. To create a part, select. The New Part dialogue box opens. To create a new Formatted Text and Images part, select. For more information about this part, see Parts.
42 To move a part with a pane, select Move up or Move down. Administrator Step: To edit the template, select. Administrator Step: To edit the style sheet, select Edit style sheet. To hide Page part buttons on the page design page, select. To enable links in a Menu part, click. This allows you to click links in the menu and access the page design page to those pages. 4. To view how the appears to different website users: select to View as a specific role; to preview the page as visitors see it on desktop browsers or mobile devices; or to display the page as it appeared on a particular date; and click. 5. Administrator Steps: To edit the page s properties, click. To edit the template, click. Important: When you edit a template, you change it for all the web pages that use it. To create a unique template for a web page, you can copy an existing template. To edit the page's layout or style sheets, click. You can access the layouts and style sheets for desktop browsers and for mobile devices. Style sheets are listed in the cascading hierarchy that you define in Style sheets. To see and manage your style sheets, select Manage style sheets. Important: When you edit a style sheet, you change it for all layouts, templates, and web pages that use it. For more information see Style Sheets. 6. To delete the page, click. You can restore it from the Deleted folder on the Folders tab. 7. BBIS automatically saves your changes. To return to Pages & templates, click Create a Template Templates are the framework for your website. You create and design templates to provide consistent website components from one web page to another. To create a web page that is different from the rest of your website, you most likely will create a special template. For example, your organisation may want to add an online donor recognition page with a virtual wall similar to your newsletters. To create a page that is different from existing pages, you must start from the beginning with a new template. In Pages & templates, the design of the template becomes the main component for the donor recognition page. To save time and effort during the template design, you can add pieces from other areas of BBIS such as Layouts, Parts, and Image library.
43 When you create a template and include one of these parts, the second part is not available for the template. If an existing template includes both parts, a warning message informs you that the parts are incompatible. Important: We strongly recommend that you assign supervisor rights for this section to only a select group of users. General users should not access templates. Any change can affect multiple web pages. We recommend that only users knowledgeable in all areas of website design and BBIS should perform tasks in this section. After you create a template, you can use it for multiple pages. 1. Navigate to the Pages & templates page and click. The New Template dialogue box opens. Note: You can also create a template based on an existing template. In Pages & templates, locate the page in the grid and click. The Copy template dialogue box opens. In the New Template name field, enter a name and click. 2. Enter a Template Name to identify the template. This name is for internal use and does not appear on the website. 3. Select the Folder where the template will be stored. You can use folders to group templates. By default, BBIS stores templates in the root Website folder. You cannot edit this folder. 4. Select layouts for the template. You can select different layouts for desktop browsers and mobile devices. a. In the Site to select layout from fields, select a site to narrow the list of layouts you can use for the template. You can select a layout from another site even though the template is for the site you are currently on. If you do not host multiple websites, your single site defaults in the field.
44 b. In the Layout fields, select a layout for the template. Note: The layout is crucial to your website's appearance. It determines the design and placement of elements on templates. The layout includes where to place content, graphics, and navigation buttons. For more information see Layouts. 5. Enter a Metadata Description to embed in the template s HTML coding. When a search engine includes a page with the template in search results, the description opens with the link to the page. 6. Enter Metadata Keywords for search engines to include in online searches. For example, you can use keywords to describe pages that have little text or to include terms that are not on the page but are likely search criteria. Separate the keywords with commas. Each keyword opens only once in a web page s META tag, so if a web page inherits a duplicate keyword from the template, it only opens once in the HTML coding. Note: The metadata fields only allow 255 characters. In general, search engines do not examine more than 255 characters of metadata. Note: The template s HTML coding also includes metadata for the last date the template was modified. This date reflects the most recent change to the template or to a part on the template. However, it does not include changes to parts that are stored within parts on the template. For example, a Targeted Content part can contain multiple parts to display content based on user roles. If a supervisor modifies these parts but not the Targeted Content part itself, the changes are not reflected in the metadata. 7. To assign security rights for the template, select the Targeting & Security tab. For each user role, you can manage rights to view, edit, delete, and change security for the template. 8. Click to add additional users and roles. The Create new security permissions dialogue box opens.
45 a Select the required users and/or roles and assign permissions as required. b Click. 9. Click. The Template designer page opens. For more information see Design a Template Edit Template Properties Important: We strongly recommend that you limit supervisor rights for this section to a select group of users. General users should not access templates. Any change can affect multiple web pages. We recommend that only users knowledgeable in all areas of website design and BBIS perform tasks in this section.. 1. On the Pages & templates page, locate the relevant template. 2. To view the properties for a template, select it and click the Properties tab below the grid. This tab includes information such as whether the template uses Secure Sockets Layer authentication and the number of page hits.
46 3. To edit a template s properties, click. The Template properties dialogue box opens. 4. Make changes as necessary. The options on the Properties tab and Targeting & Security tab are the same as on the New Template page. See previous section. 5. On the Usage tab, you can view the web pages that use the template. 6. Click Design a Template Templates provide the framework for the pages on your website. Because of the time, research, and detail involved to design templates, we recommend that you base new pages on existing templates rather than creating new templates. However, you can edit a template to fit the needs of a web page, or you can copy a template to make adjustments as necessary. Important: We strongly recommend that you limit supervisor rights for this section to a select group of users. General users should not access templates. Any change can affect multiple web pages. We recommend that only users knowledgeable in all areas of website design and BBIS perform tasks in this section. 1. On the Pages & templates page, locate the relevant template and click. The Template designer dialogue box opens. You can add parts to the editable panes that the template inherits from the layout. 2. To add a part to an empty pane, click. If a part exists in the pane, click. A menu opens. If the Page part button displays an hourglass, the part is in the content approval workflow.
47 To edit a part, click. The Edit Part dialogue box opens. To remove a part, click. BBIS saves the part to the clipboard. To place it in another pane, select. Important: You can cut and paste a part from one pane to another, but if your session times out, BBIS clears the clipboard. When you reopen BBIS, you can no longer paste the part. To add a part, select. The Select a Part dialogue box opens. You can search for parts by folder, part type, name, or site. To create a part, select. The New Part dialogue box opens. To create a new Formatted Text and Images part, select. For more information about this part, see Parts. To move a part with a pane, select Move up or Move down. Administrator Step: To edit the style sheet, select Edit style sheet. To hide Page part buttons, select. To enable links in a Menu part, click. This allows you to click links in the menu and access the page design page to those pages. 3. To view how the page appears to different website users: select to View as a specific role; to preview the page as visitors see it on desktop browsers or mobile devices; or to display the page as it appeared on a particular date; and click. 4. To edit the template's layout or style sheets, click. You can access the layouts and style sheets for desktop browsers and mobile devices. Style sheets are listed in the cascading hierarchy that you define in style sheets. To see and manage your style sheets, select Important: When you edit a layout, you change it for all the web pages that use it. To create a unique layout for a template, you can copy an existing layout. For more information, see Layouts. Important: When you edit a style sheet, you change it for all layouts, templates, and web pages that use it. For more information, see Style Sheets.
48 5. To edit the template's properties click. 6. To copy the template into a new one, click. 7. To delete the template, click. You can restore it from the Deleted folder on the Folders tab. 8. BBIS automatically saves your changes. To return to Pages & templates, click. 4.4 Files In Files, you can upload, store, and manage all files for your website. Files lets you upload and approve multiple files at one time and gives you access to all Documents part files in one location Upload Files In Files, you can upload files for your website and store them in folders. The Folders tab includes a root Files folder. You cannot edit or delete this folder, but you can add subfolders. You can also create subfolders within subfolders to organise your files, and you can move, rename, and delete folders as necessary. After you upload files, you can post them on web pages and create links to documents from Files. You can also specify which users and roles can view, upload, and manage files. When you host multiple sites, you can add files for individual sites. To do this, log in to the site and add the file. 1. From Site explorer, click. The Files page opens. Navigate to the folder you wish to add the file/s to. 2. Click. The Add files dialogue box opens.
49 3. The Select folder field defaults to the folder selected on the Files page. If require, select a different folder to store the files. 4. Click. A Select files... dialogue box opens. Note: If you do not allow Flash files in your browser, five Browse buttons appear in place of the Add files button. When the browser does not allow Flash files, you must select files one at a time, and you can only upload five at a time. a Select files from your hard drive or computer network and click. The file names appear under Select files for upload. b To add more files repeat steps 4 and 4a. You can upload files from multiple locations. Important: Files cannot exceed size limitations. The default is set to 4 megabytes, but the system administrator can adjust the limit in the web.config file. For example, to increase the size to 8192, add the following code to the configuration node of web.config: <location path= FileUpload.ashx > <system.web><httpruntimemaxrequestlength= 8192 /></system.web> </location> 5. If you add a file by mistake, click to remove it. 6. To approve the files for your website, tick under File options. 7. Click. An additional dialogue box opens that lists the uploaded file/s.
50 8. In the Description field, you can enter a description for each file. 9. Click Search for Files 1. Navigate to the Files page and select the Search tab. 2. Enter all or part of the name, tab or description, select a site, if required. 3. Click. All files matching the search criteria are displayed in the Search Results grid Edit File Properties After you upload files, you can edit them as necessary. You can replace files, edit names, URLs, folder and site locations, and change the approval status. You can also edit targeting and security preferences and modify file tags. Remember: If you include a file on multiple web pages, changes in Files affect all instances. 1. Navigate to the Files page. 2. Locate the relevant file and click. The File properties dialogue box opens. 3. Edit name, folder, site and description as required 4. You can edit the end of the file URL for the web page that stores the file. By default, the URL includes the file's folder, name, and extension. You can edit the folder and name in the URL, but this does not affect the file's name or the folder where it is stored. You cannot edit the file extension 5. To choose a different file, click. A File upload dialogue box opens. Select a file on your hard drive or computer network and click.
51 Important: Files cannot exceed size limitations. The default is set to 4 megabytes, but the system administrator can adjust the limit in the web.config file. For example, to increase the size to 8192, add the following code to the configuration node of web.config: <location path= FileUpload.ashx > <system.web><httpruntimemaxrequestlength= 8192 /></system.web> </location> 6. To approve the file for your website, tick. 7. To enter security settings, select the Targeting & security tab. For more information see step 7 in Create a Template. 8. On the Tags tab, enter keywords or phrases to identify the file. The Tags tab allows files to be included in the results for Suggested Content parts. For information about tags, see Parts. Note: You can use a file's tags as search criteria on the Search tab in Files. The tags are not included as hyperlinks on Tag Display parts. 9. Click. 4.5 Layouts In Layouts, you design the overall appearance of the pages on your website. Layouts are a critical part of your website, and the design settings that you put in place play a crucial role in the success of each and every page on your website. On your layouts, you include images, links, and other items that appear on web pages throughout your website. In combination with style sheets, layouts provide the basis of your website's design and allow you to create a consistent look and feel for your web pages. To find a specific Layout, you can scroll through the list of layouts, or use the filter functionality. 1. Enter the name and/or specific site and click. 2. The page updates to display all layouts that meet the filter criteria.
52 4.5.1 Create Layouts When you design layouts, you create the design settings that play a crucial role in the success of your entire website. Layouts determine the appearance of multiple pages on your site, and they must be in place before you can create individual web pages. Before you create a layout, you must have at least one style sheet available. The style sheets you associate with a layout allows you to edit the appearance of elements such as fonts and colours. Style sheets also affect the appearance of the content on the web pages and templates that you associate with the layout. For information see Style Sheets. On your layouts, you include images, links, and other items to display throughout your site. These design elements provide the backdrop for all web pages and templates associated with a particular layout. In addition, you include content placeholder panes in layouts to define where to place content on templates and web pages. After you associate a page or template with a layout, you can insert parts in these panes and display content on your website. For example, you can create a layout with your logo at the top, your mission statement at the bottom, background colours that match your branding, and content placeholder panes throughout. When you create a template based on the layout, the template inherits the logo, mission statement, and background colours, and you can insert parts in the panes. When you create pages based on such a template, the pages inherit the logo, mission statement, colours from the layout, as well as any content from the template. In the remaining content placeholder panes, you can insert parts to display content that is particular to the web page. Important: We strongly recommend that you limit supervisor rights for this section to a select group of users. General users should not access layouts. Any change can affect multiple web pages. We recommend that only users knowledgeable in all areas of website design and BBIS perform tasks in this section. If you host multiple sites, you can log in to a site to create site-specific layouts for that site. 1. From Site explorer, click. The Layouts page opens. 2. Click. The New Layout dialogue box opens.
53 Note: You can also use an existing layout as the starting point for a new layout. Select a layout in the grid and click. After you save the layout with a new name, you can edit it as necessary. 3. Enter a name and description for the layout. The layout name is for internal use and does not appear on your website. 4. Select the DOCTYPE for the pages and templates that use this layout Note: We recommend selecting HTML 5, which is backwards compatible. If you prefer to keep HTML 4 as the DOCTYPE, HTML 5 elements still render correctly for modern browsers (for example, Internet Explorer 9 or higher). 5. Select the site to narrow the list of style sheets you can use for the layout, and then select a style sheet for the layout. If you do not host multiple websites, your single website defaults in the first field. For information see Style Sheets. 6. Click. For information about how to design a layout, see Design a layout Edit Layout Properties Important: We strongly recommend that you assign supervisor rights for this section to only a select group of users. General users should not access layouts. Any change can affect multiple web pages. We recommend that only users knowledgeable in all areas of website design and BBIS should perform tasks in this section. 1. On the Layouts page, locate the relevant layout and click. The Layout Properties dialogue box opens.
54 2. Edit the layout name, description, DOCTYPE, and style sheet as necessary. 3. If you host multiple sites, the Assign to site field will appear. You can move a layout from its current site to another site. If the layout is in use on a web page on the source site, it continues to appear on that site. However, the layout is now associated with the target site and its security. 4. Under Usage, the page displays the templates and web pages that use the layout. 5. Click Save. You return to Layouts. For information about how to design a layout, see Design a layout Preview a Layout With preview, you can test a layout before it is live on your website. The preview replaces a web page's existing layout with the new layout, but it does not alter the actual web page. Note: Preview uses the names of content placeholder panes to determine where to display page content. For example, content in an existing layout's pane 1 opens in the new layout's pane 1. If content placeholder names do not match, then page content does not appear in the preview. 1. On the Layouts page, locate the relevant layout and click. The Preview Layout dialogue box opens.

55 2. Click on to choose a page for a preview. 3. Click. BBIS creates a preview URL. It applies the new layout to the web page in a new instance of your web browser. The preview does not alter your live website. Note: You may need to change the block popup window settings in your browser. Note: You can navigate in the preview URL to see the layout in place throughout your website. You can also share the preview URL with other users to allow them to preview the layout Design a layout Important: We strongly recommend that you assign supervisor rights for this section to only a select group of users. General users should not access layouts. Any change can affect multiple web pages. We recommend that only users knowledgeable in all areas of website design and BBIS should perform tasks in this section. 1. On the Layouts page, locate the relevant layout and click. The Layout designer dialogue box opens.


56 2. In the HTML editor content area, enter the content for the layout and format its appearance. The content opens on all pages that you associate with the layout. For example, you can include your organisation s mission statement and logo to display them throughout your website. For information see HTML editor. Note: When you update a layout, it is important to include similar characteristics from the rest of your website. This provides a uniform look for your website as users move from page to page. For example, include buttons, links, images, fonts, and colours that are consistent with the rest of your site. You can use Cascading Style Sheets (CSS) to make most of these customisations in Style sheets. For information see Style Sheets. 3. To add a content placeholder pane to the layout, select the Insert tab and click. The insert content placeholder dialogue box opens a Enter a name (ID) and description to identify the pane.
57 Note: We recommend that you use a standard naming convention for your content placeholder panes. This allows you to change the layout for a web page and still retain its content. For example, if you replace the layout for a page with a layout that uses the same pane names, the content in the original layout's panes appear in the corresponding panes in the new layout. So page content in the original pane 1 would appear in the new layout's pane 1. If pane names do not match, then page content no longer opens on a web page if you replace its layout. b Click. A yellow icon appears on the layout designer for the content placeholder pane. You use these panes to insert content on templates and pages. When you create templates and web pages, you select a layout, and its content placeholder panes determine where you can insert parts. For more information, see Website Overview. 4. To edit the style sheet for the layout, click. The Edit style sheet text editor opens. After you edit the style sheet, click. The changes appear in your page design. Important: When you edit a style sheet, you change the style for any layouts, templates, or web pages that use it. If a layout uses the default style sheet, does not appear because you cannot edit the default style sheet. For more information see Style Sheets. 5. Click. 4.6 Style Sheets
58 Style sheets create unique elements such as colours, font types and size, and spacing for your website. Style sheets, written in Cascading Style Sheets (CSS) format, are easier to use than other methods such as HTML. Unless you specify a custom style sheet, your website uses the default style sheets. You can create custom style sheets in Style sheets that override a default style. When you override elements in style sheets, we recommend you make changes only once to update the pages that use the style sheet. This saves time and helps eliminate mistakes when you update your website. You use style sheets when you create layouts. In Layouts, you link a style sheet to the layout. For more information, see Create Layouts Create Style Sheets When you design and customise your website, we recommend you test the rendering of your site in multiple browsers. For example, if your primary browser is Internet Explorer, also test your site with Mozilla Firefox. If your site renders differently, we recommend you modify your style sheets so your site has a similar look and feel in all browsers you test. Important: We strongly recommend that you assign supervisor rights for this section to only a select group of users. General users should not access style sheets. Any change can affect multiple web pages. We recommend that only users knowledgeable in all areas of website design and BBIS should perform tasks in this section. 1. From Site explorer, click. The Style sheets page opens. 2. Click. The New style sheet dialogue box opens. Note: You can also use an existing style sheet as the starting point for a new style sheet. Click against the required style sheet on the All style sheets tab. After you save the style sheet with a new name, you can edit it as necessary.
59 3. Enter a name for your style sheet. This name helps program users quickly identify the file in Style sheets. The name is for internal use and does not appear on your website. 4. In the Description field, enter any additional information about the style sheet. 5. When you host multiple sites, the Assign to site field appears so you can move a style sheet from its current site to another site. If the style sheet is in use on a web page on the source site, it continues to appear on that site. However, the style sheet is now associated with the target site and its security. 6. Under Style sheet options, select whether to apply the style sheet to a specific target. To make the style sheet available for all templates, select None. To apply the style sheet to a specific media type such as portrait page dimensions for smartphones, select Media. In the textbox, enter the media query for the target. For help to create a media query, please contact the DARS Support Centre. To apply the style sheet to a specific browser, select Browser. For example, an older browser may not handle your preferred styles, so you may need to create a style sheet to handle these exceptions to the browser. 7. To assign security rights for users and roles for the style sheet, select the Targeting & Security tab. Note: You can apply the style sheet to the Desktop browsers or Mobile devices tabs in Style sheets. In addition, you can also apply the style sheet directly to a layout. For information about layouts, see Layouts. 8. Click. The Edit style sheet text editor opens. See Design a style sheet For more information.
60 4.6.2 Edit Style Sheet Properties Important: We strongly recommend that you assign supervisor rights for this section to only a select group of users. General users should not access style sheets. Any change can affect multiple web pages. We recommend that only users knowledgeable in all areas of website design and BBIS should perform tasks in this section. 1. On the Style sheets page, locate the relevant style sheet and click. The Style sheet Properties dialogue box opens. 2. Make changes as necessary. For information about the options on this page, see Create Style Sheets. Note: When you host multiple sites, the Assign to site field opens so you can move a style sheet from its current site to another site. If the style sheet is in use on a web page on the source site, it continues to appear on that site. However, the style sheet is now associated with the target site and its security. 3. To view the web pages that use the style sheet, select the Usage tab. 4. Click Preview a Style Sheet With preview, you can test a style sheet before it is live on your website. The preview applies the new style sheet to a web page but does not alter that page on your live site. 1. On the Style sheets page, locate the relevant style sheet and click. The Preview style sheet dialogue box opens. 2. In the Choose a page for a preview field, select a page for the preview. 3. In the Select delivery channel field, select whether to preview the style sheet in a desktop browser or a mobile device. 4. Under Configure style sheet delivery order, select where to apply the style sheet. You can replace an existing style sheet or add the style sheet to your list of applied style sheets.
61 5. Click. BBIS creates a preview URL. It applies the new style sheet to the web page in a new instance of your web browser. The preview does not alter your live website. Note: You may need to change the block popup window settings in your browser. Note: You can navigate in the preview URL to see the style sheet in place throughout your website. You can also share the preview URL with other users to allow them to preview the style sheet Design a Style Sheet Important: When you design and customise your website, we recommend you test the rendering of your site in multiple browsers. For example, if your primary browser is Internet Explorer, we recommend you also test your site with Mozilla Firefox. If your site renders differently, we recommend you modify your style sheets so your site has a similar look and feel in all browsers you test. 1. On the Style sheets page, locate the relevant style sheet and click. The Stylesheet text editor opens. If you create a style sheet, first save the style sheet properties. For more information, see Create Style Sheets. On this page, you can edit properties using CSS markup language. For example, you can edit the web page s fonts, colours, backgrounds, and other properties. You can also insert HTML tags and apply styles to the tags.
62 2. To load the CSS selectors that allow you to edit the appearance of the parts that appear on your web pages, click. The CSS selectors dialogue box opens. You can access this page multiple times to add multiple selectors. 3. In the Insert selectors for field, select the CSS selectors to include in the style sheet editor. To display default styles along with the class names, tick. 4. Click. You return to the style sheet editor, and the selectors appear in a new section within the editor. Edit the styles as necessary. Note: To identify CSS classes on parts, we recommend you use a thirdparty tool such as Firebug. 5. After you edit the style sheet, click if you want to keep the style sheet editor open while you access web pages to view your changes, otherwise click to return to Style sheets Apply a Style Sheet You can apply style sheets to desktop browsers, mobile devices, or both. Your existing style sheets appear on the All style sheets tab of the Style sheets page in numerical order. BBIS gives priority to style sheets that are higher in the list, and uses others when there are exceptions, such as when a website visitor is using an older browser. You may apply style sheets to desktop browsers and mobile devices and adjust the hierarchy as needed. 1. On the Style sheets page, select the Desktop browsers or Mobile devices tab. These tabs display their sets of style sheets and the order they are applied. 2. Click. The Insert style sheet dialogue box opens.
63 a b If you host multiple sites, select the site for the style sheet. Select a style sheet. c Click. The relevant tab on the Style sheets page updates with the new style sheet. 3. To rearrange the order of the style sheet, click to drag and drop it to the required location. 4. Click. Note: You also apply style sheets directly to layouts. When you create a layout, you select a style sheet for desktop browsers and for mobile devices. These style sheets are represented on the Desktop browsers and Mobile devices tabs in Style sheets in the Layout style sheet entry. For more information see Layouts. 4.7 Image Library
64 In Image library, you can upload and store images to display on your website. After you upload images, you can use them repeatedly on your website. For example, you can upload an image of volunteers at work on your latest project and display it on a welcome page, a volunteers page, and a recent events page Search for Images 1. From Site explorer, click. The Image library page opens. 2. Select the Search tab and enter or select from options including name, tag, image ID, image type, approval status, and site. 3. Click. A thumbnail of all the images meeting the search criteria appear in the main section of the page. 4. To view details such as Caption, Owner and Size hover the mouse over the image thumbnail. 5. Click to view more specific details such as the dates when it was uploaded and last modified, and the folder where it is stored. To access the user record of the website user who uploaded the image, click the user name link. The User editor page in Users & security opens. 6. Click to preview a larger version of the image. The image can also be approved or edited from the preview popup screen. 7. On the search results screen you can, or one or more images. Click on an image to select it. To select multiple images use the standard shortcut keys - [Ctrl]+click or [Shift]+click.
65 4.7.2 Upload Images In Image library, you can upload images for your website and store them in folders. The Folders tab includes a root Files folder. You cannot edit or delete this folder, but you can add subfolders. You can also create subfolders within subfolders to organise your images, and you can move, rename, and delete folders as necessary. After you upload images, you can display them throughout the website. You can also allow website users to upload images. Tip: On the Settings tab in Sites & settings, you can require approval for the images that users upload. Under User Image Options, select Require approval for all images uploaded by users. When you select this checkbox, you must approve images before users can post them on your website. You can also limit the number of images users can upload, set a maximum file size, and select a default folder. When you host multiple sites, you can add images for individual sites. To do this, log in to the site and add the image. Important: Images must be *.bmp, *.gif, *.ico, *.jpeg, *.jpg, or *.png files, and must not exceed the size limit for images. The default is set to 4 megabytes, but the system administrator can adjust the limit in the web.config file. For example, to increase the size to 8192, add the following code to the configuration node of web.config: <location path= FileUpload.ashx > <system.web><httpruntimemaxrequestlength= 8192 /></system.web> </location> 1. On the Image library page click. The Add images dialogue box opens. 2. You can upload one or more images at once. For each image or group of images to be uploaded: a. Select the folder to upload the images to. Click. A select files dialogue box opens. b. Select images from your hard drive or computer network and click. Thumbnails for the images appear under Select images for upload.
66 3. To remove an image from the upload section, click on the thumbnail. 4. To approve the images for your website, tick. Note: If you select Require approval for all images uploaded by users on the Settings tab in Sites & settings, you must approve images that website users upload before they can post them on your website. If users post images that are not approved, they can see their images, but all other users see Photo Not Available graphics. 5. Click. Additional options appear for the images. 6. In the URL path field, edit the end of the URL for the web page that stores the image. To improve rankings in Google image search results, image URLs should be as discrete and descriptive as possible. By default, the URL includes the image's folder, name, and extension after your domain. If you edit the image name, both the URL and the image name are updated. If you edit the folder, only the URL is updated. The folder where you store the image remains the same. You cannot edit the file extension. 7. In the Alt text field, enter text to appear in place of an image if it cannot display for some reason. 8. To associate tags with images, click Edit Tags or Add tags to all.tags are keywords or phrases that identify an image s content, and you can use them to search for images on the Search tab in Image
67 library. On the Add selected tags page, you can create tags or use existing tags. For more information see Parts. 9. Click. You return to Image library Edit Image Properties After you upload images to Image library, you can edit them as necessary. You can replace images, edit names, URLs, and alt text, enter a photographer and date, and change the approval status. You can also edit targeting and security preferences and image tags. Remember that if you include an image on multiple web pages, changes in Image library affect all instances. 1. On the Image library page, click on the relevant image. The Image properties dialogue box opens. 2. Edit the name if required. The name is for internal use and does not appear on your website. 3. In the URL path field, edit the end of the URL for the web page that stores the image. To improve rankings in Google image search results, image URLs should be as discrete and descriptive as possible. By default, the URL includes the image's folder, name and extension. You can edit the folder and name in the URL, but this does not affect the image's name or the folder where it is stored. You cannot edit the file extension. 4. In the Alt text field, edit the text that opens in place of the image if it cannot display for some reason. 5. In the Photographer and Date fields, enter the creator of the image and when it was created. 6. To approve the image for your website, tick. Note: If you select Require approval for all images uploaded by users on the Settings tab in Sites & settings, you must approve images that website users upload before they can post them on your website. If users post images that are not approved, they can see their images, but all other users see Photo Not Available graphics. 7. To replace the image, click. A File upload dialogue box opens. Select a file on your hard drive or computer network and click
68 Important: Images must be *.bmp, *.gif, *.ico, *.jpeg, *.jpg, or *.png files, and must not exceed the size limit for images. The default is set to 4 megabytes, but the system administrator can adjust the limit in the web.config file. For example, to increase the size to 8192, add the following code to the configuration node of web.config: <location path= FileUpload.ashx > <system.web><httpruntimemaxrequestlength= 8192 /></system.web> </location> 8. To enter security settings, select the Targeting & security tab. For information about security settings, see Parts. 9. On the Tags tab, enter keywords or phrases to identify the image. The Tags tab for images is the same as for parts, but tags for images are not included in the results for the Suggested Content or Tag Display parts. For information about tags, see Parts. Note: You can use an image's tags as search criteria on the Search tab in Image library. The tags are not included as hyperlinks on Tag Display parts. 10. Click Photo Albums on Your Website Depending on user roles for your website, users may be able to post photos on some pages of your website. In areas where users can post photos, they use albums to manage photos and to select them for your website. The areas where users can manage photos include personal pages, the user networking site, user photos forms, and slideshows. On personal pages, user photos forms, and slideshows, users can only upload photos to their photo albums and select images to display on the website.
69 Note: When you select Enable Photos for a User Networking Manager part, security options appear when a member creates an album. The member can make the photos viewable by everyone, friends only, or just the user (private). Album security applies to all areas where the photos are used in the website, including slideshows, personal pages, and profile displays. On the user networking site, users can also create and delete albums, designate default albums, and select whether to allow other website users to view images in the albums. In addition, they can enter captions and other data for their images, copy or move images to other albums, select images as album covers and profile pictures, and delete images in their albums. 4.8 Adding Video 1. Source the video Video can be a sourced many ways. For example: Filmed specially by a staff member Filmed specially by a 3rd party Re-used from elsewhere with permission Once you have a video you need to be sure of the answers to certain questions. Who has copyright of the video? Remember, the person who shot the video, or their company, retains copyright. You need their permission to post a video on your website. Is there music on the video, if so where does it come from? Music is tricky to use online. It attracts royalty payments, so you must tread carefully. If in doubt contact the Online Community Manager for advice. Have the contributors to the video signed consent forms? You need consent before you film people. This is particularly important when those filmed are under the age of 18. If you have commissioned a company to produce a video then they should supply you with written consent forms as part of the deliverables.
70 2. Compress the video Video can take up a huge amount of space. Consequently, any video file needs to be compressed before it can be used on a web page. Your AV or IT team may be able to help you with this task. You should use specialist software to reduce the size of the video so it can be shared online. Examples of software that do this: Final Cut Pro Premiere Elements Quicktime Pro (the cheapest solution) Sorenson Squeeze To be playable via Internet Solutions your video file must conform to the following specification: Format: MP4, FLV, WebM, OGG (See JWPlayer format page for more info) Frame size: Depends on your website template. Some websites only have space for a video less than 400 pixels wide. Data rate: Less than 1mbps Learn more about terms like data rate with this article: Streaming 101: The Basics - Codecs, Bandwidth, Data Rate and Resolution 3. Find a host Even compressed video files are large. Their size means they can cause a web server to crash if viewed by too many people. This would bar access to the entire website for everyone. As such, like many organisations, we don t allow video files to be stored on the Internet Solutions servers. Instead you need to arrange storage elsewhere. The storage can be straightforward webhosting storage. Do check what bandwidth is provided, and if extra charges are incurred if your video gets lots of views. It might be that your college/department already has webspace set up for this in order to host videos of lectures. Other places to store video: OUCS Amazon s3 A Small Orange Clook When storing a video please ensure that the filename doesn t include spaces or brackets. This can stop the video playing on some devices such as ipads. 4. Add the video to a page a. Get the parameters To add the video to a web page you need to know 3 pieces of information about the video:
71 Web address Width Height Here s an example (a video of Christine Fairchild): Web address: Width: 630 pixels Height: 380 pixels What if I don t know the dimensions of the video? Open the video in a player to examine the properties. For example, in the Quicktime Player click on Show Movie Inspector (see image below). b. Build the part Now create a new part of type 'Unformatted Text' on your Internet Solutions page. Take the following code and insert it into the part: <div id="videocontainer">loading the player...</div> <script type="text/javascript"> jwplayer("videocontainer").setup({ flashplayer: "document.doc?id=152", file: " controlbar: "bottom", height: 320, width: 470 }); </script>
72 Now swap the fields in bold below for the parameters of your video: <div id="videocontainer">loading the player...</div> <script type="text/javascript"> jwplayer("videocontainer").setup({ flashplayer: "document.doc?id=152", file: " controlbar: "bottom", height: 320, width: 470 }); </script> Note: the height of the video comes first in this example. For example, using the parameters of the Christine Fairchild video: <div id="videocontainer">loading the player...</div> <script type="text/javascript"> jwplayer("videocontainer").setup({ flashplayer: "document.doc?id=152", file: " controlbar: "bottom", height: 380, width: 630 }); </script> c. Save the part. 5. Test the page You now need to test the page to make sure the video work wells for your audience. It s recommended you view the page and play the video on: a work PC using Internet Explorer over the Oxford network. a home PC using Firefox over a broadband connection. an iphone/ipad using wifi (at home or work). 4.9 Create Group Sign-up Pages Many parts of the University have groups, chapters or societies for their alumni or friends. With Internet Solutions you can create a page that allows website visitors to join your group. In order to distinguish between DARS groups and real-life groups we will use the term 'chapter' for the latter. 1. Referring to the Fundamentals 1 manual, if required, create a group in DARS to store data on the people in your chapter. To gain the most value you will need to add all existing members of your chapter to the DARS group.
73 2. To set up a chapter sign-up page you will need an appeal code category. This lets you add a mailing preference to a constituent. BBIS doesn't currently support joining and leaving groups as standard. Instead, the DARS team have developed a workaround to achieve this. We use mailing preferences to indicate a desire to join a group. A mailing preference form is built with suitable wording, for example: When a visitor submits the form a mailing preference is applied to their DARS record. An overnight process then looks for such mailing preferences and adds the DARS constituent to the appropriate group. You need to apply for an appeal code category with a name that matches your group name, but also has the prefix 'GROU ' (note the space at the end of the prefix). Applications should be made to the DARS Support Centre. Please specify that the site of the appeal code category must match the site of your department or college. For example, if you wanted to create a form that allowed visitors to join the Israel Chapter of the Said Business School (group name: SBSO Israel Chapter) you might send this request: Dear DARS helpdesk, I'd like to request creation of the appeal code category - GROU SBSO Israel Chapter This category should have the same site as me, namely - Said: OBA I'll use the appeal code category to build a website form for joining the SBSO Israel Chapter in Internet Solutions.
74 Thanks, DARS user The DARS Support Centre will log the request, and the Process and Data support team will fulfil it in due course. 3. Build group sign-up form. This process will have been covered in an appropriate training session. Refer also to the relevant sections in this manual. Things to remember: You need to add Appeals and Solicit codes to the form. Be careful to select the appropriate site when setting the properties of the appeal element. Pick the appeal code that the Process and Data team created for you in step 2. The CSS Class of the form should be groupref. The CSS class of the appeal should be appcode. The CSS class of the Solicit code element should be solcode (this hides the solicit codes as these are irrelevant in this context). 4. Test the form When a visitor submits the form you have created, a mailing preference is applied to their DARS record. When a user has the mailing preference already, they will see the option ticked when they visit the form. If a user un-ticks the option and submits, then the mailing preference becomes negative.
75 Use the form to add the mail preference to a test user. Then check the user's constituent record the next day to verify that the overnight process has added them to the correct DARS group. 5. Launch the form. Once the form is tested you can link to it from other pages on your website and from the site navigation. Be careful to apply an appropriate role to the page that holds the form. Taking this action will ensure that the group is only available to appropriate people. If the form is open to everyone, then everyone can join your group Friendly URLs With friendly URLs, you can allow website users to access web pages with multiple URLs. For example, if your standard donation page is you can create the friendly URL to direct users to that page in response to a natural disaster. Web browsers display friendly URLs just like the actual URLs. Website users can also create friendly URLs. For example, if you support user networking on your website, a website user can add a profile page for the account and create a URL that is easy to remember, type, and verbalise to other users. You can also create friendly URLs to link to another website. For example, you can create a friendly URL to link to an elected official s website. When you create a friendly URL, we recommend you keep it short, simple, and easy for users to remember and verbally communicate. Friendly URLs are an extension of your website s domain. For example, a friendly URL to a web page about your organisation s annual walkathon could be The domain name entered in the Site URL field on the Settings tab in Sites & settings determines the domain that opens in friendly URLs Create a friendly URL You can define a URL for any page on your website. You can also create URLs for pages in Pages & templates. Website users create URLs for personal pages for the Chapter Manager, Personal Page Manager, or User Networking Manager parts. 1. From Site explorer, click. The Friendly URLs page opens.
76 2. Click. The New URL dialogue box opens. 3. Under Friendly URL, the domain entered in the Site URL field on the Settings tab in Sites & settings is shown. In the field, enter the remainder of the URL for the friendly URL. For example, for a web page about your organisation s annual walkathon, enter walkathon. When you create friendly URLs, you can define the site architecture. For example, you can create a friendly URL of for a web page with general information about your walkathon and or for the Donation Form associated with the event. Note: Friendly URLs combine the domain name from the Site URL field in Sites & settings with the friendly URL information that you enter here. To change the domain portion of the URL, edit the URL in the Site URL field. 4. To verify the friendly URL is available, click the link. If the URL is available, a success message appears. If not, adjust the URL so it is unique. 5. Under Target, select the web page for the friendly URL. To search for the web page, select Select Page and click to browse to the page to associate with the link. To enter the target URL for the web page, select Enter URL. A field opens for you to enter the full URL. Tip: If you are creating a friendly URL to link to an external website, select Enter URL and enter the external target URL in the field that opens.
77 6. Click Edit a Friendly URL After you create a friendly URL, you can edit it as necessary. For example, you can correct typographical errors or associate the friendly URL with a different web page. 1. On the Friendly URLs page locate the relevant friendly URL and click. The URL dialogue box opens. 2. Edit the URL or web page associated with the link. For information about how to create a friendly URL, see previous section. 3. Click Delete a Friendly URL You can delete friendly URLs from your website. For example, you can delete a friendly URL to remove a link for a web page that no longer exists. 1. On the Friendly URLs page find the relevant friendly URL and click. 2. Click to confirm Approvals Certain parts will ask for users to approve before publishing onto the site, you will see the following image where a part requires your approval. To approve a web part all you need to highlight the part and select either Publish Now or Reject Changes. and select
78 5. Forms With Forms, you can create and manage online forms to collect information from website users. When you create a form, you use the form designer to create distinct steps and sections, insert instructional text, and insert fields to collect data from website users. For each form type, you add elements to the form that are specific for the type of information you want to collect from users. For example, for a Profile Update Form, you add elements to provide a way for users to add, edit, and remove profile information. Elements accept different types of data. For example, website users can enter text or select from a list, a checkbox, or options. After you design the form, you then create a Form part and add the part to a web page. 5.1 Online Forms: Process Overview To create an online form, you must perform several steps in different areas of BBIS. 1. Assign Security Rights To allow users to create and manage online forms, you must provide security rights. You add the desired rights to a task group. In Security assignments, you then associate the task group with a role or individual user. In the task group, you can provide users with full supervisor rights, rights to create forms but not edit or delete other forms, view-only rights, or limited view-only rights. For more information, see the Blackbaud Users & Security Guide. When you host multiple sites, you can create forms for individual sites. To do this, log in to the site and create the form. For more information, see the Blackbaud BBIS Administration Guide. 2. Create Form Create the online form from scratch, or copy an existing one. 3. Design, Preview, and Save Add the elements (fields), sections and steps to design the form which website users will see and complete online. 4. Create Form part Create a Form Part to add the form to a web page. 5. Test View the form in a web browser to make sure it is accurate and easy to use. 6. Manage Form Manage the form (copy, edit, view) after you create and design it Create Forms In Forms, you can create, search, preview, and view form details. When you design a form, BBIS assigns identifiers at various stages: When you create the form, BBIS assigns a form ID.
79 When you add the Form part to a web page, BBIS assigns a page ID. When you add the page to a website, BBIS assigns a website ID Create a New Form 1. From Site explorer, click and select the folder to store the form in. 2. Click. The New Form dialogue box opens. 3. Select the form type to determine the elements that are available on the form. 4. Enter a name to identify the form. Note: If you edit the name after you create the form, BBIS creates a new form. 5. Click. The form designer screen appears Copy a Form 1. On the Forms screen, select the folder for the form type you want to copy and then select the form you want to copy.

80 2. Click in the Action column. The Copy Form dialogue box opens. Note: When you copy a form, the new form saves to the same folder the original form appears in.. 3. Enter a name for the new form and click. 5.3 Design Forms After you save a form, or when you select to edit a form, the Form Designer screen opens. From this screen you add elements, sections and steps to the form to create the required form design. Elements are the fields that website users see on the form. Elements accept different types of data. For example, website users can enter text or select from a list, a checkbox, or options. You organise forms by sections and steps and add elements to sections. By default, each new form contains one step and one section. All forms must contain at least one section in a step. Add Fields: The element groups that are available under Form elements depend on the form type. When you select an element group, the elements you can add to a form appear. Required element groups and elements appear in bold. Additionally, when you select an element group or element, a description appears under Property Description. For more information, see Form Elements. Step details (centre pane): When you create a form, the form designer screen automatically contains one step and one section. By default, the step name is the form name and the section has no title. You can add as many steps and sections as necessary. Steps allow you to organise a form in the order you want it completed. You place form elements in a section and these become the fields that website users view and complete. You can change the order of sections, steps, and elements..
81 Properties: When you select an element in the design area, its properties appear under Properties. The Form tab within Properties displays properties for the form. The Element tab displays properties for an element group, element, grouped element, step, or section. Design and action buttons: The buttons on the form designer screen allow you to organise a form into sections and steps, preview it, and save the form. For previews, the form uses the style sheet associated with the form. When you place it on a web page, it inherits the page s style sheet. If the web page is part of a website, the form inherits the website s style sheet. After you design a form, you create a Form part to add the part to a web page Design a Form 1. On the Forms screen, navigate to the relevant form and click. The Form Designer screen opens. 2. Under Add fields, click an element group to view its elements. To hide elements, click the element group again. 3. Drag and drop elements to the design area (the center pane). When you do this, a horizontal line appears in the design area to indicate the placement of an element. Required elements are in bold. You cannot save a form until you include required elements. When you add an element to the design area that can only be added once, it disables. If you need to use the element someplace else on the form, you can delete it from the design area to make it available again. After you add an element to the design area, a double arrow icon appears if the form requires another element or the element conflicts with an existing element. For example, when you have only one element on a form, the icon appears because forms require multiple elements. Likewise, if you include the Addresses and Primary address elements on a Profile Update Form, the icon appears because you cannot use both elements on the form. 4. You can organise the form into sections and steps to manage the elements you add to the form. 5. Edit properties as necessary. 6. Click. 7. To preview the form, click. A preview appears for you to view and test the design.

82 5.3.2 Form Types When you create a form you can select different online form types depending on the data you want to collect from website users. For more information about form types and the elements each contain, see Form Elements Table. Communication Preferences: Use this form so registered website users can select the types of mail and communications they want to receive. You also use this form to provide a way for these users to opt out of communication from your organisation. Signup: Use this form so registered and non-registered website users can sign up for different newsletters and communications. Profile Update: This form displays a user's profile and provides a way for users to add, edit, and remove profile data, such as biographical, education, and relationship information Form Designer Style Sheets By default, forms inherit the styles defined in style sheets. Styles determine the appearance of text for steps, sections, and button labels. Forms use the form default style sheet when you preview them in Forms. When you insert the Form part on a web page, the form inherits the styles defined for the web page or website. For more information, see style sheets. 5.4 Form Sections and Steps Use sections and steps to organise elements you add to the Form Designer. When you create a new form, it automatically includes one step, and the step contains one section. Each form requires at least one step, and each step requires at least one section. By default, the new form name is the step name, and the section has no title. In the Form Designer, steps appear as tabs and sections appear within tabs. Each section has a title area. Sections are added to steps and allow you to group elements you add to a form. This is useful if the form contains many elements. You can organise steps and sections in the order you want website users to complete the form Add a Step 1. On the Form Designer, click. The Add step dialogue box opens. 2. Enter a label for the step. If you don t enter a label, the step will save as Untitled.
83 3. Click. The new step tab is added to the Form Designer. 4. To change the label, select the step. Under Properties, select the Step tab. In the Label row, enter the text you want to appear for the step name Reorder a Step Reorder steps when you have two or more steps on a form. Arrows appear next to the step name so you can move the step to the left or right. 1. On the Form Designer, click the step you want to reorder. 2. Click the arrow in the direction you want to move it Add a Section to a Step Sections allow you to group elements you add to a form. This is useful if the form contains many elements. Each section you add to a form appears below the previous section 1. In the Form Designer, click. The Add section dialogue box opens. 2. Enter a label for the section. This is optional at this point. 3. Click. The new section is added to the step. 4. To change the label, click the section. Under Properties, select the Element tab. In the Label row, enter the text you want to appear for the section name. Note: To delete a section, click the on the right edge of it. Click to confirm. After you delete a section, you cannot recover it. If there is only one section in the step, you cannot delete it because you must have one section in each step Reorder Sections 1. On the Form Designer, select the relevant step and click. The Reorder sections dialogue box opens.
84 2. Drag and drop the section/s to required position. 3. Click. The sections have been reordered on the step. 5.5 Form Elements Element groups contain elements that become one or more fields on a web page. For example, the first name element appears as a single field on a web page. The address element appears as multiple fields on a web page to collect all address information. Tip: Required elements are bold. Element groups that contain one or more required elements are also bold. To view elements for an element group, select the group under Form elements. The groups and elements depend on the form type. For example, you do not see communication preference element groups when the form type is Profile Update Form. When you hover over an element group or element, a short description appears in a help window. Form elements also contain attribute elements. You create attributes in DARS. To view attribute elements in Forms, you need to include them in Administration. For more information, see the Blackbaud BBIS Administration Guide Form Elements Table Each form type contains elements that are applicable to the form. For example, the Profile Update form contains biographical and spouse elements. Elements become fields on a web page for users to view and complete.

85 Review each element section (in the following manual sections) for details about the elements that become fields on a web page Attribute Elements You can include attribute elements on most forms. They are custom fields you add to a form. For example, you can include the Constituent Attributes element on the Profile Update Form to obtain t-shirt size information for constituents. Existing attributes integrate from DARS. Note: If you know an attribute exists, but do not see it in Forms, check the Settings tab in Sites & settings to verify the attribute is available. For more information, see the Blackbaud BBIS Administration Guide. When you create the Profile Update Form and Allow only one per record is selected for the attribute category in DARS, the attribute appears as a drop-down field on the web page so users can select only one option. When this is not selected, each attribute appears with a checkbox beside it so users can select multiple options Biographical Fields Profile Update Form Use Biographical fields on the Profile Update form. This data integrates with a constituent record. Note: Use the Profile Update form so website users can add, edit, and remove profile information. For more information, see Create Forms. To display a form on a web page, you must include it on a Form part.
86 Signup Form The Signup Form uses the element under Biographical fields. Note: Use the Signup so website users can sign up for or opt out of different newsletters and communications. For more information, see Create Forms. To display a form on a web page, you must include it on a Form part Communication Preferences Use Communication Preferences fields on the Communication Preferences form. Note: Use the Communications Preferences form so registered website users can select the types of mail and communications they want to receive. You also use this form to provide a way for these users to opt out of communication from your organisation. For more information, see Create Forms. To display a form on a web page, you must include it on a Form part.

87 Use the Communication Preferences form to target these elements for registered website users. Use the Signup form to target the Appeals element for registered users, non-registered website users, or both. On either form, the data defaults directly on the constituent record in DARS when a constituent submits a communication preference on your website. When a non-registered user submits a communication preference on the Signup form, the data defaults on the subscribers page in Users & security. For more information, see the Blackbaud BBIS Administration guide. Note: To view a list of constituents and their preferences, create a query in DARS. For more information, see the Fundamentals 2 manual. For advanced properties information about these elements, see Communication Preferences Form: Advanced Properties Contact Information Use Contact information fields on the Profile Update form. This data integrates with a constituent record. Note: Use the Profile Update form so website users can add, edit, and remove profile information. For more information, see Create Forms. To display a form on a web page, you must include it on a Form part.

88 5.5.6 Education Use the fields under Education on the Profile Update form. This data integrates with a constituent record. Note: Use the Profile Update form so website users can add, edit, and remove profile information. For more information, see Create Forms. To display a form on a web page, you must include it on a Form part Form Elements Use Form elements to add static text to a form

89 5.5.8 User Login Element Use the Login information element on the Profile Update form so users can edit login credentials for your site. Note: Use the Profile Update form so website users can add, edit, and remove profile information. For more information, see Create Forms. To display a form on a web page, you must include it on a Form part. Important: This element does not provide the ability to log in to your site Primary Employment Use Primary employment fields on the Profile Update form. This data integrates with a constituent record. Note: Use the Profile Update form so website users can add, edit, and remove profile information. For more information, see Create Forms. To display a form on a web page, you must include it on a Form part. Tip: The Primary employment element includes the ability to select a primary employer. Therefore, when you use this element, you cannot use the Organisation element under Relationships. For more information about advanced properties for this element, see Profile Update Form: Primary Address and Business Primary Address Advanced Properties Relationships Use Relationships fields on the Profile Update form. This data integrates with a constituent record.

90 Note: Use the Profile Update form so website users can add, edit, and remove profile information. For more information, see Create Forms. To display a form on a web page, you must include it on a Form part. For advanced properties information about these elements, see Profile Update Form: Relationships Advanced Properties. 5.6 Properties Use properties to view and change form and element properties, using the Form tab and Element tab respectively. When you select a form or element property, a description appears below the Properties pane. Click to show or hide the Properties pane.
91 To resize the Properties pane, place the cursor to the left of the pane on the vertical line and drag the line to resize. To resize the Name and Value columns, place the cursor on the vertical line in between them and drag to resize. When elements contain many properties, a scroll bar appears so you can scroll them to view all properties Form Tab Properties The Form tab in the Properties pane displays properties for the form. You can change any form property except Form type. Once you create a form, you cannot change its type. You change a form property in the Value column. Some properties require you to enter text. Other properties open a screen for you to enter text or select options Step Properties The Step tab in the Properties pane on forms displays properties for the step selected in the design area. From the Value column, you can enter text for the Label property to appear as the step name Element Tab Properties The Element tab in the Properties pane displays properties for the element selected in the design area. It also displays properties for sections. Each element shares common properties, such as (Name) and CSS class. You can change any of the properties except for the ones that appear in parentheses and are disabled, such as (Name) and (Mode). The Form Designer provides great flexibility so you can create the exact form you want. You change element properties in the Value column. Some elements require you enter text. Other properties, such as Advanced properties, open a screen for you to enter text or select options. Element properties may vary for different elements, but many have common elements. For example, all elements have a name and a CSS class property. Note: If you have administrator rights and BBIS automatically logs you out due to inactivity, changes you save for advanced properties remain when you log in again. To check your changes, return to the advanced properties page Communication Preferences Form: Advanced Properties When you select an element under Communication Preferences for a Communication Preferences Form, you can select advanced properties for the element. 1. To view advanced property options, locate Advanced properties in the Properties pane.
92 2. Click in the Value column to edit. The... Properties dialogue box opens. 3. The options on this screen are similar but vary depending on the data that applies to each element. For example, most elements, such as General Correspondence, Events, and Acknowledgements include the ability to select specific codes or types on the web page. The Reminders element does not include this because codes and types do not apply to reminders. All elements include the ability to enter text for the communication as you want it to appear on the web page. You can also select the mail options for each element such as send by mail or . When you select Advanced properties for the Appeals element, the Appeal Preferences Properties dialogue box opens.


93 a Under Create appeal options, filter the appeals to appear on your form based on category, site, or business unit and select how users can receive appeals. For users who receive an appeal by , messages are based on a template that is associated with the appeal and that uses "Appeal" as the data source. For more information about Appeal templates and data sources, see the Marketing and Communications manual. Tip: In the Properties pane, enter custom text for headers and columns for a communication preference form. For example, to update the opt in and communication columns, locate the Opt in text and Communication text rows. In the Value column, enter the text to appear for the columns. To update the header, locate the Header text row. In the Value column, enter the text to appear for the header. For more information about the communication preferences element, see Communication Preferences Profile Update Form: Addresses Advanced Properties When you select the Addresses element under Contact information for a Profile Update Form, you can select advanced properties for the element. Use advanced properties to select whether users can add or edit an address from profiles. 1. To view advanced property options for addresses, select the element and find Advanced properties in the Properties pane. 2. Click in the Value column to edit. The Multiple Addresses dialogue box opens.

94 3. On this screen, select the address types to include on the form. For example, to allow users to update business and home primary address information, move Home Main and Business - Main to the box on the right. To customise how these appear on your web page, enter the text as you want it to appear in the Caption column 4. Under Configure address options, you can choose to allow users to add new addresses. You can also change the field captions that appear on the web page, select whether the field is required, and allow users to edit or hide the field. When you select Include, a user can add or edit information for the field. If you clear Edit and select Include, the field is disabled when a user adds or edits information for this element Education Advanced Properties When you select an element under Education, you can select advanced properties for the element. Use advanced properties to select the education information that appears for profiles. Note: For more information about the education elements, see Education. 1. To view advanced property options for education elements, select the element and find Advanced properties in the Properties pane. 2. Click in the Value column to edit. The Multiple Educational [...] Properties dialogue box opens.


95 3. On this screen, you can select to allow users to add new education history or involvements. When you select Display in summary, the field appears in a grid for a user to view when the form displays on a web page. When you select Include, a user can add or edit information for the field. If you clear Edit and select Include, the field is disabled when a user adds or edits information for this element. You can change the field captions that appear on the web page, select whether the field is required, and allow users to edit or hide the field Addresses and Phones Advanced Properties When you select addresses and Phones under Contact information, you can select advanced properties for the element. Use advanced properties to select the and phone types to make available online. Note: When you use these elements, users can enter multiple addresses and phone numbers. They can also select a primary address type and a primary phone type. For more information about these elements, see Contact Information. 1. To view advanced property options for addresses or Phones, select the element and find Advanced properties in the Properties pane. 2. Click in the Value column to edit. The Multiple [...] Advanced Properties dialogue box opens.


96 3. On this screen, select the /phone types to include on the web page. You can also change the field captions that appear on the web page. Note: If you know a type exists in DARS but do not see it on this part, check the Settings tab in Sites & settings to make sure the type is available Name Format Types When you select Name format types under Biographical fields for a Profile Update Form, you can select advanced properties for name format options and types. Use advanced properties so users can enter multiple name recognition preferences on the profile page. For example, users can enter a preferred name for your annual report and enter a preferred name for your alumni mailings. Note: For more information about the name format type element, see Biographical Fields. 1. To view advanced property options for name format types, select the element and find Advanced properties in the Properties pane. 2. Click in the Value column to edit. The Name Format Properties dialogue box opens. 3. On this screen, select the name format options to include on the web page. 4. If applicable, you can select the name format types to include and change the field captions that appear on the web page. Note: If you know a name format type exists in DARS but do not see it on this screen, check the Settings tab in Sites & settings to make sure the name format type is available.


97 Primary Address and Business Primary Address Advanced Properties When you select Primary address under Contact information or Business address under Primary employment for a Profile Update Form, you can select advanced properties for the element. Use advanced properties to select the address information that appears for profiles. Note: For more information about the primary address element, see Contact Information. For more information about the business address element, see Primary Employment. 1. To view advanced property options, select the element and find Advanced properties in the Properties pane. 2. Click in the Value column to edit. The Profile Address Advanced Properties dialogue box opens. 3. On this screen, select the address fields to include on the web page. You can change the field captions that appear on the web page, select whether the field is required, and allow users to edit or hide the field Relationships Advanced Properties When you select an element under Relationships for a Profile Update Form, you can select advanced properties for the element. Use advanced properties to select whether users can add new relationships and to select the specific fields to include on the form. You can also enter text as you want it to appear on the web page for each field you include. 1. To view advanced property options for relationships, select the element and find Advanced properties in the Properties pane.


98 2. Click in the Value column to edit. The Relationship Properties dialogue box opens. 3. Options on this screen will depend on the relationship element selected, though all include: The options to change the field captions that appear on the web page, select whether the field is required, and allow users to edit or hide the field. When you select Include, a user can add or edit information for the field. If you clear Edit and select Include, the field is disabled when a user adds or edits information for this element. When you select Display in summary, the field appears in a grid for a user to view when the form displays on a web page. On the Relationships Properties screen for an Employment element, you can allow users to add new employment relationships.
99 On the Relationships Properties screen for an Organisations element, to filter the organisation types to include on the form, select the type in the Available box and click type appears in the box on the right.. The Note: The relationship type you select in the Individual relationship type field when you configure integration with DARS does not appear in the Available box for this element. For more information about this field, see the Blackbaud Web Transactions Guide. Under Configure organisation relationship options, you can select to allow users to add new organisation relationships. On the Relationships Properties screen for the Spouse element, select the fields to include and options for the fields. For more information about the Relationships elements, see Relationships Property Descriptions Depending on what you select in the design area, property descriptions appear below the Properties pane. Review the following for property description information. Descriptions appear for element groups. For example, Layout elements and Profile elements. Descriptions appear for an element. For example, Surname and First name under Biographical fields. Descriptions appear for element properties. For example, CSS class in the Name column.
100 5.7 Form Permission Task Groups When you host multiple sites, you can create forms for individual sites. To do this, log in to the site and create the form. For more information, see the Blackbaud BBIS Administration Guide. To create a form, you must have appropriate security rights. In addition, you can assign modify, copy, or delete rights for forms. You assign task rights from Users & security, Task groups. Under Forms security, Full rights grants rights to supervisors and form owners to create, modify, copy, and delete forms. Other users can only view and copy forms. When you copy a form, the new form saves to the same folder the original form appears in. Create rights grants full rights to supervisors. It also grants create, modify, and copy rights to form owners. Other users can only view and copy forms. View rights grants rights to preview the form. Non-supervisors cannot open the form in the Form Designer. For more information about task rights, see the Blackbaud Users & Security Guide. 5.8 Form Part To display a form on a web page, you must include it on a Form part Create and Design a Form Part For more information about how to create or edit a part, as well as the tabs on the Edit Part screen, see Managing Parts. 1. To create a Form part, navigate to the Parts page and click. The New Part dialogue box opens.
101 2. On the Properties tab, select Form as the part type and enter a name. Enter/select other information on the Properties Tab and Targeting & Security Tab as required. 3. Click. 4. On the Edit Part > Design tab, select the form to associate with the part. 5. Click.
102
103 6. Further Help and Information 6.1 DARS Support Centre Contact DARS Support if you are a member of staff and have any problems or need help using the system: Tel: Fax: Hours: Website: [email protected] Monday to Friday 8.30am to 5pm (UK time), excluding public holidays and University closure days DARS Project An overview and further details about the DARS project can be found at: Website: Additional DARS Documentation The DARS website contains a library of information about the project, key process and the weekly circular: Documents Underpinning DARS Frequently Asked Questions Circular IT Services Programmes and Projects IT Services Programmes and Projects is part of University Administration and Services (UAS). We aim to strengthen and support the University's strategy and objectives by working in partnership with the rest of UAS, in the following areas: Professional project planning, management & implementation, using a tried and tested project methodology. IT Systems Development Programmes. Customer Services and Applications Support, e.g. Student Systems support and helpdesks. In the left hand site menu you will find an overview of our main helpdesks.
104 Infrastructure and technical systems support Website: IT Services Training Team The IT Services Training Team design and deliver training courses and produce learning materials in order to maximise the effective use of new business systems. This is achieved by working closely with the project and business teams to identify the end users and training requirements associated with using new systems. For more information about the training and services we offer: Website: DARS 3.0 BBIS Manual v
105 6.6 Document Information This document is subject to change amendments will be apparent from a change in version numbering. Revision Changes Revision Version Summary of Changes Changed By Date Number 09/01/ Copied information from five Blackbaud guides and updated to University of Oxford requirements and DARS v3.0 images DRAFT CLM2 31/01/ Revisions and comments CY 20/02/ Pre-Go Live with Document EFM 18/03/ Document Split and Published to website MD DARS 3.0 BBIS Manual v
Quick Reference Guide: Enhancements and New Features in Internet Solutions V3.0
 : Introduction This QRG covers the various new enhancements and performance upgrades brought into DARS Blackbaud Internet Solutions (BBIS) through the Version 3.0 upgrade. For each new feature, it provides
Terminal Four (T4) Site Manager
 Site Manager") Terminal Four (T4) Site Manager Contents Terminal Four (T4) Site Manager... 1 Contents... 1 Login... 2 The Toolbar... 3 An example of a University of Exeter page... 5 Add a section... 6 Add content to
Terminal Four (T4) Site Manager Contents Terminal Four (T4) Site Manager... 1 Contents... 1 Login... 2 The Toolbar... 3 An example of a University of Exeter page... 5 Add a section... 6 Add content to
JOOMLA 2.5 MANUAL WEBSITEDESIGN.CO.ZA
 JOOMLA 2.5 MANUAL WEBSITEDESIGN.CO.ZA All information presented in the document has been acquired from http://docs.joomla.org to assist you with your website 1 JOOMLA 2.5 MANUAL WEBSITEDESIGN.CO.ZA BACK
Cascade Server. End User Training Guide. OIT Training and Documentation Services OIT TRAINING AND DOCUMENTATION. oittraining@uta.
 OIT Training and Documentation Services Cascade Server End User Training Guide OIT TRAINING AND DOCUMENTATION [email protected] http://www.uta.edu/oit/cs/training/index.php 2013 CONTENTS 1. Introduction
Go Kiwi Internet Content Management System Version 5.0 (K5) TRAINING MANUAL
 TRAINING MANUAL") Go Kiwi Internet Content Management System Version 5.0 (K5) TRAINING MANUAL K5 CMS The K5 Content Management System (CMS), previously known as Kwik-Az Updating, is a small downloadable program that permits
Go Kiwi Internet Content Management System Version 5.0 (K5) TRAINING MANUAL K5 CMS The K5 Content Management System (CMS), previously known as Kwik-Az Updating, is a small downloadable program that permits
Joomla! 2.5.x Training Manual
 Joomla! 2.5.x Training Manual Joomla is an online content management system that keeps track of all content on your website including text, images, links, and documents. This manual includes several tutorials
Web Ambassador Training on the CMS
 Web Ambassador Training on the CMS Learning Objectives Upon completion of this training, participants will be able to: Describe what is a CMS and how to login Upload files and images Organize content Create
Content Management System
 OIT Training and Documentation Services Content Management System End User Training Guide OIT TRAINING AND DOCUMENTATION [email protected] http://www.uta.edu/oit/cs/training/index.php 2009 CONTENTS 1.
Ingeniux 8 CMS Web Management System ICIT Technology Training and Advancement ([email protected])
") Ingeniux 8 CMS Web Management System ICIT Technology Training and Advancement ([email protected]) Updated on 10/17/2014 Table of Contents About... 4 Who Can Use It... 4 Log into Ingeniux... 4 Using Ingeniux
Ingeniux 8 CMS Web Management System ICIT Technology Training and Advancement ([email protected]) Updated on 10/17/2014 Table of Contents About... 4 Who Can Use It... 4 Log into Ingeniux... 4 Using Ingeniux
Virtual Exhibit 5.0 requires that you have PastPerfect version 5.0 or higher with the MultiMedia and Virtual Exhibit Upgrades.
 28 VIRTUAL EXHIBIT Virtual Exhibit (VE) is the instant Web exhibit creation tool for PastPerfect Museum Software. Virtual Exhibit converts selected collection records and images from PastPerfect to HTML
The Home link will bring you back to the Dashboard after. Workflows alert you to outstanding assets waiting for approval or review.
 Gonzaga University s content management system (CMS) is a software program that allows individuals to create and edit departmental websites. This tutorial demonstrates commonly used CMS functions. For
Using Adobe Dreamweaver CS4 (10.0)
") Getting Started Before you begin create a folder on your desktop called DreamweaverTraining This is where you will save your pages. Inside of the DreamweaverTraining folder, create another folder called
Getting Started Before you begin create a folder on your desktop called DreamweaverTraining This is where you will save your pages. Inside of the DreamweaverTraining folder, create another folder called
Google Docs Basics Website: http://etc.usf.edu/te/
 Website: http://etc.usf.edu/te/ Google Docs is a free web-based office suite that allows you to store documents online so you can access them from any computer with an internet connection. With Google
How to Edit Your Website
 How to Edit Your Website A guide to using your Content Management System Overview 2 Accessing the CMS 2 Choosing Your Language 2 Resetting Your Password 3 Sites 4 Favorites 4 Pages 5 Creating Pages 5 Managing
USER GUIDE. Unit 2: Synergy. Chapter 2: Using Schoolwires Synergy
 USER GUIDE Unit 2: Synergy Chapter 2: Using Schoolwires Synergy Schoolwires Synergy & Assist Version 2.0 TABLE OF CONTENTS Introductions... 1 Audience... 1 Objectives... 1 Before You Begin... 1 Getting
Your Blueprint websites Content Management System (CMS).
.") Your Blueprint websites Content Management System (CMS). Your Blueprint website comes with its own content management system (CMS) so that you can make your site your own. It is simple to use and allows
Your Blueprint websites Content Management System (CMS). Your Blueprint website comes with its own content management system (CMS) so that you can make your site your own. It is simple to use and allows
ITP 101 Project 3 - Dreamweaver
 ITP 101 Project 3 - Dreamweaver Project Objectives You will also learn how to make a website outlining your company s products, location, and contact info. Project Details USC provides its students with
SiteBuilder User Guide
 SiteBuilder User Guide Page 1 of 41 SiteBuilder Manual Table of contents SiteBuilder Manual... 2 Table of contents... 2 What is SiteBuilder?... 4 Tips for building a great site... 4 Getting started...
How To Create A Campaign On Facebook.Com
 Seriously powerful email marketing, made easy Table of Contents DOTMAILER QUICK START GUIDE... 3 Main Screen... 4 Getting Started... 6 STEP 1: CAMPAIGN SETTINGS... 7 STEP 2: CAMPAIGN CONTENT... 8 Editing
NJCU WEBSITE TRAINING MANUAL
 NJCU WEBSITE TRAINING MANUAL Submit Support Requests to: http://web.njcu.edu/its/websupport/ (Login with your GothicNet Username and Password.) Table of Contents NJCU WEBSITE TRAINING: Content Contributors...
Adobe Dreamweaver CC 14 Tutorial
 Adobe Dreamweaver CC 14 Tutorial GETTING STARTED This tutorial focuses on the basic steps involved in creating an attractive, functional website. In using this tutorial you will learn to design a site
SHAREPOINT 2010 FOUNDATION FOR END USERS
 SHAREPOINT 2010 FOUNDATION FOR END USERS WWP Training Limited Page i SharePoint Foundation 2010 for End Users Fundamentals of SharePoint... 6 Accessing SharePoint Foundation 2010... 6 Logging in to your
UCL INFORMATION SERVICES DIVISION INFORMATION SYSTEMS. Silva. Introduction to Silva. Document No. IS-130
 UCL INFORMATION SERVICES DIVISION INFORMATION SYSTEMS Silva Introduction to Silva Document No. IS-130 Contents What is Silva?... 1 Requesting a website / Web page(s) in Silva 1 Building the site and making
Module One: Getting Started... 6. Opening Outlook... 6. Setting Up Outlook for the First Time... 7. Understanding the Interface...
 2 CONTENTS Module One: Getting Started... 6 Opening Outlook... 6 Setting Up Outlook for the First Time... 7 Understanding the Interface...12 Using Backstage View...14 Viewing Your Inbox...15 Closing Outlook...17
RHYTHMYX USER MANUAL EDITING WEB PAGES
 RHYTHMYX USER MANUAL EDITING WEB PAGES Rhythmyx Content Management Server... 1 Content Explorer Window... 2 Display Options... 3 Editing an Existing Web Page... 4 Creating a Generic Content Item -- a Web
Web Portal User Guide. Version 6.0
 Web Portal User Guide Version 6.0 2013 Pitney Bowes Software Inc. All rights reserved. This document may contain confidential and proprietary information belonging to Pitney Bowes Inc. and/or its subsidiaries
Salesforce Customer Portal Implementation Guide
 Salesforce Customer Portal Implementation Guide Salesforce, Winter 16 @salesforcedocs Last updated: December 10, 2015 Copyright 2000 2015 salesforce.com, inc. All rights reserved. Salesforce is a registered
EMAIL QUICK START GUIDE
 IT Services Microsoft Outlook 2010 EMAIL QUICK START GUIDE Contents What is Outlook?...2 Quick Guide to Email...2 Create a new e-mail message...2 Forward or reply to an e-mail message...2 Creating new
Creating a Website with Publisher 2013
 Creating a Website with Publisher 2013 University Information Technology Services Training, Outreach, Learning Technologies & Video Production Copyright 2015 KSU Division of University Information Technology
Login: https://ipfw.edu/c Quick Guide for dotcms & Accessibility November 2014 Training: http://ipfw.edu/training
 dotcms & Accessibility Folders Creating a New Folder Note: All folders showing on menu must have an index page. 1. Right-click the parent folder in which the new folder will reside. 2. Click New > Folder.
Creating a website using Voice: Beginners Course. Participant course notes
 Creating a website using Voice: Beginners Course Topic Page number Introduction to Voice 2 Logging onto your website and setting passwords 4 Moving around your site 5 Adding and editing text 7 Adding an
Table of Contents. Welcome... 2. Login... 3. Password Assistance... 4. Self Registration... 5. Secure Mail... 7. Compose... 8. Drafts...
 Table of Contents Welcome... 2 Login... 3 Password Assistance... 4 Self Registration... 5 Secure Mail... 7 Compose... 8 Drafts... 10 Outbox... 11 Sent Items... 12 View Package Details... 12 File Manager...
CMS Basic Training. Getting Started
 The (Content Management System), was designed to allow most people in an organization to contribute to or edit their website(s). Utilizing a set of templates and stylesheets, users can add or edit information
Mastering the JangoMail EditLive HTML Editor
 JangoMail Tutorial Mastering the JangoMail EditLive HTML Editor With JangoMail, you have the option to use our built-in WYSIWYG HTML Editors to compose and send your message. Note: Please disable any pop
CMS Training Manual. A brief overview of your website s content management system (CMS) with screenshots. CMS Manual
 with screenshots. CMS Manual") Training A brief overview of your website s content management system () with screenshots. 1 Contents Logging In:...3 Dashboard:...4 Page List / Search Filter:...5 Common Icons:...6 Adding a New Page:...7
Training A brief overview of your website s content management system () with screenshots. 1 Contents Logging In:...3 Dashboard:...4 Page List / Search Filter:...5 Common Icons:...6 Adding a New Page:...7
DRUPAL WEB EDITING TRAINING
 LOGIN AND VIEW CONTENT Work in Firefox DRUPAL WEB EDITING TRAINING the black logo in the upper right corner to log into Drupal The User Work Area will come up: General Information My Recent Edits the content
UH CMS Basics. Cascade CMS Basics Class. UH CMS Basics Updated: June,2011! Page 1
 UH CMS Basics Cascade CMS Basics Class UH CMS Basics Updated: June,2011! Page 1 Introduction I. What is a CMS?! A CMS or Content Management System is a web based piece of software used to create web content,
WEBSITE CONTENT MANAGEMENT SYSTEM USER MANUAL CMS Version 2.0 CMS Manual Version 1.0 2-25-13
 WEBSITE CONTENT MANAGEMENT SYSTEM USER MANUAL CMS Version 2.0 CMS Manual Version 1.0 2-25-13 CONTENTS Things to Remember... 2 Browser Requirements... 2 Why Some Areas of Your Website May Not Be CMS Enabled...
CMS Training. Prepared for the Nature Conservancy. March 2012
 CMS Training Prepared for the Nature Conservancy March 2012 Session Objectives... 3 Structure and General Functionality... 4 Section Objectives... 4 Six Advantages of using CMS... 4 Basic navigation...
Content Management System User Guide
 CWD Clark Web Development Ltd Content Management System User Guide Version 1.0 1 Introduction... 3 What is a content management system?... 3 Browser requirements... 3 Logging in... 3 Page module... 6 List
Introduction 3. Getting Familiar With Presence Builder... 4. Creating and Editing Websites 6
 Contents Introduction 3 Getting Familiar With Presence Builder... 4 Creating and Editing Websites 6 Importing Sites from SiteBuilder 4.5... 7 Editing Websites... 9 Structure: Pages and Navigation... 9
EBOX Digital Content Management System (CMS) User Guide For Site Owners & Administrators
 User Guide For Site Owners & Administrators") EBOX Digital Content Management System (CMS) User Guide For Site Owners & Administrators Version 1.0 Last Updated on 15 th October 2011 Table of Contents Introduction... 3 File Manager... 5 Site Log...
EBOX Digital Content Management System (CMS) User Guide For Site Owners & Administrators Version 1.0 Last Updated on 15 th October 2011 Table of Contents Introduction... 3 File Manager... 5 Site Log...
HOW TO USE THIS GUIDE
 HOW TO USE THIS GUIDE This guide provides step-by-step instructions for each exercise. Anything that you are supposed to type or select is noted with various types and colors. WHEN YOU SEE THIS Click Help
Create a Simple Website. Intel Easy Steps 1 2012 Intel Corporation All rights reserved.
 Create a Simple Website Intel Easy Steps 1 2012 Intel Corporation Website Creating a Simple Website As more and more people are using the Internet to get information, it has become very important for businesses
Quick Guide to the Cascade Server Content Management System (CMS)
") Quick Guide to the Cascade Server Content Management System (CMS) Waubonsee Community College Cascade Server Content Administration January 2011 page 1 of 11 Table of Contents Requirements...3 Logging
Quick Guide to the Cascade Server Content Management System (CMS) Waubonsee Community College Cascade Server Content Administration January 2011 page 1 of 11 Table of Contents Requirements...3 Logging
Using the Content Management System 05-02-12
 Using the Content Management System 05-02-12 Using the Content Management System Introduction 2 Logging In 3 Using the Editor 4 Basic Text Editing 5 Pasting Text 7 Adding Hyperlinks 8 Adding Images 9 Style
6. If you want to enter specific formats, click the Format Tab to auto format the information that is entered into the field.
 Adobe Acrobat Professional X Part 3 - Creating Fillable Forms Preparing the Form Create the form in Word, including underlines, images and any other text you would like showing on the form. Convert the
Jadu Content Management Systems Web Publishing Guide. Table of Contents (click on chapter titles to navigate to a specific chapter)
") Jadu Content Management Systems Web Publishing Guide Table of Contents (click on chapter titles to navigate to a specific chapter) Jadu Guidelines, Glossary, Tips, URL to Log In & How to Log Out... 2 Landing
Jadu Content Management Systems Web Publishing Guide Table of Contents (click on chapter titles to navigate to a specific chapter) Jadu Guidelines, Glossary, Tips, URL to Log In & How to Log Out... 2 Landing
Beginner s Guide to AIA Contract Documents Online Service for Single-Seat Users
 Beginner s Guide to AIA Contract Documents Online Service for Single-Seat Users Table of Contents Getting Started - Introducing ACD5- AIA Contract Documents New Online Service System Requirements Transitioning
OU Campus Web Content Management
 DRAFT DRAFT DRAFT DRAFT DRAFT DRAFT DRAFT DRAFT DRAFT DRAFT DRAFT DRAFT DRAFT DRAFT DRAFT DRAFT DRAFT OU Campus Web Content Management Table of Contents OU Campus Web Content Management... 1 Introduction
Converting Prospects to Purchasers.
 Email Template Guide LASSO EMAIL TEMPLATE EDITOR... 2 ABOUT LASSO EMAIL TEMPLATE EDITOR... 2 CREATING AN EMAIL TEMPLATE... 2 ACCESSING EMAIL TEMPLATES... 2 ADDING AN EMAIL TEMPLATE FOLDER... 3 BASIC PRINCIPLES
Contents. Launching FrontPage... 3. Working with the FrontPage Interface... 3 View Options... 4 The Folders List... 5 The Page View Frame...
 Using Microsoft Office 2003 Introduction to FrontPage Handout INFORMATION TECHNOLOGY SERVICES California State University, Los Angeles Version 1.0 Fall 2005 Contents Launching FrontPage... 3 Working with
Index. Page 1. Index 1 2 2 3 4-5 6 6 7 7-8 8-9 9 10 10 11 12 12 13 14 14 15 16 16 16 17-18 18 19 20 20 21 21 21 21
 Index Index School Jotter Manual Logging in Getting the site looking how you want Managing your site, the menu and its pages Editing a page Managing Drafts Managing Media and Files User Accounts and Setting
Creating Personal Web Sites Using SharePoint Designer 2007
 Creating Personal Web Sites Using SharePoint Designer 2007 Faculty Workshop May 12 th & 13 th, 2009 Overview Create Pictures Home Page: INDEX.htm Other Pages Links from Home Page to Other Pages Prepare
Building a Personal Website (Adapted from the Building a Town Website Student Guide 2003 Macromedia, Inc.)
") Building a Personal Website (Adapted from the Building a Town Website Student Guide 2003 Macromedia, Inc.) In this project, you will learn the web publishing skills you need to: Plan a website Define a
Building a Personal Website (Adapted from the Building a Town Website Student Guide 2003 Macromedia, Inc.) In this project, you will learn the web publishing skills you need to: Plan a website Define a
Designing HTML Emails for Use in the Advanced Editor
 Designing HTML Emails for Use in the Advanced Editor For years, we at Swiftpage have heard a recurring request from our customers: wouldn t it be great if you could create an HTML document, import it into
Mura CMS. (Content Management System) Content Manager Guide
 Content Manager Guide") Mura CMS (Content Management System) Content Manager Guide Table of Contents Table of Contents 1. LOGGING IN...1 2. SITE MANAGER...2 3. ADDING CONTENT (Pages, Folders, etc.)...6 4. WORKING WITH IMAGES...15
Mura CMS (Content Management System) Content Manager Guide Table of Contents Table of Contents 1. LOGGING IN...1 2. SITE MANAGER...2 3. ADDING CONTENT (Pages, Folders, etc.)...6 4. WORKING WITH IMAGES...15
UW WEB CONTENT MANAGEMENT SYSTEM (CASCADE SERVER)
") UW WEB CONTENT MANAGEMENT SYSTEM (CASCADE SERVER) LEVEL 1 Information Technology Presented By: UW Institutional Marketing and IT Client Support Services University of Wyoming UW CONTENT MANAGEMENT SYSTEM
UW WEB CONTENT MANAGEMENT SYSTEM (CASCADE SERVER) LEVEL 1 Information Technology Presented By: UW Institutional Marketing and IT Client Support Services University of Wyoming UW CONTENT MANAGEMENT SYSTEM
Config Guide. Gimmal Smart Tiles (SharePoint-Hosted) Software Release 4.4.0
 Software Release 4.4.0") Config Guide Gimmal Smart Tiles (SharePoint-Hosted) Software Release 4.4.0 November 2014 Title: Gimmal Smart Tiles (SharePoint-Hosted) Configuration Guide Copyright 2014 Gimmal, All Rights Reserved. Gimmal
Config Guide Gimmal Smart Tiles (SharePoint-Hosted) Software Release 4.4.0 November 2014 Title: Gimmal Smart Tiles (SharePoint-Hosted) Configuration Guide Copyright 2014 Gimmal, All Rights Reserved. Gimmal
Web Mail Guide... Error! Bookmark not defined. 1 Introduction to Web Mail... 4. 2 Your Web Mail Home Page... 5. 3 Using the Inbox...
 Powered by Table of Contents Web Mail Guide... Error! Bookmark not defined. 1 Introduction to Web Mail... 4 1.1 Requirements... 4 1.2 Recommendations for using Web Mail... 4 1.3 Accessing your Web Mail...
Basic Web Development @ Fullerton College
 Basic Web Development @ Fullerton College Introduction FC Net Accounts Obtaining Web Space Accessing your web space using MS FrontPage Accessing your web space using Macromedia Dreamweaver Accessing your
Umbraco v4 Editors Manual
 Umbraco v4 Editors Manual Produced by the Umbraco Community Umbraco // The Friendly CMS Contents 1 Introduction... 3 2 Getting Started with Umbraco... 4 2.1 Logging On... 4 2.2 The Edit Mode Interface...
PowerPoint 2007 Basics Website: http://etc.usf.edu/te/
 Website: http://etc.usf.edu/te/ PowerPoint is the presentation program included in the Microsoft Office suite. With PowerPoint, you can create engaging presentations that can be presented in person, online,
Communication Manager Email Template Library
 Communication Manager Email Template Library Create and edit email templates for use in mass email and drip campaigns. Email templates can be stored in Template Tags for easy access to frequently used
USC Aiken CMS Manual. A manual on using the basic functions of the dotcms system. Office of Marketing and Community Relations-USC Aiken
 USC Aiken CMS Manual A manual on using the basic functions of the dotcms system Office of Marketing and Community Relations-USC Aiken Table Of Contents Introduction/How to Use Manual... 2 Logging In...
Website Editor User Guide
 CONTENTS Minimum System Requirements... 3 Design Your Website... 3 Choosing your Theme... 4 Choosing your Header Style... 4-5 Website Content Editor... 6 Text Editor Toolbar features... 6 Main Menu Items...
Acclipse Document Manager
 Acclipse Document Manager Administration Guide Edition 22.11.2010 Acclipse NZ Ltd Acclipse Pty Ltd PO Box 2869 PO Box 690 Level 3, 10 Oxford Tce Suite 15/40 Montclair Avenue Christchurch, New Zealand Glen
ADP Workforce Now Portal Administrator Guide. Version 2.0 2.0-1
 ADP Workforce Now Portal Administrator Guide Version 2.0 2.0-1 ADP Trademarks The ADP logo, ADP, and ADP Workforce Now are registered trademarks of ADP, Inc. Third-Party Trademarks Microsoft, Windows,
Cal Poly Pomona Cascade Server Beginning Web Author Training
 Cal Poly Pomona Cascade Server Beginning Web Author Training Contents Recommended Browsers for using Cascade... 3 Content Management System Overview... 3 Content Management System Diagram- workflow...
Microsoft Expression Web Quickstart Guide
 Microsoft Expression Web Quickstart Guide Expression Web Quickstart Guide (20-Minute Training) Welcome to Expression Web. When you first launch the program, you ll find a number of task panes, toolbars,
NDSU Technology Learning & Media Center. Introduction to Google Sites
 NDSU Technology Learning & Media Center QBB 150C 231-5130 www.ndsu.edu/its/tlmc Introduction to Google Sites Get Help at the TLMC 1. Get help with class projects on a walk-in basis; student learning assistants
Getting Started with KompoZer
 Getting Started with KompoZer Contents Web Publishing with KompoZer... 1 Objectives... 1 UNIX computer account... 1 Resources for learning more about WWW and HTML... 1 Introduction... 2 Publishing files
darlingharbour.com Content Management System Tenant User Guide
 darlingharbour.com Content Management System Tenant User Guide August 2014 Table of Contents 1 Introduction... 1 2 Getting started... 1 2.1 Requirements...1 2.2 Logging in...1 2.3 Change your Password...2
USER GUIDE. Unit 4: Schoolwires Editor. Chapter 1: Editor
 USER GUIDE Unit 4: Schoolwires Chapter 1: Schoolwires Centricity Version 4.2 TABLE OF CONTENTS Introduction... 1 Audience and Objectives... 1 Getting Started... 1 How the Works... 2 Technical Requirements...
Where do I start? DIGICATION E-PORTFOLIO HELP GUIDE. Log in to Digication
 You will be directed to the "Portfolio Settings! page. On this page you will fill out basic DIGICATION E-PORTFOLIO HELP GUIDE Where do I start? Log in to Digication Go to your school!s Digication login
Human Resources Website Drupal User Guide
 Human Resources Website Drupal User Guide Logon http://www.hr.ucsb.edu/user You will be given a unique username and password for editing the website. Basic Tools Quick Start 1. EDIT TAB on content page
Course Exercises for the Content Management System. Grazyna Whalley, Laurence Cornford June 2014 AP-CMS2.0. University of Sheffield
 Course Exercises for the Content Management System. Grazyna Whalley, Laurence Cornford June 2014 AP-CMS2.0 University of Sheffield PART 1 1.1 Getting Started 1. Log on to the computer with your usual username
Creating a Web Site with Publisher 2010
 Creating a Web Site with Publisher 2010 Information Technology Services Outreach and Distance Learning Technologies Copyright 2012 KSU Department of Information Technology Services This document may be
Digital Marketing EasyEditor Guide Dynamic
 Surveys ipad Segmentation Reporting Email Sign up Email marketing that works for you Landing Pages Results Digital Marketing EasyEditor Guide Dynamic Questionnaires QR Codes SMS 43 North View, Westbury
Redback Solutions. Visionscape Manual
 Redback Solutions Visionscape Manual Updated 31/05/2013 1 Copyright 2013 Redback Solutions Pty Ltd. All rights reserved. The Visionscape Content Management System (CMS) may not be copied, reproduced or
KOMPOZER Web Design Software
 KOMPOZER Web Design Software An IGCSE Student Handbook written by Phil Watkins www.kompozer.net CONTENTS This student guide is designed to allow for you to become a competent user* of the Kompozer web
+ Create, and maintain your site
 T4 Basics Version 1.0 + Create, and maintain your site With T4, you are in control of the content of your website. Feel free to be creative, and keep your site up to date. Few of T4 Features Media Library
Training Schedule: Third Wednesday of every month from 1:30 PM to 3:00 PM in the ARKU Team Meeting Room ARKU A354
 OU Campus 101 Training Schedule: Third Wednesday of every month from 1:30 PM to 3:00 PM in the ARKU Team Meeting Room ARKU A354 Class Description: This introductory course is designed specifically to train
Introduction to Drupal
 Introduction to Drupal Login 2 Create a Page 2 Title 2 Body 2 Editor 2 Menu Settings 5 Attached Images 5 Authoring Information 6 Revision Information 6 Publishing Options 6 File Attachments 6 URL Path
Manual English KOI Desktop App 2.0.x
 Manual English KOI Desktop App 2.0.x KOI Kommunikation, Organisation, Information Comm-Unity EDV GmbH 2010 Contents Introduction... 3 Information on how to use the documentation... 3 System requirements:...
Sage Accountants Business Cloud EasyEditor Quick Start Guide
 Sage Accountants Business Cloud EasyEditor Quick Start Guide VERSION 1.0 September 2013 Contents Introduction 3 Overview of the interface 4 Working with elements 6 Adding and moving elements 7 Resizing
Microsoft PowerPoint 2010 Handout
 Microsoft PowerPoint 2010 Handout PowerPoint is a presentation software program that is part of the Microsoft Office package. This program helps you to enhance your oral presentation and keep the audience
How To Create A Website In Drupal 2.3.3
 www.webprophets.com.au PO Box 2007 St Kilda West Victoria Australia 3182 Phone +61 3 9534 1800 Fax +61 3 9534 1100 Email [email protected] Web www.webprophets.com.au Welcome to the Drupal How to
DESIGN A WEB SITE USING PUBLISHER Before you begin, plan your Web site
 Page 1 of 22 DESIGN A WEB SITE USING PUBLISHER Before you begin, plan your Web site Before you create your Web site, ask yourself these questions: What do I want the site to do? Whom do I want to visit
How to Edit an Email. Here are some of the things you can do to customize your email:
 How to Edit an Email Editing a new email created during the Create an Email wizard or editing an existing email in the Edit Email section of the Manage Emails tab is easy, using editing tools you re probably
Microsoft FrontPage 2003
 Information Technology Services Kennesaw State University Microsoft FrontPage 2003 Information Technology Services Microsoft FrontPage Table of Contents Information Technology Services...1 Kennesaw State
Content Author's Reference and Cookbook
 Sitecore CMS 6.2 Content Author's Reference and Cookbook Rev. 091019 Sitecore CMS 6.2 Content Author's Reference and Cookbook A Conceptual Overview and Practical Guide to Using Sitecore Table of Contents
UOFL SHAREPOINT ADMINISTRATORS GUIDE
 UOFL SHAREPOINT ADMINISTRATORS GUIDE WOW What Power! Learn how to administer a SharePoint site. [Type text] SharePoint Administrator Training Table of Contents Basics... 3 Definitions... 3 The Ribbon...
Parallels Panel. User s Guide to Parallels Presence Builder 12.0. Revision 1.0
 Parallels Panel User s Guide to Parallels Presence Builder 12.0 Revision 1.0 Contents Introduction 3 Getting Familiar With Presence Builder... 4 Creating and Editing Websites 6 Importing Sites from SiteBuilder
State of Nevada. Ektron Content Management System (CMS) Basic Training Guide
 Basic Training Guide") State of Nevada Ektron Content Management System (CMS) Basic Training Guide December 8, 2015 Table of Contents Logging In and Navigating to Your Website Folders... 1 Metadata What it is, How it Works...
State of Nevada Ektron Content Management System (CMS) Basic Training Guide December 8, 2015 Table of Contents Logging In and Navigating to Your Website Folders... 1 Metadata What it is, How it Works...
Colligo Email Manager 6.0. Offline Mode - User Guide
 6.0 Offline Mode - User Guide Contents Colligo Email Manager 1 Key Features 1 Benefits 1 Installing and Activating Colligo Email Manager 2 Checking for Updates 3 Updating Your License Key 3 Managing SharePoint
Introduction To Microsoft Office PowerPoint 2007. Bob Booth July 2008 AP-PPT5
 Introduction To Microsoft Office PowerPoint 2007. Bob Booth July 2008 AP-PPT5 University of Sheffield Contents 1. INTRODUCTION... 3 2. GETTING STARTED... 4 2.1 STARTING POWERPOINT... 4 3. THE USER INTERFACE...