Eliminator Vented Disc Brake Owners Manual
|
|
|
- Stephany Anderson
- 8 years ago
- Views:
Transcription
1 Eliminator Vented Disc Brake Owners Manual

2 Eliminator Vented Disc Brakes Exclusive Features Whenever possible, the tendency is to use an aluminum alloy in order to reduce weight. These alloys are much lighter and are also much better heat conductors: 220W/m. K for aluminum compared to 44 W/m. K for cast iron. That s 5X faster! *Haynes Automotive Disc Brake Manual Bi-metal Piston Bi-metal piston combines a stainless steel outer jacket with an anodized aluminum inner sleeve to shed braking heat 5X faster than one piece stainless pistons. The stainless steel outer jacket is specifically designed for road salt and salt water conditions. U.S. Patent #7,028,813 Oversized Rubber Boot Rubber boot is 50% thicker by design and provides for positive piston withdrawal. Stainless Steel Bleeder Valves Type 304 stainless steel with teflon coating for easy bleeding. Stainless Steel Slider Pins Stainless steel provides corrosion resistance for smoother brake operation. The hex head design allows fast removal for easy servicing. Vented Rotor Eliminator rotors are vented to provide faster cooling and are available in E-coat, GalvX coatings and Stainless Steel. Aluminum Caliper Aluminum sheds heat 5X faster than traditional cast iron, resulting in cooler braking even in the worst conditions. E-coat finish protects the caliper from salt buildup in harsh environments. Lifetime Ceramic/Stainless Steel Brake Pads No Dust, No Rust. Lifetime Warranty Automotive quality ceramic brake pads with stainless steel backing plates. Slim Design Slim caliper design allows for short axle overhangs and aids in faster cooling. Bronze Bushing Oil impregnated bronze bushings last longer, slide smoother and will NOT corrode.

3 Vented Rotor Disc Brakes, w/aluminum Caliper Read your trailer manufacturer s operating manual and follow the towing vehicle s guidelines for towing capability, hitch requirements and other towing information. Congratulations on your decision to have Tie Down Engineering vented rotor disc brakes with aluminum caliper installed on your trailer. Disc brakes have many advantages over drum brakes. These include: Greater fade resistance Self cleaning Self adjusting Less maintenance Greater stopping power Easy visual inspection without removing any parts Tie Down Engineering vented rotor disc brakes with aluminum calipers have many exclusive features not found on automotive type brakes modified for trailer use. Please see our web site at tiedown.com for further information on features and benefits. Vented rotor disc brakes are designed to activate when the vehicle s brakes are applied. As the vehicle stops or slows, the momentum of the trailer pushes forward developing pressure in the actuator (master cylinder), used to apply pressure to the brakes. Operating Information Read and understand the towing information for your trailer and actuator. Check your trailer frequently for any leaks in the hydraulic system, which includes the actuator, brake lines and brakes. The brake rotors are made of steel and will show surface rust on the braking surface when not used for a week or more. Normal use will wipe the rust off of the rotor surface. If the trailer is used in salt water, it is recommended that you rinse off the brakes with fresh water after each use to reduce the effects of saltwater corrosion. Your trailer should tow easily. Disc brakes operate at a higher temperature than drum brakes. This is normal and is very similar to the way disc brakes operate on your vehicle. If for any reason your trailer does not tow easily or wants to veer to one side, stop and investigate immediately and solve the problem. Towing a trailer (even a trailer with brakes) puts an added load on the tow vehicle s handling and braking capabilities. Do not follow to closely; you will need extra distance to maneuver and to stop. Towing downhill puts added stress on both the tow vehicle and the trailer. Slow down before you start on an incline and maintain a controlled downhill speed with repeated application of brakes followed by a cooling period when brakes are not applied. It is very important to start off with a slow speed and maintain it rather than trying to slow down from a higher speed. Should you feel the brakes on the trailer or tow vehicle are running hot or showing signs of fade, stop immediately on the side of the road and allow the brakes to cool before resuming your trip. 2

4 Vented Rotor Disc Brakes, w/aluminum Caliper Should you feel the tow vehicle and trailer brakes are not working as they should; have the tow vehicle and trailer inspected. Make sure your trailer s GVW is within the tow vehicles capacity. If your trailer has multiple axles, verify that the GVW of the trailer does not exceed the capacity of the brakes, which is 3750 lbs on 10-inch (5 lug) brakes and 6000 lbs on 12-inch (6 lug) brakes, per axle. Some states require brakes on all axles. Check with your state laws and the state laws of where you will be using your trailer. After long trips or downhill towing, your brakes could be very hot and it is a good idea to let them cool down before submerging in cold water. The change in temperature of very hot brakes submerged in water creates additional stress on the parts and could cause damage to your brakes. Pads must be replaced when the friction material is 3/32 or less. Original Tie Down Engineering brake pads have a GalvX coated backing plate that aids in corrosion resistance. Replacement pads can also be purchased at most auto parts stores. Use NAPA #TS-7192-M or IBN # 289 and MXD289 (1990 Chevrolet Cavalier front brakes). Use DOT 3 brake fluid only. DO NOT USE SILICONE BASED BRAKE FLUID. When backing a trailer with disc brakes, you must have a lockout lever or preferably an electrically operated solenoid to stop brake pressure to the disc brakes. The solenoid is mounted at the rear of the actuator, between the master cylinder and brake line. It has a wire connected to your back up lights to stop or redirect the fluid to keep the brakes form operating. Replace Brake Pads 1. Elevate the trailer using the manufacturers instructions. Always use jack stands for support. Do not depend on a jack to support the trailer. Block wheels to keep trailer from rolling. 2. Remove the tire/wheel assembly. Inspect the rotor surface. Check for excessive wear or grooves that may affect braking. Original Cap Style rotor thickness is.939 with a minimum thickness of.85 or 21.6 mm. Original Integral rotor thickness is.75 with a minimum thickness of.67 or 17 mm. 3. Inspect brake pads. Minimum thickness is 3/32. Pads should be replaced if below this width. 4. Remove the caliper by unscrewing the slider pins from the mounting bracket. Be careful to hold the caliper in place so that it does not fall and pull on the brake hose. The inside pad is spring loaded in the caliper piston. Pry this pad out gently with a flat blade screwdriver. The outside pad is held in place with two metal tabs. Use a large pair of pliers to straighten the tabs to remove the outside pad. 5. Clean the rotor with a brake cleaning spray. Replace brake pads in reverse order. The tabs should only be bent enough to hold the pad in place. Do not bend tab to far or the pad will not seat correctly. Outside pad should be able to wiggle after tab is bent. 6. Clean threads on slider bolts and mounting plate and apply a coating of Loctite or similar brand of thread lock. Tighten bolts to 40 ft lbs. DO NOT REASSEMBLE WITHOUT APPLYING LOCTITE TO THE SLIDER PIN THREADS AND THE BACKING PLATE. SLIDER PINS COULD BACK OUT AND CAUSE PERMANENT DAMAGE TO YOUR BRAKES AND TRAILER.

5 Removing Hub/Rotor 1. If your axle has an integral style rotor, hub and rotor is one piece, and will come off as one. 2. If you have a cap style rotor, the rotor will be removed after the wheel and caliper is removed. The hub will come off separate. 3. Elevate the trailer using the manufacturers instructions. Always use jack for support. Do not depend on a jack to support the trailer. Block wheels to keep trailer from rolling. 4. Remove the tire/wheel assembly. Vented Caliper Intergal Style Rotor Bleeder Valve Slider Pin Brake Line Out Mounting Plate Spindle/Alxe Nut/Bolt Brake Flange 5. Remove the caliper by unscrewing the slider pins from the mounting bracket. Be careful to hold the caliper in place so that it does not fall and pull on the brake hose. Support the caliper so that it does not hang from the brake line. 6. Remove the grease cap from the hub by prying around the edge of the cap. 7. Bend the locking tang washer to the free position. If spindle is equipped with a cotter key, straighten cotter key to remove. 8. Remove the spindle nut in a counter clockwise direction and remove the spindle washer. 9. Remove the hub from the spindle. Be careful not to allow bearings to fall out of the hub. 10. Clean bearing and cup surfaces, repack with lithium marine grade grease. 11. Place hub on spindle in reverse order as listed above. Rotate the hub while tightening the spindle nut to approximately 50 ft lbs. This translates into full hand pressure with a 12 long set of pliers or 12 long wrench. 12. Loosen the spindle nut to remove the torque, do not rotate hub. 13. Finger tighten the spindle nut until snug, backing out only to line up the locking tang washer. 14. Bend the locking tang tab in place. 15. Replace rotor. Clean threads of slider bolts & mounting bracket and apply a fresh coating of Loctite to the pins as well as the mounting bracket. Tighten pins to 40 ft lbs. DO NOT REASSEMBLE WITHOUT APPLYING LOCTITE TO THE SLIDER PIN THREADS AND THE BACKING PLATE. SLIDER PINS COULD BACK OUT AND CAUSE PERMANENT DAMAGE TO YOUR BRAKES AND TRAILER. 16. Replace cap. Install tire/wheel assembly, tighten wheel nuts to Trailer manufacturer specifications. Test wheel for excessive tightness or excessive play. readjust in necessary. 17. Road test vehicle in a safe place before traveling on main roads in traffic. 4

6 Installation/Replacement Instructions for Vented Disc Brakes 1. On a bare axle attach mounting plate to the brake flanges on the axle. Preferred position is at 12:00 high or to the back side. Exact positioning will be determined by the brake flange. Use 7/16 x 1-1/4 zinc hex bolts, lock nuts/washers and torque to 40 lbs. Note: brake mounting plates can have 2 or 4 holes for attaching to the axle. 2. If installation is on a completed trailer, remove tire/wheel. This would be a good time to repack wheel bearings and inspect the bearing and seals if it has not been done recently. 3. Install hub (use existing instruction on installing hubs). Step 1 Step 3 4. Place cap style rotor over hub. Make sure the hub face is clean with a smooth surface or: 4a. If installing a integral or one piece hub rotor, install rear bearing and seal. Grease bearings, install front bearings (use existing instructions on installing hubs on page Step 4 Cap Style Rotor 5 Step 4a Integral Rotor
. Step 1 Step 3 4.")
7 Step 5 Step 6 5. Place caliper over rotor and mounting plate. A bleeder valve must be in the up position (see below). Check both calipers for this position. Some calipers have two valves others have only one. 6. Apply a coating of Loctite to threads on the mounting plate. Insert slider pins thru backside of rotor into mounting plate. Use a 7/16 hex socket and tighten both pins to 40 ft. lbs. Check for binding, make sure rotor spins freely. NOTE: Slider pins have a lock-thread coating. If pins do not have loctite or if the pins are removed after step 6, the threads must be cleaned and a new coat of permanent Loctite must be applied. Clean and apply Loctite to threads on the mounting plate. Be careful not to get Loctite on slider pins or bushings. 7. Connect brakes lines and bleed brakes before using. IMPORTANT: When bleeding calipers, always use the top most bleeder valve to allow air to escape from the caliper piston. Always bleed through the upper most bleeder valve. 6

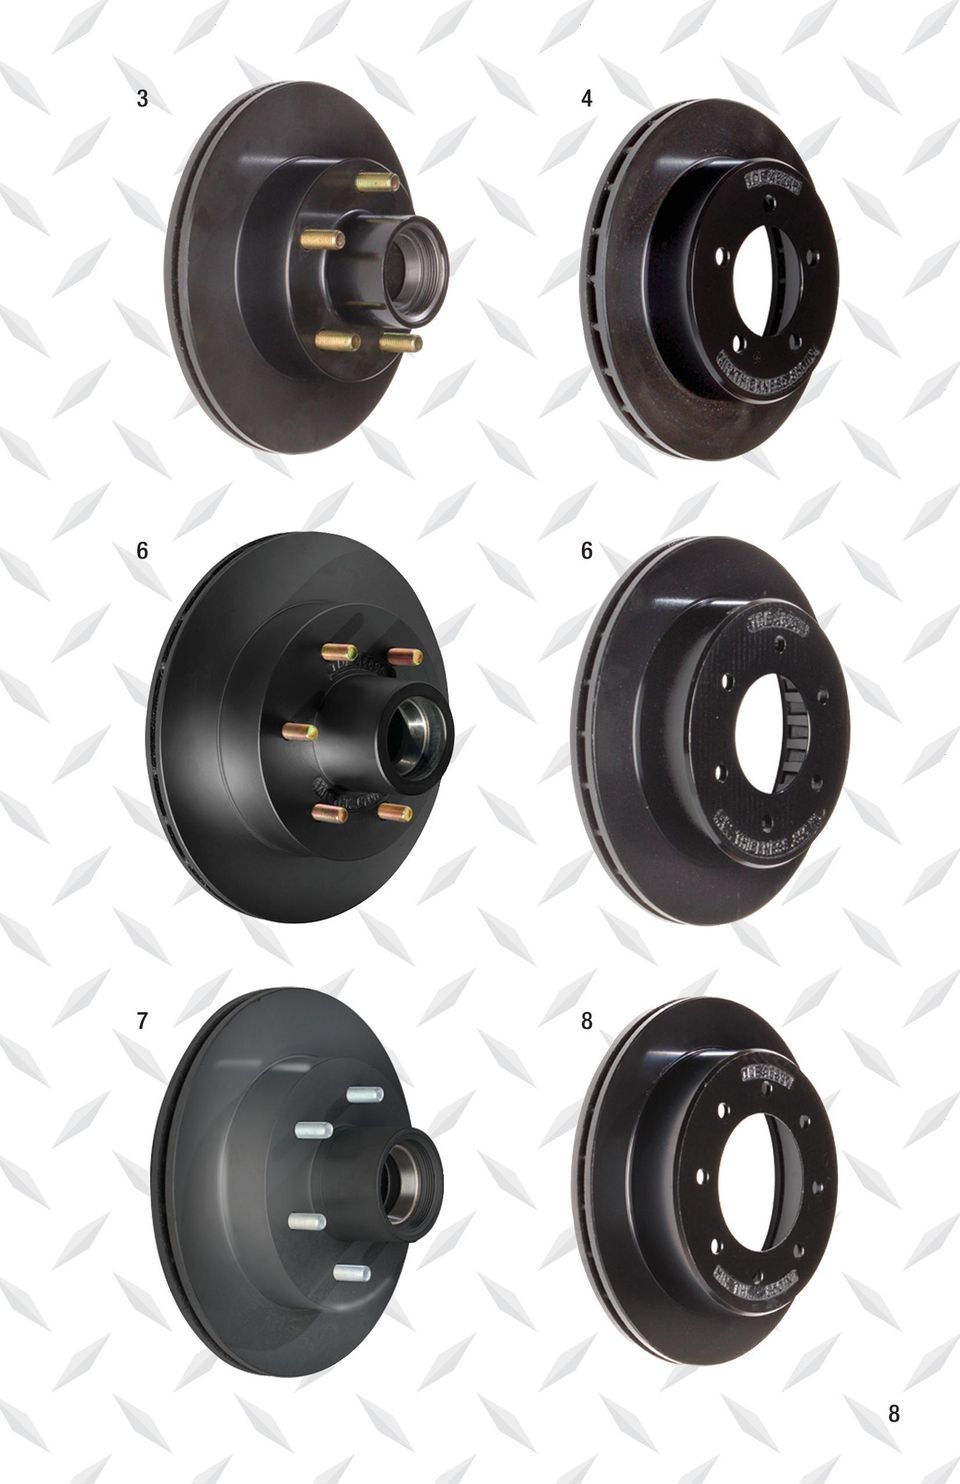
8 Parts List for Eliminator Vented Disc Brakes # Eliminator Rotors Part # Vented Rotor - E-coat 46902P Vented Rotor - E-coat 46845P Vented Rotor - GalvX 46845X Vented Turbo Lube/Vortex Rotor - E-coat 46845TLP Vented Turbo Lube/Vortex Rotor - GalvX 46845TLX 4 10 Vented Cap Rotor - E-coat 46246P 4 10 Vented Cap Rotor - GalvX 46246X 4 10 Vented Cap Rotor - Stainless Steel Vented Rotor - E-coat 46895P 5 12 Vented Rotor - GalvX 46895X 6 12 Vented Cap Rotor - E-coat 46247P 6 12 Vented Cap Rotor - GalvX 46247X 6 12 Vented Cap Rotor - Stainless Steel Vented Turbo Lube/Vortex Rotor - E-coat 46895TLP 7 12 Vented Turbo Lube/Vortex Rotor - GalvX 46895TLX 8 13 Vented Cap Rotor - E-coat 46890P 8 13 Vented Cap Rotor - GalvX 46890X 8 13 Vented Cap Rotor - Stainless Steel

9
10 # Brake Part Descriptions Part # 1 Caliper Assembly (8.15 rotor) 46901A 2 Caliper Assembly (9.6, 10 & 12 rotors) 46304S 3 Caliper Assembly - Stainless Steel (9.6, 10 & 12 rotors) 46804A 4 Caliper Assembly (13 cap rotor) 46802A 5 Caliper Assembly - Stainless Steel (13 cap rotor) 46803A 6 Stainless Steel Bleeder Valve 11246SS 7 Brake Line Fitting Stainless Steel Slider Pins Ceramic/Stainless Steel Brake Pads 11334/ Organic/GalvX Brake Pads 11330/ Adjustable Banjo Assembly A Brass Banjo Fitting B Stainless Steel Banjo Bolt C Copper Crush Washer Turbo Lube Cap Assembly for # rotors 48399A 11 Turbo Lube Cap Assembly for 3000# rotors 48395A 11A Turbo Lube Cap for # rotors A Turbo Lube Cap for 3000# rotors B O-Ring C Oil Filling Plug Vortex Lube Cap for # rotors 48357A Vortex Lube Cap for 3000# rotors 48355B 12 Mounting Bracket (8.15 Rotor) 44686G 13 Mounting Bracket (9.6 Rotor) 44676G 14 Mounting Bracket (9.6 Rotor, Special Order) 44684G 15 Mounting Bracket (10 Cap Rotor) 44480G 16 Mounting Bracket (12 Rotor) 44478X 17 Mounting Bracket (13 Cap Rotor) Replacement Kits: Organic Brake Pad Kit (boxed kit for 1 axle) Ceramic Brake Pad Kit (boxed kit for 1 axle) Caliper Rebuild Kit 46304RB Caliper Rebuild Kit for 46802A & 46803A 46802RB

11 B 10A 11 10C 11A 11B 11C

12 Eliminator Vented Disc Brake Owners Manual TIE DOWN ENGINEERING 255 Villanova Drive SW, Atlanta, GA (404) Fax (404) TIE DOWN ENGINEERING, ALL RIGHTS RESERVED Instruction Manual # ,C1184

Front brakes (FN- 3), servicing
, servicing") j a t Front brakes (FN- 3), servicing 46-1 Front brakes, servicing Note: Install complete repair kit. After replacing brake pads and before moving vehicle, depress brake pedal several times firmly to properly
j a t Front brakes (FN- 3), servicing 46-1 Front brakes, servicing Note: Install complete repair kit. After replacing brake pads and before moving vehicle, depress brake pedal several times firmly to properly
Rear wheel brakes, servicing. Стр. 1 из 45. Note:
 Volkswagen Touareg - Rear wheel brakes, servicing Стр. 1 из 45 46-2 Rear wheel brakes, servicing Rear brakes, FN 44 brake caliper, servicing Note: After replacing brake pads, depress brake pedal firmly
Drum Brake Owners Manual
 Drum Brake Owners Manual TIE DOWN ENGINEERING, Inc. 5901 Wheaton Drive, Atlanta, GA 30336 www.tiedown.com (404) 344-0000 Fax (404) 349-0401 2007 TIE DOWN ENGINEERING, INC. ALL RIGHTS RESERVED Instruction
Installation Instructions and Service Manual
 Installation Instructions and Service Manual Model 85, 85-3/4 & 85E Actuator* for Trailer Brakes 8,500 lbs. Capacity for use with -5/16 Hitch Balls Drum Brake Ready - Part #4736 Disc Brake Ready - Part
How Do I Replacing My Rear Brake Pads and Rotors?
 How Do I Replacing My Rear Brake Pads and Rotors? WARNING! Always have the vehicle under inspection on level ground, in park with the emergency brake on. Always wear protective eyewear, gloves and necessary
7600 SAND STREET, FORT WORTH, TX 76118. www.kodiaktrailer.com -2-
 7600 SAND STREET, FORT WORTH, TX 76118 www.kodiaktrailer.com -2- CONTENTS SECTION I. INTRODUCTION II. GENERAL INFORMATION III. SAFETY INFORMATION IV. INSTALLATION INFORMATION V. SOLENOID REVERSING VALVES
Rebuild Instructions for 70001 and 70010 Transmission
 Rebuild Instructions for 70001 and 70010 Transmission Brinn, Incorporated 1615 Tech Drive Bay City, MI 48706 Telephone 989.686.8920 Fax 989.686.6520 www.brinninc.com Notice Read all instructions before
Volkswagen Jetta, Golf, GTI 1999, 2000 Brake System 46 Brakes - Mechanical Components (Page GR-46)
") 46 Brakes - Mechanical Components (Page GR-46) Front brakes Brake pads, removing and installing Brake pads, removing and installing FN 3 brake caliper, servicing FS III brake caliper, servicing Rear wheel
46 Brakes - Mechanical Components (Page GR-46) Front brakes Brake pads, removing and installing Brake pads, removing and installing FN 3 brake caliper, servicing FS III brake caliper, servicing Rear wheel
2007 Hummer H3. 2007 BRAKES Disc Brakes - H3. Fastener Tightening Specifications Specification Application
 2007 BRAKES Disc Brakes - H3 SPECIFICATIONS FASTENER TIGHTENING SPECIFICATIONS Fastener Tightening Specifications Specification Application Metric English Backing Plate Bolts 135 N.m 100 lb ft Brake Hose
MKV Golf GTI Rear Brake Service - Replace Pads and Rotors
 Page 1 Installation Procedures MKV Golf GTI Rear Brake Service - This tutorial is provided as a courtesy by ECS Tuning. Proper service and repair procedures are vital to the safe, reliable operation of
Front axle components, overview
 just a test. Front axle components, overview 40-1 General Information Load bearing components and parts of the suspension must not be welded or straightened. Vehicles without drive axle must not be moved,
STEERING HANDLEBAR/FRONT WHEEL/ FRONT SHOCK ABSORBER
 14 14 STEERING HANDLEBAR/FRONT WHEEL/ SCHEMATIC DRAWING ------------------------------------------------- 14-1 SERVICE INFORMATION------------------------------------------------ 14-2 TROUBLESHOOTING-----------------------------------------------------
Volkswagen Jetta, Golf, GTI 1999, 2000 Brake System 47 Brakes - Hydraulic Components (Page GR-47)
") 47 Brakes - Hydraulic Components (Page GR-47) FS III front brake calipers, servicing Front brake caliper piston, removing and installing FN 3 front brake calipers, servicing Front caliper piston, removing
47 Brakes - Hydraulic Components (Page GR-47) FS III front brake calipers, servicing Front brake caliper piston, removing and installing FN 3 front brake calipers, servicing Front caliper piston, removing
DiscPlus DX195 and DX225 Air Disc Brakes
 Revised 11-04 Technical Bulletin Revised 1 Technical 11-04 Bulletin DiscPlus DX195 and DX225 Air Disc Brakes Inspection, Installation and Diagnostics Air Disc Brake Inspection Intervals and Procedures
FOR ANY QUESTIONS, PLEASE CALL US @ 727.347.9915 M-F 8:00a.m.-8:00p.m. EST. REAR BRAKES 1 AEROSPACE COMPONENTS 727.347.9915
 REAR BRAKES 1 AEROSPACE COMPONENTS 727.347.9915 REAR BRAKES Before getting started, remove all stock braking components. Pre-assembly of parts: Clean the bolts and the threads in the hat with acetone.
MUSTANG II IFS COMPLETE PARTS PACKAGE
 MUSTANG II IFS COMPLETE PARTS PACKAGE Your Southern Rods & Parts Mustang II IFS Parts Package contains the following items: 1 pr) Upper Control Arms (2023) 1) Upper Arm Bolt Kit (MP-001-A) 1 pr) Lower
4 PISTON BRAKE CALIPERS AND ROTORS
 Installation Instructions 4 PISTON BRKE CLIPERS ND ROTORS TTENTION Statements in these instructions that are preceded by the following words are of special significance: Warning This means there is the
TUTORIAL. REbUILdING. front CALIpER O-RING CONVERSION CORVETTE 1965-82. Part #: HT-1
 Part #: HT-1 1965-82 CORVETTE O-RING CONVERSION front CALIpER REbUILdING TUTORIAL Choosing a Brake Caliper Rebuild Kit Standard Lip Seals vs. O-Ring Seals Lip seal design seals are used on 1965-1982 Corvette
TITAN 13 x 2 ½ BRAKES
 INSTALLATION INSTRUCTION AND SERVICE MANUAL Actuator/Trailer Dealer - Please provide these instructions to the consumer. Consumer - Read and follow these instructions. Keep them with the trailer for future
Drive shaft, servicing
 Volkswagen Passat B6 - Drive shaft, servicing Стр. 1 из 41 40-7 Drive shaft, servicing Drive shafts, overview I - Assembly overview: Drive axle with CV joint VL100 40-7, Drive axle with CV joint VL100,
2005-2007 Ford Focus Front Brake Rotors
 2005-2007 Ford Focus Front Brake Rotors Replacement Replacing the rotors in 2005-2007 Ford Focus models with rear drum brakes. Written By: David Hodson INTRODUCTION The steps in this guide are used to
Verify caster, camber and toe-in are correct before proceeding.
 If rotating the tie rod end 360 degrees changes the toe-in too much, use the rack tie rod to make smaller adjustments. Put the tie rod end in the steering arm and snug the castle nut before adjusting.
Unit: mm(in) Item Standard value Service limit Axle shaft run out - 0.2(0.008)
 Item Standard value Service limit Axle shaft run out - 0.2(0.008)") Rear Wheel/Brake/Suspension 13. Rear Wheel/Brake/Suspension Service Information 13-1 Troubleshooting 13-2 Rear Wheel 13-3 Rear Cushion 13-4 Rear Swing Arm 13-7 Service Information General Safety If the
Rear Wheel/Brake/Suspension 13. Rear Wheel/Brake/Suspension Service Information 13-1 Troubleshooting 13-2 Rear Wheel 13-3 Rear Cushion 13-4 Rear Swing Arm 13-7 Service Information General Safety If the
Installation Instructions and Service Manual
 Installation Instructions and Service Manual Model 80LP (Low Profile) Actuator* for Trailer Brakes 8000 lbs Capacity Part #48875A- Disc Brake Ready Part #48876A- Drum Brake Ready *US Patent No. 6,375,211
TUTORIAL. REbUILdING. REAR CALIpER O-RING CONVERSION CORVETTE 1965-82. Part #: HT-2
 Part #: HT-2 1965-82 CORVETTE O-RING CONVERSION REAR CALIpER REbUILdING TUTORIAL Choosing a Brake Caliper Rebuild Kit Standard Lip Seals vs. O-Ring Seals Lip seal design seals are used on 1965-1982 Corvette
Rear Disc Kit. Front Caliper
 Caliper and Wheel Kit 52-0600 1973-85 FX-FLH Chrome Rear Wheel/Brake Assembly includes chrome 16 x 3.0 Wheel Assembly, chrome caliper, chrome 51T sprocket with bolts, 10 or 11 1 /2 rear drill brake disc,
Volkswagen B3 Passat Manual Transmission 02A 34 Manual Transmission - Controls, Assembly (Page GR-34) 02A 5-speed. Gearshift cable/lever installing
 02A 5-speed. Gearshift cable/lever installing") 34 Manual Transmission - Controls, Assembly (Page GR-34) 02A 5-speed Gearshift cable/lever installing Gearshift housing repairing Gearshift lever repairing lever/relay lever, installing Gearshift mechanism
34 Manual Transmission - Controls, Assembly (Page GR-34) 02A 5-speed Gearshift cable/lever installing Gearshift housing repairing Gearshift lever repairing lever/relay lever, installing Gearshift mechanism
Pallet Jack. OWNER S MANUAL Model MH1230. Important Safety Instructions Assembly Instructions Parts and Hardware Identification
 OWNER S MANUAL Model MH1230 Important Safety Instructions Assembly Instructions Parts and Hardware Identification Pallet Jack CAUTION: Read, understand and follow ALL instructions before using this product
Solstice/Sky Water Pump Replacement
 Solstice/Sky Water Pump Replacement The water pump on the Solstice/Sky is starting to need replacement on some vehicles. This guide will help in replacing the water pump while the engine is still in the
13. REAR WHEEL/BRAKE/SUSPENSION
 13. REAR WHEEL/BRAKE/SUSPENSION 13 3.5~4.5kg-m 8.0~10.0kg-m 0.8~1.2kg-m 3.0~4.0kg-m 2.4~3.0kg-m 3.5~4.5kg-m 6.0~8.0kg-m 13-0 13. REAR WHEEL/BRAKE/SUSPENSION 13 REAR WHEEL/BRAKE/SUSPENSION SERVICE INFORMATION...
DANA 30 MANUAL HUB CONVERSION KIT
 DANA 30 MANUAL HUB CONVERSION KIT 12194 PLEASE READ AND UNDERSTAND ALL INSTRUCTIONS BEFORE YOU BEGIN Your safety and the safety of other motorists is very important. Your Jeep is an off road capable vehicle
GTI VR6 Front Wheel Bearing DIY http://www.gtishrine.com
 GTI VR6 Front Wheel Bearing DIY http://www.gtishrine.com This procedure covers replacing the front wheel bearings. Tools and Parts required: Wheel Bearing Puller w/ ABS adapter. Available for rent from
2008 ACCORD - Front Knuckle/Hub/Wheel Bearing Replacement (page 18-13)
") 2008 ACCORD - Front Knuckle/Hub/Wheel Bearing Replacement (page 18-13) Exploded View Special Tools Required Ball joint remover, 28 mm 07MAC-SL0A202 Hub dis/assembly tool 07GAF-SD40100 Bearing driver attachment,
2008 ACCORD - Front Knuckle/Hub/Wheel Bearing Replacement (page 18-13) Exploded View Special Tools Required Ball joint remover, 28 mm 07MAC-SL0A202 Hub dis/assembly tool 07GAF-SD40100 Bearing driver attachment,
BRAKE DRUM AND ROTOR SERVICE INFORMATION
 SERVICE INFORMATION To achieve maximum drum life and optimum performance, proper brake maintenance and brake balance are essential. Consult your truck or trailer manufacturer s maintenance manual for proper
Webinar Series. Committee. Disc Brake Wheels Off Inspection and Reline. Presents
 1 APTA Bus Webinar Technical Series Maintenance Committee Webinar Series Presents Disc Brake Wheels Off Inspection and Reline January 21, 2015 2 Introduction Welcome to today s webinar in which we will
8) Push piston in the remaining distance while bleeding through bleed nipple
 Push piston in the remaining distance while bleeding through bleed nipple") 1 of 16 Replacing Brake pads on a Jeep Cherokee (XJ) Copyright 2004 jeep@blackonyx.net *All things shown or advice given in this PDF is to give you ideas of what can be done. They may not be suited to
1 of 16 Replacing Brake pads on a Jeep Cherokee (XJ) Copyright 2004 jeep@blackonyx.net *All things shown or advice given in this PDF is to give you ideas of what can be done. They may not be suited to
www.kodiaktrailer.com
 www.kodiaktrailer.com -2- CONTENTS SECTION I. INTRODUCTION II. GENERAL INFORMATION III. SAFETY INFORMATION IV. INSTALLATION INFORMATION V. SOLENOID REVERSING VALVES (SURGE BRAKED TRAILERS ONLY) VI. BLEEDING
Service Information for. With patented stainless steel wheel bearing protectors.
 Service Information for With patented stainless steel wheel bearing protectors. Spindle Spring Loaded Seal Bearing Cap Hub Patent No. 5,054,859 Check Valve Overflow Cavity Grease Fitting Stainless Steel
Service Manual Rol-Lift
 R 2000 Service Manual Rol-Lift Series: T and E Developed by Generic Parts Service This manual is intended for basic service and maintenance of the Rol-Lift pallet jack. The pallet jacks you are servicing
Stainless Steel Single and Dual Circulation Kits
 Instruction Sheet P/N 160780 01 Stainless Steel Single and Dual Circulation Kits Introduction The single and dual high-pressure circulation kits allow you to vary and control the circulation rate of coating
DO NOT attempt to repair hub and wheel bearing assembly.
 Page 1 of 6 HUB & WHEEL BEARINGS (WITH PULSE VACUUM HUBLOCK) DO NOT attempt to repair hub and wheel bearing assembly. Removal DO NOT remove hub lock assembly by prying on hub lock legs. This can crack
POSEIDON 2-29, 2-25 & 2-22 POSEIDON 2-29, 2-25 & 2-22 XT
 POSEION 2-29, 2-25 & 2-22 POSEION 2-29, 2-25 & 2-22 XT Repair Manual Index A. Safety precautions 3 B. Technical data 4 C. Structure 5-6. Service / Repair 7-23 E. Tools 24 F. Function 25-26 G. Electric
6 inch A-Arm Lift Kit WARNING: 16-018/16-019. installation instructions. will fit CLUB CAR DS. included:
 Revised May 205 6-08/6-09 6 inch A-Arm Lift Kit will fit CLUB CAR DS installation instructions included: Rear Lift Blocks Main Suspension Assembly Spindles A-Arms Rear Shock Mounting Plates U-Bolts WARNING:
STEERING SYSTEM - POWER
 STEERING SYSTEM - POWER 1990 Nissan 240SX 1990 STEERING Nissan - Power Rack & Pinion Axxess, Maxima, Pulsar NX, Sentra, Stanza, 240SX, 300ZX DESCRIPTION The power steering system consists of a rack and
DYNA RIDER FOOTBOARD KIT
 -J0 REV. 0-0-0 DYNA RIDER FOOTBOARD KIT GENERAL Kit Number 000 Models For model fitment information, see the P&A Retail Catalog or the Parts and Accessories section of www.harley-davidson.com (English
Char-Lynn Hydraulic Motor. Repair Information. 10 000 Series. October, 1997
 Char-Lynn Hydraulic Motor October, 1997 Repair Information Geroler Motor Two Speed 001 27 Retainer inside bore of valve plate bearingless motors only 4 15 16 3 6 35 Parts Drawing 25 2 2 1 19 17 36 40 47
6,100 7,000 lb. Spring Axles
 Typical Industries & Applications include: Recreational Vehicle Trailers Enclosed Trailers Cargo Vehicle Race Vehicle Open Utility Trailers Landscape Equipment Dump Trailers Construction Agricultural Equipment
Class 5 to 7 Truck and Bus Hydraulic Brake System
 Class 5 to 7 Truck and Bus Hydraulic Brake System Diagnostic Guide 1st Edition * 5+0 Important Service tes The information in this publication was current at the time of printing. The information presented
3. SEISCO PARTS & SERVICE REMOVAL AND REPAIR GUIDE
 4 3. SEISCO PARTS & SERVICE REMOVAL AND REPAIR GUIDE A. Changing the Control Board B. Replacing a Heating Element C. Thermistor Replacement D. High Limit Switch Replacement E. Level Detector Replacement
Operating Instructions Parts List Manual Scissor Lift Pallet Truck
 Operating Instructions Parts List Manual Scissor Lift Pallet Truck Note: Operator MUST read and understand this operating instructions before use this Hand Scissor Lift. Thank you for using this hand scissors
MASTER CYLINDER. Section 2. Master Cylinder. Tandem Master Cylinder. Master Cylinder
 MASTER CYLINDER Master Cylinder The master cylinder converts the motion of the brake pedal into hydraulic pressure. It consists of the reservoir tank, which contains the brake fluid; and the piston and
Spicer Axles & Brakes ABIB-0302
 Information Bulletin Bulletin Type: Parts / Service Information Topic: Dana LMS Hub Assembly Procedure Steer and Drive Axles Spicer Axles & Brakes ABIB-0302 Note: Bulletin ABIB-0302 replaces the original
Joplin Rebuild Instructions
 Joplin Rebuild Instructions This is a step by step list of instruction on how to rebuild the Crankbrothers Joplin post. It may not always be required to completely tear-down the post to do the work needed
MKIII 2.0 Golf/Jetta Rear Disk Brake DIY
 MKIII 2.0 Golf/Jetta Rear Disk Brake DIY This "how to" assumes you have some basic tools, and safety gear. Safety glasses should be worn at all times when working with tools and automotive fluids. Always
Hydraulic Disc Brake, Installation, Maintenance, and Service Manual
 Hydraulic Disc Brake, Installation, Maintenance, and Service Manual HFX-Mag HFX-9 45-14550DWeb 02/06 copyright 2006 Hayes Bicycle Group, LLC Introduction to this Manual This manual is intended to provide
M113 VEHICLE FAMILY RUBBER TRACK INSTALLATION INSTRUCTIONS SOUCY TRACK SYSTEM 04-M113-1ENS (SPLIT IDLER) Litho d in Canada 1 04-M113-1ENS
 Litho d in Canada 1 04-M113-1ENS") M113 VEHICLE FAMILY RUBBER TRACK INSTALLATION INSTRUCTIONS (SPLIT IDLER) 1 # TABLE OF CONTENTS List of parts and tools................................................3 Installation of complete kit...................................................5
M113 VEHICLE FAMILY RUBBER TRACK INSTALLATION INSTRUCTIONS (SPLIT IDLER) 1 # TABLE OF CONTENTS List of parts and tools................................................3 Installation of complete kit...................................................5
CHROME FRONT BRAKE MASTER CYLINDER KIT
 -J075 REV. 009-0-0 CHROME FRONT BRAKE MASTER CYLINDER KIT GENERAL Kit Number 5-99D, 5-99D Models These Chrome Master Cylinder Kits are designed to replace the original equipment front brake master cylinder
For exploded diagram and part number information, refer to the Spare Parts Catalog available on our website at www.rockshox.com.
 For exploded diagram and part number information, refer to the Spare Parts Catalog available on our website at www.rockshox.com. Information contained in this publication is subject to change at anytime
AXLE SHAFTS - FRONT. 1998 Pontiac Bonneville MODEL IDENTIFICATION DESCRIPTION & OPERATION TROUBLE SHOOTING REMOVAL & INSTALLATION
 AXLE SHAFTS - FRONT 1998 Pontiac Bonneville 1998-99 DRIVE AXLES FWD Axle Shafts - Cars - "C", "G" & "H" Bodies GM Aurora, Bonneville, Eighty Eight, LeSabre, LSS, Park Avenue, Regency, Riviera MODEL IDENTIFICATION
Fisher 1052 Size 20 Diaphragm Rotary Actuator with F and G Mounting Adaptation
 Instruction Manual 1052 Size 20 Actuator (F & G) Fisher 1052 Size 20 Diaphragm Rotary Actuator with F and G Mounting Adaptation Contents Introduction... 1 Scope of manual... 1 Description... 1 Specifications...
CETAC Z-Drive Assembly
 CETAC Z-Drive Assembly Replacement Guide Manual Part Number 610144 Rev 1, 2012 CETAC Technologies, Printed in USA Overview This guide describes the necessary steps to replace the Z-drive assembly on your
HYDRAULIC TABLE CART 500-LB.
 HYDRAULIC TABLE CART 500-LB. OWNER S MANUAL WARNING: Read carefully and understand all MACHINE ADJUSTMENT AND OPERATION INSTRUCTIONS before operating. Failure to follow the safety rules and other basic
Operation of the overrun braking system.
 Operation of the overrun braking system. Fig 1 The overrun device can be described as the control device of the overrun brake system. A draw-bar force is produced at the coupling point by reducing the
Original ATE wheel cylinders. Reduced in weight and resistant to brake fluid
 Original ATE wheel cylinders Reduced in weight and resistant to brake fluid 1 Original ATE wheel cylinders The ATE brand is backed up by Continental, one of the worlds biggest brake specialists: this is
2006 HEADSHOK Service Video #1
 LEFTY SPEED DLR DAMPING CARTRIDGE This document explains how to properly remove, disassemble, inspect, reassemble and reinstall the Lefty Speed DLR2 damping cartridge. It is a document to be used in conjunction
AXLE SHAFTS - FRONT. 1993 Toyota Celica DESCRIPTION REMOVAL, DISASSEMBLY, REASSEMBLY & INSTALLATION. 1993 DRIVE AXLES Toyota FWD Axle Shafts
 AXLE SHAFTS - FRONT 1993 Toyota Celica 1993 DRIVE AXLES Toyota FWD Axle Shafts Toyota; Celica DESCRIPTION Axle shafts transfer power from transaxle to driving wheels. All axle shafts consist of a shaft
Range Road RR Series Semi-Automatic Firewood Processor. Crated Unit Assembly Manual
 Range Road RR Series Semi-Automatic Firewood Processor Crated Unit Assembly Manual 1 1) Undo 8-18mm x 19mm Nuts and bolts, 2 on each leg of top frame 2) Lift top of Metal crate off and move out of work
2003 Audi A4. AUDI' '3.0L V6 - AVK Engine - A4 & A6
 Installation (A4) CAUTION: Before installation, ensure camshafts are aligned, crankshaft is locked in place and camshaft gear bolts are loose as described in removal procedures. When turning camshaft,
INSTALLATION INSTRUCTIONS. 6108 Air Spring Kit 2011+ Ford F250 Single Wheel 4WD 2011+ Ford F350 Dually 4WD (2011 F350 Single Wheel 4WD use p/n 6113)
") INSTALLATION INSTRUCTIONS 6108 Air Spring Kit 2011+ Ford F250 Single Wheel 4WD 2011+ Ford F350 Dually 4WD (2011 F350 Single Wheel 4WD use p/n 6113) Thank you for purchasing a quality Hellwig Product. PLEASE
INSTALLATION INSTRUCTIONS 6108 Air Spring Kit 2011+ Ford F250 Single Wheel 4WD 2011+ Ford F350 Dually 4WD (2011 F350 Single Wheel 4WD use p/n 6113) Thank you for purchasing a quality Hellwig Product. PLEASE
Cooling system components, removing and installing
 Engine BHW Cooling system components, removing and installing Page 1 / 24 19-1 Cooling system components, removing and installing Warning! When doing any repair work, especially in the engine compartment,
DR125 and DR150 Hensim Dirt Runner 125cc and 150cc Dirt Bike (VIN PREFIX LLCH or LUAH)
") Parts Lists - DR125 and DR150 Hensim Dirt Runner 125cc and 150cc Dirt Bike (VIN PR... Page 1 of 25 Product Information Baja Web > Product Information > Parts Lists > DIRTBIKE > DR125 and DR150 Hensim Dirt
Parts Lists - DR125 and DR150 Hensim Dirt Runner 125cc and 150cc Dirt Bike (VIN PR... Page 1 of 25 Product Information Baja Web > Product Information > Parts Lists > DIRTBIKE > DR125 and DR150 Hensim Dirt
ARTICLE BEGINNING APPLICATION IDENTIFICATION DESCRIPTION LUBRICATION & ADJUSTMENT TROUBLE SHOOTING. MANUAL TRANSMISSIONS Saab 5-Speed Transaxle
 Article Text ARTICLE BEGINNING MANUAL TRANSMISSIONS Saab 5-Speed Transaxle APPLICATION TRANSMISSION APPLICATION ÄÄÄÄÄÄÄÄÄÄÄÄÄÄÄÄÄÄÄÄÄÄÄÄÄÄÄÄÄÄÄÄÄÄÄÄÄÄÄÄÄÄÄÄÄÄÄÄÄÄÄÄÄÄÄÄÄÄÄÄ Vehicle Application Transmission
Thank You For Choosing. INSTALLATION INSTRUCTIONS Portal Gear Hubs Polaris RZR XP 900 Crew. (Right) (Left)
 (Left)") 740B Clifty Drive Madison, Indiana 47250 812-574-7777 INSTALLATION INSTRUCTIONS Portal Gear Hubs Polaris RZR XP 900 Crew A Item Description Qty A Rotor 4 B Gear Box, L 2 C Gear Box, R 2 D Gasket 4 E Cap
740B Clifty Drive Madison, Indiana 47250 812-574-7777 INSTALLATION INSTRUCTIONS Portal Gear Hubs Polaris RZR XP 900 Crew A Item Description Qty A Rotor 4 B Gear Box, L 2 C Gear Box, R 2 D Gasket 4 E Cap
Service Manual. For ConMet Hub & Rotor Assemblies HEAVY DUTY MEDIUM DUTY. For Hydraulic & Air Disc Brakes. PreSet Trailer Hub & Rotor Assemblies
 Service Manual For ConMet Hub & Rotor Assemblies HD HEAVY DUTY MD MEDIUM DUTY For Hydraulic & Air Disc Brakes PreSet Drive Hub & Rotor Assemblies PreSet Trailer Hub & Rotor Assemblies PreSet Steer Hub
DR90. Baja Motorsports Inc. P.O. Box 61150 Phoenix, AZ 85082 Toll Free: 888-863-2252 PART NUMBERS AND PRICES ARE SUBJECT TO CHANGE 1 of 51
 DR90 Toll Free: 888-863-2252 PART NUMBERS AND PRICES ARE SUBJECT TO CHANGE 1 of 51 CYLINDER & CYLINDER HEAD 1 DR90-001 842645048166 CYLINDER 1 1 2 DR90-002 842645048173 GASKET, CYLINDER 1 1 3 DR90-003
PUMP MAINTENANCE SCHEDULE AND CHECKLISTS
 PUMP MAINTENANCE SCHEDULE AND CHECKLISTS Providing a maintenance schedule defined specifically by run hours or yardage pumped serves only as a general guideline given the large amount of variables a unit
2,500 3,700 lb. Spring Axles
 Typical Industries & Applications include: Recreational Vehicle Trailers Enclosed Trailers Cargo Vehicle Race Vehicle Open Utility Trailers Landscape Equipment Sport Utility motorcycle, quad and tri wheel
This is the civilian transfer case with the cooling loop only found in the driven gear half of the front case.
 INTRODUCTION The Transfer case used in the AMG Hummer is a New Venture Gear, model 242. This case has been in use for the H-1/Hummer since the early 1990 s. There have been modifications to the internal
REAR AXLE 27-1 CONTENTS 27109000161 ON-VEHICLE SERVICE... 3 GENERAL INFORMATION... 2 SERVICE SPECIFICATIONS... 2 SPECIAL TOOLS... 2 REAR AXLE HUB...
 27-1 REAR AXLE CONTENTS 27109000161 GENERAL INFORMATION... 2 SERVICE SPECIFICATIONS... 2 SPECIAL TOOLS... 2 ON-VEHICLE SERVICE... 3 Wheel Bearing Axial Play Check... 3 Wheel Bearing Rotary-Sliding Resistance
2100 AD 015 0009 Mirror Elevator Ball Nut Replacement Procedure
 2100 AD 015 0009 Mirror Elevator Ball Nut Replacement Procedure Derek Guenther 1/28/2015 Rev. Purpose The purpose of this document is to describe the procedure necessary to replace one of the ball nuts
Rating when used as a weight carrying hitch without spring bars:
 BOLT-TOGETHER WEIGHT DISTRIBUTING HITCH SYSTEM Rating when used as a weight distributing hitch with spring bars: Part Number 48051 4805 48053 48054 Max Tongue Weight 550 Ibs. 750 Ibs. 1000 Ibs. 1400 lbs.
INSTALLATION INSTRUCTIONS. 6111 Air Spring Kit 2011+ Ford F250/F-350 Single Wheel 2WD 2011+ Ford F350 Dually 2WD IMPORTANT NOTES
 INSTALLATION INSTRUCTIONS 6111 Air Spring Kit 2011+ Ford F250/F-350 Single Wheel 2WD 2011+ Ford F350 Dually 2WD Thank you for purchasing a quality Hellwig Product. PLEASE READ THIS INSTRUCTION SHEET COMPLETELY
For exploded diagram and part number information, refer to the Spare Parts Catalog available on our website at www.rockshox.com.
 For exploded diagram and part number information, refer to the Spare Parts Catalog available on our website at www.rockshox.com. 2 0 0 5 D U K E A I R X C / S L / R A C E S E R V I C E G U I D E Information
SERVICE PARTS LIST PAGE 1 OF 6 BASE ASSEMBLY SPECIFY CATALOG NO. AND SERIAL NO. WHEN ORDERING PARTS 12" DUAL BEVEL COMPOUND MITER SAW B27A
 PAGE 1 OF 6 BASE ASSEMBLY 00 0 EXAMPLE: Component Parts (Small #) Are Included When Ordering The Assembly (Large #). SPECIFY CATALOG NO. AND NO. WHEN ORDERING PARTS 1 02-80-0050 Thrust Bearing (1) 2 05-80-0510
2012 XX World Cup, XX, & XO Service Manual
 2012 XX World Cup, XX, & XO Service Manual GEN.0000000003507 Rev B SRAM LLC WARRANTY SRAM warrants its products to be free from defects in materials or workmanship for a period of two years after original
INTRODUCTION KINGPIN REPLACEMENT
 KINGPIN REPLACEMENT Author: Randy Baumann All information, illustrations and specifications are based on the best information available at the time of publication. The author cannot guarantee the accuracy
INSTRUCTIONS. FLHR/C/S (Road King) FRONT END LOWERING KIT 1WARNING -J03242 REV. 10-19-04. General. Removal (Left and Right Forks) Kit Number 54614-05
 FRONT END LOWERING KIT 1WARNING -J03242 REV. 10-19-04. General. Removal (Left and Right Forks) Kit Number 54614-05") INSTRUCTIONS -J04 REV. 0-9-04 General FLHR/C/S (Road King) FRONT END LOWERING KIT This kit is designed for installation on 00 and later FLHR/C/S Model Motorcycles. Road King models use the conventional
INSTRUCTIONS -J04 REV. 0-9-04 General FLHR/C/S (Road King) FRONT END LOWERING KIT This kit is designed for installation on 00 and later FLHR/C/S Model Motorcycles. Road King models use the conventional
Trouble Shooting Tech Tips Operation
 Steering Components TroubleShooting Tech Tips Table of Contents Basic Steering System Operation 2 Sector Shaft Adjustments 4 Drag Link Adjustment 5 Relief Valve/Unloading Valve Adjustment 6 Ross TAS Automatic
ARVINMERITOR UNITIZED FRONT WHEEL HUB INSPECTION AND MAINTENANCE
 SERVICE BULLETIN (Also applies to Mack Trucks Australia) NUMBER: SB-423-002 DATE: 8/23/02 MODEL: All with FF981 Front Axle ARVINMERITOR UNITIZED FRONT WHEEL HUB INSPECTION AND MAINTENANCE The ArvinMeritor
4,000 6,000 lb. Spring Axles
 Typical Industries & Applications include: Recreational Vehicle Trailers Enclosed Trailers Cargo Vehicle Race Vehicle (Stacker) Open Utility Trailers Landscape Equipment Sport Utility motorcycle, quad
SUPERCHIPPER CASTING MAINTENANCE
 INTRODUCTION By design, the Superchipper Rotor is clad in castings which wear during crushing. The castings wear at different rates depending on their location on the rotor, material feed rate, material
Thank You For Choosing. INSTALLATION INSTRUCTIONS Portal Gear Hubs Polaris RZR 800. (installation performed on 60 Model) (Right) (Left)
 (Right) (Left)") 740B Clifty Drive Madison, Indiana 47250 812-574-7777 INSTALLATION INSTRUCTIONS Portal Gear Hubs Polaris RZR 800 A (installation performed on 60 Model) Item Description Qty A Rotor 4 B Gear Box, L 2 C
740B Clifty Drive Madison, Indiana 47250 812-574-7777 INSTALLATION INSTRUCTIONS Portal Gear Hubs Polaris RZR 800 A (installation performed on 60 Model) Item Description Qty A Rotor 4 B Gear Box, L 2 C
(A5) Brakes Sample Questions and Answers
 Brakes Sample Questions and Answers") (A5) Brakes Sample Questions and Answers Answers to these questions are found beginning on page 4 of this document 1. Two technicians are discussing a problem where the brake pedal travels too far before
(A5) Brakes Sample Questions and Answers Answers to these questions are found beginning on page 4 of this document 1. Two technicians are discussing a problem where the brake pedal travels too far before
Fire Hydrant Troubleshooting
 Fire Hydrant Troubleshooting Pulsation or chatter during opening and flow of water from hydrant. Loose condition in stem at lower valve plate nut. Tighten lower valve plate nut and secure with SS lock
2011-14 F250 6 RADIUS ARM KIT
 92154000 Thank you for choosing Rough Country for your suspension needs. 2011-14 F250 6 RADIUS ARM KIT Rough Country recommends a certified technician installs this system. In addition to these instructions,
AKRAPOVIC SLIP-ON EXHAUST SYSTEM for the HONDA CB1000R
 Installation instructions: *502131* AKRAPOVIC SLIP-ON EXHAUST SYSTEM for the HONDA CB1000R Congratulations on purchasing an Akrapovic exhaust system. Please read these installation instructions carefully.
The Ford Model A Water Pump
 The Ford Model A Water Pump George Washington Chapter, Inc. 3903 Old Lee Highway Fairfax, VA 22030 1 Table of Contents Introduction/Specifications.. 3 1. Water Pump Inspection and Removal. 4 a. Removal..
Technical Service Bulletin
 Subject BRAKE SERVICE BEST PRACTICES RECOMMENDATIONS Date Model [X] PARTS MANAGER OCTOBER, 2010 [X] TECHNICIAN CIRCULATE TO: [ ] GENERAL MANAGER [X] SERVICE ADVISOR [X] SERVICE MANAGER [X] WARRANTY MGR
12. REAR WHEEL/BRAKE/SUSPENSION
 12 12 12-0 SERVICE INFORMATION... 12-1 REAR BRAKE... 12-5 TROUBLESHOOTING... 12-2 REAR SHOCK ABSORBER... 12-8 REAR WHEEL... 12-3 REAR FORK... 12-9 SERVICE INFORMATION GENERAL INSTRUCTIONS When installing